

Page 1

CVP-509/505/503/501
Internet Connection Guide
Internet Connection Guide
Enjoy your instrument with Internet Direct Connection
This instrument can be directly connected to the Internet, conveniently letting you
display and access the special website from the instrument's display and enjoy the
various contents. This guide provides detailed instructions on connecting. You can
also refer to the Internet-related terms at the end of this guide. For the latest ser-
vices of the Internet Direct Connection function, refer to the Yamaha website:
http://services.music.yamaha.com/
NOTE
• Only the special website can be opened when the instrument is directly connected
to the Internet.
PSR-S910/S710
* The illustrations and screens as shown in this guide are for instructional purposes only, and may appear somewhat different from
those on your instrument.
* Clicking on the Internet-related terms (blue characters) in this guide jumps to the “Glossary of Terms” at the end.
Contents
Selection of the Connection Environment................................................ 2
Connection ........................................................................................................ 3
LAN Cable Connection .................................................................................... 3
Wireless LAN Connection Using USB LAN Adaptor ....................................... 6
Wireless LAN Connection Using Wireless Game Adaptor ............................ 11
Using Static IP Address or Proxy Server....................................................... 14
Connection Help............................................................................................. 18
Initialization of the Setup ............................................................................. 19
Glossary of Terms.......................................................................................... 20
Internet Connection Guide 1
Page 2
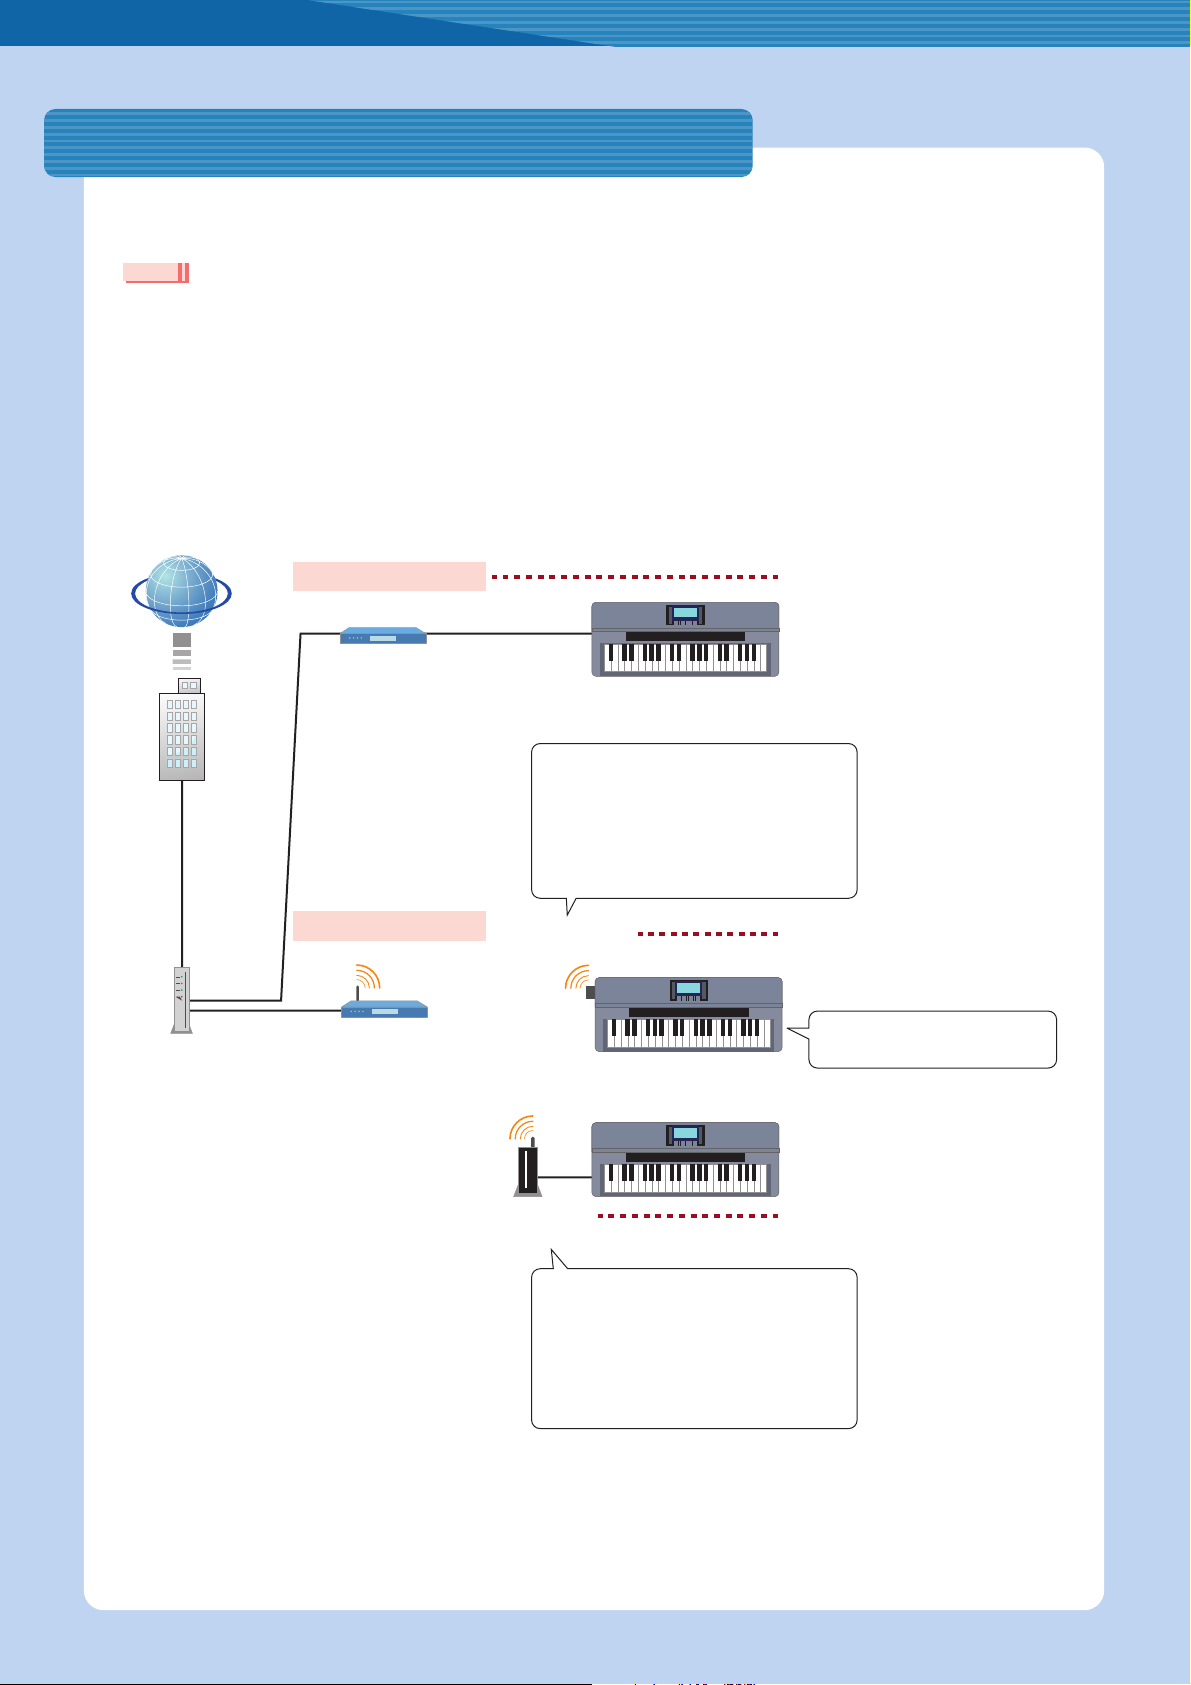
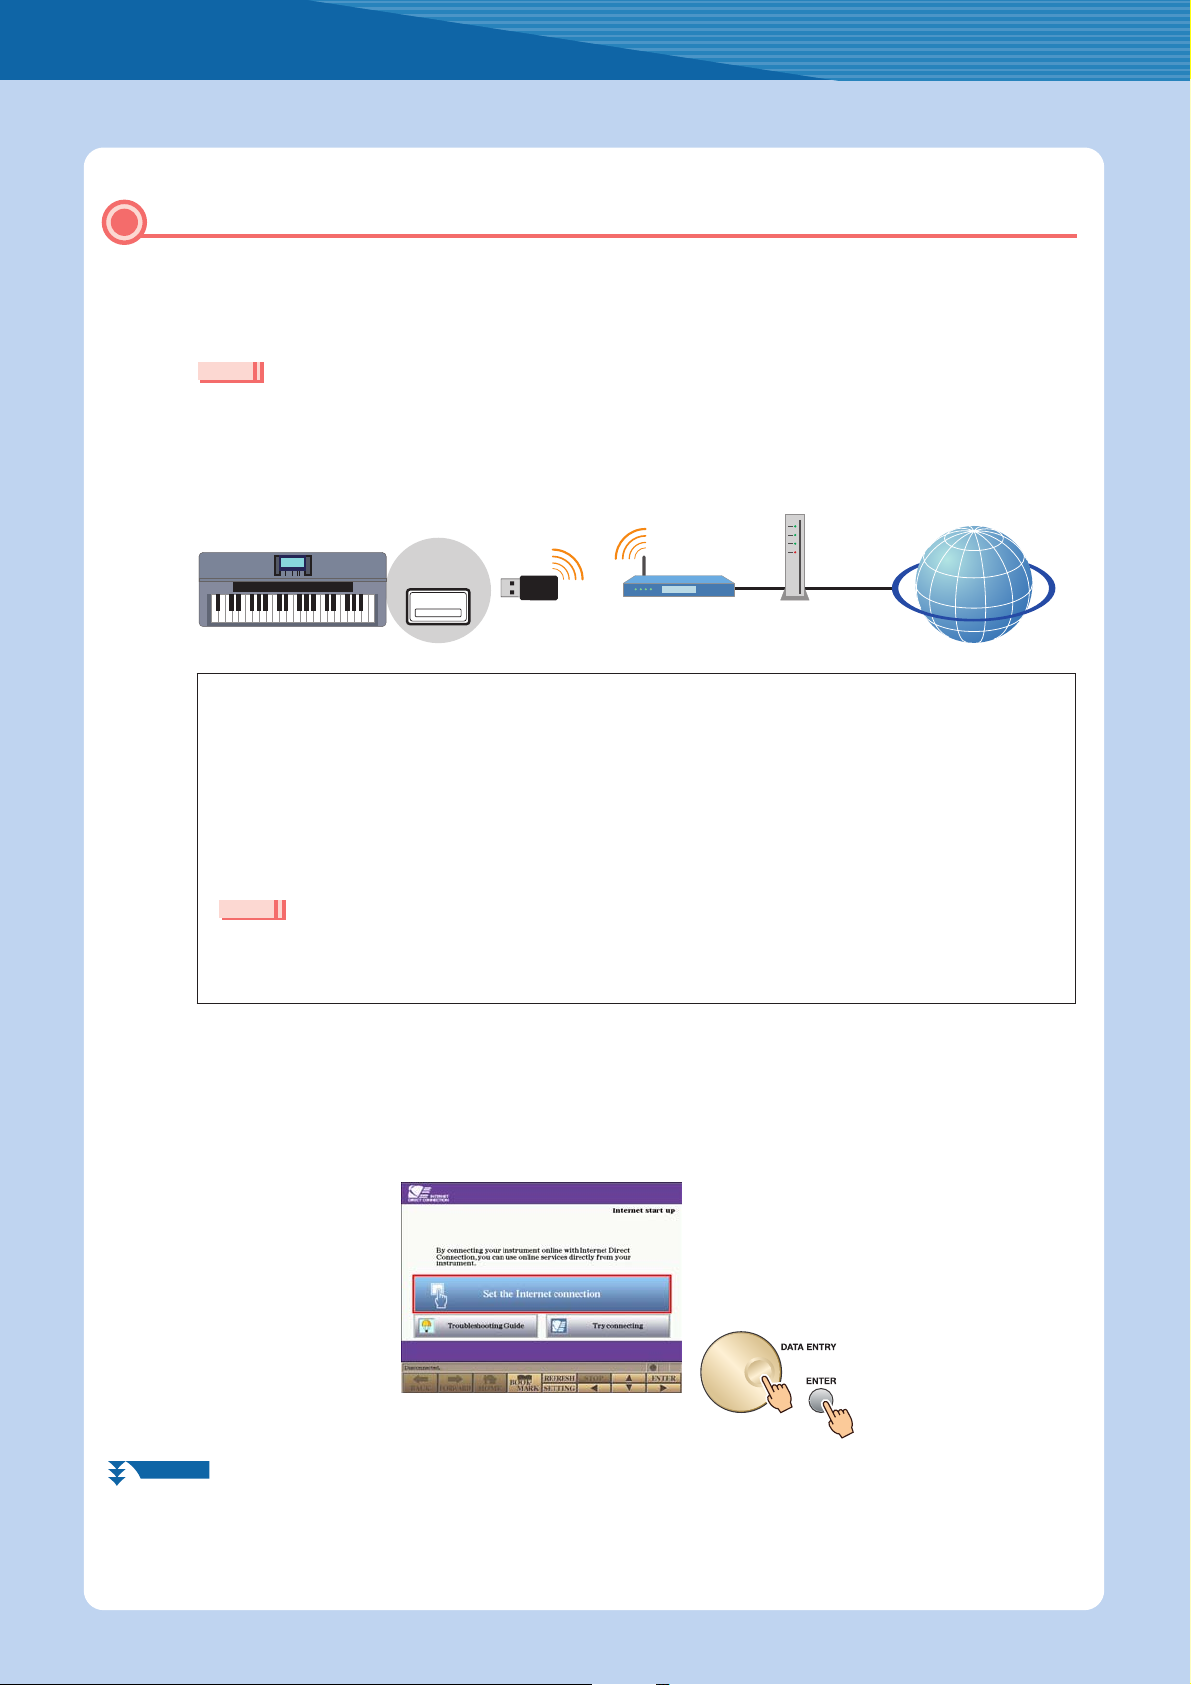
Selection of the Connection Environment
To connect the instrument to the Internet, a full-time online connection (ADSL, optical fiber, cable Internet, etc.) using a
broadband router or a modem equipped with a router is necessary.
NOTE
• Since no broadband router or modem settings can be made by the instrument itself, use a computer to make the settings before connecting to the instrument.
• Since this instrument does not support PPPoE communication, it is not possible to directly connect to the modem without a router.
• Dial-up and ISDN connections cannot be used.
Depending on the Internet connection, the number of connectable devices may be limited. This may mean that your
instrument cannot be connected to the Internet. If in doubt, check your contract or contact your provider.
Select the connection environment of your home from the following.
Internet
LAN cable connection
router cable
LAN cable
LAN
terminal
For details on connection operations,
refer to page 3.
Provider
To use the Internet connection,
you will first need
to subscribe to
an Internet service or provider.
Modem
An ADSL modem, optical
network unit (ONU) or
cable modem
* Some modems have a
built-in router.
Wireless LAN Connection
Access point
with router
Set the instrument within 10–20 m
from the access point. If the signal
is weak, the loading of web pages
will become slow and the connection will be unstable. The signal will
not be received if there is an obstacle blocking reception.
• It is comparatively inexpensive.
• Electric power source is unnecessary.
•For a list of USB wireless LAN adaptors whose
compatibility has been confirmed by Yamaha,
refer to the website:
http://music.yamaha.com/download/
* The USB wireless LAN adaptor which is not on the list
cannot be used.
USB wireless
LAN adaptor
USB TO
DEVICE
terminal
LAN
terminal
Wireless game
adaptor
• Strongly secured encryption, WPA2 format, etc.
can be set.
• Wireless connection of several Internet devices
is possible.
•For a list of wireless game adaptors whose
compatibility has been confirmed by Yamaha,
refer to the website:
http://music.yamaha.com/download/
For details on connection operations,
refer to page 6.
Only WEP encryption is available.
For details on connection operations,
refer to page 11.
For details on operations for connections using static IP address or proxy server, refer to page 14.
Internet Connection Guide 2
Page 3
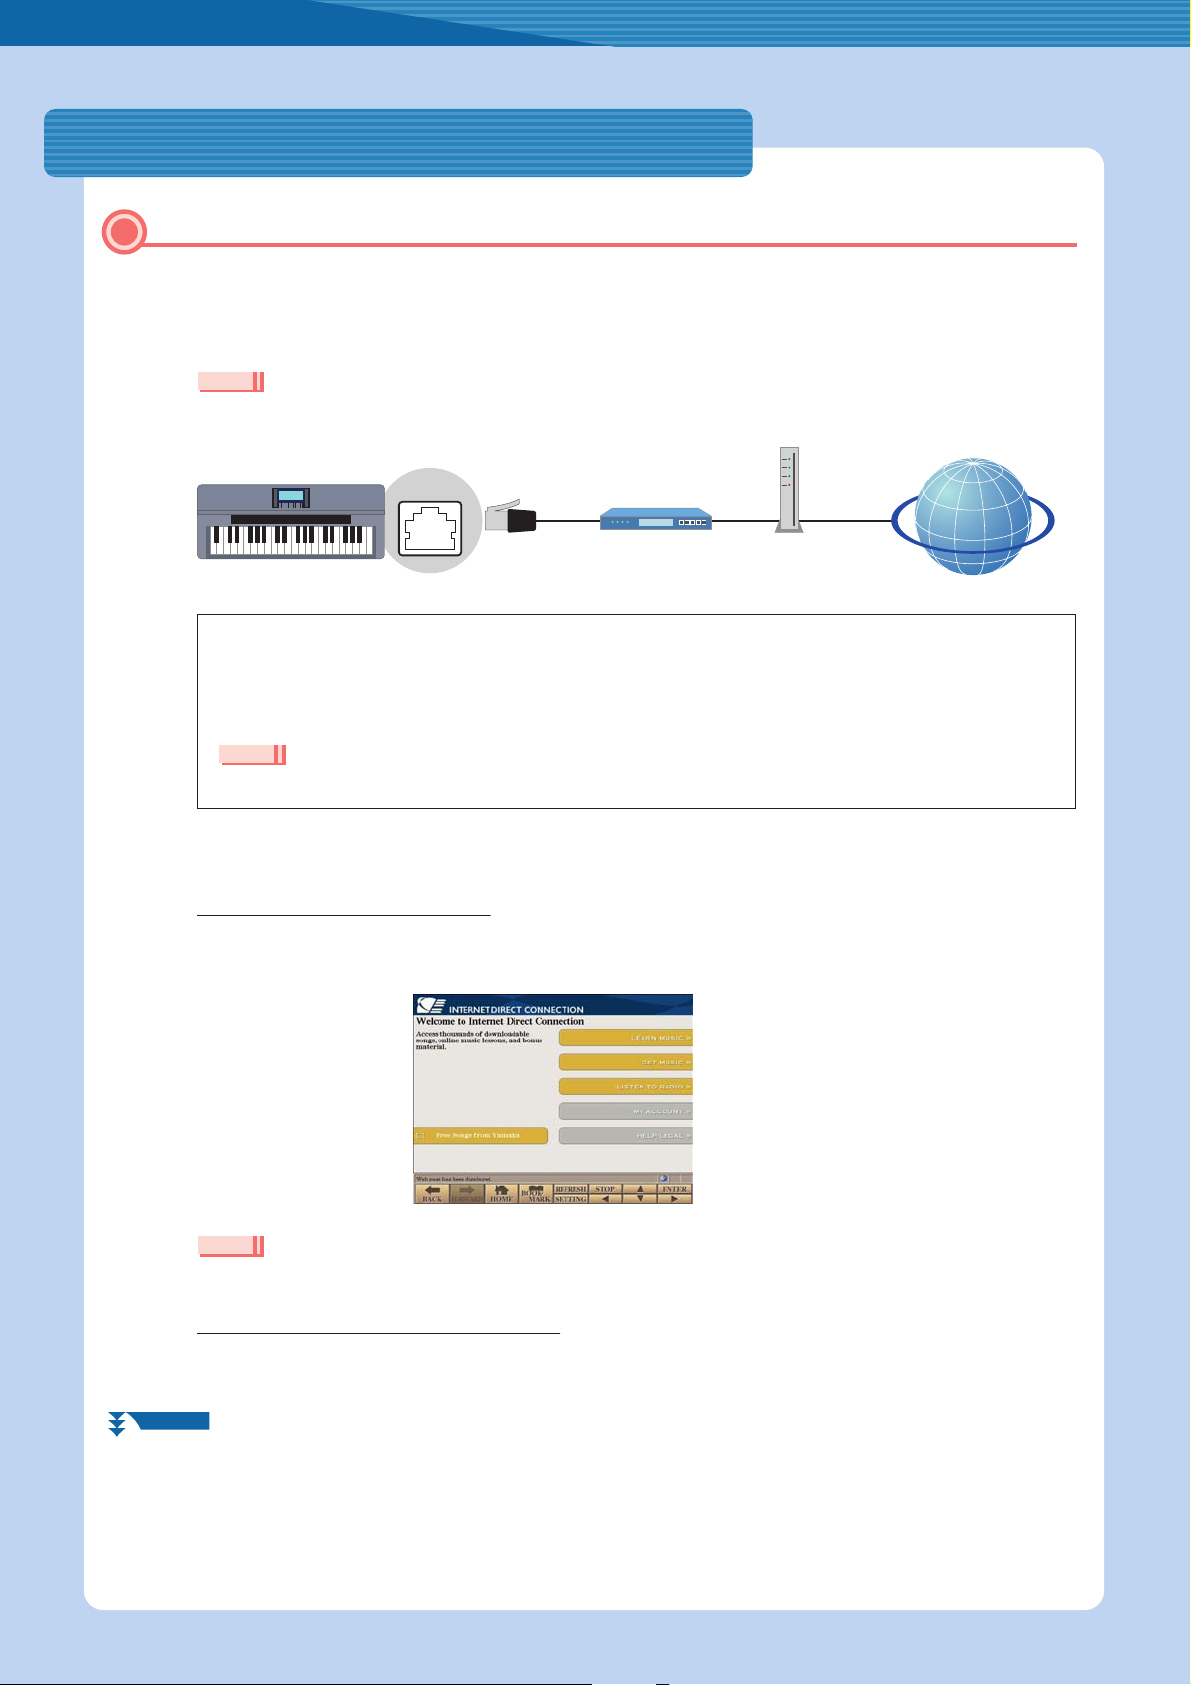
Connection
LAN Cable Connection
Connect the devices according to the example.
1
First turn the power of the instrument off, then connect the devices as shown in the illustration below, and finally
turn the power on again.
•For an illustration of the location of the LAN terminal, refer to the Owner’s Manual (Chapter 10).
NOTE
LAN
terminal
LAN cable
Required Devices
• LAN cable
• Router cable (This is unnecessary if your modem has router capability.)
• Modem (ADSL modem, optical network unit or cable modem)
Router cable Modem
Internet
NOTE
• Before installing a new router, check that the router performs normally by connecting via a computer.
Press the [INTERNET] button.
2
When the special website appears
Since the instrument is connected to the special website, you do not need to make Internet settings. About the operations in
the special website, refer to the Owner’s Manual (Chapter 9).
NOTE
• The contents of the service as appearing here are current as of May, 2009. The available contents of the service are subject to change.
When the special website does not appear
Proceed to step 3.
NEXT PAGE
Internet Connection Guide 3
Page 4
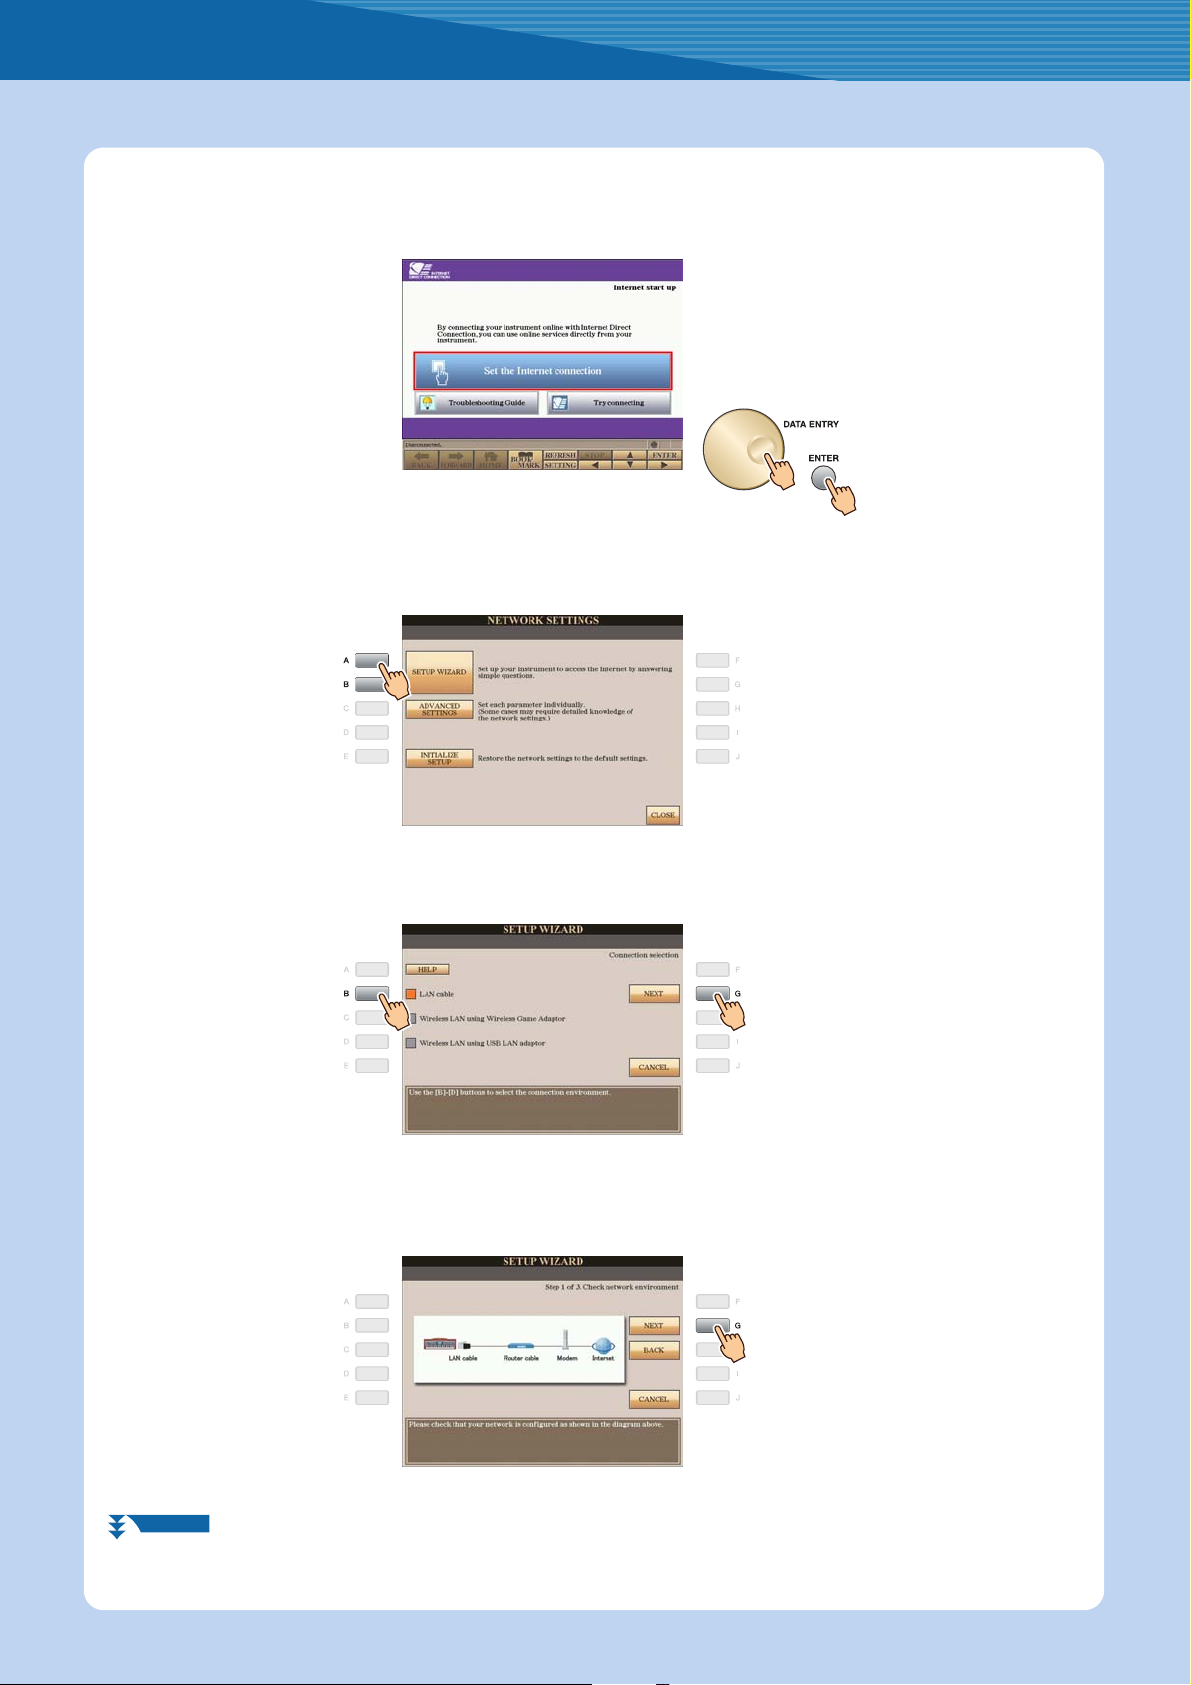
Use the [DATA ENTRY] dial to select “Set the Internet connection,” then press the [ENTER]
3
button to execute.
Use the [A]/[B] buttons to select “SETUP WIZARD.”
4
Connection
Press the [B] button to select “LAN cable,” then press the [G] button to proceed to “NEXT.”
5
Make sure that the devices are connected as shown in the illustration of the display, then
6
press the [G] button to proceed to “NEXT.”
NEXT PAGE
Internet Connection Guide 4
Page 5
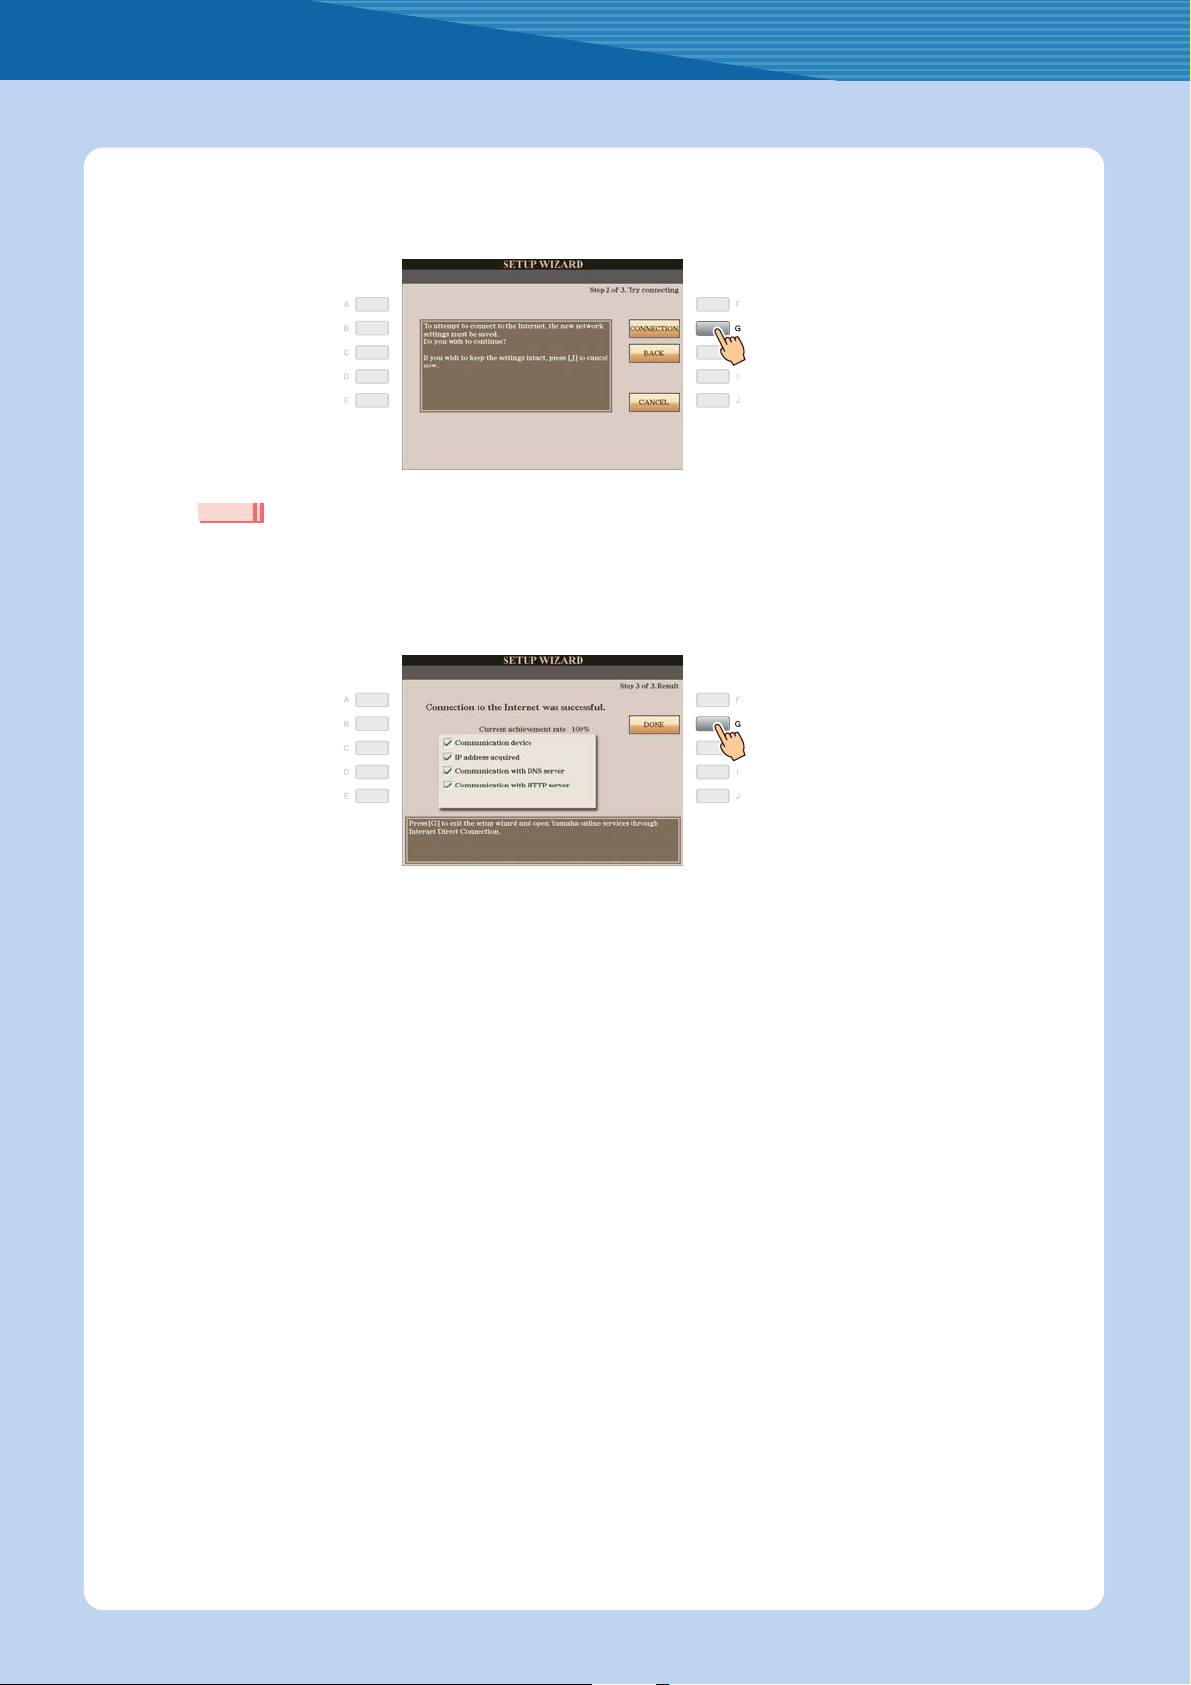
Press the [G](CONNECTION) button to check the connection to the special website.
7
The settings are saved by checking the connection.
NOTE
• Because the settings are lost when you turn off the power of the instrument, be sure to save the settings and changes you made.
Press the [G](DONE) button to connect to the special website.
8
When the special website appears, the network settings to the Internet are complete.
Connection
When the special website does not appear, refer to “Connection Help” on page 18.
For more details on the operations in the special website, refer to the Owner’s Manual (Chapter 9).
Internet Connection Guide 5
Page 6
Wireless LAN Connection Using USB LAN Adaptor
Connect the devices according to the example.
1
First turn the power of the instrument off, then connect the devices as shown in the illustration below, and finally
turn the power on again.
NOTE
•For an illustration of the location of the USB TO DEVICE terminal, refer to the Owner’s Manual (Chapter 10).
• Only WEP encryption is available.
Set the instrument within 10–20 m from the
access point. The signal will not be received if
there is an obstacle blocking reception.
USB TO
DEVICE
terminal
Wireless
network
USB wireless
LAN adaptor
Access point
with router
Modem
Internet
Connection
Required Devices
• USB wireless LAN adaptor
For a list of USB wireless LAN adaptors whose compatibility has been confirmed by Yamaha, refer to the
website:
http://music.yamaha.com/download/
* The USB wireless LAN adaptor which is not on the list cannot be used.
• Access point with router (The router capability here is unnecessary if your modem has router capability.)
• Modem (ADSL modem, optical network unit or cable modem)
NOTE
• About the confirmation and changes in the setting of the access point with router side, read the owner’s manual for the product you are
using.
• Before installing a new router, check that the router performs normally by connecting via a computer.
Press the [INTERNET] button.
2
Use the [DATA ENTRY] dial to select “Set the Internet connection,” then press the [ENTER]
3
button to execute.
NEXT PAGE
Internet Connection Guide 6
Page 7

Use the [A]/[B] buttons to select “SETUP WIZARD.”
4
Press the [D] button to select the “Wireless LAN using USB LAN adaptor,” then press the [G]
5
button to proceed to “NEXT.”
Connection
Make sure that the devices are connected as shown in the illustration of the display.
6
Press the [G](NEXT) button to search for wireless network near the instrument.
7
NEXT PAGE
Internet Connection Guide 7
Page 8

Use the [DATA ENTRY] dial to select the desired wireless network, then press the [G] button
8
to proceed to “NEXT.”
The SSID and channel of the selected wireless network are automatically set. Since the encrypted wireless
network is displayed with padlock icon “ ,” input the WEP key. Make sure that the settings are the same as
those for the access point on the router side.
NOTE
•For details on confirmation and changes in the setting of the access point on the router side, refer to the owner’s manual for the product you
are using.
Connection
Strength of the
reception
The strength of the reception may not be
displayed depending on the particular USB
wireless LAN adaptor you are using.
With padlock icon “ ” (encryption)
Since your access point with router is an encrypted setting, proceed to step 9 to input the WEP key.
No padlock icon (No encryption)
Because your access point with router is not an encrypted setting, you don’t need to make a setting for the WEP key. Proceed
to step 12 on page 9. If you want to encrypt the access point, change this in the settings of your access point with router.
Press the [C](WEP KEY) button to call up the character-entry display to input the WEP key.
9
Only WEP encryption is available.
NEXT PAGE
Internet Connection Guide 8
Page 9

Input the WEP key.
10
Refer to the Owner’s Manual (Starting Up) for character-entry details.
To cancel the WEP key input, press the [8t](CANCEL) button.
Press the [G](NEXT) button to set the WEP key input.
11
When you set the WEP key input, the characters are hidden and displayed as “******.”
Connection
Press the [G](CONNECTION) button to check the connection to the special website.
12
The settings are saved by checking the connection.
NOTE
• Because the settings are lost when you turn off the power of the instrument, be sure to save the settings and changes you made.
NEXT PAGE
Internet Connection Guide 9
Page 10

Press the [G](DONE) button to connect to the special website.
13
When the special website appears, the network settings to the Internet are complete.
When the special website does not appear, refer to “Connection Help” on page 18.
For details on operations in the special website, refer to the Owner’s Manual (Chapter 9).
Make a written note of the settings, in case you have to enter them again.
Connection
Access point
Encryption YES NO
WEP key —
SSID
Channel
Internet Connection Guide 10
Page 11

Wireless LAN Connection Using Wireless Game Adaptor
Connect the devices according to the example.
1
First turn the power of the instrument off, then connect the devices as shown in the illustration below, and finally
turn the power on again.
NOTE
•For an illustration of the location of the LAN terminal, refer to the Owner’s Manual (Chapter 10).
Set the instrument within 10–20 m from the
access point. The signal will not be received if
LAN
terminal
there is an obstacle blocking reception.
LAN cable
Wireless
game adaptor
Access point
with router
Modem
Internet
Connection
NEXT PAGE
Required Devices
• LAN cable
• Wireless game adaptor
For a list of wireless game adaptors whose compatibility has been confirmed by Yamaha, refer to the web-
site:
http://music.yamaha.com/download/
• Access point with router (The router capability here is unnecessary if your modem has router capability.)
• Modem (ADSL modem, optical network unit or cable modem)
NOTE
• The wireless game adaptor requires connection to the AC outlet. For details on changes in the settings of the wireless game adaptor,
read the owner’s manual for the product you are using.
• About confirmation and changes in the setting of the access point on the router side, read the owner’s manual for the product you are
using.
• Before installing a new router, check that the router performs normally by connecting via a computer.
Internet Connection Guide 11
Page 12

Press the [INTERNET] button.
2
When the special website appears
Since the instrument is connected to the special website, you do not need to make Internet settings. For details on operations
in the special website, refer to the Owner’s Manual (Chapter 9).
NOTE
• The contents of the service as appearing here are current as of May, 2009. The available contents of the service are subject to change.
Connection
When the special website does not appear
Proceed to step 3.
Use the [DATA ENTRY] dial to select “Set the Internet connection,” then press the [ENTER]
3
button to execute.
Use the [A]/[B] buttons to select “SETUP WIZARD.”
4
NEXT PAGE
Internet Connection Guide 12
Page 13

Press the [C] button to select “Wireless LAN using Wireless Game Adaptor,” then press the
5
[G] button to proceed to “NEXT.”
Make sure that the devices are connected as shown in the illustration of the display, then
6
press the [G] button to proceed to “NEXT.”
Connection
Press the [G](CONNECTION) button to check the connection to the special website.
7
The settings are saved by checking the connection.
NOTE
• Because the settings are lost when you turn off the power of the instrument, be sure to save the settings and changes you made.
Press the [G](DONE) button to connect to the special website.
8
When the special website appears, the network settings to the Internet are complete.
When the special website does not appear, refer to “Connection Help” on page 18.
For details on operations in the special website, refer to the Owner’s Manual (Chapter 9).
Internet Connection Guide 13
Page 14

Using Static IP Address or Proxy Server
Some cases may require detailed knowledge of the network settings.
Turn the power of the instrument on, then press the [INTERNET] button.
1
Use the [DATA ENTRY] dial to select “Set the Internet connection,” then press the [ENTER]
2
button to execute.
Connection
Press the [C] button to select “ADVANCED SETTINGS.”
3
Use the TAB [<][>] buttons to call up the desired page.
4
NEXT PAGE
Internet Connection Guide 14
Page 15

Use the [A]–[J] buttons to select the desired parameter.
5
For details on each parameter, refer to page 17.
Select the setting or change the value.
6
Selecting the setting
Use the [2 st]/[3 st] buttons to select the setting, then use the [4 st](OK) buttons to execute.
Connection
Changing the value
Enter the value, then press the [8 s](OK) button to execute.
Refer to the Owner’s Manual (Starting Up) for character-entry details.
NEXT PAGE
Internet Connection Guide 15
Page 16

Use the [7 st] buttons to select “OK.”
7
Press the [G](YES) button to save the settings.
8
Connection
NOTE
• Because the settings are lost when you turn off the power of the instrument, be sure to save the settings and changes you made.
Connect the devices.
9
First turn the power of the instrument off, then connect the devices, and finally turn the power on again.
Press the [INTERNET] button to connect to the special website.
10
When the special website appears, the network settings to the Internet are complete.
When the special website does not appear, refer to “Connection Help” on page 18.
For details on operations in the special website, refer to the Owner’s Manual (Chapter 9).
Internet Connection Guide 16
Page 17

Parameters
IP INFORMATION
DHCP Determines the DHCP ON/ON (SET DNS MANUALLY)/OFF settings.
IP ADDRESS/SUBNET MASK/
GATEWAY
DNS SERVER 1/2 These settings must be made when DHCP above is set to “ON (SET DNS MANUALLY)” or “OFF.”
PROXY SERVER
Determines the IP ADDRESS/SUBNET MASK/GATEWAY settings. These settings must be made
when DHCP above is set to “OFF.”
Connection
PROXY SERVER/PROXY PORT/
NON-PROXY SERVER
Determines the proxy server name, port number and the host name for the non-proxy server.
WIRELESS LAN
SSID Determines the SSID setting.
CHANNEL Determines the channel.
ENCRYPTION Determines the ENCRYPTION ON/OFF settings.
WEP KEY Input the WEP key when ENCRYPTION above is set to “ON.”
Internet Connection Guide 17
Page 18

Connection Help
If the instrument is not connected to the Internet, sometimes the [HELP] button appears on the display. You can view the
solutions by selecting “HELP.”
Press the [G] button to select “HELP.”
1
Use the [DATA ENTRY] dial to select a solution (Details), then press the [ENTER] button to view
2
the details.
Solve the problem with the displayed solutions.
3
Use the [DATA ENTRY]
dial to select the link, then
press the [ENTER] button
to see the comments.
Check the part where the
Check mark is displayed.
Internet Connection Guide 18
Page 19

Initialization of the Setup
Press the [INTERNET] button.
1
Use the [DATA ENTRY] dial to select “Set the Internet connection,” then press the [ENTER] but-
2
ton to execute.
Press the [E] button to select “INITIALIZE SETUP.”
3
Press the [G](YES) button to initialize the settings.
4
CAUTION
• This restores the network settings to the default settings.
Internet Connection Guide 19
Page 20

Glossary of Terms
Access point
broadband
DHCP
DNS SERVER A server that maps names to actual IP addresses of devices connected to a network.
Encryption Protects data passed from various access points from being intercepted from an unauthorized person/device.
GATEWAY A Gateway is a link between two computer programs or systems.
Internet
IP ADDRESS
LAN
link
MAC address An identifying number used to distinguish network devices.
MAC address filter
Modem
Provider
PROXY PORT This number determines where on the server to connect to.
PROXY SERVER A computer that relays Internet communications for security and efficiency.
router
Server A hardware system or computer used as a central point for a network, providing access to files and services.
Site
SSID A name used to identify a particular access point.
SUBNET MASK The structure for dividing a large-scale network.
WEP An encryption format used by wireless networks.
WEP KEY An encryption key used by WEP encryption format.
Wireless game adaptor
Wireless LAN A LAN connection that allows data transfer through a wireless, cable-free connection.
wireless network Wireless network where signal is sent and received by using electric waves.
A device that allows devices like your Yamaha instrument to connect to the Internet using a wireless network. Some
access points are combined with the modem.
An Internet connection technology/service (such as ADSL and optical fiber) that allows for highspeed, high-volume
data communication.
A standard or protocol by which IP addresses and other low-level network configuration information can be dynamically and automatically assigned each time the computer and the instrument connect to the Internet.
A huge network made up of networks, the Internet allows high-speed data transfer among computers, mobile
phones and other devices.
A string of numbers assigned to each computer connected to a network that indicate the device’s location on the network.
Short for Local Area Network, this is a data-transfer network that connects a group of computers at a single location
(such as an office or home) by means of a special cable.
Location information in other sentences and images, etc. that are under buttons and character strings on a web
page. When the place with the link is clicked, the page selection jumps to the relevant link.
The mechanism for restricting network devices that can connect to an access point. Unless the device has registered the MAC address with the access point, it cannot connect to the access point.
A device which connects and allows data transfer between a conventional telephone line and a computer. It converts
the digital signals from the computer to analog audio for sending over the phone line, and vice versa.
A communications business that offers Internet connection services. In order to connect to the Internet, it is necessary to contract to a provider.
A device that allows multiple devices (e.g., computers, your Yamaha instrument) to share the same Internet connection.
Short for “website,” this refers to the group of web pages that are opened together. For example, the collection of
web pages whose addresses begin with “http://www.yamaha.com/” is referred to as the Yamaha site.
A device that allows easy wireless connection with digital consumer electronic devices, printers, and game
machines, etc. equipped with [LAN] ports.
U.R.G., Pro Audio & Digital Musical Instrument Division, Yamaha Corporation
© 2009 Yamaha Corporation
 Loading...