

Yamaha CLP-156 Owner's Manual
CLP-156
Introduction
Thank you for choosing a Yamaha CLP-156 Clavinova. Your Clavinova is a fine musical instrument that employs advanced Yamaha music technology. With the proper care, your Clavinova
will give you many years of musical pleasure.
● Stereo sampling of the acoustic piano voices offers unmatched realism and expressive power, while
the AWM (Advanced Wave Memory) tone generator system offers rich, realistic reproductions of all
other voices.
● Piano-like touch response — adjustable in 4 stages — provides extensive expressive control and out-
standing playability.
● Dual play mode allows 2 voices to be played simultaneously.
● Unique Clavinova Tone voice provides a fresh sound for new musical expression.
● Damper pedal includes natural resonance effect for the piano voices, simulating the string and sound-
board resonance of acoustic pianos.
● Metronome feature with variable tempo facilitates practice.
● 2-track digital recorder lets you record and play back anything you play on the keyboard.
● Internal 3.5" floppy disk drive provides extended Recorder capacity and Disklavier PianoSoft™ play-
back capability – one blank floppy disk for recording and one PianoSoft demonstration disk (excerpts
from the Disklavier PianoSoft disks) are provided.
● MIDI compatibility and a range of MIDI functions make the Clavinova useful in a range of advanced
MIDI music systems.
In order to make the most of your Clavinova’s performance potential and features, we urge you
to read this Owner’s Manual thoroughly, and keep it in a safe place for later reference.
1
Taking Care Of Your Clavinova
Your Clavinova is a fine musical instrument, and deserves the most careful treatment.
Observe the following points and your Clavinova will sound and look great for many years.
1. Never Tamper With the Internal Circuitry
Never open the case and touch or tamper with the internal
circuitry.
2. Turn Off After Use
Always turn the POWER switch OFF after use, and close the
key cover to protect the keyboard.
3. Clean Carefully
Clean the cabinet and keys of your Clavinova only with a
clean, slightly damp cloth. A neutral cleanser may be used if
desired. Never use abrasive cleansers, waxes, solvents or
chemical dust cloths since these can dull or damage the finish.
4. Avoid Vinyl
Never place any vinyl products on your Clavinova. Contact
with vinyl can cause irreversible damage to the finish.
5. Avoid Humidity & Heat
Install your Clavinova in a place that is away from direct sunlight, excessive humidity or heat.
6. Handle With Care
Never apply excessive force to the controls, connectors or
other parts of your Clavinova, and avoid scratching or bumping it with hard objects.
7. Name Plate Location
The CLP-156 name plate is located on the bottom panel.
8. Handling Floppy Disks
Yamaha Disklavier PianoSoft disk is write-protected, and
therefore cannot be used to save songs. To save Recorder
songs from the Recorder, a blank floppy disk should be
used (one blank disk is supplied with the Clavinova).
Taking Care of Your Floppy Disks
■ Do NOT eject the disk during recording or playback, or at
any time when the disk drive lamp is lit. Doing so may
damage both the disk and the FDD.
■ Do NOT turn the Clavinova on or off while the disk is in
the drive.
■ Always eject the disk before turning the Clavinova off.
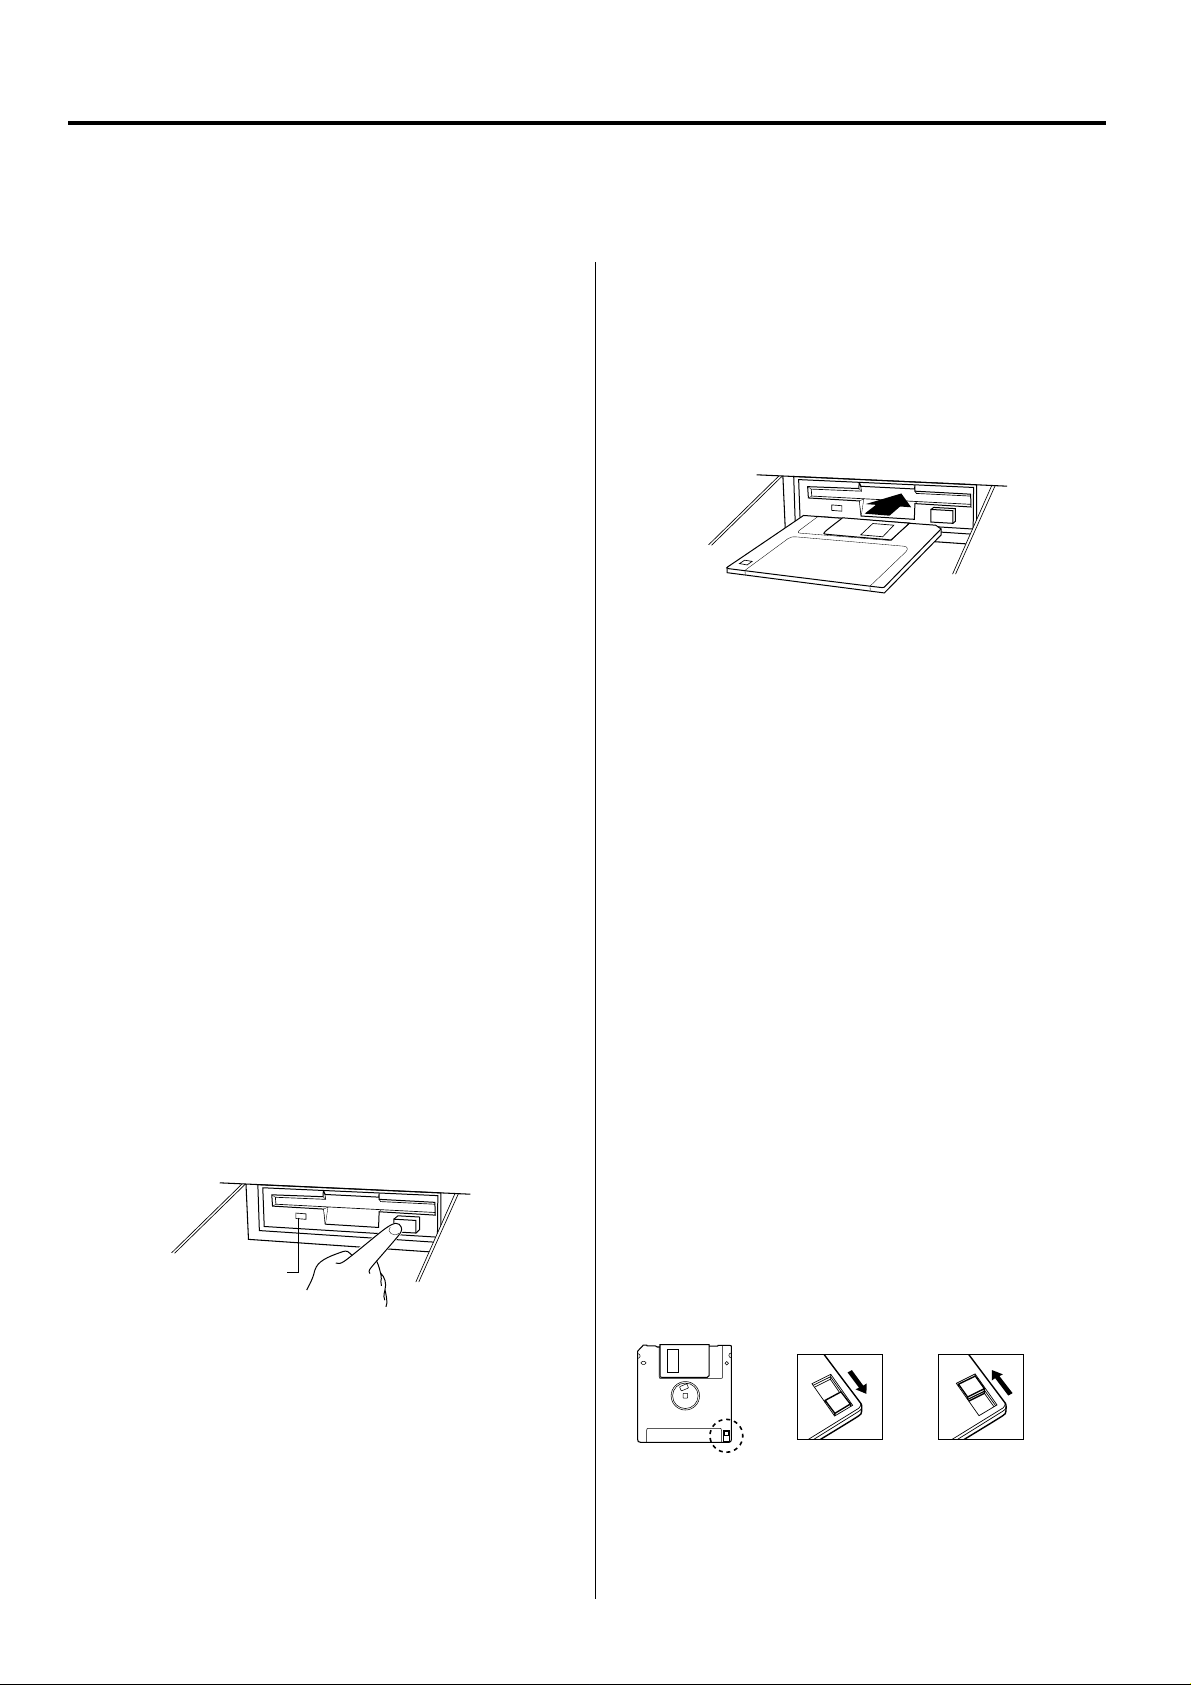
■ When ejecting a floppy disk from the disk drive:
■ Never open or close the key cover while a disk is extend-
ing from the drive (i.e. in the ejected position). The key
cover may contact the disk, possibly damaging the disk or
even the disk drive.
■ Do not insert anything but floppy disks into the disk drive.
Other objects may cause damage to the disk drive or
floppy disk.
■ Use only double-sided double density (2DD) 3.5-inch
floppy disks with the Clavinova.
Precautions Regarding Floppy Disk Use
■ Never open the disk’s shutter. Dirt or dust on the Internal
magnetic surface will cause data errors.
■ Never leave disks near a speaker, TV, or other device that
emits a strong magnetic field.
■ Do not store disks in places exposed to direct sunlight or
sources of high temperature.
■ Do not place heavy objects such as books on top of a
disk.
■ Avoid getting the disks wet.
■ Be sure to store the disks in environmental conditions as
specified below:
• Storage temperature: 4° to 53°C (39° to 127°F).
• Storage humidity: 8 to 90% relative humidity.
• Store in an area free from dust, sand, smoke, etc.
■ Be sure to apply the disk label at the proper position.
When changing the label never cover the old label with a
new label; always remove the old label first.
Head Cleaning
The head of the disk drive unit will get dirty as you use it
eventually causing data errors. If this occurs, clean the head
with a 3.5 inch head cleaning disk (available from most
computer supply stores).
Disk drive lamp
• To eject a floppy disk, press the eject button slowly as far as it will
go. Then when the disk Is fully ejected, remove it by hand.
• The disk may not be ejected properly if the eject button is pressed
too quickly or if it is not pressed in far enough. (The eject button
may become stuck halfway with the disk extending from the slot
by only a few millimeters). If this is the case, do not attempt to pull
out the partially ejected disk. Doing so may damage the disk drive
mechanism and/or the floppy disk. To remove a partially ejected
disk, try pressing the eject button once again or push the disk
back into the slot, then repeat the eject procedure carefully.
2
Data Backup
It is recommended that you copy your recorded songs to
another disk for backup (see page 25). If the original disk is
damaged or your song is deleted, the backup disk can be
used instead of the original.
Protecting Your Data (Write Protect Tab)
Write protect tab
open (locked —
write protected)
Write protect tab
closed (unlocked —
write enabled)

Contents
The Control Panel............................................................4
Connections......................................................................6
Selecting & Playing Voices ...........................................7
■ Playing the Demonstration Tunes................................8
The Dual Mode..................................................................9
● Adjusting the Balance Between the Dual-mode
Voices......................................................................9
● Shifting a Dual-mode Voice Up One Octave ...........9
● Slow-attack Strings..................................................9
● Memorizing the Balance, Strings Type, & Octave
Shift Settings .........................................................10
Brilliance ..........................................................................10
● Memorizing the Brilliance Setting ..........................10
Reverb...............................................................................11
● Adjusting Reverb Depth ........................................11
● Memorizing the Reverb Type & Depth Settings ....11
Touch Sensitivity ...........................................................12
● Memorizing the Touch Sensitivity Setting .............12
The Pedals .......................................................................12
● Soft (Left) Pedal ....................................................12
● Sostenuto (Center) Pedal ......................................12
● Damper (Right) Pedal............................................12
Using the Recorder .......................................................18
■ Recording...................................................................18
● Changing the Initial Settings ..................................19
● Erasing a Single Track ..........................................20
● If You Record Without First Inserting a Disk … ...20
■ Playback ....................................................................20
Utility Functions.............................................................21
■ Utility 1: Individual key Tuning ...................................21
● To Lower the Pitch of a Single Key .......................21
● To Raise the Pitch of a Single Key ........................21
To Turn the Individual Key Tune Mode OFF or ON...
●
■ Utility 2: Save Individual Key Tuning..........................23
■ Utility 3: Load Individual Key Tuning..........................23
■ Utility 4: Floppy Disk Format ......................................24
■ Utility 5: Song Copy ...................................................25
● Copying to a Different Disk....................................26
■ Utility 6: Song Delete .................................................26
● Deleting a Single Track .........................................26
■ Utility 7: Disk Playback Track Selection.....................27
● Selecting the Playback Track for CLP-156
Track 1/R or 2/L.....................................................27
■ Utility 8: Convert to SMF ............................................27
■ Utility 9: All-song Random Repeat .............................28
■ Utility 10: Standard MIDI File Voice Mode .................29
22
Transposition..................................................................13
Pitch Control ...................................................................14
● Tuning Up ..............................................................14
● Tuning Down .........................................................14
● To Restore Standard Pitch ....................................14
● The Pitch Display ..................................................14
● Memorizing the Pitch Control Setting ....................14
The Metronome & Tempo Control.............................15
■ The Metronome..........................................................15
● Metronome Volume ...............................................15
● Metronome Time Signature ...................................15
■ Tempo Control ...........................................................15
Disk Playback .................................................................16
● Adjusting the Playback Tempo ..............................17
● Fast Reverse and Forward ....................................17
● Playing Back only One Track ................................17
● Repeat Playback ...................................................17
● Playing Other Types of Music Data .......................17
MIDI Functions ...............................................................30
● A Brief Introduction to MIDI ...................................30
● MIDI “Messages” Transmitted & Received by the
Clavinova...............................................................30
● MIDI Transmit & Receive Channel Selection ........31
● MIDI Transmit Transpose ......................................31
■ Other MIDI Functions.................................................32
● Local Control ON/OFF...........................................32
● Program Change ON/OFF ....................................32
● Control Change ON/OFF.......................................33
● The Multi-Timbre Mode .........................................33
● The MIDI Split & Left Local OFF Mode .................33
● The MIDI Split & Right Local OFF Mode ...............34
● Transmitting the Panel Settings ............................34
Factory Preset Recall ...................................................34
Error Messages ..............................................................35
Troubleshooting.............................................................35
Options .............................................................................35
Keyboard Stand Assembly .........................................36
MIDI Data Format ...........................................................38
MIDI Implementation Chart.............................................40
Specifications .................................................................41
3
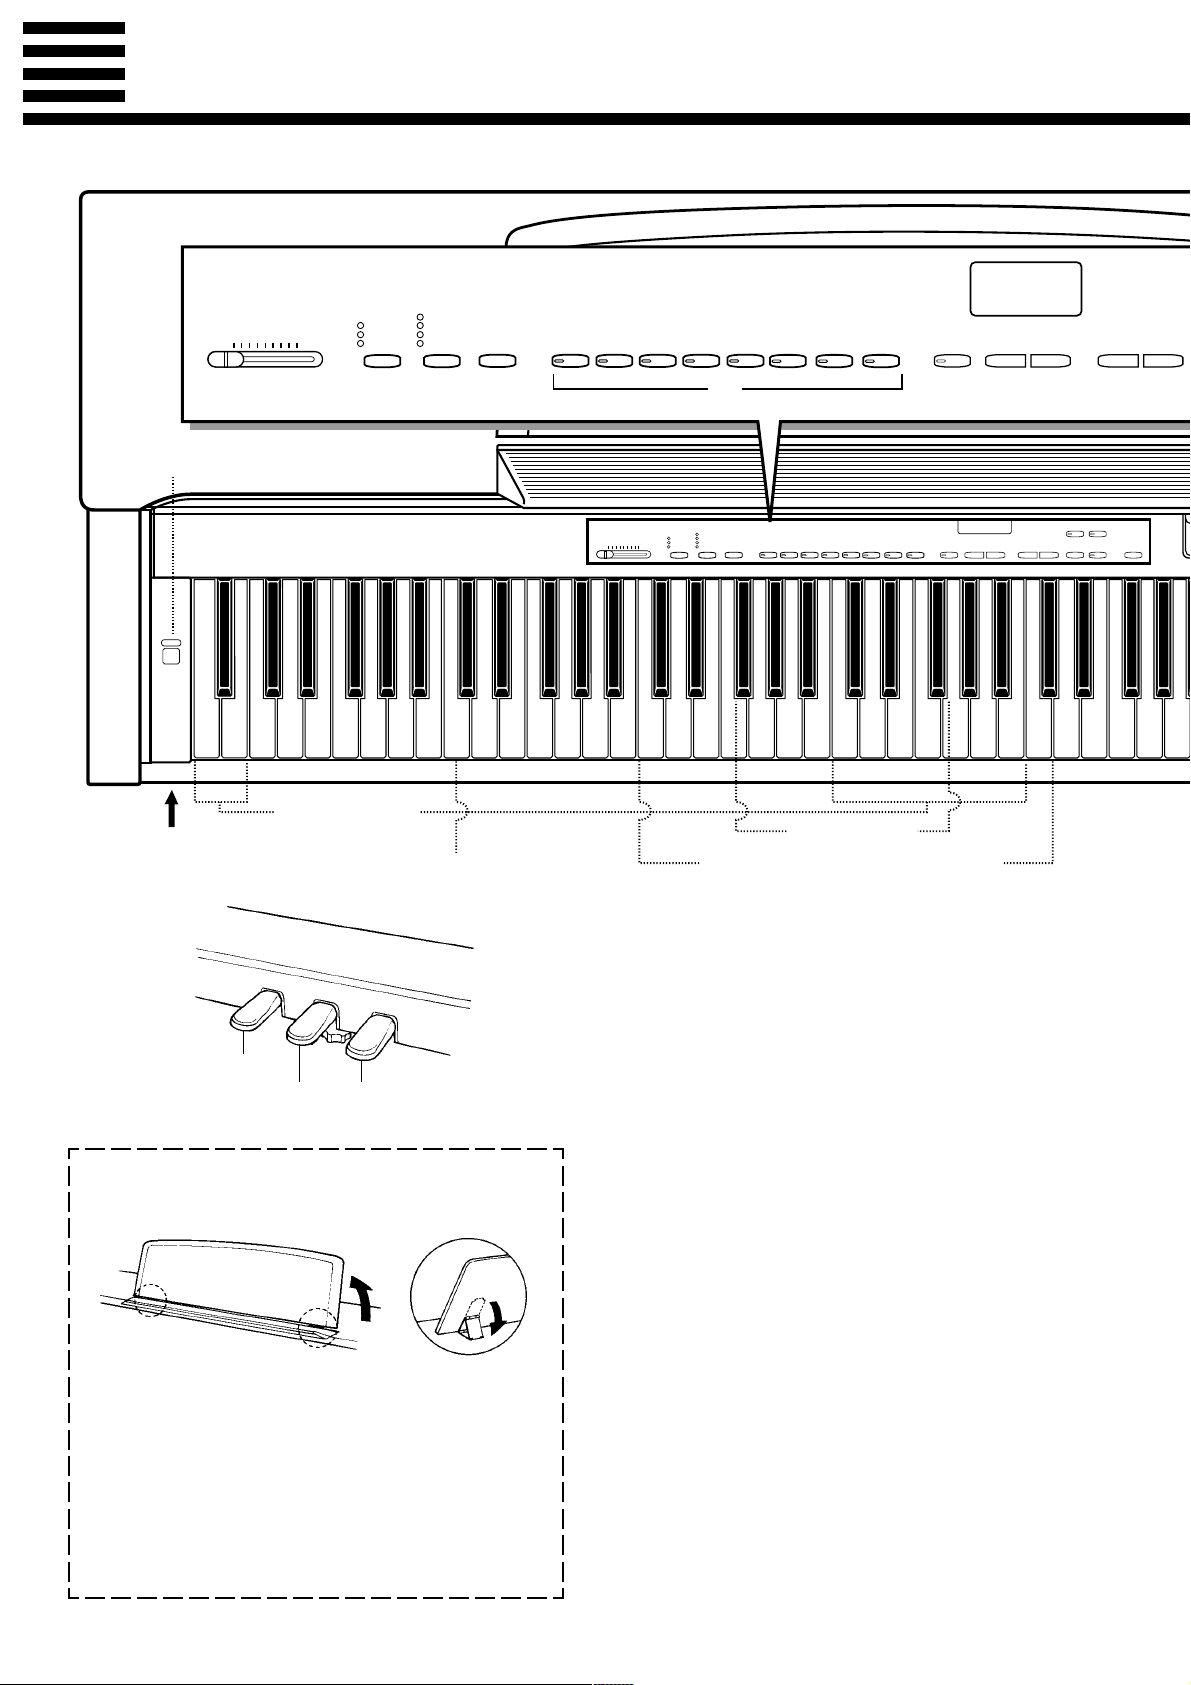
The Control Panel
REVERB
ROOM
HALL 1
HALL 2
COSMIC
46578032
MIDI/
TRANSPOSE
1
POWER
MASTER VOLUME
MIN MAX
BRILLIANCE
MELLOW
NORMAL
BRIGHT
PIANO 1
PIANO 2
MASTER VOLUME
MIN MAX
CLAVINOVA
TONE
BRILLIANCE
MELLOW
NORMAL
BRIGHT
E. PIANO
REVERB
ROOM
HALL 1
HALL 2
COSMIC
HARPSI-
MIDI/
TRANSPOSE
CHORD
9
120
STRINGS
VIBES
CLAVINOVA
PIANO 1
TONE
PIANO 2
ORGAN
HARPSICHORD
E. PIANO
VIBES
METRONOME
METRONOME
STRINGS
ORGAN
TEMPO
▲
▼
TEMPO
SONG
▲
f
r
▼
1/R
PLAY
RECORDER
r
2/L
REC DEMO
SONG
f
C1 D1 E1 F1 G1 A1 B1 C2 D2 E2 F2 G2 A2 B2 C3 D3 E3 F3 G3 A3 B3 C4 D4 E4 F4 G4 A4
B0A0G0F0E0D0C0B-1A-1
Pitch control keys
(See page 14)
PHONES Jacks
(Bottom Panel)
Left voice shift up key
(See page 9)
%
Soft pedal
Sostenuto pedal Damper pedal
● The Music Stand
If you will be using sheet music with your
Clavinova, raise the music stand built into its top
panel by lifting the rear edge of the music stand, then
flip down the music stand braces and engage them
with the corresponding recesses.
The music stand can be lowered after slightly lifting it and folding the two brackets which support it
against the back of the stand.
Transpose keys
(See page 13)
Balance/Depth keys (See page 9, 11)
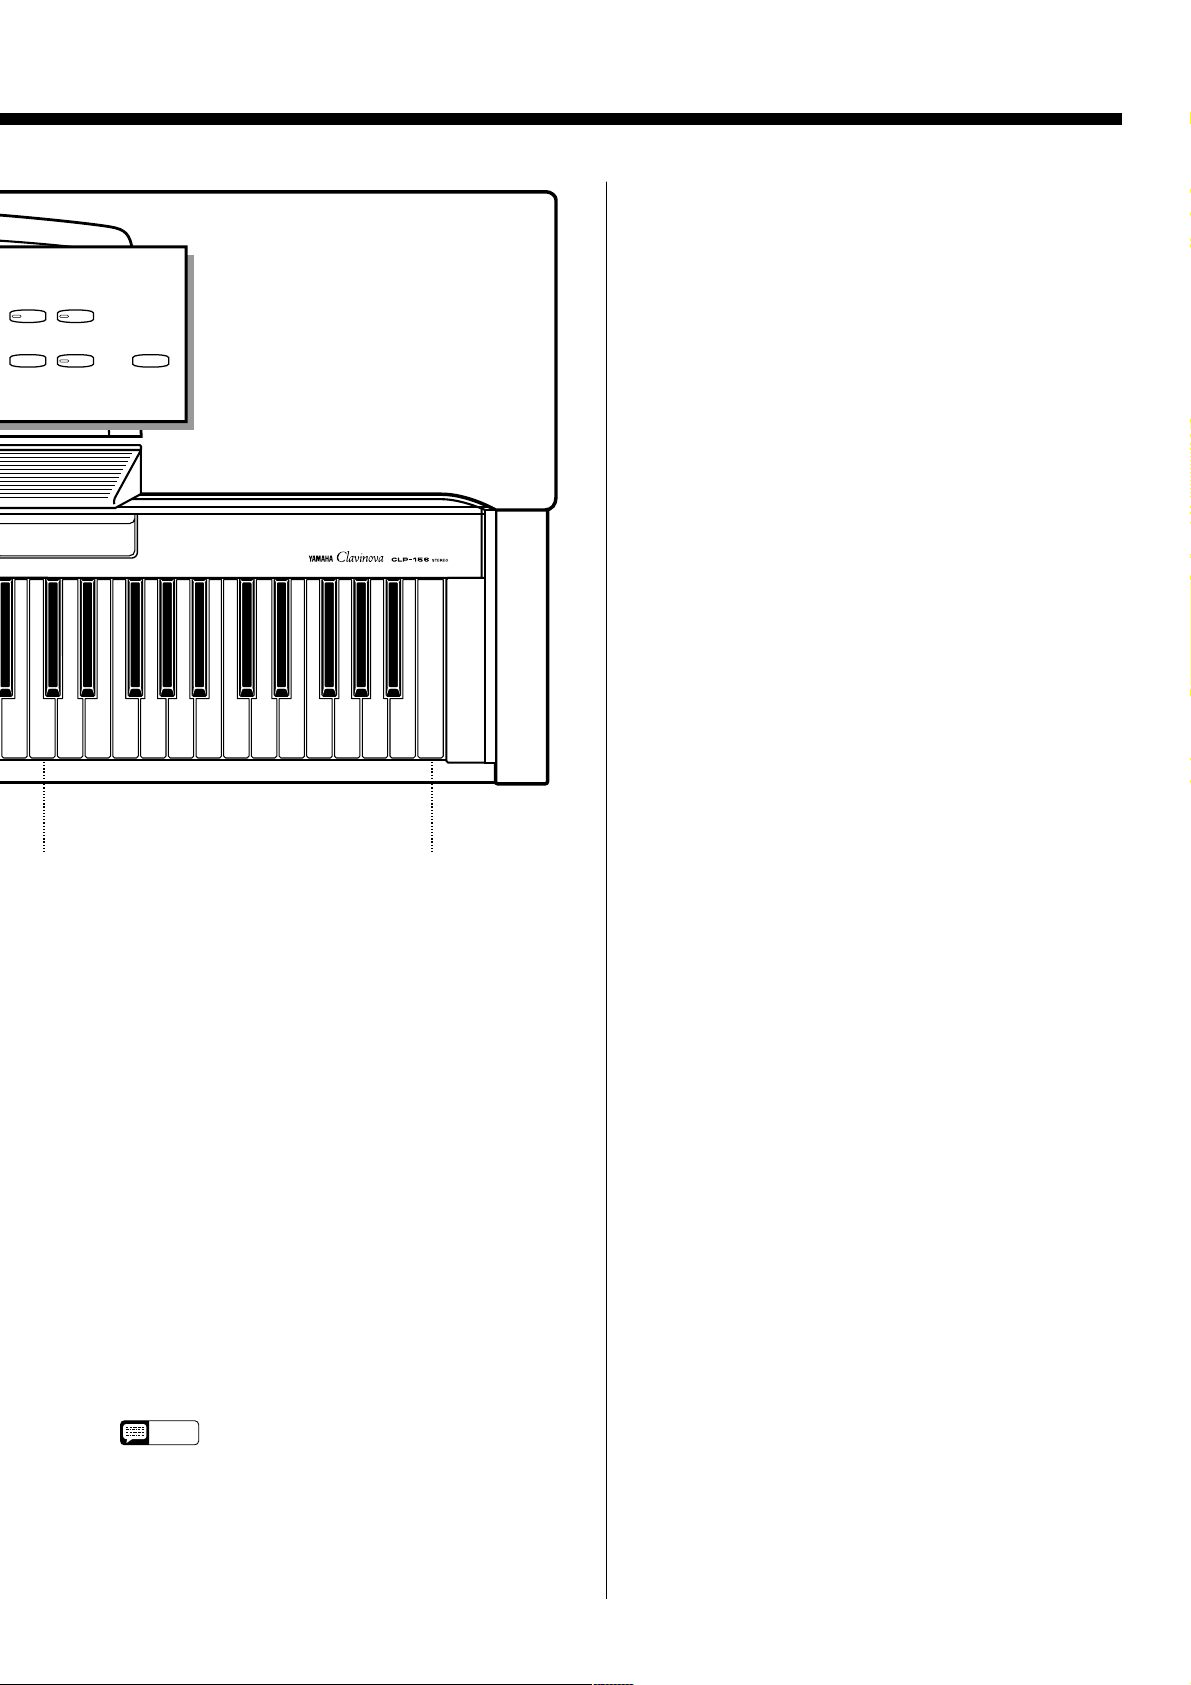
1 [POWER] Switch
Press the [POWER] switch once to turn the power ON,
a second time to turn the power OFF. When the power
is initially turned ON, the [PIANO 1] voice selector
LED will light, and the power indicator located below
the left end of the keyboard will light.
2 [MASTER VOLUME] Control
The [MASTER VOLUME] control adjusts the volume
(level) of sound produced by the Clavinova’s internal
stereo sound system. The [MASTER VOLUME] control also adjusts headphone volume when a pair of
headphones is plugged into the PHONES jack (page 6).
3 [BRILLIANCE] Button
This button can be used to change the tonality or “timbre” of the selected voice. See page 10 for details.
4 [REVERB] Button
The [REVERB] button selects a number of digital
reverb effects that you can use for extra depth and expressive power. See page 11 for details.
4
1/R
PLAY
RECORDER
!
2/L
@
REC DEMO
$
#
7 [METRONOME] Button
Turns the metronome sound on and off. The TEMPO
[s] and [t] buttons, below, are used to set the tempo
of the metronome sound — see page 15 for details.
8 TEMPO [t] and [s] Buttons
These buttons adjust the tempo of the CLP-156 metronome function as well as the recording and playback
functions. The tempo range is from 32 to 280 quarternote beats per minute.
9 TEMPO Display
This 3-digit LED display normally shows the current
tempo in quarter-note beats per minute. When the metronome, recording, or playback is in operation, it displays the current measure number. It also displays the
selected song number when a disk is in the disk drive,
and various parameters of functions while they are in
operation.
B4 C5 D5 E5 F5 G5 A5 B5 C6
Right voice shift up key
(See page 9)
5 [MIDI/TRANSPOSE] Button
The [MIDI/TRANSPOSE] button allows access to the
Clavinova’s TRANSPOSE function (to shift the pitch
of the entire keyboard up or down), keyboard touch
sensitivity adjustment, Utility functions (to enhance the
versatility and flexibility of the Clavinova), and MIDI
functions. For details refer to “Transposition” on page
13, “Touch Sensitivity” on page 12, “Utility Functions”
on page 21, and “MIDI Functions” on page 30.
6 Voice Selectors
The CLP-156 has eight voice selectors. Simply press
any of the voice selectors to select the corresponding
voice. The voice selector LED will light to indicate
which voice is currently selected.
The CLP-156 also has a DUAL mode in which two
voices can be played simultaneously across the full
range of the keyboard — see page 9 for details.
• The PIANO 1 voice is automatically selected
NOTE
D6 E6 F6 G6 A6 B6 C7
Memory key
(See page 10, 11, 12, 14)
whenever the [POWER] switch is initially turned
ON.
0 SONG [r] and [f] Buttons
Select a song number on a floppy disk for recording or
playback. See page 18 or16 for details.
! RECORDER [PLAY] and [REC] Buttons
These buttons control the CLP-156 2-track recorder,
letting you record and play back just about anything
you play on the keyboard — the music data that you
record is stored on a 3.5" floppy disk loaded into the
Clavinova’s disk drive unit. See page 18 for details.
@ RECORDER [1/R] and [2/L] Buttons
Select the track for recording or playback. See page 18
or 16 for details.
# [DEMO] Button
Activates the demo playback mode in which you can
select playback of different demonstration sequences
for each of the Clavinova’s voices. See page 8 for details.
$ 3.5" Floppy Disk Drive
A floppy disk for recording and playback is inserted
into the 3.5" floppy disk drive. See page 2 for precautions about handling the floppy disk and the disk drive.
% Pedals
The CLP-156’s soft (left), sostenuto (center), and
damper (right) pedals provide a range of expressive
control capabilities similar to the pedal functions on an
acoustic piano. See page 12 for details.
5
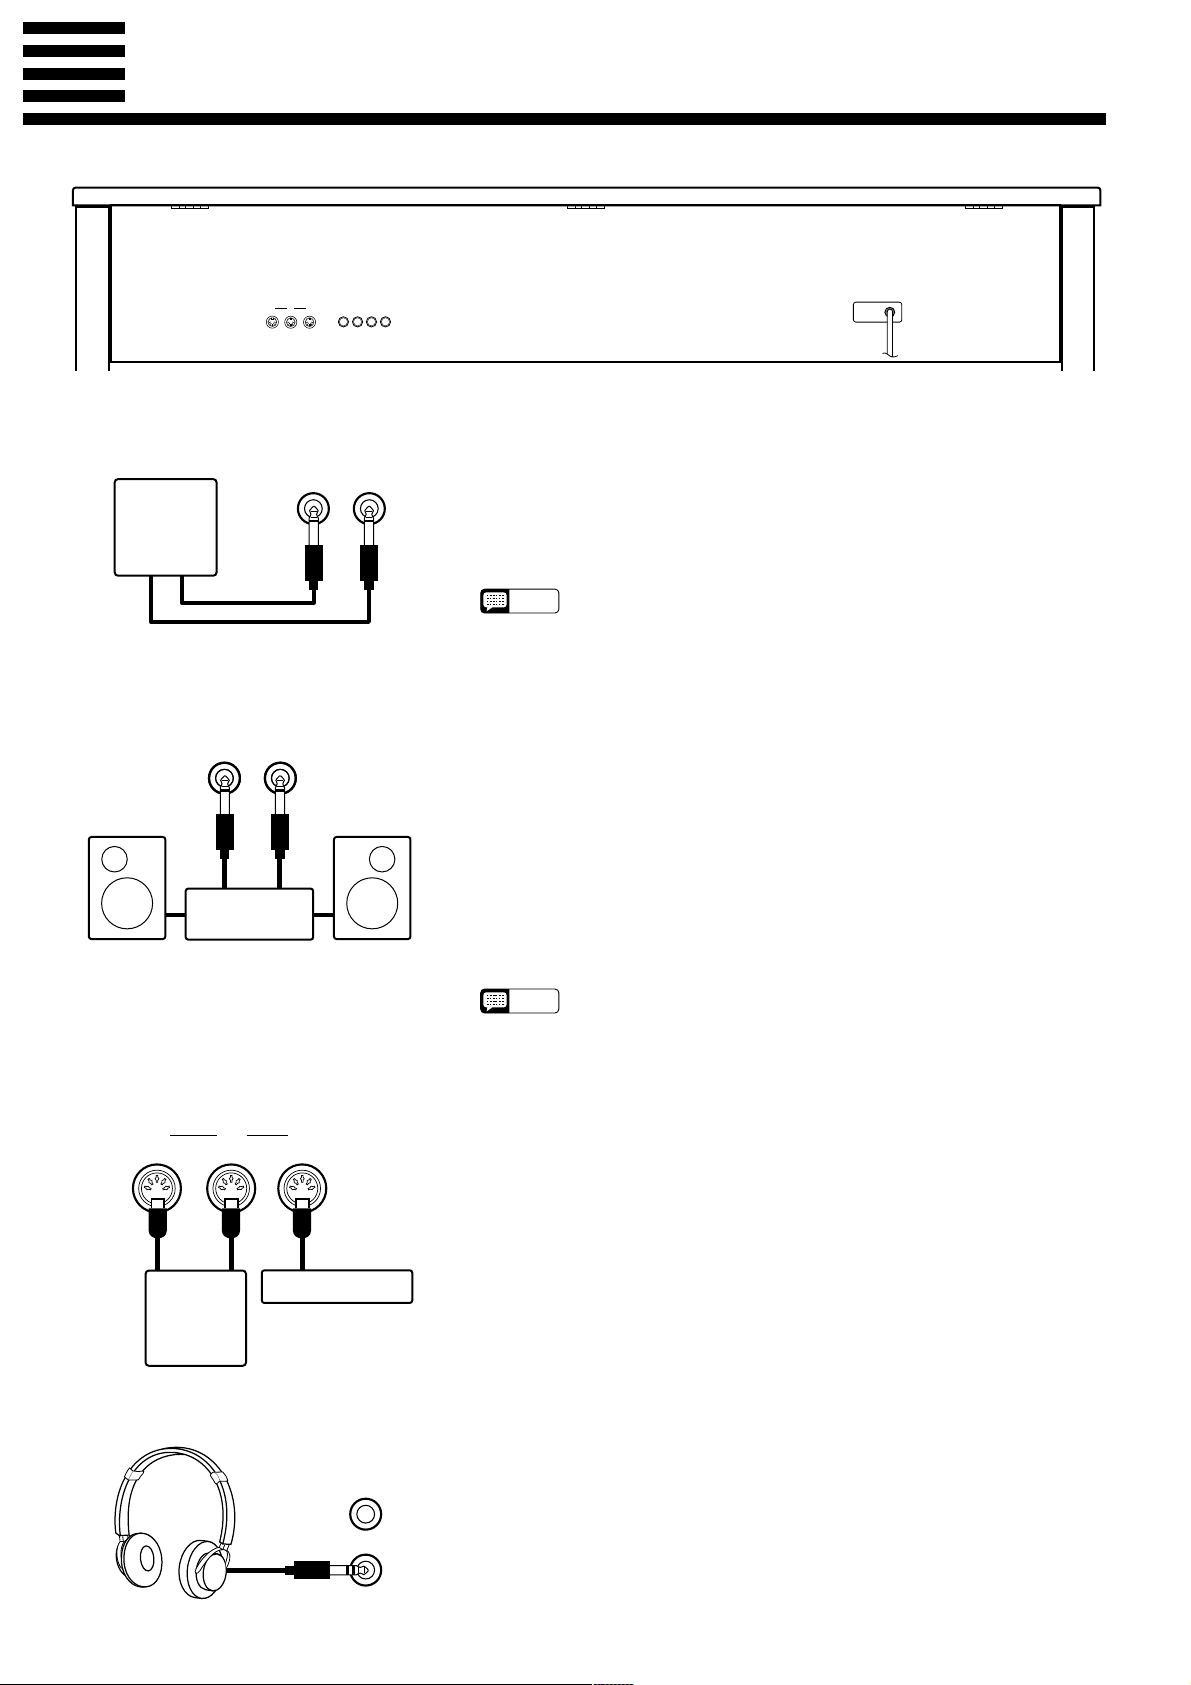
Connections
312
MIDI
IN
THRU
OUT
AUX IN
AUX OUT
RL
R L/L+R
1 AUX IN L and R Jacks
AUX IN
RL
Tone
Generator
2 AUX OUT L/L+R and R Jacks
AUX OUT
L/L+RR
Stereo System
These jacks are intended primarily for use with external synthesizers or
tone generator modules.
For example, the outputs of the synthesizer/tone generator can be to the
Clavinova AUX IN jacks, allowing the sound of the synthesizer/tone generator to be reproduced via the Clavinova’s internal amplifier and speaker
system.
• The input signal from the AUX IN jacks is delivered to the AUX OUT
NOTE
jacks, but is not affected by the Clavinova’s volume control or reverb
effect.
The AUX OUT L/L+R and R jacks deliver the output of the Clavinova
for connection to an instrument amplifier, mixing console, PA system, or
recording equipment. If you will be connecting the Clavinova to a monaural
sound system, use only the L/L+R jack. When a plug is inserted into the L/
L+R jack only, the left- and right-channel signals are combined and delivered via the L/L+R jack so you don’t lose any of the Clavinova’s sound.
The Internal Amplifier & Speaker System
The CLP-156 features a powerful stereo amplifier delivering 30 watts per channel,
driving a speaker system that puts out exceptionally rich sound with natural response from powerful lows to shimmering highs. The speaker system features a
bass-reflex type enclosure with two 13-centimeter and two 5-centimeter speaker
units.
• The AUX OUT jack signal must never be returned to the AUX IN jacks,
NOTE
either directly or through external equipment.
3 MIDI IN, THRU and OUT
Connectors
IN OUT THRU
Sequencer
MIDI
Tone Generator
MIDI
● PHONES Jacks (Bottom Panel)
6
The MIDI IN connector receives MIDI data from an external MIDI device (such as a synthesizer, sequencer, music computer, etc.) which can be
used to control the Clavinova. The MIDI THRU connector re-transmits any
data received at the MIDI IN connector, allowing “chaining” of several
MIDI instruments or other devices. The MIDI OUT connector transmits
MIDI data generated by the Clavinova (e.g. note and velocity data produced
by playing the Clavinova keyboard).
More details on MIDI are given in “MIDI Functions” on page 30.
Two pairs of standard pair of stereo headphones can be plugged in here
for private practice or late-night playing. The internal speaker system is
automatically shut off when a pair of headphones is plugged into either of
the PHONES jacks.
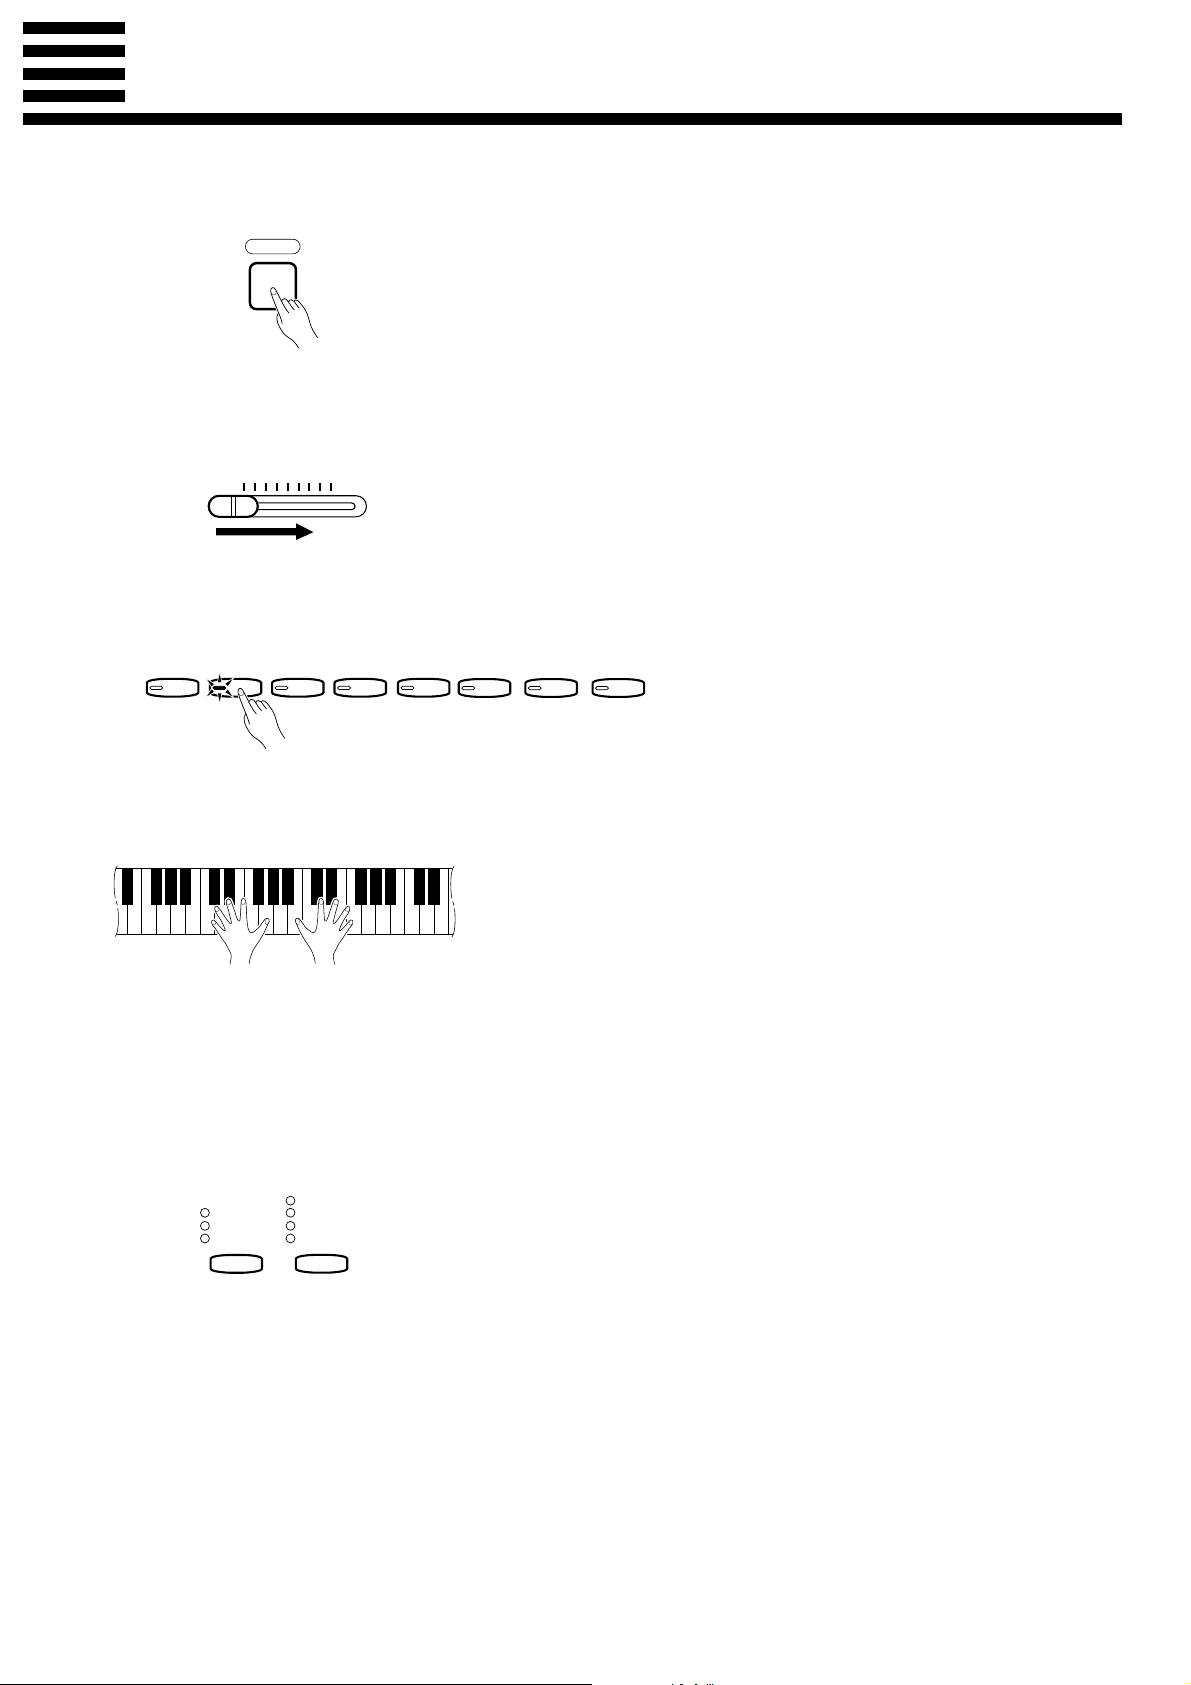
Selecting & Playing Voices
ZTurn Power On
POWER
XSet the Volume
MASTER VOLUME
MIN MAX
CSelect a Voice
PIANO 1
PIANO 2
CLAVINOVA
TONE
E. PIANO
HARPSI-
CHORD
After making sure that the Clavinova’s AC plug is properly inserted into
a convenient AC wall outlet, press the [POWER] switch located to the left
of the keyboard to turn the power ON.
When the power is turned ON, the [PIANO 1] voice selector LED will
light (the PIANO 1 voice is automatically selected whenever the power is
turned ON).
Initially set the [MASTER VOLUME] control about half way between
the “MIN” and “MAX” settings. Then, when you start playing, re-adjust the
[MASTER VOLUME] control for the most comfortable listening level.
Select the desired voice by pressing one of the voice selectors.
VIBES
STRINGS
ORGAN
VPlay
BAdjust Tone & Add Effects
As Required
BRILLIANCE
MELLOW
NORMAL
BRIGHT
REVERB
ROOM
HALL 1
HALL 2
COSMIC
The Clavinova also offers keyboard touch response, so the volume and
timbre of notes played can be controlled according to how “hard” you play
the keys. The amount of variation available depends on the selected voice.
You can also change the overall tone or add reverb and/or effects as desired by using the [REVERB] and [BRILLIANCE] buttons (see page 10
for [BRILLIANCE] button operation, “Reverb” on page 11).
7
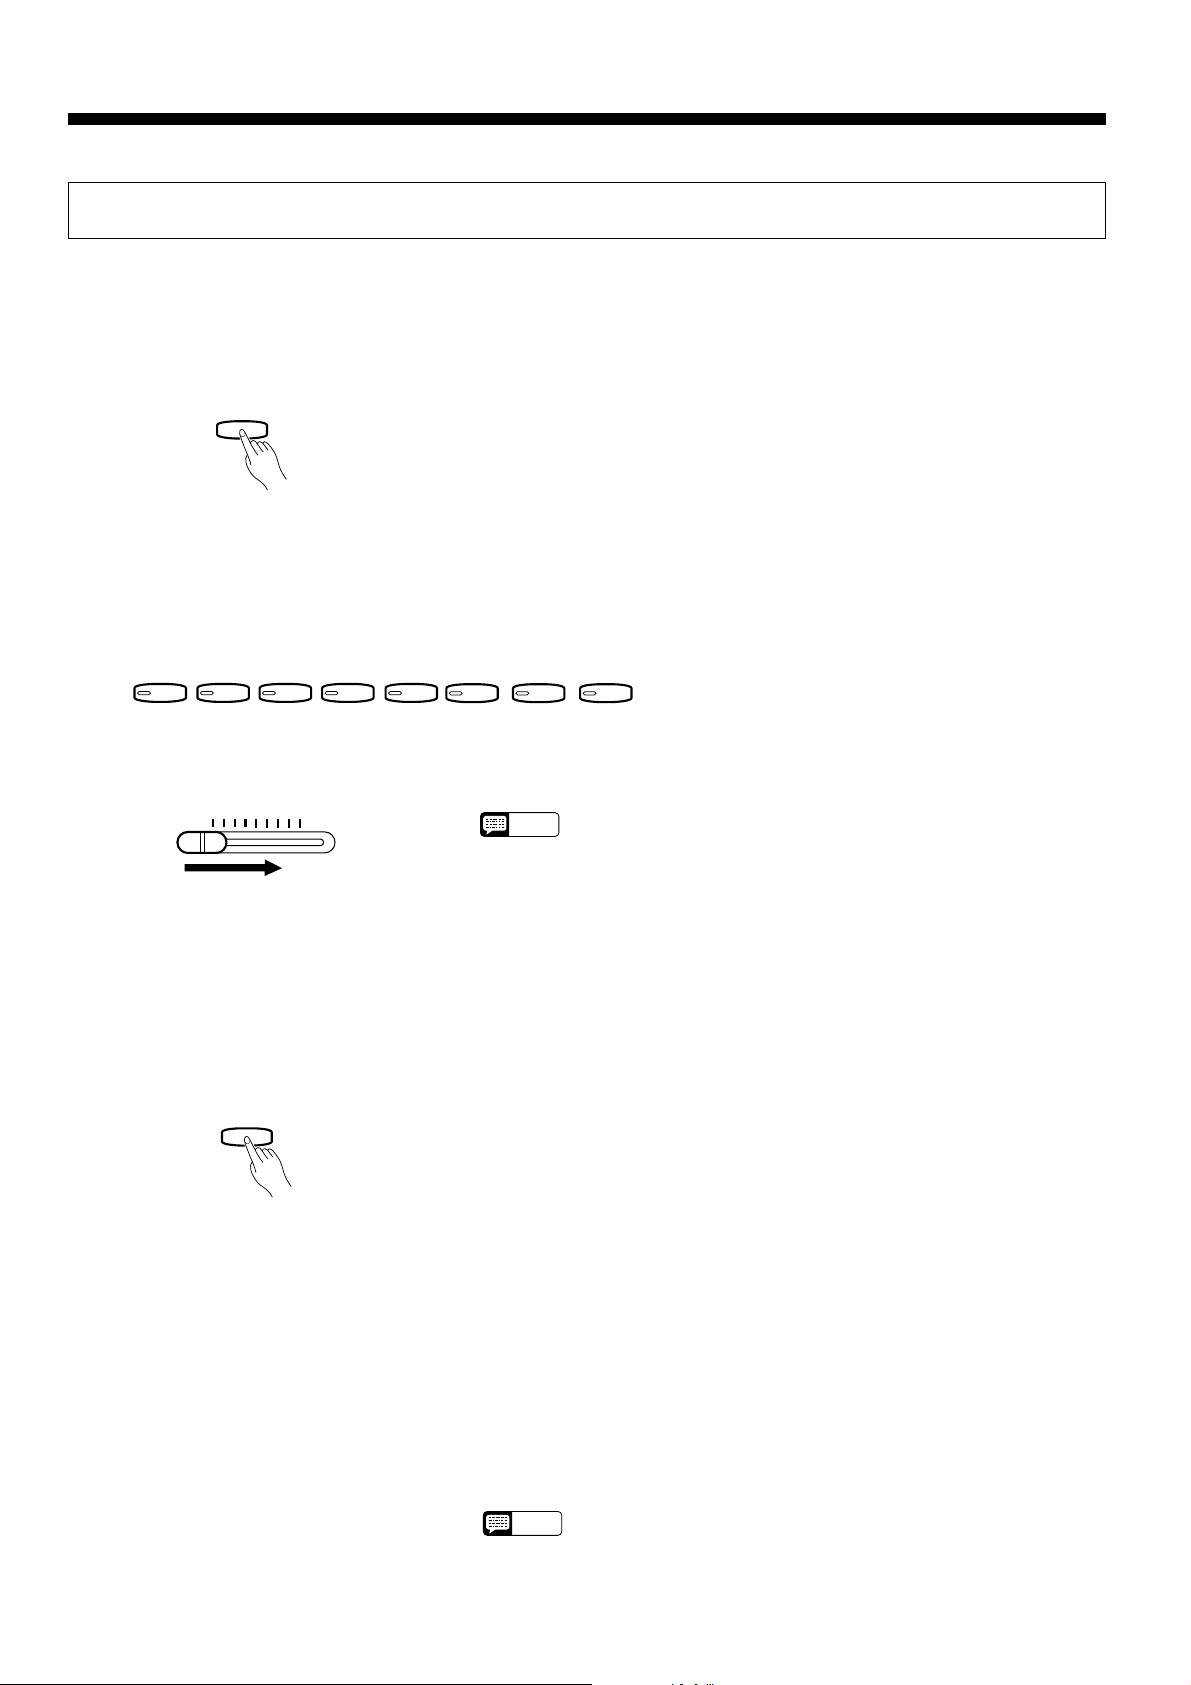
Selecting & Playing Voices
Playing the Demonstration Tunes
The CLP-156 features 8 demonstration tunes that effectively demonstrate its sound
capabilities. Here’s how you can select and play the demo tunes.
ZEngage the Demo Mode
DEMO
Select a Demo Tune
X
PIANO 1
PIANO 2
CLAVINOVA
TONE
E. PIANO
CSet the Volume
MASTER VOLUME
MIN MAX
VPlay a Different Demo
HARPSI-
CHORD
Press the [DEMO] button to engage the demo mode — the voice selec-
tors will flash in sequence.
The 8 demo tunes are selected via the voice selectors. Press a selector to
start playback of the corresponding tune, featuring the voice normally selected by that voice selector button. The demo tunes will play in sequence
until stopped, starting with the selected tune. The voice selector indicator
will flash during demo playback.
VIBES
STRINGS
ORGAN
Use the [MASTER VOLUME] control to adjust the volume.
• The TEMPO buttons do not affect demo playback (“_ _ _” appears on
NOTE
the TEMPO display).
You can start playback of any other demo tune during playback by simply pressing the corresponding voice selector. Playback will stop and the
playback-ready mode described in step 2, above, will be re-engaged if you
press the voice selector of the demo that is currently playing.
B Stop the Demo
DEMO
8
Press the [DEMO] button when you want to stop demo playback and
return to the normal play mode.
The Demo Tunes
[PIANO 1] button: Etude op. 10-5 “Black Keys” by F. F. Chopin
[PIANO 2] button: “Le Rhône” by K. Hattori
[CLAVINOVA TONE] button: “Pavane pour une infante défunte” by M. J. Ravel
[HARPSICHORD] button: “Le Coucou” by L. C. Daquin
[VIBES] button: “Schmetterling (Papilions)” op. 43 by E. H. Grieg
[STRINGS] button: “Charmaine” by L. Polladk
[ORGAN] button:
• The demonstration pieces listed above are short excerpts from the original compositions.
The other demo song is original (© 1994 by YAMAHA CORPORATION).
NOTE
“Jesu, Joy Of Man’s Desiring” (Chorale from Cantata No. 147) by J. S. Bach
• One PianoSoft demonstration disk is also provided with the CLP-156. It
contains several excerpts from the Disklavier PianoSoft disks. Refer to
the “Disk Playback” section on page 16 for how to playback the Demonstration disk.
The Dual Mode
V
O
The DUAL mode makes it possible to play two voices simultaneously across the entire range of the keyboard. To activate the DUAL mode simply press two voice selectors at the same time (or press one voice
selector while holding another). The voice indicators of both selected voices will light when the DUAL mode
is active. To return to the normal single-voice play mode, press any single voice selector.
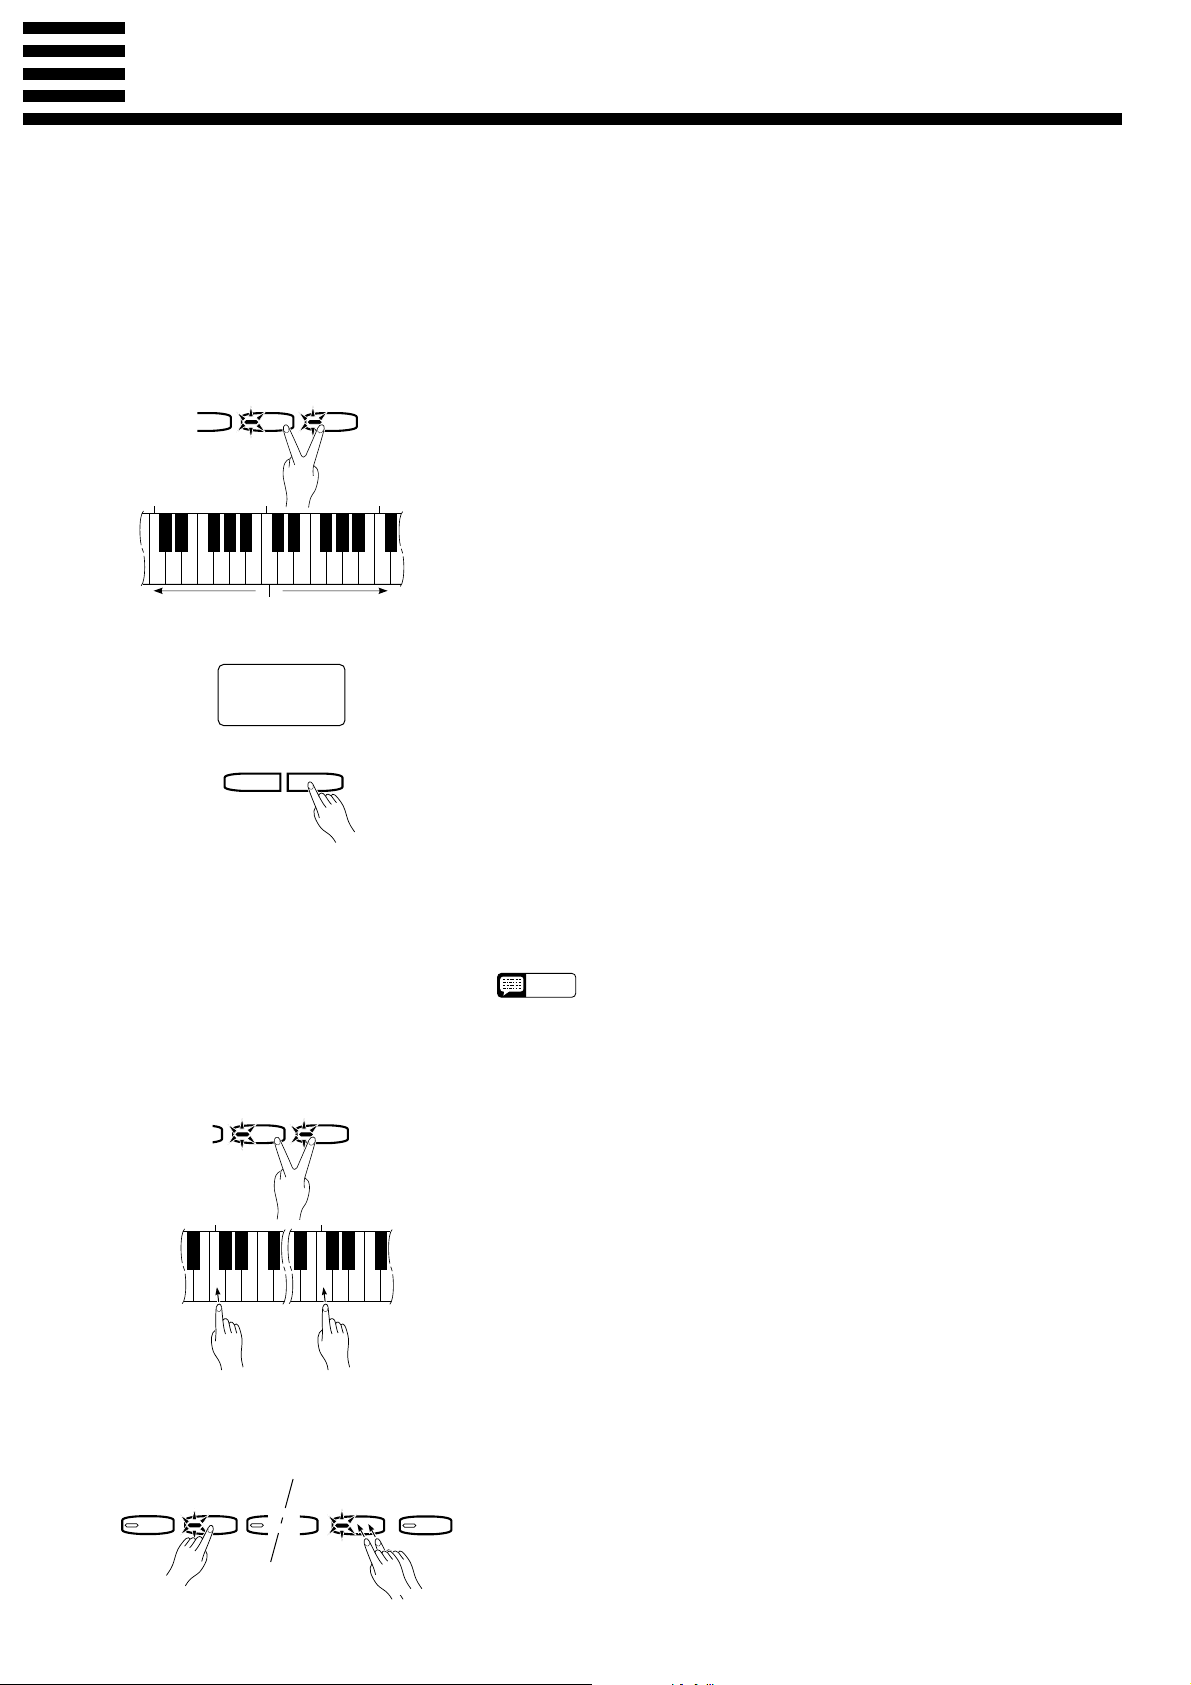
● Adjusting the Balance Be-
tween the Dual-mode Voices
C
2
Left voice
maximum.
INOVA
NE
E. PIANO
balance.
C
3
Equal
HARPSI-
CHORD
Right voice
maximum.
C
4
8
TEMPO
▼
▲
The volume levels of the two voices combined in the DUAL mode are
normally set automatically to produce a pleasing balance (see “Default Settings” below). The balance can be adjusted manually by using the C2
through C4 keys on the keyboard or the TEMPO [s] and [t] buttons
while pressing the two voice selectors corresponding to the voices to be
combined in the DUAL mode. The selected balance value (1 … 15) will be
shown on the TEMPO display until the voice selectors are released.
When using the keyboard, the C3 keys produces equal balance between
the two voices (a setting of “8”), while keys to the left of C3 increase the
volume of the left voice in relation to the right voice, and keys to the right
of C3 increase the volume of the right voice in relation to the left voice. By
“left” and “right” voices we refer to the relative positions of the voice selectors — i.e. in a STRINGS/ORGAN combination STRINGS is the left voice
and ORGAN is the right voice.
When using the TEMPO buttons the first time either button is pressed
the current balance appears on the TEMPO display, then pressing the [t]
button increases the volume of the left voice in relation to the right while
the [s] button has the opposite effect. Press both the [s] and [t] buttons
simultaneously to instantly recall the equal-volume (“8”) setting.
■ A setting of “1” sets the volume of the left voice to maximum and the
volume of the right voice to minimum.
■ A setting of “8” sets both voices to the same volume.
■ A setting of “15” sets the volume of the right voice to maximum and the
volume of the left voice to minimum.
● Shifting a Dual-mode Voice
Up One Octave
A
E. PIANO
1
C
Left voice
shift up.
HARPSI-
CHORD
5
C
Right voice
shift up.
● Slow-attack Strings
PIANO 1
PIANO 2
CLA
T
STRINGS
S
ORGAN
• Hold either the TEMPO [s] or [t] button for continuous scrolling in the
NOTE
specified direction.
Depending on which voices you combine using the DUAL mode, the
combination may sound better if one of the voices is shifted up an octave.
To shift the right voice, press the C5 key while pressing the two voice selectors corresponding to the voices to be combined in the DUAL mode.
Press C5 again to shift the voice back to its normal range. Use the C1 key
in the same way to shift the left voice.
Default octave settings are provided for all voice combinations, as listed
in the “Default Settings” chart, below.
In a DUAL mode voice combination using STRINGS and any other
voice, it is possible to switch the STRINGS voice to a slow-attack variation
when initially selecting the voices by pressing the [STRINGS] selector
twice while holding the other voice selector. Repeat this operation to return
to the normal STRINGS voice attack.
9
The Dual Mode
● Memorizing the Balance,
Strings Type, & Octave Shift
Settings
C
A
E. PIANO
HARPSI-
CHORD
7
Press the C7 key while holding any two voice selectors to memorize all
balance, STRINGS voice attack variation, and octave shift settings made
since the power was turned on. The memorized settings will be retained in
memory for about one week after the power is turned off, then the default
settings will be restored. To keep the memorized settings for longer periods,
turn the power on briefly at least once a week.
If these settings are not memorized as described above, they are retained
in memory only until the Clavinova is turned off.
Default Settings
PIANO 1 PIANO 2
PIANO 1 8 (C3) 8 (C3) 8 (C3) 8 (C3) 8 (C3) 4 (F2) 3 (E2)
Octave Shift
C2 … C4: Balance keys 0: Normal octave L: Left voice up one octave R: Right voice up one octave
PIANO 2 0 8 (C3) 8 (C3) 8 (C3) 8 (C3) 4 (F2) 3 (E2)
CLAVINOVA TONE
E. PIANO 0 0 0
HARPSICHORD 0 0 0 0 8 (C3) 4 (F2) 5 (G2)
VIBES R R R R R 7 (B2) 7 (B2)
STRINGS 0 0 0 0 0 L 8 (C3)
ORGAN 0 0 0 0 0 L 0
0 0 8 (C3) 8 (C3) 8 (C3) 4 (F2) 4 (F2)
CLAVINOVA
TONE
Balance
E. PIANO
HARPSI- VIBES STRINGS
CHORD
8 (C3) 8 (C3) 4 (F2) 3 (E2)
ORGAN
Brilliance
The [BRILLIANCE] button makes it possible to change the tonality or “timbre” of the selected
voice to suit your musical requirements. Three settings are provided: MELLOW, NORMAL, and
BRIGHT. To select one of these settings, press the [BRILLIANCE] button a few times until the
indicator corresponding to the desired setting lights.
NORMAL .....This setting produces the “normal” tone of the selected voice.
BRIGHT .......This setting creates a brighter, sharper tone.
MELLOW.....The MELLOW setting produces a rounder, softer tone.
● Memorizing the Brilliance
Setting
BRILLIANCE
MELLOW
NORMAL
BRIGHT
C
7
Press the C7 key while holding the [BRILLIANCE] button to memorize
the current brilliance setting. The memorized setting will be retained in
memory for about one week after the power is turned off, then the default
setting (NORMAL) will be restored. To keep the memorized setting for
longer periods, turn the power on briefly at least once a week.
If this setting is not memorized as described above, it is retained in
memory only until the Clavinova is turned off.
10
Reverb
The [REVERB] button selects a number of digital reverb effects that you can use for
extra depth and expressive power.
To select a reverb type press the [REVERB] button a few times until the indicator
corresponding to the desired type lights (the indicators light in sequence each time the
[REVERB] button is pressed). No reverb is produced when all indicators are off.
OFF ............When no reverb effect is selected (no REVERB indicator is lit), a special natural
damper effect is applied to the piano voices. This simulates the natural resonance of
an acoustic piano’s strings and sound board when the damper pedal is pressed.
ROOM........This setting add a continuous reverb effect to the sound that is similar to the type of
acoustic reverberation you would hear in a medium-size room.
HALL 1 ......For a “bigger” reverb sound, use the HALL 1 setting. This effect simulates the natu-
ral reverberation of a medium-size concert hall.
HALL 2 ......For a really spacious reverb sound, use the HALL 2 setting. This effect simulates the
natural reverberation of a large concert hall.
COSMIC ....The COSMIC reverb effect produces an echo-plus-reverb sound that can add life and
animation to your music.
● Adjusting Reverb Depth
REVERB
ROOM
HALL 1
HALL 2
COSMIC
C
2
0 2 3 4 5 6 7 8 9 10 11 12 13 14 15
Decrease
depth.
C
3
Normal
depth.
Increase
depth.
8
TEMPO
▼
▲
The depth of the selected reverb effect can be adjusted for the current
voice (separate settings can be made for each voice and reverb type) by
using the C2 through C4 keys on the keyboard or the TEMPO [s] and [t]
buttons while holding the [REVERB] button. The selected reverb depth
value (0 … 15) will be shown on the TEMPO display until the [REVERB]
button is released. The default reverb depth settings are given in the “Default Settings” chart below.
C
4
When using the keyboard, the C3 keys sets the “normal” depth (a setting
of “8”). Keys to the left of C3 decrease the reverb depth, and keys to the
right of C3 increase the reverb depth.
When using the TEMPO buttons the first time either button is pressed
the current depth setting appears on the TEMPO display, then pressing the
ss
[
s] button increases the reverb depth while the [
ss
tt
t] button decreases the
tt
reverb depth. Press both the [s] and [t] buttons simultaneously to instantly recall the normal (“8”) setting.
■ A setting of “0” sets the minimum reverb depth (no reverb).
■ A setting of “8” sets medium “normal” reverb depth.
■ A setting of “15” sets the maximum reverb depth.
• Hold either the TEMPO [s] or [t] button for continuous scrolling in the
NOTE
specified direction.
• A setting of “1” cannot be entered via the keyboard.
Default Settings
ROOM HALL 1 HALL 2
STRINGS, ORGAN 8 (C3) 8 (C3) 11 (F3) 10 (E3)
* All effect types set to 8 (C3) for all other voices.
* The default reverb type is ROOM.
COSMIC
● Memorizing the Reverb
Type & Depth Settings
REVERB
ROOM
HALL 1
HALL 2
COSMIC
Press the C7 key while holding the [REVERB] button to memorize the
current effect type and all depth settings made since the power was turned
C
7
on. The memorized settings will be retained in memory for about one week
after the power is turned off, then the default settings will be restored. To
keep the memorized settings for longer periods, turn the power on briefly at
least once a week.
If these settings are not memorized as described above, they are retained
in memory only until the Clavinova is turned off.
11
Touch Sensitivity
Four different types of keyboard touch sensitivity — HARD, MEDIUM, SOFT or FIXED —
can be selected to match different playing styles and preferences. The different touch sensitivity settings are selected by using the [MIDI/TRANSPOSE] and [REVERB] buttons.
HARD (ROOM indicator) ...........The HARD setting requires the keys to be played quite hard to produce maxi-
mum loudness.
MEDIUM (HALL 1 indicator)......The MEDIUM setting produces a fairly “standard” keyboard response. This is
the initial factory default setting.
SOFT (HALL 2 indicator) ...........The SOFT setting allows maximum loudness to be produced with relatively
light key pressure.
FIXED (No indicator lit)..............All notes are produced at the same volume no matter how hard the keyboard is
REVERB
ROOM
HALL 1
HALL 2
COSMIC
MIDI/
TRANSPOSE
played. This is an ideal setting for voices which normally have no keyboard
sensitivity (i.e. harpsichord and organ).
To select a touch sensitivity setting press the [REVERB] button a few times
while holding the [MIDI/TRANSPOSE] button until the indicator corresponding to the desired setting lights.
● Memorizing the Touch
Sensitivity Setting
REVERB
ROOM
HALL 1
HALL 2
COSMIC
MIDI/
TRANSPOSE
The Pedals
The CLP-156 has three foot pedals that produce a range of expressive effects similar to
those produced by the pedals on an acoustic piano.
● Soft (Left) Pedal
● Sostenuto (Center) Pedal
Press the C7 key while holding the [MIDI/TRANSPOSE] and [REVERB]
button to memorize the current touch sensitivity setting. The memorized setting
C
7
will be retained in memory for about one week after the power is turned off,
then the default setting (MEDIUM) will be restored. To keep the memorized
setting for longer periods, turn the power on briefly at least once a week.
If this setting is not memorized as described above, it is retained in memory
only until the Clavinova is turned off.
Pressing the soft pedal reduces the volume and slightly changes the timbre of
notes played.
If you play a note or chord on the keyboard and press the sostenuto pedal while
the note(s) are held, those notes will be sustained as long as the pedal is held (as if
the damper pedal had been pressed) but all subsequently played notes will not be
sustained. This makes it possible to sustain a chord, for example, while other notes
are played “staccato.”
● Damper (Right) Pedal
12
The damper pedal functions in the same way as a damper pedal on an acoustic
piano. When the damper pedal is pressed notes played have a long sustain. When
no REVERB effect is selected and a piano voice is selected, the damper pedal also
produces a special “resonance” that simulates the ring of the strings and the sound
board of an acoustic piano. Releasing the pedal immediately stops (damps) any
sustained notes. The CLP-156 damper pedal additionally features continuous
damping. This allows you to create shorter effects by pressing the damper pedal
down only part of the way.

Transposition
The Clavinova’s TRANSPOSE function makes it possible to shift the pitch of the entire keyboard up or down in semitone intervals up to a maximum of six semitones. “Transposing” the
pitch of the Clavinova keyboard facilitates playing in difficult key signatures, and you can easily
match the pitch of the keyboard to the range of a singer or other instrumentalist.
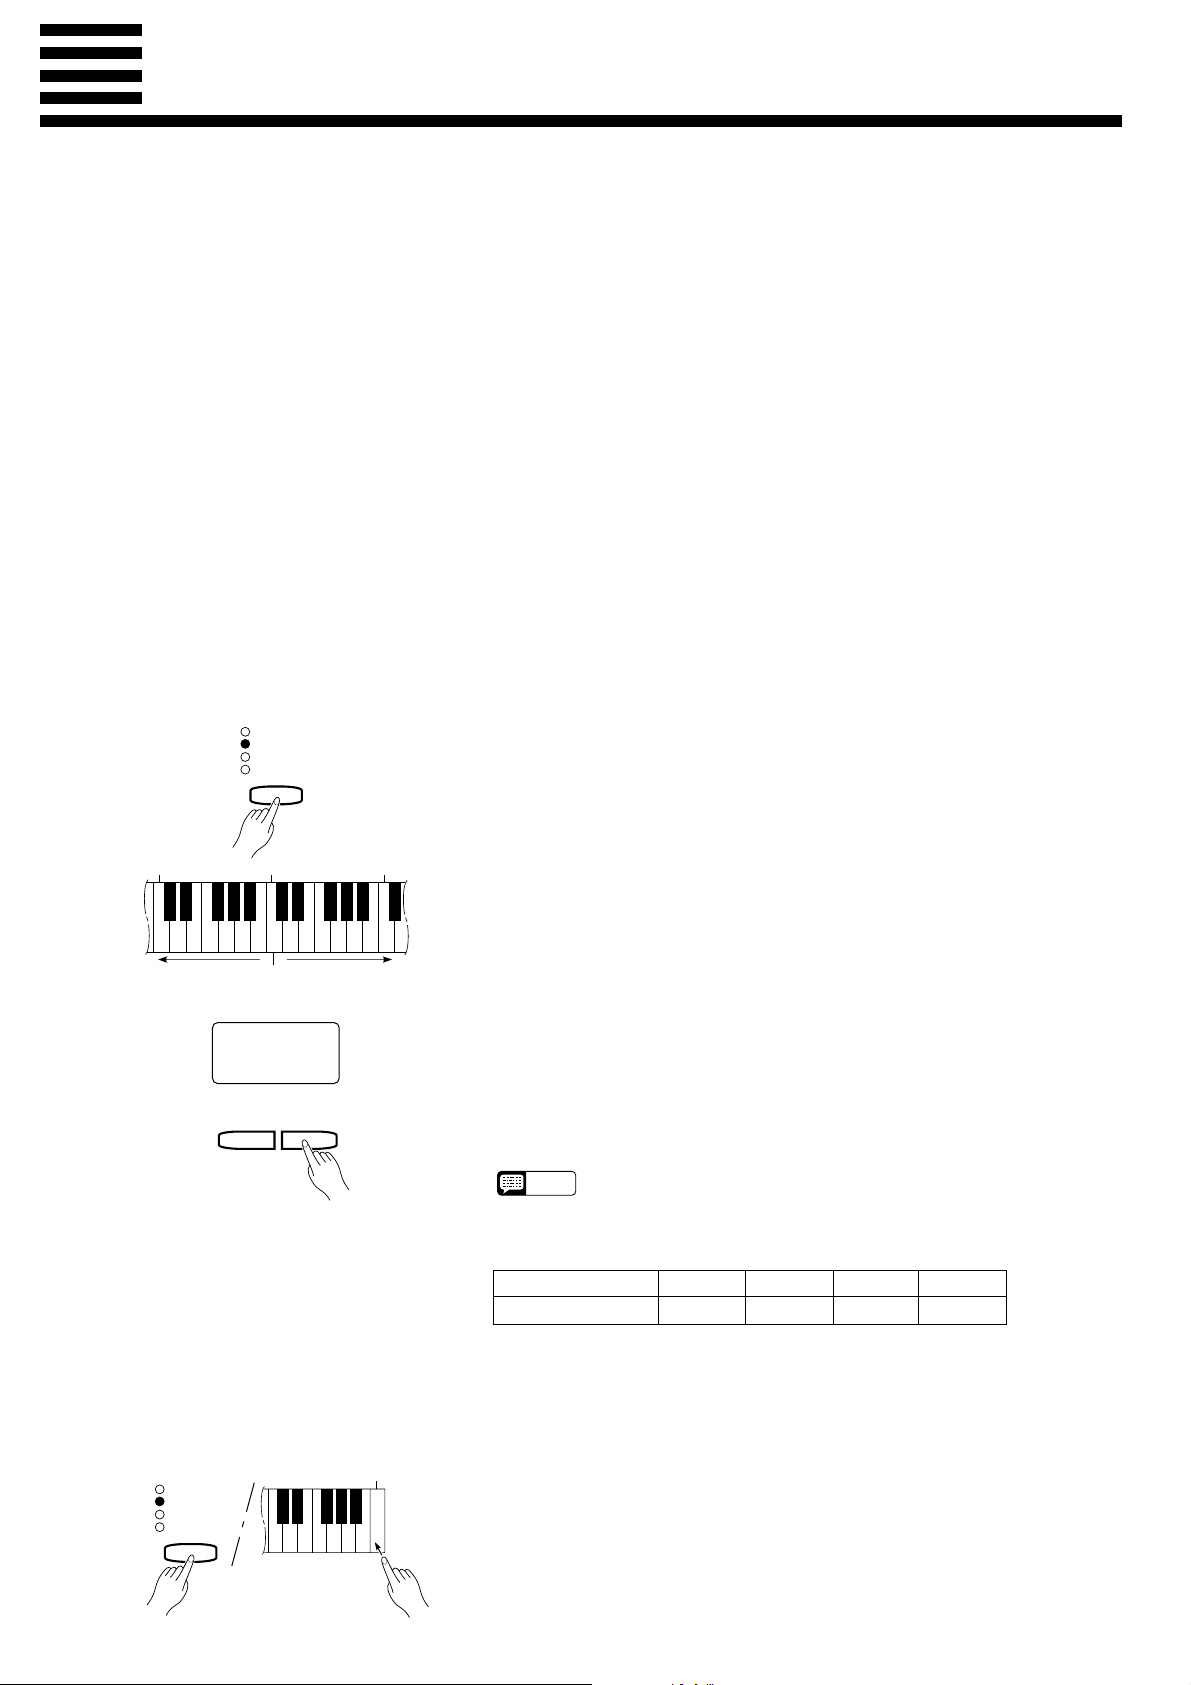
The [MIDI/TRANSPOSE] button and keys F#2 through F#3 on the keyboard, or the TEMPO [s] and [t] buttons, are
used for transposition.
ZPress and hold the [MIDI/TRANSPOSE] button. The current transpose
3
C
MIDI/
TRANSPOSE
F#
2
-6 -4 -2 +1
-5 -3 -1 0 +2 +4 +5
Transpose
down.
Normal
pitch.
-1
TEMPO
▼
F#
+3 +6
Transpose
up.
▲
3
setting will appear on the TEMPO display (“-6” semitones through “0”
through “6” semitones).
XPress a key between F#2 and F#3 according to the desired amount of
transposition*, or use the TEMPO [s] and [t] buttons to set the required transposition value. The “0” default setting can be instantly recalled by simultaneously pressing the TEMPO [s] and [t] buttons.
CRelease the [MIDI/TRANSPOSE] button.
* Pressing the C3 key produces normal keyboard pitch. Pressing the key to
the left of C3 (B2) transposes the pitch of the keyboard down a semitone,
the next key to the left (Bb2) transposes down a whole tone (two semitones), etc., down to the F#2 key which transposes down 6 semitones.
Upward transposition is accomplished in the same way using the keys to
the right of C3, up to F#3 which transposes up 6 semitones.
• Hold either the TEMPO [s] or [t] button for continuous scrolling in the
NOTE
specified direction.
• Notes below and above the A-1 — C7 of the Clavinova sound one octave
higher and lower, respectively.
13
Pitch Control
Pitch control makes it possible to tune the Clavinova over a ±50-cent range (approximate) in approximately 1.2-cent or 1-hertz intervals. A hundred “cents” equals one semitone, so the tuning range
provided allows fine tuning of overall pitch over a range of approximately a semitone. Pitch control is
useful for tuning the Clavinova to match other instruments or recorded music.
● Tuning Up
-1
A-1B
▼
TEMPO
3
C
▲
3
B
● Tuning Down
-1
A#
-1
A
▼
TEMPO
3
C
▲
3
B
● To Restore Standard Pitch
-1
A#
A-1B
-1
3
C
3
B
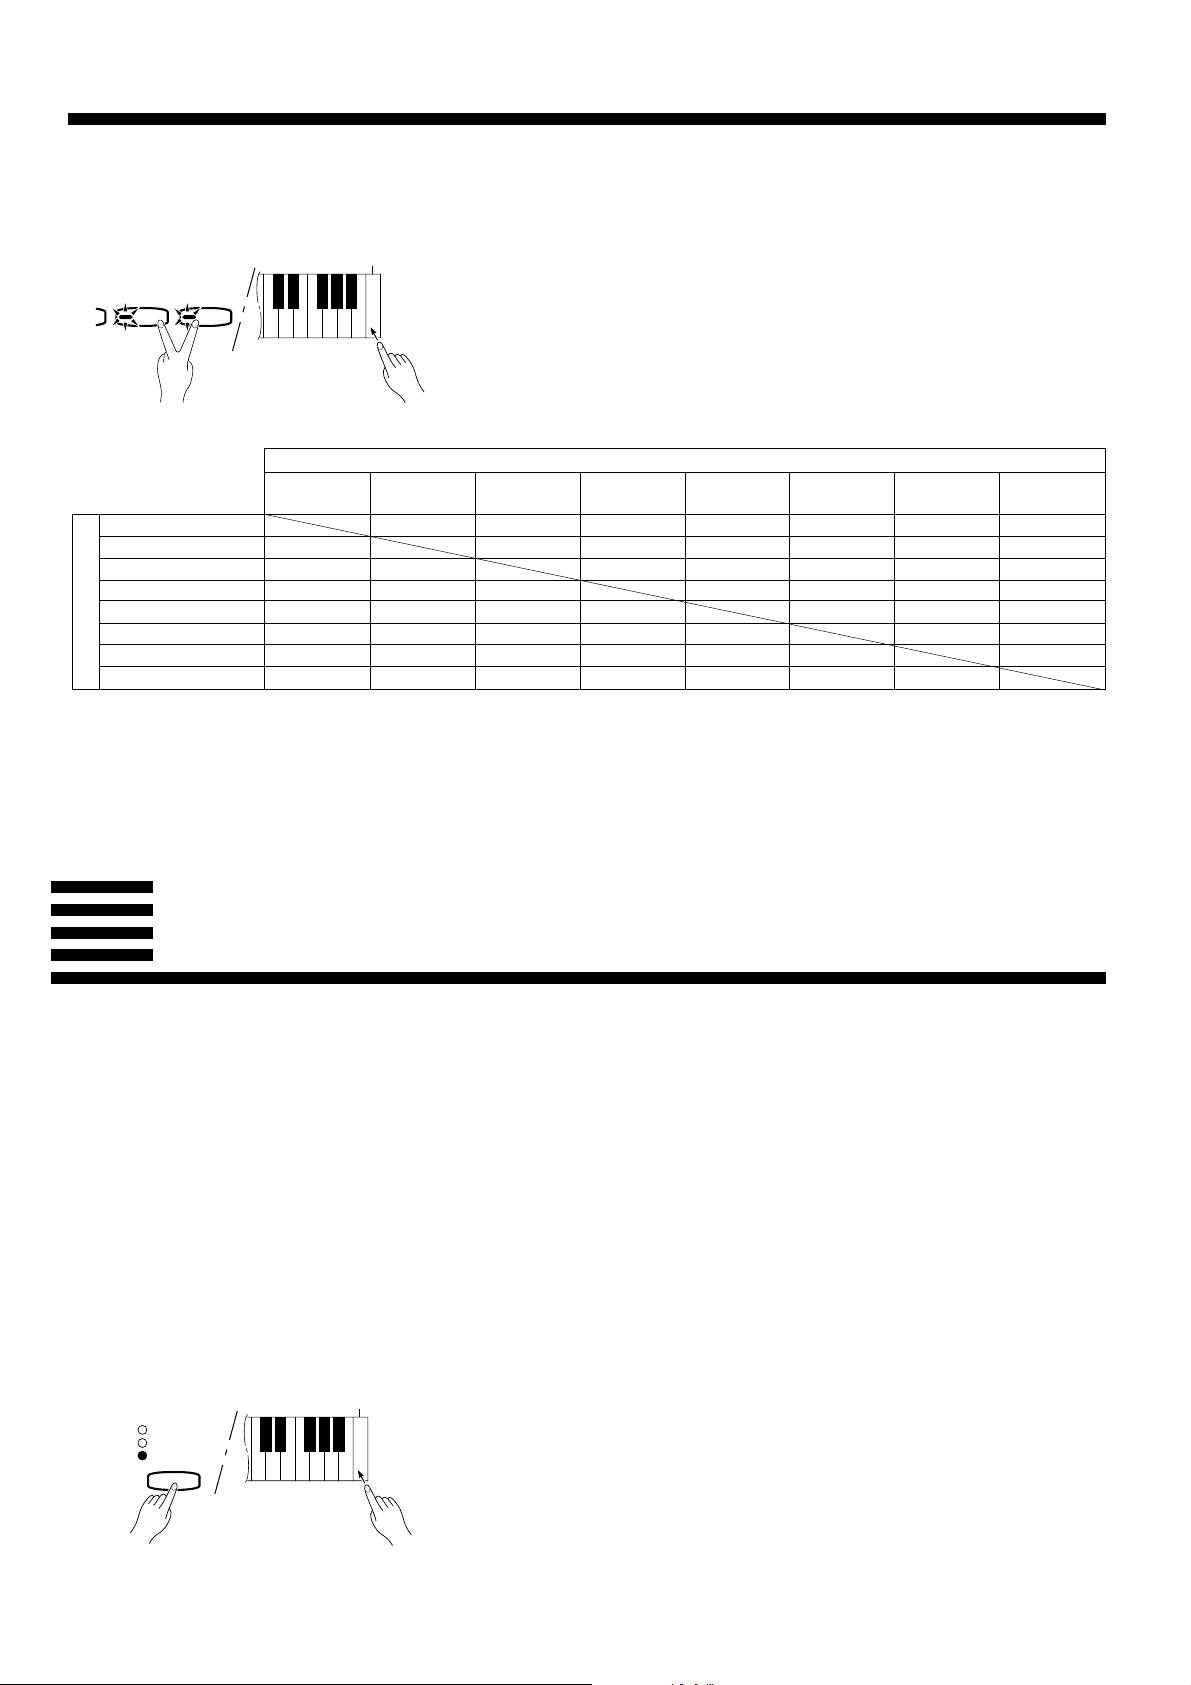
Z To tune up (raise pitch), hold the A-1 and B-1 keys simultaneously
(A-1 and B-1 are the two lowest white keys on the keyboard) and press
any key between C3 and B3. Each time a key in this range is pressed the
pitch is raised by approximately 1.2 cents, up to a maximum of about 50
cents above standard pitch. To raise the pitch in 1-hertz increments press
the TEMPO [s] button instead of the C3-B3 keys. The TEMPO [t]
button can also be used to tune down while the A-1 and B-1 keys are held.
X Release the A-1 and B-1 keys.
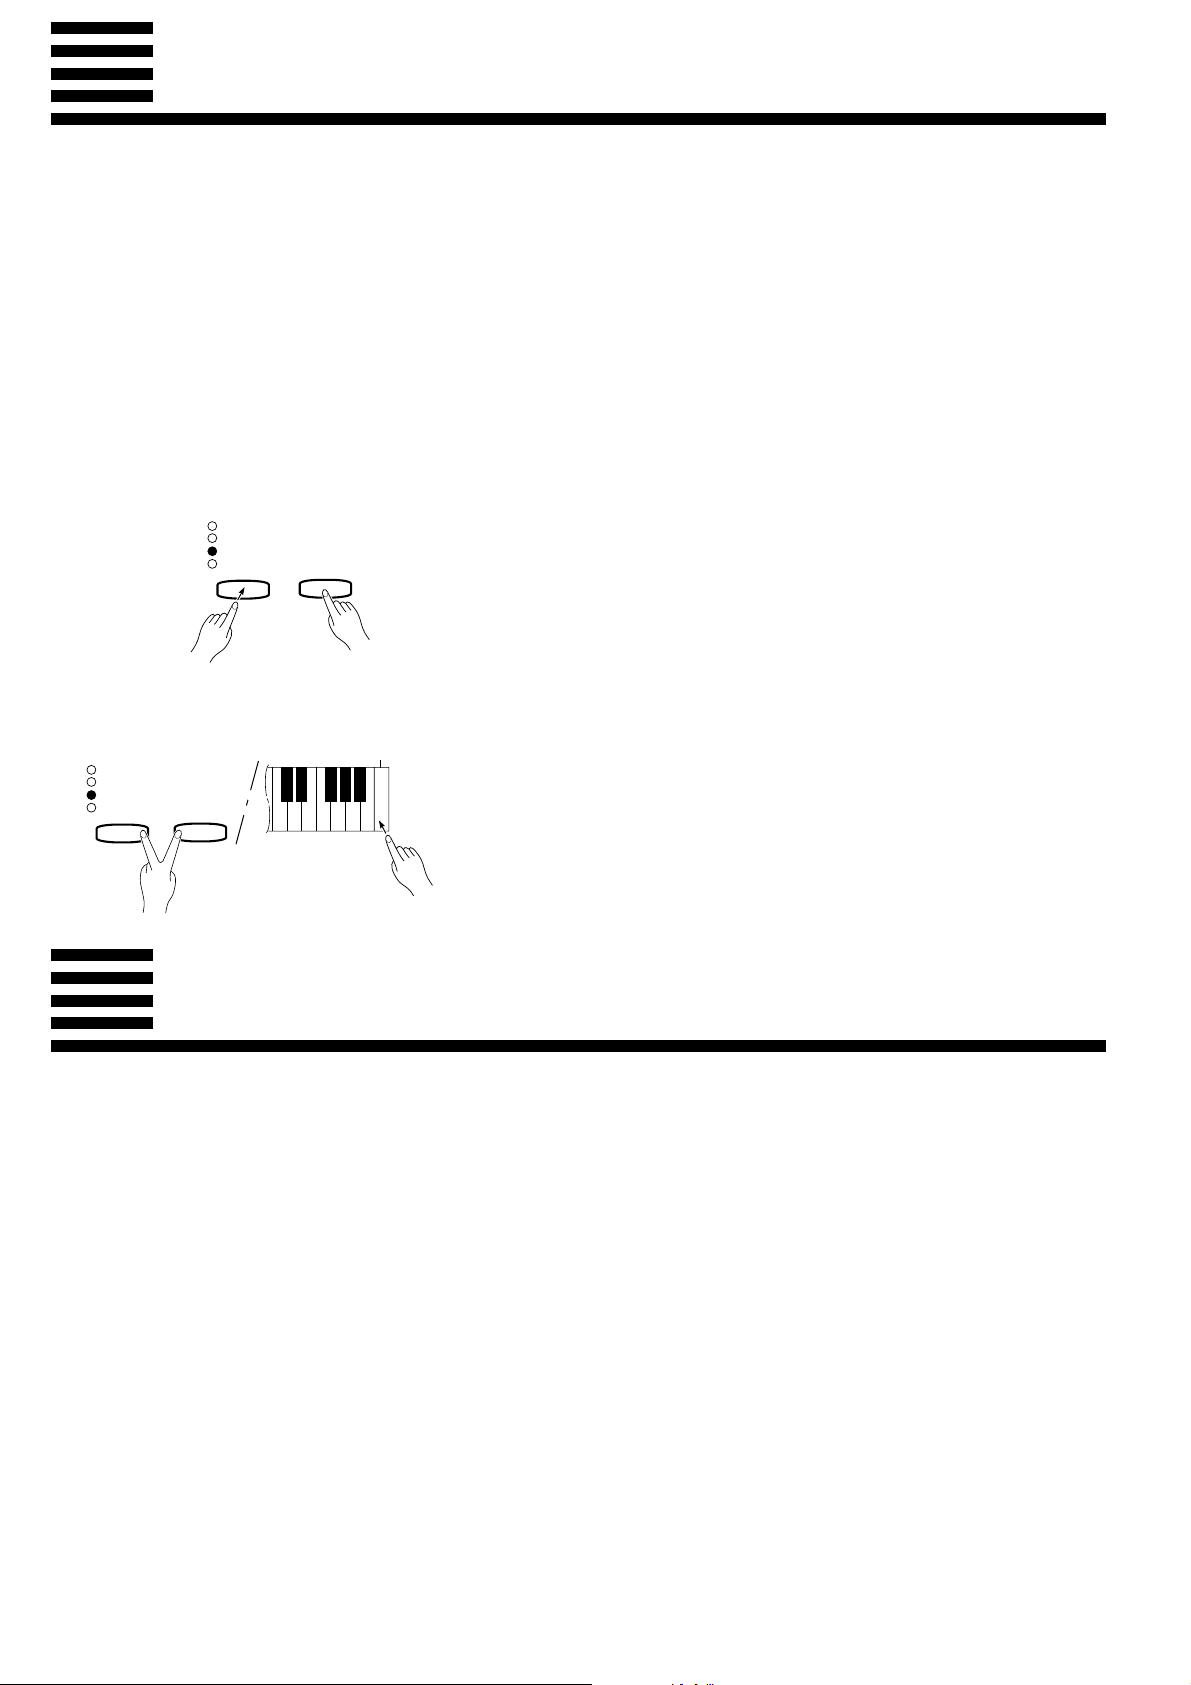
Z To tune down (lower pitch), hold the A-1 and A#-1 keys simultane-
ously and press any key between C3 and B3. Each time a key in this range
is pressed the pitch is lowered by approximately 1.2 cents, up to a maximum of about 50 cents below standard pitch. To lower the pitch in 1-hertz
increments press the TEMPO [t] button instead of the C3-B3 keys. The
TEMPO [s] button can also be used to tune up while the A-1 and A#-1
keys are held.
XRelease the A-1 and A#-1 keys.
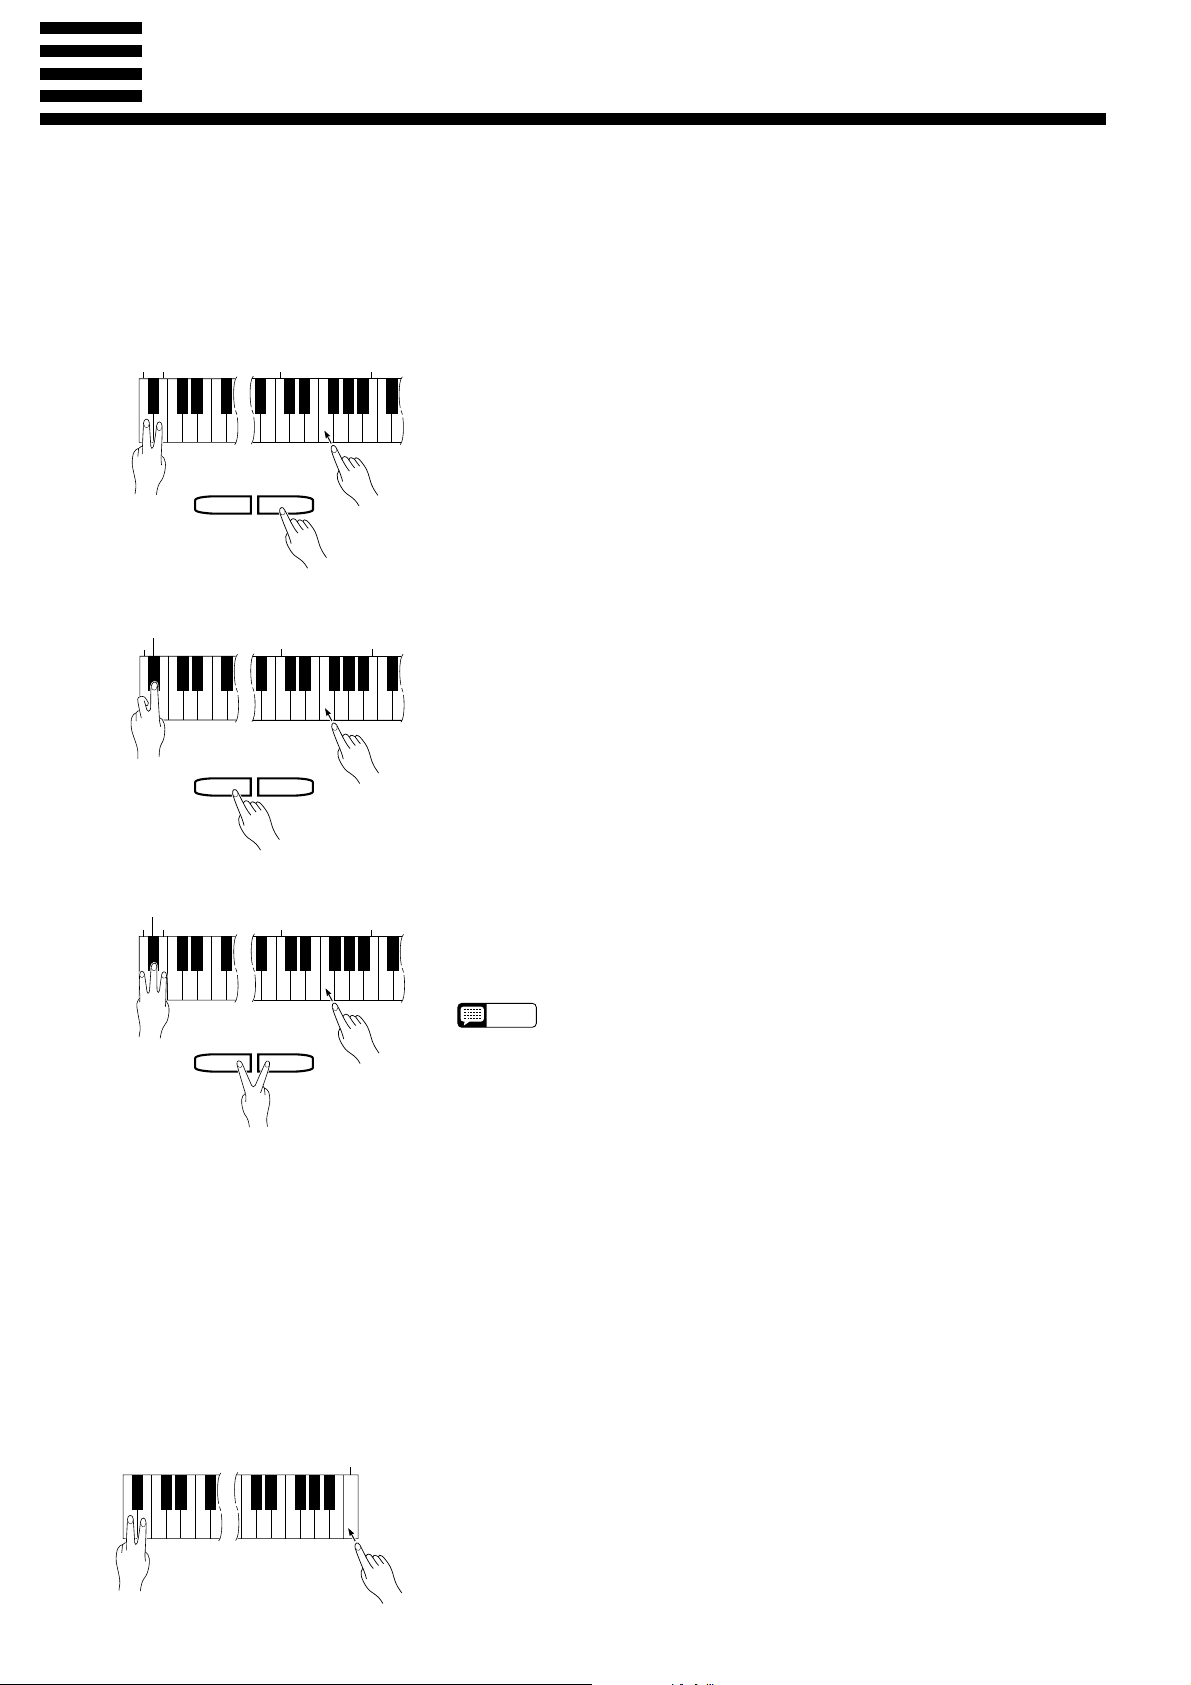
ZTo restore the default pitch (A3 = 440 Hz), hold the A-1, A#-1, and B-1
keys simultaneously and press any key between C3 and B3, or simultaneously press the TEMPO [s] and [t] buttons.
XRelease the A-1, A#-1 and B-1 keys.
• Hold either the TEMPO [s] or [t] button for continuous scrolling in the
TEMPO
▼
▲
NOTE
● The Pitch Display The approximate pitch of A3 is shown on the TEMPO display in Hertz
Example:
442 442.0 .........442.24
4.42 442.25 .......442.49
while the pitch control function is in operation. The total display range is from
approximately 427 hertz (-50 cents) to 453 hertz (+50 cents).
The dots to the right of each figure in the display are used to provide a
general idea of fractional pitches.
44.2 442.5 .........442.74
442. 442.75 .......442.99
● Memorizing the Pitch Con-
trol Setting
C
7
Press the C7 key while holding the A-1/B-1, A-1/A#-1, or A-1/A#-1/B-1 key
combination to memorize the current pitch control setting. The memorized
setting will be retained in memory for about one week after the power is
turned off, then the standard pitch will be restored. To keep the memorized
setting for longer periods, turn the power on briefly at least once a week.
If this setting is not memorized as described above, it is retained in memory
only until the Clavinova is turned off.
specified direction.
• The PITCH CONTROL function has no effect when LOCAL OFF is active
(see “MIDI FUNCTIONS,” page 32).
14
 Loading...