


 Loading...
BAL
HOME THEATER SOUND SYSTEM
AVX-S30
(AVC-S30 + NX-S30 + NX-SW30)
OWNER’S MANUAL

CAUTION: READ THIS BEFORE OPERATING YOUR UNIT.
1To assure the finest performance, please read this manual carefully. Keep it in a safe place for future reference.
2Install this sound system in a well ventilated, cool, dry, clean place with at least 10 cm on the top, 10 cm on the left and right, and 10 cm at the back of AVC-S30, and 20 cm on the top, 20 cm on the left and right, and 20 cm at the back of NX-SW30 — away from direct sunlight, heat sources, vibration, dust, moisture, and/ or cold.
3Locate this unit away from other electrical appliances, motors, or transformers to avoid humming sounds.
4Do not expose this unit to sudden temperature changes from cold to hot, and do not locate this unit in an environment with high humidity (i.e. a room with a humidifier) to prevent condensation inside this unit, which may cause an electrical shock, fire, damage to this unit, and/or personal injury.
5Avoid installing this unit where foreign object may fall onto this unit and/or this unit may be exposed to liquid dripping or splashing. On the top of this unit, do not place:
–Other components, as they may cause damage and/or discoloration on the surface of this unit.
–Burning objects (i.e. candles), as they may cause fire, damage to this unit, and/or personal injury.
–Containers with liquid in them, as they may fall and liquid may cause electrical shock to the user and/or damage to this unit.
6Do not cover this unit with a newspaper, tablecloth, curtain, etc. in order not to obstruct heat radiation. If the temperature inside this unit rises, it may cause fire, damage to this unit, and/or personal injury.
7Do not plug in this unit to a wall outlet until all connections are complete.
8Do not operate this unit upside-down. It may overheat, possibly causing damage.
9Do not use force on switches, knobs and/or cords.
10When disconnecting the power cable from the wall outlet, grasp the plug; do not pull the cable.
11Do not clean this unit with chemical solvents; this might damage the finish. Use a clean, dry cloth.
12Only voltage specified on this unit must be used. Using this unit with a higher voltage than specified is dangerous and may cause fire, damage to this unit, and/or personal injury. YAMAHA will not be held responsible for any damage resulting from use of this unit with a voltage other than specified.
13Do not attempt to modify or fix this unit. Contact qualified YAMAHA service personnel when any service is needed. The cabinet should never be opened for any reasons.
14When not planning to use this unit for long periods of time (i.e. vacation), disconnect the AC power plug from the wall outlet.
15Be sure to read the “Troubleshooting” section on common operating errors before concluding that this unit is faulty.
16Before moving this unit, press STANDBY/ON to set this unit in standby mode, and disconnect the AC power plug from the wall outlet.
17Condensation will form when the surrounding temperature changes suddenly. Disconnect the power cable from the outlet, then leave the unit alone.
18When using the unit for a long time, the unit may become warm. Turn the power off, then leave the unit alone for cooling.
19Install this unit near the AC outlet and where the AC power plug can be reached easily.
This unit is not disconnected from the AC power source as long as it is connected to the wall outlet, even if this unit itself is turned off. This state is called the standby mode. In this state, this unit is designed to consume a very small quantity of power.
The name plate is located on the bottom of the unit.
(Bottom of AVC-S30)
MODEL NO. AVC-S30 |
MODEL NO. AVC-S30
MADE IN MALAYSIA
Name plate
WARNING
TO REDUCE THE RISK OF FIRE OR ELECTRIC SHOCK, DO NOT EXPOSE THIS APPLIANCE TO RAIN OR MOISTURE.
■ For U.K. customers
If the socket outlets in the home are not suitable for the plug supplied with this appliance, it should be cut off and an appropriate 3 pin plug fitted. For details, refer to the instructions described below.
Note
The plug severed from the mains lead must be destroyed, as a plug with bared flexible cord is hazardous if engaged in a live socket outlet.
■ Special Instructions for U.K. Model
IMPORTANT
THE WIRES IN MAINS LEAD ARE COLOURED IN ACCORDANCE WITH THE FOLLOWING CODE:
Blue: NEUTRAL
Brown: LIVE
As the colours of the wires in the mains lead of this apparatus may not correspond with the coloured markings identifying the terminals in your plug, proceed as follows: The wire which is coloured BLUE must be connected to the terminal which is marked with the letter N or coloured BLACK. The wire which is coloured BROWN must be connected to the terminal which is marked with the letter L or coloured RED.
Making sure that neither core is connected to the earth terminal of the three pin plug.
CAUTION

CONTENTS
PREPARATION |
|
Supplied Parts......................................................... |
2 |
Controls and Functions.......................................... |
3 |
Front panel ................................................................ |
3 |
Remote control........................................................... |
4 |
Placing the Speakers............................................... |
6 |
Placing the Satellite Speakers ................................... |
7 |
Placing the subwoofer................................................ |
7 |
Connecting the Speakers........................................ |
8 |
Connecting External Components ........................ |
9 |
Digital connection ..................................................... |
9 |
Analog connection .................................................. |
10 |
Using the Remote Control.................................... |
11 |
Replacing the batteries ............................................ |
11 |
OPERATION |
|
Basic Operation .................................................... |
12 |
Enjoying Sounds with Specific Speaker |
|
Channels ............................................................ |
13 |
Enjoying realistic sounds (CINEMA DSP) ............ |
13 |
Enjoying stereo sounds with multi speaker |
|
channels (Dolby Pro Logic II) ............................ |
13 |
Using the DVS function |
|
(Dolby Virtual Speaker) ..................................... |
13 |
Enjoying Sounds in a Variety of Ways ............... |
14 |
Listening with headphones |
|
(“SILENT CINEMA”) ....................................... |
14 |
Listening at low volume (Night Listening) ............ |
14 |
CONFIGURATIONS |
|
|
Adjusting the Speaker Balance |
............................ |
15 |
Adjusting the speaker balance with ........test tones |
15 |
|
Adjusting the speaker balance during .....playback |
16 |
|
Adjusting the Orientation of the Virtual |
|
|
Surround Speakers............................................ |
|
16 |
ADDITIONAL INFORMATION |
|
|
Status Indicator ..................................................... |
|
18 |
Volume level ........................................................... |
|
18 |
Input signal ............................................................. |
|
18 |
Troubleshooting..................................................... |
|
19 |
Recommended Virtual Surround Speaker |
|
|
Settings ............................................................... |
|
20 |
Glossary.................................................................. |
|
21 |
Specifications .......................................... |
back cover |
|
■ Introduction
The Yamaha Home Theater Sound System “AVX-S30” consists of the AV amplifier (AVC-S30), satellite speakers (NXS30) and subwoofer (NX-SW30). This product provides you with the best sound possible with simple operations, allowing you to enjoy various audio sources. We hope the “AVX-S30” brings you great listening pleasure and satisfaction.
■ About this manual
•This manual provides information relevant only to the YAMAHA Home Theater Sound System “AVX-S30”. For information on the DVD player “DVD-S30”, refer to the “DVD-S30 OWNER’S MANUAL”. For information on other AV components, refer to the manual for that product.
•In this manual, operations that can be performed using either the front panel buttons or remote control are explained using the remote control.
•yindicates a tip for your operation. Notes contain important information about safety and operating instructions.
•This manual is printed prior to production. Design and specifications are subject to change in part as a result of improvements, etc. In case of differences between the manual and the product, the product has priority.
1

PREPARATION
Supplied Parts
This product consists of the following parts. Before connecting speakers or a TV to this product, make sure you received all of the following parts. (The remote control is supplied with the DVD-S30.)
AV amplifier (AVC-S30) x 1
Satellite speaker (NX-S30) x 2
Subwoofer (NX-SW30) x 1
Accessories
System control cable |
Subwoofer cable |
Speaker cable |
(5 m) x 1 |
(1-pin, 5 m) x 1 |
(for satellite, 5 m) x 2 |
Amplifier stand x 2 |
Non-skid pad (large) |
Non-skid pad (small) |
Owner’s Manual |
|
x 1 set (4 pieces) |
x 2 sets (8 pieces) |
(this manual) |
|
|
|
HOME THEATER SOUND SYSTEM |
|
|
|
AVX-S30 |
|
|
|
(AVC-S30 + NX-S30 + NX-SW30) |
OWNER’S MANUAL
y
You can place the amplifier vertically (STANDBY/ON becomes the top and VOLUME becomes the bottom as the diagram below) using the supplied amplifier stands.
STANDBY/ON
Amplifier stand |
VOLUME |
2
PREPARATION
Controls and Functions
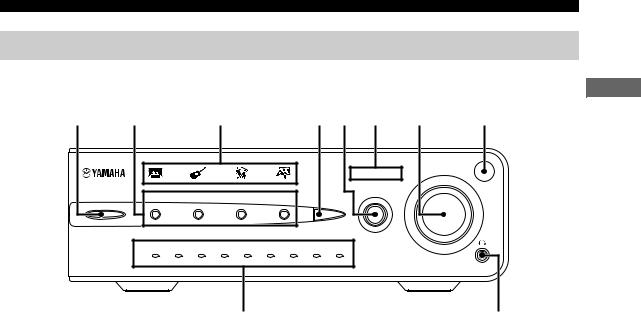
■ Front panel
1 |
2 |
|
|
3 |
|
|
|
|
4 5 |
6 |
7 |
8 |
||
|
|
|
|
|
|
|
|
|
|
1 |
2 |
3 |
4 |
VOLUME |
|
|
|
|
|
|
|
|
|
|
|
||||
STANDBY/ON |
|
|
|
|
|
|
|
|
|
|
INPUT |
|
|
|
MOVIE |
|
MUSIC |
|
SPORTS |
|
GAME |
|
|
|
|
|
|
||
|
|
|
|
|
MODE |
|
|
|
|
|||||
|
|
|
|
|
|
|
|
|
|
|
||||
|
|
|
|
|
|
|
|
|
|
|
|
|
||
|
|
|
|
|
|
|
|
q Pro Logic II |
|
|
|
|
|
|
|
NIGHT |
qDigital |
DTS |
|
|
AUTO |
|
MOVIE |
MUSIC |
qVS |
|
|
|
|
|
1 |
2 |
|
3 |
4 |
5 |
6 |
7 |
8 |
9 |
|
|
|
|
|
-8 |
-6 |
-4 |
-2 |
0 |
+2 |
|
+4 |
+6 |
+8 |
|
|
|
|
SILENT CINEMA
PREPARATION
9
1 STANDBY/ON
Turn this unit on or set it to the standby mode.
y
While the unit is in the standby mode, the unit consumes a small amount of power.
2 CINEMA DSP buttons
Select CINEMA DSP programs. (page 13)
3 CINEMA DSP indicator
Lights up the icon for the CINEMA DSP program currently selected. (page 13)
4 MODE
Switches the Dolby Pro Logic II modes. (page 13)
5 INPUT
Selects an input source.
0
6 Input indicator
Lights up the input number currently selected.
7 VOLUME
Adjusts the overall volume level.
8 Remote control sensor
Receives signals from the remote control.
9 Status indicator
Shows the input signal type (page 18) or Dolby Pro Logic II mode (page 13) currently selected. Also, you can check the volume level (page 18) when adjusting it.
0  SILENT CINEMA jack
Connects the headphones. (page 14)
3

PREPARATION
■ Remote control
You can control both the AV amplifier (AVC-S30) and DVD player (DVD-S30) with the supplied remote control. Read the following for the function of each button. (The buttons shaded in the illustration below are used to control the DVDS30. For details on DVD-S30 operations, refer to the “DVD-S30 OWNER’S MANUAL”.)
1
STANDBY/ON |
STANDBY/ON |
2 |
|
|
DVD |
|
|
|
ANGLE |
1 |
2 |
3 |
4 |
3 |
SW |
CENTER |
SURR |
ZOOM |
|
|
|
||
5 |
6 |
7 |
8 |
|
REPEAT |
A-B |
AUDIO |
SUBTITLE |
|
9 |
0 |
|
|
4* |
TV |
TV INPUT |
SHIFT |
|
5* |
|
|||
|
|
|
|
|
6* |
|
|
|
DUAL MONO |
TV CH |
|
qVS |
|
|
7 |
|
|
|
|
8 |
ON SCREEN |
|
|
SETUP |
9 |
|
|
|
|
0 |
|
|
ENTER |
|
A |
MENU |
|
|
RETURN |
|
|
|
|
|
TV VOL |
VOLUME |
|
|
MUTE |
|
B* |
|
|
|
|
|
NIGHT |
|
C |
TEST |
L |
R |
|
1 |
2 |
|
D |
|
INPUT |
|
MODE |
3 |
4 |
4 TV 
 *
*
Turns the TV on, or set it to the standby mode.
5 TV INPUT*
Switches the TV inputs.
F
6 TV CH +/–*
Switches the TV channels.
G
H7  (Play)
IStarts disc playback on the DVD-S30.
J8  (Pause)
KPauses disc playback on the DVD-S30.
M |
9 ON SCREEN |
|
|||
Displays the On-Screen Menu on the TV screen while |
|||||
|
|||||
N |
operating the DVD-S30. |
|
|||
|
|
|
|
||
|
0 |
, |
, , , ENTER |
|
|
O |
Operates the On-Screen Menu or specify various |
||||
P |
parameters while operating the DVD-S30. |
||||
|
Press |
|
to slow reverse and press |
to slow forward |
|
Q |
on the DVD-S30. |
|
|||
R |
|
, |
(Search) |
|
|
Fast forwards/fast reverses playback on the DVD-S30 |
|||||
|
|||||
S |
with a specific speed. |
|
|||
MOVIE MUSIC SPORTS GAME
E
*To control your TV with these buttons, you need to set the appropriate remote control code. For details, refer to “DVDS30 OWNER’S MANUAL”.
1Infrared signal transmitter
Sends signals to the units.
2STANDBY/ON (
 )
)
Turns the AVC-S30 on, or set it to the standby mode.
y
This unit consumes a small amount of power during the standby mode.
3 Number buttons (1 to 9, 0)
Input numerals to specify parameters such as track or chapter numbers while operating the DVD-S30.
A MENU
Displays the DVD menu on the TV screen while playing back a DVD on the DVD-S30.
Turns on/off the Playback Control menu on the TV screen while playing back a VCD on the DVD-S30.
BTV VOLUME +/–*
Adjusts the TV volume level.
CTEST
Outputs a test tone. (page 15)
D MODE
Switches between the Dolby Pro Logic II modes. (page 13)
E CINEMA DSP buttons
Selects a CINEMA DSP program. (page 13)
F STANDBY/ON (DVD)
Turns the DVD-S30 on, or set it to the standby mode.
4

G SUBTITLE
Selects the subtitle language of the DVD video while operating the DVD-S30.
H AUDIO
Selects the audio language of the DVD video or the audio channel setting of the VCD and SVCD while operating the DVD-S30.
I SHIFT
While holding down SHIFT, press a button below to enable the corresponding operation.
SW +/–: Adjusts the subwoofer channel volume. (page 16)
CENTER +/–: Adjusts the center speaker channel volume. (page 16)
SURR +/–: Adjusts the surround speaker channel volume. (page 16)
ANGLE: Selects the disc viewing angle while operating the DVD-S30.
ZOOM: Selects the zoom setting of the DVD while operating the DVD-S30.
REPEAT: Enables the Repeat Play mode on the DVDS30.
A–B: Enables the A-B Repeat mode on the DVD-S30.
JqVS (Dolby Virtual Speaker)
Turns on/off the DVS mode. (page 13)
KDUAL MONO
This button is not used for U.K., Australia, and Asia models.
L  ,
,  (Skip)
Skips to the start of current track or next track while operating the DVD-S30.
Press and hold  to fast reverse or
  to fast forward disc playback on the DVD-S30.
M 
 (Stop)
Stops disc playback on the DVD-S30.
N SETUP
Displays or closes the Setup menu on the TV while operating the DVD-S30.
O RETURN
Returns the DVD menu to the previous screen while operating the DVD-S30.
P MUTE
Turns off the volume.
Q VOLUME +/–
Adjusts the overall volume level.
PREPARATION
R NIGHT
Turns on/off the Night Listening mode. (page 14)
S INPUT buttons
Select an input source.
L/R buttons
While a test tone is output, press L to set the orientation of the virtual surround speaker (L), and press R to set the orientation of the virtual surround speaker (R). (page 16, 17)
PREPARATION
5
PREPARATION
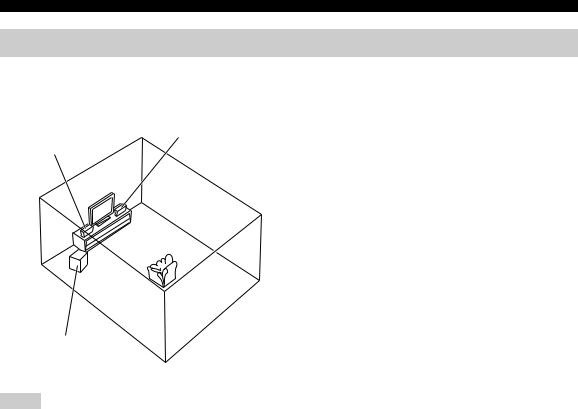
Placing the Speakers
To enjoy quality sounds thoroughly, you need to place the speakers in their appropriate positions and install them correctly. After deciding the speaker layout, follow the procedure below to install the speakers.
|
Satellite speakers (L, R) (NX-S30) |
|
Satellite speaker (R) |
Place the left/right speakers on both sides of your TV at equal |
|
Satellite speaker (L) |
distances. We recommend that you place the speakers at the |
|
height of your ears at the listening position, and keep the speakers |
||
|
||
|
at least 80 cm (2’ 6”) apart while they are placed 80 cm (2’ 6”) |
|
|
away from the side walls. |
|
|
Main roles: Produces front channel (stereo) sounds. Also |
|
|
produces center channel sounds (dialogues or vocal sounds) and |
|
|
surround channel sounds effectively using the Yamaha Air |
|
|
Surround system. |
Subwoofer (NX-SW30)
Place the subwoofer near a front speaker and turn it slightly toward the center of the room to reduce wall reflections. Main roles: Produces bass sounds and low frequency (LFE) sounds contained in Dolby Digital or DTS.
Subwoofer
Notes
•Be sure to place the satellite speaker (L) on the left of the TV and the satellite speaker (R) on the left of the TV since the speakers are not symmetrical. Check the (L) and (R) marks printed on the back of each speaker to identify them.
•To create better acoustic field, you need to place the satellite speakers properly and adjust the orientation of the virtual surround speakers suited for your listening environment. Also, the arrangement of furniture affects the acoustic field. For details, refer to “Adjusting the Orientation of the Virtual Surround Speakers” (page 16).
•If the speakers interfere with TV reception, noises may appear on the TV screen. In such a case, move the speakers a little away from the TV.
•Bass sounds produced by the subwoofer may be heard differently depending on the listening position and subwoofer location. To enjoy desired sounds, try to change the location of the subwoofer according to the listening position.
6
Loading...