


smart |
Yale Smart Home |
Living |
Alarm Manual |
|
SR-310 • SR-320 • SR-330 • SR-340 |
Installation · Programming · Operating
Keep this manual safe for reference and future maintenance
Thank you for choosing the Yale Smart Home Alarm System. This simple to install system has been designed with the user in mind.
All the components are self contained and no wired connections are needed between the units. There is no need to damage the home decor, lift carpets or run cables.
You can install up to 20 devices (Max. 6 PIR Image / Video Cameras) in this system. As well as extra Door/Window Contacts, PIR Motion Detectors and Smoke Detectors, you can add Key Fob remote controls for added control convenience.
Regular testing and battery changes (when notified by the system) will ensure reliability and peace of mind.
There is no need to wire into the mains supply or seek the services of a qualified electrician. The Smart Hub is powered by an adaptor and all other components are powered by battery (all batteries included).
All accessories are ‘tamper’ protected. Any unauthorised tampering with these items when the system is armed will result in the alarm being triggered.
For more information on this product and Yale Smart Living Range visit www.yale.co.uk/smart-living
Consumer Support: info@yale.co.uk
Contents
1. Location planning |
2 |
2. Un-pack all the parts |
4 |
3. Initial set-up |
5 |
3. Additional accessories |
6 |
4. Mounting devices |
8 |
5. Using the system |
10 |
6. About your Alarm System |
12 |
7. Using accessories |
13 |
8. Changing the batteries |
15 |
9. Troubleshooting |
17 |
10. Specifications |
19 |
Recommended Installation Sequence
We recommend you follow the simple install sequence, headings numbered 1-5.
|
The 2 year guarantee for this Yale Smart |
2 |
Home Alarm Kit is active from the date |
of purchase (A copy of this guarantee is |
available on our website).
Please register online within 12 months of purchase at
www.yale.co.uk/registeryourproduct
Information and illustrations are subject to change within this document. Yale reserves the right to alter the specification and product design at anytime without notice. Yale® is a registered trademark. © 2016 ASSA ABLOY. All rights reserved.
Issue No: 1A

1Location Planning
Work out the best places to locate the devices for maximum protection. Having chosen the locations do not mount at this stage.
Home and Away Mode Planning
The Home Arming mode allows the premises to be part armed so that no one can get inside without warning the occupier, yet the person already inside the house can move freely without triggering the alarm. For example the downstairs of a house can be armed while upstairs can be disarmed allowing the user to go to bed without causing an alarm.
If this feature is to be used, then it should be planned now, before installation.
Decide what areas can be occupied when in Home Arming mode, the sensors for these areas should have its attribute set to “Home Omit” (see page 10 and 12); and the sensors activated on the path to access the Key Pad should be to be set to “Home Access”.
Operating Range
All devices must be within 30 metres of the Smart Hub and must not be mounted on or near large metal objects. Avoid obvious sources of electrical interference such as fridges and microwave ovens.
Tamper Switches
When mounting devices ensure that any tamper switches close fully. On uneven surfaces it may be necessary to place packing behind the switch for reliable operation.
Extend the System
Extend the system in the future to increase your security or as your needs change.
For example, add extra PIR Motion Detectors and extra Door/Window Contacts.
You can add upto 20 devices, of which a maximum of 6 of these could be PIR Image or PIR Video Cameras.
Choosing Location
To minimise interference, avoid locating devices close to metal framework, glass, electrical appliances (especially wireless devices) and electric cables.
Please note that the presence of high density material (metal, glass etc) in the transmission path will significantly reduce the wireless transmission range.
Key Pad
When used as a secondary Key Pad, it is ideal for use in bedrooms or at the top of a stairwell so the ground floor can be armed when going to bed for the night, or, at a side or back door for alternative entry point.
•Mount at chest height for ease of use
•Designed for indoor use only
•Key Pad should be accessible from a protected entry/exit point
•Ensure that the Key Pad is not visible from the outside of the premises.
Panic Button
The Panic Button provides extra protection for you and your family. When help is needed the Panic Button can activate your alarm immediately - even when the system is disarmed.
•Mount at chest height for ease of use
•Mount on flat wall surface
•Designed for indoor use only
•Out of reach of children
•Hidden from view while easily accessible.
Yale |
|
|
1 |
2 |
3 |
4 |
5 |
6 |
7 |
8 |
9 |
|
0 |
|
2

2 |
3 |
5 |
6 |
8 |
9 |
0 |
|
Smoke Detector
•Mount in the middle of the ceiling at the top of a stairwell, or on the centre of hallway ceilings where smoke would most likely be detected.
•Do not mount in corners or above cooking appliances and heaters.
•Install additional detectors if there are closed doors preventing smoke from reaching detectors.
Yale
PIR Motion Detector or PIR Image Camera
•Mount in a position such that an intruder would normally move across the PIRs field of view.
•Height should be between 1.9 and 2 metres above floor level.
•Location in a corner will ensure wider room coverage.
•Do not mount the PIR where its field of view will be obstructed e.g. by curtains, ornaments etc.
•Do not point directly at sources of heat e.g. fires or boilers, and do not position directly
above radiators.
•Avoid mounting the PIR directly facing a window.
•Do not point the PIR at a door protected by a Door/Window Contact.
External Siren
Choose a position on an external wall where the siren would be most prominent. Mount as high as possible, out of easy reach.
Door/Window Contact
Select a door that will be the main point of entry and exit, usually your front door.
•Mount as high as possible
•Do not aim a PIR at this door or window
Key Fob
Can be used inside or outside the property and can be kept on your keyring.
Smart Hub 2.0
•This Smart Hub is the brains of your Smart Home Alarm System. All accessories wirelessly connect to the Smart Hub.
•Ensure it is hidden from view.
•Access to mains socket and broadband internet router required.
3
2Unpack all the parts
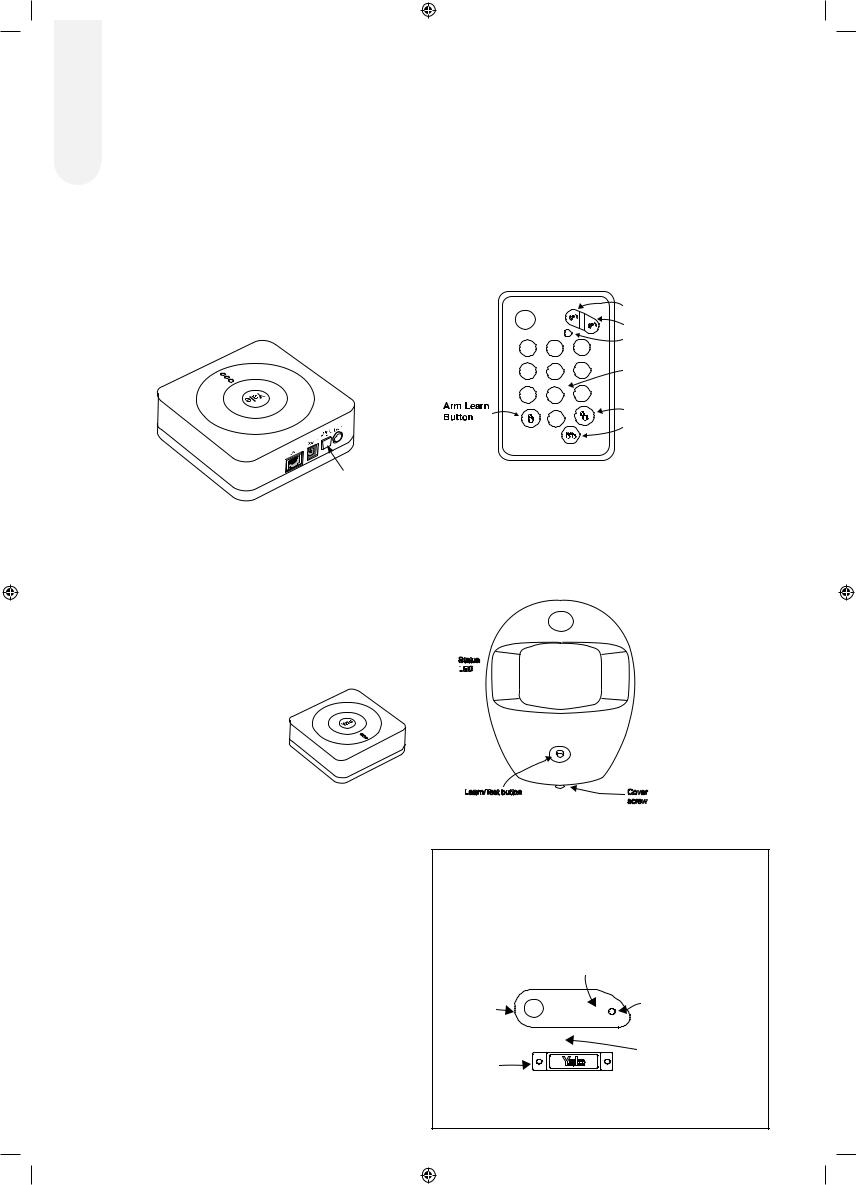
Smart Hub 2.0
1.Unpack the kit content on a table. Remove the mounting plate (if fitted) from the Smart Hub by sliding plate downwards. A power adaptor is supplied that plugs into the main wall socket and Smart Hub. Plug in the power adaptor and connect the Smart Hub to your internet router using the cable provided.
Battery Switch
Cover
2.In addition to the adapter, there is a rechargeable battery inside the Smart Hub that serves as a backup in case
of a power failure. A fully charged battery can provide backup standby power for a period of approximately 5 hours. It takes approximately 72 hours to fully charge the battery. The battery must always be turned on.
3.Remove the rubber battery switch cover and locate the battery switch. Switch ON the internal battery and replace the rubber cover.
Smart Hub LED’s
Top LED Green = Linked to the
Server/Internet
Top LED not lit = No link to the
Server/Internet
Middle LED Yellow = System Fault
Further details can be found in the App
Middle LED not lit = System OK
Bottom LED solid red = System Armed
Bottom LED flashing red = System part Armed
Bottom LED not lit up = System Disarmed
4
Key Pad EF-KP
1.Pull out the plastic battery saver tab at the back of the Key Pad. This will activate the batteries.
|
Yale |
|
|
Panic button A |
|
|
|
Panic button B |
|
|
|
|
|
|
|
1 |
2 |
3 |
LED |
|
Learn button= |
|||
|
4 |
5 |
6 |
|
|
Press 8 and 9 together |
|||
Away |
7 |
8 |
9 |
Disarm |
/ |
|
0 |
|
|
|
|
|
HomeArm |
|
|
|
|
|
2.All accessories in the kit box are already pre-learned to the system.
PIR Motion Detector EF-PIR
1.Pull out the plastic pull tab on the back of the PIR. This will activate the batteries.
Yale
Status
LED

Learn/Test button |
Cover |
|
screw |
2. All accessories in the kit box are already pre-learned to the system.
Not Included in the Starter Kit
Door/Window Contact EF-DC
(SR-320, 330 & 340 Kits)
1. Pull out the battery saver tab on the side to activate
the battery. |
|
LED |
Sensor |
Yale |
Learn/Test |
button |
||
|
|
Gap no more |
Magnet |
|
than 10mm |
2. All accessories in the kit box are already pre-learned to the system.
3 |
Additional Accessories |
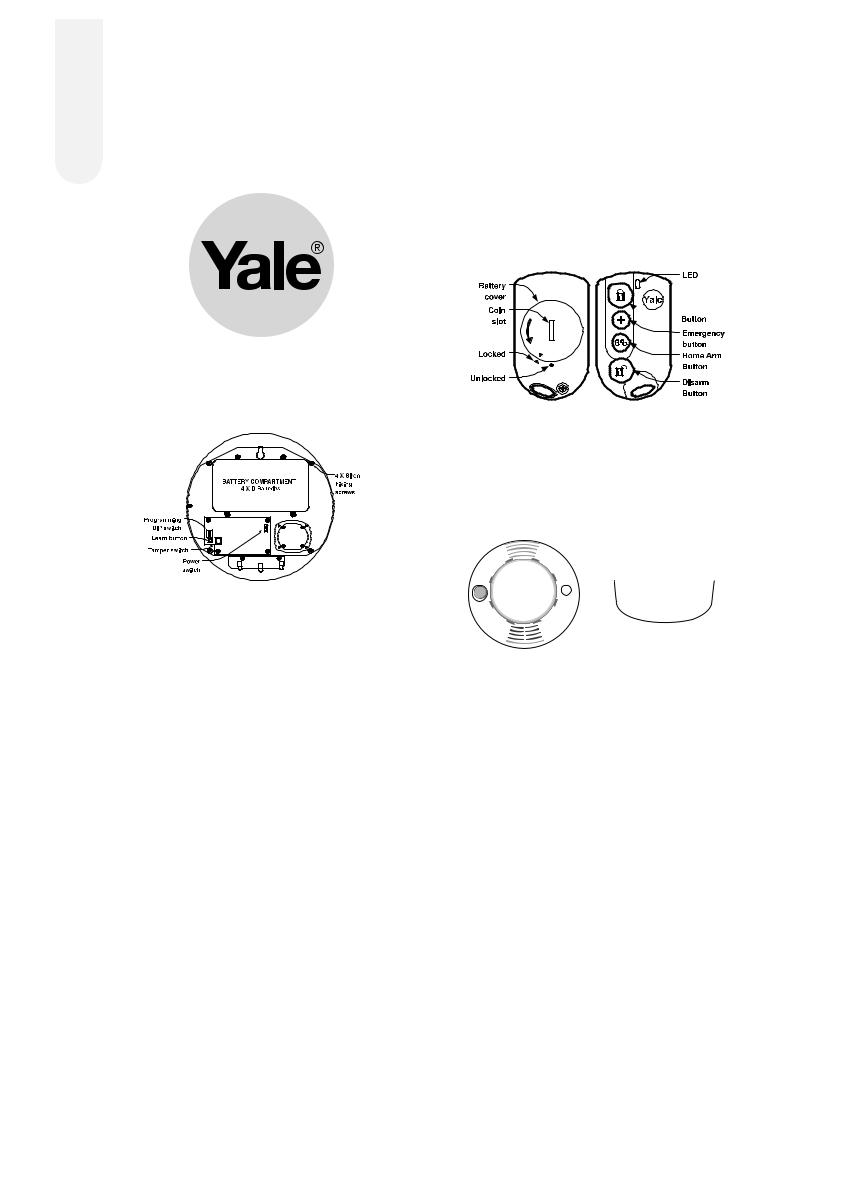
External Siren EF-BX (SR-320, 330 & 340 kits) Keyfob EF-KF (Sold Separately) |
WARNING
The Siren is very loud, be prepared! Take care not to activate the Siren tamper switch unnecessarily.
•Remove the cover by unscrewing the single screw located on the lid. Power switch to ON position.
Smart Home Alarm Accessories:
•Insert AA/AAA batteries (supplied). Power Switch does not require any battery.
PIR Image Camera SR-PC PIR Video Camera SR-PVC
(SR-330 & 340 Kits & |
(Sold Separately) |
Sold Separately) |
1. Open back of PIR Video |
1. Pull out the plastic tab on |
Camera to insert batteries. |
the back of the PIR Image |
|
Camera activate batteries. |
|
1.Open the battery compartment using a coin by turning cover in the direction of the big arrow so the small arrow is next to round dot.
2.Insert CR2032 battery (supplied) and replace cover.
Away


 /
/


Smoke Detector EF-SD (Sold Separately)
1.Remove the cover and insert three AA batteries (supplied)
2.The Smoke Detector will now enter into self-calibration mode for 10 minutes. It will resume normal operation after this period.
|
Learn/Test |
LED |
Button |
Yale
Panic Button EF-PB (Sold Separately)
Remove the cover by loosening the fixing screw and insert the CR2032 battery (supplied) as shown (1). Please ensure you observe battery polarity and insert the battery under the two tabs and click into place (see image on page 16)
 Learn/Test button
 Flash light

 Camera
2.Learn: Hold for 10 seconds Test: Hold for 1 second
Flash light
Camera
Learn/Test button
2.Learn: Hold for 10 seconds Test: Hold for 1 second
Power Switch SR-PS
(SR-340 Kits & Sold Separately)
1
Panic/Learn button
PET PIR Detector EF-PETPIR
(Sold Separately)
Yale
Status
L
 ED
ED
On/Off, Test &
Learn button
1. Learn: Hold for 10 seconds Power On/Off:
Press & release Test: Press & release
Learn/Test button |
Cover |
|
screw |
This pet friendly accessory will activate the alarm when large motion is detected. Ideal for homes with one small pet (less than 25kg). Please note when used with large pets there is an increased possibility of false alarms. In these scenarios use a Door/Window Contact to protect the area instead.
5
Initial set-up
Please ensure all devices are powered and operational at this point.
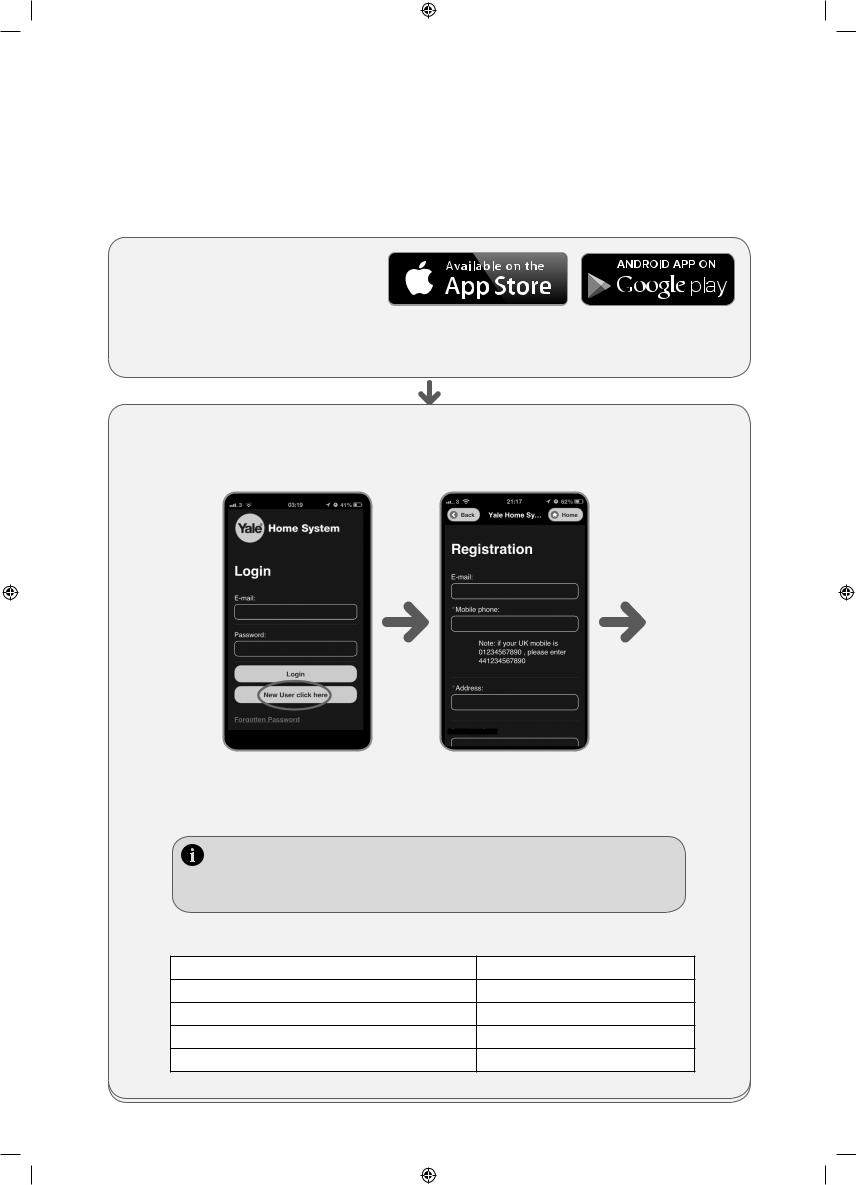
Download Yale App (Smartphone)
Search term in App Store: Yale Home System
Compatibility: iOS 9, Android 4.2+
Internet Connection: Required on Smartphone
First time registration
Start The Yale Home System App on your phone. *Due to continuous improvement, please note that the graphic may differ from shown.
Select
New user click here
Further down on this start page you can set Language.
Panel MAC / Serial Number:
Enter your details
Panel Serial Number can be found on the Smart Hub sticker.
If you encounter errors, it is due to the Smart Hub not communicating with our server. Please see troubleshooting “Warning LED” (see page 18). You will be asked to setup a password when registration is successful. Please use your email and this new password to login via the front page.
Recording your set-up information
E-mail used to set up system:
Smart Security Hub 2.0 serial number
Phone number used for notifications:
Keypad PIN Code for Disarm/Arm (default 1234):
Keypad code for keypad setting (default 0000):
Make sure you keep this manual in a safe and convenient place for future reference.
6
 Loading...