


Book Version 1.0
February 2017
702P04572
®
Xerox
Versant
User Guide
®
180 Press

©2017 Xerox Corporation. All rights reserved. Xerox®, Xerox and Design®, FreeFlow®,
SquareFold®, CentreWare®and Versant®are trademarks of Xerox Corporation in the
United States and/or other countries.
Adobe PDF is a registered trademarks of Adobe Systems, Inc. PostScript is an Adobe
registered trademark used with the Adobe PostScript Interpreter, the Adobe page
description language, and other Adobe products.
Fiery®and EFI™are trademarks or registered trademarks of Electronics For Imaging, Inc.
GBC®and AdvancedPunch™are trademarks or registered trademarks of General Binding
Corporation.
Microsoft, Windows, Windows XP, Windows Vista, Internet Explorer, and Word are
registered trademarks of Microsoft Corporation in the United States and/or other
countries.
3-IN-ONE®and WD-40®are a registered trademarks of the WD-40 Company.
BR4005

Table of Contents
1 Product Symbols........................................................................................1-1
2 Getting Started..........................................................................................2-1
Print Server Overview..........................................................................................................2-1
Press Components...............................................................................................................2-1
Locating the Press Serial Number....................................................................2-2
User Interface (UI).................................................................................................2-3
Features......................................................................................................................2-4
Logon.............................................................................................................2-4
Language ....................................................................................................2-5
Optional Performance Package...........................................................2-5
Power On/Off.........................................................................................................................2-7
The Power Switches...............................................................................................2-7
Power On/Off the Press........................................................................................2-8
Power On the Press...................................................................................2-8
Power Off the Press...................................................................................2-8
Power Saver...............................................................................................................2-8
Low Power Mode.......................................................................................2-8
Sleep Mode..................................................................................................2-9
Exiting Power Saver..................................................................................2-9
Getting Help...........................................................................................................................2-9
Help on the Xerox Web Site................................................................................2-9
Print Server Customer Documentation..........................................................2-9
3 Press Apps.....................................................................................................3-1
Print...........................................................................................................................................3-1
Print Job Submission.............................................................................................3-1
Printing from a Computer...................................................................................3-1
Printing a Job from the Print Server................................................................3-2
Printing from the FreeFlow Print Server............................................3-2
Printing from the EX Print Server.........................................................3-2
Printing on Tabs from the Print Server...........................................................3-3
Basic Procedure for Printing on Tabs from a Print
Server...................................................................................................3-3
Tips for Printing on Tabs from the EX Print Server.......................3-3
Copy..........................................................................................................................................3-4
Document Feeder and Glass..............................................................................3-4
Document Feeder Tips............................................................................3-4
User Guide
iXerox®Versant®180 Press

Table of Contents
Document Glass.........................................................................................3-4
Basic Copying Steps..............................................................................................3-4
Basic Copying with the Document Feeder (DADF)......................3-4
Basic Copying with the Document Glass.........................................3-5
Selecting Copy Options for a Third-Party Finishing
Device..................................................................................................3-5
Copy Feature............................................................................................................3-6
Copy Feature Overview...........................................................................3-6
Reduce/Enlarge..........................................................................................3-7
Paper Supply...............................................................................................3-8
Output Color................................................................................................3-8
Copy Output................................................................................................3-9
2 Sided Copying.........................................................................................3-9
Original Type............................................................................................3-10
Darken/Lighten........................................................................................3-11
Image Quality Feature......................................................................................3-11
Image Quality Feature Overview.....................................................3-11
Selecting Image Quality Options.....................................................3-11
Original Type............................................................................................3-12
Image Options.........................................................................................3-12
Image Enhancement............................................................................3-13
Color Effects..............................................................................................3-13
Color Balance...........................................................................................3-14
Color Shift..................................................................................................3-14
Layout Adjustment Feature.............................................................................3-14
Layout Adjustment Feature Overview............................................3-14
Selecting Layout Adjustment Options...........................................3-15
Book Copying...........................................................................................3-15
2 Sided Book Copying...........................................................................3-16
Original Size..............................................................................................3-16
Edge Erase.................................................................................................3-16
Image Shift...............................................................................................3-17
Image Rotation.......................................................................................3-17
Invert Image............................................................................................3-18
Original Orientation...............................................................................3-18
Output Format Feature......................................................................................3-18
Output Format Feature Overview....................................................3-18
Selecting Output Format Options....................................................3-19
Booklet Creation.....................................................................................3-20
Covers..........................................................................................................3-21
Page Layout..............................................................................................3-22
Xerox®Versant®180 Pressii
User Guide

Table of Contents
Poster...........................................................................................................3-22
Annotations..............................................................................................3-22
Watermark.................................................................................................3-23
Tab Margin Shift.....................................................................................3-23
Face Up/Down Output..........................................................................3-24
ID Card Copy............................................................................................3-24
Transparency Options...........................................................................3-25
Folding (optional)...................................................................................3-25
Job Assembly Feature........................................................................................3-26
Job Assembly Feature Overview.......................................................3-26
Build Job.....................................................................................................3-26
Sample Job................................................................................................3-27
Combine Original Sets..........................................................................3-28
Delete Outside/Delete Inside............................................................3-28
Scan........................................................................................................................................3-29
Scan Overview.......................................................................................................3-29
Basic Scanning......................................................................................................3-30
Basic Scanning Procedure...................................................................3-30
Previewing Scanned Images..............................................................3-31
Changing Scan Settings/Options.....................................................3-31
Canceling a Scan Job............................................................................3-31
Stopping a Scan Job..............................................................................3-31
Scan Options..........................................................................................................3-32
Scan Options Overview.........................................................................3-32
Basic Scan Options.................................................................................3-32
Advanced Settings.................................................................................3-33
Layout Adjustment................................................................................3-35
E-mail Options.........................................................................................3-36
Filing Options...........................................................................................3-39
Resolving a File Name Conflict.........................................................3-40
E-mail........................................................................................................................3-41
E-mail Overview.......................................................................................3-41
E-mail Components...............................................................................3-41
Scanning to an E-mail Address.........................................................3-42
Network Scanning...............................................................................................3-43
Network Scanning Overview..............................................................3-43
Network Scanning Components.......................................................3-43
Network Scanning Procedure............................................................3-44
Scan to PC...............................................................................................................3-44
Scan to PC Overview..............................................................................3-44
Scan to PC Components......................................................................3-44
User Guide
iiiXerox®Versant®180 Press

Table of Contents
Send from Folder (Folder / File Management)......................................................3-52
Job Flow................................................................................................................................3-57
Web Applications..............................................................................................................3-62
How to Use the Scan to PC Feature................................................3-45
Store to Folder.......................................................................................................3-47
Store to Folder Overview......................................................................3-47
Store to Folder Components..............................................................3-47
Using the Store to Folder Feature....................................................3-47
Store to USB...........................................................................................................3-47
Store to USB Overview.........................................................................3-47
Using the Store to USB Feature........................................................3-48
Store and Send Link Feature (Send to Folder)..........................................3-49
Store and Send Link (Send to Folder) Overview.........................3-49
Storing and Sending a Link (Sending to Folder)........................3-50
Store to Web Services for Devices (WSD)...................................................3-50
Store to WSD Overview........................................................................3-50
How to Use the Store to Web Services for Devices (WSD)
Feature..............................................................................................3-51
Send from Folder (Folder / File Management) Overview.....................3-52
File Options............................................................................................................3-52
Managing Folders and Scanned Files..........................................................3-54
How to Configure/Start a Job Flow..............................................................3-54
Configuring/Starting a Job Flow......................................................3-54
Using Send from Folder to Link a Job Flow Sheet to a
Folder.................................................................................................3-56
Job Flow Overview...............................................................................................3-57
Job Flow Settings and Options.......................................................................3-58
Overview of Job Flow Options...........................................................3-58
Additional Job Flow Options..............................................................3-58
Sheet Filtering Options.........................................................................3-59
Send as E-mail Options........................................................................3-59
Transfer via FTP (1) / Transfer via FTP (2) Options...................3-59
Transfer via SMB (1) / Transfer via SMB (2) Options................3-60
Print Options.............................................................................................3-60
E-mail Notification Options................................................................3-60
Job Flow Procedures...........................................................................................3-60
Creating a Job Flow Sheet..................................................................3-60
Linking a Job Flow Sheet with a Folder..........................................3-61
Starting a Job Flow Manually............................................................3-62
Confirming/Changing a Job Flow....................................................3-62
Web Applications Overview.............................................................................3-62
Accessing Web Applications............................................................................3-63
Xerox®Versant®180 Pressiv
User Guide

Table of Contents
Job Status.............................................................................................................................3-63
Job Status Overview............................................................................................3-63
Job Status Area.....................................................................................................3-63
Active Jobs Tab.....................................................................................................3-63
Completed Jobs Tab............................................................................................3-63
Machine Status..................................................................................................................3-64
Machine Status Overview.................................................................................3-64
Device Information Tab....................................................................................3-64
Faults Tab................................................................................................................3-65
Supplies Tab...........................................................................................................3-66
Billing Information Tab......................................................................................3-66
Accessing Billing Information............................................................3-66
Billing Impressions Information.......................................................3-66
Usage Counters.......................................................................................3-67
Tools Tab..................................................................................................................3-68
Changing the Paper Tray Attributes.............................................................3-69
4 Paper and Media.......................................................................................4-1
Supported Paper...................................................................................................................4-1
Paper Specifications..............................................................................................4-1
Paper Tray Information........................................................................................4-3
Throughput / Productivity Information ........................................................4-3
Loading Media in Trays 1, 2, and 3...............................................................................4-5
Information About Loading Media in Trays 1, 2, and 3..........................4-5
Loading Paper in Trays 1, 2, and 3...................................................................4-5
Loading Tab Stock in Trays 1, 2, and 3...........................................................4-6
Loading Transparencies in Trays 1, 2, and 3................................................4-7
Loading Pre-drilled Stock in Trays 1, 2, and 3..............................................4-7
Loading Media in the Bypass (Tray 5).........................................................................4-8
Loading Paper in the Bypass (Tray 5).............................................................4-9
Loading Tab Stock in the Bypass (Tray 5).....................................................4-9
Loading Transparencies in the Bypass (Tray 5).......................................4-10
Loading Pre-drilled Stock in the Bypass (Tray 5).....................................4-10
Loading Envelopes in the Bypass (Tray 5).................................................4-11
5 Maintenance...............................................................................................5-1
Cleaning the Press Overview............................................................................................5-1
Cleaning the Exterior............................................................................................5-1
Cleaning the Document Cover and Glass.....................................................5-1
Cleaning the Document Feeder Rollers.........................................................5-3
Cleaning the Drum Drawer Area......................................................................5-4
Cleaning the ROS Windows................................................................................5-4
User Guide
vXerox®Versant®180 Press

Table of Contents
Cleaning the Fuser Assembly.............................................................................5-5
Replacing Consumable Supplies....................................................................................5-5
Ordering Supplies...................................................................................................5-6
Checking the Status of Consumables.............................................................5-7
Replacing a Dry Ink/Toner Cartridge..............................................................5-7
Replacing the Dry Ink/Toner Waste Bottle...................................................5-8
Replacing a Drum Cartridge...............................................................................5-9
Replacing the Suction Filter.............................................................................5-11
6 Troubleshooting.........................................................................................6-1
General Troubleshooting..................................................................................................6-1
Reducing Toner Consumption...........................................................................6-7
Image Quality Problems...................................................................................................6-8
Custom Paper Settings Troubleshooting.................................................................6-11
Custom Paper Settings - Default Settings..................................................6-20
Paper Jams...........................................................................................................................6-27
Paper Jams Overview..........................................................................................6-27
Information about Paper Jams......................................................................6-27
Jam Recovery Offset Feature..........................................................................6-27
Setting Up the Jam Recovery Offset Feature..............................6-28
Paper Jams in the Document Feeder...........................................................6-29
Document Feeder Jams.......................................................................6-29
Document Jams Under the Document Feeder Belt..................6-31
Press Paper Jams..................................................................................................6-31
Paper Jams Inside the Press...............................................................6-31
Paper Jams in Trays 1-3.......................................................................6-33
Paper Jams in the Bypass (Tray 5)................................................................6-33
Paper Jams in the Standalone Bypass (Tray 5)..........................6-33
Troubleshooting Help......................................................................................................6-34
Locating the Press Serial Number.................................................................6-34
Calling for Service................................................................................................6-34
Fuser Hints and Tips.........................................................................................................6-35
Extending Fuser Life............................................................................................6-35
Preventing Fuser Damage................................................................................6-35
Fuser Paper Width Information.....................................................................6-35
7 Specifications..............................................................................................7-1
First Print-Out Time.............................................................................................................7-2
Press Warm-up Time...........................................................................................................7-2
Document Feeder Specifications...................................................................................7-2
Copy Specifications.............................................................................................................7-2
Scan Specifications.............................................................................................................7-4
Xerox®Versant®180 Pressvi
User Guide

Table of Contents
Environmental Specifications.........................................................................................7-5
User Guide
viiXerox®Versant®180 Press

Table of Contents
Xerox®Versant®180 Pressviii
User Guide
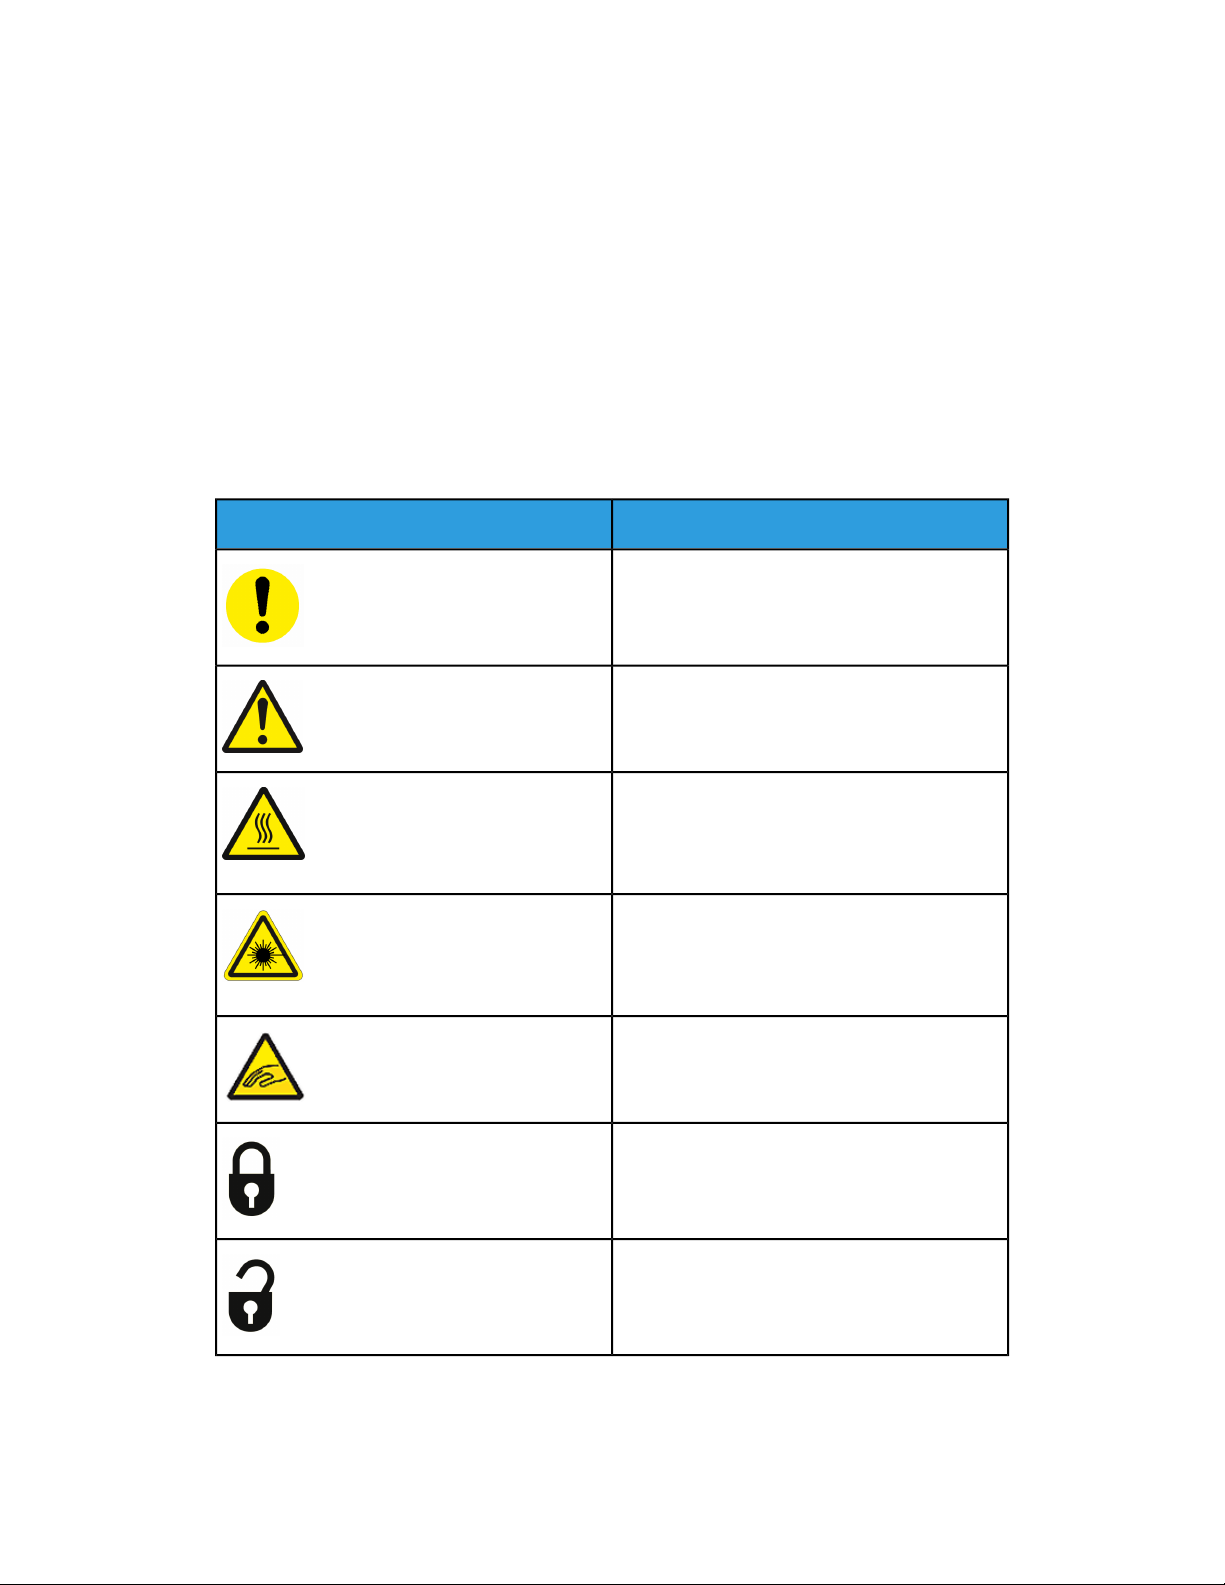
Product Symbols
DefinitionSymbol
Caution
This symbol indicates a mandatory action to
take in order to avoid damage to these areas.
Warning
This symbol alerts users to areas where there
is the possibility of personal injury.
Hot Warning
This symbol alerts users to areas where there
are heated surfaces which should not be
touched.
1
User Guide
Laser Warning
This symbol indicates a laser is being used and
alerts the usertorefertotheappropriate safety
information.
Pinch Hazard
This warning symbol alerts users to areas where
there is the possibility of personal injury.
Lock
Unlock
1-1Xerox®Versant®180 Press

Product Symbols
DefinitionSymbol
Do Not Touch
Do Not Touch the Drum Cartridge
To avoid damage, do not touch the surface of
the Drum Cartridge.
Do Not Dispose into an Open Flame / Incinerate
Do Not Incinerate the Toner Cartridge
Always refer to the recycling instructions for
your region / marketplace for correct disposal
information and procedures.
Do Not Incinerate the Toner Waste Bottle
Do Not Incinerate the Drum Cartridge
Do Not Incinerate the Second Bias Transfer
Roll
Ground / Common / Earth Terminal
LAN
Local Area Network
USB
Universal Serial Bus
Xerox®Versant®180 Press1-2
User Guide

Product Symbols
DefinitionSymbol
Keep Area Clear
Do not store any objects in this location.
Keep Area Clear
Do Not Use Transparencies with a White Strip
/ Overhead Projector Sheets with a White
Strip
Do Not Use Envelopes with Open Flaps
Do Not Use Folded, Creased, Curled, or
Wrinkled Paper
Do Not Use Ink Jet Paper
Do Not Load Postcards in the Indicated Direction
Do Not Use Media Attached with Staples or
Paper / Metal Clips
Do Not Copy Money
User Guide
1-3Xerox®Versant®180 Press
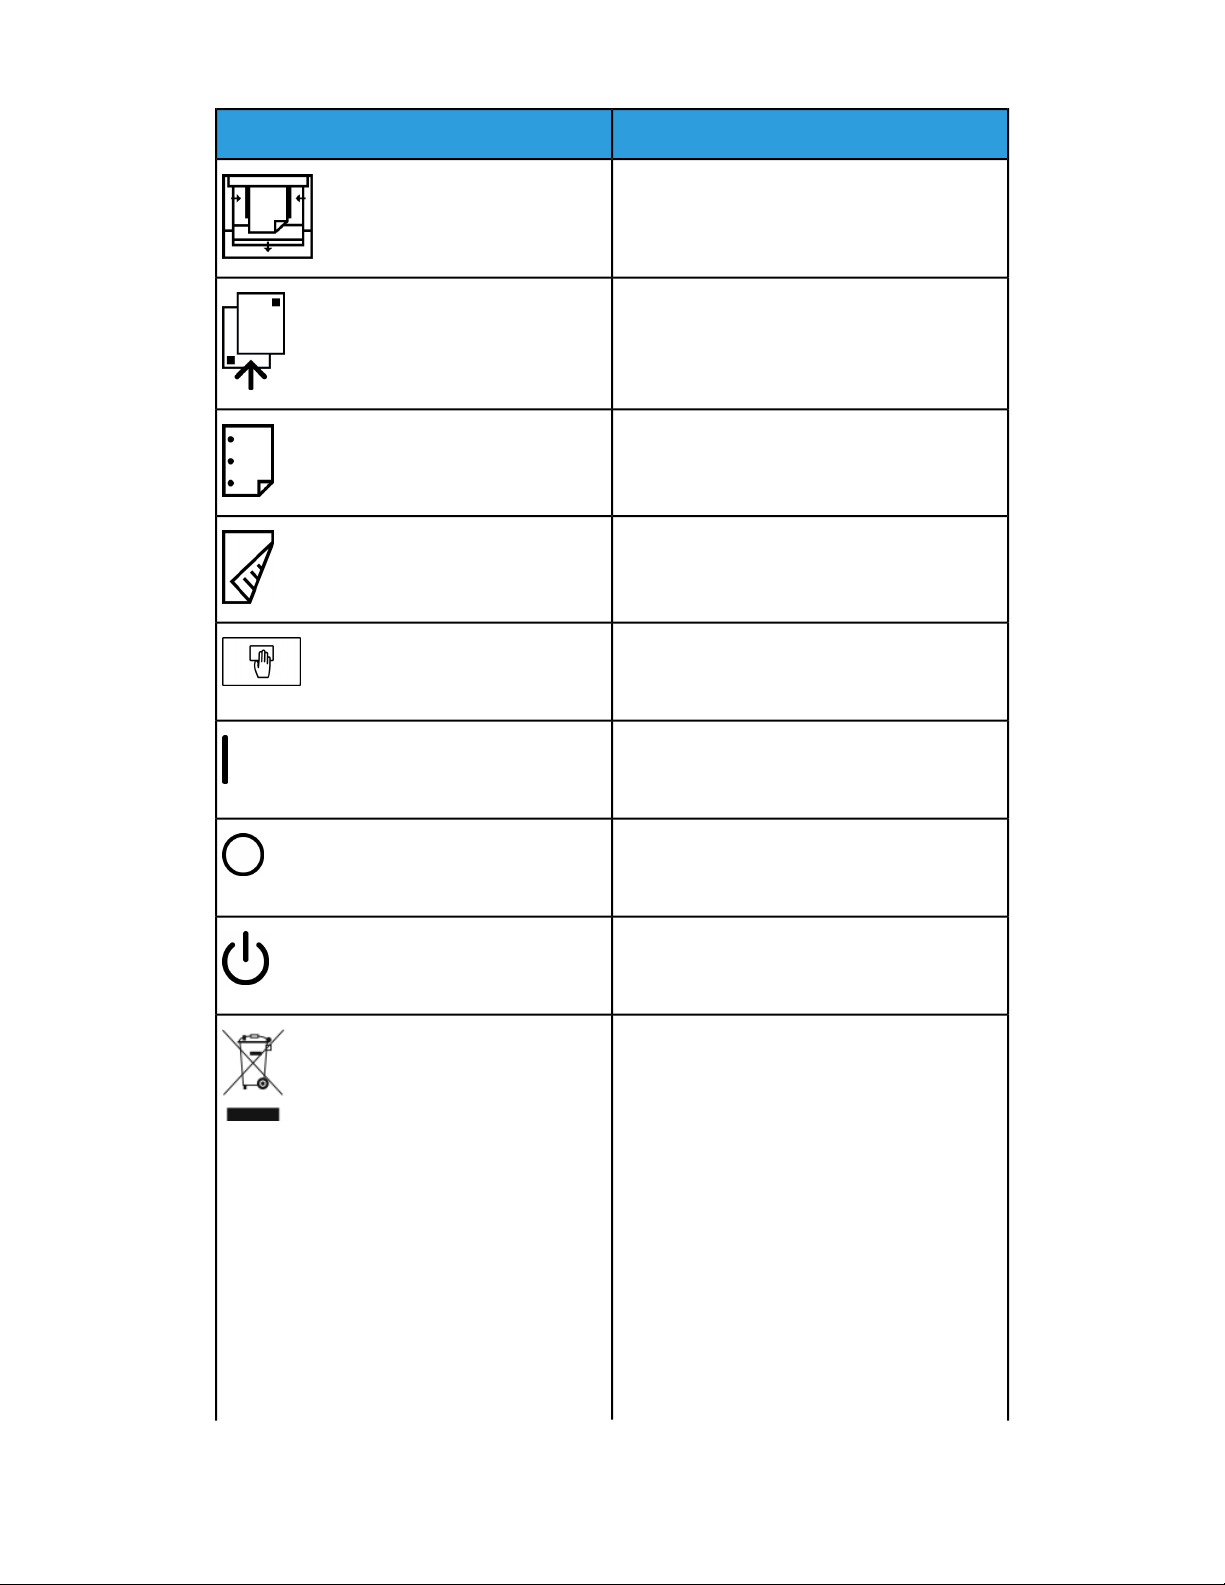
Product Symbols
DefinitionSymbol
Tray Guides Must Touch Media
Load Postcards in the Indicated Direction
Load Hole-punched Paper as Indicated
Load Media / Documents Face Down
IC Card Reader
Integrated Circuit Card Reader / Smart Card
Reader / Chip Card Reader
On
This symbol indicates the main power switch is
in the ON position.
Off
This symbol indicates the main power switch is
in the OFF position.
Standby
This symbol indicates the secondary power
switch is in the Standby position.
Do Not Dispose in Normal Household Waste
Stream
• Application of this symbol is confirmation
that you should not dispose of items, such
as Customer Replaceable Units (CRUs), in
the normal household waste stream. You
must dispose of these items in compliance
with agreed national procedures.
• This symbol often accompanies batteries
and indicates that used electrical and electronic products and batteries should not be
mixed with general household waste.
• For more information about collection and
recycling, please contact your local municipality, your waste disposal service, or the
Xerox®Versant®180 Press1-4
User Guide

Product Symbols
DefinitionSymbol
point of sale where you purchased the
items.
User Guide
1-5Xerox®Versant®180 Press

Product Symbols
Xerox®Versant®180 Press1-6
User Guide

2
Getting Started
The Xerox®Versant®ColorPress is a full color/black and white, auto-duplex copier/printer
that operates at a speed of 80 prints per minute (when printing on 8.5 x 11 inch/A4
paper).
Print Server Overview
The print server networked with your press accepts, processes, and manages document
files for job submission to the press.
One of the following print servers may be used with your press:
• Xerox®FreeFlow®Print Server
• Xerox®EX Print Server, Powered by Fiery
• Xerox®EX-P Print Server, Powered by Fiery
®
®
Note
For detailed information on your specific print server, refer to the customer
documentation that was delivered with it. Documentation may also be downloaded
from www.xerox.com by searching for the press and selecting the Support link.
Press Components
User Guide
2-1Xerox®Versant®180 Press

Getting Started
1 Bypass Tray
The Bypass Tray is also called Tray 5 or Multisheet Inserter; the tray accommodates
all types of stock in various sizes and weight ranges.
Note
The mounting location for the Bypass tray varies when optional feeding devices are
added to the machine configuration.
2 User Interface (UI)
The User Interface (UI) consists of the touch screen and control panel with the buttons
and keypad.
3 Duplex Automatic Document Feeder (DADF)
Automatically feeds 1- and 2-sided original documents. A maximum of 250 two-sided
documents can be scanned at one time.
4 Offset Catch Tray (OCT)
This tray receives the completed print job. Output print sheets can be offset for easy
separation. The maximum capacity of the OCT is determined by the tray sensor as well
as stock weight, but is approximately 500 sheets of 24 lb. (90 gsm) paper.
Note
Offsetting per set in the stack continues up to the point when the tray reaches the
maximum height or weight allowed.
5 Dry Ink/Toner Waste Bottle Door
Open this door to access the waste bottle when replacement of the bottle is required.
6 Trays 1-3
Trays 1, 2, and 3 accommodate a variety of paper sizes and weights; refer to the
Technical Specifications chapter for detailed information.
7 Front Door
Open this door to clear paper jams and to replace various Customer Replaceable Units
(CRUs).
8 Dry Ink/Toner Cover
Open this cover to access and replace the dry ink/toner cartridges.
Locating the Press Serial Number
The press serial number can be accessed from either the press User Interface or from
the serial number plate which is located on the inside frame of Tray 1.
1. Press the Machine Status button on the User Interface.
2. Fromthe Machine Status screen, ensure that the Device Information tab is displayed.
The press serial number is displayed under Device Serial Information near the bottom
of the screen.
Xerox®Versant®180 Press2-2
User Guide

Getting Started
3. If there is a loss of power and it is not possible to access the Machine Status screen,
the press serial number can also be found on the inside frame of the press near the
Paper Tray 1 drawer:
a) At the press, fully open Tray 1.
b) At the left of the tray, on the press frame,locate the plate with the serial number
(SER#).
User Interface (UI)
1 Touch Screen
Directly touch the screen to select and set features. Displays instructional and
informational messages, fault clearance procedures and general press information.
2 Home button
Press this button to display the main window. Provides access to features such as Copy,
E-Mail, and Network Scanning, just to name a few features. Other features may be
available depending on your marketplace.
3 Services
This button lights when the main power is on.
4 Job Status button
Use to check the progress of active jobs and detailed information about completed
jobs or pending jobs. This area also allows you to delete a job (cancel printing or copying)
and pause jobs.
5 Machine Status button
Use to access the Tools feature, check the press configuration, the software version,
the press billing meters and counter information, and to access and print job history
or error reports.
6 Log In/Out button
Use to log in and out of Administrator mode or Authentication mode with user ID and
password.
User Guide
2-3Xerox®Versant®180 Press

Getting Started
7 Energy / Power Saver button
Use this button if the press has been inactive and the touch screen is dark (system is
in Energy Saver mode). This button manually exits the system fromEnergy Saver mode;
it does not place the press in Energy Save mode.
8 Clear All button
Use this button to return all selections to the same state as when the press was powered
on. Press once to clear a current entry. Press twice to return to default settings.
9 Stop button
Press to stop and pause the print or copy job in progress.
10 Start button
Use this button to perform certain functions, such as scanning/copying a document or
printing a selected report from the print engine. This button is also used by the Customer
Service Engineer (CSE) during diagnostic routine procedures.
11 Interrupt button
Use this button to suspend a copy or print job in progress and have the machine stop
to process another job. During the Interrupt mode, the Interrupt button lights. Pressing
the Interrupt button again exits the Interrupt mode and resumes the suspended job.
12 Numeric Keypad
Use to enter alphanumeric characters.The C (Cancel) Entry cancels the previous entry
made on the numeric keypad.
13 Language button
Use to select a different language for the touch screen options.
14 Help button
Displays the Help System; this feature may not be available in all marketplaces.
Features
Logon
There are two logon levels:
• Guest/Operator: This is the default logon user. You are automatically logged on as
Guest.
• Administrator: This logon level is required to customize the system and network
defaults for your press and to customize particular print jobs by setting, or changing
parameters for certain features. Press the Guest button (or the Log in button on the
Control Panel) to access the Login screen.
Xerox®Versant®180 Press2-4
User Guide

Getting Started
Note
Refer to the System Administration Guide for more information on the Administrator
features.
Language
Note
The number of languages available on your system depends on what was installed during
the initial installation process.
Selecting a particular Language button immediately changes the language. No
confirmation is required.
Changing the Language
1. Press the Language button on the press User Interface
The Language window displays on the touch screen.
2. Choose one of the following:
• Select the desired language from the list, and select Save. The language on the
screen changes to the new language and closes the Language window.
• Select the Cancel button to return to the main screen.
Optional Performance Package
Important
The Performance Package must be ordered prior to initial installation of the system. It
is not possible to upgrade an existing press with the Performance Package after the
system has been ordered and installed.
The optional Performance Package is a suite of technologies and tools that enhances
the capabilities of the base press in three areas: operational speed, color management
automation, and print shop productivity.
The Performance Package is comprised of the following technologies and tools:
• All Stocks Rated Speed (ASRS) software
• Automated Color Quality System (ACQS) software
• Inline Spectrophotometer (ILS) - which is included with the InterfaceCooling Module
• Xerox EX 80 Print Server
User Guide
2-5Xerox®Versant®180 Press

Getting Started
All Stocks Rated Speed (ASRS)
The All Stocks Rated Speed (ASRS) feature eliminates the slower speeds created by
heavier weight stocks. With ASRS, the speed of the press is governed by the size of the
stock only and not by its weight. This means that all stock weights up to 350 gsm for a
given sheet size will run at the rated speed (the top speed) for that stock size.
Automated Color Quality System (ACQS)
The Automated Color Quality System (ACQS) is an advanced color management
technology that transfersthe complex decisions about color maintenance fromoperators
to an automated system. ACQS automates the printing and measuring of calibration
charts and then calculates and makes precise adjustments to color tables based on the
results.
Note
The ACQS suite is available only with the external Xerox EX 80 Print Server Powered by
Fiery; it is not available with the Xerox EX-i 80 Print Server Powered by Fiery.
ACQS takes the variability out of the color equation by incorporating standardized color
measurements using the Inline Spectrophotometer (on the Interface Cooling Module)
to calibrate color on the press as well as generating accurate destination profiles for
different stocks.
Procedures are automated in that they eliminate the need for an operator to manually
scan target sheets using an external spectrophotometer. The operator must initiate the
procedure at the print server, but all target sheets are then generated and scanned
automatically, and all measurements, calculations, and corrections are performed
automatically.
Inline Spectrophotometer (ILS)
The Inline Spectrophotometer (ILS) is housed in the Interface Cooling Module. The ILS
enables the Automated Color Quality Suite, which automates the process of ensuring
stable and accurate color from job to job, by eliminating the need for operators to use
a hand-held spectrophotometer during print server calibration. It also facilitates the
creation of custom destination profiles for each stock on which the press prints.
With the ILS is strategically placed within the paper path, automated processes like
measurements forcalibration and destination profiling are quick to perform and require
less down-time for the press. Workingtogether, the ACQS software and the ILS hardware
gives accurate color faster, and provides more stable color over time.
Besides the Inline Spectrophotometer (ILS), the Interface Cooling Module contains
additional cooling to support the higher speeds of the press when running at higher
speeds, and a Decurler to ensure flat sheets for finishing.
Configuration Information Regarding the Performance Package
1. The Performance Package must be ordered when the press is ordered. Once the
press has been configured without the Performance Package option, it cannot be
upgraded at a later time to include the package.
Xerox®Versant®180 Press2-6
User Guide

Getting Started
2. The Performance Package is not available with the Xerox EX-i 80 Print Server.
Customers must order the external Xerox EX 80 Print Server.
3. If customers configure the press with the Business Ready (BR) Finisher, the Business
Ready Finisher with Booklet Maker, or the Offset Catch Tray, then the Performance
Package option is not available for the configuration.
4. When the Performance Package is ordered, the Interface Cooling Module must be
used. The package cannot be used with the Interface Module.
5. Finishing options enabled by the Interface Cooling Module include these finishers
and their options:
• High Capacity Stacker (HCS)
• Standard Finisher
• Booklet Maker Finisher
• Standard Finisher Plus
• SquareFold Trimmer Module (which requires the Booklet Maker Finisher)
• Plockmatic Pro 35 and Plockmatic Pro 50 (which requires the Standard Finisher
Plus)
Power On/Off
The Power Switches
There are three power switches involved with the press:
• The Breaker switch located at the rear of the press. Initially check to make sure this
switch is set to On when the press is shipped.
• The Main Power switch located inside the Front Door. This switch is used mainly by
the Xerox Service Representative when servicing the press. In rare problem solving
cases, you may be directed to power off the press with this switch.
• The Power On/Off button located on the top of the press near the Document Feeder.
This button is the primary way for you to switch on or off the press. It is used by the
operator as workflow requires.
Use the Power On/Off button to power ON or power OFF the press.
User Guide
2-7Xerox®Versant®180 Press

Getting Started
Important
Always use the Power On/Off button first, and then power off the Main Power Switch.
Power On/Off the Press
Power On the Press
1. Check that the Main Power switch behind the Front Door is On.
2. Press the Power On/Off button on top of the press to the ON position.
The Ready Indicator light displays green.
A screen message advises of a short wait while the fuser warms up and the press runs
a system check. Youcan set featuresfor a job during this time and the printing process
will start automatically when the press is ready.
Power Off the Press
Important
Always power off the Power Switch first and then power off the Main Power Switch.
1. Press the Power On/Off button on the top of the press to Off.
Wait until the lights on UI stop blinking, as this allows the fuser to begin cooling.
2. Switch Off the Main Power switch behind the Front Door.
Note
Allow the press to remain off for a minimum of 10 seconds before switching on the
power again.
Power Saver
The Power Saver feature allows the press to enter a reduced power consumption mode
when all print jobs have completed and there are no jobs currently processing. There
are two energy saving modes: Low Power and Sleep.
By default, the press automatically enters the Low Power mode after 1 minute of
inactivity. After 1 minute of inactivity, the press then enters Sleep mode. These time
intervals for both modes can be changed by the system administrator.
Refer to the following example:
• Low Power Mode is set to 1 minute.
• Sleep Mode is set to 10 minutes.
• Sleep Mode activates after 10 minutes of total inactivity and not 10 minutes after
the Low Power Mode begins.
Low Power Mode
In this mode, the power to the User Interface (UI) and fuser unit is lowered to save
power. The display goes out and the Energy Saver button on the UI lights. To use the
press, press the Energy Saver button. The Energy Saver button is no longer lit, indicating
that the Energy Saver feature is canceled.
Xerox®Versant®180 Press2-8
User Guide

Getting Started
Sleep Mode
In this mode, the power is lowered more than in the Low Power mode. The display goes
out and the Energy Saver button on the UI lights. To use the press, press the Energy
Saver button. The Energy Saver button is no longer lit, indicating that the Energy Saver
feature is canceled.
Exiting Power Saver
The press exits Power Saver mode by doing one of the following:
• Pressing the Power Saver button on the press UI,
• Receiving print data for an incoming job to be printed, or
• Programming and performing a copy or scan job.
Getting Help
Help on the Xerox Web Site
For technical product support, Xerox supplies, customer documentation, and answers to
frequently-asked questions, go to www.xerox.com. You will find the latest documentation
and the knowledge base under Support & Drivers. Use the Contact link for specific
contact information/telephone numbers in your area.
Note
Be sure to periodically check this website for the latest information on your product.
It may be helpful to know your press serial number before calling for support. The press
serial number is shown on the Device Information tab: Machine Status > Device
Information.
Print Server Customer Documentation
• The FreeFlow Print Server features are documented in the Online Help system from
the Help menu shown on the main print server window. Additional FreeFlow Print
Server user documentation can be found at www.xerox.com.
• The EFI Print Server Help menu on the Command WorkStation window is designed
to provide informationon specific work flows when using the Command WorkStation.
Additional user documentation supplied by EFI is available to you from www.xerox.com
under the Support and Drivers link.
User Guide
2-9Xerox®Versant®180 Press

Getting Started
Xerox®Versant®180 Press2-10
User Guide

3
Press Apps
Print Job Submission
There are several ways in which to submit your job for printing:
• From your computer workstation (PC or Mac), using print drivers such as PostScript
and Printer Command Language (PCL), you can submit a document file to the print
server queue. From the print server, you would then submit the job to the press.
Note
Make sure the appropriate print drivers have been installed on your computer. Refer
to your print driver documentation or the Xerox web site for more information on
how to download or install print drivers.
• At any remote workstation, using a Hot Folders application to submit the document
file to the print server.
• At the print server, importing/adding a document file to a print queue. Manage the
job settings of the document and then submit to the press for printing.
Printing from a Computer
The system supports either Xerox FreeFlow or Fiery EX print drivers. Through print drivers
installed on your computer or Mac, you can send a document file from your desktop to
the print server, which can then be submitted to the press for printing.
Note
You can also use a drag and drop Hot Folders feature by which to send your files to the
print server for printing to the press.
1. From your computer, select the file you want to print and open it in its application.
2. Select File > Print.
3. Select the desired print server queue.
4. Select the Properties button for the queue.
5. Select the desired output options such as quantity or 1 sided/2 sided printing.
3-1Xerox®Versant®180 Press
User Guide

Press Apps
6. Select OK to close the Properties window.
7. Select Print to send the job to the print server queue.
Printing a Job from the Print Server
The following is a basic workflow for setting up a job and submitting it from the print
server:
1. At the press, load the appropriate paper to be used for the job.
2. From the press UI, ensure that the Paper Tray settings/Tray Properties window
matches the stock properties for the paper you will use, and that it assigned to the
same feeder tray where the paper is loaded.
3. At the print server main window, customize your job such as inserting special pages
and tabs, and create your print queue that defines the attributes of those jobs sent
to the queue.
4. Submit the job file from the print server to the networked press for printing.
Printing from the FreeFlow Print Server
From your computer, you can submit your document files (select Print) to a directory on
the print server through the use of installed print drivers. You could also copy the
document files onto a USB flash drive or CD/DVD and then connect those devices to the
print server for importing.
1. If you copied the file onto a storage device, connect your device to the print server
and from the top menu bar select Services > Print From File.
2. From the Print From File window, select the Files tab and Browse.
3. From Look In, locate your storage device or other network directory containing the
document files you want.
4. Select and highlight one of the document files. Select OK.
5. From the Queue field at the top right of the Print From File window, select the desired
print queue.
6. Using the other tabs on the screen, select the desired output options such as quantity
or 1 or 2-sided printing.
7. Select Print.
The job is sent to the desired queue and either held or immediately printed.
8. Select Close.
Printing from the EX Print Server
From your computer, you can submit your document files (select Print) to a directory on
the print server through the use of installed print drivers. You could also copy the
document files onto a USB flash drive or CD/DVD and then connect those devices to the
print server for importing.
1. If you copied the file onto a storage device, connect your device to the print server
and select Services > Print From File.
2. From the EX Print Server, select File > Import Job.
3. Select Add.
4. Locate your storage device or other directory containing the document files.
5. Select and highlight one of the document files. Select Open.
Xerox®Versant®180 Press3-2
User Guide

Press Apps
6. Select Import.
7. Select the desired queue such as Process and Hold or Print and Hold.
The job is sent to the selected queue or to the press for immediate printing.
Printing on Tabs from the Print Server
Basic Procedure for Printing on Tabs from a Print Server
There are many types of tab stock and tab sequences available. Precut tabs are commonly
used and have two different orientations: the single straight collated tab stock or the
single reverse collated tab stock.
When programming tab jobs and loading tab stock, consider the following:
• Precut tabs can only print 1-sided
• There are specific job settings that you need to define such as tab order/sequence,
number of bank sets, stock weight, paper size, and insertion before or after body
pages. Refer to your print server documentation formore detailed setting information.
• Always load tab stock LEF into the tray where the straight edge of the stock is the
lead edge and the tabs are oriented at the trail edge.
• Always use a complete set or bank or tabs in the paper tray.
• If staple or punch finishing, use tray 5 or trays 6 or 7 (if available).
The following are the basic steps for printing tabs on your press.
1. From the print server, create and define the Tab stock for the paper tray you will be
using.
2. Load the Tab stock in Trays 1, 2, 3, 5, 6 or 7.
3. From the print server window, access the Held queue that contains your document.
Select the document you want to configure with tabs. Double click to open the file’s
properties.
4. Once all settings are made, select Print.
The press prints the complete set of tabs with the body pages defined. Any extra
tabs not used in the job are sent to the output tray.
Tips for Printing on Tabs from the EX Print Server
Use the following tips for printing on tabs from the EX Print Server:
• The EX Print Server allows for setting up your job to print on tabs. Otherwise, you can
set up your job to insert preprinted tabs into your document. Use one tray for the
body pages, another tray for the preprinted tab stock, and another tray for cover or
back pages.
• While you can print tab stock from any of the paper trays on the system (Trays 1, 2,
3, 5, 6 or 7), Trays 6 and 7 should be used for best results. If you plan to apply staple
or punch finishing, use Trays 5, 6 or 7 only.
• Loading orientation depends on what tray you are using.
User Guide
3-3Xerox®Versant®180 Press

Press Apps
Copy
Document Feeder and Glass
Document Feeder Tips
Tips for using the Duplex Automatic Document Feeder (DADF):
• For best output, ensure that the documents are in good condition.
• A maximum of 250 documents can be scanned at one time by using the document
feeder.
• Mixed-size original documents can be used; however, the top left corners of the
original documents must be aligned in the document handler.
• Remove any staples and paper clips from the documents before loading them in the
document feeder.
Document Glass
Use the Document Glass for scanning and copying various types documents, such as
bound originals (books), odd size documents or poor quality originals. Documents should
be placed face down on the glass and aligned with the tip of the registration arrow in
the top left corner.
The document glass accommodates document sizes up to a maximum of 11 x 17 in./A3.
Basic Copying Steps
Basic Copying with the Document Feeder (DADF)
1. Adjust the movable document guides to their widest position.
2. Load the documents faceup with the first page on top and with the headings toward
the back or left of the machine.
The confirmation indicator lights to show that the documents are loaded correctly.
3. Press the Home button on the press UI.
4. Select Copy on the Home window.
5. Select the desired Copy features/options:
• Paper Supply
• Reduce/Enlarge
Xerox®Versant®180 Press3-4
User Guide

• Output Color
• 2-Sided Copying
• Original Type
• Lighten/Darken
The features displayed on the main Copy window vary depending on how it is
configured by the administrator.
6. Enter the quantity.
7. Press Start.
Basic Copying with the Document Glass
1. Open the document feeder.
2. Place the document face down by aligning it as shown in the illustration.
Press Apps
3. Press the Home button on the press UI.
4. Select Copy on the Home window.
5. Select the desired Copy features/options:
• Paper Supply
• Reduce/Enlarge
• Output Color
• 2-Sided Copying
• Original Type
• Lighten/Darken
The features displayed on the main Copy window vary depending on how it is
configured by the administrator.
6. Enter the quantity.
7. Press Start.
Selecting Copy Options for a Third-Party Finishing Device
Read the following list before performing the procedure:
• If your machine has an optional, third-party, Document Finishing Architecture (DFA)
device attached, then this profile feature is available, and specific copy options may
be selected for a job.
User Guide
3-5Xerox®Versant®180 Press

Press Apps
• Prior to physically attaching the DFAdevice to the machine, device profiles are created.
The profiles represent the characteristics of your finishing device.
• Refer to the third-party customer documentation for information on setting the
profile values for the specific DFA device attached to the machine.
• A profile for the job can be selected from either the print server, the print driver on
your computer, or the press User Interface.Depending on the DFA device, a maximum
of twelve profiles are available.
1. Place your original documents either in the document feeder or on the document
glass.
2. Press the Home button on the press UI.
3. Select Copy on the Home window.
4. Select the Output Format tab.
a) Select the DFA Finisher.
The DFA Finisher Profile screen displays.
b) From the displayed list, select the profile for the job.
If the device is an e-binder, select the binding position.
c) Select Save.
d) Select the desired Face Up/Down Output option.
5. Select the desired Copy features/options.
The features displayed on the main Copy window vary depending on how it is
configured by the administrator.
6. Enter the quantity.
7. Press Start.
If prompted on the UI, followthe instructions provided to correct any job submission
errors. If there is a DFA problem, refer to your DFA documentation.
Copy Feature
Copy Feature Overview
Tip
Depending on how the Copy tab is configured by the administrator, this tab may contain
different features than the ones listed here.
The Copy feature includes the following options:
• Reduce/Enlarge (R/E)
• Paper Supply (Auto Select)
• Output Color
• Copy Output
• 2 Sided Copying
• Original Type
• Darken/Lighten
Xerox®Versant®180 Press3-6
User Guide

Press Apps
Reduce/Enlarge
Reduce / Enlarge (R/E)
The reduce / enlarge (R/E) feature provides a variety of reduction and enlargement
options to adjust the size of the output image. Originals can be enlarged or reduced
from25-400%. Variousautomatic and preset selections are available to help you choose
the most common reductions or enlargements, while a custom setting enables you to
select the ratio that suits your requirements. Basic reduction/enlargement options include:
100% or R/E entry box
The default setting in the R/E entry box is 100%. This selection produces an image on
your copy exactly the same size as the image on your original document.
You can also set the R/E ratio by using the plus or minus buttons. In this case, the ratio
is displayed in the R/E entry box.
Auto%
This selection proportionally reduces or enlarges the image so that it will fit onto your
chosen paper. If this option is selected, you must also select a specific paper tray.
Preset R/E buttons
Depending on what the System Administratorhas selected, you see severalpercentage
options for reduction or enlargement. These buttons can be customized by the
Administrator to display the reduction/enlargement ratios that you frequently use.
More
When the Reduce/Enlarge (R/E) More button is selected, a new window opens and
displays additional R/E options.
More Reduce/Enlarge (R/E) Options
The Reduce/Enlarge (R/E) More options include:
Proportional %
All of the options will reduce or enlarge the image by the same ratio in both directions
so that the image gets bigger or smaller, but the proportion remain the same.
Auto %
Proportionally reduces or enlarges the image so that it will fit onto your chosen paper.
If this option is selected, you must also select a specific paper tray.
Independent X-Y%
This option allows you to specify different height and width ratios to scale the height
and width independently.
Auto X-Y% ensures copies are made with the height and width ratiosset automatically
to match the paper size.
Auto Center
This option allows you to specify individually the height and width values.
User Guide
3-7Xerox®Versant®180 Press

Press Apps
Preset percentage buttons
The percentagebuttons are preset for specific magnification levels by the administrator
to reflect the percentages used most frequently.
Paper Supply
Select the desired tray to be used for your job; options include:
Auto Select
This option automatically detects the size of the original document and selects the
proper tray for output.
Tray buttons
Allows you to select a specific tray containing the desired media for your job.
More button
Displays the Paper Supply screen showing all available trays for the machine and their
media content.
Output Color
Select the desired Output Color option which best applies to the job. The options include:
Auto Detect
This option allows the machine to automatically detect if the original document is in
color or black and white.
Color
This option generates copies with full color output, using all four printing colors - cyan,
magenta, yellow, and black.
Black and White
This option copies in black and white only. Colors in the original are converted to shades
of gray.
Dual Color
This option allows you to separate the colors of the original into two groups of colors
for copying. The source color is extracted from the original and replaced by the target
area color. The rest of the colors are replaced by the non-target area color that you
select.
Single Color
This option allows you to copy in one of the preset or custom colors.
More
This options allow you to customize the color for the copied output.
Xerox®Versant®180 Press3-8
User Guide

Press Apps
Copy Output
Important
CopyOutput options vary depending on the finishing devices attached to your machine.
Note
Copy Output may be accessed either from the Copy tab or from the Output Format tab.
Use the Copy Output feature to select the desired options for your output; options
include:
• Auto
• Collated
• Uncollated
• Uncollated with Separators
• Original Orientation
• Optional finishing features, including:
- Output Destination/Offset
- Stapling
- Hole Punching
- C/Z Folding
2 Sided Copying
Note
The 2 Sided Copying option may be accessed either from the main Copy screen or from
the Output Format tab.
Makeone or two-sided copies from one or two-sided originals using either the document
feeder or the document glass. The two-sided option enables you to select your output
in book or calendar orientation. Options include:
1-1 Sided
Use this option if your originals are printed on one side and you want single-sided
copies.
1-2 Sided
Use this option if your originals are printed on one side and you want two-sided copies.
2-2 Sided
Use this option if you want to make two sided copies from two-sided originals.
2-1 Sided
This option will make one-sided copies from two-sided originals.
Originals/Copies
Select the orientation of both your original documents and the output copies. Options
include Head to Head and Head to Toe.
User Guide
3-9Xerox®Versant®180 Press

Press Apps
Head to Head
This option is sometimes called Top-to-Top. For your original documents, select this
option when all the pages of your original documents have the same orientation. For
copy output, select this option to copy/print the reverse side of a page so that the
finished document opens like a book.
Head to Toe
This option is sometimes called Top-to-Bottom. Foryour original documents, select this
option when the pages of your original documents have the opposite orientation such
as on a calendar. For copy output, select this option to copy/print the reverse side of a
page so that the finished document opens like a calendar.
Original Orientation
Upright Images
Select this option when placing the top edge of the document against the top side
of the document glass or document feeder.
Sideways Images
Select this option when placing the top edge of the document against the left side
of the document glass or document feeder.
Original Type
Note
The Original Type option may be accessed either from the main Copy screen or from
the Image Quality tab.
The Original Type feature provides a convenient way to enhance the quality of your
output based on the type of original images you are copying. Select the Original Type
button on the Image Quality tab, and select the desired option.
Auto
This option sets the output color according to the document type preset in the System
Administration mode.
Photo and Text
Use this option if your original is from a magazine or other source that contains high
quality photographs with text. This setting produces better pictures, but slightly reduces
sharpness for text and line art.
Text
Use this option if your original contains only text or line art. The result is sharper edges
for the text and line art.
Photo
This option is specifically designed to copy photographs or magazine pictures without
any text or line drawings. This option prevents faint reproduction of colors.
Xerox®Versant®180 Press3-10
User Guide

Press Apps
Map
Use this option formaking copies of documents that have text on colored backgrounds
such as maps.
Darken/Lighten
Note
The Darken/Lighten option may be accessed either from the main Copy screen or from
the Image Quality tab and then by selecting Image Options.
The Darken/Lighten option provides manual control to adjust the lightness or darkness
of the scanned images.
• Select the Left scroll button to darken the scanned image from light originals such
as pencil images.
• Select the Right scroll button to lighten the scanned image from dark originals such
as half tones or originals with colored backgrounds.
Image Quality Feature
Image Quality Feature Overview
The Image Quality feature includes the following options:
• Original Type
• Image Options
• Image Enhancement
• Color Effects
• Color Balance
• Color Shift
Selecting Image Quality Options
1. Load the document or documents either onto the Document Glass or into the
Document Feeder.
2. Press the Home button on the press UI.
3. Select Copy on the Home window.
4. Select the Image Quality tab.
5. From the Image Quality window, select the desire options:
• Original Type
• Image Options
• Image Enhancement
• Color Effects
• Color Balance
• Color Shift
6. Select the Copy tab.
7. Select the desired Copy options including:
• Paper Supply
User Guide
3-11Xerox®Versant®180 Press

Press Apps
• Reduce/Enlarge
• 2-Sided Copying
8. Select any other desired Copy features/options (such as LayoutAdjustment, Output
Format).
9. Enter the quantity.
10. Press Start on the UI.
Original Type
Note
The Original Type option may be accessed either from the main Copy screen or from
the Image Quality tab.
The Original Type feature provides a convenient way to enhance the quality of your
output based on the type of original images you are copying. Select the Original Type
button on the Image Quality tab, and select the desired option.
Auto
This option sets the output color according to the document type preset in the System
Administration mode.
Photo and Text
Use this option if your original is from a magazine or other source that contains high
quality photographs with text. This setting produces better pictures, but slightly reduces
sharpness for text and line art.
Text
Use this option if your original contains only text or line art. The result is sharper edges
for the text and line art.
Photo
This option is specifically designed to copy photographs or magazine pictures without
any text or line drawings. This option prevents faint reproduction of colors.
Map
Use this option formaking copies of documents that have text on colored backgrounds
such as maps.
Image Options
Use the Image Options feature to make adjustments to the following options:
Lighten/Darken
This option provides manual control to adjust the lightness or darkness of the scanned
images.
• Select the Down scroll button to darken the scanned image from light originals such
as pencil images.
• Select the Up scroll button to lighten the scanned image from dark originals such as
half tones or originals with colored backgrounds.
Xerox®Versant®180 Press3-12
User Guide

Press Apps
Sharpness
This option controls the balance between sharp text and moiré (patterns within the
image). Move the slider control down (Soften) to produce an image with a smooth,
uniform appearance ideally suited for photographic scanned images. Move the slider
control up (Sharpen) to produce an image with better quality text or line art.
Saturation
This option allows colors to become more or less vivid. To make the colors on your
output more vivid, move the slide bar up. To create a less vivid output, or a pastel effect,
move the slide bar down. To keep the output normal, do not adjust the saturation.
Image Enhancement
Use the Image Enhancement settings when your scanned image requires more than
the basic image quality. There are two features associated with Image Enhancement:
Suppress Background
This option prevents reproduction of unwanted shading from originals where the
opposite side printing shows through.
Off
Auto Suppression: This option automatically reduces or eliminates any background
on the copies caused by colored paper or newspaper originals.
Contrast
Selections are either Auto Contrast or Manual Constrast. The Constrastfeaturecontrols
the difference between the image densities within the scanned image. Lower contrast
settings reproduce more detail in light and dark areas of the original. Higher contrast
settings produce vivid blacks and whites for sharper text and lines, but produce less
detail in pictures. Auto Correction automatically chooses the best settings foryour job.
Color Effects
This feature produces balanced image tones on your output. Options include:
Lively
This option uses the highest color saturation to produce rich, vivid output colors. The
option increases the color saturation of the most vivid setting in order to produce
fresher images.
Bright
This option produces images that have a brighter appearance and enhanced contrast.
Warm
This option produces a soft image on the output and adding a warm, reddish tint to
low density colors. Use this setting to apply a light pink tone to skin colors and to give
a soft tone to dark, warm colors.
User Guide
3-13Xerox®Versant®180 Press

Press Apps
Cool
This option produces a strong, clear blue tone on the output. This setting makes blue
color stronger and makes dark, cold colors clearer.
Shadow Suppression
This option reduces or eliminates any background shadow caused by colored paper or
newspaper originals.
Color Balance
This feature allows you to adjust the balance between colors and the overall amount of
color on the output copies. You can adjust the levels of all four process colors (Yellow,
Magenta, Cyan, and Black) for their low, medium, and high density ranges.
• The default option is Normal.
• Basic Color adjusts the density.
• Advanced Color adjusts the Highlights, Midtones, and Shadows.
Color Shift
This feature allows you to shift all hues in an image simultaneously in order to make the
overall character of the output image warmer or cooler. For example, if you select one
of the:
Normal
This is the default option.
Plus buttons
The red colors shift toward the yellow hue, the green colors shift toward the cyan hue,
and the blue colors shift toward the magenta hue. All colors between these original
colors also shift in the same direction.
Minus buttons
The red colors shift toward the magenta hue, the blue colors shift toward the cyan hue,
and the green colors shift toward the yellow hue. Again, all colors between these original
colors also shift in the same direction.
Layout Adjustment Feature
Layout Adjustment Feature Overview
The Layout Adjustment feature includes the following options:
• Book Copying
• 2 Sided Book Copying
• Original Size
• Edge Erase
• Image Shift
• Image Rotation
• Invert Image
Xerox®Versant®180 Press3-14
User Guide

Press Apps
• Original Orientation
Selecting Layout Adjustment Options
1. Load the document or documents either onto the Document Glass or into the
Document Feeder.
2. Press the Home button on the press UI.
3. Select Copy on the Home window.
4. Select the Layout Adjustment tab.
5. From the Layout Adjustment window, select the desire options:
• Book Copying
• 2 Sided Book Copying
• Original Size
• Edge Erase
• Image Shift
• Image Rotation
• Invert Image
• Original Orientation
6. Select the Copy tab.
7. Select the desired Copy options including:
• Paper Supply
• Reduce/Enlarge
• Darken/Lighten
8. Select any other desired Copy features/options (such as Image Quality, Output
Format).
9. Enter the quantity.
10. Press Start on the UI.
Book Copying
Bound originals (such as books) can be placed on the document glass to make 1-sided
or 2-sided copies. The bound original should be placed face down and registered to the
rear left corner of the document glass. Align the top of the bound original against the
rear edge of the document glass.
Book Copying options include:
Both Pages
Copies both pages in page order.
User Guide
3-15Xerox®Versant®180 Press

Press Apps
Left Page Only
Copies the left page only.
Right Page Only
Copies the right page only.
Binding Edge Erase
This option erases or deletes the shadow from your copies that is caused by the center
binding of the bound original.
2 Sided Book Copying
You can make 2-sided copies from two pages of a bound original. This feature allows
you to assign pages when making copies of a bound original so that the copied pages
face each other in the same way as the bound original. 2 Sided Book Copying options
include:
• Select a starting and ending page
• Select Starting Page (Left Page or Right Page), and
• Selecting Ending Page (Left Page or Right Page).
Original Size
The machine can detect the size of the document if it is a standard size. If the document
is not a standard size, the machine does not know what size it is. This does not matter
if you select a specific reduction/enlargement option and also select a specific paper
tray. However, you can tell the machine the size of the document if you want to use the
Auto features. Original Size options include:
Auto Detect
This option automatically detects the size of the scanned pages. The document sizes
that can be detected automatically include all standard sizes.
Manual Size Input
This option allows you to select a standard paper size from the options shown or to
input a non-standard (custom) size. When you haveselected the size of your document,
you can use the auto reduce/enlarge or the auto paper supply features.
Mixed Size Originals
With this option the machine automatically detects the size of each document.
Edge Erase
This option allows you to erase images around the border of a document. Edge Erase
also deletes center streaks caused by a gap between the spine of a bound document
and the document glass. Options include:
All Edges
This option causes a preset amount to be erased from the top/bottom and left/right
edges and from the center of the output image.
Xerox®Versant®180 Press3-16
User Guide

Press Apps
Print to Edge
This option does not perform any edge deletions.
Individual Edges
This option allows you to independently set the amount to be erased for each of the
four edges and the center of your output. The default is 0.1 in. (2.54 mm) and each
edge can be adjusted in 0.1 in. (2.54 mm) increments up to 2.0 in (50.8 mm).
Presets
With this option you choose pre-programmed erase amounts that were previously
created and saved by the system administrator.
Image Shift
Image Shift allows you to move the position of the image on the output page. Options
include:
Off
This is the defaultsetting. The image on the copy will be in the same place as the image
on the original.
Auto Center
This option automatically centers the scanned image on the output paper. To work
effectively, the original should be smaller than the selected output stock or the image
should be reduced.
Corner Shift
This option enables you to move the image to each of the four corners of the paper or
to the center of each of the four sides of the paper (eight positions total).
Margin Shift
This option creates a margin for binding one edge of a document by shifting the image
away from that edge. The Margin Shift option enables you to center a document image,
shift the image to one edge slightly, or move the image to a specified edge (0-2.0
in./0-50.8 mm Left/Right or Top/Bottom) of the output.
Presets
With this option you choose pre-programmed shift amounts that were previously
created and saved by the system administrator.
Image Rotation
If the orientation of the paper loaded in the selected paper tray differs from that of the
document that is scanned, the Image Rotation option automatically rotates the
document image to match the orientation of the paper loaded in the paper tray. You
can also select which edge of the original document to use as a reference for image
rotation if documents are of mixed orientations. Options include:
User Guide
3-17Xerox®Versant®180 Press

Press Apps
Off
This option causes copies to be made as they are loaded, even if they are oriented
differently from the paper in the selected paper tray.
Always On
This option causes copies to be made with the document image automatically rotated
so that the orientation of the document matches that of the paper in the selected
paper tray.
On during Auto
This option provides automatic rotation of the image on your original to fit correctly
on your selected copy paper when Auto Select or Auto% is selected.
Invert Image
The Invert Image feature allows you to make copies with the left and right sides of the
document image reversed or the colors reversed. Options include:
Mirror Image
This option reverses the original image creating a mirror of the original. This feature
can be used when you want to change the apparent direction of an image or where
the original is inked on the reverse of the paper (for example engineering drawings).
Negative Image
This option converts the black image areas in the original to white, the white image
areas to black, and any dark gray image areas to light gray. This feature is useful for
documents that have a substantial amount of dark background and/or light text and
images, saving on toner usage.
Original Orientation
This feature is used to inform the system of orientation of your original document when
it is placed in the document feeder or on the document glass. The orientation must be
specified in order to identify the top of the document set. This information is used by
the system to make a decision about how to accurately place images on paper when
using featuressuch as Image Shift, Edge Erase, Multiple-Up, Repeat Image, Annotation,
and Booklet Creation. Original Orientation options include:
• Upright Images: Select this option when placing the top edge of the document
against the top side of the document glass or document feeder.
• Sideways Images: Select this option when placing the top edge of the document
against the left side of the document glass or document feeder.
Output Format Feature
Output Format Feature Overview
The Output Format feature includes the following options:
• Booklet Creation
• Covers
Xerox®Versant®180 Press3-18
User Guide

Press Apps
• Transparency Options
• Page Layout
• Poster
• Annotations
• Watermark
• Tab Margin Shift
• Face Up/Down Output
• ID Card Copying
• Transparency Options
• Folding (optional)
Selecting Output Format Options
1. Load the document or documents either onto the Document Glass or into the
Document Feeder.
2. Press the Home button on the press UI.
3. Select Copy on the Home window.
4. Select the Output Format tab.
5. From the Output Format window, select the desire options:
• Booklet Creation
• Covers
• Transparency Options
• Page Layout
• Poster
• Annotations
• Watermark
• Tab Margin Shift
• Face Up/Down Output
• ID Card Copying
• Transparency Options
• Folding (optional)
6. Select the Copy tab.
7. Select the desired Copy options including:
• Paper Supply
• Reduce/Enlarge
• Darken/Lighten
8. Select any other desired Copy features/options (such as Image Quality, Layout
Adjustment, Output Format).
9. Enter the quantity.
10. Press Start on the UI.
User Guide
3-19Xerox®Versant®180 Press

Press Apps
Booklet Creation
Booklet Creation allows you to create multi-page booklets froman ordered set of 1-Sided
or 2-Sided originals.
Refer to the following tips when using the Booklet Creation feature:
• When Auto% is selected, the press reduces or enlarges the image as required.
• Any other Reduce/Enlarge selection could result in image loss.
• When Booklet Creation is selected, the output is automatically set to 1-2 Sided.
• Ensure that the Original Orientation setting reflects the same orientation as that
of the original documents.
Booklet Creation Options
When On is selected, the following Booklet Creation options are available:
Original Input
• 1 Sided Originals
• 2 Sided Originals
• 2 Sided Rotated Originals
Binding Shift
Use this option to set the booklet binding-shift value within the range from 0 to 1.9 in.
(0 to 50 mm) in 0.1 in. or 1 mm increments.
Covers
This option allows you to attach covers to the booklet. The front and back covers can
be output before the first page and after the last page of the document and on a
different type of paper.
Divide Output
Use this option when you have a large number of original documents. The original
documents are divided to create subsets in order to reduce the thickness of each booklet.
The machine folds copies in half, and piles them up to form a booklet. The Light
Production C Finisher with Booklet Maker allows you to specify the number of sheets
within the range of 1-50 sheets in one-sheet increments.
Output/Offset
This option is available only when specific optional finishers are attached, such as the
Standard Finisher or Booklet Maker Finisher.
Auto Image Positioning
This option adjusts the image position so that the printing position from the edge of
each page remains consistent between the inner and outer pages of the booklet. Auto
Image Positioningis available forselection if you have already selected Create Left/Top
Bound Booklet or Create Right Bound Booklet.
Xerox®Versant®180 Press3-20
User Guide

Press Apps
Fold and Staple (optional)
Folding and/or stapling are optional features. These features are available only with
finishing devices that provide these capabilities.
When available, select the desired Fold and Staple option:
• No Fold and Staple: This option produces booklets without folding or stapling.
• Fold Only: This option produces booklets that are folded in half.
• Fold and Staple: This option produces booklets that are folded in half and stapled
in the center.
Booklet Trimming/Pressing (optional)
Booklet trimming and pressing are available only if the optional SquareFold Trimmer
Module is attached to the Booklet Maker Finisher.
Booklet Trimming/Pressing options include the following:
• Booklet Trimming: This option trims (cuts) away the face (edge) of the booklet,
resulting in a neat finished edge.
• Book Pressing: Book Pressing, also known as square folding, flattens the booklet
spine, thereby reducing the booklet thickness and giving it the appearance of a
perfect bound book.
Covers
This feature allows you to automatically add covers to your copied sets using stock from
a different tray. For example you can add colored stock, card or transparencies to your
copied sets to add a professional finish to your copy job.
The Covers feature includes the following options:
Front Cover/Back Cover
Select an option for a front cover only, back cover only, or select options for both front
and back covers:
• Off
• Blank Cover: Uses blank sheets of paper as the cover.
• Print on Side 1
• Print on Side 2
• Print on Both
Paper Supply
Select the tray or trays from which front and/or back cover media is supplied. If Blank
Covers is selected, enter the number of blank sheets that will be used for the covers.
Note
If Blank Coveris used for both the front and back covers, verify that the correct quantity
is selected for both the covers.
User Guide
3-21Xerox®Versant®180 Press

Press Apps
Page Layout
The Page Layout options are ideal for handouts, storyboards, or for archival purposes.
Pages per Side
The Pages per Side feature is ideal for handouts, storyboards or for archival purposes.
It allows the scanning of up to eight independent images to fit onto one sheet of paper.
Your press reduces or enlarges the images as needed in order to display them either
in portrait (upright) or landscape (sideways) orientation on one page; this is based on
the paper supply selected.
Repeat Image
This option allows you to copy a single image up to eight times onto one page.
Variable Repeat: This option specifies the number of times to repeatedly copy the
image along each of the long and short sides of the paper. You can specify from 1 to
23 repeats along the short side (Y) and from 1 to 33 repeats along the long side (X).
The examples shown are a typical output that can be produced when using the Repeat
Image feature.
Poster
This feature allows you to create a large poster by pasting together copies spread over
multiple sheets. Copies are provided with a paste margin so that they can be pasted
together. Options include:
Output Size
This option allows you to choose from a list of preset output poster sizes.
Enlargement %
This option allows you to enter specific height and width percentage values (from
100% to 400%) for your final poster size.
Annotations
This option allows you to add a stamp to your copied output. Options include:
Comment
This option allows you to add comment stamps that are stored on the machine to the
output copies. Select one of eight existing stamped messages to be printed on the first
page or all pages of your copied sets. Stored comments include Confidential, Urgent,
and Draft. Youcan also create new or edit existing comments. These can also be stored
to the machine memory. You can also change the position and appearance of the
comment using the Position and Font Size buttons.
Date
This option allows you to place the current date in the margins of your output. The
date can be printed on only the first page of the output, or it can be printed on all
pages. Youcan also change the position and appearance of the date using the Position
buttons.
Xerox®Versant®180 Press3-22
User Guide

Press Apps
Page Numbers
This option allows you to add an independent page number to one or many copied
pages. You can also change the position and appearance of the page numbers using
the Position and Font Size buttons.
Bates Stamp
This option allows you to place an alphanumeric prefix, followed by a sequential page
number in the margins of the output. You can specify an existing Bates Stamp, or you
can create a new or edit an existing Bates Stamp. You can also change the position
and appearance of the stamp using the Position and Font Size buttons.
Watermark
This option to add a lightly printed sequential control-number, stored watermark, date
and time, or serial number on the background of each copy set. This feature can be used
to help track confidential documents. For example, you can use sequential numbering
to associate distribution copies with specific recipients. Options include:
Control Number
This option allows you to input a start number that will be printed on each document
set. For example, if you select 1 for the start number, the number 1 will be printed on
the first set of documents, the number 2 will be printed on the second set, and so on.
Stored Watermarks
This option allows you to select an existing watermark to be printed on one page or
many pages. Existing watermarks include Copy Prohibited, Copy, and Duplicate.
Date and Time
This option prints the current date and time on the output (each page).
Serial Number
This option allows you to make copies with the machine's serial number printed on
each page. This feature is useful if you want to track the copies coming from a certain
machine.
Watermark Effect
This option allows you choose an embossed or outline style for the watermark text you
print.
Tab Margin Shift
The Tab Margin Shift option allows you to copy images from a document onto tabbed
stock. You have the option to copy the entire original document onto the tabbed stock,
or you can choose to copy only the edge of the original document onto the tabbed stock.
Options include:
User Guide
3-23Xerox®Versant®180 Press

Press Apps
Shift to Tab
This option prints the edge of the original document image onto the tab of the tabbed
stock. You can change the amount of shift required by using the Shift Value buttons
on the touch screen.
Shift All
This option copies the whole image of the document onto tab stock. Use the Shift
Value button when you want to adjust the position of the image on the tab area.
Shift Value buttons
These buttons allow you to specify a shift value in the range of 0-15 mm (0-0.59 in.)
in 1 mm (0.039 in.) increments.
Add Tab Stock
Use this option to select a specific number of tab stock sheets to use.
Paper Supply
Use this option to select the tray containing the tab stock.
Face Up/Down Output
The Face Up/Down Output option allows you to select whether copies are output facing
up or facing down. Options include:
Auto
Selecting the Auto button automatically determines whether the copies should be
output face up or face down.
Face Up
Selecting the Face Up button causes all output to be delivered face up, with the first
page on top of the output stack.
Face Down
Selecting the Face Down button causes all output to be delivered face down, with the
first page on the bottom of the output stack.
Face Up (Reverse Order)
Selecting the Face Up (Reverse Order) button causes all output to be delivered face
up, with the last page on the top of the output stack. This setting may not be available,
depending on how your system administrator configures the machine.
ID Card Copy
Whether needing to copy insurance cards, a driver’s license, or any other form of
identification, the ID Card Copying feature offers a simple and efficient way to save
time. Information on both sides of an ID card can be copied onto one side of a sheet
of paper into the paper or bypass tray.
1. Open the document feeder and place the ID card on the top, left corner of the
document glass.
Xerox®Versant®180 Press3-24
User Guide

Press Apps
2. Close the document feeder.
3. Press the Home button on the press UI.
4. Select Copy on the Home window.
5. Select Output Format > ID Card Copying.
6. Select On.
7. Select Save.
8. Enter the quantity.
9. Press Start to begin scanning side 1.
10. Open the document feeder and turn the ID card over to copy side 2.
11. Close the document feeder.
12. Press Start to begin scanning side 2.
Printing begins and copies are delivered to the output area.
Transparency Options
When making a set of transparencies you can insert a divider between each transparency
in order to make it easier to manage your presentation slides. You can also produce
paper copies of the transparencies in order to distribute them to people. Transparency
options include:
Blank Transparency Separators
This option delivers your transparencies to the output destination with a blank sheet
of paper separating each transparency.
Blank Separators and Handouts
This option inserts a blank sheet of paper between each printed transparency. In
addition, a distribution set of copies is also printed on the stock you specify using the
Paper Supply Settings button. Handouts can be 1- or 2-sided and stapled (if available).
Transparency Set and Handouts
This option delivers the transparencies without separators. However, a distribution set
of copies will be printed on the stock you specify using the Paper Supply button.
Handouts can be 1- or 2-sided and stapled (if available).
Transparency Tray
Select the tray containing the transparencies.
Separator Tray / Separator and Handout Tray / Handout Tray
This option varies depending on the selected transparency option. Select the desired
tray that contains the separator and/or handout stock.
Folding (optional)
Note
This feature is available only if the appropriate, optional finishing device is attached to
your press.
3-25Xerox®Versant®180 Press
User Guide

Press Apps
Review the following information before using the Folding option.
• If your press is equipped with an optional Folder, you can make copies or prints using
the Folding feature.
• Depending on the finishing device, the Folding option can fold your output in half
(single or bi-fold) or in thirds (C-fold or Z-fold types).
• The Folding option can be selected for both your copy and network print jobs.
• Depending on the copy/print job, the Folding option can be selected from either the
press UI or from the print driver on your workstation.
• The Folding option can also be selected at the print server for the selected job.
• In order to use the folding option, the orientation of documents must be short-edge
feed (SEF). You must select a paper tray that contains SEF stock.
Folding options include:
• Single Fold (Bi-Fold): Select this option to fold the output copies in half.
• C-Fold: Select this option to fold the output copies in thirds.
• Z-Fold: Select this option to fold the output copies with two folds that are folded in
opposite directions, resulting in a type of fan fold.
• Z-Fold Half Sheet: This option has two folds that are folded in opposite directions,
with two unequal folds. The two unequal folds allow one edge of the sheet to have
a longer edge which allows for stapling or hole punching.
• Image Inside Fold: Folds copies so that the image is printed on the inside.
• Images Outside Fold: Folds copies so that the image is printed on the outside.
Job Assembly Feature
Job Assembly Feature Overview
Job Assembly includes the following features:
• Build Job
• Sample Job
• Combine Original Sets
• Delete Outside / Delete Inside
Build Job
This feature allows you to change and save settings individually for each document
page or stack. You can then make copies of documents with different settings as one
job.
1. Split the hard-copy document into sections for individual programming.
2. On the Home window, select Copy.
3. Select the Job Assembly tab.
4. Select Build Job.
5. Select Build Job On.
6. Select Save.
Xerox®Versant®180 Press3-26
User Guide

Press Apps
7. Programthe job requirements for the first segment of the job by selecting and saving
the applicable features from the features shown at the bottom of the Build Job
window.
• Copy Output
• Booklet Creation
• Covers
• Annotations
• Segment Separators
• Watermark
• Face Up/Down Orientation
8. Load only the first segment into the document feeder or place the segment on the
document glass one page at a time.
9. Press Start.
When the first segment has finished scanning, the Copy Status screen will appear.
10. Remove the originals from the document feeder or document glass.
11. Select Change Settings.
12. Program the job requirements for the second segment.
13. Load the second segment into the document feeder or on the document glass.
14. Press Start.
15. Repeat the previous steps until all segments of your job have been programmed and
scanned.
16. After the last segment has been scanned, select Last Original.
The machine will complete the quantity selected.
17. Retrieve the copies from the output area.
Sample Job
When making multiple copies, you can continue making copies after making and
examining a sample set. Youcan choose to continue or cancel the job after confirmation.
To print a sample of the job, perform the following:
1. Press the Home button on the press UI.
2. Select Copy on the Home window.
3. Select Job Assembly > Sample Job.
4. Select Sample Job On.
5. Select Save.
6. Load the documents in either the document feeder or on the document glass.
7. Program the job with the Copy desired features/options.
8. Enter the quantity.
9. Press Start.
One copy set of the job (the sample set) is printed and the remainder of the job is
placed on hold, and the machine is paused.
10. If desired, change any applicable setting and copy quantity.
11. Select either Start to finish the job or Cancel to stop the job.
User Guide
3-27Xerox®Versant®180 Press

Press Apps
Selecting Start continues the copy process and the programmed number of sets will
be printed. Retrieve the copies from the output area.
12. Upon completion, press the Clear All button on the control panel to return the settings
to their default state.
Combine Original Sets
This feature allows you to copy sets of documents that cannot be loaded into the
document feeder.This is useful when copying documents that may be damaged, ripped
or torn, or too wrinkled to go through the document feeder.Combine Original Sets allows
you to copy each original by placing it on the document glass and creating one copy
job for the entire set.
1. Press the Home button on the press UI.
2. Select Copy on the Home window.
3. Select the Job Assembly tab.
4. From the Job Assembly tab, select Combine Original Sets.
5. Select either On or Off.
• On: Select this option to have the Next Original option highlighted on the copy
screen when scanning is in process.
• Off: Select this option to have the Last Original option highlighted on the copy
screen the scanning process is in process.
6. Select Save to save your choice.
This feature is available only when Collated is selected in the Copy Output window.
7. Load your documents into the document feeder or individually place them on the
document glass.
8. Program the job with the desired Copy features/options.
9.
10. Enter the quantity.
11. Press Start.
12. When you are finished scanning all the documents, select Last Original to complete
the job.
13. Retrieve the copies from the output area.
Delete Outside/Delete Inside
This feature allows you to specify the area for omission or deletion and then to copy
that area. Keep the following in mind when using this feature:
• When specifying multiple areas to delete, it is also possible to overlap and specify an
area.
• When selecting Reduce/Enlarge, the areas are reduced or enlarged by interlocking
magnification.
1. Press the Home button on the press UI.
2. Select Copy on the Home window.
3. Select the Job Assembly tab.
4. Select Delete Outside/Delete Inside.
The Delete Outside/Delete Inside screen is displayed. By default, Off is selected.
Xerox®Versant®180 Press3-28
User Guide

Press Apps
5. Select either Delete Outside or Delete Inside.
6. If the originals are 2-sided, select the applicable option:
• Both Sides
• Side 1 Only
• Side 2 Only
7. Select the Area 1 button.
The Delete Outside/Delete Inside Area 1 screen is displayed; use this screen to define
the first area for deletion (omission) from the copy output.
8. To define a specific area, enter the two X/Y coordinates within a range 0.0-17.0 inches
(0.0-431.8 mm). Navigate from coordinate to coordinate by selecting each X/Y button:
a) Select the Y1 box and use the numeric keypad on the control panel to enter the
value for Y1.
b) Select the Y2 box and use the numeric keypad on the control panel to enter the
value for Y2.
c) Select the X1 box and use the numeric keypad on the control panel to enter the
value for X1.
d) Select the X2 box and use the numeric keypad on the control panel to enter the
value for X2.
Clear a deletion area by selecting the Clear Area X (1, 2, or 3) button.
9. Select Save.
10. Select Save again.
11. Select any other desired copy features/options.
12. Enter the quantity.
13. Press Start.
14. Retrieve the copies from the output area.
Scan
Scan Overview
The Scan feature supports several methods for scanning and storing an original
document. This machine supports the following scan capabilities:
• Email: Scans a document and sends the scanned data as an e-mail attachment after
convertingthe data to TIFF, JPEG, PDF, DocuWorks®, or XPS (XML Paper Specification).
• Network Scanning: Scans a document using a job template that was created using
CentreWare®Internet Services (CWIS). When Scan to Home is enabled and the
RemoteAccess featureis available, the scanned data can be transferred to a different
destination according to an authenticated user.
• Scan to PC: Scans a document and sends the scanned data to a network computer
via the FTP or SMB protocol.
• Store to Folder: Scans a document and saves the scanned data in a folder on the
machine.
User Guide
3-29Xerox®Versant®180 Press

Press Apps
• Store to USB: Scans a document and saves the scanned data to a USB memory
device. (This is an optional feature.)
• Store & Send Link (Send to Folder):Scans a document and sends an e-mail notifying
the user of two URLs: one is for the location where the scanned data can be retrieved,
and second is for the location from which the data can be deleted.
• Store to WSD (Web Services on Device): Scan a job either at the press or by sending
a command from a network computer to the press. The scanned data is then sent to
a specified network computer.
Basic Scanning
Basic Scanning Procedure
1. From the press UI, press the Clear All button.
2. Press the Home button.
3. Select the desired scan method.
• E-mail
• Network Scanning
• Scan to PC
• Store to Folder
• Send from Folder
• Store to USB
• Store & Send Link (Send to Folder)
• Store to WSD
4. Load your original documents either in the document feeder or on the document
glass.
5. Select the desired scan options.
• Color Scanning
• 2 Sided Scanning
• Original Type
• Scan Presets
• Advanced Settings
• Layout Adjustments
• E-mail Options or Filing Options
6. Press Start.
If using the document glass and multiple documents or multiple pages of a bound
original/book need to be scanned, the perform the following substeps:
a) Select Next Original, place the original to be scanned and select the Start button.
b) Continue until you are scanning the last original, select Last Original then select
the Start button.
7. Select Job Status on the UI to view the status of the scanned job.
8. Retrievethe original documents either fromthe Document Feederor Document Glass.
Xerox®Versant®180 Press3-30
User Guide

Press Apps
Previewing Scanned Images
1. Scan the images and select job features.
2. While scanning, select Preview to preview the last page that was scanned.
3. From the drop-down menu, specify the view size by selecting Whole Page or Enlarge
View, and set Current Page.
4. After the confirmation, select Close to close the preview screen.
Changing Scan Settings/Options
While your job is scanning, you can change settings to that job by performing the
following steps.
1. Select Next Original.
2. Select Change Settings.
3. Select the appropriate section and make select features. The following features can
be adjusted:
• Color Scanning
• 2 Sided Scanning
• Original Type
• Image Options (Lighten/Darken)
• Image Enhancement
• Resolution
• Quality/File Size
• Shadow Suppression
• Original Orientation
• Original Size
• Edge Erase
• Book Scanning
• Reduce/Enlarge
4. After your changes are complete, select Start.
Canceling a Scan Job
1. Either select Stop on the UI touch screen or press the Stop button on the UI control
panel.
2. On the UI control panel, press Cancel to end scanning or Start to restart the scan.
3. Press the Job Status button on the UI.
4. Select the job to cancel, and then press Stop.
Note
When a scan is canceled, scan data already stored to the mailbox is deleted.
Stopping a Scan Job
1. While a scan job is in process, Press either the Stop button on the UI control panel
or select Delete on the UI touch screen.
3-31Xerox®Versant®180 Press
User Guide

Press Apps
2. Select Delete.
3. If Delete does not appear on the screen, press the Job Status button on the UI control
panel.
4. Select the job to cancel and select Delete.
Scan Options
Scan Options Overview
The following settings can be set for scan jobs.
• Basic Scan Options (shown on the first tab of the selected scan method window)
• Advanced Settings
• Layout Adjustment
• Email Options or Filing Options (depends upon the selected scan method)
Basic Scan Options
The basic scan options are shown on the first tab of the selected scan method. These
options include the following:
Color Scanning
Color Scanning options include:
• Auto Detect: The color of the document is determined automatically; the machine
scans in full color when the document is colored, otherwise, scans in monochrome.
• Color: Select this option to scan a color document.
• Black & White: Scans a document in monochrome two tones. You can select the
document type in Original Type.
• Grayscale: Scans a document in grayscale. Adds shades to monochrome, creating
intermediatetones that change gradually.Suited to documents containinggradations
that cannot be reproduced with monochrome (2-color tone).
2 Sided Scanning
2 Sided Scanning options include:
• 1 Sided: Select this option to scan only one side of the document.
• 2 Sided: Select this option when both sides of the 2-sided document are in the same
orientation.
• 2 Sided, Rotate Side 2: Select this option when both sides of the 2-sided document
are in opposite orientations.
Original Type
Original Type options include:
• Photo & Text:Select this option when scanning a document that contains both text
and photos. The machine automatically identifies the text and photo areas and
scans each area with optimum quality.
• Text: Select this option when scanning text clearly.
• Photo: Select this option when scanning photos.
Xerox®Versant®180 Press3-32
User Guide

Press Apps
Scan Presets
Scan Presets options include:
• Sharing and Printing: This setting is best used for sharing files to be viewed on
screen and for printing most of the standard business documents. This setting results
in small file sizes and higher image quality.
• Archival Record: This setting is best used for standard business documents that are
stored for record keeping purposes. This setting results in the smallest file size and
normal image quality.
• Optical Character Recognition: This setting is best used for documents that are
processed by OCR software. This setting results in large file sizes and the highest
image quality.
• High Quality Printing: This setting is best used for documents that contain detailed
graphics and photos. This setting results in large file sizes and the maximum image
quality.
• Simple Scan: This setting is best used for faster processing but may result in
excessively large file sizes. Use this setting to apply the minimal amount of image
processing and compression.
Advanced Settings
The options for Advanced Settings are shown on the second tab of the selected scan
method; these options include the following:
Image Options
The Image Options include:
• Lighten/Darken: This option provides manual control to adjust the lightness or
darkness of the scanned images. Scroll down to darken the scanned image of light
originals such as pencil images. Scroll up to lighten the scanned image of dark
originals such as half tones or originals with colored backgrounds.
• Sharpness: This option controls the balance between sharp text and moiré (patterns
within the image). Move the slider control down (Soften) to produce an image with
a smooth, uniform appearance (ideally suited for photographic scanned images).
Move the slider control up (Sharpen) to produce an image with better quality text
or line art.
User Guide
3-33Xerox®Versant®180 Press

Press Apps
Image Enhancement
The Image Enhancement options include:
• Background Suppression: This option prevents reproduction of unwanted shading
from originals where the opposite side printing shows through (translucent).
Off: This is the default setting. With background suppression off, originals are scanned
without filtering the document backgrounds.
Auto Suppression: This option automatically reduces or eliminates any background
on the output which may be caused by colored paper or newspaper originals. For
example, when Color Scanning is set to Black & White, the background of a
document printed on colored paper, such as newspaper, is suppressed. When Color
Scanningis set to Color, the background of a document printed on white-color paper
is suppressed.
• Contrast: This option controls the difference between the image densities within the
scanned image. Lower contrast settings reproduce more detail in light and dark areas
of the original. Higher contrast settings produce vivid blacks and whites for sharper
text and lines, but produce less detail in pictures.
Resolution
Choose one of four resolution settings:
• 200 dpi (dots per inch): This setting produces normal output quality and a small file
size. Use this setting for office documents and photos.
• 300 dpi: This setting produces a higher output quality and larger file size. Use this
setting for sharper scanning of office documents and photos.
• 400 dpi: This setting produces medium output quality and the largest file size. Use
this setting for high quality printing; this setting is suitable for fine lines and small
fonts than have been enlarged, and for documents with low image definition.
• 600 dpi: This setting produces maximum output quality and the largest file size. Use
this setting for high quality printing; this setting is suitable for fine lines and small
fonts than have been enlarged, and for documents with low image definition.
Quality/File Size
This feature allows you to select the ratio of data compression for color and grayscale
scanned images. Use the slider to choose from good image quality with small file size,
higher image quality with larger file size, or highest image quality with largest file size.
Note
This feature is unavailable whenever Black and White (Color Scanning) is selected.
Xerox®Versant®180 Press3-34
User Guide

Press Apps
Photographs
This featureenhances the image forfiles that are scanned using photographic originals.
Select either Off (default setting) or Enhance Photographs.
Note
In order to use this feature, Color Scanning must be set for Color. Furthermore, when
Enhance Photographs is selected, Shadow Suppression and Background Suppression
are not available.
Shadow Suppression
Select Auto Suppression to hide background color and image bleed through for color
scanning. This feature is not available when Black and White is selected for Color
Scanning.
Layout Adjustment
The options for Layout Adjustment are shown on the third tab of the selected scan
method; these options include the following:
Original Orientation
Select the direction that your original lays either in the document feeder or on the
document glass. Select either Upright Images or Sideways Images.
Original Size
Select one of three options that indicate the size of your originals.
• Auto Detect: This option automatically detects the size of the scanned pages. All
standard sizes are automatically detected.
• Manual Size Input: This option allows you to select a standard paper size from the
options shown or to input a non-standard (custom) size.
• Mixed Size Originals: With this option the machine automatically detects the size
of each document.
Edge Erase
This option erases images around the border (margins) of a document.
• All Edges: This option erases a preset, equal amount from the top, bottom, left and
right margins.
• Print to Edge: This option does not erase any of the margins of the document.
• Individual Edges: This option independently erases each of the four margins in
differing amounts.
• Presets: This option erases preprogrammed amounts as set up by the System
Administrator.This includes preset options for Header/Footer Eraseand Hole Punch
Erase.
User Guide
3-35Xerox®Versant®180 Press

Press Apps
Book Scanning
Use this option to scan pages from bound originals. Options include:
• Left Page then Right: Scans the left page first and the right page of the bound
original’s facing pages.
• Right Page then Left: Scans the right page first and the left page of the bound
original’s facing pages.
• Top Page then Bottom: Scans the top page first and then the bottom page of the
bound original’s facing pages.
The following sub-options are also available:
• Both Pages: Scans both pages in page order.
• Left Page Only: Scans the left page only.
• Right Page Only: Scans the right page only.
• Top Page Only: Scans the top page only.
• Bottom Page Only: Scan the bottom page only.
• Binding Edge Erase: This option erases or deletes the shadow that is caused by the
center binding of the bound original.
Reduce/Enlarge
Use this option to select a reduction or enlargement value for the scanned document.
E-mail Options
E-mail Options is the fourth tab of the E-mail scan method, and options include the
following:
File Name
Use this option to enter a file name. If no name is entered, the system automatically
generates a file name.
Reply To
Use this option to enter a reply recipient email address.
Read Receipts
This option requests an email with the delivery status from the recipient to the sender.
Xerox®Versant®180 Press3-36
User Guide

Press Apps
File Format
Select the desired file format for scanned data; options include:
• PDF: Saves scanned data in PDF format.
• PDF/A: Saves scanned data in the PDF/A format.PDF/A is used primarily forarchiving
and long-term preservation.
• TIFF: Saves scanned data in TIFF format.
• JPEG: Saves scanned data in JPEG format. This option is selectable when either Color
or Grayscale is selected for Color Scanning.
• TIFF/JPEG Auto Select: Automatically selects JPEG or TIFF. The file format is
determined for each page: JPEG for full-color and grayscale pages, and TIFF for
monochrome pages.
• XPS (XML Paper Specification): Saves multiple pages into a single file.
Note
Options may vary and some options may not be available for your machine.
Additional File Format options
Depending on the selected file format, the following sub-options also are available:
• Compression Method: Allows you to select a compression method for the scanned
data.
• MRC High Compression: Allows you to save PDF and XPS files with high compression.
• Searchable Text: Allows you to select whether to perform character recognition in
PDF files.
• PDF Security: Allows you to configure security for the PDF output in order to prevent
unauthorized access.
• Optimize For Quick Web View: Optimizes the PDF file so that it is displayed faster
on a web browser.
• Add Thumbnail: Allows you to attach thumbnails to XPS files when XPS is selected.
A thumbnail is a reduced, small file size image that helps you check the file contents.
• Single File for Each Page: Saves each page as a single file in the specified format.
User Guide
3-37Xerox®Versant®180 Press

Press Apps
Compression Method options
When Manual Select is chosen for the Compression Method, some or all of the
following options are available.
For black and white images/pages only, select one of the following options:
• Modified Modified Read (MMR): This setting is automatically selected when either
Photo and Text or Text is chosen for Original Type.
• Modified Huffman(MH): This setting is automatically selected when Photo is chosen
for Original Type.
• JBIG2 Arithmetic Encoded: This process has better compression performance than
the Huffman encoded process. However, the compression rate is slower than Huffman
encoded and it uses more memory but yields better compression results.
Note
JBIG stands for Joint Bi-level Image experts Group. JBIG compresses only black and
white images.
• JBIG2 Huffman Encoded: Huffman coding takes less page memory and has faster
compression and decompression than the arithmetic coding. Use this option if
high-quality compression results do not matter and you want to use less page
memory.
For grayscale or color images/pages, select one of the following options:
• JPEG: This is the default setting for grayscale/color pages.
• Flate: This option saves the image data at a higher compression rate than JPEG.
Flate is lossless and does not remove data during the compression process.
PDF Security options
The following PDF Security options are available when selecting E-mail Options > File
Format > PDF > PDF Security > Password:
• Encryption Algorithm: Choose one of three encryption methods:
- 128-bit RC4: Encrypts the file by using the 128-bit RC4 method. Files encrypted
with this method can be opened with Adobe®Acrobat®5.0 or later.
- 128-bit AES: Encrypts the file by using the 128-bit AES method. Files encrypted
with this method can be opened with Adobe®Acrobat®7.0 or later.
- 256-bit AES: Encrypts the file by using the 256-bit AES method. Files encrypted
with this method can be opened with Adobe®Acrobat®9.0 or later.
• File Open Password: This option sets a password foropening the PDF. The recipient
of the PDF file must know the password before it can be opened.
• Permissions: This option adds restrictions to the PDF file which prevents unauthorized
printing or editing of the file. The recipient of the PDF must know the permissions
password in order to remove these restrictions.
Xerox®Versant®180 Press3-38
User Guide

Press Apps
Filing Options
Note
Filing Options is not available with the E-mail scan method.
Filing Options is the fourth tab of the selected scan method, and options include the
following:
File Name
Use this option to enter a file name. If no name is entered, the system automatically
generates a file name.
File Name Conflict
Use this option to resolve file name conflicts. Choices include:
• Do Not Save: Cancels the scan operation so that you can enter another file name.
• Rename New File: Attaches a 4-digit number (0000-9999) to the end of the duplicate
file name and saves the file in the same directory.
• Overwrite Existing File: Deletes the existing file with the duplicate file name and
saves the new file with the specified file name in the same directory.
• Add to Existing Folder: Adds the scanned file to the existing folder and overwrites
any other file that has the same file name.
• Add Date Stamp to File Name: Adds the current date to the name of the new file.
File Format
Select the desired file format for scanned data; options include:
• PDF: Saves scanned data in PDF format.
• PDF/A: Saves scanned data in the PDF/A format.PDF/A is used primarily forarchiving
and long-term preservation.
• TIFF: Saves scanned data in TIFF format.
• JPEG: Saves scanned data in JPEG format. This option is selectable when either Color
or Grayscale is selected for Color Scanning.
• TIFF/JPEG Auto Select: Automatically selects JPEG or TIFF. The file format is
determined for each page: JPEG for full-color and grayscale pages, and TIFF for
monochrome pages.
• XPS (XML Paper Specification): Saves multiple pages into a single file.
Note
Options may vary and some options may not be available for your machine.
User Guide
3-39Xerox®Versant®180 Press

Press Apps
Additional File Format options
Depending on the selected file format, the following sub-options also are available:
• Compression Method: Allows you to select a compression method for the scanned
data.
• MRC High Compression: Allows you to save PDF and XPS files with high compression.
• Searchable Text: Allows you to select whether to perform character recognition in
PDF files.
• Optimize For Quick Web View: Optimizes the PDF file so that it is displayed faster
on a web browser.
• Add Thumbnail: Allows you to attach thumbnails to XPS files when XPS is selected.
A thumbnail is a reduced, small file size image that helps you check the file contents.
• Single File for Each Page: Saves each page as a single file in the specified format.
Compression Method options
When Manual Select is chosen for the Compression Method, some or all of the
following options are available.
For black and white images/pages only, select one of the following options:
• Modified Modified Read (MMR): This setting is automatically selected when either
Photo and Text or Text is chosen for Original Type.
• Modified Huffman(MH): This setting is automatically selected when Photo is chosen
for Original Type.
• JBIG2 Arithmetic Encoded: This process has better compression performance than
the Huffman encoded process. However, the compression rate is slower than Huffman
encoded and it uses more memory but yields better compression results.
Note
JBIG stands for Joint Bi-level Image experts Group. JBIG compresses only black and
white images.
• JBIG2 Huffman Encoded: Huffman coding takes less page memory and has faster
compression and decompression than the arithmetic coding. Use this option if
high-quality compression results do not matter and you want to use less page
memory.
For grayscale or color images/pages, select one of the following options:
• JPEG: This is the default setting for grayscale/color pages.
• Flate: This option saves the image data at a higher compression rate than JPEG.
Flate is lossless and does not remove data during the compression process.
Resolving a File Name Conflict
Note
This option is not available with some of the scan methods.
1. Select the Filing Options tab.
Xerox®Versant®180 Press3-40
User Guide

2. Select the File Name Conflict option.
3. Select the appropriate option:
• Do Not Save: Cancels the scan operation so that you may enter another file
name.
• Rename New File: Attaches a 4-digit number (0000-9999) to the end of the
duplicate file name and saves the file in the same directory.
• Overwrite Existing File: Deletes the existing file with the duplicate file name
and saves the new file with the specified file name in the same directory.
4. Select Save.
E-mail Overview
The E-mail feature scans a document and sends the scanned data as an e-mail
attachment to one or more recipients.
E-mail Components
New Recipient
Press Apps
If the recipient of the e-mail cannot be foundin the address book, select New Recipient
option to add the address in the To, Cc, or Bcc field of the e-mail. A maximum of 128
characters may be entered for a single e-mail address.
Address Book
Use the address book to find and add recipients in the To, Cc, or Bcc fields of the e-mail.
• List all public entries: This option displays the local address list which resides on the
machine.
• Retrieve entries using index: This option displays a keyboard allowing you to enter
characters and narrow the search to specific recipients.
• Search Public: This option searches for entries in the local address list.
Note
The address book displays only entries that were previously added by the system
administrator. A maximum of 2,000 addresses may be stored in the address book.
Add Me and From fields
Bydefault,these fields are not available for use. The system administrator must change
the settings for these fields before they can be used.
When these fields are available for use, enter the sender’s e-mail address in the From
field and send a copy of the e-mail to the sender by selecting Add Me. A maximum of
128 characters may be entered for the sender’s address in the From field.
Recipient(s) field
From this field, an e-mail address can be edited or removed by selecting a specific
recipient.
User Guide
3-41Xerox®Versant®180 Press

Press Apps
Subject
Use this field to enter the subject of the e-mail. A maximum of 128 characters may be
entered for the subject line.
Message
Use this field to enter a message to the recipient. A maximum of 512 characters may
be entered for the e-mail body text.
Preview
Select this check box in order to preview the scanned images/data.
Note
Scanned images/data cannot be previewed with E-mail Options > File Format > MRC
High Compression > On.
Scanning to an E-mail Address
1. From the UI, press the Clear All button.
This clears all previous settings from the machine.
2. Press the Home button.
3. Select E-mail.
4. Specify one or more recipients by choosing one of the following options:
• Select New Recipient.
1. Use the keyboard to enter the entire address.
2. Select Add.
3. If sending to multiple recipients, repeat the previous sub-steps until finished.
4. Select Close.
• Select Address Book.
1. Select Address Book.
2. Select one of the choices from the pull-down menu (such as List all public
entries).
3. Select the desired recipient.
4. Select one of the fields To, Cc, or Bcc.
5. If sending to multiple recipients, repeat the previous sub-steps until finished.
6. Select Close.
5. If applicable, perform the following:
• Select From and add the sender e-mail address.
• To send a copy of the email to the sender, select Add Me.
• Edit or remove recipients from the Recipient(s) field.
• Select Subject to enter and save an e-mail subject.
• Select Message to enter and save the e-mail message.
Xerox®Versant®180 Press3-42
User Guide

Press Apps
6. Load your original documents either in the document feeder or on the document
glass.
7. Select the desired scan options.
8. Press Start to begin scanning.
9. Retrieve the original documents from either the Document Feeder or the Document
Glass.
Network Scanning
Network Scanning Overview
This featurescans documents after selecting a specific job template and choosing other
scan options such as the forwarding destination server. Job templates are created by
using CentreWare Internet Services. Scanned data is converted to the format specified
in a job template, and is automatically sent to a server. The machine allows you to
automatically retrieve the job templates that are stored in a server.
When Scan to Home is enabled, and when the Remote Access feature is available, the
scanned document can be transferred to a different destination according to an
authenticated user.
Note
In order to use Network Scanning, job templates must be created and set up by the
system administrator. The system administrator uses CentreWare Internet Services to
create and set up Job templates. Refer to the System Administration Guide for detailed
information.
Network Scanning Components
Job templates
On the Network Scanning tab, this is a list of available job templates. Select the desired
template to use for your network scanning job. If a template is not listed, contact your
system administrator.
DEFAULT: This is the default job template. When a new template is created from
CentreWare Internet Services, it is based on the default template. This template cannot
be deleted. It can be edited and returned to the factory-default template only by the
system administrator.
Go To
Use the numeric keypad to enter a 3-digit job template number. The job template then
appears at the top of the list.
Template Description
This displays the Template Description screen. This button is available for selection
only when a description has been added to a job template.
Update Templates
Select this button to refreshthe information. If a created job template is not displayed,
select Update Templates to display all the job templates.
3-43Xerox®Versant®180 Press
User Guide

Press Apps
Network Scanning Procedure
On the Network Scanning window, you can scan documents after specifying a file (job
template) saving scanning conditions, informationon the forwardingdestination server,
and others. This feature creates job templates on a computer using CentreWare Internet
Services. Scanned data is converted to the format specified in a job template, and is
automatically sent to a server. The machine allows you to automatically retrieve job
templates stored in a server. When Scan to Home is enabled, and when the Remote
Access feature is available, the scanned document can be transferred to a different
destination according to an authenticated user.
1. From the UI, press the Clear All button.
2. Press the Home button.
3. Select Network Scanning.
4. Select a template.
5. Load your original documents either in the document feeder or on the document
glass.
6. Select Preview.
a) From the drop-down menu, specify the view size by selecting Whole Page or
Enlarge View, and set Current Page.
b) After the confirmation, select Close to close the preview screen.
7. Select the desired scan options.
8. Press Start to begin scanning.
9. Retrieve the original documents from either the Document Feeder or the Document
Glass.
Scan to PC
Scan to PC Overview
The Scan to PC service allows you to scan documents and send the scanned data to a
network computer using the FTP or SMB protocol.
Scan to PC Components
Transfer Protocol
The Scan to PC service allows you to scan documents and send the scanned data to a
network computer using the FTP or SMB protocol. Specify the protocol to use when
selecting Transfer Protocol. Choices include:
• FTP
• SMB
• SMB (UNC Format): UNC stands for Universal Naming Convention and its format
is as follows: \\host name\shared name\directory name
Address Book
Specify the recipient from the Address Book.
Xerox®Versant®180 Press3-44
User Guide

Press Apps
Browse Network for PC
Specify a destination PC by browsing your network. Selecting browse will displays a
hierarchy consisting of available server names and folders.
Specify Destination
Use this option to specify a destination PC using the screen keyboard,Enter information
in the fields provided for the selected protocol, to specify a forwarding destination.
How to Use the Scan to PC Feature
Using the Scan to PC Feature
Before performing the following procedure, ensure that a shared folder is created on
your computer; this folder is where the scanned data will be stored.
The Scan to PC service allows you to scan documents and send the scanned data to a
network computer using the FTP or SMB protocol.
1. From the UI, press the Clear All button.
2. Press the Home button.
3. Select Scan to PC.
4. Select the desired Transfer Protocol.
5. Select Save.
6. Choose the Save in destination where the data will be stored:
• Address Book; for instructions, refer to Using the Address Book to Specify a Scan
to PC Destination.
• Browse the network for a destination PC; for instructions, refer to Browsing the
Network for a Scan to PC Destination.
• Use the UI screen keyboard; for instructions, refer to Specifying a Scan to PC
Destination Using the UI Keyboard.
7. Load your original documents either in the document feeder or on the document
glass.
8. If desired, select Preview.
9. Select the desired scan options.
10. Press Start to begin scanning.
11. Retrieve the original documents from either the Document Feeder or the Document
Glass.
Using the Address Book to Specify a Scan to PC Destination
1. From the main Scan to PC tab window, select Address Book.
2. The Address Book was previously setup (contains address information):
• Yes: Continue to the next step
• No: See your System Administrator; only the administrator can setup entries in
the Address Book.
3. Select a recipient from the Name/Protocol list.
4. Select Add.
User Guide
3-45Xerox®Versant®180 Press

Press Apps
This adds the recipient to the Save in box.
5. Select Close to save and close the window.
Complete the steps in the procedure Using the Scan to PC Feature.
Browsing the Network for a Scan to PC Destination
1. From the main Scan to PC tab window, select Browse.
2. Select the destination for saving the data by locating a file:
• Select Previous to move to an upper directory.
• Select Next to move to a lower directory.
3. To add the selected destination to the address book, performthe following substeps:
a) Select Add to Address Book.
b) Select Save.
The Browse window is displayed.
4. Select Save to save and close the Browse window.
Complete the steps in the procedure Using the Scan to PC Feature.
Specifying a Scan to PC Destination Using the UI Keyboard
1. From the main Scan to PC tab window, select inside the Server field.
The UI screen keyboard is displayed.
2. Enter information to identify the server using the keyboard.
For the Server name, enter a server name or IP address. When the save location is in
the DFS namespace on Windows, enter a domain name or server name. Up to 64
characters are allowed.
3. Select Save.
4. Select inside the Shared Name field and enter a shared name.
When the save location is in the DFS namespace on Windows, enter a root name. Up
to 64 characters. This option is only available when you select SMB in Transfer
Protocol.
5. Select Save.
6. Select inside the Save In field and enter a directory path.
When the save location is in the DFS namespace on Windows, enter a folder name.
Up to 128 characters. This option is only available when you select FTP or SMB in
Transfer Protocol.
7. Select Save to save and return to the main Scan to PC tab window.
8. Select inside the User Name field then enter the user name of the computer to which
you are forwarding the data.
When a user name is not required for the destination, this field can be skipped.
9. Select Save.
10. Select inside the Password field and enter the password for the user name.
Up to 32 characters are allowed.
11. Select Save.
Complete the steps in the procedure Using the Scan to PC Feature.
Xerox®Versant®180 Press3-46
User Guide

Press Apps
Store to Folder
Store to Folder Overview
Use the Store to Folderoption to scan documents and save the scanned data in a folder
of the machine.
Note
Folders must be created before using the Store to Folder feature. Refer to the System
Administration Guide for detailed information and instruction on creating folders.
Store to Folder Components
Use the Scan to Folder option to scan documents and save the scanned data in a folder
of the machine.
Folder
Select a folder to savethe scanned data in. Select the up arrow to return to the previous
screen, or the down arrow to move to the next screen.
Go to
Use the numeric keypad to enter a 3-digit folder number. The folder then appears at
the top of the list.
File List
Select a folderand then select this button to display the File List screen. Youcan confirm
or delete files stored in the folder.
Using the Store to Folder Feature
Note
Folders must be created before using the Store to Folder feature. Refer to the System
Administration Guide for detailed information and instruction on creating folders.
1. From the press UI, press the Clear All button.
2. Press the Home button.
3. Select Store to Folder.
4. Select the desired destination folder.
5. Load your original documents either in the document feeder or on the document
glass.
6. Select the desired scan options.
7. Press Start to begin scanning.
8. Retrieve the original documents from either the Document Feeder or the Document
Glass.
Store to USB
Store to USB Overview
The Store to USB allows you to scan documents and save the scanned data to a USB
memory device.
3-47Xerox®Versant®180 Press
User Guide

Press Apps
Use the following USB memory devices:
• A formatted USB memory device
• A USB 2.0 compliant memory device (USB 1.1 is not supported.)
• A USB memory device with a storage capacity of up to 128 GB
Before using the Store to USB feature, review the following information:
• A USB memory device encrypted with software is not supported.
• A commercially available Memory Card Reader with a single slot can be used for this
feature, but the safe performance of this reader is not guaranteed. When a Memory
Card Reader with multiple slots is used, only one particular slot is available.
• When a USB memory device is inserted into the USB memory slot during the Energy
Saver mode, the UI touch screen does not light. After exiting the Energy Saver mode
by pressing the Energy Saver button, insert the USB memory device again or select
Store to USB on the Home window.
• Before removing the USB memory device, make sure that a window indicating that
data is being transferred is not displayed. If you remove the USB memory device
while the data is being stored, the data in the device may be damaged. You can also
view Job Status to confirm if the data has been stored to the USB memory device.
Using the Store to USB Feature
1. Load your original documents either in the document feeder or on the document
glass.
2. Insert the USB memory device into the USB memory slot on the front of the press
(near the User Interface).
One of the following happens:
• The USB Device Detected window displays.
• The Store to USB window displays.
• The UI touch screen does not change.
3. Choose one of the following options:
• If the USB Device Detected window displays, perform the following:
1. On the press UI, select Store to USB.
2. Go to Step 4.
• If the Store to USB window displays, go to Step 4.
4. From the main Store to USB window, select Save in.
5. Select a folder in which to save the scanned data.
This will be a folder location on the USB memory device.
6. Select Save.
The main Store to USB window displays.
7. Select the desired scan options.
8. If desired, select Preview.
9. Press Start to begin the scanning process.
10. Retrieve the original documents from either the Document Feeder or the Document
Glass.
Xerox®Versant®180 Press3-48
User Guide

Press Apps
Store and Send Link Feature (Send to Folder)
Store and Send Link (Send to Folder) Overview
Tip
This feature may not be available in all marketplaces.
Note
The Store & Send Link feature is also referred to as the Send to Folder feature.
If an authenticated user scans a document, the press temporarily saves the scanned
data, and automatically obtains the user's e-mail address that was registered in advance.
The press then sends an e-mail notifying the user of two URLs:
• One URL is for the location where the scanned data can be retrieved.
• The second URL is for the location from which the data can be deleted.
Tip
Only the authenticated user who logs into the press can be the recipient of an e-mail
transmission. The press cannot send e-mail to multiple recipients.
After receiving the e-mail on a computer, the user can retrieve the scanned data using
a web browser.
Review the following information before using the Store & Send Link (Send to Folder)
feature:
• Scan files stored in the machine will be automatically deleted when the retention
period expires.
• This retention period can be specified in URL File Expiration option by the System
Administrator in the range of 1 to 168 hours. The default value is 3 hours.
• The files will always be deleted automatically.
• To strengthen security, after retrieving the scanned data, access the second URL to
delete the scanned data stored in the machine.
• The Store & Send Link feature does not provide the following document management
features:
- Backing up and/or restoring files,
- Deleting all the data at one time,
- Listing files, and
- Displaying available storage space.
• The Store & Send Link featureallows you to retrieve scanned data without specifying
an e-mail address from the Address Book or from a folderfor each scan job. However,
the size of the data and its retention period are restricted on the press. If you want
to avoid these restrictions, use the Scan to PC or E-mail service.
• For more information, refer to the System Administration Guide.
• You can customize the layout of the features displayed on the Store and Send Link
feature. For more information, refer to System Administration Guide.
User Guide
3-49Xerox®Versant®180 Press

Press Apps
Storing and Sending a Link (Sending to Folder)
1. Press the Log In/Out button on the UI or select the login information field on the UI
touch screen.
2. Enter the user ID.
3. Select Store & Send Link on the UI Home window.
The system automatically obtains the preregistered e-mail addresses of the
authenticated users and displays them in the Scan To and From fields.
4. Select inside the Subject and Message fields to enter the desired information.
A maximum of 128 characters may be used for the Subject field, and a maximum of
512 characters may be used for the Message field.
5. Load your original documents either in the document feeder or on the document
glass.
6. If desired, select Preview.
7. Select the desired scan options.
8. Press Start to begin scanning.
9. Retrieve the original documents from either the Document Feeder or the Document
Glass.
Store to Web Services for Devices (WSD)
Store to WSD Overview
Note
WSD stands for Web Services for Devices.
Use the Store to WSD feature to scan a job either at the press or by sending a command
from a network computer to the press. The scanned data is then sent to a specified
network computer.
The following options are available with Store to WSD:
• Computer: Select this option to start a scan job by sending a request from a network
computer, and then forward the scanned data to a network computer. The scan job
will be operated from the network computer.
- To operate the scan job from a network computer, use an application which
supports image loading feature such as Windows Fax and Scan.
- Windows Faxand Scan is not availableforcomputers with Windows Vista Home
Basic or Windows Vista Home Premium. Toperform a scan fromsuch a computer,
use a different method, for example, using the Paint application and selecting
the option From Scanner or Camera.
• This Device: Select this option to starta scan job from the press UI, and then forward
the scanned data to a network computer. When this option is selected a list of
available computers is displayed; from this list select the computer that will receive
the scanned data.
- When This Device is selected, a List of Components is displayed.
Xerox®Versant®180 Press3-50
User Guide

Press Apps
- This list shows computer names and four processing methods including Scan to
User PC (this is a specified network computer), Scan for Print to User PC, Scan
for E-mail to User PC, and Scan for OCR to User PC.
How to Use the Store to Web Services for Devices (WSD) Feature
Using the Store to WSD Feature
1. From the press UI, press the Clear All button.
2. Load your original documents either in the document feeder or on the document
glass.
3. Press the Home button.
4. Select Store to WSD.
5. From the Start Scan Job From window, choose one of the following options:
• Computer; go to Starting a Scan Job from a Network Computer
• This Device; go to Starting a Scan Job from This Device
Starting a Scan Job from a Network Computer
Ensure that the original documents are loaded and that Computer is selected on the
Start Scan Job From window.
Note
The following procedure describes the scan method using Windows Fax and Scan with
Windows 7.
1. Select Operate from Computer.
The UI displays a standby message stating that a scan job is waiting.
2. To exit the standby mode, select Delete.
The UI displays a Remove Your Original message.
3. Remove your originals and select OK.
4. Reload your originals.
5. From the network computer, select Start > All Programs > Windows Fax and Scan
6. At the bottom of the left pane, select Scan, and then select New Scan from the
toolbar.
7. In the New Scan dialog box, select Change, and then select the press.
Ensure that the press model name is displayed; it will be shown to the right of Scanner.
If the press model name is not displayed, select Change, and then select the press.
8. Select the Profile list, and then select Document.
9. Select the desired scan options.
10. Select Scan.
After the documents are scanned, the scanned data is forwarded to the specified
computer.
11. The press UI displays a Remove Your Original message.
a) Removeyour original documents fromthe press Document Feederor Documennt
Glass.
b) Select OK on the press UI.
12. The UI displays a standby message stating that a scan job is waiting.
User Guide
3-51Xerox®Versant®180 Press

Press Apps
• Yes: The press cannot start another scan job even though the network computer
recognizes the press. Clear the press; go to the next step.
• No: The scan job is completed and the press is ready for other copy/print jobs.
13. From the UI, select Delete.
The scan operation is stopped. The UI displays a Remove Your Original message.
14. Remove your originals and select OK.
The scan job is completed and the press is ready for other copy/print jobs.
Starting a Scan Job from This Device
Ensure that the original documents are loaded and that This Device is selected on the
Start Scan Job From window.
Note
This procedure is done from the press UI.
1. From the List of Components, select a destination.
2. Press the Start button.
The scanned date will be forwarded to the specified destination.
3. Retrieve the original documents from either the Document Feeder or the Document
Glass.
4. Check the forwarded data on the destination computer.
Send from Folder (Folder / File Management)
Send from Folder (Folder / File Management) Overview
The Send from Folder feature allows you to access and manage folders and files that
were saved on the press. Folder/file management includes the following functions:
• Access the saved files
• Review the details of the files
• Print the files
• Rescan the files
• Send the files in an email
• Retrieve the email (with the file attachment) from a network computer
• Delete the files
• Create automatic routine tasks
• Register/create private folders and/or shared folders
File Options
The following options are available:
• Refresh: Displays the updated information.
• List: Lists the files stored in the folder, with their stored dates and pages.
Xerox®Versant®180 Press3-52
User Guide

Press Apps
• Thumbnail: Displays the images and names of the files stored in the folder.
• Number of Files: Displays the number of files stored in the selected folder.
• Select All: Allows you to select all the files in the folder. If you select Select All again,
all the files are deselected.
• Delete: Allows you to delete the selected files in the folder.
• File Details: Previews the selected file to allow you to check its details, and copy or
move it to another folder.
• Job Flow Settings: Allows you to create, link, and execute job flows.
• Print: Allows you to print selected files separately.
• Batch Print: Allows you to print multiple files as one file.
File Details Option
For the File Details option, these additional selections are available:
• Whole Page: Allows you to select whether to display the whole page or to enlarge
the image by 200%. You can select the view size from Whole Page and Enlarged
View. A small-sized document cannot be enlarged even if you select Enlarged View.
You can rotate or enlarge the image of the file in a folder in preview, but cannot save
the file with the image rotated or enlarged.
• No Rotation: Allows you to select an angle to preview the image from Right 90
degrees, Left 90 degrees, and 180 degrees. You can rotate or enlarge the image of
the file in a folder in preview, but cannot save the file with the image rotated or
enlarged
• Change File Name: Allows you to change the file name. Use the displayed keyboard
to enter a new name.
• Current Page: Allows you to specify a page to preview on the screen using + and - or
the numeric keypad.
Print Option
For the Print option, these additional selections are available:
• Paper Supply: Select the desired paper tray.
• 2 Sided Printing: Select 2-sided printing.
• Output: Select the desired output options including stapling, hole punching, and
which finishing tray to deliver the printed output.
• File Details: Displays a preview image of the selected file.
• Print Quantity: Select the number of print sets.
• Print: Prints the selected file.
Batch Print Option
The Batch Print option allows you to select batch printing. You can print multiple files
as one file. A maximum of 100 files can be bound in the selected order.
3-53Xerox®Versant®180 Press
User Guide

Press Apps
Note
For 2-sided printing, the last page becomes blank when the total number of printed
pages is odd. For printing of multiple files, a blank page is inserted after the final page
of each file. If a different size document is included in multiple files, it may be printed
in improper orientation.
These additional options are available with Batch Print:
• Paper Supply: Select the desired paper tray.
• 2 Sided Printing: Select 2-sided printing.
• Output: Select the desired output options including stapling, hole punching, and
which finishing tray to deliver the printed output.
• File Details: Displays a preview image of the selected file.
• Print Quantity: Select the number of print sets.
• Print: Prints the selected file.
Managing Folders and Scanned Files
1. From the UI, press the Clear All button.
2. Press the Home button.
3. Select Send from Folder.
4. Select a folder.
5. Select a file from the folder list.
6. From the drop-down menu, select how to display the file:
• List
• Thumbnail
7. Select one or more other options.
• Refresh
• Number of Files
• Select All
• Delete
• File Details
• Job Flow Settings
• Print
• Batch Print
How to Configure/Start a Job Flow
Configuring/Starting a Job Flow
The Send from Folder feature allows you to configure and/or start a job flow. Refer to
the followinginformationfor the various job flow settings and options that are available
in the Send from Folder feature.
Xerox®Versant®180 Press3-54
User Guide

Press Apps
Job Flow Settings
The options available with Job Flow Settings include the following:
• Auto Start: This sets auto start of the job flow for files stored in the folder. The job
flow automatically starts when a file is stored.
• Start Current Job Flow: Select files in the folder, and then select this button to start
the job flow linked to this folder. After executing the job flow, confirm fromJob Status
or print a Job History Report to check the result.
• Cut Link: Cancels the link between a folder and the linked job flow sheet.
• Create/Change Link: Displays the Link Job Flow Sheet to Folder window.
• Select Job FlowSheet: Select this button while files are selected to display the Select
Job Flow Sheet screen.
Create/Change Link
The settings available with the Create/Change Link option include the following:
• Refresh: Displays the updated file information.
• Create: Displays the Create New Job Flow Sheet window.
• Edit/Delete: Displays the Details window.
• Search by Name: Searches for job flows that partially match the entry. The machine
searches through job flow names that were registered upon each job flow creation.
The entry can be up to 128 characters.
• Search by Keyword: Searches for job flows that fully match the entry. The machine
searches through keywords that were registered upon each job flow creation. The
entry can be up to 12 characters. You can select from preset keywords if they have
been registered in the System Administration mode.
• Select byKeyword: Displays the Select Keyword window. Select a keyword registered
in the System Administration mode to search for job flows. Job flows that fully match
the entry are searched. The machine searches through keywords that were registered
upon each job flow creation.
• Sheet Filtering: Displays the Sheet Filtering window. Sheet Filtering allows you to
filter the job flow sheets that are displayed. Displayed job flow sheets may vary
depending on the Authentication feature.
Select Job Flow Sheet
The settings available with the Select Job Flow Sheet option include the following:
• Start: Executes the selected job flow sheet.
• Refresh: Displays updated information.
• Details: Displays the Details window.
• Change Settings: If the selected job flow sheet setting is editable, the Change Settings
window appears. You can temporarily change the settings.
• Search by Name: Searches for job flows that partially match the entry. The machine
searches through job flow names that were registered upon each job flow creation.
The entry can be up to 128 characters.
3-55Xerox®Versant®180 Press
User Guide

Press Apps
• Search by Keyword: Searches for job flows that fully match the entry. The machine
searches through keywords that were registered upon each job flow creation. The
entry can be up to 12 characters. You can select from preset keywords if they have
been registered in the System Administration mode.
• Select byKeyword: Displays the Select Keyword window. Select a keyword registered
in the System Administration mode to search for job flows. Job flows that fully match
the entry are searched. The machine searches through keywords that were registered
upon each job flow creation.
• Sheet Filtering: Displays the Sheet Filtering window. Sheet Filtering allows you to
filter the job flow sheets that are displayed. Displayed job flow sheets may vary
depending on the Authentication feature.
Sheet Filtering Options
Sheet Filter options include the following:
• Owner:
- System Administrator - If this box is checked, the only Job Flow Sheets available
to the System Administrator are displayed.
- Non-System Administrator - If this box is checked, Job Flow Sheets displayed do
not include those available to the System Administrator.
- No Filtering - When both the SystemAdministrator and Non-System Administrator
boxes are checked, all the Job Flow Sheets are displayed.
• Target: Place a check in each job type you want displayed.
Using Send from Folder to Link a Job Flow Sheet to a Folder
1. From the UI, press the Clear All button.
2. Press the Home button.
3. Select Send from Folder.
4. Select a folder, if required.
5. Select the files from the folder list.
6. Select the desired Job Flow option.
• Auto Start
• Start Current Job Flow
• Cut Link
• Create/Change Link
• Select Job Flow Sheet
7. To link a specific job flow sheet, choose Select Job Flow Sheet.
a) Select a desired job flow sheet.
b) Select Job Flow Settings.
c) Select Create/Change Link.
d) Select any option.
If Sheet Filtering is selected, select the desired filtering conditions, and then
select Save.
e) From the Link Job Flow Sheet to Folder window, select Save.
Xerox®Versant®180 Press3-56
User Guide

Press Apps
8. Select Start to run the job flow.
Job Flow
Job Flow Overview
Job Flow is a feature that allows you to register transfer settings of scanned data, such
as a transfer method and destination; this simplifies data-transfer tasks. Job flow sheets
are categorized into two types according to the target:
• One type of job flow sheet targets files stored in folders, and
• The other type targets scan files
Automatic/Manual Starting a Job Flow
A Job Flow is started in the following ways:
• Automatically when a document/file is linked to a folder
• Manually selecting a Job Flow to act on the documents/files stored in the folder.
To automatically start a job flow, you must create a link with a folder and a job flow
sheet in advance. Files are automatically processed with the job flow sheet when they
are stored in the linked folder.
Acceptable Features to Register
You can register the following features:
• Forward: Multiple forwarding recipients can be configured for each forwarding
method.
- FTP: Forwards via FTP. A maximum of two recipients can be specified.
- SMB: Forwards via SMB. A maximum of two recipients can be specified.
- Mail: Forwards via email. A maximum of 100 recipients can be specified.
• Email Notification: Job results may bes sent by email.
• Print: Files in a folder may be printed.
Job Flow Restrictions
A job flow sheet can be used by only one user, can be shared by multiple users, or can
be used for only certain folders.
Only the Job Flow Sheets that you have permission to execute are displayed.
User Guide
3-57Xerox®Versant®180 Press

Press Apps
Job Flow Settings and Options
Overview of Job Flow Options
Note
Created Job Flow Sheets can be executed, modified, duplicated, or deleted only from
the folder in which it was created.
Job Flow options include the following:
• Refresh: Displays updated information.
• Details: Displays the Details window. You can confirm the details of a job flow such
as the name, last updated date, target, owner, and save location. When you select
the information (i) button, the entire description of the job flow sheet is displayed.
• Change Settings: If available, this option allows you to change the job flow settings.
• Search by Name: Searches for job flows that partially match the entry. The machine
searches through job flow names that were registered upon each job flow creation.
The entry can be up to 128 characters.
• Search by Keyword: Searches for job flows that fully match the entry. The machine
searches through keywords that were registered upon each job flow creation. The
entry can be up to 12 characters. You can select from preset keywords if they have
been registered in the System Administration mode.
• Select byKeyword: Displays the Select Keyword window. Select a keyword registered
in the System Administration mode to search for job flows. Job flows that fully match
the entry are searched. The machine searches through keywords that were registered
upon each job flow creation.
• Sheet Filtering: Displays the Sheet Filtering window. Sheet Filtering allows you to
filter the job flow sheets that are displayed. Displayed job flow sheets may vary
depending on the Authentication feature.
Additional Job Flow Options
Additional job flow options include the following:
• Name: Set the name for the job flow using a maximum of 128 characters.
• Description: Set the description of the job flow using a maximum of 256 characters.
• Keyword: Used to search for a Job Flow Sheet using a maximum of 12 characters.
For example, enter Accounting as a keyword to access any Job Flow Sheets that
contain Accounting in the Job Flow name.
• Send as E-mail: Specify the recipients for the e-mail. You can specify a total of up to
100 addresses. Select from the address book numbers or by direct input by using the
keypad.
• Transfer via FTP (1), Transfer via FTP (2): Specify the server where documents are
sent using SMB protocols. When the server address is registered in the address book,
you can specify the address from the address book. The specified address appears
in the SMB Transfer window.
• Transfer via SMB (1), Transfer via SMB (2): Specify where SMB forwarding is to be
stored.
Xerox®Versant®180 Press3-58
User Guide

Press Apps
• Print: Configure the print settings. When On is selected, you can configure the settings
for the Print feature.
• E-mail Notification: You can receive an e-mail notification when a file is saved in a
folder or a job flow ends.
• Edit/Delete: Review the content of the job flow sheet, and edit, copy, or delete it.
Additonal options include: Edit, Delete, and Copy.
Sheet Filtering Options
Sheet Filter options include the following:
• Owner:
- System Administrator: If this box is checked, the only Job Flow Sheets available
to the System Administrator are displayed.
- Non-System Administrator: If this box is checked, Job Flow Sheets displayed do
not include those available to the System Administrator.
- No Filtering: When both the System Administrator and Non-System Administrator
boxes are checked, all the Job Flow Sheets are displayed.
• Target: Place a check in each job type you want displayed.
Send as E-mail Options
The settings available with the Send as E-mail option include the following:
• Address Book: The recipients can be specified from address book. The specified
recipient appears in Recipient Name/E-mail Address in the Send E-mail screen.
• New Recipient: Specify a new recipient. The specified recipient appears in Recipient
Name/E-mail Address in the Send as E-mail screen.
• Name/E-mail Address: Displays the recipient name or e-mail address specified.
• Subject: If desired, set a specific subject.
• Delete Recipient: Deletes all the information for the selected recipient.
• Edit: Allows you to check or change the information for the selected recipient.
• File Format: Specify the output file format.
• Resend Attempts: Set the amount of times you want to resend an E-mail or to switch
off the feature. If you select On, set the number of resend attempts and time interval:
- Resend Attempts: Set the number of times to resend an email between 1-5.
- Resend Interval: Set the transmission retry interval from 30-300 seconds.
Transfer via FTP (1) / Transfer via FTP (2) Options
The additional settings available with the Transfer via FTP (1) / Transfer via FTP (2)
option include the following:
• Address Book
• File Format
• Resend Attempts
• Name, Server, Save, User Name, and Password: The maximum number of characters
for each item is:
3-59Xerox®Versant®180 Press
User Guide

Press Apps
Name: Maximum 18 single-byte characters-
- Server: Maximum 64 single-byte characters
- Save in: Maximum 128 single-byte characters
- User Name: Maximum 97 single-byte characters
- Password: Maximum 32 single-byte characters
Transfer via SMB (1) / Transfer via SMB (2) Options
The additional settings available with the Transfer via SMB (1) / Transfer via SMB (2)
option include the following:
• Address Book
• File Format
• Resend Attempts
• Name, Server, Save, User Name, and Password: The maximum number of characters
for each item is:
- Name: Maximum 18 single-byte characters
- Server: Maximum 64 single-byte characters
- Save in: Maximum 128 single-byte characters
- User Name: Maximum 97 single-byte characters
- Password: Maximum 32 single-byte characters
Print Options
The additional settings available for Print option include the following:
• Print Quantity
• Paper Supply
• 2 Sided Printing
• Output
E-mail Notification Options
The additional settings available for E-mail Notification option include the following:
• Name/E-mail Address
• Message
• When to Notify
• Delete Recipient
• Edit
• Close Menu
Job Flow Procedures
Creating a Job Flow Sheet
1. Press the Machine Status button.
2. Select the Tools tab on the UI.
Xerox®Versant®180 Press3-60
User Guide

Press Apps
3. Select Setup & Calibration > Setup > Create Job Flow Sheet.
4. Select Create.
5. Select one of the line items from the list (Name).
a) Select Edit.
b) Enter the name information using the UI screen keypad.
c) Select Save.
6. Repeat the previous step for other line items (such as Description) until all desired
information is entered and saved.
7. If Send as E-mail is used, ensure all the required information is entered for it, including
recipient's name and e-mail address.
8. If desired, select Print to set options to print the linked Job Flow Sheet. Select Off to
disable this feature.
9. Select Save to keep your settings.
To activate the Save option, you must enter values in any of the following fields:
Send as E-mail, Transfer via FTP, Transfer via SMB, Print.
10. Review the newly created Job Flow Sheets and select Exit.
11. Press Clear All to return the press to its default values and settings.
Linking a Job Flow Sheet with a Folder
1. Press the Machine Status button.
2. Select the Tools tab on the UI.
3. Select Setup & Calibration > Setup > Create Folder.
4. Select a folder that is not being used (Available).
The New Folder window displays.
5. On the New folder - Password window choose one of the following:
• Off; if you do not assign a passcode, all users will be allowed access to the folder.
• On:
1. Enter a passcode with a maximum of 20 digits.
2. Select a Target Operation option: Always (All Operations), Save (Write),
or Print/Delete (Read).
3. Select Save.
6. Enter the following information by selecting each line item and selecting Edit:
• Folder Name (maximum of 20 characters)
• Check Folder Passcode
• Delete Documents After Retrieval
• Delete Expired Documents
• Link Job Flow Sheet to Folder: Select and go to the next step.
7. At the Link Job Flow to Folder window, select Create/Change Link.
8. Select the Job Flow Sheet that you want to link and then select Save.
9. At the Link Job Flow to Folder window, choose one of the following:
• Auto Start: Select this option if you want the Job Flow Sheet to be automatically
executed when a new document is saved to the folder. If you do not select Auto
User Guide
3-61Xerox®Versant®180 Press

Press Apps
Start, you will need to press the Start button on the UI to execute the linked Job
Flow Sheet.
• Select Close.
Note
Selecting Cut Link at any time will remove the link to the specified Job Flow
Sheet.
The Job Flow Sheet is linked to the folder.
10. Select Close to exit to the Tools tab.
Starting a Job Flow Manually
1. Load the original document(s).
2. From the UI, press the Clear All button.
3. Press the Home button.
4. Select Job Flow Sheets, and if enabled by the System Administrator, select OK.
5. Select a listed Job Flow Sheet.
6. Press the Start button. The job runs and is placed in a folder or on the appropriate
server.
Confirming/Changing a Job Flow
You can confirm a Job Flow and temporarily change its parameters. However, only fields
that have change permission, assigned when the Job Flow was created, can be edited.
1. From the UI, press the Clear All button.
2. Press the Home button.
3. Select Job Flow Sheets, and if enabled by the System Administrator, select OK.
4. Select a listed Job Flow.
5. Select Change Settings.
6. Select the group to change from the Group of Items.
7. Select an item in the group that will be changed.
8. Select the options you want to change and make changes as instructed.
9. Close any open windows to keep your changes.
Web Applications
Web Applications Overview
WebApplications is a service that allows you to access to web applications via a network
using the browser on the press in order to display and store data.
The press provides the following features:
• Access web applications fromthe press, and display the web application on the press
UI.
• Store scanned documents directly in a web application folder on the press.
• Print a file that is stored on a remote server.
Xerox®Versant®180 Press3-62
User Guide

Press Apps
Note
The web applications that can be displayed are those which are compatible with the
press. You cannot access internet websites on the press UI.
Accessing Web Applications
1. Press the Home button on the UI.
2. Select Web Applications.
3. Select an access destination.
4. Select Open from the pop-up menu displayed.
Job Status
Job Status Overview
The Job Status feature allows the user to check active, pending, and completed jobs.
The ability to cancel printing or pause jobs is also available from Job Status.
Job Status Area
The Job Status button on the press UI displays the progress and status of any currently
printing jobs and lists all completed jobs.
1. Select the Active Jobs tab to view the status of currently pending or in-progress
print jobs on the system.
2. Select the Completed Jobs tab to view a list of all jobs that have printed successfully.
3. Select the Group Parent Jobs checkbox to list and display the jobs according to a
parent/child relationship hierarchy.
Active Jobs Tab
1. Press the Job Status button on the UI.
2. Select the Active Jobs tab.
3. From the displayed list, select the applicable job to view.
Use the up or down buttons to navigate the list.
4. If required, select Display Time to show the time required to process the job.
5. To delete a job or change the execution order, select a job from the list.
6. Select Delete or Promote from the pop-up menu.
• Delete: This option cancels the current or pending job.
• Promote: This option moves a job to the top of list and runs it after the job that
is currently printing/copying.
• Job Progress: This option shows the details of the selected document.
• Close Menu: This option closes the pop-up menu.
Completed Jobs Tab
1. Press the Job Status button on the UI.
User Guide
3-63Xerox®Versant®180 Press

Press Apps
2. Select the Completed Jobs tab.
A list of the completed or deleted jobs display. Use the scroll bar to navigate the list.
3. To check the details of a job, select the job from the displayed list.
4. From this Status window, select one of the following to print a history of this job.
a) To print the job details, select Print this Job Report button.
b) To print the history of parent / child jobs, select Print this Job History button.
5. After checking the job details, select Close.
Machine Status
Machine Status Overview
Press the Machine Status button on the UI to access the Machine Status information,
including maintenance and reporting features.
• Device Information
• Faults
• Supplies
• Billing Information
• Tools
Device Information Tab
This tab provides general information about the press such as the currently installed
software version and the press (device) serial number. This area also allows you to print
reports and view details that apply to billing impressions.
Device Serial Number
The Device Serial Number is displayed under the General Information area on the
Device Information tab. Use this number when calling Xeroxfor technical information
or assistance.
Current System Software
The version of the system software that is currently installed on the press is displayed
under the Current System Software title.
IP Address and Host Name
The unique Internet Protocol Address and name identifying the press to the specific
network to which it is connected.
Paper Tray Status
Select the Paper Tray Status button to display tray status information including
percentage amount of media installed in each tray.
Xerox®Versant®180 Press3-64
User Guide

Press Apps
Device Configuration
Select the Device Configuration button to display a list of the various hardware
components and options that are available on the press as well as their status. Hardware
components and options include any optional feeding and finishing devices attached
to the press.
Software Version
Select the Software Version button to display a list of the software versions for the
various system components, including any optional feeding and finishing devices.
Print Reports
This Print Reports button is enabled by the system administrator. From the various
reports available, select a report on the touch screen and then select the Start button
to print. Some reports are only available in the system administrator mode.
From the Print Reports screen, select:
• Job Status
• Copy Reports
• Scan Reports
• Network Controller Job Report
• Job Counter Report (available in System Administrator mode only)
• Auditron Report / Meter Report (available in System Administrator mode only)
Maintenance Assistant
Select the Maintenance Assistant button to send the Xerox Remote Print Services
diagnostic information on the press to Xerox Support.
Others
From the Device Information - Others window select the Overwrite Hard Disk button;
this featureis a standarddata security function on the system. It prevents the document
image and registered data that is recorded on the press hard disk from being illegally
retrieved or removed.
Job image data stored on the hard disk within the press can be deleted and overwritten
after a number of overwritesor a period of time specified by the system administrator.
The Standby status indicates the completion of the overwriting process.
Faults Tab
The Faults tab provides access to a list of current faults affecting the press and some
detailed information about the faultsuch as when it occurred. Access this tab by pressing
the Machine Status button on the UI and selecting the Faults tab on the screen.
Fault History
This column identifies the fault code number assigned to the fault message.
Date/Time
This column indicates the day and time the fault occurred.
User Guide
3-65Xerox®Versant®180 Press

Press Apps
Image Count
This column indicates the total number of printed impressions.
From the Faults screen, select a fault to view instructions on how to fix the error.
Supplies Tab
The Supplies tab provides status information about the customer replaceable units
(CRUs) that are used in the press.
To access supplies information, press the Machine Status button on the UI and then
select the Supplies tab. Each Customer Replaceable Unit and status is displayed.
Billing Information Tab
Accessing Billing Information
1. Press the Machine Status button on the UI.
2. Select the Billing Information tab.
The Billing Information screen displays.
Billing Impressions Information
The Billing Informationscreen allows you to view the total number of impressions (prints)
recorded by the press, including a category of the number of color prints only, black
prints only and large media prints. It also displays specific usage counter information.
The counters display the impression amount for all printed jobs.
All meters that may be used for billing purposes are displayed on the Billing Information
screen:
• Color PrintedImpressions: This value (number) represents the total number of color
impressions that have been printed.
• Black Printed Impressions: This value (number) represents the total number of
black-only impressions that have been printed.
• Total Impressions: This value (number) represents the total number of ALL
impressions. It is the sum of the Color Impressions and the Black Impressions.
• Color Large Impressions: This value (number) represents the total number of large
color impressions. These impressions are one side of one sheet of large media (for
example 11 x17 in./A3). Large Impressions are any prints that are larger than 145
sq. in./935 sq. cm.
Note
This meter/counter is NOT added to the Total Impressions meter/counter since it is
already added to the Color Impressions meter/counter.
• Black Large Impressions: This value (number) represents the total number of large,
black-only impressions. These impressions are one side of one sheet of large media
(for example 11 x17 in./A3). Large Impressions are any prints that are larger than
145 sq. in./935 sq. cm.
Xerox®Versant®180 Press3-66
User Guide

Press Apps
Note
This meter/counter is NOT added to the Total Impressions meter/counter since it is
already added to the Black Impressions meter/counter.
Usage Counters
Select the Usage Counters button (from Machine Status > Billing Information)toview
even more detail on billing and counts being tracked on the press such as the number
of 1-sided vs 2-sided print jobs.
From the Counters drop-down list you can select the desired counter to view:
• Impression Counters
• Sheet Counters
• Images Sent Counters
• All Usage Counters
Impression Counters
This view displays the total impression amount. In other words, impression is the image
on one side of one sheet of media. This counter shows the total impression amount
for color and black-only impressions.
• Total Impressions: This number represents the total number of impressions for all
color and black-only print jobs.
• Black Impressions: This number represents the total number of impressions for all
black/white print jobs; includes Black Copied Impressions and Black Printed
Impressions.
• Black Large Impressions: These impressions are one side of one sheet of a large
black-only document (such as 11 x17 in./A3). Large Impressions are any prints that
are larger than 8.5 x14 in./B4.
• Color Impressions: This number represents the total number of impressions for all
color print jobs; includes Color Copied Impressions and Color Printed Impressions.
• Color Large Impressions: These impressions are one side of one sheet of a large color
document (such as 11 x17 in./A3). Large Impressions are any prints that are larger
than 8.5 x14 in./B4.
Sheet Counters
This counter provides information on the total number of sheets the press feeds to the
output area. Each sheet counts as one click on the counter (regardless of size or whether
it is a one-sided or two-sided print job).
Images Sent Counters
This counter provides informationon the total amounts for email images and network
scanned images.
All Usage Counters
This view provides a complete total of all the counters, including the totals from the
Impression Counters and Sheet Counters.
User Guide
3-67Xerox®Versant®180 Press

Press Apps
Update Button
Select this button to refresh and update the counts.
Tools Tab
Regular users have limited access to some of the features on the Tools tab.
Create Folder
Use this feature to create folders on the press for storing copied and scanned
documents.
Stored Programming
When available to the user, this feature enhances productivity by saving a series of
programming steps and assigning them to a specified Stored Programming option.
Stored programs save frequently used features and job settings which can be accessed
using a shortcut button. Stored Programming not only remembers feature settings,
but it can record a series of operations. This enables the user to record the hierarchy
of displayed screens for each step. For example, Stored Programming can record the
following actions: press the Machine Status button, and display the Print Reports
screen to print reports.
Note
This feature is available only if the system administrator has created and saved stored
programs.
Create Job Flow Sheet
Use this feature to create job flow sheets which contain transfer settings of scanned
data, such as a transfer method and destination. These sheets simplify data-transfer
tasks.
Add Address Book Entry
Select to add Address and Recipient Information. To add, select an available entry and
enter the information. To view an entry, select the entry and the information will
automatically display.
Paper Tray Attributes
The Paper Tray Attributes feature allows the user to change the attributes of a paper
tray, including size, type, and weight.
Note
The Paper Tray Attributes feature appears on the Tools tab only if the system
administrator has made it available to users.
Xerox®Versant®180 Press3-68
User Guide

Press Apps
Billing Impression Mode
The Billing Impression Mode defines how the press tracks and records impressions
made on large-size paper such as A3 or tabloid. The type of Billing Impression Modes
used by your press is set during system installation. A Xerox Sales Representative can
confirm the Billing Impression Modes applicable for your press. There are two types of
Impression Mode:
• A3 ImpressionMode - For all media sizes (including oversized), counts all impressions
equally.
• A4 Impression Mode - Counts large impressions on media such as A3 and 11 x 17
inches (media that is larger than 8.5 x 14 inches), as their A4 equivalent.
To view the current Billing Impression Mode, press the Machine Status button on the
UI, then select Tools > Billing Impression Mode.
Changing the Paper Tray Attributes
1. Press the Machine Status button on the UI.
2. Select the Tools tab.
3. Select Setup & Calibration > Setup > Paper Tray Attributes.
4. Select a tray.
5. Select Change Settings.
6. If the settings are correct, select Confirm or select Change Settings.
7. If necessary, make the required changes to the tray settings (such as weight, type,
and size).
8. Select Save.
9. Select Confirm.
10. Select Close.
The main Tools screen is displayed.
11. Press the Home button on the UI to return to the main home screen.
User Guide
3-69Xerox®Versant®180 Press

Press Apps
Xerox®Versant®180 Press3-70
User Guide

4
Paper and Media
Before loading paper, consider the following:
• The press supports the ability to pull different stock sizes and paper types from various
trays and assemble them as part of a single job. To select multiple paper trays and
insert different papers within one job, program this custom job at the print server
using features such as special pages.
• The press supports Automatic Tray Switching, which allows a job to switch
automatically from an empty tray to a full tray containing the same size paper,
orientation and stock type. Referto the System Administrator Guide for how to enable
this feature and prioritize the order of trays to search on and use.
Supported Paper
Paper Specifications
Note
Always refer to the Recommended Media List (RML) for a comprehensive list of supported
media. The RML can be accessed can be downloaded from www.xerox.com.
User Guide
4-1Xerox®Versant®180 Press

Paper and Media
Weight (gsm)TraysPaper SizePaper Type
Plain paper (coated & uncoated)
Drilled paper (coated & uncoated)
B5 SEF/LEF
A4 SEF/LEF
A4-Cover SEF/LEF
DT Special A4 SEF/LEF
B4 SEF
A3 SEF
SRA3 SEF
DT Special A3 SEF
4 x 6 in. SEF
7.25 x 10.5 in. SEF/LEF
8 x 10 in. SEF/LEF
8.46 x 12.4 in. SEF
8.5 x 11 in. SEF/LEF
8.5 x 13 in. SEF/LEF
8.5 x 14 in. SEF
9 x 11 in. SEF/LEF
11 x 15 in. SEF
11 x 17 in. SEF
12 x 18 in. SEF
12.6 x 19.2 in. SEF
13 x 18 in. SEF
16-kai (TFX) SEF/LEF
16-kai (GCO) SEF/LEF
Pa-kai (TFX) SEF
pa-kai (GCO) SEF
Trays 1 to 3
Trays 5, 6 and 7
52 to 256
52 to 350
coated)
Embossed (coated & uncoated)
Envelopes
rectangle 3 x 10 SEF
Square SEF / LEF
8.5 x 11 in./A4 LEFLabels (coated & uncoated)
Trays 1 to 3
Trays 5, 6 and 7
Trays 1 to 3
Trays 5, 6 and 7
64 to 105All TraysRecycled paper (coated & un-
106 to 256
106 to 350
---All Trays8.5 x 11 in. (A4) LEFTransparency
106 to 350Trays 5, 6 and 7Postcard (coated & uncoated)
---215.9 x 330.28.5 x 13 in.Government-Legal SEF/LEF
---226.0 x 310.08.90 12.20 in.DT Special A4 SEF/LEF
---310.0 x 432.012.20 x 17.00 in.DT Special A3 SEF
106 to 256
106 to 350
163All Trays9 x 11 in. LEFTabbed Inserts
Xerox®Versant®180 Press4-2
User Guide

Paper and Media
Paper Tray Information
Print Engine Trays 1, 2 and 3
When the press is first installed, the tray size setting for Trays 1 and 3 are set at 8.5 x
11 inches or A4 (LEF). The tray size setting for Tray 2 is set at 11 x 17 inches or A3 (SEF).
The specifications for each tray are:
• Maximum of 550 sheets of 24 lb.(90 gsm) uncoated paper; 28 lb. to 80 lb. cover
(105-120 gsm) coated stock
• Paper weight range of 18 lb. Bond to 95 lb. Cover (64 gsm to 256 gsm)
• Paper sizes starting at 7.2 x 7.2 in. (182 x 182 mm) to a maximum of 13 x 19.2 in.
(330 x 488 mm)
• If using the optional Postcard bracket, minimum size is 101.6 x 152.4 mm (4 x 6
inches)
Note
For more information on the optional Postcard bracket, refer to the Paper and Media
section of this guide.
• Stock types include transparencies, heavyweight, coated and uncoated, predrilled,
and tabs
• Loading paper Long Edge Feed (LEF)/portrait or Short Edge Feed (SEF)/landscape
(dependent on the actual paper size)
• Auto size detection capability
• Automatically adjusts the trayposition in the front and back based on the paper size;
this is done once the tray is closed
Bypass Tray 5
• Maximum of 250 sheets of 24 lb. (90 gsm) uncoated paper; 28 lb. to 110 lb. cover
(106-300 gsm) coated stock
• Paper weight range of 52 gsm (uncoated) to 300 gsm (coated)
• Stock types include transparencies, heavyweight, coated and uncoated, predrilled,
and tabs
Throughput / Productivity Information
Process and print speed is based on simplex/duplex mode, paper type, paper weight,
paper size and feeding tray.
Table 1: Trays 1, 2 and 3 in LEF Feed Direction
and coated
and Transparencies
User Guide
Prints Per MinuteSimplex/DuplexPaper WeightPaper Type
100 ppm / 50 ppmSimplex / Duplex64 to 256 gsm8.5 x 11 / A4 uncoated
40 ppmSimplex106 to 256 gsm8.5 x 11 / A4 Labels
4-3Xerox®Versant®180 Press

Paper and Media
coated and coated
coated and coated
Table 2: Trays 1, 2 and 3 in SEF Feed Direction
coated
coated
and coated
Prints Per MinuteSimplex/DuplexPaper WeightPaper Type
80 ppmSimplex106 to 176 gsm8.5 x 11 / A4 Tab un-
80 ppmSimplex177 to 256 gsm8.5 x 11 / A4 Tab un-
Prints Per MinuteSimplex/DuplexPaper WeightPaper Type
80 ppm / 40 ppmSimplex / Duplex64 to 256 gsm8.5 x 11 uncoated and
60 ppm / 30 ppmSimplex / Duplex64 to 256 gsmA4 uncoated and
60 ppm / 30 ppmSimplex / Duplex64 to 256 gsm8.5 x 14 / B4 uncoated
and coated
coated and coated
uncoated
and Transparencies
and Transparencies
Table 3: Tray 5 (Bypass Tray)
148 mm
coated and coated
52 ppm / 26 ppmSimplex / Duplex64 to 256 gsm11 x 17 / A3 uncoated
50 ppm / 24 ppmSimplex / Duplex64 to 256 gsm12 x 18 / SRA3 un-
50 ppm / 24 ppmSimplex / Duplex64 to 256 gsm13 x 19.2 coated and
32 ppmSimplex106 to 256 gsm8.5 x 11 / A4 Labels
25 ppmSimplex106 to 256 gsm8.5 x 14 / B4 Labels
Prints Per MinuteSimplex/DuplexPaper WeightFeedDirectionPaper Type
70 ppm / 35 ppmSimplex / Duplex52 to 300 gsmPostal card 148 x
70 ppm / 35 ppmSimplex / Duplex52 to 300 gsmLEF8.5 x 11 / A4 un-
and coated
coated
60 ppm / 30 ppmSimplex / Duplex52 to 300 gsmSEF8.5 x 11 uncoated
50 ppm/ 25 ppmSimplex / Duplex52 to 300 gsmSEFA4 uncoated and
Xerox®Versant®180 Press4-4
User Guide
 Loading...