


|
|
|
|
|
|
|
|
|
|
|
|
|
|
|
|
|
|
|
|
|
|
|
|
|
|
|
|
|
|
|
|
|
|
|
|
|
|
|
|
|
|
|
|
|
|
|
|
|
|
|
|
|
|
|
|
|
|
|
|
|
|
|
|
|
|
|
|
|
|
|
|
|
|
|
|
|
|
|
|
|
|
|
|
|
|
|
|
|
|
|
|
|
|
|
|
|
|
|
|
|
|
|
|
|
|
|
|
|
|
|
|
|
|
|
|
|
|
|
|
|
|
|
|
|
|
|
|
|
|
|
|
|
|
|
|
|
|
|
|
|
|
|
|
|
|
|
|
|
|
|
|
|
|
|
|
|
|
|
|
|
|
|
|
|
|
|
|
|
|
|
|
|
|
|
|
|
|
|
|
|
|
|
|
|
|
|
|
|
|
|
|
|
|
|
|
|
|
|
|
|
|
|
|
|
|
|
|
|
|
|
|
|
|
|
|
|
|
|
|
|
|
|
|
|
|
|
|
|
|
|
|
|
|
|
|
|
|
|
|
|
|
|
|
|
|
|
|
|
|
|
|
|
|
|
|
|
|
|
|
|
|
|
|
|
|
|
|
|
|
|
|
|
|
|
|
|
|
|
|
|
|
|
|
|
|
|
|
|
|
|
|
|
|
|
|
|
|
|
|
|
|
|
|
|
|
|
|
|
|
|
|
|
|
|
|
|
|
|
|
|
|
|
|
|
|
|
|
|
|
|
|
|
|
|
|
|
|
|
|
|
|
|
|
|
|
|
|
|
|
|
|
|
|
|
|
|
|
|
|
|
|
|
|
|
|
|
|
|
|
|
|
|
|
|
|
|
|
|
|
|
|
|
|
|
|
|
|
|
|
|
|
|
|
|
|
|
|
|
|
|
|
|
|
|
|
|
|
|
|
|
|
|
|
|
|
|
|
|
|
|
|
|
|
|
|
|
|
|
|
|
|
|
|
|
|
|
|
|
|
|
|
|
|
|
|
|
|
|
|
|
|
|
|
|
|
|
|
|
|
|
|
|
|
|
|
|
|
|
|
|
|
|
|
|
|
|
|
|
|
|
|
|
|
|
|
|
|
|
|
|
|
|
|
|
|
|
|
|
|
|
|
|
|
|
|
|
|
|
|
|
|
|
|
|
|
|
|
|
|
|
|
|
|
|
|
|
|
|
|
|
|
|
|
|
|
|
|
|
|
|
|
|
|
|
|
|
|
|
|
|
|
|
|
|
|
|
|
|
|
|
|
|
|
|
|
|
|
|
|
|
|
|
|
|
|
|
|
|
|
|
|
|
|
|
|
|
|
|
|
|
|
|
|
|
|
|
|
|
|
|
|
|
|
|
|
|
|
|
|
|
|
|
|
|
|
|
|
|
|
|
|
|
|
|
|
|
|
|
|
|
|
|
|
|
|
|
|
|
|
|
|
|
|
|
|
|
|
|
|
|
|
|
|
Oscillating Tool |
|
|
|
|
|
|
|
|
|
|
|
|
|
|
|
|
|
|
|
|
|
|
|
|
|
|
|
|
|
|
|
|
|
|
|
|
|
|
|
|
|
|
|
|
|
|
|
|
EN |
|
P06 |
|||||||||||||||||||||||||||||||||||||||||||||||||||||||||
Oszillationswerkzeug |
|
|
|
|
|
|
|
|
|
|
|
|
|
|
|
|
|
|
|
|
|
|
|
|
|
|
|
|
|
|
|
|
|
|
|
|
|
|
|
|
|
|
|
|
|
|
|
|
|
|
D |
|
P13 |
|||||||||||||||||||||||||||||||||||||||||||||||||||||||
Outil oscillant |
|
|
|
|
|
|
|
|
|
|
|
|
|
|
|
|
|
|
|
|
|
|
|
|
|
|
|
|
|
|
|
|
|
|
|
|
|
|
|
|
|
|
|
|
|
|
|
|
|
|
|
F |
|
P20 |
||||||||||||||||||||||||||||||||||||||||||||||||||||||
Attrezzo ad oscillazione |
|
|
|
|
|
|
|
|
|
|
|
|
|
|
|
|
|
|
|
|
|
|
|
|
|
|
|
|
|
|
|
|
|
|
|
|
|
|
|
|
|
|
|
|
|
|
|
|
|
|
|
|
|
I |
|
P27 |
||||||||||||||||||||||||||||||||||||||||||||||||||||
Herramienta oscilante |
|
|
|
|
|
|
|
|
|
|
|
|
|
|
|
|
|
|
|
|
|
|
|
|
|
|
|
|
|
|
|
|
|
|
|
|
|
|
|
|
|
|
|
|
|
|
|
|
ES |
|
P34 |
|||||||||||||||||||||||||||||||||||||||||||||||||||||||||
Trillende machine |
|
|
|
|
|
|
|
|
|
|
|
|
|
|
|
|
|
|
|
|
|
|
|
|
|
|
|
|
|
|
|
|
|
|
|
|
|
|
|
|
|
|
|
|
|
|
|
|
NL |
|
P41 |
|||||||||||||||||||||||||||||||||||||||||||||||||||||||||
Narzędzie oscylacyjne |
|
|
|
|
|
|
|
|
|
|
|
|
|
|
|
|
|
|
|
|
|
|
|
|
|
|
|
|
|
|
|
|
|
|
|
|
|
|
|
|
|
|
|
|
|
|
|
|
PL |
|
P48 |
|||||||||||||||||||||||||||||||||||||||||||||||||||||||||
Oszcilláló szerszám |
|
|
|
|
|
|
|
|
|
|
|
|
|
|
|
|
|
|
|
|
|
|
|
|
|
|
|
|
|
|
|
|
|
|
|
|
|
|
|
|
|
|
|
|
|
|
|
|
HU |
|
P55 |
|||||||||||||||||||||||||||||||||||||||||||||||||||||||||
Instrument oscilant |
|
|
|
|
|
|
|
|
|
|
|
|
|
|
|
|
|
|
|
|
|
|
|
|
|
|
|
|
|
|
|
|
|
|
|
|
|
|
|
|
|
|
|
|
|
|
|
|
RO |
|
P62 |
|||||||||||||||||||||||||||||||||||||||||||||||||||||||||
Oscilační nástroj |
|
|
|
|
|
|
|
|
|
|
|
|
|
|
|
|
|
|
|
|
|
|
|
|
|
|
|
|
|
|
|
|
|
|
|
|
|
|
|
|
|
|
|
|
|
|
|
|
CZ |
|
P69 |
|||||||||||||||||||||||||||||||||||||||||||||||||||||||||
Vibračný nástroj |
|
|
|
|
|
|
|
|
|
|
|
|
|
|
|
|
|
|
|
|
|
|
|
|
|
|
|
|
|
|
|
|
|
|
|
|
|
|
|
|
|
|
|
|
|
|
|
|
SK |
|
P76 |
|||||||||||||||||||||||||||||||||||||||||||||||||||||||||
|
|
|
|
|
|
|
|
|
|
|
|
|
|
|
|
|
|
|
|
|
|
|
|
|
|
|
|
|
|
|
|
|
|
|
|
|
|
|
|
|
|
|
|
|
|
|
|
|
|
|
|
|
|
|
|
|
|
|
|
|
|
|
|
|
|
|
|
|
|
|
|
|
|
|
|
|
|
|
|
|
|
|
|
|
|
|
|
|
|
|
|
|
|
|
|
|
|
|
|
|
|
|
|
|
|
|
|
|
WX680

|
Original instructions |
EN |
|
|
Originalbetriebsanleitung |
D |
|
|
Notice originale |
F |
|
|
Istruzioni originali |
I |
|
|
Manual original |
ES |
|
|
Oorspronkelijke gebruiksaanwijzing |
NL |
|
|
Tłumaczenie oryginalnych instrukcji |
PL |
|
|
Eredeti használati utasítás |
HU |
|
|
Traducerea instrucţiunilor iniţiale |
RO |
|
|
Překlad původních pokynů |
CZ |
|
|
Preklad pôvodných pokynov |
SK |
|
|
|
|
|
|
|
|
|
1 |
2 |
3 |
|
5 |
4 |
|
|
|
|
|
6 |
8 |
|
|
|
|
7 |

A |
B |
|
1 |
3
C 
 D
D
E1 |
E2 |
E3 |
E4 |
|
|
|
|
E3 |
E4 |
E5
F 

 G
G
OFF
ON

1.HYPERLOCKTM ACCESSORY CLAMPING LEVER
2.ON/OFF SWITCH
3.VARIABLE SPEED DIAL
4.CONSTANT SPEED ELECTRONICS
5.VENTING SLOTS
6.UNIVERSAL-FIT ACCESSORY INTERFACE*
7.SMALLER FLANGE (FOR OTHER BRANDS‘ SANDING PADS)
8.FLANGE
Not all the accessories illustrated or described are included in standard delivery. *Works with other oscillating tool brands’ accessories.
The following compatible brands are trademarks owned by third parties which may be registered by their respective owners: Black & Decker®, Bosch®, Chicago Electric®, Craftsman®, Dremel®, Fein®, Genesis®, Makita®, Mastercraft®, Milwaukee®, Performax®, Porter Cable®, Ridgid®, Ryobi®, Skil®, and Tool Shop®.
6
Oscillating Tool |
EN |
|
|
TECHNICAL DATA
Type Designation WX680 (6-designation of machinery, representative of sonicrafter)
Rated voltage |
230-240V~50Hz |
|
|
Rated power |
350W |
|
|
Oscillations speed |
11000-20000/min |
|
|
Oscillations angle |
4.0° |
|
|
Protection class |
/ll |
|
|
Tool weight (without power cable) |
1.3kg |
|
|
NOISE INFORMATION
A weighted sound pressure |
87dB(A) |
|||
A weighted sound power |
98dB(A) |
|
||
KpA&KwA |
3.0dB(A) |
|||
Wear ear protection when sound pressure is over |
80dB(A) |
|
||
|
|
|
|
|
VIBRATION INFORMATION |
|
|
|
|
7 |
||||
|
|
|
|
|
|
|
|
|
|
Vibration total values (triax vector sum) determined according to EN 60745:
Vibration emission value ah = 3,68m/s2
Uncertainty K = 1.5m/s²
–The declared vibration total value has been measured in accordance with a standard test method and may be used for comparing one tool with another;
–The declared vibration total value may also be used in a preliminary assessment of exposure.
WARNING:The vibration emission value during actual use of the power tool can differ from the declared value depending on the ways in which the tool is used dependant on the
following examples and other variations on how the tool is used: How the tool is used and the materials being cut or sanded.
The tool being in good condition and well maintained
The use the correct accessory for the tool and ensuring it is sharp and in good condition. The tightness of the grip on the handles and if any anti vibration accessories are used. And the tool is being used as intended by its design and these instructions.
This tool may cause hand-arm vibration syndrome if its use is not adequately managed.
WARNING:To be accurate, an estimation of exposure level in the actual conditions of use should also take account of all parts of the operating cycle such as the times when the tool
is switched off and when it is running idle but not actually doing the job.This may significantly
Oscillating Tool |
EN |
|
|
reduce the exposure level over the total working period.
Helping to minimize your vibration exposure risk.
ALWAYS use sharp chisels, drills and blades. Maintain this tool in accordance with these instructions and keep well lubricated (where appropriate).
If the tool is to be used regularly then invest in anti vibration accessories.
Avoid using tools in temperatures of 10OC or less.
Plan your work schedule to spread any high vibration tool use across a number of days.
SAFETY INSTRUCTION FOR CUTTING
1.Hold power tool by insulated gripping surfaces, when performing an operation where the cutting accessory may contact hidden wiring or its own cord. Cutting accessory
contacting a “live” wire may make
8 exposed metal parts of the power tool  “live” and could give the operator an
electric shock.
2. Always wear a dust mask.
SYMBOLS
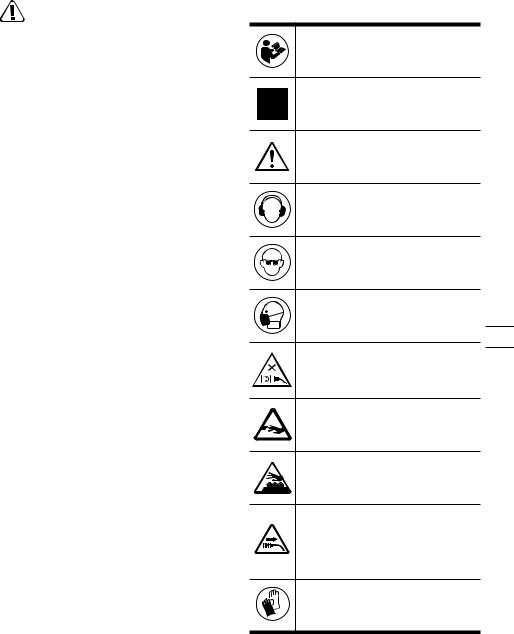
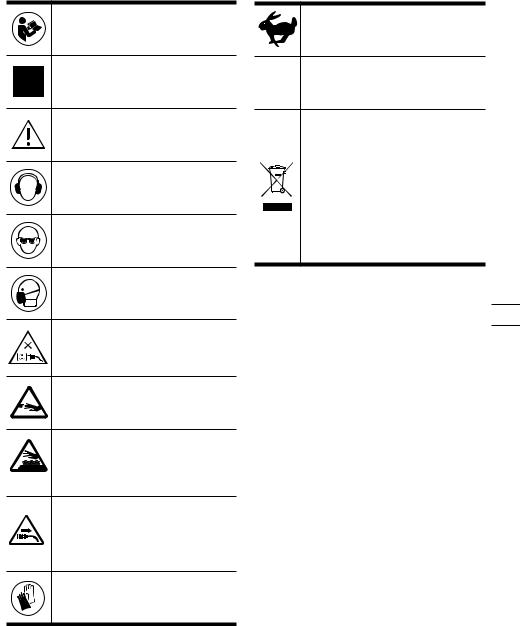
To reduce the risk of injury, user must read instruction manual
Double insulation
Warning
Wear ear protection
Wear eye protection
Wear dust mask
Before working with your tool make sure that no power cords will be damaged.
Avoid danger of injury from the sharp edges of the accessories.
Accessories can become very hot while working, presenting danger of burns!
Make sure the tool is unplugged prior to changing accessories.
Wear protective gloves
Oscillating Tool |
EN |
|
|

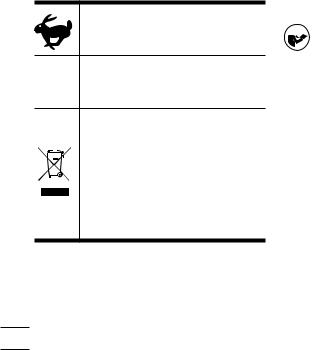
High oscillation frequency.
 Low oscillation frequency:
Waste electrical products must not be disposed of with household waste. Please recycle where facilities exist. Check with your local authorities or retailer for recycling advice.
OPERATING INSTRUCTIONS
NOTE: Before using the tool, read the instruction book carefully.
INTENDED USE
The power tool is intended for sawing and remodelling wooden materials, plastic, plaster, non-ferrous metals and fasteners (e.g. nails and clamps) as well as for working on soft wall tiles and for dry grinding of small surfaces. It is especially suitable for working close to edges and for flush cutting.
ASSEMBLY AND OPERATION
Action |
Figure |
|
|
|
|
|
|
|
|
Mounting accessories |
See Fig. A-C |
|
||
|
|
|
|
|
Mounting the sanding |
See Fig. D |
|
||
sheet |
|
|||
|
|
|
||
|
|
|
|
|
Mounting the suction |
See Fig. E1-E5 |
|
||
device (not supplied) |
|
|||
|
|
|
||
|
|
|
|
|
Operating the on/off |
|
|
|
|
See Fig. F |
9 |
|||
switch |
||||
|
|
|
||
|
|
|
|
|
Using the variable speed |
See Fig.G |
|
||
dial |
|
|||
|
|
|
||
|
|
|
|
|
The Variable Speed Dial can be used to set the optimum oscillating frequency according to the accessories used and the respective application.
Oscillation |
Application |
|
Frequency |
||
|
||
|
|
|
|
Sanding, sawing, |
|
High oscillation |
rasping and |
|
frequency |
polishing stone and |
|
|
metal. |
|
|
|
|
Low oscillation |
Scraping, polishing |
|
frequency |
varnishes. |
|
|
|
Oscillating Tool |
EN |
|
|
WORKING HINTS FOR YOUR TOOL
If your power tool becomes too hot, especially when used at low speed, set the speed to maximum and run it with no load for 2-3 minutes to cool the motor. Avoid prolonged usage at very low speeds. Always keep the blade sharp.
Always ensure the workpiece is firmly held or clamped to prevent movement.
Any movement of the material may affect the quality of the cutting or sanding finish.
Start your tool before working and turn it off only after you stop working.
Do not start sanding without having the sandpaper fitted.
Do not allow the sandpaper to wear away , it will damage the sanding pad.The guarantee does not cover sanding pad wear and tear.
Use coarse grit paper to sand rough surfaces, medium grit for smooth surfaces and fine grit for finishing surfaces. If necessary, first make a test run on scrap material.
 Excessive force will reduce the working 10 efficiency and cause motor overload.
Replacing the accessory regularly will maintain optimum working efficiency.
MAINTAIN TOOLS WITH CARE
Remove the plug from the socket before carrying out any adjustment, servicing or maintenance.
Your power tool requires no additional lubrication or maintenance. There are no user serviceable parts in your power tool. Never use water or chemical cleaners to clean your power tool. Wipe clean with a dry cloth. Always store your power tool in a dry place. Keep the motor ventilation slots clean. Keep all working controls free of dust. Occasionally you may see sparks through the ventilation slots.This is normal and will not damage your power tool.
If the supply cord is damaged, it must be replaced by the manufacturer, its service agent or similarly qualified persons in order to avoid a hazard.
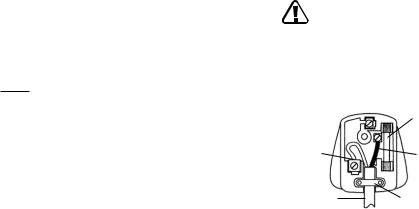
PLUG REPLACEMENT (UK & IRELAND ONLY)
If you need to replace the fitted plug then followthe instructions below.
IMPORTANT
The wires in the mains lead are colored in accordance with the following code: blue – neutral
brown – live
As the colors of the wires in the mains lead of thisappliance may not correspond with the coloured markings identifying the terminals in your plug,proceed as follows.The wire which is coloured blue must be connected to the terminal which is marked with N.The wire
which is coloured brown must be connected to the terminal which is marked with L.
WARNING: Never connect live or neutral wires to the earth terminal of the
plug. Only fit an approved 13A BS1363/A plug and the correct rated fuse.
NOTE: If a moulded plug is fitted and has to be removed take great care in disposing of the plug and severed cable, it must be destroyed to prevent engaging into a socket.
13 Amp fuse approved to BS1362
Connect
Blue to N Brown L (live) (neutral)
Outer sleeve |
Cable grip |
firmly clamped |
|
Oscillating Tool |
EN |
|
|
APPLICATION
WARNING: The sawing teeth are very sharp. Do not touch during mounting and application.
The workpiece must be clamped tightly before it is cut.
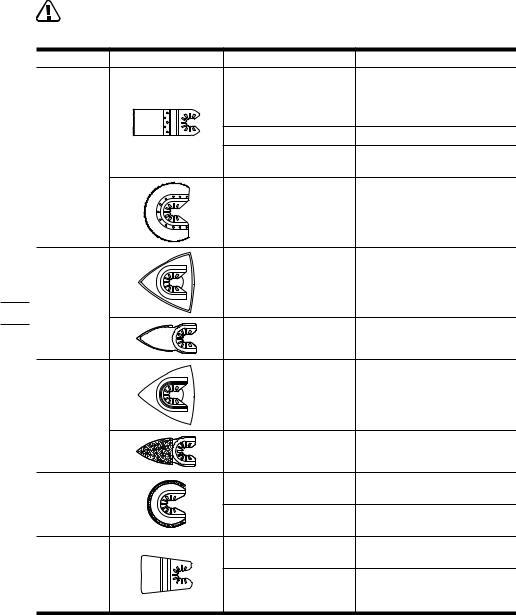
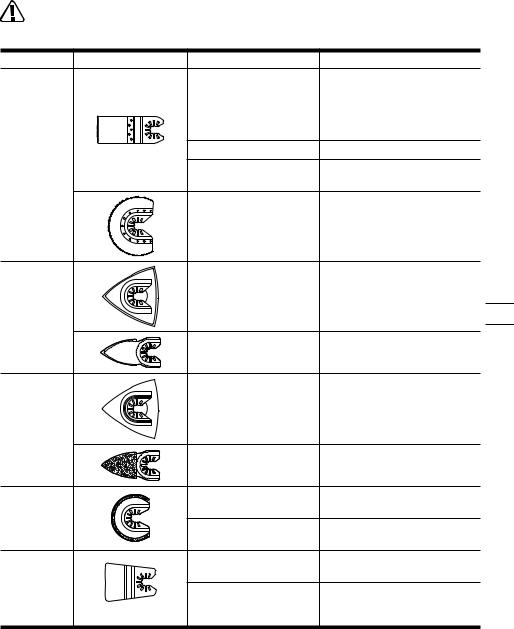
Pic |
Description |
Application |
|
|
Bi-Metal |
Wood, plastic, fiberglass, |
|
|
nails, non-ferrous metals, |
|
|
|
Metal/Wood End Cut |
|
|
|
thin sheet metal, hardened |
|
|
|
Blade |
|
|
|
fillers. |
|
|
|
|
|
|
|
Standard Wood End |
Wood, plastic, drywall. |
|
|
Cut Blade |
|
|
|
|
|
|
Sawing |
Precision Wood Cut |
Wood, soft plastics. |
|
|
Blade |
|
|
|
|
|
|
|
|
Thin wood, plastic, |
|
|
HSS Semicircle Saw |
fiberglass, |
|
|
non-ferrous metals, thin |
|
|
|
Blade |
|
|
|
sheet metal, hardened fillers, |
|
|
|
|
|
|
|
|
window glazing. |
|
|
Sanding Pad |
Wood, plastic, hardened |
|
|
(Perforated) |
fillers. |
11 |
Sanding |
|
|
|
|
|
|
|
|
Sanding Finger Pad |
Wood, plastic, hardened |
|
|
fillers. |
|
|
|
|
|
|
|
Triangular Carbide Grit |
Wood, hardened adhesives, |
|
|
Rasp |
thin set, masonry. |
|
Rasping |
|
|
|
|
Carbide Rasp (Finger |
Wood, hardened adhesives, |
|
|
Shaped) |
thin set, masonry. |
|
|
Carbide Grit Semicircle |
Grout, porous concrete, |
|
Removing |
Saw Blade |
masonry. |
|
grout |
Diamond-Coated |
Ceramic and stone tile, |
|
|
Semicircle Saw Blade |
backerboard. |
|
|
Rigid Scraper Blade |
Old paint, hardened |
|
|
adhesives, caulk, carpet. |
|
|
Scraping |
|
|
|
|
Elastic sealants, paint, |
|
|
|
Flexible Scraper Blade |
|
|
|
adhesive residues, carpet. |
|
|
|
|
|
Oscillating Tool |
EN |
|
|

We recommend that you purchase your accessories listed in the above list from the same store that sold you the tool. Use good quality accessories marked with a well-known brand name. Refer to the accessory packaging for further details. Store personnel can assist you and offer advice.
NOTE: When plunging and sawing use a slight pendulum motion, to allow sufficient chip removal.
The saw blade lasts longer if the wear is distributed evenly.To ensure an even
distribution, loosen the saw blade, rotate it and retighten firmly.
Cut/Sand with a constant movement and light pressure.
Heavy pressure does not increase the cut/ removal rate – the accessory merely wears faster.
ENVIRONMENTAL
PROTECTION
12 |
|
|
Waste electrical products must not be |
|
|
disposed of with household waste. |
|
|
|
|
|
|
|
|
Please recycle where facilities exist. |
|
|
|
|
|
Check with your local authorities or retailer for |
||
|
recycling advice. |
||
DECLARATION OF
CONFORMITY
We,
POSITEC Germany GmbH
Konrad-Adenauer-Ufer 37
50668 Köln
Declare that the product, Description
WORX Oscillating Tool
Type WX680 (6-designation of machinery, representative of high frequency oscillation tool) Function Sanding, sawing, rasping, scraping, polishing
Complies with the following directives,
2006/42/EC
2004/108/EC
2011/65/EU
Standards conform to
EN 55014-1
EN 55014-2
EN 60745-1
EN 60745-2-4
EN 61000-3-2
EN 61000-3-3
The person authorized to compile the technical file,
Name: Russell Nicholson
Address: Positec Power Tools (Europe) Ltd, PO Box 152, Leeds, LS10 9DS, UK
2014/08/19 YujinTang
POSITEC Quality Manager
Oscillating Tool |
EN |
|
|

1.HYPERLOCKTM ZUSATZ-SPANNHEBEL
2.EIN/AUS-SCHALT
3.VARIABLER GESCHWINDIGKEIT
4.KONSTANTE GESCHWINDIGKEITSELEKTORNIK
5.LÜFTUNGSSCHLIT
6.UNIVERSELLE ZUBEHÖRSCHNITTSTELLE*
7.KLEINER FLANSCH FÜR SCHLEIFPADS ANDERER MARKEN
8.FLANSCH
Abgebildetes oder beschriebenes Zubehör gehört teilweise nicht zum Lieferumfang. *Funktioniert mit dem Zubehör von anderen oszillierenden Markenwerkzeugen
Die folgenden kompatiblen Marken sind Warenzeichen, die im Eigentum Dritter stehen und von den jeweiligen Eigentümern eingetragen sein können: Black & Decker®, Bosch®, Chicago Electric®, Craftsman®, Dremel®, Fein®, Genesis®, Makita®, Mastercraft®, Milwaukee®, Performax®, Porter Cable®, Ridgid®, Ryobi®, Skil®, and Tool Shop®.
13
Oszillationswerkzeug |
D |
|
|
TECHNISCHE DATEN
Typ WX680 (Bezeichnung der Maschine, Repräsentant des Hochfrequenz-
Multifunktionswerkzeug )
Nennspannung |
230-240V~50Hz |
|
|
Nennleistung |
350W |
|
|
Schwingfrequenz |
11000-20000/min |
|
|
Schwingwinkel |
4.0° |
|
|
Zweifach isoliert |
/ll |
|
|
Gewicht( ohne Netzkabel) |
1.3kg |
|
|
INFORMATIONEN ÜBER LÄRM
|
|
Gewichteter Schalldruck |
|
LpA: 87dB(A) |
|
|
|
Gewichtete Schallleistung |
|
LwA: 98dB(A) |
|
|
|
KPA& KWA |
|
3.0dB(A) |
|
|
|
Tragen Sie bei einem Schalldruck über einen Gehörschutz |
|
80dB(A) |
|
|
|
|
|
|
|
|
|
|
|
|
|
14 |
|
|
|
|
|
|
|
INFORMATIONEN ÜBER VIBRATIONEN |
|
|
|
|
|
|
|
||
|
|
|
|
|
|
|
|
Vibrationsgesamtmesswertermittlung gemäß EN60745: |
|
|
|
|
|
|
|
|
|
|
|
Typischer gewichteter Vibrationswert |
Vibrationsemissionswert a |
h |
= 3,68m/s2 |
|
|
Unsicherheit K = 1.5m/s² |
|
|
|
|
|
|
|
|
|
|
|
|
|
|
|
–Der erklärte Schwingungsgesamtwert wurde im Einklang mit einem Standard-Prüfverfahren gemessen und kann zum Vergleichen eines Werkzeugs mit einem anderen genutzt werden;
–Der erklärte Schwingungsgesamtwert kann auch zur vorläufigen Beurteilung von Belastungen verwendet werden.
WARNUNG: Der Vibrationsemissionswert kann während des tatsächlichen Gebrauchs des Elektrowerkzeugs vom angegebenen Wert abweichen, je nachdem, wie das Werkzeug
gemäß folgenden Beispielen und weiteren Verwendungsmöglichkeiten eingesetzt wird: Anwendung des Werkzeugs und der zu schneidenden oder schleifenden Materialien. Der Pflegeund Wartungszustand des Werkzeugs.
Die Verwendung des richtigen Zubehörs und dessen Schärfe und Zustand. Die Festigkeit der Handgriffe und die Benutzung von Antivibrationszubehör. Der bestimmungsgemäß eund diesen Anweisungen entsprechende Gebrauch.
Wird dieses Werkzeug nicht angemessen gehandhabt, kann es zum Auftreten des Hand-Arm-Vibrationssyndroms kommen.
Oszillationswerkzeug |
D |
|
|
WARNUNG: Sie sollten die tatsächlichen Arbeitsabschnitte genau ermitteln, um so
den Belastungsrad abzuschätzen. Auf diese Weise kann der Belastungsgrad während der gesamten Arbeitszeit möglicherweise wesentlich gemindert werden.
So minimieren Sie das Risiko, dem Sie bei Vibrationen ausgesetzt sind.
Verwenden Sie IMMER scharfe Meißel, Bohrer und Sägeblätter.
Pflegen Sie dieses Werkzeug den Anweisungen entsprechend und achten Sie stets auf eine gutes Einfetten (wo erforderlich).
Bei regelmäßiger Verwendung von Elektrowerkzeug sollten Sie in Antivibrationszubehör investieren.
Vermeiden Sie den Einsatz von Werkzeugen beiTemperaturen von 10ºC oder darunter. Erstellen Sie einen Arbeitsplan, um die Verwendung von hochvibrierenden Werkzeugen auf mehrereTage zu verteilen.
SICHERHEITSHINWEISE ZUM SCHNEIDEN
1.Halten Sie das Werkzeug an den isolierten Griffen, wenn die Gefahr besteht, dass Sie beim Arbeiten in Wänden, Decken usw. verborgene Leitungen oder das Netzkabel berühren könnten. Metallteile am Werkzeug, die mit stromführenden Drähten in Berührung kommen, werden selbst stromführend und können der Bedienperson einen elektrischen Schlag versetzen.
2.Tragen Sie immer eine Staubmaske.
SYMBOLE
Zur Reduzierung der
Verletzungsgefahr bitte die
Bedienungsanleitung durchlesen
Schutzisolation
WARNUNG!
Tragen Sie einen Gehörschutz
Tragen Sie eine Schutzbrille
Tragen Sie eine Schutzbrille
15
Vor der Arbeit mit Ihrem Werkzeug sicherstellen, dass keine Netzkabel beschädigt sind.
Vermeiden Sie
Verletzungsgefahren durch scharfe
Kanten des Zubehörs.
Das Zubehör kann bei der
Arbeit sehr heiß werden und
Verbrennungsgefahren verursachen!
Vor dem Auswechseln von Zubehör sicherstellen, dass das Werkzeug von der
Stromversorgung getrennt ist.
Tragen Sie Schutzhandschuhe.
Oszillationswerkzeug |
D |
|
|
Hohe Schwingungsfrequenz
 Niedrige Schwingungsfrequenz
Elektroprodukte dürfen nicht mit dem normalen Haushaltsmüll entsorgt werden, sondern sollten nach Möglichkeit zu einer Recyclingstelle gebracht werden. Ihre zuständigen Behörden oder
Ihr Fachhändler geben Ihnen hierzu gerne Auskunft.
16
HINWEISE ZUM BETRIEB
 HINWEIS: Lesen Sie das Handbuch vor Inbetriebnahme des Werkzeuges
sorgfältig durch.
BESTIMMUNGSGEMÄSSER GEBRAUCH
Das Elektrowerkzeug ist bestimmt zum Sägen undTrennen von Holzwerkstoffen, Kunststoff, Gips, Nichteisen-Metallen und Befestigungselementen (z.B. Nägel, Klammern) sowie zum Bearbeiten von weichen Wandfliesen und zum trockenen
Schleifen kleiner Flächen. Es ist besonders zum randnahen und bündigen Arbeiten geeignet.
MONTAGE UND BEDIENUNG
Massnahme |
Abbildung |
|
|
|
|
Montagezubehör |
Siehe Abb. A-C |
|
|
|
|
Montage des Sandblechs |
Siehe Abb. D |
|
|
|
|
Staubabsaugung |
Siehe E1-E5 |
|
Anbringen(nicht mitgeliefert) |
||
|
||
|
|
|
Bedienen des Ein-/Aus- |
Siehe Abb. F |
|
Schalters |
||
|
||
|
|
|
Nutzung des variablen |
Siehe Abb. G |
|
Drehzahlreglers |
||
|
||
|
|
Der variable Drehzahlregler kann verwendet werden, um die optimale Schwingungsfrequenz gemäß der
verwendeten Zubehörteile und der jeweiligen Anwendung einzustellen.
Schwingungsfrequenz |
Anwendung |
|
|
|
Schleifen, Sägen, |
Hohe |
Raspeln und Polieren |
Schwingungsfrequenz |
von Steinen und |
|
Metall. |
|
|
Niedrige |
Schaben, Lacke |
Schwingungsfrequenz |
schleifen |
|
|
Oszillationswerkzeug |
D |
|
|

TIPPS ZUR ARBEIT MIT IHREM WERKZEUG
Ist Ihr Elektrowerkzeug zu heiss geworden, insbesondere während der Arbeit bei niedriger Geschwindigkeit, stellen Sie die maximale Geschwindigkeit ein und lassen Sie es 2-3 Minuten lang unbelastet laufen, um den Motor abzukühlen. Vermeiden
Sie längere Arbeiten bei niedrigen Geschwindigkeiten. Achten Sie immer auf ein scharfes Sägeblatt.
Das Werkstück muss bei allen Arbeiten sicher befestigt oder festgeklemmt werden, damit es nicht verrutschen kann.
Jegliche Bewegung des Materials kann die Qualität des Schnittes oder der Schleifausführung beeinträchtigen. Starten Sie Ihr Werkzeug vor der Arbeit und schalten Sie es nur aus, nachdem Sie aufgehört haben zu arbeiten.
Verwenden Sie das Gerät niemals ohne Schleifpapier.
Das Schmirgelpapier darf nicht komplett abgenutzt werden, denn sonst wird der Schleifteller beschädigt. Die Garantie umfasst nicht den Verschleiss des Schleiftellers. Verwenden Sie kleine (grobe) Körnungen
für raue Oberflächen, mittlere Körnungen für bereits geglättete Oberflächen und hohe
(feine) Körnungen für die Endbearbeitung der Oberfläche. Gegebenenfalls sollten Sie zuerst einenTest auf einem Probestück ausführen.
Zu große Kraftanwendung mindert die Arbeitseffizienz und führt zur Überlastung des Motors. Regelmäßiges Ersetzen des Zubehörs sorgt stets für eine optimale Arbeitseffizienz.
WARTUNG
Halten Sie Werkzeuge für bessere und sicherere Leistung scharf und sauber. Befolgen Sie die Anweisungen zum Schmieren und Auswechseln von Zubehör. Prüfen Sie die Werkzeugkabel regelmäßig; lassen Sie sie bei Schäden von einer autorisierten Serviceeinrichtung reparieren. Ihr Werkzeug benötigt keine zusätzliche
Schmierung oder Wartung. Es enthält keine Teile, die Sie warten müssen. Reinigen
Sie Ihr Werkzeug niemals mit Wasser oder chemischen Loesungsmitteln. Wischen Sie es mit einem trockenenTuch sauber.
Lagern Sie Ihr Werkzeug immer an einem trockenen Platz. Sorgen Sie dafür, dass bei staubigen Arbeiten die Lüftungsöffnungen frei sind. Falls es erforderlich sein sollte, den Staub zu entfernen, trennen Sie zuerst das Elektrowerkzeug vom Stromversorgungsnetz. Verwenden Sie nichtmetallische Objekte zum Entfernen von Staub und vermeiden Sie das Beschädigen innererTeile. Gelegentlich sind durch die Lüftungsschlitze hindurch Funken zu sehen. Dies ist normal und wird Ihr Werkzeug nicht beschädigen.
Falls das Netzkabel beschädigt sein sollte, muss es vom Hersteller, einem seiner ServiceBeauftragten oder einer ähnlich qualifizierten Person instandgesetzt werden, damit es nicht zu Gefährdungen kommt.
17
Oszillationswerkzeug |
D |
|
|
ANWENDUNG
WARNUNG: Die Sägezähne sind sehr scharf. Bei Montage und
Anwendung nicht berühren.
Das Werkstück muss vor dem Schneiden festgespannt werden.
Abb. |
Beschreibung |
Anwendung |
|
|
Holz, Plastik, Fiberglas, |
|
Universalklinge |
Nägel, nicht-eiserne |
|
Metalle, dünnes Metallblech, |
|
|
|
|
|
|
gehärtete Füllstoffe |
|
Vornschneideklinge |
Holz, Plastik, Gipskarton |
Sägen |
Präzisions- |
Holz, weiche Kunststoffe |
|
Holzsägeblatt |
|
|
|
|
|
|
Holz, Plastik, Fiberglas, |
|
HSS Segmentsägeblatt |
nicht-eiserne Metalle, |
|
dünnes Metallblech, |
|
|
|
|
|
|
gehärtete Füllstoffe |
|
Schleifpapierfolie |
Holz, Plastik, |
|
gehärtete Füllstoffe |
|
|
|
|
Schleifen |
|
|
18 |
|
|
|
Schleifausatz |
Holz, Plastik, |
|
gehärtete Füllstoffe |
|
|
|
|
|
|
Holz, gehärtete Klebstoffe, |
|
Dreieckige Raspel |
Keramik, |
Raspeln |
|
Mauerwerk |
|
|
|
|
Finger-Raspel |
Holz, gehärtete Klebstoffe, |
|
Keramik, |
|
|
|
|
|
Karbid- |
Schrot, poröser Beton, |
Mörtel |
Sandstrahlklinge |
Mauerwerk |
entfernen |
Diamant- |
Keramik und Steinfliesen, |
|
Sandstrahlklinge |
Rigipsplatte |
|
Fester Kratzer |
Alte Farbe, gehärtete |
|
Klebstoffe und Kitt, Teppich |
|
|
|
|
Schaben |
|
Elastische Dichtungsmittel, |
|
Flexibler Abkratzer |
Farbe, Klebstoffreste, |
|
|
Teppich |
Oszillationswerkzeug |
D |
|
|

Wir empfehlen Ihnen, sämtliche Zubehörteile beim selben Fachhändler zu beziehen, bei dem Sie auch Ihr Elektrowerkzeug gekauft haben. Verwenden Sie nur hochwertige Zubehörteile von namhaften Herstellern. Weitere Informationen finden Sie auf der Verpackung der Zubehörteile. Auch Ihr Fachhändler berät Sie gerne.
HINWEIS: Beim Eintauchen und Sägen mit einer leichten Pendelbewegung für eine ausreichende Spanabfuhr sorgen.
Das Sägeblatt hält länger, wenn es gleichmäßig abgenutzt wird. Dazu das Sägeblatt lösen, etwas weiterdrehen und wieder festspannen.
Schneiden/Schleifen Sie mit gleichmäßigen Bewegungen und leichtem Druck.
Festes Aufdrücken erhöht den Abtrag nicht, das Schleifblatt verschleißt nur schneller.
UMWELTSCHUTZ
Elektroprodukte dürfen nicht mit dem normalen Haushaltsmüll entsorgt
 werden, sondern sollten nach Möglichkeit zu einer Recyclingstelle gebracht werden. Ihre zuständigen Behörden oder
Ihr Fachhändler geben Ihnen hierzu gerne Auskunft.
KONFORMITÄTSERKLÄRUNG
Wir,
POSITEC Germany GmbH
Konrad-Adenauer-Ufer 37
50668 Köln
Erklären hiermit, dass unser Produkt, Beschreibung WORX Oszillationswerkzeug Typ WX680 (6- Bezeichnung
der Maschine, Repräsentant des Hochfrequenz-Multifunktionswerkzeug ) Funktional Schleifen, sägen, raspeln, schaben, polieren
Den Bestimmungen der folgenden Richtlinien entspricht:
2006/42/EC
2004/108/EC
2011/65/EU
Werte nach:
EN 55014-1
EN 55014-2
EN 60745-1
EN 60745-2-4 19 EN 61000-3-2
EN 61000-3-3
Zur Kompilierung der technischen Datei ermächtigte Person
Name Russell Nicholson
Anschrift Positec Power Tools (Europe) Ltd, PO Box 152,Leeds,LS10 9DS,UK
2014/08/19 YujinTang
POSITEC Qualitätsleiter
Oszillationswerkzeug |
D |
|
|

1.LEVIER DE SERRAGE HYPERLOCKTM
2.COMMUTATEUR MARCHE/ARRÊT
3.COMMANDE DE VITESSE
4.ÉLECTRONIQUE À VITESSE CONSTANTE
5.OUÏES DE VENTILATION
6.INTERFACE* D‘ACCESSOIRE UNIVERSELLE
7.PETITE COLLERETTE POUR LES PATINS DE PONÇAGE D‘AUTRES MARQUES
8.COLLERETTE
Les accessoires reproduits ou décrits ne sont pas tous compris avec le modèle standard livré.
*Fonctionne avec les accessoires d’outils oscillants d’autres marques.
Les marques compatibles suivantes sont des marques enregistrées et détenues par des tiers qui peuvent être déposées par leurs propriétaires respectifs: Black & Decker®, Bosch®, Chicago Electric®, Craftsman®, Dremel®, Fein®, Genesis®, Makita®,
Mastercraft®, Milwaukee®, Performax®, Porter Cable®, Ridgid®, Ryobi®, Skil®, and Tool Shop®.
20
Outil oscillant |
F |
|
|
CARACTÉRISTIQUES TECHNIQUES
Modèle WX680 (6- désignations des pièces, illustration de l’outil multifonction de haute fréquence)
Tension nominale
Puissance nominale
Vitesse d’oscillation
Angle d’oscillation
Double isolation
Masse ( sans cordon d’alimentation)
230-240V~50Hz
350W
11000-20000/min
4.0°
 /ll
/ll
1.3kg
INFORMATIONS RELATIVES AU BRUIT
Niveau de pression acoustique pondéré |
LpA: 87dB(A) |
Niveau de puissance acoustique pondéré |
LwA: 98dB(A) |
|
|
KPA& KWA |
3.0dB(A) |
Porter des protections auditives lorsque la pression sonore est supérieure à |
80dB(A) |
|
|
21
INFORMATIONS RELATIVES AUX VIBRATIONS
Valeurs totales de vibrations déterminées selon la norme EN 60745:
Valeur d’émission de vibrations ah = 3,68m/s2
Incertitude K = 1.5m/s²
–La valeur totale déclarée des vibrations a été mesurée conformément à la méthode d’essai standard et elle peut être utilisée pour comparer cet outil à un autre outil.
–Il est aussi possible d’utiliser la valeur totale déclarée des vibrations pour une appréciation préliminaire de l’exposition.
AVERTISSEMENT: La valeur d’émission de vibrations pendant l’utilisation réelle de l’outil électrique peut différer de la valeur déclarée selon la manière dont l’outil est utilisé, selon
les exemples suivants et d’autres variations sur la manière dont l’outil est utilisé: Utilisation de l’outil et des matériaux à couper ou à poncer.
L’outil est en bon état et bien entretenu.
L’utilisation du bon accessoire pour l’outil et l’assurance qu’il est affûté et en bon état. La bonne tenue des poignées et, le cas échéant, les accessoires anti-vibrations utilisés. L’outil est utilisé comme prévu dans sa conception et dans le présent mode d’emploi.
Cet outil peut causer un syndrome des vibrations main-bras s’il n’est pas correctement géré.
Outil oscillant |
F |
|
|

AVERTISSEMENT: Pour être précise, une évaluation du niveau d’exposition en
conditions réelles d’utilisation doit également tenir compte de toutes les parties du cycle d’utilisation telles que les moments où l’outil est éteint, et ceux où il fonctionne au ralenti mais ne réalise pas réellement de tâche. Ceci peut réduire de manière significative le niveau d’exposition et la durée d’utilisation totale. Afin de minimiser le risque d’exposition aux vibrations:
UtilisezTOUJOURS des burins, des forets et des lames affûtés.
Entretenez cet outil de manière conforme au mode d’emploi et maintenez-le lubrifié (le cas échéant).
Si l’outil doit être utilisé régulièrement, investissez dans des accessoires antivibrations.
Évitez d’utiliser des outils à des températures inférieures ou égales à 10oC.
Planifiez votre travail pour étaler l’utilisation des outils à forte vibration sur plusieurs jours.
22MISES EN GARDE POUR LA COUPE
1.Tenir l’outil par les zones de prises isolées lors d’une utilisation où l’outil tranchant pourrait entrer en contact avec des fils cachés ou avec son propre cordon. Si les parties externes en métal entrent en contact avec un fil électrique « sous tension », elles pourraient elles aussi devenir « sous tension » et l’utilisateur pourrait recevoir une décharge électrique.
2.Portez toujours un masque antipoussières.
Outil oscillant |
F |
|
|
SYMBOLES
Pour réduire le risque de blessure, l’utilisateur doit lire le mode d’emploi.
Double isolation
Avertissement
Porter une protection pour les oreilles
Porter une protection pour les yeux
Porter un masque contre la poussière
Avant de travailler avec votre outil, assurez-vous qu’aucun cordon d’alimentation ne sera endommagé.
Éviter tout risque de blessure émanant des bords tranchants des accessoires.
Les accessoires peuvent devenir très chauds pendant leur fonctionnement, et ils peuvent présenter un risque de brûlures.
Veuillez vous assurer que l’outil est débranché avant de modifier les accessoires.
Porter des gants de protection.
Haute fréquence d’oscillation
 Basse fréquence d’oscillation
Les déchets d’équipements électriques et électroniques ne doivent pas être déposés avec les ordures ménagères. Ils doivent être collectés pour être recyclés dans des centres spécialisés. Consultez les autorités locales ou votre revendeur pour obtenir des renseignements sur l’organisation de la collecte.
23
Outil oscillant |
F |
|
|

FONCTIONNEMENT
 REMARQUE: Avant d’utiliser cet outil, lire attentivement le mode d’emploi.
UTILISATION CONFORME
Cet outil électroportatif est destiné à scier et à tronçonner des matériaux en bois, matières plastiques, du plâtre, des métaux non-ferreux et des éléments de fixation (p.ex. clous, agrafes) ainsi que pour travailler du carrelage mural tendre et au ponçage à sec de petites surfaces. Il est particulièrement bien approprié pour travailler près du bord et bord à bord.
ASSEMBLAGE ET
FONCTIONNEMENT
|
|
Action |
Figure |
|
|
|
|
|
|
|
|
Accessoires de montage |
Voir Fig. A-C |
|
|
|
|
|
|
|
|
Assemblage du patin de |
Voir Fig. D |
|
|
|
ponçage |
||
|
|
|
||
|
|
|
|
|
|
|
Montage de l’aspiration de |
Voir Fig. E1-E5 |
|
24 |
||||
|
Poussieres (non fourni) |
|||
|
|
|
||
|
|
|
|
|
|
|
Fonctionnement du bouton |
Voir Fig. F |
|
|
|
marche/arrêt. |
|
|
|
|
Utilisation du bouton de |
Voir Fig. G |
|
|
|
vitesse variable. |
||
|
|
|
||
|
|
|
|
Il est possible d’utiliser le bouton de vitesse variable pour régler une fréquence d’oscillation optimale en fonction des accessoires utilisés et de l’application correspondante.
Fréquence |
Application |
|
d'oscillation |
||
|
||
|
|
|
|
Ponçage, sciage, |
|
Haute fréquence |
limage et polissage |
|
d'oscillation |
de la pierre et du |
|
|
métal. |
|
|
|
|
Basse fréquence |
Décapage et |
|
d'oscillation |
polissage de vernis. |
|
|
|
ASTUCES CONCERNANT VOTRE OUTIL
Si votre outil électrique devient trop chaud, en particulier une fois utilisé à vitesse réduite, mettez la vitesse au maximum et laissez-le fonctionner à vide pendant 2 ou 3 minutes pour refroidir le moteur. Évitez l’utilisation prolongée aux vitesse très basses. Maintenez toujours la lame affutée. Assurez-vous toujours que la pièce à usiner
est bien maintenue ou fixée pour empêcher le mouvement.
Tout mouvement du matériau peut affecter la qualité de la coupe et de la finition de ponçage. Démarrez votre outil avant de l’utiliser et éteignezle après avoir terminé de travailler.
Ne commencez pas à poncer avant d’avoir ajusté le papier de verre.
Ne laissez pas le papier de verre s’user, car cela endommagerait la plaque de base. La garantie ne couvre pas l’usure normale de la plaque de base. Utilisez du papier à gros grain pour poncer les surfaces rugueuses, du papier à grain moyen pour les surfaces lisses et du papier à grain fin pour les surfaces finales. Au besoin, faites d’abord un essai sur la matière mise au rebut.
Une force excessive réduit l’efficacité du travail et provoque une surcharge du moteur. Remplacez l’accessoire régulièrement pour maintenir une efficacité de travail optimale.
ENTRETIEN
Retirer la fiche de la prise avant de procéder à un réglage, une réparation ou un entretien.
L’outil motorisé ne requiert pas de graissage ou d’entretien particulier. Il n’y a pas de pièces réparables par l’utilisateur dans cet outil. Ne
jamais utiliser d’eau ou de nettoyants chimiques pour nettoyer l’outil. Nettoyer avec un chiffon sec.Toujours conserver l’outil motorisé dans un endroit sec. Maintenir les fentes de ventilation du moteur propres. Empêcher que les commandes de marche soient couvertes de sciure. Il est normal que des étincelles soient visibles dans les fentes de
ventilation, cela n’endommagera pas l’outil motorisé. Si le cordon d’alimentation est endommagé, il doit être remplacé par le fabricant, un technicien du S.A.V ou toute autre personne qualifiée afin d’éviter tout danger.
Outil oscillant |
F |
|
|
APPLICATION
AVERTISSEMENT: Les dents de la lame de scie sont très pointues. Ne pas les toucher lors du montage ni durant le travail.
La pièce à travailler doit être solidement attachée avant de la couper.
Schéma |
Nom |
Application |
|
|
|
Bois, plastique, fibre de |
|
|
|
verre, clous, métaux non |
|
|
Lame universelle |
ferreux, tôle mince, |
|
|
|
substances de remplissage |
|
|
|
durcies |
|
|
Lame de coupe en bout |
Bois, plastique, cloison sèche |
|
Sciage |
Lame de coupe de |
Bois , plastiques souples |
|
|
|||
|
précision |
||
|
|
||
|
|
Bois, plastique, fibre de |
|
|
Lame de scie |
verre, métaux non ferreux, |
|
|
segmentée HSS |
tôle mince,substances de |
|
|
|
remplissage durcies |
|
|
Patin de ponçage |
Bois, plastique, enduits |
|
Ponçage |
|
25 |
|
|
|
||
|
Tampon à poncer |
Bois, plastique, enduits |
|
|
Râpe triangulaire |
Bois, plastique, colles durcis, |
|
|
céramique, maçonnerie |
||
|
|
||
Râpage |
|
|
|
|
Râpe triangulaire |
Bois, plastique, colles durcis, |
|
|
céramique, maçonnerie |
||
|
|
||
Découpe |
Lame en carbure à |
Ciment, béton poreux, |
|
coupe grossière |
maçonnerie |
||
dans le |
|||
Lame diamantaire à |
Céramique et pierre, planche |
||
ciment |
|||
coupe grossière |
d’appui |
||
|
|||
|
Racloir rigide |
Vieille peinture, colles durcies |
|
|
et mastic, silicone, moquettes |
||
|
|
||
Grattage |
|
Enduits d’étanchéité |
|
|
Lame de racloir flexible |
élastiques, peintures, résidus |
|
|
|
adhésifs, moquettes |
Outil oscillant |
F |
|
|

Nous recommandons d’acheter tous les accessoires dans le magasin d’acquisition de l’outil. Il est impératif d’utiliser des accessoires de bonne qualité et de marque connue et de choisir l’accessoire correct recommandé dans ce manuel. Pour plus d’informations, se référer à l’emballage des accessoires. Le personnel du magasin est également là pour vous conseiller.
REMARQUE: Lors de la pénétration de l’outil et lors du sciage, assurer une évacuation de copeaux suffisante par un mouvement pendulaire.
La durée de vie de la lame de scie est plus longue lorsqu’elle est usée de manière régulière. Pour celà,, desserrer la lame de scie, la tourner un petit peu, puis la resserrer.
Coupez / poncez avec un mouvement continu et une légère pression
Une pression plus élevée n’augmente pas l’enlèvement de matière mais l’usure de la feuille abrasive.
|
PROTECTION DE |
||
|
L’ENVIRONNEMENT |
||
26 |
|
|
Les déchets d’équipements électriques |
|
|
|
et électroniques ne doivent pas être |
|
|||
|
|
|
déposés avec les ordures ménagères. Ils |
|
|
|
|
doivent être collectés pour être recyclés dans des centres spécialisés. Consultez les autorités locales ou votre revendeur pour obtenir
des renseignements sur l’organisation de la collecte.
DÉCLARATION DE
CONFORMITÉ
Nous,
POSITEC Germany GmbH
Konrad-Adenauer-Ufer 37
50668 Köln
Déclarons ce produit,
Description WORX Outil oscillant Modèle WX680 (6- désignations des
pièces, illustration de l’outil multifonction de haute fréquence)
Fonctions Ponçage, sciage, rapage, grattage, polissage
Est conforme aux directives suivantes:
2006/42/CE
2004/108/EC
2011/65/EU
Et conforme aux normes:
EN 55014-1
EN 55014-2
EN 60745-1
EN 60745-2-4
EN 61000-3-2
EN 61000-3-3
La personne autorisée à compiler le dossier technique,
Nom: Russell Nicholson
Adresse: Positec Power Tools (Europe) Ltd, PO Box 152, Leeds, LS10 9DS, UK
2014/08/19 YujinTang
Responsible qualité POSITEC
Outil oscillant |
F |
|
|
 Loading...