


Rotary hammer |
EN |
P05 |
Bohrhammer |
D |
P09 |
Marteau Perforateur |
F |
P13 |
Martello Rotativo |
I |
P17 |
Martillo rotatorio |
ES |
P21 |
Boorhamer |
NL |
P25 |
Młot obrotowy |
PL |
P29 |
Pneumatikus fúrókalapács |
HU |
P33 |
Ciocan articulat |
RO |
P37 |
Rotační kladivo |
CZ |
P41 |
Otočné kladivo |
SK |
P45 |
Martelo rotativo |
PT |
P49 |
Rotorhammare |
SV |
P53 |
Rotacijski vrtalnik |
SL |
P56 |
WX331 WX331.1 WX332
|
Original instructions |
EN |
|
|
|
|
|
|
|
|
Originalbetriebsanleitung |
D |
||
|
|
|
|
|
|
Notice originale |
F |
||
|
|
|
|
|
|
Istruzioni originali |
I |
||
|
|
|
|
|
|
Manual original |
ES |
||
|
|
|
|
|
|
Oorspronkelijke gebruiksaanwijzing |
NL |
||
|
|
|
|
|
|
Tłumaczenie oryginalnych instrukcji |
PL |
||
|
|
|
|
|
|
Eredeti használati utasítás |
HU |
||
|
|
|
|
|
|
Traducerea instrucţiunilor iniţiale |
RO |
||
|
|
|
|
|
|
Překlad původních pokynů |
CZ |
||
|
|
|
|
|
|
Preklad pôvodných pokynov |
SK |
||
|
|
|
|
|
|
Manual original |
PT |
||
|
|
|
|
|
|
Bruksanvisning i original |
SV |
||
|
|
|
|
|
|
Izvorna navodila |
SL |
||
|
|
|
|
|
|
|
|
|
|
|
|
|
|
|

|
7 |
|
|
8 |
|
|
|
3 |
|
|
2 |
|
|
1 |
|
6 |
4 |
|
|
|
|
5 |
|
A1 |
|
A2 |
SDS-plus |
SDS-plus |
1
|
1 |
|
|
2 |
2 |
|
|
|
B |
|
C |
B 


 C
C
D E
F 

 G
G
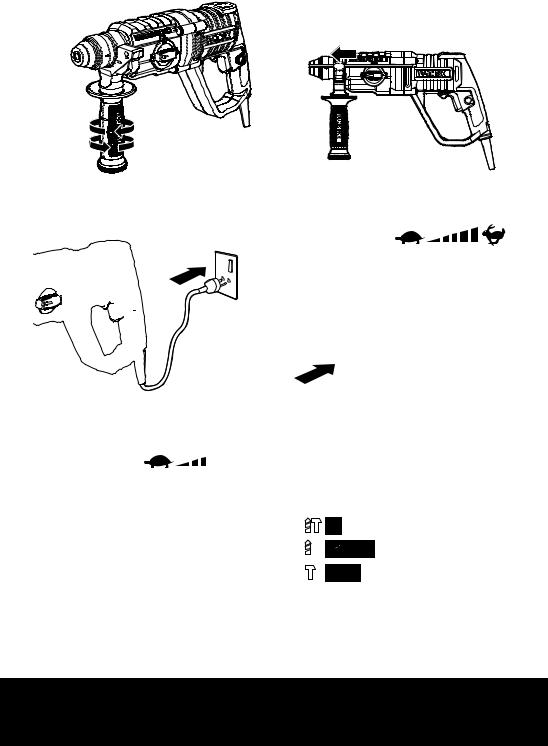
1.ON/OFF SWITCH
2.SWITCH LOCK-ON BUTTON
3.FORWARD AND REVERSE ROTATION CONTROL
4.FUNCTION MODE SELECTION SWITCH
5.AUXILIARY HANDLE
6.ADJUSTABLE DEPTH STOP
7.DUST PROTECTION CAP
8.SDS-PLUS “QUIK-CHANGE” CHUCK
Not all the accessories illustrated or described are included in standard delivery.
TECHNICAL DATA
Type WX331 WX331.1 WX332
(330-359-designation of machinery, representative of rotary hammer)
|
WX331 |
|
WX332 |
|
|
WX331.1 |
|||
|
|
|
||
|
|
|
||
Voltage |
230-240V~50Hz |
|||
|
|
|
|
|
Power input |
750W |
|
|
800W |
|
|
|
||
No load speed |
0-1200/min |
|||
|
|
|
||
Impact rate |
0-5000bpm |
|||
|
|
|
|
|
Impact energy |
2.0J |
|
|
2.5J |
|
|
|
|
|
Protection class |
|
|
/II |
|
|
|
|
|
|
Drilling capacity max |
|
|
|
|
|
|
|
|
|
Masonry |
20mm |
|
|
26mm |
|
|
|
|
|
Steel |
|
13mm |
|
|
|
|
|
|
|
Wood |
30mm |
|
||
|
|
|
|
|
Machine weight |
2.3kg |
|
|
2.7kg |
|
|
|
|
|
NOISE INFORMATION
|
A weighted sound |
When tested at hammer |
pressure LPA= 90.4dB |
& drill mode |
A weighted sound |
|
|
|
power LWA =101.4dB |
KPA & KWA: 3dB(A)
When tested at hammer |
LPA= 92.3dB |
|
only mode according to |
|
|
LWA= 103.3dB |
||
2000/14/EC |
||
|
|
Wear ear protection when sound pressure is over 80dB(A) 
VIBRATION
INFORMATION
Vibration total values (triax cover sum) determined according to EN 60745
Hammer drilling |
Vibration emission value |
|
|
||||
a |
h,HD |
=15.674m/s2 |
|
||||
into concrete |
|
|
|
|
|
||
Uncertainty K=1.5m/s2 |
|
|
|||||
|
|
||||||
|
Vibration emission value |
|
|||||
Chiseling |
a |
h,Cheq |
=16.065m/s2 |
|
|||
|
|
|
|
||||
|
Uncertainty K=1.5m/s2 |
|
|
||||
The declared vibration total value may be used for |
|
||||||
5 |
|||||||
comparing one tool with another, and may also be |
|||||||
|
|||||||
in a preliminary assessment of exposure . |
|
||||||
WARNING: The vibration emission value |
|
||||||
during actual use of the power tool can differ |
|
||||||
from the declared value depending on the ways in |
|
||||||
which the tool is used dependant on the following |
|
||||||
examples and other variations on how the tool is |
|
||||||
used: |
|
|
|
|
|
|
|
How the tool is used and the materials being drilled. |
|
||||||
The tool being in good condition and well |
|
||||||
maintained. |
|
|
|
|
|
|
|
The use the correct accessory for the tool and |
|
||||||
ensuring it is sharp and in good condition. |
|
||||||
The tightness of the grip on the handles and if any |
|
||||||
anti vibration accessories are used. |
|
||||||
And the tool is being used as intended by its design |
|
||||||
and these instructions. |
|
|
|
|
|||
This tool may cause hand-arm vibration syndrome if its use is not adequately managed.
WARNING: To be accurate, an estimation of exposure level in the actual conditions of use should also take account of all parts of the
operating cycle such as the times when the tool is switched off and when it is running idle but not
actually doing the job.This may significantly reduce the exposure level over the total working period.
Helping to minimize your vibration exposure risk.
Rotary hammer |
EN |
|
|
ALWAYS use sharp chisels, drills and blades. |
|
|
|
||
Maintain this tool in accordance with these |
Warning |
|
instructions and keep well lubricated (where |
||
appropriate). |
|
|
If the tool is to be used regularly then invest in anti |
|
|
|
||
vibration accessories. |
|
|
Avoid using tools in temperatures of 10oC or less. |
Wear ear protection |
|
Plan your work schedule to spread any high |
||
|
||
vibration tool use across a number of days. |
|
ACCESSORIES |
|
|
Wear eye protection |
||
|
|
|
|
||
WX331 |
WX331.1 |
WX332 |
|
||
Auxiliary handle |
1 |
1 |
1 |
Wear dust mask |
|
Depth gauge |
1 |
1 |
1 |
|
|
SDS drill bits |
/ |
5 |
3 |
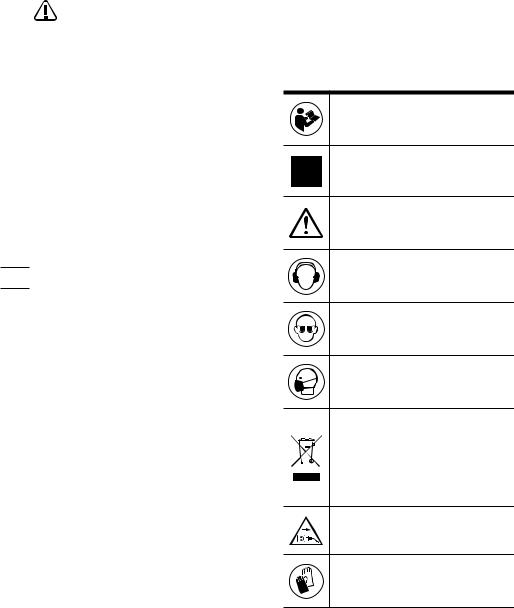
Waste electrical products must not be |
|
disposed of with household waste. |
|||||
|
|
|
|
||
SDS flat chisel |
/ |
/ |
1 |
Please recycle where facilities exist. |
|
Check with your local authorities or |
|||||
|
|
|
|
||
We recommend that you purchase your accessories |
retailer for recycling advice. |
||||
from the same store that sold you the tool. Use |
|
||||
good quality accessories marked with a well-known |
Before any work on the machine itself, |
||||
brand name. Choose the type according to the work |
pull the mains plug from the socket |
||||
you intend to undertake. Refer to the accessory |
outlet. |
||||
packaging for further details. Store personnel can |
|
||||
assist you and offer advice. |
|
|
|
||
6 |
|
|
|
Wear protective gloves |
|
|
|
|
|
||
HAMMER SAFETY |
|
|
|||
WARNINGS |
|
|
|
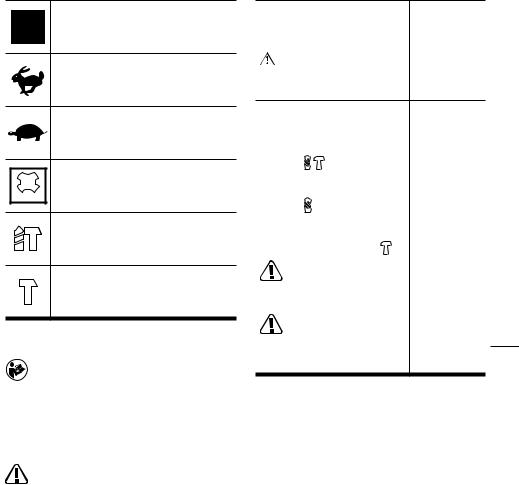
Concrete |
|
1. Wear ear protectors. Exposure to noise can |
|||||
|
|||||
cause hearing loss. |
|
|
|
|
|
2. Use auxiliary handle(s), if supplied with the |
|
||||
tool. Loss of control can cause personal injury. |
|
||||
3. Hold power tool by insulated gripping |
High speed |
||||
surfaces, when performing an operation |
|
||||
where the cutting accessory may contact |
|
||||
hidden wiring or its own cord. Cutting |
|
||||
accessory contacting a “live” wire may make |
Low speed |
||||
exposed metal parts of the power tool “live” and |
|||||
could give the operator an electric shock. |
|
||||
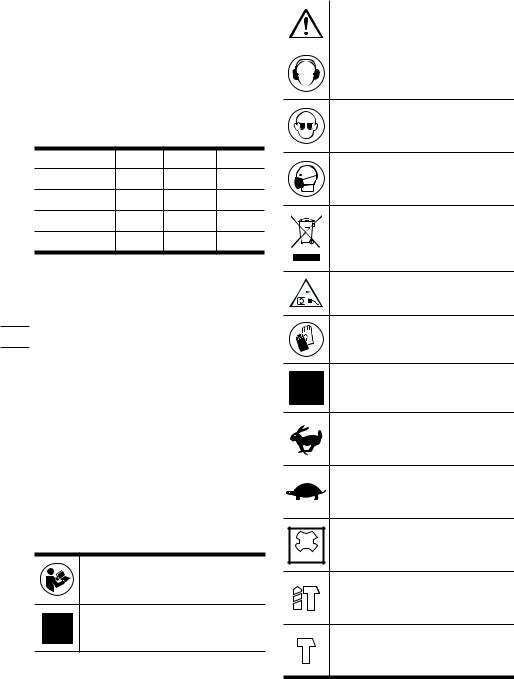
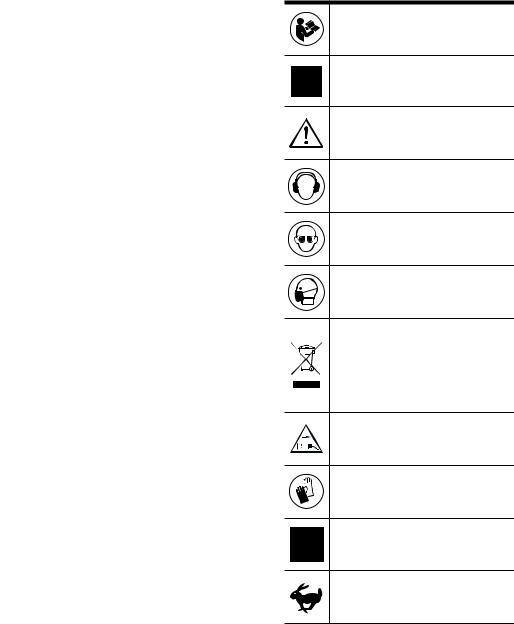
SYMBOLS
Tool holder
SDS-plus
To reduce the risk of injury, user must read instruction manual
Drilling
Double insulation
Chiseling
Rotary hammer |
EN |
|
|
OPERATING INSTRUCTIONS
 NOTE: Before using the tool, read the instruction book carefully.
INTENDED USE
The machine is intended for hammer drilling in concrete, brick and stone as well as for light chiseling work. It is also suitable for drilling without impact in wood, metal, ceramic and plastic.
 WARNING: Before any work on the machine itself, pull the mains plug.
OPERATION
Action |
Figure |
|
|
|
|
INSERTING AND REMOVING DRILL |
See Fig. |
|
BIT IN SDS |
A1& A2 |
|
|
|
|
Adjusting the Auxiliary Handle |
See Fig. B |
|
|
|
|
Using the Depth Gauge |
See Fig. C |
|
|
|
|
Plugging in the power |
See Fig. D |
|
|
|
|
On/Off Switch With Variable Speed |
See Fig. E |
|
Control |
||
|
||
|
|
|
FORWARD / REVERSE ROTATION |
|
|
CONTROL |
|
|
WARNING: Never change the |
See Fig. F |
|
direction of rotation while the tool is |
|
|
rotating, wait until it has stopped. |
|
|
|
|
|
SelectingThe Operating Mode |
|
|
For simultaneous drilling and |
|
|
impacting of concrete or masonry, |
|
|
choose the Hammer drilling position. |
|
|
For screw driving, drilling into steel, |
|
|
wood and plastics choose the Rotary |
|
|
drilling position. |
|
|
For impacting only - for light |
|
|
chipping, chiseling and demolition |
See Fig. G |
|
applications choose the Hammer |
|
|
position. |
|
|
WARNING: The operating |
|
|
mode selector switch may |
|
|
be actuated only at a standstill. |
|
|
WARNING: Prolonged use |
|
|
will cause the aluminum |
|
|
housing to become hot, do not |
|
|
touch. |
|
|
|
|
WORKING HINTS FOR YOUR DRILL (HAMMER)
If your power tool becomes over heated, set the speed to maximum and run no load for 2-3 minutes
to cool the motor. SDS-plus tungsten carbide drill bits should always be used for concrete and
masonry. When drilling in metal, only use HSS drill bits in good condition. Always use a magnetic bit holder when using short screwdriver bits. Where possible use a pilot hole before drilling a large diameter hole.
MAINTENANCE
Remove the plug from the socket before carrying out any adjustment, servicing or maintenance.
Your power tool requires no additional lubrication or maintenance.There are no user serviceable parts in your power tool. Never use water or chemical cleaners to clean your power tool. Wipe clean with a dry cloth. Always store your power tool in a dry
place. Keep the motor ventilation slots clean. Keep all working controls free of dust.
If the supply cord is damaged, it must be replaced by the manufacturer, its service agent or similarly qualified persons in order to avoid a hazard.
ENVIRONMENTAL PROTECTION
Waste electrical products must not be  disposed of with household waste. Please 7
 recycle where facilities exist. Check with your local authorities or retailer for recycling advice.
PLUG REPLACEMENT (UK & IRELAND ONLY)
If you need to replace the fitted plug then followthe instructions below.
IMPORTANT
The wires in the mains lead are colored in
accordance with the following code:
Blue =Neutral
Brown = Live
As the colors of the wires in the mains lead of thisappliance may not correspond with the
coloured markings identifying the terminals in your plug,proceed as follows.The wire which is coloured blue must be connected to the terminal which is marked with N.The wire which is coloured brown must be connected to the terminal which is marked
with L.
WARNING: Never connect live or neutral wires to the earth terminal of the plug. Only
fit an approved 13ABS1363/A plug and the correct
rated fuse.
NOTE: If a moulded plug is fitted and has to be removed take great care in disposing of the plug and severed cable, it must be destroyed to prevent
Rotary hammer |
EN |
|
|
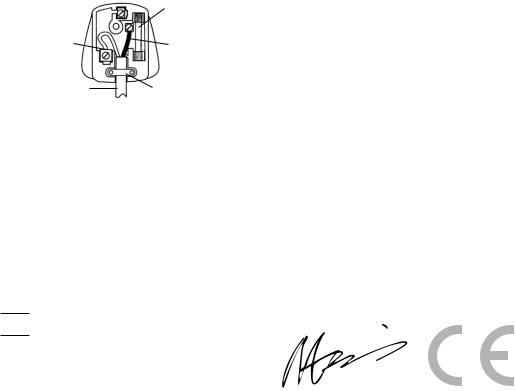
engaging into a socket.
13 Amp fuse approved to BS1362
Connect
Blue to N Brown L (live) (neutral)
Outer sleeve |
Cable grip |
firmly clamped |
|
8
DECLARATION OF
CONFORMITY
We,
POSITEC Germany GmbH
Konrad-Adenauer-Ufer 37
50668 Köln
Declare that the product, Description WORX Rotary hammer Type WX331 WX331.1 WX332
(330~359--designation of machinery, representative of Rotary Hammer) Function Hammering various materials
Complies with the following directives,
2006/42/EC, 2004/108/EC, 2011/65/EU
Standards conform to
EN 60745-1
EN 60745-2-6
EN 55014-1
EN 55014-2
EN 61000-3-2
EN 61000-3-3
The person authorized to compile the technical file,
Name Russell Nicholson
Address Positec Power Tools (Europe)Ltd, PO Box 152, Leeds, LS10 9DS, UK
Suzhou 2015/06/30
Allen Ding
Deputy Chief Engineer,Testing & Certification
Rotary hammer |
EN |
|
|
1.EIN/AUS-SCHALTER
2.EINSCHALTSPERRE
3.VORWÄRTS-RÜCKWÄRTSLAUF-REGELUNG
4.BETRIEBSARTENWAHLSCHALTER
5.ZUSATZGRIFF
6.TIEFENANSCHLAG
7.STAUBSCHUTZKAPPE
8.SDS-PLUS „QUIK-CHANGE“-BOHRFUTTER
Abgebildetes oder beschriebenes Zubehör gehört teilweise nicht zum Lieferumfang.
TECHNISCHE DATEN
Typ WX331 WX331.1WX332 (330~359--
Bezeichnung der Maschine, Repräsentant Bohrhammer)
|
WX331 |
|
WX332 |
|
WX331.1 |
|
|
|
|
|
|
|
|
|
|
Spannung |
230-240V~50Hz |
||
|
|
|
|
Nennaufnahmel- |
750W |
|
800W |
eistung |
|
||
|
|
|
|
|
|
|
|
Leerlaufdrehzahl |
0-1200/min |
||
|
|
|
|
Nennschlagzahl |
0-5000bpm |
||
|
|
|
|
Schlagkraft |
2.0J |
|
2.5J |
|
|
|
|
Schutzisoliert |
|
/II |
|
|
|
|
|
Max. Bohrleistung |
|
|
|
|
|
|
|
Mauerwerk |
20mm |
|
26mm |
|
|
|
|
Stahl |
13mm |
|
|
|
|
|
|
Holz |
30mm |
|
|
|
|
|
|
Gewicht |
2.3kg |
|
2.7kg |
|
|
|
|
INFORMATIONEN ÜBER LÄRM
|
Gewichteter Schalldruck |
Bei Test im |
LpA= 90.4dB |
Schlagbohrbetrieb |
Gewichtete Schallleistung |
|
|
|
LwA = 101.4dB |
KpA & KwA: 3dB(A)
Bei Test im reinen LpA= 92.3dB Bohrbetrieb nach
2000/14/EC
Tragen Sie bei einem Schalldruck über einen Gehörschutz 80dB(A)
INFORMATIONEN ÜBER VIBRATIONEN
Vibrationsgesamtmesswertermittlung gemäß EN 60745:
Schlagbohren in |
Vibrationsemissionswert |
|
|
|||
a |
h,HD |
=15.674m/s2 |
|
|||
Beton |
|
|
|
|
|
|
|
|
|
|
|
|
|
Unsicherheit K=1.5m/s2 |
|
|
||||
|
|
|||||
|
Vibrationsemissionswert |
|
||||
Meißeln |
a |
h,Cheq |
=16.065m/s2 |
|
||
|
|
|
|
|||
|
Unsicherheit K=1.5m/s2 |
|
||||
|
|
|
9 |
|||
Der Schwingungsgesamtwert kann zum Vergleichen |
||||||
eines Werkzeugs mit einem anderen verwendet werden, ebenso für eine vorläufige Beurteilung von Belastungen.
WARNUNG: Der Vibrationsemissionswert während des tatsächlichen Gebrauchs
des Elektrowerkzeugs kann vom angegebenen Wert abweichen, je nachdem, wie das Werkzeug gemäß folgender Beispiele und anderweitiger Verwendungsmöglichkeiten eingesetzt wird:
Wie das Werkzeug verwendet wird und Materialen angebohrt werden.
Das Werkzeug ist in gutem Zustand und gut gepflegt.
Verwendung des richtigen Zubehörs für das Werkzeug und Gewährleistung seiner Schärfe und seines guten Zustands.
Die Festigkeit der Handgriffe und ob Antivibrationszubehör verwendet wird.
Und ob das verwendete Werkzeug dem Design und diesen Anweisungen entsprechend verwendet wird.
Wird dieses Werkzeug nicht anemessen gehandhabt, kann es ein Hand-Arm-Vibrations- syndrom erzeugen.
WARNUNG: Um genau zu sein, sollte ein Abschätzung des Belastungsgrades aller Arbeitsabschnitte während tatsächlicher
Verwendung berücksichtigt werden, z.B. die Zeiten, wenn das Werkzeug ausgeschaltet ist, und wenn es sich im Leerlauf befindet und eigentlich
Bohrhammer |
D |
|
|
nicht eingesetzt wird. Auf diese Weise kann der Belastungsgrad während der gesamten Arbeitszeit wesentlich gemindert werden.
Minimieren Sie Ihr Risiko, dem Sie bei Vibrationen ausgesetzt sind.
Verwenden Sie IMMER scharfe Meissel, Bohrer und Sägeblätter.
Pflegen Sie dieses Werkzeug diesen Anweisungen entsprechend und achten Sie auf eine gute Einfettung (wo erforderlich).
Bei regelmäßiger Verwendung dieses Werkzeugs sollten Sie in Antivibrationszubehör investieren. Vermeiden Sie den Einsatz von Werkzeugen bei Temperaturen von 10ºC oder darunter.
Machen Sie einen Arbeitsplan, um die Verwendung von hochvibrierenden Werkzeugen auf mehrereTage zu verteilen.
ZUBEHÖRTEILE
|
|
|
WX331 |
WX331.1 |
WX332 |
|
|
|
|
|
|
|
|
Zusatzhandgriff |
1 |
1 |
1 |
|
|
|
|
|
|
|
|
Tiefenanschlag |
1 |
1 |
1 |
|
|
|
|
|
|
|
|
SDS plus-Bohrer |
/ |
5 |
3 |
|
|
|
|
|
|
10 Flachmeißel |
/ |
/ |
1 |
||
|
|
|
|
|
|
Wir empfehlen Ihnen, sämtliche Zubehörteile beim selben Fachhändler zu beziehen, bei dem Sie auch Ihr Elektrowerkzeug gekauft haben. Verwenden Sie nur hochwertige Zubehörteile von namhaften Herstellern. Die Güteklasse muss entsprechend der
Anwendung gewählt werden. Weitere Informationen finden Sie auf der Verpackung der Zubehörteile. Auch Ihr Fachhändler berät Sie gerne.
SICHERHEITSHINWEISE FÜR HÄMMER
1.Tragen Sie Gehörschutz, Wenn Sie die Schlagbohrmaschine benutzen.
Lärmaussetzung kann Gehörverlust verursachen.
2.Benutzen Sie den zusätzlichen Handgriff, der mit dem Werkzeug geliefert wird.
Kontrollverlust kann Personenschäden zufolge haben.
3.Halten Sie das Werkzeug nur an den isolierten griffigen Oberflächen, wenn Sie einen Einsatz durchführen, bei dem Schneidwerkzeuge eventuell versteckte
Kabel berühren könnten. Berührung mit einem unter Strom stehenden Kabel kann auch die Metallteile des Gerätes unter Strom setzen und dem Bedienenden einen Stromschlag versetzen.
SYMBOLE
Zur Reduzierung der Verletzungsgefahr bitte die Bedienungsanleitung durchlesen
Schutzisolation
WARNUNG!
Tragen Sie einen Gehörschutz
Tragen Sie eine Schutzbrille
Tragen Sie eine Schutzbrille
Elektroprodukte dürfen nicht mit dem normalen Haushaltsmüll entsorgt werden, sondern sollten nach Möglichkeit zu einer Recyclingstelle gebracht werden. Ihre zuständigen Behörden oder Ihr Fachhändler geben Ihnen hierzu gerne Auskunft.
Ziehen Sie vor allen Arbeiten am Elektrowerkzeug den Netzstecker aus der Steckdose.
Schutzhandschuhe tragen
Beton
Hohe Geschwindigkeit
Bohrhammer |
D |
|
|
Niedrige Geschwindigkeit
Werkzeughalter
SDS-plus
Bohren
Meißeln
BETRIEBMODUS WÄHLEN
-Zum Schlagbohren in Beton oder Mauerwerk wählen Sie die Bohrhammer-Position.
-Für Schraubungen, Bohren in Stahl, Holz und Kunststoff wählen Sie die Bohr-Position.
-Nur Hammerbetrieb: Zum Zerspanen, Meißeln und zum
Zertrümmern wählen Sie die |
Siehe Bild G |
|
Hammer-Position. |
||
|
Warnung: Der
BetriebsartenWahlschalter darf nur im Stillstand betätigt werden. WARNUNG: Das
Aluminiumgehäuse wird bei längerem Betrieb sehr heiß. Nicht berühren!
HINWEISE ZUM BETRIEB
HINWEIS: Lesen Sie das Handbuch vor Inbetriebnahme des Werkzeuges sorgfältig
durch.
BESTIMMUNGSGEMÄSSER GEBRAUCH
Das Elektrowerkzeug ist bestimmt zum Hammerbohren in Beton, Ziegel und Gestein. Es ist ebenso geeignet zum Bohren ohne Schlag in Holz, Metall, Keramik und Kunststoff.
WARNUNG: Ziehen Sie vor allen Arbeiten am Elektrowerkzeug den Netzstecker aus
der Steckdose.
ARBEITSHINWEISE FÜR IHREN BOHRHAMMER
Wenn derBohrhammer zu heiß wird, lassen Sie ihn 2-3 Minuten im Leerlauf laufen, um den Motor abzukühlen.
SDS-plus-Wolframkarbid-Bohrer sollten grundsätzlich  für Beton und Mauerwerk eingesetzt werden. 11 Wenn Sie in Metall bohren, verwenden Sie nur HSS-
  Bohrer in gutem Zustand.
Immer einen magnetischen Bithalter verwenden, wenn Sie kurze Schraubendreherbits verwenden. Wenn möglich, immer ein Loch vorbohren, wenn Sie große Durchmesser bohren möchten.
BEDIENUNG
Aktion |
Abbildung |
|
|
|
|
Bohrer in SDS einsetzen und |
Siehe Bild |
|
herausnehmen |
A1& A2 |
|
|
|
|
ZUSATZGRIFF EINSTELLEN |
Siehe Bild B |
|
|
|
|
TIEFENANSCHLAG VERWENDEN |
Siehe Bild C |
|
|
|
|
Anschließen der |
Siehe Bild D |
|
Stromversorgung |
||
|
||
|
|
|
EIN/AUS-SCHALTER MIT |
Siehe Bild E |
|
DREHZAHLREGELUNG |
||
|
||
|
|
|
VORWÄRTS-RÜCKWÄRTSLAUF- |
|
|
REGELUNG |
|
|
Warnung: Wechseln Sie die |
Siehe Bild F |
|
Drehrichtung niemals, während |
||
|
||
der Bohrer läuft.Warten Sie, bis der |
|
|
Bohrer ausgelaufen ist. |
|
|
|
|
WARTUNG
Ziehen Sie grundsätzlich den Netzstecker, bevor Sie Einstell-, Reparaturoder Wartungstätigkeiten ausführen.
Ihr Werkzeug benötigt keine zusätzliche Schmierung oder Wartung. Es enthält keineTeile, die Sie warten müssen. Reinigen Sie Ihr Werkzeug niemals mit Wasser oder chemischen Reinigungsmitteln. Wischen Sie es mit einem trockenenTuch sauber. Lagern Sie Ihr Werkzeug immer an einem trockenen Platz. Halten Sie die Lüftungsschlitze sauber.
Falls das Netzkabel beschädigt sein sollte, muss es vom Hersteller, einem seiner Service-Beauftragten oder einer ähnlich qualifizierten Person instandgesetzt werden, damit es nicht zu Gefährdungen kommt.
UMWELTSCHUTZ
Elektroprodukte dürfen nicht mit dem normalen Haushaltsmüll entsorgt werden, sondern sollten nach Möglichkeit zu einer
Bohrhammer |
D |
|
|

Recyclingstelle gebracht werden. Ihre zuständigen Behörden oder Ihr Fachhändler geben Ihnen hierzu gerne Auskunft.
12
KONFORMITÄTSERKLÄRUNG
Wir,
POSITEC Germany GmbH
Konrad-Adenauer-Ufer 37
50668 Köln
Erklären hiermit, dass unser Produkt Beschreibung WORX Bohrhammer
Typ WX331 WX331.1 WX332 (330~359--
Bezeichnung der Maschine, Repräsentant Bohrhammer)
Funktion Hämmern verschiedener Materialien
Den Bestimmungen der folgenden Richtlinien
entspricht:
2006/42/EC, 2004/108/EC, 2011/65/EU
Werte nach
EN 60745-1
EN 60745-2-6
EN 55014-1
EN 55014-2
EN 61000-3-2
EN 61000-3-3
Zur Kompilierung der technischen Datei ermächtigte
Person
Name: Russell Nicholson
Anschrift: Positec Power Tools (Europe) Ltd, PO Box 152, Leeds, LS10 9DS, UK
Suzhou 2015/06/30 Allen Ding
Stellvertretender Chefingenieur, Prüfung und Zertifizierung
Bohrhammer |
D |
|
|
1.INTERRUPTEUR VARIATEUR MARCHE/ARRET
2.BOUTON DE VERROUILLAGE
3.INVERSEUR DE SENS DE ROTATION
4.SELECTEUR DE MODE DE FONCTIONNEMENT
5.POIGNEE LATERALE
6.JAUGE DE PROFONDEUR AJUSTABLE
7.CAPUCHON DE PROTECTION CONTRE LA POUSSIERE
8.MANDRIN “QUIK-CHANGE” SDS-PLUS
Les accessoires reproduits ou décrits ne sont pas tous compris avec le modèle standard livré.
CARACTÉRISTIQUES TECHNIQUES
Type WX331 WX331.1 WX332 (330~359-- désignations des pièces, illustration de la Marteau Perforateur)
|
WX331 |
WX332 |
||
|
WX331.1 |
|||
|
|
|
||
|
|
|
|
|
Tension Nominale- |
230-240V~50Hz |
|||
Fréquence |
||||
|
|
|
||
|
|
|
|
|
Puissance |
750W |
|
800W |
|
|
|
|
||
Vitesse à vide |
0-1200/min |
|||
|
|
|
|
|
Cadence de frappe |
0-5000bpm |
|||
nominale |
||||
|
|
|
||
|
|
|
|
|
Energie d'impact |
2.0J |
|
2.5J |
|
|
|
|
|
|
Double isolation |
|
/II |
|
|
|
|
|
||
Capacité max de perçage |
|
|
|
|
|
|
|
|
|
Béton |
20mm |
|
26mm |
|
|
|
|
|
|
Acier |
13mm |
|
||
|
|
|
|
|
Bois |
30mm |
|
||
|
|
|
|
|
Masse de la machine |
2.3kg |
|
2.7kg |
|
|
|
|
|
|
INFORMATIONS RELATIVES AU BRUIT
Lorsque testé en |
Niveau de pression |
|
acoustique LpA= 90.4dB |
||
mode perçage et |
|
|
|
||
percussion |
Niveau de puissance |
|
|
acoustique LwA= 101.4dB |
|
KPA & KWA: 3dB(A) |
|
|
|
|
|
Lorsque testé en |
LPA= 92.3dB |
|
mode percussion seul |
|
|
LWA= 103.3dB |
||
selon la 2000/14/EC |
||
|
|
Porter des protections auditives lorsque la pression sonore est supérieure à 80dB(A) 
INFORMATIONS
RELATIVES AUX
VIBRATIONS
Valeurs totales de vibrations déterminées selon
l'EN 60745: |
|
|
|
13 |
|||
|
|
|
|
||||
Perçage à per- |
Valeur d’émission de vibrations |
||||||
a |
|
=15.674m/s2 |
|||||
cussion dans |
h,HD |
||||||
|
|
|
|
|
|||
du béton |
Incertitude K=1.5m/s2 |
|
|||||
|
|||||||
|
Valeur d’émission de vibrations |
||||||
Burinage |
a |
h,Cheq |
=16.065 m/s2 |
||||
|
|
|
|
||||
|
Incertitude K=1.5m/s2 |
|
|||||
Il est possible d’utiliser la valeur totale déclarée des vibrations pour comparer cet outil à un autre outil, et il est aussi possible d’utiliser cette valeur pour une appréciation préliminaire de l’exposition.
AVERTISSEMENT: La valeur d’émission de vibrations pendant l’utilisation réelle de l’outil
électrique peut différer de la valeur déclarée selon la façon dont l’outil est utilisé, selon les exemples suivants et d’autres variations sur la façon dont l’outil est utilisé:
Comment l’outil est utilisé et quels matériaux sont percés.
L’outil est en bon état et bien entretenu. L’utilisation du bon accessoire pour l’outil et l’assurance qu’il est affuté et en bon état.
Le serrage du grip sur les poignées et le cas échéant les accessoires anti-vibrations utilisés.
Et l’outil est utilisé comme prévu dans sa
Marteau Perforateur |
F |
|
|
conception et dans les présentes instructions.
Cet outil peut causer un syndrome de vibration du bras et de la main s’il n’est pas correctement géré.
AVERTISSEMENT: Pour être précise, une évaluation du niveau d’exposition en
conditions réelles d’utilisation doit également tenir compte de toutes les parties du cycle d’utilisation telles que les moments où l’outil est éteint, et ceux où il fonctionne au ralenti mais ne réalise pas réellement de tâche. Ceci peut réduire de façon significative le niveau d’exposition et la période de fonctionnement totale.
Aider à minimiser le risque d’exposition aux vibrations.
UtilisezTOUJOURS des ciseaux, des forets et des lames affutés.
Entretenez cet outil en accord avec les présentes instructions et maintenez-le lubrifié (si approprié). Si l’outil doit être utilisé régulièrement, alors investissez dans des accessoires anti-vibrations. Évitez d’utiliser des outils à des températures de 100C ou moins.
Planifiez votre travail pour étaler toute utilisation d’outil à fortes vibrations sur plusieurs jours.
14 ACCESSOIRES
|
WX331 |
WX331.1 |
WX332 |
|
|
|
|
Poignée auxiliaire |
1 |
1 |
1 |
|
|
|
|
Jauge de profondeur |
1 |
1 |
1 |
|
|
|
|
Mèches SDS plus |
/ |
5 |
3 |
|
|
|
|
Burin à bout plat |
/ |
/ |
1 |
|
|
|
|
Nous recommandons d’acheter tous les accessoires dans le magasin d’acquisition de la machine.
Il est impératif d’utiliser des accessoires de bonne qualité et de marque connue et de choisir l’accessoire correct recommandé dans ce manuel. Pour plus d’informations, se référer à l’emballage des accessoires. Le personnel du magasin est également là pour vous conseiller.
AVERTISSEMENTS DE SÉCURITÉ POUR LES MARTEAUX
1.Porter une protection pour les oreilles.
L’exposition au bruit peut causer une perte d’audition.
2.Veuillez utiliser les poignées auxiliaires fournies avec l’outil. La perte de contrôle peut engendrer des blessures.
3.Tenir l’outil par ses surfaces antidérapantes et isolées si l’outil de coupe risque d’entrer en contact avec des câbles cachés. L’entrée en contact avec un câble sous tension rendra les parties en métal de l’outil également sous tension et l’utilisateur pourrait recevoir une décharge électrique.
SYMBOLES
Pour réduire le risque de blessure, l'utilisateur doit lire le mode d’emploi.
Classe de protection
Avertissement
Porter une protection pour les oreilles
Porter une protection pour les yeux
Porter un masque contre la poussière
Les déchets d’équipements électriques et électroniques ne doivent pas être déposés avec les ordures ménagères. Ils doivent être collectés pour être recyclés dans des centres spécialisés. Consultez les autorités locales ou votre revendeur pour obtenir des renseignements sur l’organisation de la collecte.
Avant toute intervention sur l’appareil, toujours retirer la fiche du câble d’alimentation de la prise de courant.
Portez des gants de protection
Marteau Perforateur |
F |
|
|
Béton
Haute vitesse
Basse vitesse
Porte-outil
SDS-plus
Perceuse
Burinage
FONCTIONNEMENT
REMARQUE: Avant d’utiliser cet outil, lire attentivement les instructions.
UTILISATION CONFORME
Cet outil électroportatif est destiné au perçage en frappe dans le béton, la brique et dans la Pierre naturelle. Il est également tout à fait approprié au perçage sans frappe du bois, du métal, de la céramique ou de matières plastiques.
AVERTISSEMENT! Avant toute intervention sur l’appareil, toujours
retirer la fiche du câble d’alimentation de la prise de courant.
FONCTIONNEMENT
Action |
Illustration |
|
|
|
|
Sélection du mode de |
Voir Fig. A1& |
|
fonctionnement |
A2 |
|
|
|
|
Ajustement de la poignée |
Voir Fig. B |
|
auxiliaire |
||
|
||
|
|
|
Utiliser la jauge de profondeur |
Voir Fig. C |
|
|
|
|
Branchement de l'alimentation |
Voir Fig. D |
|
|
|
INTERRUPTEUR VARIATEUR |
Voir Fig. E |
|
MARCHE/ARRÊT |
||
|
||
|
|
|
INVERSEUR DE SENS DE |
|
|
ROTATION |
|
|
AVERTISSEMENT : Ne |
Voir Fig. F |
|
jamais changer le sens de rotation |
||
|
||
lorsque l’outil tourne ; attendre qu’il |
|
|
soit arrêté. |
|
Sélection du mode de fonctionnement
-Pour percer et percuter dans du béton ou de la maçonnerie, choisissez la position de perçage Marteau.
-Pour visser, percer dans de l’acier, du bois et des plastiques choisir la position de perçage Rotation.
-Pour buriner ou piquer uniquement – pour ébrécher,
ciseler et démolir légèrement |
Voir Fig. G |
choisir la position Marteau. |
|
AVERTISSEMENT: Le sélecteur de mode
de fonctionnement ne doit être activé que lorsque le marteau est arrêté.
AVERTISSEMENT:  L’utilisation prolongée 15
rendra le boîtier en aluminium chaud ; ne pas le
toucher.
CONSEIL D’UTILISATION DU MARTEAU
Si l’outil motorisé devient trop chaud, régler-le sur la vitesse maximale et faite-le tourner à vide pendant 2-3 minutes pour refroidir le moteur.
Les mèches en carbure de tungstène SDS-plus doivent toujours être utilisées pour le béton et la maçonnerie.
Pour percer dans le métal, utiliser uniquement des mèches HSS en bon état.
Utiliser toujours un porte-embout magnétique lors de l’utilisation de mèches courtes.
Lorsque c’est possible, faites un avant-trou avant de percer un trou de gros diamètre.
ENTRETIEN
Retirer la fiche de la prise avant de procéder à un réglage, une réparation ou un entretien.
L’outil motorisé ne requiert pas de graissage ou d’entretien particulier. Il n’y a pas de pièces réparables par l’utilisateur dans cet outil. Ne
Marteau Perforateur |
F |
|
|

jamais utiliser d’eau ou de nettoyants chimiques pour nettoyer l’outil. Nettoyer avec un chiffon sec. Toujours conserver l’outil motorisé dans un endroit sec. Maintenir les fentes de ventilation du moteur propres. Empêcher que les commandes de marche soient couvertes de sciure.
Si l’alimentation est endommagée, elle doit être remplacée par le fabricant, son agent de
maintenance ou une personne qualifiée de façon similaire, afin d’éviter tout danger.
PROTECTION DE L’ENVIRONNEMENT
Les déchets d’équipements électriques et électroniques ne doivent pas être déposés
avec les ordures ménagères. Ils sont collectés pour être recyclés dans des centres spécialisés. Consultez les autorités locales ou votre revendeur pour obtenir des renseignements sur l’organisation de la collecte.
16
DÉCLARATION DE
CONFORMITÉ
Nous,
POSITEC Germany GmbH
Konrad-Adenauer-Ufer 37
50668 Köln
Description Marteau Perforateur WORX Modèle WX331 WX331.1 WX332 (330~359-
- désignations des pièces, illustration de la Marteau Perforateur)
Fonction Martelage de différents matériaux
Est conforme aux directives suivantes,
2006/42/EC, 2004/108/EC, 2011/65/EU
et conforme aux normes :
EN 60745-1
EN 60745-2-6
EN 55014-1
EN 55014-2
EN 61000-3-2
EN 61000-3-3
La personne autorisée à compiler le dossier
technique,
Nom: Russell Nicholson
Adresse: Positec Power Tools (Europe) Ltd, PO Box 152, Leeds, LS10 9DS, UK
Suzhou 2015/06/30 Allen Ding
Ingénieur en chef adjoint, Essais & Certification
Marteau Perforateur |
F |
|
|

1.INTERRUTTORE D’ACCENSIONE/SPEGNIMENTO
2.PULSANTE DI BLOCCO
3.CONTROLLO ROTAZIONE AVANTI ED INDIETRO
4.MANOPOLA DI SELEZIONE FUNZIONI
5.IMPUGNATURA AUSILIARIA
6.ASTA DI PROFONDITÀ
7.PROTEZIONE ANTIPOLVERE
8.MANDRINO “ATTACCO RAPIDO” DI TIPO SDS-PLUS
Accessori illustrati o descritti non fanno necessariamente parte del volume di consegna.
DATI TECNICI
Codice WX331 WX331.1 WX332(330~359-- designazione del macchinario rappresentativo del Martello Rotante)
|
WX331 |
WX332 |
|
|
WX331.1 |
||
|
|
|
|
|
|
|
|
Tensione nominale |
230-240V~50Hz |
||
|
|
|
|
Potenza nominale |
750W |
|
800W |
|
|
|
|
Velocità nominale a vuoto |
0-1200/min |
||
|
|
|
|
Velocità impatto |
0-5000bpm |
||
|
|
|
|
Energia di impatto |
2.0J |
|
2.5J |
|
|
|
|
Doppio isolamento |
|
/II |
|
|
|
|
|
Capacità massima di foratura |
|
|
|
|
|
|
|
Muratura |
20mm |
|
26mm |
|
|
|
|
Acciaio |
13mm |
|
|
|
|
|
|
Legno |
30mm |
|
|
|
|
|
|
Peso |
2.3kg |
|
2.7kg |
|
|
|
|
INFORMAZIONI SUL RUMORE
Pressione acustica ponCollaudo in modalità derata A LpA= 90.4dB percussione e
trapano
KPA & KWA: 3dB(A)
Collaudo in modalità |
LPA= 92.3dB |
|
percussione soltanto |
|
|
LWA= 103.3dB |
||
secondo 2000/14/CE |
||
|
|
Indossare protezione per le orecchie quando la pressione acustica è superiore a 80dB (A)
INFORMAZIONI SULLA VIBRAZIONE
I valori totali di vibrazione sono determinati secondo lo standard EN 60745:
Perforazione a |
Valore emissione vibrazioni |
|
|
||||
a |
|
=15.674m/s2 |
|
|
|||
percussione su |
h,HD |
|
|||||
cemento |
Incertezza K=1.5m/s2 |
|
|
||||
|
Valore emissione vibrazioni |
|
|||||
Scalpellatura |
a |
h,Cheq |
=16.065m/s2 |
|
|
||
|
Incertezza K=1.5m/s2 |
|
|
||||
Il valore totale dichiarato delle vibrazioni può essere |
|
||||||
utilizzato per confrontare un utensile con un altro e |
|
||||||
17 |
|||||||
in una valutazione di esposizione preliminare. |
|||||||
|
|
|
|
|
|
|
|
AVVERTENZA: Il valore delle vibrazioni emesse durante il reale utilizzo dello
strumento possono differire dal valore dichiarato in base ai modi con cui viene usato lo strumento, ai seguenti esempi e ad altre variabili:
Come viene usato l’apparecchio e i materiali forati. Le condizioni e la buona manutenzione dello strumento.
L’uso dell’accessorio corretto per il taglio e la sua affilatura, nonché le sue buone condizioni.
La stretta sull’impugnatura e l’eventuale utilizzo di accessori antivibrazione.
L’adeguatezza dell’utilizzo dell’utensile rispetto a quanto previsto.
Questo strumento potrebbe causare la sindrome della vibrazione dell’avambraccio se il suo utilizzo non viene gestito correttamente.
AVVERTENZA: Per essere precisi, una stima del livello di esposizione nelle attuali
condizioni di utilizzo dovrebbe anche tenere conto di tutte le parti del ciclo operativo, come le volte in cui lo strumento viene spento e il tempo in cui viene lasciato girare a vuoto senza realmente fare il suo lavoro. Questo potrebbe ridurre significativamente il livello di esposizione sul periodo di lavoro totale.
Martello Rotativo |
I |
|
|
Un aiuto a minimizzare il proprio rischio di esposizione alle vibrazioni.
Usare sempre scalpelli, trapani e lame affilati. Conservare questo strumento sempre in conformità a queste istruzioni e mantenerlo ben lubrificato (dove appropriato).
Se lo strumento deve essere usato regolarmente, investire in accessori antivibrazione.
Evitare l’utilizzo dello strumento a temperature di 100C o inferiori.
Pianificare il programma di lavoro in modo da suddividere i lavori che implicano le maggiori vibrazioni nell’arco di più giorni.
ACCESSORI
|
WX331 |
WX331.1 |
WX332 |
|
|
|
|
Impugnatura ausiliaria |
1 |
1 |
1 |
|
|
|
|
Asta di profondità |
1 |
1 |
1 |
|
|
|
|
Punte per forare SDS |
/ |
5 |
3 |
|
|
|
|
Scalpello piatto |
/ |
/ |
1 |
|
|
|
|
Si raccomanda di acquistare tutti gli accessori nello  stesso negozio in cui è stato acquistato l’attrezzo.
18 Usare accessori di buona qualità e di marca  rinomata. Fare riferimento alla sezione “Consigli
sul funzionamento del trapano” di questo manuale oppure alla confezione degli accessori per altri dettagli. Il personale del negozio può aiutarvi e consigliarvi.
INDICAZIONI DI
SICUREZZA PER
MARTELLI
1.Indossare protezione per le orecchie.
L’esposizione al rumore può provocare la perdita dell’udito.
2.Usare le impugnature ausiliarie fornite in dotazione all’attrezzo. La perdita di controllo può provocare lesioni personali.
3.Afferrare lo strumento per le apposite maniglie quando si eseguono operazioni durante le quali l’attrezzo potrebbe entrare in contatto con cavi nascosti. Il contatto con cavi elettrici in tensione espone l’operatore al rischio di scosse elettriche.
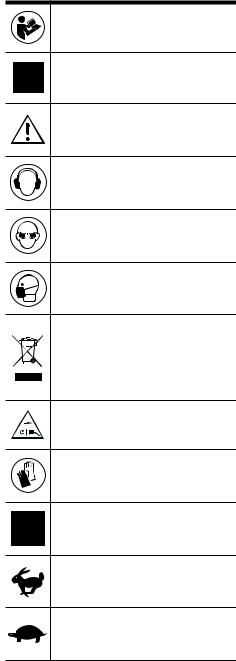
SIMBOLI
Per ridurre il rischio di lesioni, l'utente deve leggere il manuale di istruzioni
Doppio isolamento
Attenzione
Indossare protezione per le orecchie
Indossare protezione per gli occhi
Indossare una mascherina antipolvere
I prodotti elettrici non possono essere gettati tra i rifiuti domestici. L’apparecchio da rottamare deve essere portato al centro di riciclaggio per un corretto trattamento. Controllare con le autorità locali o con il rivenditore per localizzare il centro di riciclaggio più vicino.
Prima di qualunque intervento alla macchina, estrarre la spina dalla presa di rete.
Indossare guanti protettivi
Calcestruzzo
Alta velocità
Bassa velocità
Martello Rotativo |
I |
|
|
 Loading...