


DRYER DOOR REVERSAL INSTRUCTIONS
You can change your door swing from a right-side opening to a left-side opening, if desired. The following instructions are applicable for models with a side-opening door.
Tools Needed
Flat-blade screwdriver |
Plastic putty knife |
Minimum 8" long TORX® T25® |
#2 Phillips screwdriver |
|
|
star driver |
|
|
|
|
|
 WARNING
Electrical Shock Hazard Disconnect power before removing doors.
Failure to do so could result in death or electrical shock.
3. Remove and transfer plastic hinge plugs
Use a small, flat-blade screwdriver to gently remove 4 hinge hole plugs (A) on left side of dryer cabinet. Transfer plugs into hinge holes on opposite side of dryer cabinet (where hinges were removed in Step 2).
1. Place towel on dryer
Place towel on top of dryer to avoid damaging the surface.
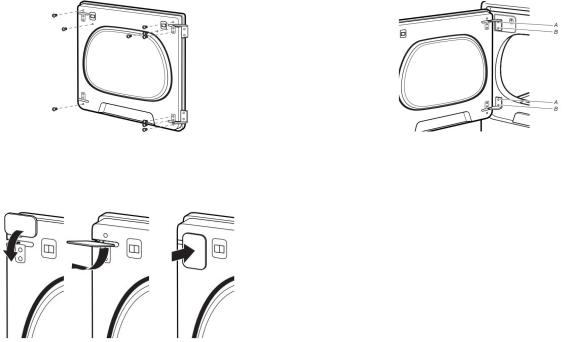
2. Remove door from dryer cabinet
Open dryer door. Using a T25® screwdriver, remove screws (A) and then (B) screws from each of the two hinges that attach dryer door to front panel of dryer. Set the hinge screws off to the side for reinstalling the door.
Remove the dryer door by lifting upward and out to lift the door off the cabinet. Lay the door on a flat, covered surface, with the inside of the door facing up.
4. Reverse the strike
Remove the door strike (A) from the dryer door opening. Remove the cosmetic screw (B) opposite the door strike (A). Reinstall the door strike and cosmetic screw on the opposite side of dryer door opening from where they were removed.
NOTE: Door strike and plugs must be on the same side of the dryer door opening.
5. Remove the door assembly
Lay the door on a flat, covered surface with the inside of the door facing up. Remove the 3 plugs with a plastic putty knife. There is a cut out to stick the putty knife under to pop out.
TORX and T25 are trademarks of Acument Intellectual Property, LLC. |
1 |

6. Remove screws from dryer door
Remove the 10 screws from the dryer door and set screws off to the side.
7. Remove inner door
Remove the inner door by using a plastic putty knife to separate the sides and bottom of the dryer door and trim. There are 2 snaps on left, right, and bottom of door. Insert the putty knife next to the snaps.
8. Pull door from frame
When you have the door separated from the frame, use a putty knife to lift up in the center tab and then pull door toward you and out.
9. Transfer door strike
Remove door strike by pinching the clips from the inside of the door panel. Then rotate 90° and push out the front. Insert door strike on the other side of dryer door by pushing in and then add the door strike plug.
10. Remove door hinges and trim screws
Remove the door hinges and set off to the side. Remove the 3 screws down the left and right sides of the door to remove the outer trim pieces.
11. Rotate trim pieces
Lift door up and rotate trim pieces to the opposite side from which they were removed. Then screw trim pieces back in.
12. Add hinges
Add the hinges to the right side of the door and then flip the hinge labeled 1 to the bottom of the right side and the hinge labeled 2 to the top of the right side of the door.
13. Add inside panel
Add inside door panel back into the dryer door by sliding the top into the top trim piece and then lower door down. Then press down on the corners to snap into place with the hinges lined up with the hinge holes.
2
14. Reinstall door screws
Install 6 hinge screws and the other 4 screws.
15. Install hinge covers and plugs
Hinge covers will go in sideways. Then rotate 90° and snap into place.
16. Hang door
Hang door by placing set pin in dryer cabinet hole and slide door down. Using a T25® screwdriver, install (A) screws and then (B) screws. Tighten all hinge screws.
Troubleshooting
See your Owner’s Manual or visit our website and reference Frequently Asked Questions to possibly avoid the cost of a service call.
3
 Loading...