


BHDH2500AS1
Whirlpool BHDH2500AS1, BHDH2500AS0, BHDH2500AS2, BHDH4000AS2, BHDH5000BS1 Use & Care Manual
...
DEHUMIDIFIER
Use & Care Guide
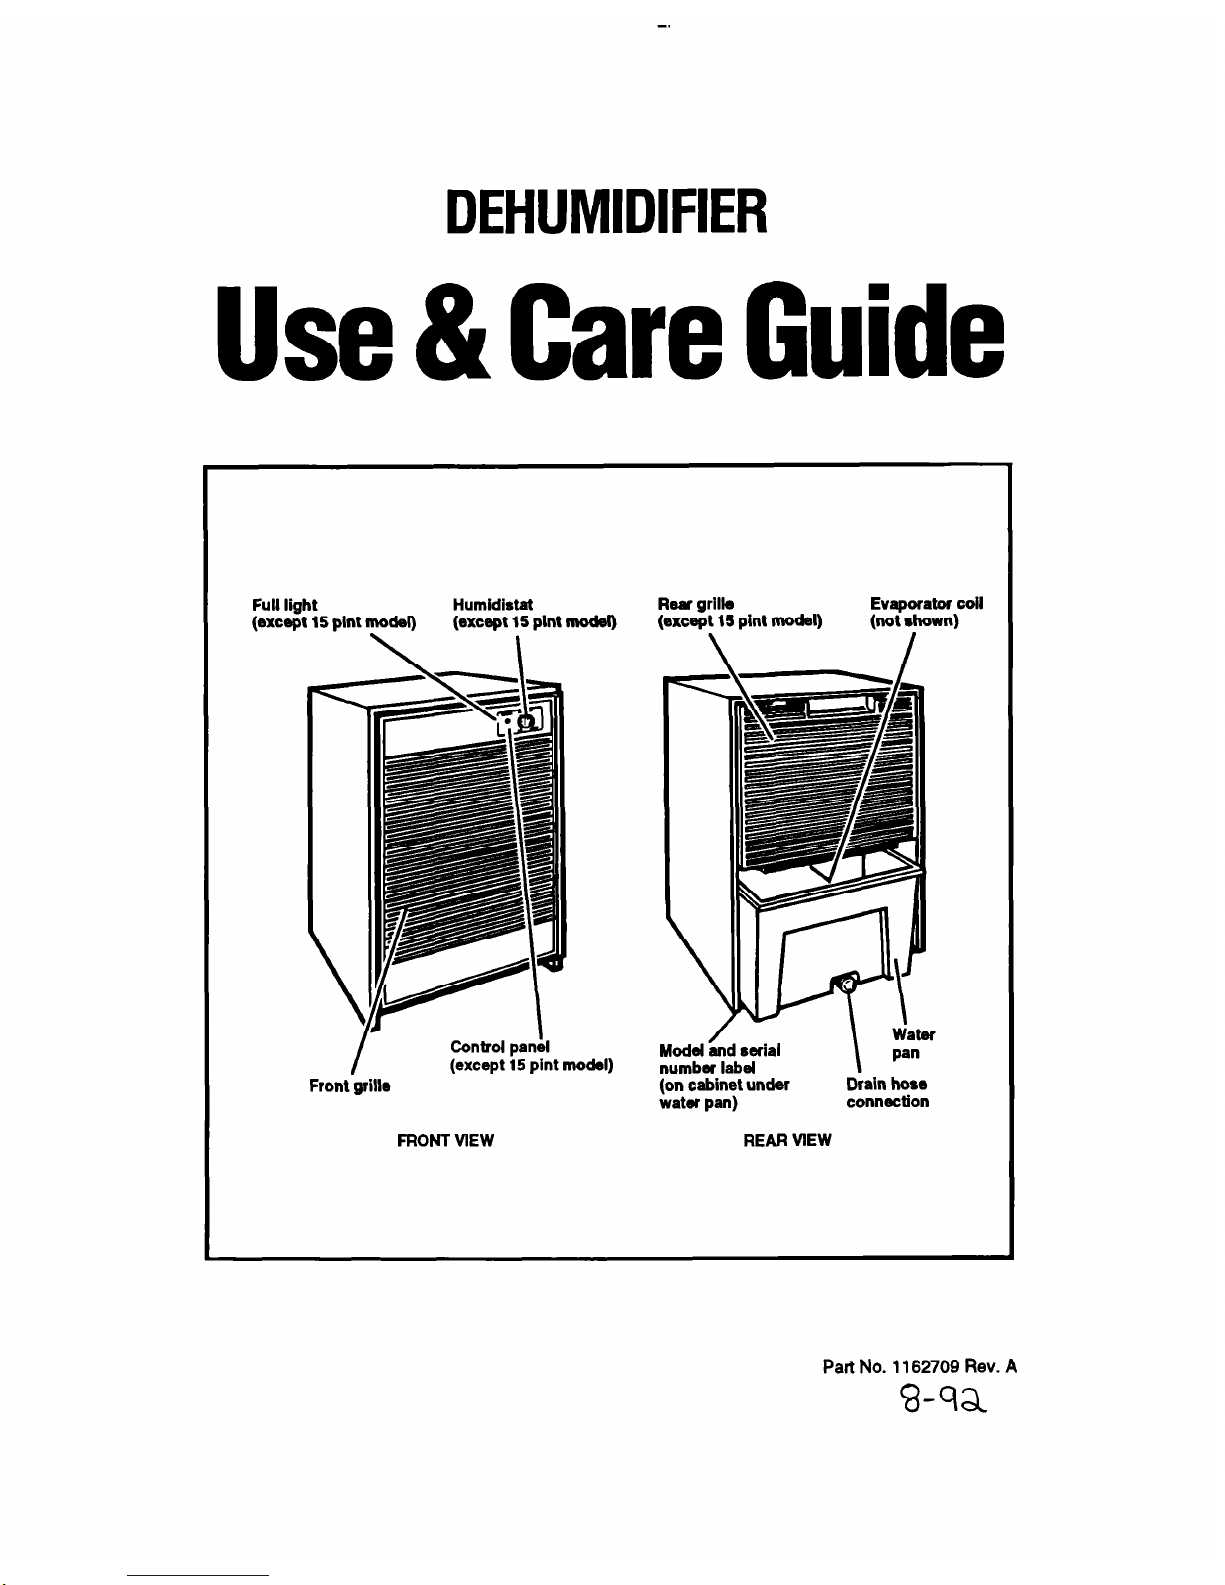
Full light
Humidistat
(except 15 pint model)
(except 15 pint model)
Rw grille
(except 15 pint model)
Evaporator cdl
(not shown)
Model
and seria
number label
Front grille
(on cabinet under
Drain hose
water pan)
connection
morn
VIEW
REAR VlEW
Part No. 1162709 Rev. A
a-sa
Contents
Page
important Safety instructions ........................ .2
Before Using Your Dehumidifier
...................
.3
Install properly
................................................. 3
Electrical requirements ................................... .4
Using Your Dehumldifier ................................ .5
15 pint model
..................................................
.6
25, 30, 40 and 50 pint models
........................
.6
Setting the water level adjustment ................. .8
Water disposal methods
.................................
.9
Carlng For Your Dehumldifier ...................... -10
if You Need Servlce Or Assistance ............. .12
Warranty
.........................................................
16
Thank you for buying this dehumidifier. Please
complete the form below. Have this information
ready if you need senrice or call with a question.
l
Copy model and serial numbers from label (see
diagram on front cover) and purchase date from
sales slip.
l
Keep this book and sales slip together in a
handy place.
Model Number
Serial Number
Purchase Date
Service Company Phone Number
mportant Safety
nstructions
To reduce the risk of fire, eiectrkai shock
or personal Injury when using your dehu-
midifier, follow these basic precautions:
l
Read all instructions before using your
dehumldifier.
l
Complete the installation and electrical
requirements as described in “Before
Using Your Dehumidlfier” on pages 3
and 4.
l
Never allow children to operate or play
with the dehumidifier.
l
Never clean dehumidifier part8 with
flammable fluids. The fumes can create a
fire hazard or explosion.
. FOR YOUR SAFETY.
DO NOT STORE OR USE GASOLINE OR
OTHER FLAMMABLE VAPORS AND
LIQUIDS IN THE ViCiNiTY OF THIS OR ANY
OTHER APPUANCE. THE FUMES CAN
CREATE A FIRE HAZARD OR EXPLOSION.
It is your responsibility to be sure your dehu-
midifier:
l
Is properly installed on a floor, table or shelf
that is reasonably level and strong enough to
support unit with a full pan of water. Unit can
weigh between 22.5 kg (50 Ibs.) and 33.8 kg
(75 Ibs.), depending on the amount of water
collected in the pan.
l
Is the correct size for the area you want to
dehumidify.
l
Is connected to the proper kind of outlet, with
the correct electrical supply and grounding.
(See “Electrical requirements” on page 4.)
l
Is used only for jobs expected of home
dehumidifiers.
l
Is not used by children or anyone unable to
operate it properly.
l
Is properly maintained.
l
Is used in an area where the room temperature will not fall below 18.3% (65°F).
- SAVE THESE INSTRUCTiONS -
DO NOT REMOVE TECH SHEET from inside
cabinet. Your service technician will need this
information.
Before Using Your Dehumidifier
Install properly
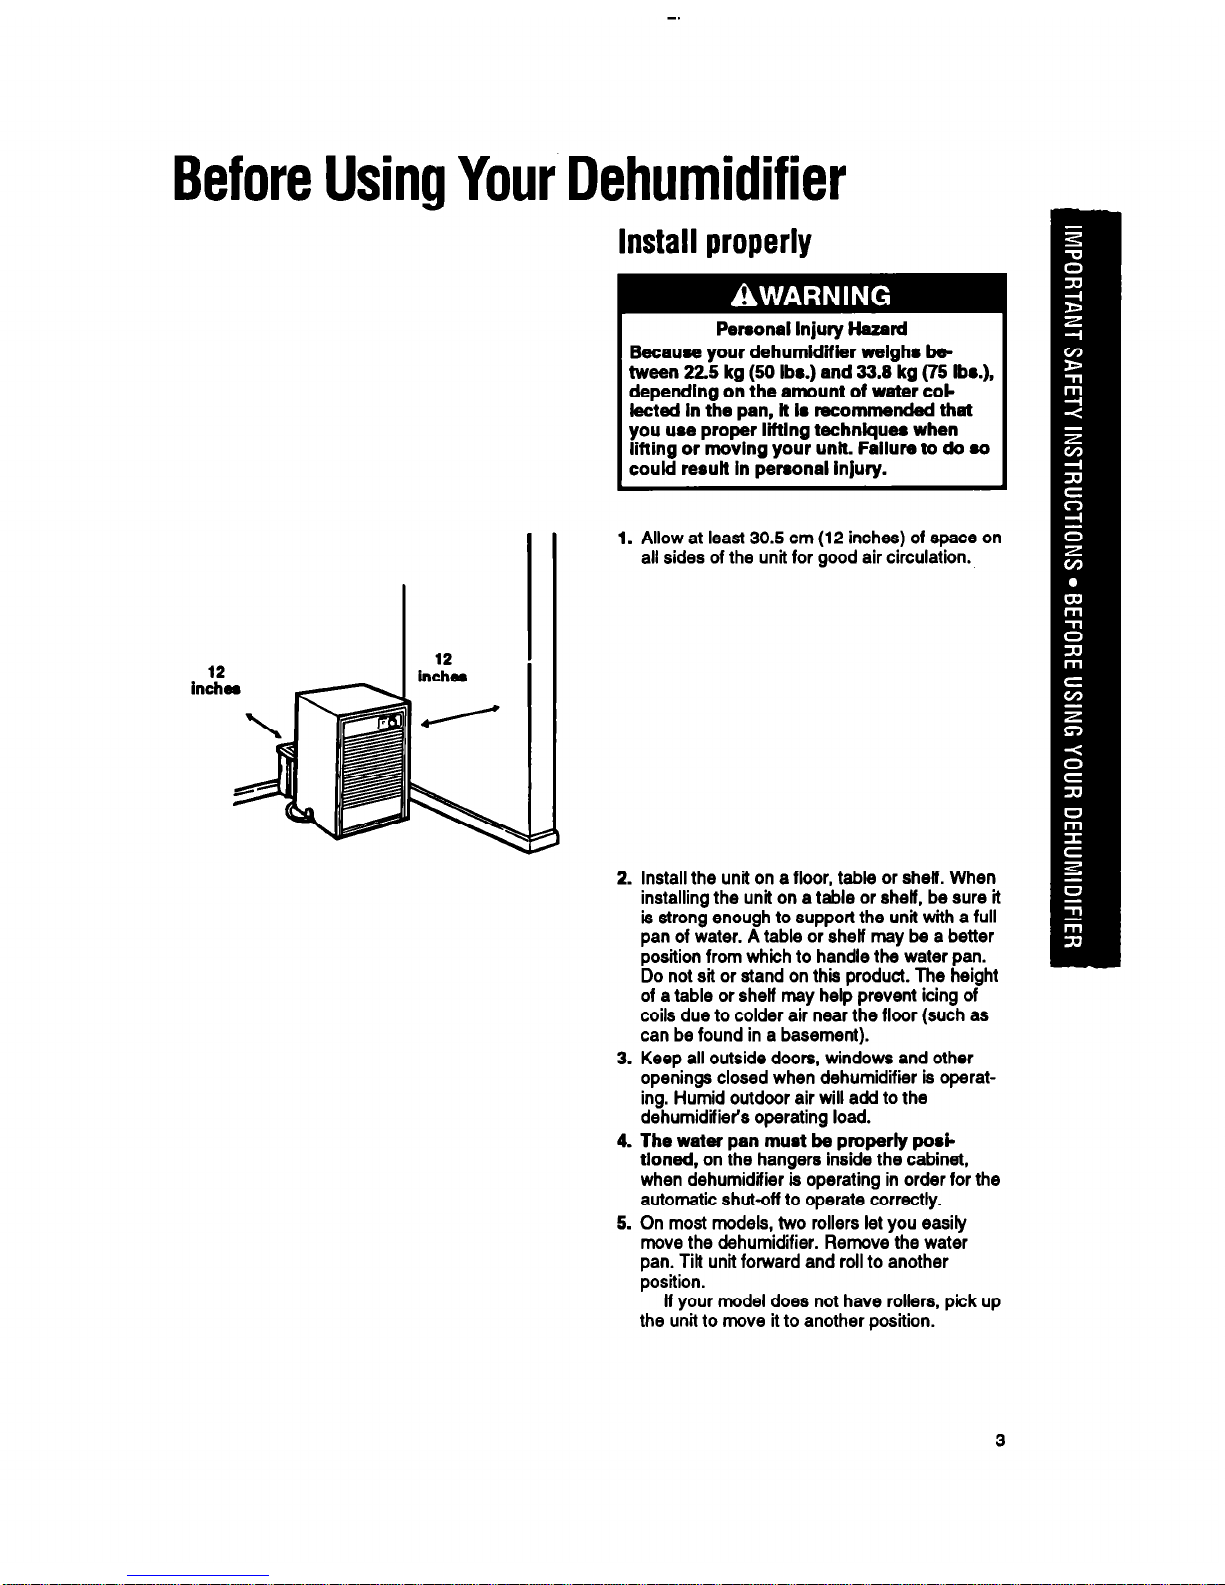
12
inchss
Personal injury Hazard
Because your dehumidifier weighs between 225 kg (50 ibs.) and 83.8 kg (75 ibs.),
depending on the amount of water coiiected In the pan, it Is recommended that
you use proper lifting technlquee when
lifting or moving your unit. Failure to do ao
could result in personal injury.
1. Allow at least 30.5 cm (12 inches) of space on
all sides of the unit for good air circulation.
:
,
2. Install the unit on a floor, table or shelf. When
installing the unit on a table or shelf, be sure it
is strong enough to support the unit with a full
pan of water. A table or shelf may be a better
position from which to handle the water pan.
Do not sit or stand on this product. The height
of a table or shelf may help prevent icing of
coils due to colder air near the floor (such as
can be found in a basement).
3. Keep all outside doors, windows and other
openings closed when dehumidifier is operating. Humid outdoor air will add to the
dehumidifier’s operating load.
4. The water pan must be properly posi-
tioned, on the hangers inside the cabinet,
when dehumidifier is operating in order for the
automatic shut-off to operate correctly.
5. On most models, two rollers let you easily
move the dehumidifier. Remove the water
pan. Tilt unit forward and roll to another
position.
If your model does not have rollers, pick up
the unit to move it to another position.

Beet;J$g Your Dehumidifier
Electrical requirements
OBSERVE ALL GOVERNING CODES AND
ORDINANCES.
Electrical ground is required on this
appliance.
A 115 volt, 60 Hz., AC only, 15 ampere fused
electrical supply is recommended. (Time delay
fuse or circuit breaker is recommended.) It is
recommended that a separate circuit serving only
this appliance be provided. Do not use an
extension cord.
DO NOT, UNDER ANY CIRCUMSTANCES,
REMOVE THE POWER SUPPLY CORD
GROUND PRONG.
Recommended grounding method
For your personal safety, this appliance must be
grounded. This appliance is equipped with a
power supply cord having a B-prong grounding
plug. To minimize possible shock hazard, the
cord must be plugged into a mating grounding
type wall receptacle, grounded in accordance
with all local codes and ordinances. If a mating
wall receptacle is not available, it is the responsibility of the customer to have a properly
grounded, 3-prong wall receptacle installed by a
qualified electrician.
Using Your Dehumidifier
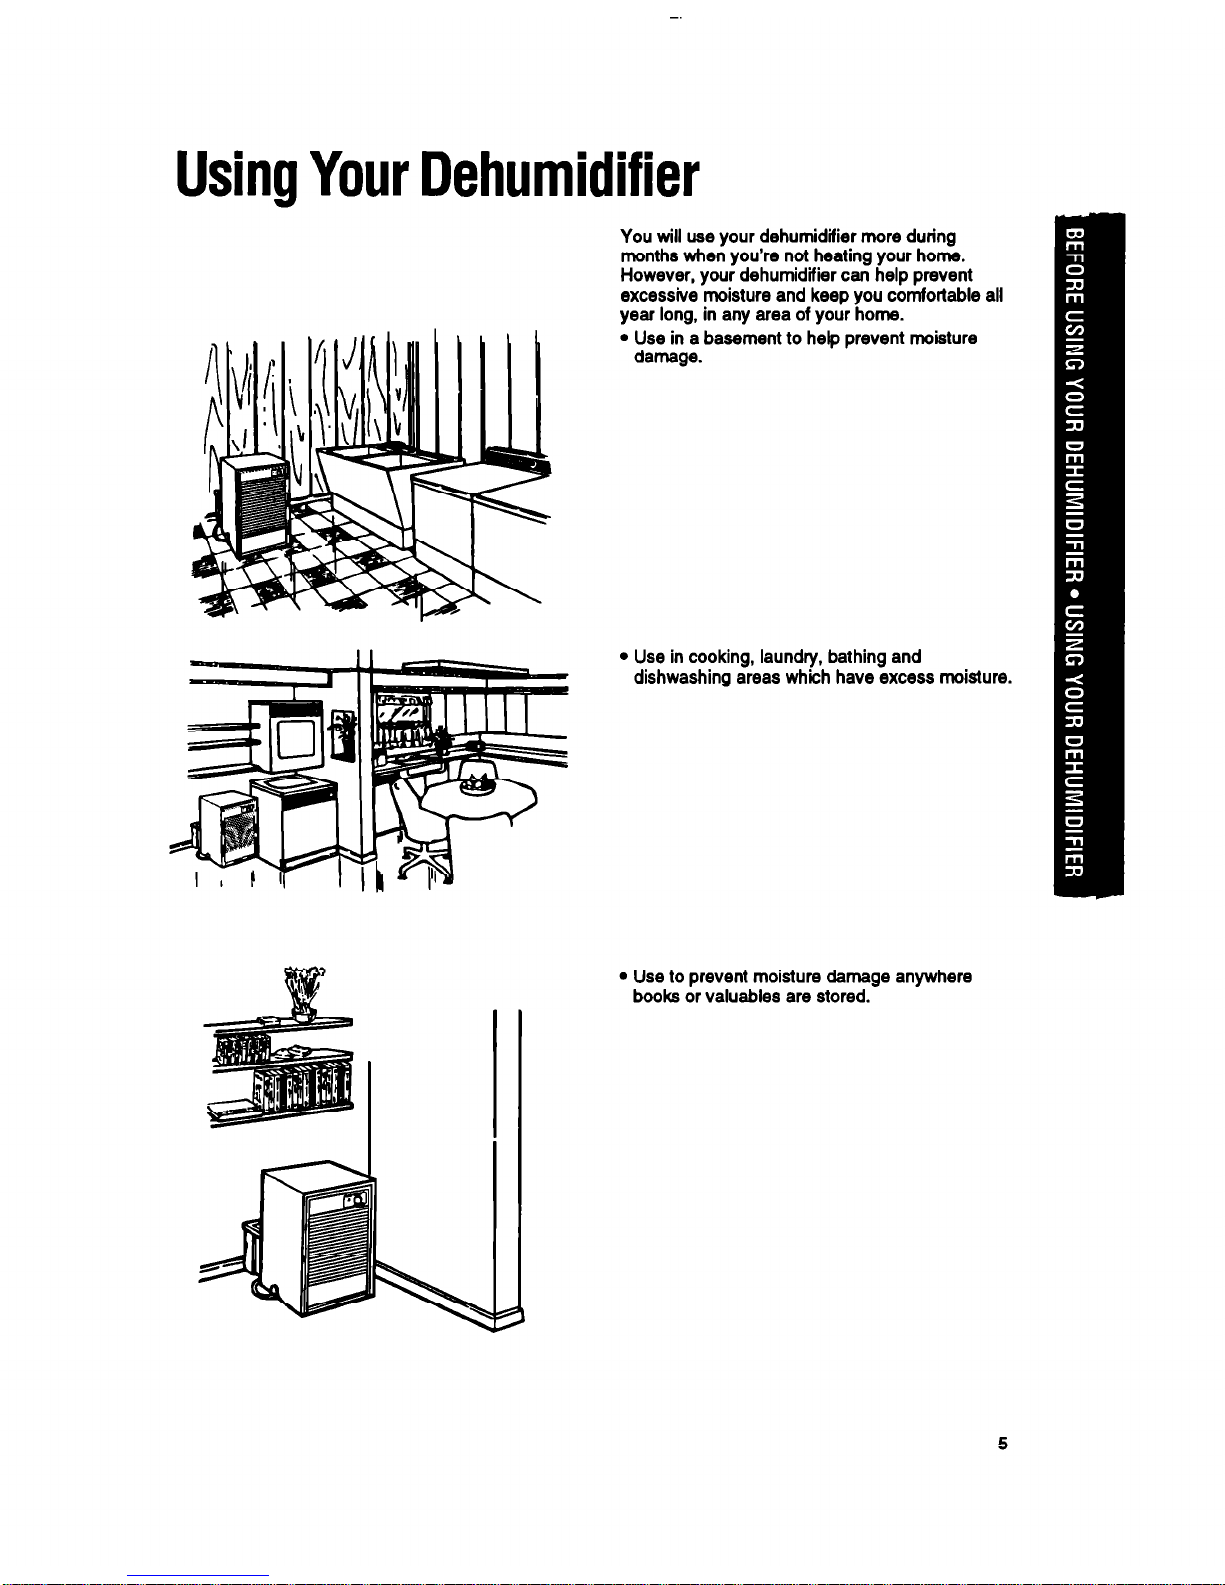
You will use your dehumidifier more during
months when you’re not heating your home.
However, your dehumidifier can help prevent
excessive moisture and keep you comfortable all
year long, in any area of your home.
l
Use in a basement to help prevent moisture
damage.
l
Use in cooking, laundry, bathing and
dishwashing areas which have excess moisture.
l
Use to prevent moisture damage anywhere
books or valuables are stored.
Usi:ttpz Dehumidifier
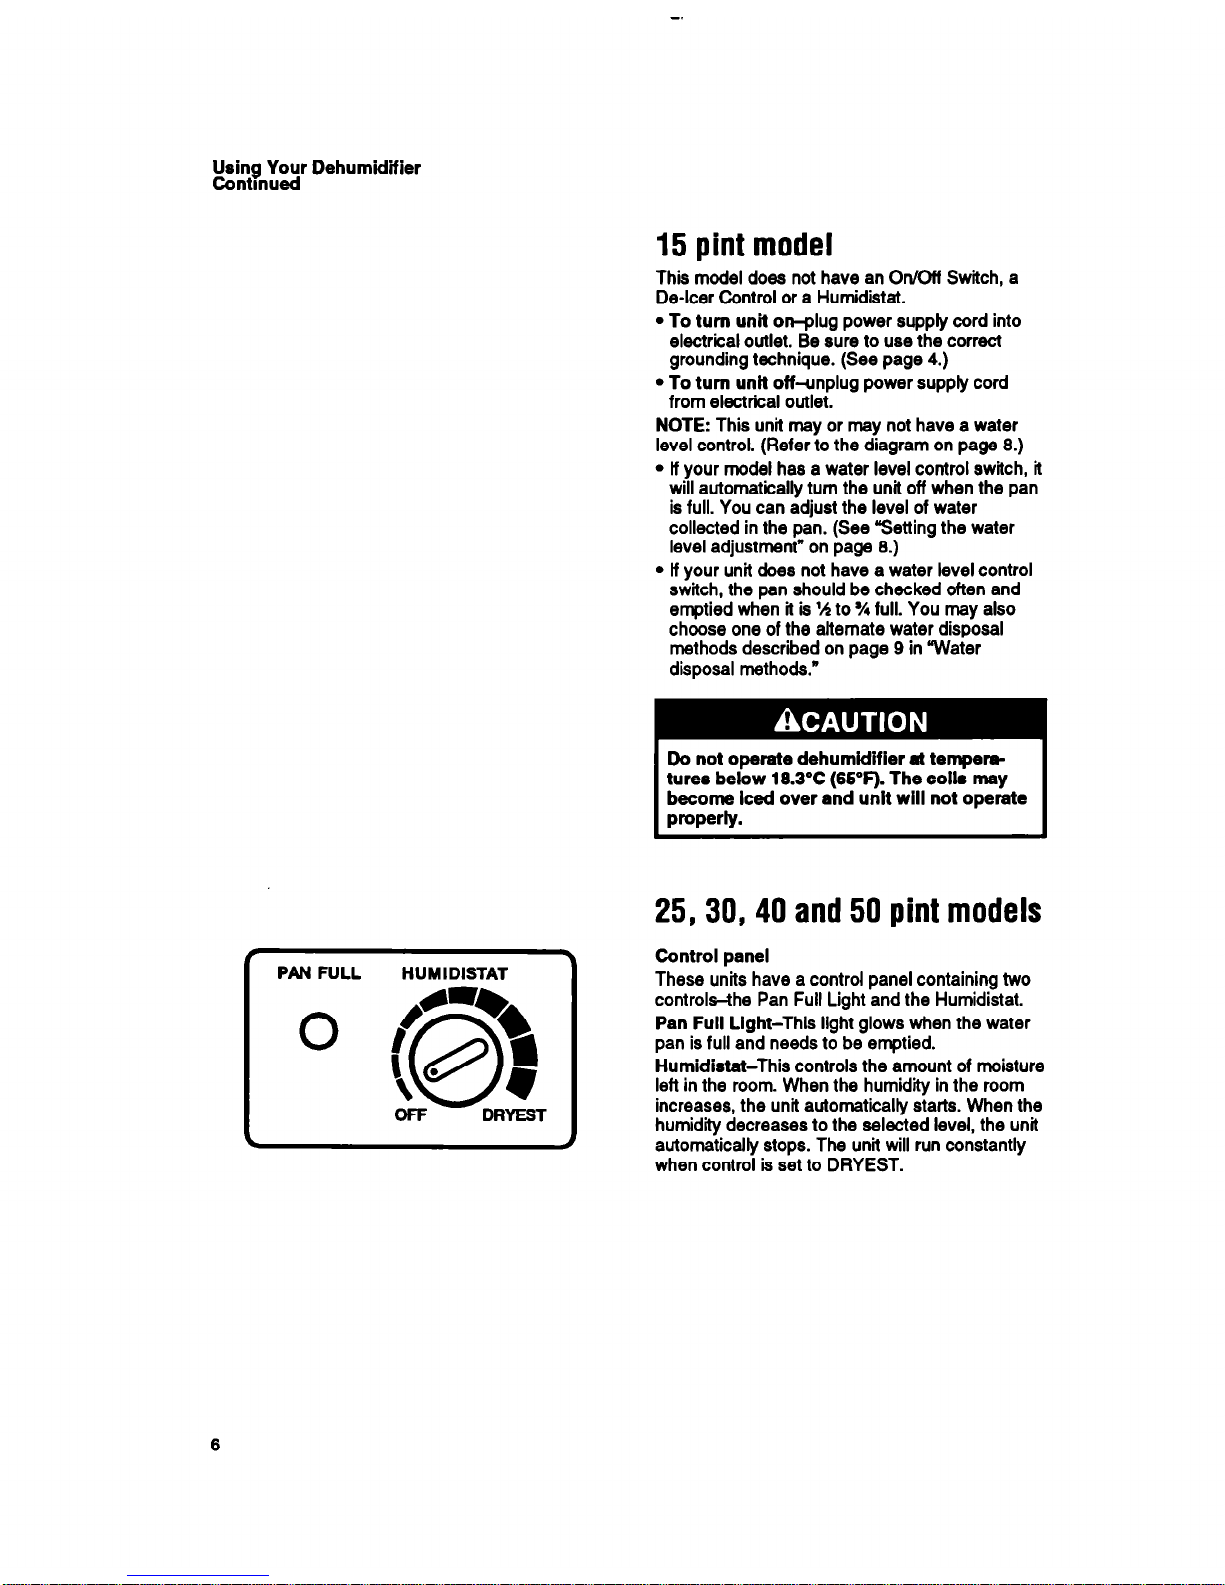
PAN FULL
0
HUMIDISTAT
15 pint model
This model does not have an On/Oft Switch, a
De-leer Control or a Humidistat.
l
To turn unit on-plug power supply cord into
electrical outlet. Be sure to use the correct
grounding technique. (See page 4.)
l
To turn unti off-unplug power supply cord
from electrical outlet.
NOTE: This unit may or may not have a water
level control. (Refer to the diagram on page 9.)
l
lf your model has a water level control switch, it
will automatically turn the unit off when the pan
is full. You can adjust the level of water
collected in the pan. (See Setting the water
level adjustment” on page 9.)
l
lf your unit does not have a water level control
switch, the pan should be checked often and
emptied when it is 54 to % full. You may also
choose one of the alternate water disposal
methods described on page 9 in “Water
disposal methods.”
Do not operate dehumidifier d temperstures below 16.3% (65’F). The coils msy
become iced over and unit will not operate
pwerly.
25,30, 40 and 50 pint models
Control panel
These units have a control panel containing two
controls-the Pan Full Light and the Humidistat.
Pan Full Light-This light glows when the water
pan is full and needs to be emptied.
Humidistat-This controls the amount of moisture
left in the room. When the humidity in the room
increases, the unit automatically starts. When the
humidity decreases to the selected level, the unit
automatically stops. The unit will run constantly
when control is set to DRYEST.

.
PAN FULL HUMIDISTAT
0
I
PAN FULL
HUMIDISTAT
0
OFF
DRYEST
Unit operetion
1. Turn Humidistat to OFF. Plug power supply
cord into electrical outlet. Be sure to use the
correct grounding technique. (See page 4.)
2 Turn Humidistat left toward DRYEST for
normal operation. Set at 5 or 6 to start. Adjust
later, if necessary.
lt you need more dehumidification, turn
Humidistat left to a higher number. If you need
less, turn Humidistat right to a lower number.
3. Stop the unit manually by turning Humidistat
right to OFF.
De-icer control
Do not operate dehumidifier at tempemtures below 18.3% (65°F). The coils msy
become iced over and unit will not operate
pwerly.
Your dehumidifier is equipped with a feature to
help you get the most comfort from your new
appliance by permitting it to operate down to
18.3% (65’F). lf your dehumidifier runs when
room temperature and humidii conditions are
tow, frost can form on its evaporator coil. This
interferes with proper operation.
The De-icer Control senses frost build-up on
the evaporator coil and automatically shuts off
the compressor. The fan continues to run,
drawing air across the coil and melting the frost.
When the coil is defrosted, the compressor is
automatically restarted, and dehumidifying is
resumed.
Using Your Dehumidifier
Contlnusd
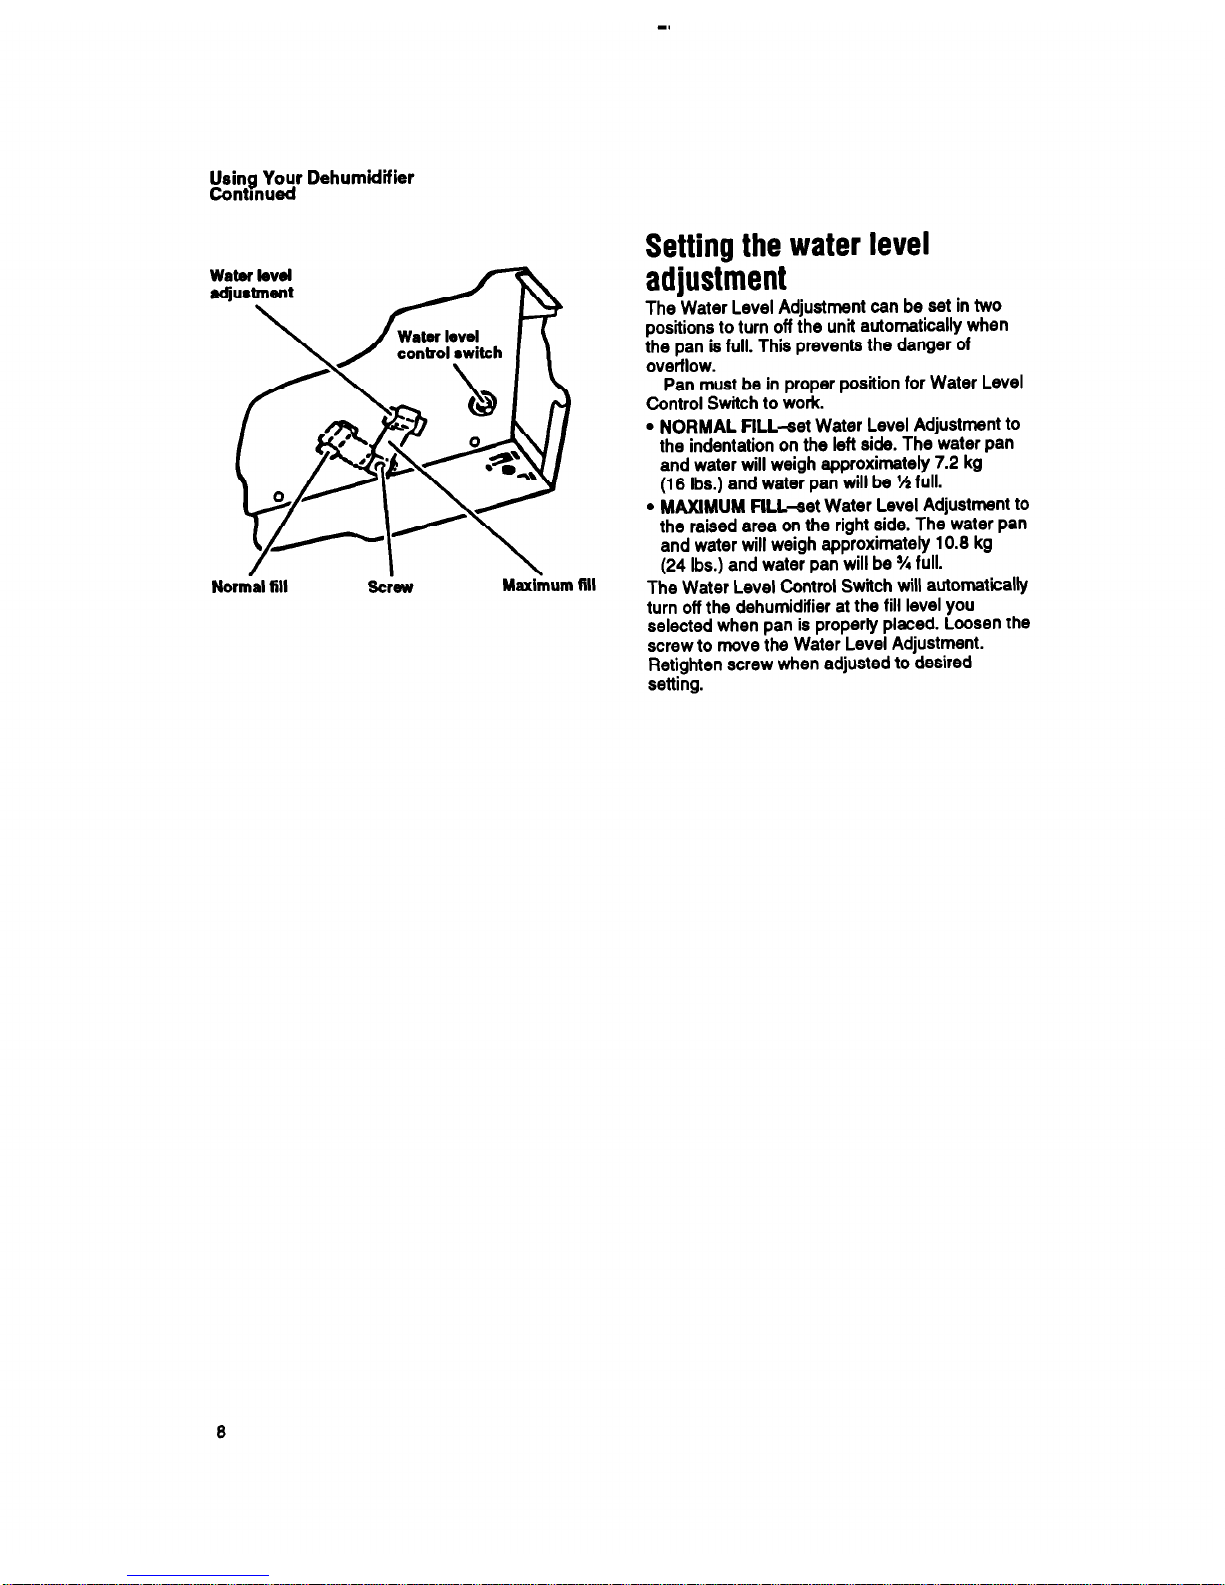
Watsr tsvsl
adjustment
Nor&al fill
Maximum RII
Setting the water level
adiustment
The-Water Level Adjustment can be set in two
positions to turn off the unit automatically when
the pan is full. This prevents the danger of
overflow.
Pan must be in proper position for Water Level
Control Switch to work.
l
NORMAL FILL-et Water Level Adjustment to
the indentation on the left side. The water pan
and water will weigh approximately 7.2 kg
(16 lbs.) and water pan will be % full.
l
MAXMUM FILL-et Water Level Adjustment to
the raised area on the right side. The water pan
and water will weigh approximately 10.8 kg
(24 Ibs.) and water pan will be % full.
The Water Level Control Switch will automatically
turn off the dehumidifier at the fill level you
selected when pan is properly placed. Loosen the
screw to move the Water Level Adjustment.
Retighten screw when adjusted to desired
setting.
Personal injury Hazard
Do not use the water that collects in the
water pan for drinklng purposes. it is not
sanitary and coukf cause iliness.
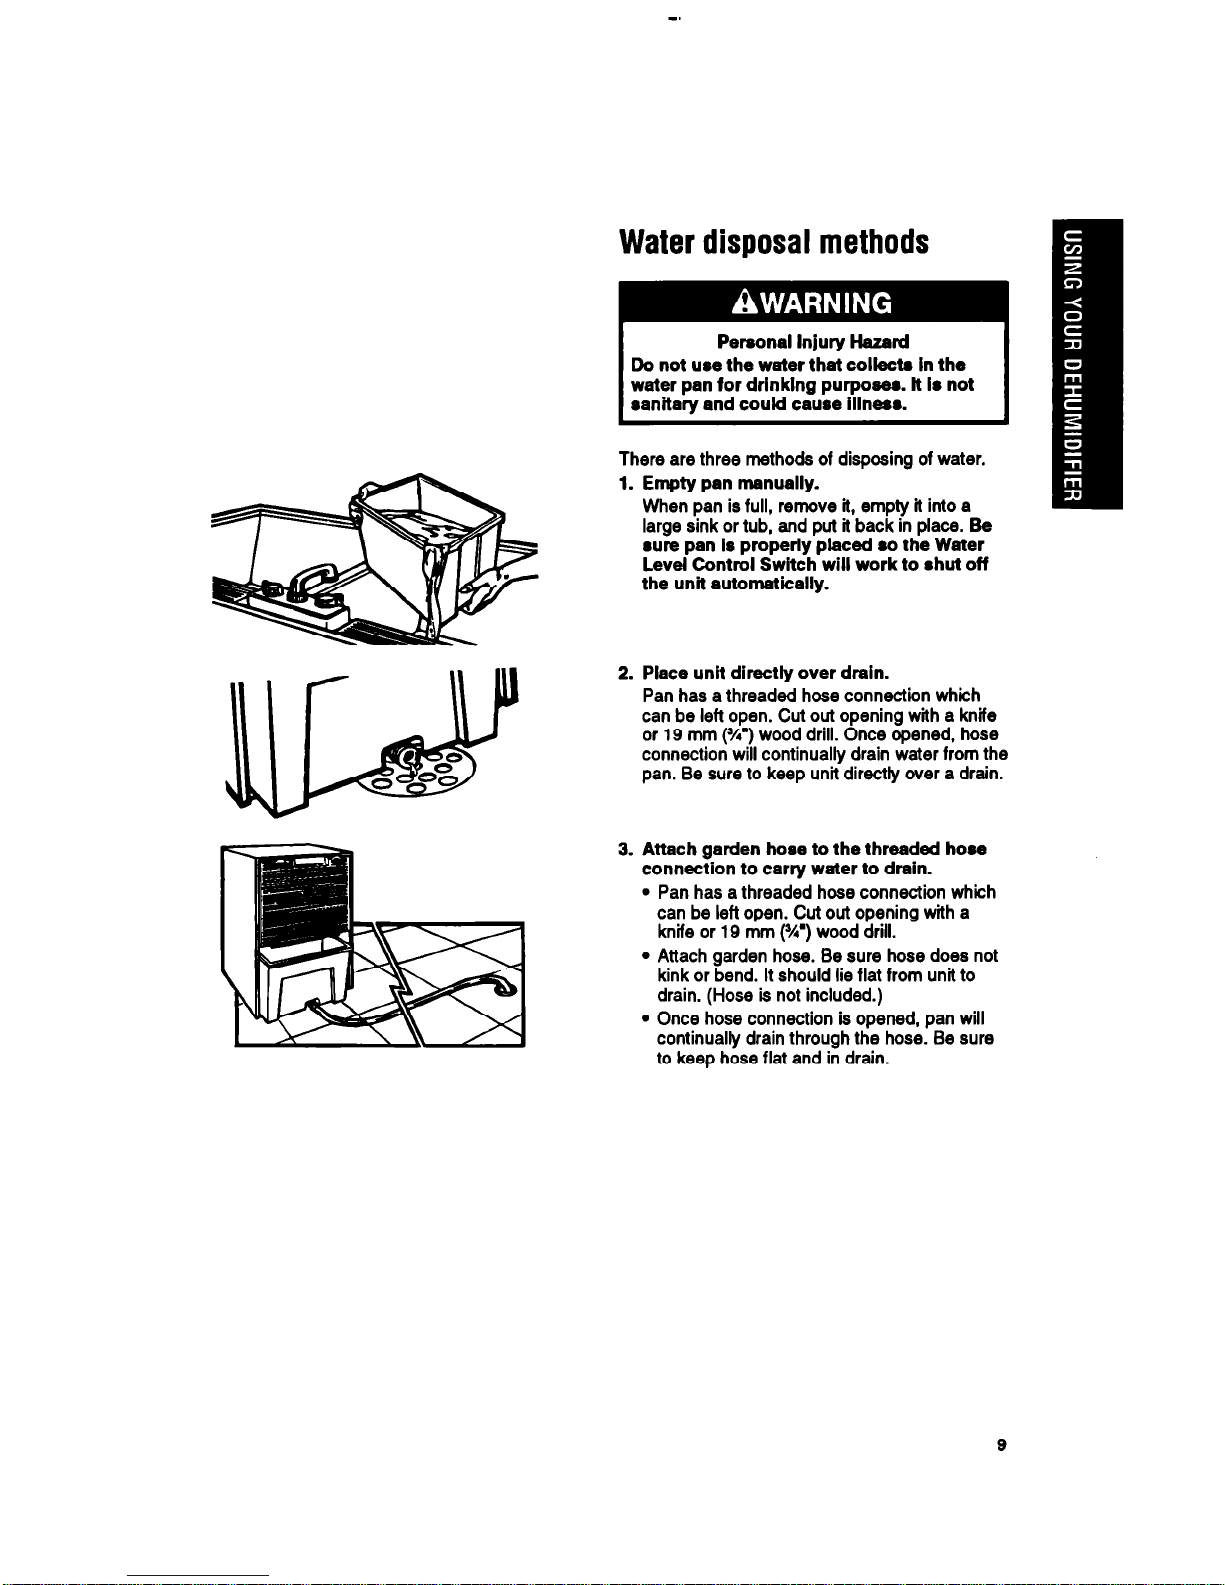
There are three methods of disposing of water.
1. Empty pan manually.
When pan is full, remove it, empty it into a
large sink or tub, and put it back in place. Be
sure pan lo properly placed so the Water
Level Control Switch will work to shut off
the unit automatically.
2. Place unit directly over drain.
Pan has a threaded hose connection which
can be left open. Cut out opening with a knife
or 19 mm (%.) wood drill. Once opened, hose
connection will continually drain water from the
pan. Be sure to keep unit directly over a drain.
3. Attach garden hose to the threaded hose
connection to carry water to drain.
l
Pan has a threaded hose connection which
can be left open. Cut out opening with a
knife or 19 mm (w) wood drill.
l
Attach garden hose. Be sure hose does not
kink or bend. It should lie flat from unit to
drain. (Hose is not included.)
l
Once hose connection is opened, pan will
continually drain through the hose. Be sure
to keep hose flat and in drain.
Caring For Your Dehumidifier
Your dehumidifier is designed to serve you yearround. lt needs practically no attention. However,
you should check your dehumidifier and inspect
the coils annually.
You may call a service company to perform this
annual checkup or you can do it yourself. Cost of
annual inspection is the owner’s responsibility.
OR
lt you are familiar with electrical appliances and
their functions, below we have listed instructions
which would allow you to do the inspection and
maintenance yourself. However, we suggest you
contact a qualified se&e company to perform
this service, as we will not be held responsible for
any personal injury or damages, should you elect
to service this unit.
Electrical Shock and
Personal injury Hazard
l
Disconnect power supply cord from
receptacle before performing any main@
nanca Failure to do so could resuit in
electrical shock.
l
Be careful when cleaning the coils. Fins
are sharp. Failure to do so could result in
personal injury.
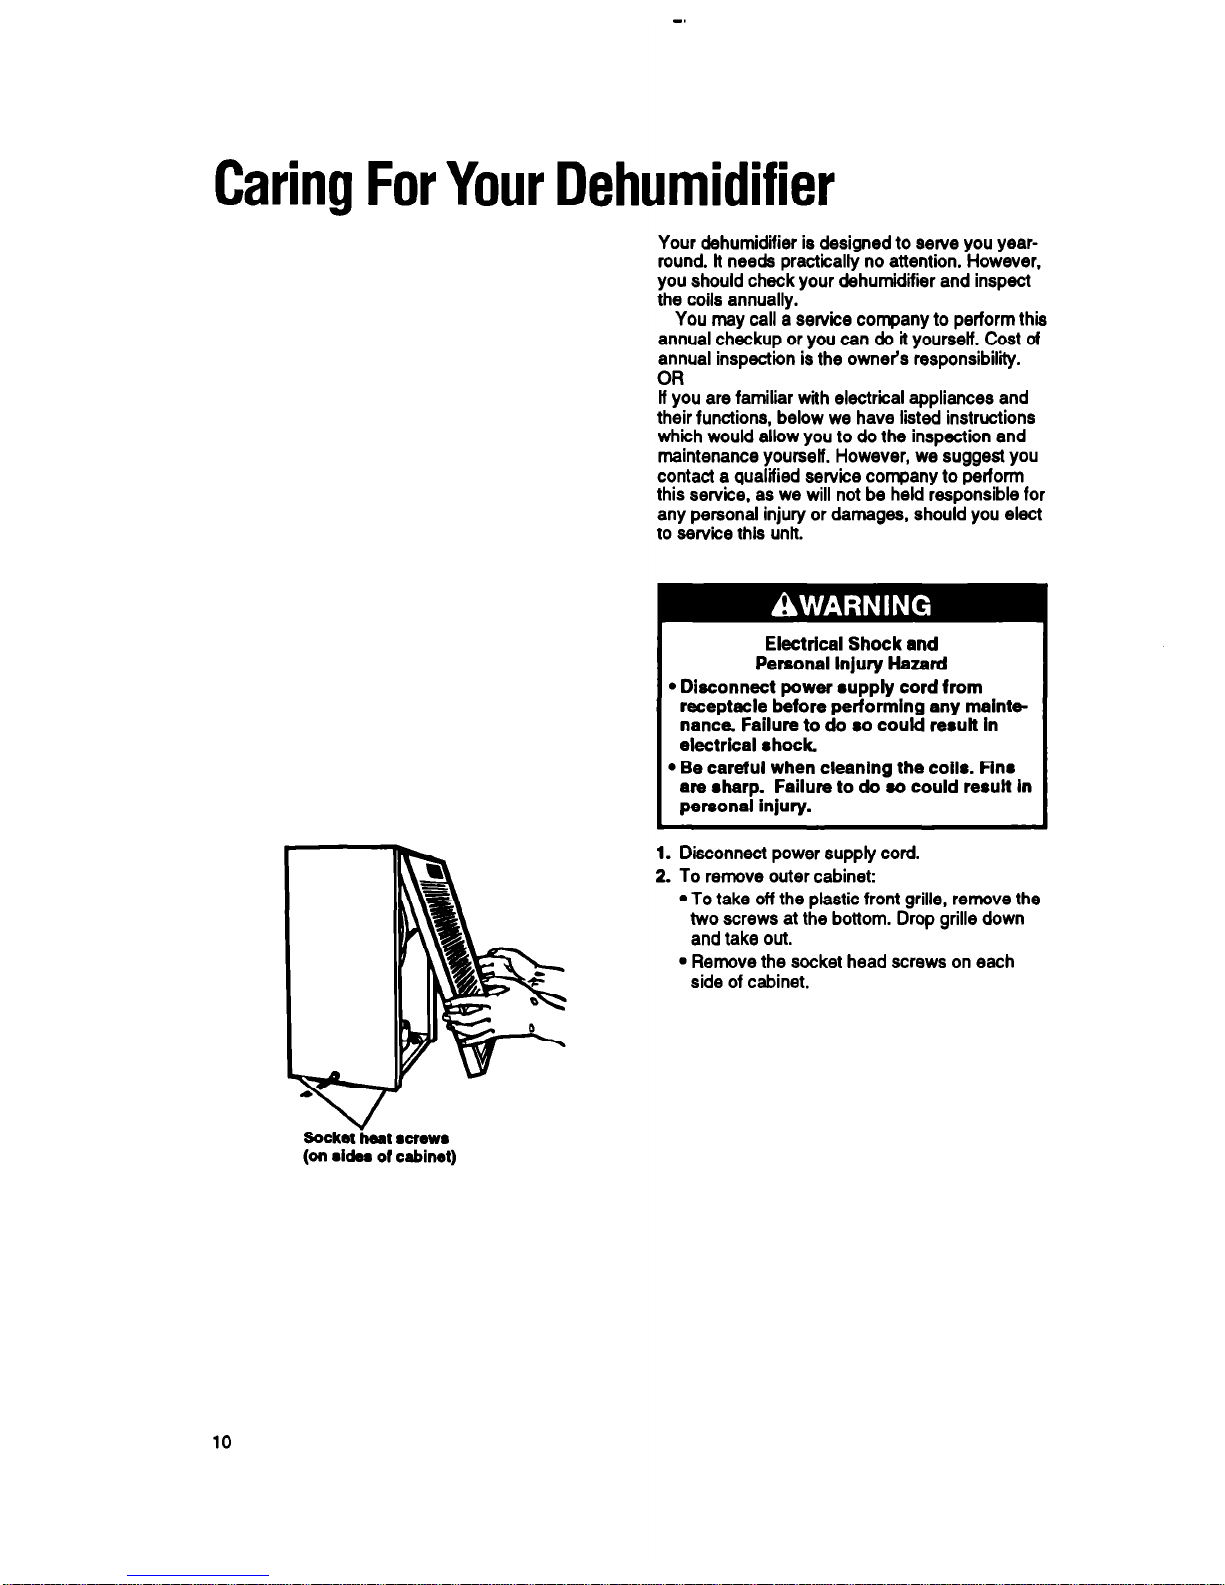
1. Disconnect power supply cord.
2. To remove outer cabinet:
l
To take off the plastic front grills, remove the
two screws at the bottom. Drop grille down
and take out.
l
Remove the socket head screws on each
side of cabinet.
Socket -imat screws
(on l idm of cabinet)
10
 Loading...