


Description of unit and operating instructions for patients
Descripción del aparato y manual de instrucciones para los pacientes
Opis urządzenia
i instrukcja obsługi dla pacjentów
VENTImotion
BiLevel ST - Home Ventilation Unit
BiLevel ST – Aparato de respiración asistida para uso doméstico
BiLevel ST - domowy aparat do sztucznego oddychania
WM 24800
English |
3 |
Español |
54 |
Polski |
108 |

Contents
1. Overview . . . . . . . . . . . . . . . . . . . |
4 |
2. Description of unit . . . . . . . . . . . . . 8
2.1 Intended use . . . . . . . . . . . . . . 8 2.2 User qualification . . . . . . . . . . . 8 2.3 Functional description . . . . . . . . 8
3. Safety instructions . . . . . . . . . . . . 10
3.1 Safety instructions. . . . . . . . . . 10 3.2 Contraindications. . . . . . . . . . 12 3.3 Side effects. . . . . . . . . . . . . . 13 3.4 Special labelling on unit . . . . . 13
4. Set up unit . . . . . . . . . . . . . . . . . . 15
4.1 Set up and connect unit. . . . . . 15 4.2 Put on the Mask. . . . . . . . . . . 16 4.3 Accessories . . . . . . . . . . . . . 16
5. Operation . . . . . . . . . . . . . . . . . . 19
5.1 Start up the VENTImotion. . . . . 19 5.2 Auto switch-on . . . . . . . . . . . 20 5.3 Set soft start . . . . . . . . . . . . . 21 5.4 Set humidifier . . . . . . . . . . . . 22 5.5 After usage . . . . . . . . . . . . . . 23
5.6 Travelling with the
VENTImotion. . . . . . . . . . . . . 23
6. |
Hygienic preparation . . . . . . . . . |
25 |
|
|
6.1 |
Intervals . . . . . . . . . . . . . . . |
25 |
|
6.2 |
Cleaning. . . . . . . . . . . . . . . |
26 |
|
6.3 |
Disinfection, sterilization . . . . . |
28 |
|
6.4 |
Change in patients . . . . . . . . |
29 |
7. |
Function check . . . . . . . . . . . . . . . |
30 |
|
|
7.1 |
Intervals . . . . . . . . . . . . . . . |
30 |
|
7.2 |
Method . . . . . . . . . . . . . . . |
30 |
8. |
Troubleshooting . . . . . . . . . . . . . . |
34 |
|
|
8.1 |
Malfunctions . . . . . . . . . . . . |
34 |
|
8.2 |
Alarms . . . . . . . . . . . . . . . . |
35 |
9. |
Maintenance . . . . . . . . . . . . . . . . |
39 |
|
|
9.1 |
Intervals . . . . . . . . . . . . . . . |
39 |
|
9.2 |
Filter change . . . . . . . . . . . . |
40 |
|
9.3 |
Change pressure |
42 |
|
|
measuring hose . . . . . . . . . . |
|
|
9.4 |
Disposal . . . . . . . . . . . . . . . |
42 |
10. |
Scope of supply . . . . . . . . . . . . . . |
43 |
|
|
10.1Standard scope of supply. . . . |
43 |
|
|
10.2Accessories . . . . . . . . . . . . . |
43 |
|
|
10.3Spare parts . . . . . . . . . . . . . |
45 |
|
11. |
Technical specifications . . . . . . . . |
46 |
|
|
11.1Pneumatic diagram . . . . . . . . |
48 |
|
|
11.2Safety distances . . . . . . . . . . |
49 |
|
12. |
Warranty . . . . . . . . . . . . . . . . . . |
50 |
|
13. |
Index . . . . . . . . . . . . . . . . . . . . . |
52 |
|
3

1. Overview
VENTImotion
|
|
|
|
1 Bacteria filter |
15 |
Headgear |
9 Drying adapter |
|
|
14 |
Mask |
|
|
2 Connecting |
|
|
|
|
|
|
|
|
|
cord |
13 |
Exhalation |
8 Sealing plug (2x) |
|
|
|
system |
|
|
|
12 |
Hose system |
7 Unit outlet |
|
3 Handle |
|
|
10 Adapter |
|
|
11 |
Pressure |
|
|
|
|
measuring |
|
|
4 Serial interfaces |
|
hose |
|
|
|
|
|
5 Control panel and display |
||
|
|
|
||
|
|
6 Connection for humidifier |
||
|
|
|
21 Alarm acknowledgement switch with LED |
|
|
|
|
|
22 On/off |
|
|
|
|
switch |
|
|
|
|
23 Dial |
|
|
20 O2 connection |
|
|
|
18 Cable se- |
VENTI-O2 |
|
24 Operating switches |
|
curing clip 19 Battery connection |
27 Soft start |
25 Menu switch |
|
|
17 Supply connection |
VENTIpower |
switch |
26 Humidifier switch with LED |
16 Filter compartment cover, air inlet
30 VENTIclick |
31 Carrying bag |
28 VENTIpower |
29 Rating plate |
32 VENTI-O2
4 Overview

1 Bacteria filter
For protecting patient from bacteria, especially if the device is being used by several patients.
2 Connecting cord
For connecting the VENTImotion to the supply.
3 Handle
For transporting the unit.
4 Serial interfaces
Used to connect to devices for display and analysis.
5 Control panel and display
For controlling and monitoring the VENTImotion and connected accessories.
6 Connection for humidifier
For connecting the VENTIclick humidifier available as an accessory.
7 Unit outlet
Respiratory air flows out from here to the patient via the hose system and mask.
8 Sealing plug (2x)
For sealing the pressure measuring hose during cleaning.
9 Drying adapter
Required if the hose system is being dried with the VENTImotion.
10 Adapter
For connecting the hose system to the unit outlet.
11 Pressure measuring hose
For measuring the pressure in the mask and thus for controlling flow.
12 Hose system
The air flows to the mask through the hose system. The hose system consists of corrugated hose, pressure measurement tube and adapter.
13 Exhalation system
Carbon dioxide-enriched expired air escapes here during therapy.
14 Mask
Respiratory air at the necessary therapy pressure is administered to the patient via the mask.
15 Headgear
For correct and secure positioning of the mask.
16 Filter compartment cover, air inlet
For covering and securely positioning the coarse and fine dust filter.
17 Supply connection
This is where the connecting cord is attached to the unit.
18 Cable securing clip
Prevents the unit being disconnected inadvertently from the power supply.
19 Battery connection VENTIpower
For connecting the VENTIpower mobile power supply available as an accessory.
20 O2 connection VENTI-O2
For connecting the VENTI-O2 oxygen connection valve available as an accessory.
21 Alarm acknowledgement switch with LED
The alarm acknowledgement switch can be used for temporary muting of alarms. The LED gives a visual indication of alarms.
22 On/off switch
For switching the VENTImotion on and off.
23 Dial
Central control for the VENTImotion, for navigating in the menu.
24 Operating switches
For rapid setting by a doctor, locked out in patient mode.
Overview 5
25 Menu switch |
29 |
Rating plate |
For switching between the standard display and the |
Provides information about the unit, like serial num- |
|
menu. |
ber and year of manufacture. |
|
26 Humidifier switch with LED |
30 |
VENTIclick |
For setting humidifier stage. Six stages are availa- |
Available as an accessory, for humidifying and |
|
ble. The LED indicates whether the humidifier is |
heating respiratory air. |
|
activated. |
31 |
Carrying bag |
|
||
27 Soft start switch
Used for activating Softstart and for setting the Softstart time up to the maximum set by the physician.
28 VENTIpower
Available as an accessory, to provide mains-inde- pendent power to the VENTImotion.
For transporting the VENTImotion.
32 VENTI-O2
Obtainable as an accessory, for introducing oxygen into the mask.
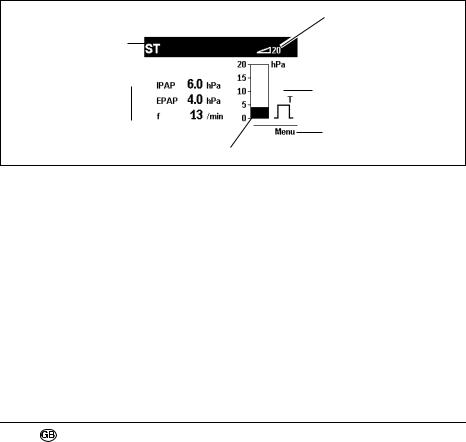
Standard display during therapy:
|
|
|
|
|
|
|
1 Status line |
|
2 |
Soft start symbol |
|
7 |
Active ventilation |
|
|
|
|
|
|
|
|||
|
|
|
|
|
|
|
|||||
|
|
|
|
|
|
|
|||||
|
mode |
|
|
|
|
|
|
|
|||
6 |
Ventilation |
|
|
|
|
|
|
3 |
Respiratory phase switch |
||
|
|
|
|
|
|
||||||
|
|
|
|
|
T |
||||||
|
|
|
|
|
|
|
|
|
|
|
|
|
parameters |
|
|
|
|
|
indicator |
||||
|
|
|
|
|
|
|
|||||
|
|
|
|
|
|
|
|
|
|
4 Access to patient menu |
|
|
|
|
|
|
|
|
|
|
|
||
|
5 Bar chart for pressure indication |
|
|
|
|||||||
1 Status line
This is where information about the status of the unit is displayed, like filter change or maintenance due.
2 Soft start symbol
Indicates that soft start is activated, the number showing time remaining in minutes.
3 Respiratory phase switch indicator
Indicates whether the current respiratory phase switch is spontaneous or mandatory (spontaneous: S, mandatory: T); the indicator switches from left (inspiration) to right (expiration) depending on respiratory phase; mandatory expiration is shown here.
4 Access to patient menu
The switch next to this menu item is used to switch between the patient menu and the standard display.
5 Bar chart for pressure indication
For graphical display of therapy pressure.
6 Ventilation parameters
The relevant current ventilation parameters are displayed depending on the active mode.
7 Active ventilation mode
The active ventilation mode is displayed at this point in the status line.
6 Overview
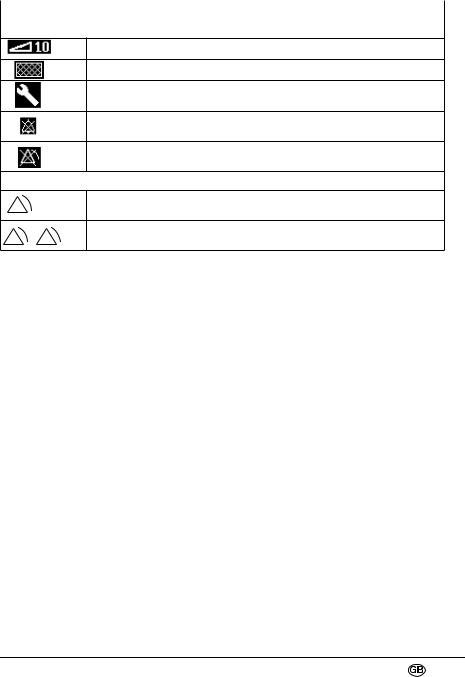
Symbols used in the display
Symbol |
Significance |
|
|
Status line:
Soft start active, remaining time faded in
Filter change required
Maintenance required
Acoustic signal for the IPAPmin and VTmin alarms silent
Alarm for IPAPmin and VTmin alarms deactivated
Main window:
Low-priority alarm triggered
Medium-priority alarm triggered
Abbreviations used in the display
Symbol |
Significance |
|
|
Status line: |
|
|
|
S |
S mode active |
|
|
ST |
ST mode active |
|
|
T |
T mode active |
|
|
SX |
SX mode active |
|
|
SXX |
SXX mode active |
|
|
+V |
Volume compensation activated (after mode: e.g. SXX+V) |
|
|
Main window: |
|
|
|
IPAP |
Inspiration pressure |
|
|
EPAP |
Expiration pressure |
|
|
hPa |
Pressure indication in Hectopascal: 1,01973 hPa equal 1 cm H2O |
f |
Respiratory frequency |
|
|
S |
Spontaneously-triggered respiratory phase switch |
|
|
T |
Mandatorily-triggered respiratory phase switch |
|
|
Overview 7

2. Description of unit
2.1 Intended use
The VENTImotion is a home ventilation unit for non-invasive, non-life support ventilation of adult patients with respiratory insufficiency in whom there is evidence of autonomous respiratory drive. This corresponds to the following clinical pictures:
•restrictive and obstructive ventilation disorders like paresis of the diaphragm, OSAS, COPD
•disorders of the respiratory mechanism like scoliosis, deformity of the thorax
•neurological, muscular and neuromuscular disorders
•central respiratory regulation disorders
The VENTImotion is not suitable for life-support use.
Use the unit only for the purpose described here.
2.2 User qualification
The VENTImotion may only be used by a doctor on an individual basis for a specific patient.
When the VENTImotion is handed over to the patient, the doctor in charge or hospital staff must instruct the patient in how the unit works.
2.3 Functional description
Provision of therapy pressure
An electronically-controlled fan draws in ambient air through a filter and delivers it to the unit outlet. From here, the air flows through the hose system and the mask to the patient.
Sensors detect the pressure in the mask and in the hose system and also the respiratory phase switch (trigger point). The fan accordingly provides the IPAP and EPAP pressures set by the doctor.
8 |
Description of unit |

Therapy modes
The VENTImotion can be operated in six therapy modes: CPAP, S, ST, T, SX and SXX mode. Your doctor will set the mode required for your therapy on the unit.
Your doctor can activate volume compensation. Minimum volume and maximum pressure increase are set for this purpose. If the minimum volume is undershot, the unit automatically increases pressure continuously until the set maximum pressure (therapy pressure + max. pressure increase) is reached.
In time-controlled mode T and in assisted-controlled mode ST, your doctor can set respiratory frequency in the range from 6 to 45 breaths a minute and inspiration time in the range from 20 % to 67 % of the respiratory period.
In assisted modes S, SX and SXX and in assisted-controlled mode ST, your doctor can select one of 6 trigger stages for both inspiration and expiration. Your doctor can switch off the trigger for expiration. Expiration is then time-controlled.
If no breath is taken into the unit in S mode, the pressure is switched at a minimum frequency of 6 breaths a minute.
Other functions
The soft start function makes it easier to fall asleep. Your doctor sets initial pressures for inspiration and expiration which rise continuously to the therapy pressures during the soft start phase. This function can be locked out by the doctor.
The VENTImotion has an auto switch-on system. If this is activated, the unit can be switched on by a breath being taken into the mask. The unit is still switched off using the on / off switch  .
.
The display shows therapy mode and, depending on mode, the values currently being applied for CPAP/IPAP and EPAP and for respiratory frequency (f). Spontaneous or mechanical respiratory phase switches are also displayed and the pressure change shown in the form of a graph.
Description of unit |
9 |

3. Safety instructions
3.1 Safety instructions
Read these operating instructions carefully. They form part of the unit and must be available at all times. Use the unit only for the purpose described here (see “2.1 Intended use” on page 8).
For your own safety and for the safety of your patients and to comply with the requirements of the Medizinproduktegesetz (German law governing medical devices), please observe the following.
Operating the unit
Caution!
•Check that the supply voltage of the unit matches your supply voltage. The unit can operate with voltages of 115 V and 230 V. It sets itself to one of these voltages automatically.
•Always secure the supply plug with the cable securing clip to prevent the plug being pulled out inadvertently.
•The VENTImotion must be connected to an easily accessible supply socket so that in the event of a malfunction, the supply plug can be removed quickly.
•Do not place the unit near a source of heating or expose to direct sunlight to prevent the unit overheating. Condensation could also form in the VENTIclick humidifier which would then condense in the hosesystem.
•Do not cover the unit with blankets etc.. The air inlet would be blokked and the unit could overheat. This can lead to inadequate therapy and damage to the unit.
•Maintain a safe distance between the VENTImotion and devices which emit high-frequency radiation (e.g. mobile phones), otherwise there may be malfunctions (see page 49.)
•An alternative ventilation system should be on hand in case of a unit failure.
10 |
Safety instructions |
Caution!
•Third-party masks may be used only after approval from the manufacturer (Weinmann). Use of non-approved masks puts successful therapy in jeopardy.
•If a pneumotachograph with a high flow resistance is used in determining flow rate to start or check therapy, the trigger function of the VENTImotion may be restricted. If you have any questions, please contact the manufacturer (Weinmann).
•No antistatic or electrically-conductive hoses may be used.
•Using the VENTIclick humidifier, bacteria filter and O2 connection valve VENTI-O2 accessories may modify the characteristics of the unit. Subsequent additions to these accessories may render it necessary to readjust the unit parameters. Consult your doctor if necessary.
•Please comply with Section “6. Hygienic preparation” on page 25 to prevent infection or bacterial contamination.
Transport/accessories/spare parts/repair
Caution!
•Do not transport the VENTImotion with the VENTIclick humidifier attached. Tilting might cause water remaining in the VENTIclick to run into the VENTImotion and damage it.
•Malfunctions and a lack of biocompatiblity may result if third-party articles are used. Please bear in mind that in these cases, any warranty entitlement and liability shall lapse where neither the accessories recommended in the instructions for use nor original spare parts have been used.
•Have all inspections and repair work carried out only by the manufacturer (Weinmann) or specialist staff.
Safety instructions |
11 |
Oxygen supply
Warning!
•When oxygen is introduced into the respiratory flow, smoking and naked flames are prohibited. Risk of fire. The oxygen may be deposited in clothing, bedlinen or hair. It can only be removed by thorough ventilation.
Caution!
•Oxygen may only be introduced into the respiratory flow using the O2 supply valve VENTI-O2, WM 24200.
•Always follow the safety information included in the instructions for your oxygen system.
3.2Contraindications
The VENTImotion should be used only with particular caution, if at all, with the following diseases. In each case, the decision whether to treat with the VENTImotion lies with the doctor in charge.
•Cardiac decompensation
•Severe cardiac arrhythmia
•Severe hypotension, particularly in conjunction with intravascular volume depletion
•Severe epitaxy
•High risk of barotrauma
•Pneumothorax or pneumomediastinum
•Pneumoencephalus
•Cranial trauma
•Status following brain surgery and surgical procedure performed on the pituitary gland or middle/inner ear
•Acute sinusitis, inflammation of the middle ear (otitis media) or perforated eardrum
•Dehydration
Threatening situations have not been observed with the VENTImotion.
12 |
Safety instructions |
3.3 Side effects
The following undesired side effects may occur during short and long-term usage of the VENTImotion:
•pressure points on the face caused by the mask and forehead padding
•reddening of skin on face
•blocked nose
•dry nose
•dry mouth in the morning
•feeling of pressure in sinuses
•irritation of conjunctiva of eyes
•gastrointestinal insufflation of air ("stomach bloating")
•nosebleeds.
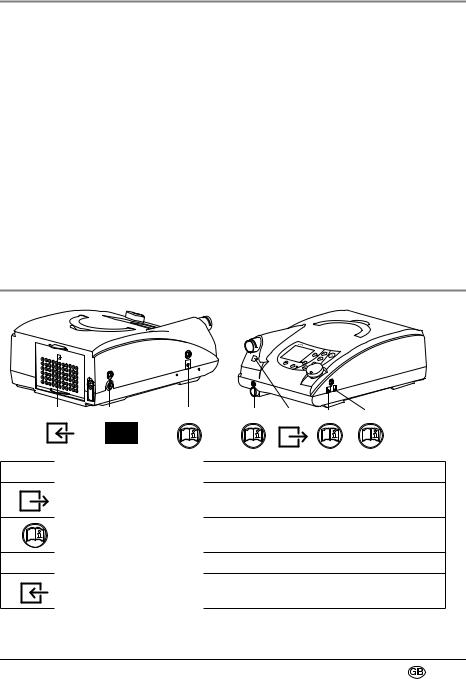
3.4Special labelling on unit
16 |
19 |
20 |
6 |
7 |
4a |
4b |
Front
7
Unit outlet: outlet for ambient air at 4 - 35 hPa
6Socket: electrical connection for the VENTIclick humidifier, WM 24365; max. power consumption at 40 V: 600 mA
Rear
16
Unit inlet: inlet for ambient air at room temperature
Safety instructions |
13 |
|
Side connection sockets |
4a |
Connection for specialist staff to adjust therapy parameters with VENTIsupport, |
|
WM 93340; max. power consumption at 12 V: 15 mA |
4b |
Connection for optional additional SaO2 devices; max. power consumption at 12 |
|
V: 25 mA |
19Connection for supply-independent operation using VENTIpower, WM 24100; power supply: 12 V/40 V DC
20Connection for controlling the O2 connection valve VENTI-O2, WM 24200. Max. power consumption at 12 V: 125 mA
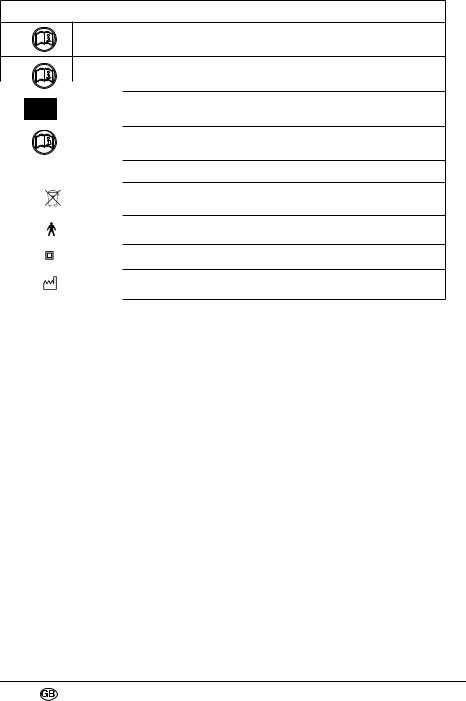
Rating plate
Do not dispose of the unit in domestic waste!
Protection class B
Protection class II, protective insulation
Year of manufacture
14 |
Safety instructions |
4. Set up unit
4.1 Set up and connect unit
Set up the unit on a flat surface, e.g. on a bedside cabinet or on the floor next to the bed. Keep a space of min. 5 cm between the rear of the unit and the wall, as the air inlet is on the rear of the unit.
Caution!
Do not cover the unit with blankets etc.. The air inlet would be blokked and the unit could overheat. This can lead to inadequate therapy and damage to the unit.
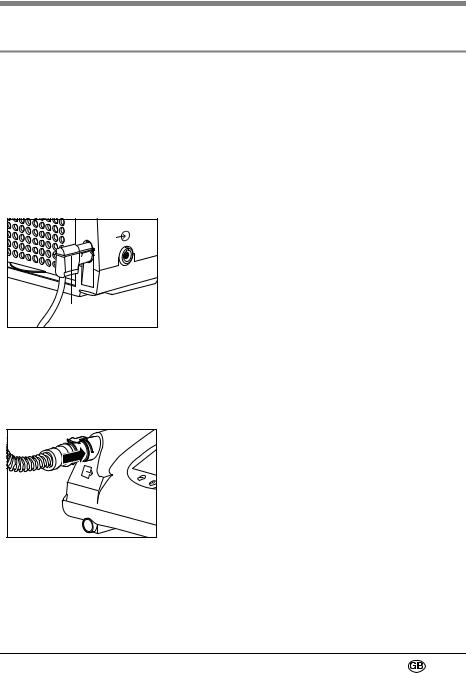
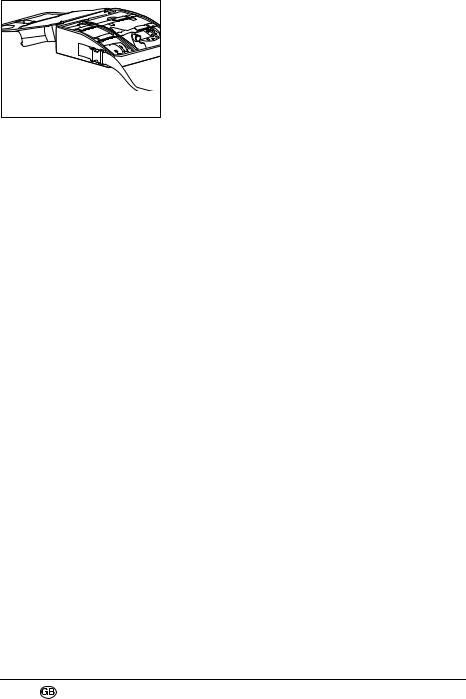
Cable-securing clip |
1.Connect the connecting cord to the supply connection of the unit. To do so, lift the cable securing clip, plug the plug into the supply connection and clip the cable securing clip over the plug.
Caution!
Always secure the supply plug with the cable securing clip to prevent the plug being pulled out inadvertently.
2.Connect the connectig cord to a supply socket. The VENTImotion is designed for a supply voltage of 115 V ~ to 230 V ~. "Weinmann VENTImotion" appears in the display.
3.Plug the hose system adapter in the unit outlet. The unit is now operational.
Set up unit |
15 |
4.2 Put on the Mask
The VENTImotion is designed for use with nasal, nasal/oral and full facial masks. Proceed as follows to put on the mask.
1.Adjust the forehead support of the l mask (if provided).
2.Connect the headgear/the headband to the mask and position the mask.
3.Adjust the headgear/headband so that the bulge of the mask only results in low pressure to prevent pressure points on the face.
Please refer to the operating instructions for the relevant mask.
4.3 Accessories
Separate exhalation system
A separate exhalation system is required if you are using a mask without an integrated exhalation system.
Used carbon dioxide (CO2)-enriched air escapes from the mask through the exhalation system. Without an exhalation system, the CO2 concentration would rise to critical values in the mask and hose, thus hindering your breathing.
The exhalation system also allows you to breathe through the nose or mouth if the unit malfunctions. In the event of a malfunction with a full facial mask, you breathe through a safety valve on the mask.

 Exhalation sy-
  stem
stem
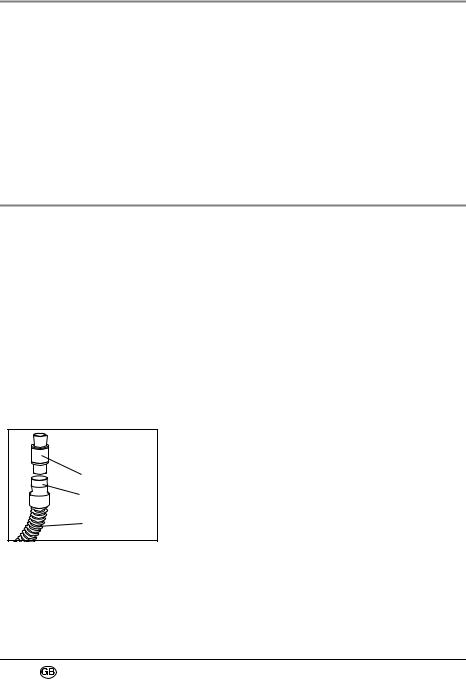
Sleeve
The sleeve on the end of the hose system has a diameter of 19.5 mm and fits over a 22 mm standard cone. Put the exhalation system on the sleeve of the creased hose.
Hose system
Please refer to the operating instructions for your exhalation system.
16 |
Set up unit |
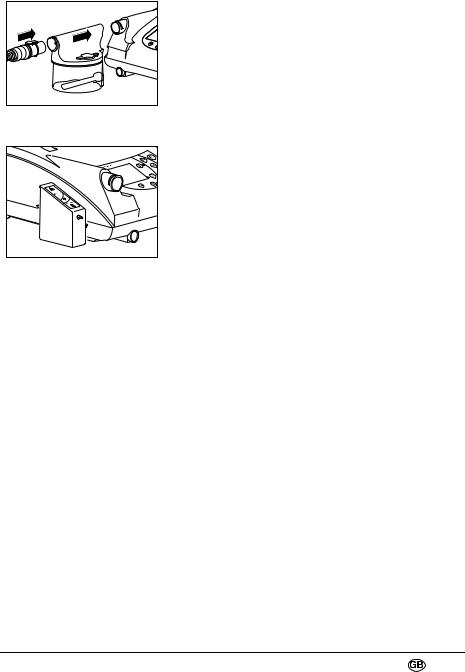
Humidifier VENTIclick
The VENTIclick humidifier is positioned between the VENTImotion and the hose system. The inlet connection stub and the electrical connection of the heating element must be pointing at the VENTImotion. Please also see the operating instructions for the VENTIclick.
Oxygen supply using the VENTI-O2
The supply of oxygen must have been prescribed by the doctor in charge.
For safety reasons (risk of fire), the direct introduction of oxygen into the hose system or the mask is not permitted without a special protective device.
On the VENTImotion, the introduction of oxygen is permitted solely using the VENTI- O2 oxygen valve, WM 24200. This valve allows up to 4 l/min. of oxygen to be introduced. In the event of a fault, the VENTI-O2 gives off the oxygen into the ambient air. This means that it cannot accumulate in the unit.
The oxygen can be supplied using an oxygen concentrator (e.g. Oxymat 3), central gas supply system, liquid oxygen or an oxygen cylinder with a suitable pressure reducer. The external oxygen source must be equipped with a flow-adjustment device independent of the VENTI-O2.
You must follow the safety instructions for handling oxygen without fail, as well as the operating instructions for the VENTI-O2 oxygen valve and the oxygen device used.
Set up unit |
17 |
Bacteria filter
If the VENTImotion is intended for use by several patients (e.g. in hospital), bacteria filter WM 24148 should be used to protect against infection. It is installed between the hose system and the VENTImotion or the VENTIclick. Please also observe the enclosed operating instructions for the bacteria filter.
Caution!
The bacteria filter represents an additional resistance in the air stream. This may lead to a change in the response characteristics of the trigger. For this reason, you should have the unit parameters reset if a bacteria filter is fitted retrospectively.
VENTIpower
For mains-power independant operation VENTIpower is available.
VENTIpower can also be connected to VENTImotion in parallel to mains power. VENTIpower then remains in standby mode. If mains power fails, VENTIpower automatically supplies power to the therapy device with a delay of about 4 seconds.
Using VENTIpower you can operate VENTImotion independant from mains power in the carrying bag WM 24888. To do so place VENTIpower in the dedicated section of the carrying bag and connect it to the therapy device.
Please also observe the operating instructions for VEN-
TIpower.
18 |
Set up unit |
5. Operation
5.1Start up the VENTImotion
1.If your mask has no integrated exhalation system, place the exhalation system on the end of the hose system(see “ Separate exhalation system” on
page 16).
Caution!
Always use an exhalation system. Otherwise the CO2 concentration would rise to critical values in the mask and hose, thus hindering your breathing.
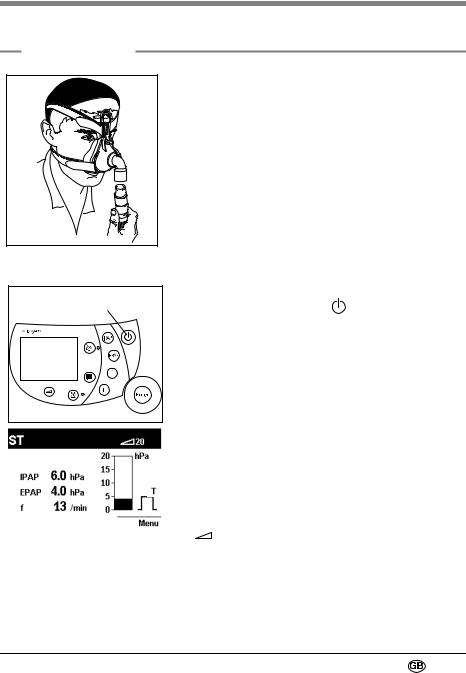
2. Put on the mask (see “4.2 Put on the Mask” on page 16) and connect the hose system including the exhalation system to the mask (plug cone). Please follow the relevant operating instructions for the mask and exhalation systems.
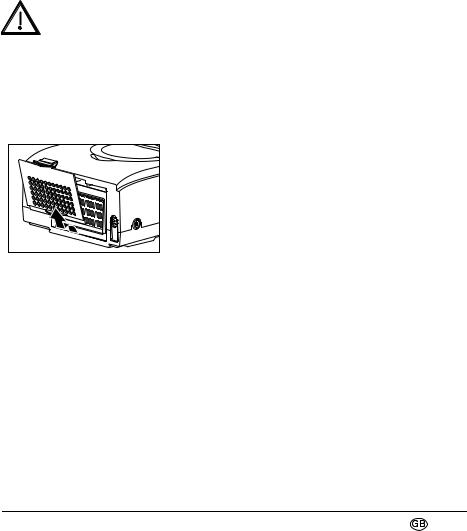
On/off switch |
|
|
3. Press the on / off switch |
. If auto switch-on is |
|
|
|
T |
|
|
|
|
activated, you can also position the mask and |
|
|
|
|
switch on the VENTImotion by taking a breath |
|
|
|
|
(see “5.2 Auto switch-on” on page 20). |
|
|
|
|
Operating hours and the Weinmann software ver- |
|
|
|
|
sion will appear in the display for approx. 3 se- |
|
|
|
|
conds. The unit starts to convey air through the |
|
|
|
|
hose system. The display switches to the standard |
|
|
|
|
||
|
|
|
display. |
|
|
|
|
The display shows the therapy mode set, therapy |
|
|
|
|
pressures (only CPAP pressure in CPAP mode) and |
|
|
T |
|
current respiratory frequency. |
|
|
|
|
||
|
|
|
When soft start is activated, the soft start indicator |
|
|
|
|
appears with the remaining soft start time, |
|
Standard display |
|
|
||
|
|
|
max. 30 minutes, or the max soft start time speci- |
|
|
|
|
||
|
|
|
fied by the doctor (see “5.3 Set soft start” on |
|
|
|
|
page 21). |
|
Operation 19
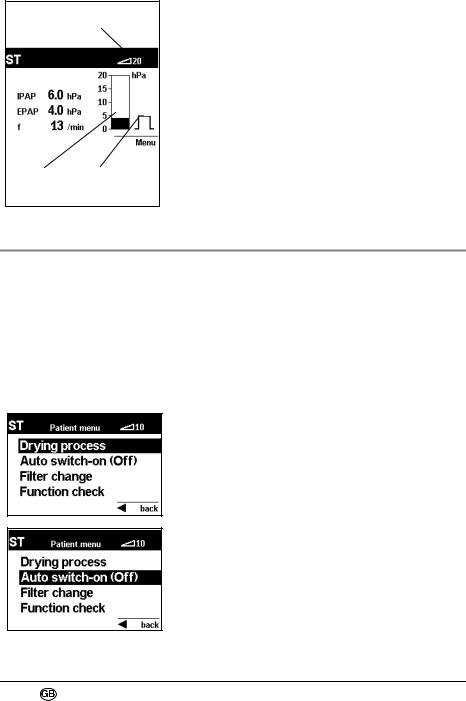
Soft start indicator
T
Bar chart Respiratory phase switch
The bar chart shows the inspiratory and expiratory pressure curve.
The respiratory phase switch indicator shows whether the current respiratory phase was triggered spontaneously by the patient (S) or mechanically (T). Depending on the respiratory phase, the indicator switches from left (inspiration) to right (expiration). The illustration shows mechanically-trigge- red expiration.
5.2 Auto switch-on
When auto switch-on is activated, you can switch on the VENTImotion using the on / off switch  or by "taking a breath". You can only switch off the VENTImotion using the on / off switch
  .
.
Activate auto switch-on
1.Seal the hose system or put on the mask.
2.Press the on / off switch  to switch on the VENTImotion.
3.Press the menu switch  . The patient menu appears in the display. The selection bar is over
Drying process.
4.Use the dial to select the menu item Auto switch-on (Off) and press the dial.
20 Operation
The message Auto switch-on ON appears for three seconds. After the message, the VENTImotion reverts to the patient menu. Auto switch-on is now activated.
5.Exit the patient menu using the dial (move selection
bar to Back and press dial) or using the menu switch  .
.
If no switch is activated for 5 minutes, the display reverts to the standard display.
Deactivate auto switch-on
Repeat steps 2.–5. as described in „ Activate auto switch-on“. When the automatic system is switched off, you can only switch on the VENTImotion using the  switch.
5.3 Set soft start
If your doctor has enabled the soft start function, the soft start time can be selected in 5-minute increments up to a maximum time of 30 minutes. Your doctor can limit the maximum time to less than 30 minutes. Proceed as follows to set soft start time.
1.Seal the hose system or put on the mask.
2.Switch on the VENTImotion and hold down the soft start switch  until the soft start window appears. Change the soft start time using the dial (turn to the right to increase time and turn to the left to decrease time). Alternatively, keep pressing the soft start switch
  to increase the soft start time in 5-minute increments (once maximum time is reached, the unit restarts at the minimum time of 5 minutes if pressed again).
3.Press the menu switch  or the dial to store the soft start time. The soft start time displayed will be stored and the soft start window closes automatically. If no switch is pressed for 4 seconds, the soft start time displayed is likewise stored. The settings are retained after the unit is switched off.
Operation 21
Note
VENTImotion starts in soft start mode automatically if this was activated when the unit was last used. Soft start can be switched on and off at any time by briefly pressing the soft start switch  .
.
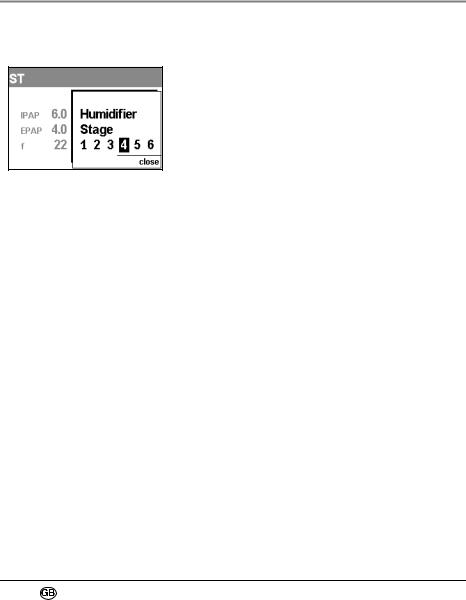
5.4 Set humidifier
The VENTIclick humidifier can be used to humidify and heat up the respiratory air supplied by the VENTImotion. Heat output can be selected in six stages. Proceed as follows.
1.Seal the hose system or put on the mask.
2.Switch on the VENTImotion and press the humidifier switch until the Humidifier stage window appears. Alter the heat output (stages 1-6) of the humidifier using the dial or repeatedly press the
 switch.
3.Press the menu switch  or the dial to store heating output. The Humidifier stage window closes automatically. If no switch is pressed for 4 seconds, the heating output displayed is likewise stored. The settings are retained after the unit is switched off.
Please also see the operating instructions for the VENTIclick.
Note
•VENTImotion automatically starts with the VENTIclick activated if this was activated when the unit was last used. VENTIclick can be swit-
ched on and off at any time by briefly pressing the Humidifier switch  . When the humidifier is activated, the green status indicator next to the humidifier switch is illuminated.
•If you press the humidifier switch  without a humidifier being connected, the VENTImotion switches this function off again automatically.
22 Operation

5.5 After usage
1.Remove the headgear/headband and the mask.
2.Keep the on / off switch  depressed for 2 seconds to switch off the unit. The fan switches off. Date and duration of the last therapy session appear in the display. "Weinmann VENTImotion" appears in the display. The unit then switches to standby mode. "Standby" appears in the display.
3. Remove the hose connection and, if necessary, the exhalation system from the mask.
4. Clean the mask and the exhalation system (see "6. Hygienic preparation" on Page 25).
Note!
To save electricity, you can remove the plug of the supply connection from the supply socket. The stored therapy parameters and settings will be retained.
5.6 Travelling with the VENTImotion
Carrying bag with |
VENTImotion and VENTIclick |
VENTImotion should only be transported long distances in the carrying bag provided.
Place the unit, the connecting cord, the hose system including the drying adapter, the mask including the exhalation system and, if necessary, the VENTIclick humidifier and the VENTI-O2 oxygen valve in the carrying bag. Please do not forget to take spare filters and all the operating instructions with you.
Warning!
•Never operate the VENTI-O2 oxygen valve available as an accessory in the carrying bag. Risk of fire. Oxygen may be deposited in the carrying bag.
Operation 23
Carrying bag with |
VENTImotion and VENTIpower |
If you want to use the VENTImotion on the journey, leave the unit and the VENTIpower in the bag during operation to prevent damage. To operate the unit in the bag, see the operating instructions for the VENTIpower.
If you want to take the VENTImotion on an aircraft as hand baggage, find out about any formalities required before departure. You can obtain a certificate for transportation in an aircraft from the manufacturer (Weinmann).
24 Operation

6. Hygienic preparation
6.1 Intervals
You should check the filters and wipe clean the housing and the filter compartment cover regularly. The headgear/headband can be washed as necessary. Please also observe the following intervals.
Interval |
Activity |
|
||
|
|
|
|
|
|
– Clean mask |
|
||
|
– Clean hose system |
|
||
|
– Clean bacteria filter in accordance with the operating |
|||
Daily |
instructions |
|
||
– Clean VENTIclick humidifier in accordance with the relevant |
||||
|
||||
|
operating instructions. |
|
||
|
– Clean the exhalation system after every use in accordance with |
|||
|
the operating instructions . |
|
||
|
|
|
|
|
Every 24 |
– Change the particle filter in the bacteria filter |
|
||
operating hours |
|
|||
|
|
|
||
Weekly |
– Clean the mask thoroughly in accordance with the operating |
|||
instructions. |
|
|||
|
– Clean coarse dust filter |
|
||
|
|
|
|
|
Every 1000 |
– Change fine filter (filter change indicator |
|
). If it is soiled, |
|
operating hours |
change it sooner |
|
||
|
|
|
||
Every 6 months |
– Change coarse dust filter. Change it sooner if soiled or worn |
|||
– Change pressure measuring hose – sooner if soiled – (see “9.3 |
||||
|
Change pressure measuring hose” on page 42). |
|||
|
|
|
|
|
Annually |
– Change hose system. |
|
||
|
|
|
|
|
Hygienic preparation |
25 |

6.2 Cleaning
Clean hose system
1.Detach the hose system from the unit and the exhalation system.
2.Remove one end of the pressure measuring hose
(shake gently if necessary) and seal it with the sealing plug provided. At the other end, use the second sealing plug to seal the small opening of the adapter to prevent water getting inside.
3.Clean the creased hose so no residues remain using a small amount of detergent in warm water. Rinse the inside of the hose thoroughly in the process.
4.Rinse both the inside and the outside of the creased hose thoroughly using clean warm water.
5.Shake the hose system thoroughly.
6.Hang up the hose system and allow to drip to prevent moisture getting into the VENTImotion.
7.Remove the plugs from the pressure measuring hose.
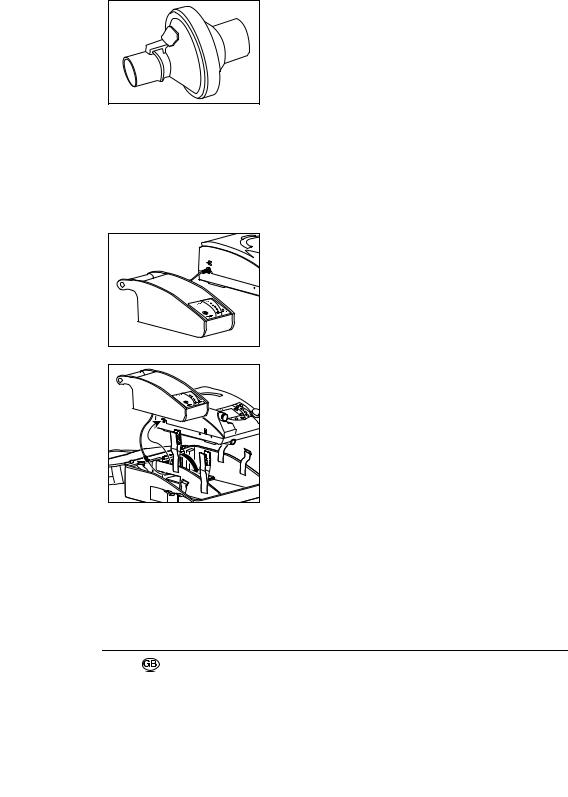
Dry the hose system using the VENTImotion
1. If water accidentally gets into the pressure measuring hose, insert the red drying adapter supplied in the unit outlet.
2. Insert the adapter of the hose system in the unit outlet or if necessary, onto the red drying adapter.
3.To activate the drying process, press the on / off
switch  . Use the menu switch
  to reach the patient menu. Press the dial to start the drying process. The unit now dries the hose system.
26 |
Hygienic preparation |
The remaining drying time is displayed. The VENTImotion switches off automatically after 30 minutes. You can interrupt the process at any time by keeping the menu switch  , the dial or the on / off switch
  depressed for 2 seconds. If the hose system is still damp in places after drying, start the drying process again.
4. Remove the drying adapter from the unit outlet.
Clean the VENTImotion housing
Warning!
•There is a risk of electric shock. Before cleaning, remove the connecting cord from the supply connection on the rear of the unit and the supply plug from the supply socket without fail.
•Make sure no liquids get into the unit. Never immerse the unit in disinfectant or other liquids. Otherwise the unit may be damaged, resulting in a hazard to users and patients.
1.Wipe the unit and the connecting cord clean with a soft damp cloth. The VENTImotion must be completely dry before being started up.
2. Remove the filter compartment cover.
3. Remove the coarse dust filter as described in 9.2.
4. Clean the filter compartment cover under running water so no residues remain. Then dry it carefully.
5.Replace the coarse dust filter and the filter compartment cover as described in 9.2.
Clean coarse dust filter/change fine filter
1.Remove the filter compartment cover as described in 9.2.
2.Remove the coarse dust filter from the filter compartment cover and clean it under clear running water so no residues remain.
3.Change the fine filter if required.
Hygienic preparation |
27 |

4.Let the coarse dust filter dry. The coarse dust filter must be completely dry before the unit is started up.
5.Replace the coarse dust filter and close the filter compartment cover.
Note:
the fine filter cannot be cleaned. It is changed every 1000 operating hours.
Accessories
To clean the exhalation system, the mask, the headgear/headband, the VENTIpower, the VENTI-O2, the bacteria filter and the VENTIclick, please see the section entitled "Cleaning" in the relevant operating instructions.
6.3 Disinfection, sterilization
If necessary, for example after an infectious illness or if the unit has become unusually soiled, you can also disinfect the housing, the connecting cord, the hose system, the bacteria filter housing, the VENTIclick, the VENTI-O2 and the VENTIpower. Refer to the operating instructions for the disinfectant used. We recommend that you wear suitable gloves (e.g. household or disposable gloves) when disinfecting the equipment.
Unit
The housing and the connecting cord of the VENTImotion are cleaned by simply being wiped over with disinfectant. We recommend TERRALIN for this purpose.
Hose system
We recommend GIGASEPT FF as disinfectant. When using GIGASEPT FF, use the same procedure as described under "Cleaning".
After disinfecting, rinse all parts thoroughly in distilled water. Let the parts dry completely.
Let the hose system drip. Dry the hose system using the VENTImotion as described in 6.2.
•Creased hose WM 24130 (clear) can be cleaned using hot water up to 70 ˚C. Sterilization is not permitted.
28 |
Hygienic preparation |

•Creased hose WM 24120 (grey) can be steam-sterilized using equipment to EN 285. Temperature: 134 ˚C, minimum treatment time 3 minutes. Follow EN 554/ ISO 11134 with regard to validation and monitoring.
Accessories
To disinfect the exhalation system, the mask, the VENTIpower, the VENTI-O2, the bacteria filter and the VENTIclick, please see the section entitled "Disinfection and sterilization" in the relevant operating instructions.
6.4 Change in patients
If the unit is being operated with a bacteria filter, please note the following:
•change the bacteria filter
or
•sterilize the bacteria filter and change the particle filter located inside it.
If the unit is to be utilized for another patient without using a bacteria filter, it must undergo hygienic preparation beforehand. This has to be carried out by the manufacturer (Weinmann) or a dealer.
The procedure used for hygienic preparation is described in the inspection sheet and in the service and repair instructions for the VENTImotion.
Hygienic preparation |
29 |

7. Function check
7.1 Intervals
Perform a function check at least every 6 months. If you discover defects during the function check, you must not use the VENTImotion again until these defects have been rectified.
7.2 Method
1.Assemble the VENTImotion so that it is ready to function with the hose system, exhalation system and the supply cable connection.
2.Close the opening of the hose system, for example using your thumb or hand.
3.Switch on the unit by pressing the on / off switch  .
.
4.If soft start is switched on, switch it off by pressing the soft start switch  .
.
Depending on the operating mode set, now check the following functions:
Function: / Mode: |
CPAP |
S |
T |
ST |
SX |
SXX |
|
|
|
|
|
|
|
Pressure setting |
• |
• |
• |
• |
• |
• |
|
|
|
|
|
|
|
Triggering |
− |
• |
− |
• |
• |
• |
|
|
|
|
|
|
|
Soft start |
• |
• |
• |
• |
• |
• |
|
|
|
|
|
|
|
Flow sensor |
− |
• |
• |
• |
• |
• |
|
|
|
|
|
|
|
Alarms |
• |
• |
• |
• |
• |
• |
|
|
|
|
|
|
|
If the values/functions set out below are not met/fulfilled, send the unit to your dealer or to the manufacturer (Weinmann) for repair.
30 |
Function check |
 Loading...