


 Loading...
Description and
Operating Instructions
ACCUVAC Basic
Aspirator
WM 10700
WM 10709

Contents
1. Description . . . . . . . . . . . . . . . . . . . .2
1.1 Purpose . . . . . . . . . . . . . . . . 2
1.2 Function . . . . . . . . . . . . . . . . 3
2. Safety . . . . . . . . . . . . . . . . . . . . . . .5
2.1 Special symbols on the
appliance . . . . . . . . . . . . . . . 5
2.2 Safety rules . . . . . . . . . . . . . . 5
3. Assembly . . . . . . . . . . . . . . . . . . . . .8
3.1Assembly with wall bracket . . . 8
3.2Fitting a re-usable collection
canister . . . . . . . . . . . . . . . 10 3.3 Fitting an accessory bag . . . . 11 3.4 Fitting a rinsing glass . . . . . . 11
4. Operation . . . . . . . . . . . . . . . . . . .13
4.1 Preparing for aspiration . . . . . 13 4.2 Aspiration . . . . . . . . . . . . . . 14 4.3 After aspiration . . . . . . . . . . 16 4.4 Charging ACCUVAC Basic . . 16
5. Hygienic preparation . . . . . . . . . . .19
5.1 Preparations . . . . . . . . . . . . .19
5.2 Cleaning, disinfecting and sterilizing . . . . . . . . . . . . . . .20
5.3 Reassembling the disposable collection canister . . . . . . . . .22
6. Functional check . . . . . . . . . . . . . . .23
6.1 Intervals . . . . . . . . . . . . . . . .23 6.2 Performing the functional check 25
7. Troubleshooting . . . . . . . . . . . . . . .26
7.1 Power pack . . . . . . . . . . . . .27 7.2 Changing fuses . . . . . . . . . .29 7.3 Changing the muffler . . . . . . .31
8. Maintenance . . . . . . . . . . . . . . . . .32
8.1 Intervals . . . . . . . . . . . . . . . .32 8.2 Disposal . . . . . . . . . . . . . . .32
9. Product and accessories . . . . . . . . .33
9.1 Standard product . . . . . . . . .33 9.2 Accessories . . . . . . . . . . . . .34 9.3 Spare parts . . . . . . . . . . . . .36
10. Technical Data . . . . . . . . . . . . . . . |
.37 |
10.1 Safe distances . . . . . . . . . . . |
38 |
11. Warranty . . . . . . . . . . . . . . . . . . . .39

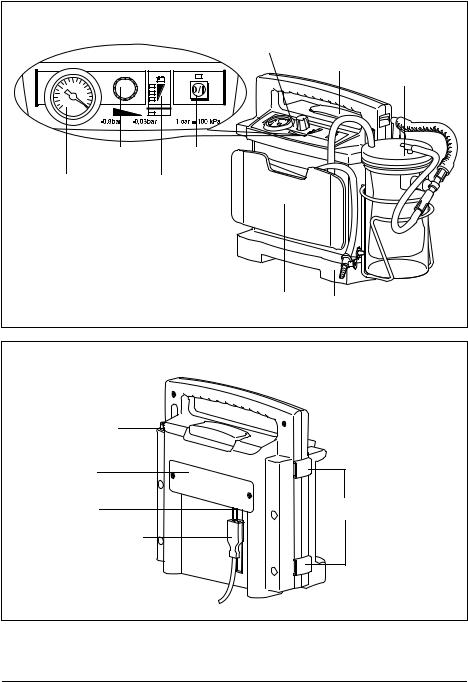
ACCUVAC Basic from front with disposable collection canister
5 Membrane keyboard |
|
6 Release catch |
7 Disposable |
|
canister |
-0,6 -0,4
-
|
|
|
|
|
|
|
|
|
2 Vacuum control |
4 On/Off |
|
|
|
switch |
1 Pressure gage 3 Voltage indicator
9 Tube holder plate |
8 Motor unit |
ACCUVAC Basic from rear without collection canister
14 Suction port
13 Muffler
(hidden)
12 Power socket |
10 Loops for |
(hidden) |
|
|
accessory bag |
11Adapter/charger plug

ACCUVAC Basic interior |
Disposable collection canister |
|||
15 Fuse F116 Fuse F2 (hidden) |
|
19 Aspiration tube |
||
|
|
|
|
with fingertip |
|
|
|
20 |
Intermediate tube |
|
|
|
21 |
Disposable bag |
|
|
|
|
22 Vacuum |
|
|
|
|
tube |
|
|
|
23 |
T-piece |
|
|
|
24 |
Collection canister |
18 Plug X1 |
17 Power pack |
25 Holder |
11 Adapter/charger plug |
|
Accessories |
|
|
|
26 Re-usable collection canister WM 15269 |
|
|
|
27 |
Vent tab |
|
|
28 |
Filter cover |
|
|
29 |
Bacteria filter |
|
|
30 |
Locking tab |
|
|
31 Bracing |
|
|
|
32 |
Secretion cover |
|
|
33 |
Ball (overfill guard) |
|
|
34 |
Sealing ring |
Accessory bag |
Wall bracket |
|
|
WM 10655 |
WM 15208 |
35 Fingertip |
|
|
|
36 Aspiration tube |
|
|
|
37 |
Collection canister |
|
|
|
|
13,8 V |
|
38 Holder set WM 15271 |
Mains / charger unit |
Connection cable |
|
WM 2645 |
WM 10650 |
||

1. Description
1.1 Purpose
ACCUVAC Basic is a mobile and portable electrically powered aspirator (suction pump).
It is used for:
•aspirating accumulations of blood, secretions and food from the oral cavity, the nose and throat region and the bronchial system;
•deflating vacuum matresses and inflatable splints. ACCUVAC Basic:
•can when used by a skilled operator eliminate obstruction of the respiratory tract and hence the risk of respiratory failure;
•cuts energy consumption by reducing power output on reaching the necessary vacuum;
•can optionally be powered by a rechargeable internal power pack;
•or by an external DC source supplying 12.0 - 13.8 V;
•is also suitable for use in wards.
ACCUVAC Basic must not be used:
•in medical rooms where potential equalization is
necessary (e.g. heart surgery);
•in explosion-risk areas.
2 Description
1.2 Function
-0,6 |
-0,4 |
-0,8 |
|
-1,0 |
0 |
An electrically operated diaphragm pump generates the vacuum necessary for aspiration.
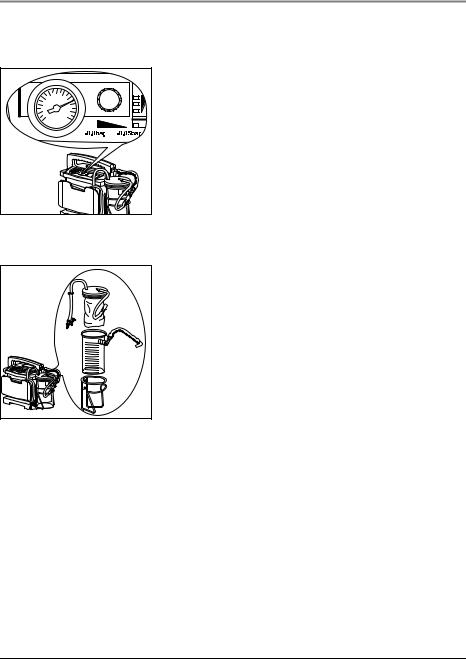
Use the vacuum control 2 to set the desired vacuum, which is continuously variable between –0.05 bar and –0.8 bar. You can read off the set value on the pressure gage 1.
The aspirated material passes via the aspiration tube 19 into the disposable collection canister 7.
Disposable collection canister
The disposable collection canister 7 consists of the collection canister 24 itself, the disposable collection bag 21, the aspiration tube with fingertip 19, the intermediate tube 20, the T-piece 23 and the vacuum tube 22.
The disposable collection canister 7 is inserted in the holder 25 screwed on the side of the motor unit 8.
The vacuum tube 22 of the disposable canister 24 is pushed onto the suction port 14 of the motor unit 8.
The aspirated material passes through the aspiration tube 19 into the disposable collection bag 21. The disposable collection bag is intended for once-only use. When it is full, you can remove it from the collection canister 24 and dispose of it complete with contents.
An overflow valve filter is integrated in the disposable collection bag 21. This prevents secretions and liquid from finding their way into the motor unit 8 and passing into the environment via the muffler 13.
Description 3

Power supply
Power for operating the appliance and charging the power pack can be drawn:
•from the built-in power pack 17.
•from a 12-volt electrical cable system, using the connecting cable WM 10650 which is available as an accessory.
•from the mains and charger unit WM 2645 which is available as an accessory.
Important The AC adapter/charger plug 11 supplied with the appliance is only designed for charging the power pack with the appliance switched off. It must not be used to operate the appliance itself, as this will overload it and cause it to overheat.
The voltage indicator 3 shows the charge status of the power pack.
Charging of the power pack starts automatically as soon as the appliance is switched off and connected to an external power supply (see “10. Technical Data” on page 37).
4 Description
2. Safety
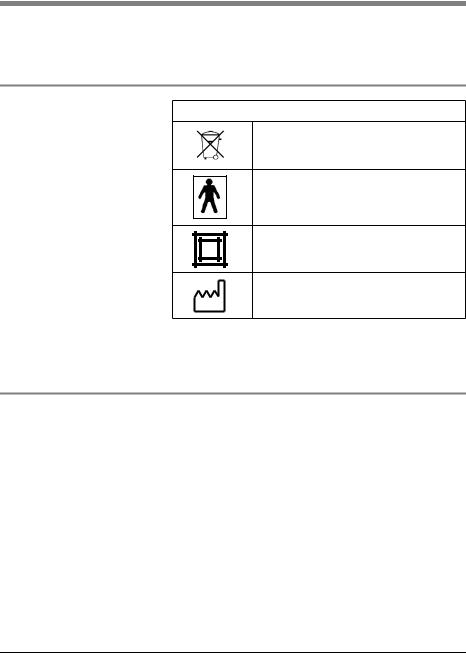
2.1 Special symbols on the appliance
Rating plate ACCUVAC Basic
Do not dispose of the unit in domestic waste!
Protection class BF
Protection class II, safety insulation
Year of manufacture
2.2 Safety rules
For your own safety and the safety of your patients, and in accordance with the requirements of the 93/42/EEC, we would draw your attention to the following points:
•Please read these operating instructions carefully. They belong to the appliance and must be kept available at all times.
•Before working with ACCUVAC Basic, you must understand how to use it.
•Be sure to observe these operating instructions when working with ACCUVAC Basic.
Safety 5

•To avoid infection or contamination with bacteria please read section “5. Hygienic preparation” on page 19.
•ACCUVAC Basic may only be used by trained staff instructed in aspiration techniques. Incorrect use can cause serious bodily harm.
•ACCUVAC Basic must be used for the designated purpose only (see “1.1 Purpose” on page 2).
•Maintenance operations such as inspection and repair work must be performed by expert personnel or by the manufacturer Weinmann.
•Malfunctions and a lack of biocompatibility may result if third-party articles are used. Please bear in mind that in these cases any warranty entitlement and liability shall lapse where the accessories recommended in the instructions for use or original spare parts are not utilised.
•During the aspiration process, take particular care not to cause injuries to the patient’s mouth or
throat, e.g. to mucous membrane.
The suction can be interrupted by briefly opening the fingertip, for example if the nozzle becomes firmly attached to the skin.
•Ensure sterile conditions during bronchial aspiration, and always use sterile catheters.
Important! • The disposal of liquids such as blood and secretions and any items contaminated with such liquids should be carried out according to the national guidelines for hygiene.
•The ACCUVAC Basic should only be operated in the upright position, in order to prevent liquid from wetting the overflow valve filter integrated in the disposable collection bag 21. If this happens, the overflow valve filter becomes impermeable to air and the disposable collection bag 21 has to be changed.
6 Safety
•The AC adapter/charger plug supplied is only for recharging the power pack when the appliance is switched off. It must not be used for operating the appliance itself, as this will overload it and cause it to overheat.
•To extend its service life, the power pack 17 must not be allowed to become fully discharged. If the red charge control LED 3 lights up, it is time to recharge immediately.
•To eliminate the risk of fully discharging the power pack, ACCUVAC Basic must never be stored in an uncharged condition. Always recharge the power pack first as described in “4.4 Charging ACCUVAC Basic” on page 16.
•Lead cell power packs discharge even during nonuse. The rate of auto-discharge increases with rising temperature and amounts to about 20 % after three months’ non-use at 20 °C. For this reason be sure to carry out functional checks at the specified intervals (see “6. Functional check” on page 23).
•Never sterilize the motor unit 8 in an autoclave.
•Never dip the motor unit 8 in disinfectant solution.
•We recommend keeping alternative means of aspiration ready in case of appliance failure.
•Do not use mobile telefones right beside ACCUVAC Basic.
ACCUVAC Basic can however be operated without any problem in the back of an ambulance even if a mobile telephone is being used in the cab.
Safety 7
3. Assembly
ACCUVAC Basic is supplied ready for use.
Important Before using ACCUVAC Basic for the first time, fully charge the power pack (see “4.4 Charging ACCUVAC Basic” on page 16).
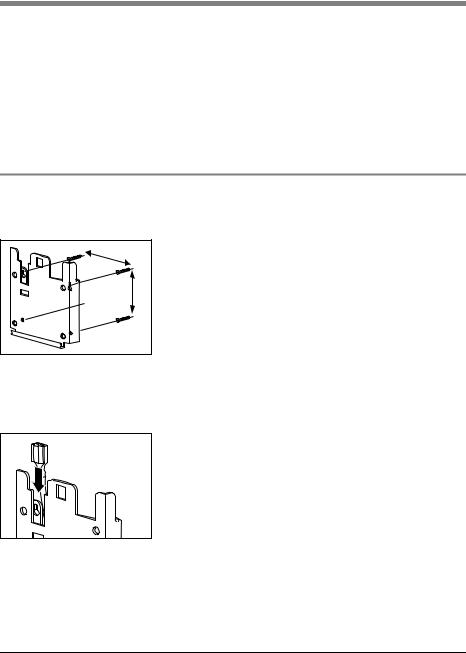
3.1 Assembly with wall bracket
1 |
|
15 |
mm |
|
|
|
1 |
|
10 |
|
mm |
|
˘ |
|
3 mm |
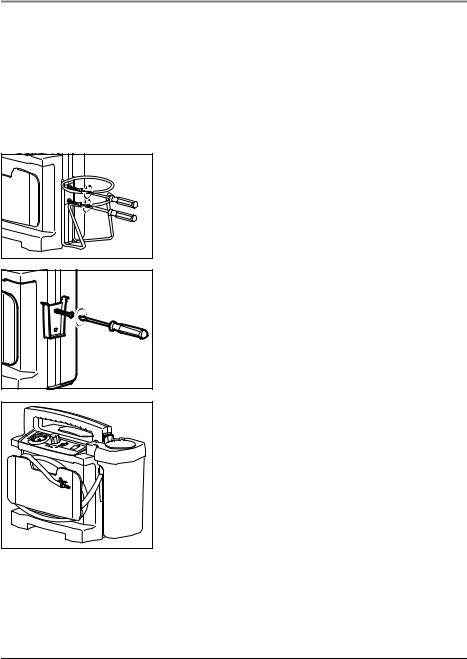
To mount ACCUVAC Basic on a wall, use wall bracket WM 15208, available as an accessory.
1.Find a suitable mounting location on an even, vertical surface. The outline of the ACCUVAC on the drilling template shows the space required.
2.Hold up the drilling template and level it with a spirit level.
3.Mark the required screw holes on the mounting location.
4.Drill the screw holes with a Ø 3 mm drill.
5.Screw the wall bracket on with the screws supplied.
6.Push the appliance plug 11 of the connection cable or of the mains/charger unit into the guide rail of the wall bracket until it engages with the tongue.
Important: the mounting substrate must be sufficiently strong to hold the wall bracket and the ACCUVAC securely in accordance with CEN 1789 Medical Vehicles and their Equipment - Road Ambulances.
8 Assembly
As an alternative to the AC adapter/charger plug supplied with the appliance, you can also use the connecting cable WM 10650 available as an accessory.
7.Insert the AC adapter/charger plug in a 230 V/ 50 Hz power socket, or if using the connecting cable, insert the vehicle plug into a 12 volt DC power source.
The vehicle plug is supplied complete with a red adapter ring. This is needed if you want to plug the vehicle plug into a cigarette lighter socket. To connect to the mains/charger unit WM 2645 (accessory) or a 12 volt vehicle socket, remove the red adapter ring.
8.Slide ACCUVAC Basic downwards into the wall bracket.
If ACCUVAC Basic appliance is switched off, it will automatically be charged up from the DC power source.
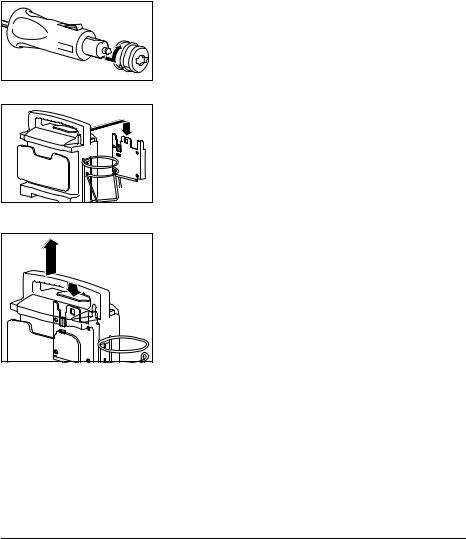
9.To remove the ACCUVAC Basic from the bracket ready for use, press the release catch 6 and lift ACCUVAC Basic out of the wall bracket.
Assembly 9
3.2 Fitting a re-usable collection canister
Instead of the disposable collection canister 7 supplied as standard, you can also fit a sterilizable re-usable collection canister 26 with holder 38, available as an accessory. This conversion kit is available under order number WM 15261.
1.Remove the disposable collection canister 7 from its holder 25.
2.Unscrew the holder 25 from the motor unit 8.
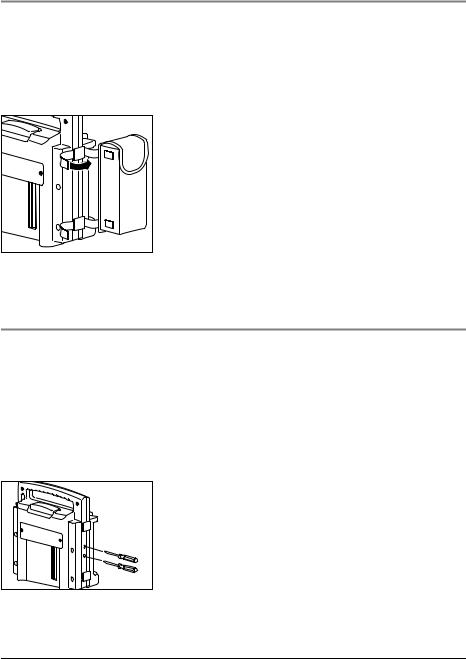
3.In the same place, screw on the holder 38 for the re-usable collection canister 26.
4.Push the re-usable collection canister 26 into the
holder 38. Since the collection canister is directly connected to the suction port 14 of the motor unit 8, there is no need for an intermediate tube.
10 Assembly
3.3 Fitting an accessory bag
The accessory bag WM 10655 is available as an optional extra. It is used to hold aspiration catheters and other small parts. The accessory bag cannot be fitted at the same time as a rinsing glass (see “3.4 Fitting a rinsing glass” on page 11).
1. Use the velcro-type strips to attach the accessory bag to the loops on the motor unit.
3.4 Fitting a rinsing glass
On the left side of the appliance it is possible to fit an additional collection canister in the form of a rinsing glass for holding a rinsing liquid, e.g. water.
The rinsing glass kit WM 15229 consists of:
•Collection canister 37 WM 10631
•Holder set 38 WM 15271
1. Use a pointed object to pierce the two closed drill holes on the left of the appliance case.
Assembly 11
Loading...