


 Loading...
MEDUMAT Basic
Ventilator |
WM 22600 |
MEDUMAT Basic p
Ventilator |
WM 22650 |
Servicing and repair instructions

Contents
Introduction . . . . . . . . . . . . . . . . . . . . . . . . . . 3
1. Overview . . . . . . . . . . . . . . . . . . . . . . . . . . . 4
1.1 Symbols used on the ventilator. . . . . . . . 5
2. Description of ventilator . . . . . . . . . . . . . . . . . 6
2.1 Uses. . . . . . . . . . . . . . . . . . . . . . . . . 6 2.2 Ventilation function . . . . . . . . . . . . . . . 6 2.3 Patient valve . . . . . . . . . . . . . . . . . . . 7
3. Final Check . . . . . . . . . . . . . . . . . . . . . . . . . . 8
3.1 Test resources required . . . . . . . . . . . . 8 3.2 Preparations for final check. . . . . . . . . . 9 3.3 Entering device data . . . . . . . . . . . . . . 9
3.4 Testing for leaks and checking pressure reading . . . . . . . . . . . . . . . . . . . . . . 9
3.5 Device self-test after switching on . . . . . 10 3.6 Functional check on alarms. . . . . . . . . 10 3.7 Functional check on frequency setting . . 11
3.8Functional check on tidal volume at 4.5 bar delivery pressure and
10 mbar counterpressure . . . . . . . . . . 11 3.9 Checking oxygen concentration. . . . . . 12
3.10Functional check on pressure limit . . . . 13
3.11Functional check on exhaust valve
without patient valve . . . . . . . . . . . . . 13 3.12 Check the breath volume . . . . . . . . . . 13
3.13 Checking equipment and accessories (system components) . . . . . . . . . . . . . 13
3.14 Checking external condition . . . . . . . . 14 3.15 Documentation . . . . . . . . . . . . . . . . . 14
4. Servicing . . . . . . . . . . . . . . . . . . . . . . . . . . . 15
4.1 Intervals and Scope. . . . . . . . . . . . . . 15 4.2 Batteries and fuses . . . . . . . . . . . . . . 16 4.3 Adjusting the pressure gauge . . . . . . . 16 4.4 Storage . . . . . . . . . . . . . . . . . . . . . 17 4.5 Disposal . . . . . . . . . . . . . . . . . . . . . 17
5. Troubleshooting. . . . . . . . . . . . . . . . . . . . . . 18
6. Repair information and repair instructions . . |
21 |
|
6.1 |
General . . . . . . . . . . . . . . . . . . . . . |
21 |
6.2 |
Replacing the sieve in the compressed |
|
|
gas connection . . . . . . . . . . . . . . . . |
21 |
6.3 |
Changing the foam insert in the |
|
|
pressure relief valve outlet. . . . . . . . . . |
22 |
6.4 |
Opening the device . . . . . . . . . . . . . |
22 |
6.5 |
Closing the device . . . . . . . . . . . . . . |
23 |
6.6 |
Changing the batteries . . . . . . . . . . . |
23 |
6.7 |
Replacing the fuse. . . . . . . . . . . . . . . |
24 |
6.8 |
Replacing ventilation control knob . . . . |
24 |
6.9Calibration after removal of PCB, ventilation control knob 5 and/or
pneumatic block . . . . . . . . . . . . . . . . 25 6.10 Replacing the alarm signalling device. . 27
6.11Replacing two-way switch for maximum ventilation pressure (MEDUMAT Basic /
|
Basic p Basic p only). . . . . . . . . . . . . |
28 |
6.12 |
Replacing the circuit board. . . . . . . . . |
29 |
6.13 |
Replacing the pressure gauge . . . . . . . |
31 |
6.14 |
Replacing the pneumatic block . . . . . . |
32 |
6.15 |
Replacing the pneumatic block with |
|
|
angled outlet . . . . . . . . . . . . . . . . . . |
34 |
6.16 |
Replace 3/2 solenoid valve . . . . . . . . |
37 |
6.17 |
Changing the Air Mix/ |
|
|
No Air Mix switch . . . . . . . . . . . . . . |
38 |
6.18 |
Replace upper part of housing/ |
|
|
control panel . . . . . . . . . . . . . . . . . . |
39 |
6.19 |
Replacing the housing base section . . . |
45 |
6.20 |
Upgrading ventilation tube . . . . . . . . . |
46 |
7. Spare parts . . . . . . . . . . . . . . . . . . . . . . . . . |
47 |
|
7.1 |
List of spare parts . . . . . . . . . . . . . . . |
47 |
7.2 |
Maintenance set. . . . . . . . . . . . . . . . |
49 |
8. Tools and test equipment . . . . . . . . . . . . . . . |
51 |
|
8.1 |
General tools. . . . . . . . . . . . . . . . . . |
51 |
8.2 |
Special tools . . . . . . . . . . . . . . . . . . |
51 |
8.3 |
Test equipment . . . . . . . . . . . . . . . . . |
52 |
9. Technical data . . . . . . . . . . . . . . . . . . . . . . . 53
9.1 Pneumatics . . . . . . . . . . . . . . . . . . . 54 9.2 O2 content when using Air Mix . . . . . . 55
10. Technical Changes . . . . . . . . . . . . . . . . . . . . 56
11. Repair and inspection log. . . . . . . . . . . . . . . 57
© Copyright Weinmann GmbH & Co. KG.
The content and presentation are copyright protected and may only be used by authorised Weinmann Service Partners in the course of their service operations. The content must not be reproduced or passed on to third parties. The complete documents must be returned on termination of the cooperation with Weinmann.
2

Introduction
For decades, Weinmann has developed, manufactured and distributed equipment for emergency medicine, oxygen therapy and inhalation therapy.
In 1972, Weinmann introduced the first MEDUMAT emergency ventilator to the market.
MEDUMAT emergency ventilators are automatic resuscitators. They are used for controlled respiration in emergency medicine, e.g. in the event of acute ventilatory disorders, and for secondary obstructions.
The new generation of equipment, which was especially developed to meet the requirements of users, offers users and patients an enhanced level of safety. An intelligent alarm system monitors the patient's breathing and notifies the user of any malfunctions. Hence, this technology offers even greater safety and reliability during respiration.
The aim of these service and repair instructions is to familiarise you, as a knowledgeable expert, with the MEDUMAT in terms of function, technology and repairs. In conjunction with the training you have already received from Weinmann, you are
now a "trained, qualified expert" and are able to instruct your clients correctly, rectify faults yourself, and perform the functional checks described in the instructions for use, as well as conduct any repairs which may be necessary, as outlined in these service and repair instructions.
In the event of a guarantee claim, MEDUMAT should be returned to Weinmann.
To enable us to process any guarantee or goodwill claims, please return the consumer's proof of purchase (invoice) together with the device.
Repairs and maintenance work must be carried out only by Weinmann or by knowledgeable experts.
You are responsible for all repairs performed by yourself and the warranty thereof!
Only original Weinmann spare parts should be used for repair purposes.
Please remember:
Your customer trusts you and relies on your expertise, just as you rely on Weinmann.
Note:
The following information can be found in the description and operating instructions for MEDUMAT:
•Safety instructions
•Mounting with the wall bracket STATION MEDUMAT, Mounting of accessories
•Operation
•Hygienic preparation
•Functional check
3

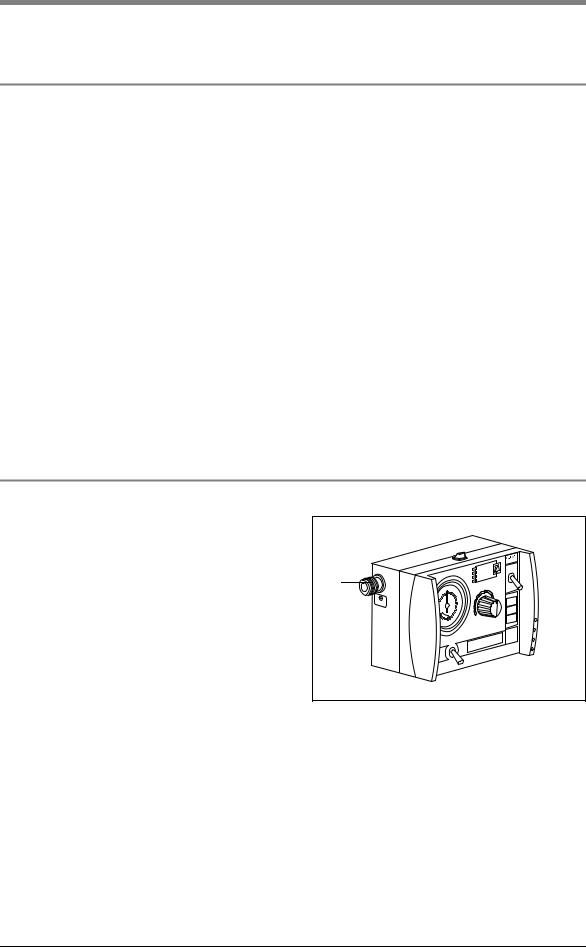
1. Overview
Control panel MEDUMAT Basic, Basic p
1 Ventilation pressure gauge 2 Alarm panel 3 Alarm mute button (Manometer)
4 Air Mix/No Air Mix switch
5 Minute volume regulator
6 Colour code
7 Recommendations for ventilation settings
8 ON/OFF switch
9Tumbler switch for setting max. ventilation pressure (Basic p only)
MEDUMAT Basic, Basic p connections
Basic |
p |
10 Pressure gas connection
O/I
11Locking latch for STATION MEDUMAT wall bracket
|
® |
MEDU |
MAT |
Basic |
|
O/I
up to appliance no.: Basic 1019 Basic p 1399
12
13
|
® |
|
|
MEDU |
MAT |
|
|
Basic |
|
|
|
|
|
12 |
Connection for ventilation hose |
|
|
13 |
Pressure gauge hose connection |
O/I |
14 Relief valve |
||
|
|
15 |
Dust cover |
|
|
16 |
Mixed air filter |
from appliance no.: Basic 1020 Basic p 1400
4Overview

1.1 Symbols used on the ventilator
SN |
: |
O/I |
|
||
O/I |
: |
|
|
|
|
Inlet 2,7 - 6 bar O2. |
|
|
MEDUMAT Basic / Basic p device information plate
SN Serial number of device
Year of manufacture
Do not dispose of device in domestic waste.
Safety check and servicing label
Servicing label: indicates when the next service is due.
Safety check label (in Germany only): marks when the next safety check as per §6 of the German law relating to users of medical devices is required.
Overview 5
2. Description of ventilator
2.1 Uses
MEDUMAT Basic / Basic p is an automatic (short-term) ventilator.
You can use MEDUMAT Basic / Basic p:
•to revive patients at the site of an emergency
•on a longer term basis in more protracted emergencies, e.g. fires.
You can use MEDUMAT Basic / Basic p whilst transporting patients:
•between the various rooms and departments of a hospital;
•between the hospital and other premises;
•in emergencies;
•when transport over a considerable distance is planned.
MEDUMAT Basic / Basic p:
•is designed to provide controlled ventilation to persons of 10 kg body weight or more;
•is used to treat respiratory arrest;
•can be preset to parameters that ensure evenly balanced ventilation provided that the selected
maximum ventilation pressure Pmax is not exceeded.
•can be supplied with additional modules for aspiration and oxygen inhalation. (N.B. MEDUMAT Basic / Basic p cannot be used as a ventilator simultaneously with these modules)
2.2 Ventilation function
MEDUMAT Basic / Basic p operates within a pres- |
|
|
sure range of 2.7 to 6 bar and at a flow rate of not |
|
|
less than 70 l/min O2. It has a built-in power |
Basic p |
|
pack. |
10 |
|
The gas used for ventilation is highly compressed |
||
|
||
medical oxygen, which is reduced to the required |
|
|
operating pressure by a two-stage external pres- |
O/I |
|
sure reducer. The oxygen supply is fed in at input |
||
|
||
valve 10. |
|
The continuously adjustable ventilation settings and the inspiration/expiration ratio of1:1.67 are regulated internally by electronic control processes.
The gas for inspiration flows along the hose and through the patient valve and either the mask or the tracheal tube into the patient’s airways. The patient valve is fitted with a lip membrane that enables expired gas to be conducted away through the expiration tube.
6Description of ventilator
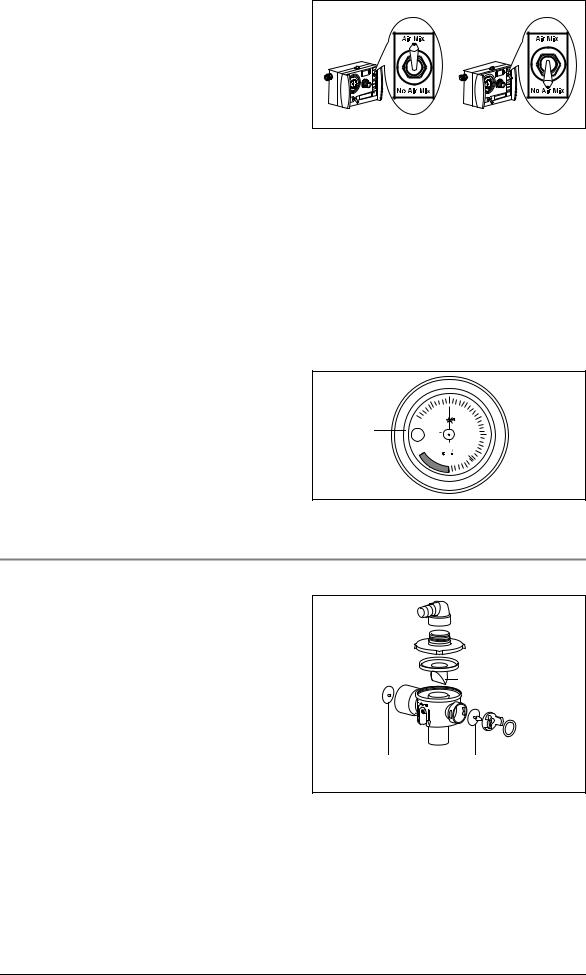
At the normal Air Mix setting, atmospheric air is admixed to give an O2-concentration of between 55% and 85% at 10 mbar ventilation pressure (see “9.2 O2 content when using Air Mix“ on page 55).
In certain indications and in cases where the surrounding atmosphere is contaminated, you can switch to No Air Mix and ventilate with pure oxygen.
The injector unit is switched off when switching from Air Mix to No Air Mix. This increases minute volume which can result in the set pressure limit being exceeded and a stenosis alarm (Stenosis) being triggered. In this case, set minute volume correspondingly lower.
In the opposite instance, in other words when switching from No Air Mix to Air Mix, the injector unit is switched on. This reduces minute volume which can lead to the set pressure limit being undershot. In this case, set minute volume correspondingly higher.
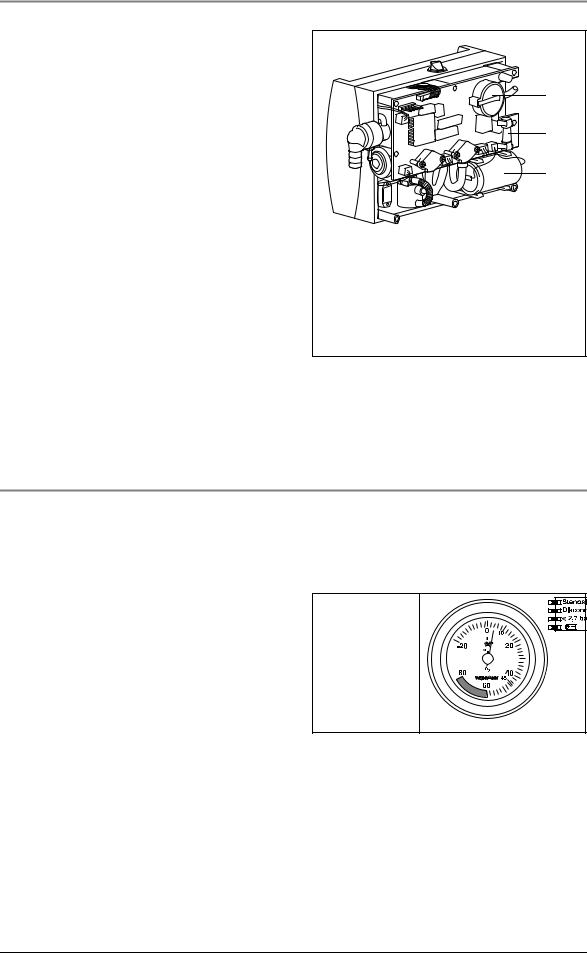
You can check the course of the ventilation on pressure gauge 1.
O/I
|
0 |
10 |
|
S |
|
1 |
-20 |
20 |
KL.1,6 |
|
|
10 mbar = |
EN 837 |
|
|
1 kPa |
mbar |
80 O2 40


 45
45
60
2.3 Patient valve
The gas for inspiration is channelled into the patient’s airways through the patient valve.
This valve is designed to enable spontaneous breathing in case of equipment failure.
Lip membrane
Diaphragm for |
Diaphragm for |
exspirations arm |
spontaneous |
|
breathing arm |
Description of ventilator |
7 |

3. Final Check
After any repair and maintenance work, the device must be subjected to the following final check in accordance with the Test Instructions WM 22671 and Test Record.
Note:
For a final check on the MEDUMAT Basic / Basic p you must connect the respiration tube and the patient valve.
If the final check reveals faults or deviations from the specified values, you must not use the MEDUMAT Basic / Basic p.
We recommend you to keep the following parts in stock:
•Replacement seals for device connections;
•Replacement dust filter;
•Lip diaphragm for patient valve;
•Diaphragm for spontaneous breathing leg;
•Diaphragm for expiration leg;
•O–Ring 1145/118.
3.1 Test resources required
•Flowmeter, PF 300 (imtmedical), RT 200 (Timeter), EKU VIP (EKU Elektronik) or comparable testing device
•Functional check test set WM 15335
•Adjustable orifice, e.g. ball valve, internal diameter ≥ 10 mm
•Oxygen concentration measuring device, 0 – 100 % ± 1 %, e.g. Type Oxycontrol WM 13550
•Set: hose with injector WM 15359
• |
Pressure gauge |
0 |
- 13 bar, class 1.6 |
• |
Pressure gauge |
0 |
- 160 mbar, class 1.6 |
•Set, supply test Medumat / Modules WM 15440
Default settings for flow meter PF300
Settings |
Values |
|
|
Default settings: |
|
– Type of gas |
Air/02 auto |
– Gas standardization |
STP |
|
|
Trigger settings: |
|
– Type of ventilation |
Adult |
– Source |
Internal HF |
– Start |
Flow rate ≥ 3.0 l/min |
– End |
Flow rate ≤ 3,0 l/min |
– Delay |
60 ms |
– Base flow rate |
disabled |
|
|
Units and measured values: |
|
– P high |
bar |
– P diff |
mbar |
– Rate |
1/min or b/min |
– Vti |
ml |
– O2 |
% |
If you have a comparable testing device, contact WEINMANN’s Technical Support department to have the setting parameters calibrated.
8Final Check
3.2 Preparations for final check
1.Connect MEDUMAT Basic / Basic p to pressure supply 4.5 – 6 bar of cylinder system.
2.Connect respiration tube and pressure measurement tube to MEDUMAT Basic / Basic p.
3.Set MEDUMAT Basic / Basic p with switch in position No Air Mix to Freq. = 30 min-1, MV = 3 l/min and Pmax = 45 mbar.
4.Start check.
3.3 Entering device data
•Enter the device number and date of manufacture in the Test Record.
3.4 Testing for leaks and checking pressure reading
3.4.1 Testing for leaks on the inlet side
•With device switched off, apply pressure of 6 bar to inlet side and shut off outlet pressure.
•Set lever to No Air Mix.
Requirement: The pressure drop must be less than 0.2 bar/min.
•Set lever to Air Mix.
Requirement: The pressure drop must be less than 0.2 bar/min.
3.4.2 Testing for leaks in pressure measurement segment
• Apply pressure of 60 mbar to pressure measurement segment of MEDUMAT Basic / Basic p.
• During the measurement, a traction force of approx. 3 N must be applied manually to the elbow outlet.
Requirement: The pressure drop must be less than 2 mbar/min.
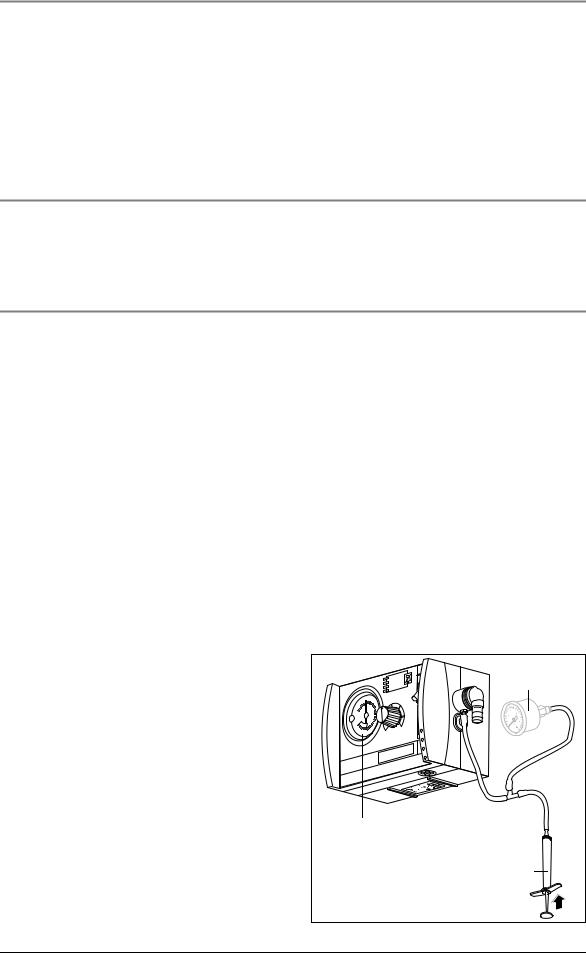
3.4.3 Checking pressure reading
|
Basic |
® |
Test pressure |
|
1. Attach T-connector with injector (WM 15359) |
MEDU |
MAT |
|
|
|
|
|
||
|
|
gauge |
|
|
to pressure measurement connection 13. |
|
|
|
|
|
|
|
|
|
2. Connect test pressure gauge 0 - 100 mbar or |
|
|
|
|
Timeter to free end of T-connector (pressure |
O |
|
|
|
gauge/volumetric flowmeter not supplied with |
|
|
||
|
|
/I |
|
|
device). |
|
|
|
|
3. Use injector to create a pressure of 55 mbar |
|
|
|
|
as shown on the test pressure gauge. |
|
|
|
|
Requirement: Respiration pressure reading must not |
Pressure gauge |
|
|
|
deviate from set value by more than ≤ 1.5 mbar. |
|
|
|
|
|
|
|
Injector |
|
|
|
|
Final Check |
9 |

3.5 |
Device self-test after switching on |
|
1. |
Apply approx. 4.5 bar to the inlet. |
|
2. |
Switch on MEDUMAT Basic / Basic p at pushbutton 8 O/I. |
|
|
Requirement: The self-test is activated: all 4 LEDs light up together and a brief signal tone sounds. |
|
3.6 |
Functional check on alarms |
|
|
|
|
3.6.1 Stenosis alarm check up to appliance no.: Basic 1019; Basic p 1399
•Set MEDUMAT Basic / Basic p to the Air Mix setting at f = 30/min, MV = 3 l/min and
pmax = 45 mbar. Close patient valve outlet. Note: Over-response of needle is normal.
Requirement: The stenosis alarm must be activated after two respiration cycles.
•Set MEDUMAT Basic / Basic p to the No Air Mix setting at f = 30/min, MV = 3 l/min and
pmax = 45 mbar. Close patient valve outlet. Note: Over-response of needle is normal.
Requirement: The stenosis alarm must be activated after two respiration cycles.
3.6.2 Stenosis alarm check from appliance no.: Basic 1020; Basic p 1400
•Set MEDUMAT Basic / Basic p to the Air Mix setting at f = 30/min, MV = 3 l/min and
pmax = 45 mbar. Close patient valve outlet. Note: Over-response of needle is normal.
MEDUMAT Basic / Basic p briefly switches to expiration if the maximum ventilation pressure is exceeded, but then tries to continue inspiration in the same inspiration phase.
If the maximum ventilation pressure is exceeded for a second time during the same inspiration phase, the unit finally switches to expiration and vents the patient tube system completely. The next inspiration begins with the following ventilation stroke according to the frequency selected.
Requirement: The stenosis alarm must be activated after two respiration cycles.
•Set MEDUMAT Basic / Basic p to the No Air Mix setting at f = 30/min, MV = 3 l/min and
pmax = 45 mbar. Close patient valve outlet. Note: Over-response of needle is normal.
Requirement: The stenosis alarm must be activated after two respiration cycles.
3.6.3 Test alarm mute button
• Immediately after first alarm tone sounds, press button 3 alarm acknowledgement.
Requirement: The alarm tone must be suppressed immediately. The alarm sounds again after approx. 1 min (or immediately, if parameters are changed).
3.6.4 Disconnection alarm check
• Open patient valve outlet.
Requirement: The disconnection alarm must be activated after two respiration cycles.
3.6.5 Pressure alarm check
•Shut off pressurised gas connection of MEDUMAT Basic / Basic p (2.7 - 6.0 bar).
Requirement: The pressure alarm must be activated.
10 Final Check
3.7 Functional check on frequency setting
Connect respiration tube to 10 mbar orifice and to volumetric flowmeter.
®
MEDUMAT
Basic
O/I
Patient valve with tube system
Volumetric flowmeter |
Orifice 10 mbar |
|
open |
||
|
1.Run MEDUMAT Basic / Basic p in position No Air Mix, Freq. = 16 min-1 and MV = 20 l/min.
Requirement: The measured frequency must be 16 ± 2 min-1.
2.Run MEDUMAT Basic / Basic p in position No Air Mix, Freq. = 10 min-1 and MV = 11 l/min.
Requirement: The measured frequency must be 10 ± 2 min-1 .
3.Run MEDUMAT Basic / Basic p in position No Air Mix, Freq. = 30 min-1 and MV = 3 l/min.
Requirement: The measured frequency must be 30 ± 2 min-1 .
3.8Functional check on tidal volume at 4.5 bar delivery pressure and 10 mbar counterpressure
1.Run MEDUMAT Basic / Basic p in position No Air Mix, Freq. = 16 min-1 and MV = 20 l/min.
Requirement: Tidal volume must be 1250 ± 190 ml. Switch MEDUMAT Basic / Basic p to position Air Mix.
Requirement: Tidal volume must be 1250 ± 190 ml.
2.Run MEDUMAT Basic / Basic p in position No Air Mix, Freq. = 10 min-1 and MV = 11 l/min.
Requirement: Tidal volume must be 1100 ± 170 ml. Switch MEDUMAT Basic / Basic p to position Air Mix.
Requirement: Tidal volume must be 1100 ± 170 ml.
Final Check |
11 |
3.Run MEDUMAT Basic / Basic p in position No Air Mix, Freq. = 30 min-1 and MV = 3 l/min.
Requirement: Tidal volume must be 100 ± 20 ml. Switch MEDUMAT Basic / Basic p to position Air Mix.
Requirement: Tidal volume must be 100 ± 20 ml.
Patient valve with tube system
MEDUMAT
Basic
O/I
Volumetric flowmeter |
Orifice set to |
10 mbar
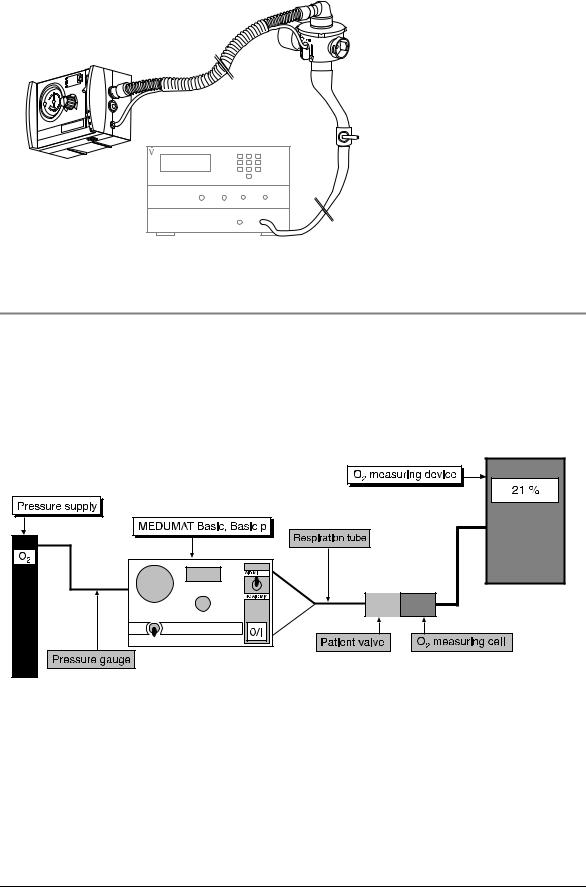
3.9 Checking oxygen concentration
1.Run MEDUMAT Basic / Basic p in position Freq. = 10 min-1 and MV = 11 l/min with 100 % O2.
2.Check O2 concentration in position No Air Mix.
Requirement: The O2 concentration must be greater than 98 %.
3.Check O2 concentration in position Air Mix.
Requirement: The O2 concentration must lie between 50 % and 65 %.
12 Final Check

3.10 Functional check on pressure limit
1.Connect respiration tube to test bag.
2.Set MEDUMAT Basic / Basic p to No Air Mix, Freq. = 11 min-1 and MV = 7 l/min.
3.Applies to MEDUMAT Basic / Basic p Basic p only Set pressure limit to 20 mbar.
Requirement: The pressure limit must respond at 20 ± 5 mbar and trigger the stenosis alarm.
4.Applies to MEDUMAT Basic / Basic p Basic and MEDUMAT Basic / Basic p Basic p
Set pressure limit to 45 mbar.
Requirement: The pressure limit must respond at 45 ± 5 mbar and trigger the stenosis alarm.
3.11 Functional check on exhaust valve without patient valve
1. Run MEDUMAT Basic / Basic p in position f = 10 min-1 and MV = 11 l/min.
2. Connect patient valve to device outlet with expiration outlet closed, without lip diaphragm and with test bag.
Requirement: The test bag is completely inflated in one inspiration stroke. The respiration device can then be heard to exhaust.
3.12 Check the breath volume
See “Check the breath volume” in the description and operating instructions for MEDUMAT.
3.13 Checking equipment and accessories (system components)
•Respiration tube with patient valve undamaged and in working order
•Functional check test set in working order
•Pressure reducer in working order
•O2 cylinder within test deadline; valve in working order
•Portable system complete and in working order
•Medical products book present
•Operating instructions present
Final Check |
13 |

3.14 Checking external condition
•Check external condition of device.
Requirement: No mechanical damage to housing.
Device labels with operating information are legible.
Sealing sleeves are properly seated.
Pressure gauge zero reading is correct.
Connecting thread G3/8 is undamaged and functions smoothly.
All rotary knobs are self-locking against inadvertent readjustment.
3.15 Documentation
•Document points 4. to 13. in the Test Record, along with test date and tester number.
14 Final Check

4. Servicing
N.B.
Always remember to carry out a technical safety check of the ventilator after every repair.
MEDUMAT Basic / Basic p must be serviced regularly.
We recommend having all maintenance work, servicing and repairs carried out either by the manufacturer Weinmann or by a qualified agent expressly authorised by that company.
4.1 Intervals and Scope
Every 2 years:
Every 2 years, you must subject the device (including patient valve and tube system) to a technical safety check and maintenance.
The servicing and inspection may also be carried out by the manufacturer Weinmann.
The following points should be observed:
•Check that the equipment is complete
•Visual check for:
–physical or mechanical damage
–correct markings on controls
–damage to all external hoses
•Replacement of worn components/ compulsory change parts (see “7.2 Maintenance set” on page 49);
•Check of system components: portable system, oxygen supply fittings, secretion suction system, hose connections etc.
•Check test bag.
•Repeat testing of aluminium oxygen bottles WM 1821 and WM 3621 by the Technical Testing Association. The specified testing date is stamped on the shoulder of the bottle.
•Final check in accordance with Test Instructions/ Test Report STK WM 22671 (see „3. Final Check“ on page 8 and see “11. Repair and inspection log” on page 57).
Every 4 years:
•Servicing of the fittings in the oxygen supply system (e.g. pressure reducer) either by the manufacturer or by a qualified agent expressly authorised by him.
Every 10 years:
•Repeat testing of the conventional steel or aluminium oxygen bottles by the Technical Testing Association. The specified testing date is stamped on the shoulder of the bottle.
Servicing 15
4.2 Batteries and fuses
MEDUMAT Basic / Basic p is fitted with two batteries which must always be changed together:
A button cell CR2430 17 supplies the electronics with auxiliary power if the capacity of the main battery 19 is exhausted. This means that an alarm can still be activated in the event of sudden failure of the main battery. The device switches to expiration.
As a general rule, the capacities of the batteries are designed in such a way that under normal usage conditions, they do not need to be changed during the 2-year servicing intervals. Within the context of the prescribed 2-year servicing, the batteries are replaced completely.
We recommend that the batteries be changed only by the manufacturer Weinmann or by authorised specialists explicity authorised by them, since special precautions must be taken to protect the electronics (see “6.6 Changing the batteries” on page 23)).
For information on replacing the fuse, see Section „6.7 Replacing the fuse“ on page 24.
17
18
19
17:Button cell for auxiliary power
18:Fuse to prevent internal short-circuiting
19:Lithium battery 3.6 V for main power to MEDUMAT Basic / Basic p
4.3 Adjusting the pressure gauge
In the idle state, with MEDUMAT Basic / Basic p deactivated and the oxygen cylinder closed, the needle of the pressure gauge must point precisely to “0”.
To adjust the needle, proceed as follows:
1.Carefully lever out the plastic cover of the adjusting screw.
2.Adjust the needle with the adjusting screw using a small screwdriver.
3.Re-insert the plastic cover.
Adjusting screw 


16 Servicing

4.4 Storage
If you are not intending to use MEDUMAT Basic / Basic p for a long period, we recommend the following storage precautions:
1.Clean and disinfect the ventilator (see
“5. Hygienic preparation” of the description and operating instructions for MEDUMAT).
2.Store MEDUMAT Basic / Basic p in a dry place.
Important note!
Remember that the ventilator still requires servicing at the stipulated intervals even when in storage, otherwise it cannot be used when removed from storage.
4.5 Disposal
Do not dispose of the unit with domestic waste. For proper waste disposal of the equipment, please contact an approved and certified waste disposal site for electronic goods. Ask your Environmental Officer or town council for the address.
Servicing 17

5. Troubleshooting
Defect |
Cause of defect |
Elimination |
|
|
|
|
|
|
Battery failure |
Replace both batteries |
|
|
(chap. 6.6, page 23) |
||
|
|
||
|
|
|
|
|
Fuse is defective |
Replace the fuse (chap. 6.7, |
|
|
page 24) |
||
|
|
||
|
|
|
|
MEDUMAT Basic / Basic p |
|
Check plug-in connectors X7 and |
|
Ribbon cable to front membrane |
cable (chap. 6.12, page 29); |
||
Basic, Basic p cannot be |
|||
faulty or not connected |
If necessary replace top of housing |
||
switched on |
|||
|
(chap. 6.18, page 39) |
||
|
|
||
|
|
|
|
|
On/Off switch faulty |
If necessary replace top of housing |
|
|
(chap. 6.18, page 39) |
||
|
|
||
|
|
|
|
|
Circuit board faulty |
Replace circuit board (chap. 6.12, |
|
|
page 29) |
||
|
|
||
|
|
|
|
MEDUMAT Basic / Basic p |
User error |
Keep switch 8 depressed for at least |
|
2 seconds |
|||
Basic, Basic p cannot be |
|
||
|
|
||
|
If necessary replace top of housing |
||
switched off |
On/Off switch 8 faulty |
||
(chap. 6.18, page 39) |
|||
|
|
||
|
|
|
|
|
Pressure gauge hose on |
|
|
MEDUMAT Basic / Basic p |
MEDUMAT Basic / Basic p Basic, |
|
|
Basic, Basic p is functioning |
Basic p or on patient valve slipped |
Check pressure gauge hose |
|
but without any displays |
off |
|
|
|
Kink in pressure gauge hose |
|
|
|
|
|
|
MV too high |
Measured without 10 mbar |
Set to 10 mbar counterpressure |
|
counterpressure |
|||
|
|
||
|
|
|
|
|
Measuring device not calibrated |
Calibrate measuring device |
|
|
|
|
|
MEDUMAT Basic / Basic p |
|
Replace pneumatic block (chap. |
|
|
6.14, page 32) |
||
Basic, Basic p: |
Spindles in pneumatic block out of |
||
or replace pneumatic block with |
|||
MV not correct |
adjustment |
||
angled outlet (chap. 6.15, |
|||
|
|
||
|
|
page 34) |
|
|
|
|
|
|
Inlet pressure > 6 bar |
Adjust system to below 6 bar |
|
|
|
|
|
|
|
Check diaphragms and O-ring, |
|
|
Patient valve not in order |
replace if necessary (Chapter 6.8 of |
|
|
|
Operating Instructions) |
|
|
|
|
|
|
Adjustment knob incorrectly set |
Reset adjustment knob (chap. 6.9, |
|
MEDUMAT Basic / Basic p |
page 25) |
||
|
|||
Basic only: |
|
|
|
Air Mix/No Air Mix switch 4 faulty |
Replace switch (chap. 6.17, |
||
MV not correct |
|||
page 38) |
|||
|
|
||
|
|
|
|
|
|
Replace pneumatic block (chap. |
|
|
|
6.14, page 32) |
|
|
Leak in pneumatic block |
or replace pneumatic block with |
|
|
|
angled outlet (chap. 6.15, |
|
|
|
page 34) |
|
|
|
|
18 Troubleshooting
Loading...