


VTech IP8300 User Manual

Model: ip8300
User’s manual
w w w . v t e c h p h o n e s . c o m

Congratulations
on purchasing your new VTech product.
Before using this telephone, please read the
Important safety instructions
on page 106 of this manual.
This manual has all the feature operations and troubleshooting necessary to install
and operate your new VTech telephone. Please review this manual thoroughly to
ensure proper installation and operation of this innovative and feature rich VTech
product. For support, shopping, and everything new at VTech, visit our website at
www.vtechphones.com. In Canada, go to www.vtechcanada.com.

Table of contents
Before you begin . . . . . . . . . . . . . . . . . . . . 1
Minimum requirements . . . . . . . . . . . . . . . . 1
Parts checklist . . . . . . . . . . . . . . . . . . . . . 2
Installation and conguration . . . . . . . . . . . . . 3
Handset installation . . . . . . . . . . . . . . . . . . 3
Handset charger installation . . . . . . . . . . . . . . 3
Install handset battery . . . . . . . . . . . . . . . . . 4
Charge handset battery . . . . . . . . . . . . . . . . 5
Telephone base installation . . . . . . . . . . . . . . 7
Getting to know the ip8300. . . . . . . . . . . . . . . 9
Telephone base layout . . . . . . . . . . . . . . . . . 9
Base status lights . . . . . . . . . . . . . . . . . . 10
Handset layout . . . . . . . . . . . . . . . . . . . . 11
Handset status icons. . . . . . . . . . . . . . . . . 12
Using the handset . . . . . . . . . . . . . . . . . . 13
Softkeys . . . . . . . . . . . . . . . . . . . . . 13
Basic navigation . . . . . . . . . . . . . . . . . 13
Entering text . . . . . . . . . . . . . . . . . . . 13
Text entry tips . . . . . . . . . . . . . . . . . . 13
Chart of characters . . . . . . . . . . . . . . . . . 14
Chart of symbols . . . . . . . . . . . . . . . . . . . 16
Congure your Yahoo! account . . . . . . . . . . . 16
Access Internet content on the handset . . . . . . 17
Create a user prole . . . . . . . . . . . . . . . . . 17
Access personalized content on the handset . . . 18
Area code setup . . . . . . . . . . . . . . . . . . . . 18
Caller ID operation . . . . . . . . . . . . . . . . . . 19
Caller ID with call waiting . . . . . . . . . . . . . . 19
Telephone operation . . . . . . . . . . . . . . . . . 20
Making calls . . . . . . . . . . . . . . . . . . . . . 20
Receiving calls . . . . . . . . . . . . . . . . . . . . 20
Ending calls . . . . . . . . . . . . . . . . . . . . . 21
Speakerphone operation. . . . . . . . . . . . . . . 21
Mute . . . . . . . . . . . . . . . . . . . . . . . . . 21
Call volume. . . . . . . . . . . . . . . . . . . . . . 21
Redial . . . . . . . . . . . . . . . . . . . . . . . . 22
Service provider voicemail. . . . . . . . . . . . . . 22
Call log . . . . . . . . . . . . . . . . . . . . . . . . 24
Make a call log entry ready to dial . . . . . . . . . . 24
Missed calls . . . . . . . . . . . . . . . . . . . . . 25
Dial a missed call entry . . . . . . . . . . . . . . . 25
Delete a missed call entry . . . . . . . . . . . . . . 26
Delete all missed call entries . . . . . . . . . . . . 26
Save a missed call entry . . . . . . . . . . . . . . . 27
Answered calls . . . . . . . . . . . . . . . . . . . . 28
Dial an answered call entry . . . . . . . . . . . . . 29
Delete an answered call entry . . . . . . . . . . . . 29
Delete all answered call entries . . . . . . . . . . . 30
Save an answered call entry . . . . . . . . . . . . . 31
Dialed calls. . . . . . . . . . . . . . . . . . . . . . 32
Dial a dialed call entry . . . . . . . . . . . . . . . . 32
Delete a dialed call entry. . . . . . . . . . . . . . . 33
Delete all dialed call entries . . . . . . . . . . . . . 33
Ring tones . . . . . . . . . . . . . . . . . . . . . . 34
Play ring tones . . . . . . . . . . . . . . . . . . . . 34
Set ring tone . . . . . . . . . . . . . . . . . . . . . 35
I
www.vtechphones.com

Table of contents
Wallpapers . . . . . . . . . . . . . . . . . . . . . . 36
Phone settings . . . . . . . . . . . . . . . . . . . . 37
Ringer volume . . . . . . . . . . . . . . . . . . . . 37
Keypad tone . . . . . . . . . . . . . . . . . . . . . 38
Color themes. . . . . . . . . . . . . . . . . . . . . 39
Handset name . . . . . . . . . . . . . . . . . . . . 40
Set contrast . . . . . . . . . . . . . . . . . . . . . 40
Reset settings . . . . . . . . . . . . . . . . . . . . 41
Registration settings . . . . . . . . . . . . . . . . . 42
Handset settings . . . . . . . . . . . . . . . . . . . 42
Select a base. . . . . . . . . . . . . . . . . . . . . 42
Register a handset . . . . . . . . . . . . . . . . . . 42
Base settings. . . . . . . . . . . . . . . . . . . . . 44
Change system PIN . . . . . . . . . . . . . . . . . 44
De-register handset . . . . . . . . . . . . . . . . . 45
Area code . . . . . . . . . . . . . . . . . . . . . . 46
Date and time . . . . . . . . . . . . . . . . . . . . 48
Set the time . . . . . . . . . . . . . . . . . . . . . 48
Hide/show the time. . . . . . . . . . . . . . . . . . 49
Set the date . . . . . . . . . . . . . . . . . . . . . 50
Hide/show the date . . . . . . . . . . . . . . . . . 51
Set alarm . . . . . . . . . . . . . . . . . . . . . . . 52
Set alarm volume . . . . . . . . . . . . . . . . . . 53
Set alarm tone . . . . . . . . . . . . . . . . . . . . 54
Change alarm . . . . . . . . . . . . . . . . . . . . 55
Disable alarm . . . . . . . . . . . . . . . . . . . . 56
VIP list . . . . . . . . . . . . . . . . . . . . . . . . 57
Search and dial an entry from the VIP list . . . . . . 57
Info . . . . . . . . . . . . . . . . . . . . . . . . . . . 58
Info menu. . . . . . . . . . . . . . . . . . . . . . . 58
Access the Internet on the handset . . . . . . . . . 58
Accessing basic Internet content . . . . . . . . . . 59
Weather . . . . . . . . . . . . . . . . . . . . . . 59
Channels . . . . . . . . . . . . . . . . . . . . . 60
Yahoo! Local search . . . . . . . . . . . . . . . 61
Call log . . . . . . . . . . . . . . . . . . . . . . 62
Customize proles . . . . . . . . . . . . . . . . . . 62
Phone settings . . . . . . . . . . . . . . . . . . . . 62
Contacts in the info menu . . . . . . . . . . . . . . 63
Add a new entry in the contacts list (VIP list) . . . . 63
Review and dial an entry in contacts (VIP list) . . . 65
Edit an entry in contacts (VIP list) . . . . . . . . . . 66
Delete an entry in contacts (VIP list). . . . . . . . . 67
Activating web access and creating proles . . . . . 68
My settings tab page . . . . . . . . . . . . . . . . . 70
Services tab page . . . . . . . . . . . . . . . . . . 74
Channels tab page . . . . . . . . . . . . . . . . . . 75
Modify the prole settings . . . . . . . . . . . . . . 76
Retrieve ID or password . . . . . . . . . . . . . . . 76
Login to personal info . . . . . . . . . . . . . . . . 77
Username and password . . . . . . . . . . . . . . 77
Personal info menu explained . . . . . . . . . . . . 78
Email . . . . . . . . . . . . . . . . . . . . . . . 78
View a new email . . . . . . . . . . . . . . . . . . 78
Delete a new email. . . . . . . . . . . . . . . . . . 79
Reply to a new email. . . . . . . . . . . . . . . . . 79
www.vtechphones.com
II

Text entry tips . . . . . . . . . . . . . . . . . . . . 80
Yahoo! Messenger (IM) . . . . . . . . . . . . . 81
Choose your IM status . . . . . . . . . . . . . . . . 81
Send out instant messages . . . . . . . . . . . . . 81
Check for received instant messages . . . . . . . . 82
Contacts (Yahoo! Address Book) . . . . . . . . . . 83
Search for a contact . . . . . . . . . . . . . . . . . 83
Edit contact information . . . . . . . . . . . . . . . 84
Add a new entry in the contact list . . . . . . . . . . 85
Intercom calling . . . . . . . . . . . . . . . . . . . 87
Intercom . . . . . . . . . . . . . . . . . . . . . . . 87
Swap internal and external calls . . . . . . . . . . . 88
Answer an incoming call during an intercom call . . 89
Conference call . . . . . . . . . . . . . . . . . . . 89
Handset screen display message . . . . . . . . . . 90
Troubleshooting. . . . . . . . . . . . . . . . . . . . 92
Operating range . . . . . . . . . . . . . . . . . . . .103
Maintenance . . . . . . . . . . . . . . . . . . . . . .103
About cordless telephones . . . . . . . . . . . . .104
Warranty . . . . . . . . . . . . . . . . . . . . . . . .104
Important safety instructions . . . . . . . . . . . .106
FCC, ACTA and IC regulations . . . . . . . . . . . .107
The RBRC® seal . . . . . . . . . . . . . . . . . . .108
Technical specications . . . . . . . . . . . . . . .109
www.vtechphones.com
III

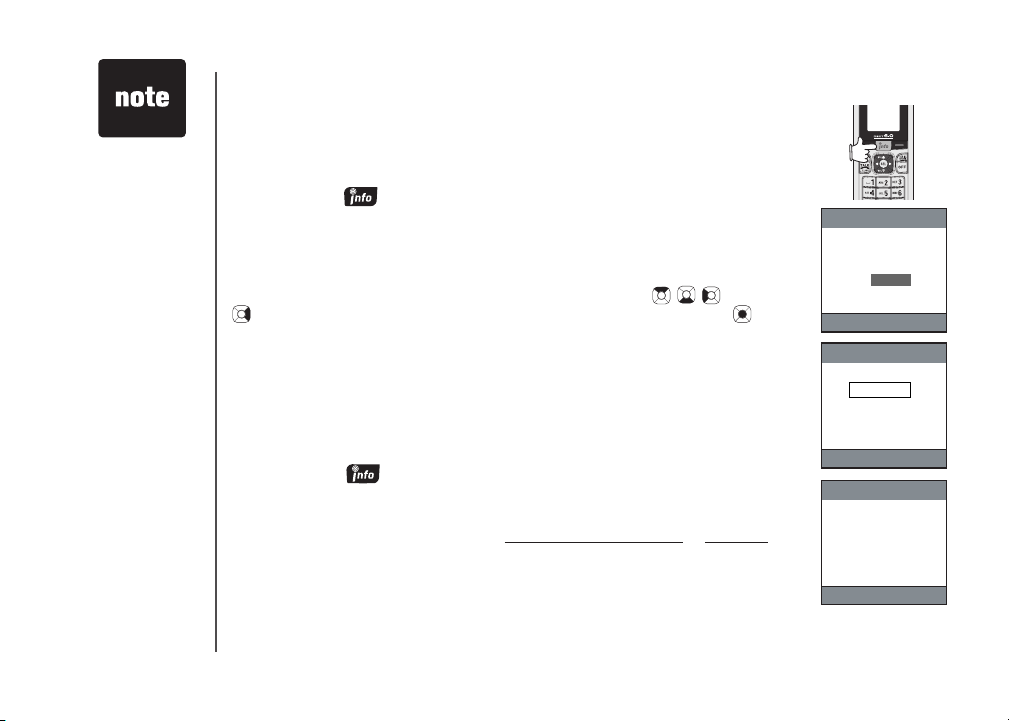
Before you begin
Minimum requirements
Conrm your system meets the following minimum requirements:
Yahoo! email account*
•
PC with an up-to-date web browser
•
Broadband Internet access (cable/DSL)
•
Broadband router with an available LAN port
•
* In order to access email and instant messaging with the ip8300, you must have an account with
Yahoo! Mail service. If you don’t already have a Yahoo! account, you may sign up for a free one at
http://www.yahoo.com.
1
www.vtechphones.com
Before you begin
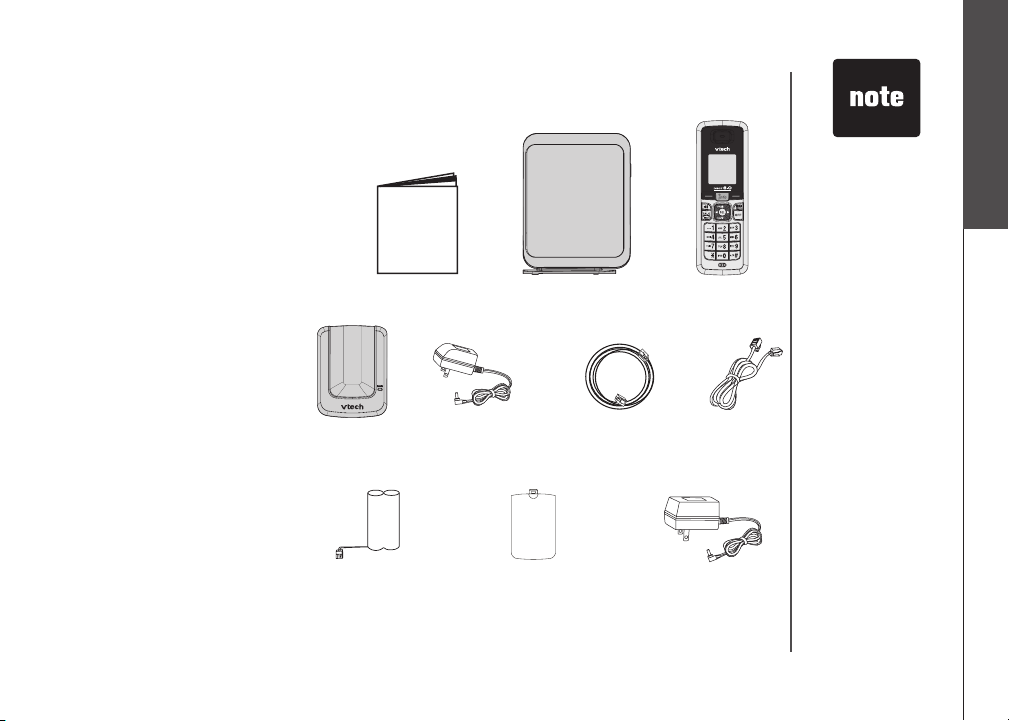
Parts checklist
Check to make sure the
package includes the following:
1. Quick start guide
2. Telephone base
3. Handset
4. Handset charger
5. Handset charger power
adapter
6. Yellow ethernet cable
7. Telephone line cord
8. Battery
9. Battery compartment cover
10. Telephone base power
adapter
Remember to save your sales
receipt and original packaging in
case it is necessary to ship your
telephone for warranty service.
1. Quick start guide
4. Handset
charger
2. Telephone base 3. Handset
5. Handset charger
power adapter
6. Yellow ethernet
cable
7. Telephone
line cord
Before you begin
• To purchase• To purchaseTo purchase
a new battery
pack, visit our
website at www.
vtechphones.
com or call VTech
Communications,
Inc. at 1 (800)
595-9511 in the
United States.
In Canada,
go to www.
vtechcanada.com.
or dial 1 (800)
267-7377.
8. Battery
9. Battery compartment
cover
www.vtechphones.com
10. Telephone base
power adapter
2
Use only the AC
•
power adapter
supplied with this
telephone.
This power
•
adapter is
intended to be
correctly oriented
in a vertical
or oor mount
position.
Installation and conguration
Handset installation
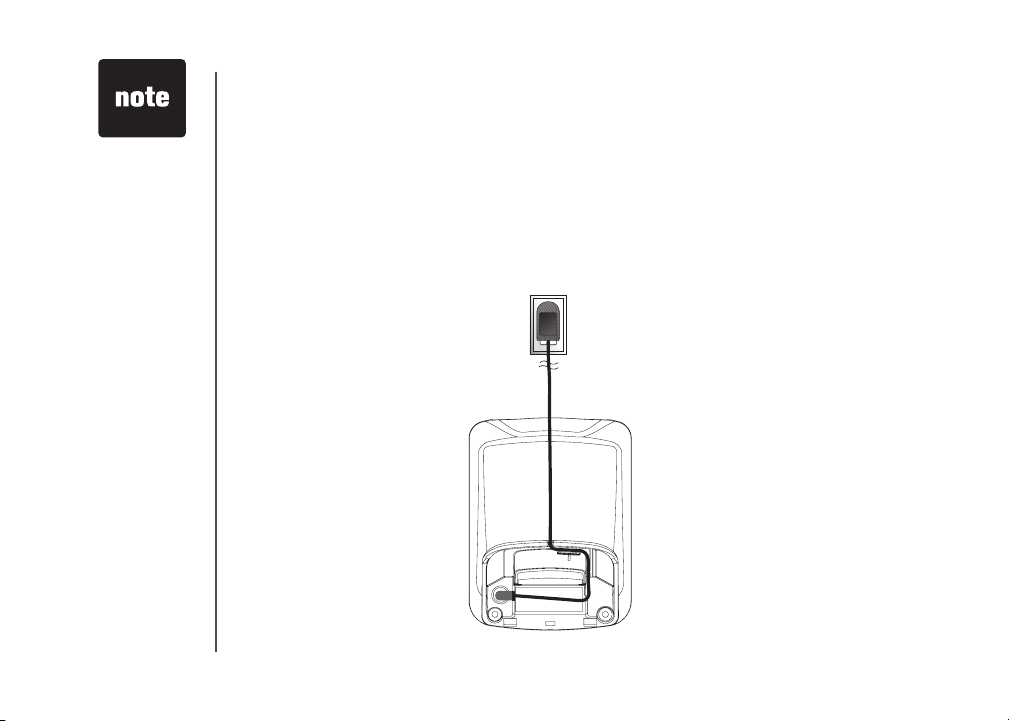
Handset charger installation
Plug the smaller power adapter into the power port on the bottom of the charger. Route the
•
cord through the slots and plug the other end into the electrical outlet as shown below. Make
sure the electrical outlet is not controlled by a wall switch.
The power adapters for the handset charger and the telephone base are different. The power
•
adapter for the handset charger is the smaller adapter.
3
www.vtechphones.com

Installation and conguration
Red
wire
Red
wire
Black
wire
Black
wire
Install handset battery
Step 1: Align the two holes of the battery plug with the socket pins in the handset battery
compartment, matching the red and black wires of the color-coded label.
Step 2: Place the battery in the compartment with the wires in the bottom left corner.
Step 3: Position the battery compartment cover and slide it up until it clicks into place.
Installation and configuration
• To purchase
replacement
batteries,
visit us on the
web at www.
vtechphones.
com or call VTech
Communications,
Inc. at 1 (800)
595-9511.
In Canada,
go to www.
vtechcanada.com
or dial 1 (800)
267-7377.
www.vtechphones.com
4

Installation and conguration
Charge handset battery
After battery installation, there may be enough power for some short calls. For optimal performance,
we recommend that you place the handset in the charger and allow the battery to charge for 16
hours before use. The CHARGE light on the handset charger will be lit to indicate that the handset is
charging. You can keep the battery charged by returning the handset to the charger after each use.
When the battery power is completely depleted, a full recharge takes about 16 hours. If the handset
will not be used for a long period, remove the battery to prevent possible leakage.
After the battery is fully charged, you can expect the following performance:
Operation Operating time
While in use (handset/headset) 7 hours
While in use (Speakerphone) 5 hours
While in use (Internet browsing) 3 hours
While not in use (standby*) 100 hours
* Handset is off the charger but not in use.
# The oper ation time in standby mo de will dec rease to app roximately 50 hours if the keypad is blinking to ind icate you have new
voicemail.
The battery needs charging when:
• A new battery is installed in the handset.
• The battery indicator on the handset display is ashing and empty.
#
5
www.vtechphones.com

Installation and conguration
CAUTION:
To reduce the risk of re or injury to persons, read and follow these instructions:
1. Use only the battery(ies) provided or their equivalent.
2. Do not dispose of the battery(ies) in a re. They may explode. Check local waste management
codes for special disposal instructions.
3. Do not open or mutilate the battery(ies). Released electrolyte is corrosive and may cause burns
or injury to the eyes or skin. The electrolyte may be toxic if swallowed.
4. Exercise care in handling battery(ies) in order not to create a short circuit with conductive materials
such as rings, bracelets, and keys. The battery and/or conductor may overheat and cause
burns.
5. Charge the battery(ies) provided with or identied for use with this product only in accordance with
the instructions and limitations specied in this manual.
WARNING: TO PREVENT FIRE OR SHOCK HAZARD, DO NOT EXPOSE THIS PRODUCT TO
WATER OR ANY TYPE OF MOISTURE.
If you subscribe to high-speed Internet service (Digital Subscriber Line - DSL) through your telephone
lines, you must have a DSL lter between the telephone base and the telephone wall jack. The lter will
prevent noise and caller ID problems caused by DSL interference. Please contact your DSL service
provider for more information about DSL lters.
Installation and configuration
www.vtechphones.com
6
• The power
adapter is
intended to be
correctly oriented
in a vertical
or oor mount
position.
• Use only the
power adapter
provided in this
package; using
any other power
adapter could
damage the
telephone.
7
Telephone base installation
To install the telephone base:
Do NOT plug in the telephone base until you are instructed to do so.
Before connecting the telephone base to the broadband router, make sure the router’s DHCP server
is enabled. Typically, the DHCP server is enabled by default. Refer to your router’s documentation
for details on conguring this feature.
Step 1: Install telephone line
Plug one end of the telephone line cord into the telephone line jack on the back of the telephone
base. Then plug the other end of the cord into a telephone outlet. If you have DSL, you must install
a DSL lter between the telephone line cord and the wall jack. Contact your DSL provider for more
information on DSL lters and telephone line interference.
Step 2: Install ethernet cable
Using the yellow ethernet cable provided, connect one end into the port labeled INTERNET, located on
the back of the telephone base. Connect the other end into an available LAN port on your broadband
router.
Step 3: Turn power on
Plug the telephone base power adapter into the power port located on the back of the ip8300 telephone
base and the other end into an electrical outlet not controlled by a wall switch. This turns the telephone
on. Do NOT interrupt the telephone installation process by unplugging the power adapter or by using
the handsets until the POWER, INFO and INTERNET indicator lights on the front of telephone base
have changed to solid.
Step 4: Check diagnostic lights
The POWER light should be solid indicating the power is on.
•
The INTERNET light should be solid indicating a good physical
•
connection between the telephone base and router.
The INFO light should be solid indicating that the telephone system
•
is able to access data services on the Internet.
www.vtechphones.com
Telephone base installation
If you have problems getting the ip8300 installed properly, rst verify that you have the device physically
installed correctly. Then try rebooting the telephone base by unplugging the power and plugging it
back in after few seconds. Some routers require modications to their rewall settings to allow the
ip8300 to access Internet content. In this case, we recommend that you forward TCP port 5060 to
the IP address of the ip8300, or congure it as the DMZ host. To nd the IP address of the ip8300,
check the DHCP log for your router.
For detailed information on checking DHCP logs, setting up port forwarding, or DMZ host conguration,
refer to your router’s documentation or call the manufacturer for help. If you continue to have problems,
refer to the Troubleshooting section on page 92 for additional information relating to setup.
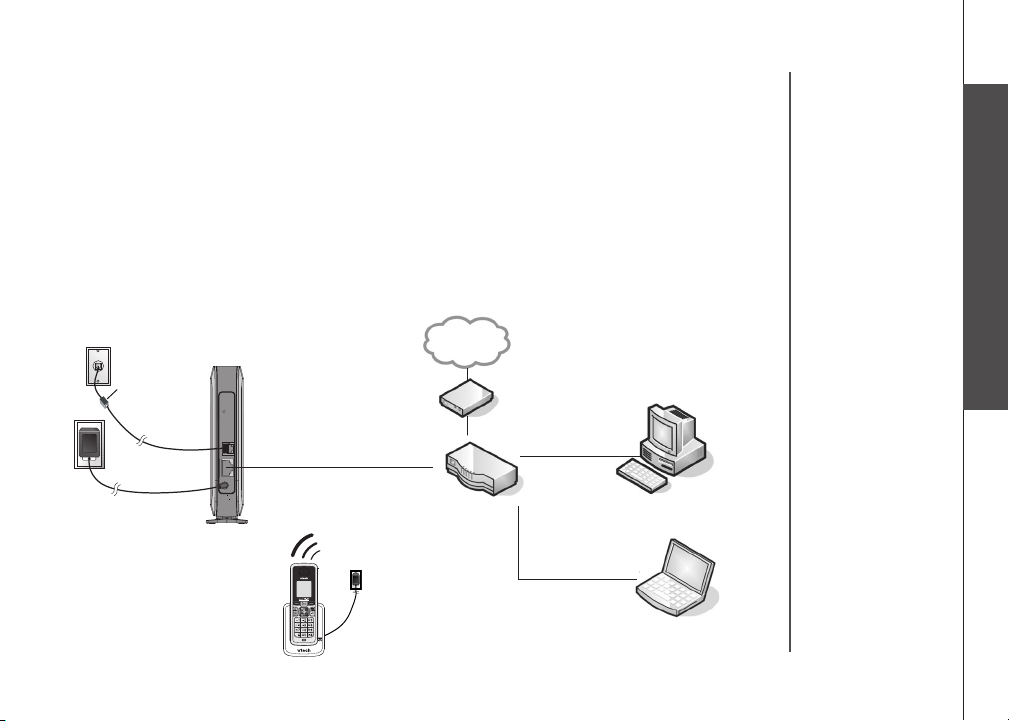
The following diagram illustrates a typical network layout after the ip8300 has been installed.
INTERNET
Telephone base installation
DSL lter
(not included)
TEL.LINE
INTERNET
Telephone base
ip830 0
ip830 0
Handset
Modem
Broadband router
www.vtechphones.com
Computer
Laptop
8

Getting to know the ip8300
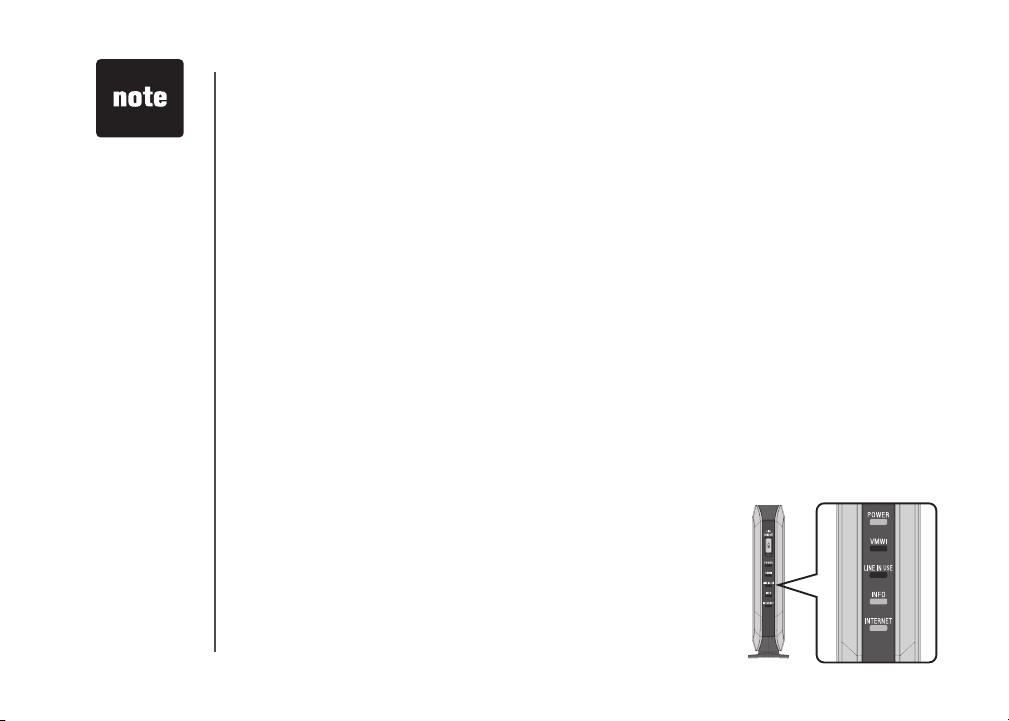
Telephone base layout
1. FIND HANDSET
If yo u mis p la c e a han dse t ,
press this button to make the
handset ring. To stop the ringing,
press OFF on the handset, or
press FIND HAND SET on the
telephone base again.
2. POWER
A steady red light indicates the
base is powered on.
3. VMWI
A blinking orange light indicates
that there are new voic email
messages. If the light is off, there
are no new voicemail messages.
4. LINE IN USE
A blinking orange light indicates
that there is an incoming call. A
steady orange light indicates that
the telephone line is in use. If the
light is off, the telephone line is
not in use.
5. INFO
A blinking orange light indicates that
the telephone has an IP address from
the broadband router, but cannot
communicate with the Internet. A
steady orange light indicates that
the base is communicating with the
Internet and is ready to be used. If
the light is of f, the base has failed
to obtain an IP address from the
router.
6. INTERNET
A steady or ickering orange light
in dic at es the ba se is pr ope rly
connected to the router.
7. RESET
Press the reset button while the
telephone base is powered on to
reboot the system. Press and hold
the reset button for 10 seconds
while the telephone base is powered
on to reset the system PIN to the
default (0000), clear the call history,
and perform a software reboot.
1
2
3
4
5
6
8. TEL LINE JACK
Conn ec t s t o you r h o m e
te le ph one li ne for mak in g
and receiving calls.
9. ETHERNET
Connects to your broadband
router to access the Internet.
10. POWER PORT
Connects to the power adapter
which plugs into an electrical
outlet to provide power to the
base.
7
8
9
10
9
www.vtechphones.com
Getting to know the ip8300
Base status lights
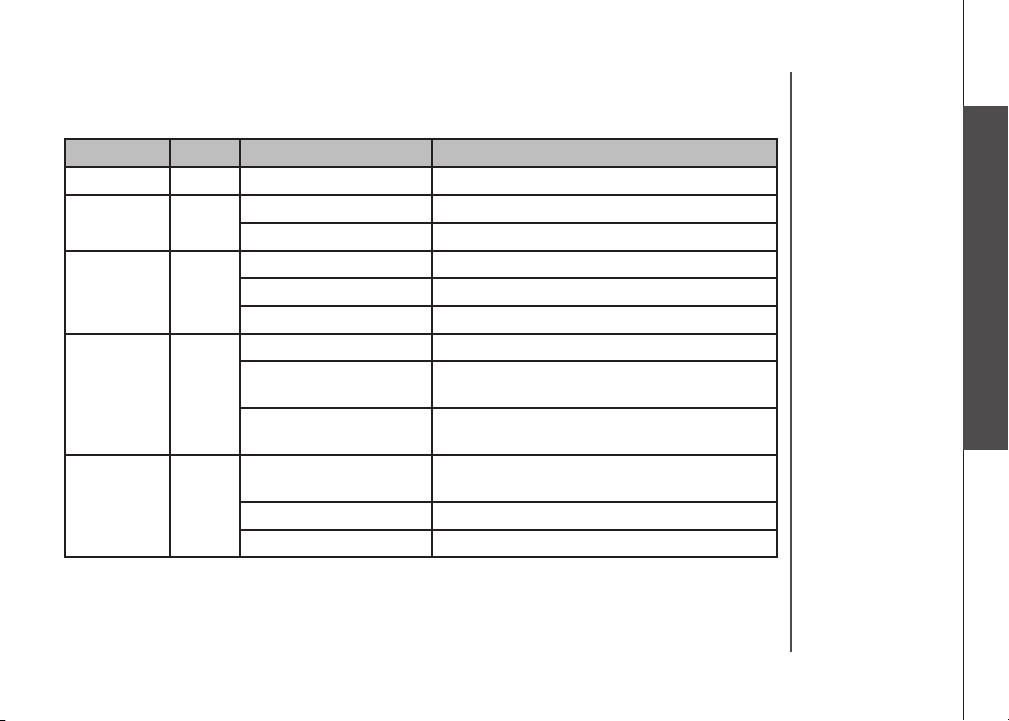
Name Color Indication light status Description
POWER
VMWI
Line in use
Info
Internet
Red Steady on The base is powered on.
Orange
Orange
Orange
Orange
Off There is no new voicemail.
Blinking There is new voicemail.
Off The telephone line is not in use.
Blinking The telephone is ringing.
On steady The telephone line is in use.
Off Unable to obtain an IP address; DHCP failed.
Blinking Obtained an IP address, but unable to register
with server.
On steady Registration successful, the telephone base
is ready to use.
Off The ethernet cable is not connected from the
telephone base to the router.
Flickering Data transmit/receive.
On steady The ethernet cable is properly connected.
Getting to know the ip8300
www.vtechphones.com
10
CENTER
DOWN
UP
LEFT
RIGHT
11
Getting to know the ip8300
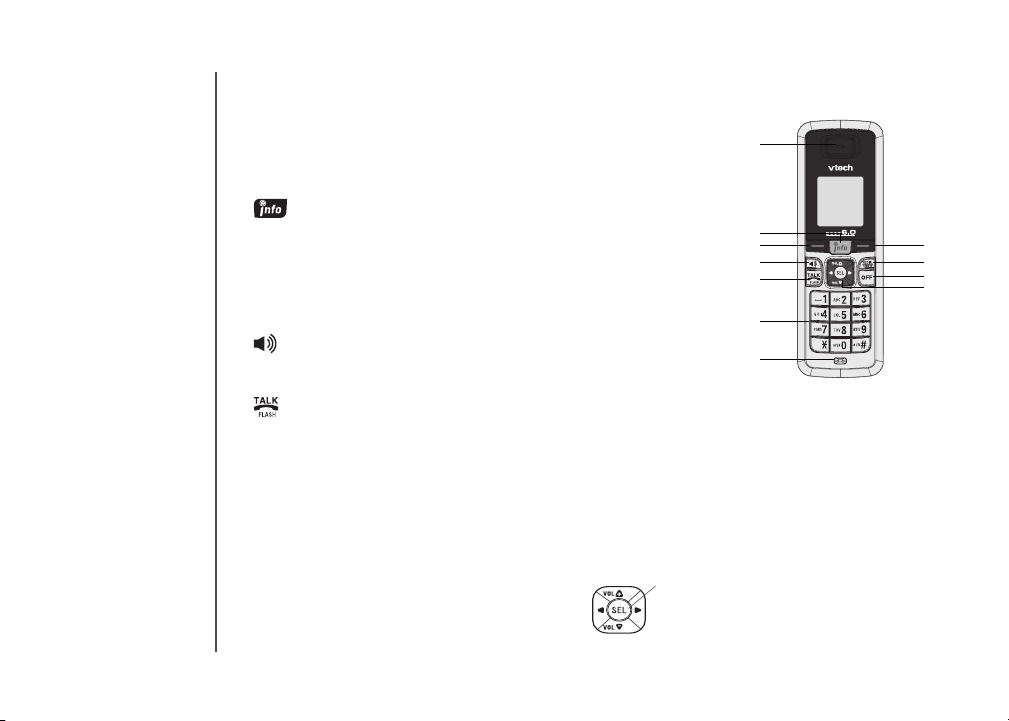
Handset layout
1. Earpiece
Audio output for telephone
calls.
2. (info key)
Press this key to access online
content.
3. Left softkey
Press this key to select the
action shown on the bottom
left of the screen.
4. (speaker)
Press this key to turn the
speakerphone on or off.
5.
Press this key to get a dial
tone. After pre-dialing a
number, press this key to
make a call.
Press this key to answer call
waiting.
6. Keypad
These keys are used for
dialing phone numbers, or
entering text.
7. Microphone
Audio input for telephone
calls.
www.vtechphones.com
8. Right softkey
Press this key to select the
action shown on the bottom right
of the screen.
9. REDIAL/REMOVE
Press this key to bring up a list
of recently dialed numbers, or to
delete characters when entering
text.
10. OFF
Press this key to end a call.
Press this key from any menu
or submenu to return to the idle
screen.
11. NavKey (navigation key)
Use this key for navigating menu
screens and for positioning the
cursor when editing text.
While on a call, press the up
or down NavKey to adjust the
listening volume.
Press the center NavKey/SEL to
select the highlighted item.
1
2
3
4
5
10
11
8
9
6
7
NEW
Getting to know the ip8300
Menu
VIP List
1
NEW
Info Phone
01-01-2007 12:08 PM
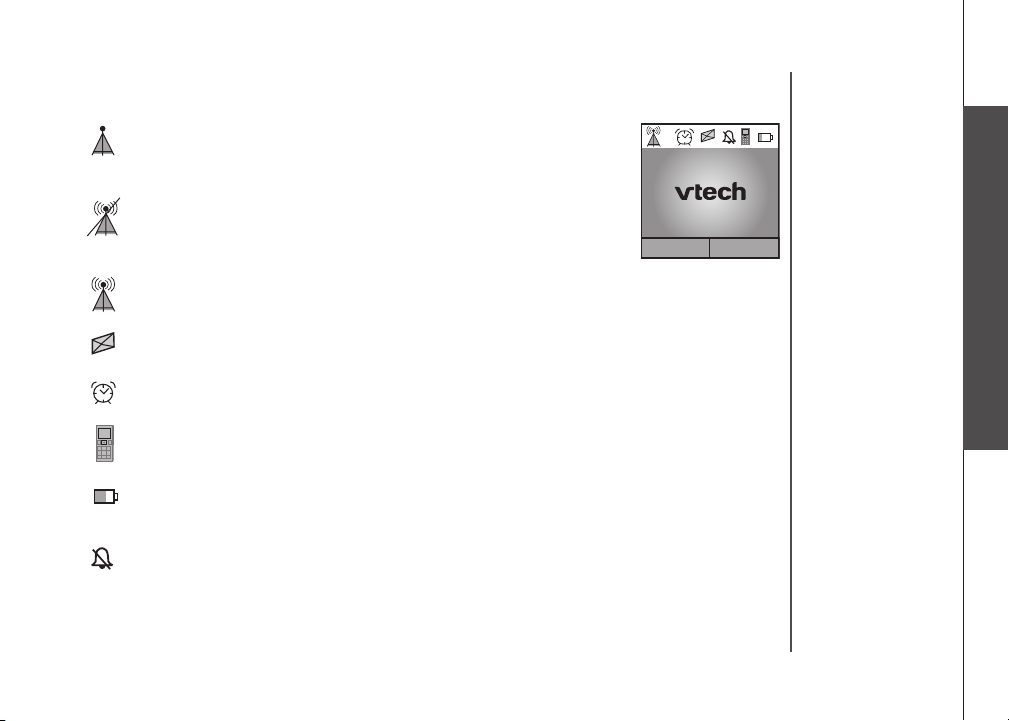
Handset status icons
1.
No connection to the telephone base. Make sure the telephone base
is powered on and the telephone is within its range.
2.
The handset is not registered to a telephone base. See page 42 for
registration instructions.
3.
Handset has signal and is communicating with the telephone base.
4.
There are new voicemail messages.
5.
The handset alarm is set.
6.
The telephone line is in use.
7.
Battery indicator. An animated battery icon is displayed when the
battery is charging.
8.
The ringer volume is set to zero.
Getting to know the ip8300
www.vtechphones.com
12
Getting to know the ip8300
Select
Back
Using the handset
Softkeys
The handset has two softkeys that serve multiple functions. The text shown
above the softkey indicates the current function of the key. If no text is shown,
then the key has no function.
Basic navigation
Use the NavKey (navigation key) to move around the menu screens.
•
Press the center NavKey/SEL/ to select a given option.
•
Return to the idle screen at anytime by pressing OFF.
•
Press to access online content. See the Info section on page 58
•
for more information on the info menu.
Entering text
Use the dial pad to enter characters while in a text entry eld. The rst key
press will display the rst character presented on the key. Pressing the
key repeatedly will cycle through the characters on the key (see Chart of
characters on pages 14-15).
Text entry tips
Pressing the # key in text entry mode alternates between lower case
•
mode, upper case mode, and numeric mode. The upper right corner of
the screen will display which mode is activated.
Pressing the * key in text entry mode will present a chart of different
•
symbols that you can select from. Use the navigation key to scroll though
the options and press the Select softkey to insert the symbol (see Chart
of symbols on page 16).
Press 1 to enter a space. If the # key was used to enable numeric mode,
•
then it will enter a 1.
Press the left or right NavKey or to move the cursor to the right
•
of the character you want to delete and press REDIAL/REMOVE to
13
delete text.
www.vtechphones.com

Getting to know the ip8300
Chart of characters
Use the dial pad and the chart below to enter a text. Each press of a particular key causes characters
to be displayed in the following order:
Lower case:
Keys
1 2 3 4 5 6 7 8 9 10 11 12 13 14 15 16
space
1
2
3 d e f 3
4 g h i 4
5 j k l 5
6 m n o 6
7 p q r s 7
8 t u v 8
9 w x y z 9
0 + & @ / % $ \ _ 0
* Symbol table
# Loop lower case ->upper case ->numeric
1 _ ? ! , . : ; ‘ “ < = > ( )
a b c 2
Character versus number of key presses
Getting to know the ip8300
www.vtechphones.com
14

Getting to know the ip8300
Chart of characters
Upper case:
Keys
1 2 3 4 5 6 7 8 9 10 11 12 13 14 15
space
1
2 A B C 2
3 D E F 3
4 G H I 4
5 J K L 5
6 M N O 6
7 P Q R S 7
8 T U V 8
9 W X Y Z 9
0 + & @ / % $ \ _ 0
* Symbol table
# Swap among lower case, upper case & numeric
1 _ ? ! , . : ; ‘ “ < = >
Character versus number of key presses
16
( )
15
www.vtechphones.com

Getting to know the ip8300
Chart of symbols
Press the * key in text entry mode will present a chart of different symbols as shown in the following
table.
. , ‘ ? ! “ - (
) @ / : _ ; + %
* = < > $ [ ] {
} \ ~ ^ # |
Congure your Yahoo! account
A Yahoo! account is required for accessing email, instant messaging, and your online address book
with the ip8300. If you don’t already have a Yahoo! account, visit http://www.yahoo.com to sign up
for free. Remember your Yahoo! username and password for when you congure your user prole.
Getting to know the ip8300
www.vtechphones.com
16
Account activation in
process.
Please wait.
Welcome to the
ip8300 info phone!
Press Activate to
set up the phone.
Welcome
Activate
Enter your zip code:
Activation
Enter
Your 5 digit zip code is used to
localize the cotent delivered
to the phone
• For more
information on
creating and
personalizing a
prole see page
68.
17
Access Internet content on the handset
After installing the telephone base and cordless handset you will be able
to make and receive standard telephone calls and access basic content
from the Internet. To access basic content from the Internet, complete the
following steps:
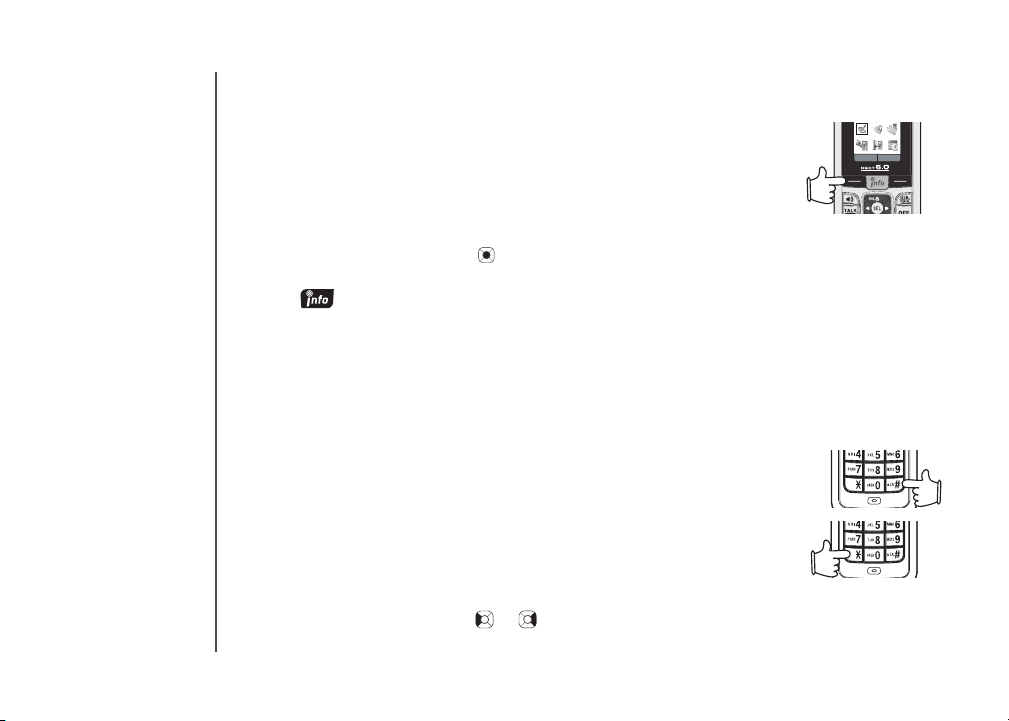
Step 1: Press on the handset while in idle mode to display the welcome
screen.
Step 2: Press the Activate softkey and then enter your zip code. Press the
Enter softkey when you are nished.
After entering your zip code, the info menu will display. The info menu provides
news headlines and weather forecasts for your area. Use the , , and/or
NavKeys to scroll through the menu. Press the center NavKey/SEL/ to
conrm the highlighted item.
Create a user prole
Creating a user prole allows you to access additional content on the handset.
This content includes Yahoo! email, instant messaging, and contact list,
daily horoscope, and sports scores. To personalize the content for your
user prole:
Step 1: Press to display the info menu.
Step 2: Press the Users softkey then press the New softkey.
Step 3: From your computer, open a web browser and navigate to
https://infophone.com. Click Activate a new account or Activate
Step 4: Enter the activation code and then follow the steps on the web
NOTE: The activation code is case sensitive.
You may return to https://infophone.com at any time to modify your prole
settings (see page 76).
on the page.
pages to complete the activation.
www.vtechphones.com

Access personalized content on the handset
After activating your cordless phone and conguring a user prole, you will be able to login and access
your personalized content on the handset. To login to a user prole:
Step 1: From the idle screen, press to display the info menu.
Step 2: Press the Users softkey to display a list of proles congured for the telephone.
Step 3: Press the up or down NavKey or to highlight the prole you want to login to, then press
the center NavKey/SEL/ .
Step 4: Enter the four to eight digit PIN you chose while activating the telephone, then press the
Login softkey. After you’ve logged in, the personalized info menu will be displayed.
Step 5: Use the , , and/or NavKeys to scroll through the menu. Press
the center NavKey/SEL/ to select the highlighted item.
Area code setup
To ensure that phone numbers are dialed correctly from the call log you may need to program your
home area code into the phone. Local area code(s) must be programmed into the phone before
making calls through Yahoo! Address Book or Yahoo! Local Search. Please see pages 46-47 for
instructions.
Access personalized content on the handset
www.vtechphones.com
18

Caller ID operation
Caller ID with call waiting
This product can be used with regular caller ID service, or this product’s other features can be used
without subscribing to either caller ID or combined caller ID with call waiting service. There are fees
for caller ID services, and they may not be available in all areas.
Depending on your service, you may see the caller’s number or the caller’s name and number. This
product can provide information only if both you and the caller are in areas offering caller ID service
and if both telephone companies use compatible equipment. The time and date are sent by the
telephone company along with the call information.
This product has a caller ID function with call waiting feature which works with service from your local
telephone company.
Caller ID with call waiting lets you see the name and telephone number of the caller before answering
the telephone, even when on another call.
It may be necessary to change your telephone service to use this feature. Contact your telephone
company if:
You have both caller ID and call waiting, but as separate services (you may need combined
•
service).
You have only caller ID service, or only call waiting service.
•
You do not have any caller ID or call waiting services.
•
19
www.vtechphones.com
Telephone operation
Answer
Incoming Call
Info Phone 1
Mute
Options
9845098450
00:03:55
Info Phone 1
Menu
VIP list
Line busy
Making calls
To make a standard telephone call, press and then dial the number. If
•
you want to use the speakerphone, press and then dial the number.
For pre-dialing, (preview numbers before dialing) enter the numbers rst.
•
If you make a mistake when dialing, press the left or right NavKey or
to place the cursor to the right of the number you want to delete and
press REDIAL/REMOVE to delete the number.
After entering the number, press or the Call softkey. If you want to use
•
the speakerphone, predial and then press .
While you are on a call, the screen displays the elapsed time of the call (in
hours, minutes and seconds) and the telephone number you dial.
Line Busy will be displayed if you try to make a call when another handset
(e.g. Handset 2) is on a call.
Receiving calls
When the telephone is ringing, press or the Answer softkey to answer
•
the call. Press if you want to answer using the speakerphone.
After you answer the call, the screen displays the elapsed time of the call. If
you subscribe to caller ID service, refer to page 19 for caller ID information.
www.vtechphones.com
• Out of range will
be displayed while
the telephone is
not in the range.
Telephone operation
20

Options
Mute
i
Info
Call summary
02:46:40
Options
Mute
21
Telephone operation
Ending calls
While you are on a call, press OFF to end the call. After a call ends, the call
summary will be displayed, showing the length of the call in hours, minutes
and seconds.
Speakerphone operation
Speakerphone provides you a hands-free option while on a call.
press
to alternate between speakerphone and normal handset use.
Mute
The mute function is used to silence the microphone during a conversation.
You will be able to hear the caller, but the caller will not be able to hear you
until you press the UnMute softkey to resume the conversation. When you
hang up the telephone, the feature will be canceled.
To mute/unmute the microphone:
During a call, press the Mute softkey to mute the microphone and press the
UnMute softkey to resume normal conversation.
Call volume
You can adjust the listening volume from the earpiece or speaker volume
during a call.
While on a call using the handset earpiece or speakerphone, press the up or
down NavKey or to adjust the listening volume for the earpiece or speaker
respectively and a volume bar will be displayed on the screen.
After adjusting of the volume, the volume bar will only be displayed for three
seconds and the volume level will be saved automatically.
www.vtechphones.com
During a call,
Options Mute
Telephone operation
NEW
Registration Settings
Select
Back
Registration Settings
Handset Settings
Base Settings
SelectBack
Select
Back
Redial
The Redial button is a short-cut key for the history of dialed calls. Dialed calls
memory can store up to 10 dialed calls. If there are more than 10 calls, the
oldest entry is deleted to make room for new dialed calls.
Pressing REDIAL/REMOVE on the handset will display the Dialed calls
screen. A list of the last ten numbers called and the time and date of the
calls will be displayed on the screen. The most recent number called will be
highlighted. Press the up or down NavKey or to select the number you
wish to dial and press to make a call. For details, refer to the Dialed calls
section on page 32.
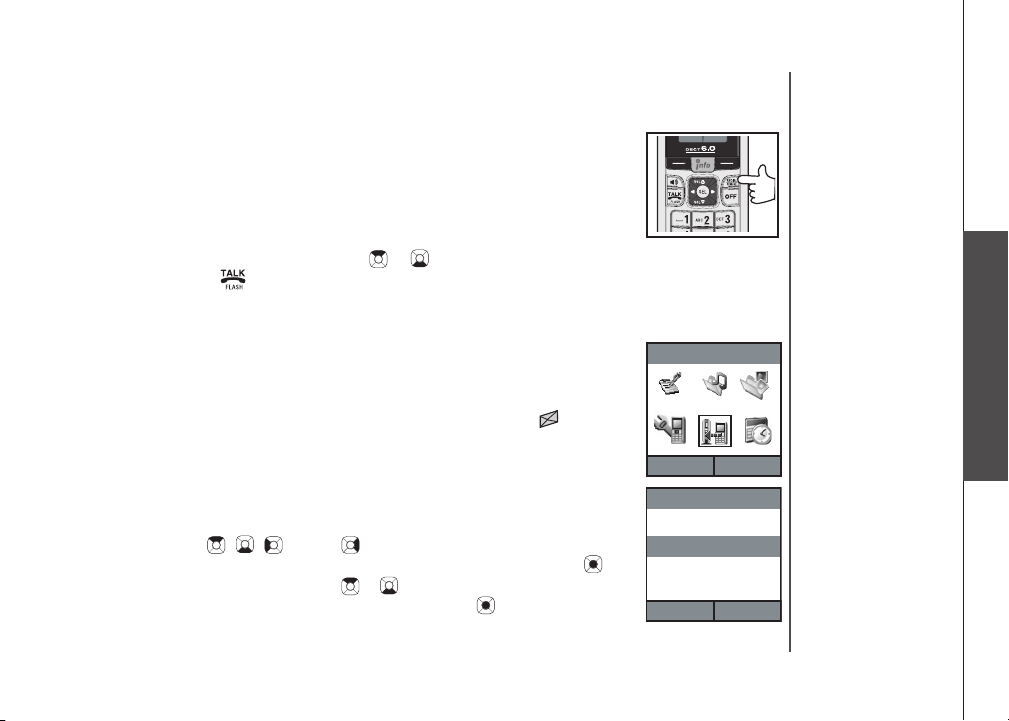
Service provider voicemail
If you subscribe to the voicemail service provided by your local telephone
company, you can receive voicemail left by the caller. When you have a new
voicemail message the VMWI indicator light on the telephone base will blink.
The handset info key and dial pad will also blink. The VMWI icon
displayed on the screen. Please contact your local telephone company for
more information about voicemail service. To manually remove the VMWI
indications:
Step 1: To display the telephone feature menu, press the Menu softkey on
Step 2: Press the , , and/or NavKeys to choose Registration
Step 3: Press the up or down NavKey or to choose Base Settings and
the main idle screen.
Settings, and press the Select softkey or center NavKey/SEL/ .
press the Select softkey or center NavKey/SEL/ .
www.vtechphones.com
Telephone operation
will be
22

Base Setting
Change System PIN
De-register Handset
Clear VMWI
SelectBack
23
Telephone operation
Service provider voicemail
Step 4: Press the up or down NavKey or to choose Clear VMWI and
press the Select softkey or center NavKey/SEL/ .
Step 5: The screen will display Clear VMWI? Press the Yes softkey to
conrm and VMWI cleared will display.
Clearing the VMWI only turns off the indicators; it does not delete the voicemail
message(s). Use this feature when the telephone indicates there is voicemail
when you have none or you have accessed your voice mail from a different
telephone line (while away from home). If there actually is a new voicemail
message, your local telephone company will continue to send the signal which
turns the indicators back on.
www.vtechphones.com

Telephone operation
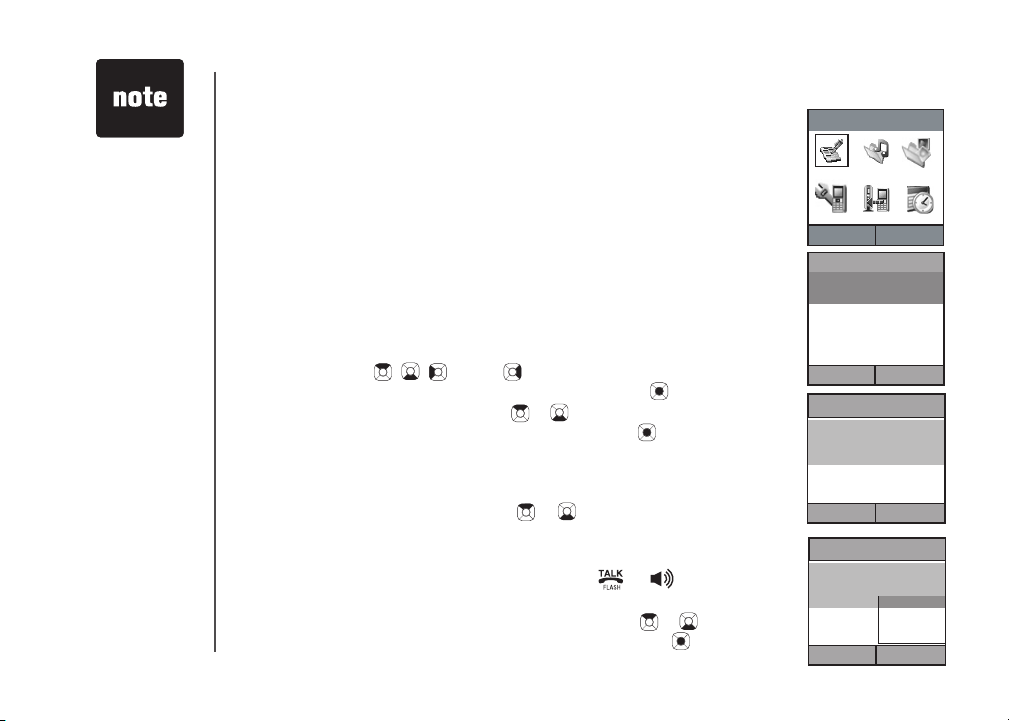
Call log
The ip8300 telephone has three call histories: missed calls, answered calls,
and dialed calls. The missed call and answered call histories can each hold
20 records. The dialed calls history can hold 10 records.
Entries are displayed from the most recent entry to the oldest entry. When
the memory is full, the oldest entry is deleted to make room for new call
information.
If you subscribe to caller ID from your telephone company, then the missed and
answered call log will display more specic information on the caller, such as
their name and telephone number; otherwise, the telephone will only record
the date and time the call comes in. The dialed call log keeps track of the
telephone numbers dialed and the date and time the calls are made.
Make a call log entry ready to dial
Although the call log entries can display 10 digits (area code plus the sevendigit number), in some areas you may need to dial only the seven digits, a 1
plus the seven digits, or a 1 plus the area code plus the seven digits.
While reviewing the call log, press # repeatedly to display these dialing options
before dialing or saving the telephone number in the phonebook. See the
example on the right.
The # feature does not work on the Yahoo! Address Book or Yahoo! Local
Search phone numbers.
800-595-9511
1-800-595-9511
595-9511
1-595-9511
• Press the Back
softkey to return
to the previous
screen.
• Due to regional
service
differences,
caller ID
information
may not be
available for
every incoming
call. In addition,
the callers may
intentionally
block their name
and/or telephone
number.
Telephone operation
www.vtechphones.com
24
• Press the Back
Back
Select
Call Log
Missed calls
Answered calls
Dialed calls
Close Options
Missed calls
Thomas
1-222-333-4444
01/31 00:12
Mike
1-444-555-6666
Back
Select
Missed calls
Thomas
1-222-333-4444
01/31 00:12
Mike
1-444-555-6666
Call
Delete
Save Number
Delete All
Call Log
Select
Back
25
softkey to return
to previous
screen.
Telephone operation
Missed calls
Missed calls are the calls that were not answered (including missed call
waiting records).
If you have unreviewed calls and the handset is not in use, You have new
missed call(s) will be display on the screen. Press the View softkey to
review the missed call list or press the Back softkey to return to the main
idle screen.
You can also review the missed calls list through the telephone feature menu,
to review the missed calls:
Step 1: To display the telephone feature menu, press the Menu softkey on
the main idle screen.
Step 2: Press the , , and/or NavKeys to choose Call Log and
press the Select softkey or center NavKey/SEL/ .
Step 3: Press the up or down NavKey or to choose Missed calls and
press the Select softkey or center NavKey/SEL/ . A list of missed
calls with name, telephone number, date and time will be displayed
if you subscribe to caller ID from your telephone company. No
missed calls will be displayed if there are no missed call entries.
Step 4: Press the up or down NavKey or to review the entries.
Dial a missed call entry
While the entry you want to call is displayed, press , or to dial.
-ORPress the Options softkey. Press the up or down NavKey or to choose
Call then press the Select softkey or center NavKey/SEL/ to dial the
www.vtechphones.com
 Loading...