

Page 1
10
19
28
36
VT-1525 BK
Coffee maker
Кофеварка
3
1
IM VT-1525.indd 1 25.04.2016 15:17:58
Page 2
IM VT-1525.indd 2 25.04.2016 15:17:58
Page 3

E N G L I S H
COFFEE MAKER VT-1525 BK
The coffee maker is intended for making drinks of
ground coffee beans.
DESCRIPTION
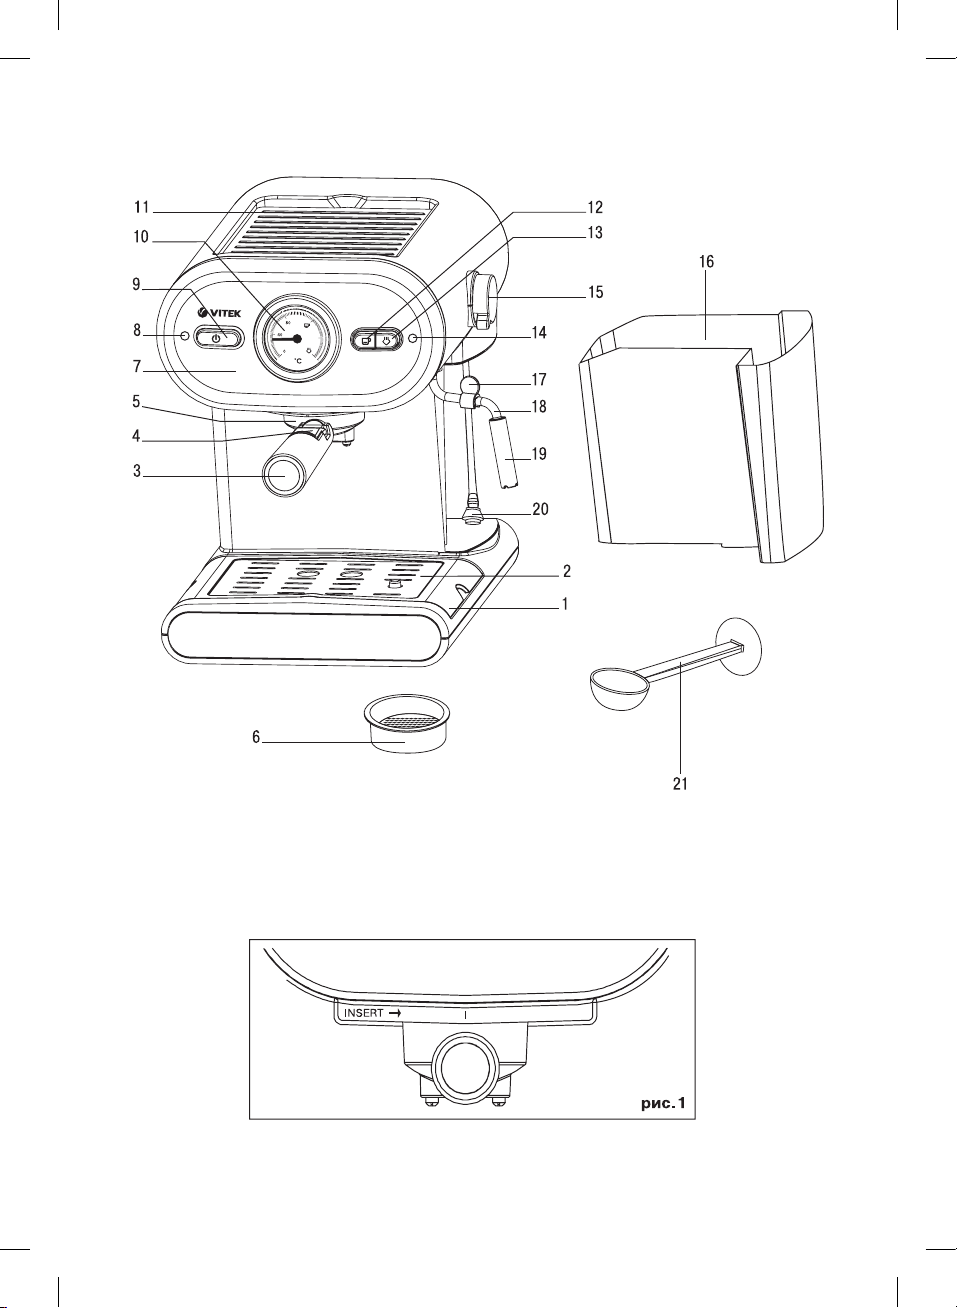
1.
Drip tray
2.
Tray grid
3.
Filter holder handle
4.
Filter clamp
5.
Filter holder
6.
Coffee filter
7.
Control panel
8.
Power indicator
9.
Power ON/OFF button
10.
Thermometer
11.
Cup warming tray
12.
Water supply button
13.
Steam delivery button
14.
Ready indicator
15.
Steam supply control knob
16.
Removable water tank
17.
Cappuccinator handle
18.
Cappuccinator pipe
19.
Cappuccinator pipe tip
20.
Water intake pipe
21.
Measuring spoon with ground coffee tamper
ATTENTION!
For additional protection it is reasonable to
install a residual current device (RCD) with
nominal operation current not exceeding 30 mA
into the mains of the kitchen; to install RCD,
contact a specialist.
SAFETY MEASURES
Read this instruction manual carefully before using
the unit and keep it for the whole operation period.
Use the unit for intended purposes only, as specified in this instruction manual. Mishandling the unit
can lead to its breakage and cause harm to the user
or damage to his/her property.
•
Before switching the coffee maker on for the
first time, make sure that the mains voltage
corresponds to the voltage specified on the
unit body.
•
The power cord is equipped with a «europlug»;
plug it into the socket with a reliable grounding contact.
•
Electric safety of the coffee maker is guaranteed
only if the coffee maker is securely grounded.
•
To avoid fire, do not use adapters for plugging
the unit in.
•
Place the unit on a flat steady surface.
•
Do not use the unit near heat sources or open
flame.
•
Do not use the unit in rooms with high humidity.
•
Do not switch the coffee maker on if the water
tank is empty.
•
Use only the accessories supplied with the unit.
•
Before switching the coffee maker on, make
sure that all removable parts are installed properly.
•
Do not touch hot parts and surfaces of the coffee maker.
•
Do not place the coffee maker on hot surfaces.
•
Be careful to avoid burns by steam or hot water.
•
Do not remove the filter holder or the cappuccinator tip during the coffee maker operation.
•
To avoid fire, electric shock or physical injuries
do not immerse the electric cord, the plug or the
coffee maker body into water or other liquids.
•
To switch the coffee maker off, first press the
ON/OFF button, make sure that the power indicator is off and only after that take the power
plug out of the socket.
•
When unplugging the unit, pull the plug but not
cord.
•
Attention! Remove scale not less than once a
month. Troubles caused by appearance of scale
on the coffee maker parts are not covered by
warranty.
•
Unplug the coffee maker every time before
cleaning and when you are not using it.
•
Let the coffee maker cool down completely
before cleaning it.
•
Do not let the power cord hang from the edge
of the table and touch hot surfaces and sharp
edges of the kitchen furniture.
•
Do not use the coffee maker outdoors.
•
Never leave the coffee maker in places with the
temperature below 0°C.
•
Do not allow children to touch the unit body and
the power cord during the unit operation.
•
Do not leave the operating unit unattended.
Close supervision is necessary when children
or disabled persons are near the operating unit.
•
This unit is not intended for usage by children.
Place the unit out of reach of children during the
operation and cooling down.
•
The unit is not intended for usage by physically or mentally disabled persons (including
children) or by persons lacking experience or
knowledge if they are not under supervision of
a person who is responsible for their safety or
if they are not instructed by this person on the
usage of the unit.
3
IM VT-1525.indd 3 25.04.2016 15:17:59
Page 4

ENGLISH
•
Do not leave children unattended to prevent
using the unit as a toy.
•
For children safety reasons do not leave polyethylene bags, used as packaging, unattended.
Attention! Do not allow children to play with polyethylene bags or packaging film. Danger of suf-
focation!
•
Check the power cord, the power plug and the
unit body integrity periodically.
•
Never use the unit if the power cord or the power
plug is damaged, if the unit works improperly or
after it was dropped or in case of any damages.
•
Do not attempt to repair the unit by yourself.
Do not disassemble the unit by yourself, if any
malfunction is detected or after it was dropped,
unplug the unit and apply to any authorized service center from the contact address list given
in the warranty certificate and on the website
www.vitek.ru.
•
Transport the unit in the original package only.
•
Keep the unit out of reach of children and disabled persons.
THE UNIT IS INTENDED FOR HOUSEHOLD USAGE
ONLY
Control panel and steam supply knob
–
The power ON/OFF button (9) is used for switching the unit on and off. The button is not fixed in
the lower position. To switch the coffee maker
on or off just press the button and release it.
–
The power indicator (8) allows to specify the current state of the unit. When the unit is switched
on, the indicator glows red. If the unit is switched
off, the indicator doesn’t glow.
–
The water supply button (12) has two fixed positions. Press the button to switch the water supply on to make coffee. When the button is not
pressed, the water supply is off.
–
The steam supply button (13) has two fixed
positions as well. When you press the button,
water in the boiler heats up to vapor condition;
such additional heating is used for frothing milk
and warming up drinks. When the button is not
pressed, the additional heating is off.
–
The ready indicator (14) is used to control the
boiler heating temperature when making coffee and to control the additional heating when
frothing milk. After reaching the set heating
temperature the ready indicator (14) lights up
green.
–
The thermometer (10) shows the water/steam
temperature during making drinks.
–
The steam supply knob (15) switches the steam
supply on and allows to control its intensity. For
steam supply and steam supply control slowly
turn the steam supply knob (15) counterclockwise in the direction of the symbol “+”. To switch
the steam supply off turn the knob clockwise
until bumping, in the direction of the symbol “-”.
BEFORE THE FIRST USE
After unit transportation or storage at low temperature keep it for at least three hours at room
temperature before switching on.
Note: There may be water spots in the remov-
able water tank (16). This is normal, as the unit has
undergone factory quality control.
–
Unpack the coffee maker, remove any stickers and package materials that can prevent unit
operation.
–
Check the unit for damages; do not use it in case
of damages.
–
Make sure that operating voltage of the unit corresponds to the voltage of your mains.
–
Before using the coffee maker for the first time
wash all the removable parts, the filter holder
(5), the coffee filter (6), the removable water
tank (16) and the measuring spoon (21) with
warm water and a neutral detergent and then
dry them.
–
Wash the water supply system and the cappuccinator pipe.
Washing the water supply system
•
Make sure that the buttons (12, 13) are not
pressed and the steam supply knob (15) is in the
position “-” (turned clockwise until bumping).
•
Pull the removable water tank (16) from the right
side, disconnect it from the unit and fill with cold
water till the maximal mark «MAX». After that
install the water intake pipe (20) into the tank and
install the removable tank (16) back to its place.
•
Insert the coffee filter (6) into the filter holder (5).
•
Without adding coffee into the filter (6), attach
the filter holder (5) to the coffee maker boiler; to
do this, place the filter holder handle (3) under
the inscription «INSERT» on the coffee maker
body, insert the holder (5) into the boiler and
turn the filter holder handle (3) counterclockwise until bumping (in the direction of the “I”
mark) (pic. 1).
•
Place a suitable bowl (with a capacity of no less
than 250 ml) on the tray grid (2). Make sure that
the steam supply knob (15) is set to the position «-».
4
IM VT-1525.indd 4 25.04.2016 15:17:59
Page 5
E N G L I S H
•
Insert the power plug into the mains socket.
Press the button
(9) to switch the coffee
maker on, the indicator (8) will light up red.
•
Press the button (12) and wait until water
is delivered from the outlet openings of the filter holder (5) and then press the button
(12)
again. It is necessary for water from the removable tank (16) to start filling the boiler.
•
Make sure that the buttons (12, 13) are
not pressed. Wait until the unit starts preheating.
Wait until the ready indicator (14) lights up green.
It means that the preheating is over (the water in
the boiler heated up).
•
Press the button (12), water will start
pouring from the outlet openings of the filter
holder (5).
•
Pour water out for 1 minute and then stop the
water supply by pressing the button
(12). Wait
until water stops pouring from the filter holder (5)
outlet openings and pour it out from the bowl. The
water supply system washing is over.
Washing the cappuccinator pipe
•
After washing the water supply system press
the steam supply button
(13) and wait
until the ready indicator (14) lights up green.
Place a suitable cup under the cappuccinator pipe (18).
•
Switch the steam supply on slowly turning the
knob (15) counterclockwise in the direction of
the symbol “+”.
•
Wait until some water pours from the cappuccinator pipe tip (19), after that steam will go out
more intensively; switch the steam supply off by
setting the steam supply knob (15) to the position “-”.
The water supply system and cappuccinator
pipe washing is over.
Note: When the water supply is switched on for
the first time, a loud sound of the operating pump
and noticeable vibration of the coffee maker body
is possible, but in 20-30 seconds, when the pump
is filled with water, the sound and vibration level will
decrease significantly.
Attention! When switching the steam supply on,
be careful to avoid burns by hot water drops and
hot steam.
Preheat the cups that you want to use as well; to do
this, place them on the tray (11), while water is
heated in the boiler, the tray (11) heats up too, thus
warming the cups.
Preliminary warming
•
Make sure that the buttons (12, 13) are not
pressed and the steam supply knob (15) is in the
position “-”.
•
Before the operation fill the removable water
tank (16) with water. Pull the removable water
tank (16), disconnect it from the unit and fill with
cold water (the water level should be above the
mark «MIN» but should not exceed the mark
«MAX»). After that install the water intake pipe
(20) into the tank and install the removable tank
(16) back to its place.
•
Insert the coffee filter (6) into the filter holder (5).
•
Without adding coffee into the filter (6), attach
the filter holder (5) to the coffee maker boiler; to
do this, place the filter holder handle (3) under
the inscription «INSERT» on the coffee maker
body, insert the holder (5) into the boiler and
turn the filter holder handle (3) counterclockwise until bumping (in the direction of the “I”
mark) (pic. 1).
•
Place a suitable bowl on the tray grid (2). Make
sure that the steam supply control knob (15) is
set to the position «-».
•
Insert the power plug into the mains socket.
Press the button
(9) to switch the coffee
maker on, the indicator (8) will light up red.
Make sure that the buttons
(12, 13) are
not pressed.
•
Press the button (12). Wait until water is delivered from the outlet openings of the filter holder
(5) and then press the button
(12) again. It
is necessary for water from the removable tank
(16) to start filling the boiler.
Note: For making high-quality hot drink always
fill the boiler with water before making drinks.
•
When the ready indicator (14) lights up green,
press the button
(12) and water will start
pouring from the outlet openings of the filter
holder (5).
•
Pour the water out for about 20 seconds and
then press the button
(12). Preheating is over.
MAKING ESPRESSO
Before making coffee it is recommended to warm
the coffee maker, the filter (6) and the filter holder
(5). Preliminary warming is necessary for making
high-quality ready coffee.
Making espresso
•
Make sure that there is enough water in the
removable tank (16), the buttons (12, 13) are not
pressed and the steam supply knob (15) is in the
position “-”.
5
IM VT-1525.indd 5 25.04.2016 15:17:59
Page 6
ENGLISH
It is not necessary to remove the water tank (16)
from the unit to refill it; pull the tank out halfway and
use a suitable container to pour the water in.
•
Remove the filter holder (5) from the coffee
maker boiler by turning the holder handle (3)
clockwise in the direction of the inscription
«INSERT».
•
Put ground coffee in the filter (6) and slightly
tamp it with the back side of the measuring
spoon (21).
•
Attach the filter holder (5) to the coffee maker
boiler; to do this, place the filter holder handle
(3) under the inscription «INSERT» on the coffee maker body, insert the holder (5) into the
boiler and turn the filter holder handle (3) counterclockwise until bumping (in the direction of
the mark «I») (pic. 1).
•
When the ready indicator (14) lights up green,
press the water supply button
(12) and water
will start pouring from the outlet openings of the
filter holder (5). Watch the cup being filled with
ready coffee.
•
After the cup is filled with ready coffee (or if the
coffee color becomes less rich), press the button
•
(12) and switch the water supply off.
After you remove the cup with the coffee, some
water may drip from the filter holder openings.
It is normal. Control the tray (1) filling, periodically pour out the liquid from it and wash the tray
(1) with water.
Attention!
–
Do not remove the filter holder (5) during coffee
maker operation.
Notes:
–
Successive making of coffee should be performed with an at least 5 min interval.
–
Use only clear water for making coffee and keep
the removable water tank (16) clean.
–
Before making coffee wait until the ready indicator (14) lights up green, showing that the
water temperature in the boiler has reached the
required value.
–
During the coffee maker operation the ready
indicator (14) will go out and light up again periodically, indicating the heating element operation. This operation mode keeps the boiler
temperature within the set range.
•
Switch the coffee maker off by pressing the button
•
(9), the indicators (8) and (14) will go out.
Wait until the coffee maker cools down and
remove the filter holder (5).
•
To remove the filter holder (5), turn the handle
(3) in the direction of the inscription «INSERT»
on the coffee maker body and remove the
holder (5).
•
Lift the filter clamp (4) and press it to the holder
(5), holding the filter (6) with it, turn the holder
(5) upside down and remove ground coffee
remnants.
•
Remove the filter (6) from the holder (5) and
wash the filter.
HOW TO MAKE A GOOD ESPRESSO
•
Use fresh ground coffee for “espresso” coffee
makers.
•
Slightly tamp the ground coffee in the filter (6),
you can do it with the back side of the measuring spoon (21).
•
Coffee strength depends on the quality and
grinding degree of coffee beans and on the
water supply time.
•
If coffee is pouring out too long, this means the
coffee powder is too fine or it is tamped too
strongly.
MAKING CAPPUCCINO
Make coffee, as described in the section «MAKING
ESPRESSO», in a cup with enough capacity to add
frothed milk or cream.
Note: The first portion of steam may contain some
water; to obtain dry water steam it is necessary to
release the steam into an appropriate container
during several seconds.
Attention! When switching the steam supply on,
be careful to avoid burns by hot water drops and
hot steam.
•
Make sure that there is enough water in the
removable tank (16) and the steam supply knob
(15) is set to the position «-».
•
Press the button (13) and wait until the ready
indicator (14) lights up green. Place a suitable
cup under the cappuccinator pipe (18).
•
Switch the steam supply on slowly turning the
knob (15) counterclockwise in the direction of
the symbol “+”.
•
Wait until some water pours from the cappuccinator pipe tip (19), after that steam will go out
more intensively; switch the steam supply off by
setting the steam supply knob (15) to the position “-”.
•
Take a narrow high tumbler (preferably a metal
one), and fill it with cold milk or cream approximately by 1/3.
•
Take the cappuccinator handle (17) and draw
the cappuccinator pipe tip (19) into the tumbler,
immersing it into milk by approximately 2 cm,
6
IM VT-1525.indd 6 25.04.2016 15:17:59
Page 7
E N G L I S H
and slowly turn the knob (15) counterclockwise
to adjust the steam supply intensity at your discretion. The tip of the cappuccinator pipe should
not touch the bottom of the tumbler, as this can
prevent the steam release. With certain skill you
can make frothed milk in several seconds.
•
Switch the steam supply off by setting the knob
(15) to the position «-».
•
Clean the cappuccinator pipe (18) and its tip
(19) right after milk or cream frothing - to do this,
put the cappuccinator pipe (18) with the tip into
a glass of water, switch the steam supply on by
setting the steam supply knob (15) to the position «+», and after that switch the steam supply
off by setting the steam supply knob (15) to the
position «-».
•
Switch the coffee maker off by pressing the button (9), the indicators (8 and 14) will go out.
•
Wait until the coffee maker cools down and
detach the tip (19) of the cappuccinator pipe
(18), turning the tip (19) in different directions
and wash (rinse) it under a water jet.
Note: The next time you make coffee, let the coffee maker boiler cool down to required temperature
to avoid the smell of burnt coffee. To do this, follow
the steps below:
–
Switch the additional heating off by pressing the
steam supply button
–
Place a suitable cup (with a capacity of no less
(13).
than 250 ml) on the tray grid (2).
–
Put the tip of the cappuccinator pipe (19) into
the cup.
–
Press the water supply button (12) and switch
the steam supply on by setting the knob (15) to
the position «+». The pump will start running
cold water through the boiler. Water will start
pouring from the outlet openings of the filter
holder (5) and the cappuccinator tip (19). Run
water through the broiler until the ready indicator (14) goes out. You can watch the temperature decrease on the built-in thermometer (10).
–
After that close the water and steam supply,
press the button
(12), set the knob (15) to
the position «-» and wait until the ready indicator (14) lights up green again.
WARMING THE DRINKS
You can warm up your drinks by putting the cappuccinator pipe (18) without the tip (19) into the cup
with the drink.
•
Remove the tip (19) from the cappuccinator
pipe (18).
•
Make sure that there is enough water in the
removable tank (16), the buttons (12, 13) are not
pressed and the steam supply knob (15) is in the
position “-”.
•
Place a suitable bowl on the tray grid (2).
•
Insert the power plug into the mains socket.
Press the button
(9) to switch the coffee
maker on, the indicator (8) will light up red. Press
the button
supply button
•
Wait until water is delivered from the outlet open-
(12). Make sure that the steam
(13) is not pressed.
ings of the filter holder (5), after that stop the water
supply by pressing the button
•
Press the button (13) and wait until the ready
(12) again.
indicator (14) lights up green. It means that the
additional heating of water up to vapor condition is over.
•
Draw the cappuccinator pipe (18) into the cup
with the drink you want to warm up. If you want to
heat up milk, immerse the cappuccinator pipe tip
(18) into milk by approximately 2 cm, and slowly
turn the knob (15) counterclockwise to adjust the
steam supply intensity at your discretion.
•
After heating up the drink set the knob (15) to
the position «-».
•
Switch the coffee maker off by pressing the button (9), the indicators (8 and 14) will go out.
Note: The first portion of steam may contain some
water; to obtain dry water steam it is necessary to
release the steam into an appropriate container
during several seconds.
AUTO SWITCH-OFF FUNCTION
After pressing the button
(9) the coffee maker
will be switched off automatically after 29 minutes
of nonoperation.
After pressing the button
(13) the coffee maker
will be switched off automatically after 29 minutes
of nonoperation.
IMPORTANT:
•
It is important that milk for making milk froth
is fresh and without additives, therefore socalled long storage milk is not suitable for this
purpose.
Take ordinary whole milk with fat content from 4 to
6%, cream fat content should be not less than 10%.
DESCALING
For effective operation of the coffee maker we recommend to remove scale every month and more
often when you use “hard” water.
Regular descaling extends the coffee maker operating life and decreases the hazard of damaging
the unit.
7
IM VT-1525.indd 7 25.04.2016 15:17:59
Page 8
ENGLISH
Untimely descaling, as well as non-observance
of these instructions and mishandling the coffee
maker are not covered by warranty.
•
Prepare a citric acid solution (2 tea spoons per
1 liter of water).
•
Make sure that the buttons (12, 13) are not
pressed and the steam supply knob (15) is in the
position “-”.
•
Place a suitable bowl on the tray grid (2) and
under the cappuccinator pipe (18).
•
Pull the removable water tank (16), disconnect
it from the unit and fill with citric acid solution till
the maximal mark «MAX». After that install the
water intake pipe (20) into the tank and install
the removable tank (16) back to its place.
•
Perform the actions described in the chapter
«Preheating».
1.
Insert the power plug into the mains socket.
Press the button
(9) to switch the coffee
maker on, the indicator (8) will light up red. Press
the button
(12). Make sure that the button
(13) is not pressed. Wait until water is delivered
from the outlet openings of the filter holder (5)
and then stop the water supply by pressing the
button
(12). Wait for some time until the cof-
fee maker heating starts.
2.
Wait until the ready indicator (14) lights up green.
It means that the heating is over. Press the button
(12) and wait until the bowl is filled with
approximately 100 ml of water. Stop the water
supply by pressing the button
(12) and wait
for 5 seconds.
3.
Press the steam supply button (13) and wait
until the ready indicator (14) lights up green.
Switch the steam supply on by setting the
knob (15) to the position «+». Wait for 2 minutes
and switch the steam supply off by setting the
knob (15) to the position «-». Press the button
(9) and leave the coffee maker filled with the
citric acid solution for 15 minutes.
4.
Repeat steps 1-3 at least 3 times.
5.
Press the button (13) (the button is released).
Wait until the ready indicator (14) lights up green.
TROUBLES AND TROUBLESHOOTING
Press the button
(12) and wait until all the
solution is poured out.
6.
Fill the removable tank (16) with clear cold water
and repeat the steps 1-3 no less than 3 times
(there’s no need to wait for 15 minutes as
described in the step 3). Wait until all the water
is in the bowl.
7.
To make sure that the water supply system and
the cappuccinator pipe are clean, repeat the
step 7 at least 3 times.
8.
Switch the coffee maker off by pressing the button (9).
Notes: To remove the scale you can use special descaling agents for coffee makers and coffee machines, strictly following the instructions on
their usage.
CLEANING
•
If during the filter (6) cleaning you find out that
the openings are blocked with ground coffee remnants, you can clean them with a small
brush.
•
Clean the coffee maker body with a soft damp
cloth, and then wipe the unit body dry. Do not
use metal brushes or abrasives.
•
Never immerse the coffee maker body into
water or other liquids.
•
Wash the removable parts of the coffee maker
with warm water and a soft detergent, then rinse
them and dry.
Drip tray
•
Remove the grid (2) from the tray (1) and pour
out water, wash the tray and put it back to its
place, put the grid on the tray.
STORAGE
•
Clean the coffee maker before taking it away for
long storage.
•
Do not store the coffee maker at temperatures
below 0°C.
•
Keep the coffee maker away from children in a
dry cool place.
Problem Cause Solution
The unit can’t be
switched on
No voltage in the mains
socket.
The power plug is not
completely inserted into the
Make sure that the socket is properly
operating.
Check whether the plug is completely
inserted into the socket.
socket.
8
IM VT-1525.indd 8 25.04.2016 15:17:59
Page 9
E N G L I S H
Problem Cause Solution
Water leaks from the
lower part of the unit
Coffee leakage from the
filter holder
Coffee is pouring out
into the cup too long or
is not running at all.
Ready coffee has a
foreign smell
Coffee slops over the
edges of the filter.
Steam doesn’t froth milk Low temperature of outgoing
The water tray is full. Pour out water from the tray.
Untight connection of filter and
boiler gasket, ground coffee got
on the edges of the filter.
The coffee powder is too fine
or it is tamped too strongly in
the filter.
Wrong process of scale removal
in the coffee maker boiler
Improper storage of coffee. Use fresh ground coffee. Keep coffee in
The coffee powder is too fine or
there’s is too much coffee in the
filter, or the coffee in the
filter is tamped too strongly.
steam.
Clean the edges of the filter.
Use ground coffee for espresso coffee
makers.
Experimentally adjust the tamping
degree of coffee in the filter depending
on the coffee grinding degree.
See the sections «Washing the water
supply system» and «Descaling» and
perform the procedures described in
them several times.
a dry cool place.
Use ground coffee for espresso coffee
makers.
Experimentally adjust the tamping
degree of coffee in the filter depending
on the coffee grinding degree.
Do not overfill the filter with coffee.
The vessel is too big or of improper size.
You used skimmed milk.
Froth the milk only after the ready
indicator (14) lights up green.
Use a narrow high container to froth
milk. Use only whole milk with fat
content of 4-6%.
DELIVERY SET
Coffee maker – 1 pc.
Filter holder – 1 pc.
Coffee filter – 1pc.
Measuring spoon – 1 pc.
Instruction manual – 1 pc.
TECHNICAL SPECIFICATIONS
Power supply: 220-240 V ~ 50 Hz
Power consumption: 1100 W
Pressure: 15 bar
Water tank capacity: 1 l – up to the «MAX» mark
The manufacturer reserves the right to change the
specifications of the unit without a preliminary notification.
IM VT-1525.indd 9 25.04.2016 15:18:00
Unit operating life is 3 years
Guarantee
Details regarding guarantee conditions can be obtained from the dealer from whom the appliance
was purchased. The bill of sale or receipt must be
produced when making any claim under the terms
of this guarantee.
This product conforms to the EMCRequirements as laid down by the Council
Directive 2004/108/ЕС and to the Low
Voltage Regulation (2006/95/ЕС)
9
Page 10

DEUTSCH
KAFFEEMASCHINE VT-1525 BK
Die Kaffeemaschine ist für Zubereitung von
Getränken aus gemahlenen Kaffeebohnen
bestimmt.
BESCHREIBUNG
1. Tropfschale
2. Gitter der Tropfschale
3. Griff des Filterhalters
4. Filterhalterung
5. Filterhalter
6. Kaffeefilter
7. Bedienungsplatte
8. Betriebskontrolleuchte
9. Ein-/Ausschalttaste der Stromversorgung
10. Thermometer
11. Aufheizplatte für Tassen
12. Taste der Wasserzufuhr
13. Taste der Dampfzufuhr
14. Betriebsbereitschaftsleuchte
15. Griff des Dampfreglers
16. Abnehmbarer Wasserbehälter
17. Griff des Cappuccinators
18. Cappuccinatore-Rohr
19. Endstück des Cappuccinatore-Rohrs
20. Wassereinlaufrohr
21. Messlöffel mit Presse des gemahlenen
Kaffees
ACHTUNG!
Als zusätzlicher Schutz ist es zweckmäßig,
den FI-Schalter mit Nennstrom maximal bis
30 mA im Stromversorgungskreis der Küche
aufzustellen; wenden Sie sich dafür an einen
Spezialisten.
SICHERHEITSMAßNAHMEN
Vor der ersten Nutzung des Geräts lesen Sie
diese Bedienungsanleitung aufmerksam durch
und bewahren Sie diese für weitere Referenz auf.
Benutzen Sie das Gerät nur bestimmungsmäßig
und laut dieser Bedienungsanleitung. Nicht ordnungsgemäße Nutzung des Geräts kann zu seiner
Störung führen und einen gesundheitlichen oder
materiellen Schaden beim Nutzer hervorrufen.
• Vergewissern Sie sich vor dem ersten
Einschalten der Kaffeemaschine, dass die
Netzspannung und die Spannung des Geräts,
die am Gehäuse des Geräts angegeben ist,
übereinstimmen.
• Das Netzkabel ist mit einem „Eurostecker“
ausgestattet; stecken Sie diesen in die
Steckdose mit sicherer Erdung ein.
• Die elektrische Sicherheit der Kaffeemaschine
wird nur dann gewährleistet, wenn die
Kaffeemaschine richtig geerdet ist.
• Verwenden Sie keine Adapterstecker beim
Anschließen des Geräts ans Stromnetz, um
Brandrisiko zu vermeiden.
• Stellen Sie das Gerät auf einer ebenen stand-
festen Oberfläche auf.
• Benutzen Sie das Gerät in direkter Nähe von
Wärmequellen oder offenem Feuer nicht.
• Es ist nicht gestattet, das Gerät in Räumen mit
erhöhter Luftfeuchtigkeit zu benutzen.
• Schalten Sie die Kaffeemaschine ohne
Wasser nicht ein.
• Benutzen Sie nur das mitgelieferte Zubehör.
• Vor der Einschaltung der Kaffeemaschine ver-
gewissern Sie sich, dass alle abnehmbaren
Teile richtig aufgestellt sind.
• Berühren Sie heiße Teile und Oberflächen der
Kaffeemaschine nicht.
• Es ist nicht gestattet, die Kaffeemaschine auf
heiße Oberflächen zu stellen.
• Seien Sie vorsichtig, um Verbrühungen durch
Dampf oder Heißwasser zu vermeiden.
• Es ist nicht gestattet, den Filterhalter oder das
Endstück des Cappuccinatore-Rohrs während
des Betriebs der Kaffeemaschine abzunehmen.
• Um Brand- und Stromschlagrisiko oder
Verletzungen zu vermeiden, tauchen Sie nie
den Stecker des Netzkabels, das Netzkabel
oder das Gehäuse der Kaffeemaschine ins
Wasser oder andere Flüssigkeiten.
• Um die Kaffeemaschine auszuschalten, drü-
cken Sie zuerst die Ein-/Ausschalttaste,
vergewissern Sie sich, dass die
Betriebskontrolleuchte erloschen ist, erst
danach dürfen Sie den Netzstecker aus der
Steckdose herausziehen.
• Wenn Sie den Netzstecker aus der Steckdose
herausnehmen, ziehen Sie das Kabel nicht,
sondern halten Sie den Stecker.
• Achtung! Entkalken Sie das Gerät nicht selte-
ner als einmal pro Monat. Die Störungen, die
infolge der Kalkbildung an den Bestandteilen
der Kaffeemaschine auftreten, gehören zu
den Garantieverpflichtungen nicht.
• Trennen Sie die Kaffeemaschine vom
Stromnetz vor der Reinigung und wenn Sie
die Kaffeemaschine nicht benutzen immer ab.
• Warten Sie vor der Reinigung ab, bis die
Kaffeemaschine völlig abgekühlt ist.
• Achten Sie darauf, dass das Netzkabel
vom Tisch nicht herabhängt, sowie heiße
10
IM VT-1525.indd 10 25.04.2016 15:18:00
Page 11

D E U T S C H
Oberflächen und scharfe Küchenmöbelkanten
nicht berührt.
• Benutzen Sie die Kaffeemaschine draußen
nicht.
• Lassen Sie die Kaffeemaschine nie an Orten
mit der Temperatur unter 0°C.
• Lassen Sie Kinder das Gerät und das
Netzkabel während des Betriebs des Geräts
nicht berühren.
• Lassen Sie das eingeschaltete Gerät nie unbe-
aufsichtigt. Besondere Vorsichtsmaßnahmen
sind in den Fällen angesagt, wenn sich Kinder
oder behinderte Personen während der
Nutzung des Geräts in der Nähe aufhalten.
• Dieses Gerät ist nicht für Gebrauch von
Kindern geeignet. Während des Betriebs und
des Abkühlens stellen Sie das Gerät an einen
für Kinder unzugänglichen Ort auf.
• Dieses Gerät ist für körper- oder geistesbe-
hinderte Personen (darunter Kinder) oder
Personen ohne ausreichende Erfahrung
und Kenntnisse nicht geeignet, wenn sie
sich unter Aufsicht der Person, die für ihre
Sicherheit verantwortlich ist, nicht befinden oder entsprechende Anweisungen über
die Nutzung des Geräts nicht bekommen
haben.
• Beaufsichtigen Sie Kinder, damit sie das
Gerät als Spielzeug nicht benutzen.
• Aus Kindersicherheitsgründen lassen Sie
Plastiktüten, die als Verpackung verwendet
werden, nie ohne Aufsicht.
Achtung! Lassen Sie Kinder mit Plastiktüten
oder Verpackungsfolien nicht spielen.
Erstickungsgefahr!
• Prüfen Sie periodisch den Zustand des
Netzkabels, des Netzsteckers und des
Gehäuses des Geräts.
• Es ist nicht gestattet, das Gerät zu benutzen,
wenn das Netzkabel oder der Netzstecker
beschädigt sind, wenn das Gerät nicht richtig
funktioniert, heruntergefallen ist oder nach
jeglichen anderen Störungen.
• Es ist nicht gestattet, das Gerät selbständig
zu reparieren. Es ist nicht gestattet, das Gerät
selbständig auseinanderzunehmen, bei
der Feststellung jeglicher Beschädigungen
oder im Sturzfall trennen Sie das Gerät von
der Steckdose ab und wenden Sie sich
an einen autorisierten (bevollmächtigten)
Kundendienst unter den Kontaktadressen,
die im Garantieschein und auf der Website
www.vitek.ru angegeben sind.
• Transportieren Sie das Gerät nur in der
Fabrikverpackung.
• Bewahren Sie das Gerät an einem für Kinder
und behinderte Personen unzugänglichen Ort
auf.
DAS GERÄT IST NUR FÜR DEN GEBRAUCH IM
HAUSHALT GEEIGNET
Bedienungsplatte und Dampfregler
– Die Ein-/Ausschalttaste der Stromversorgung
(9) dient zum Ein-/Ausschalten des Geräts.
Die Taste hat keine Fixation in der niedrigen
Position. Um die Kaffeemaschine einzuschalten oder auszuschalten, ist es genug, die
Taste zu drücken und loszulassen.
– Die Betriebskontrolleuchte (8) lässt den
laufenden Zustand des Geräts bestimmen.
Wenn das Gerät eingeschaltet ist, leuchtet die Betriebsontrolleuchte rot. Wenn
das Gerät ausgeschaltet ist, leuchtet die
Betriebskontrolleuchte nicht.
– Die Taste der Wasserzufuhr (12) hat zwei
fixierte Positionen. Beim Drücken der
Taste schaltet sich die Wasserzufuhr für
die Kaffeezubereitung ein. Wenn die Taste
gedrückt ist, ist die Wasserzufuhr ausgeschaltet.
– Die Taste der Dampfzufuhr (13) hat auch zwei
fixierte Positionen. Beim Drücken der Taste
schaltet sich die zusätzliche Aufwärmung des
Wassers im Boiler bis zum Dampfzustand ein,
wird bei der Zubereitung von Milchschaum
und Erwärmung von Getränken benutzt. Wenn
die Taste nicht gedrückt ist, ist die zusätzliche
Aufwärmung ausgeschaltet.
– Die Betriebsbereitschaftsleuchte (14) dient
zur Kontrolle der Aufwärmungstemperatur
des Boilers der Kaffeemaschine bei der
Zubereitung von Kaffee und zur Kontrolle der
zusätzlichen Aufwärmung bei der Zubereitung
von Milchschaum. Wenn die eingestellte
Aufwärmungstemperatur erreicht wird, leuchtet die Betriebsbereitschaftsleuchte (14)
grün.
– Der Thermometer (10) zeigt die Wasser-/
Dampftemperatur bei der Zubereitung von
Getränken.
– Der Dampfregler (15) schaltet die
Dampfzufuhr ein und lässt ihre Intensität
regeln. Um die Dampfzufuhr einzuschalten und zu regeln, drehen Sie langsam den
Griff des Dampfreglers (15) entgegen dem
11
IM VT-1525.indd 11 25.04.2016 15:18:00
Page 12
DEUTSCH
Uhrzeigersinn in die Richtung des Symbols
«+». Um die Dampfzufuhr auszuschalten, drehen Sie den Griff des Dampfreglers
im Uhrzeigersinn bis zum Anschlag in die
Richtung des Symbols «-».
VOR DER ERSTEN NUTZUNG
Falls das Gerät bei niedrigen Temperaturen
transportiert oder aufbewahrt wurde, lassen Sie es bei der Raumlufttemperatur nicht
weniger als drei Stunden bleiben.
Anmerkung: Es können Wirkungsspuren des
Wassers im abnehmbaren Behälter (16) vorhanden sein. Es ist normal, weil das Gerät durch
betriebliche Qualitätskontrolle geprüft wurde.
– Nehmen Sie die Kaffeemaschine aus der
Verpackung heraus, entfernen Sie alle
Verpackungsmaterialien und jegliche
Aufkleber, die den Gerätebetrieb stören.
– Prüfen Sie die Ganzheit des Geräts, wenn das
Gerät beschädigt ist, benutzen Sie es nicht.
– Vergewissern Sie sich, dass die
Betriebsspannung des Geräts und die
Netzspannung übereinstimmen.
– Vor der ersten Nutzung der Kaffeemaschine
waschen Sie alle abnehmbaren Teile, den
Filterhalter (5), den Kaffeefilter (6), den
abnehmbaren Wasserbehälter (16) und den
Messlöffel (21) mit Warmwasser und neutralem Waschmittel und trocknen Sie sie ab.
– Spülen Sie das Wasserzufuhrsystem und das
Cappuccinatore-Rohr.
Spülung des Wasserzufuhrsystems
• Vergewissern Sie sich, dass die Tasten (12,
13) nicht gedrückt sind, und dass sich der
Griff des Dampfreglers (15) in der Position «-»
(im Uhrzeigesinn bis zum Anschlag gedreht
ist) befindet.
• Ziehen Sie den abnehmbaren Wasserbehälter
(16) von der rechten Seite, trennen Sie ihn
vom Gerät ab und füllen Sie ihn mit Kaltwasser
bis zur Wasserstandsmarke «MAX» auf.
Danach legen Sie darin das Wassereinlaufrohr
(20) ein und stellen Sie den abnehmbaren
Behälter (16) zurück auf.
• Setzen Sie den Kaffeefilter (6) in den
Filterhalter (5) ein.
• Ohne Kaffee ins Filter (6) einzuschütten,
schließen Sie den Filterhalter (5) an den Boiler
der Kaffeemaschine an, stellen Sie dafür den
Griff des Filterhalters (3) unter die Aufschrift
«INSERT» (EINSETZEN) am Gehäuse der
Kaffeemaschine auf, setzen Sie den Halter (5)
in den Boiler ein und drehen Sie den Griff des
Filterhalters (3) entgegen dem Uhrzeigersinn
bis zum Einrasten (in die Richtung der Marke
«I») (Abb. 1).
• Stellen Sie einen passenden Behälter (mit
Fassungsvermögen von nicht weniger als
250 ml) auf das Gitter der Tropfschale (2)
auf. Vergewissern Sie sich, dass sich der
Dampfregler (15) in der Position «-» befindet.
• Stecken Sie den Netzstecker in die Steckdose
ein. Schalten Sie die Kaffeemaschine durch
das Drücken der Taste
(9) ein, dabei leuch-
tet die Betriebskontrolleuchte (8) rot.
• Drücken Sie die Taste (12) und nach der
Wasserzufuhr aus den Austrittsöffnungen
des Filterhalters (5) drücken Sie nochmal die
Taste
(12). Es ist notwendig, damit Wasser
aus dem abnehmbaren Wasserbehälter (16)
in den Boiler einzutreten anfängt und ihn einfüllt .
• Vergewissern Sie sich, dass die Tasten
(12, 13) nicht gedrückt sind. Warten
Sie einige Zeit ab, das Gerät fängt die vorzeitige Aufwärmung an. Warten Sie ab, bis
die Betriebsbereitschaftsleuchte (14) grün
leuchtet. Das bedeutet, dass die vorzeitige
Aufwärmung beendet ist (das Wasser im
Boiler aufgewärmt ist).
• Drücken Sie nochmal die Taste der
Wasserzufuhr
(12), das Wasser beginnt
aus den Austrittsöffnungen des Filterhalters
(5) auszufließen.
• Gießen Sie Wasser ungefähr eine Minute lang
ab, dann schalten Sie die Wasserzufuhr aus,
indem Sie die Taste
(12) drücken. Warten
Sie ab, bis Wasser aus den Austrittsöffnungen
des Filterhalters (5) auszugießen aufhört, und
gießen Sie das Wasser aus dem Behälter.
Spülung des Wasserzufuhrsystems ist beendet.
Spülung des Cappuccinatore-Rohrs
• Nach der Spülung des Wasserzufuhrsystems
(13) warten Sie ab, bis die Betriebsbereitschaftsleuchte (14) grün leuchtet. Stellen
Sie einen passenden Behälter unter das
Cappuccinatore-Rohr (18).
• Schalten Sie die Dampfzufuhr ein, indem Sie
den Griff (15) entgegen dem Uhrzeigesinn in
die Richtung des Symbols «+» langsam drehen.
• Warten Sie ab, bis eine kleine Menge Wasser
aus dem Endstück des Cappuccinatore-
12
IM VT-1525.indd 12 25.04.2016 15:18:00
Page 13
D E U T S C H
Rohrs (19) ausfließt, danach beginnt der
Dampf intensiver auszutreten, schalten Sie
die Dampfzufuhr aus, indem Sie den Griff des
Dampfreglers (15) in die Position «-» drehen.
Die Spülung des Wasserzufuhrsystems und
des Cappuccinatore-Rohrs ist beendet.
Anmerkung: Beim ersten Einschalten der
Wasserzufuhr sind lautes Geräusch von der funktionierenden Pumpe und merkliche Vibration des
Gehäuses der Kaffeemaschine möglich, aber
nach 20-30 Sekunden, wenn die Pumpe mit
Wasser gefüllt wird, reduziert sich das Vibrationsund Geräuschniveau.
Achtung! Beim Einschalten der Dampfzufuhr
seien Sie vorsichtig, um Verbrühungen durch
Heißwassertropfen und heißen Dampf zu vermeiden.
ESPRESSOZUBEREITUNG
Vor der Kaffeezubereitung ist es empfohlen,
die Kaffeemaschine, den Filter (6) und den
Filterhalter (5) vorher durchzuwärmen. Die vorzeitige Durchwärmung ist fürs Erhalten des
hochwertigen fertigen Kaffees notwendig.
Die benutzten Tassen sollen auch vorher durchgewärmt werden, stellen Sie dafür diese auf die
Aufheizplatte (11), während der Erwärmung des
Wassers im Boiler der Kaffeemaschine erwärmt
sich auch die Aufheizplatte (11), indem sie die
Tassen dabei erwärmt.
Vorzeitige Durchwärmung
• Vergewissern Sie sich, dass die Tasten (12,
13) nicht gedrückt sind, und dass sich der
Griff des Dampfreglers (15) in der Position
«-» befindet.
• Vor der Nutzung gießen Sie Wasser in den
abnehmbaren Wasserbehälter (16) ein.
Ziehen Sie den abnehmbaren Wasserbehälter
(16), trennen Sie ihn vom Gerät ab und füllen
Sie ihn mit Kaltwasser auf (der Wasserstand
soll über der Wasserstandsmarke «MIN»,
aber nicht über der Wasserstandsmarke
«MAX» liegen). Danach legen Sie darin das
Wassereinlaufrohr (20) ein und stellen Sie den
abnehmbaren Behälter (16) zurück auf.
• Setzen Sie den Kaffeefilter (6) in den
Filterhalter (5) ein.
• Ohne Kaffee ins Filter (6) einzuschütten,
schließen Sie den Filterhalter (5) an den Boiler
der Kaffeemaschine an, stellen Sie dafür den
Griff des Filterhalters (3) unter die Aufschrift
«INSERT» (EINSETZEN) am Gehäuse der
Kaffeemaschine auf, setzen Sie den Halter (5)
in den Boiler ein und drehen Sie den Griff des
Filterhalters (3) entgegen dem Uhrzeigersinn
bis zum Einrasten (in die Richtung der Marke
«I») (Abb. 1).
• Stellen Sie einen passenden Behälter aufs
Gitter der Tropfschale (2). Vergewissern Sie
sich, dass sich der Griff des Dampfreglers
(15) in der Position «-» befindet.
• Stecken Sie den Netzstecker in die Steckdose
ein. Schalten Sie die Kaffeemaschine durch
das Drücken der Taste
(9) ein, dabei
leuchtet die Betriebskontrolleuchte (8)
rot. Vergewissern Sie sich, dass die Tasten
(12, 13) nicht gedrückt sind.
• Drücken Sie die Taste (12). Nach der
Wasserzufuhr aus den Austrittsöffnungen des
Filterhalters (5) drücken Sie nochmal die Taste
(12). Es ist notwendig, damit Wasser aus
dem abnehmbaren Wasserbehälter (16) in den
Boiler einzutreten anfängt und ihn einfüllt .
Anmerkung: Um ein hochwertiges heißes
Getränk zu erhalten, füllen Sie den Boiler mit
Wasser vor der Zubereitung.
• Wenn die Betriebsbereitschaftsleuchte
(14) grün leuchtet, drücken Sie die Taste
(12), das Wasser fängt an, aus den
Austrittsöffnungen des Filterhalters (5) auszutreten.
• Gießen Sie Wasser ungefähr 20 Sekunden
lang ab, dann drücken Sie die Taste
Vorzeitige Aufwärmung ist beendet.
Espressozubereitung
• Vergewissern Sie sich, dass es im abnehmba-
ren Behälter (16) genug Wasser gibt, dass die
Tasten (12, 13) nicht gedrückt sind, und dass
sich der Griff des Dampfreglers (15) in der
Position «-» befindet.
Zum Wassernachfüllen können Sie den abnehmbaren Wasserbehälter (16) aus dem Gerät nicht
herausnehmen, sondern ihn bis zur Mitte ausschieben, dabei können Sie einen passenden
Behälter zum Wassernachfüllen benutzen.
• Trennen Sie den Filterhalter (5) vom Boiler der
Kaffeemaschine ab, indem Sie den Griff des
Halters (3) im Uhrzeigesinn in die Richtung
der Aufschrift «INSERT» drehen.
• Schütteln Sie den gemahlenen Kaffee in den
Filter (6) ein und stampfen Sie ihn leicht mit
der Rückseite des Messlöffels (21).
• Schließen Sie den Filterhalter (5) an den
Boiler der Kaffeemaschine an, stellen Sie
13
(12).
IM VT-1525.indd 13 25.04.2016 15:18:00
Page 14
DEUTSCH
dafür den Griff des Filterhalters (3) unter
die Aufschrift «INSERT» am Gehäuse der
Kaffeemaschine auf, setzen Sie den Halter (5)
in den Boiler ein und drehen Sie den Griff des
Filterhalters (3) entgegen dem Uhrzeigersinn
bis zum Einrasten (in die Richtung der Marke
«I») (Abb. 1).
• Wenn die Betriebsbereitschaftsleuchte (14)
grün leuchtet, drücken Sie die Taste der
Wasserzufuhr
(12), das Wasser fängt an,
aus den Austrittsöffnungen des Filterhalters
(5) auszutreten. Überwachen Sie den Prozess
der Auffüllung der Tasse mit fertigem Kaffee.
• Nach dem Auffüllen der Tasse mit zube-
reitetem Kaffee (oder bei Änderung der
Kaffeefarbe auf weniger gesättigte) drücken Sie die Taste
(12), indem Sie die
Wasserzufuhr ausschalten.
• Nach dem Abnehmen der Tasse mit zube-
reitetem Kaffee können Tropfen aus den
Öffnungen des Filterhalters ausfließen, es
ist normal. Beachten Sie die Auffüllung der
Tropfschale (1), gießen Sie die Flüssigkeit
daraus von Zeit zu Zeit ab und waschen Sie die
Tropfschale (1) mit Wasser ab.
Achtung!
– Es ist nicht gestattet, den Filterhalter (5) wäh-
rend des Betriebs der Kaffeemaschine abzunehmen.
Anmerkungen:
– Führen Sie nachfolgende Kaffeezubereitung
nach einer Pause von nicht weniger als
5 Minuten durch.
– Für die Kaffeezubereitung benutzen Sie nur
reines Wasser und prüfen Sie immer, ob der
abnehmbare Wasserbehälter (16) sauber ist.
– Vor der Kaffeezubereitung warten Sie
ab, bis die Betriebsbereitschaftsleuchte
(14) grün leuchtet, die zeigt, dass die
Wassertemperatur im Boiler den eingestellten Wert erreicht hat.
– Während des Betriebs wird die
Betriebsbereitschaftsleuchte (14) periodisch
erlöschen und wieder aufleuchten, was vom
Betrieb des Heizelements zeugt. Solcher
Betrieb gewährleistet die Unterhaltung der
Boilertemperatur im eingestellten Bereich.
• Schalten Sie die Kaffeemaschine aus, indem
Sie die Taste
(9) drücken, dabei erlöschen
die Betriebskontrolleuchten (8) und (14).
• Warten Sie ab, bis die Kaffeemaschine abge-
kühlt ist, und nehmen Sie den Filterhalter (5)
ab.
• Um den Filterhalter (5) abzunehmen, drehen
Sie den Griff (3) in die Richtung der Aufschrift
«INSERT» am Gehäuse der Kaffeemaschine
und nehmen Sie den Filterhalter (5) ab.
• Heben Sie die Filterhalterung (4) an und pres-
sen Sie sie an den Halter (5), und, indem Sie
den Filter (6) mit der Filterhalterung festhalten, kippen Sie den Halter (5) und entfernen
Sie die Reste des gemahlenen Kaffees.
• Nehmen Sie den Filter (6) aus dem Halter (5)
heraus und waschen Sie den Filter ab.
HINWEISE FÜR LECKEREN ESPRESSO
• Benutzen Sie frischgemahlenen Kaffee, der
für Kaffeemaschinen «Espresso» geeignet ist.
• Stampfen Sie leicht den gemahlenen Kaffee
im Filter (6) mit der Rückseite des Messlöffels
(21).
• Die Stärke des gekochten Kaffee hängt
von der Qualität und dem Mahlgrad der
Kaffeebohnen, sowie von der zeit der
Wasserzufuhr ab.
• Wenn der Kaffee zu lange eingegossen wird,
bedeutet das, dass der Kaffee zu fein gemahlen oder zu stark gestampft ist.
ZUBEREITUNG VON CAPUCCINO
Kochen Sie Kaffee, wie es im Abschnitt
“ZUBEREITUNG VON ESPRESSO” geschrieben ist, in der Tasse, deren Umfang fürs Zugeben
des Milch- oder Sahnenschaums hinreichend ist.
Anmerkung: Erste Dampfportion kann eine
kleine Menge Wasser enthalten, deshalb müssen
Sie den Dampf innerhalb von einigen Sekunden
in einen passenden Behälter austreten lassen,
um trockenen Wasserdampf zu erhalten.
Achtung! Beim Einschalten der Dampfzufuhr
seien Sie vorsichtig, um Verbrühungen durch
Heißwassertropfen und heißen Dampf zu vermeiden.
• Vergewissern Sie sich, dass es im abnehm-
baren Behälter (16) genug Wasser gibt, und
dass sich der Griff des Dampfreglers (15) in
der Position «-» befindet.
• Drücken Sie die Taste (13), warten Sie
ab, bis die Betriebsbereitschaftsleuchte (14)
grün leuchtet. Stellen Sie einen passenden
Behälter unter das Cappuccinatore-Rohr
(18).
• Schalten Sie die Dampfzufuhr ein, indem Sie
den Griff (15) entgegen dem Uhrzeigesinn
in die Richtung des Symbols «+» langsam
drehen.
14
IM VT-1525.indd 14 25.04.2016 15:18:00
Page 15

D E U T S C H
• Warten Sie ab, bis eine kleine Menge Wasser
aus dem Endstück des CappuccinatoreRohrs (19) ausfließt, danach beginnt der
Dampf intensiver auszutreten, schalten Sie
die Dampfzufuhr aus, indem Sie den Griff des
Dampfreglers (15) in die Position «-» drehen.
• Nehmen Sie einen hohen und schmalen
Becher, lieber einen Metallbecher, und füllen Sie ihn mit kalter Milch oder Sahne ungefähr auf 1/3.
• Fassen Sie den Griff des Cappuccinators
(17) an, tauchen Sie das Endstück des
Cappuccinatore-Rohrs (19) in den Becher,
indem Sie ihn in die Milch ungefähr um 2 cm
tauchen, drehen Sie langsam den Griff (15)
entgegen dem Uhrzeigesinn und regulieren
Sie die Dampfintensität nach Ihrem Wunsch.
Das Endstück des Cappuccinatore-Rohrs
soll den Boden des Bechers nicht berühren, anderenfalls tritt der Dampf schwer aus;
mit bestimmter Fertigkeit können Sie den
Milchschaum in einigen Sekunden erhalten.
• Schalten Sie die Dampfzufuhr aus, indem Sie
den Griff (15) in die Position «-» drehen.
• Sofort nach dem Milch- oder
Sahnenaufschlagen reinigen Sie das
Cappuccinatore-Rohr (18) und das Endstück
(19) - tauchen Sie dafür das CappuccinatoreRohr und das Endstück in den Becher mit
Wasser, schalten Sie die Dampfzufuhr ein,
indem Sie den Griff des Dampfreglers (15)
in die Position «+» drehen, danach schließen Sie die Dampfzufuhr zu, indem Sie den
Griff des Dampfreglers (15) in die Position
«-» drehen.
• Schalten Sie die Kaffeemaschine aus, indem
Sie die Taste (9) drücken, dabei erlöschen die
Betriebskontrolleuchten (8) und (14).
• Warten Sie ab, bis die Kaffeemaschine abge-
kühlt ist und nehmen Sie das Endstück (19)
vom Cappuccinatore-Rohr (18) ab, indem
Sie das Endstück (19) in verschiedene Seiten
drehen, und waschen (spülen) Sie es unter
Wasserstrahl ab.
Anmerkung: Um bei der nachfolgenden
Getränkezubereitung den Geruch des verbrannten Kaffes zu vermeiden, lassen Sie den
Boiler der Kaffeemaschine bis zur erforderlichen Temperatur abkühlen. Dafür machen Sie
Folgendes:
– Schalten Sie die zusätzliche Aufwärmung aus,
indem Sie die Taste der Dampfzufuhr
(13)
drücken.
– Stellen Sie eine passende Tasse (mit
Fassungsvermögen von nicht weniger als 250
ml) auf das Gitter der Tropfschale (2) auf.
– Tauchen Sie das Endstück des
Cappuccinators (19) in die Tasse ein.
– Drücken Sie die Taste der Wasserzufuhr
(12) und schalten Sie die Dampfzufuhr
ein, indem Sie den Griff des Dampfreglers
(15) in die Position «+» drehen. Die Pumpe
fängt an, das kalte Wasser durch den
Boiler durchzupumpen. Das Wasser
fängt an aus den Austrittsöffnungen des
Filterhalters (5) und aus dem Endstück des
Cappuccinators (19) auszugießen. Pumpen
Sie Wasser durch den Boiler durch, bis die
Betriebsbereitschaftsleuchte (14) erlischt.
Die Erniedrigung der Temperatur können
sie auch am eingebauten Thermometer (10)
beobachten.
– Danach schließen Sie die Wasser- und
Dampfzufuhr zu, drücken Sie die Taste
(12), drehen Sie den Griff des Dampfreglers
(15) in die Position «-» und warten Sie ab, bis
die Betriebsbereitschaftsleuchte (14) wieder
grün leuchtet.
WICHTIG:
• Es ist wichtig, dass sich die für
Milchschaumzubereitung benutzte frische
Milch keine Konservierungsstoffe enthält, das
heißt, benutzen Sie keine Milch mit dauernder
Aufbewahrungsfrist.
Es ist empfohlen, übliche Vollmilch mit 4-6%
Fettgehalt und Sahne mit nicht weniger als 10%
Fettgehalt zu benutzen.
ERWÄRMUNG VON GETRÄNKEN
Sie können Getränke erwärmen, indem Sie das
Cappuccinatore-Rohr (18) ohne Endstück (19) in
die Tasse mit dem Getränk eintauchen.
• Nehmen Sie das Endstück (19) vom
Cappuccinatore-Rohr (18) ab.
• Vergewissern Sie sich, dass es im abnehmba-
ren Behälter (16) genug Wasser gibt, dass die
Tasten (12, 13) nicht gedrückt sind, und dass
sich der Griff des Dampfreglers (15) in der
Position «-» befindet.
• Stellen Sie einen passenden Behälter aufs
Gitter der Tropfschale (2).
• Stecken Sie den Netzstecker in die Steckdose
ein. Schalten Sie die Kaffeemaschine durch
das Drücken der Taste
(9) ein, dabei leuch-
tet die Betriebskontrolleuchte (8) rot. Drücken
15
IM VT-1525.indd 15 25.04.2016 15:18:00
Page 16

DEUTSCH
Sie die Taste (12). Vergewissern Sie sich,
dass die Taste der Dampfzufuhr
(13) nicht
gedrückt ist.
• Nach der Wasserzufuhr aus den
Austrittsöffnungen des Filterhalters (5) schließen Sie die Wasserzufuhr zu, indem Sie die
Taste
• Drücken Sie die Taste (13), warten Sie
(12) drücken.
ab, bis die Betriebsbereitschaftsleuchte
(14) grün leuchtet. Das bedeutet, dass die
zusätzliche Aufwärmung des Wassers bis zum
Dampfzustand beendet ist.
• Tauchen Sie das Cappuccinatore-Rohr (18)
in die Tasse mit dem Getränk, das Sie erwärmen möchten. Wenn Sie Milch erwärmen
möchten, tauchen Sie das CappuccinatoreRohr (18) in die Milch ungefähr um 2 cm,
drehen Sie langsam den Griff (15) entgegen dem Uhrzeigesinn und regulieren Sie die
Dampfintensität nach Ihrem Wunsch.
• Nachdem Sie das Getränk erwärmt haben,
drehen Sie den Griff (15) in die Position «-».
• Schalten Sie die Kaffeemaschine aus, indem
Sie die Taste (9) drücken, dabei erlöschen die
Betriebskontrolleuchten (8) und (14).
Anmerkung: Erste Dampfportion kann eine
kleine Menge Wasser enthalten, deshalb müssen
Sie den Dampf innerhalb von einigen Sekunden
in einen passenden Behälter austreten lassen,
um trockenen Wasserdampf zu erhalten.
FUNKTION DER AUTOMATISCHEN
ABSCHALTUNG
Wenn nach dem Drücken der Taste
Kaffeemaschine während 29 Minuten nicht betätigt wird, schaltet sie automatisch aus.
Wenn nach dem Drücken der Taste
Kaffeemaschine während 29 Minuten nicht betätigt wird, schaltet sie automatisch aus.
KALKENTFERNUNG
Zwecks eines effektiven Betriebs der
Kaffeemaschine führen Sie die Entkalkung jeden
Monat und noch öfter, wenn Sie hartes Wasser
benutzen.
Periodische Entkalkung verlängert die
Betriebsdauer der Kaffeemaschine und reduziert das Risiko des Ausfalls des Geräts.
Nicht zeitgemäße Entkalkung, sowie
Nichtbefolgung der Vorschriften dieser
Bedienungsanleitung und falsche Nutzung
der Kaffeemaschine gehören zu keinen
Garantieverpflichtungen.
(9) die
(13) die
• Bereiten Sie eine Zitronensäurelösung
(2 Teelöffel für 1 Liter Wasser) zu.
• Vergewissern Sie sich, dass die Tasten (12,
13) nicht gedrückt sind, und dass sich der
Griff des Dampfreglers (15) in der Position
«-» befindet.
• Stellen Sie einen passenden Behälter aufs
Gitter der Tropfschale (2) und unter das
Cappuccinatore-Rohr (18).
• Ziehen Sie den abnehmbaren Wasserbehälter
(16), trennen Sie ihn vom Gerät ab und füllen Sie ihn mit Zitronensäurelösung bis zur
Wasserstandsmarke «MAX» auf. Danach
legen Sie darin das Wasserzufuhrrohr (20) ein
und stellen Sie den abnehmbaren Behälter
(16) zurück auf.
• Handeln Sie nach dem Abschnitt „Vorzeitige
Durchwärmung”.
1. Stecken Sie den Netzstecker in die Steckdose
ein. Schalten Sie die Kaffeemaschine durch
das Drücken der Taste
(9) ein, dabei
leuchtet die Betriebskontrolleuchte (8) rot.
Drücken Sie die Taste
Sie sich, dass die Taste
(12). Vergewissern
(13) nicht
gedrückt ist. Nach der Wasserzufuhr aus den
Austrittsöffnungen des Filterhalters (5) schließen Sie die Wasserzufuhr zu, indem Sie die
Taste
(12) drücken. Warten Sie einige
Zeit ab, die Kaffeemaschine fängt an aufzuwärmen.
2. Warten Sie ab, bis die Betriebsbereit-
schaftsleuchte (14) grün leuchtet. Das bedeutet, dass die Durchwärmung beendet ist.
Drücken Sie die Taste
(12), und warten Sie
ab, bis der Behälter ungefähr 100 ml Wasser
erhalten wird. Schließen Sie die Wasserzufuhr
zu, indem Sie die Taste
(12) drücken, und
warten Sie ungefähr 5 Sekunden ab.
3. Drücken Sie die Taste der Dampfzufuhr (13),
warten Sie ab, bis die Betriebsbereitschaftsleuchte
(14) grün leuchtet. Öffnen Sie die Dampfzufuhr,
indem Sie den Griff (15) in die Position «+»
drehen. Warten Sie ungefähr 2 Minuten ab,
und schließen Sie die Dampfzufuhr zu, indem
Sie den Griff (15) in die Position «-» drehen.
Drücken Sie die Taste
(9), und lassen Sie
die mit der Zitronensäurelösung befühlte
Kaffeemaschine für 15 Minuten.
4. Wiederholen Sie die Punkte 1-3 nicht weniger
als dreimal.
5. Drücken Sie die Taste (13) (die Taste
ist nicht gedrückt). Warten Sie ab, bis die
Betriebsbereitschaftsleuchte (14) grün leuch-
16
IM VT-1525.indd 16 25.04.2016 15:18:00
Page 17

D E U T S C H
tet. Drücken Sie die Taste (12), und warten Sie ab bis die ganze Zitronensäurelösung
abgegossen wird.
6. Füllen Sie den Behälter (16) mit sauberem
Kaltwasser und wiederholen Sie die Punkte
1-3 nicht weniger als dreimal (dabei gibt es
keine Notwendigkeit 15 Minuten zu warten,
wie es im Punkt 3 beschrieben ist). Warten
Sie ab, bis das ganze Wasser im Behälter wird.
7. Für bessere Sicherheit, dass das System
der Wasserzufuhr und das Cappuccinatore-
• Wischen Sie das Gehäuse der Kaffeemaschine
mit einem weichen feuchten Tuch, danach trocknen Sie das Gehäuse ab. Es ist nicht gestattet,
Metallbürsten und Abrasivmittel zu benutzen.
• Es ist nicht gestattet, das Gehäuse der
Kaffeemaschine ins Wasser oder andere
Flüssigkeiten zu tauchen.
• Waschen Sie die abnehmbaren Teile der
Kaffeemaschine mit Warmwasser und einem
weichen Reinigungsmittel, danach spülen und
trocknen Sie diese ab.
Rohr sauber sind, wiederholen Sie den Punkt
7 nicht weniger als dreimal.
8. Schalten Sie die Kaffeemaschine aus, indem
Sie die Taste (9) drücken.
Anmerkung: Zur Entkalkung können Sie unter
Beachtung der Bedienungsanleitungen der
Entkalkungsmittel spezielle Entkalkungsmittel,
Tropfschale
• Nehmen Sie das Gitter (2) von der Tropfschale
(1) ab und gießen Sie den Inhalt daraus ab,
waschen Sie die Tropfschale ab und stellen
Sie sie zurück auf, stellen Sie das Gitter auf
die Tropfschale auf.
die für die Entkalkung der Kaffeemaschinen
benutzt werden, verwenden.
REINIGUNG
• Falls es sich während der Reinigung des
Filters (6) zeigt, dass die Öffnungen mit
Resten des gemahlenen Kaffees verstopft
sind, können Sie sie mit einer kleinen Bürste
reinigen.
AUFBEWAHRUNG
• Bevor Sie die Kaffeemaschine zur langen
Aufbewahrung wegnehmen, reinigen Sie sie.
• Es ist nicht gestattet, die Kaffeemaschine bei
der Temperatur unter 0°C aufzubewahren.
• Bewahren Sie die Kaffeemaschine an einem
trockenen, kühlen und für Kinder unzugänglichen Ort auf.
STÖRUNGEN, IHRE URSACHEN UND BESEITIGUNG
Störung Ursache Beseitigung
Die Kaffeemaschine
schaltet sich nicht ein.
Keine Netzspannung in der
Steckdose.
Vergewissern Sie sich, dass die
Steckdose funktioniert.
Der Netzstecker des
Netzkabels sitzt in der
Prüfen Sie, ob der Netzstecker fest in
der Steckdose sitzt.
Steckdose nicht fest.
Ausfließen von Wasser
aus dem Unterteil der
Die Tropfschale ist überfüllt. Gießen Sie Wasser aus der Tropfschale
ab.
Kaffeemaschine.
Ausfließen von Kaffee aus
dem Filterhalter.
Undichte Verbindung des
Filters und des Verdichters
Reinigen Sie die Ränder des Filters.
im Boiler, gemahlener
Kaffee wurde auf die Ränder
des Filters verschüttet.
Der Kaffee fließt in die
Tasse zu lange ein oder
fließt überhaupt nicht ein.
Der Kaffee ist zu fein
gemahlen oder zu stark im
Filter gestampft.
Benutzen Sie den gemahlenen Kaffee,
der für Espresso-Kaffemaschinen
geeignet ist.
Stellen Sie den Einstampfgrad des
Kaffees im Filter versuchsweise
fest, abhängig vom Mahlgrad der
Kaffeebohnen.
17
IM VT-1525.indd 17 25.04.2016 15:18:00
Page 18

DEUTSCH
Störung Ursache Beseitigung
Der zubereitete Kaffee hat
einen Fremdgeruch.
Der Kaffee fließt über die
Ränder des Filters aus.
Der Dampf schlägt Milch
nicht auf.
Entkalkung im Boiler der
Kaffeemaschine wurde nicht
richtig durchgeführt.
Der Kaffee wurde falsch
aufbewahrt.
Der Kaffee ist zu fein
gemahlen oder zu große
Menge Kaffee wurde in
den Filter geschüttet oder
der Kaffee ist zu stark
gestampft.
Die Temperatur des
austretenden Dampfes ist zu
niedrig.
Sehen Sie die Abschnitte „Spülung
des Wasserzufuhrsystems” und
„Kalkentfernung” nach, führen Sie
diese Prozeduren mehrmals durch.
Benutzen Sie frischgemahlenen
Kaffee. Bewahren Sie den Kaffee an
einem kühlen trockenen Ort auf.
Benutzen Sie den gemahlenen Kaffee,
der für Espresso-Kaffemaschinen
geeignet ist.
Stellen Sie den Einstampfgrad des
Kaffees im Filter versuchsweise
fest, abhängig vom Mahlgrad der
Kaffeebohnen.
Überfüllen Sie das Filter mit einer
großen Menge Kaffee nicht.
Der Behälter ist zu groß oder passt
nicht. Sie haben Entfettungsmilch
genutzt.
Schlagen Sie Milch nur dann auf, wenn
die Betriebsbereitschaftsleuchte (14)
grün leuchtet.
Zum Milchaufschlagen benutzen
Sie enges, hohes Geschirr. Es
ist empfohlen, 4-6% Vollmilch zu
benutzen.
LIEFERUMFANG
Kaffeemaschine – 1 St.
Filterhalter – 1 St.
Kaffeefilter – 1 St.
Messlöffel – 1 St.
Bedienungsanleitung– 1 St.
TECHNISCHE EIGENSCHAFTEN
Stromversorgung: 220-240 V ~ 50 Hz
Leistungsaufnahme: 1100 W
Druck: 15 Bar
Fassungsvermögen des Wasserbehälters:
1 l - bis zur „MAX“-Marke
Der Hersteller behält sich das Recht vor, Design
und technische Eigenschaften des Geräts ohne
Vorbenachrichtigung zu verändern.
IM VT-1525.indd 18 25.04.2016 15:18:01
Nutzungsdauer des Geräts beträgt 3 Jahre
Gewährleistung
Ausführliche Bedingungen der Gewährleistung
kann man beim Dealer, der diese Geräte
verkauft hat, bekommen. Bei beliebiger
Anspruchserhebung soll man während der
Laufzeit der vorliegenden Gewährleistung den
Check oder die Quittung über den Ankauf vorzulegen.
18
Page 19

русский
КОФЕВАРКА VT-1525 BK
Кофеварка предназначена для приготовления
напитка из молотых кофейных зёрен.
ОПИСАНИЕ
1. Поддон для капель
2. Решётка поддона
3. Ручка держателя фильтра
4. Фиксатор фильтра
5. Держатель фильтра
6. Фильтр для кофе
7. Панель управления
8. Индикатор включения питания
9. Кнопка включения/выключения питания
10. Термометр
11. Площадка для подогрева чашек
12. Кнопка подачи воды
13. Кнопка подачи пара
14. Индикатор готовности
15. Ручка регулятора подачи пара
16. Съёмный резервуар для воды
17. Ручка капучинатора
18. Трубка-капучинатор
19. Наконечник трубки-капучинатора
20. Трубка забора воды
21. Мерная ложка с уплотнителем молотого
кофе
ВНИМАНИЕ!
Для дополнительной защиты в цепи питания кухни целесообразно установить
устройство защитного отключения (УЗО)
с номинальным током срабатывания, не
превышающим 30 мА; при установке следует обратиться к специалисту.
МЕРЫ БЕЗОПАСНОСТИ
Перед началом эксплуатации устройства внимательно прочитайте настоящее руководство
по эксплуатации и сохраните его для использования в качестве справочного материала.
Используйте устройство только по его прямому
назначению, как изложено в данном руководстве. Неправильное обращение с устройством
может привести к его поломке, причинению
вреда пользователю или его имуществу.
• Перед первым включением кофеварки
убедитесь в том, что напряжение электрической сети соответствует напряжению,
указанному на корпусе устройства.
• Сетевой шнур снабжён «евровилкой»;
включайте её в электрическую розетку,
имеющую надёжный контакт заземления.
• Электрическая безопасность кофеварки
гарантируется только в том случае, если
кофеварка должным образом заземлена.
• Во избежание риска возникновения
пожара не используйте переходники при
подключении прибора к электрической
розетке.
• Устанавливайте устройство на ровной
устойчивой поверхности.
• Не используйте устройство в непосред-
ственной близости от источников тепла
или открытого пламени.
• Не используйте устройство в помещениях
с повышенной влажностью.
• Не включайте кофеварку без воды.
• Используйте только те принадлежности,
которые входят в комплект поставки.
• Перед включением кофеварки убедитесь в
том, что все съёмные детали установлены
правильно.
• Не дотрагивайтесь до горячих частей и
поверхностей кофеварки.
• Не ставьте кофеварку на горячие поверх-
ности.
• Соблюдайте осторожность, чтобы избе-
жать ожогов паром или горячей водой.
• Запрещается снимать держатель фильтра
или наконечник трубки-капучинатора во
время работы кофеварки.
• Во избежание пожара, удара электриче-
ским током или физических повреждений
не погружайте вилку сетевого шнура, сетевой шнур или корпус кофеварки в воду или
в любые другие жидкости.
• Для выключения кофеварки сначала
нажмите на кнопку включения/выключения, убедитесь, что индикатор включения
питания погас, и только после этого можно
вынимать вилку сетевого шнура из электрической розетки.
• Вынимая вилку сетевого шнура из электри-
ческой розетки, не тяните за шнур, а держитесь за вилку.
• Внимание! Удаляйте накипь не реже 1 раза
в месяц. Неисправности, возникшие из-за
появления накипи на компонентах кофеварки, не являются гарантийным случаем.
• Кофеварку следует отключать от электри-
ческой сети всякий раз перед чисткой, а
также в том случае, если кофеварка не
используется.
• Перед чисткой кофеварки дождитесь пол-
ного её остывания.
19
IM VT-1525.indd 19 25.04.2016 15:18:01
Page 20

русский
• Следите за тем, чтобы сетевой шнур не
свешивался со стола и не соприкасался с
горячими поверхностями и острыми краями кухонной мебели.
• Не используйте кофеварку вне помеще-
ний.
• Никогда не оставляйте кофеварку в местах
с температурой ниже 0°C.
• Не разрешайте детям прикасаться к
устройству и к сетевому шнуру во время
работы устройства.
• Не оставляйте работающее устройство без
присмотра. Будьте особенно внимательны,
если поблизости от работающего устройства находятся дети или лица с ограниченными возможностями.
• Данное устройство не предназначено для
использования детьми. Во время работы
и остывания размещайте устройство в
местах, недоступных для детей.
• Данное устройство не предназначено для
использования лицами (включая детей)
с пониженными физическими, психическими или умственными способностями
или при отсутствии у них опыта или знаний, если они не находятся под контролем
или не проинструктированы об использовании прибора лицом, ответственным за
их безопасность.
• Осуществляйте надзор за детьми, чтобы не
допустить использования прибора в качестве игрушки.
• Из соображений безопасности детей
не оставляйте полиэтиленовые пакеты,
используемые в качестве упаковки, без
присмотра.
Внимание! Не разрешайте детям играть с
полиэтиленовыми пакетами или упаковочной
плёнкой. Опасность удушья!
• Периодически проверяйте состояние сете-
вого шнура, вилки сетевого шнура и корпуса устройства.
• Не используйте устройство, если имеются
повреждения сетевого шнура или вилки
сетевого шнура, если устройство работает
с перебоями, а также после его падения
или любых повреждений.
• Запрещается самостоятельно ремонтиро-
вать прибор. Не разбирайте прибор самостоятельно, при возникновении любых
неисправностей, а также после падения
устройства выключите прибор из электрической розетки и обратитесь в любой авто-
ризованный (уполномоченный) сервисный
центр по контактным адресам, указанным в
гарантийном талоне и на сайте www.vitek.ru.
• Перевозите устройство только в заводской
упаковке.
• Храните устройство в местах, недоступных
для детей и людей с ограниченными возможностями.
УСТРОЙСТВО ПРЕДНАЗНАЧЕНО ТОЛЬКО ДЛЯ
ДОМАШНЕГО ИСПОЛЬЗОВАНИЯ
Панель управления и регулятор подачи
пара
– Кнопка включения/выключения питания
(9) служит для включения/выключения
устройства. Кнопка не имеет фиксации в
нижнем положении. Для включения или
выключения кофеварки достаточно нажать
и отпустить кнопку.
– Индикатор включения питания (8) позво-
ляет определить текущее состояние
устройства. Когда устройство включено,
индикатор горит красными светом. Если
устройство выключено, индикатор не горит.
– Кнопка подачи воды (12) имеет два фикси-
рованных положения. При нажатии кнопки
включается подача воды для приготовления кофе. Когда кнопка не нажата, подача
воды выключена.
– Кнопка подачи пара (13) также имеет два
фиксированных положения. При нажатии
кнопки включается дополнительный нагрев
воды в бойлере до состояния пара, используется при приготовлении молочной пенки
и подогрева напитков. Когда кнопка не
нажата, дополнительный нагрев выключен.
– Индикатор готовности (14) служит для
контроля температуры нагрева бойлера
кофеварки при приготовлении кофе и
для контроля дополнительного нагрева
при приготовлении молочной пенки.
После достижения заданной температуры
нагрева индикатор готовности (14) загорается зеленым цветом.
– Термометр (10) показывает температуру
воды/пара при приготовлении напитков.
– Регулятор подачи пара (15) включает
подачу пара и позволяет регулировать его
интенсивность. Для включения и регулировки подачи пара медленно поворачивайте ручку регулятора подачи пара (15)
против часовой стрелки, в сторону сим-
20
IM VT-1525.indd 20 25.04.2016 15:18:01
Page 21

русский
вола «+». Для выключения подачи пара
поверните ручку регулятора по часовой
стрелке до упора, в сторону символа «-».
ПЕРЕД ПЕРВЫМ ИСПОЛЬЗОВАНИЕМ
После транспортировки или хранения
устройства при пониженной температуре
необходимо выдержать его при комнатной
температуре не менее трёх часов.
Примечание: В съёмном резервуаре (16)
могут находиться следы воздействия воды.
Это нормальное явление, так как устройство
проходило контроль качества.
– Извлеките кофеварку из упаковки, уда-
лите все упаковочные материалы и любые
наклейки, мешающие работе устройства.
– Проверьте целостность устройства, при
наличии повреждений не пользуйтесь
устройством.
– Убедитесь в том, что рабочее напряжение
устройства соответствует напряжению в
электросети.
– Перед первым использованием кофе-
варки промойте все её съёмные части,
держатель фильтра (5), фильтр для кофе
(6), съёмный резервуар для воды (16) и
мерную ложку (21) тёплой водой с нейтральным моющим средством и просушите.
– Проведите промывку системы подачи воды
и промывку трубки капучинатора.
Промывка системы подачи воды
• Убедитесь, что кнопки (12, 13) не нажаты,
а ручка регулятора подачи пара (15) находится в положении «-» (повёрнута по часовой стрелке до упора).
• Потяните съёмный резервуар для воды (16)
с правой стороны, отсоедините его от
устройства и наполните холодной водой
до максимальной отметки «MAX». После
этого поместите в него трубку забора
воды (20) и установите съёмный резервуар (16) на место.
• Вставьте фильтр для кофе (6) в держатель
фильтра (5).
• Не насыпая кофе в фильтр (6), присое-
дините держатель фильтра (5) к бойлеру
кофеварки, для этого расположите ручку
держателя фильтра (3) под надписью
«INSERT» (ВСТАВИТЬ) на корпусе кофеварки, вставьте держатель (5) в бойлер и
поверните ручку держателя фильтра (3)
против часовой стрелки до упора (в сторону метки «I») (рис. 1).
• Поставьте подходящую ёмкость (объёмом
не менее 250 мл.) на решётку поддона (2).
Убедитесь, что регулятор подачи пара (15)
находится в положении «-».
• Вставьте вилку сетевого шнура в электри-
ческую розетку. Нажатием кнопки
включите кофеварку, при этом индикатор
(8) загорится красным цветом.
• Нажмите кнопку
(12) и дождитесь
подачи воды из выходных отверстий держателя фильтра (5), после чего нажмите
кнопку
(12) еще раз. Это необходимо,
чтобы вода из съёмного резервуара (16)
начала поступать в бойлер и заполнила
его.
• Убедитесь, что кнопки
(12, 13) не
нажаты. Подождите некоторое время,
устройство начнёт предварительный
нагрев. Дождитесь, пока индикатор готовности (14) загорится зеленым цветом. Это
означает, что предварительный нагрев
завершён (вода в бойлере нагрелась).
• Нажмите кнопку подачи воды
(12) еще
раз, вода начнёт вытекать из выходных
отверстий держателя фильтра (5).
• Сливайте воду около 1 минуты, затем пре-
кратите подачу воды, нажав кнопку
Подождите, пока вода перестанет вытекать
из выходных отверстий держателя фильтра
(5) и вылейте воду из ёмкости. Промывка
системы подачи воды закончена.
Промывка трубки капучинатора
• После промывки системы подачи воды
нажмите кнопку подачи пара
дождитесь, когда индикатор готовности (14) загорится зелёным цветом. Под
трубку-капучинатор (18) подставьте подходящую ёмкость.
• Включите подачу пара, медленно повора-
чивая ручку (15) против часовой стрелки,
по направлению к символу «+».
• Дождитесь момента, когда из наконеч-
ника трубки-капучинатора (19) выйдет
небольшое количество воды, после чего
пар начнёт выходить более интенсивно,
выключите подачу пара, повернув ручку
регулятора подачи пара (15) в положение «-».
Промывка системы подачи воды и трубки
капучинатора завершена.
21
(9)
(12).
(13),
IM VT-1525.indd 21 25.04.2016 15:18:01
Page 22

русский
Примечание: При первом включении подачи
воды возможно появление громкого звука от
работающей помпы и ощутимой вибрации
корпуса кофеварки, но через 20-30 секунд,
когда помпа наполнится водой, уровень звука
и вибрации значительно снизится.
Внимание! При включении подачи пара
соблюдайте осторожность, чтобы избежать
ожогов горячими каплями воды и горячим
паром.
ПРИГОТОВЛЕНИЕ ЭСПРЕССО
Перед приготовлением кофе рекомендуется предварительно прогреть кофеварку, фильтр (6) и держатель фильтра (5).
Предварительный прогрев необходим для
получения качественного готового кофе.
Используемые чашки также необходимо предварительно нагреть, для этого установите их
на площадку (11), во время нагрева воды в
бойлере кофеварки площадка (11) тоже нагревается, подогревая при этом чашки.
Предварительный прогрев
• Убедитесь в том, что кнопки (12, 13) не
нажаты, а ручка регулятора подачи пара
(15) находится в положении «-».
• Перед началом работы залейте воду в
съёмный резервуар (16). Потяните съёмный резервуар для воды (16), отсоедините
его от устройства и наполните холодной водой (уровень воды должен быть
больше отметки «MIN», но не превышать
отметку «MAX».) После этого поместите в
него трубку забора воды (20) и установите
съёмный резервуар (16) на место.
• Вставьте фильтр для кофе (6) в держатель
фильтра (5).
• Не насыпая кофе в фильтр (6), присое-
дините держатель фильтра (5) к бойлеру
кофеварки, для этого расположите ручку
держателя фильтра (3) под надписью
«INSERT» (ВСТАВИТЬ) на корпусе кофеварки, вставьте держатель (5) в бойлер и
поверните ручку держателя фильтра (3)
против часовой стрелки до упора (в сторону метки «I») (рис. 1).
• Поставьте подходящую ёмкость на решётку
поддона (2). Убедитесь, что ручка регулировки подачи пара (15) находится в положении «-».
• Вставьте вилку сетевого шнура в электри-
ческую розетку. Нажатием кнопки
включите кофеварку, при этом индикатор
(8) загорится красным цветом. Убедитесь,
что кнопки
• Нажмите кнопку
(12, 13) не нажаты.
(12). Дождитесь подачи
воды из выходных отверстий держателя
фильтра (5), после чего нажмите кнопку
(12) еще раз. Это необходимо, чтобы вода
из съёмного резервуара (16) начала поступать в бойлер и заполнила его.
Примечание: Для получения качественного горячего напитка всегда заполняйте
бойлер водой перед началом приготовления.
• Когда индикатор готовности (14) загорится
зеленым цветом, нажмите кнопку
вода начнет вытекать из выходных отверстий держателя фильтра (5).
• Сливайте воду около 20 секунд, затем
нажмите кнопку
(12). Предварительный
нагрев завершён.
Приготовление эспрессо
• Убедитесь, что в съёмном резервуаре (16)
достаточно воды, кнопки (12, 13) не нажаты,
ручка регулятора подачи пара (15) находится в положении «-».
Для долива воды можно не вынимать съёмный резервуар (16) из устройства, а выдвинуть
его до середины, при этом для налива воды
использовать ёмкость подходящего объёма.
• Отсоедините держатель фильтра (5) от
бойлера кофеварки, повернув ручку держателя (3) по часовой стрелке в сторону
надписи «INSERT».
• Насыпьте молотый кофе в фильтр (6)
и слегка утрамбуйте его обратным концом
мерной ложки (21).
• Присоедините держатель фильтра (5)
к бойлеру кофеварки, для этого расположите ручку держателя фильтра (3) под надписью «INSERT» на корпусе кофеварки,
вставьте держатель (5) в бойлер и поверните ручку держателя фильтра (3) против
часовой стрелки до упора (в сторону метки
«I») (рис. 1).
• Когда индикатор готовности (14) заго-
рится зеленым цветом, нажмите кнопку
подачи воды
(12), вода начнёт вытекать
из выходных отверстий держателя фильтра (5). Следите за процессом наполнения
чашки приготовленным кофе.
• После заполнения чашки приготовлен-
(9)
ным кофе (или при изменении цвета кофе
22
(12),
IM VT-1525.indd 22 25.04.2016 15:18:01
Page 23

русский
на менее насыщенный) нажмите кнопку
(12), выключив подачу воды.
• После снятия чашки с приготовленным
кофе из отверстий держателя фильтра
могут вытекать капли, это нормальное
явление. Следите за наполнением поддона (1), периодически сливайте из него
жидкость и промывайте поддон (1) водой.
Внимание!
– Запрещается снимать держатель фильтра
(5) во время работы кофеварки.
Примечания:
– Повторное приготовление кофе рекомен-
дуется производить с интервалами не
менее 5 минут.
– Для приготовления кофе используйте
только чистую воду и всегда следите
за чистотой съёмного резервуара для
воды (16).
– Перед приготовлением кофе дождитесь,
когда индикатор готовности (14), загорится
зелёным цветом, который показывает, что
температура воды в бойлере достигла
заданного значения.
– Во время работы кофеварки индикатор
готовности (14) будет периодически гаснуть и снова загораться, сигнализируя о
работе нагревательного элемента. Такой
режим работы обеспечивает поддержание температуры бойлера в заданном диапазоне.
• Отключите кофеварку, нажав кнопку
(9),
при этом индикаторы (8) и (14) погаснут.
• Дождитесь остывания кофеварки и сни-
мите держатель фильтра (5).
• Для снятия держателя фильтра (5) повер-
ните ручку (3) в сторону надписи «INSERT»
на корпусе кофеварки и снимите держатель (5).
• Приподнимите фиксатор фильтра (4) и
прижмите его к держателю (5), удерживая фиксатором фильтр (6), переверните
держатель (5) и удалите остатки молотого
кофе.
• Извлеките фильтр (6) из держателя (5) и
промойте.
КАК ПОЛУЧИТЬ ХОРОШИЙ ЭСПРЕССО
• Используйте свежемолотый кофе, пред-
назначенный для кофеварок «эспрессо».
• Слегка утрамбовывайте молотый кофе в
фильтре (6), это можно сделать обратным
концом мерной ложки (21).
• Крепость получаемого кофе будет зави-
сеть от качества и степени помола кофейных зёрен, а также от времени подачи
воды.
• Если кофе наливается слишком долго, это
означает, что используется кофе очень
мелкого помола или кофе слишком сильно
утрамбован.
ПРИГОТОВЛЕНИЕ КАПУЧИНО
Сварите кофе, как описано в разделе
«ПРИГОТОВЛЕНИЕ ЭСПРЕССО», в чашке,
объёма которой будет вполне достаточно для
добавления взбитой пенки из молока или
сливок.
Примечание: Первая порция пара может
содержать небольшое количество воды,
поэтому для получения сухого водяного
пара необходимо в течение нескольких секунд выпустить пар в подходящую
ёмкость.
Внимание! При включении подачи пара
соблюдайте осторожность, чтобы избежать
ожогов горячими каплями воды и горячим
паром.
• Убедитесь, что в съёмном резервуаре
(16) достаточно воды, а ручка регулятора
подачи пара (15) находится в положении
«-».
• Нажмите кнопку
(13), дождитесь, когда
индикатор готовности (14) загорится зеленым цветом. Под трубку-капучинатор (18)
подставьте подходящую ёмкость.
• Включите подачу пара, медленно повора-
чивая ручку (15) против часовой стрелки,
по направлению к символу «+».
• Дождитесь момента, когда из наконеч-
ника трубки-капучинатора (19) выйдет
небольшое количество воды, после чего
пар начнёт выходить более интенсивно,
выключите подачу пара, повернув ручку
регулятора подачи пара (15) в положение «-».
• Возьмите высокий узкий стакан, жела-
тельно металлический, и наполните его
холодным молоком или сливками приблизительно на 1/3.
• Возьмитесь за ручку капучинатора (17),
опустите наконечник трубки-капучинатора
(19) в стакан, погрузив его в молоко приблизительно на 2 см, медленно поворачивайте ручку (15) против часовой стрелки
и отрегулируйте интенсивность подачи
23
IM VT-1525.indd 23 25.04.2016 15:18:01
Page 24

русский
пара по вашему усмотрению. Наконечник
трубки-капучинатора не должен касаться
дна стакана, иначе выход пара будет
затруднён, при определенном навыке
для получения молочной пены достаточно
несколько секунд.
• Выключите подачу пара, повернув ручку
(15) в положение «-».
• Сразу после взбивания молока или сли-
вок прочистите трубку-капучинатор (18)
и наконечник (19) – для этого опустите
трубку-капучинатор с наконечником в стакан с водой, включите подачу пара, повернув ручку регулятора подачи пара (15) в
положение «+», после этого закройте
подачу пара повернув ручку (15) в положение «-».
• Выключите кофеварку, нажав кнопку (9),
при этом индикаторы (8 и 14) погаснут.
• Дождитесь остывания кофеварки и сни-
мите наконечник (19) с трубки-капучинатора (18), поворачивая наконечник (19) в
разные стороны, и промойте (сполосните)
его под струёй воды.
Примечание: Чтобы при последующем приготовлении напитка исключить запах пережжённого кофе, необходимо охладить
бойлер кофеварки до требуемой температуры. Для этого выполните следующие действия:
– Выключите дополнительный нагрев, нажав
на кнопку подачи пара
– Поставьте подходящую чашку (объёмом не
(13).
менее 250 мл.) на решётку поддона (2).
– Опустите наконечник капучинатора (19) в
чашку.
– Нажмите кнопку подачи воды (12) и
включите подачу пара, повернув ручку
регулятора подачи пара (15) в положение
«+». Помпа начнёт прокачивать холодную
воду через бойлер. Вода начнёт вытекать
из выходных отверстий держателя фильтра (5) и наконечника капучинатора (19).
Прокачивайте воду через бойлер до тех
пор, пока индикатор готовности (14) не
погаснет. Снижение температуры также
можно наблюдать по встроенному термометру (10).
– После этого закройте подачу воды и пара,
нажмите на кнопку
(12), поверните
ручку (15) в положение «-» и дождитесь
когда индикатор готовности (14) снова
загорится зеленым цветом.
ВАЖНО:
• Необходимо, чтобы в свежем молоке,
используемом для приготовления пенки,
не содержались консерванты, то есть не
следует использовать так называемое
молоко длительного хранения.
Рекомендуется использовать обычное цельное молоко жирностью от 4 до 6%, жирность
сливок должна быть не менее 10%.
ПОДОГРЕВ НАПИТКОВ
Вы можете подогреть напитки, опустив
трубку-капучинатор (18) без наконечника (19)
в чашку с напитком.
• Снимите наконечник (19) с трубки-капучи-
натора (18).
• Убедитесь, что в съёмном резервуаре
(16) достаточно воды, кнопки (12, 13) не
нажаты, ручка регулятора подачи пара (15)
находится в положении «-».
• Поставьте подходящую ёмкость на решётку
поддона (2).
• Вставьте вилку сетевого шнура в электри-
ческую розетку. Нажатием кнопки
включите кофеварку, при этом инди-
катор (8) загорится красным цветом.
Нажмите кнопку
кнопка подачи пара
• Дождитесь подачи воды из выходных отвер-
(12). Убедитесь, что
(13) не нажата.
стий держателя фильтра (5), после чего
закройте подачу воды, нажав кнопку
• Нажмите кнопку
(13), дождитесь, когда
индикатор готовности (14) загорится зеленым цветом. Это означает, что дополнительный нагрев воды до состояния пара
завершён.
• Опустите трубку-капучинатор (18) в чашку
с напитком, который вы хотите подогреть.
Если вы хотите подогреть молоко, погрузите трубку-капучинатор (18) в молоко
приблизительно на 2 см, медленно поворачивайте ручку (15) против часовой стрелки
и отрегулируйте интенсивность подачи
пара по вашему усмотрению.
• Подогрев напиток, поверните ручку (15) в
положение «-».
• Выключите кофеварку, нажав кнопку (9),
при этом индикаторы (8 и 14) погаснут.
Примечание: Первая порция пара может
содержать небольшое количество воды, поэтому для получения сухого водяного пара
необходимо в течение нескольких секунд
выпустить пар в подходящую ёмкость.
24
(9)
(12).
IM VT-1525.indd 24 25.04.2016 15:18:01
Page 25

русский
ФУНКЦИЯ АВТОМАТИЧЕСКОГО
ОТКЛЮЧЕНИЯ
Если после нажатия кнопки
(9) в течение
29 минут с кофеваркой не будет ни произведено никаких действий, она автоматически
выключится.
Если после нажатия кнопки
(13) в течение
29 минут с кофеваркой не будет произведено
никаких действий, она автоматически выключится.
УДАЛЕНИЕ НАКИПИ
Для эффективной работы кофеварки рекомендуется проводить удаление накипи каждый
месяц, а при использовании «жёсткой» воды
удаление накипи следует проводить ещё чаще.
Периодическое удаление накипи продлевает срок службы кофеварки и снижает риск
выхода устройства из строя.
Несвоевременное удаление накипи, а
также несоблюдение положений настоящей
инструкции и неправильное использование
кофеварки не покрываются гарантией.
• Приготовьте раствор лимонной кислоты –
2 чайные ложки на 1 литр воды.
• Убедитесь, что кнопки (12, 13) не нажаты,
ручка регулятора подачи пара (15) находится в положении «-».
• Поставьте подходящую ёмкость на решётку
поддона (2) и под трубку-капучинатор (18).
• Потяните съёмный резервуар для воды (16),
отсоедините его от устройства и наполните его раствором лимонной кислоты до
отметки «MAX». После этого поместите в
него трубку подачи воды (20) и установите
съёмный резервуар (16) на место.
• Выполните действия, описанные в разделе
«Предварительный прогрев».
1. Вставьте вилку сетевого шнура в электри-
ческую розетку. Нажатием кнопки
(9)
включите кофеварку, при этом индикатор
(8) загорится красным цветом. Нажмите
кнопку
(12). Убедитесь, что кнопка
(13) не нажата. Дождитесь подачи воды
из выходных отверстий держателя фильтра (5), после чего закройте подачу воды,
нажав кнопку
(12). Подождите некото-
рое время, начнётся нагрев кофеварки.
2. Дождитесь, когда индикатор готовности
(14) загорится зелёным цветом. Это означает, что нагрев завершён. Нажмите кнопку
(12) и дождитесь, когда в емкости будет
около 100 мл воды. Закройте подачу воды,
нажав кнопку
(12), и подождите около
5 секунд.
3. Нажмите кнопку подачи пара
дождитесь, когда индикатор готовности
(14) загорится зелёным цветом. Откройте
подачу пара, повернув ручку (15) в положение «+». Подождите 2 минуты и закройте
подачу пара, повернув ручку (15) в положение «-». Нажмите кнопку
(9) и оставьте
кофеварку, заполненную раствором
лимонной кислоты, на 15 минут.
4. Повторите пункты 1-3 минимум 3 раза.
5. Нажмите кнопку
(13) (кнопка отжата).
Дождитесь, когда индикатор готовности
(14) загорится зелёным цветом. Нажмите
кнопку
(12) и дождитесь, пока весь рас-
твор лимонной кислоты не будет слит.
6. Наполните съёмный резервуар (16) чистой
холодной водой, повторите пункты 1-3 не
менее 3 раз (при этом нет необходимости ждать15 минут, как описано в пункте 3).
Дождитесь, когда вся вода будет в ёмкости.
7. Для большей уверенности в том, что система
подачи воды и трубка-капучинатор —
чистые, повторите пункт 7 не менее 3 раз.
8. Выключите кофеварку, нажав кнопку (9).
Примечание: Для удаления накипи можно
использовать специальные средства, применяемые для удаления накипи в кофеварках и кофемашинах, при этом следует строго
соблюдать инструкции по использованию
средств для удаления накипи.
ЧИСТКА
• Если при чистке фильтра (6) обнаружится, что
отверстия засорены осадком молотого кофе,
их можно почистить небольшой щёткой.
• Корпус кофеварки следует протирать влаж-
ной мягкой тканью, после чего корпус следует
вытереть насухо. Не используйте металлические щётки и абразивные моющие средства.
• Запрещается погружать корпус кофеварки
в воду или в любые другие жидкости.
• Съёмные детали кофеварки промывайте
тёплой водой с добавлением мягкого моющего средства, а затем сполосните и высушите их.
Поддон для капель
• Снимите решётку (2) с поддона (1), сни-
мите поддон и слейте из него содержимое,
промойте поддон и установите его на
место, установите решётку на поддон.
25
(13),
IM VT-1525.indd 25 25.04.2016 15:18:01
Page 26

русский
ХРАНЕНИЕ
• Прежде чем убрать кофеварку на длитель-
ное хранение, проведите чистку устройства.
НЕИСПРАВНОСТИ, ИХ ПРИЧИНЫ И МЕТОДЫ УСТРАНЕНИЯ
Неисправность Причина Метод устранения
Кофеварка не
включается
Вода вытекает
из нижней части
кофеварки
Утечка кофе из
держателя фильтра
Кофе наливается
в чашку слишком
долго или вообще не
наливается
Приготовленный
кофе имеет
посторонний запах
Кофе вытекает
через края фильтра
Пар не взбивает
молоко
В сетевой розетке отсутствует
напряжение.
Вилка сетевого шнура
не до конца вставлена в
электрическую розетку.
Поддон для воды переполнен. Слейте воду из поддона.
Неплотное прилегание
фильтра к уплотнителю в
бойлере, молотый кофе попал
на края фильтра.
Слишком мелкий помол кофе,
либо кофе в фильтре очень
сильно утрамбован.
Неправильный процесс
удаление накипи в бойлере
кофеварки.
Неправильное хранение кофе. Используйте свежемолотый кофе.
Слишком мелкий помол
кофе или слишком большое
количество кофе уложено
в фильтре, либо кофе слишком
сильно утрамбован.
Низкая температура
выходящего пара.
• Запрещается хранить кофеварку при тем-
пературе ниже 0°C.
• Храните кофеварку в сухом прохладном
месте, недоступном для детей.
Убедитесь в том, что сетевая розетка
исправна.
Проверьте, до конца ли вставлена
сетевая вилка в электрическую розетку.
Очистите края фильтра.
Используйте молотый кофе,
предназначенный для кофеварок
«эспрессо».
Опытным путём определите степень
утрамбовывания кофе в фильтре,
в зависимости от степени помола кофе.
Обратитесь к разделам «Промывка
системы подачи воды» и «Удаление
накипи», выполните положения этих
разделов несколько раз.
Храните кофе в сухом прохладном
месте.
Используйте молотый кофе,
предназначенный для кофеварок
«эспрессо».
Опытным путём определите степень
утрамбовывания кофе в фильтре, в
зависимости от степени помола кофе.
Не переполняйте фильтр большим
количеством кофе.
Используется слишком большая
ёмкость, либо применяется ёмкость
неподходящего размера.
Вы использовали обезжиренное молоко.
Взбивайте молоко только после того,
как индикатор готовности (14) загорится
зеленым цветом.
Для взбивания молока используйте
узкую высокую посуду. Рекомендуется
использовать цельное молоко
жирностью 4-6%.
26
IM VT-1525.indd 26 25.04.2016 15:18:01
Page 27

русский
КОМПЛЕКТАЦИЯ
Кофеварка – 1 шт.
Держатель фильтра – 1 шт.
Фильтр для кофе – 1 шт.
Мерная ложка – 1 шт.
Инструкция – 1 шт.
ТЕХНИЧЕСКИЕ ХАРАКТЕРИСТИКИ
Электропитание: 220-240 В ~ 50 Гц
Потребляемая мощность: 1100 Вт
Давление: 15 бар
Ёмкость резервуара для воды:
1л – до отметки «MAX»
Производитель оставляет за собой право
изменять характеристики устройств без
предварительного уведомления.
Срок службы прибора – 3 года
Данное изделие соответствует всем
требуемым европейским и российским стандартам безопасности и гигиены.
Изготовитель: АНДЕР ПРОДАКТС ГмбХ,
Австрия
Адрес: Нойбаугюртель 38/7А, 1070 Вена,
Австрия
Информация для связи – email:
anderproduct@gmail.com
Информация об Импортере указана на индивидуальной упаковке.
Информация об авторизованных (уполномоченных) сервисных центрах указана в гарантийном талоне и на сайте www.vitek.ru
Единая справочная служба:
+7 (495) 921-01-70
Сделано в Китае
27
IM VT-1525.indd 27 25.04.2016 15:18:01
Page 28

ҚазаҚша
VT-1525 BK КОФЕ ҚАЙНАТҚЫШ
Кофе қайнатқыш ұнтақталған кофе дәнектерінен
сусын дайындауға арналған.
СИПАТТАМАСЫ
1.
Тамшыға арналған тұғыр
2.
Тұғырдың торы
3.
Фильтр тұтқасының ұстағышы
4.
Фильтрдің бекіткіші
5.
Фильтрдің тұтқасы
6.
Кофеге арналған фильтр
7.
Басқару панелі
8.
Қоректі қосу индикаторы
9.
Қоректі қосу/сөндіру тетігі
10.
Термометр
11.
Шәшкелерді жылытуға арналған орын
12.
Суды ашатын тетік
13.
Буды ашатын тетік
14.
Дайындық индикаторы
15.
Бу шығаруды реттеуіштің тұтқасы
16.
Суға арналған алынбалы-салынбалы
резервуар
17.
Капучинатордың тұтқасы
18.
Түтікше-капучинатор
19.
Түтікше-капучинатордың саптамасы
20.
Су ағу түтікшесі
21.
Ұнтақталған кофеге арналған өлшеуіш қасық
НАЗАР АУДАРЫҒЫЗ!
Қосымша сақтық мақсатында ас үй
бөлмесінің қуаттандыру тізбегінде 30 мА
аспайтын номиналды іске қосылу тогы бар
қорғаныстық сөндіру құрылғысын (ҚСҚ)
орнатқан жөн. Орнату кезінде маманның
қызметіне жүгініңіз.
ҚАУІПСІЗДІК ШАРАЛАРЫ
Құрылғыны пайдаланбас бұрын анықтамалық
материал ретінде оны пайдалану және сақтау
бойынша осы нұсқаулықты мұқият оқып
шығыңыз.
Құрылғыны осы нұсқаулықта көрсетілгендей тек
оның тікелей қызметі бойынша пайдаланыңыз.
Құрылғыны дұрыс пайдаланбау оның сынуына,
тұтынуға немесе оның мүлкіне зияны тиюіне
әкеледі.
•
Кофе қайнатқышты алғаш рет пайдаланар
алдында электрлік желі қысымы құрылғының
корпусында көрсетілген көрсеткішке сәйкестігін
тексеріңіз.
•
Желілік сым «еуроайырмен» қамтамасыз
етілген; оны оны жерге тиюі сенімді электрлік
розеткаға қосыңыз.
•
Кофе қайнатқыштың электрлік қауіпсіздігіне
кепілдік кофе қайнатқыш тиісінше жерге тиген
кезде ғана беріледі.
•
Өрт қаупінен сақтану үшін құрылғыны
электрлік розеткаға қосуда тасымалдағышты
қолданбаңыз.
•
Құрылғыны түзу, сенімді беткейге орнатыңыз.
•
Құрылғыны жылу немесе ашық отқа өте жақын
маңайда пайдаланбаңыз.
•
Құрылғыны ылғалдылығы өте жоғары
бөлменің ішінде пайдаланбаңыз.
•
Не включайте кофеварку без воды.
•
Жеткізу комплектісіне кіретін құралжабдықтарды пайдаланыңыз.
•
Кофе қайнатқышты қосар алдында алынбалысалынбалы детальдарының бәрі дұрыс
орнатылғанына көз жеткізіңіз.
•
Кофе қайнатқыштың ыстық жерлеріне
қолыңызды тигізбеңіз.
•
Кофе қайнатқышты ыстық беткейлерге
қоймаңыз.
•
Бу немесе ыстық сумен күйіп қалудан сақтану
үшін қауіпсіздік сақтаңыз.
•
Кофе қайнатқыш жұмыс істеп тұрған кезде
фильтр тұтқасын немесе түтік-капучинатордың
саптамасын шығарып алуға болмайды.
•
Өрт қаупінен, электр тогы соғуы немесе
физикалық зақымнан сақтану үшін желілік
сым айырын, желілік сымды немесе кофе
қайнатқыш корпусын суға немесе өзге
сұйықтыққа матырмаңыз.
•
Кофе қайнатқышты сөндіру үшін алдымен
сөндіру/қосу тетігін басыңыз, қуатқа қосу
индикаторы сөніп тұрғанына көз жеткізіңіз, тек
содан кейін ғана желілік сым айырын электрлік
розеткадан ажыратуға болады.
•
Желілік сым айырын электрлік розеткадан
ажыратып жатқан кезде сымды тартпаңыз,
айырынан ұстаңыз.
•
Назар аударыңыз! Қақты айына көп
дегенге 1 рет тазалаңыз. Кофе қайнатқыш
бөлшектерінде қақ тұруы нәтижесінде
болған зақымдар кепілдемеге енетін жағдай
болып саналмайды.
•
Кофе қайнатқышты тазалар алдында әр жолы,
сонымен қатар кофе қайнатқыш қолданылмаған
кезде электрлік желіден ажыратыңыз.
•
Ккофе қайнатқыщты тазалар алдында оның
толықтау сууын күтіңіз.
•
Желілік сым үстелден салбырап тұрмауын
және ыстық беткейлер мен ас үй
жиһаздарының өткір қырларына үйкелмеуін
қадағалаңыз.
28
IM VT-1525.indd 28 25.04.2016 15:18:02
Page 29

ҚазаҚша
•
Кофе қайнатқышты ғимарат ішінен тыс
жерлерде пайдаланбаңыз.
•
Кофе қайнатқышты температурасы 0°C-тан
төмен жерде сақтамаңыз.
•
Балаларға жұмыс істеп тұрған құрылғы
және оның желілік сымына қол тигізуіне жол
бермеңіз.
•
Жұмыс істеп тұрған құрылғыны бақылаусыз
қалдырмаңыз. Жұмыс істеп тұрған маңайына
балалар немесе мүмкіндігі шектеулі жандар
жақындаса, ерекше сақ болыңыз.
•
Бұл құрылғы балалар пайдалануына
арналмаған. Жұмыс кезінде және сууы кезінде
құрылғыны балалардың қол жетпейтін жерде
сақтаңыз.
•
Бұл құрылғы физикалық, психикалық немесе
ақыл-есі төмен адамдар не болмаса, тиісті
тәжірибесі немесе білімі жоқ болған жағдайда,
егер олар бақылауда болмаса немесе олардың
қауіпсіздігіне жауапты адам құрылғыны
қалай пайдалану туралы нұсқау бермеген
жағдайда (балаларға да қатысты) қолдануына
болмайды.
•
Балалар құрылғыны ойыншық ретінде
пайдаланбауы үшін оларды қадағалаңыз.
•
Балалардың қауіпсіздігі мақсатында қаптама
ретінде пайдаланылатын полиэтилен
пакеттерді бақылаусыз қалдырмаңыз.
Назар аударыңыздар! Балалардың полиэтилен
қаптама немесе мөлдір орамалармен ойнауына
жол бермеңіз. Тұншығу қаупі бар!
•
Желілік сым мен желілік сым айырының,
құрылғы корпусының күйін үнемі тексеріп
тұрыңыз.
•
Желілік сымы немесе желілік сым айыры
бүлінген болса, шәйнекті қолданбаңыз.
Егер құрылғы дұрыс жұмыс істемей тұрса,
сондай-ақ құрылғы құлаған жағдайда, оны
қолданбаңыз.
•
Құрылғыны өз бетінше жөндеуге тыйым
салынады. Құрылғыны өз бетіңізше
бөлшектемеңіз, қандай да бір қиындық
туындаған жағдайда, сонымен қатар құрылғы
құлаған жағдайда құрылғыны электрлік
розеткадан ажыратыңыз немесе кепілдік
талонындағы байланыс мекен-жайлары
және www.vitek.ru сайтында көрсетілген кез
келген авторизацияланған (өкілетті) қызмет
көрсету орталықтарының мекен-жайларына
жүгініңіз.
•
Құрылғыны зауыттан шығарылған қорабына
салып алып жүріңіз.
•
Құрылғыны тек балалардың және мүмкіндігі
шектеулі адамдардың қолы жетпейтін жерде
сақтаңыз.
ҚҰРЫЛҒЫ ТЕК ҮЙ ЖАҒДАЙЫНДА ҚОЛДАНУҒА
АРНАЛҒАН
Басқару панелі және бу шығаруды реттеуіш
–
Қуатқа қосу/сөндіру тетігі (9) құрылғыны қосу/
сөндіруге арналған. Тетік төменге қойылған
күйде бекімейді. Кофе қайнатқышты қосу
немесе сөндіру үшін тетікті басу немесе жіберу
жеткілікті.
–
Қуатты сөндіру индикаторы (8) құрылғының
қазіргі жағдайын анықтауға мүмкіндік береді.
Құрылғы қосылып тұрған кезде индикатор
қызыл түсті болып жанады. Құрылғы сқніп
тұрса, индикатор жанбайды.
–
Су шығару тетігінің (12) екі бекитін күйі бар.
Тетікті басқан кезде кофе дайындауға арналған
су іске қосылады. Тетік басылып тұрмаған кезде
су шығару өшіріліп тұрғанын білдіреді.
–
Бу шығару тетігі де (13) екі бекитін күйге ие.
Тетікті басқан кезде бойлерді суды қосымша
қыздыру жүзеге асырылады, ол сүтті көбік
дайындауда және сусындарды жылыту үшін
қажет. Тетік басылып тұрмаған кезде қосымша
қыздыру сөндіріліп тұр.
–
Дайындық индикаторы (14) кофе дайындау
кезінде кофе қайнатқыш бойлеріндегі қыздыру
температурасын бақылау үшін және сүт
көбігін дайындау кезінде қосымша қыздыуды
бақылау үшін қажет. Қыздыруда белгіленген
температураға жеткеннен кейін дайындық
индикаторы (14) жасыл түсті болып жанады.
–
Термометр (10) сусынды дайындау кезінде су/
будың температурасын көрсетеді.
–
Бу шығаруды реттеуіш (15) буды шығарып,
оның қарқынды жүргізілуін реттеуге мүмкіндік
береді. Будың шығарылуын қосу және реттеу
үшін бу шығару реттеуішінің тұтқасын (15)
сағат тіліне қарсы, «+» белгісіне қарай
баяу бұраңыз. Бу шығаруды сөндіру үшін
реттеуіштің тұтқасын сағат тілі бойынша
тірелгенше «-» белгісіне қарай бұраңыз.
АЛҒАШ ПАЙДАЛАНАР АЛДЫНДА
Құрылғыны алып жүрген жағдайда немесе
температурасы төмен жерде сақтаған
жағдайда оны бөлме температурасы
жағдайында үш сағаттан кем емес уақыт
қойып қою керек.
29
IM VT-1525.indd 29 25.04.2016 15:18:02
Page 30

ҚазаҚша
Ескертпе: Алынбалы-салынбалы резервуарда
(16) судың ыспал еткендігінің іздері болуы
мүмкін. Бұл қалыпты құбылыс, өйткені құрылғы
сапа бақылауынан өткен.
–
Кофе қайнатқышты қорабынан шығарып,
құрылғының жұмыс істеуін кедері
жасайтын сыртындағы орамасын және
жапсырмаларының барлығын алып тастаңыз.
–
Құрылғының тұтастығын тексеріңіз, зақым
болған жағдайда құрылғыны пайдаланбаңыз.
–
Құрылғының жұмыс қысымы электр желісіндегі
қысымға сәйкес келетіндігіне көз жеткізіңіз.
–
Кофе қайнатқышты ең алғаш рет пайдаланар
алдында оның барлық алынбалы-салынбалы
бөліктерін, фильтрдің тұтқасын (5), кофеге
арналған фильтрді (6), суға арнаған алынбалысалынбалы резервуарды (16) және өлшеуіш
қасықты (21) жылы сумен арнайын қоспа
қосып жуыңыз.
–
Су шығару жүйесін жуыңыз, сондай-ақ
капучинатор түтігін жуыңыз.
•
тетігін (12) басыңыз да, фильтр тұтқасының
шығару түтіктерінен (5), будың шығуын күтіңіз,
содан кейін
тетігін (12) тағы бір рет басыңыз.
Ол алынбалы-салынбалы резервуардан (16) су
бойлерге құйылып, толуы үшін қажет.
•
тетіктері (12, 13) басылып тұрмағанына
көз жеткізіңіз. Біршама уақыт өтуі керек, содан
кейін құрылғы алдын ала жытыуды бастайды.
Дайындық индикаторы (14) жасыл түсті
болып жануын мүтіңіз. Ол алдын ала жылыту
аяқталғанын (бойлердегі су жылығанын
білдіреді).
•
су шығару тетігін (12) тағы бір рет басыңыз,
фильтр тұтқасының шығару түтіктерінен (5) су
аға бастайды.
•
Суды 1 минуттың көлемінде ағызыңыз, содан
кейін судың ағуын тоқтатыңыз, ол үшін
тетігін (12) басыңыз. Су фильтр тұтқасының
шығару түтіктерінен (5) шығып біткенге дейін
күтіңіз. Содан кейін суды ыдыстан төгіп
тастаңыз. Су шығару жүйесін жуу аяқталды.
Су шығару жүйесін жуу
•
Мына тетіктердің (12, 13) басылып тұрмағанына,
ал бу шығаруды реттеуіштің тұтқасы (15) «-»
күйінде тұрғанына (сағат тілі бойынша барынша
бұрылып тұрғанына) көз жеткізіңіз.
•
Суға арнаған алынбалы-салынбалы
резервуарды (16) оң жағынан тартып, оны
құрылғыдан ажыратып, ішіне суық суды
«MAX» белгісіне дейін толтырыңыз. Содан
кейін оған су алуға арналған түтікті салып
(20), алынбалы-салынбалы резервуарды (16)
өз орнына орнатыңыз.
•
Кофеге арналған фильтрді (6) фильтрдің
тұтқасына енгізіңіз (5).
•
Кофені фильтрге салмай тұрып (6),
фильтрдің тұтқасын (5) кофе қайнатқыштың
бойлеріне қосыңыз, сол үшін фильтр тұтқасы
ұстағышын (3) кофе қайнатқыш корпусындағы
«INSERT» (ҚОЮ) таңбасының астына қойып,
ұстағышты(5) бойлерге енгізіп, фильтр
тұтқасының ұстағышын (3) сағат тіліне қарсы
бағытта тірелгенге дейін бұраңыз («I» белгісіне
дейін) (1-сурет).
•
Сәйкес келетін ыдысты (250 мл. кем емес
көлемде) тұғырдың торына қойыңыз (2). Бу
шығаруды реттеуіш (15) «-» күйінде тұрғанына
көз жеткізіңіз.
•
Желілік сым айырын электрлік розеткаға
қосыңыз.
тетігін басу арқылы (9) кофе
қайнатқышты қосыңыз, ол кезде индикатор (8)
қызыл түсті боп жанады.
Капучинатор түтігін жуу
•
Су шығару жүйесін жуу аяқталғаннан кейін
бу шығару тетігін (13) басыңыз да, дайындық
индикаторы (14) жасыл түсті болып жанады.
Түтікше-капучинатордың (18) астына сәйкес
келетін ыдысты қойыңыз.
•
Ұстағышын(15) «+» белгісіне қарай сағат тіліне
қарсы бұрап отырып, бу шығаруды қосыңыз.
•
Түтікше-капучинатордың саптамасынан
(19) аздаған су ағуын күтіңіз, содан кейін бу
қарқындырақ шыға бастайды, бу шығаруды
сөндіріп, бу шығаруды реттеуіштің (15)
тұтқасын «-» күйіне келтіріңіз.
Су шығару жүйесін және капучинатор түтігін
жуу аяқталды.
Ескертпе: Су шығаруды ең алғаш рет қосқан
кезде жұмыс істеп тұрған сорғыдан қатты
дауыс шығуы және кофе қайнатқыш корпусында
сезілетіндей вибрация болуы мүмкін, алайда
20-30 секундтан кейін, сорғы суға толғаннан
кейін, дыбыс пен вибрация деңгейі дыбыс пен
вибрация деңгейі айтарлықтай бәсеңдейді.
Назар аударыңыз! Бу шығаруды қосқан кезде
ыстық су тамшылары мен ыстық буға күйіп
қалудан абай болыңыз.
ЭСПРЕССОНЫ ДАЙЫНДАУ
Кофе дайындау алдында кофе қайнатқышты,
фильтр (6) және фильтрдің тұтқасын (5) алдын
ала қыздырып алған жөн. Алдын ала қыздырып
алу дайындалған кофе сапалы болуы қажет.
30
IM VT-1525.indd 30 25.04.2016 15:18:02
Page 31

ҚазаҚша
Қолданылатын шәшкелерді де алдын ала
қыздырып алған жөн, ол үшін оларды алаңшаға
(11) қойып, кофе қайнатқыш бойлеріндегі су
жылыған кезде алаңша да (11) жылиды, ол
шәшкелерді жылытады.
Алдын ала қыздыру
•
(12, 13) тетіктері басылып тұрмағанына, ал бу
шығару реттеуішінің (15) тұтқасы «-» күйінде
тұрғанына көз жеткізіңіз.
•
Жұмысты бастамас бұрын алынбалысалынбалы резервуарға (16) судыы құйыңыз.
Суға арналған алынбалы-салынбалы
резервуарды (16) құрылғыдан ажыратып, оған
суық суды толтыра құйыңыз (судың деңгейі
«MIN» белгісінен асуы керек, алайда «MAX»
белгісінен асып кетпеуі керек.) Осыдан кейін
оған су алуға арналған түтікшені (20) салып,
алынбалы-салынбалы резервуарды (16) өз
орнына орнатыңыз.
•
Кофеге арналған фильтрді (6) фильтра
тұтқасына (5) енгізіп орнатыңыз.
•
Кофені фильтрге (6) салмай тұрып, фильтрдің
ұстағышын (5) кофе қайнатқыш бойлеріне
қосыңыз, ол үшін фильтр тұтқасын (3) кофе
қайнатқыш корпусындағы «INSERT» (ҚОЮ)
белгісінің төмен жағына, тұтқасын (5) бойлерге
орнатып, фильтр тұтқасының ұстағышын (3)
сағат тіліне қарсы бағытта тірелгенге дейін («I»
белгісіне дейін) бұраңыз (1-сурет).
•
Сәйкес келетін ыдысты тұғыр торына (2)
қойыңыз. Бу шығаруды реттеуіштің тұтқасы
(15) «-» күйінде тұрғанына көз жеткізіңіз.
•
Желілік сым айырын электрлік розеткаға
қосыңыз.
тетігін (9) басу арқылы кофе
қайнатқышты қосыңыз, ол кезде индикатор (8)
қызыл түсті болып жанады.
тетіктері
(12, 13) басылып тұрмағанына көз жеькізіңіз.
•
тетігін (12) басыңыз. Фильтр тұтқасының
шығару тесіктерінен (5) судың ағуын күтіңіз,
содан кейін
тетігін (12) тағы бір рет басыңыз.
Бұл алынбалы-салынбалы резервуардан (16)
су бойлерге ағып, оны толтыруы үшін қажет.
Ескертпе: Сапалы ыстық сусын алу үшін
бойлерді әрқашан дайындар алдында
толтырып отырыңыз.
•
Дайын индикаторы (14) жасыл түсті болып
жанған кезде
тетігін (12) басыңыз, фильтр
тұтқасының шығару тесіктерінен (5) су шыға
бастайды.
•
Суды 20 секунд шамасында төгіңіз, содан кейін
тетігін (12) басыңыз. Алдын ала қыздыру
осымен аяқалды.
Эспрессоны дайындау
•
Алынбалы-салынбалы резервуар (16) суға
толы екендігіне, (12, 13) тетіктері басылып
тұрмағанына, бу шығаруды реттеуіш тұтқасы
(15) «-» күйінде тұрғанына көз жеткізіңіз.
Суды толықтырып құю үшін алынбалысалынбалы резервуарды (16) құрылғыдан
шығармай-ақ, оны ортан беліне дейін сырғытып
қоюға болады, ол кезде суды құю үшін кез келген
көлемі сәйкес ыдысты пайдалануға болады.
•
Фильтр тұтқасын (5) ұстағышын (3) сағат
тілі бойынша «INSERT» белгісіне қарай
бұрау арқылы кофе қайнатқыш бойлерінен
ажыратыңыз.
•
Ұнтақталған кофені фильтрге (6) салып, оны
өлшеуіш қасықтың екінші басымен (21) аздап
нығыздаңыз.
•
Фильтр тұтқасын (5) кофе қайнатқыш
бойлеріне, ол үшін фильтр тұтқасының
ұстағышын (3) кофе қайнатқыш корпусындағы
«INSERT» жазуынының астына орнатыңыз,
тұтқаны(5) бойлерге орнатыңыз да, фильтр
тұтқасының ұстағышын (3) сағат тіліне қарсы
тірелгенге дейін(«I» белгісіне қарай) бұраңыз
(1-сурет).
•
Дайындық индикаторы (14) жасыл түсті
болып жанған кезде,
суды шығару тетігін
(12) басыңыз, фильтр тұтқасының шығару
тесіктерінен (5) су шыға бастайды. Шәшкенің
дайын болған кофеге толу процесін күтіңіз.
•
Дайындалған кофе шәшкеге толғаннан
кейін (немесе кофенің түсі бозарып өзгерген
жағдайда)
тетігін (12) басып, су шығаруды
өшіріңіз.
•
Дайындалған кофе құйылған шәшкені алғаннан
кейін фильтр тұтқасының тесіктерінен кофе
тамшылауы мүмкін, бұл қалыпты құбылыс.
Тұрыдың (1) толуын күтіңіз, үнемі ондағы
сұйықтықты төгіп, тұғырды (1) сумен жуып
отырыңыз
Назар аударыңыз!
–
Кофе қайнатқыш жұмыс істеп тұрған кезде
фильтр тұтқасын (5) шешуге тыйым
салынады.
Ескертпе:
–
Кофені қайта дайынау үшін арада
5 минуттан кем емес интервал болуы керек.
–
Кофені дайындауға тек таза суды
пайдаланыңыз және суға арналған алынбалысалынбалы резервурадың (16) әрқашан таза
болуын қадағалаңыз.
–
Кофені дайындамас бұрын, бойлердегі
су температурасы белгіленген межеге
31
IM VT-1525.indd 31 25.04.2016 15:18:02
Page 32

ҚазаҚша
жеткенін көрсететін дайындық индикаторы
(14) жасыл түсті болып жануын күтіңіз.
–
Кофе қайнатқыш жұмыс істеп тұрған
кезде дайындық индикаторы (14) тұрақты
түрде сөніп, сосын жылытушы элементтің
жұмысынан белгі беріп қайта жанып тұрады.
Жұмыстың мұндай тәртібі температуры
бойлердегі температураның белгіленген
диапазонды сақтауын қамтамасыз етеді.
•
Кофе қайнатқышты тетігін (9) басып
арқылы сөндіріңіз, ол кезде индикаторлар (8)
және (14) сөнеді.
•
Кофе қайнатқыштың сууын күтіп, фильтр
тұтқасын (5) шешіңіз.
•
Фильтр тұтқасын (5) шешу үшін ұстағышын
(3) кофе қайнатқыш корпусындағы «INSERT»
белгісіне қарай бұрап тұтқасын (5) шешіңіз.
•
Фильтрдің бекіткішін (4) көтеріңкіреп,
оны тұтқаға (5) қарай бұрап, фильтрді
(6) бекіткішпен ұстап тұрып, тұтқасын (5)
төңкеріңіз сосын ұнтақталған кофенің
қалдығын тазалаңыз.
•
Фильтрді (6) тұтқадан (5) шығарып, тазалап
жуыңыз.
ЭСПРЕССОНЫ ҚАЛАЙ ДӘМДІ ЕТІП
ДАЙЫНДАУ КЕРЕК
•
«Эспрессо» кофе қайнатқышына арналған
жаңадан ұнтақталған кофені пайдаланыңыз.
•
Ұнтақталған кофені фильтрде (6) аздап
нығыздап, оны өлшеуіш қасықтың екінші
басымен (21) жасауға болады.
•
Алынған кофенің ащылығы кофе дәнектерінің
сапасы мен ұнтақтау деңгейіне, сонымен
қатар суды шығары уақытына байланысты
болады.
•
Егер кофе өте ұзақ құйылса, ол
қолданылатын кофенің тым ұсақ етіп
ұнтақталғандығын немесе кофе шамадан
тыс нығыздалғанын білдіреді.
КАПУЧИНО ДАЙЫНДАУ
«ЭСПРЕССО ДАЙЫНДАУ» бөлімінде
сипатталғандай етіп кофені дайындаңыз, көлемі
көбіктендірілген сүт не қаймақ қосуға жеткілікті
болатындай етіп шәшкеге дайындаңыз.
Ескертпе: Будың бірінші бөлігінде аздаған су
болуы мүмкін, сондықтан құрғақ сулы бу шығуы
үшін бірнеше секундтың көлемінде буды тиісті
ыдысқы шығару керек.
Назар аударыңыз! Ыстық су тамшылары
мен ыстық буға күйіп қалудан сақтану үшін бу
шығаруды қосуда абай болыңыз.
•
Алынбалы-салынбалы резервуарда (16) су
жеткілікті, ал бу шығару реттеуішінің тұтқасы
(15) «-» күйінде тұр.
•
тетігін(13) басып, дайындық индикатор
(14) жасыл түсті болып жануын күтіңіз. Түтіккапучинатордың (18) астына сәйкес келетін
ыдысты қойыңыз.
•
Ұстағышын (15) сағат тіліне қарсы «+» белгісіне
қарай баяу бұрап отырып, бу шығаруды қосыңыз.
•
Түтік-капучинатор саптамасынан (19) аздаған
су ағуын күтіңіз, содан кейін бу көбірек шыға
бастайды, бу шығару реттеуішінің тұтқасы (15)
«-» күйіне келтіріп, бу шығаруды сөндіріңіз.
•
Биік сүйір стақан алып, мүмкіндік болса,
металл, оның 1/3 бөлігін суық сүт не қаймаққа
толтырыңыз.
•
Капучинаторды (17) тұтқасынан ұстап, түтіккапучинатордың (19) саптамасын стақанға
салып, ондағы сүтке 2 см ұшын матырып,
ұстағышын (15) сағат тіліне қарсы баяу бұрап,
будың шығу қарқынын өз қалауыңызша
реттеңіз. Түтік-капучинатордың саптамасы
стақан түбіне тиіп тұрмауы керек, әйтпесе
будың шығуы қиындайды, әдетте сүтті
көбіктендіруге бірнеше секунд жеткілікті.
•
Ұстағышты (15) «-» күйіне келтіріп, будың
шығуын тоқтатыңыз.
•
Сүт не қаймақты көбіктендіргеннен кейін
бірден түтік-капучинаторды (18) және оның
саптамасын (19) тазалаңыз – ол үшін түтіккапучинаторды саптамасымен бірге суы бар
стақанға салып, бу шығару реттеуішінің (15)
ұстағышын «+» күйіне келтіріп, будың шығуын
күтіңіз, содан кейін ұстағышты (15) «-» күйіне
қарай бұрап, будың шығуын тоқтатыңыз.
•
Тетікті (9) басып, кофе қайнатқышты сөндіріңіз,
ол кезде индикаторлар (8 және 14) сөнеді.
•
Кофе қайнатқыштың сууын күтіп, саптаманы
(19) әр жаққа қарай бұрай отырып, түтіккапучинатордан (18) шығарыңыз, сосын оның
ағынды судың астына ұстап тұрып жуыңыз
(шайыңыз).
Ескертпе: Сусынды келесі жолы дайындауда
күйген кофенің иісі шығып тұруын болдырмау
үшін, кофе қайнатқыш бойлерін қажетті
температураға дейін төмендету қажет. Ол
үшін келесі әрекеттерді орындайсыз:
–
Бу шығару тетігін басу арқылы қосымша
қыздыруды (13) сөндіріңіз.
–
Сәйкес келетін шәшкені(көлемі 250 мл кем
емес) тұғырдың торына (2) қойыңыз.
–
Капучинатор (19) саптамасын шәшкеге
салыңыз.
32
IM VT-1525.indd 32 25.04.2016 15:18:02
Page 33

ҚазаҚша
–
Су шығару тетігін (12) басып, сосын бу
шығару реттеуішінің ұстағышын (15) «+»
күйіне қарай бұрап, бу шығаруды қосыңыз.
Сорғы суды бойлер арқылы айдай бастайды.
Су фильтр тұтқасының су шығаруға
арналған тесіктерінен (5) және капучинатор
саптамасынан (19) шыға бастайды. Суды
бойлер арқылы индикатор дайындығы (14)
сөнгенге дейін құйыңыз. Температураның
төмендеуі үшін сонымен қатар біріктіре
орналастырылған термометр (10) арқылы
бақылауға болады.
–
Содан кейін тетігін (12) басу арқылы су
және бу шығаруды жауып, ұстағышын (15)
«-» күйіне келтіріп, дайындық индикаторы
(14) қайта жасыл түсті болып жанғанға дейін
күтіңіз.
МАҢЫЗДЫ:
•
Көбік дайындауға арналған сүтте
консерванттардың болмауы маңызды, демек,
ұзақ мерзім сақталатын сүтті қолданбаған
жөн.
Қаймағы алынбаған майлылығы 4-тен 6% дейінгі
кәдімгі сүтті пайдалануға кеңес беріледі, ал
қаймақтың майлылыға 10% төмен емес болуы
керек.
СУСЫНДЫ ЖЫЛЫТУ
Түтік-капучинаторды (18) саптамасыз (19) сусыны
бар шәшкеге салу арқылы сусындарыңызды
жылыта аласыз.
•
Түтік-капучинатордан (18) саптаманы (19)
алып тастаңыз.
•
Алынбалы-салынбалы резервуарда (16) судың
жеткілікті екеніне, тетіктер (12, 13) басылып
тұрмағанына, бу шығару реттеуішінің тұтқасы
(15) «-» күйінде тұрғанына көз жеткізіңіз.
•
Тұғыр торына (2) сәйкес келетін ыдысты
қойыңыз.
•
Желілік сым айырын электрлік розеткаға
қосыңыз.
тетігін (9) басу арқылы кофе
қайнатқышты қосыңыз, ол кезде индикатор
(8) қызы түсті болып жанады.
басыңыз.
бу шығару тетігі (13) басылып
тетігін (12)
тұрмағанына көз жеткізіңіз.
•
Фильтр тұтқасының су шығаруға арналған
тесіктерінен (5) судың ағуын күтіңіз, содан кейін
тетігін басып (12), су шығаруды тоқтатыңыз.
•
тетігін (13) басыңыз да, дайындық
индикаторы (14) жасыл түсті боп жанады. Бұл
суды буға айналдыру күйіне дейін қосымша
қыздыру аяқталғанын білдіреді.
•
Түтік-капучинаторды (18) қыздырғыңыз келетін
сусыны бар шәшкеге салыңыз. Егер сүтті
жылытқыңыз келсе, түтік-капучинаторды (18)
сүтке 2 см тереңдікке батырып, ұстағыщын(15)
сағат тіліне қарсы баяу бұрап, будың шығу
қарқынын қалауыңызша реттеңіз.
•
Сусынды жылытып, ұстағышты (15) «-»
белгісіне келтіріңіз.
•
Тетікті (9) кофе қайнатқышты сөндіріп,
индикаторлар (8 және 14) сөнеді.
Ескертпе: Будың алғаш бөлігінда аздаған су
бөлігі болуы мүмкін, сондықтан құрғақ су буын
алу үшін буды бірнеше секунд сәйкес келетін
ыдысқа шығару керек.
АВТОМАТТЫ ТҮРДЕ СӨНДІРУ ФУНКЦИЯСЫ
тетігін (9) басқаннан кейін 29 минут бойы кофе
қайнатқышпен егер ешқандай әрекет жасалмаса,
ол автоматты түрде сөнеді.
тетігін (13) кейін 29 минут бойы кофе
қайнатқышпен әрекет жасалмаса, ол автоматты
түрде сөнеді.
ҚАҚТЫ ТАЗАЛАУ
Кофе қайнатқыш дұрыс жұмыс істеуі үшін
қақты ай сайын тазалау керек, ал «қатқыл»
су пайдаланылатын болса, қақты одан да жиі
тазалап тұру керек.
Қақты тұрақты түрде тазалап тұру кофе
қайнатқыштың жұмысын біршама ұзартады және
құрылғының істен шығу қаупін азайтады.
Қақты уақытылы тазаламау, сонымен қатар осы
нұсқаулықтың ережелерін ұстанбау және кофе
қайнатқышты дұрыс пайдаланбау кепілдеме
қызметінің тізіміне енбейді.
•
Лимон қышқылының ерітіндісі – 2 шәй қасығы
1 литр суға.
•
(12, 13) тетіктері басылып тұрса, бу шығару
реттеуішінің ұстағышын (15) «-» күйіне
келтіріңіз.
•
Тұғыр торына (2) және түтік-капучинатор (18)
түбіне сәйкес келетін ыдысты қойыңыз.
•
Суға арналған алынбалы-салынбалы
резервуарды (16) құрылғыдан ажыратып,
лиман қышқылының ерітіндісімен «MAX»
белгісіне дейін толтырыңыз. Содан кейін оған
су шығару түтігін (20) енгізіңіз және алынбалысалынбалы резервуарды (16) өз орнына
орнатыңыз.
•
«Алдын ала қыздыру» бөлімінде сипатталған
әрекеттерді орындаңыз.
1.
Желілік сым айырын электрлік розеткаға
қосыңыз.
тетігін (9) басып, кофе
33
IM VT-1525.indd 33 25.04.2016 15:18:02
Page 34

ҚазаҚша
қайнатқышты қосыңыз, ол кезде индикатор
(8) қызыл түсті болып жанады.
басыңыз.
тетігі (13) басылып тұрмағанына
көз жеткізіңі. Судың Фильтр тұтқасының
су шығаруға арналған тесіктерінен (5)
шығуые күтіңіз, содан кейін
басып, судың ағуын тоқтатыңыз. Біршама
уақыт күтіңіз, сосын кофе қайнатқыш қыза
бастайды.
2.
Дайындық индикаторы (14) жасыл түсті болып
жанады. Бұл қыздыру аяқталғанын білдіреді.
тетігін (12) басып, ыдысты 100 мл су
болуын күтіңіз. Сулың ағуын жауып,
(12) басып, 5 секундтай күту керек.
3.
бу шығару тетігін (13) басып, дайындық
индикаторы(14) жасыл түсті боп жануын күтіңіз.
Ұстағышты (15) «+» бұрып, будың шығуын
ашыңыз. 2 минут күтіңіз де, ұстағышын (15)
«-» күйіне келтіріп, будың шығуын жабыңыз.
тетігін (9) басып, кофе қайнатқышқа лимон
қышқылы ерітіндісін толтырып, 15 минутқа
қойыңыз.
4.
1-3 пункттерін кем дегенде 3 рет қайталаңыз.
5.
тетігін (13) басып (тетік қысулы). Дайындық
индикаторы (14) жасыл түсті болып жануын
күтіңіз.
тетігін (12) басып, лимон қышқылы
ерітіндісі толықтай төгілгенге дейін күтіңіз.
6.
Алынбалы-салынбалы резервуарды (16) таза
сумен толтырып, 1-3 пункттерді кем дегенде
3 рет қайталаңыз (ол кезде 3-пункттер
көрсетілгендей, 15 минут күту керек). Су
тұтастай ыдысқа құйылуын күтіңіз.
7.
Су шығару және түтік-капучинатор жүйесі —
таза екендігіне көз жеткізу үшін, 7-пунктті кем
дегенде 3 рет қайталаңыз.
8.
Тетігін (9) басып, кофе қайнатқышты сөндіріңіз.
тетігін (12)
тетігін (12)
тетігін
Ескертпе: Қақты тазалау үшін кофе
қайнатқыштар мен кофемашинаға арналған
арнайы сұйықтықтарды пайданалуға болады,
бірақ ол сұйықтарды қақ тазалауға пайдалану
кезіндегі ережелерді мұқият орындау керек.
ТАЗАЛАУ
•
Фильтрді (6) тазалау кезінде тесіктері
ұнтақталған кофе қалдықтарымен бітелгені
байқалса, оны кішкентай қылшықпен тазалауға
болады.
•
Кофе қайнатқыштың корпусын дымқыл жұмсақ
матамен сүрту керек, содан кейін корпусын
құрғатып сүрту керек. Металл қылшық пен
абразивті жууға арналған сұйықтықтарды
қолданбаңыз.
•
Кофе қайнатқыштың корпусын су
немесе өзге сұйықтыққа матыруға болмайды.
•
Кофе қайнатқыштың алынбалы-салынбалы
детальдарын жылы суға жууға арналған
жұмсақ сұйықтық қосып жуыңыз, содан кейін
оларды шайып, кептіріңіз.
Тамшыға арналған тұғыр
•
Торды (2) тұғырдан (1) алыңыз, тұғырды
шығарып, ондағыны төгіп тастаңыз, тұғырды
жуып, оны өз орнына орнатыңыз, тұғырға
торды орнатыңыз.
САҚТАУ
•
Кофе қайнатқышты ұзақ уақыт сақтауға қоймас
бұрын, құрылғыны тазалаңыз.
•
Кофе қайнатқышты 0°C-тан төмен
температурада сақтау болмайды.
•
Кофе қайнатқышты балалардың қолы
жетпейтін суық, құрғақ жерде сақтаңыз.
ОЛҚЫЛЫҚТАР, ОЛАРДЫҢ СЕБЕПТЕРІ ЖӘНЕ ОЛАРДЫҢ АЛДЫН АЛУ АМАЛДАРЫ
Олқылықтар Себептері Алдын алу амалдары
Кофе қайнатқыш
қосылмаса
Кофе қайнатқыштың
төменгі бөлігінен су ақса
Фильтрдің тұтқасынан
кофе ақса
Желілік розеткада қысым жоқ. Желілік розетка дұрыс жұмыс істеп
тұрғанына көз жеткізіңіз.
Желілік сым айыры электрлік
розеткаға толық сұғылмаған.
Суға арналған тұғыр тым толып
Желілік айыр электрлік розеткаға
дұрыс қосылғанын тексеріңіз.
Тұғырдағы суды төгіп тастаңыз.
кеткен.
Фильтр бойлердегі
Фильтрдің шеттіктерін тазалаңыз.
тығыздауышқа толық
енгізілмеген, ұнтақталған кофе
фильтрдің шеттіктеріне төгілген.
34
IM VT-1525.indd 34 25.04.2016 15:18:02
Page 35

ҚазаҚша
Олқылықтар Себептері Алдын алу амалдары
Кофе шәшкеге өте ұзақ
уақыт құйылса немесе
мүлде құйылмаса
Дайындалған кофеден
басқа бір иіс шықса
Кофе фильтрдің шетінен
ақса
Бу сүтті көбіктендірмесе Шығатын будың температурасы
Кофе тым ұсақ етіп ұнтақталған,
болмаса фильтрдегі кофе тыс
нығыздалған.
Кофе қайнатқыш бойлеріндегі
қақты тазалау дұрыс
жүргізілмеген.
Кофе дұрыс сақталмаған. Жаңадан ұнтақталған кофені
Тым ұсақ етіп ұнтақталған
кофе немесе фильтрге кофенің
тым көп мөлшері салынған,
болмаса кофе шамалан тыс
нығыздалған.
төмен.
«Эспрессо» кофе қайнатқышына
арналған ұнтақталған кофені
пайдаланыңыз.
Тәжірибе арқылы кофенің
ұсақталуына қарай кофенің фильтрдегі
Нығыздау деңгейін анықтаңыз.
«Суды шығару жүйесін жуу» және
«Қақты тазалау» бөлімдеріне назар
аударыңыз, осы бөлімдердегі
ережелерді бірнеше қайтара
орындаңыз.
пайдаланыңыз. Кофені құрғақ салқын
жерде сақтаңыз.
«Эспрессо» кофе қайнатқышына
арналған жаңадан ұнтақталған
кофені пайдаланыңыз. Тәжірибе
арқылы кофенің ұнтақталу деңгейіне
байланысты кофенің фильтрде
нығыздалу деңгейін анықтаңыз.
Кофені өте көп салып, фильтрді
толтырмаңыз.
Шамадан тыс үлкен ыдыс
қолданылады, болмаса қолданылатын
ыдыстың көлемі сәйкес келмейді. Сіз
майы алынған сүт пайдаландыңыз.
Сүтті дайындық индикаторы (14)
жасыл түсті болып жанғаннан кейін
ғана көбіктендіріңіз.
Сүтті көбіктендіруге сүйір биік ыдысты
пайданалыңыз. Қаймағы алынбаған
майлылығы 4-6% сүтті пайдалануға
кеңес беріледі.
ЖИНАҚ
Кофеварка – 1 дана
Фильтрдің тұтқасы – 1 дана
Кофеге арналған қасық – 1 дана
Өлшеуіш қасық – 1 дана
Нұсқаулық – 1 дана
ТЕХНИКАЛЫҚ СИПАТТАМАЛАРЫ
Электрқуаттандыру: 220-240 В ~ 50 Гц
Қолданылатын қуаттылығы: 1100 Вт
Қысым: 15 бар
Суға арналған резервуардың көлемі:
1л – «MAX» белгісіне дейін
IM VT-1525.indd 35 25.04.2016 15:18:02
Құрылғының сипаттамасын алдын ала
ескертусіз өзгерту құқығы өндірушінің өзінде.
Құрылғының қызмет ету мерзімі – 3 жыл
Гарантиялық мiндеттiлiгi
Гарантиялық жағдайдағы қаралып жатқан
бөлшектер дилерден тек сатып алынған адамға
ғана берiледi. Осы гарантиялық мiндеттiлiгiндегi
шағымдалған жағдайда төлеген чек немесе
квитанциясын көрсетуi қажет.
35
Page 36

УКРАЇНЬСКА
КАВОВАРКА VT-1525 BK
Кавоварка призначена для приготування напою
з мелених кавових зерен.
ОПИС
1.
Піддон для крапель
2.
Решітка піддона
3.
Ручка тримача фільтра
4.
Фіксатор фільтра
5.
Тримач фільтра
6.
Фільтр для кави
7.
Панель управління
8.
Індикатор увімкнення живлення
9.
Кнопка увімкнення/вимикання живлення
10.
Термометр
11.
Площадка для підігрівання чашок
12.
Кнопка подачі води
13.
Кнопка подачі пари
14.
Індикатор готовності
15.
Ручка регулятора подачі пари
16.
Знімний резервуар для води
17.
Ручка капучінатора
18.
Трубка-капучінатор
19.
Наконечник трубки-капучінатора
20.
Трубка забору води
21.
Мірна ложка з ущільнювачем меленої кави
УВАГА!
Для додаткового захисту в ланцюзі живлення
кухні доцільно встановити пристрій захисного вимкнення (ПЗВ) з номінальним струмом
спрацьовування, що не перевищує 30 мА; при
установленні слід звернутися до фахівця.
ЗАПОБІЖНІ ЗАХОДИ
Перед початком експлуатації пристрою уважно
прочитайте це керівництво з експлуатації і збережіть його для використання як довідковий
матеріал.
Використовуйте пристрій тільки за його прямим призначенням, як викладено у цьому керівництві. Неправильне поводження з пристроєм
може привести до його поломки, спричинення
шкоди користувачеві або його майну.
•
Перед умиканням кавоварки переконайтеся,
що напруга в електричній мережі відповідає
напрузі, вказаній на корпусі пристрою.
•
Мережевий шнур забезпечений «євровилкою»; вмикайте її в розетку, що має надійний
контакт заземлення.
•
Електрична безпека кавоварки гарантується
лише в тому випадку, якщо кавоварка належним чином заземлена.
•
Щоб уникнути ризику виникнення пожежі, не
використовуйте перехідники при підмиканні
пристрою до електричної розетки.
•
Встановлюйте пристрій на рівній стійкій
поверхні.
•
Не використовуйте пристрій у безпосередній близькості від джерел тепла або відкритого полум’я.
•
Не використовуйте пристрій у місцях з підвищеною вологістю.
•
Не вмикайте кавоварку без води.
•
Використовуйте лише ті приладдя, які входять до комплекту постачання.
•
Перед вмиканням кавоварки переконайтеся,
що всі знімні деталі встановлені правильно.
•
Не торкайтеся гарячих частин і поверхонь
кавоварки.
•
Не ставте кавоварку на гарячі поверхні.
•
Будьте обережні, щоб уникнути опіків парою
або гарячою водою.
•
Забороняється знімати тримач фільтра або
наконечник трубки-капучінатора під час
роботи кавоварки.
•
Щоб уникнути пожежі, удару електричним
струмом або фізичних пошкоджень, не занурюйте вилку мережного шнура, мережний
шнур або корпус кавоварки у воду або у будьякі інші рідини.
•
Для вимкнення кавоварки спочатку натисніть
на кнопку увімкнення/вимикання, переконайтеся, що індикатор увімкнення живлення
погаснув, і тільки після цього можна виймати
вилку мережного шнура з електричної розетки.
•
Виймаючи вилку мережного шнура з електричної розетки, не тягніть за шнур, а тримайтеся за вилку.
•
Увага! Усувайте накип не рідше 1 разу на
місяць. Несправності, які виникли через
появу накипу на компонентах кавоварки, не
є гарантійним випадком.
•
Кавоварку слід вимикати з електричної
мережі кожного разу перед чищенням, а
також у тому випадку, якщо кавоварка не
використовується.
•
Перед чищенням кавоварки дочекайтесь її
повного охолодження.
•
Не допускайте, щоб електричний шнур звисав зі столу, а також наглядайте, щоб він не
торкався гарячих поверхонь або гострих країв
кухонних меблів.
•
Не використовуйте кавоварку поза приміщеннями.
36
IM VT-1525.indd 36 25.04.2016 15:18:02
Page 37

УКРАЇНЬСКА
•
Ніколи не залишайте кавоварку в місцях з
температурою нижче 0°С.
•
Не дозволяйте дітям торкатися пристрою та
мережного шнура під час роботи пристрою.
•
Не залишайте працюючий пристрій без
нагляду. Будьте особливо уважні, якщо
поблизу від працюючого приладу знаходяться
діти або особи з обмеженими можливостями.
•
Цей пристрій не призначений для використання дітьми. Під час роботи i охолодження
розміщайте пристрій у місцях, недоступних
для дітей.
•
Цей пристрій не призначений для використання особами (включаючи дітей) зі зниженими фізичними, психічними і розумовими
здібностями або при відсутності у них досвіду
або знань, якщо вони не знаходяться під
контролем або не проінструктовані щодо
використання пристрою особою, відповідальною за їх безпеку.
•
Здійснюйте нагляд за дітьми, щоб не допустити використання приладу як іграшки.
•
З міркувань безпеки дітей не залишайте поліетиленові пакети, що використовуються як
упаковка, без нагляду.
Увага! Не дозволяйте дітям грати з поліетиленовими пакетами або пакувальної плівкою.
Небезпека задушення!
•
Періодично перевіряйте стан мережного
шнура, вилки мережного шнура та корпусу
пристрою.
•
Не використовуйте пристрій, якщо є пошкодження мережного шнура або вилки мережного шнура, якщо пристрій працює з
перебоями, а також після його падіння або
будь-яких ушкоджень.
•
Забороняється самостійно ремонтувати пристрій. Не розбирайте пристрій самостійно,
при виникненні будь-яких несправностей, а
також після падіння пристрою вимкніть пристрій з електричної розетки та зверніться
до найближчого авторизованого (уповноваженого) сервісного центру за контактними
адресами, вказаними у гарантійному талоні
та на сайті www.vitek.ru.
•
Перевозьте пристрій лише в заводській упаковці.
•
Зберігайте пристрій у місцях, недоступних
для дітей і людей з обмеженими можливостями.
ПРИСТРІЙ ПРИЗНАЧЕНИЙ ТІЛЬКИ ДЛЯ
ДОМАШНЬОГО ВИКОРИСТАННЯ
Панель управління і регулятор подачі пари
–
Кнопка увімкнення/вимикання живлення (9)
призначена для увімкнення/вимикання пристрою. Кнопка не має фіксації у нижньому
положенні. Для увімкнення або вимикання
кавоварки досить натиснути і відпустити
кнопку.
–
Індикатор увімкнення живлення (8) дозволяє визначити поточний стан пристрою. Коли
пристрій увімкнений, індикатор світиться
червоним світлом. Якщо пристрій вимкнений, індикатор не світиться
–
Кнопка подачі води (12) має два фіксованих
положення. При натисненні кнопки вмикається подача води для приготування кави.
Коли кнопка не натиснута, подача води
вимкнена.
–
Кнопка подачі пари (13) також має два фіксованих положення. При натисненні кнопки
вмикається додатковий нагрів води у бойлері
до стану пари, використовується при приготуванні молочної пінки і підігрівання напоїв.
Коли кнопка не натиснута, додатковий нагрів
вимкнутий.
–
Індикатор готовності (14) призначений для
контролю температури нагріву бойлера кавоварки при приготуванні кави та для контролю додаткового нагріву при приготуванні
молочної пінки. Після досягнення заданої
температури нагріву індикатор готовності (14)
засвічується зеленим кольором.
–
Термометр (10) показує температуру води/
пари при приготуванні напоїв.
–
Регулятор подачі пари (15) вмикає подачу
пари та дозволяє регулювати її інтенсивність. Для вмикання та регулювання подачі
пари повільно повертайте ручку регулятора
подачі пари (15) проти годинникової стрілки
у бік символу «+». Для вимкнення подачі пара
поверніть ручку регулятора за годинниковою
стрілкою до упору у бік символу «-».
ПЕРЕД ПЕРШИМ ВИКОРИСТАННЯМ
Після транспортування або зберігання пристрою при зниженій температурі необхідно
витримати його при кімнатній температурі не
менше трьох годин.
Примітка: У знімному резервуарі (16) можуть
бути сліди впливу води. Це нормальне явище,
оскільки пристрій проходив контроль якості.
–
Витягніть кавоварку з упаковки, видаліть всі
пакувальні матеріали і будь-які наклейки, що
заважають роботі пристрою.
37
IM VT-1525.indd 37 25.04.2016 15:18:02
Page 38

УКРАЇНЬСКА
–
Перевірте цілісність пристрою, за наявності
пошкоджень не користуйтеся пристроєм.
–
Переконайтеся, що робоча напруга пристрою
відповідає напрузі в електромережі.
–
Перед першим використанням кавоварки промийте всі її знімні частини, тримач фільтра (5),
фільтр для кави (6), знімний резервуар для
води (16) та мірну ложку (21) теплою водою з
нейтральним миючим засобом і просушіть.
–
Зробіть промивання системи подачі води та
трубки капучінатора.
Промивання системи подачі води
•
Переконайтеся, що кнопки (12, 13) не натиснуті, а ручка регулятора подачі пари (15)
знаходиться у положенні «-» (повернена за
годинниковою стрілкою до упору).
•
Потягніть знімний резервуар для води (16) з
правого боку, від’єдніть його від пристрою
та наповніть холодною водою до максимальної позначки «MAX». Після цього помістіть
у нього трубку забору води (20) і встановіть
знімний резервуар (16) на місце.
•
Вставте фільтр для кави (6) у тримач фільтра (5).
•
Не насипаючи каву у фільтр (6), приєднайте
тримач фільтра (5) до бойлера кавоварки, для
цього розташуйте ручку тримача фільтра (3)
під надписом «INSERT» (УСТАВИТИ) на корпусі кавоварки, вставте тримач (5) у бойлер
та поверніть ручку тримача фільтра (3) проти
годинникової стрілки до упору (в бік мітки «І»)
(мал. 1).
•
Поставте відповідну посудину (об’ємом
не менше 250 мл) на решітку піддону (2).
Переконайтеся, що регулятор подачі пари
(15) знаходиться у положенні «-».
•
Вставте вилку мережного шнура в електричну
розетку. Натисненням кнопки
кавоварку, при цьому індикатор (8) засвітиться червоним кольором.
•
Натисніть кнопку (12) та дочекайтеся
подачі води з вихідних отворів тримача фільтра (5), після чого натисніть кнопку
ще раз. Це необхідно, щоб вода зі знімного
резервуара (16) почала надходити у бойлер
та заповнила його.
•
Переконайтеся, що кнопки (12, 13)
не натиснуті. Почекайте деякий час, пристрій
почне попередній нагрів. Дочекайтеся, коли
індикатор готовності (14) засвітиться зеленим
кольором. Це означає, що попередній нагрів
завершений (вода у бойлері нагрілася).
(9) увімкніть
(12)
•
Натисніть кнопку подачі води (12) ще раз,
вода почне витікати з вихідних отворів тримача фільтра (5) .
•
Зливайте воду близько 1 хвилини, потім припиніть подачу води, натиснувши кнопку
(12). Зачекайте, поки вода перестане витікати з вихідних отворів тримача фільтра (5) та
вилийте воду з посудини. Промивання системи подачі води закінчена.
Промивання трубки капучінатора
•
Після промивання системи подачі води натисніть кнопку подачі пари
(13), дочекайтеся,
коли індикатор готовності (14) засвітиться
зеленим кольором. Під трубку-капучінатор
(18) поставте відповідну посудину.
•
Увімкніть подачу пари, повільно повертаючи ручку (15) проти годинникової стрілки у
напрямку до символу «+».
•
Дочекайтесь моменту, коли з наконечника
трубки-капучінатора (19) вийде невелика
кількість води, після чого пара почне виходити інтенсивніше, вимкніть подачу пари,
повернувши ручку регулятора подачі пари
(15) у положення «-».
Промивання системи подачі води і трубки
капучінатора завершене.
Примітка: При першому умиканні подачі води
можливе з’явлення гучного звуку від працюючої
помпи та помітного вібрування корпусу кавоварки,
але через 20-30 секунд, коли помпа наповниться
водою, рівень звуку та вібрації значно знизиться.
Увага! При вмиканні подачі пари будьте обережні, щоб уникнути опіків гарячими краплями
води та гарячою парою.
ПРИГОТУВАННЯ ЕСПРЕСО
Перед приготуванням кави рекомендується
попередньо прогріти кавоварку, фільтр (6) та
тримач фільтра (5). Попередній прогрів необхідний для отримання якісної готової кави.
Використовуємі чашки необхідно спочатку
нагріти, для цього установіть їх на площадку
(11), під час нагрівання води у бойлері кавоварки
площадка (11) також нагрівається, підігріваючи
при цьому чашки.
Попередній прогрів
•
Переконайтеся у тому, що кнопки (12, 13) не
натиснуті, а ручка регулятора подачі пари (15)
знаходиться у положенні «-».
•
Перед початком роботи залийте воду у
знімний резервуар (16). Потягніть знімний
38
IM VT-1525.indd 38 25.04.2016 15:18:03
Page 39

УКРАЇНЬСКА
резервуар для води (16), від’єдніть його від
пристрою і наповніть холодною водою (рівень
води має бути більше позначки «MIN», але не
перевищувати позначку «MAX».) Після цього
помістіть у нього трубку забору води (20) і
встановіть знімний резервуар (16) на місце.
•
Вставте фільтр для кави (6) у тримач фільтра (5).
•
Не насипаючи каву у фільтр (6), приєднайте
тримач фільтра (5) до бойлера кавоварки, для
цього розташуйте ручку тримача фільтра (3)
під надписом «INSERT» (УСТАВИТИ) на корпусі кавоварки, вставте тримач (5) у бойлер
та поверніть ручку тримача фільтра (3) проти
годинникової стрілки до упору (в бік мітки «І»)
(мал. 1).
•
Поставте відповідну посудину на решітку
піддона (2). Переконайтеся, що ручка регулювання подачі пари (15) знаходиться у положенні «-».
•
Вставте вилку мережного шнура в електричну
розетку. Натисненням кнопки
(9) увімкніть
кавоварку, при цьому індикатор (8) засвітиться червоним кольором. Переконайтеся,
що кнопки
•
Натисніть кнопку (12). Дочекайтеся подачі
(12, 13) не натиснуті.
води з вихідних отворів тримача фільтра (5),
після чого натисніть кнопку
(12) ще раз.
Це необхідно, щоб вода з знімного резервуара (16) почала надходити у бойлер та заповнила його.
Примітка: Для отримання якісного гарячого
напою завжди заповнюйте бойлер водою
перед початком приготування.
•
Коли індикатор готовності (14) засвітиться
зеленим кольором, натисніть кнопку
(12),
вода почне витікати з вихідних отворів тримача фільтра (5).
•
Зливайте воду близько 20 секунд, потім
натисніть кнопку
(12). Попередній нагрів
завершений.
Приготування еспресо
•
Переконайтеся, що у знімному резервуарі
(16) достатньо води, кнопки (12, 13) не натиснуті, ручка регулятора подачі пари (15) знаходиться у положенні «-».
Для доливання води можна не виймати знімний
резервуар (16) з пристрою, а висунути його до
середини, при цьому для наливання води використовувати посудину відповідного об’єму.
•
Від’єдніть тримач фільтра (5) від бойлера
кавоварки, повернувши ручку тримача (3)
за годинниковою стрілкою у бік надпису
«INSERT».
•
Насипте мелену каву у фільтр (6) та злегка
утрамбуйте її зворотним боком мірної ложки
(21).
•
Приєднайте тримач фільтра (5) до бойлера
кавоварки, для цього розташуйте ручку тримача фільтра (3) під надписом «INSERT» на
корпусі кавоварки, вставте тримач (5) у бойлер та поверніть ручку тримача фільтра (3)
проти годинникової стрілки до упору (у бік
мітки «І») (мал. 1).
•
Коли індикатор готовності (14) засвітиться
зеленим кольором, натисніть кнопку подачі
води
(12), вода почне витікати з вихідних отворів тримача фільтра (5). Наглядайте
за процесом наповнення чашки приготованою кавою.
•
Після заповнення чашки приготованою
кавою (або при змінюванні кольору кави на
менш насичений) натисніть кнопку
вимкнувши подачу води.
•
Після зняття чашки з приготованою кавою з
отворів тримача фільтра можуть витікати краплі, це нормальне явище. Наглядайте за заповненням піддона (1), періодично зливайте з
нього рідину та промивайте піддон (1) водою.
Увага!
–
Забороняється знімати тримач фільтра (5) під
час роботи кавоварки.
Примітки:
–
Повторне приготування кави рекомендується
робити з інтервалами не менше 5 хвилин.
–
Для приготування кави використовуйте тільки
чисту воду і завжди наглядайте за чистотою
знімного резервуара для води (16).
–
Перед приготуванням кави дочекайтеся, коли
індикатор готовності (14) засвітиться зеленим кольором, який показує, що температура
води у бойлері досягнула заданого значення.
–
Під час роботи кавоварки індикатор готовності (14) буде періодично гаснути та знову
засвічуватися, показуючи роботу нагрівального елементу. Такий режим роботи забезпечує підтримання температури бойлера у
заданому діапазоні.
•
Вимкніть кавоварку, натиснувши кнопку (9),
при цьому індикатори (8) та (14) погаснуть.
•
Дочекайтесь остигання кавоварки та зніміть
тримач фільтра (5).
•
Для зняття тримача фільтра (5) поверніть
ручку (3) у бік надпису «INSERT» на корпусі
кавоварки і зніміть тримач (5).
39
(12),
IM VT-1525.indd 39 25.04.2016 15:18:03
Page 40

УКРАЇНЬСКА
•
Підніміть фіксатор фільтра (4) та притисніть
його до тримача (5), утримуючи фіксатором
фільтр (6), переверніть тримач (5) та видаліть
залишки меленої кави.
•
Витягніть фільтр (6) з тримача (5) та промийте.
ЯК ОТРИМАТИ ХОРОШУ КАВУ ЕСПРЕСО
•
Використовуйте свіжо мелену каву, призначену для кавоварок «еспресо».
•
Злегка утрамбуйте мелену каву у фільтрі (6),
це можна зробити зворотним кінцем мірної
ложки (21).
•
Міцність отримуємої кави залежатиме від
якості і ступеня помелу кавових зерен, а
також від часу подачі води.
•
Якщо кава наливається дуже довго, це означає, що кава дуже дрібного помелу або дуже
сильно утрамбована.
ПРИГОТУВАННЯ КАПУЧIНО
Зваріть каву, як описано у розділі
«ПРИГОТУВАННЯ ЕСПРЕСО», у чашці, об’єму
якої буде цілком достатньо для додання збитої
пінки молока або вершків.
Примітка: Перша порція пари може містити
невелику кількість води, тому для отримання
сухої водяної пари необхідно протягом декілька
секунд випустити пару у відповідну посудину.
Увага! При вмиканні подачі пари будьте обережні, щоб уникнути опіків гарячими краплями
води та гарячою парою.
•
Переконайтеся, що у знімному резервуарі (16) достатньо води, а ручка регулятора
подачі пари (15) знаходиться у положенні «-».
•
Натисніть кнопку (13), дочекайтеся, коли
індикатор готовності (14) засвітиться зеленим кольором. Під трубку-капучінатор (18)
поставте відповідну посудину.
•
Увімкніть подачу пари, повільно повертаючи ручку (15) проти годинникової стрілки у
напрямку до символу «+».
•
Дочекайтесь моменту, коли з наконечника
трубки-капучінатора (19) вийде невелика
кількість води, після чого пара почне виходити інтенсивніше, вимкніть подачу пари,
повернувши ручку регулятора подачі пари
(15) у положення «-».
•
Візьміть високу вузьку склянку, бажано металеву, та наповніть її холодним молоком або
вершками приблизно на 1/3.
•
Візьміться за руку капучінатора (17), опустіть наконечник трубки-капучінатора (19) у
склянку, зануривши його у молоко приблизно
на 2 см, повільно повертайте ручку (15) проти
годинникової стрілки і відрегулюйте інтенсивність подачі пари за вашим розсудом.
Наконечник трубки-капучінатора не має торкатися дна склянки, інакше вихід пари буде
утруднений, при певному навику для отримання молочної піни достатньо декілька
секунд.
•
Увімкніть подачу пари, повернувши ручку (15)
у положення «-».
•
Відразу після збивання молока або вершків
прочистіть трубку-капучінатор (18) та наконечник (19) – для цього опустіть трубку-капучінатор з наконечником у склянку з водою,
увімкніть подачу пари, повернувши ручку
регулятора подачі пари (15) у положення «+»,
після цього закрийте подачу пари, повернувши ручку (15) у положення «-».
•
Вимкніть кавоварку, натиснувши кнопку (9),
при цьому індикатори (8 та 14) погаснуть.
•
Дочекайтесь остигання кавоварки та зніміть
наконечник (19) з трубки-капучінатора (18),
повертаючи наконечник (19) у різні боки, та
промийте (сполосніть) його під струменем
води.
Примітка: Щоб при подальшому приготуванні напою усунути запах перепаленої кави,
необхідно охолодити бойлер кавоварки до
потрібної температури. Для цього виконайте
наступні дії:
–
Вимкніть додатковий нагрів, натиснувши на
кнопку подачі пари
–
Поставте відповідну посудину (об’ємом не
(13).
менше 250 мл) на решітку піддону (2).
–
Опустіть наконечник капучінатора (19) у
чашку.
–
Натисніть кнопку подачі води (12) та увімкніть подачу пари, повернувши ручку регулятора подачі пари (15) у положення «+».
Помпа почне прокачувати холодну воду через
бойлер. Вода почне витікати з вихідних отворів тримача фільтра (5) та наконечника капучінатора (19). Качайте воду через бойлер
до тих пір, поки індикатор готовності (14)
не погасне. Зниження температури також
можна спостерігати на вбудованому термометрі (10).
–
Після цього закрийте подачу води і пари,
натисніть на кнопку
(12), поверніть ручку
(15) у положення «-» та дочекайтеся, коли
індикатор готовності (14) знов засвітиться
зеленим кольором.
40
IM VT-1525.indd 40 25.04.2016 15:18:03
Page 41

УКРАЇНЬСКА
ВАЖЛИВО:
•
Необхідно, щоб в свіжому молоці, використовуємому для приготування пінки, не містилися
консерванти, тобто не слід використовувати
так зване молоко тривалого зберігання.
Рекомендується використовувати звичайне
незбиране молоко жирністю від 4 до 6%, жирність вершків має бути не менше 10%.
ПІДІГРІВАННЯ НАПОЇВ
Ви можете підігріти напої, опустивши трубку-капучінатор (18) без наконечника (19) у чашку з напоєм.
•
Зніміть наконечник (19) з трубки-капучіна-
тора (18).
•
Переконайтеся, що у знімному резервуарі
(16) достатньо води, кнопки (12, 13) не натис-
нуті, ручка регулятора подачі пари (15) знахо-
диться у положенні «-».
•
Поставте відповідну посудину на решітку під-
дона (2).
•
Вставте вилку мережного шнура в електричну
розетку. Натисненням кнопки
(9) увімкніть
кавоварку, при цьому індикатор (8) засвітиться червоним кольором. Натисніть кнопку
(12). Переконайтеся, що кнопка подачі
пари
•
Дочекайтеся подачі води з вихідних отво-
(13) не натиснута.
рів тримача фільтра (5), після чого закрийте
подачу води, натиснувши кнопку
•
Натисніть кнопку (13), дочекайтеся, коли
(12).
індикатор готовності (14) засвітиться зеленим
кольором. Це означає, що додатковий нагрів
води до стану пари завершений.
•
Опустіть трубку-капучінатор (18) у чашку з
напоєм, який ви хочете підігріти. Якщо ви
хочете підігріти молоко, занурте трубку-капучінатор (18) у молоко приблизно на 2 см,
повільно повертайте ручку (15) проти годинникової стрілки і відрегулюйте інтенсивність
подачі пари за вашим розсудом.
•
Підігрівши напій, поверніть ручку (15) у положення «-».
•
Вимкніть кавоварку, натиснувши кнопку (9),
при цьому індикатори (8 та 14) погаснуть.
Примітка: Перша порція пари може містити
невелику кількість води, тому для отримання
сухої водяної пари необхідно протягом декілька
секунд випустити пару у відповідну ємність.
ФУНКЦІЯ АВТОМАТИЧНОГО ВИМКНЕННЯ
Якщо після натиснення кнопки
(9) протягом
29 хвилин з кавоваркою не буде зроблено жодних дій, вона автоматично вимкнеться.
Якщо після натиснення кнопки
(13) протягом
29 хвилин з кавоваркою не буде зроблено жодних дій, вона автоматично вимкнеться.
УСУНЕННЯ НАКИПУ
Для ефективної роботи кавоварки рекомендується проводити усунення накипу кожен місяць,
а при використанні «твердої» води усунення
накипу слід проводити ще частіше.
Періодичне усунення накипу продовжує термін
служби кавоварки та зменшує ризик виходу пристрою з ладу.
Несвоєчасне усунення накипу, а також недотримування положень цієї інструкції та неправильне
використовування кавоварки не покривається
гарантією.
•
Приготуйте розчин лимонної кислоти –
2 чайні ложки на 1 літр води.
•
Переконайтеся, що кнопки (12, 13) не натиснуті, ручка регулятора подачі пари (15) знаходиться у положенні «-».
•
Поставте відповідну посудину на решітку піддона (2) та під трубку-капучінатор (18).
•
Потягніть знімний резервуар для води (16),
від’єдніть його від пристрою та наповніть
його розчином лимонної кислоти до позначки
«MAX». Після цього помістіть у нього трубку
подачі води (20) і встановіть знімний резервуар (16) на місце.
•
Виконайте дії, які описані у розділі
«Попередній прогрів».
1.
Вставте вилку мережного шнура в електричну
розетку. Натисненням кнопки
(9) увімкніть
кавоварку, при цьому індикатор (8) засвітиться червоним кольором. Натисніть кнопку
(12). Переконайтеся, що кнопка (13) не
натиснута. Дочекайтеся подачі води з вихідних отворів тримача фільтра (5), після чого
закрийте подачу води, натиснувши кнопку
(12). Почекайте деякий час, починається
нагрів кавоварки.
2.
Дочекайтеся, коли індикатор готовності (14)
засвітиться зеленим кольором. Це означає,
що нагрів завершений. Натисніть кнопку
(12) та дочекайтеся, коли у посудині буде
близько 100 мл води. Закрийте подачу води,
натиснувши кнопку
(12), і почекайте
близько 5 секунд.
3.
Натисніть кнопку подачі пари (13), дочекайтеся, коли індикатор готовності (14) засвітиться зеленим кольором. Відкрийте подачу
пари, повернувши ручку (15) у положення
«+». Зачекайте 2 хвилини та закрийте подачу
41
IM VT-1525.indd 41 25.04.2016 15:18:03
Page 42

УКРАЇНЬСКА
пари, повернувши ручку (15) у положення
«-». Натисніть кнопку
(9) та залиште кавоварку, заповнену розчином лимонної кислоти, на 15 хвилин.
4.
Повторіть пункти 1-3 мінімум 3 рази.
5.
Натисніть кнопку (13) (кнопка відтиснута). Дочекайтеся, коли індикатор готовності (14) засвітиться зеленим кольором.
Натисніть кнопку
(12) та дочекайтеся,
поки весь розчин лимонної кислоти не буде
злитий.
6.
Наповніть знімний резервуар (16) чистою
холодною водою, повторіть пункти 1-3
ЧИЩЕННЯ
•
Якщо при чищенні фільтра (6) виявиться, що
отвори засмічені осадом меленої кави, їх
можна почистити невеликою щіткою.
•
Корпус кавоварки можна протирати м’якою
вологою тканиною, після чого корпус слід
витерти досуха. Не використовуйте металеві
щітки і абразивні миючі засоби.
•
Забороняється занурювати корпус кавоварки
у воду або в будь-які інші рідини.
•
Знімні деталі кавоварки промивайте теплою
водою з нейтральним миючим засобом, а
потім сполосніть та висушіть їх.
не менше 3 разів (при цьому немає необхідності чекати 15 хвилин, як описано у
пункті 3). Дочекайтеся, коли вся вода буде
у посудині.
7.
Для більшої упевненості в тому, що система
подачі води і трубка-капучінатор — чисті
Піддон для крапель
•
Зніміть решітку (2) з піддону (1), зніміть під-
дон та злийте з нього уміст, промийте під-
дон та установіть його на місце, установіть
решітку на піддон.
повторіть пункт 7 не менше 3 разів.
8.
Увімкніть кавоварку, натиснувши кнопку (9).
Примітка: Для усунення накипу можна використовувати спеціальні засоби, що застосовуються
для усунення накипу у кавоварках та кавомашинах, при цьому слід строго дотримуватися
інструкції з використання засобів для усунення
накипу.
ЗБЕРІГАННЯ
•
Перш ніж забрати кавоварку на тривале збе-
рігання, зробіть чищення пристрою.
•
Забороняється зберігати кавоварку при тем-
пературі нижче 0°C.
•
Зберігайте кавоварку у сухому прохолодному
місці, недоступному для дітей.
НЕСПРАВНОСТІ, ЇХ ПРИЧИНИ ТА МЕТОДИ УСУНЕННЯ
Несправність Причина Метод усунення
Кавоварка не
вмикається
У мережній розетці відсутня
напруга.
Вилка мережевого шнура не до
кінця вставлена в електричну
Переконайтеся, що мережева розетка
працює.
Перевірте, чи до кінця вставлена
вилка в електричну розетку.
розетку.
Вода витікає з нижньої
Піддон для води переповнений. Злийте воду з піддона.
частини кавоварки
Витік кави з тримача
фільтра
Нещільне прилягання фільтру до
ущільнювача у бойлері, мелена
Очистіть краї фільтра.
кава потрапила на краї фільтра.
Кава наливається
у чашку дуже довго
або взагалі не
наливається.
Кава дуже дрібного помелу
або кава у фільтрі дуже сильно
утрамбована.
Використовуйте мелену каву,
призначену для кавоварок «еспресо».
Дослідним шляхом визначте ступінь
забутинування кави у фільтрі залежно
від ступеня помелу кави.
Приготована кава має
сторонній запах.
Неправильний процес усунення
накипу у бойлері кавоварки.
Зверніться до розділів «Промивання
системи подачі води» та «Усунення
накипу», здійсніть положення цих
розділів декілька разів.
Неправильне зберігання кави. Використовуйте свіжомелену
каву. Зберігаєте каву в сухому
прохолодному місці.
42
IM VT-1525.indd 42 25.04.2016 15:18:03
Page 43

УКРАЇНЬСКА
Несправність Причина Метод усунення
Кава витікає через
краї фільтра
Пара не збиває
молоко
Кава дуже дрібного помелу
або дуже велика кількість кави
укладена
у фільтрі або кава дуже сильно
втрамбована.
Низька температура виходячої
пари.
Використовуйте мелену каву,
призначену для кавоварок «еспресо».
Дослідним шляхом визначте ступінь
забутинування кави у фільтрі залежно
від ступеня помелу кави.
Не переповнюйте фільтр великої
кількістю кави.
Використовується дуже велика
посудина або застосовується
посудина невідповідного розміру.
Ви використовували знежирене
молоко.
Збивайте молоко лише після того, як
індикатор готовності (14) засвітиться
зеленим кольором.
Для збивання молока використовуйте
вузький високий посуд.
Використовуйте лише незбиране
молоко жирністю 4-6%.
КОМПЛЕКТАЦІЯ
Кавоварка – 1 шт.
Тримач фільтра – 1шт.
Фільтр для кави – 1 шт.
Мірна ложка – 1 шт.
Інструкція – 1 шт.
ТЕХНІЧНІ ХАРАКТЕРИСТИКИ
Електроживлення: 220-240 В ~ 50 Гц
Споживаєма потужність: 1100 Вт
Тиск: 15 бар
Місткість резервуара для води:
1 л – до позначки «MAX»
Виробник залишає за собою право змінювати
характеристики пристроїв без попереднього
повідомлення.
Термін служби пристрою – 3 роки
Гарантія
Докладні умови гарантії можна отримати в дилера, що продав дану апаратуру. При пред’явленні
будь-якої претензії протягом терміну дії даної
гарантії варто пред’явити чек або квитанцію про
покупку.
Даний виріб відповідає вимогам
до електромагнітної сумісності, що
пред’являються директивою 2004/108/
ЕС Ради Європи й розпорядженням
2006/95/ЕС по низьковольтних апаратурах.
43
IM VT-1525.indd 43 25.04.2016 15:18:03
Page 44

GB
A production date of the item is indicated in the serial number on the technical data plate. A serial number is an eleven-unit number, with the first four figures indicating the production date. For example, serial number 0606ххххххх
means that the item was manufactured in June (the sixth month) 2006.
DE
Das Produktionsdatum ist in der Seriennummer auf dem Schild mit technischen Eigenschaften dargestellt. Die Seriennummer stellt eine elfstellige Zahl dar, die ersten vier Zahlen bedeuten dabei das Produktionsdatum. Zum Beispiel bedeutet die Seriennummer 0606xxxxxxx, dass die Ware im Juni (der sechste Monat) 2006 hergestellt wurde.
RUS
Дата производства изделия указана в серийном номере на табличке с техническими данными. Серийный
номер представляет собой одиннадцатизначное число, первые четыре цифры которого обозначают дату
производства. Например, серийный номер 0606ххххххх означает, что изделие было произведено в июне
(шестой месяц) 2006 года.
Kz
Бұйымның шығарылған мерзімі техникалық деректері бар кестедегі сериялық нөмірде көрсетілген. Сериялық
нөмір он бір саннан тұрады, оның бірінші төрт саны шығару мерзімін білдіреді. Мысалы, сериялық нөмір
0606ххххххх болса, бұл бұйым 2006 жылдың маусым айында (алтыншы ай) жасалғанын білдіреді.
UA
Дата виробництва виробу вказана в серійному номері на табличці з технічними даними. Серійний номер представляє собою одинадцятизначне число, перші чотири цифри якого означають дату виробництва. Наприклад, серійний номер 0606ххххххх означає, що виріб був виготовлений в червні (шостий місяць) 2006 року.
ЗАПРЕЩЕНО УТИЛИЗИРОВАТЬ
С БЫТОВЫМ МУСОРОМ.
ОБРАТИТЕСЬ НА СООТВЕТСТВУЮЩИЙ
ПУНКТ ПЕРЕРАБОТКИ ЭЛЕКТРИЧЕСКОГО
И ЭЛЕКТРОННОГО ОБОРУДОВАНИЯ.
IM VT-1525.indd 44 25.04.2016 15:18:03
 Loading...