


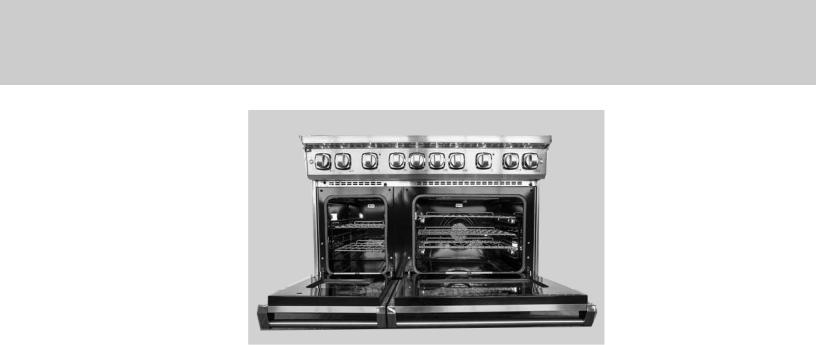
Viking VDR73624GBW, VDR73626BSBLP, VDR74826GABLP, VDR74826GAGLP, VDR74826GBF Maintance Manual
...Use & Care
Professional Freestanding Ranges /
Built-In Rangetops
VGR7362, VGR7482, VDR7362, CVDR7362, VDR7482, CVDR7482 VRT736, VRT748,

Congratulations
Congratulations and welcome to the elite world of Viking Range, LLC ownership. We hope you will enjoy and appreciate the care and attention we have put into every detail of your new, state-of-the-art range.
Your range is designed to offer years of reliable service. This Use and Care Manual will provide you with the information you need to become familiar with your range’s care and operation.
Your complete satisfaction is our ultimate goal. If you have any questions or comments about this product, please contact the dealer from whom you purchased it, or contact our Consumer Support Center at 1-888-845-4641.
We appreciate your choice of our range and hope that you will again select our products for your other major appliance needs.
For more information about our complete and growing selection of products, contact your dealer or visit us online at vikingrange.com
Table of Contents
Getting Started
Warnings ____________________________________________________________________________________________3 Before Using Range ____________________________________________________________________________________8
Product Controls
Rangetop Features ____________________________________________________________________________________9 Gas Range Features ____________________________________________________________________________________9 Dual fuel Range Features ______________________________________________________________________________10 Backlit Knobs Features __________________________________________________________________________________11 Oven Functions and Settings ____________________________________________________________________________12
Operation
Surface Operation ____________________________________________________________________________________13 Lighting Burners ____________________________________________________________________________________13 Surface Burners-Automatic Reignition __________________________________________________________________13 Vari-Simmer™ ______________________________________________________________________________________13 Surface Cooking Tips ________________________________________________________________________________14 Cooking Vessels ____________________________________________________________________________________14
Griddle/Simmer Plate __________________________________________________________________________________15 Oven Features ________________________________________________________________________________________16 Rack Positions ______________________________________________________________________________________16 Using the Oven ______________________________________________________________________________________17 Conventional and Convection Cooking __________________________________________________________________17 Baking ______________________________________________________________________________________________17 Bake (VGR Gas Ranges) ______________________________________________________________________________17 Convection Bake (Gas Ranges) ________________________________________________________________________17 Bake (Dual Fuel Ranges) ______________________________________________________________________________18 Convection Bake (Dual Fuel Ranges) ____________________________________________________________________18 Roasting (Dual Fuel Ranges) __________________________________________________________________________22 Broiling (VGR Ranges) __________________________________________________________________________________25 Broiling (VDR Ranges) __________________________________________________________________________________26 Convection Dehydrate ________________________________________________________________________________27 Convection Defrost ____________________________________________________________________________________27
Product Care
Cleaning and Maintenance ______________________________________________________________________________28 Replacing Oven Lights__________________________________________________________________________________30 Self-Clean Cycle (Dual Fuel models) ______________________________________________________________________31 Door Removal ________________________________________________________________________________________32 Door Replacement ____________________________________________________________________________________32 Troubleshooting ______________________________________________________________________________________33 Service Information ____________________________________________________________________________________34 Warranty ____________________________________________________________________________________________35
2

Warnings
Warning and Important Safety Instructions appearing in this manual are not meant to cover all possible conditions and situations that may occur. Common sense, caution, and care must be exercised when installing, maintaining, or operating the appliance.
ALWAYS contact the manufacturer about problems or conditions you do not understand.
Recognize Safety Symbols, Words, Labels
 DANGER
Hazards or unsafe practices which WILL result in severe personal injury or death
 WARNING
Hazards or unsafe practices which COULD result in death or severe personal injury
 CAUTION
Hazards or unsafe practices which COULD result in minor personal injury.
All safety messages will identify the hazard, tell you how to reduce the chance of injury, and tell you what can happen
if the instructions are not followed.
 WARNING
If the information in this manual is not followed exactly, a fire or explosion may result causing property damage, personal injury or death.
WHAT TO DO IF YOU SMELL GAS:
•DO NOT try to light any appliance.
•DO NOT touch any electrical switch.
•DO NOT use any phone in your building.
•Immediately call your gas supplier from a neighbor's phone. Follow the gas supplier's instructions.
•If you cannot reach your gas supplier, call the fire department.
Installation and service must be performed by a qualified installer, service agency or the gas supplier.
 WARNING
DO NOT use commercial oven cleaners inside the oven. Use of these cleaners can produce hazardous fumes or can damage the porcelain finishes.
 WARNING
To avoid risk of property damage, personal injury or death; follow information in this manual exactly to prevent a fire or explosion. DO NOT store or use gasoline or other flammable vapors and liquids in
the vicinity of this or any appliance.
 WARNING
TIPPING HAZARD
To reduce the risk of the appliance tipping, it must
be secured by a properly installed anti-tip bracket(s). To make sure the bracket has been installed properly, look behind the range with a flashlight to verify proper installation engaged in the rear top left corner of the range.
•THIS RANGE CAN TIP
•INJURIES TO PERSONS CAN RESULT
•INSTALL ANTI-TIP DEVICE PACKED WITH RANGE
•SEE INSTALLATION INSTRUCTIONS
Read and follow all instructions before using this appliance to prevent the potential risk of fire, electric shock, personal injury or damage to the appliance as a result of improper usage of the appliance. Use appliance only for its intended purpose as described in this manual.
To ensure proper and safe operation: Appliance must be properly installed and grounded by a qualified technician. DO NOT attempt to adjust, repair, service, or replace any part of your appliance unless it is specifically recommended in this manual. All other servicing should be referred to a qualified servicer. Have the installer show you the location of the gas shutoff valve and how to shut it off in an emergency. A certified technician is required for any adjustments or conversions to Natural or LP gas.
KEEP THESE INSTRUCTIONS FOR FUTURE REFERENCE
3

Warnings
To Prevent Fire or Smoke Damage
•Be sure all packing materials are removed from the appliance before operating it.
•Keep area around appliance clear and free from combustible materials, gasoline, and other flammable vapors and materials.
•If appliance is installed near a window, proper precautions should be taken to prevent curtains from blowing over burners.
•NEVER leave any items on the rangetop. The hot air from the vent may ignite flammable items and may increase pressure in closed containers which may cause them to burst.
•Many aerosol-type spray cans are EXPLOSIVE when exposed to heat and may be highly flammable. Avoid their use or storage near an appliance.
•Many plastics are vulnerable to heat. Keep plastics away from parts of the appliance that may become warm or hot. DO NOT leave plastic items on the rangetop as they may melt or soften if left too close to the vent or a lighted surface burner.
•Combustible items (paper, plastic, etc.) may ignite and metallic items may become hot and cause burns. DO NOT pour spirits over hot foods. DO NOT leave oven unsupervised when drying herbs, breads, mushrooms, etc; fire hazard.
In Case of Fire
Turn off appliance and ventilating hood to avoid spreading the flame. Extinguish flame then turn on hood to remove smoke and odor.
•Cooktop: Smother fire or flame in a pan with a lid or cookie sheet.
•NEVER pick up or move a flaming pan.
•Oven: Smother fire or flame by closing the oven door. DO NOT use water on grease fires. Use baking soda, a dry chemical or foam-type extinguisher to smother fire or flame.
•GREASE–Grease is flammable and should be handled carefully. DO NOT use water on grease fires. Flaming grease can be extinguished with baking soda or, if available, a multipurpose dry chemical or foam type extinguisher. Let fat cool before attempting to handle it. DO NOT allow grease to collect around the oven or in vents. Wipe up spillovers immediately.
Child Safety
•NEVER leave children alone or unsupervised near the appliance when it is in use or is still hot.
•NEVER allow children to sit or stand on any part of the appliance as they could be injured or burned.
•DO NOT store items of interest to children over the unit. Children climbing to reach items could be seriously injured.
•Children must be taught that the appliance and utensils in it can be hot. Let hot utensils cool in a safe place, out of reach of small children. Children should be taught that an appliance is not a toy. Children should not be allowed to play with controls or other parts of the appliance.
Cooking Safety
•To eliminate the hazard of reaching over hot surface burners, cabinet storage should not be provided directly above a unit. If storage is provided, it should be limited to items which are used infrequently and which are safely stored in an area subjected to heat from an appliance. Temperatures may be unsafe for some items, such as volatile liquids, cleaners or aerosol sprays.
•ALWAYS place a pan on a surface burner before turning it on. Be sure you know which knob controls which surface burner. Make sure the correct burner is turned on and that the burner has ignited. When cooking is completed, turn burner off before removing pan to prevent exposure to burner flame.
•ALWAYS adjust surface burner flame so that it does not extend beyond the bottom edge of the pan. An excessive flame is hazardous, wastes energy and may damage the appliance, pan or cabinets above the appliance. This is based on safety considerations.
•NEVER leave a surface cooking operation unattended especially when using a high heat setting or when deep fat frying. Boilovers cause smoking and greasy spillovers may ignite. Clean up greasy spills as soon as possible. DO NOT use high heat for extended cooking operations.
•DO NOT heat unopened food containers, build up of pressure may cause the container to explode and result in injury.
•Use dry, sturdy pot-holders. Damp pot-holders may cause burns from steam. Dishtowels or other substitutes should NEVER be used as potholders because they can trail across hot surface burners and ignite or get caught on appliance parts.
•ALWAYS let quantities of hot fat used for deep fat frying cool before attempting to move or handle.
•DO NOT let cooking grease or other flammable materials accumulate in or near the appliance, hood or vent fan. Clean hood frequently to prevent grease from accumulating on hood or filter. When flaming foods under the hood, turn the fan off.
•NEVER wear garments made of flammable material or loose fitting or long-sleeved apparel while cooking. Clothing may ignite or catch utensil handles. DO NOT drape towels or materials on oven door handles. These items could ignite and cause burns.
•ALWAYS place oven racks in the desired positions while oven is cool. Slide oven rack out to add or remove food, using dry, sturdy pot-holders. ALWAYS avoid reaching into the oven to add or remove food. If a rack must be moved while hot, use a dry pot-holder.
•ALWAYS turn the oven off at the end of cooking.
•Use care when opening the oven door. Let hot air or steam escape before moving or replacing food.
•NEVER use aluminum foil to cover oven racks or oven bottom. This could result in risk of electric shock, fire, or damage to the appliance. Use foil only as directed in this guide.
4

Warnings
•PREPARED FOOD WARNING: Follow food manufacturer's instructions. If a plastic frozen food container and/or its cover distorts, warps, or is otherwise damaged during cooking, immediately discard the food and its container. The food could be contaminated.
• If you are “flaming” liquor or other spirits under an exhaust, TURN THE FAN OFF. The draft could cause the flames to spread out of control.
•Once the unit has been installed as outlined in the Installation Instructions, it is important that the fresh air supply is not obstructed. The use of a gas cooking appliance results in the production of heat and moisture in the room in which it is installed. Ensure that the kitchen is well-ventilated. Keep natural venting holes open or install a mechanical ventilation device. Prolonged or intensive use of the appliance may call for additional (such as opening a window) or more effective ventilation (such as increasing the level of a mechanical ventilation if present).
Utensil Safety
•Use pans with flat bottoms and handles that are easily grasped and stay cool. Avoid using unstable, warped, easily tipped or loose-handled pans. Also avoid using pans, especially small pans, with heavy handles as they could be unstable and easily tip. Pans that are heavy to move when filled with food may also be hazardous.
•Be sure utensil is large enough to properly contain food and avoid boilovers. Pan size is particularly important in deep fat frying. Be sure pan will accommodate the volume of food that is to be added as well as the bubble action of fat.
•To minimize burns, ignition of flammable materials and spillage due to unintentional contact with the utensil, DO NOT extend handles over adjacent surface burners. ALWAYS turn pan handles toward the side or back of the appliance, not out into the room where they are easily hit or reached by small children.
•NEVER let a pan boil dry as this could damage the utensil and the appliance.
•Follow the manufacturer's directions when using oven cooking bags.
•Only certain types of glass, glass/ceramic, ceramic or glazed utensils are suitable for rangetop surface or oven usage without breaking due to the sudden change in temperature. Follow manufacturer's instructions when using glass.
•This appliance has been tested for safe performance using conventional cookware. DO NOT use any devices or accessories that are not specifically recommended in this guide. DO NOT use eyelid covers for the surface units, stovetop grills, or add-on oven convection systems. The use of devices or accessories that are not expressly recommended in this manual can create serious safety hazards, result in performance problems, and reduce the life of the components of the appliance.
•The flame of the burner should be adjusted to just cover the bottom of the pan or pot. Excessive burner setting may cause scorching of adjacent counter-top surfaces, as well as the outside of the utensil. This is based on safety considerations.
Burners and Heating Elements
•NEVER touch oven bake and broil burner areas or interior surfaces of oven.
•Bake and broil burners may be hot even though they are dark in color. Areas near burners and interior surfaces of an oven may become hot enough to cause burns.
•During and after use, DO NOT touch or let clothing or other flammable materials contact hot burners, heating elements, areas near elements, or interior surfaces of oven until they have had sufficient time to cool. Other surfaces of the oven may become hot enough to cause burns, such as the oven vent opening, the surface near the vent opening, and the oven door window.
Cleaning Safety
•Turn off all controls and wait for appliance parts to cool before touching or cleaning them. DO NOT touch the burner grates or surrounding areas until they have had sufficient time to cool.
•Clean appliance with caution. Use care to avoid steam burns if a wet sponge or cloth is used to wipe spills on a hot surface. Some cleaners can produce noxious fumes if applied to a hot surface.
•DO NOT clean door gasket. It is essential for a good tight seal. Care should be taken not to rub, damage, or move the gasket.
•No commercial oven cleaner or oven liner protective coating such as aluminum foil should be used in or around any part of the oven. Improper oven liners may result in a risk of electric shock or fire. Keep oven free from grease buildup.
5
Warnings
Self-Clean Oven
•Clean only parts listed in this guide. DO NOT clean door gasket. The door gasket is essential for a good seal. Care should be taken not to rub, damage, or move the gasket. DO NOT use oven cleaners of any kind in or around any part of the self-clean oven.
•Before self-cleaning the oven, remove oven racks and other utensils and wipe up excessive spillovers to prevent excessive smoke, flareups or flaming.
•This range features a cooling fan which operates automatically during a clean cycle. If the fan does not turn on, cancel the clean operation and contact an authorized servicer.
•It is normal for the top cooking surface of the range to become hot during a self-clean cycle. Therefore, touching the top cooking surface during a clean cycle should be avoided.
Important Safety Notice and Warning
The California Safe Drinking Water and Toxic Enforcement Act of 1986 (Proposition 65) requires the Governor of California to publish a list of substances known to the State of California to cause cancer or reproductive harm, and requires businesses to warn customers of potential exposures to such substances. Users of this appliance are hereby warned that when the oven is engaged in the self-clean cycle, there may be some low-level exposure to some of the listed substances, including carbon monoxide. Exposure to these substances can be minimized by properly venting the oven to the outdoors by opening the windows and/or door in the room where the appliance is located during the self-clean cycle.
Important notice regarding pet birds:
NEVER keep pet birds in the kitchen or in rooms where the fumes from the kitchen could reach. Birds have a very sensitive respiratory system. Fumes released during an oven self-cleaning cycle may be harmful or fatal to birds. Fumes released due to overheated cooking oil, fat, margarine and overheated non-stick cookware may be equally harmful.
About Your Appliance
•For proper oven performance and operation, DO NOT block or obstruct the oven vent duct located on the right side of the air grille.
•Avoid touching oven vent area while oven is on and for several minutes after oven is turned off. When the oven is in use, the vent and surrounding area become hot enough to cause burns. After oven is turned off, DO NOT touch the oven vent or surrounding areas until they have had sufficient time to cool.
•Other potentially hot surfaces include rangetop, areas facing the rangetop, oven vent, surfaces near the vent opening, oven door, areas around the oven door and oven window.
•The misuse of oven doors (e.g. stepping, sitting, or leaning on them) can result in potential hazards and/or injuries.
Power Failure
If power failure occurs, the electric igniters will not work. No attempt should be made to operate the appliance during a power failure. Make sure the oven control is in the “OFF” position.
Momentary power failure can occur unnoticed. The range is affected only when the power is interrupted. When it comes back on, the range will function properly without any adjustments. A “brown-out” may or may not affect range operation, depending on how severe the power loss is.
 WARNING
NEVER use appliance as a space heater to heat or warm a room to prevent potential hazard to the user and damage to the appliance. Also, DO NOT use the rangetop or oven as a storage area for food or cooking utensils.
 WARNING
ELECTRICAL SHOCK HAZARD
DO NOT touch a hot oven light bulb with a damp cloth as the bulb could break. Should the bulb break,
disconnect power to the appliance before removing bulb to avoid electrical shock.
6
Warnings
 WARNING
NEVER cover any slots, holes or passages in the oven bottom or cover an entire rack with materials such as aluminum foil. Doing so blocks air flow through the oven and may cause carbon monoxide poisoning. Aluminum foil linings may also trap heat, causing a fire hazard.
 WARNING
ELECTRICAL SHOCK HAZARD
Disconnect the electric power at the main fuse or circuit breaker before replacing bulb.
 WARNING
BURN OR ELECTRICAL SHOCK HAZARD
Make sure all controls are OFF and oven is COOL before cleaning. Failure to do so can result in burns or electrical shock.
 WARNING
To avoid sickness and food waste, DO NOT allow defrosted food to remain in the oven for more than two hours.
 NOTICE
DO NOT turn the Temperature Control on during defrosting. Turning the convection fan on will accelerate the natural defrosting of the food without the heat.
 WARNING
You must carefully check the food during the dehydration process to ensure that it does not catch fire.
 WARNING
DO NOT store items of interest to children over the unit. Children climbing to reach items could be seriously injured.
 WARNING
BURN HAZARD
The oven door, especially the glass, can get hot.
Danger of burning: DO NOT touch the glass!
This range features a self-cleaning cycle. During this cycle, the oven reaches elevated temperatures in order to burn off soil and deposits.
A powder ash residue is left in the bottom of the oven after completion of the self-clean cycle.
Note: DO NOT use commercial oven cleaners inside the oven. Use of these cleaners can produce hazardous fumes or can damage the porcelain finishes. DO NOT line the oven with aluminum foil or other materials. These items can melt or burn during a self-clean cycle, causing permanent damage to the oven.
 WARNING
DO NOT touch the exterior portions of the oven after selfcleaning cycle has begun, since some parts become extremely hot to the touch!
During the first few times the self-cleaning feature is used, there may be some odor and smoking from the “curing” of the binder in the high-density insulation used in the oven. When the insulation is thoroughly cured, this odor will disappear. During subsequent self-cleaning cycles, you may sense an odor characteristic of high temperatures.
KEEP THE KITCHEN WELL-VENTED DURING THE SELF-CLEAN
CYCLE.
 WARNING
BURN HAZARD
When self-cleaning, surfaces may get hotter than usual. Therefore, children should be kept away.
 WARNING
WARNING - CALIFORNIA RESIDENTS {Cancer} and {Reproductive harm} - www.P65Warning.ca.gov
7
Before Using Range / Rangetop
All products are wiped clean with solvents at the factory to remove any visible signs of dirt, oil, and grease which may have remained from the manufacturing process. Before starting to cook, clean the appliance thoroughly with hot, soapy water. There may be some burn off and odors on first use of the appliance—this is normal.
All VRT Rangetop models include:
•Exclusive Elevation Burners™ for commercial-type performance.
•Front burners rated at 23,000 BTUs
•Rear burners rated at 15,000 BTUs / one at 8,000 BTUs
•Exclusive VariSimmer™ Setting for all burners provides gentle, even simmering.
•Exclusive SureSpark™ Ignition System with automatic re-ignition for consistent and reliable ignition on all burners.
Oven
Important! Before first use, wipe interior with soapy water and dry thoroughly. Then set the oven selector to bake, the thermostat to 450°F, and operate for an hour.
All VGR Gas models include:
•Exclusive restaurant style sealed burner system for commercialtype performance.
•Front burners rated at 23,000 BTUs
•Back burners rated at 15,000 BTUs / one at 8,000 BTUs.
•Exclusive VariSimmerTM setting for all burners provides gentle, even simmering.
•Exclusive SureSparkTM ignition system with automatic re-ignition for consistent and reliable ignition on all burners.
•Exclusive one-piece tooled and porcelainized cooking surface contains spills for easy cleaning.
•Five performance modes—including convection baking and convection broiling—providing air circulation for shorter cooking times with even results.
•Convection baking with a hidden 30,000 BTU burner provides fast, even baking for all your casserole dishes as well as easy cleanup.
•The 1500°F closed door, infrared broiler allows intense heat to sear delicate cuts of meat providing that restaurant taste.
•Two halogen lights illuminate the oven cavity with less glare.
•Six rack positions and three racks provide ample space for your baking needs.
All VDR/CVDR Dual Fuel models include:
•Exclusive restaurant style sealed burner system for commercialtype performance.
•Front burners rated at 23,000 BTUs
•Back burners rated at 15,000 BTUs / one at 8,000 BTUs
•Exclusive VariSimmerTM setting for all burners provides gentle, even simmering.
•Exclusive SureSparkTM ignition system with automatic re-ignition for consistent and reliable ignition on all burners.
•Exclusive one-piece tooled and porcelainized cooking surface contains spills for easy cleaning.
•Split baking and broiling elements—which reduces preheating time and provides greater control and more even heating.
•A reversing convection fan which is two times larger than most on the market—this allows you to cook foods more thoroughly and evenly—even when baking large quantities.
•Four convection modes offering greater air circulation to shorten cooking times and cook foods more evenly.
•Three broiling modes including a new low-broil mode for delicate broiling and top-browning.
•A profiled, concealed bake element for easier cleaning.
8

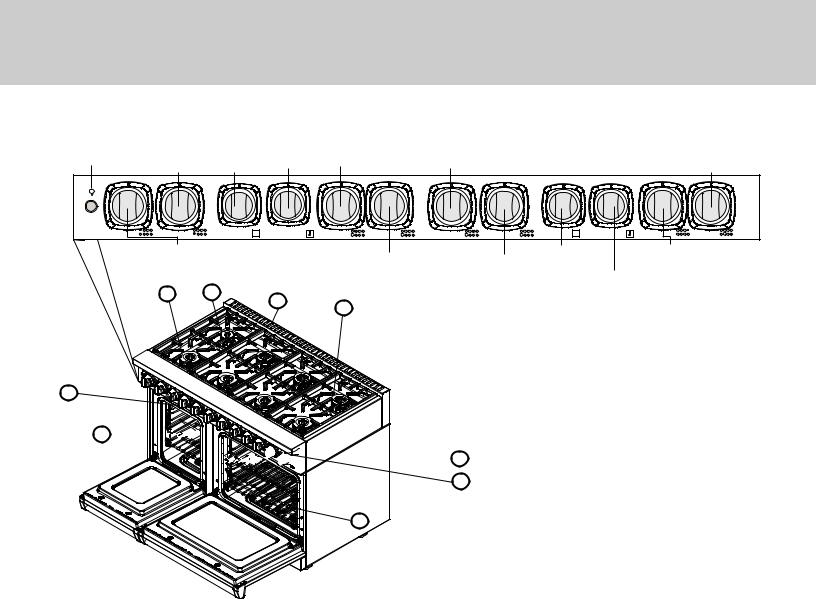
Rangetop Features (VRT)
|
Left Front Burner |
Center Left Rear Burner |
Center Right Rear Burner |
|
Right Front Burner |
||||
|
Control Knob |
Control Knob |
|
||||||
|
Control Knob |
(15,000 BTU) |
(15,000 BTU) |
|
Control Knob |
||||
|
(23,000 BTU) |
|
|
|
|
|
(23,000 BTU) |
||
|
|
|
|
|
|
|
|
|
|
|
|
|
|
|
|
|
|
|
|
|
|
|
|
|
|
|
|
|
|
Left Rear Burner |
|
|
Control Knob |
|
Center Left |
(8,000 BTU) |
|
Front Burner |
|
|
Control Knob |
|
3 |
(23,000 BTU) |
|
|
|
|
1 |
4 |
|
|
2
5
6
|
Right Rear Burner |
|
Center Right |
Control Knob |
|
(15,000 BTU) |
||
Front Burner |
||
Control Knob |
|
|
(23,000 BTU) |
|
1.Front 23,000 BTU burners
2.Rear 15,000 BTU burners
3.Rear 8.000 BTU burner
4.Island trim
5.Night Light Switch (under bullnose)
6.Lighted Bezel Switch (under bullnose)
Range Features (VGR Gas Range)
|
|
|
Left Front Burner |
Left Oven |
Center Left Rear Burner |
Center Right Rear Burner |
|
Right Front Burner |
|||||||
Interior Oven |
Control Knob |
Control Knob |
|
||||||||||||
Light Switch |
Control Knob |
Temperature |
(15,000 BTU) |
(15,000 BTU) |
|
Control Knob |
|||||||||
|
|
|
(23,000 BTU) |
Control Knob |
|
|
|
|
|
|
(23,000 BTU) |
||||
|
|
|
|
|
|
|
|
|
|
|
|
|
|
|
|
|
|
|
|
|
|
|
|
|
|
|
|
|
|
|
|
|
|
|
|
|
|
|
|
|
|
|
|
|
|
|
|
|
|
|
|
|
|
|
|
|
|
|
|
|
|
|
|
|
|
|
|
|
|
|
|
|
|
|
|
|
|
|
|
|
|
|
|
|
|
|
|
|
|
|
|
|
|
|
|
Left Rear Burner |
|
Control Knob |
Center Left Front Burner |
(8,000 BTU) |
Control Knob |
|
(23,000 BTU) |
3
1
4
2
5
7 


6
|
Right Oven |
Right Rear Burner |
Convection |
|
Center Right |
Temperature |
Control Knob |
Fan |
|
Control Knob |
(15,000 BTU) |
Switch |
||
Front Burner |
||||
Control Knob |
|
|
|
|
(23,000 BTU) |
|
|
|
1.Front 23,000 BTU burners
82. Rear 15,000 BTU burners
3. Rear 8.000 BTU burner
94. Island trim
5.Identification plate (under control panel)
6.30” Oven - Three TruGlide racks/Six rack positions
7.18” Oven - Two standard tilt-proof rack/Six rack positions
8.Night Light Switch (under bullnose)
9.Lighted Bezel Switch (under bullnose)
9
Range Features (VDR/CVDR Gas Range)
|
|
|
Center Left Rear Burner |
Center Right |
|
|
Interior Oven |
Left Front Burner |
Left Oven |
Left Oven |
Control Knob |
Rear Burner |
Right Front Burner |
Light Switch |
Control Knob |
Selector |
Temperature |
(15,000 BTU) |
Control Knob |
Control Knob |
|
(23,000 BTU) |
Knob |
Control Knob |
|
(15,000 BTU) |
(23,000 BTU) |
Left Rear Burner |
|
Center Left |
|
Right Oven |
Right Rear Burner |
Control Knob |
|
Center Right |
Selector |
Control Knob |
|
|
Front Burner |
||||
(8,000 BTU) |
|
Front Burner |
Knob |
(15,000 BTU) |
|
|
|
Control Knob |
|
Right Oven |
|
|
|
Control Knob |
|
||
|
|
(23,000 BTU) |
|
Temperature |
|
|
3 |
(23,000 BTU) |
|
||
1 |
|
|
Control Knob |
||
|
|
|
|||
|
4 |
2 |
|
|
|
|
|
|
|
|
5
7 


 8
8
|
|
9 |
6 |
1. |
Front 23,000 BTU burners |
2. |
Rear 15,000 BTU burners |
|
|
3. |
Rear 8.000 BTU burner |
|
4. |
Island trim |
|
5. |
Identification plate (under control panel) |
|
6. |
30” Oven-Three TruGlide racks/Six rack positions |
|
7. |
18” Oven-Two standard tilt-proof racks/Six rack positions |
|
8. |
Night Light Switch (under bullnose) |
|
9. |
Lighted Bezel Switch (under bullnose) |
Night Light Switch:
When switched to on position, all of the rings behind the knobs will display the user’s preselected light color.
Lighted Bezel Switch:
To change the color of the bezel light, hold the switch until the bezel color changes and then release the switch.
10
Backlit Knob Features
2 1
Backlight Night Light Function & Color Change
•The night light functions turns all of the bezel back lights on (button 1 on the right hand under side of the bull nose) NOTE: buttons 1 & 2 are on the right side for ranges and the left side for range tops
•The back light color can be cycled between blue, white, and off by holding the number 2 button. Release the switch when you reach the desired setting.
•The error code will still function when the number 2 switch is cycled to off.
Burner knob lighting
•Knob tic: hard on/off
•Knob ring: fade on (white or blue) (2 sec) when knob is turned on; fade off (1 sec) when knob is turned off.
.
Griddle Knob/ Gas oven knob lighting
•Knob tic: hard on/off; cycles.
•Knob ring: fade on (white or blue) (2 sec) when knob is turned on; fade off (1 sec) when knob is turned off.
•Ring preheat: ring pulses until temp is initially reached; then solid until the knob is turned off.
Dual Fuel Oven Knob Lighting
•Selector knob tic: hard on when knob is turned on; hard off when knob is turned off
•Temp knob tic (cycle light): hard on/off; cycles.
•Selector knob ring: fade on (white or blue) (2 sec) when knob is turned on; fade off (1 sec) when knob is turned off.
•Temp knob ring: fade on (2 sec) when knob is turned on; fade off (1 sec) when knob is turned off.
•Ring preheat: rings pulse 180 out of phase until temp is initially reached; then solid until the knob(s) are turned off.
Self-Clean
•Backlight color will be yellow
•Selector knob tic: hard on when knob is turned on; hard off if knob is turned off
•Temp knob tic (cycle light): hard on/off; cycles.
•Selector knob ring: fade on (2 sec) when knob is turned on; fade off (1 sec) when knob is turned off.
•Temp knob ring: fade on (2 sec) when knob is turned on; fade off (1 sec) when knob is turned off.
•Ring preheat: rings pulse 180 out of phase until temp is initially reached; then solid until the knob(s) are turned off.
•Ring cooldown: once door is unlocked rings to revert back to Viking blue until knobs are manually turned off.
•Note: if one oven is in self clean, the other will not go into self clean. If you place the other oven in self-clean with one already being in self-clean
only the indicator for the selector knob will illuminate, the temperature knob indicator will not turn on as the door has not locked; also, the knob backlights will turn on but will not pulse, indicating that the oven has not started its self-clean preheat
Note: If the self-clean cycle is cancelled before the door latch is fully engaged within the first 30 seconds, the door may be locked.
To unlock the door, turn the selector and temperature knob to SELFCLEAN until bezel pulses yellow. Once the bezel pulses yellow, turn both knobs to “OFF”. The bezel will turn to a solid yellow color and when the solid yellow color disappears, the door will be unlocked.
Error Code
•Backlight will be red
•Griddle / oven knob(s): errors should flash the corresponding rings at the defined rate/qty times for each error code
11
 Loading...