


 Loading...
 IFP30 Series
IMPORTANT: Please read this User Guide to obtain important information on installing and using your product in a safe manner, as well as registering your product for future service. Warranty information contained in this User Guide will describe your limited coverage from ViewSonic® Corporation, which is also found on our web site at http://www.viewsonic.com in English, or in specific languages using the Regional selection box in the upper right corner of our website. “Antes de operar su equipo lea cu idadosamente las instrucciones en este manual”
Model No. VS17775/VS17776
P/N: IFP6530/IFP7530
Thank you for choosing ViewSonic®
As a world-leading provider of visual solutions, ViewSonic® is dedicated to exceeding the world’s expectations for technological evolution, innovation, and simplicity. At ViewSonic®, we believe that our products have the potential to make a positive impact in the world, and we are confident that the ViewSonic® product you have chosen will serve you well.
Once again, thank you for choosing ViewSonic®!
2
 Safety Precautions
Please read the following Safety Precautions before you start using the device.
•Keep this user guide in a safe place for later reference.
•Read all warnings and follow all instructions.
•Do not use the device near water. To reduce the risk of fire or electric shock, do not expose the device to moisture.
•Never remove the rear cover. This display contains high-voltage parts. You may be seriously injured if you touch them.
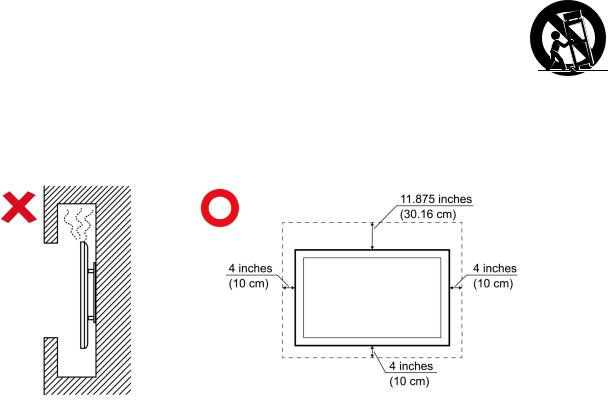
•Avoid exposing the device to direct sunlight or other sources of sustained heat.
•Do not install near any heat sources such as radiators, heat registers, stoves, or other devices (including amplifiers) that may increase the temperature of the device to dangerous levels.
•Use a soft, dry cloth to clean the external housing. For more information, refer to the "Maintenance" section on page 103.
•When moving the device, be careful not to drop or bump the device on anything.
•Do not place the device on an uneven or unstable surface. The device may fall over resulting in an injury or a malfunction.
•Do not place any heavy objects on the device or connection cables.
•If smoke, an abnormal noise, or a strange odor is present, immediately turn the device off and call your dealer or ViewSonic®. It is dangerous to continue using the device.
•The device is a monitor with an LED backlight intended for general office use.
•Do not attempt to circumvent the safety provisions of the polarized or grounding-type plug. A polarized plug has two blades with one wider than the other. A grounding-type plug has two blades and a third grounding prong. The wide blade and the third prong are provided for your safety. If the plug does not fit into your outlet, obtain an adapter and do not attempt to force the plug into the outlet.
•When connecting to a power outlet, DO NOT remove the grounding prong. Please ensure grounding prongs are NEVER REMOVED.
•Protect the power cord from being treaded upon or pinched, particularly at the plug, and at the point where it emerges from the equipment. Ensure that the power outlet is located near the equipment so that it is easily accessible.
3
•Only use attachments/accessories specified by the manufacturer.
•When a cart is used, use with caution when moving the cart/equipment combination to avoid injury from tipping over.
•Disconnect the power plug from the AC outlet if the device is not being used for a long period of time.
•Place the device in a well-ventilated area. Do not place anything on the device that prevents heat dissipation.
•Refer all servicing to qualified service personnel. Service will be required when the unit has been damaged in any way, such as:
ͫͫ if the power supply cord or plug is damaged ͫͫ if liquid is spilled onto or objects fall in the unit ͫͫ if the unit is exposed to moisture
ͫͫ if the unit does not operate normally or has been dropped
4

Contents |
|
Safety Precautions....................................................... |
3 |
Introduction............................................................... |
10 |
Package Contents.................................................................................................. |
10 |
Wall Mount Kit Specifications (VESA).................................................................... |
11 |
Product Overview.................................................................................................. |
12 |
Control Panel......................................................................................................... |
12 |
I/O Panel................................................................................................................ |
13 |
Remote Control...................................................................................................... |
15 |
Using Gestures....................................................................................................... |
19 |
Select and Deselect an Object (Clicking)............................................................ |
19 |
Display Menu Options (Right-Clicking)............................................................... |
19 |
Double-Clicking.................................................................................................. |
19 |
Moving an Object............................................................................................... |
20 |
Erasing Digital Ink............................................................................................... |
20 |
Swipe Up for General Settings........................................................................... |
20 |
Making Connections................................................... |
21 |
Connecting External Devices and Touch Connection............................................ |
21 |
DisplayPort Connection......................................................................................... |
21 |
HDMI Connection................................................................................................... |
21 |
VGA Connection..................................................................................................... |
21 |
RS-232 Connection................................................................................................. |
22 |
USB and Networking Connections......................................................................... |
23 |
Media Player Connection....................................................................................... |
24 |
SPDIF Connection................................................................................................... |
25 |
Video Output Connection...................................................................................... |
26 |
5
Using Your ViewBoard............................................... |
27 |
Powering On/Off your ViewBoard........................................................................ |
27 |
Initial Launch Setup............................................................................................... |
28 |
vLauncher - Customizable Welcome Screen......................................................... |
30 |
Customize Default Applications (vLauncher)........................................................ |
31 |
Tool Bar................................................................................................................. |
32 |
ViewBoard On-Screen Display (OSD) Menu.......................................................... |
36 |
General Settings..................................................................................................... |
37 |
Detailed Settings.................................................................................................... |
39 |
Audio.................................................................................................................. |
39 |
Screen................................................................................................................ |
40 |
Display................................................................................................................ |
41 |
Adjust................................................................................................................. |
42 |
Advanced Settings.................................................................................................. |
43 |
Wireless & Networks.......................................................................................... |
43 |
Wi-Fi............................................................................................................... |
44 |
Ethernet......................................................................................................... |
45 |
Wi-Fi Hotspot................................................................................................. |
46 |
Share.................................................................................................................. |
47 |
Device................................................................................................................ |
48 |
Theme............................................................................................................ |
48 |
Display............................................................................................................ |
48 |
Wallpaper................................................................................................... |
49 |
ENERGY STAR® mode................................................................................. |
50 |
HDMI EDID................................................................................................. |
51 |
HDMI OUT Resolution Setting.................................................................... |
52 |
Auto Brightness.......................................................................................... |
52 |
Burn-in Protection Interval........................................................................ |
53 |
Storage........................................................................................................... |
54 |
Sound............................................................................................................. |
54 |
Security.......................................................................................................... |
55 |
Trusted Credentials.................................................................................... |
55 |
Clear Credentials........................................................................................ |
55 |
Languages & Input......................................................................................... |
56 |
Keyboard and Input Method...................................................................... |
56 |
Android Keyboard...................................................................................... |
56 |
Language.................................................................................................... |
58 |
Boot Setting................................................................................................... |
59 |
6
Startup Channel......................................................................................... |
59 |
Built-in PC startup option........................................................................... |
59 |
Standby after Startup................................................................................. |
60 |
Power On/Off Timer................................................................................... |
60 |
No Signal Power Off................................................................................... |
61 |
HDMI CEC................................................................................................... |
61 |
Password for Screen Lock............................................................................... |
62 |
Channel Setting.............................................................................................. |
63 |
Input Channel Alias Switch......................................................................... |
63 |
Power On by Active Source........................................................................ |
63 |
Signal Auto Search..................................................................................... |
63 |
Auto Switch to new Source........................................................................ |
63 |
Side Tool Bar Channel.................................................................................... |
64 |
System................................................................................................................ |
65 |
Date & Time................................................................................................... |
65 |
About Device.................................................................................................. |
68 |
System Update........................................................................................... |
68 |
Advanced....................................................................................................... |
71 |
Mode.......................................................................................................... |
72 |
App Info...................................................................................................... |
72 |
Password.................................................................................................... |
72 |
Reset.......................................................................................................... |
73 |
7
Embedded Applications and Settings......................... |
74 |
Embedded Digital Whiteboard App...................................................................... |
74 |
myViewBoard......................................................................................................... |
74 |
Floating Bar........................................................................................................ |
74 |
Toolbar............................................................................................................... |
74 |
ViewBoard Cast..................................................................................................... |
76 |
Cast Sender from Windows-based Devices, Macbook, and Chrome devices........ |
77 |
Cast Sender from Mobile Devices: iOS-based (iPhone, iPad) and Android OS based |
|
phone/tablet.......................................................................................................... |
78 |
Cast Out from a Mobile Device that Supports Annotation.................................... |
79 |
vSweeper............................................................................................................... |
80 |
Screen Lock............................................................................................................ |
81 |
Chromium.............................................................................................................. |
82 |
WPS Office............................................................................................................. |
82 |
Folders................................................................................................................... |
83 |
RS-232 Protocol......................................................... |
84 |
Description............................................................................................................ |
84 |
RS-232 Hardware Specification.............................................................................. |
84 |
LAN Hardware Specification.................................................................................. |
85 |
RS-232 Communication Setting............................................................................. |
85 |
LAN Communication Setting.................................................................................. |
85 |
Command Message Reference.............................................................................. |
85 |
Protocol................................................................................................................. |
86 |
Set-Function Listing................................................................................................ |
86 |
Get-Function Listing............................................................................................... |
90 |
Remote Control Pass-through Mode..................................................................... |
95 |
Appendix................................................................... |
98 |
Specifications........................................................................................................ |
98 |
Display Modes....................................................................................................... |
99 |
VGA Mode.............................................................................................................. |
99 |
HDMI/OPS Mode................................................................................................... |
99 |
DisplayPort (DP) Mode......................................................................................... |
100 |
Troubleshooting.................................................................................................. |
101 |
Maintenance....................................................................................................... |
103 |
General Precautions............................................................................................. |
103 |
Cleaning the Screen............................................................................................. |
103 |
Cleaning the Case................................................................................................. |
103 |
8
Regulatory and Service Information......................... |
104 |
Compliance Information..................................................................................... |
104 |
CE Conformity for European Countries................................................................ |
104 |
Declaration of RoHS2 Compliance....................................................................... |
104 |
ENERGY STAR® statement.................................................................................... |
105 |
Indian Restriction of Hazardous Substances........................................................ |
105 |
Product Disposal at End of Product Life............................................................... |
106 |
Copyright Information......................................................................................... |
107 |
Customer Service................................................................................................. |
108 |
Limited Warranty................................................................................................. |
109 |
Mexico Limited Warranty.................................................................................... |
112 |
9
 Introduction
Package Contents
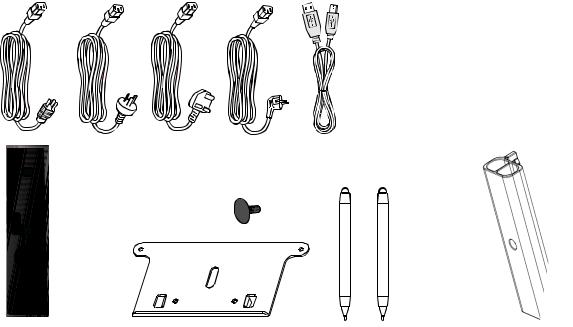
• HDMI cable |
• Touch Pen x 2 |
• Power cable x 4 |
• Wall mount screws |
• Remote control |
• Quick Start Guide |
• AAA battery x 2 |
• Webcam plate with screws |
• USB touch cable |
• Pen Tray and screws |
• Compliance Statement |
|
X 2 |
|
X 1 |
X 2 |
5V.1 |
|
5V.1 |
|
|
|


 X 4
X 4
NOTE:The power cord and video cables included in your package may vary depending on your country. Please contact your local reseller for more information.
10
Wall Mount Kit Specifications (VESA)
NOTE:Please follow the instructions in the wall mount installation guide to install your wall mount or mobile mount bracket. If attaching to other building materials, please contact your nearest dealer.
Model |
VESA Spec. (A x B) |
Standard Screw (C x D) |
Quantity |
IFP6530 - 65” |
600 x 400 mm |
M8 x 20 mm |
4 |
|
|
|
|
IFP7530 - 75” |
600 x 400 mm |
M8 x 20 mm |
4 |
NOTE:Do not use screws that are longer than the standard dimension, as they may cause damage to the inside of the display.
11

Product Overview
Control Panel
Item |
Description |
Back to the Home screen
Return to the previous screen
Activate the Screen Freeze function
Decrease the Volume
Increase the Volume
Turn on/off the device
Tap to enter Energy Saving mode
Press and hold for at least two (2) seconds to shut down
Remote control receiver
Ambient light sensor
12
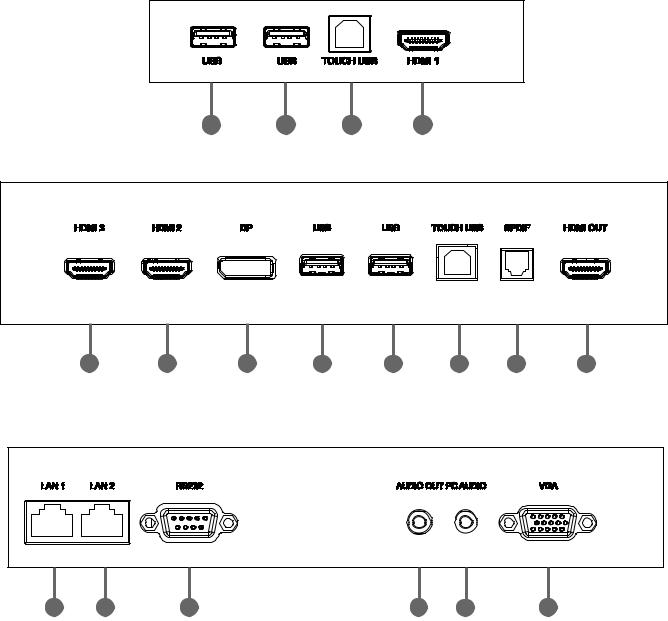
I/O Panel
Front Left
1 |
1 |
2 |
3 |
Side Left
3 |
3 |
4 |
1 |
1 |
2 |
5 |
6 |
Bottom Left
7 |
7 |
1 |
8 |
9 |
10 |
11 |
|
|
|
13

Number |
Port |
Description |
|
|
|
Connect USB devices such as hard disks, keyboard, |
|
1 |
USB 2.0 |
mouse, etc. |
|
|
|
NOTE:Rear USB port is for Embed player only. |
|
|
|
• Touch signal output to external PC |
|
|
|
• Network signal output to external PC |
|
|
|
• After connection (with external PC), the external |
|
2 |
TOUCH USB |
PC’s audio can be played through the ViewBoard, |
|
and the external PC’s audio can be controlled by |
|||
|
|
the audio button of the ViewBoard. |
|
|
|
• After connection (with external PC), the device |
|
|
|
connected to the USB port can be directly used |
|
|
|
by an external PC. |
|
3 |
HDMI IN |
High definition input; connect to PC with HDMI |
|
output, set-top box, or other video device. |
|||
|
|
||
4 |
DisplayPort |
Connect to devices with DisplayPort output function. |
|
5 |
SPDIF |
Multichannel sound via optical signals |
|
6 |
HDMI OUT |
Extend content out to another display device |
|
7 |
LAN |
Standard RJ45 (10M/100M) Internet connection |
|
interface. |
|||
|
|
||
8 |
RS-232 |
Serial interface; used for mutual transfer of data |
|
between devices |
|||
|
|
||
9 |
AUDIO OUT |
Audio output to an external speaker |
|
10 |
PC AUDIO |
External computer audio input |
|
11 |
VGA |
External computer image input |
14
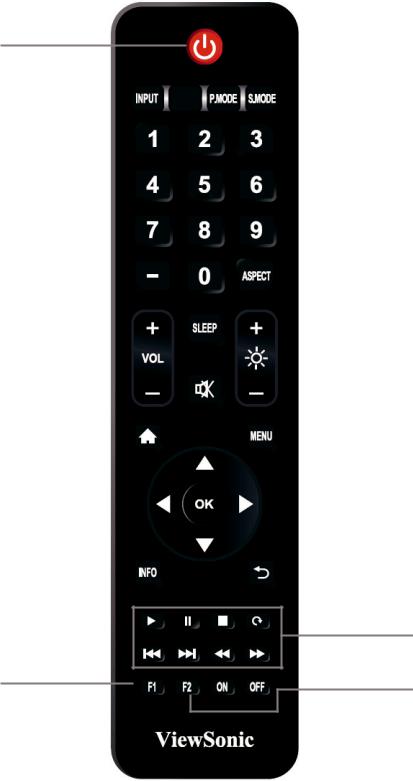
Remote Control
1
|
|
|
|
|
|
|
|
|
|
|
|
|
|
|
|
2 |
||
|
|
|
|
|
|
|
|
|
|
|
|
|
|
|
|
|
||
3 |
|
|
|
|
|
|
|
|
|
|
|
|
|
|
|
4 |
||
|
||||||||||||||||||
|
|
|
|
|
|
|
|
|
|
|
|
|||||||
5 |
|
|
|
|
|
|
|
|
|
|
|
|
|
|
|
|
|
6 |
|
|
|
|
|
|
|
|
|
|
|
|
|
|
|
|
|
||
|
|
|
|
|
|
|
|
|
|
|
|
|
|
|
||||
|
|
|
||||||||||||||||
|
|
|
|
|
|
|
|
|
|
|
|
7 |
||||||
|
|
|
|
|
||||||||||||||
8 |
|
|
|
|
|
|
|
|
|
9 |
||||||||
|
|
|
||||||||||||||||
10 |
|
|
|
|
|
|
|
|
|
|
|
|
|
|
|
|
|
|
|
|
|
|
|
|
|
|
|
|
|
|
|
|
|
|
|
|
|
12 |
|
|
|
|
|
|
|
11 |
||||||||||
|
|
|
||||||||||||||||
13 |
|
|
|
|
|
14 |
||||||||||||
|
|
|
|
|||||||||||||||
15 |
|
|
|
16 |
||||||||||||||
|
|
|||||||||||||||||
17
18 |
19 |
|
15

Number |
Item |
Description |
1 |
|
Power on/off |
|
|
|
2 |
P.MODE |
Image adjustment menu for DP/HDMI/VGA |
3 |
INPUT |
Input source selection |
4 |
S.MODE |
Audio adjustment menu for DP/HDMI/VGA |
5 |
|
Numeric input buttons |
6 |
ASPECT |
Adjust aspect ratio for DP/HDMI/VGA |
7 |
SLEEP |
Blank the screen. Press again to resume the screen |
8 |
VOL+ / VOL- |
Increase/Decrease volume |
9 |
Brightness.+ |
Brightness +/- 1 |
Brightness.- |
|
|
|
|
|
10 |
|
Mute/Unmute |
|
|
|
11 |
MENU |
Setting menu |
12 |
HOME |
Back to Embed player Home screen |
13 |
p/t/u/q |
Scroll up, left, right, down |
14 |
OK |
Confirm selection |
15 |
INFO |
Channel information |
16 |
RETURN |
Return to previous page |
17 |
|
Media control |
18 |
F1 |
Screen capture1 |
19 |
F2 |
Screen freeze |
NOTE:All computer-related function keys are not available without a built-in
computer.
1. The files will be saved in the embedded player under: System\Picture\Screenshots. When a USB is connected to a rear slot, pictures will save to the USB disk.
16
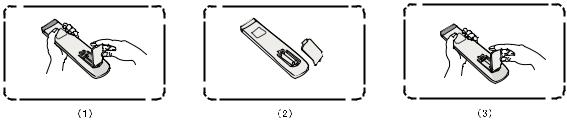
Inserting Remote Control Batteries
To insert batteries into the remote control:
1.Remove the cover on the rear of the remote control.
2.Insert two “AAA” batteries, ensuring the “+” symbol on the battery matches the “+” on the battery post.
3.Replace the cover by aligning it with the slot on the remote control and snapping the latch shut.
WARNING:There is a risk of explosion if batteries are replaced with the incorrect
type.
NOTE:
•It is recommended that you do not mix battery types.
•Always dispose of old batteries in an environmentally friendly way. Contact your local government for more information on how to dispose of batteries safely.
17
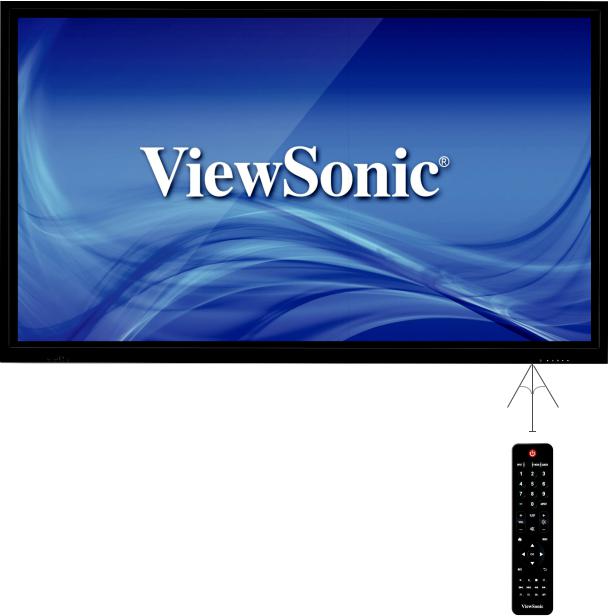
Remote Control Receiver Range
The working range of the remote control is shown here. It has an effective range of 7 meters, 30° degrees left and right. Ensure there is nothing obstructing the remote control’s signal to the receiver.
30° 30°
7m
18
Using Gestures
Touch gestures allow the user to use pre-determined commands without using a keyboard or mouse. Using gestures on the ViewBoard, the user can select/deselect objects, change the location of an object, access settings, erase digital ink, and much more.
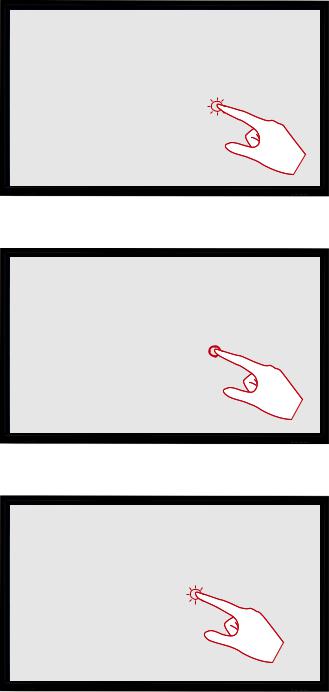
Select and Deselect an Object (Clicking)
Press and release the ViewBoard to select/deselect options or objects. This is like a single, standard left mouse click.
Display Menu Options (Right-Clicking)
Press and hold the ViewBoard with your finger. This is like a single, standard right mouse click.
Double-Clicking
Quickly press and release twice in the same location on the ViewBoard. This is like a double, standard left mouse click.
2x
19
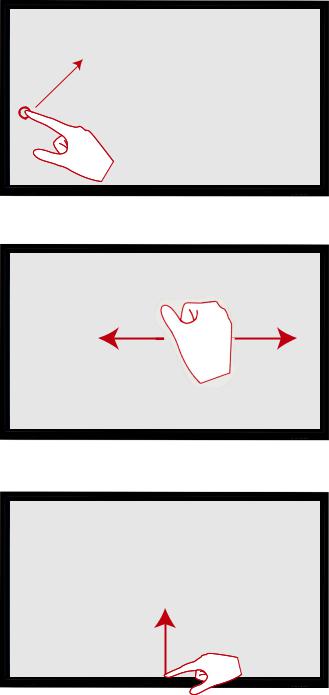
Moving an Object
Press and hold the object on the ViewBoard and slowly drag it with your finger to your desired location.
Erasing Digital Ink
Use your flattened hand, palm, or fist on the ViewBoard and move your hand across the area which you wish to erase.
Swipe Up for General Settings
Swipe up from the bottom of the
ViewBoard to launch the General
Settings. To learn more, see page 36.
20
 Making Connections
Connecting External Devices and Touch Connection
DisplayPort Connection
To connect via DisplayPort:
1.Connect a DisplayPort cable from your external device to the DisplayPort port on the ViewBoard.
2.Connect a USB cable to the external device from the TOUCH port of the ViewBoard.
HDMI Connection
To connect via HDMI:
1.Connect an HDMI cable from your external device to the HDMI IN port on the ViewBoard.
2.Connect a USB cable to the external device from the TOUCH port of the ViewBoard.
VGA Connection
To connect via VGA:
1.Connect a VGA cable from your external device to the VGA port on the ViewBoard.
2.Connect a USB cable to the external device from the TOUCH port of the ViewBoard.
3.For audio, connect an audio cable from the external device to the PC Audio port of the ViewBoard.
NOTE:The front TOUCH port is arranged to pair with HDMI 1; the rear TOUCH port is arranged to pair with HDMI 2/3, DisplayPort, and VGA.
21

RS-232 Connection
When you use a RS-232 serial port cable to connect your display to an external computer certain functions can be controlled remotely by the PC, including Power On/Off, Volume adjustment, Input select, Brightness, and more.
22
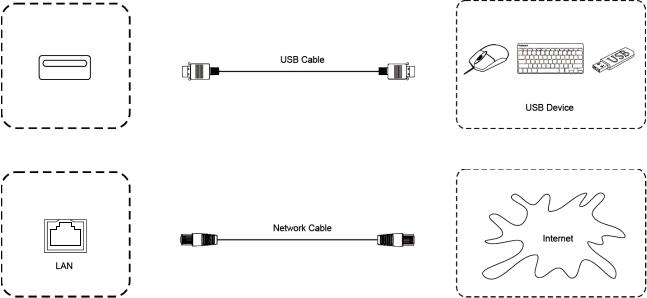
USB and Networking Connections
Just like any PC, it is easy to connect various USB devices and other peripherals to your ViewBoard.
USB Peripherals
Plug the USB device cable into the USB port.
Networking and Modem cables
Plug the router cable into the LAN port.
23
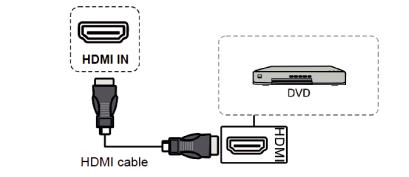
Media Player Connection
To connect to a media player:
1.Connect an HDMI cable to the HDMI ports (or connect a DisplayPort cable to the DisplayPort port) on your ViewBoard and peripheral device.
2.Plug in the power cord of your ViewBoard, and turn on the power supply switch.
3.Press the  Power button on the right-hand side of the ViewBoard to turn the screen on.
4.Press the INPUT button on the remote control and switch to the “HDMI” input source.
NOTE:
•HDR is not supported on the IFP30 series.
•HDMI 1/2/3 supports up to 3840 x 2160 @ 60Hz
•DisplayPort supports up to 3840 x 2160 @ 60Hz
24

SPDIF Connection
To connect to an external sound system:
1.Connect an optical cable from the SPDIF port to your sound system’s optical connector.
2.Plug in the power cord of your ViewBoard, and turn on the power supply switch.
3.Press the  Power button on the right-hand side of the ViewBoard to turn the screen on.
25
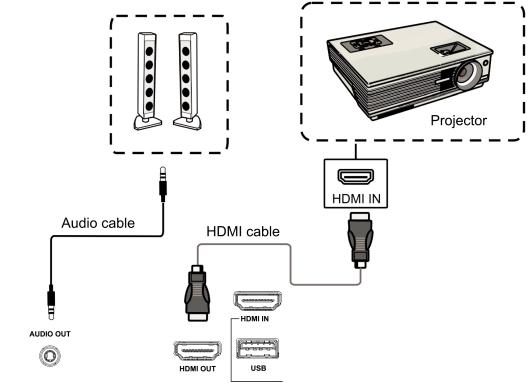
Video Output Connection
To output video via a display device:
1.Connect an HDMI cable to the HDMI IN port of your display device, and the other end to the HDMI OUT port of your ViewBoard.
2.For audio, connect one end of an audio cable to your ViewBoard’s AUDIO OUT port (or SPDIF) and the other end to your speakers.
3.Plug in the power cord of your ViewBoard, and turn on the power supply switch.
4.Press the  Power button on the right-hand side of the ViewBoard to turn the screen on.
26

 Using Your ViewBoard
Powering On/Off your ViewBoard
1.Ensure the power cord is connected, plugged into a power outlet, and the power switch is in the “On” position.
The Power switch is located at the bottom of the unit.
The AC Power input is located on the right side of the unit.
2.Press the  Power button to turn on the ViewBoard.
3.To turn the ViewBoard off, press and hold the Power button on the device or press the
  Power button on the remote control.
27
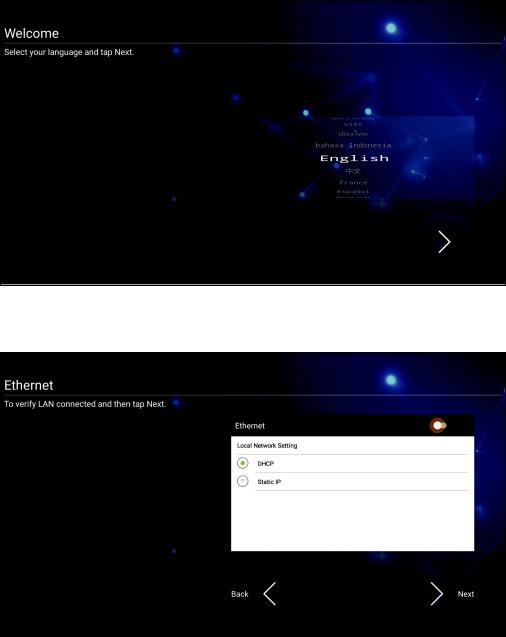
Initial Launch Setup
When you first turn on your ViewBoard, an initial setup wizard will launch.
1. Select your Language:
2.Setup and verify your LAN connection. DHCP is for regular network connection. Static IP is for a specific network environment.
28

3. Select your Time Zone to set the Date and Time:
4. Select your preferred System Mode:
NOTE:For more information see page 72.
5. Select your preferred vLauncher mode:
29
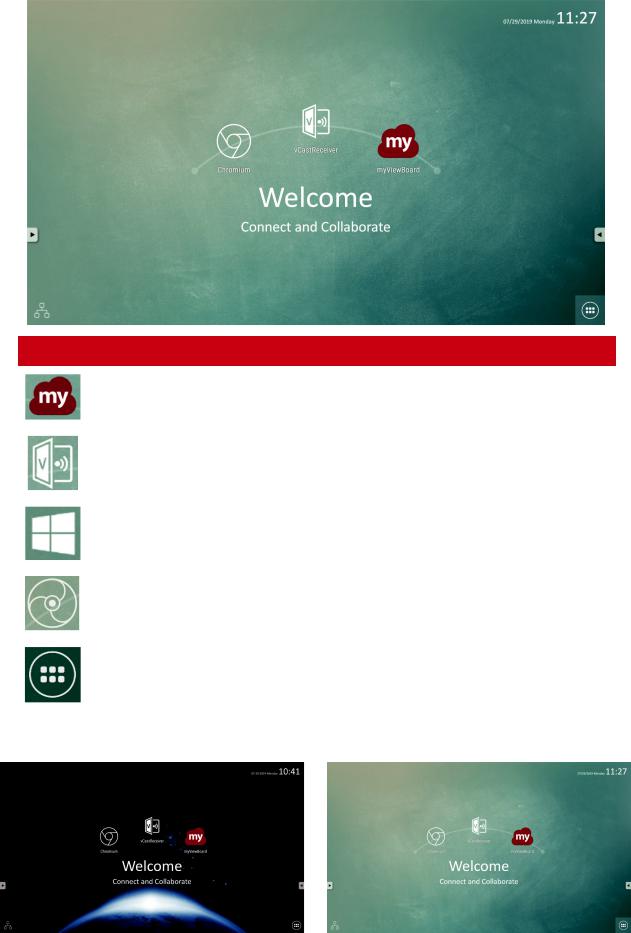
vLauncher - Customizable Welcome Screen
Icon |
Description |
|
myViewBoard annotation application |
|
|
|
Wireless screen sharing application, vCastReceiver |
|
|
|
Switch to slot-in PC source |
|
|
|
Open the web browser |
|
|
|
Application list |
|
|
NOTE:ViewBoard offers two background themes, Corporate and Education.
30
Loading...