


 Loading...
![]() LS831WU
LS831WU
Projector
User Guide
IMPORTANT: Please read this User Guide to obtain important information on installing and using your product in a safe manner, as well as registering your product for future service. Warranty information contained in this User Guide will describe your limited coverage from ViewSonic Corporation, which is also found on our web site at http://www.viewsonic.com in English, or in specific languages using the Regional selection box in the upper right corner of our website. “Antes de operar su equipo lea cu idadosamente las instrucciones en este manual”
Model No. VS18021
P/N: LS831WU
Thank you for choosing ViewSonic®
As a world-leading provider of visual solutions, ViewSonic® is dedicated to exceeding the world’sexpectationsfortechnologicalevolution,innovation,andsimplicity.AtViewSonic®, webelievethatourproductshavethepotentialtomakeapositiveimpactintheworld,and we are confident that the ViewSonic® product you have chosen will serve you well.
Once again, thank you for choosing ViewSonic®!
2
 Safety Precautions - General
Please read the following Safety Precautions before you start using the projector.
•Keep this user guide in a safe place for later reference.
•Read all warnings and follow all instructions.
•Allow at least 20“ (50 cm) clearance around the projector to ensure proper ventilation.
•Place the projector in a well-ventilated area. Do not place anything on the projector that prevents heat dissipation.
•Do not place the projector on an uneven or unstable surface. The projector may fall over, causing personal injury or projector malfunction.
•Do not use if the projector is tilted at an angle of more than 10° degrees left or right, nor at an angle of more than 15° degrees forwards or backwards.
•Do not look straight at the projector lens during operation. The intense light beam may damage your eyes.
•Always open the lens shutter or remove the lens cap when the projector light source is on.
•Do not block the projection lens with any objects when the projector is under operation as this could cause objects to become heated and deformed or even cause a fire.
•The light source becomes extremely hot during operation. Allow the projector to cool for approximately 45 minutes prior to removing the light source assembly for replacement.
•Do not use light sources beyond the rated light source life. Excessive use of light sources beyond the rated life could cause them to break on rare occasions.
•Never replace the light source assembly or any electronic component unless the projector is unplugged.
•Do not attempt to disassemble the projector. There are dangerous high voltages inside which may cause death if you should come into contact with live parts.
•When moving the projector, be careful not to drop or bump the projector on anything.
•Do not place any heavy objects on the projector or connection cables.
•Do not stand the projector on end vertically. Doing so may cause the projector to fall over, causing personal injury or projector malfunction.
•Avoid exposing the projector to direct sunlight or other sources of sustained heat. Do not install near any heat sources such as radiators, heat registers, stoves, or other devices (including amplifiers) that may increase the temperature of the projector to dangerous levels.
•Do not place liquids near or on the projector. Liquids spilled into the projector may cause it to fail. If the projector does become wet, disconnect it from the power supply and call your local service center to have the projector serviced.
3

•When the projector is under operation, you may sense some heated air and odor from its ventilation grill. It is a normal operation and not a defect.
•Do not attempt to circumvent the safety provisions of the polarized or grounding-type plug. A polarized plug has two blades with one wider than the other. A grounding-type plug has two blades and a third grounding prong. The wide and third blade are provided for your safety. If the plug does not fit into your outlet, obtain an adapter and do not attempt to force the plug into the outlet.
•When connecting to a power outlet, DO NOT remove the grounding prong. Please ensure grounding prongs are NEVER REMOVED.
•Protect the power cord from being treaded upon or pinched, particularly at the plug, and at the point where it emerges from the projector.
•In some countries, the voltage is NOT stable. This projector is designed to operate safely within a voltage between 100 to 240 volts AC, but could fail if power cuts or surges of ±10 volts occur. In areas where voltage may fluctuate or cut out, it is recommended that you connect your projector through a power stabilizer, surge protector, or uninterruptable power supply (UPS).
•If smoke, an abnormal noise, or a strange odor is present, immediately switch the projector off and call your dealer or ViewSonic®. It is dangerous to continue using the projector.
•Use only attachments/accessories specified by the manufacturer.
•Disconnect the power cord from the AC outlet if the projector is not being used for a long period of time.
•Refer all servicing to qualified service personnel.
CAUTION: Possibly hazardous optical radiation is emitted from this product. As with any bright light source, do not stare into the beam,
RG2 IEC 62471-5:2015.
4
 Safety Precautions - Ceiling Mounting
Please read the following Safety Precautions before you start using the projector.
If you intend to mount the projector on the ceiling, we strongly recommend that you use a proper fitting projector ceiling mount kit and that you ensure it is securely and safely installed.
If you use an inappropriate projector ceiling mount kit, there is a safety risk that the projector may fall from the ceiling due to an improper attachment through the use of the wrong gauge or length screws.
You can purchase a projector ceiling mount kit from the place you purchased your projector. We recommend that you also purchase a separate security cable and attach it securely to both the anti-theft lock slot on the projector and the base of the ceiling mount bracket. This will perform the secondary role of restraining the projector should its attachment to the mounting bracket become loose.
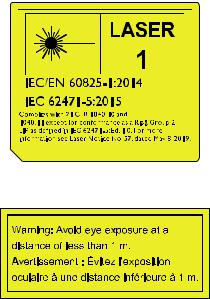
Laser Caution
This product belongs to CLASS I laser product and complies with IEC 60825-1:2014.
Above laser cautions are located on the bottom of this apparatus.
(for all regions except China)
•Notice is given to supervise children and to never allow them to stare into the projector beam at any distance from the projector.
•Notice is given to use caution when using the remote control for starting the projector while in front of the projection lens.
•Notice is given to the user to avoid the use of optical aids such as binoculars or telescopes inside the beam.
5

Contents |
|
Safety Precautions - General........................................ |
3 |
Introduction............................................................... |
10 |
Features................................................................................................................ |
10 |
Package Contents.................................................................................................. |
10 |
Product Overview.................................................................................................. |
11 |
Projector................................................................................................................ |
11 |
Controls and Functions................................................................................................ |
11 |
Connection Ports......................................................................................................... |
12 |
Remote Control...................................................................................................... |
13 |
Controls and Functions................................................................................................ |
13 |
Remote Control Effective Range.................................................................................. |
14 |
Replacing the Remote Control Batteries..................................................................... |
14 |
Initial Setup............................................................... |
15 |
Choosing a Location.............................................................................................. |
15 |
Projection Dimensions.......................................................................................... |
16 |
16:10 Image on a 16:10 Screen................................................................................... |
16 |
16:10 Image on a 4:3 Screen....................................................................................... |
17 |
Mounting the Projector......................................................................................... |
18 |
Preventing Unauthorized Use............................................................................... |
19 |
Using the Security Slot........................................................................................... |
19 |
Using the Password Function................................................................................. |
20 |
Setting a Password...................................................................................................... |
20 |
Changing the Password............................................................................................... |
21 |
Disabling the Password Function................................................................................. |
21 |
Forgetting the Password.............................................................................................. |
22 |
Password Recall Procedure.......................................................................................... |
22 |
Locking the Control Keys........................................................................................ |
23 |
6
Making Connections................................................... |
24 |
Connecting to Power............................................................................................. |
24 |
Connecting to Video Sources................................................................................ |
25 |
HDMI Connection................................................................................................... |
25 |
S-Video Connection................................................................................................ |
26 |
Composite Video Connection................................................................................ |
27 |
Connecting to Computer Sources......................................................................... |
28 |
VGA Connection..................................................................................................... |
28 |
VGA Out Connection.............................................................................................. |
28 |
Connecting to Audio.............................................................................................. |
29 |
Operation.................................................................. |
30 |
Turning the Projector On/Off................................................................................ |
30 |
Starting Up the Projector....................................................................................... |
30 |
First Time Activation.................................................................................................... |
30 |
Shutting Down the Projector................................................................................. |
31 |
Selecting an Input Source...................................................................................... |
32 |
Adjusting the Projected Image.............................................................................. |
33 |
Adjusting the Projector's Height and Projection Angle............................................... |
33 |
Auto-Adjusting the Image............................................................................................ |
33 |
Fine-Tuning the Image Size and Clarity.................................................................. |
33 |
Correcting Keystone............................................................................................... |
34 |
Hiding the Image................................................................................................... |
35 |
Controlling the Projector through a LAN Environment......................................... |
36 |
Configuring the LAN Control Settings.................................................................... |
36 |
Controlling the Projector through a Web Browser................................................ |
38 |
About Crestron e-Control®.................................................................................... |
42 |
PJLink™, SNMP, AMX and Xpanel Formats Supported........................................... |
45 |
Menu Functions......................................................... |
46 |
General On-Screen Display (OSD) Menu Operation.............................................. |
46 |
On-Screen Display (OSD) Menu Tree.................................................................... |
47 |
DISPLAY Menu....................................................................................................... |
54 |
IMAGE Menu......................................................................................................... |
57 |
POWER MANAGEMENT Menu.............................................................................. |
61 |
BASIC Menu........................................................................................................... |
64 |
ADVANCED Menu.................................................................................................. |
67 |
SYSTEM Menu....................................................................................................... |
71 |
INFORMATION Menu............................................................................................ |
73 |
7
Appendix................................................................... |
74 |
Specifications........................................................................................................ |
74 |
Projector Dimensions............................................................................................. |
75 |
Timing Chart.......................................................................................................... |
75 |
Analog RGB............................................................................................................ |
75 |
HDMI (PC).............................................................................................................. |
77 |
HDMI (Video)......................................................................................................... |
78 |
Video/S-Video........................................................................................................ |
79 |
Component video.................................................................................................. |
79 |
IR Control Table..................................................................................................... |
80 |
Address Code........................................................................................................ |
81 |
RS-232 Command Table........................................................................................ |
82 |
Pin Assignment...................................................................................................... |
82 |
Interface................................................................................................................. |
82 |
Command Table..................................................................................................... |
82 |
Glossary................................................................................................................. |
90 |
Troubleshooting.................................................................................................... |
93 |
Common Problems................................................................................................ |
93 |
LED Indicators........................................................................................................ |
94 |
Maintenance......................................................................................................... |
95 |
General Precautions............................................................................................... |
95 |
Cleaning the Lens................................................................................................... |
95 |
Cleaning the Case................................................................................................... |
95 |
Storing the Projector.............................................................................................. |
95 |
Disclaimer.............................................................................................................. |
95 |
Light Source Information....................................................................................... |
96 |
Light Source Hour.................................................................................................. |
96 |
Extending Light Source Life.................................................................................... |
96 |
8
Regulatory and Service Information........................... |
97 |
Compliance Information....................................................................................... |
97 |
FCC Compliance Statement.................................................................................... |
97 |
Industry Canada Statement................................................................................... |
97 |
CE Conformity for European Countries.................................................................. |
97 |
Declaration of RoHS2 Compliance......................................................................... |
98 |
Indian Restriction of Hazardous Substances.......................................................... |
99 |
Product Disposal at End of Product Life................................................................. |
99 |
Copyright Information......................................................................................... |
100 |
Customer Service................................................................................................. |
101 |
Limited Warranty................................................................................................. |
102 |
Mexico Limited Warranty.................................................................................... |
105 |
9
 Introduction
The ViewSonic LS831WU shine bright in virtually any environment with 4,500 ANSI
Lumens of high-brightness projection and WUXGA resolution clarity. The projector comes equipped with the latest laser phosphor technology capable of achieving up to 20,000 hours of maintenance free projection and 24/7 continuous operation to provide a reliable solution for public use. With its 0.25 ultra-short throw ratio, H/V keystone correction and four-corner adjustment, it provides amazing flexibility.
Perfect for creative installations, these projectors also include a 360-degree orientation function that allows them to be installed in just about any position and angle from floor to ceiling. Along with these features, the ViewSonic LS831WU offers flexible connectivity options including a one-wire HDBaseT input, which allows the projectors to receive HD video and audio over long distances (up to 200 feet) through a single network cable.
Features
•0.25 Ultra short throw for 21 cm short distance placement with 100” projection image
•2nd generation laser phosphor technology
•Up to 4,500 ANSI Lumens
•20,000 hours of maintenance free projection
•Built-in HDBaseT receiver
•360-degree projection
•24/7 operation
Package Contents
• Projector |
• Remote Control & Batteries |
• Power Cord |
• Quick Start Guide |
•Video Cable
NOTE: The power cord and video cables included in your package may vary depending on your country. Please contact your local reseller for more information.
10
Product Overview
Projector
Projection Lens
Power Indicator Light
Temperature Indicator Light
![]() Light Source Indicator Light
Light Source Indicator Light
Remote IR sensor
Power key
Controls and Functions
Key |
|
|
Description |
|
[ |
] Power |
|
Toggles the projector between standby mode and Power On. |
|
[ |
/ |
/ / |
] Keystone |
Manually corrects distorted images resulting from an angled |
Keys |
|
|
projection. |
|
[ |
/ / |
/ |
] |
Selects the desired menu items and makes adjustments when |
Left/Right/Up/Down |
the On-Screen Display (OSD) Menu is activated. |
|||
Menu/Exit |
|
Turns on or off the On-Screen Display (OSD) Menu. |
||
Source |
|
|
Displays the input source selection bar. |
|
|
(Help) |
|
Displays the HELP menu with a long press for 3 seconds. |
|
|
|
|
||
Focus |
|
|
Displays the Lens Focus menu. |
|
Enter |
|
|
Enacts the selected On-Screen Display (OSD) Menu item when |
|
|
|
|
|
the OSD Menu is activated. |
[ |
] Corner Adjustment |
Displays the Corner Adj. menu when the OSD menu is not |
||
|
|
|
|
activated. |
Color Mode |
|
Displays the color mode selection bar. |
||
|
|
|
|
|
11
Connection Ports
1 |
2 |
3 |
4 |
5 |
6 |
7 |
8 |
9 |
10 |
11 |
13 |
15 |
16 |
12 |
14 |
Security Slot
Security Bar
AC Power Cord Inlet
Adjuster Feet
Ceiling Mount |
Holes |
Port |
Description |
[1] RJ-45 |
LAN port. |
[2] HDBase T |
HDBaseT port. |
[3] HDMI 1 |
HDMI port. |
[4] HDMI 2 |
HDMI port. |
[5] USB 5V/1.5A OUT (Service) |
USB Type A port for power supply and serivce. |
[6] COMPUTER IN |
RGB (PC) signal input socket. |
[7] MONITOR OUT |
RGB (PC) signal output socket. |
[8] RS-232 |
RS-232 control port. |
[9] S-VIDEO |
S-Video port. |
[10] VIDEO |
Composite video port. |
[11] AUDIO IN (R) |
Audio signal (right) input socket. |
[12] AUDIO IN (L) |
Audio signal (left) input socket. |
[13] AUDIO IN |
Audio signal input socket. |
[14] AUDIO OUT |
Audio signal output socket. |
[15] 3D VESA |
3D VESA port. |
[16] 12V OUT |
12V DC output terminal. |
12
Remote Control
Controls and Functions
|
|
|
|
|
|
|
|
|
|
||||
Button |
|
Description |
||||
On/ |
Off |
Toggles between standby |
||||
|
|
mode and Power On. |
||||
COMP |
|
Selects the source from the |
||||
|
|
COMPUTER IN port for display. |
||||
HDMI |
|
Selects the source from the |
||||
|
|
HDMI 1/HDMI 2 port for |
||||
|
|
display. |
||||
HDBaseT |
|
Selects the source from the |
||||
|
|
HDBaseT port for display. |
||||
Auto Sync |
Automatically determines |
|||||
|
|
the best picture timings for |
||||
|
|
the displayed image. |
||||
Source |
|
Displays the source selection |
||||
|
|
bar. |
||||
[ / / |
/ ] |
Manually corrects distorted |
||||
Keystone Keys |
images resulting from an |
|||||
|
|
angled projection. |
||||
Enter |
|
Enacts the selected OSD |
||||
|
|
Menu item. |
||||
(Corner |
Displays the Corner Adj. |
|||||
adjustment) |
menu when the OSD menu is |
|||||
|
|
not activated. |
||||
|
|
|
|
|
|
|
Button |
|
Description |
||||
|
Left/ |
Right |
Selects the desired menu |
|||
|
|
|
Up/ |
Down |
items and makes adjustments. |
|
Menu |
|
Turns on/off the On-Screen |
||||
|
|
|
|
|
|
Display (OSD) Menu or goes |
|
|
|
|
|
|
back to previous OSD Menu. |
|
|
|
|
(Laser) |
Emits visible laser pointer light |
|
|
|
|
|
for presentation purposes. |
||
|
|
|
|
|
|
|
|
|
|
|
|
|
|
Exit |
|
Exits and saves menu settings. |
||||
Focus |
|
Displays the Lens Focus menu. |
||||
|
|
|
|
|
|
Displays the INFORMATION |
(INFORMATION) |
menu. |
|||||
Network |
Displays the |
|||||
|
|
|
|
|
|
LAN Control Settings menu. |
|
|
|
|
(Aspect) |
Displays the aspect ratio |
|
|
|
|
|
|
|
selection bar. |
Pattern |
|
Displays embedded test |
||||
|
|
|
|
|
|
pattern. |
Blank |
|
Hides the screen picture. |
||||
PgUp (Page Up)/ |
Operates your display |
|||||
PgDn (Page |
software program (on a |
|||||
Down) |
|
connected PC) which responds |
||||
|
|
|
|
|
|
to page up/down commands |
|
|
|
|
|
|
(like Microsoft PowerPoint). |
|
|
|
|
|
|
NOTE: Only available when |
|
|
|
|
|
|
a PC input signal is |
|
|
|
|
|
|
selected. |
|
|
|
|
(Help) |
Displays the HELP menu. |
|
|
|
|
|
|
||
|
|
|
|
|
|
|
|
|
|
(Presentation |
Displays the |
||
Timer) |
|
Presentation Timer menu. |
||||
|
|
|||||
|
|
|
|
|
|
|
Eco Mode |
Selects the Eco mode. |
|||||
|
|
|
|
(Volume Up) |
Increases the volume level. |
|
|
||||||
|
||||||
|
|
|
|
|
|
|
|
|
|
|
(Volume Down) |
Decreases the volume level. |
|
|
|
|
|
|||
|
|
|
|
|
|
|
|
|
|
|
(Mute) |
Toggles audio between on |
|
|
|
|
|
|||
|
|
|
|
and off. |
||
|
|
|
|
|
|
|
Color Mode |
Displays the color mode |
|||||
|
|
|
|
|
|
selection bar. |
|
|
|
|
|
|
Magnifies the projected |
|
|
|
|
|
|
picture size. |
|
|
|
|
|
|
Reduces the projected |
|
|
|
|
|
|
picture size. |
Audio Mode |
Displays the Audio Settings |
|||||
|
|
|
|
|
|
menu. |
13
Remote Control Effective Range
To ensure proper function of the remote control follow the steps below:
1.The remote control must be held at an angle within 30° perpendicular to the projector’s IR remote control sensor(s).
2.The distance between the remote control and the sensor(s) should not exceed 8 m (26 ft.)
NOTE: Refer to the illustration for the location of the infrared (IR) remote control sensor(s).
![]()
![]()
![]()
![]()
![]()
![]() Approx.30°
Approx.30°
Replacing the Remote Control Batteries
1.Remove the battery cover from the rear of the remote control by pressing the finger grip and sliding it down.
2.Remove any existing batteries (if necessary) and install two AAA batteries. NOTE: Observe the battery’s polarities as indicated.
3.Replace the battery cover by aligning it with the base and pushing it back into position.
NOTE:
•Avoid leaving the remote control and batteries in excessive heat or a humid environment.
•Replace only with the same or equivalent type recommended by the battery manufacturer.
•Dispose of the used batteries according to the manufacturer’s instructions and local environment regulations for your region.
•If the batteries are drained or if you will not be using the remote control for an extended period of time, remove the batteries to avoid damage to the remote control.
14
 Initial Setup
This section provides detailed instructions for setting up your projector.
Choosing a Location
Personal preference and room layout will decide the installation location. Consider the following:
•Size and Position of your screen.
•Location of a suitable power outlet.
•Location and Distance between the projector and other equipment.
The projector is designed to be installed in one of the following locations:
1. Front
The projector is placed near the floor in front of the screen.
2. Front Ceiling
The projector is suspeneded upsidedown from the ceiling in front of the screen.
3. Rear Ceiling
The projector is suspended upside-down from the ceiling behind the screen.
NOTE: A special rear projection screen is required.
4. Rear
The projector is placed near the floor behind the screen.
NOTE: A special rear projection screen is required.
15

Projection Dimensions
NOTE: See “Specifications” on page 74 for the native display resolution of this projector.
•16:10 Image on a 16:10 Screen
•16:10 Image on a 4:3 Screen
NOTE: (e) = Screen / (f) = Center of Lens
16:10 Image on a 16:10 Screen
(a) Screen Size (b) Projection (c) Image Height (d) Vertical Offset Distance
in. |
cm |
in. |
cm |
in. |
cm |
in. |
cm |
70 |
178 |
2.34 |
5.933 |
37.10 |
94.2 |
5.8 |
14.8 |
80 |
203 |
4.33 |
10.989 |
42.40 |
107.7 |
7.0 |
17.7 |
90 |
229 |
6.32 |
16.045 |
47.70 |
121.2 |
8.1 |
20.7 |
100 |
254 |
8.31 |
21.101 |
53.00 |
134.6 |
9.3 |
23.6 |
110 |
279 |
10.30 |
26.156 |
58.30 |
148.1 |
10.5 |
26.6 |
120 |
305 |
12.29 |
31.212 |
63.60 |
161.5 |
11.6 |
29.6 |
130 |
330 |
14.28 |
36.268 |
68.90 |
175.0 |
15.2 |
38.5 |
140 |
356 |
16.27 |
41.324 |
74.20 |
188.5 |
16.3 |
41.5 |
150 |
381 |
18.26 |
46.380 |
79.50 |
201.9 |
17.5 |
44.4 |
160 |
406 |
20.25 |
51.435 |
84.80 |
215.4 |
18.7 |
47.4 |
170 |
432 |
22.24 |
56.491 |
90.10 |
228.9 |
19.8 |
50.3 |
180 |
457 |
24.23 |
61.547 |
95.40 |
242.3 |
21.0 |
53.3 |
190 |
483 |
26.22 |
66.603 |
100.70 |
255.8 |
22.2 |
56.3 |
200 |
508 |
28.21 |
71.659 |
106.00 |
269.2 |
23.3 |
59.2 |
16
16:10 Image on a 4:3 Screen |
|
|
|
|
|
||
|
|
|
|
|
|
|
|
(a) Screen Size |
(b) Projection |
(c) Image Height |
(d) Vertical Offset |
||||
|
|
Distance |
|
|
|
|
|
|
|
|
|
|
|
|
|
in. |
cm |
in. |
cm |
in. |
cm |
in. |
cm |
70 |
178 |
3.7 |
9.5 |
35.0 |
88.9 |
5.4 |
13.6 |
80 |
203 |
5.8 |
14.8 |
40.0 |
101.6 |
6.5 |
16.4 |
90 |
229 |
7.9 |
20.1 |
45.0 |
114.3 |
7.6 |
19.2 |
100 |
254 |
10.0 |
25.4 |
50.0 |
127.0 |
8.7 |
22.0 |
110 |
279 |
12.1 |
30.7 |
55.0 |
139.7 |
9.8 |
24.8 |
120 |
305 |
14.1 |
35.9 |
60.0 |
152.4 |
10.9 |
27.6 |
130 |
330 |
16.2 |
41.2 |
65.0 |
165.1 |
12.0 |
30.4 |
140 |
356 |
18.3 |
46.5 |
70.0 |
177.8 |
13.1 |
33.1 |
150 |
381 |
20.4 |
51.8 |
75.0 |
190.5 |
14.2 |
35.9 |
160 |
406 |
22.5 |
57.1 |
80.0 |
203.2 |
15.3 |
38.7 |
170 |
432 |
24.5 |
62.4 |
85.0 |
215.9 |
16.4 |
41.5 |
180 |
457 |
26.6 |
67.6 |
90.0 |
228.6 |
17.5 |
44.3 |
190 |
483 |
28.7 |
72.9 |
95.0 |
241.3 |
18.6 |
47.1 |
200 |
508 |
30.8 |
78.2 |
100.0 |
254.0 |
19.7 |
49.9 |
NOTE: There is a 3% tolerance among these numbers due to optical component variations. It is recommended to physically test the projection size and distance before permanently installing the projector.
17
Mounting the Projector
NOTE: If you buy a third-party mount, please use the correct screw size. Screw size can vary depending on the thickness of the mounting plate.
1.To ensure the most secure installation, please use a ViewSonic® wall or ceiling mount.
2.Ensure the screws used to attach a mount to the projector meet the following specifications:
•Screw type: M4
•Screw length: 12.8 mm ~ 15.8 mm
72.17
196.46 |
174.19 |
|
|
|
|
|
|
|
|
|
|
|
|
|
|
|
|
|
|
|
|
|
|
|
|
|
|
|
|
|
|
|
|
|
|
|
|
|
|
|
|
||
|
|
|
|
|
|
|
|
|
|
|
|
|
|
|
|
|
|
|
|
||
|
|
|
|
|
|
|
|
|
|
|
|
|
|
|
|
|
|
|
|
|
|
98.53
308.33
346.34
NOTE:
•Avoid installing the projector near a heat source.
•Keep at least a 10 cm gap between the ceiling and the bottom of the projector.
18
Preventing Unauthorized Use
The projector has several built-in security features to prevent theft, access, or accidental setting changes.
Using the Security Slot
To help prevent the projector from being stolen, use a security slot locking device to secure the projector to a fixed object.
Below is an example of setting up a security slot locking device:
NOTE: The security slot can also be used as a safety anchor if the projector is mounted to the ceiling.
19
Using the Password Function
To help prevent unauthorized access or use, the projector offers a password security option. The password can be set through the On-Screen Display (OSD) Menu.
NOTE: Make note of your password, and keep it in a safe place.
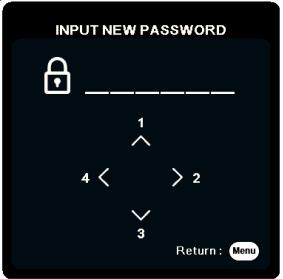
Setting a Password
1.Press Menu to open the OSD Menu and go to: SYSTEM > Security Settings and press Enter.
2.Highlight Power On Lock and select On by pressing  /
/  .
.
3.As pictured to the right, the four arrow keys ( ,
,  ,
,  ,
,  ) represent 4 digits (1, 2, 3, 4). Press the arrow keys to enter a six digit password.
4.Confirm the new password by re-entering the new password. Once the password is set, the OSD Menu will return to the Security Settings page.
5.Press Exit to leave the OSD Menu.
NOTE: Once set, the correct password must be entered every time the projector is started.
20
Changing the Password
1.Press Menu to open the OSD Menu and go to: SYSTEM > Security Settings >
Change Password.
2.Press Enter, the message, ‘INPUT CURRENT PASSWORD’ will appear.
3.Enter the old password.
ͫIf the password is correct, the message, ‘INPUT NEW PASSWORD’ will appear.
ͫIf the password is incorrect, a password error message will appear for 5 seconds followed by the message, ‘INPUT CURRENT PASSWORD’. You can try again or press Exit to cancel.
4.Enter a new password.
5.Confirm the new password by re-entering the new password.
6.To leave the OSD Menu, press Exit.
NOTE: The digits being input will display as asterisks (*).
Disabling the Password Function
1.Press Menu to open the OSD Menu and go to: SYSTEM > Security Settings >
Power On Lock.
2.Press  /
/  to select Off.
3.The message, “Input Password” will appear. Enter the current password.
ͫIf the password is correct, the OSD Menu returns to the Password page with “Off” shown in the row of Power On Lock.
ͫIf the password is incorrect, a password error message will appear for 5 seconds followed by the message, ‘INPUT CURRENT PASSWORD’. You can try again or press Exit to cancel.
NOTE: Please keep the old password, as you will need it to reactivate the password
function.
21

Forgetting the Password
If the password function is activated, you will be asked to enter the six-digit password every time you turn on the projector. If you enter the wrong password, the password error message, as pictured to the right, will appear for 5 seconds, and the message ‘INPUT PASSWORD’ follows.
You can retry or if you do not remember, you can use the “Password Recall Procedure”.
NOTE: If you enter an incorrect password 5 times in succession, the projector will automatically shut down for a short time.
Password Recall Procedure
1.When the message ‘INPUT CURRENT PASSWORD’ appears, press and hold
Auto Sync for 3 seconds. The projector will display a coded number on the screen.
2.Write down the number and turn off your projector.
3.Seek help from the local service center to decode the number. You may be required to provide proof of purchase documentation to verify that you are an authorized user of the projector.
22
Locking the Control Keys
With the control keys on the projector locked, you can prevent your settings from being changed accidentally (by children, for example).
NOTE: When the Panel Key Lock is On, no control keys on the projector will operate except Power.
1.Press Menu to open the OSD Menu and go to: SYSTEM > Panel Key Lock.
2.Press  /
/ to select On.
3.Select Yes and press Enter to confirm.
4.To release panel key lock, press and hold on the projector for 3 seconds.
NOTE: You can also use the remote control to enter the SYSTEM > Panel Key Lock menu and select Off.
23
 Making Connections
This section guides you on how to connect the projector with other equipment.
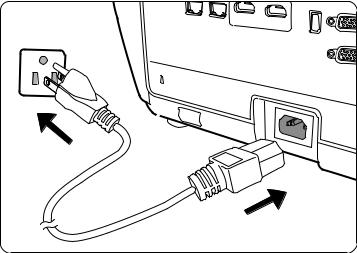
Connecting to Power
1.Connect the power cord to the AC IN jack at the rear of the projector.
2.Plug the power cord into a power outlet.
NOTE: When installing the projector, incorporate a readily accessible disconnect device in the fixed wiring, or connect the power plug to an easily accessible outlet near the unit. If a fault should occur during operation of the projector, use the disconnect device to switch off the power supply, or disconnect the power plug.
24
Connecting to Video Sources
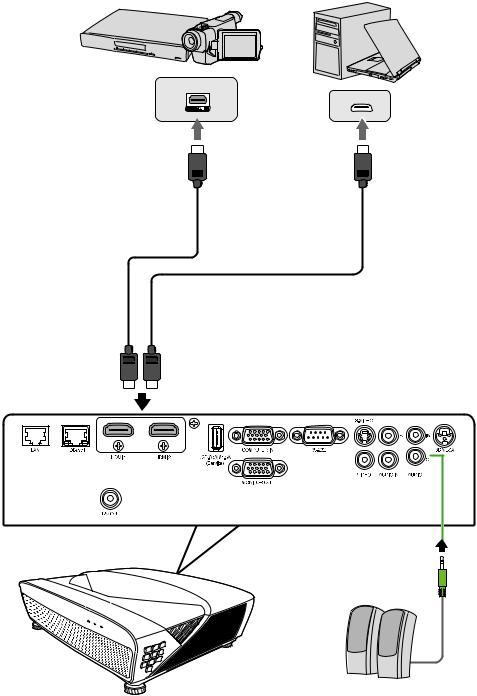
HDMI Connection
Connect one end of an HDMI cable to the HDMI port of your video device. Then connect the other end of the cable to the HDMI port of your projector.
25
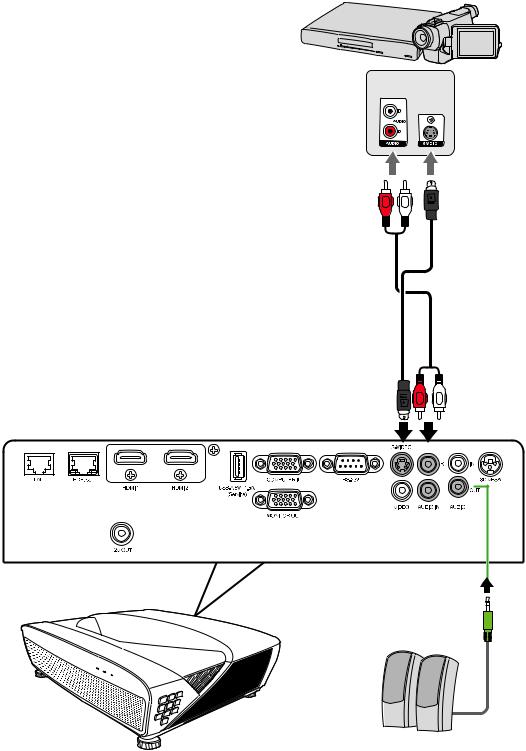
S-Video Connection
Connect one end of an S-Video cable to the S-Video port of your video device. Then connect the other end of the cable to the S-VIDEO port of your projector.
26
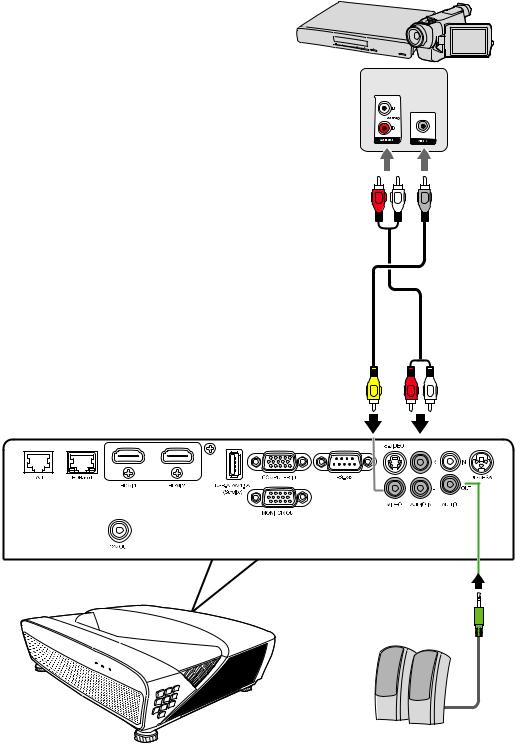
Composite Video Connection
Connect one end of a Video cable to the Video port of your video device. Then connect the other end of the cable to the VIDEO port of your projector.
27
Connecting to Computer Sources
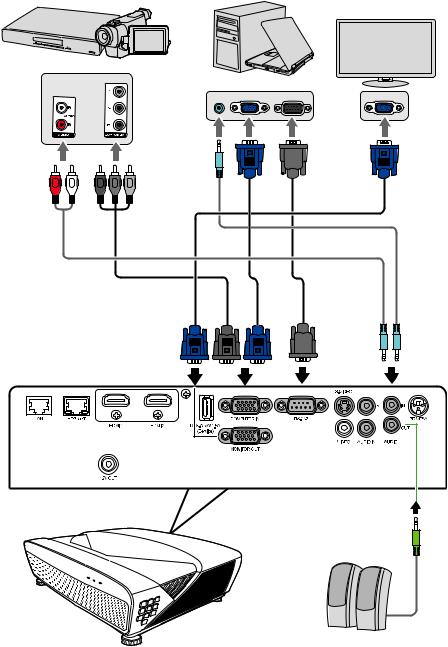
VGA Connection
Connect one end of a VGA cable to the VGA port of your computer. Then connect the other end of the cable to the COMPUTER IN port of your projector.
NOTE: Some notebooks do not turn on their external displays automatically when connected to a projector. You may have to adjust your notebook’s projection settings.
VGA Out Connection
After establishing the VGA Connection, connect one end of a VGA cable to the VGA port of your monitor. Then connect the other end of the cable to the MONITOR OUT port of your projector.
28
Connecting to Audio
The projector is equipped with speakers, however, you can also connect external speakers to the AUDIO OUT port of the projector.
NOTE: The audio output is controlled by the projector’s Volume and Mute settings.
29

 Operation
Turning the Projector On/Off
Starting Up the Projector
1.Press the Power button to turn on the projector.
2.The light source will light up, and a “Power On/Off Ring Tone” will play.
3.The Power Indicator Light stays green when the projector is On.
NOTE: To maintain light source life, once you turn the projector On, wait at least five
(5)minutes before turning it off.
4.Turn on all of the connected equipment, i.e. notebook, and the projector will start to search for an input source.
NOTE: If the projector detects an input source, the source information will appear. If an input source is not detected, the message, ‘No Signal’ will appear.
First Time Activation
If the projector is activated for the first time, select your OSD language following the on-screen instructions.
30
Loading...