

Page 1
DVM8681
pH METER
pH-METER
pH-MÈTRE
pH-METRO
pH-MESSGERÄT
pH-METRO
pH-METR
USER MANUAL
GEBRUIKERSHANDLEIDING
NOTICE D’EMPLOI
MANUAL DEL USUARIO
BEDIENUNGSANLEITUNG
MANUALE UTENTE
INSTRUKCJA OBSŁUGI
Page 2
DVM8681 – pH METER
1. Introduction
To all residents of the European Union
Important environmental information about this product
This symbol on the device or the package indicates that disposal of the device after its lifecycle could harm
the environment.
Do not dispose of the unit (or batteries) as unsorted municipal waste; it should be taken to a specialized
company for recycling.
This device should be returned to your distributor or to a local recycling service.
Respect the local environmental rules.
If in doubt, contact your local waste disposal authorities.
Thank you for choosing Velleman! Contents: 1 x pH meter, 4 x LR44 button cell and this manual. Please read the
manual thoroughly before bringing this device into service. If the device was damaged in transit, don't install or use it
and contact your dealer.
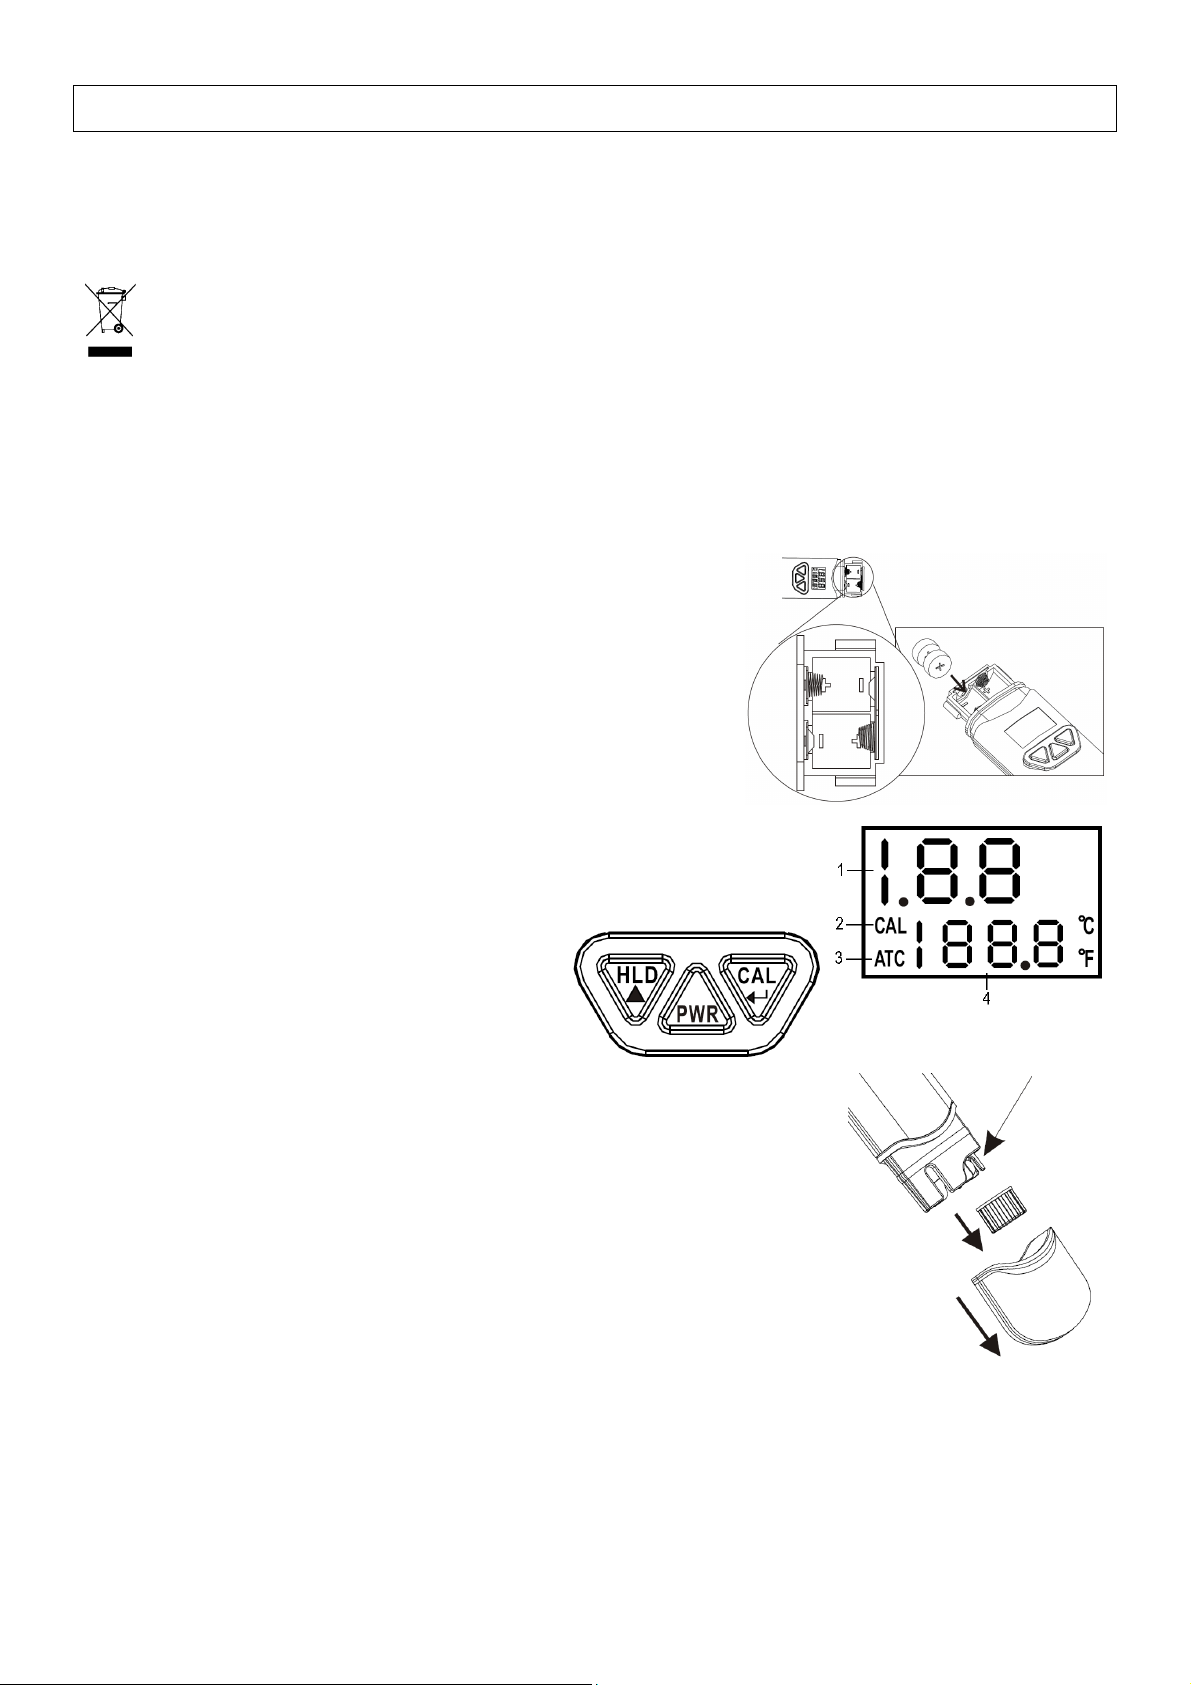
2. Battery Installation
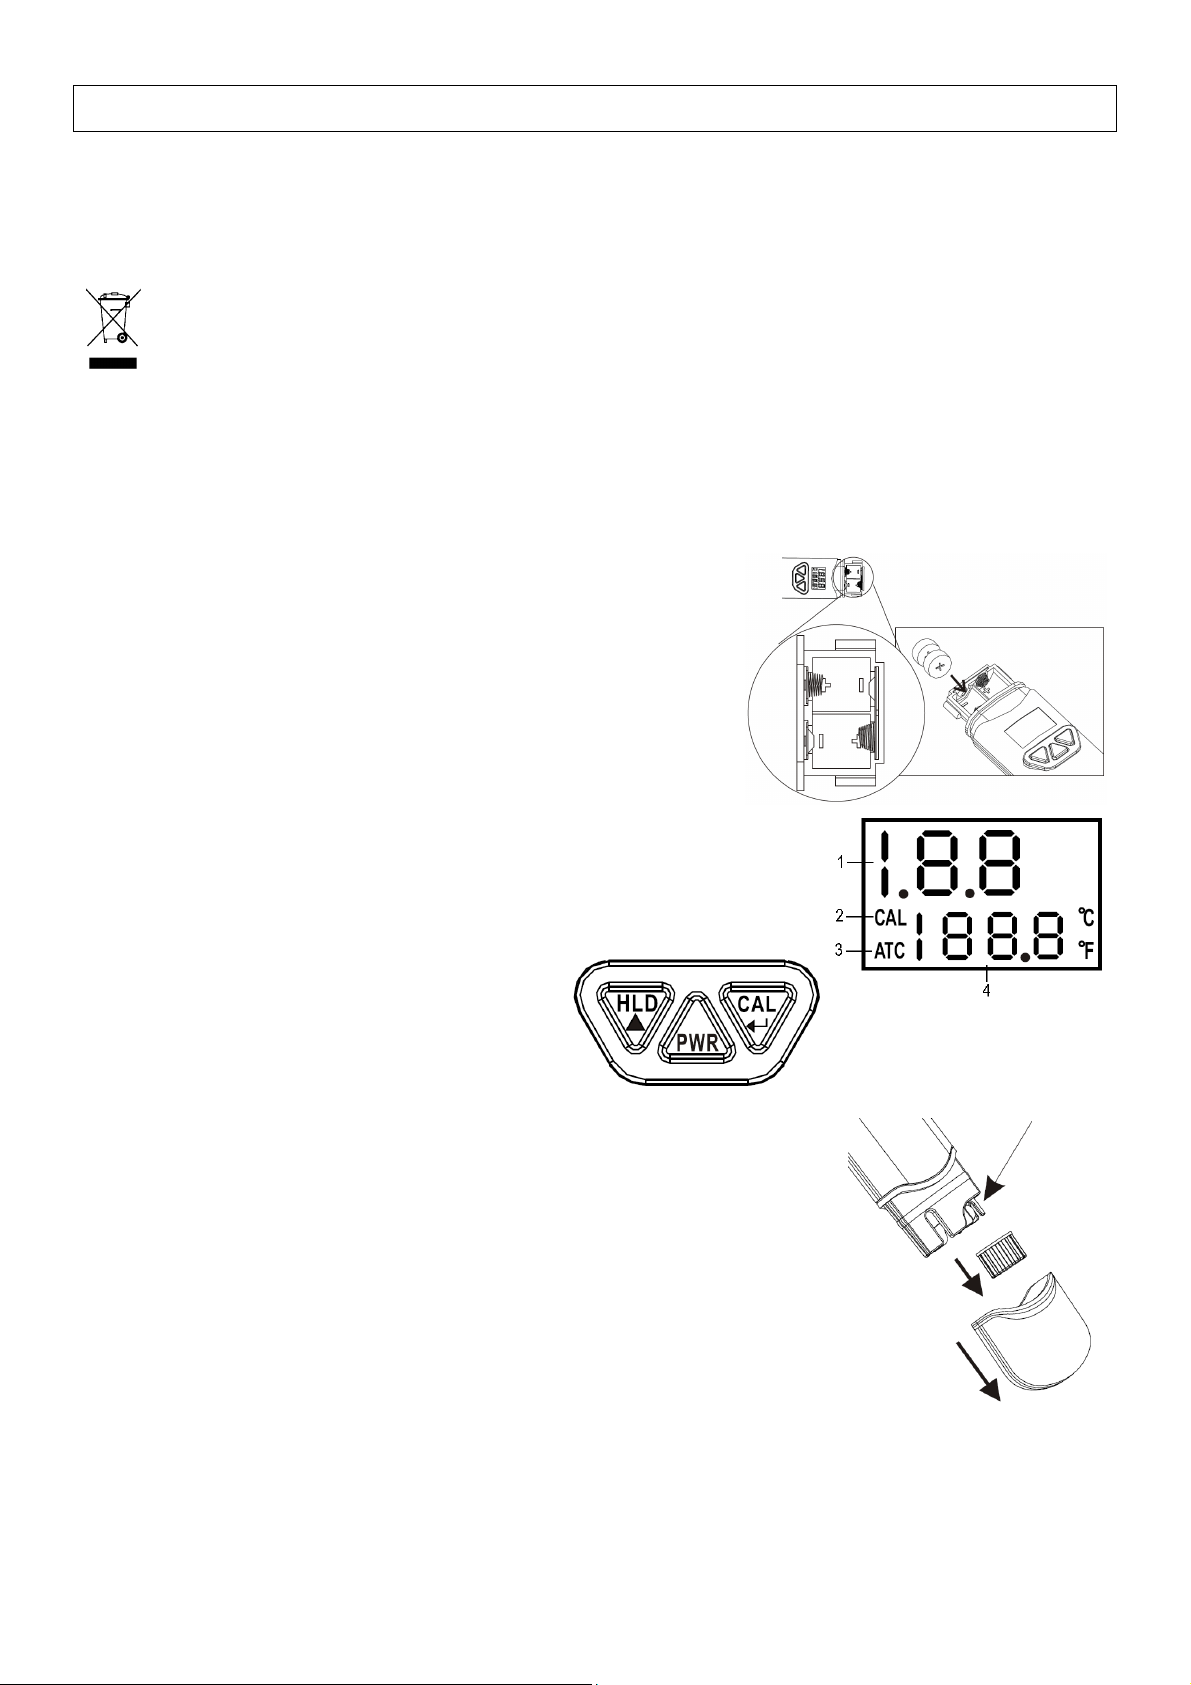
• Loosen the two screws holding the battery cover. Do not discard
the small washer.
• Insert 4 x LR44 button cell batteries respecting the polarity.
• Close the battery compartment.
3. Description
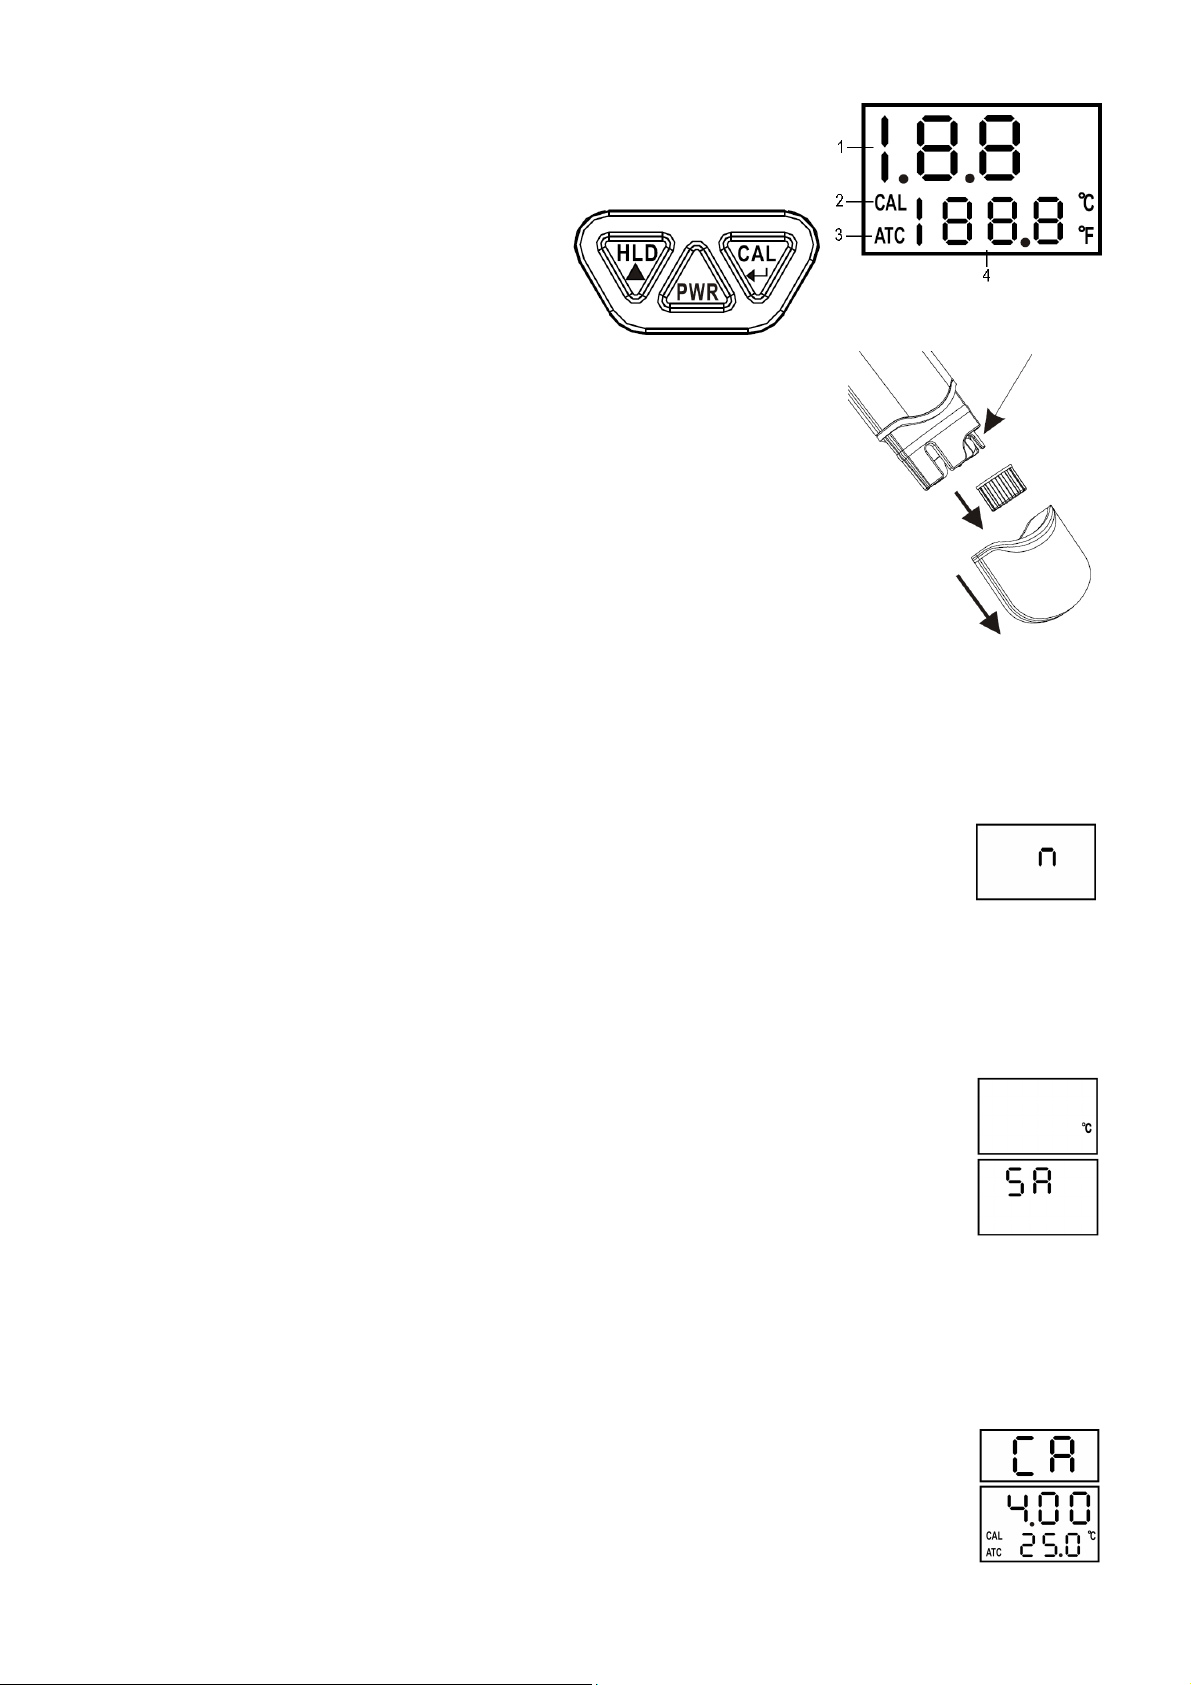
1. measured pH reading
2. CAL – calibration mode
3. ATC – automatic temperature compensation
4. temperature reading
5. HLD – data hold
6. PWR – power button
7. CAL – calibration
4. Operation
a. General Operation
• Remove the bottom and the inner cap to expose the electrode. It is normal
to find some whitish crystals on the inner cap and electrode. Keep the
sponge in the cap wet to keep the electrode in a good storage
condition.
• Dip the electrode into the test solution. Press PWR and stir the pH meter to
get a stable reading.
• A small dot will be flashing while the meter is in measuring mode. The temperature (in °C or °F) will also be
displayed.
• Press HLD to freeze the current reading. Note that the dot will stop flashing. Press HLD again to release
the reading.
• Turn off the meter by pressing PWR. Cover the electrode with the cap and store the meter at an ambient
temperature between 0°C ~ 50°C (32°F ~ 122°F). Refer to “d. Calibrating your Meter” to perform the 3-
points calibration.
Page 3
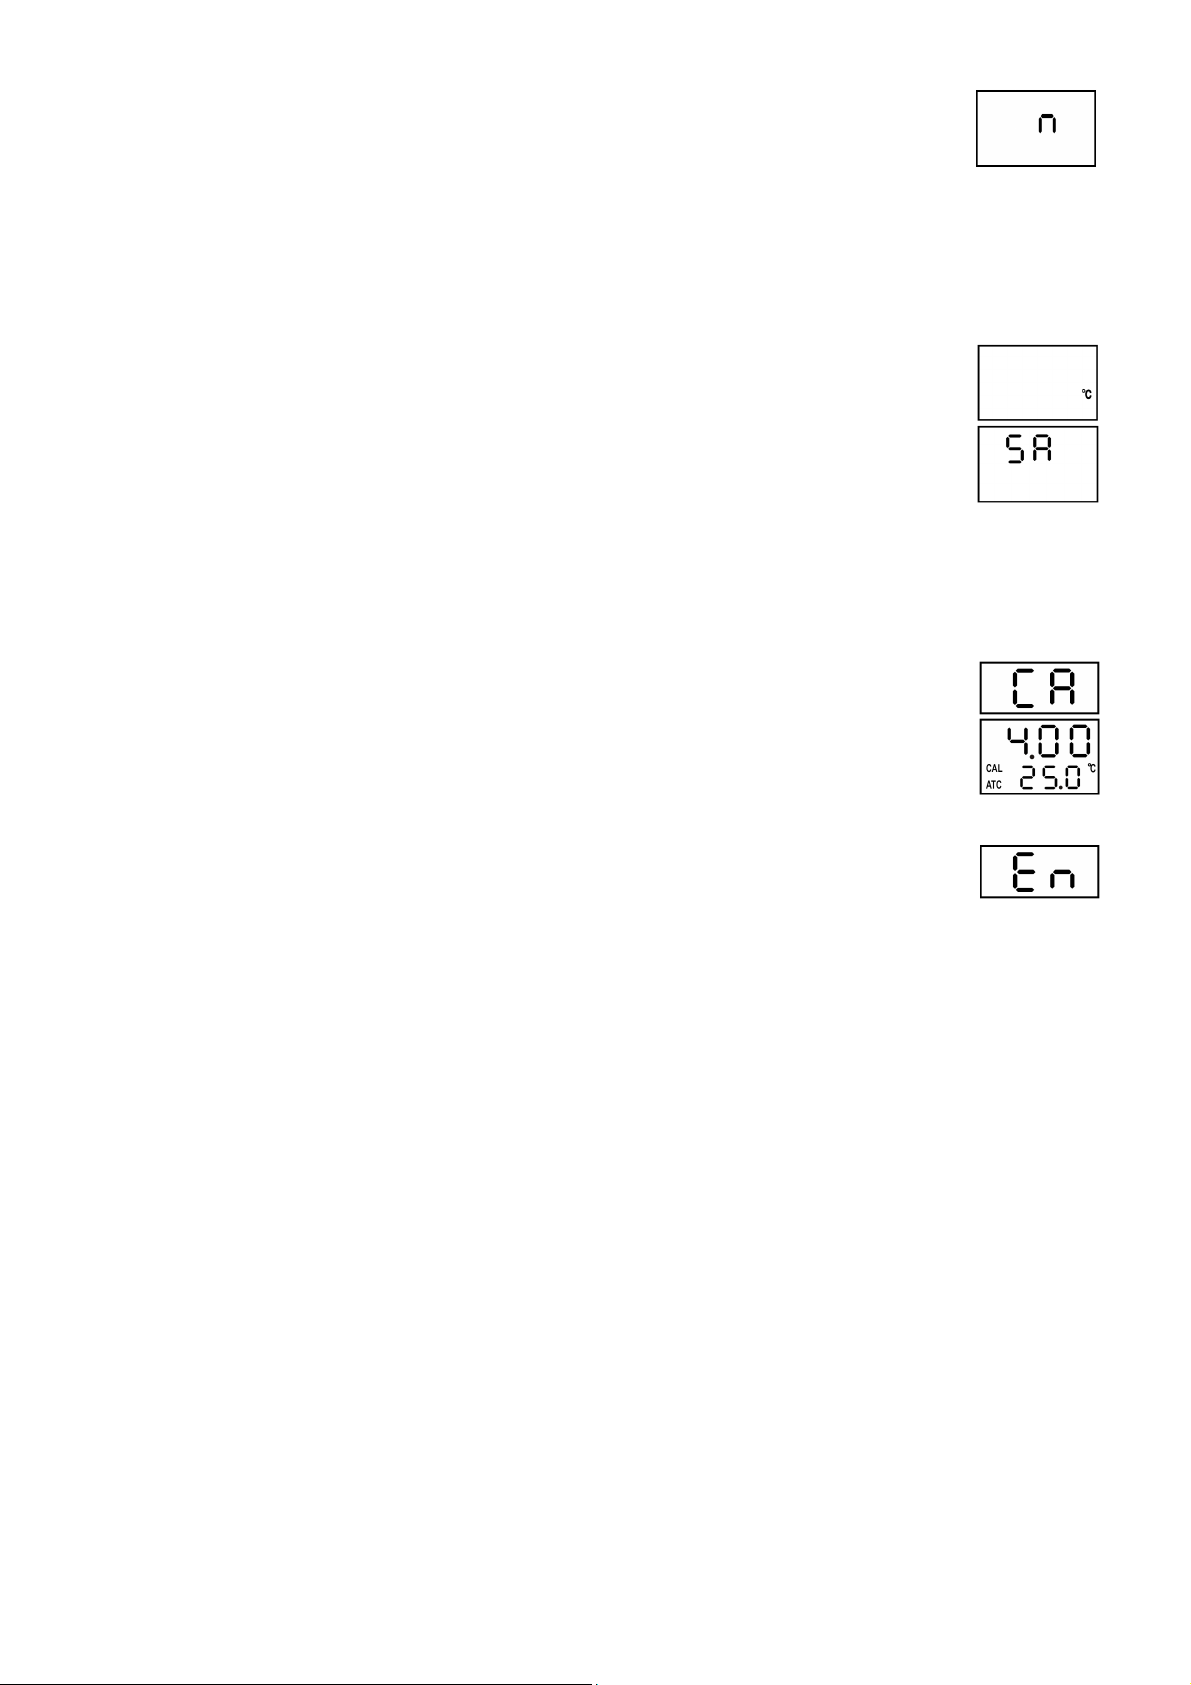
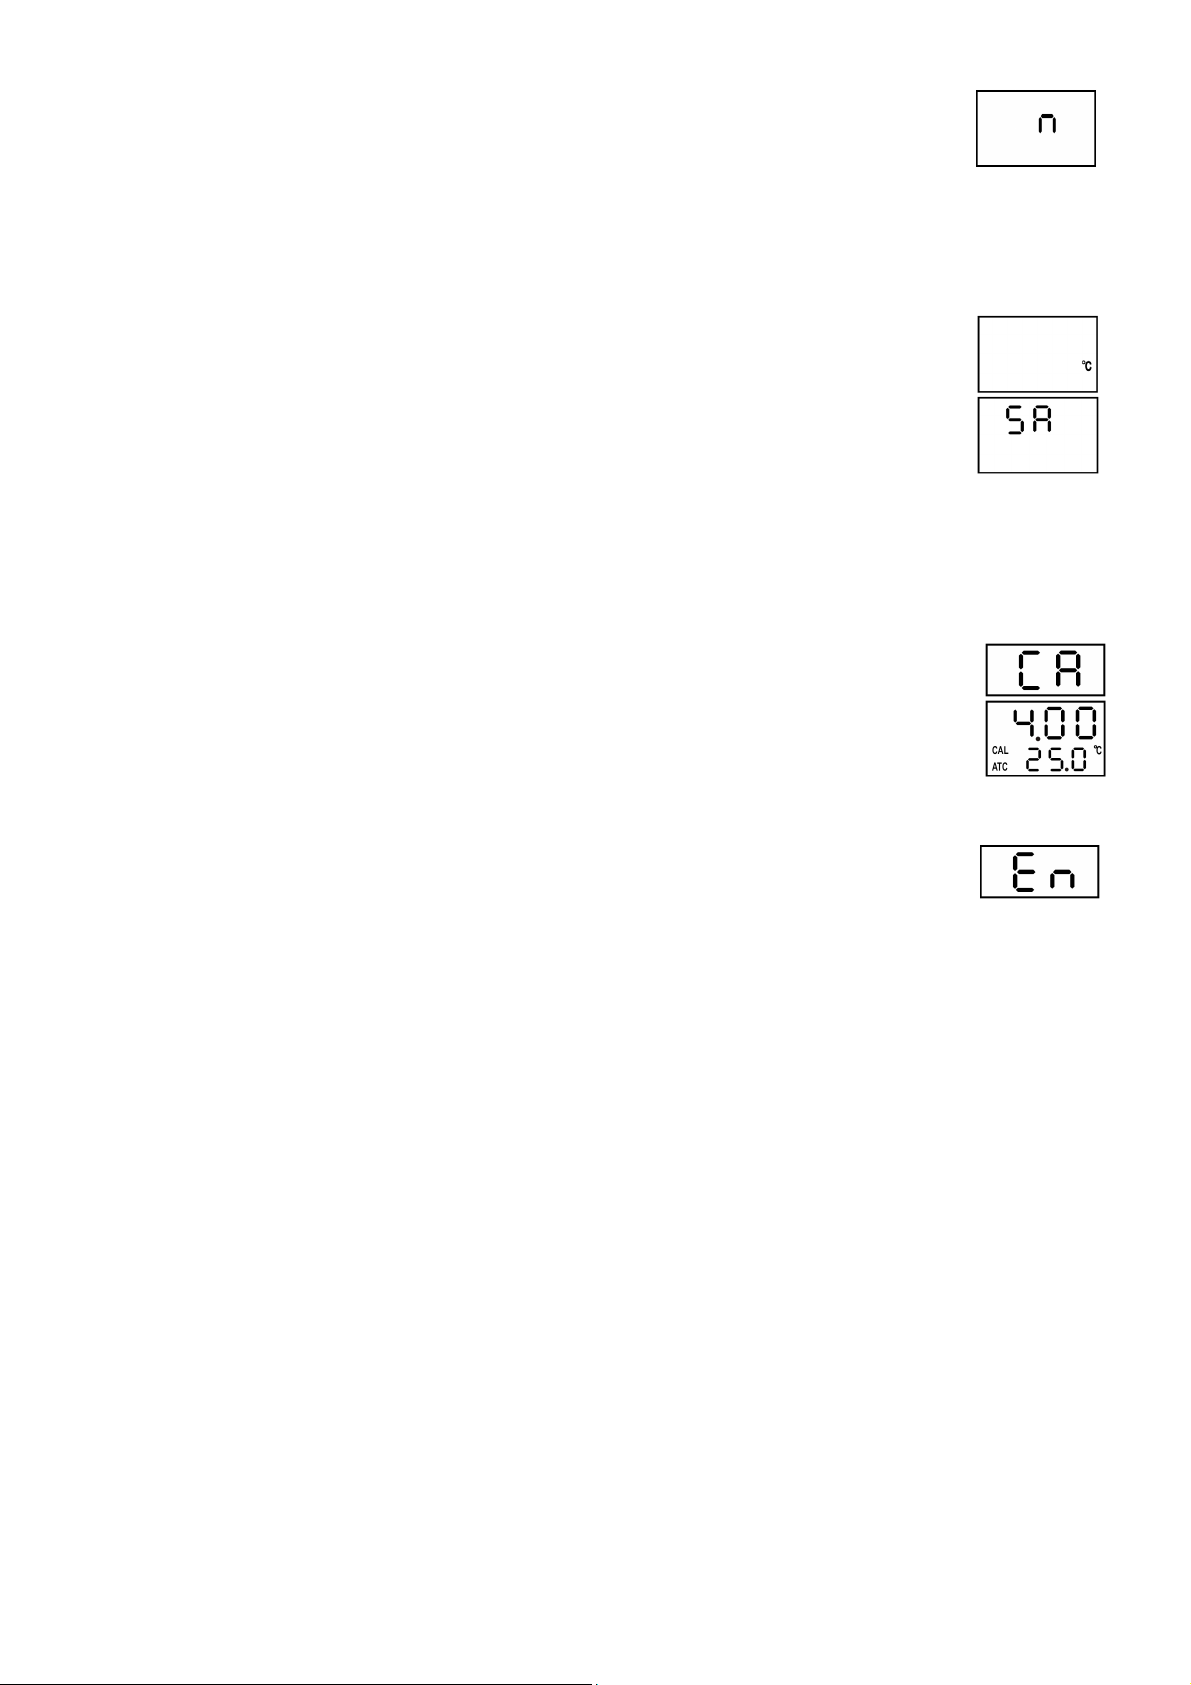
b. Auto Power-Off
• This meter will switch off after approximately 20 minutes of inactivity.
• Disable this function by holding HLD and PWR simultaneously pressed before power-on. An “n” will briefly
appear onto the display. The function has been disabled. The function will be reactivated after every
power-off.
c. Automatic Temperature Compensation (ATC)
• Since pH values are temperature dependent, pH applications require some form of
temperature compensation to ensure standardized pH values. This meter automatically
corrects the pH values based on the temperature of the measured solution.
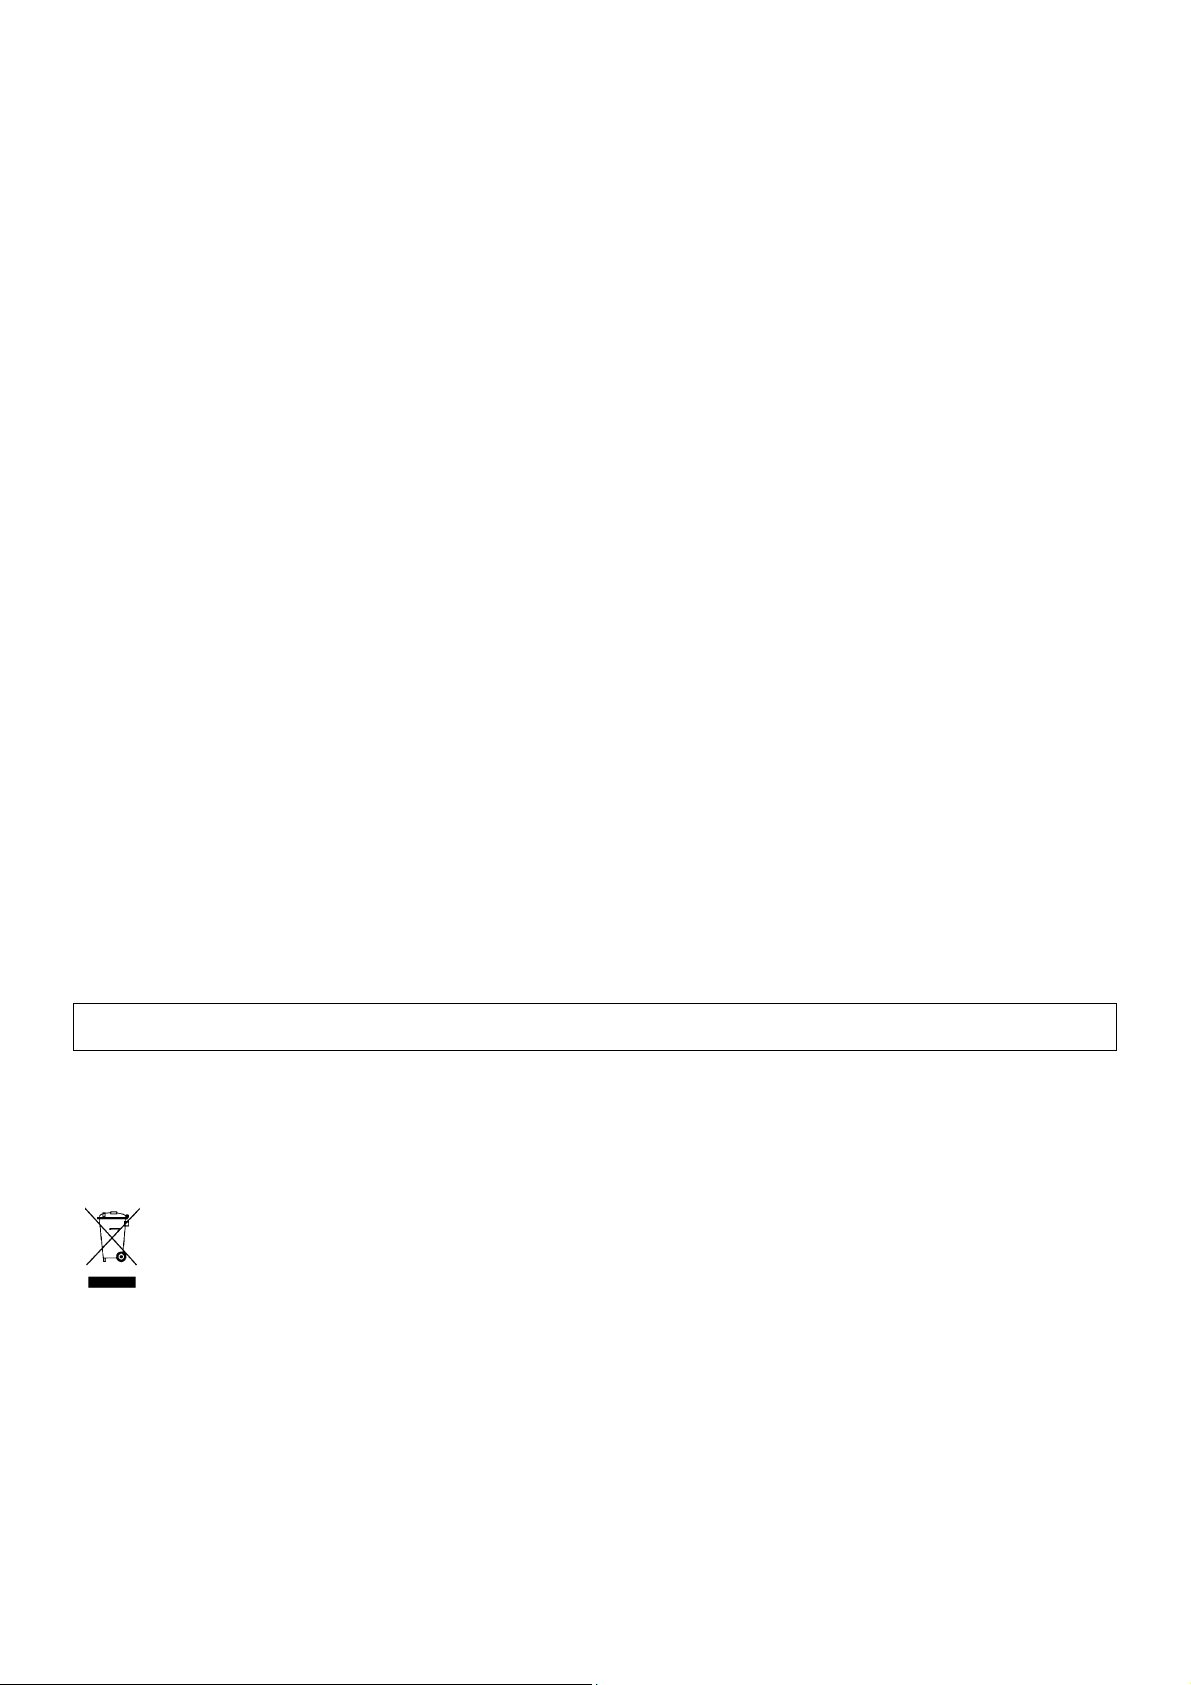
• Hold CAL and PWR simultaneously pressed before power-on. “°C” or “°F” will appear on
the display. Select your temperature unit with HLD and press CAL to save.
• “SA” will briefly appear on the display to indicate the selection has been saved. This
selection will be saved after power-off.
d. Calibrating your Meter
• Calibration is necessary and should be done regularly, even on a daily basis when using the meter often.
• Switch on your pH meter.
• Place the electrode into the pH 7 test solution first and into the pH 4 or pH 10 afterwards
(test solution available at your local chemist’s).
• Press CAL to enter the calibration mode. “CA” will briefly appear on the display. After a
few seconds “CAL” and the pH value will appear on the display indicating the meter has
been calibrated.
• The meter will display “En” if the calibration was not done correctly or if the probe could
not detect the test solution in the voltage range below. In this case, recalibrate as per
above.
pH 4.00 97mV….250mV
pH 7.00 -60mV….60mV
pH 10.00 -250mV….-97mV
• If the meter successfully recognizes the test solution, the solution pH value (4, 7 or 10) will appear on the
display. If the displayed value differs slightly from the supposed value, e.g. 4.01 instead of 4.00, press HLD
to change the value. The adjustable calibration range for pH 4 is 3.50 ~ 4.50, for pH 7 is 6.50 ~ 7.50 and for
pH 10 is 9.50 ~ 10.50.
• A stable value will automatically be saved.
5. Cleaning and Maintenance
• Avoid touching the probe with bare hands and keep it wet by moistening the sponge in the cap.
• Rinse the probe with tap water or better, de-ionized water after each measurement.
• Remove the batteries from the meter if not used for a long time.
6. Troubleshooting
• No display after power-on
Check the batteries. Replace them if necessary (see “2. Battery Installation”).
• Slow response
Clean the probe thoroughly with tap water and rinse with de-ionized water afterwards.
DVM8681 VELLEMAN
- 3 -
Page 4
• Display indicates “- - -”
The pH value is out of the pH range (pH 0 ~ pH 14). The solution is either too acid or too alkaline.
• The displayed pH value is unstable
The probe is exposed. Dip it in the solution to be measured.
7. Technical Specifications
pH Range pH 0 ~ pH 14
Accuracy pH 0.2
Resolution pH 0.1
Temperature Accuracy ± 1°C
Temperature Resolution 0.5°C
Operating Temperature 0°C ~ 50°C (32°F ~ 122°F)
Operating Humidity 0 ~ 80% RH
ATC yes
Self-Calibration yes
Dimensions 150 x 36 x 25mm
Calibration Test Solution standard USA buffers, standard NIST buffers, standard DIN buffers
Use this device with original accessories only. Velleman nv cannot be held responsible in the event of
damage or injury resulted from (incorrect) use of this device.
The Velleman nv warranty covers normal operation and does not cover battery, misuse, abuse, alteration,
tampering, neglect, improper maintenance or damage resulting from leaking batteries. Proof of purchase is
required for warranty repairs. Warranty is void if the meter has been opened.
For warranty and service, please contact Velleman nv (www.velleman.eu).
For more info concerning this product, please visit our website www.velleman.eu.
The information in this manual is subject to change without prior notice.
DVM8681 – pH-METER
1. Inleiding
Aan alle ingezetenen van de Europese Unie
Belangrijke milieu-informatie betreffende dit product
Dit symbool op het toestel of de verpakking geeft aan dat, als het na zijn levenscyclus wordt weggeworpen,
dit toestel schade kan toebrengen aan het milieu.
Gooi dit toestel (en eventuele batterijen) niet bij het gewone huishoudelijke afval; het moet bij een
gespecialiseerd bedrijf terechtkomen voor recyclage.
U moet dit toestel naar uw verdeler of naar een lokaal recyclagepunt brengen.
Respecteer de plaatselijke milieuwetgeving.
Hebt u vragen, contacteer dan de plaatselijke autoriteiten inzake verwijdering.
Dank u voor uw aankoop! Inhoud: 1 x pH-meter, 4 x LR44 knoopcellen en deze handleiding. Lees deze handleiding
grondig voor u het toestel in gebruik neemt. Werd het toestel beschadigd
tijdens het transport, installeer het dan niet en raadpleeg uw dealer.
2. Installeren van de batterijen
• Maak de 2 schroeven los. Zorg dat u de kleine sluitringen niet
verliest.
• Plaats 4 x LR44 knoopcellen en respecteer de polariteit.
• Sluit het batterijvak.
DVM8681 VELLEMAN
- 4 -
Page 5
3. Omschrijving
1. gemeten pH-waarde
2. CAL – ijkingmodus
3. ATC – automatische temperatuurcompensatie
4. temperatuuraflezing
5. HLD – data hold-functie
6. PWR – voedingsschakelaar
7. CAL – ijking
4. Gebruik
a. Algemeen
• Verwijder de 2 doppen zodat de elektrode zichtbaar wordt. Mogelijks vindt
u witte kristallen rond de sonde. Houd het sponsje altijd vochtig.
• Dompel de elektrode in de testoplossing. Druk op PWR en beweeg de pH-
meter tot u een stabiele aflezing krijgt.
• Het decimale punt knippert wanneer u het toestel kunt gebruiken. De
temperatuur (in °C of °F) is eveneens weergegeven.
• Druk op HLD om de huidige aflezing vast te zetten. Merk op dat het punt niet meer knippert. Druk opnieuw
op HLD om de aflezing te ontgrendelen.
• Schakel de meter uit door op PWR te drukken. Sluit de elektrode af en bewaar de meter aan een
omgevingstemperatuur tussen 0°C ~ 50°C. Raadpleeg “d. Uw meter ijken” om de driepuntsijking uit
voeren.
b. Automatische uitschakeling
• Deze meter schakelt zichzelf na ongeveer 20 minuten uit.
• Deactiveer deze functie door gelijktijdig HLD en PWR ingedrukt te houden voor u het toestel inschakelt.
Een “n” verschijnt kort op het scherm om aan te tonen dat deze functie uitgeschakeld is. De functie wordt
opnieuw ingeschakeld wanneer u de meter uitschakelt.
c. Automatische temperatuurcompensatie (ATC)
• Een pH-waarde is temperatuurafhankelijk. Daarom is de temperatuurcompensatie tijdens
pH-metingen belangrijk. Deze meter corrigeert automatisch de pH-waarden volgens de
temperatuur van de gemeten oplossing.
• Houd bij een uitgeschakeld toestel CAL en PWR gelijktijdig ingedrukt. “°C” of “°F”
verschijnt op het scherm. Selecteer de temperatuureenheid met HLD en druk op CAL om
te bewaren.
• “SA” verschijnt kort op het scherm om aan te tonen dat uw keuze werd opgeslagen. Deze keuze wordt
opgeslagen wanneer u de meter uitschakelt.
d. Uw meter ijken
• IJking is uiterst belangrijk en zou, wanneer u de meter dagelijks gebruikt, op zeer regelmatige basis
moeten gebeuren.
• Schakel de meter in.
• Plaats de elektrode eerst in een testoplossing van pH 7, en daarna in een testoplossing
van pH 4 of pH 10 (testoplossing verkrijgbaar bij uw apotheek).
• Druk op CAL om de meter te ijken. “CA” verschijnt kort op het scherm. Na enkele
seconden verschijnen “CAL” en de pH-waarde om aan te geven dat de meter werd geijkt.
DVM8681 VELLEMAN
- 5 -
Page 6

• De meter geeft “En” weer wanneer de ijking verkeerd werd uitgevoerd of wanneer de
sonde de testoplossing niet kon waarnemen in het spanningsbereik hieronder. In dit geval
herijkt u de meter zolas hierboven beschreven.
pH 4.00 97mV….250mV
pH 7.00 -60mV….60mV
pH 10.00 -250mV….-97mV
• De pH-waarde van de testoplossing (4, 7 of 10) verschijnt op het scherm wanneer de meter de
testoplossing herkent. Druk op HLD en wijzig de waarde wanneer deze lichtjes afwijkt van de
veronderstelde waarde, bv. 4.01 in de plaats van 4.00. Het ijkingbereik voor pH 4 ligt tussen 3.50 ~ 4.50,
voor pH 7 tussen 6.50 ~ 7.50 en voor pH 10 tussen 9.50 ~ 10.50.
• Een stabiele waarde wordt automatisch opgeslagen.
5. Reiniging en onderhoud
• Raak de sonde niet met blote vingers aan en houd ze altijd vochtig door het sponsje te bevochtigen.
• Spoel de sonde met kraantjeswater of, nog beter, met gedesioniseerd water na elke meting.
• Verwijder de batterijen uit het toestel wanneer u het niet gebruikt.
6. Problemen en oplossingen
• Geen aflezing na het inschakelen
Controleer de batterijen. Vervang ze indien nodig (zie “2. Installeren van de batterijen”).
• Trage aflezing
Maak de sonde grondig schoon met kraantjeswater en spoel nadien af met gedesioniseerd water.
• Het lcd-scherm geeft “- - -” weer
De pH-waarde is buiten het bereik van de meter (pH 0 ~ pH 14). De oplossing is te zuur of te alkalisch.
• De weergegeven pH-waarde is onstabiel
De sonde wordt blootgesteld. Dompel ze in de te meten oplossing onder.
7. Technische specificaties
pH-bereik pH 0 ~ pH 14
Nauwkeurigheid pH 0.2
Resolutie pH 0.1
Nauwkeurigheid temperatuur ± 1°C
Resolutie temperatuur 0.5°C
Werktemperatuur 0°C ~ 50°C
Vochtigheidsgraad 0 ~ 80% RH
ATC ja
Automatische ijking ja
Afmetingen 150 x 36 x 25mm
Testoplossing standaard USA buffers, standaard NIST buffers, standaard DIN buffers
Gebruik dit toestel enkel met originele accessoires. Velleman nv is niet aansprakelijk voor schade of
kwetsuren bij (verkeerd) gebruik van dit toestel.
De batterij, verkeerd gebruik, misbruik, wijzigingen, modificaties, verwaarlozing, nalatig onderhoud en schade
door lekkende batterijen vallen niet onder de garantie van Velleman nv. Een toestel onder garantie moet bij
inlevering voor reparatie vergezeld zijn van het aankoopbewijs. De garantie vervalt wanneer u het toestel
opent.
Voor garantie en service, neem contact op met Velleman nv (www.velleman.eu).
Voor meer informatie omtrent dit product, zie www.velleman.eu.
De informatie in deze handleiding kan te allen tijde worden gewijzigd zonder voorafgaande kennisgeving.
DVM8681 VELLEMAN
- 6 -
Page 7
DVM8681 – pH-MÈTRE
1. Introduction
Aux résidents de l'Union européenne
Des informations environnementales importantes concernant ce produit
Ce symbole sur l'appareil ou l'emballage indique que l’élimination d’un appareil en fin de vie peut polluer
l'environnement.
Ne pas jeter un appareil électrique ou électronique (et des piles éventuelles) parmi les déchets municipaux
non sujets au tri sélectif ; une déchèterie traitera l’appareil en question.
Renvoyer les équipements usagés à votre fournisseur ou à un service de recyclage local.
Il convient de respecter la réglementation locale relative à la protection de l’environnement.
En cas de questions, contacter les autorités locales pour élimination.
Nous vous remercions de votre achat ! Contenu : 1 x pH-mètre, 4 piles bouton LR44 et cette notice. Lire la présente
notice attentivement avant la mise en service de l’appareil. Si l’appareil a été endommagé pendant le transport, ne
pas l’installer et consulter votre revendeur.
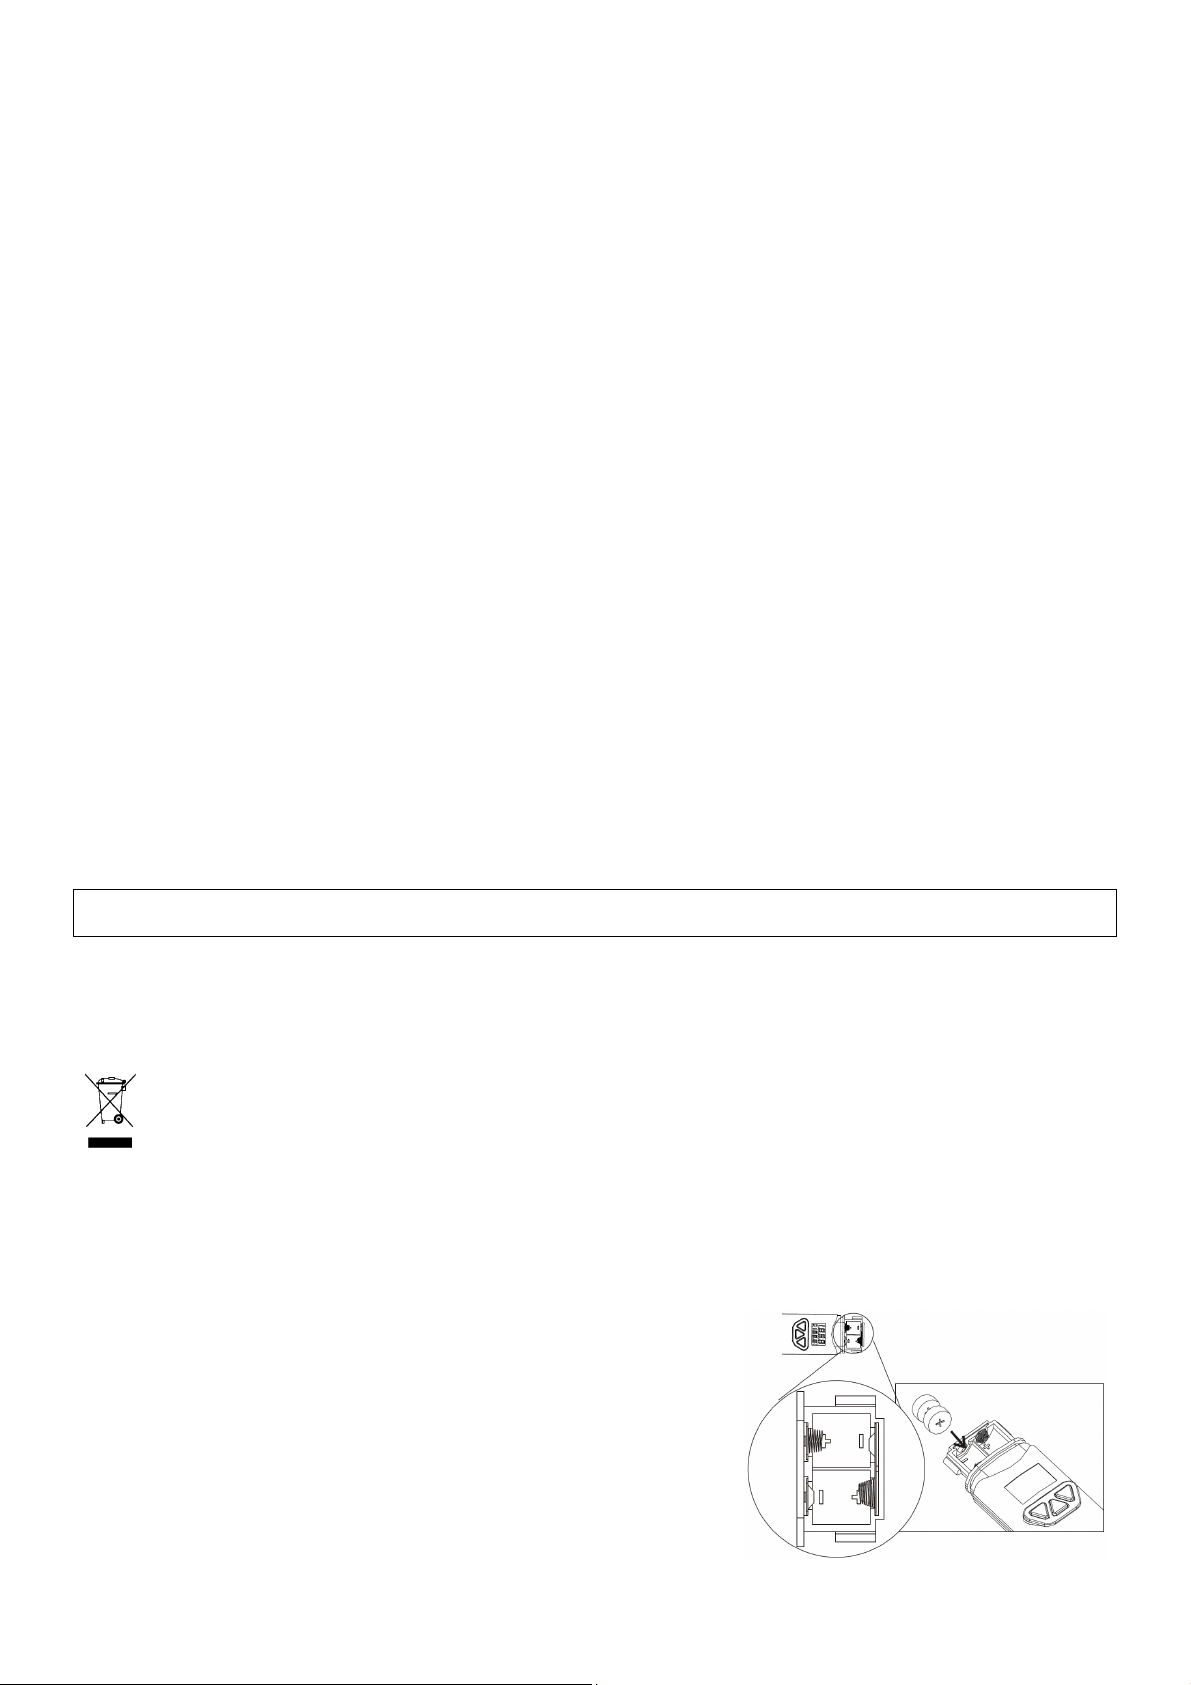
2. Insertion des piles
• Desserrer les vis du capuchon. Veiller à récupérer la petite
rondelle.
• Insérer 4 piles bouton LR44 en respectant la polarité.
• Refermer le compartiment des piles.
3. Description
1. valeur pH mesurée
2. CAL – mode de calibrage
3. ATC – compensation automatique de la température
4. affichage de la température
5. HLD – gel de l’affichage
6. PWR – touche d’alimentation
7. CAL – calibrage
4. Emploi
a. En général
• Retirer les capuchons inférieur et intérieur afin d’exposer la sonde. Il est
normal de trouver de cristaux blancs. Tenir la sonde humide en
humectant l’éponge à l’intérieur du capuchon.
• Tremper l’électrode dans la solution. Enfoncer PWR et remuer le pH-mètre
afin d’obtenir un affichage stable.
• Le point décimal clignote lorsque le mètre se trouve en mode de mesurage.
La température (en °C ou °F) sera également affichée.
• Enfoncer HLD pour geler l’affichage actuel. Le point ne clignote plus.
Renfoncer HLD pour dégeler l’affichage.
• Éteindre le mètre en enfonçant PWR. Recouvrir l’électrode avec le capuchon et stocker le mètre à une
température ambiante entre 0°C ~ 50°C. Consulter le paragraphe « d. Calibrage du pH-mètre » pour
effectuer le calibrage de 3 points.
DVM8681 VELLEMAN
- 7 -
Page 8
b. Extinction automatique
• Ce mètre s’auto-éteint après environ 20 minutes d’inactivité.
• Désactiver la fonction en maintenant simultanément enfoncé les touches HLD et PWR lorsque le mètre est
éteint. Un « n » s’affiche brièvement pour indiquer que la fonction a été désactivée. La fonction sera
réactivée lorsque l’on rallume le mètre.
c. Compensation automatique de la température (ATC)
• Une valeur pH est tributaire de la température. Par conséquent, le mesurage de la valeur
pH nécessite une compensation de la température afin d’assurer une valeur pH
standardisée. Ce mètre corrige automatiquement la valeur pH basée sur la température
de la solution mesurée.
• Maintenir simultanément enfoncé CAL et PWR lorsque le mètre est éteint. « °C » ou
« °F » s’affiche. Sélectionner l’unité de température avec HLD et enfoncer CAL pour confirmer.
• « SA » s’affiche brièvement pour indiquer que la sélection a été mémorisée. Cette sélection sera
mémorisée après l’extinction du mètre.
d. Calibrage du pH-mètre
• Il est conseillé de calibrer le mètre régulièrement lorsque l’on l’utilise quotidiennement.
• Allumer votre pH-mètre.
• Placer d’abord l’électrode dans la solution tampon pH 7, ensuite dans la solution tampon
pH 4 ou pH 10 (solution tampon disponible à la pharmacie).
• Enfoncer CAL pour accéder au mode de calibrage. « CA » s’affiche brièvement. « CAL »
et la valeur pH s’affichent après quelques secondes pour indiquer que le mètre a été calibré.
• Le mètre affiche « En » lorsque le calibrage a échoué ou lorsque la sonde n’a pas pu
détecter la solution tampon dans la plage de tension ci-dessous. Le cas échéant,
recalibrer le mètre comme décrit ci-dessus.
pH 4.00 97mV….250mV
pH 7.00 -60mV….60mV
pH 10.00 -250mV….-97mV
• La valeur pH de la solution tampon (4, 7 ou 10) apparaît sur l’afficheur lorsque le mètre reconnaît la
solution. Si la valeur affichée s’écarte légèrement de la valeur pH supposée, p.ex. 4.01 au lieu de 4.00,
enfoncer HLD pour modifier la valeur. La plage de calibrage s’étend de 3.50 à 4.50 pour un pH 4, de 6.50 à
7.50 pour un pH 7 et de 9.50 à 10.50 pour un pH 10.
• Une valeur stable sera automatiquement mémorisée.
5. Nettoyage et entretien
• Ne pas toucher la sonde avec les doigts et la tenir humide en humectant l’éponge à l’intérieur du capuchon.
• Rincer la sonde à l’eau claire ou préférablement à l’eau désionisée après chaque mesurage.
• Retirer les piles d’un appareil non utilisé.
6. Problèmes et solutions
• Pas d’affichage après branchement
Vérifier l’état des piles. Les remplacer si nécessaire (voir « 2. Insertion des piles »).
• Affichage ralenti
Nettoyer la sonde minutieusement à l’eau claire et rincer à l’eau désionisée.
DVM8681 VELLEMAN
- 8 -
Page 9

• Affichage de « - - - »
La valeur pH se trouve en dehors de la plage de mesure (pH 0 ~ pH 14). La solution est trop acide ou trop
alcaline.
• La valeur pH affichée est instable
La sonde est exposée à l’air libre. La tremper dans la solution à mesurer.
7. Spécifications techniques
Plage de mesure pH 0 ~ pH 14
Précision pH 0.2
Résolution pH 0.1
Précision de la température ± 1°C
Résolution de la température 0.5°C
Température de service 0°C ~ 50°C
Taux d’humidité 0 ~ 80% RH
ATC oui
Calibrage automatique oui
Dimensions 150 x 36 x 25mm
Solution tampon solution USA standard, solution NIST standard, solution DIN standard
N’employer cet appareil qu’avec des accessoires d’origine. SA Velleman ne sera aucunement responsable
de dommages ou lésions survenus à un usage (incorrect) de cet appareil.
La garantie de Velleman SA ne couvre que l’usage normal de l’appareil et exclut la pile, le mauvais usage,
l’abus, les modifications, la négligence, l’entretien impropre ou tout dommage résultant de fuite des piles.
Un appareil sous garantie remis pour réparation doit nécessairement être accompagné de son bon d’achat.
La garantie s’annule dès l’ouverture du mètre.
Pour la garantie et le service après vente, veuillez contacter SA Velleman (www.velleman.eu).
Pour plus d’information concernant cet article, visitez notre site web www.velleman.eu.
Toutes les informations présentées dans cette notice peuvent être modifiées sans notification préalable.
DVM8681 – pH-METRO
1. Introducción
A los ciudadanos de la Unión Europea
Importantes informaciones sobre el medio ambiente concerniente a este producto
Este símbolo en este aparato o el embalaje indica que, si tira las muestras inservibles, podrían dañar el
medio ambiente.
No tire este aparato (ni las pilas, si las hubiera) en la basura doméstica; debe ir a una empresa
especializada en reciclaje. Devuelva este aparato a su distribuidor o a la unidad de reciclaje local.
Respete las leyes locales en relación con el medio ambiente.
Si tiene dudas, contacte con las autoridades locales para residuos.
¡Gracias por haber comprado el DVM8681! Incluye: 1 x pH-metro, 4 pilas de botón LR44 y este manual del usuario.
Lea atentamente las instrucciones del manual antes de usar el aparato. Si el aparato ha sufrido algún daño en el
transporte no lo instale y póngase en contacto con su distribuidor.
2. Introducir las pilas
• Desatornille los tornillos de la tapa del compartimiento de pilas.
Asegúrese de que no pierda la pequeña arandela.
• Introduzca 4 pilas de botón LR44. Respete la polaridad.
• Vuelva a cerrar el compartimiento de pilas.
DVM8681 VELLEMAN
- 9 -
Page 10

3. Descripción
1. valor pH medido
2. CAL – modo de calibración
3. ATC – compensación automática de la temperatura
4. visualización de la temperatura
5. HLD – función data hold (retención de lectura)
6. PWR – tecla de alimentación
7. CAL – calibración
4. Uso
a. En general
• Saque los capuchones inferior e interior para exponer la sonda. Es normal
que encuentra cristales blancos. Asegúrese de que la esponja esté
siempre húmida.
• Sumerja el electrodo en el líquido. Pulse PWR y mueva el pH-metro para
obtener una visualización estable.
• El punta decimal parpadea si el metro está en el modo de medición. La temperatura (en °C o °F) se
visualizará también.
• Pulse HLD para fijar la visualización actual. El punto ya no parpadeará. Pulse HLD para desbloquear la
visualización.
• Desactive el metro al pulsar PWR. Cubra el electrodo con el capuchón y guarde el metro a una
temperatura ambiente entre 0°C ~ 50°C. Consulte el parágrafo « d. Calibración del pH-metro » para
efectuar la calibración de 3 puntos.
b. Desactivación automática
• Este metro se apaga automáticamente después de aproximadamente 20 minutos de inactividad.
• Desactive la función al mantener pulsado simultáneamente las teclas HLD y PWR si el metro está
desactivado. Se visualiza brevemente la « n » para indicar que ha desactivado la función. La función al
volver a activar el metro.
c. Compensación automática de la temperatura (ATC)
• Un valor pH depende de la temperatura. Por tanto, la medición del valor pH necesita una
compensación de la temperatura para asegurar un valor pH estándar Este metro corrige
automáticamente el valor pH basado en la temperatura del líquido medido.
• Mantenga pulsado simultáneamente CAL y PWR si el metro está desactivado. « °C » o
« °F » se visualiza. Seleccione la unidad de temperatura con HLD y pulse CAL para confirmar.
• « SA » se visualiza brevemente para indicar que se ha guardado el valor seleccionado. Esta selección
se guardará después de haber desactivado el metro.
d. Calibración del pH-metro
• Calibre el metro regularmente si lo utiliza cada día.
• Active el pH-metro.
• Primero, ponga el electrodo en el líquido de prueba pH 7, luego en el líquido de prueba pH
4 o pH 10 (liquido de prueba disponible en la farmacia).
• Pulse CAL para entrar en el modo de calibración. « CA » se visualiza brevemente. « CAL » y el valor pH
se visualizan después de algunos segundos para indicar que el metro está calibrado.
• Se visualiza « En » si la calibración no ha logrado o si la sonda no ha podido detectar el
líquido de prueba en el rango de tensión (véase a continuación). Si es el caso, vuelva a calibrar el metro
(véase a continuación).
DVM8681 VELLEMAN
- 10 -
Page 11

pH 4.00 97mV….250mV
pH 7.00 -60mV….60mV
pH 10.00 -250mV….-97mV
• El valor pH del líquido de prueba (4, 7 ó 10) aparece en la pantalla si el metro reconoce el líquido de
prueba. Si el valor visualizado se aparta ligeramente del valor pH supuesto, p.ej. 4.01 en lugar de 4.00,
pulse HLD para modificar el valor. El rango de calibración se encuentra entre 3.50 y 4.50 para un pH 4,
entre 6.50 y 7.50 para un pH 7 y entre 9.50 y 10.50 para un pH 10.
• El valor estable se guardará automáticamente.
5. Limpieza y mantenimiento
• No toque la sonda con los dedos y manténgala siempre húmeda al humedecer la esponja del interior del
capuchón.
• Lave la sonda con agua clara o preferentemente con agua desionizada después de cada medición.
• Saque las pilas de si no utiliza el aparato.
6. Solución de problemas
• No hay una visualización después de la activación
Verifique el estado de las pilas. Reemplácelas si fuera necesario (véase « 2. Introducir las pilas »).
• Visualización lenta
Limpie la sonda cuidadosamente con agua clara y enjuague con agua desionizada.
• Visualización « - - - »
El valor pH está fuera del rango de medición (pH 0 ~ pH 14). El líquido está demasiado ácido o demasiado
alcalizado.
• El valor pH visualizado es inestable
La sonda está expuesta al aire libre. Sumérjala en el líquido que quiere medir.
7. Especificaciones
Rango de medición pH 0 ~ pH 14
Precisión pH 0.2
Resolución pH 0.1
Precisión de la temperatura ± 1°C
Resolución de la temperatura 0.5°C
Temperatura de funcionamiento 0°C ~ 50°C
Humedad 0 ~ 80% RH
ATC sí
Calibración automática sí
Dimensiones 150 x 36 x 25mm
Líquido de prueba líquido USA estándar, líquido NIST estándar, líquido DIN estándar
Utilice este aparato sólo con los accesorios originales. SA Velleman no será responsable de daños ni
lesiones causados por un uso (incorrecto) de este aparato.
La garantía de Velleman SA cubre sólo el uso normal del aparato y excluye las pilas, el mal uso, las
modificaciones, el descuido, el mantenimiento inadecuado y cualquier daño causado por una fuga de las
pilas. Asegúrese de que un aparato cubierto por la garantía y devuelto para su reparación esté acompañado
de la factura de compra. La garantía también expira cuando se abre el aparato.
Para la garantía y el servicio posventa, contacte SA Velleman (www.velleman.eu).
Para más información sobre este producto, visite nuestra página web www.velleman.eu.
Se pueden modificar las especificaciones y el contenido de este manual sin previo aviso.
DVM8681 VELLEMAN
- 11 -
Page 12

DVM8681 – pH-MESSGERÄT
1. Einführung
An alle Einwohner der Europäischen Union
Wichtige Umweltinformationen über dieses Produkt
Dieses Symbol auf dem Produkt oder der Verpackung zeigt an, dass die Entsorgung dieses Produktes nach
seinem Lebenszyklus der Umwelt Schaden zufügen kann.
Entsorgen Sie die Einheit (oder verwendeten Batterien) nicht als unsortiertes Hausmüll; die Einheit oder
verwendeten Batterien müssen von einer spezialisierten Firma zwecks Recycling entsorgt werden.
Diese Einheit muss an den Händler oder ein örtliches Recycling-Unternehmen retourniert werden.
Respektieren Sie die örtlichen Umweltvorschriften.
Falls Zweifel bestehen, wenden Sie sich für Entsorgungsrichtlinien an Ihre örtliche Behörde.
Wir bedanken uns für den Kauf des DVM8681! Lieferumfang: 1 x pH-Messgerät, 4 x LR44 Knopfzellen und diese
Bedienungsanleitung. Lesen Sie diese Bedienungsanleitung vor
Inbetriebnahme sorgfältig durch. Überprüfen Sie, ob Transportschäden
vorliegen. Sollte dies der Fall sein, verwenden Sie das Gerät nicht und
wenden Sie sich an Ihren Händler.
2. Die Batterien installieren
• Lockern Sie die 2 Schrauben. Sorgen Sie dafür, dass Sie den
kleinen Dichtungsring niet verliert.
• Legen Sie 4 x LR44 Knopfzellen ein und beachten Sie die Polarität.
• Schließen Sie das Batteriefach wieder.
3. Umschreibung
1. gemessener pH-Wert
2. CAL – Justierungsmodus
3. ATC – automatische Temperaturausgleich
4. Temperaturanzeige
5. HLD – Data-Hold-Funktion
6. PWR – Netzschalter
7. CAL – Justierung
4. Gebrauch
a. Allgemein
• Entfernen Sie die beiden Abdeckkappen damit die Elektrode sichtbar wird.
Es ist möglich, dass Sie weiße Kristalle finden auf dem Messfühler. Halten
Sie den Schwamm immer feucht.
• Tauchen Sie die Elektrode in die Probelösung ein. Drücken Sie PWR und
bewegen Sie das pH-Messgerät bis Sie eine stabile Anzeige bekommen.
• Wenn der Dezimalpunkt fangen Sie dann mit den Messungen an. Die
Temperatur (in °C oder °F) wird auch angezeigt.
• Drücken Sie HLD, um die aktuelle Anzeige festzusetzen. Bemerken Sie, dass der Punkt nicht mehr blinkt.
Drücken Sie HLD wieder, um die Anzeige zu entriegeln.
• Schalten Sie das Messgerät aus indem Sie PWR drücken. Schließen Sie die Elektrode ab und bewahren
Sie das Messgerät in einer Umgebungstemperatur zwischen 0°C ~ 50°C. Ziehen Sie “d. Das Messgerät
justieren”, um die Dreipunkt-Justierung auszuführen.
DVM8681 VELLEMAN
- 12 -
Page 13

b. Automatische Ausschaltung
• Dieses Messgerät wird nach etwa 20 Minuten automatisch ausgeschaltet
• Deaktivieren Sie diese Funktion indem Sie gleichzeitig HLD und PWR gedrückt halten ehe Sie das Gerät
einschalten. “n” erscheint kurz auf dem Schirm, um anzuzeigen, dass diese Funktion ausgeschaltet ist. Die
Funktion wird wieder eingeschaltet wenn Sie das Messgerät ausschalten.
c. Automatischer Temperaturausgleich (ATC)
• Ein pH-Wert hängt von der Temperatur ab. Deshalb ist der Temperaturausgleich während
pH-Messungen wichtig. Dieses Messgerät korrigiert automatisch die pH-Werte gemäß
der Temperatur der gemessenen Flüssigkeit.
• Halten Sie CAL und PWR gleichzeitig gedrückt wenn das Gerät ausgeschaltet ist. “°C”
oder “°F” erscheint im Display. Wählen Sie die Temperatureinheit mit HLD aus und
drücken Sie CAL zum Speichern.
• “SA” erscheint kurz im Display, um anzuzeigen, dass Ihre Wahl gespeichert wurde. Diese Wahl wird
gespeichert wenn Sie das Messgerät ausschalten.
d. Das Messgerät justieren
• Es ist sehr wichtig, um das Messgerät zu justieren. Führen Sie also regelmäßig eine Justierung aus wenn
Sie das Gerät täglich verwenden.
• Schalten Sie das Messgerät ein.
• Stecken Sie die Elektrode zuerst in eine Probeflüssigkeit von pH 7, danach in eine
Probeflüssigkeit van pH 4 oder pH 10 (Probeflüssigkeit vorhanden von Ihrer Apotheke).
• Drücken Sie CAL, um das Messgerät zu justieren. “CA” erscheint kurz im Display. Nach
einigen Sekunden erscheinen “CAL” und pH-Wert, um anzuzeigen, dass das Messgerät
justiert worden ist.
• Das Messgerät zeigt “En” an wenn die Justierung falsch ausgeführt wurde oder wenn die
Sonde die Probeflüssigkeit nicht wahrnehmen kann (siehe Spannungsbereich unten).
Wenn dies der Fall ist, justieren Sie das Messgerät aufs Neue (siehe unten).
pH 4.00 97mV….250mV
pH 7.00 -60mV….60mV
pH 10.00 -250mV….-97mV
• Der pH-Wert der Probeflüssigkeit (4, 7 oder 10) erscheint im Display wenn das Messgerät die Flüssigkeit
wieder erkenn. Drücken Sie HLD und ändern Sie den Wert wenn dieser leicht vom angenommenen Wert
abweicht, z.B 4.01 statt 4.00. Der Justierungsbereich für pH 4 liegt zwischen 3.50 ~ 4.50, für pH 7
zwischen 6.50 ~ 7.50 und für pH 10 zwischen 9.50 ~ 10.50.
• Ein stabiler Wert wird automatisch gespeichert.
5. Reinigung und Wartung
• Berühren Sie die Sonde nie mit bloßen Händen und halten Sie sie immer feucht indem Sie den Schwamm
befeuchten.
• Spülen Sie die Sonde nach jeder Messung mit Leitungswasser, oder noch besser, mit entionisiertem Wasser.
• Entfernen Sie die Batterien aus dem Gerät wenn Sie das Gerät nicht verwenden.
6. Problemlösung
• Keine Anzeige nach dem einschalten
Überprüfen Sie die Batterien. Wenn nötig, ersetzen Sie diese wenn nötig (siehe “2. Die Batterien
installieren”).
DVM8681 VELLEMAN
- 13 -
Page 14
• Langsame Anzeige
Reinigen Sie die Sonde gründlich mit Leitungswasser und spülen Sie sie mit entionisiertem Wasser ab.
• Das LCD-Display zeigt “- - -” an
Der pH-Wert ist außer Bereich des Messgerätes (pH 0 ~ pH 14). Die Flüssigkeit ist zu säure oder zu alkalisch.
• Der angezeigte pH-Wert ist instabil
Die Sonde wird ausgesetzt. Tauchen Sie sie in die zu messenden Flüssigkeit ein.
7. Technische Daten
pH-Bereich pH 0 ~ pH 14
Genauigkeit pH 0.2
Auflösung pH 0.1
Genauigkeit Temperatur ± 1°C
Auflösung Temperatur 0.5°C
Betriebstemperatur 0°C ~ 50°C
Feuchte 0 ~ 80% RH
ATC ja
Automatische Justierung ja
Abmessungen 150 x 36 x 25mm
Probeflüssigkeit Standard USA Probeflüssigkeit, Standard NIST Probeflüssigkeit,
Verwenden Sie dieses Gerät nur mit originellen Zubehörteilen. Velleman NV übernimmt keine Haftung für
Schaden oder Verletzungen bei (falscher) Anwendung dieses Gerätes.
Die Batterie, eine unsachgemäße Anwendung, Missbrauch, Änderungen, Modifikationen, Vernachlässigung,
nachlässige Wartung und Schaden verursacht durch leckende Batterien fallen nicht unter die Garantie von
Velleman nv. Legen Sie das Gerät im Garantiefall mit dem Original-Kaufbeleg vor. Die Garantie erlischt wenn
Sie das Gerät öffnen.
Für Garantie und Service, wenden Sie sich an Velleman nv (www.velleman.eu).
Für mehr Informationen zu diesem Produkt, siehe www.velleman.eu.
Alle Änderungen ohne vorherige Ankündigung vorbehalten.
Standard DIN Probeflüssigkeit
DVM8681 – pH-METRO
1. Introduzione
A tutti i residenti dell’Unione Europea
Importanti informazioni ambientali relative a questo prodotto
Questo simbolo riportato sul prodotto o sull’imballaggio, indica che è vietato smaltire il prodotto nell’ambiente
al termine del suo ciclo vitale in quanto può essere nocivo per l’ambiente stesso. Non smaltire il prodotto
(o le pile, se utilizzate) come rifiuto urbano indifferenziato; dovrebbe essere smaltito da un’impresa
specializzata nel riciclaggio.
Per informazioni più dettagliate circa il riciclaggio di questo prodotto, contattare l’ufficio comunale, il
servizio locale di smaltimento rifiuti oppure il negozio presso il quale è stato effettuato l’acquisto.
La ringraziamo per aver scelto Velleman! Contenuto della confezione: 1 pH-metro, 4 batterie a bottone LR44 e il
presente manuale. Si prega di leggere attentamente le informazioni contenute nel presente manuale prima di utilizzare
il dispositivo. Assicurarsi che l’apparecchio non sia stato danneggiato durante il trasporto; in tale evenienza, contattare il
proprio fornitore.
DVM8681 VELLEMAN
- 14 -
Page 15

2. Installazione delle batterie
• Svitare le due viti di chiusura del vano batterie. Fare attenzione
a non perdere le due piccole rondelle.
• Inserire 4 batterie a bottone LR44 rispettando la polarità.
• Richiudere il vano batterie.
3. Descrizione
1. indicazione pH misurato
2. CAL – modalità calibrazione
3. ATC – compensazione automatica della temperatura
4. indicazione temperatura
5. HLD – memorizzazione dato
6. PWR – tasto accensione/spegnimento
7. CAL – calibrazione
4. Utilizzo
a. Normale utilizzo
• Rimuovere il coperchio inferiore e il cappuccio protettivo interno per
scoprire l’elettrodo. È normale trovare dei cristalli bianchi attorno al
cappuccio e sull’elettrodo. Tenere bagnata la spugna presente
all’interno del cappuccio per mantenere l’elettrodo in buone
condizioni.
• Immergere l’elettrodo nella soluzione che si desidera esaminare. Premere
PWR ed agitare gentilmente il pH-metro nella soluzione fino a quando non si ottiene una lettura stabile.
• Durante la misurazione, sul display lampeggia un piccolo punto. Lo strumento mostrerà simultaneamente il
valore misurato del pH e della temperatura (°C o ° F).
• Premere HLD per “congelare” la lettura corrente. Il punto smette di lampeggiare. Premere nuovamente
HLD per sbloccare la lettura.
• Spegnere lo strumento premendo il tasto PWR. Rimettere il cappuccio protettivo sull’elettrodo e riporre lo
strumento in un ambiente la cui temperatura è compresa tra 0°C e +50°C (32°F ~ 122°F). Fare riferimento
al paragrafo “d. Calibrazione dello strumento” per eseguire la calibrazione.
b. Spegnimento automatico
• Lo strumento si spegne automaticamente dopo circa 20 minuti di inattività.
• Per disabilitare questa funzione, a strumento spento, premere e tenere premuto il tasto HLD mentre si
preme il tasto PWR. Rilasciare i tasti. Sul display appare brevemente il simbolo “n” ad indicare che la
funzione è stata disattivata. La funzione sarà riattivata dopo ogni spegnimento.
c. Compensazione automatica della temperatura (ATC)
• Poiché i valori di pH variano in funzione della temperatura, le applicazioni nel campo della
misura del pH richiedono una compensazione della temperatura per garantire valori di pH
standardizzati. Questo strumento corregge automaticamente valori di pH misurati in base
alla temperatura della soluzione sotto esame.
• A strumento spento, premere e tenere premuto il tasto CAL mentre si preme il tasto PWR.
Rilasciare i tasti. Sul display appare il simbolo “°C” o “°F”. Selezionare l’unità di misura
desiderata con il tasto HLD, quindi premere CAL per salvare l’impostazione.
DVM8681 VELLEMAN
- 15 -
Page 16

• Sul display appare brevemente la scritta “SA” ad indicare l’avvenuto salvataggio dell’impostazione.
L’impostazione verrà mantenuta anche dopo lo spegnimento
d. Calibrazione dello strumento
• La calibrazione è necessaria e deve essere effettuata regolarmente, anche su base giornaliera quando lo
strumento viene utilizzato spesso.
• Accendere il pH-metro.
• Immergere l'estremità dell'elettrodo prima in una soluzione tampone a pH 7 e
successivamente in una soluzione tampone a pH 4 (o pH10) (è possibile trovare la
soluzione campione presso una farmacia).
• Premere CAL per entrare in modalità calibrazione. Sul display apparirà la scritta “CA”.
Dopo alcuni secondi sul display apparirà la scritta “CAL” affiancata dal valore pH misurato
ad indicare che lo strumento è stato calibrato.
• Lo strumento visualizzerà la scritta “En” se la taratura non è stata eseguita correttamente
o se la sonda non ha potuto individuare la soluzione nella gamma di tensione come di
seguito indicato. In tale evenienza, rieseguire la calibrazione.
pH 4.00 97mV….250mV
pH 7.00 -60mV….60mV
pH 10.00 -250mV….-97mV
• Se il valore visualizzato differisce leggermente da quello presunto, ad esempio 4.01 anziché 4.00, premere
HLD per modificare il valore. La gamma di regolazione della calibrazione, per pH 4 è 3.50 ~ 4.50, per pH 7
è 6.50 ~ 7.50 e per pH 10 è 9.50 ~ 10.50.
• Un valore stabile verrà salvato automaticamente.
5. Pulizia e manutenzione
• Evitare di toccare la sonda a mani nude e mantenerlo bagnato inumidendo la spugna presente nel cappuccio
protettivo.
• Sciacquare la sonda con acqua di rubinetto, o meglio, con acqua deionizzata dopo ogni misurazione.
• Rimuovere le batterie dallo strumento se questo non viene utilizzato per lungo tempo.
6. Risoluzione dei problemi
• Nessuna visualizzazione dopo l’accensione
Verificare la carica delle batterie. Se necessario, provvedere alla loro sostituzione (vedere capitolo
“2. Installazione delle batterie”).
• Risposta lenta
Pulire la sonda accuratamente con acqua di rubinetto e successivamente con acqua deionizzata.
• Il display indica “- - -”
Il valore del pH è al di fuori della gamma misurabile (pH 0 ~ pH 14). La soluzione è troppo acida o troppo
alcalina.
• Il valore visualizzato è instabile
La sonda è esposta. Immergerla nella soluzione da analizzare.
DVM8681 VELLEMAN
- 16 -
Page 17

7. Specifiche tecniche
Gamma pH pH 0 ~ pH 14
Accuratezza pH 0,2
Risoluzione pH 0,1
Accuratezza temperatura ± 1°C
Risoluzione temperatura 0,5°C
Temperatura operativa 0°C ~ 50°C (32°F ~ 122°F)
Umidità operativa 0 ~ 80% RH
ATC si
Calibrazione automatica si
Dimensioni 150 x 36 x 25mm
Soluzione di calibrazione tamponi standard USA, tamponi standard NIST, tamponi standard DIN
Utilizzare questo dispositivo solamente con accessori originali. Velleman nv non può essere ritenuta
responsabile per danni a cose o persone che potrebbero derivare da un errato utilizzo del dispositivo.
Velleman nv offre una garanzia che copre il funzionamento normale dell’apparecchio ma non copre la
batteria, l’uso improprio ed eventuali abusi, alterazioni e manomissioni, negligenza nell’utilizzo,
manutenzione impropria o danni derivanti da perdite provenienti dalle batterie.
Per avere diritto alla riparazione in garanzia, è necessario essere in possesso della prova d’acquisto.
La garanzia decade se lo strumento è stato aperto.
Per garanzia e assistenza si prega di contattare Velleman nv (www.velleman.eu).
Per ulteriori informazioni relative a questo prodotto, vi preghiamo di visitare il nostro sito www.velleman.eu.
Le informazioni contenute in questo manuale possono essere soggette a modifiche senza alcun preavviso.
DVM8681 – pH-METR
1. Wprowadzenie
Do wszystkich mieszkańców Unii Europejskiej
Ważne informacje środowiskowe
Ten symbol umieszczony na urządzeniu lub opakowaniu wskazuje, że niewłaściwa utylizacja urządzenia
po zakończeniu jego eksploatacji, może szkodzić środowisku. Nie należy wyrzucać jednostek (lub baterii)
jako nieposortowanych śmieci komunalnych, odpady tego typu powinny zostać przetransportowane do
specjalistycznej firmy w celu ich recyklingu. Urządzenie należy zwrócić sprzedawcy lub lokalnej firmie
recyklingowej. Należy przestrzegać lokalnych zasad ochrony środowiska.
W razie wątpliwości, należy skontaktować się z władzami odpowiedzialnymi za usuwanie i unieszkodliwianie
odpadów.
Dziękujemy za wybranie firmy Velleman! Zawartość: 1 x pH-metr, 4 x baterie guzikowe LR44 i niniejsza instrukcja.
Przed rozpoczęciem użytkowania urządzenia należy dokładnie przeczytać niniejszą instrukcję obsługi. Jeżeli
urządzenie zostało uszkodzone podczas transportu, nie należy go
instalować czy użytkować, lecz skontaktować się ze sprzedawcą.
2. Instalacja baterii
• Poluzować dwie śruby przytrzymujące pokrywę komory baterii.
Nie usuwać małej uszczelki.
• Włożyć 4 baterie guzikowe zachowując odpowiednią biegunowość.
• Zamknąć komorę baterii.
DVM8681 VELLEMAN
- 17 -
Page 18

3. Opis
1. odczyt pH
2. CAL – tryb kalibracji
3. ATC – automatyczna kompensacja
temperatury
4. odczyt temperatury
5. HLD - pamięć
6. PWR – włącznik
7. CAL – kalibracja
4. Eksploatacja
a. Zasady ogólne
• Zdjąć górną i wewnętrzną zaślepkę, aby odsłonić elektrodę. Na
wewnętrznej stronie zaślepki i na elektrodzie mogą znajdować się białawe
kryształki. Aby przechowywać elektrodę we właściwych warunkach,
gąbka znajdująca się w zaślepce musi cały czas pozostać wilgotna.
• Zanurzyć elektrodę w testowanym roztworze. Przycisnąć PWR i
zamieszać pH-metrem, aby uzyskać stabilny wynik.
• Mała dioda będzie migać w czasie, gdy pH-metr będzie w trybie pomiaru. Wyświetli się również
temperatura (skala °C lub °F).
• Aby zatrzymać aktualny odczyt, przycisnąć HLD. Dioda przestanie migać. Aby wznowić aktualny odczyt,
przycisnąć HLD.
Przyciśnięcie PWR spowoduje wyłączenie urządzenia. Założyć zaślepkę na elektrodę i przechowywać pH-
•
metr w pomieszczeniu o temperaturze 0°C ~ 50°C (32°F ~ 122°F). Wykonanie 3-stopniowej kalibracji,
patrz „d. Kalibrowanie pH-metru”.
b. Automatyczne wyłączanie
• Urządzenie wyłączy się automatycznie, jeżeli przez około 20 minut nie będzie używane.
• Jednoczesne przytrzymanie HLD i PWR przed włączeniem urządzenia wyłącza funkcję automatycznego
wyłączania. Przez chwilę na wyświetlaczu pojawi się litera „n", oznacza to, że powyższa funkcja została
wyłączona. Funkcja włączy się automatycznie po wyłączeniu urządzenia.
c. Automatyczna kompensacja temperatury (ATC)
• Wartość pH jest zależna od temperatury, dlatego, aby zapewnić standaryzację pomiarów
wymagana jest kompensacja temperatury. Urządzenie automatycznie koryguje wskazanie
na podstawie pomiaru temperatury roztworu.
•
Jednocześnie przytrzymać CAL i PWR przed włączeniem urządzenia. Na wyświetlaczu
pojawi się °C lub °F. Przycisnąć HLD, aby wybrać jednostkę temperatury, a następnie
CAL, aby zapisać wybór.
• Przez chwilę na wyświetlaczu pojawi się „SA” wskazując, że zapisano wybór. Wybór pozostanie
zachowany po wyłączeniu urządzenia.
DVM8681 VELLEMAN
- 18 -
Page 19

d. Kalibrowanie pH-metru
• Kalibracja jest niezbędna i należy ją wykonywać regularnie, jeśli pH-metr jest używany często – nawet
codziennie.
• Włączyć pH-metr.
• Umieścić elektrodę w roztworze o pH równym 7, następnie 4 lub 10 (roztwory testowe
dostępne są w lokalnych aptekach)
• Przycisnąć CAL, aby wejść w tryb kalibracji. Przez chwilę na wyświetlaczu pojawią się
litery „CA". Po paru sekundach na wyświetlaczu pojawi się napis „CAL” oraz wartość pH,
co będzie oznaczać, że urządzenie zostało skalibrowane.
• Jeśli kalibrację wykonano niepoprawnie lub urządzenie nie wykryło roztworu testowego w
zakresie napięcia wskazanym poniżej, na wyświetlaczu pojawi się napis „En”. W tym
przypadku należy powtórzyć proces kalibracji, jak opisano powyżej.
pH 4,00 od 97mV do 250mV
pH 7,00 od -60mV do 60mV
pH 10,00 od -250mV do 97mV
• Jeżeli urządzenie zmierzy pH roztworu testowego, wartość pH roztworu (4, 7 lub 10) zostanie wyświetlona.
Jeżeli wyświetlona wartość różni się od znanej wartości pH roztworu i wynosi np. 4,01 zamiast 4,00,
przycisnąć HLD, aby zmienić wartość. Nastawny zakres kalibracji dla pH 4 wynosi od 3,50 do 4,50, dla pH
7 od 6,50 do 7,50, a dla pH 10 od 9,50 do 10,50.
• Stabilna wartość zostanie zapisana w pamięci.
5. Czyszczenie i konserwacja
• Unikać dotykania sondy. Utrzymywać sondę w wilgotnym środowisku przez zwilżanie gąbki w zaślepce.
• Po każdym pomiarze przemyć sondę wodą z kranu lub wodą dejonizowaną (bardziej zalecane).
• Jeżeli pH-metr nie będzie użytkowany przez dłuższy czas, wyjąć baterie z komory baterii.
6. Wykrywanie i usuwanie usterek
• Po włączeniu wyświetlacz nie działa.
Sprawdzić baterie. Jeżeli zajdzie potrzeba, wymienić baterie (patrz „2. Instalacja baterii”).
• Opóźniona odpowiedź
Umyć sondę wodą z kranu i przepłukać ją wodą dejonizowaną.
• Wskazanie “- - -”
Wartość pH roztworu jest poza zakresem od 0 do 14. Odczyn roztworu jest za bardzo kwaśny lub zasadowy.
• Wyświetlona wartość pH nie jest stabilna
Sonda jest odsłonięta. Zanurzyć sondę w roztworze do pomiaru.
7. Specyfikacja techniczna
Zakres pH pH 0 ~ pH 14
Dokładność pH 0,2
Rozdzielczość pH 0,1
Dokładność pomiaru temperatury ± 1°C
Rozdzielczość pomiaru temperatury 0,5°C
Temperatura robocza 0°C ~ 50°C (32°F ~ 122°F)
DVM8681 VELLEMAN
- 19 -
Page 20

Wilgotność robocza 0 ~ 80% RH
Automatyczna kompensacja temperatury tak
Autokalibracja tak
Wymiary 150 x 36 x 25mm
Testowy roztwór kalibracyjny standardowe bufory wg. USA, NIST, DIN
Używać tylko z oryginalnymi akcesoriami. Velleman nv nie ponosi odpowiedzialności w przypadku
uszkodzenia ciała lub mienia wynikającego z (niewłaściwego) użytkowania sprzętu.
Gwarancja firmy Velleman nv obejmuje normalną eksploatację, nie obejmuje natomiast baterii,
niewłaściwego zastosowania sprzętu, nadużycia, zmian, nieumiejętnego manipulowania przez osoby
niepowołane, zaniedbań, niewłaściwej konserwacji czy uszkodzeń wynikających z wyciekającego płynu z
baterii. Przy wszystkich naprawach gwarancyjnych wymagane jest okazanie dowodu zakupu. Gwarancja
traci wartość, jeżeli urządzenie zostało otworzone.
W sprawach związanych z gwarancją i serwisowaniem należy skontaktować się z firmą Velleman nv
(www.velleman.eu).
Więcej informacji o produkcie można znaleźć na stronie www.velleman.eu.
Informacje w niniejszej instrukcji mogą ulec zmianie bez uprzedniego powiadomienia.
Velleman® Service and Quality Warranty
Velleman
distributes its products in more than 85 countries.
All our products fulfil strict quality requirements and legal stipulations in
the EU. In order to ensure the quality, our products regularly go
through an extra quality check, both by an internal quality department
and by specialized external organisations. If, all precautionary
measures notwithstanding, problems should occur, please make appeal
to our warranty (see guarantee conditions).
General Warranty Conditions Concerning Consumer Products
(for EU):
• All consumer products are subject to a 24-month warranty on
production flaws and defective material as from the original date of
purchase.
• Velleman
or to refund the retail value totally or partially when the complaint is
valid and a free repair or replacement of the article is impossible, or if
the expenses are out of proportion.
You will be delivered a replacing article or a refund at the value of
100% of the purchase price in case of a flaw occurred in the first year
after the date of purchase and delivery, or a replacing article at 50% of
the purchase price or a refund at the value of 50% of the retail value in
case of a flaw occurred in the second year after the date of purchase
and delivery.
• Not covered by warranty:
- all direct or indirect damage caused after delivery to the article (e.g.
by oxidation, shocks, falls, dust, dirt, humidity...), and by the article, as
well as its contents (e.g. data loss), compensation for loss of profits;
- frequently replaced consumable goods, parts or accessories such as
batteries, lamps, rubber parts, drive belts... (unlimited list);
- flaws resulting from fire, water damage, lightning, accident, natural
disaster, etc.;
- flaws caused deliberately, negligently or resulting from improper
handling, negligent maintenance, abusive use or use contrary to the
manufacturer’s instructions;
- damage caused by a commercial, professional or collective use of the
article (the warranty validity will be reduced to six (6) months when the
article is used professionally);
- damage resulting from an inappropriate packing and shipping of the
article;
- all damage caused by modification, repair or alteration performed by
a third party without written permission by Velleman
• Articles to be repaired must be delivered to your Velleman
solidly packed (preferably in the original packaging), and be completed
with the original receipt of purchase and a clear flaw description.
• Hint: In order to save on cost and time, please reread the manual and
check if the flaw is caused by obvious causes prior to presenting the
article for repair. Note that returning a non-defective article can also
involve handling costs.
• Repairs occurring after warranty expiration are subject to shipping
costs.
• The above conditions are without prejudice to all commercial
warranties.
The above enumeration is subject to modification according to the
article (see article’s manual).
®
has over 35 years of experience in the electronics world and
®
can decide to replace an article with an equivalent article,
®
.
®
dealer,
®
Velleman
Velleman
verdeelt in meer dan 85 landen.
Al onze producten beantwoorden aan strikte kwaliteitseisen en aan de
wettelijke bepalingen geldig in de EU. Om de kwaliteit te waarborgen,
ondergaan onze producten op regelmatige tijdstippen een extra
kwaliteitscontrole, zowel door onze eigen kwaliteitsafdeling als door
externe gespecialiseerde organisaties. Mocht er ondanks deze
voorzorgen toch een probleem optreden, dan kunt u steeds een beroep
doen op onze waarborg (zie waarborgvoorwaarden).
Algemene waarborgvoorwaarden consumentengoederen (voor
Europese Unie):
• Op alle consumentengoederen geldt een garantieperiode van 24
maanden op productie- en materiaalfouten en dit vanaf de
oorspronkelijke aankoopdatum.
• Indien de klacht gegrond is en een gratis reparatie of vervanging van
een artikel onmogelijk is of indien de kosten hiervoor buiten verhouding
zijn, kan Velleman
door een gelijkwaardig artikel of de aankoopsom van het artikel
gedeeltelijk of volledig terug te betalen. In dat geval krijgt u een
vervangend product of terugbetaling ter waarde van 100% van de
aankoopsom bij ontdekking van een gebrek tot één jaar na aankoop en
levering, of een vervangend product tegen 50% van de kostprijs of
terugbetaling van 50% bij ontdekking na één jaar tot 2 jaar.
• Valt niet onder waarborg:
- alle rechtstreekse of onrechtstreekse schade na de levering
veroorzaakt aan het toestel (bv. door oxidatie, schokken, val, stof, vuil,
vocht...), en door het toestel, alsook zijn inhoud (bv. verlies van data),
vergoeding voor eventuele winstderving.
- verbruiksgoederen, onderdelen of hulpstukken die regelmatig dienen
te worden vervangen, zoals bv. batterijen, lampen, rubberen
onderdelen, aandrijfriemen... (onbeperkte lijst).
- defecten ten gevolge van brand, waterschade, bliksem, ongevallen,
natuurrampen, enz.
- defecten veroorzaakt door opzet, nalatigheid of door een
onoordeelkundige behandeling, slecht onderhoud of abnormaal gebruik
of gebruik van het toestel strijdig met de voorschriften van de
fabrikant.
- schade ten gevolge van een commercieel, professioneel of collectief
gebruik van het apparaat (bij professioneel gebruik wordt de
garantieperiode herleid tot 6 maand).
- schade veroorzaakt door onvoldoende bescherming bij transport van
het apparaat.
- alle schade door wijzigingen, reparaties of modificaties uitgevoerd
door derden zonder toestemming van Velleman
• Toestellen dienen ter reparatie aangeboden te worden bij uw
Velleman
oorspronkelijke aankoopbewijs. Zorg voor een degelijke verpakking (bij
voorkeur de originele verpakking) en voeg een duidelijke
foutomschrijving bij.
• Tip: alvorens het toestel voor reparatie aan te bieden, kijk nog eens
na of er geen voor de hand liggende reden is waarom het toestel niet
naar behoren werkt (zie handleiding). Op deze wijze kunt u kosten en
tijd besparen. Denk eraan dat er ook voor niet-defecte toestellen een
kost voor controle aangerekend kan worden.
• Bij reparaties buiten de waarborgperiode zullen transportkosten
aangerekend worden.
• Elke commerciële garantie laat deze rechten onverminderd.
service- en kwaliteitsgarantie
®
heeft ruim 35 jaar ervaring in de elektronicawereld en
®
beslissen het desbetreffende artikel te vervangen
®
-verdeler. Het toestel dient vergezeld te zijn van het
®
.
DVM8681 VELLEMAN
- 20 -
Page 21

Bovenstaande opsomming kan eventueel aangepast worden
naargelang de aard van het product (zie handleiding van het
betreffende product).
Garantie de service et de qualité Velleman
Velleman
l’électronique avec une distribution dans plus de 85 pays.
Tous nos produits répondent à des exigences de qualité rigoureuses et
à des dispositions légales en vigueur dans l’UE. Afin de garantir la
qualité, nous soumettons régulièrement nos produits à des contrôles de
qualité supplémentaires, tant par notre propre service qualité que par
un service qualité externe. Dans le cas improbable d’un défaut malgré
toutes les précautions, il est possible d’invoquer notre garantie (voir les
conditions de garantie).
Conditions générales concernant la garantie sur les produits
grand public (pour l’UE) :
• tout produit grand public est garanti 24 mois contre tout vice de
production ou de matériaux à dater du jour d’acquisition effective ;
• si la plainte est justifiée et que la réparation ou le remplacement d’un
article est jugé impossible, ou lorsque les coûts s’avèrent
disproportionnés, Velleman
article équivalent ou à rembourser la totalité ou une partie du prix
d’achat. Le cas échéant, il vous sera consenti un article de
remplacement ou le remboursement complet du prix d’achat lors d’un
défaut dans un délai de 1 an après l’achat et la livraison, ou un article
de remplacement moyennant 50% du prix d’achat ou le
remboursement de 50% du prix d’achat lors d’un défaut après 1 à 2
ans.
• sont par conséquent exclus :
- tout dommage direct ou indirect survenu à l’article après livraison
(p.ex. dommage lié à l’oxydation, choc, chute, poussière, sable,
impureté…) et provoqué par l’appareil, ainsi que son contenu (p.ex.
perte de données) et une indemnisation éventuelle pour perte de
revenus ;
- tout bien de consommation ou accessoire, ou pièce qui nécessite un
remplacement régulier comme p.ex. piles, ampoules, pièces en
caoutchouc, courroies… (liste illimitée) ;
- tout dommage qui résulte d’un incendie, de la foudre, d’un accident,
d’une catastrophe naturelle, etc. ;
- tout dommage provoqué par une négligence, volontaire ou non, une
utilisation ou un entretien incorrect, ou une utilisation de l’appareil
contraire aux prescriptions du fabricant ;
- tout dommage à cause d’une utilisation commerciale, professionnelle
ou collective de l’appareil (la période de garantie sera réduite à 6 mois
lors d’une utilisation professionnelle) ;
- tout dommage à l’appareil qui résulte d’une utilisation incorrecte ou
différente que celle pour laquelle il a été initialement prévu comme
décrit dans la notice ;
- tout dommage engendré par un retour de l’appareil emballé dans un
conditionnement non ou insuffisamment protégé ;
- toute réparation ou modification effectuée par une tierce personne
sans l’autorisation explicite de SA Velleman
- frais de transport de et vers Velleman
sous la garantie.
• toute réparation sera fournie par l’endroit de l’achat. L’appareil doit
nécessairement être accompagné du bon d’achat d’origine et être
dûment conditionné (de préférence dans l’emballage d’origine avec
mention du défaut) ;
• conseil : il est conseillé de consulter la notice et de contrôler câbles,
piles, etc. avant de retourner l’appareil. Un appareil retourné jugé
défectueux qui s’avère en bon état de marche pourra faire l’objet d’une
note de frais à charge du consommateur ;
• une réparation effectuée en-dehors de la période de garantie fera
l’objet de frais de transport ;
• toute garantie commerciale ne porte pas atteinte aux conditions
susmentionnées.
La liste susmentionnée peut être sujette à une complémentation
selon le type de l’article et être mentionnée dans la notice
d’emploi.
Garantía de servicio y calidad Velleman
Velleman
de la electrónica con una distribución en más de 85 países.
Todos nuestros productos responden a normas de calidad rigurosas y
disposiciones legales vigentes en la UE. Para garantizar la calidad,
sometimos nuestros productos regularmente a controles de calidad
adicionales, tanto por nuestro propio servicio de calidad como por un
servicio de calidad externo. En el caso improbable de que surgieran
problemas a pesar de todas las precauciones, es posible apelar a
nuestra garantía (véase las condiciones de garantía).
Condiciones generales referentes a la garantía sobre productos
de venta al público (para la Unión Europea):
• Todos los productos de venta al público tienen un período de garantía
de 24 meses contra errores de producción o errores en materiales
desde la adquisición original;
• Si la queja está fundada y si la reparación o la sustitución de un
artículo es imposible, o si los gastos son desproporcionados, Velleman
autoriza reemplazar el artículo por un artículo equivalente o reembolsar
la totalidad o una parte del precio de compra. En este caso, recibirá un
artículo de recambio o el reembolso completo del precio de compra al
descubrir un defecto hasta un año después de la compra y la entrega, o
un artículo de recambio al 50% del precio de compra o la sustitución de
un 50% del precio de compra al descubrir un defecto después de 1 a 2
años.
®
jouit d’une expérience de plus de 35 ans dans le monde de
®
s’autorise à remplacer ledit article par un
®
disfruta de una experiencia de más de 35 años en el mundo
®
®
;
®
si l’appareil n’est plus couvert
®
®
DVM8681 VELLEMAN
• Por consiguiente, están excluidos entre otras cosas:
- todos los daños causados directamente o indirectamente al aparato y
su contenido después de la entrega (p.ej. por oxidación, choques,
caída,...) y causados por el aparato, al igual que el contenido (p.ej.
pérdida de datos) y una indemnización eventual para falta de
ganancias;
- partes o accesorios que deban ser reemplazados regularmente, como
por ejemplo baterías, lámparas, partes de goma... (lista ilimitada);
- defectos causados por un incendio, daños causados por el agua,
rayos, accidentes, catástrofes naturales, etc.;
- defectos causados a conciencia, descuido o por malos tratos, un
mantenimiento inapropiado o un uso anormal del aparato contrario a
las instrucciones del fabricante;
- daños causados por un uso comercial, profesional o colectivo del
aparato (el período de garantía se reducirá a 6 meses con uso
profesional);
- daños causados por un uso incorrecto o un uso ajeno al que está
previsto el producto inicialmente como está descrito en el manual del
usuario;
- daños causados por una protección insuficiente al transportar el
aparato.
- daños causados por reparaciones o modificaciones efectuadas por una
tercera persona sin la autorización explicita de SA Velleman
- se calcula gastos de transporte de y a Velleman
está cubierto por la garantía.
• Cualquier reparación se efectuará por el lugar de compra. Devuelva el
aparato con la factura de compra original y transpórtelo en un embalaje
sólido (preferentemente el embalaje original). Incluya también una
buena descripción del defecto;
• Consejo: Lea el manual del usuario y controle los cables, las pilas,
etc. antes de devolver el aparato. Si no se encuentra un defecto en el
artículo los gastos podrían correr a cargo del cliente;
• Los gastos de transporte correrán a carga del cliente para una
reparación efectuada fuera del periodo de garantía.
• Cualquier gesto comercial no disminuye estos derechos.
La lista previamente mencionada puede ser adaptada según el
tipo de artículo (véase el manual del usuario del artículo en
cuestión)
Velleman® Service- und Qualitätsgarantie
Velleman
vertreibt seine Produkte in über 85 Ländern.
Alle Produkte entsprechen den strengen Qualitätsforderungen und
gesetzlichen Anforderungen in der EU. Um die Qualität zu gewährleisten
werden unsere Produkte regelmäßig einer zusätzlichen
Qualitätskontrolle unterworfen, sowohl von unserer eigenen
Qualitätsabteilung als auch von externen spezialisierten Organisationen.
Sollten, trotz aller Vorsichtsmaßnahmen, Probleme auftreten, nehmen
Sie bitte die Garantie in Anspruch (siehe Garantiebedingungen).
Allgemeine Garantiebedingungen in Bezug auf Konsumgüter
(für die Europäische Union):
• Alle Produkte haben für Material- oder Herstellungsfehler eine
Garantieperiode von 24 Monaten ab Verkaufsdatum.
• Wenn die Klage berechtigt ist und falls eine kostenlose Reparatur oder
ein Austausch des Gerätes unmöglicht ist, oder wenn die Kosten dafür
unverhältnismäßig sind, kann Velleman® sich darüber entscheiden,
dieses Produkt durch ein gleiches Produkt zu ersetzen oder die
Kaufsumme ganz oder teilweise zurückzuzahlen. In diesem Fall erhalten
Sie ein Ersatzprodukt oder eine Rückzahlung im Werte von 100% der
Kaufsumme im Falle eines Defektes bis zu 1 Jahr nach Kauf oder
Lieferung, oder Sie bekommen ein Ersatzprodukt im Werte von 50%
der Kaufsumme oder eine Rückzahlung im Werte von 50 % im Falle
eines Defektes im zweiten Jahr.
• Von der Garantie ausgeschlossen sind:
- alle direkten oder indirekten Schäden, die nach Lieferung am Gerät
und durch das Gerät verursacht werden (z.B. Oxidation, Stöße, Fall,
Staub, Schmutz, Feuchtigkeit, ...), sowie auch der Inhalt (z.B.
Datenverlust), Entschädigung für eventuellen Gewinnausfall.
- Verbrauchsgüter, Teile oder Zubehörteile, die regelmäßig
ausgewechselt werden, wie z.B. Batterien, Lampen, Gummiteile,
Treibriemen, usw. (unbeschränkte Liste).
- Schäden verursacht durch Brandschaden, Wasserschaden, Blitz,
Unfälle, Naturkatastrophen, usw.
- Schäden verursacht durch absichtliche, nachlässige oder
unsachgemäße Anwendung, schlechte Wartung, zweckentfremdete
Anwendung oder Nichtbeachtung von Benutzerhinweisen in der
Bedienungsanleitung.
- Schäden infolge einer kommerziellen, professionellen oder kollektiven
Anwendung des Gerätes (bei gewerblicher Anwendung wird die
Garantieperiode auf 6 Monate zurückgeführt).
- Schäden verursacht durch eine unsachgemäße Verpackung und
unsachgemäßen Transport des Gerätes.
- alle Schäden verursacht durch unautorisierte Änderungen,
Reparaturen oder Modifikationen, die von einem Dritten ohne Erlaubnis
von Velleman
• Im Fall einer Reparatur, wenden Sie sich an Ihren Velleman
Verteiler. Legen Sie das Produkt ordnungsgemäß verpackt
(vorzugsweise die Originalverpackung) und mit dem Original-Kaufbeleg
vor. Fügen Sie eine deutliche Fehlerumschreibung hinzu.
• Hinweis: Um Kosten und Zeit zu sparen, lesen Sie die
Bedienungsanleitung nochmals und überprüfen Sie, ob es keinen auf de
Hand liegenden Grund gibt, ehe Sie das Gerät zur Reparatur
zurückschicken. Stellt sich bei der Überprüfung des Geräts heraus, dass
kein Geräteschaden vorliegt, könnte dem Kunden eine
Untersuchungspauschale berechnet.
®
hat gut 35 Jahre Erfahrung in der Elektronikwelt und
®
vorgenommen werden.
®
si el aparato ya no
- 21 -
®
;
®
-
Page 22

• Für Reparaturen nach Ablauf der Garantiefrist werden
Transportkosten berechnet.
• Jede kommerzielle Garantie lässt diese Rechte unberührt.
Die oben stehende Aufzählung kann eventuell angepasst werden
gemäß der Art des Produktes (siehe Bedienungsanleitung des
Gerätes).
Garanzia di Qualità Velleman®
Velleman
distribuisce i suoi prodotti in oltre 85 paesi. Tutti i nostri prodotti
soddisfano rigorosi requisiti di qualità e rispettano le disposizioni
giuridiche dell'Unione europea. Al fine di garantire la massima qualità, i
nostri prodotti vengono regolarmente sottoposti ad ulteriori controlli,
effettuati sia da un reparto interno di qualità che da organizzazioni
esterne specializzate. Se, nonostante tutti questi accorgimenti,
dovessero sorgere dei problemi, si prega di fare appello alla garanzia
prevista (vedi condizioni generali di garanzia).
Condizioni generali di garanzia per i prodotti di consumo:
• Questo prodotto è garantito per il periodo stabilito dalle vigenti norme
legislative, a decorrere dalla data di acquisto, contro i difetti di
materiale o di fabbricazione. La garanzia è valida solamente se l’unità è
accompagnata dal documento d’acquisto originale.
• Futura Elettronica provvederà, in conformità con la presente garanzia
(fatto salvo quanto previsto dalla legge applicabile), a eliminare i difetti
mediante la riparazione o, qualora Futura Elettronica lo ritenesse
necessario, alla sostituzione dei componenti difettosi o del prodotto
stesso con un altro avente identiche caratteristiche.
• Le spese di spedizione o riconsegna del prodotto sono a carico del
cliente.
• La garanzia decade nel caso di uso improprio, manomissione o
installazione non corretta dell’apparecchio o se il difetto di conformità
non viene denunciato entro un termine di 2 mesi dalla data in cui si è
scoperto il difetto.
• Il venditore non è ritenuto responsabile dei danni derivanti dall’uso
improprio del dispositivo.
• L’apparecchio deve essere rispedito con l’imballaggio originale; non si
assumono responsabilità per danni derivanti dal trasporto.
• Il prodotto deve essere accompagnato da un’etichetta riportante i
propri dati personali e un recapito telefonico; è necessario inoltre
allegare copia dello scontrino fiscale o della fattura attestante la data
dell’acquisto.
L’eventuale riparazione sarà a pagamento se:
• Sono scaduti i tempi previsti.
• Non viene fornito un documento comprovante la data d’acquisto.
• Non è visibile sull’apparecchio il numero di serie.
• L’unità è stata usata oltre i limiti consentiti, è stata modificata,
installata impropriamente, è stata aperta o manomessa.
Velleman® usługi i gwarancja jakości
Velleman
Dystrybuujemy swoje produkty do ponad 85 krajów.
Wszystkie nasze produkty spełniają surowe wymagania jakościowe oraz
wypełniają normy i dyrektywy obowiązujące w krajach UE. W celu
zapewnienia najwyższej jakości naszych produktów, przechodzą one
regularne oraz dodatkowo wyrywkowe badania kontroli jakości,
zarówno naszego wewnętrznego działu jakości jak również
wyspecjalizowanych firm zewnętrznych. Pomimo dołożenia wszelkich
starań czasem mogą pojawić się problemy techniczne, prosimy odwołać
się do gwarancji (patrz warunki gwarancji).
®
ha oltre 35 anni di esperienza nel mondo dell'elettronica e
®
ma ponad 35-letnie doświadczenie w świecie elektroniki.
Ogólne Warunki dotyczące gwarancji:
Wszystkie produkty konsumenckie podlegają 24-miesięcznej gwarancji
na wady produkcyjne i materiałowe od daty zakupu.
W przypadku, gdy usterka jest niemożliwa do usunięcia lub koszt
usunięcia jest nadmiernie wysoki Velleman
wymianie artykułu na nowy, wolny od wad lub zwrócić zapłaconą kwotę.
Zwrot gotówki może jednak nastąpić z uwzględnieniem poniższych
warunków:
zwrot 100% ceny zakupu w przypadku, gdy wada wystąpiła w ciągu
pierwszego roku od daty zakupu i dostawy
wymiana wadliwego artykułu na nowy, wolny od wad z odpłatnością
50% ceny detalicznej lub zwrot 50% kwoty ceny nabycia w przypadku
gdy wada wystąpiła w drugim roku od daty zakupu i dostawy.
Produkt nie podlega naprawie gwarancyjnej:
- gdy wszystkie bezpośrednie lub pośrednie szkody spowodowane są
działaniem czynników środowiskowych lub losowych (np. przez
utlenianie, wstrząsy, upadki, kurz, brud, ...), wilgotności;
- gwarant nie ponosi odpowiedzialności za szkody wynikających z utraty
danych;
- utrata zysków z tytułu niesprawności produktu; z gwarancji wyłaczone
są matriały eksploatacyjne: baterie, żarówki, paski napędowe, gumowe
elementy napędowe... (nieograniczona lista);
- usterka wynika z działania pożaru, zalania wszelkimi cieczami,
uderzenia pioruna, upadku lub klęski ż
- usterka wynika z zaniedbań eksploatacyjnych tj. umyślne bądź
nieumyślne zaniechanie czyszczenia, konserwacji, wymiany materiałów
ekspolatacyjnych, niedbalstwa lub z niewłaściwego obchodzenia się lub
niezgodnego użytkowania z instrukcją producenta;
- szkody wynikające z nadmiernego użytkowania gdy nie jest do tego
celu przeznaczony tj. działalność komerycjna, zawodowa lub wspólne
użytkowanie przez wiele osób - okres obowiązywania gwarancji zostanie
obniżony do 6 (sześć) miesięcy;
- Szkody wynikające ze źle zabezpieczonej wysyłki produktu;
- Wszelkie szkody spowodowane przez nieautoryzowaną naprawę,
modyfikację, przeróbkę produktu przez osoby trzecie jak również bez
pisemnej zgody firmy Velleman
Uszkodzony produkt musi zostać dostarczony do sprzedawcy
Velleman
wraz z wyposażeniem z jakim produkt został sprzedany. W przypadku
wysyłki towaru w opakowaniu innym niż oryginalnym ryzyko usterki
produktu oraz tego skutki przechodzą na właściciela produktu. Wraz z
niesprawnym produktem należy dołączyć jasny i szczegółowy opis jego
usterki, wady;
Wskazówka: Aby zaoszczędzić na kosztach i czasie, proszę szczegółowo
zapoznać się z instrukcja obsługi; czy przyczyną wady są okoliczności
techniczne czy też wynikaja wyłącznie z nieznajomości obsługi
produktu. W przypadku wysyłki sprawnego produktu do serwisu
nabywca może zostać obciążony kosztmi obsługi oraz transportu.
W przypadku napraw pogwarancyjnych lub odpłatnych klient ponosi
dodatkowo koszt wysyłki produktu do i z serwisu.
wymienione wyżej warunki są bez uszczerbku dla wszystkich
komercyjnych gwarancji.
Powyższe postanowienia mogą podlegać modyfikacji w
zależności od wyrobu (patrz art obsługi).
®
, solidnie zapakowany (najlepiej w oryginalnym opakowaniu),
®
.
®
może zdecydować o
ywiołowej, itp.;
DVM8681 VELLEMAN
- 22 -
 Loading...