

Page 1
D
ODESOSOSCUGNM
B
7
E
M
ÈT
T
E
N
E
D
N
T
D
R
T
S
A
I
G
E
T
D
N
ÉE
R
VM1
S
UND L
CIBEL
NOM
NÓME
HALLP
3SD
VEL DA
ETER/
RE/EN
RO/DA
GELME
ALOGG
ATALO
EGISTR
A LOGG
SGERÄ
ER
GER
UR DE
ER
/DATE
ONN
LOGGE
S
SER MA
EBRUIK
OTICE D
ANUAL
EDIENU
UAL
RSHAND
’EMPLOI
EL USU
GSANLE
LEIDING
RIO
TUNG
3
9
15
21
27
Page 2
/
1
D
D
1234567891234567891234567891234
5678912345678
9
v
n
u
o
e
r
n
o
m
d
h
o
o
d
M
C
o
e
ó
e
M
C
e
k
a
m
L
D
e
h
P
e
n
a
e
a
a
f
h
n
r
Table
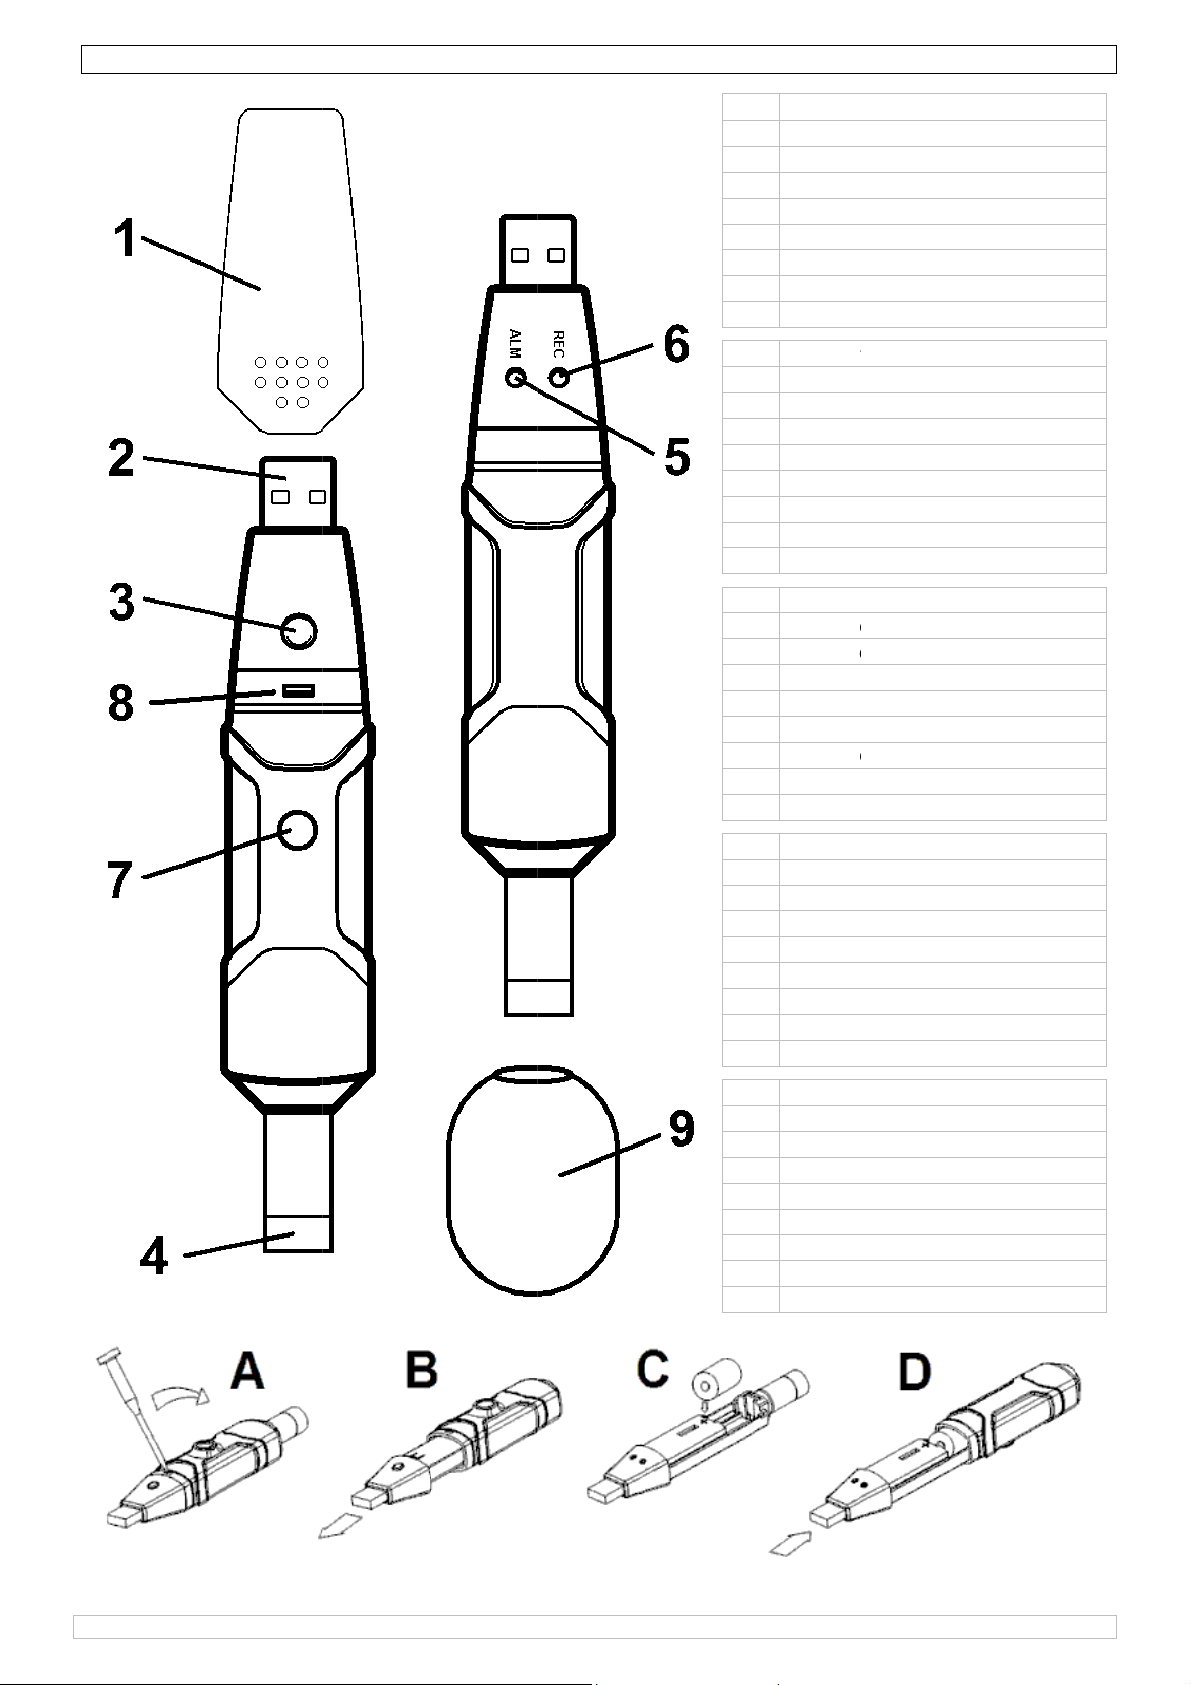
VM173S
Protecti
USB co
Start b
pick-up
Alarm L
Record
bracket
open h
windscr
besche
USB-aa
startkn
opnee
alarmle
REC-led
aansluit
vergren
windsc
capuch
connexi
bouton
capteur
LED AL
LED RE
connexi
encoch
pare-ve
capuch
conexió
botón d
e cover
nector to
tton
element
ED (red/y
LED (gree
nut
using
en
mdop
sluiting n
p
element
(rood/ge
(groen)
ing statief
dellipje
erm
n protecte
on USB
e mesure
(rouge/j
(verte)
on statif
nt
n protecto
n USB
medición
C port
llow)
)
ar pc-poo
l)
ur
une)
r
t
sensor
LED AL
LED RE
conexió
muesca
cortavi
Schutz
USB-An
Start-T
Aufnah
Alarm-
REC-LE
Anschlu
Verrieg
Windsc
(rojo/am
(verde)
n soporte
nto
appe
schluss au
ste
e-Elemen
ED (rot/ge
(grün)
ss Fuß
lungslasc
utz
rillo)
PC-Port
t
lb)
e
16
12/2010
2
©Vellema
nv
Page 3
/
.
oImIf Thint
.3.
e
.
.
e
u
e
e
y
o
I
K
K
V
i
e
e
c
t
n
e
e
m
a
e
g
w
c
n
i
r
a
C
h
n
r
e
e
h
e
e
o
c
e
e
i
®
g
w
h
f
d
o
o
t
s
t
o
.
v
e
o
r
n
d
u
w
m
e
n
a
n
f
e
-
l
o
2
w
u
e
n
)
L
D
e
b
c
t
t
p
a
e
d
e
u
t
o
a
e
t
C
g
d
D
n
p
a
i
l
t
h
u
t
n
u
b
t
e
e
m
d
i
h
a
l
g
u
a
h
a
f
s
i
a
c
t
c
t
v
o
h
e
a
a
e
h
u
n
v
a
h
a
a
U
n
d
t
y
h
n
VM173S
1
Introd
T
all resid
portant
in doubt,
ank you f
o service.
2
Safety
Genera
R
fer to the
•
Protect th
Protect th
•
Familiaris
•
All modifi
•
Only use
•
the warra
Damage c
•
and the d
4
Featur
This
lifec
mun
icipal wast
This
local
ction
nts of th
nvironm
symbol on
cle could
device sho
environm
contact y
r choosing
If the devi
nstruct
eep this d
eep this d
l Guidel
elleman
s device fr
device a
yourself
ations of t
he device
ty.
aused by
aler will n
s
Europea
ntal info
the device
arm the e
; it shoul
uld be ret
ntal rules.
ur local
Velleman!
e was da
ions
vice away
vice away
nes
Service
om shocks
ainst extr
ith the fu
e device
or its inte
isregard o
t accept r
Us
n Union
mation a
or the pa
vironmen
be taken
rned to yo
aste dis
Please rea
aged in tr
from child
from rain,
and Quali
and abus
me heat,
ctions of t
re forbidd
ded purpo
certain g
sponsibili
r ma
out this
kage indic
. Do not d
o a specia
ur distribu
osal aut
d the man
nsit, don'
ren and un
moisture,
ty Warra
. Avoid br
ust and m
he device
n for safe
se. Using t
idelines in
y for any
ual
roduct
tes that d
spose of t
ized comp
or or to a
orities.
al thorou
install or
authorized
splashing
ty on the
te force w
oisture.
efore actu
y reasons.
he device i
this manu
nsuing de
sposal of t
e unit (or
ny for rec
ocal recycl
hly before
se it and
users.
nd drippin
last pages
en operat
ally using i
n an unau
l is not co
ects or pr
he device
batteries)
ycling.
ing servic
bringing t
ontact yo
g liquids.
of this ma
ing the de
t.
horised w
ered by t
blems.
fter its
s unsorte
. Respect
is device
r dealer.
ual.
ice.
y will void
e warrant
he
•
device co
normal an
•
data man
•
over rang
•
A & C wei
•
fast & slo
•
software
•
manual a
•
5
Use
R
fer to the
5.
1 Softwa
First instal
•
CD drive
locate the
directory
Remove t
•
the perso
2 Softwa
5.
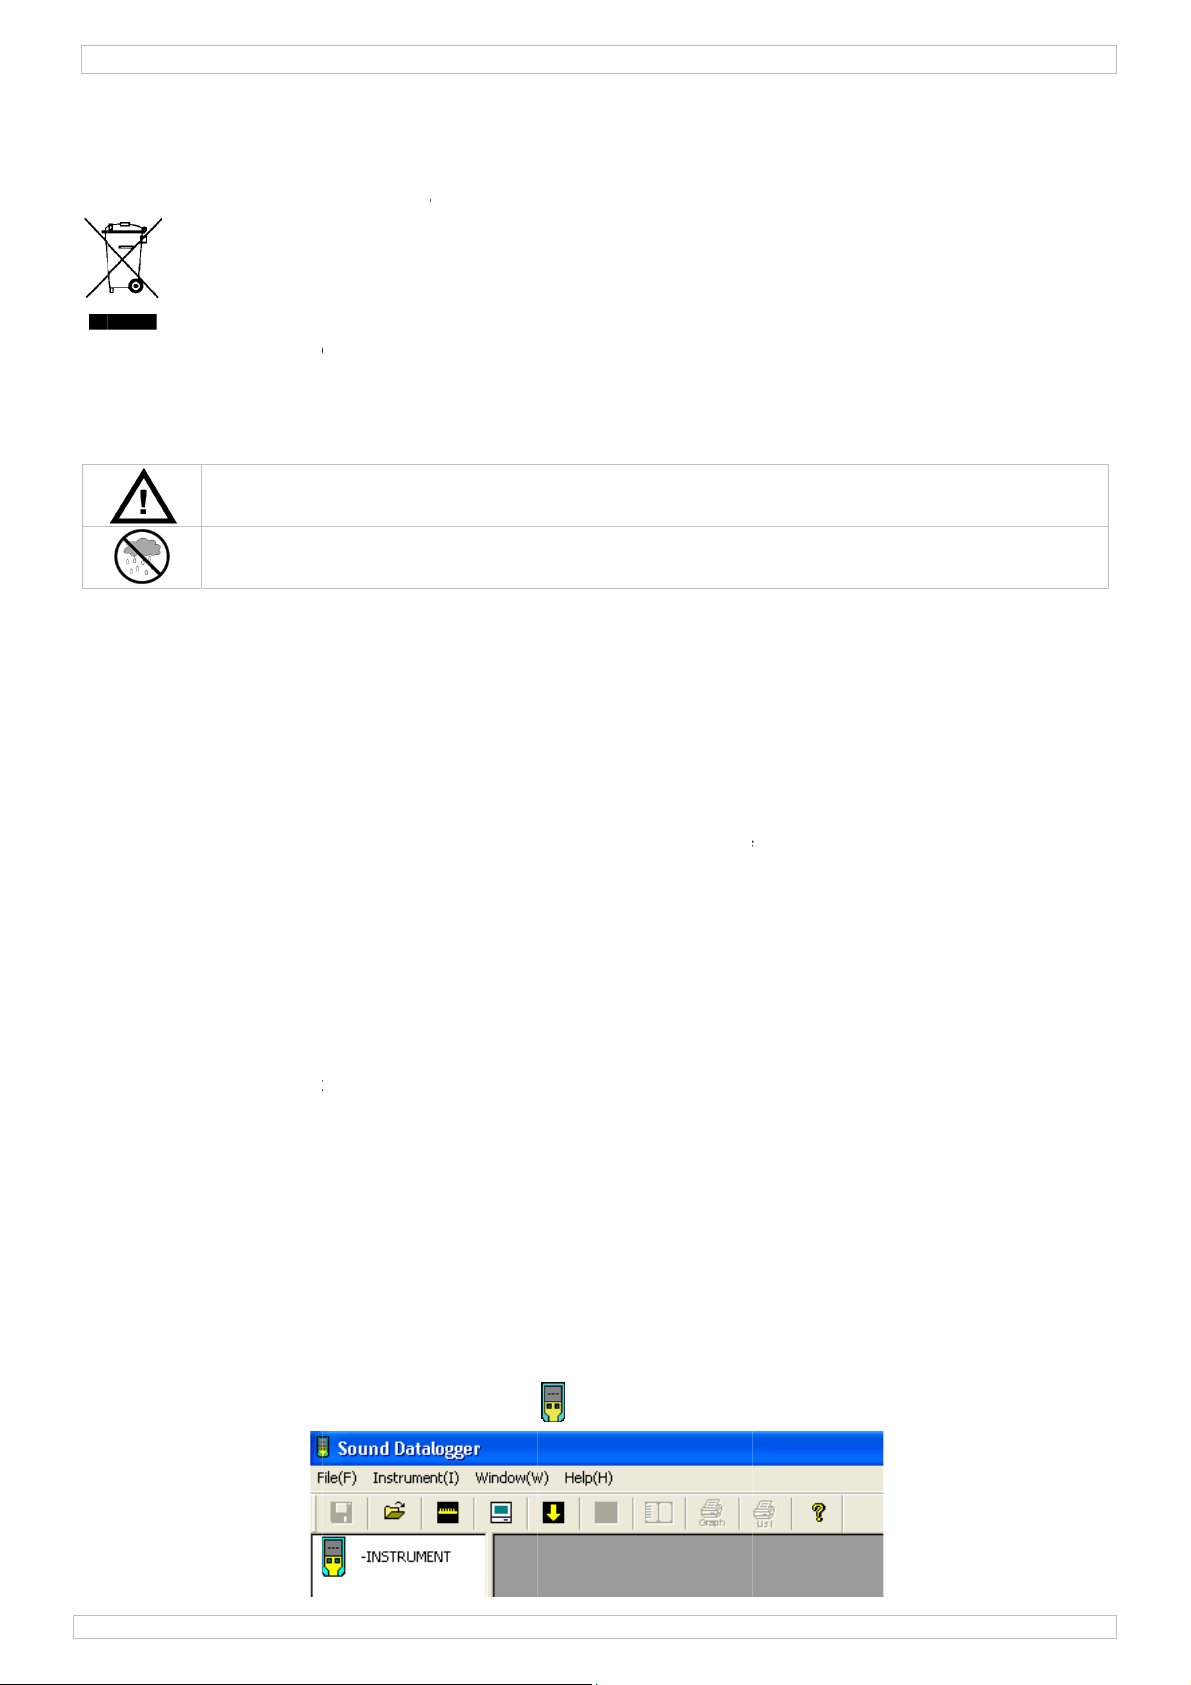
Start the
•
plies with
d peak mo
gement st
indicator
hted
response
alibration
d automa
llustration
e installa
l the datal
nd followin
file SETUP
:\Program
e protecti
al comput
e operati
datalogger
IEC61672
de
red or rea
ic start m
on page
ion
gger soft
g the instr
EXE on th
Files\Sou
e cover (1
r.
n
software.
1 Class2 f
-time
de
of this m
are on a p
ctions on
included
d Datalog
from the
ocate the
r sound l
nual.
rsonal co
he screen.
DROM an
er.
atalogger,
-icon an
vel meter
puter, by
When inst
double cli
plug the d
d click on i
nserting t
llation do
k it. Instal
atalogger i
.
e enclosed
sn’t start
l the softw
nto a free
disc into t
utomatical
re under
SB-slot o
e
ly,
16
12/2010
3
©Vellema
nv
Page 4
DVM173SD
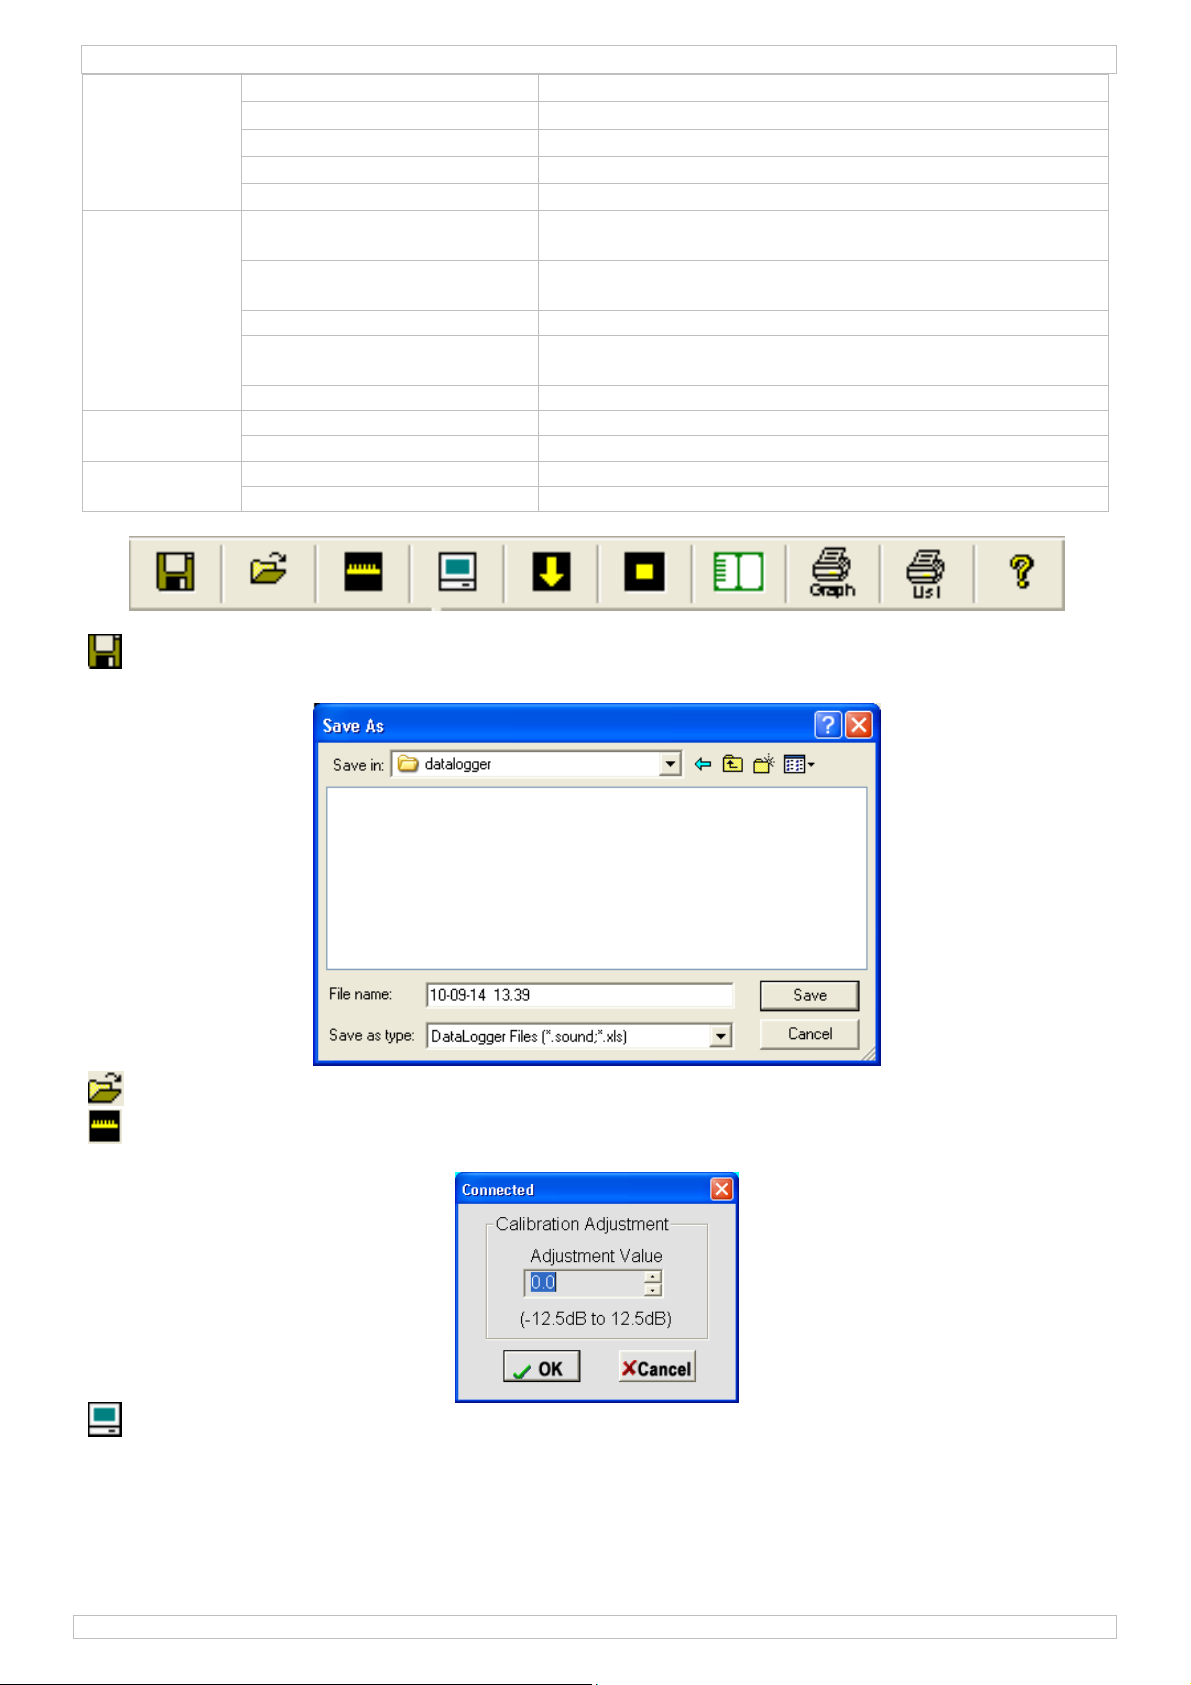
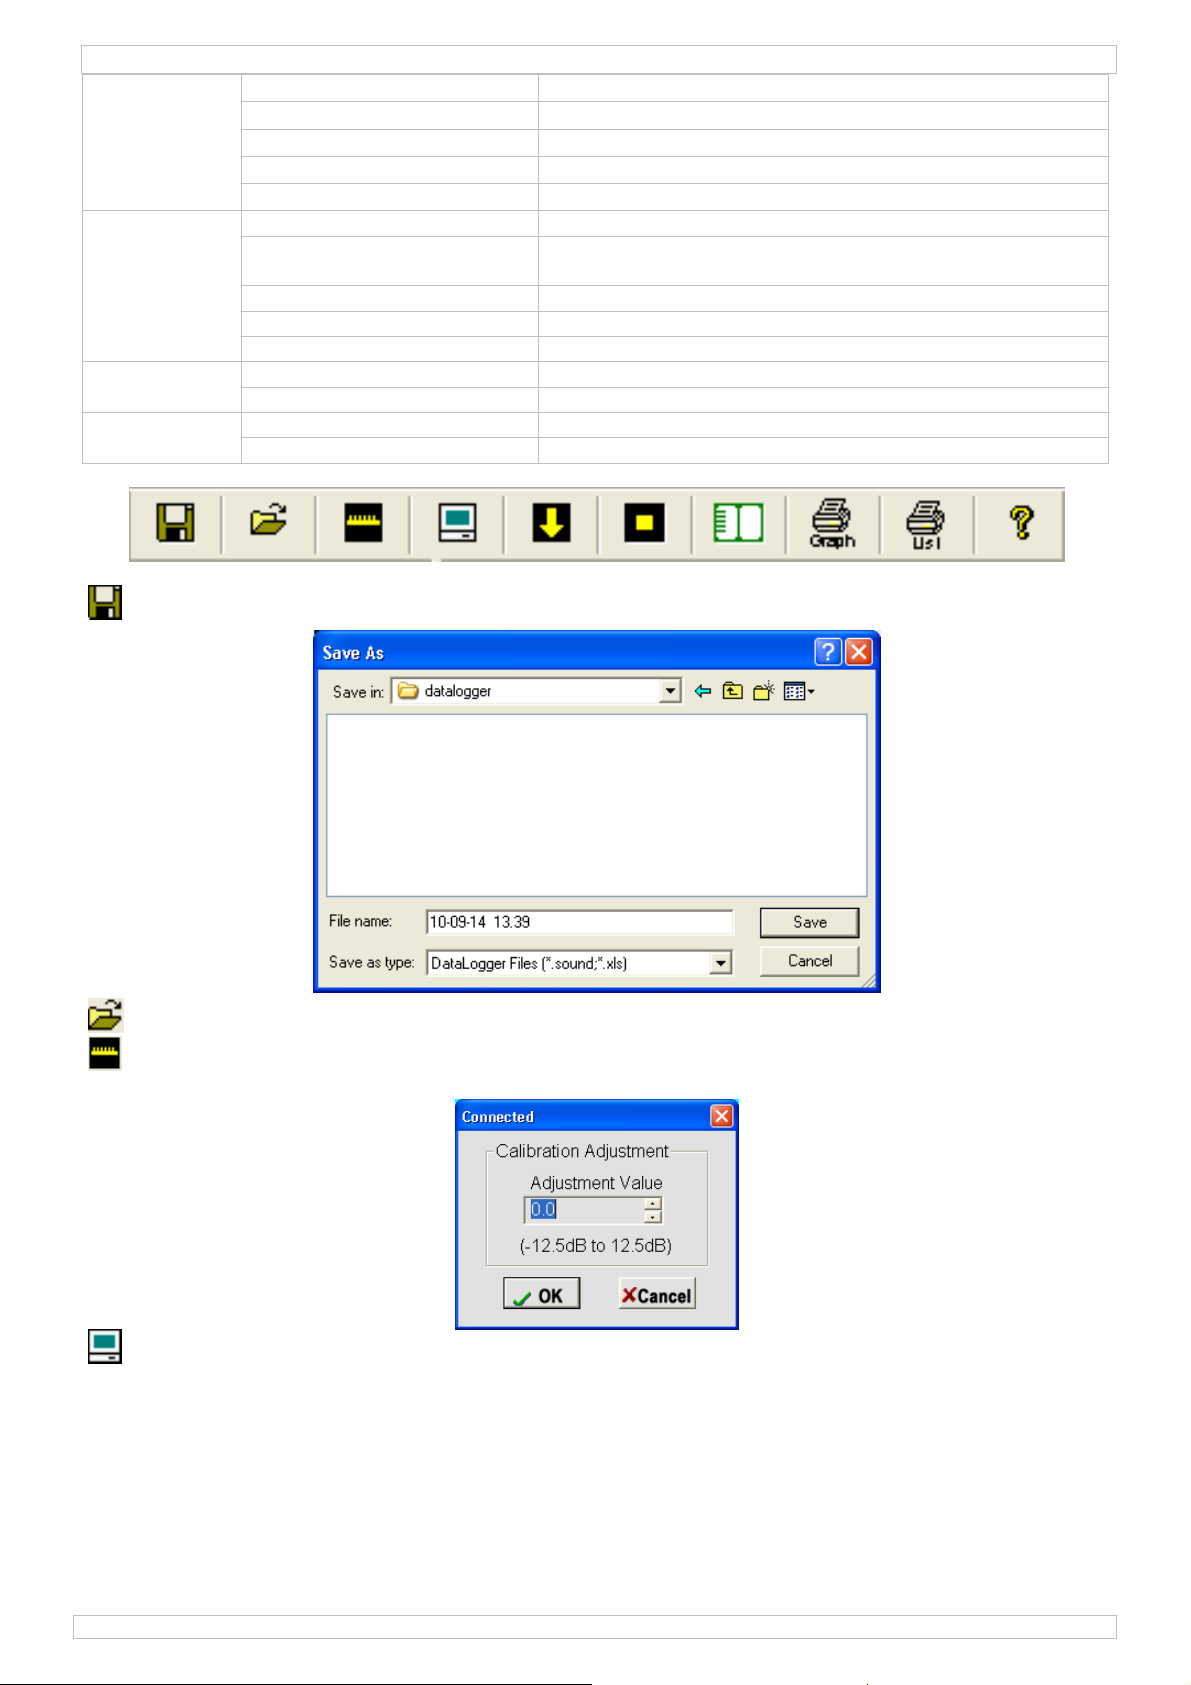
File (F) Save… save the recorded data to disk
Open… open a saved file
Print Setup… change the printer and printing options
Print Preview print preview the graph or list
Print… print the graph or the list
Instrument (I) Calibration Adjustment… calibrate the data logger to eliminate measuring errors
e.g. die to aging of the microphone
Datalogger Setup… set up sampling rate, alarm levels, LED indications,
recording mode…
Download Data… download data from the data logger
Stop Running… stop reading data from the data logger (only in real-
time mode)
Previous Measurement check the data from last measurement
Window (W) Instrument show or hide the instrument window (left pane)
Infor Dialog show or hide info dialog window
Help (H) About show the software version of the data logger
Help Topics open the software help file
Open file save dialog box to save a data file. The file is automatically saved with a .sound
extension as well as with a .xls extension.
Open previously saved files (.sound extension).
Calibrate the data logger. E.g. when reading is 0.5dB higher than actual sound level, set the
adjustment value to -0.5dB.
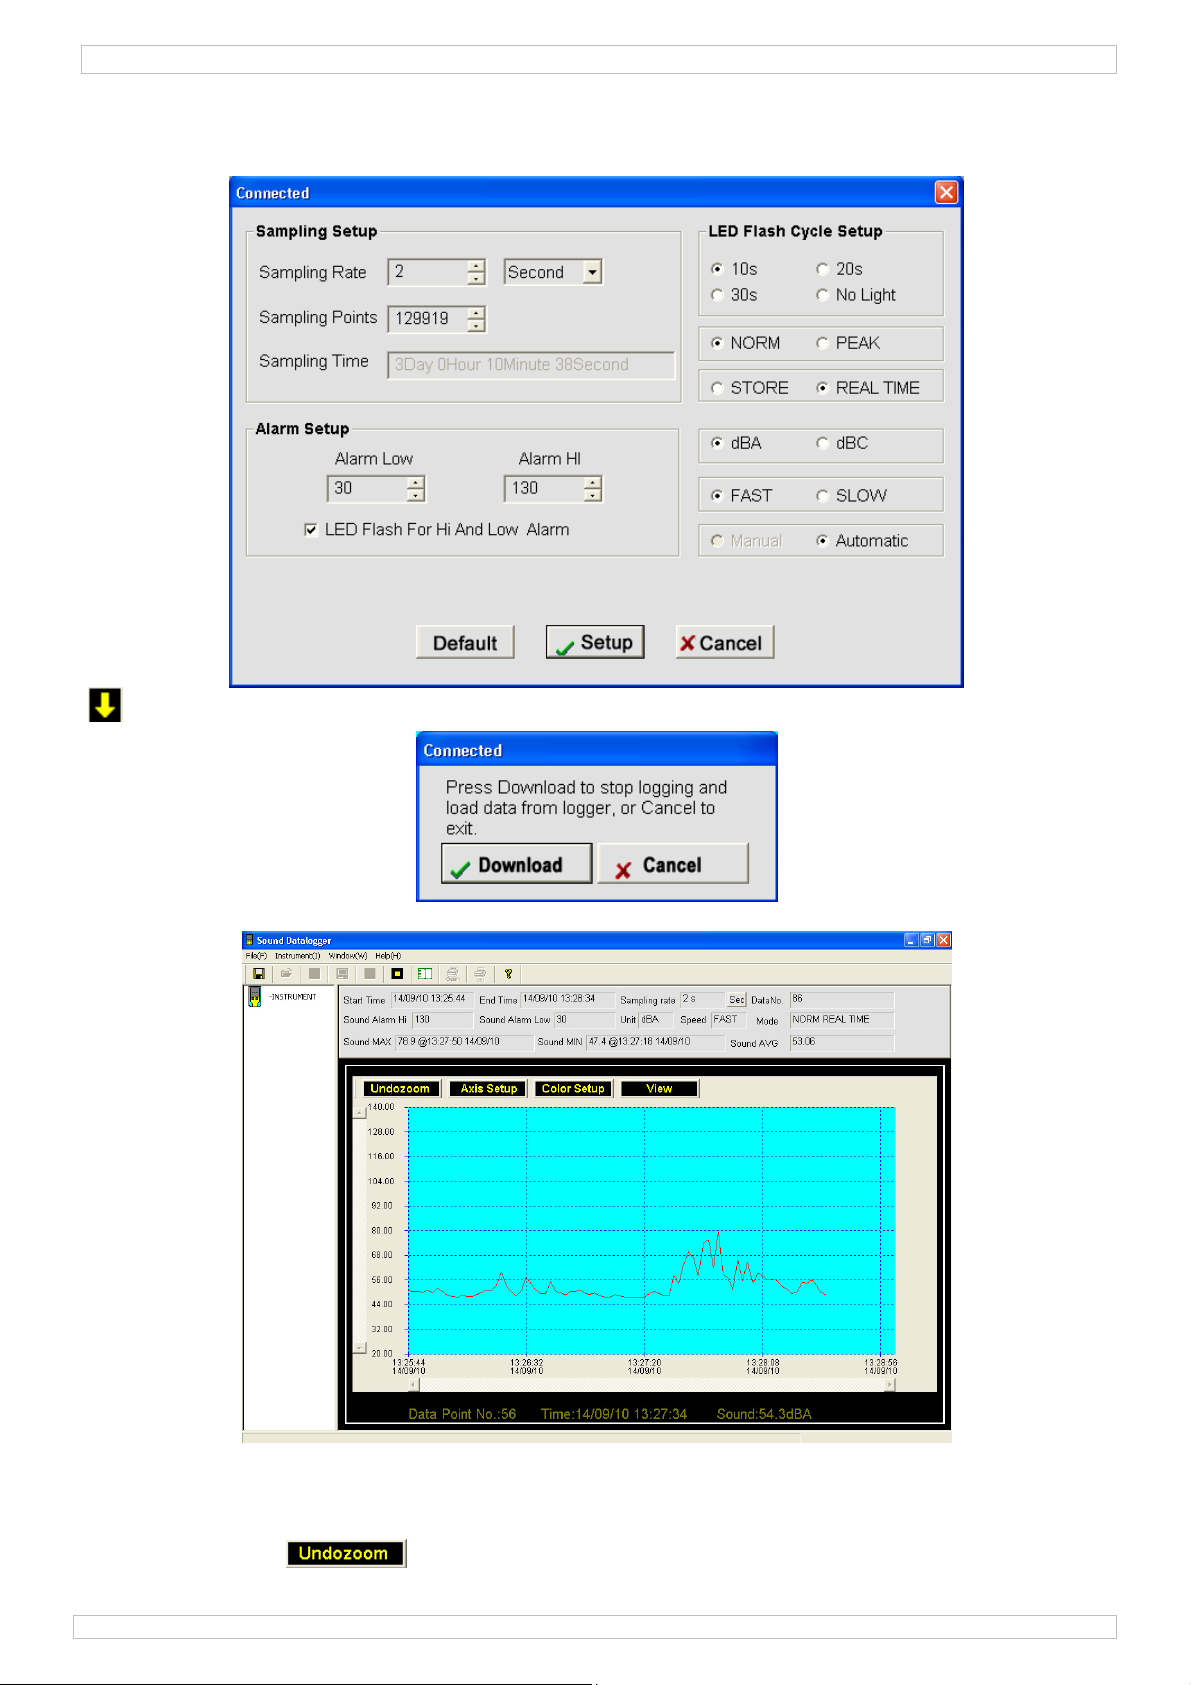
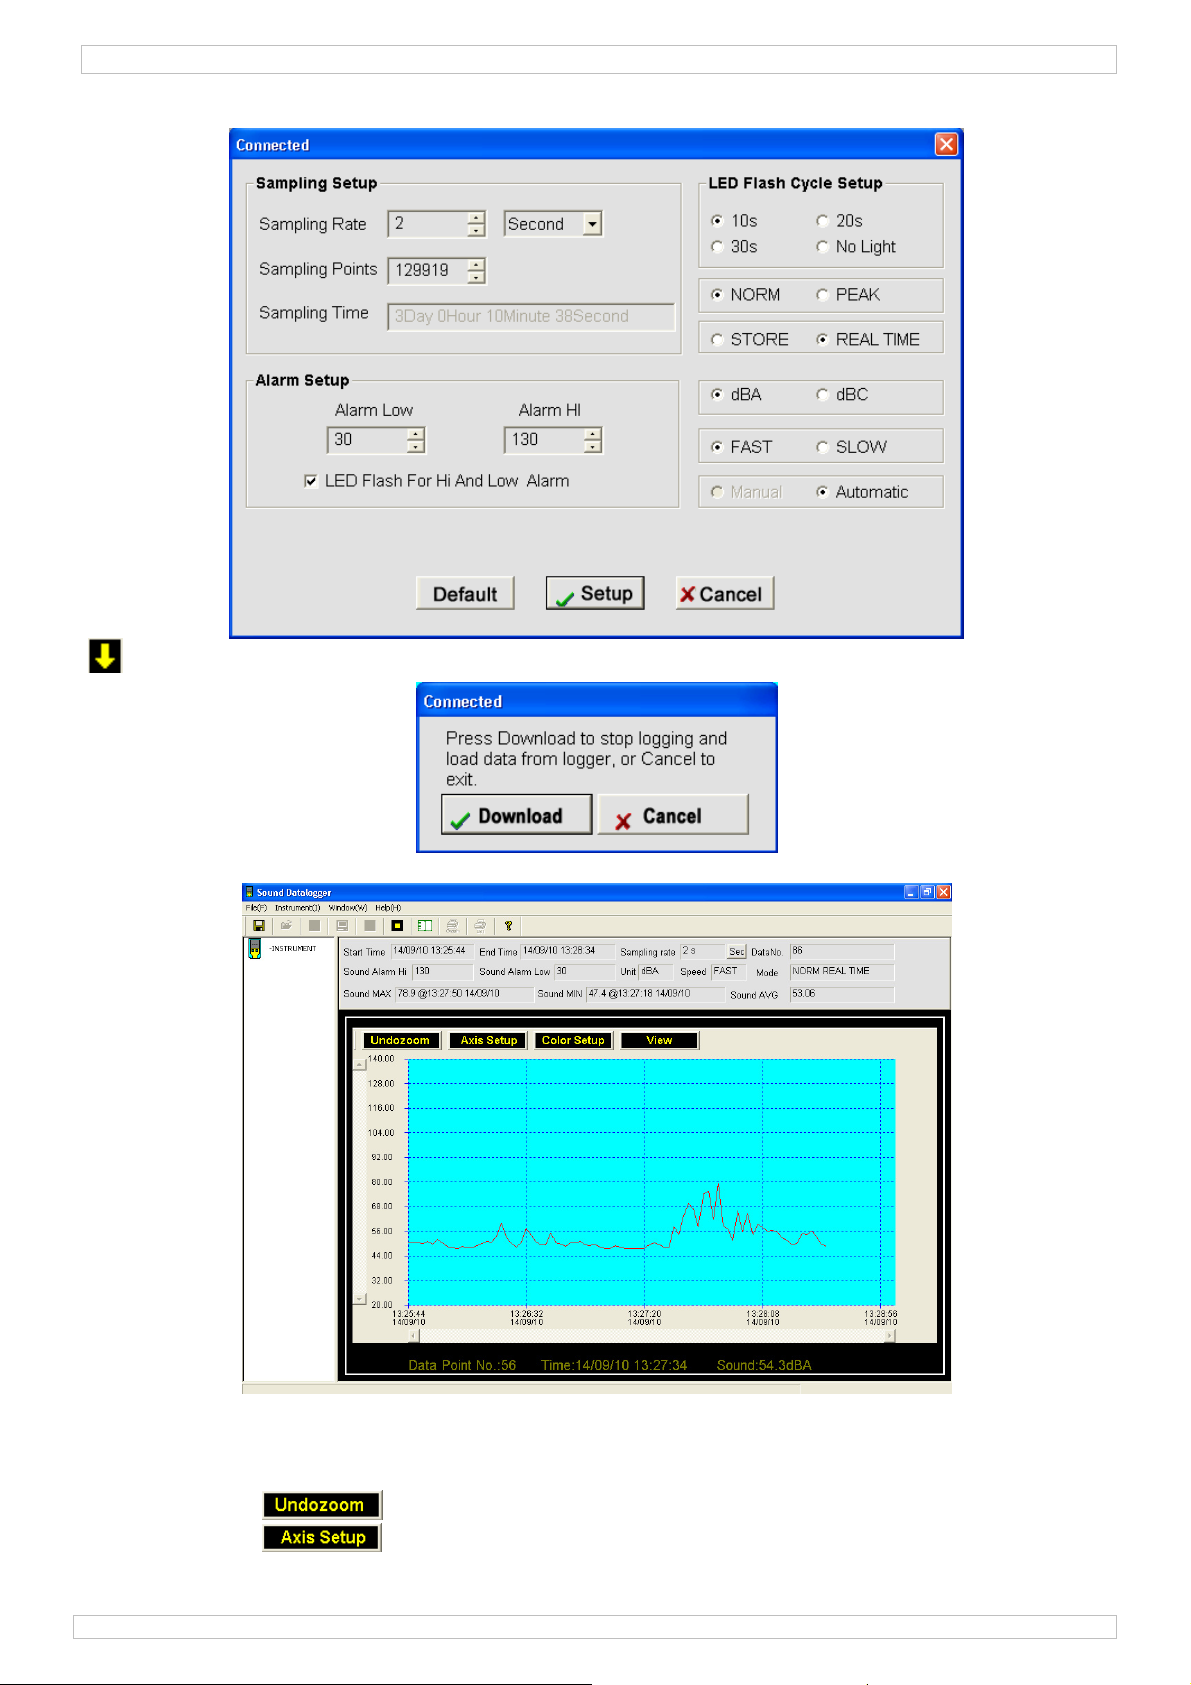
Data logger setup.
• Set the sampling rate, sampling points, alarm levels (Hi and Low) and configure the LED
indications.
• Select normal (NORM) measurement or peak values (PEAK) only.
• Select storing data (STOR) or real-time (RT) measurement.
• Select the weighting type dBA (related to human hearing, with low and high frequency cut
off) or dBC (actual loudness, better for peak measurement).
• The logger speed can be set to FAST or SLOW.
16/12/2010 ©Velleman nv
4
Page 5
DVM173SD
• The manual and automatic select buttons allow the user to start data logging immediately
when the Setup window is exited (Automatic) or at a later time (Manual).
• Click ‘Setup’ to save changes or ‘Cancel’ to close the setup menu without saving any
changes.
Start downloading from the data logger.
• Click download to view the measurement results.
Note: when the data line changes colour, the battery is running low!
• To zoom in on a certain part of the graph, move the mouse pointer to the start of the zoom
window, then click and hold the left mouse button while dragging a rectangular box. When
releasing the left mouse button, the application will zoom in on the selected data.
• Press the button to return to full graph view mode.
16/12/2010 ©Velleman nv
5
Page 6
DVM173SD
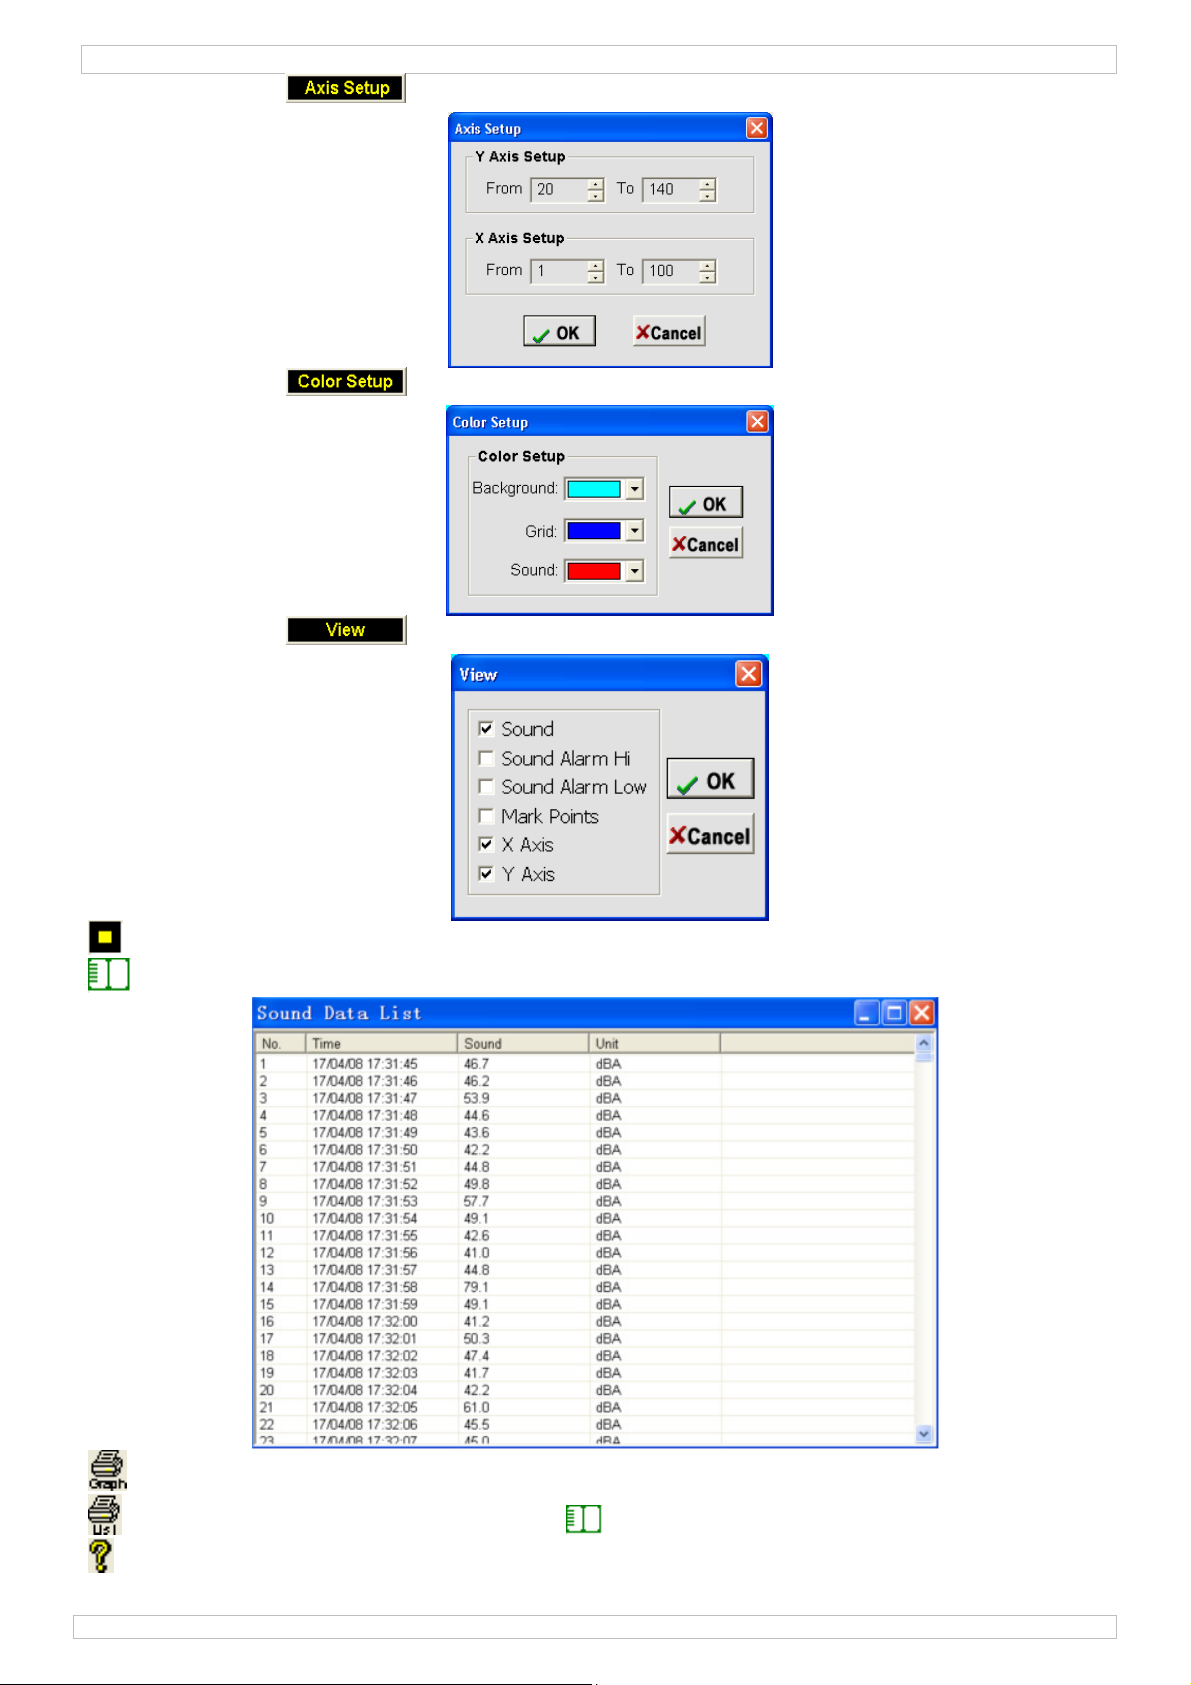
• Press the button to set up the axis:
• Press the to change the layout of the display:
• Press the button to select which data is shown on the display.
Stop downloading.
Show data list
Print graph
Print list. First create the list by pressing .
Open the help file.
16/12/2010 ©Velleman nv
6
Page 7

/
o
p
.
e
T• T
(
p
(
(
(
uNo
.
r
m
afrtim
g
n
m
e
e
k
m
p
e
h
d
o
g
e
n
a
a
e
o
a
h
o
e
y
i
g
j
v
n
h
g
R
nawa
c
a
n
r
r
t
w
i
N
s
e
A
e
l
h
g
o
n
r
(
e
e
n
a
n
c
e
s
y
d
a
e
g
g
f
c
u
h
o
m
A
s
t
v
t
h
d
s
e
o
p
k
e
d
,
o
2
e
c
e
f
f
O
n
S
o
s
D
c
s
d
e
d
e
e
v
f
t
e
)
g
e
(
e
a
e
c
n
a
3
i
z
0
D
7
e
m
c
a
s
A
i
b
D
e
l
f
c
e
e
e
d
u
s
e
w
d
n
d
m
D
e
r
s
o
v
o
e
e
a
.
t
o
y
r
i
f
m
r
e
m
e
H
R
w
n
t
d
’
h
e
i
f
h
s
f
c
s
f
o
e
s
e
e
o
t
e
a
f
m
d
c
o
)
o
d
n
u
e
e
r
)
h
e
r
5.
3 Data lo
mply with
C
O
erating
• In nor
averag
are tak
• In pea
whole
•
First set u
display. S
checkbox.
•
Remove t
Place the
•
specificati
install the
•
When the
until the
will flash
Setup).
•
When the
enabled i
•
To end m
six times.
•
When dat
will stop r
•
To downl
protective
•
To see a t
•
Refer to t
informati
•
When the
battery.
Note: wh
ger use
the operat
otes
al mode (
of these
n from th
mode (PE
easurem
the data
t ‘LED flas
e datalog
evice in a
ns for all
windscree
datalogge
reen LED
very 10 s
sound lev
the Alarm
nual recor
Recording
logger me
cording a
ad the dat
cover (1)
ble of the
e help-fu
n on down
battery be
n battery
ing conditi
ORM) gro
amples is
se 20 sa
K) data i
nt.
ogger via
cycle’ to
er from th
location w
wed opera
(9) to a
is set up
6) flashes
conds (inc
l crosses t
Setup an
ding, pres
has stopp
mory is ful
d the yell
into the
and plug t
data, clic
ction of th
loading an
omes low
becomes l
ns as indi
ups of 20
stored. Te
ples.
measure
he softwar
10, 20 or 3
e USB slot
here recor
ting temp
oid false r
o start ma
six times.
rease this
e set Alar
the LED
and hold
d and the
l or the pr
w LED (5
ersonal co
he datalog
(g); t
datalogg
handling
both red
w, the lat
VM173S
ated in §
amples ar
maximum
every 50
(refer to
0s and che
and repla
ing of sou
rature and
adings.
nually (del
The datalo
alue or di
m Low or
lash cycle
he Start
yellow LE
set numb
will also f
mputer, st
er into a
o print it,
r softwar
the data fr
5) and gr
st 1.5h of
.
taken (o
(Pmax) an
s. The P
5.2). For
ck the ‘LE
e the prot
nd level is
humidity
yed start)
gger start
able LED
larm Hi le
s not set t
utton (3)
(5) flash
r of sampl
ash once
rt the dat
ree USB-sl
lick (i)
(‘Help’ Î
om the da
en (6) wil
data are l
e reading
minimu
ax and Pm
ease of us
flash for
ctive cove
required.
ange. In
, press the
logging a
utput via
el, the re
‘No Light
±3s until t
s once ev
ing points
very 10s.
logger so
ot. Click th
To print t
‘Help topic
alogger.
l flash. Re
st
very 50m
(Pmin) p
in are tho
enable th
i and Lo al
r (1).
efer to th
indy envir
Start but
d the gre
he LED Fl
LED (5)
.
e red LED
ry 10s.
s reached,
tware, re
e downloa
e graph,
s …’) for m
er to §7 t
) and the
ak values
e of the
LED stat
arm’
technical
nments,
on (3) ±3
n LED (6)
sh Cycle
lashes wh
(5) flash
the logge
ove the
button
lick (h
ore
replace t
s
s
n
s
.
.
e
6
Batter
R
fer to the
•
he datalo
o replace
•
A) Open t
ointed ob
•
B) Gently
•
C) Remo
i
ndicated i
D) Slide t
•
sing the e
te: leavin
7
Techni
a
ccuracy
f
equency r
d
ynamic ra
easuring
d
ata memo
s
mpling ra
equency
me weight
icrophone
WA
Do
replac
llustration
ger contai
the batter
he battery
ect in the
pull the d
e/insert th
the casin
e data lo
nclosed so
the devi
NING:
ot punct
y from c
al speci
nge
ge
ange
y
e
eighting
ng
ment
on page
ns a non-r
, disconne
compartm
irection o
ta logger
battery.
.
ger back i
tware.
e in the U
re or thr
ildren.
fication
of this m
chargeabl
t the devi
nt by usi
the arrow
rom the c
nly use
the housi
B port will
w batter
± 1.4d
31.5H
50dB
30dB t
12992
1s ~ 2
A, C
fast (1
1/2" el
nual.
3.6V Lith
e from th
g a pointe
.
sing.
.6V Lithi
ng until it
reduce th
es in fire
B
to 8kHz
o 130dB
4h
25ms), slo
ectret con
ium batter
compute
object (e
m batter
naps into
battery li
as they
(1s)
enser mic
.
.
.g. small s
es. Make
place. Con
e.
ight expl
ophone
rewdriver
ure the p
igure the
de. Keep
. Move th
larity is as
ata logge
batteries
16
12/2010
7
©Vellema
nv
Page 8

DVM173SD
data output USB
power supply 1x 3.6V battery 14250 (DVM171-BAT, incl.)
consumption 5.5mA (stand-by = 30µA)
operation temperature / humidity 0 - 40°C (32 - 104°F) / 10~90%RH
operating altitude < 2000m
storage temperature / humidity -10 - 60°C (14 - 140°F) / 10%~75%RH
dimensions 130 x 30 x 25mm
weight 20g
system requirements Windows 2000 / XP / Vista
hardware requirements min. 8MB memory, 2MB disk space, free USB port
accessories user manual, battery, windscreen, CD, transparent cap
Use this device with original accessories only. Velleman nv cannot be held responsible in
the event of damage or injury resulted from (incorrect) use of this device.
For more info concerning this product and the latest version of this user manual, please
visit our website www.velleman.eu
.
The information in this manual is subject to change without prior notice.
© COPYRIGHT NOTICE
The copyright to this manual is owned by Velleman nv. All worldwide rights reserved.
No part of this manual or may be copied, reproduced, translated or reduced to any electronic medium or
otherwise without the prior written consent of the copyright holder.
16/12/2010 ©Velleman nv
8
Page 9
/
.
aBeHeDahe
.3.
a
.
.
a
n
g
s
d
n
p
r
e
e
H B
e
e
h
e
a
c
a
v
g
e
s
e
k
e
t
e
d
k
o
f
o
e
l
c
o
t
r
n
e
t
n
a
r
s
e
e
e
v
d
7
n
e
e
p
t
e
h
e
o
R
u
b
r
p
z
k
n
e
e
g
v
a
r
d
e
n
f
e
e
e
e
D
R
n
d
p
a
w
n
e
d
e
e
r
t
n
i
e
a
h
g
e
D
N
d
e
e
c
c
o
h
b
p
h
B
o
s
c
e
r
D
t
a
o
a
b
e
o
r
e
n
o
j
a
e
m
s
m
d
n
h
d
e
n
r
p
n
t
n
w
e
w
n
a
g
v
e
e
g
S
o
n
e
r
n
VM173S
1
Inleidi
A
n alle in
langrijke
bt u vrag
nk u voor
t toestel b
2
Veiligh
Algem
R
adpleeg d
•
Bescherm
•
Bescherm
•
Leer eerst
•
Om veilig
Gebruik h
•
garantie.
De garant
•
en uw de
rechtstree
ezetenen
milieu-in
ymbool op
Dit
wor
eve
ges
naa
een lokaa
en, conta
uw aanko
de camer
tegen ext
de functie
ie geldt ni
ler zal de
ks verban
t weggew
tuele batt
ecialiseerd
schadigd
idsinst
oud buite
escherm t
ne rich
Vellema
eidsreden
t toestel
GEB
van de E
ormatie
het toeste
rpen, dit t
rijen) niet
bedrijf te
recyclage
teer dan
p! Lees de
ijdens het
ucties
het berei
gen rege
lijnen
®
servic
tegen sch
eme temp
van het t
n mag u
nkel waar
t voor sch
erantwoo
mee hou
UIKE
ropese U
etreffen
l of de ver
oestel sch
bij het ge
echtkome
unt breng
de plaats
e handlei
transport,
van kind
, vochtigh
- en kwal
okken. Ve
raturen, s
oestel ken
een wijzig
oor het ge
de door h
delijkheid
en.
SHA
ie
e dit pro
akking ge
de kan to
one huish
voor recy
en. Respe
lijke aut
ing grondi
installeer
ren en on
id en ops
iteitsgara
mijd brute
of en voc
en voor u
ngen aanb
maakt is.
t negeren
fwijzen v
DLEI
uct
ft aan da
brengen a
oudelijke a
lage. U m
teer de pl
riteiten
g voor u h
et dan nie
evoegden.
attende vl
ntie achte
kracht tijd
tigheid.
het gaat g
rengen.
ij onoord
van bepaa
or defecte
ING
, als het n
n het mili
fval; het
et dit toe
atselijke
etreffen
t toestel i
t en raadpl
eistoffen.
aan deze
ens de be
ebruiken.
elkundig g
lde richtlij
of proble
zijn leve
u. Gooi di
oet bij ee
tel naar u
ilieuwetg
e de ver
gebruik
eeg uw de
andleidin
iening.
bruik ver
en in dez
men die hi
scyclus
toestel (
verdeler
ving.
ijdering.
eemt. We
ler.
.
alt de
handleidi
r
n
of
d
g
4
Eigens
•
voldoet a
weergave
•
gegevens
•
aanduidin
•
frequenti
•
trage/snel
•
ijkfunctie
•
manuele
•
5
Gebrui
R
adpleeg d
5.
1 Installa
Installeer
•
instructies
Installeer
Verwijder
•
2 Gebrui
5.
Start de s
•
happen
n IEC 616
normaal e
erwerking
buiten b
weging A
le respons
oftware
n automat
figuren o
ie van d
erst de so
op het sc
e softwar
de bescher
van de s
ftware en
2-1 klass
sterk sig
: opslag of
reik
n C
ische start
pagina 2
softwar
ftware. St
erm. Dubb
onder dir
mdop (1)
ftware
klik op .
2 voor de
aal
real-time
uncties
van deze
ek de mee
elklik, indi
ctory C:\P
n steek de
cibelmeter
andleiding
eleverde
n de cd-ro
rogram Fil
datalogge
.
d-rom in d
m niet aut
s\Sound D
in een vri
e cd-romd
matisch o
atalogger.
e USB-poo
ive en vol
start, op
rt van de c
de
ETUP.EXE.
mputer.
16
12/2010
9
©Vellema
nv
Page 10
DVM173SD
File(F) Save… data op harde schijf bewaren
Open… bestand openen
Print Setup… printerinstellingen wijzigen
Print Preview afdrukvoorbeeld grafiek of lijst
Print… grafiek of lijst afdrukken
Instrument(I) Calibration Adjustment… datalogger ijken
Datalogger Setup… instellen bemonsteringfrequentie, alarmniveaus,
ledaanduidingen, opnamefunctie …
Download Data… data downloaden
Stop Running… meting onderbreken (enkel in real-time)
Previous Measurement data laatste meting weergeven
Window(W) Instrument instrumentvenster weergeven of verbergen
Infor Dialog infovenster weergeven of verbergen
Help(H) About softwareversie weergeven
Help Topics helpbestand openen
Klik om het bestand als een .sound- of .xls-bestand op te slaan.
Klik om een bestand te openen (.sound-extensie).
IJk de datalogger. Voorbeeld: stel de gemeten waarde -0,5 dB bij indien de uitlezing 0,5 dB
hoger is dan de werkelijke waarde.
Instelling van de datalogger:
• Stel bemonsteringfrequentie, aantal monsters, alarmniveaus (Hi en Low) en
ledaanduidingen in.
• Selecteer de normale weergave (NORM) of weergave met pieksignaal (PEAK).
• Selecteer de real-time meting (RT) of die met opslagfunctie (STOR).
• Selecteer de dBA- (relatief aan het menselijk gehoor zonder lage en hoge frequenties) of
de dBC-frequentieweging (reëel geluidsniveau).
• Stel de snelheid in (FAST of SLOW).
• Kies voor MANUAL (handmatig starten van de meting na het afsluiten van het
instelvenster) of AUTOMATIC (automatisch starten van de meting na het afsluiten van het
instelvenster).
16/12/2010 ©Velleman nv
10
Page 11
DVM173SD
• Klik op Setup om de instellingen op te slaan, of op Cancel om het venster te sluiten
zonder de wijzigingen op te slaan.
Download de data.
• Klik op Download om de gemeten waarden weer te geven.
Opmerking: bij een zwakke batterij verandert de kleur van de gegevenscurve!
• Inzoomen: Verplaats de muispointer naar het begin van de in te zoomen zone, houd de
linkermuisknop ingedrukt en sleep naar het einde van de in te zoomen zone. Laat de
linkermuisknop los.
• Klik op om de grafiek opnieuw over het hele scherm weer te geven.
• Klik op om de assen in te stellen:
16/12/2010 ©Velleman nv
11
Page 12

DVM173SD
• Klik op om de grafiekkleur te selecteren:
• Klik op om te selecteren welke data u wenst weer te geven.
Downloaden van de gegevens onderbreken.
Datalijst weergeven.
Grafiek afdrukken.
Lijst afdrukken. Creëer eerst de lijst door op te klikken.
Open het helpbestand.
16/12/2010 ©Velleman nv
12
Page 13

/
n
.
a
p
.
rdm
rmm
y
k
u
m
K
u
e
d
e
r
d
n
t
k
l
g
a
w
n
t
e
g
e
f
j
v
f
e
p
r
s
h
e
b
c
n
e
n
r
a
a
m
(
g
a
G
h
t
e
3
l
n
D
h
n
e
n
p
d
t
g
a
n
e
t
R
e
e
§
U
n
a
n
‘
k
e
n
a
n
H
a
e
v
b
o
j
d
k
4
9
~
t
m
D
n
)
e
u
o
é
s
e
a
a
s
h
e
v
e
4
d
e
r
-
D
a
g
g
a
d
w
e
e
t
n
e
m
e
w
e
r
e
g
h
k
n
e
b
c
D
A
s
w
e
e
m
g
k
r
0
e
l
e
n
v
,
r
o
d
t
A
t
g
m
o
g
n
)
d
m
d
R
v
n
e
3
a
t
e
m
a
o
B
s
r
n
t
g
e
n
§
u
p
g
n
e
e
n
n
D
e
e
S
a
5.
3 Gebrui
ef de gebr
Le
structies
I
• In nor
gemidd
• In PEA
minim
•
Stel eerst
gebruiksg
•
Verwijder
•
Plaats de
specificati
vochtighei
•
In manuel
datalogge
•
Van zodra
(5) (stel
•
Houd de s
beëindige
•
Bij een vo
de meting
•
Om de da
poort. Kli
•
Klik op
printen, k
•
Raadplee
gebruik v
•
Bij een z
batterij te
Opmerki
van de d
iksvoorw
ale meet
elde, maxi
-modus w
mwaarde
de datalog
mak te ve
de datalog
atalogger
s achtera
dsgraad.
e modus,
begint de
het geme
eze functi
tartknop (
. De gele
l geheuge
stoppen.
a naar de
op om
(g) om a
ik op (
de helpfu
n de data
akke batt
vervange
g: Bij een
talogger
arden zoal
odus (NO
mum- (Pm
ordt om d
Pmin) ber
er in (zie
rhogen.
ger uit de
daar waar
n deze ha
ebruik het
oud de st
meting en
en geluids
in onder
) ingedru
ed (5) kni
of wanne
e gele led
pc te dow
te downlo
lle gegeve
) om een
ctie van d
(‘Help’ Î ‘
rij zullen d
.
zwakke b
s beschrev
M) neemt
ax) en min
50 ms ee
kend.
5.2). Het
SB-poort
u het gelu
dleiding v
windscher
rtknop (3
de groen
iveau het
Alarm Set
t tot de r
ppert nu é
r het inge
(5) knipp
loaden, st
den.
s in een t
grafiek uit
e software
elp topic
e rode (5)
tterij zal d
VM173S
en in §7 n
de datalo
imumwaar
monster
is aan te r
en plaats
idsniveau
oor verder
m (9) in e
ingedruk
led (6) k
Low- of h
p’).
de led (5)
n keer o
telde aant
rt één ke
rt de soft
bel weer t
te printen.
voor mee
…’).
en de gel
e datalogg
.
ger telken
de (Pmin)
enomen
den om d
e bescher
ilt meten.
informati
n winderi
tot de gro
ippert één
t Hi-alarm
zes keer
de 10 sec
al monste
r om de 1
are en st
geven, k
informati
led (6) k
r de gege
20 mons
orden op
n de maxi
leds in te
dop (1)
Raadplee
e over bed
e omgevi
ene led (6
keer om d
overschrij
nippert o
onden.
s werd ber
seconden
ek de data
ik op (i
over het
ipperen.
ens niet i
ers (1/50
eslagen.
um- (Pm
schakelen
ver de US
de techni
rijfstempe
g.
) zes keer
e 10 seco
t, knipper
de metin
eikt, zal d
.
logger in e
) om de ta
ownloade
aadpleeg
het gehe
s). De
x) en
m het
-aansluiti
che
atuur en
knippert.
den.
de rode l
te
datalogg
en vrije U
bel uit te
en het
7 om de
gen opsla
g.
e
d
r
B-
n.
6
De bat
R
adpleeg d
•
De datalo
Ontkoppel
•
(A) Open
•
Beweeg h
(B) Schui
•
(C) Verwi
•
polariteit
(D) Schui
•
meegelev
merking:
O
poort ge
7
Techni
n
auwkeurig
f
equentieb
ynamisch
eetbereik
o
pslagcapa
b
emonsteri
f
equentiew
eetfreque
icrofoon
t
pe stekke
v
oeding
v
erbruik
LET
inst
erij
figuren o
ger bevat
eerst de
het batteri
t puntig o
voorzichti
der/plaats
an de bat
de datalo
rde softw
De levens
lugd laat.
OP: Beha
ucties op
che sp
eid
reik
ereik
iteit
gsfrequen
ging
tie
pagina 2
een niet-h
atalogger
jvak met
bject naar
g de datal
de batteri
erij.
ger terug
re.
duur van
del lithiu
de verpa
cificatie
± 1,
31,5
50 d
30 d
129
ie 1 s
A, C
fast
elek
USB
1x 3
5,5
van deze
rlaadbare
an de pc.
ehulp van
de pijl toe.
gger uit d
. Gebruik
in zijn beh
e batterij
mbatterij
king na.
s
dB
Hz tot 8 k
B
B tot 130
20
24 u
(125 ms),
reet cond
,6 V batte
A (stand
andleiding
lithiumbat
een puntig
behuizin
enkel lit
uizing en
erkort aa
n met d
Houd de
Hz
B
slow (1 s)
nsator mi
ij 14250 (
by = 30 µ
.
terij van 3
object, bv
.
iumbatte
lik vast. C
zienlijk in
grootste
atterij ui
rofoon (12
VM171-B
)
6 V.
. een klein
ijen van
nfigureer
ien u de d
voorzich
de buurt
,7 mm)
T, meegel
schroeve
,6 V. Res
de datalog
talogger i
igheid. L
van kind
v.)
draaier.
ecteer de
er via de
de USB-
ef de
ren.
16
12/2010
13
©Vellema
nv
Page 14

DVM173SD
werktemperatuur /
0 - 40°C (32 - 104°F) / 10~90%RH
vochtigheidsgraad
max. bedrijfshoogte < 2000 m
opslagtemperatuur /
-10 - 60°C (14 - 140°F) / 10%~75%RH
vochtigheidsgraad
afmetingen 130 x 30 x 25 mm
gewicht 20 g
systeemvereisten Windows 2000 / XP / Vista
vereisten hardware 8 MB geheugen of meer, 2 MB vrije hardeschijfruimte, vrije
USB-poort
toebehoren gebruikershandleiding, batterij, windscherm, cd-rom,
transparante bescherming
Gebruik dit toestel enkel met originele accessoires. Velleman nv is niet aansprakelijk voor
schade of kwetsuren bij (verkeerd) gebruik van dit toestel. Voor meer informatie over dit
product en de meest recente versie van deze handleiding, zie www.velleman.eu. De
informatie in deze handleiding kan te allen tijde worden gewijzigd zonder voorafgaande
kennisgeving.
© AUTEURSRECHT
Velleman nv heeft het auteursrecht voor deze handleiding.
Alle wereldwijde rechten voorbehouden. Het is niet toegestaan om deze handleiding of gedeelten
ervan over te nemen, te kopiëren, te vertalen, te bewerken en op te slaan op een elektronisch
medium zonder voorafgaande schriftelijke toestemming van de rechthebbende.
16/12/2010 ©Velleman nv
14
Page 15

/
.
uDeproEnNo
.3.
e
.
.
e
u
n
a
t
s
e
e
u
e
a
t
gn
G
P
v
l
c
c
r
d
q
v
é
r
t
o
é
u
t
t
c
d
n
v
r
e
e
e
c
d
e
é
s
é
e
p
s
c
e
-
é
u
t
e
e
o
t
g
t
r
l
l
p
e
e
o
h
a
é
e
c
t
n
u
u
n
g
e
t
g
r
o
e
D
C
p
s
o
v
i
a
m
a
é
c
e
a
r
g
g
r
o
q
t
r
m
D
M
a
x
s
e
n
o
l
c
p
i
s
e
l
p
d
X
m
u
I
m
e
t
r
a
s
n
a
e
o
s
t
B
d
u
v
t
i
t
a
e
r
u
t
f
u
n
v
e
t
n
e
VM173S
1
Introd
A
x réside
s inform
tection d
cas de q
us vous r
se
rvice de l’
nsulter vo
co
2
Consi
Directi
Ce s
ymbole su
polluer l'e
peu
pile
éventuell
trait
un s
ervice de r
mercions
ppareil. Si
re revend
rotéger de
ction
ts de l'U
tions en
ra l’appar
l’environn
estions,
es de s
arder hor
es gén
ion euro
ironnem
l'appareil
nvironnem
s) parmi l
il en ques
cyclage l
ement.
ontacter
e votre ac
l’appareil
ur.
curité
de la port
la pluie, d
rales
NOTI
éenne
ntales im
ou l'embal
ent. Ne pa
s déchets
tion. Renv
cal. Il con
les autor
at ! Lire l
été endo
e des enf
l’humidit
E D’E
ortantes
lage indiqu
jeter un
municipau
yer les éq
ient de re
tés local
présente
magé pe
nts et des
et des pr
PLO
concerna
e que l’éli
ppareil él
non suje
uipements
pecter la
s pour éli
notice atte
dant le tr
personne
jections d
nt ce pro
ination d’
ctrique ou
s au tri sél
usagés à
églementa
mination.
ntivement
nsport, ne
non autor
’eau.
uit
n appareil
électroniq
ectif ; une
otre fourni
ion locale
avant la m
pas l’insta
isées.
en fin de
e (et des
déchèteri
sseur ou à
relative à l
ise en
ller et
ie
a
S
référer à
•
Protéger
Tenir à l’é
•
Se familia
•
Toute mo
•
N’utiliser
•
La garanti
•
notice et
résultent.
4
Caract
•
conforme
•
modes no
traitemen
•
indication
•
pondérati
•
délai de r
•
fonction d
•
modes de
•
5
Emploi
S
référer a
5.
1 Installa
Installer d
•
les instruc
automatiq
•
Retirer le
2 Emploi
5.
a garanti
ontre les c
art de la
iser avec l
ification e
u’à sa fon
e ne s’appl
otre reven
ristiqu
IEC 61672
mal ou de
des donn
hors plage
n de fréq
ponse len
'étalonnag
démarrag
x illustrati
ion du lo
’abord le lo
ions à l’éc
uement. In
apuchon (
u logicie
de servi
hocs et le
oussière, l
e fonction
t interdite
tion prév
ique pas a
deur décli
s
1 classe 2
crête
es : enre
ence en A
/rapide
du logici
manuel e
ns à la pa
iciel
giciel. Insé
an. Clique
staller le l
1) et insér
e et de q
raiter ave
’humidité
ement av
pour des
e. Un usa
x domma
era toute
pour sono
istrement
ou en C
l
automati
e 2 de ce
rer le cédé
double su
giciel sous
r le sono
ualité Vel
circonspe
t des tem
nt l’emplo
aisons de
e impropr
es surven
esponsabi
mètres
u en tem
ue
te notice.
om inclus
r SETUP.E
C:\Progra
ètre dans
eman® e
tion pend
ératures
.
écurité.
annule d'
us en négli
ité pour le
s réel
ans le lec
E lorsque l
Files\Sou
n port US
fin de not
nt l’opéra
xtrêmes.
ffice la ga
geant cert
problèm
eur de vot
e cédérom
nd Datalog
libre.
ce.
ion.
rantie.
ines direc
s et les dé
e ordinate
ne démarr
ger.
ives de ce
auts qui e
r et suivr
e pas
te
Lancer le l
•
16
12/2010
ogiciel et c
iquer sur
.
15
©Vellema
nv
Page 16

DVM173SD
File(F) Save… sauvegarde des valeurs sur disque dur
Open… ouverture d’un fichier
Print Setup… configuration des options d’impression
Print Preview aperçu avant impression du graphique ou de la liste
Print… impression du graphique ou de la liste
Instrument(I) Calibration Adjustment… étalonnage du sonomètre
Datalogger Setup… configuration de la fréquence d’échantillonnage, du
niveau d’alarme, des LED, du mode d’enregistrement…
Download Data… téléchargement des données
Stop Running… interrompre la mesure (mesure en temps réel
uniquement)
Previous Measurement affichage des données issues de la dernière mesure
Window(W) Instrument ouverture/fermeture du panneau de gauche
Infor Dialog ouverture/fermeture de la fenêtre d’info
Help(H) About affichage de la version du logiciel
Help Topics ouverture du fichier d’aide
Cliquer pour sauvegarder le fichier comme un fichier .sound ou .xls.
Cliquer pour ouvrir un fichier (extension .sound).
Étalonnage du sonomètre. Exemple : Ajuster la valeur avec -0,5 dB lorsque la valeur
mesurée s’avère 0,5 dB au-dessus de la valeur réelle.
Configuration du sonomètre.
• Configurer la fréquence d’échantillonnage, les points d’échantillonnage, le niveau d’alarme
(Hi ou Low) et les LED.
• Sélectionner le mode de mesure normal (NORM) ou de crête (PEAK).
• Sélectionner le mode de traitement des données à enregistrement (STOR) ou en temps
réel (RT).
• Sélectionner la pondération de fréquence en dBA (relative à l’oreille humaine sans
fréquences basse et haute) ou en dBC (niveau sonore réel).
• Sélectionner le délai de réponse lent (SLOW) ou rapide (FAST).
16/12/2010 ©Velleman nv
16
Page 17

DVM173SD
• Sélectionner le démarrage MANUAL (lancement manuel de la mesure après fermeture de
la fenêtre de configuration) ou AUTOMATIC (lancement automatique de la mesure après
fermeture de la fenêtre de configuration).
• Cliquer sur Setup pour sauvegarder les modifications ou sur Cancel pour quitter le menu
de configuration sans aucune sauvegarde.
Téléchargement des données.
• Cliquer sur Download pour afficher les valeurs mesurées.
Remarque : La courbe change de couleur lors d’une pile faible !
• Zoom avant : Déplacer le pointeur de la souris vers le début de la zone à agrandir, maintenir
enfoncé le bouton gauche de la souris et glisser le pointeur vers la fin de la zone à agrandir.
Relâcher le bouton de souris.
• Cliquer sur pour afficher le graphique sur la totalité de l’écran.
16/12/2010 ©Velleman nv
17
Page 18

DVM173SD
• Cliquer sur pour configurer les axes :
• Cliquer sur pour configurer les couleurs du graphique :
• Cliquer sur pour afficher les paramètres souhaités.
Interruption du téléchargement.
Affichage de la liste.
Impression du graphique.
Impression de la liste. Créer d’abord la liste en question en cliquant sur .
Ouverture du fichier d’aide.
16/12/2010 ©Velleman nv
18
Page 19

/
e
n
.
e
e
.
ata
r
m
y
d
s
s
d
e
d
a
r
s
s
«
a
e
r
e
è
’
o
s
o
u
e
e
c
u
è
t
r
e
e
é
é
E
s
c
m
e
n
e
e
è
s
n
e
à
d
e
e
c
n
o
o
n
o
p
u
o
e
s
r
a
g
t
t
n
m
m
e
e
S
s
n
o
r
é
è
e
E
m
m
e
e
o
g
a
s
t
a
n
s
s
s
u
D
e
e
x
e
2
c
C
t
e
n
e
e
L
n
n
s
u
a
r
t
o
t
n
a
è
u
E
’
o
d
à
0
a
o
D
p
e
a
u
c
e
e
e
e
H
é
L
e
g
t
m
g
e
b
î
u
t
e
v
u
e
h
i
r
t
t
D
n
t
e
n
l
c
f
a
3
,
d
e
g
u
à
t
c
t
s
.
E
)
g
e
n
e
o
t
R
l
e
p
b
e
)
m
a
o
U
L
u
n
u
s
l
e
r
p
e
e
m
t
a
l
s
n
.
e
(
s
e
e
o
d
5.
3 Emploi
specter le
R
I
struction
• En mo
Les val
• En mo
maxim
•
Configure
l’usage du
•
Retirer le
•
Placer le
pour plus
pare-vent
•
En mode
clignote 6
toutes les
•
Dès que l
(configur
•
Pour inter
LED roug
secondes.
•
Le sonom
nombre d
les 10 sec
•
Pour tran
dans un p
•
Cliquer su
tableau o
•
Consulter
télécharg
•
Lors d’un
le rempla
Remarqu
u sonom
condition
e normal (
urs moye
e PEAK, le
le (Pmax)
d’abord le
sonomètr
onomètre
onomètre
d’informati
(9) dans
manuel »
fois. Le so
10 second
valeur m
r cette fon
ompre l’e
(5) clign
tre interr
échantillo
ndes.
férer les d
rt USB lib
r (g)
sur (h
le fichier d
ment et la
pile faible
ement de
e : Lors d’
tre
d’emploi
NORM), le
ne, maxi
sonomètr
et minima
sonomètr
.
du port U
l’endroit
on concer
es conditi
, mainteni
nomètre d
s.
surée exc
tion sous
registrem
te 6 fois.
mpt auto
s program
nnées me
re. Cliquer
our affich
) pour imp
’aide (Help
gestion d
, les LED r
la pile.
ne pile fai
entionné
sonomètr
ale (Pma
enregistr
le (Pmin) s
(voir §5.
B et repla
ouhaité.
ant la tem
ns de ven
enfoncé l
marre l’e
de le seuil
« Alarm S
nt, maint
nsuite, la
atiqueme
é à été e
surées ver
sur po
r un table
rimer un g
Î Help to
s données
uge (5) e
ble, le son
VM173S
s sous le
enregistr
) et minim
en contin
ont contin
). Il est co
er le capu
onsulter l
pérature d
fort.
bouton d
registrem
d’alarme
tup »).
nir enfonc
ED jaune
t la mesur
registré.
l’ordinat
r téléchar
u avec les
aphique.
pics…) pou
.
verte (6)
mètre ne
aragraph
par tranc
le (Pmin)
u 1 échant
ellement
nseillé d’ac
hon (1).
s spécifica
service e
mesure (
nt et la LE
i ou Low,
le bouto
(5) cligno
e lors d’un
a LED jau
ur, lancer
er les don
données,
r plus d’in
clignotero
émoriser
§7.
e de 20 é
sont ensui
llon toute
ecalculées
tiver les L
ions techn
le taux d’
3) jusqu’à
verte (6
la LED rou
de mesur
era une foi
mémoire
e (5) clig
e logiciel
nées.
liquer sur
ormation c
nt. Se réfé
pas les d
hantillons
e sauvega
les 50 ms
D afin de f
iques en f
humidité.
ce que la
clignote
e (5) clig
(3) jusq
s toutes le
pleine ou
otera une
t insérer l
(i) pou
oncernant
rer au cha
nnées m
(/550 ms)
rdées.
. Les valeu
ciliter
n de notic
tiliser le
ED verte
ne fois
ote
’à ce que l
10
orsque le
fois toute
sonomètr
imprimer
le
itre §7 po
surées.
rs
6)
a
le
ur
6
Le pile
S
référer a
•
Le sonom
Déconnec
•
(A) Ouvri
•
plate. Bou
(B) Gliss
•
(C) Retir
•
de polarit
(D) Réins
•
du logiciel
marque :
R
7
Spécifi
p
récision
p
lage de fré
p
lage dyna
p
lage de m
c
pacité de
ux d'écha
p
ondération
f
équence d
icrophone
t
pe de fich
ATT
con
x illustrati
tre intègr
er l’enregi
le compa
ger l’objet
r douceme
r/insérer l
. Une fois
rer l’enre
.
Déconnec
NTION :
ignes me
ations
quence
ique
sure
stockage
tillonnage
de fréque
mesure
ns à la pa
une pile
treur de l’
timent de
légèremen
nt l’enregi
pile. N’u
la pile inst
istreur da
er l’enregi
Manier le
ntionnée
echniq
ce
e 2 de ce
u lithium
ordinateur
la pile à l’
t vers la fl
treur hors
iliser qu’
llée, les L
s son boît
treur de l
piles au
sur le pr
es
± 1,4
31,5 H
50 dB
30 dB
12992
1s ~ 2
A, C
fast (r
type c
USB
te notice.
on rechar
avant le r
ide d’un o
che.
de son bo
ne pile a
D verte e
ier et cliqu
ordinateur
lithium a
duit. Ten
B
z à 8 kHz
130 dB
4 h
pide, 125
ndensate
eable de
mplaceme
jet pointu
tier.
lithium
jaune clig
r en plac
après usa
ec préca
ir la pile
ms), slow
r à électre
,6 V.
nt de la pil
p.ex. un
e 3,6 V.
noteront a
. Configur
e afin de
tion en o
l’écart d
(lente, 1 s
(12,7 m
e.
ournevis à
especter l
ternative
r l’enregis
réserver l
servant
s enfant
)
petite lam
s indicati
ent.
reur à l’ai
pile.
es
.
ns
e
16
12/2010
19
©Vellema
nv
Page 20

DVM173SD
alimentation 1 pile 3,6 V 14250 (DVM171-BAT, incl.)
consommation 5,5 mA (veille = 30 µA)
température de service / taux
0 - 40°C (32 - 104°F) / 10~90%RH
d'humidité
altitude max. de service < 2000 m
température de stockage / taux
-10 - 60°C (14 - 140°F) / 10%~75%RH
d'humidité
dimensions 130 x 30 x 25 mm
poids 20 g
système requis Windows 2000 / XP / Vista
matériel requis 8 Mo de mémoire ou plus, 2 Mo d'espace disque dur
libre, port USB libre
accessoires notice d'emploi, pile, pare-vent, CD, capuchon
transparent
N’employer cet appareil qu’avec des accessoires d’origine. SA Velleman ne sera
aucunement responsable de dommages ou lésions survenus à un usage (incorrect) de cet
appareil. Pour plus d’information concernant cet article et la version la plus récente de
cette notice, visiter notre site web www.velleman.eu. Toutes les informations présentées
dans cette notice peuvent être modifiées sans notification préalable.
© DROITS D’AUTEUR
SA Velleman est l’ayant droit des droits d’auteur pour cette notice.
Tous droits mondiaux réservés. Toute reproduction, traduction, copie ou diffusion, intégrale ou
partielle, du contenu de cette notice par quelque procédé ou sur tout support électronique que se
soit est interdite sans l’accord préalable écrit de l’ayant droit.
16/12/2010 ©Velleman nv
20
Page 21

/
.
m
s
.3.
é
.
.
é
u
d
s
r
d
a
o
c
M
N
s
r
e
g
e
e
o
e
m
t
ó
e
a
u
r
n
a
c
o
s
c
n
e
a
R
c
d
a
a
s
E
a
f
r
o
e
u
r
s
u
n
m
p
a
t
t
s
1
r
a
A
u
b
a
m
s
s
s
V
g
e
p
c
e
v
e
m
a
d
r
6
a
d
w
u
e
o
t
u
D
L
d
m
a
D
a
!
n
e
u
a
p
n
s
n
a
t
C
c
ó
D
U
n
)
s
c
e
a
o
e
n
a
n
o
s
n
u
c
U
m
u
R
r
t
u
o
s
n
e
e
t
a
u
t
U
e
e
t
i
b
n
ó
a
t
u
e
b
e
n
u
c
o
r
b
c
n
g
n
d
a
1
Introd
A
los ciuda
portante
I
Si
tiene du
racias por
¡G
arlo. Si el
u
su
distribuid
2
Instru
Este
podr
ían dañar
No ti
emp
recic
laje local.
haber com
cción
anos de l
informa
símbolo e
re este ap
esa especi
as, conta
parato ha
r.
ciones
M
a Unión E
iones so
este apar
l medio a
rato (ni la
alizada en
espete la
te con la
prado el D
sufrido al
e segur
NUA
ropea
re el me
to o el e
biente.
pilas, si l
reciclaje.
leyes loca
autorid
M173SD
ún daño e
idad
VM173S
DEL
io ambie
balaje indi
s hubiera
evuelva e
les en rela
des local
Lea atent
el transp
SUA
te conce
ca que, si
en la bas
te aparat
ión con el
s para re
mente la
rte no lo i
IO
niente a
ira las mu
ra domés
a su distr
medio am
siduos.
instruccio
nstale y p
ste prod
stras inse
ica; debe i
buidor o a
iente.
es del ma
ngase en
cto
rvibles,
r a una
la unidad
nual antes
ontacto co
e
de
n
Norma
V
ase la Ga
•
No agite
No expon
•
Familiaríc
•
Por razon
•
Utilice sól
•
garantía c
Los daños
•
garantía y
4
Caract
•
cumple co
•
modo nor
tratamien
•
indicación
•
ponderaci
•
tiempo de
•
función d
•
modo de
•
antenga e
o expong
gener
antía de
l aparato.
a este ap
se con el
s de segu
el aparat
ompletam
causados
su distrib
rísticas
n las norm
o de dato
de sobre r
n de frec
respuesta
calibració
ctivación
al o valo
l aparato l
este equi
les
ervicio y
vite usar
rato a pol
uncionami
idad, las
para las
nte.
por descui
idor no se
as IEC 61
máximo
: almacen
ango
encias A o
lento/rápi
del soft
anual y a
jos del alc
o a lluvia,
alidad V
xcesiva f
o, humed
nto del a
odificacio
plicacione
o de las i
á respons
72-1 clase
miento o
C
o
are
tomática
ance de p
humedad
lleman®
erza dura
d y tempe
arato ante
es no aut
descritas
struccione
ble de nin
2 para so
iempo real
rsonas no
i a ningú
l final de
te el man
raturas ex
s de utiliza
rizadas de
en este m
de seguri
gún daño
ómetros
capacitada
tipo de sa
ste manu
jo y la ins
remas.
rlo.
l aparato e
nual. Su
dad de est
otros pro
s y niños.
lpicadura
l del usua
alación.
stán prohi
so incorre
manual i
lemas res
goteo.
io.
idas.
to anula l
validarán
ultantes.
su
5
Uso
V
ase las fig
5.
1 Instala
Primero in
•
instruccio
automátic
Saque el
•
2 Utilizar
5.
Inicie el s
•
16
12/2010
ras en la
el softw
stale el sof
es en pan
mente. In
apuchón (
el softwa
ftware y h
ágina 2 d
re
ware. Intr
alla. Haga
tale el sof
) e introd
e
ga clic en
este man
duzca el
clic dos ve
ware bajo
zca el son
.
ual del us
D-ROM in
es en SET
C:\Progra
metro en
21
ario.
l. En el lec
P.EXE si e
Files\Sou
n puerto
or del ord
l CD-ROM
nd Datalog
SB libre.
nador y si
o se inicia
ger.
a las
©Vellema
nv
Page 22

DVM173SD
File(F) Save… guardar los valores en el disco duro
Open… abrir un fichero
Print Setup… configurar las opciones de impresión
Print Preview Vista previa impresión del gráfico o la lista
Print… imprimir el gráfico o la lista
Instrument(I) Calibration Adjustment… calibrar el sonómetro
Datalogger Setup… configurar la frecuencia de muestreo, el nivel de
alarma, los LEDs, el modo de grabación, etc.
Download Data… descargar los datos
Stop Running… interrumpir la medición (sólo la medición en tiempo
real)
Previous Measurement visualizar los datos de la última medición
Window(W) Instrument abrir/cerrar la pantalla de instrumentos
Infor Dialog abrir/cerrar la pantalla de información
Help(H) About visualizar la versión del software
Help Topics abrir el fichero de ayuda
Haga clic para guardar el fichero como un fichero .sound o .xls.
Haga clic para abrir un fichero (extensión .sound).
Calibrar el sonómetro. Ejemplo: Ajuste el valor con -0,5 dB si el valor medido está 0,5 dB por
encima del valor real.
Configurar el sonómetro.
• Configure la frecuencia de muestreo, los puntos de muestreo, el nivel de alarma (Hi o
Low) y los LEDs.
16/12/2010 ©Velleman nv
22
Page 23

DVM173SD
• Seleccione el modo de visualización normal (NORM) o el modo con señal de pico (PEAK).
• Seleccione el modo de medición con registro de datos (STOR) o la medición en tiempo real
(RT).
• Seleccione la ponderación de frecuencias en dBA (respecto al oído humano sin frecuencia
baja y alta) o en dBC (nivel sonoro real).
• Seleccione el tiempo de respuesta lento (SLOW) o rápido (FAST).
• Seleccione la activación MANUAL (iniciar la medición de manera manual después de haber
cerrado la pantalla de ajuste) o AUTOMATIC (iniciar la medición de manera automática de
la medición después de haber cerrado la pantalla de ajuste).
• Haga clic en Setup para guardar las modificaciones o en Cancel para salir del menú de
configuración sin guardar nada.
Descargar los datos.
• Haga clic en Download para visualizar los valores medidos.
16/12/2010 ©Velleman nv
23
Page 24

DVM173SD
Observación: ¡La curva cambia de color en caso de batería baja!
• acercar: Desplace el puntero del ratón hacia el principio la zona que quiere ampliar,
mantenga pulsado el botón izquierdo del ratón y deslice el puntero hacia el final de la zona
que quiere ampliar. Suelte el botón del ratón.
• Haga clic en para visualizar el gráfico en pantalla completa.
• Haga clic en para configurar los ejes :
• Haga clic en para configurar los colores del gráfico:
• Haga clic en para visualizar los parámetros deseados.
Interrumpir la descarga.
Visualizar la lista.
16/12/2010 ©Velleman nv
24
Page 25

/
eIn
.
é
o
.
araracafr
m
m
e
c
e
m
m
o
o
s
a
e
r
e
r
s
e
g
e
e
e
a
c
u
e
t
e
o
c
e
d
C
Oemb
f
e
m
e
e
d
n
c
e
e
s
a
P
d
e
o
a
ó
a
g
e
p
e
t
i
r
t
a
s
u
e
p
a
n
e
a
o
n
é
e
P
é
U
s
n
n
o
e
A
m
e
m
o
o
b
e
n
p
a
s
p
a
c
o
D
e
r
t
n
d
c
v
C
m
o
g
m
p
p
e
o
a
s
s
p
r
n
e
s
n
e
o
a
w
d
u
5
d
0
D
u
d
s
d
d
y
a
b
a
e
p
r
o
u
d
p
u
a
d
m
e
m
c
z
e
ó
a
a
e
L
m
a
)
g
n
é
s
e
p
e
a
a
o
t
u
f
a
a
D
)
r
u
p
d
e
s
r
p
e
d
E
a
p
e
d
s
a
ó
e
a
t
o
m
d
n
a
d
6
j
o
u
a
VM173S
Impri
Impri
Abrir
5.
3 Utilizar
spete las
R
struccion
• En el
medio,
• En el
máxim
•
Primero aj
•
Quite el s
Ponga el
•
usuario p
cortavient
En el mod
•
parpadea
segundos.
•
En cuanto
(configur
•
Para inter
(5) parpa
•
El sonóm
de muest
segundos.
•
Para tran
puerto US
•
Haga clic
lista o ha
•
Consulte
gestión d
•
En caso d
reemplaz
Observa
ir el gráfi
ir la lista.
l fichero d
el sonóm
ondicione
s
odo norm
máximo (
odo PEAK,
(Pmax) y
uste el son
nómetro
onómetro
ra más inf
o (9) en c
o « manua
6 veces. El
el valor m
esta funci
umpir la g
dea 6 vece
tro interru
eos progra
ferir los d
B libre. Ha
n (g)
a clic en
l fichero d
datos.
pila baja,
r la pila.
ión: en ca
o.
Primero cr
ayuda.
tro
de uso, v
l (NORM),
max) y mí
el sonóm
mínimo (
ómetro (v
el puerto
n el lugar
rmación
so de vie
l », mante
sonómetr
edido sobr
n bajo «
rabación,
s. Luego,
mpe auto
mado ha s
tos medid
a clic en
para visua
(h) para
ayuda (H
el LED roj
so de pila
ee la lista
ase parág
el sonóme
nimo (Pmi
tro graba
min) se re
ase §5.2).
SB y vuel
deseado.
obre la te
to fuerte.
ga pulsad
activa la
pase el u
larm Setu
antenga
l LED ama
áticament
ido grabad
s al orden
para de
lizar una li
imprimir u
elp Î Hel
(5) y ve
aja, el so
n cuestión
afo §7.
ro graba
) se guar
e manera
alculan co
Active los
a a poner
onsulte la
peratura
el botón
rabación
bral de al
»).
ulsado el
rillo (5) p
la medici
. El LED a
dor, inici
cargar los
ta con los
n gráfico.
topics…)
de (6) pa
ómetro n
al hacer cl
na serie d
an.
continua 1
ntinuamen
LEDs para
el capuch
especific
e funcion
e medició
el LED v
rma Hi o
otón de
rpadea un
n en caso
marillo (5
el softwar
datos.
datos, ha
ara más i
padean. V
guarda lo
ic en .
20 mues
muestreo
te.
facilitar el
n (1).
ciones al
miento y l
n (3) hast
rde (6) pa
ow, el LE
edición (3
vez cada
de memo
parpadea
e e introd
a clic en
formación
ase el ca
datos me
reos (/550
cada 50 m
so del son
inal de est
humeda
que el L
rpadea un
rojo (5)
hasta qu
10 segun
ia llena o
una vez c
zca el son
(i) para i
sobre la d
ítulo §7 p
idos.
ms). El v
s. El valor
ómetro.
manual
. Utilice el
D verde (
vez cada
arpadea
el LED ro
os.
i el númer
da 10
metro en
mprimir la
scarga y l
ra
lor
el
)
10
o
n
6
La pila
V
ase las fig
•
El sonóm
Desconec
•
(A) Abra
•
Mueva el
(B) Desli
•
(C) Saqu
•
Después
(D) Vuelv
•
correcto.
ta: Desco
N
7
Especi
p
recisión
r
ngo de fr
ngo diná
ngo de m
pacidad d
ecuencia
p
onderació
16
12/2010
¡OJ
ras en la
tro incluy
e el apara
l compart
bjeto lige
e el apara
/introduzc
e haber in
a a introd
onfigure
necte el a
!: Manej
alaje. Ma
icacion
cuencia
ico
dición
almacen
e muestre
de frecue
ágina 2 d
una pila d
o del orde
mento de
amente h
o cuidado
la pila. U
talado la
cir el apar
l aparato
arato del
las pilas
tenga la
s
miento
cias
este man
e litio no r
ador ante
ilas con u
cia la flech
amente fu
tilice sól
ila, el LED
to en la c
on el soft
rdenador
de litio c
pila lejos
± 1.4d
de 31.
50dB
de 30
12992
1s ~ 2
A, C
ual del us
cargable
de reem
objeto p
a.
ra de la c
una pila
verde y a
ja y esper
are.
espués de
idadosa
del alcan
B
Hz a 8kH
B a 130dB
4h
25
ario.
e 3,6 V.
lazar la pil
ntiagudo,
ja.
e litio d
arillo par
hasta qu
l uso para
ente. Sig
e de niñ
a.
p.ej. un p
3,6 V. Re
adearán a
haya ent
horrar la
las instr
s.
queño des
pete la p
lternativa
ado en su
ila.
ucciones
ornillador.
laridad.
ente.
sitio
el
©Vellema
nv
Page 26

DVM173SD
ponderación de tiempo fast (rápida,125ms), slow (lenta, 1s)
micrófono tipo condensador electret (12.7mm)
tipo de enchufe USB
alimentación 1 x pila 3.6V 14250 (DVM171-BAT, incl.)
consumo 5.5mA (modo de espera = 30µA)
temperatura de funcionamiento /
0 - 40°C (32 - 104°F) / 10~90%RH
humedad
altura máx. de funcionamiento < 2000m
temperatura de almacenamiento /
-10 - 60°C (14 - 140°F) / 10%~75%RH
humedad
dimensiones 130 x 30 x 25mm
peso 20g
exigencias del sistema Windows 2000 / XP / Vista
exigencias del hardware 8MB de memoria o superior, 2MB de espacio disco
duro libre, puerto USB libre
accesorios manual del usuario, cortavientos, CD, tapa de
protección transparente
Utilice este aparato sólo con los accesorios originales. Velleman NV no será responsable
de daños ni lesiones causados por un uso (indebido) de este aparato. Para más
información sobre este producto y la versión más reciente de este manual del usuario,
visite nuestra página www.velleman.eu. Se pueden modificar las especificaciones y el
contenido de este manual sin previo aviso.
© DERECHOS DE AUTOR
Velleman NV dispone de los derechos de autor para este manual del usuario. Todos los
derechos mundiales reservados. Está estrictamente prohibido reproducir, traducir, copiar, editar y
guardar este manual del usuario o partes de ello sin previo permiso escrito del derecho habiente.
16/12/2010 ©Velleman nv
26
Page 27

/
.
n
tFaBeWi
.3.
e
.
.
e
r
w
m
w
d
w
e
n
h
H
S
w
e
m
n
g
S
S
h
n
c
o
a
u
b
/
n
u
d
u
t
n
u
E
C
t
e
r
h
e
s
e
t
w
K
o
h
v
t
r
ä
n
G
n
2
S
c
A
t
a
t
t
e
e
h
w
D
s
n
r
e
n
ü
S
n
Ü
ä
p
Q
n
r
B
ü
u
2
t
t
a
a
A
n
n
c
D
N
o
s
s
e
H
i
3
r
g
e
m
c
u
u
e
e
e
m
e
u
D
N
a
e
a
e
w
r
a
t
c
m
,
s
r
c
s
m
m
t
U
g
n
e
F
c
f
h
B
n
e
ä
d
i
r
n
e
m
e
n
k
k
l
n
s
e
G
c
S
e
e
g
o
e
n
v
u
n
a
n
h
s
s
VM173S
1
Einfüh
A
alle Ein
W
ichtige U
re
ourniert
lls Zweif
hörde.
r bedanke
In
betriebnah
2
Sicher
Allgem
ung
Dies
es Symbol
uktes nac
Prod
eit (oder v
Einh
ver
wer
erden. Re
me sorgfäl
ohner de
weltinfo
endeten B
en. Diese
l bestehe
uns für d
eitshin
alten Sie
chützen Si
ie z.B. Tr
ine Ric
BE
r Europäi
matione
auf dem P
seinem L
rwendete
atterien m
Einheit mu
pektieren
n, wende
n Kauf de
ig durch.
eise
inder und
e das Ger
pf- oder S
tlinien
IENU
chen Uni
über die
odukt ode
benszyklu
Batterien
ssen von
ss an den
ie die örtl
Sie sich
s DVM17
berprüfen
Unbefugte
t vor Rege
ritzwasse
GSA
n
es Produ
r der Verp
der Umw
) nicht als
iner spezi
ändler od
chen Um
für Entso
SD! Lesen
Sie, ob Tr
vom Gerä
n und Feu
, aus.
LEIT
kt
ckung zei
lt Schade
unsortiert
lisierten
r ein örtli
eltvorschri
gungsric
Sie diese
nsportsch
fern.
hte. Setze
NG
t an, dass
zufügen
s Hausmül
irma zwec
hes Recyc
ten.
tlinien a
edienung
äden vorli
Sie das
die Entsor
ann. Ents
l; die Einh
s Recyclin
ing-Unter
Ihre örtl
anleitung
gen.
erät keine
ung diese
rgen Sie d
it oder
g entsorgt
ehmen
iche
or
r Flüssigke
s
ie
it
Si
he Velle
•
Vermeide
Bedienun
•
Schützen
•
Nehmen
haben.
•
Eigenmäc
•
Verwende
kann dies
4
Eigens
•
entspricht
•
Anzeige n
Datenver
•
Anzeige a
•
Frequenz
•
langsame
•
Kalibrieru
•
manuelle
•
5
Anwen
Si
he Abbild
5.
1 Die Sof
Installiere
•
Laufwerk
SETUP.EX
directory
Entfernen
•
PC.
2 Die Sof
5.
an® Ser
Sie Ersch
des Gerä
ie das Ge
ie das Ger
tige Verä
Sie das
zu Schäde
haften
IEC 6167
rmal und
rbeitung:
ßer Berei
ewertung
schnelle A
g der Sof
nd autom
ung
ngen, Sei
ware inst
Sie zuers
nd befolg
, wenn di
:\Program
Sie die Sc
ware ver
ice- und
ütterunge
es.
ät vor ext
t erst in
derungen
erät nur f
am Prod
-1 Klasse
Höchstwer
peicherun
h
und C
nsprechzei
ware
tische St
e 2 dieser
allieren
die Softw
n Sie die
CD-ROM
Files\Sou
utzkappe
enden
ualitäts
. Vermeid
emen Te
etrieb, na
sind aus Si
r Anwend
kt führen
für Schal
g oder Ech
rtfunktion
Bedienung
re. Steck
nweisung
icht auto
d Gerät.
(1) und st
arantie a
n Sie rohe
peraturen
hdem Sie
cherheitsg
ngen bes
nd erlisch
lpegelmes
tzeit
n
sanleitung
n Sie die
n auf de
atisch star
cken Sie d
Ende di
Gewalt w
Staub un
ich mit se
ünden ve
hrieben in
t der Gara
geräte
.
itgeliefert
Bildschir
et. Installi
as Gerät i
ser Bedien
hrend der
Feuchte.
nen Funkti
boten.
dieser Bed
tieanspru
CD-ROM
. Klicken
ren Sie di
einen frei
ungsanleit
Installatio
onen vertr
ienungsanl
h.
in das CDie zweimal
Software
n USB-An
ng.
und
ut gemac
eitung son
ROM-
auf
unter
schluss de
t
t
Starten Si
•
16
12/2010
die Softw
are und kli
ken Sie a
f .
27
©Vellema
nv
Page 28

DVM173SD
File(F) Save… Daten auf Festplatte speichern
Open… Datei öffnen
Print Setup… Druckeinstellungen ändern
Print Preview Druckvorschau der Grafik oder Liste
Print… Grafik oder Liste drucken
Instrument(I) Calibration Adjustment… das Gerät kalibrieren
Gerät Setup… Abtastrate, Alarmpegel, LED-Anzeigen,
Aufnahmefunktion, usw. einstellen
Download Data… Daten herunterladen
Stop Running… Messung unterbrechen (nur in Echtzeit)
Previous Measurement Daten der letzten Messung anzeigen
Window(W) Instrument Instrumentfenster anzeigen oder verbergen
Infor Dialog Informationsfenster anzeigen oder verbergen
Help(H) About Softwareversion anzeigen
Help Topics Hilfedatei öffnen
Klicken Sie, um die Datei als eine .sound- oder .xls-Datei zu speichern.
Klicken Sie, um eine Datei zu öffnen (.sound-Dateiendung).
Kalibrieren Sie das Gerät. Beispiel: regeln Sie den gemessenen Wert -0,5 dB wenn die
Anzeige um 0,5 dB höher als der wirkliche Wert ist.
Das Gerät einstellen:
• Stellen Sie die Abtastrate, die Anzahl Muster, die Alarmpegel (Hi und Low) und die LED-
Anzeigen ein.
• Wählen Sie die normale Anzeige (NORM) oder die Anzeige mit Spitzensignal (PEAK).
16/12/2010 ©Velleman nv
28
Page 29

DVM173SD
• Wählen Sie die Echtzeit-Messung (RT) oder die Messung mit Speicherfunktion (STOR) aus.
• Wählen Sie die dBA- (in Bezug auf das menschliche Gehör ohne niedrige und hohe
Frequenzen) oder die dBC-Frequenzbewertung (wirklicher Schallpegel) aus.
• Stellen Sie die Ansprechzeit und (FAST oder SLOW).
• Wählen Sie MANUAL (manuell Starten der Messung nach dem Schließen des Einstellfenster)
oder AUTOMATIC (automatisch Starten der Messung nach dem Schließen des
Einstellfenster).
• Klicken Sie auf Setup um die Einstellungen zu speichern, oder auf Cancel um das Fenster
zu schließen, ohne dass Sie die Änderungen speichern.
Daten herunterladen.
• Klicken Sie auf Download um die gemessenen Werte anzuzeigen.
Bemerkung: Bei schwacher Batterie ändert sich die Farbe der Datenkurve!
16/12/2010 ©Velleman nv
29
Page 30

DVM173SD
• heranzoomen: Bewegen Sie den Mauszeiger zum Anfang der Zone, die Sie heranzoomen
möchten, halten Sie die linke Maustaste gedrückt und schleppen Sie zum Ende der Zone, die
Sie heranzoomen möchten. Lassen Sie die linke Maustaste los.
• Klicken Sie auf um die Grafik wieder in Vollbild anzuzeigen.
• Klicken Sie auf um die Achsen einzustellen:
• Klicken Sie auf um die Grafikfarbe auszuwählen:
• Klicken Sie auf um auszuwählen, welche Daten Sie anzeigen möchten.
Das Herunterladen der Daten unterbrechen.
Datenliste anzeigen.
Grafik drucken.
16/12/2010 ©Velleman nv
30
Page 31

/
eAn
.
e
e
.
G
MSA
d
n
r
e
e
m
s
A
e
g
A
d
V
e
s
e
e
a
e
e
u
c
u
S
n
n
b
r
b
T
s
r
h
p
e
w
r
n
b
s
w
s
e
G
e
s
g
m
n
a
L
L
C
s
g
k
o
r
h
t
n
ä
B
e
s
a
l
s
n
h
t
z
n
O
s
m
w
e
i
e
e
e
c
n
d
u
c
w
a
e
o
h
r
t
h
e
f
a
D
L
e
m
2
s
m
(
-
d
d
e
n
e
a
u
)
s
5
c
b
m
e
V
v
m
a
z
b
0
D
m
ä
e
d
e
m
r
o
E
0
k
e
a
G
m
g
G
m
e
a
ä
u
h
K
a
a
E
e
m
b
b
b
h
n
r
a
,
u
b
(
a
R
s
h
p
n
s
m
P
m
t
S
b
a
k
n
e
m
e
a
r
n
e
e
s
)
u
e
e
M
a
)
o
ü
d
e
n
e
u
n
u
u
e
a
P
VM173S
Liste
Öffne
5.
3 Das Ge
achten Si
B
weisung
• Im nor
, Höch
• Im PE
(Pmin)
•
Stellen Si
Bedienun
•
Entfernen
den USBInstalliere
•
am Ende
Feuchte.
•
Im manu
blinkt. Da
Überschre
•
(stellen Si
•
Halten Si
beenden.
Ist der Sp
•
Messung.
•
Um die D
einen frei
•
Klicken Si
Liste ausz
•
Siehe die
Gebrauch
•
Bei schwa
ersetzen.
Bemerku
rucken. K
Sie die Hi
ät verwe
die Betrie
n
alen Mes
t- (Pmax)
K-Modus
berechnet.
zuerst da
skomfort z
Sie das G
nschluss.
n Sie das
ieser Bedi
erwenden
llen Modu
Gerät be
itet der ge
e diese Fu
die Startt
Die gelbe
icher voll
Die gelbe
ten auf P
n USB-An
auf (
drucken,
Hilfefunkti
der Daten
her Batte
ng: Bei sc
eieren Sie
lfedatei.
den
sbedingu
modus (N
und Minde
ird alle 50
Gerät ein
u erhöhen.
rät aus de
erät dort
nungsanl
Sie den W
, halten Si
innt die M
essene S
ktion unt
ste gedrü
ED (5) bli
oder wird
ED (5) bli
herunterz
chluss. Kli
) um alle
licken Sie
n der Soft
(‘Help’ Î ‘
ie blinken
wacher B
uerst die
gen, sieh
RM) nim
twert (Pm
ms ein Mu
(siehe §5.
USB-An
o Sie den
itung für
ndschutz
die Start
ssung un
challpegel
r ‘Alarm S
kt (3) bis
kt nun ei
ie eingest
nkt einmal
laden, st
ken Sie a
Daten in e
auf (h
are für m
Help topic
die rote (
tterie spei
iste, inde
§7.
t das Ger
in) werden
ster gezog
). Schalte
chluss un
Schallpeg
ehr Infor
9) in eine
Taste (3)
die grüne
en Low-
tup’ ein).
die rote L
mal alle 1
llte Anzah
alle 10 Se
rten Sie di
f um h
iner Liste
um eine
ehr Infor
…’).
) und die
hert das
Sie
t jedes M
gespeiche
n und der
n Sie die L
setzen Si
l messen
ationen ü
windigen
gedrückt
LED (6)
der den Hi
D (5) sec
Sekunde
l Muster e
unden.
Software
erunterzul
nzuzeigen
rafik ausz
ationen ü
elbe LED
erät die D
nklicken.
l 20 Muste
rt.
Höchst- (
Ds ein, u
die Schu
öchten.
er Betrie
Umgebung
is die grün
linkt einm
-Alarm, bli
smal blin
.
reicht, da
und steck
den.
klicken Si
drucken.
er das Her
6). Siehe
ten nicht.
r (1/50 m
max) und
den
zkappe (1
iehe techn
stemperat
.
e LED (6)
l alle 10 S
nkt die rot
t, um die
n stoppt d
n Sie das
e auf (i
unterladen
§7 um die
). Der Mitt
Mindestwe
wieder a
ische Date
r und
sechsmal
kunden.
LED (5)
essung z
s Gerät di
Gerät in
um die
und den
Batterie z
l-
rt
f
e
6
Die Bat
Si
he Abbild
•
Das Gerät
•
Trennen
(A) Öffne
•
Schraube
(B) Schie
•
(C) Entfe
•
Beachten
gelbe LED
•
(D) Schie
Gerät übe
B
merkung
verbunde
7
Techni
enauigkeit
F
requenzbe
d
ynamische
essbereic
peicherka
btastfrequ
F
requenzbe
16
12/2010
ACH
Anw
terie
ngen, Sei
enthält ei
ie das Ger
Sie das
dreher. B
en Sie da
nen/legen
Sie die Pol
abwechse
en Sie da
r die mitge
: Die Lebe
n lassen.
UNG: Be
eisungen
che Da
eich
r Bereich
azität
nz
ertung
e 2 dieser
e nicht wi
t zuerst v
atteriefac
wegen Sie
Gerät vo
Sie die Ba
rität. Nac
nd blinken
Gerät wi
lieferte So
sdauer de
andeln S
der Verp
en
Bedienung
derauflad
m PC.
mit eine
den spitz
sichtig aus
terie ein.
dem Sie d
.
der in das
tware.
r Batterie
ie Lithiu
ckung. H
± 1.4d
31.5H
50dB
30dB
12992
1s ~ 2
A, C
sanleitung
are Lithiu
spitzen G
n Gegenst
dem Geh
erwende
ie Batterie
Gehäuse
erkürzt er
batterien
lten Sie
B
bis 8kHz
is 130dB
4h
31
.
batterie.
genstand,
nd in die
use herau
n Sie nur
eingelegt
nd schnap
eblich we
sehr vor
inder vo
z.B. eine
ichtung d
.
Lithiumb
aben, we
en Sie ei
n Sie das
ichtig. B
Gerät f
kleinen
s Pfeils.
tterien v
den die gr
. Konfiguri
Gerät mit
folgen Si
rn.
n 3,6 V.
ne und di
eren Sie d
em USB-
die
©Vellema
s
ort
nv
Page 32

DVM173SD
Messbereiche fast (schnell, 125ms), slow (langsam, 1s)
Mikrofon Elektret-Kondensatormikrofon (12.7mm)
Typ Stecker USB
Stromversorgung 1x 3.6V-Batterie 14250 (DVM171-BAT, mitgeliefert)
Stromverbrauch 5.5mA (stand-by = 30µA)
Betriebstemperatur / Feuchte 0 - 40°C (32 - 104°F) / 10~90%RH
Lagertemperatur / Feuchte < 2000m
Lagertemperatur / Feuchte -10 - 60°C (14 - 140°F) / 10%~75%RH
Abmessungen 130 x 30 x 25mm
Gewicht 20g
Systemvoraussetzungen Windows 2000 / XP / Vista
Hardwarevoraussetzungen 8MB Speicher oder mehr, 2MB freier Speicherplatz,
freier USB-Port
Zubehör Bedienungsanleitung, Batterie, Windschutz, CD-ROM,
transparente Schutzkappe
Verwenden Sie dieses Gerät nur mit originellen Zubehörteilen. Velleman NV übernimmt
keine Haftung für Schaden oder Verletzungen bei (falscher) Anwendung dieses Gerätes.
Für mehr Informationen zu diesem Produkt und die neueste Version dieser
Bedienungsanleitung, siehe www.velleman.eu. Alle Änderungen ohne vorherige
Ankündigung vorbehalten.
© URHEBERRECHT
Velleman NV besitzt das Urheberrecht für diese Bedienungsanleitung.
Alle weltweiten Rechte vorbehalten. Ohne vorherige schriftliche Genehmigung des Urhebers ist es
nicht gestattet, diese Bedienungsanleitung ganz oder in Teilen zu reproduzieren, zu kopieren, zu
übersetzen, zu bearbeiten oder zu speichern.
16/12/2010 ©Velleman nv
32
Page 33

Velleman® Service and Quality Warranty
Velleman® has over 35 years of experience in the electronics world
and distributes its products in more than 85 countries.
All our products fulfil strict quality requirements and legal stipulations
in the EU. In order to ensure the quality, our products regularly go
through an extra quality check, both by an internal quality
department and by specialized external organisations. If, all
precautionary measures notwithstanding, problems should occur,
please make appeal to our warranty (see guarantee conditions).
General Warranty Conditions Concerning Consumer Products
(for EU):
• All consumer products are subject to a 24-month warranty on
production flaws and defective material as from the original date of
purchase.
• Velleman® can decide to replace an article with an equivalent
article, or to refund the retail value totally or partially when the
complaint is valid and a free repair or replacement of the article is
impossible, or if the expenses are out of proportion.
You will be delivered a replacing article or a refund at the value of
100% of the purchase price in case of a flaw occurred in the first year
after the date of purchase and delivery, or a replacing article at 50%
of the purchase price or a refund at the value of 50% of the retail
value in case of a flaw occurred in the second year after the date of
purchase and delivery.
• Not covered by warranty:
- all direct or indirect damage caused after delivery to the article (e.g.
by oxidation, shocks, falls, dust, dirt, humidity...), and by the article,
as well as its contents (e.g. data loss), compensation for loss of
profits;
- frequently replaced consumable goods, parts or accessories such as
batteries, lamps, rubber parts, drive belts... (unlimited list);
- flaws resulting from fire, water damage, lightning, accident, natural
disaster, etc. …;
- flaws caused deliberately, negligently or resulting from improper
handling, negligent maintenance, abusive use or use contrary to the
manufacturer’s instructions;
- damage caused by a commercial, professional or collective use of
the article (the warranty validity will be reduced to six (6) months
when the article is used professionally);
- damage resulting from an inappropriate packing and shipping of the
article;
- all damage caused by modification, repair or alteration performed by
a third party without written permission by Velleman®.
• Articles to be repaired must be delivered to your Velleman® dealer,
solidly packed (preferably in the original packaging), and be
completed with the original receipt of purchase and a clear flaw
description.
• Hint: In order to save on cost and time, please reread the manual
and check if the flaw is caused by obvious causes prior to presenting
the article for repair. Note that returning a non-defective article can
also involve handling costs.
• Repairs occurring after warranty expiration are subject to shipping
costs.
• The above conditions are without prejudice to all commercial
warranties.
The above enumeration is subject to modification according to
the article (see article’s manual).
Velleman® service- en kwaliteitsgarantie
Velleman® heeft ruim 35 jaar ervaring in de elektronicawereld en
verdeelt in meer dan 85 landen.
Al onze producten beantwoorden aan strikte kwaliteitseisen en aan de
wettelijke bepalingen geldig in de EU. Om de kwaliteit te waarborgen,
ondergaan onze producten op regelmatige tijdstippen een extra
kwaliteitscontrole, zowel door onze eigen kwaliteitsafdeling als door
externe gespecialiseerde organisaties. Mocht er ondanks deze
voorzorgen toch een probleem optreden, dan kunt u steeds een
beroep doen op onze waarborg (zie waarborgvoorwaarden).
Algemene waarborgvoorwaarden consumentengoederen (voor
Europese Unie):
• Op alle consumentengoederen geldt een garantieperiode van 24
maanden op productie- en materiaalfouten en dit vanaf de
oorspronkelijke aankoopdatum.
• Indien de klacht gegrond is en een gratis reparatie of vervanging
van een artikel onmogelijk is of indien de kosten hiervoor buiten
verhouding zijn, kan Velleman® beslissen het desbetreffende artikel
te vervangen door een gelijkwaardig artikel of de aankoopsom van
het artikel gedeeltelijk of volledig terug te betalen. In dat geval krijgt
u een vervangend product of terugbetaling ter waarde van 100% van
de aankoopsom bij ontdekking van een gebrek tot één jaar na
aankoop en levering, of een vervangend product tegen 50% van de
kostprijs of terugbetaling van 50 % bij ontdekking na één jaar tot 2
jaar.
• Valt niet onder waarborg:
- alle rechtstreekse of onrechtstreekse schade na de levering
veroorzaakt aan het toestel (bv. door oxidatie, schokken, val, stof,
vuil, vocht...), en door het toestel, alsook zijn inhoud (bv. verlies van
data), vergoeding voor eventuele winstderving.
- verbruiksgoederen, onderdelen of hulpstukken die regelmatig dienen
te worden vervangen, zoals bv. batterijen, lampen, rubberen
onderdelen, aandrijfriemen... (onbeperkte lijst).
- defecten ten gevolge van brand, waterschade, bliksem, ongevallen,
natuurrampen, enz.
- defecten veroorzaakt door opzet, nalatigheid of door een
onoordeelkundige behandeling, slecht onderhoud of abnormaal
gebruik of gebruik van het toestel strijdig met de voorschriften van de
fabrikant.
- schade ten gevolge van een commercieel, professioneel of collectief
gebruik van het apparaat (bij professioneel gebruik wordt de
garantieperiode herleid tot 6 maand).
- schade veroorzaakt door onvoldoende bescherming bij transport van
het apparaat.
- alle schade door wijzigingen, reparaties of modificaties uitgevoerd
door derden zonder toestemming van Velleman®.
• Toestellen dienen ter reparatie aangeboden te worden bij uw
Velleman®-verdeler. Het toestel dient vergezeld te zijn van het
oorspronkelijke aankoopbewijs. Zorg voor een degelijke verpakking
(bij voorkeur de originele verpakking) en voeg een duidelijke
foutomschrijving bij.
• Tip: alvorens het toestel voor reparatie aan te bieden, kijk nog eens
na of er geen voor de hand liggende reden is waarom het toestel niet
naar behoren werkt (zie handleiding). Op deze wijze kunt u kosten en
tijd besparen. Denk eraan dat er ook voor niet-defecte toestellen een
kost voor controle aangerekend kan worden.
• Bij reparaties buiten de waarborgperiode zullen transportkosten
aangerekend worden.
• Elke commerciële garantie laat deze rechten onverminderd.
Bovenstaande opsomming kan eventueel aangepast worden
naargelang de aard van het product (zie handleiding van het
betreffende product).
Garantie de service et de qualité Velleman®
Velleman® jouit d’une expérience de plus de 35 ans dans le
monde de l’électronique avec une distribution dans plus de 85
pays.
Tous nos produits répondent à des exigences de qualité
rigoureuses et à des dispositions légales en vigueur dans l’UE.
Afin de garantir la qualité, nous soumettons régulièrement nos
produits à des contrôles de qualité supplémentaires, tant par
notre propre service qualité que par un service qualité externe.
Dans le cas improbable d’un défaut malgré toutes les
précautions, il est possible d’invoquer notre garantie (voir les
conditions de garantie).
Conditions générales concernant la garantie sur les
produits grand public (pour l’UE) :
• tout produit grand public est garanti 24 mois contre tout vice
de production ou de matériaux à dater du jour d’acquisition
effective ;
• si la plainte est justifiée et que la réparation ou le
remplacement d’un article est jugé impossible, ou lorsque les
coûts s’avèrent disproportionnés, Velleman® s’autorise à
remplacer ledit article par un article équivalent ou à rembourser
la totalité ou une partie du prix d’achat. Le cas échéant, il vous
sera consenti un article de remplacement ou le remboursement
complet du prix d’achat lors d’un défaut dans un délai de 1 an
après l’achat et la livraison, ou un article de remplacement
moyennant 50% du prix d’achat ou le remboursement de 50%
du prix d’achat lors d’un défaut après 1 à 2 ans.
• sont par conséquent exclus :
- tout dommage direct ou indirect survenu à l’article après
livraison (p.ex. dommage lié à l’oxydation, choc, chute,
poussière, sable, impureté…) et provoqué par l’appareil, ainsi que
son contenu (p.ex. perte de données) et une indemnisation
éventuelle pour perte de revenus ;
- tout bien de consommation ou accessoire, ou pièce qui
nécessite un remplacement régulier comme p.ex. piles,
ampoules, pièces en caoutchouc, courroies… (liste illimitée) ;
- tout dommage qui résulte d’un incendie, de la foudre, d’un
accident, d’une catastrophe naturelle, etc. ;
- out dommage provoqué par une négligence, volontaire ou non,
une utilisation ou un entretien incorrects, ou une utilisation de
l’appareil contraire aux prescriptions du fabricant ;
- tout dommage à cause d’une utilisation commerciale,
professionnelle ou collective de l’appareil (la période de garantie
sera réduite à 6 mois lors d’une utilisation professionnelle) ;
- tout dommage à l’appareil qui résulte d’une utilisation
incorrecte ou différente que celle pour laquelle il a été
initialement prévu comme décrit dans la notice ;
Page 34

- tout dommage engendré par un retour de l’appareil emballé
dans un conditionnement non ou insuffisamment protégé.
- toute réparation ou modification effectuée par une tierce
personne sans l’autorisation explicite de SA Velleman® ; - frais
de transport de et vers Velleman® si l’appareil n’est plus couvert
sous la garantie.
• toute réparation sera fournie par l’endroit de l’achat. L’appareil
doit nécessairement être accompagné du bon d’achat d’origine et
être dûment conditionné (de préférence dans l’emballage
d’origine avec mention du défaut) ;
• tuyau : il est conseillé de consulter la notice et de contrôler
câbles, piles, etc. avant de retourner l’appareil. Un appareil
retourné jugé défectueux qui s’avère en bon état de marche
pourra faire l’objet d’une note de frais à charge du
consommateur ;
• une réparation effectuée en-dehors de la période de garantie
fera l’objet de frais de transport ;
• toute garantie commerciale ne porte pas atteinte aux conditions
susmentionnées.
La liste susmentionnée peut être sujette à une
complémentation selon le type de l’article et être
mentionnée dans la notice d’emploi.
Garantía de servicio y calidad Velleman®
Velleman® disfruta de una experiencia de más de 35 años en el
mundo de la electrónica con una distribución en más de 85
países. Todos nuestros productos responden a normas de calidad
rigurosas y disposiciones legales vigentes en la UE. Para
garantizar la calidad, sometemos nuestros productos
regularmente a controles de calidad adicionales, tanto a través
de nuestro propio servicio de calidad como de un servicio de
calidad externo. En el caso improbable de que surgieran
problemas a pesar de todas las precauciones, es posible recurrir
a nuestra garantía (véase las condiciones de garantía).
Condiciones generales referentes a la garantía sobre
productos de venta al público (para la Unión Europea):
• Todos los productos de venta al público tienen un período de
garantía de 24 meses contra errores de producción o errores en
materiales desde la adquisición original;
• Si la queja está fundada y si la reparación o sustitución de un
artículo no es posible, o si los gastos son desproporcionados,
Velleman® autoriza reemplazar el artículo por un artículo
equivalente o reembolsar la totalidad o una parte del precio de
compra. En este caso, usted recibirá un artículo de recambio o el
reembolso completo del precio de compra si encuentra algún fallo
hasta un año después de la compra y entrega, o un artículo de
recambio al 50% del precio de compra o el reembolso del 50%
del precio de compra si encuentra un fallo después de 1 año y
hasta los 2 años después de la compra y entrega.
Por consiguiente, están excluidos entre otras cosas:
- todos los daños causados directa o indirectamente al aparato
(p.ej. por oxidación, choques, caída,...) y a su contenido (p.ej.
pérdida de datos) después de la entrega y causados por el
aparato, y cualquier indemnización por posible pérdida de
ganancias;
- partes o accesorios que deban ser reemplazados regularmente,
como por ejemplo baterías, lámparas, partes de goma, etc. (lista
ilimitada)
- defectos causados por un incendio, daños causados por el agua,
rayos, accidentes, catástrofes naturales, etc.;
- defectos causados a conciencia, descuido o por malos tratos, un
mantenimiento inapropiado o un uso anormal del aparato
contrario a las instrucciones del fabricante;
- daños causados por un uso comercial, profesional o colectivo
del aparato (el período de garantía se reducirá a 6 meses con uso
profesional);
- daños causados por un uso incorrecto o un uso ajeno al que
está previsto el producto inicialmente como está descrito en el
manual del usuario;
- daños causados por una protección insuficiente al transportar el
aparato.
- daños causados por reparaciones o modificaciones efectuadas
por una tercera persona sin la autorización explícita de
Velleman®;
- se calcula gastos de transporte de y a Velleman® si el aparato
ya no está cubierto por la garantía.
• Cualquier artículo que tenga que ser reparado tendrá que ser
devuelto a su distribuidor Velleman®. Devuelva el aparato con la
factura de compra original y transpórtelo en un embalaje sólido
(preferentemente el embalaje original). Incluya también una
buena descripción del fallo;
• Consejo: Lea el manual del usuario y controle los cables, las
pilas, etc. antes de devolver el aparato. Si no se encuentra un
defecto en el artículo los gastos podrían correr a cargo del
cliente;
• Los gastos de transporte correrán a carga del cliente para una
reparación efectuada fuera del período de garantía.
• Cualquier gesto comercial no disminuye estos derechos.
La lista previamente mencionada puede ser adaptada
según el tipo de artículo (véase el manual del usuario del
artículo en cuestión)
Velleman® Service- und Qualitätsgarantie
Velleman® hat gut 35 Jahre Erfahrung in der Elektronikwelt und
vertreibt seine Produkte in über 85 Ländern.
Alle Produkte entsprechen den strengen Qualitätsforderungen
und gesetzlichen Anforderungen in der EU. Um die Qualität zu
gewährleisten werden unsere Produkte regelmäßig einer
zusätzlichen Qualitätskontrolle unterworfen, sowohl von unserer
eigenen Qualitätsabteilung als auch von externen spezialisierten
Organisationen. Sollten, trotz aller Vorsichtsmaßnahmen,
Probleme auftreten, nehmen Sie bitte die Garantie in Anspruch
(siehe Garantiebedingungen).
Allgemeine Garantiebedingungen in Bezug auf
Konsumgüter (für die Europäische Union):
• Alle Produkte haben für Material- oder Herstellungsfehler eine
Garantieperiode von 24 Monaten ab Verkaufsdatum.
• Wenn die Klage berechtigt ist und falls eine kostenlose
Reparatur oder ein Austausch des Gerätes unmöglich ist, oder
wenn die Kosten dafür unverhältnismäßig sind, kann Velleman®
sich darüber entscheiden, dieses Produkt durch ein gleiches
Produkt zu ersetzen oder die Kaufsumme ganz oder teilweise
zurückzuzahlen. In diesem Fall erhalten Sie ein Ersatzprodukt
oder eine Rückzahlung im Werte von 100% der Kaufsumme im
Falle eines Defektes bis zu 1 Jahr nach Kauf oder Lieferung, oder
Sie bekommen ein Ersatzprodukt im Werte von 50% der
Kaufsumme oder eine Rückzahlung im Werte von 50 % im Falle
eines Defektes im zweiten Jahr.
• Von der Garantie ausgeschlossen sind:
- alle direkten oder indirekten Schäden, die nach Lieferung am
Gerät und durch das Gerät verursacht werden (z.B. Oxidation,
Stöße, Fall, Staub, Schmutz, Feuchtigkeit, ...), sowie auch der
Inhalt (z.B. Datenverlust), Entschädigung für eventuellen
Gewinnausfall.
- Verbrauchsgüter, Teile oder Zubehörteile, die regelmäßig
ausgewechselt werden, wie z.B. Batterien, Lampen, Gummiteile,
Treibriemen, usw. (unbeschränkte Liste).
- Schäden verursacht durch Brandschaden, Wasserschaden, Blitz,
Unfälle, Naturkatastrophen, usw.
- Schäden verursacht durch absichtliche, nachlässige oder
unsachgemäße Anwendung, schlechte Wartung,
zweckentfremdete Anwendung oder Nichtbeachtung von
Benutzerhinweisen in der Bedienungsanleitung.
- Schäden infolge einer kommerziellen, professionellen oder
kollektiven Anwendung des Gerätes (bei gewerblicher
Anwendung wird die Garantieperiode auf 6 Monate
zurückgeführt).
- Schäden verursacht durch eine unsachgemäße Verpackung und
unsachgemäßen Transport des Gerätes.
- alle Schäden verursacht durch unautorisierte Änderungen,
Reparaturen oder Modifikationen, die von einem Dritten ohne
Erlaubnis von Velleman® vorgenommen werden.
• Im Fall einer Reparatur, wenden Sie sich an Ihren Velleman®Verteiler. Legen Sie das Produkt ordnungsgemäß verpackt
(vorzugsweise die Originalverpackung) und mit dem OriginalKaufbeleg vor. Fügen Sie eine deutliche Fehlerbeschreibung
hinzu.
• Hinweis: Um Kosten und Zeit zu sparen, lesen Sie die
Bedienungsanleitung nochmals und überprüfen Sie, ob es keinen
auf de Hand liegenden Grund gibt, ehe Sie das Gerät zur
Reparatur zurückschicken. Stellt sich bei der Überprüfung des
Geräts heraus, dass kein Geräteschaden vorliegt, könnte dem
Kunden eine Untersuchungspauschale berechnet.
• Für Reparaturen nach Ablauf der Garantiefrist werden
Transportkosten berechnet.
• Jede kommerzielle Garantie lässt diese Rechte unberührt.
Die oben stehende Aufzählung kann eventuell angepasst
werden gemäß der Art des Produktes (siehe
Bedienungsanleitung des Gerätes).
 Loading...