


VANGUARD LOAD TAP CHANGER ANALYZER (LTCA)
VERSION 2.xx SOFTWARE MANUAL
For Use with Vanguard’s
LTCA-10, LTCA-40, WRM-10P, and WRM-40
Load Tap Changer Analyzers and Winding Resistance Meters
Vanguard Instruments Company, Inc.
1520 S. Hellman Ave.
Ontario, California 91761, USA
TEL: (909) 923-9390 |
March 2011 |
FAX: (909) 923-9391 |
Revision 3 |
|
|

|
LTCA VERSION 2.xx SOFTWARE MANUAL |
REV 3 |
|
TABLE OF CONTENTS |
|
CONVENTIONS USED IN THIS DOCUMENT ................................................................................................... |
1 |
|
1.0 |
INTRODUCTION................................................................................................................................. |
2 |
1.1 |
System Requirements................................................................................................................... |
2 |
2.0 |
SOFTWARE INSTALLATION................................................................................................................ |
3 |
3.0 |
STARTING THE LTCA SOFTWARE....................................................................................................... |
6 |
3.1 |
LTCA Software User Interface Elements....................................................................................... |
7 |
3.2 |
Keyboard Shortcuts ...................................................................................................................... |
9 |
3.3 |
Application Setup........................................................................................................................ |
10 |
3.4 |
Printer Setup............................................................................................................................... |
15 |
4.0 |
WORKING WITH TEST RECORDS ..................................................................................................... |
16 |
4.1 |
Retrieving Test Records From an LTCA or WRM ........................................................................ |
16 |
4.2 |
Recalling Test Records From the PC Hard Drive ......................................................................... |
18 |
4.3 |
Saving a Test Record................................................................................................................... |
19 |
4.3.1. Saving a Test Record with its Original File Name................................................................ |
19 |
|
4.3.2. Saving a Test Record with a Different File Name................................................................ |
19 |
|
4.4 |
Exporting Test Records ............................................................................................................... |
20 |
4.5 |
Viewing and Working with Static Test Results ........................................................................... |
23 |
4.5.1. Working with Test Reports ................................................................................................. |
25 |
|
Returning to the Graph View ............................................................................................................. |
29 |
|
4.6.3. Viewing a Graph Expansion................................................................................................. |
44 |
|
4.6.4. Overlaying Test Results Graphs .................................................................................................. |
46 |
|
4.7 |
Working with Dynamic Test Results (LTCA Only) ....................................................................... |
49 |
4.7.1. Working with Dynamic Test Results Data Points (LTCA Only) ............................................ |
51 |
|
5.0 |
PERFORMING TESTS........................................................................................................................ |
54 |
5.1 |
Running a Static Resistance Test ................................................................................................ |
54 |
5.2 |
Running an LTCA/Voltage Regulator Resistance Test................................................................. |
59 |
5.3 |
Running a Dynamic Resistance Test (LTCA-10 and LTCA-40 Only) ............................................. |
64 |
|
LIST OF FIGURES |
|
Figure 1. Typical Dynamic Resistance Graph with Overlay......................................................................... |
47 |
|
Figure 2. Typical Static Resistance Graph with Overlay .............................................................................. |
48 |
|
i
REV 3 LTCA VERSION 2.xx SOFTWARE MANUAL
CONVENTIONS USED IN THIS DOCUMENT
This document uses the following conventions:
•Microsoft® Windows XP, Vista, and 7 will be simply referred to as Windows in this manual
•The term “LTCA” will be used to refer to both the LTCA-10 and LTCA-40. If any information or instructions pertain to a specific model, the specific model name will be used.
•The term “WRM” will be used to refer to both the WRM-10P and WRM-40. If any information or instructions pertain to a specific model, the specific model name will be used.
•Menu Names and icons are referred to as Menu Name and Icon
•Menu items are referred to as Menu Item
•Dialog boxes and their elements (buttons, options, etc.) are referred to as “Dialog Box Element”
•PC keyboard keys are referred to as [Key]. Key combinations are shown as [Key]+[Key].
•A key or switch on the LTCA or WRM is indicated as [KEY]
•File locations, directories, and file names are shown as “C:\folder\filename”
•Warning messages are indicated as:
Warning message
WARNING
•Important notes are indicated as:
Note details
NOTE
Microsoft, Windows, Windows XP, Windows Vista, and Windows 7 are either registered trademarks or trademarks of Microsoft Corporation in the United States and/or other countries. All other trademarks are the property of their respective owners.
1

LTCA VERSION 2.xx SOFTWARE MANUAL REV 3
1.0INTRODUCTION
The Vanguard Load Tap Changer Analyzer (LTCA) software is a Windows-based PC software application for use with Vanguard’s LTCA-10 and LTCA-40 load tap changer analyzers and Vanguard’s WRM-10P and WRM-40 winding resistance meters. This software allows users to perform the following tasks:
•Retrieve Test Records from an LTCA or WRM
•Analyze Retrieved Test Records
•View Test Results in Graphic Format
•Export Retrieved Test Records
•Print Retrieved Test Records
•Run tests from the PC
1.1System Requirements
The LTCA software has the following minimum system requirements:
•PC running Microsoft® Windows® XP or Windows® Vista
•CD-ROM or DVD-ROM drive (if installing from disc). You may also download the software from our site at http://www.vanguard-instruments.com.
•RS-232C serial port or USB port (LTCA-10 and LTCA-40 only)
2
REV 3 LTCA VERSION 2.xx SOFTWARE MANUAL
2.0SOFTWARE INSTALLATION
Follow the steps below to install the LTCA software on your PC.
1.Insert the installation CD in the PC’s CD or DVD drive.
2.From the Windows Desktop, click on the “Start” button to bring up the Start Menu.
3.From the Start Menu, click on My Computer to open the My Computer window.
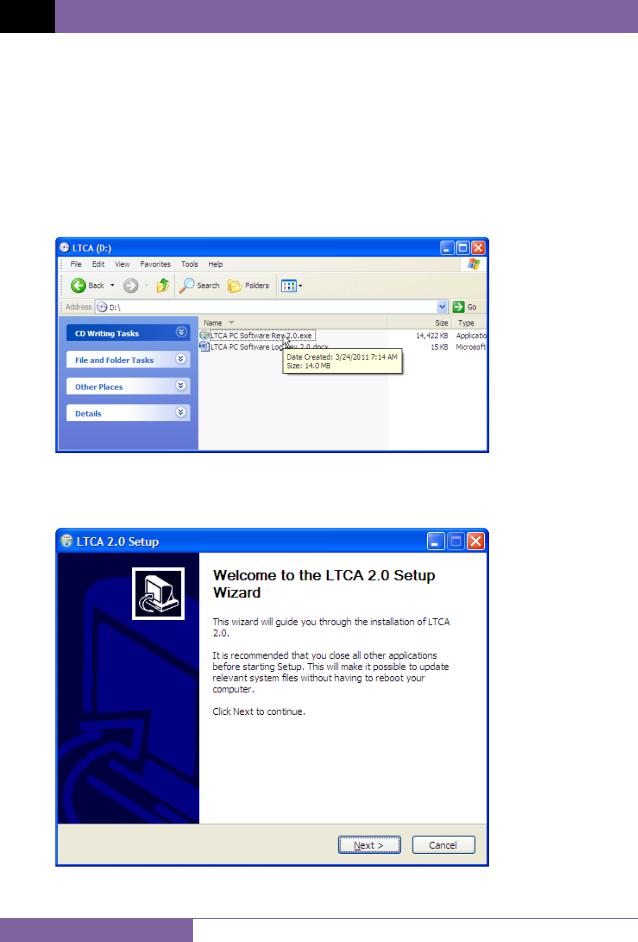
4.Double click (or single click in some Windows configurations) on your CD/DVD Drive icon to navigate the installation CD. The contents of the CD will be listed as shown below:
5.Double click (or single click in some Windows configurations) on the “LTCA PC Software Rev 2.x.exe” file to start the installation process. The LTCA Setup Wizard will appear as shown below:
3

LTCA VERSION 2.xx SOFTWARE MANUAL REV 3
6.Click on the “Next” button to continue. The following screen will be displayed showing the location on your hard drive where the software will be installed (C:\Vanguard\LTCA):
7.You may choose a different installation location by clicking on the “Browse…” button and then browsing to the location on your hard drive where you would like to install the software. If you would like to install the software in the default location, click on the “Install” button to continue. The installation progress window will be displayed:
4
REV 3 LTCA VERSION 2.xx SOFTWARE MANUAL
|
|
The LTCA 2 software requires Microsoft .NET 4.x to be installed on your |
|
|
computer. If Microsoft .NET 4.x is not installed on your computer, it will be |
|
NOTE |
installed automatically. |
|
|
|
|
|
|
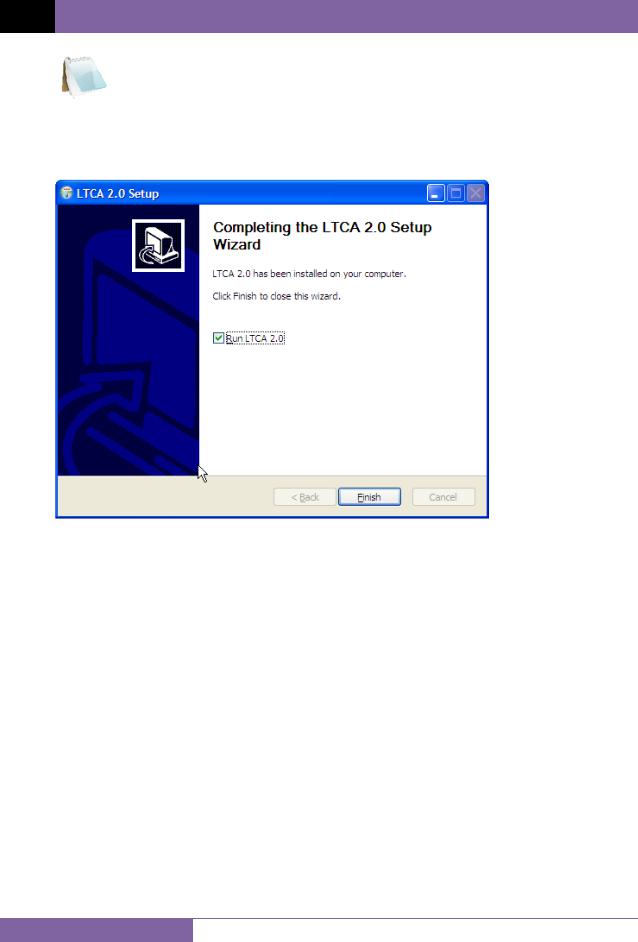
8. The following screen will be displayed once the software has been successfully installed:
9.If you would like to run the LTCA software now, check the “Run LTCA 2.0” checkbox. Click on the “Finish” button to close the InstallShield Wizard and complete the installation process.
5
LTCA VERSION 2.xx SOFTWARE MANUAL REV 3
3.0STARTING THE LTCA SOFTWARE
During the installation process, a Vanguard program group will be created under the All Programs submenu in the Windows Start menu. To launch the LTCA software:
1.Click on the Windows “Start” menu button to open the Start Menu.
2.Click on the All Programs menu item.
3.Click on the Vanguard menu item.
4.Click on the LTCA menu item.
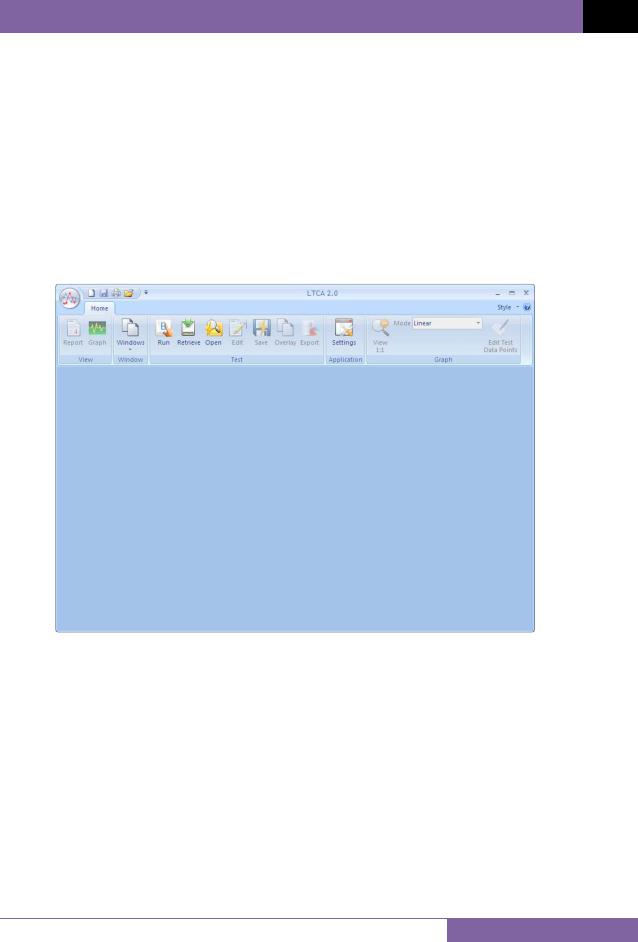
5.Click on the Launch ltca.exe menu item. The LTCA main application window will appear as shown below:
6
REV 3 LTCA VERSION 2.xx SOFTWARE MANUAL
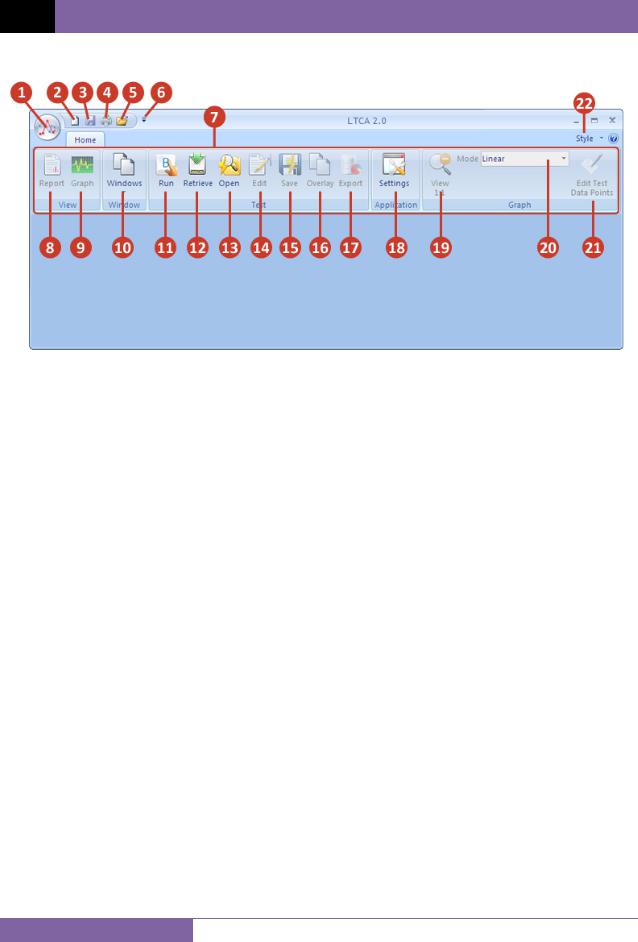
3.1LTCA Software User Interface Elements
1.File Menu: You can open, close, save, and print test records from the file menu.
2.New Document: Click on this icon to create a new document (LTCA data or LTCA Graph).
3.Save: Click on this icon to save the current active test record.
4.Quick Print: Click on this icon to quickly print the active document using current options.
5.Open: Click on this icon to open a test record.
6.Quick Access Toolbar Options: Click on this menu to customize which icons (items 1-5 above) are displayed on the toolbar.
7.Main application ribbon. The ribbon houses the various application icons. Icons are grouped by their functionality.
8.View Report: Click on this button to view the test report for the current active test record.
9.View Graph: Click on this button to view the graph for the current active test record.
10.Windows: Click on this button to view a list of current open windows.
11.Run: Click on this button to start performing a test. The WRM or LTCA unit must be connected to the PC.
12.Retrieve: Click on this button to retrieve a test record from a connected unit’s internal memory.
13.Open: Click on this button to open a test record file from the PC.
14.Edit: Click on this button to edit the current active test record’s header information and test notes.
15.Save: Click on this button to save the current active test record.
7

LTCA VERSION 2.xx SOFTWARE MANUAL REV 3
16.Overlay: Click on this button to overlay graphs from multiple test records.
17.Export: Click on this button to export the current test record data in XML, PDF, and Excel formats.
18.Settings: Click on this button to configure the application preferences such as graph colors, communications port, etc.
19.View 1:1: If you are zoomed in on a specific area on a graph, click on this button to zoom out to the full view.
20.Mode: When viewing a graph, you can select the graph viewing mode from this menu. The graph can be displayed using a linear or a logarithmic scale.
21.Edit Test Data Points: Click on this button to edit any stored test data points (for dynamic LTCA test records only)
22.Style: Click on this menu to select the user interface style. This affects the look and feel of the LTCA software.
8
REV 3 LTCA VERSION 2.xx SOFTWARE MANUAL
3.2Keyboard Shortcuts
Keyboard shortcuts are available for quick access to some of the menu options and icons. To use a keyboard shortcut, press the [ALT] key on the keyboard. The user interface will be updated with pop-ups over items that can be accessed using a keyboard shortcut as shown below:
You can access the item under the pop-up by pressing the corresponding key on the keyboard. For example, press the [F] key to access the File Menu. The file menu will be displayed as shown below:
Once again, pop-ups will be displayed over the menu items. To select a menu item, press the corresponding key indicated by the pop-up. For example, press the [O] key to select the Open… option.
9
LTCA VERSION 2.xx SOFTWARE MANUAL REV 3
3.3Application Setup
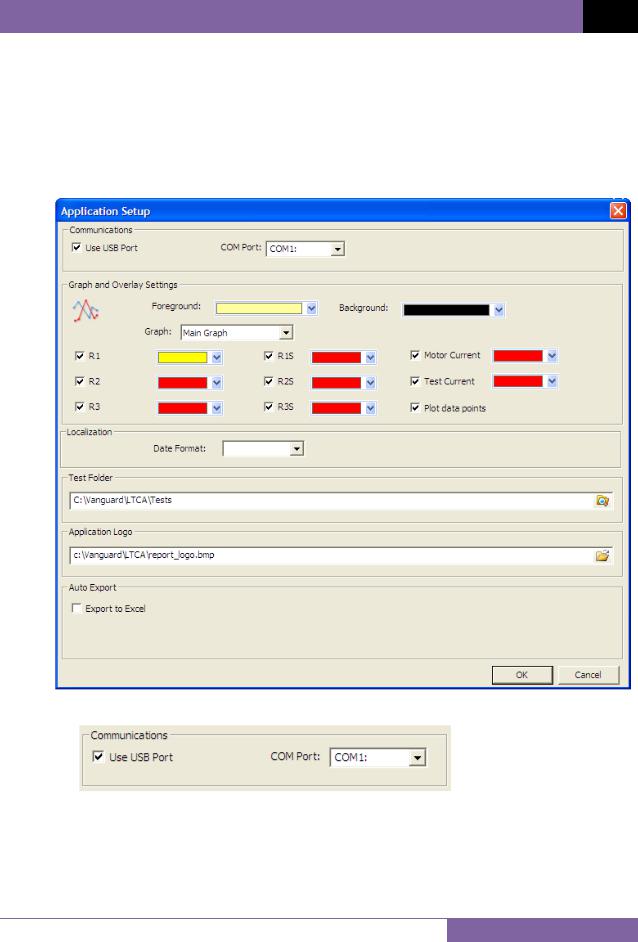
Before using the LTCA program, the application setup parameters should be reviewed and changed as required. To change the setup parameters:
1.Make sure the LTCA software is running on the PC.
2.Click on the Settings icon on the ribbon (alternatively you can select Application Setup from the File menu). The following window will be displayed:
a.Communications
WRM-10P and WRM-40
Since the WRM-10P and WRM-40 feature only an RS-232C port, the “Use USB Port” check box should be un-checked. To configure the serial port settings, select the correct COM: port from the “COM Port:” drop-down list.
10
REV 3 LTCA VERSION 2.xx SOFTWARE MANUAL
LTCA-10 and LTCA-40
If the LTCA is connected to the PC via the USB port, check the “Use USB port” checkbox. You can ignore the “COM Port:” drop down list.
If the LTCA is connected to the PC via the RS-232C (serial) port, un-check the “Use USB port” check box and select the correct COM: port from the “COM Port:” dropdown list.
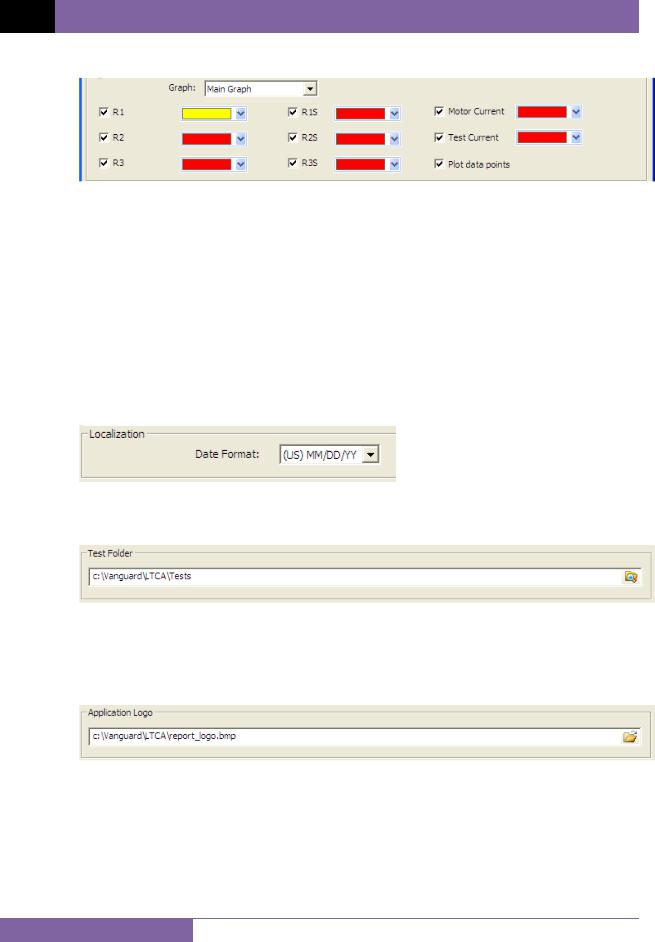
b.Graph and Overlay Settings
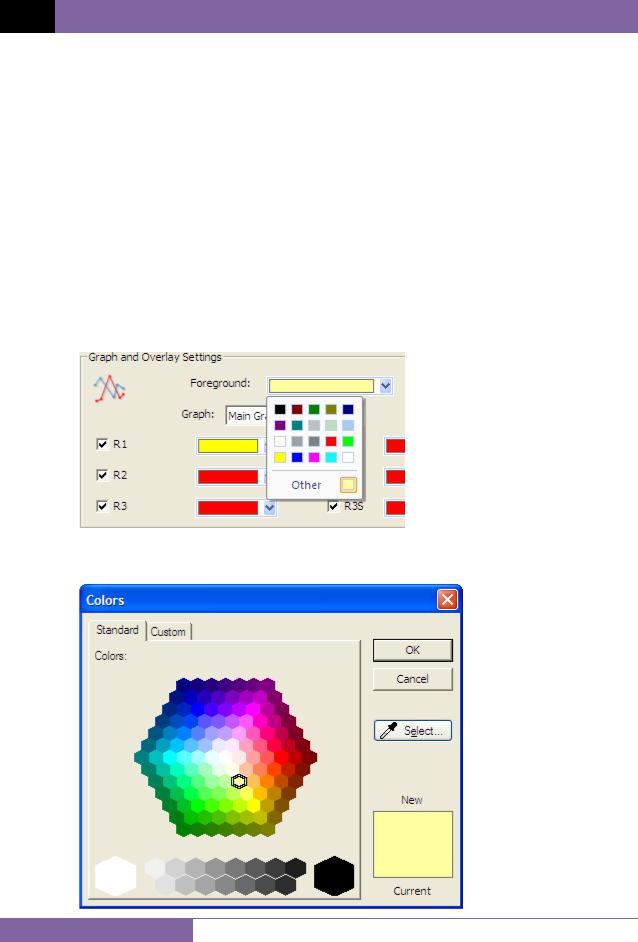
The LTCA software can overlay graphs from up to three test records. The graph for the first loaded test record is referred to as the “Main Graph”. Additional overlain graphs are referred to as “Overlay #1” and “Overlay #2”.
You can customize the colors for the main graph and overlay graph elements by clicking on the color drop down menu next to the element’s name. For each item, a color selector will be displayed as shown:
You can select a color from the pre-set colors shown or click on “Other” for more colors. The following color picker will be displayed:
11
LTCA VERSION 2.xx SOFTWARE MANUAL REV 3
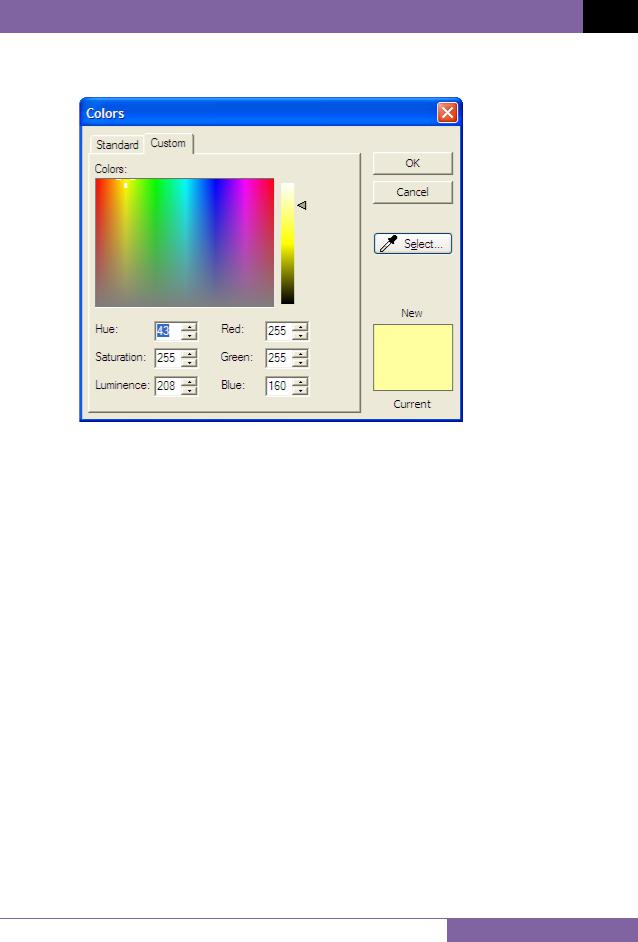
If you would like to pick a completely custom color, you can click on the “Custom” tab. The following color picker will be displayed:
You can also select a color from any pixel on the screen by clicking on the “Select...” button. This will turn your mouse cursor into an eyedropper. Move the eyedropper over an area on the screen and the underlying color will be displayed in the “New” color swatch area in the “Colors” window. When you have found the color you like, click to select it.
WRM-10P and WRM-40
The WRM is capable of reading two static resistance values at the same time, and their values are referred to as “R1” and “R2” on the graph. The LTCA software can also calculate each resistance’s value at a reference temperature. These values are referred to as “R1s” and “R2s”, respectively.
LTCA-10 and LTCA-40
In static resistance test mode, the LTCA is capable of reading three static resistance values at the same time, and their values are referred to as “R1”, “R2”, and “R3” on the graph. The LTCA software can also calculate each resistance’s value at a reference temperature. These values are referred to as “R1s”, “R2s”, and “R3s”, respectively.
In dynamic resistance test mode, only the “R1” resistance values are recorded over time. For dynamic resistance tests, the LTCA software displays the resistance curve for “R1”, the test current graph for “R1” (referred to as “Test Current”), and the LTC motor current graph (referred to as “Motor Current”). The colors for each graph can be customized.
12
REV 3 LTCA VERSION 2.xx SOFTWARE MANUAL
Configuring the Graph Settings
In the “Graph and Overlay Settings” section you can select which items should be displayed on each graph. You can also configure the color used for displaying each graph element. To configure the settings for a graph:
1.Select the graph that you would like to configure the settings for from the “Graph:” drop-down list (Main Graph, Overlay #1, or Overlay #2).
2.Select the items that you would like to be displayed on the graph by checking the checkbox next to their labels (such as R1, R2, Current, etc.).
3.Change the color used for each graph item by clicking on the “Select” button next to each item and then selecting a color.
c.Localization
Select the preferred date format from the “Date Format:” drop-down list.
d.Test Folder
The default location where test records are stored on the PC hard drive is listed in the “Test Folder” section. You can change the default test record storage location by clicking on the folder icon and then selecting a different folder.
e.Application Logo
You can customize your test reports with your company logo. The selected logo will be displayed at the top of each report page. The JPEG, BMP, TIFF, or PNG file formats are supported. We recommend an image with a height of 1” and resolution of 150 DPI or higher. Click on the folder icon to locate the logo file on your computer.
13
LTCA VERSION 2.xx SOFTWARE MANUAL REV 3
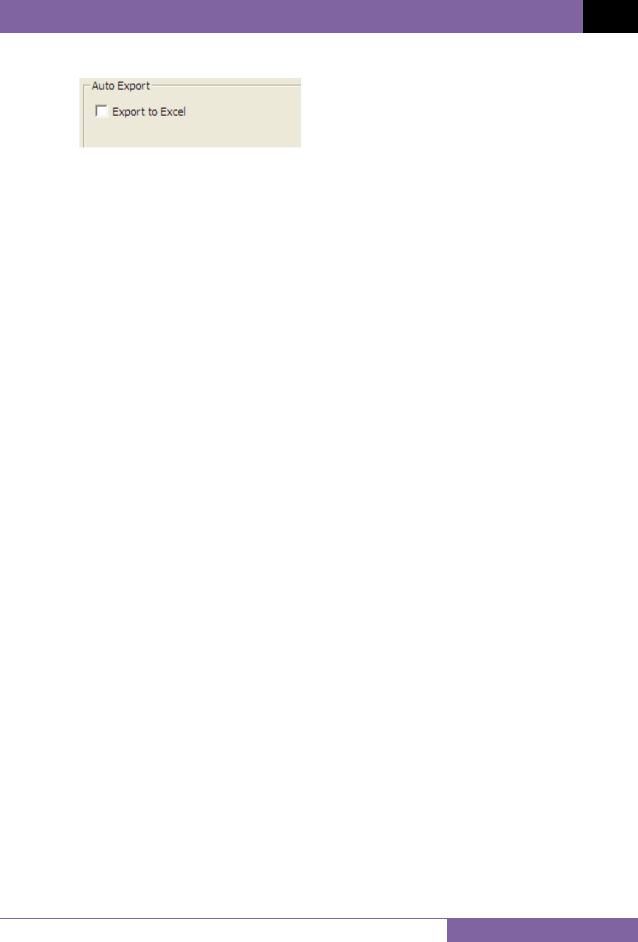
f.Auto Export
When test records are saved, by default they are also exported in PDF and XML format. You can also automatically export test records in Microsoft® Excel format by checking the “Export to Excel” checkbox in the “Auto Export” section.
3.Click on the “OK” button to apply all changes to the application settings. The settings will be permanently stored for the current and any future sessions.
14
REV 3 LTCA VERSION 2.xx SOFTWARE MANUAL
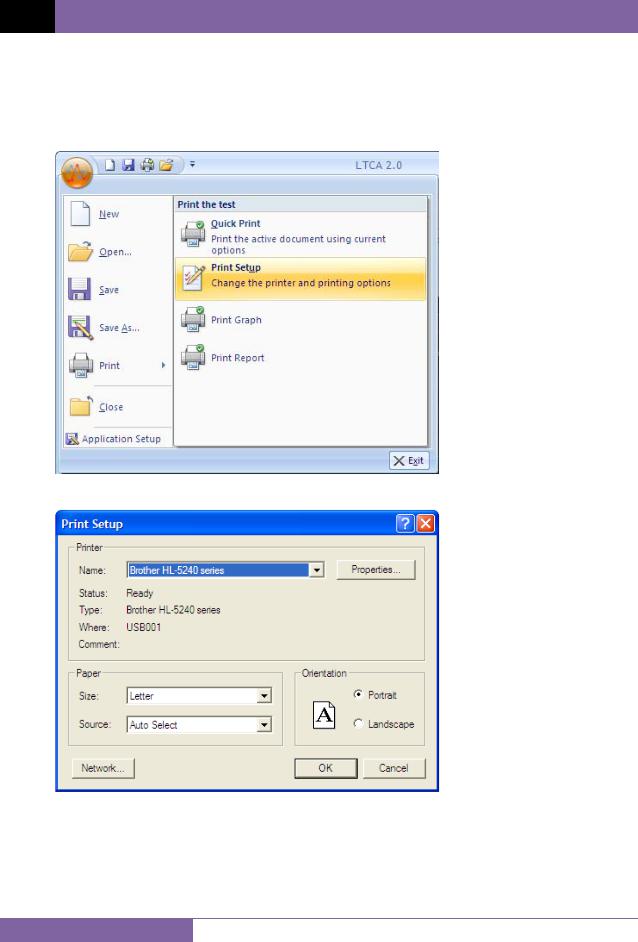
3.4Printer Setup
To setup the default printer and configure its settings:
1. Click on the File menu and then click on the arrow icon to the right of the Print option. Then click on Print Setup:
The following window will be displayed:
2.Select the printer you would like to use from the “Name” drop-down list.
3.Select the appropriate options for the printer.
4.Click on the “OK” button.
15
LTCA VERSION 2.xx SOFTWARE MANUAL REV 3
4.0WORKING WITH TEST RECORDS
The LTCA software can be used to retrieve test records from an LTCA, a WRM or from the PC hard drive. Test records contain results from either a static or dynamic test (LTCA only). A test record from a static test contains tabulated results of up to three resistances (R1, R2, and R3) that can be graphed. A test record from a dynamic test (LTCA only) contains a graph of the R1 resistance values and the external motor current values plotted over time.
4.1Retrieving Test Records From an LTCA or WRM
You can retrieve one or more test records from a connected LTCA or WRM using the LTCA software. To retrieve test records:
1.Make sure the LTCA software is running and the LTCA or WRM is properly connected to the PC (see section 3.3 for selecting and configuring the PC interface).
|
|
The WRM must first be placed in Computer Control Mode in order to |
|
|
communicate with the LTCA software. Please see the WRM User’s Manual for |
|
NOTE |
further instructions. |
|
|
|
|
|
|
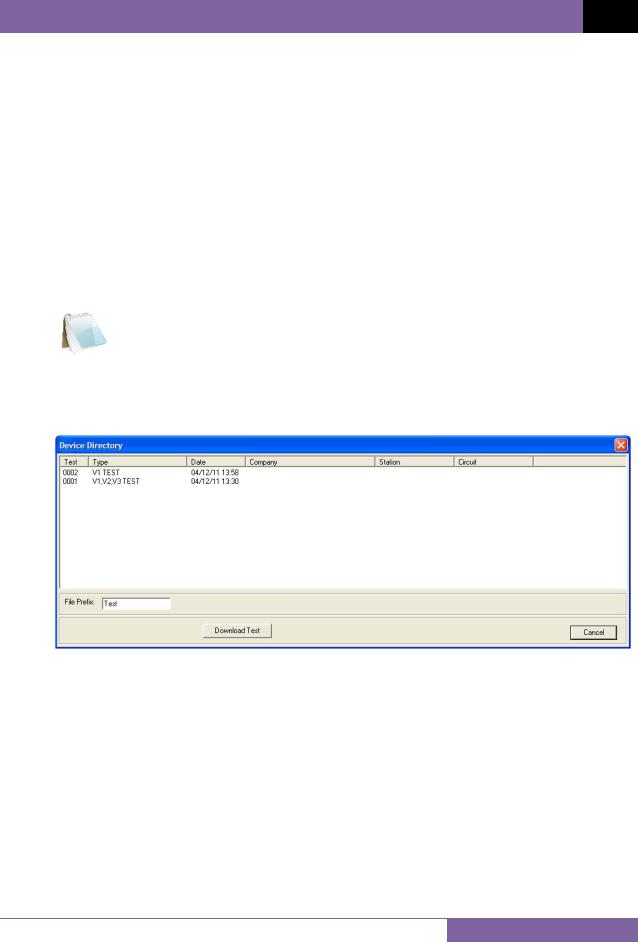
2.Click on the Retrieve icon. The following screen will be displayed listing a directory of all the test records stored in the unit’s memory:
3.You can select a test record to be retrieved by clicking on the record number. The selected record will be highlighted. You may select multiple records by holding down the [CTRL] key and clicking on the record numbers. All selected records will be highlighted. You may de-select a selected record by holding down the [CTRL] key and clicking on the selected test record number a second time.
16

REV 3 LTCA VERSION 2.xx SOFTWARE MANUAL
4.The “File Prefix” input field allows you to enter a word that will be used as part of the file name for the stored record on the PC hard drive. When a test record is retrieved from an LTCA or WRM and stored on the hard drive, the file name will be in the following format:
So if you would like the file name to be “SAMPLE1.TEST”, enter the word SAMPLE in the “File Prefix” input field.
Test records that are retrieved from a WRM or LTCA unit will have the “.test” file extension. If a test record is saved from the LTCA software, it will be given either the “.tst-wrm” or the “.tst-ltca” file extension, depending on whether
NOTE |
the test was performed using a WRM or LTCA unit, respectively. |
|
5. Click on the “OK” button. The following screen will be displayed:
Select the folder where you would like the retrieved test records to be stored. The default test record folder will be initially selected. Click on the “OK” button to start retrieving the selected test records.
17
LTCA VERSION 2.xx SOFTWARE MANUAL REV 3
4.2Recalling Test Records From the PC Hard Drive
Test records stored on the PC hard drive can be recalled using the steps below:
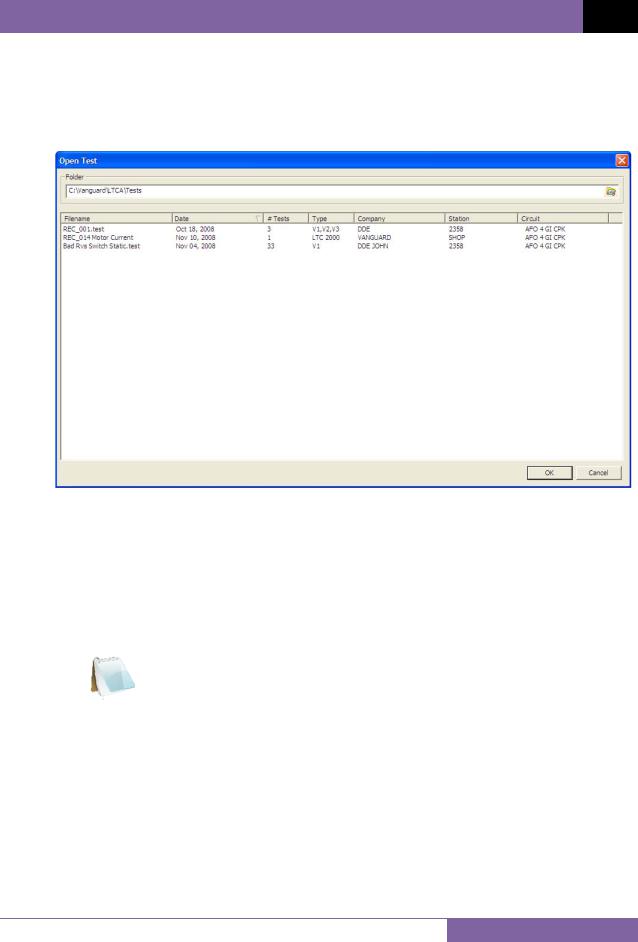
1.Click on the Open icon (or click on the File menu and select Open...). The following window will be displayed:
•The top left section of the window displays the name of the directory where the test records are being retrieved from. If you wish to retrieve records from a different folder, click on the folder icon to the far right of the folder name and browse to the folder containing the test records.
•You can sort the records by Filename, Date, Number of Tests, Type, Company, Station, or Circuit. To change the sort order, click on the column heading that you would like to sort by. To reverse the sort order, click on the column heading again.
|
|
You can quickly find the test records from dynamic tests by clicking on |
|
|
the “Type” column heading. All test records of type “LTC 2000” and “LTC |
|
NOTE |
1000” are from dynamic tests. |
|
|
|
|
|
|
2.Click on the file name you would like to retrieve and click the “OK” button. The test record will be loaded.
18
REV 3 LTCA VERSION 2.xx SOFTWARE MANUAL
4.3Saving a Test Record
4.3.1. Saving a Test Record with its Original File Name
1.To save a loaded test record with its original file name, click on the Save icon (or click on the File menu and select Save). The following confirmation window will be displayed:
Click on the “Yes” button to save the test record with its original file name, or click on the “Cancel” button to cancel the process.
Clicking on the “No” button allows you to save the file with a different file name. Please see section 4.3.2 below.
4.3.2. Saving a Test Record with a Different File Name
1.To save a test record with a different file name, click on the File menu and select Save As. The following window will be displayed:
2.Browse to the folder where you would like to save the test record.
3.Enter the file name in the “File name:” input field.
4.Click on the “Save” button.
5.The test record will be saved with the new file name.
19
 Loading...