

Page 1
Bedienungsanleitung
Instructions for use | Notice d´utilisation
Gebruiksaanwijzing | Istruzioni per l’uso
Instrucciones de uso | Návod k obsluze
Instrukcja obsługi
Modell 58315
REISKOCHER
Copyright UNOLD AG | www.unold.de
Page 2

Impressum:
Copyright UNOLD AG | www.unold.de
Bedienungsanleitung Modell 58315
Stand: November 2016 /nr
Copyright ©
Mannheimer Straße 4
68766 Hockenheim
Telefon +49 (0) 62 05/94 18-0
Telefax +49 (0) 62 05/94 18-12
E-Mail info@unold.de
Internet www.unold.de
Page 3

Copyright UNOLD AG | www.unold.de
Page 4
INHALTSVERZEICHNIS
Copyright UNOLD AG | www.unold.de
Bedienungsanleitung Modell 58315
Technische Daten ................................... 10
Symbolerklärung ..................................... 10
Sicherheitshinweise ................................ 10
In Betrieb nehmen .................................. 14
Wichtige Hinweise und Tipps .................. 15
Bedienen – Reis kochen .......................... 16
Milchreis ............................................... 18
Getreide................................................. 18
Rezept ................................................... 19
Reinigen und Pflegen .............................. 20
Fehler beheben ...................................... 21
Garantiebestimmungen ........................... 22
Entsorgung / Umweltschutz ..................... 22
Informationen für den Fachhandel ............ 22
Service-Adressen .................................... 23
Instructions for use Model 58315
Technical Specifications .......................... 24
Explanation of symbols ............................ 24
Important Safeguards .............................. 24
Preparing the appliance for operation ....... 28
Important instructions and tips ............... 28
Operation – cooking rice .......................... 30
Rice pudding ......................................... 32
Grain ..................................................... 32
Recipe ................................................... 33
Cleaning and care ................................... 34
Troubleshooting ...................................... 35
Guarantee Conditions .............................. 36
Waste Disposal / Environmental Protection 36
Service .................................................. 23
Notice d’utilisation modèle 58315
Spécification technique .......................... 37
Explication des symboles ......................... 37
Consignes de sécurité ............................. 37
Mise en service....................................... 41
Consignes importantes et conseils ........... 41
Utilisation - Cuisson du riz ...................... 42
Riz au lait .............................................. 44
Céréales................................................. 45
Recette .................................................. 45
Nettoyage et entretien ............................. 46
Dépannage ............................................. 47
Conditions de Garantie ............................ 48
Traitement des déchets /
Protection de l’environnement .................. 48
Service .................................................. 23
Gebruiksaanwijzing model 58315
Technische gegevens .............................. 49
Verklaring van de symbolen ...................... 49
Veiligheidsvoorschriften ........................... 49
Ingebruikneming .................................... 53
Belangrijke aanwijzingen en tips .............. 53
Bedienen – rijst koken ............................. 54
Melkrijst ................................................ 56
Graan .................................................... 56
Recept................................................... 57
Reinigen en onderhouden ........................ 58
Storingen verhelpen ................................ 59
Garantievoorwaarden ............................... 60
Verwijderen van afval /
Milieubescherming ................................. 60
Service .................................................. 23
Page 5

INHALTSVERZEICHNIS
Copyright UNOLD AG | www.unold.de
Istruzioni per l’uso modello 58315
Dati tecnici ........................................... 61
Significato dei simboli ............................ 61
Avvertenze di sicurezza ........................... 61
Messa in funzione ................................... 65
Avvertenze e consigli importanti ............... 65
Uso – Cottura del riso .............................. 66
Riso al latte ........................................... 68
Cereali ................................................... 68
Ricetta .................................................. 69
Pulizia e cura ......................................... 70
Risoluzione dei problemi ......................... 70
Norme die garanzia ................................. 72
Smaltimento / Tutela dell’ambiente .......... 72
Service .................................................. 23
Manual de Instrucciones modelo 58315
Datos técnicos ....................................... 73
Explicación de los símbolos ..................... 73
Indicaciones de seguridad ....................... 73
Poner en servicio .................................... 77
Indicaciones importantes y consejos ......... 77
Manejo: cocer arroz ................................. 78
Arroz con leche....................................... 80
Cereales................................................. 80
Receta ................................................... 81
Limpieza y cuidado ................................. 82
Eliminación de fallos .............................. 83
Condiciones de Garantia .......................... 84
Disposición/Protección del
medio ambiente ..................................... 84
Service .................................................. 23
Návod k obsluze model 58315
Technické údaje .................................... 85
Vysvětlení symbolů .................................. 85
Bezpečnostní pokyny ............................... 85
Uvedení do provozu ................................ 89
Důležitá upozornění a tipy ....................... 89
Obsluha – vaření rýže .............................. 90
Mléčná rýže............................................ 92
Obilí ...................................................... 92
Recept................................................... 93
Čištění a péče ........................................ 94
Odstraňování chyb .................................. 94
Záruční podmínky ................................... 95
Likvidace / Ochrana životného prostředí ... 95
Service .................................................. 23
Instrukcja obsługi Model 58315
Dane techniczne ..................................... 96
Objaśnienie symboli ................................ 96
Zasady bezpieczeństwa ........................... 96
Uruchomienie......................................... 100
Ważne wskazówki i porady ....................... 100
Obsługa – Gotowanie ryżu ........................ 101
Ryż na mleku ......................................... 103
Zboże .................................................... 103
Przepis .................................................. 104
Czyszczenie i pielęgnacja ........................ 105
Usuwanie błędów .................................... 106
Warunki gwarancji................................... 107
Utylizacja / ochrona środowiska ................ 107
Service .................................................. 23
Page 6

EINZELTEILE
Copyright UNOLD AG | www.unold.de
1
2
3
4
5 6
6
8 97
Page 7
EINZELTEILE
Copyright UNOLD AG | www.unold.de
D Ab Seite 10
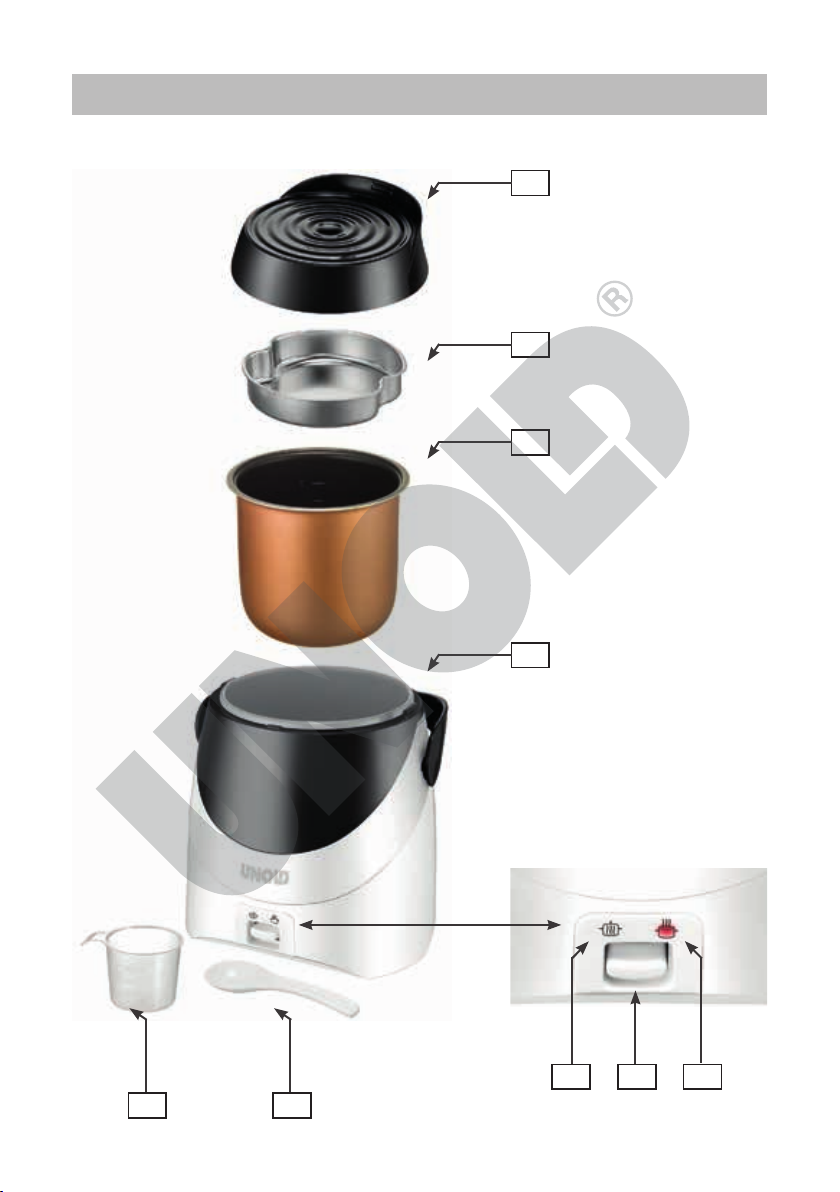
1 Deckel
2 Edelstahlbehälter für Aroma
3 Kochbehälter
4 Gehäuse
5 Messbecher
6 Reislöffel
7 Kontrollleuchte
= Warmhalten
8 EIN-Schalter
9 Kontrollleuchte
= Kochen
GB Page 24
1 Lid
2 Stainless steel container
3 Cooking container
4 Housing
5 Measuring cup
6 Rice spoon
7 Indicator light
= Keep warm
8 ON-switch
9 Indicator light
= Cook
F Page 37
1 Couvercle
2 Récipient en inox
3 Récipient de cuisson
4 Boîtier
5 Verre doseur
6 Cuillère de riz
7 Voyant de contrôle
= garder au chaud
8 Interrupteur MARCHE
9 Voyant de contrôle
= cuisinier
NL Pagina 49
1 Deksel
2 Rvs reservoir
3 Kookreservoir
4 Behuizing
5 Maatbeker
6 Rijst lepel
7 Controlelamp
= warm houden
8 AAN-schakelaar
9 Controlelamp
= kok
I Pagina 61
1 Coperchio
2 Contenitore in acciaio inox
3 Recipiente per cottura
4 Scocca
5 Misurino
6 Cucchiaio ri riso
7 Spia di controllo
= tenere in caldo
8 Interruttore ON
9 Spia di controllo
= cuoco
E Página 73
1 Tapa
2 Recipiente de acero fino
3 Recipiente de cocción
4 Carcasa
5 Vaso medidor
6 Cuchara de arroz
7 Piloto luminoso
= mantener el calor
8 Interruptor CON
9 Piloto luminoso
= cocinero
7
Page 8
EINZELTEILE
Copyright UNOLD AG | www.unold.de
1
2
3
4
5 6
8
8 97
Page 9
EINZELTEILE
Copyright UNOLD AG | www.unold.de
CZ Strany 85
1 Kryt
2 Nerezová nádoba
3 Varná nádoba
4 Těleso
5 Odměřovací nádoba
6 Lžíce rýže
7 Kontrolka
= zahřál
8 Spínač ZAP
9 Kontrolka
= kuchař
PL Strony 96
1 Pokrywa
2 Obudowa ze stali szlachetnej
3 Wewnętrzny pojemnik
4 Obudowa
5 Kubek
6 Łyżka ryżu
7 Lampka kontrolna
= ogrzać
8 Przycisk WŁ
9 Lampka kontrolna
= kucharz
9
Page 10
BEDIENUNGSANLEITUNG MODELL 58315
Copyright UNOLD AG | www.unold.de
TECHNISCHE DATEN
Leistung: 250 Watt, 220 V~, 50 Hz
Maße: Ca. 23,0 x 23,0 x 26,0 cm (B/T/H)
Zuleitung: Ca. 115 cm
Gewicht: Ca. 1,4 kg
Material: Kunststoff
Volumen: 1,3 Liter
Ausstattung: Vollautomatischer Reiskocher, geeignet für z. B. Naturreis,
Risottoreis, Basmati, Bulgur, Quinoa, Grünkern, Hirse,
antihaftbeschichteter Kochbehälter, Trockengehschutz
Zubehör: Messbecher, Löffel, Kochbehälter, Bedienungsanleitung
Änderungen und Irrtümer in Ausstattungsmerkmalen, Technik, Farben und Design
vorbehalten
SYMBOLERKLÄRUNG
Dieses Symbol kennzeichnet eventuelle Gefahren, die Verletzungen
nach sich ziehen können oder zu Schäden am Gerät führen.
Dieses Symbol weist Sie auf eine eventuelle Verbrennungsgefahr hin.
Gehen Sie hier immer besonders achtsam vor.
SICHERHEITSHINWEISE
Bitte lesen Sie die folgenden
Anweisungen und bewahren Sie
diese auf.
Allgemeine Sicherheitshinweise/
Personen im Haushalt
1. Das Gerät kann von Kindern
ab 8 Jahren und von Per
sonen mit verringerten physischen, sensorischen oder
10
mentalen Fähigkeiten oder
Mangel an Erfahrung und/
oder W
issen benutzt wer
den, wenn sie beaufsichtigt werden oder bezüglich
des sicheren Gebrauchs des
-
Gerätes unterwiesen wurden
und die aus dem Gebrauch
des Gerätes resultierenden
Page 11

Gefahren verstanden haben.
Copyright UNOLD AG | www.unold.de
Das Gerät ist kein Spielzeug.
Das Säubern und die War
tung des Gerätes dürfen von
Kindern nur unter Aufsicht
durchgeführt werden.
2.
Kinder unter 3 Jahren sollten
dem Gerät fernbleiben oder
durchgehend beaufsichtigt
werden.
3. Kinder zwischen 3 und 8
Jahren sollten das Gerät nur
dann ein- und ausschal
ten, wenn es sich in seiner vorgesehenen normalen
Bedienungsposition befin-
det, sie beaufsichtigt werden
oder bezüglich des sicheren Gebrauchs unterwiesen
wurden und die aus dem
Gebrauch des Gerätes resul
-
tierenden Gefahren verstanden haben. Kinder zwischen
3 und 8 Jahren sollten das
Gerät weder anschließen
noch bedienen, säubern oder
warten.
4.
Kinder sollten beaufsichtigt
werden, um sicherzustellen,
dass sie nicht mit dem Gerät
spielen.
5. Das Gerät an einem für Kin
der unzugänglichen Ort aufbewahren.
6.
Gerät nur an Wechselstrom
mit Spannung gemäß Typen
schild anschließen.
7.
Stellen Sie sicher, dass
allen Nutzern des Gerätes
die Gefahr durch austreten
den Dampf und Berühren der
heißen Geräteteile bekannt
ist.
8.
Dieses Gerät darf nicht mit
einer externen Zeitschaltuhr
oder einem Fernbedienungs
system betrieben werden.
9.
Tauchen Sie das Gerät oder
die Zuleitung keinesfalls in
Wasser oder andere Flüssig
keiten ein.
10.
Das Gehäuse und die Zulei-
tung dürfen nicht in der Spülmaschine gereinigt werden.
11.
Das Gehäuse darf nicht mit
Wasser oder anderen Flüs
sigkeiten in Kontakt kommen. Falls dies doch einmal
geschehen sollte, müssen
vor erneuter Benutzung alle
T
eile vollkommen trocken
sein.
Halten Sie niemals Körper
12.
teile direkt über das Gerät,
wenn es in Betrieb ist – V
brennungsgefahr durch austretenden Dampf!
13.
Austretendes Kondenswas-
ser kann sehr heiß sein –
V
erbrennungsgefahr! Nutzen
Sie immer geeignete
Topf
lappen und wischen Sie ggf.
austretendes Wasser auf.
-
-
-
-
-
er-
-
11
Page 12

14. Achtung, geben Sie niemals
Copyright UNOLD AG | www.unold.de
Flüssigkeiten direkt in das
geöffnete Gerät – Gefahr
durch Stromschlag! Das
Wasser darf ausschließlich in
den mitgelieferten Kochbe
hälter gefüllt werden. Sollte
doch einmal Flüssigkeit
direkt in das Gerät gelangen,
trennen Sie das Gerät umge
hend vom Stromnetz und
wischen Sie umgehend die
Flüssigkeit
das Gerät vollständig
auf. Lassen Sie
trock
nen, bevor Sie es erneut in
Betrieb nehmen.
15.
Das Gerät ist ausschließlich
für den Haushaltsgebrauch
oder ähnliche Verwendungs
-
zwecke bestimmt, z. B.
in Teeküchen, Geschäf-
ten, Büros oder sonstigen
Arbeitsstätten,
zur Verwendung durch Gäste
in Hotels, Motels oder sons
-
tigen Beherbergungsbetrieben,
in Privatpensionen oder
Ferienhäusern.
16. Prüfen Sie regelmäßig
das Gerät, den Stecker
und die Zuleitung auf Ver
schleiß oder Beschädigungen. Bei Beschädigung des
Anschlusskabels oder anderer Teile senden Sie das Gerät
oder die Zuleitung bitte zur
Überprüfung und Reparatur
an unseren Kundendienst.
Unsachgemäße Reparatu
ren können zu erheblichen
Gefahren
für den Benutzer führen und haben den
Ausschluss der Garantie zur
Folge.
17.
Wenn die Anschlussleitung
dieses Gerätes beschädigt
wird, muss sie durch den
Hersteller oder seinen Kun
dendienst oder eine ähnlich
qualifizierte Person ersetzt
werden, um Gefährdungen
zu vermeiden.
18.
Das Gerät darf nicht mit
Zubehör anderer Hersteller
oder Marken benutzt wer
den, um Schäden zu vermeiden.
19.
Nach Gebrauch sowie vor
dem Reinigen den Netzste
cker aus der Steckdose ziehen. Das Gerät niemals unbeaufsichtigt lassen, wenn der
Netzstecker eingesteckt ist.
Hinweise zum Aufstellen und Bedienen des Gerätes
20.
Das Gerät oder die Zuleitung
dürfen nicht in der Nähe von
Flammen betrieben werden.
21. Das Gerät bzw. die Zuleitung
niemals mit nassen Händen
berühren.
-
-
-
-
12
Page 13

22. Stellen Sie das Gerät aus
Copyright UNOLD AG | www.unold.de
Sicherheitsgründen niemals
auf heiße Oberflächen, ein
Metalltablett oder auf einen
nassen Untergrund.
23. Benutzen Sie das Gerät stets
auf einer freien, ebenen und
hitzebeständigen Oberflä
-
che.
24.
Achten Sie darauf, dass
die Zuleitung nicht über
den Rand der Arbeitsflä
che hängt, da dies zu Unfällen führen kann, wenn z. B.
Kleinkinder daran ziehen.
25.
Wickeln Sie die Zuleitung
nie um das Gerät.
26. Die Zuleitung muss so verlegt
sein, dass ein Ziehen oder
Stolpern verhindert wird.
27. Verwenden Sie den Reisko
-
cher nur in Innenräumen.
28.
Vor dem Einsetzen oder Her-
ausnehmen von Zubehörteilen muss das Gerät ausgeschaltet und der Stecker aus
der Steckdose gezogen werden.
29.
Verwenden Sie nach Mög-
lichkeit keine Verlängerungskabel oder Mehrfachsteckdosen, um das Gerät zu
betreiben.
30.
Achten Sie darauf, dass der
Kochbehälter an der Außen
-
seite immer trocken und sau-
ber sein muss, bevor Sie diesen in das Gerät einsetzen.
31.
Prüfen Sie außerdem, dass
sich im Inneren des Gerätes
keine Reiskörner oder ande
ren Gegenstände befinden,
um Schäden am Gerät zu
vermeiden.
32.
Achtung: Niemals Kochbeu
telreis verwenden, dieser
kann das Gerät beschädigen.
33.
Bereiten Sie den Reis nie
mals mit Ei, Milchprodukten
oder anderen schaumbildenden Zutaten zu. Der Schaum
kann überkochen und zu
Schäden am Gerät führen.
34.
Der Kochbehälter darf nie
mals als Kochtopf auf Herdplatten o. Ä. eingesetzt werden.
35.
Entnehmen Sie den Reis
nie mit harten Besteckteilen
z. B. aus Metall, da sonst
die Beschichtung zerkratzt
werden kann. Verwenden Sie
ausschließlich Besteckteile
aus Kunststoff oder Holz.
36. Bitte tragen Sie das Gerät
niemals am Deckel, um
Schäden am Deckel und am
Gerät zu vermeiden.
37. Während des Betriebs darf
das Gerät niemals am Griff
getragen oder herumge
-
schleudert werden. Heißes
13
Page 14
Wasser oder heiße Lebens-
Copyright UNOLD AG | www.unold.de
mittel können austreten und
zu Verbrennungen führen.
38.
Nach dem Gebrauch und vor
dem Reinigen muss der Ste
cker aus der Steckdose gezogen werden. Erst dann ist
das Gerät vollständig abgeschaltet.
ACHTUNG!
Das Gerät wird während des Betriebs sehr heiß. Bitte achten Sie
daher auf ausreichenden Abstand zu allen brennbaren Gegen
ständen und auf ausreichende Belüftung.
Verwenden Sie grundsätzlich Topflappen, solange das Gerät in
Betrieb ist bzw
. solange es noch heiß ist.
Halten Sie niemals Körperteile direkt über das Gerät, wenn es
in Betrieb ist – Verbrennungsgefahr durch austretenden Dampf!
Öffnen Sie auf keinen Fall das Gehäuse des Gerätes. Es besteht
die Gefahr eines Stromschlages.
39.
Das Gerät ist nur zum Ver-
arbeiten von Lebensmitteln
geeignet.
40.
Bevor Sie das Gerät ausein
-
anderbauen oder bewegen,
-
muss es vollständig abgekühlt sein.
-
Der Hersteller übernimmt keine Haftung bei fehlerhafter Montage, bei unsachgemäßer oder fehlerhafter
Verwendung oder nach Durchführung von Reparaturen durch nicht autorisierte Dritte.
IN BETRIEB NEHMEN
1. Entfernen Sie alle Verpackungsmaterialien und ggf. Transportsicherungen. Halten Sie Verpackungsmaterial von Kindern fern
– Erstickungsgefahr!
2. Prüfen Sie, ob alle aufgeführten
Zubehörteile vorhanden sind.
14
3. Reinigen Sie alle entnehmbaren
Teile mit einem feuchten Tuch,
wie im Kapitel „Reinigen und
Pflegen“ beschrieben.
Page 15
WICHTIGE HINWEISE UND TIPPS
Copyright UNOLD AG | www.unold.de
1. Bitte beachten Sie, dass das ideale Kochergebnis von vielen Faktoren abhängt. Die Kochzeit für
Ihr Reisgericht kann sich durch
die verwendete Reisart, durch die
Wassertemperatur und natürlich
auch durch Ihre persönliche Vorliebe von unseren Empfehlungen
unterscheiden. Die Kochzeit für
2 Messbecher Reis beträgt ca.
15-30 Minuten.
2. Grundsätzlich können Sie mit dem
Gerät nicht nur Reis kochen, sondern auch Bulgur, Quinoa, Grün-
kern, Hirse oder Porridge zube-
reiten.
3. Tipp: Bevorzugen Sie etwas wei-
cheren Reis, geben Sie etwas
mehr Wasser hinzu oder lassen
Sie den Reis nach dem Kochvorgang noch etwas nachquellen.
Achtung: Niemals Kochbeutelreis verwenden, dieser kann
das Gerät beschädigen.
4. Bereiten Sie den Reis niemals mit
Ei, Milchprodukten oder anderen
schaumbildenden Zutaten zu. Der
Schaum kann überkochen und zu
Schäden am Gerät führen.
5. Der Kochbehälter darf niemals als
Kochtopf auf Herdplatten o. Ä.
eingesetzt werden.
6. Entnehmen Sie den Reis nie mit
harten Besteckteilen z. B. aus
Metall, da sonst die Beschichtung
zerkratzt werden kann. Verwenden Sie ausschließlich Besteckteile aus Kunststoff oder Holz.
Lassen Sie diese außerdem nicht
zu lange in Kontakt mit dem Reis,
um geschmackliche Beeinträchtigungen zu vermeiden.
7. Wir empfehlen, den Reis vor dem
Kochen mit kaltem Wasser zu
waschen, damit dieser nicht am
Kochbehälter kleben bleibt.
8. Einige Reis- und Getreidesorten
müssen vor dem Kochen eingeweicht werden. Dies betrifft z. B.
Wildreis oder Dinkel.
15
Page 16
BEDIENEN – REIS KOCHEN
Copyright UNOLD AG | www.unold.de
Achtung: Halten Sie das Innere
des Gerätes immer trocken und
achten Sie darauf, dass keine
Lebensmittel oder anderen Gegenstände hineingelangen. Nehmen Sie
das Gerät nie in Betrieb, wenn das
Innere des Gerätes nass oder verunreinigt ist. Reinigen und trocknen Sie das Gerät in diesem Fall
zunächst sorgfältig.
1. Stellen Sie sicher, dass der Stecker nicht in der Steckdose eingesteckt ist.
2. Prüfen Sie, ob das Gerät rich-
tig zusammengebaut ist und auf
einer ebenen, stabilen und hitzebeständigen Fläche steht.
3. Entnehmen Sie den Kochbehälter.
4. Messen Sie die gewünschte
Menge Reis mit dem Messbecher
ab. Füllen Sie den Reis in den
Kochbehälter.
5. Messen Sie nun die entsprechende Menge kaltes Wasser ab
und geben Sie diese in den Kochbehälter. Geben Sie jedoch nie
mehr Wasser als bis zur Max-Markierung in den Kochbehälter, um
Schäden am Gerät zu vermeiden.
Unsere Empfehlungen lauten:
Reismenge ca. Wassermenge ca.
1 Messbecher 1,5 Messbecher
2 Messbecher 2,5 Messbecher
3 Messbecher 3,5 Messbecher
4 Messbecher 4,5 Messbecher
5 Messbecher 5,5 Messbecher
6 Messbecher 6,5 Messbecher
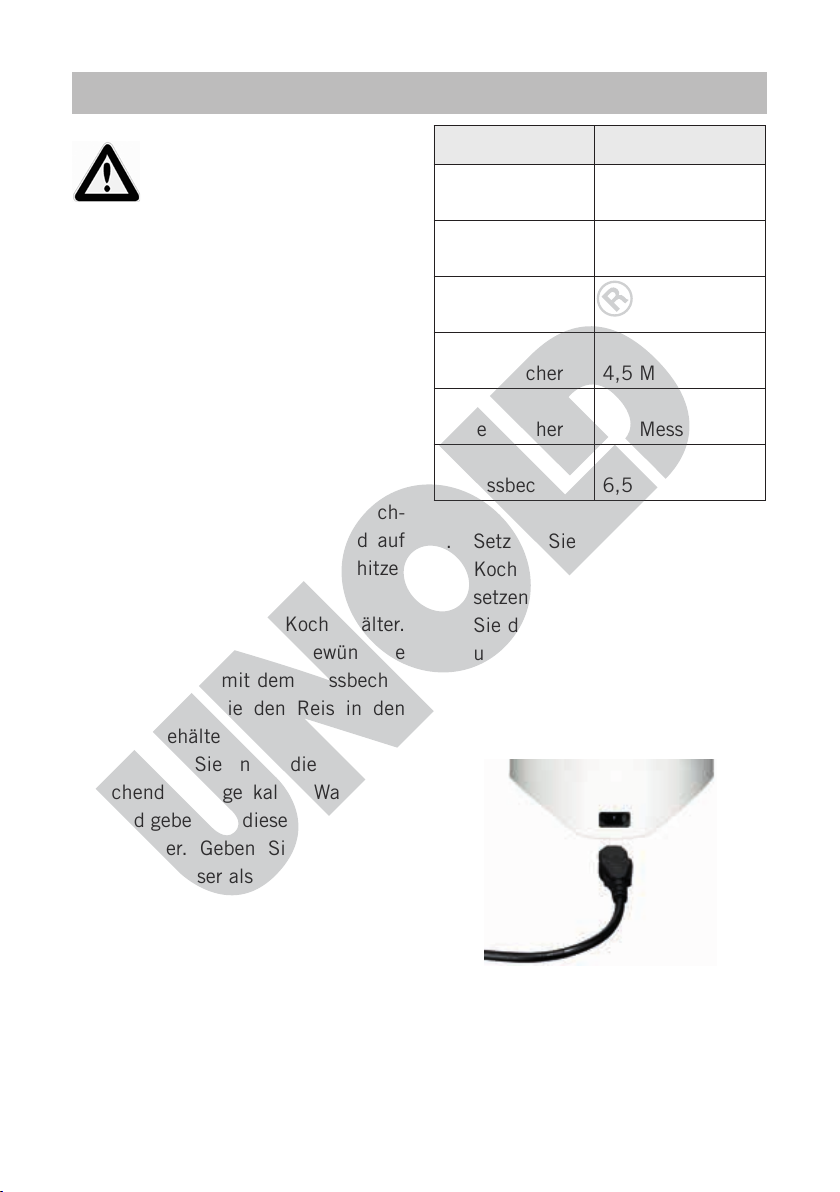
6. Setzen Sie nun den gefüllten
Kochbehälter in das Gerät und
setzen Sie den Deckel auf. Drehen
Sie den Deckel im Uhrzeigersinn,
um den Deckel zu verriegeln.
7. Verbinden Sie den Kaltgerätestecker mit der Buchse an der Rückseite des Gerätes.
16
Page 17

8. Stecken Sie den Stecker in eine
Copyright UNOLD AG | www.unold.de
Steckdose. Bitte verbinden Sie
das Gerät immer erst, kurz bevor
Sie es benutzen, mit der Stromversorgung! Das Gerät heizt, sobald
es mit dem Stromnetz verbunden
ist! Die rote Kontrollleuchte zeigt
an, dass das Gerät in Betrieb ist.
9. Schalten Sie die Kochfunktion
mit der EIN-Taste ein, indem Sie
die Taste nach unten drücken, bis
diese einrastet.
10. Wenn der Reis fertig ist, leuchtet
die grüne Kontrollleuchte auf und
das Gerät hält den Reis warm, bis
Sie den Netzstecker ziehen.
11. Rühren Sie den Reis nach Möglich-
keit jetzt sofort um, damit sich der
Geschmack voll entfaltet. Verwen-
den Sie hierfür bitte nur Kochu-
tensilien aus Holz oder Kunst-
stoff, um die Beschichtung des
Kochbehälters nicht zu beschä-
digen. Möchten Sie den Reis weiterhin warmhalten, schließen Sie
anschließend den Deckel wieder.
Bitte beachten Sie jedoch, dass
der Reis noch etwas nachquillt,
wenn Sie ihn zum Warmhalten im
Gerät lassen.
12. Die Temperatur im Warmhaltemodus beträgt ca. 70 °C.
13. Aus hygienischen Gründen raten
wir dazu, den Reis niemals länger
als 10-12 Stunden warmzuhalten.
14. Um den Warmhaltemodus zu
beenden und um das Gerät end-
gültig auszuschalten, ziehen Sie
den Stecker aus der Steckdose.
15. Hinweis: Das Gerät ist mit einem
Trockengehschutz ausgestattet,
der das Gerät ausschaltet, wenn
das Heizelement zu heiß wird
(z. B. wenn kein Wasser mehr
enthalten ist). Lassen Sie das
Gerät in diesem Fall mindestens
15 Minuten abkühlen, bevor Sie
es erneut in Betrieb nehmen.
16. Tipp: Wenn Sie dem Reis ein Kräuteraroma zufügen wollen, befüllen
Sie den mitgelieferten Edelstahlbehälter mit frischen Kräutern
nach Wunsch. Setzen Sie diesen
ein, nachdem Sie den Kochbehälter ins Gerät gesetzt haben, und
fahren Sie wie beschrieben fort.
Der Reis wird nach der Kochzeit
ein dezentes Kräuteraroma haben.
Es lassen sich auch kleinere Mengen Fischfilet (max. 100-150 g)
mit garen. Dies gelingt jedoch nur,
wenn Sie maximal 1-2 Portionen
Reis zubereiten.
ACHTUNG! Das Gerät wird während des Betriebs sehr heiß.
Bitte achten Sie daher auf ausreichenden Abstand zu allen
brennbaren Gegenständen und
auf ausreichende Belüftung.
Verwenden Sie grundsätzlich
Topflappen, solange das Gerät
in Betrieb ist bzw. solange es
noch heiß ist.
17
Page 18
MILCHREIS
Copyright UNOLD AG | www.unold.de
Achtung: Halten Sie das Innere
des Gerätes immer trocken und
achten Sie darauf, dass keine
Lebensmittel oder anderen Gegenstände hineingelangen. Nehmen Sie
das Gerät nie in Betrieb, wenn das
Innere des Gerätes nass oder verunreinigt ist. Reinigen und trocknen Sie das Gerät in diesem Fall
zunächst sorgfältig.
GETREIDE
Achtung: Halten Sie das Innere
des Gerätes immer trocken und
achten Sie darauf, dass keine
Lebensmittel oder anderen Gegen-
stände hineingelangen. Nehmen Sie
das Gerät nie in Betrieb, wenn das
Innere des Gerätes nass oder verunreinigt ist. Reinigen und trock-
nen Sie das Gerät in diesem Fall
zunächst sorgfältig.
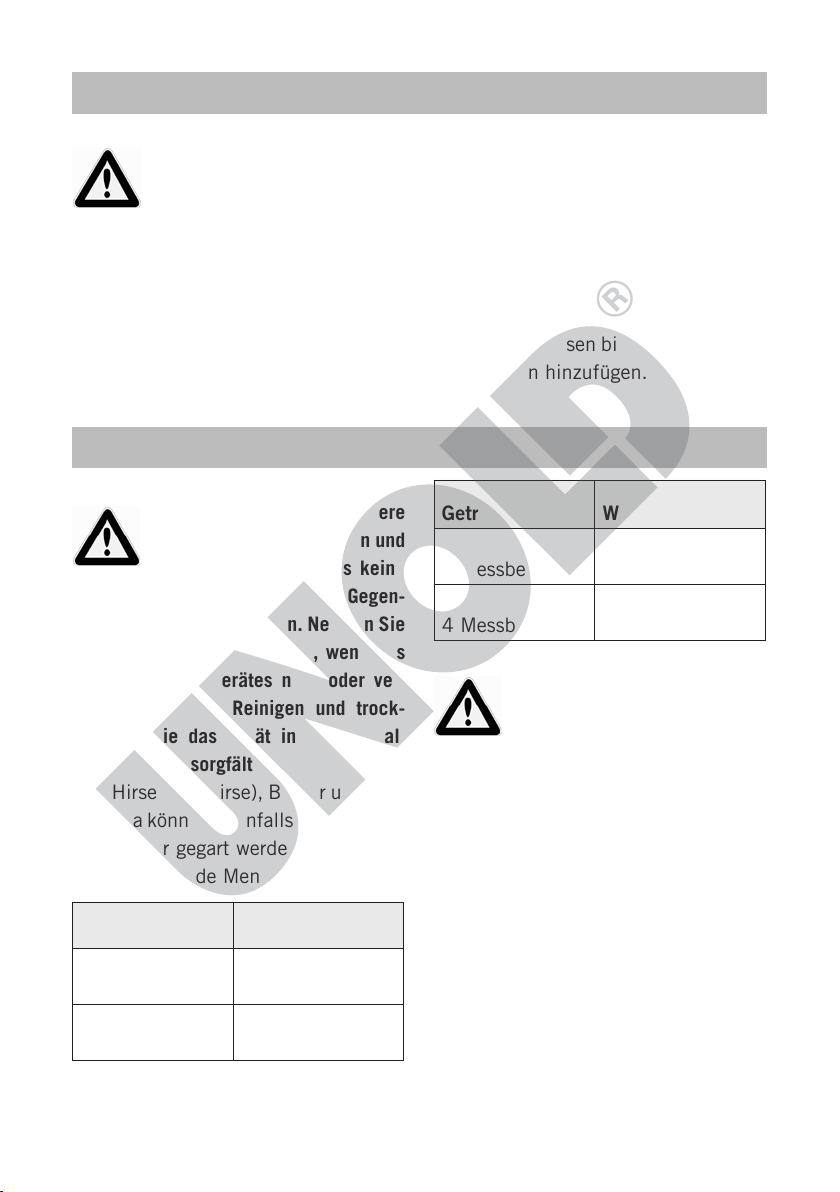
1. Hirse (Goldhirse), Bulgur und Quinoa können ebenfalls in dem Reiskocher gegart werden. Verwenden
sie folgende Mengen:
Getreide Wassermenge
1 Messbecher 1,5 Messbecher
1. Es können maximal 4 Portionen Milchreis (4 Messbecher) in
einem Durchgang hergestellt werden. Geben Sie pro Messbecher
Reis 2 Becher Milch und ca. 5 g
Butter (1/2 TL) hinzu. Falls Sie
den Milchreis mit Zucker süßen
wollen, diesen bitte erst nach dem
Kochen hinzufügen.
Getreide Wassermenge
3 Messbecher 4,5 Messbecher
4 Messbecher 6 Messbecher
Achtung: Verwenden Sie nur
Wasser, um Getreide im Gerät
zuzubereiten, niemals milchhaltige Produkte. Das Gerät
kann dabei beschädigt werden.
2. Mehr als diese Mengen sollten
nicht zubereitet werden um ein
ideales Kochergebnis zu erzielen.
3. Selbstverständlich können Sie
auch Salz nach Belieben zugeben.
2 Messbecher 3 Messbecher
18
Page 19

REZEPT
Copyright UNOLD AG | www.unold.de
Gefüllte Zucchini
4 Portionen
2 Messbecher Reis mit 3 Messbechern
Wasser im Reiskocher garen.
4 kleine Zucchini, 5 gehäutete und
entkernte Tomaten, 1 Bund Frühlingszwiebeln, 500 g Rinderhackfleisch,
Salz, Pfeffer, Oregano, 2 Knoblauchzehen, 200 g Sauerrahm, 100 g geriebener Käse
Zucchini halbieren, das innere Gemüsefleisch mit einem Melonenausstecher auskratzen. Dieses Fruchtfleisch
kleinschneiden.
Die Zucchinihälften in eine gefette-
te Auflaufform setzen. Tomaten sehr
klein würfeln, zum kleingeschnitte-
nen Fruchtfleisch geben, Knoblauch
schälen und sehr fein würfeln. Früh-
lingszwiebeln in Ringe schneiden, mit
Pfeffer, Salz, Oregano würzen, durchziehen lassen. Gekochten Reis zugeben.
Hackfleisch in ein wenig Öl anbraten,
fast durchbraten, mit dem Gemüse
mischen. In die Zucchinihälften füllen. Käse mit Sauerrahm mischen und
diese Creme auf den gefüllten Zucchini verteilen.
Die Auflaufform auf einen Rost auf die
mittlere Schiene des Backofens stellen und bei ca. 170 °C ca. 20-30 Minuten garen.
Tipp: Sie können auch die Zucchini einfach in Scheiben von ca. 8 mm
schneiden. In eine gefettete Auflaufform schichten, mit der Mischung bedecken, mit der Rahm-Käsemischung
bestreichen und backen.
19
Page 20

REINIGEN UND PFLEGEN
Copyright UNOLD AG | www.unold.de
Vor dem Reinigen den Netzstecker ziehen.
Das Gerät abkühlen lassen und
ggf. Restwasser aus dem Kochbehälter entleeren.
1. Das Gerät niemals in Wasser oder
andere Flüssigkeiten eintauchen.
2. Verwenden Sie keine scharfen
Scheuermittel, Stahlwolle, metallischen Gegenstände, heißen
Reinigungsmittel oder Desinfektionsmittel, da diese zu Beschädi-
gungen führen können.
3. Wischen Sie das Gehäuse sowie
den Deckel mit einem feuchten
Tuch mit etwas mildem Reinigungsmittel ab und trocknen Sie
es mit einem weichen Tuch nach.
4. Reinigungsmittel nie direkt auf
das Gerät, sondern immer auf das
Tuch geben.
5. Der Kochbehälter kann gespült
und mit einem weichen Tuch
abgetrocknet werden.
6. Prüfen Sie hin und wieder, ob die
Dichtung im Deckel noch intakt
ist. Wenn Sie Risse oder andere
Beschädigungen erkennen, muss
die Dichtung ausgewechselt werden. Sie erhalten neue Dichtungen bei unserem Kundenservice.
20
Page 21
FEHLER BEHEBEN
Copyright UNOLD AG | www.unold.de
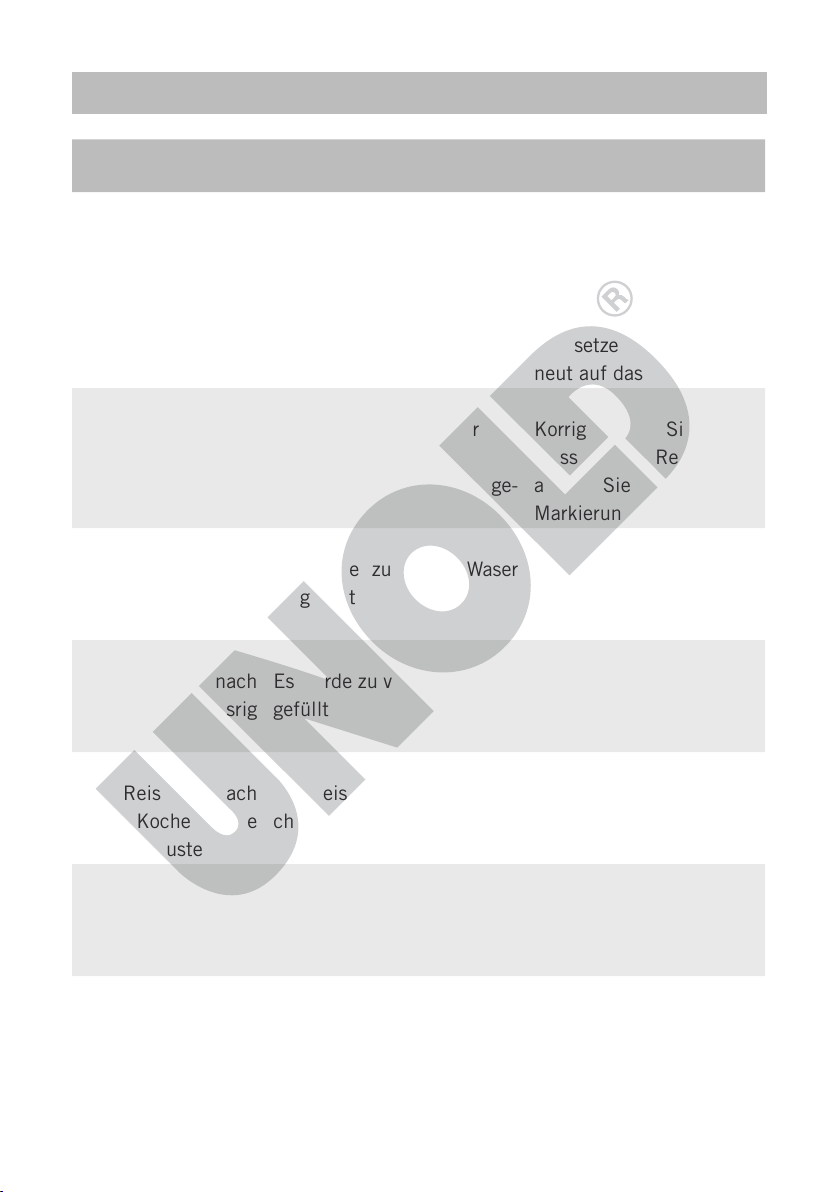
Fehler Ursache Lösung
Wassertropfen am
Deckel
Wasser quillt aus
dem Gerät
Der Reis ist nach
dem Kochen noch
hart
Der Reis ist nach
dem Kochen wässrig
Der Reis hat nach
dem Kochen eine
braune Kruste
Die Dichtung am Deckel ist
nicht richtig angebracht
Der Deckel ist nicht richtig
zugedreht
Es wurde zu viel Wasser eingefüllt
Es wurde zu viel Reis einge-
füllt
Es wurde zu wenig Waser
eingefüllt
Es wurde zu viel Wasser eingefüllt
Der Reis wurde vor dem Kochen nicht gewaschen
Befestigen Sie die Dichtung exakt am Deckelrand.
Entfernen Sie den Deckel
und setzen Sie diesen erneut auf das Gerät.
Korrigieren Sie die
Wasser- und Reismenge,
achten Sie auf die MaxMarkierung.
Korrigieren Sie die
Wassermenge, achten Sie
auf die Min-Markierung.
Korrigieren Sie die
Wassermenge, achten Sie
auf die Max-Markierung.
Waschen Sie den Reis vor
dem Kochen immer mit
klarem, kaltem Wasser.
Die Kontrollleuchte
leuchtet, aber das
Gerät heizt nicht
Technische Probleme am
Gerät
Nehmen Sie Kontakt mit
unserem Kundenservice
auf.
21
Page 22
GARANTIEBESTIMMUNGEN
Copyright UNOLD AG | www.unold.de
Wir gewähren auf unsere Geräte eine Garantie von 24 Monaten, bei gewerblichem Gebrauch 12 Monate, ab dem Kaufda-
tum für Schäden, die bei bestimmungsgemäßem Gebrauch nachweislich auf Werksfehler zurückzuführen sind. Innerhalb
der Garantiezeit beheben wir Material- und Herstellungsfehler nach unserem Ermessen durch Reparatur oder Umtausch.
Unsere Garantieleistungen gelten ausschließlich für in Deutschland und Österreich verkaufte Geräte. Bei anderen Ländern
wenden Sie sich bitte an den zuständigen Importeur. Geräte, für die eine Mängelbeseitigung beansprucht wird, senden Sie
bitte zusammen mit einer Kopie des maschinell erstellten Kauf belegs, aus dem das Kaufdatum ersichtlich sein muss, sowie
einer Fehlerbeschreibung gut verpackt und freigemacht an unseren Kundendienst. Im Garantiefall werden dem Kunden in
Deutschland und Österreich entstandene Versandkosten zurückerstattet. Von der Garantie ausgeschlossen sind Schäden
durch Verschleiß, unsachgemäße Handhabung und Nichteinhaltung der Wartungs- und Pflegeanweisungen. Der Garantiean-
spruch erlischt, wenn Reparaturen oder Eingriffe am Gerät von dritter Stelle vorgenommen werden. Eventuelle Ansprüche des
Endverbrauchers gegenüber dem Verkäufer oder Händler werden durch diese Garantie nicht eingeschränkt.
ENTSORGUNG / UMWELTSCHUTZ
Unsere Geräte werden auf hohem Qualitätsniveau für eine lange Nutzungsdauer her ge stellt. Regelmäßige
Wartung und fachge rechte Reparaturen durch unseren Kunden dienst können die Nutzungsdauer des Gerätes
verlängern. Wenn ein Gerät defekt und nicht mehr zu reparieren ist, beachten Sie bitte: Dieses Produkt darf
nicht zusammen mit dem normalen Hausmüll entsorgt werden. Sie müssen dieses Produkt an einer aus-
gewiesenen Sammelstelle zum Recycling von elektrischen oder elektronischen Geräten ab liefern. Durch das
separate Sammeln und Recyceln von Abfallprodukten helfen Sie mit, die natürlichen Ressourcen zu schonen
und stellen sicher, dass das Produkt in gesundheits- und umweltverträglicher Weise entsorgt wird.
INFORMATIONEN FÜR DEN FACHHANDEL
Hiermit erklärt die UNOLD AG, dass sich der Reiskocher 58315 in Übereinstimmung mit den
grundlegenden Anforderungen der europäischen Richtlinie für elektromagnetische Verträglichkeit
und der Niederspannungsrichtlinie bendet.
Die Übereinstimmung mit den Regularien bezieht sich auf den Tag der Erstellung dieser Erklärung.
Hockenheim, 5.11.2012
UNOLD AG, Mannheimer Straße 4, 68766 Hockenheim
Diese Anleitung kann im Internet unter www.unold.de als pdf-Datei heruntergeladen werden.
22
Page 23

SERVICE-ADRESSEN
Copyright UNOLD AG | www.unold.de
DEUTSCHLAND
Kundendienst
Telefon +49 (0) 62 05/94 18-27
Mannheimer Straße 4
68766 Hockenheim
Sie möchten innerhalb der Garantiezeit ein Gerät zur Reparatur einsenden? Auf unserer
Internetseite www.unold.de/ruecksendung können Sie sich einen Rücksendeschein ausdrucken,
um damit das Paket kostenlos bei der Post abzugeben (nur für Einsendungen aus Deutschland
und Österreich).
SCHWEIZ
MENAGROS AG
Hauptstr. 23
CH 9517 Mettlen
Telefon +41 (0) 71 6346015
Telefax +41 (0) 71 6346011
E-Mail info@bamix.ch
Internet www.bamix.ch
Telefax +49 (0) 62 05/94 18-22
E-Mail service@unold.de
Internet www.unold.de
POLEN TSCHECHIEN
Quadra-Net
Dziadoszanska 10
61-248 Poznań
Internet www.quadra-net.pl
befree.cz s.r.o.
Škroupova 150
537 01 Chrudim
Telefon +42 0 46 46 01 881
E-Mail obchod@befree.cz
23
Page 24
INSTRUCTIONS FOR USE MODEL 58315
Copyright UNOLD AG | www.unold.de
TECHNICAL SPECIFICATIONS
Power: 250 watt, 220 V~, 50 Hz
Dimensions: approx. 23.0 x 23.0 x 26.0 in (L/W/H)
Power cord: approx. 100 cm
Weight: approx. 1.4 kg
Material: Plastic/stainless steel
Volume: 1.3 litres
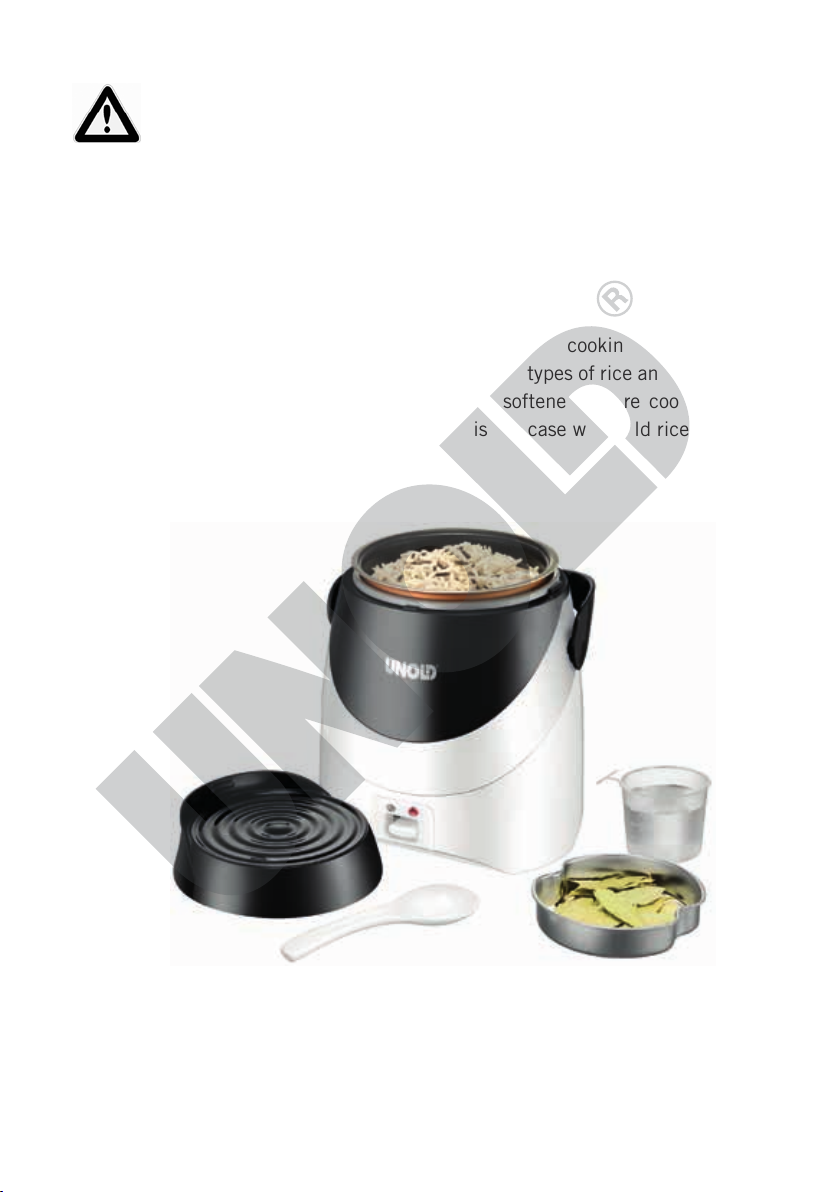
Features: Automatic rice cooker, suitable, for example, for brown rice,
risotto rice, basmati, bulgur, quinoa, green spelt, millet, cooking
container with non-stick coating, boil-dry protection
Accessories: Measuring cup, spoon, cooking container, operating instructions
Equipment features, technology, colours and design are subject to change without
notice. Errors and omissions excepted
EXPLANATION OF SYMBOLS
This symbol denotes a possible hazard which could cause injury or damage to the appliance.
This symbol indicates a potential burning hazard. Please be especially
careful at all times here.
IMPORTANT SAFEGUARDS
Please read the following
instructions and keep them on
hand for later reference.
General safety instructions/per
sons in the household
1.
The appliance can be used
by children 8 years and older
and by persons with limited
physical, sensory or mental
24
abilities or with lack of expe
rience or limited knowledge,
if they are supervised by a
-
person
who is responsible
for their safety or if they have
been instructed with regard
to safe use of the appli
ance and have understood
the dangers that can result
Page 25

from use of the appliance.
Copyright UNOLD AG | www.unold.de
The appliance is not a toy.
Children should only clean
and maintain the appliance
under supervision.
2. Children under the age of 3
should stay away from the
appliance or they must be
under constant supervision.
3. Children between the ages of
3 and 8 should only switch
the appliance on and off
when it is in its normal
intended operating position,
they are supervised or have
been instructed relative to
safe use of the appliance
and have understood the
hazards that can result from
using the product. Children
between 3 and 8 years of
age should neither connect
or operate the appliance, nor
should they clean or main
-
tain the appliance.
4.
Children should be super-
vised to ensure that they do
not play with the appliance.
5.
Keep the appliance out of
the reach of children.
6. Only connect the appliance
to an AC power supply with
voltage corresponding to the
voltage specified on the rat
-
ing plate.
7.
Ensure that all users of the
appliance, are aware of the
danger of injury from escap
-
ing steam.
8.
This appliance must not be
operated with an external
timer or a remote control
system.
9. Never immerse the appliance
or the power cord in water or
other liquids.
10. Do not clean the housing or
power cord in a dishwasher.
11. The base should never come
into contact with water or
other liquids. However, if
this should happen, all parts
must dry completely before it
is used again.
12. Never hold body parts directly
above the appliance when it
is in operation – danger of
burn injuries due to escap
-
ing steam!
13.
Escaping condensation can
be very hot – danger of burn
ing injuries! Always use suitable pot holders and wipe up
any escaping water
Attention, never pour liq
14.
.
uids directly into the opened
appliance – danger due to
electric shock! Water must
only be poured into the pro
vided cooking container. If
liquid should get directly
into the appliance, immedi
ately disconnect the appli
-
ance from the mains supply
25
Page 26

and immediately wipe up the
Copyright UNOLD AG | www.unold.de
liquid. Allow the appliance to
cool completely before plac
-
ing it in service again.
15.
The appliance is intended
for household use only, or for
similar areas of use, such as,
in kitchenettes in busi
nesses, offices or other
workplaces,
for use by guests in hotels,
motels or other lodgings,
in private guest houses or
holiday homes.
16. Check the appliance, the
plug and the power cord reg
-
ularly for wear or damage. In
the
event of damage
to the
power cord or other parts,
please send the appliance
or the power cord to our cus
-
tomer service organisation for
inspection and repair.
Unau-
thorised repairs can result in
serious hazards for the user
and void the warranty.
17.
If the power cord of this
appliance is damaged, it
must be replaced by the
manufacturer or by the man
ufacturer’s customer service
organisation, or by a person
with similar qualifications,
to prevent hazards.
18.
To avoid damage, do not use
the appliance with accesso
-
ries of other manufacturers
or brands.
Unplug the mains plug from
19.
the electrical outlet after use
and before cleaning. Never
leave the appliance unat
tended when the mains plug
is plugged in.
Information on setup and operation
of the appliance
20.
Do not place the appliance or
power cord near open flames
during operation.
21. Never touch the appliance or
power cord with wet hands.
22. For safety reasons, never
place the appliance on hot
surfaces, a metal tray or a
wet surface.
23. Always use the appliance
on a level, uncluttered and
heat-resistant surface.
24. Ensure that the power cord
does not hang over the edge
of the counter top or table,
since this can cause acci
dents, for example if small
children pull on the cord.
25.
Never wrap the power cord
around the appliance.
26. Route the power cord so that
there is no possibility of the
cord being pulled or tripped
over.
26
Page 27

27. Only use the rice cooker
Copyright UNOLD AG | www.unold.de
indoors.
28. Before inserting or removing
accessories or switch off the
appliance and unplug it from
the electrical outlet.
29. If possible, do not use an
extension cord or multiple
socket outlets to operate the
appliance.
30. Note that the cooking con
tainer must always be dry
and clean on the outside
before inserting it in the
appliance.
31.
In addition, check to ensure
that there are no rice grains
or other objects in the inte
rior of the appliance that
could damage the appliance.
32.
Caution: Never use rice in
cooking bags, this can dam
age the appliance.
33.
Never prepare the rice with
eggs, milk products or other
ingredients that cause foam
ing. The foam can boil over
and damage the appliance.
34.
Never use the cooking con
tainer as cooking pot on
stove top burners or other
similar cooking surfaces.
35.
Never remove the rice with
hard utensils, e.g. metal
utensils, as such utensils
can scratch the coating. Only
use utensils that are made of
plastic or wood.
36. To prevent the lid and appli
ance from being damaged,
never use the lid to carry the
appliance.
37.
Never carry the appliance via
the handle or swing it around
when it is operation. Hot
water or hot food can escape
and cause burn injuries.
38. After use and before clean
ing, the appliance must be
unplugged from the electrical outlet. The appliance is
not completely switched off
until it is unplugged.
39.
The appliance is suitable
only for processing of foods.
40. Before you take the appli
ance apart or move it, it must
be completely cooled.
-
-
-
27
Page 28
CAUTION!
Copyright UNOLD AG | www.unold.de
The appliance becomes very hot during operation. Therefore,
be sure to maintain sufficient clearance between the appliance
and all flammable objects; also provide for sufficient ventila
tion.
Always use pot holders whenever the appliance is in operation
or as long as it is still hot.
Never hold body parts directly above
the appliance when it is in
operation – danger of burn injuries due to escaping steam!
Never open the housing of the appliance. This can result in
electric shock.
The manufacturer will not be liable in the event of incorrect assembly, improper or incorrect use or if
repairs are carried out by unauthorized third parties.
PREPARING THE APPLIANCE FOR OPERATION
-
1. Remove all packaging materials
and any transport safeguards.
Keep packaging materials away
from children – danger of suffo-
cation!
2. Check whether all listed accessory
parts are present.
IMPORTANT INSTRUCTIONS AND TIPS
1. Please note that the ideal cooking
result depends on many factors.
The cooking time for your rice dish
can vary from our recommendations, depending on the type of
rice used, the water temperature
and naturally also through your
personal preferences. The cooking
time for 2 measuring cups or rice
is approx. 15-30 minutes.
28
3. Clean all removable parts with a
damp cloth as described in the
section "Cleaning and care".
2. In addition to rice, with the appliance you can also cook bulgur,
quinoa, green spelt, millet or porridge.
3. Tip: If you prefer slightly softer
rice, add a little more water, or
after the cooking cycle leave the
rice in the cooking container for
a short time to allow the rice to
absorb residual moisture.
Page 29
Caution: Never use rice in
Copyright UNOLD AG | www.unold.de
cooking bags, this can damage
the appliance.
4. Never prepare the rice with eggs,
milk products or other ingredients
that cause foaming. The foam can
boil over and damage the appliance.
5. Never use the cooking container
as cooking pot on stove top burners or other similar cooking surfaces.
6. Never remove the rice with hard
utensils, e.g. metal utensils, as
such utensils can scratch the
coating. Only use utensils that are
made of plastic or wood. To avoid
flavour impairments, never leave
the utensils too long in contact
with the rice.
7. We recommend washing the rice
with cold water before cooking it;
this prevents the rice from adhering on the cooking container.
8. Some types of rice and grain must
be softened before cooking. This
is the case with wild rice or spelt.
29
Page 30
OPERATION – COOKING RICE
Copyright UNOLD AG | www.unold.de
Caution: Always keep the interior of the rice dry, and ensure
that food or other objects do
not get into the interior of the appliance. Never place the appliance in
service if the interior of the appliance is wet or not clean. If this
case, first clean and dry the appliance carefully.
1. Ensure that the appliance is not
plugged into the electrical outlet.
2. Check to make sure that the appliance has been assembled correctly and is standing on a level,
stable and heat-resistant surface.
3. Remove the cooking container.
4. Measure out the desired quantity
of rice with the measuring cup.
5. Pour the rice into the cooking con-
tainer.
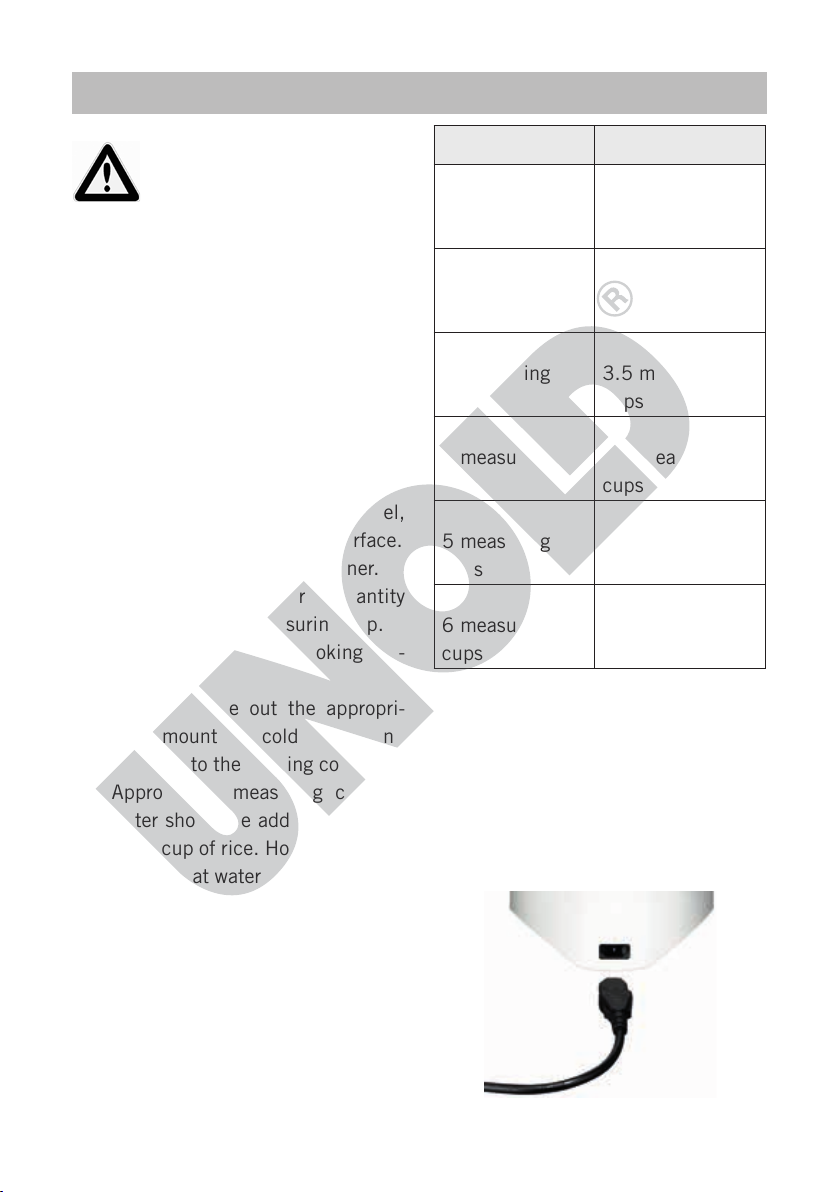
6. Then measure out the appropri-
ate amount of cold water and
pour it into the cooking container.
Approx. 1.5 measuring cups of
water should be added per measuring cup of rice. However, always
ensure that water does not exceed
the Max mark in the cooking container to prevent appliance damage. Our recommendations are:
Rice quantity Water quantity
1 measuring
cup
2 measuring
cups
3 measuring
cups
4 measuring
cups
5 measuring
cups
6 measuring
cups
1.5 measuring
cups
2.5 measuring
cups
3.5 measuring
cups
4.5 measuring
cups
5.5 measuring
cups
6.5 measuring
cups
7. Then fit the filled cooking container into the appliance and put
the lid on. Turn the lid clockwise
to lock the lid.
8. Connect the thermostat plug to
the socket on the rear of the appliance.
30
Page 31

9. Plug the power cord into an elec-
Copyright UNOLD AG | www.unold.de
trical outlet. Always connect the
appliance to the power supply,
just before you use it! The appliance heats up as soon as it is connected to the power supply! The
red indicator light shows that the
appliance is in operation.
10. Switch on the appliance with the
ON-button by pressing the button
downward until it engages.
11. The red indicator light keeps on
until the rice is cooked. Then the
appliance jump to keep warm.
12. If possible stir the rice immediately to bring out the full flavour.
To do this, only use cooking uten-
sils of wood or plastic, to prevent
the coating of the cooking con-
tainer from being damaged. If you
want to continue keeping the rice
hot, then reclose the lid. However,
please note that the rice will still
continue to absorb residual moisture if you leave it in the appliance
to keep it hot.
13. The temperature in warming mode
is approx. 70°C.
14. For hygienic reasons we recommend that you never keep the rice
warm longer than 10-12 hours.
15. To end warming mode, and to
safely and definitively switch off
the appliance, unplug the mains
plug from the electrical outlet.
16. Note: The has boil-dry protection, which means the appliance
shuts off automatically if the heating element becomes too hot (if
there is no longer any water in the
container). In this case allow the
appliance to cool for at least 15
minutes before placing it in service again.
17. If you want to add the aroma of
herbs and spices to the rice, fill
the small provided tray with fresh
herbs and spices as desired. Insert
the tray after you have fitted the
cooking container into the appliance and proceed as described.
After the cooking time the rice will
have a discrete herbal aroma. Tip:
In the metal container for herbs,
smaller quantities of fish fillet
(max. 100-150 g) can be cooked
at the same time. Thus is only
successful if you are preparing a
maximum of 1-2 portions of rice.
CAUTION!
The appliance becomes very
hot during operation. Therefore,
be sure to maintain sufficient
clearance between the
appliance and all flammable
objects; also provide for
sufficient ventilation.
Always use pot holders
whenever the appliance is in
operation or as long as it is
still hot.
31
Page 32

RICE PUDDING
Copyright UNOLD AG | www.unold.de
Caution: Always keep the interior of the rice dry, and ensure
that food or other objects do
not get into the interior of the appliance. Never place the appliance in
service if the interior of the appliance is wet or not clean. If this
case, first clean and dry the appliance carefully.
GRAIN
Caution: Always keep the inte-
rior of the rice dry, and ensure
that food or other objects do
not get into the interior of the appli-
ance. Never place the appliance in
service if the interior of the appli-
ance is wet or not clean. If this
case, first clean and dry the appli-
ance carefully.
1. Millet (golden millet), bulgur and
quinoa can also be cooked in the
rice cooker. Use the following
quantities:
Grain Water
1 measuring
cup
1,5 measuring
cups
1. A maximum of 4 portions rice
pudding (4 measuring cups) can
be made in one batch. Per measuring cup of rice add 2 measuring
cups of milk and approx. 5 g (1/2
tsp). If you want to sweeten the
rice pudding with sugar, please
add it only after the boiling.
Grain Water
2 measuring
cups
3 measuring
cups
4 measuring
cups
3 measuring
cups
4,5 measuring
cups
6 measuring
cups
2. To achieve an ideal cooking result,
more than these quantities should
not be used.
3. Naturally, you can also add salt
as desired.
32
Page 33

RECIPE
Copyright UNOLD AG | www.unold.de
Stuffed zucchini
4 portions
Cook 2 measuring cups rice with 3
measuring cups water in the rice cooker.
4 small zucchini, 5 peeled and seedless tomatoes, 1 bunch scallions,
500 g ground beef, salt, pepper, oregano, 2 garlic cloves, 200 g sour cream,
100 g grated cheese
Cut the zucchini in half, scrape out
the inner vegetable pulp with a melon cutter. Finely chop this vegetable
pulp.
Place the zucchini halves in a greased
casserole. Finely dice the tomatoes,
add to the vegetable pulp, peel and
finely dice garlic. Cut scallions into
rings, season with pepper, salt, orega-
no, let marinate. Add boiled rice.
Fry the ground beef in a little oil, cook
it almost all the way through, mix with
the vegetables. Fill the zucchini halves
with this mixture. Mix cheese with
sour cream and distribute this mixture
on the filled zucchini.
Place the casserole on the middle rack
of the oven and bake at approx. 170°C
for approx. 20-30 minutes.
Tip: You can also simply cut the zucchini into slices approx. 8 mm thick.
Layer in a greased casserole, cover with the mixture, brush with the
cream/cheese mixture and bake.
33
Page 34

CLEANING AND CARE
Copyright UNOLD AG | www.unold.de
Before cleaning, unplug the
appliance from the electrical
outlet.
Let the appliance cool and if
necessary, empty any residual
water from the cooking container.
1. Never immerse the appliance in
water or other liquids.
2. Never use harsh abrasives, steel
wool, metal objects, hot cleansers or disinfectants, because they
could cause damage.
3. Wipe off the housing with a damp
cloth and a little mild dish-wash-
ing liquid and dry it with a soft
cloth.
4. Never place cleaning agents
directly on the appliance; always
put cleaning agents on the cloth.
5. The cooking container can be
rinsed out and dried off with a
soft cloth.
6. From time to time check whether
the seal in the lid is still intact. If
you detect cracks or other damage, the seal must be replaced.
You can obtain new seals from our
customer service organization.
34
Page 35

TROUBLESHOOTING
Copyright UNOLD AG | www.unold.de
Problem Cause Solution
Water drops on the
lid
Water escapes from
the appliance
After cooking the
rice is still hard
After cooking the
rice is watery
After cooking the
rice has a brown
crust
The seal on the lid is not attached properly
The lid is not turned closed
properly
Fasten the seal precisely
on the edge of the lid.
Remove the lid and then
put it back on the appliance.
Too much water was poured
into the appliance.
Too much rice was poured
into the appliance.
Insufficient water was
poured in
Correct the quantity
of water and rice, pay
attention to the Max
mark.
Correct the quantity of
water, pay attention to
the Min mark.
Too much water was poured
into the appliance.
Correct the quantity of
water, pay attention to
the Min mark.
The rice was not washed before cooking
Before cooking, always
wash the rice with clean
cold water.
The indicator light
is illuminated but
the appliance does
not heat
Technical problems on the
appliance.
Contact our customer service organization.
35
Page 36

GUARANTEE CONDITIONS
Copyright UNOLD AG | www.unold.de
We grant a 24 months guarantee, and in case of commercial use a 12 months guarantee, starting from the date of purchase
for any damage demonstrably due to manufacturing defects and when the appliance has been used according to its intended
use. Within the warranty period we will remedy defective materials or workmanship through repair or replacement, at our
option. Our warranty terms apply only to appliances sold in Germany and Austria. For other countries, please contact the re-
sponsible importer. In the event of a claim for remedy of defects, please send the appliance to our after sales service, properly
packaged and postage paid, together with a copy of the automatically generated sales receipt, which must show the date of
purchase, and a description of the defect. If the defect is covered by the warranty, the customer will be reimbursed for the
shipping costs only in Germany and Austria. The warranty does not cover damage from normal wear, improper handling and
failure to comply with the maintenance and care instructions. The warranty is void if repairs or modifications are made to the
appliance by third parties. Any claims of the end consumer vis-à-vis the retailer are not limited by this warranty.
WASTE DISPOSAL / ENVIRONMENTAL PROTECTION
Our appliances are produced on a high quality level for a long lifetime. Regular maintenance and expert
repairs by our after-sales service can extend the useful life of the appliance. If an appliance is defective
and repair is not possible we ask you to follow the following instructions for disposal. Do not dispose this
appliance together with your standard household waste. Please bring this product to an approved collection
point for recycling of electric and electronic products. By separate collection and disposal of waste products
you help to protect natural resources and ensure, that the product is disposed in an adequate way to protect
health and environment.
The instruction booklet is also available for download: www.unold.de
36
Page 37

NOTICE D’UTILISATION MODÈLE 58315
Copyright UNOLD AG | www.unold.de
SPÉCIFICATION TECHNIQUE
Puissance : 250 watts, 220 V~, 50 Hz
Dimensions : env. 23,0 x 23,0 x 26,0 cm (l/p/h)
Câble d’alimentation : env. 100 cm
Poids : env. 1,4 kg
Matériau : plastique / acier inoxydable
Volume : 1,3 litres
Équipement : cuiseur à riz totalement automatique, convient pour, par ex., du riz naturel,
du riz à risotto, du riz basmati, du boulgour, de la quinoa, de l'épeautre
vert séché, du millet, récipient de cuisson avec revêtement antiadhésif,
protection contre la marche à sec
Accessoires : verre doseur, cuillère, récipient de cuisson, mode d'emploi
Modifications et erreurs des caractéristiques de l‘équipement, de la technique, des couleurs et du design
réservées
EXPLICATION DES SYMBOLES
Ce symbole indique les dangers susceptibles de provoquer des blessures ou des
endommagements de l’appareil.
Ce symbole indique le risque d’être brûlé. Soyez prudent en utilisant l’appareil.
CONSIGNES DE SÉCURITÉ
Veuillez lire les instructions
suivantes et les conserver.
Consignes de sécurité générales /
Personnes dans le foyer
1. L'appareil peut être utilisé par
des enfants de plus de 8 ans
et par des personnes dont les
capacités physiques, senso
rielles ou intellectuelles sont
limitées ou dont l'expérience
et/ou les connaissances sont
insuffisantes, si ceux-ci sont
surveillés ou s'ils ont été for
més à une utilisation sûre
de l'appareil et aux dangers
pouvant résulter de l'usage
de l'appareil. L'appareil n'est
pas
un jouet. Le
-
la maintenance de l'appareil
nettoyage et
peuvent être exécutés par
des enfants, exclusivement
sous surveillance.
37
Page 38

2. Les enfants de moins de 3
Copyright UNOLD AG | www.unold.de
ans doivent se tenir loin de
l'appareil ou être surveillés
9. Ne plonger en aucun cas
en permanence.
3. Les enfants de 3 à 8 ans ne
doivent allumer et éteindre
l'appareil que s'il se trouve
dans sa position d'utilisa
10.
tion normale prévue, s'ils
sont surveillés ou s'ils ont
été informés concernant
11.
la sécurité d'utilisation et
qu'ils ont compris les risques
potentiels
en résultant. Les
enfants âgés de 3 à 8 ans ne
doivent ni brancher
, ni utili
-
ser, ni nettoyer ou entretenir
l'appareil.
4.
Les enfants doivent être sur
12.
-
veillés afin de s’assurer qu’ils
ne jouent pas avec l’appareil.
5.
Conserver l’appareil hors de
portée des enfants.
13. L'eau de condensation qui
6. Raccorder exclusivement
l’appareil au courant alterna
tif à la tension se conformant
au panneau signalétique.
7.
S'assurer que tous les uti
lisateurs de l'appareil ont
-
14.
connaissance du danger
que présente la vapeur qui
s'échappe et le contact avec
les parties chaudes de l'ap
-
pareil.
8.
Cet appareil ne doit pas être
utilisé avec un minuteur
externe ou un système de
commande à distance.
l’appareil ou le câble d'ali
mentation dans de l’eau ou
un autre liquide.
Le boîtier et le câble d'ali
mentation ne doivent pas
être nettoyés au lave-vaisselle.
Le boîtier ne doit pas entrer
en contact avec de l’eau ou
d’autres liquides. Si cela
devait se produire, toutes les
pièces doivent sécher inté
gralement avant de renouveler l’utilisation.
Ne placez jamais des parties
du corps juste au-dessus de
l'appareil lorsqu'il fonctionne
: risque de brûlure avec la
vapeur qui s'échappe !
s'échappe peut être très
chaude : risque de brû
lures ! Utilisez toujours des
maniques et essuyez l'eau
qui coule, le cas échéant.
Attention : ne versez jamais
de liquides directement dans
l'appareil ouvert ; il existe un
risque d'électrocution ! L'eau
doit exclusivement être ver
sée dans le récipient de
cuisson fourni. Si du liquide
devait entrer directement
dans l'appareil, débranchez
38
Page 39

immédiatement l'appareil
Copyright UNOLD AG | www.unold.de
du secteur et essuyez tout
de suite le liquide. Laissez
l'appareil sécher intégrale
ment avant de le remettre en
marche.
15.
L'appareil est exclusivement
destiné à un usage ménager
ou à des fins similaires, par
ex.
dans une kitchenette dans
des boutiques, des bureaux
ou d'autres lieux de travail,
à l'usage des clients dans
des hôtels, motels ou autres
lieux d'hébergement,
dans des pensions pri
vées ou des résidences de
vacances.
16.
Vérifier régulièrement l’usure
et la détérioration de l’appa
reil, de la prise et du câble.
En cas de détérioration du
cordon d’alimentation ou
d’autres pièces, veuillez
envoyer votre appareil ou le
cordon pour contrôle et répa
ration à notre service clientèle. Toute réparation nonconforme peut provoquer des
risques importants pour l’uti
lisateur et entraîner l’exclusion de la garantie.
17.
Si le câble d'alimentation de
cet appareil est endommagé,
il doit être remplacé par le
fabricant, son service clien
tèle ou une personne qualifiée similaire, afin d'éviter
tout danger.
18.
-
L'appareil ne doit pas être
utilisé avec des accessoires
d'un autre fabricant ou d'une
autre marque pour ne pas
risquer de l'abîmer.
19. Débrancher l’appareil du
secteur après utilisation
et avant le nettoyage. Ne
jamais laisser l’appareil sans
surveillance lorsque la prise
est branchée.
Consignes pour installer et utiliser
l'appareil
-
20. L’appareil ou le câble ne
doivent pas être utilisés à
proximité de flammes.
21. Ne jamais toucher l’appareil
-
ou son cordon d’alimentation
avec les mains mouillées.
22. Pour des raisons de sécurité,
ne mettez jamais l'appareil
sur des surfaces chaudes, ni
-
sur une étagère métallique ni
sur un support humide.
23. Utilisez l'appareil toujours
sur une surface dégagée,
-
plane et résistante à la cha
leur.
24.
Veiller à ce que le câble ne
pende pas par-dessus le bord
du plan de travail, cela pou
vant provoquer des accidents
-
-
-
39
Page 40

si un enfant tire dessus, par
Copyright UNOLD AG | www.unold.de
exemple.
25. N'enroulez jamais le câble
d'alimentation autour de
l'appareil.
26. Le câble d'alimentation doit
être disposé de façon à ce
qu'il soit impossible de tirer
dessus ou de trébucher.
27. Utilisez exclusivement le
cuiseur à riz en intérieur.
28. Avant d'installer ou de reti
rer des accessoires, l'appareil doit être éteint et la prise
doit être débranchée.
29.
Dans la mesure du possible,
n'utilisez pas de rallonge ou
de prise multiple pour faire
fonctionner l'appareil.
30. Veillez à ce que la face exté
-
rieure du récipient de cuis-
son soit toujours sèche et
propre avant de le position-
ner dans l'appareil.
31.
En outre, vérifiez qu'aucun
grain de riz ou autre objet
ne se trouve à l'intérieur de
l'appareil afin d'éviter toute
détérioration.
32. Attention : ne jamais utiliser
de riz en sachets de cuisson,
cela pourrait endommager
l'appareil.
33. Ne préparez jamais le riz
avec des œufs, des produits
laitiers ou autres ingrédients
moussants. La mousse pour
-
rait déborder et provoquer
des dommages sur l'appareil.
34.
Le récipient de cuisson ne
doit jamais être utilisé comme
casserole sur des plaques de
cuisson ou autres.
35. Ne récupérez pas le riz avec
des couverts rigides, en
métal par exemple, car cela
pourrait rayer le revêtement.
Utilisez exclusivement des
couverts en plastique ou en
bois.
36. Ne portez jamais l'appareil
par le couvercle afin d'éviter
toute détérioration de l'appa
-
reil ou de son couvercle.
37.
Durant le fonctionnement,
ne jamais porter ou déplacer
l'appareil par la poignée. De
l'eau chaude ou des aliments
chauds pourraient s'échap
per et provoquer des brûlures.
38.
Après usage et avant le net-
toyage, la prise doit être
débranchée. Ce n'est
que l'appareil sera totale
qu'alors
ment éteint.
39.
L'appareil est exclusivement
destiné au traitement de pro
duits alimentaires.
40.
Avant de démonter ou de
déplacer l'appareil, il doit
avoir totalement refroidi.
40
Page 41

ATTENTION !
Copyright UNOLD AG | www.unold.de
L'appareil devient très chaud durant son fonctionnement. Il
convient donc de veiller à maintenir une distance suffisante par
rapport à tous les objets inflammables et à assurer une aération
suffisante.
En principe, il convient d'utiliser des maniques tant que l'appa
reil fonctionne ou qu'il est encore chaud.
Ne placez jamais des parties du corps juste au-dessus de l'appareil lorsqu'il fonctionne : risque de brûlure avec la vapeur qui
s'échappe !
Ne pas ouvrir le boîtier de l'appareil. Risque d'électrocution.
Le fabricant n’est nullement responsable en cas de montage non conforme, d‘utilisation irrégulière ou non
conforme ou suite à l’exécution de réparations par des tiers non autorisés.
MISE EN SERVICE
-
1. Retirer tous les matériaux d'emballage et, le cas échéant, les
sécurités de transport. Tenir le
matériel d'emballage hors de por-
tée des enfants : risque d'asphyxie !
2. Vérifier si tous les accessoires
énumérés sont présents.
CONSIGNES IMPORTANTES ET CONSEILS
1. Rappelez-vous que le résultat de
cuisson idéal dépend d'une multitude de facteurs. Le temps de
cuisson pour votre plat de riz peut
différer de nos recommandations
selon le type de riz utilisé, la
température de l'eau et, naturellement, selon vos goûts personnels. Le temps de cuisson pour 2
3. Nettoyer toutes les pièces amovibles à l’aide d’un chiffon humide,
comme décrit dans le chapitre
« Nettoyage et Entretien ».
verres doseurs de riz est de 15 à
30 minutes env.
2. En principe, vous ne pouvez pas
uniquement cuire du riz avec l'appareil, mais également du boulgour, de la quinoa, de l'épeautre
vert séché, du millet ou du porridge.
41
Page 42

3. Conseil : si vous préférez le riz un
Copyright UNOLD AG | www.unold.de
peu plus moelleux, ajoutez un peu
plus d'eau ou laissez le riz gonfler
encore un peu après la cuisson.
Attention : ne jamais utiliser de
riz en sachets de cuisson, cela
pourrait endommager l'appareil.
4. Ne préparez jamais le riz avec
des œufs, des produits laitiers ou
autres ingrédients moussants. La
mousse pourrait déborder et provoquer des dommages sur l'appareil.
5. Le récipient de cuisson ne doit
jamais être utilisé comme casse-
role sur des plaques de cuisson
ou autres.
UTILISATION - CUISSON DU RIZ
6. Ne récupérez pas le riz avec des
couverts rigides, en métal par
exemple, car cela pourrait rayer
le revêtement. Utilisez exclusivement des couverts en plastique
ou en bois. En outre, ne les laissez pas trop longtemps en contact
avec le riz de manière à éviter des
altérations du goût.
7. Nous recommandons de laver le
riz à l'eau froide avant la cuisson
afin qu'il ne colle pas au récipient
de cuisson.
8. Certaines variétés de riz et de
céréales doivent tremper avant
la cuisson. Cela concerne, par
exemple, le riz sauvage ou
l'épeautre.
Attention : l'intérieur de l'appareil doit toujours rester sec et
veillez à ce qu'aucun aliment
ni objet ne pénètre à l'intérieur. Ne
mettez jamais l'appareil en marche
si l'intérieur est humide ou sale.
Dans ce cas, nettoyez et séchez
tout d'abord l'appareil soigneusement.
1. S'assurer que la prise n'est pas
branchée.
2. Vérifiez si l'appareil est correctement monté et s'il se trouve sur
une surface plane, stable et résistante à la chaleur.
3. Retirez le récipient de cuisson.
42
4. Mesurez la quantité de riz souhaitée avec le verre doseur. Versez le
riz dans le récipient de cuisson.
5. Mesurez maintenant la quantité
correspondante d'eau froide et
versez-la dans le récipient de cuisson. Vous devez verser env. 1,5
verre doseur d'eau pour chaque
verre doseur de riz. Cependant,
ne versez jamais de l'eau au-dessus du marquage Max dans le
récipient de cuisson afin d'éviter
toute détérioration de l'appareil.
Nos recommandations sont les
suivantes :
Page 43

Quantité de riz Quantité d'eau
Copyright UNOLD AG | www.unold.de
1 verre doseur 1,5 verre doseur
2 verres doseurs 2,5 verres
doseurs
3 verres doseurs 3,5 verres
doseurs
4 verres doseurs 4,5 verres
doseurs
5 verres doseurs 5,5 verres
doseurs
6 verres doseurs 6,5 verres
doseurs
6. Maintenant, placez le récipient
de cuisson rempli dans l'appareil
et installez le couvercle. Tournez le couvercle dans le sens des
aiguilles d'une montre pour le verrouiller.
7. Branchez la prise thermostatique
sur la prise femelle située sur la
face arrière de l'appareil.
8. Branchez la prise mâle sur une
prise de courant. Veuillez systématiquement brancher l'appareil
juste avant de l'utiliser ! L'unité de
chauffe quand il est connecté au
réseau électrique ! Le voyant de
contrôle rouge indique que l'appareil fonctionne.
9. Allumez l'appareil à l'aide de la
touche MARCHE en pressant la
touche vers le bas jusqu'à ce
qu'elle s'enclenche.
10. Si le riz est prêt, le voyant de
contrôle vert s'allume et l'appareil
maintient le riz au chaud jusqu'à
ce que vous débranchiez la prise.
11. Dans la mesure du possible,
mélangez le riz immédiatement
afin que le goût se déploie totalement. Pour ce faire, utilisez uniquement des ustensiles de cuisine en bois ou en plastique afin
de ne pas endommager le revêtement du récipient de cuisson.
Si vous souhaitez garder davantage le riz au chaud, refermez
ensuite le couvercle. Attention :
le riz continue à gonfler encore un
peu lorsque vous le laissez dans
l'appareil pour être maintenu au
chaud.
12. La température en mode de maintien au chaud est de 70 °C env.
13. Pour des raisons d'hygiène, nous
conseillons de ne jamais maintenir le riz au chaud plus de 10 à
12 heures.
14. Pour quitter le mode de maintien au chaud et éteindre définitivement l'appareil, débranchez la
prise du secteur.
15. Remarque : l'appareil est équipé
d'une protection contre la marche
à sec qui éteint l'appareil lorsque
43
Page 44

l'élément chauffant devient trop
Copyright UNOLD AG | www.unold.de
chaud (par ex. si l'appareil ne
contient plus d'eau). Dans ce
cas, laissez l'appareil refroidir au
moins 15 minutes avant de le
remettre en marche.
16. Si vous souhaitez ajouter un
arôme d'herbes à votre riz, remplissez la petite coupelle fournie
d'herbes fraîches en fonction de
vos désirs. Positionnez-la après
avoir placé le récipient de cuisson dans l'appareil et poursuivez
comme décrit. Le riz aura un délicat arôme d'herbes après la cuisson. Conseil : il est également
possible de cuire de petites quan-
tités de filet de poisson (100-
RIZ AU LAIT
150 g max.) simultanément dans
le récipient métallique destiné
aux herbes. Cela n'est toutefois
possible que si vous préparez 1
ou 2 portions de riz au maximum.
ATTENTION !
L'appareil devient très chaud
durant son fonctionnement.
Il convient donc de veiller à
maintenir une distance suffisante
par rapport à tous les objets inflammables et à assurer une aération
suffisante.
En principe, il convient d'utiliser des maniques tant que l'appareil fonctionne ou qu'il est encore
chaud.
Attention : l'intérieur de l'appareil doit toujours rester sec et
veillez à ce qu'aucun aliment
ni objet ne pénètre à l'intérieur. Ne
mettez jamais l'appareil en marche
si l'intérieur est humide ou sale.
Dans ce cas, nettoyez et séchez
tout d'abord l'appareil soigneusement.
44
1. Il est possible de fabriquer 4
portions de riz au lait (4 verres
doseurs) au maximum en une
seule opération. Pour un verre
doseur de riz, ajoutez 2 verres de
lait et env. 5 g de beurre (1/2 c. à
café). Si vous souhaitez sucrer le
riz au lait, veuillez ajouter le sucre
après la cuisson.
Page 45

CÉRÉALES
Copyright UNOLD AG | www.unold.de
Attention : l'intérieur de l'appareil doit toujours rester sec et
veillez à ce qu'aucun aliment
ni objet ne pénètre à l'intérieur. Ne
mettez jamais l'appareil en marche
si l'intérieur est humide ou sale.
Dans ce cas, nettoyez et séchez
tout d'abord l'appareil soigneusement.
1. Millet (millet doré), boulgour et
quinoa peuvent également être
cuits dans le cuiseur à riz. Utilisez
les volumes suivants :
Céréales Eau
1 verre doseur 1,5 verre doseur
2 verres doseurs 3 verres doseurs
RECETTE
Céréales Eau
3 verres doseurs 4,5 verres do-
seurs
4 verres doseurs 6 verres doseurs
2. Il n'est pas recommandé de dépasser ces quantités afin d'obtenir
une cuisson parfaite.
3. Naturellement, vous pouvez aussi
saler à votre convenance.
Courgettes farcies
4 portions
Faire cuire 2 verres doseurs de riz avec
3 verres doseurs d'eau dans le cuiseur
à riz.
4 petites courgettes, 5 tomates pelées et épépinées, 1 bottes d'oignons
nouveaux, 500 g de viande de bœuf
hachée, sel, poivre, origan, 2 gousses
d'ail, 2 g de crème aigre, 100 g de fromage râpé
Couper les courgettes en deux et retirer la chair intérieur du légume à l'aide
d'une cuillère parisienne. Découper
cette chair de légume en petits morceaux.
Déposer les demi-courgettes dans un
plat à four graissé. Couper les tomates
en très petits dés, ajouter à la chair de
courgettes coupée en petits morceaux.
Peler l'ail et le hacher finement. Couper les oignons en rondelles, les as-
45
Page 46

saisonner avec du poivre, du sel et de
Copyright UNOLD AG | www.unold.de
l'origan, puis laisser macérer. Ajouter
le riz cuit.
Faire rissoler la viande hachée dans
un peu d'huile. La cuire et la mélanger
aux légumes. Remplir les demi-courgettes de farce. Mélanger le fromage
avec la crème aigre et répartir cette
crème sur les courgettes farcies.
NETTOYAGE ET ENTRETIEN
Placer le plat à four sur une grille au
milieu du four et cuire env. 20-30 minutes à 170 °C environ.
Conseil : vous pouvez également couper les courgettes en tranches de 8
mm env. Former une couche de courgettes dans le plat graissé, couvrir du
mélange de viande et légumes, napper
du mélange crème-fromage et cuire.
Avant de procéder au nettoyage, débranchez la prise.
Laisser l'appareil refroidir et,
le cas échéant, vider l'eau res-
tant dans le récipient de cuisson.
1. L’appareil ne doit jamais être
plongé dans l’eau ou un autre
liquide.
2. N’utiliser aucun produit à récurer agressif, ni de laine de verre,
d’objets métalliques, de détergent
chaud ou de désinfectant, lesquels pourraient détériorer l'appareil.
3. Essuyez le boîtier ainsi que le couvercle avec un chiffon humide,
avec un peu de produit nettoyant
doux, et séchez-le à l'aide d'un
chiffon doux.
4. Ne jamais appliquer de produit
nettoyant directement sur l'appareil, mais toujours le verser sur le
chiffon.
5. Le récipient de cuisson peut être
rincé et séché soigneusement
avec un chiffon doux.
6. Vérifiez de temps à autre si le joint
d'étanchéité placé dans le couvercle est encore intact. Si vous
constatez des fissures ou d'autres
détériorations, le joint doit être
remplacé. Vous pouvez acheter de
joints neuf auprès de notre service
clients.
46
Page 47

DÉPANNAGE
Copyright UNOLD AG | www.unold.de
Problème Cause Solution
Gouttes d'eau sur le
couvercle
De l'eau coule hors
de l'appareil
Le riz est encore dur
après la cuisson
Le riz contient de
l'eau après la cuis-
son
Le riz a une croûte
brune après la cuis-
son
Le joint du couvercle n'est
pas correctement positionné
Le couvercle n'est pas fermé
correctement
Trop d'eau a été versée dans
l'appareil
Trop de riz a été versée dans
l'appareil
Trop peu d'eau a été versée
dans l'appareil
Trop d'eau a été versée dans
l'appareil
Le riz n'a pas été lavé avant
la cuisson
Fixez le joint d'étanchéité exactement sur le bord
du couvercle.
Retirez le couvercle et replacez-le sur l'appareil.
Corrigez la quantité d'eau
et de riz en respectant le
marquage Max.
Corrigez la quantité
d'eau en respectant le
marquage Min.
Corrigez la quantité
d'eau en respectant le
marquage Max.
Lavez toujours le riz à
l'eau froide et claire avant
la cuisson.
Le voyant de
contrôle s'allume
mais l'appareil ne
chauffe pas
Problème technique sur
l'appareil
Veuillez contacter notre
service après-vente.
47
Page 48

CONDITIONS DE GARANTIE
Copyright UNOLD AG | www.unold.de
En cas d’utilisation conforme et lors de dégâts manifestement dus à des défauts de fabrication, nos appareils sont garantis
24 mois, lors d’utilisation professionnelles 12 mois, à dater de l’achat. Notre garantie n’est valide que pour les appareils
vendus en Allemagne et en Autriche. Dans tout autre pays veuillez contacter l’importateur. Veuillez envoyer à notre adresse
les appareils, pour lesquels vous réclamez une suppression de défauts, avec le bon d’achat montrant la date d’achat, port
payé et proprement emballé. Les coûts de transport seront remboursés en cas de garantie en Allemagne et en Autriche. Les
défauts causés par usure, utilisation incorrecte ou non-respect des instructions de maintenance sont exclus. Notre obligation
de garantie cesse, si de réparations ou des interventions sont accomplies par des tiers. Cette garantie n’affecte pas les droits
du consommateur contre le commerçant.
TRAITEMENT DES DÉCHETS / PROTECTION DE L’ENVIRONNEMENT
Nos appareils sont produits selon un standard élevé de qualité pour une longue durée d’utilisation. Un
entretien régulier et des réparations compétentes par notre service après-vente prolongent cette durée d’uti-
lisation. Si néanmoins l’appareil est endommagé et ne peut plus être réparé, veuillez suivre les instructions
suivantes. Ne jamais disposer ce produit avec les dégâts de ménage. Apportez ce produit à une station de
collection pour récupération de produits électriques et électroniques. Par la collection séparée vous aidez à
protéger les ressources naturelles et prenez soin, que le produit est démonté sans risque pour la santé et
l’environnement.
48
Page 49

GEBRUIKSAANWIJZING MODEL 58315
Copyright UNOLD AG | www.unold.de
TECHNISCHE GEGEVENS
Vermogen: 250 Watt, 220 V~, 50 Hz
Afmetingen: ca. 23,0 x 23,0 x 26,0 cm (b/d/h)
Snoer: ca. 100 cm
Gewicht: ca. 1,4 kg
Materiaal: Kunststof/ rvs
Volume: 1,3 liter
Uitvoering: Volautomatische rijstkoker, geschikt voor bv. natuurrijst, risottorijst, basmati, bulgur,
quinoa, spelt, gierst, kookreservoir met antiaanbakcoating, droogloopbeveiliging
Toebehoren: Maatbeker, lepel, kookreservoir, gebruiksaanwijzing
Wijzigingen en vergissingen in de uitrustingskenmerken, techniek, kleuren en design voorbehouden
VERKLARING VAN DE SYMBOLEN
Dit symbool wijst op eventuele gevaren die letsel tot gevolg kunnen hebben of tot schade
aan het apparaat leiden.
Dit symbool wijst op een eventueel verbrandingsgevaar. Ga hier altijd zeer voorzichtig te
werk.
VEILIGHEIDSVOORSCHRIFTEN
Lees de volgende aanwijzingen
a.u.b. door en bewaar ze goed.
Algemene veiligheidsinstructies /
personen in het huishouden
1. Het apparaat kan worden
gebruikt door kinderen vanaf
8 jaar en door personen die
over gebrekkige fysieke, sen
sorische of geestelijke vaardigheden of gebrek aan ervaring en/of kennis beschikken,
mits zij onder toezicht staan
of instructies hebben
gekre
gen aangaande het veilige
gebruik van dit apparaat en
de uit het gebruik van het
apparaat resulterende geva
ren begrepen hebben.
-
Het
apparaat is geen speelgoed.
-
Schoonmaak en onderhoud
van het apparaat mogen uit
sluitend onder toezicht worden uitgevoerd.
49
Page 50

2. Kinderen onder 3 jaar moe-
Copyright UNOLD AG | www.unold.de
ten uit de buurt van het
apparaat blijven of voortdurend onder toezicht staan.
3.
Kinderen tussen 3 en 8 jaar
moeten het apparaat uit
sluitend in- en uitschakelen
als het zich op zijn beoogde
normale bedieningspositie
bevindt, als zij onder toe
zicht staan of instructies
hebben gekregen aangaande
het veilige gebruik en de uit
het gebruik van het apparaat
resulterende gevaren begre
pen hebben. Kinderen tus-
sen 3 en 8 jaar moeten het
apparaat noch aansluiten,
noch bedienen, schoonma
ken of onderhouden.
4.
Kinderen moeten onder toe-
zicht staan om te waarborgen
dat zij niet met het apparaat
spelen.
5.
Het apparaat op een voor kin
deren ontoegankelijke plaats
opslaan.
6.
Het apparaat uitsluitend op
wisselstroom met spanning
conform typeplaatje aanslui
ten.
7.
Zorg ervoor dat alle gebrui-
kers van het apparaat het
gevaar van naar buiten
komende stoom en
aanra
king van de hete onderdelen
van het apparaat kennen.
8.
Dit apparaat mag niet wor
den gebruikt met een externe
tijdschakelklok of afstandsbesturing.
9.
Dompel het apparaat of het
-
snoer in geen geval in water
of andere vloeistoffen.
10. De behuizing en het snoer
mogen niet in de afwasma
-
chine worden gereinigd.
11.
De behuizing mag niet in
contact komen met water of
andere vloeistoffen. Mocht
dit toch eens gebeuren,
-
moeten alle delen volkomen
droog zijn vóór hernieuwd
gebruik.
12. Houd nooit lichaamsdelen
-
pal boven het apparaat als
het in bedrijf is – gevaar voor
verbranding door naar buiten
komende stoom!
13. Naar buiten komend con
denswater kan zeer heet zijn
-
– gevaar voor verbranding!
Gebruik altijd geschikte pan
nenlappen en veeg evtl. naar
buiten komend water op.
14.
Attentie, doe nooit vloei
-
stoffen rechtstreeks in het
geopende apparaat – gevaar
door stroomstoot! Het water
mag uitsluitend in het mee
geleverde kookreservoir wor-
-
den gedaan. Mocht toch ooit
vloeistof rechtstreeks in het
apparaat terechtkomen, kop
-
-
-
-
-
-
-
50
Page 51

pelt u het apparaat onmid-
Copyright UNOLD AG | www.unold.de
dellijk los van het stroomnet
en veegt u direct de vloeistof op. Laat het apparaat
volledig
afkoelen voordat u
opnieuw gebruikt.
15.
Het apparaat is uitsluitend
bestemd voor huishoude
lijk gebruik of soortgelijke
gebruiksdoelen, bv.
in theekeukens in bedrijven,
kantoren of overige werklo
-
caties,
voor gebruik door gasten
in hotels, motels of overige
logiesbedrijven,
in particuliere pensions of
vakantiehuizen.
16. Controleer het apparaat, de
stekker en het snoer regel
-
matig op slijtage of bescha-
digingen. Bij beschadiging
van de aansluitkabel of van
andere
onderdelen stuurt u
het apparaat of het snoer
voor controle en reparatie
naar onze klantenservice.
Onvakkundige reparaties
kunnen leiden tot aanzien
lijke gevaren voor de gebrui
-
ker en hebben tot gevolg dat
de garantie vervalt.
17.
Als de aansluitkabel van dit
apparaat wordt beschadigd,
moet deze, om risico te voor
komen, door de fabrikant
of de klantenservice van de
fabrikant of door iemand met
dezelfde competentie wor
-
den vervangen.
18.
Om schade te voorkomen
mag het apparaat niet met
toebehoren van andere fabri
kanten of merken worden
gebruikt.
19.
Na gebruik en vóór het reini
gen van het apparaat de netstekker uit de stekkerdoos
trekken. Het apparaat nooit
zonder toezicht laten als de
netstekker ingestoken is.
Aanwijzingen om het apparaat op
te stellen en te bedienen
20.
Het apparaat of het snoer
mogen niet in de buurt van
vlammen worden gebruikt.
21. Het apparaat c.q. het snoer
nooit met natte handen aan
-
raken.
22.
Plaats het apparaat om veilig-
heidsredenen nooit op hete
oppervlakken, een metalen
dienblad of op een natte
ondergrond.
23.
Gebruik het apparaat altijd
op een vrij, egaal en hittebe
-
stendig oppervlak.
24.
Let erop dat het snoer niet
over de rand van het werk
vlak heen hangt, omdat dit
tot ongevallen kan leiden,
als bv. kleine kinderen eraan
trekken.
51
Page 52

25. Wikkel het snoer nooit om
Copyright UNOLD AG | www.unold.de
het apparaat.
26. Het snoer moet zodanig
gelegd zijn dat trekken of
erover struikelen wordt voor
-
komen.
27.
Gebruik de rijstkoker uitslui-
tend binnen.
28.
Voordat accessoireonderde-
len worden geplaatst of weggepakt, moet het apparaat
worden uitgeschakeld en
moet de stekker uit het stop
-
contact worden getrokken.
29.
Gebruik zo mogelijk geen
verlengkabel of aftakcontact
-
dozen om het apparaat te
gebruiken.
30.
Let erop dat het kookreser
-
voir aan de buitenkant altijd
droog en schoon moet zijn,
voordat u dit in het apparaat
plaatst.
31.
Controleer bovendien of zich
in het apparaat geen rijst
korrels of andere objecten
bevinden, om schade aan het
apparaat te voorkomen.
32.
Attentie: Nooit kookbuidel
rijst gebruiken, deze kan het
apparaat beschadigen.
33.
Bereid de rijst nooit toe met
ei, melkproducten of andere,
schuimvormende ingrediën
ten. Het schuim kan overkoken en schade aan het apparaat veroorzaken.
34.
Het kookreservoir mag nooit
als kookpan op kookplaten
en dergelijke worden inge
-
zet.
35.
Haal de rijst er nooit met
harde bestekonderdelen van
bv. metaal uit, omdat er
anders krassen op de coating
kunnen ontstaan. Gebruik
uitsluitend bestekonderde
-
len van kunststof of hout.
36.
Draag het apparaat a.u.b.
nooit aan het deksel om
schade aan het deksel en
het apparaat te voorkomen.
37. Tijdens het gebruik mag het
apparaat nooit aan de greep
worden gedragen of rondge
slingerd. Heet water of hete
levensmiddelen kunnen naar
buiten
komen en brandwon
den veroorzaken.
Na het gebruik en vóór het
38.
reinigen moet de stekker
uit het stopcontact worden
getrokken. Dan pas is het
apparaat volledig uitgescha
-
keld.
39.
Het apparaat is uitsluitend
geschikt om levensmiddelen
te verwerken.
40. Voordat u het apparaat
demonteert of beweegt, moet
het volledig afgekoeld zijn.
52
Page 53

ATTENTIE!
Copyright UNOLD AG | www.unold.de
Het apparaat wordt tijdens het gebruik zeer heet. Let daarom
op voldoende afstand tot alle brandbare voorwerpen en op vol
doende beluchting a.u.b.
Gebruik in beginsel
pannenlappen zolang het apparaat in
gebruik is c.q. zolang het nog heet is.
Houd nooit lichaamsdelen pal boven het apparaat als het in
bedrijf is – gevaar voor verbranding door naar buiten komende
stoom!
Open in geen geval de behuizing van het apparaat. Er bestaat
gevaar van een stroomstoot.
De fabrikant aanvaardt geen aansprakelijkheid bij foutieve montage, bij ondeskundig of foutief gebruik of
als reparaties door niet geautoriseerde personen worden uitgevoerd.
INGEBRUIKNEMING
-
1. Verwijder alle verpakkingsmateri-
alen en evtl. transportbeveiligin-
gen. Houd verpakkingsmateriaal
uit de buurt van kinderen – gevaar
voor verstikking!
2. Controleer of alle vermelde accessoireonderdelen aanwezig zijn.
BELANGRIJKE AANWIJZINGEN EN TIPS
1. Neem in acht a.u.b. dat het ideale kookresultaat van veel factoren afhangt. De kooktijd voor uw
rijstgerecht kan door de gebruikte
rijstsoort, de watertemperatuur en
natuurlijk ook door uw persoonlijke voorliefde verschillen van
onze adviezen. De kooktijd voor
3. Reinig alle uitneembare onderdelen met een vochtige doek, zoals
beschreven staat in het hoofdstuk
„Reinigen en onderhouden“.
2 maatbekers rijst bedraagt ca.
15-30 minuten.
2. U kunt in beginsel met het apparaat niet alleen rijst koken, maar
ook bulgur, quinoa, spelt, gierst of
porridge bereiden.
3. Tip: Als u een wat zachtere rijst
prefereert, voegt u een beetje
53
Page 54

meer water toe of laat u de rijst
Copyright UNOLD AG | www.unold.de
na het kookproces nog een beetje
nazwellen.
Attentie: Nooit kookbuidelrijst
gebruiken, deze kan het apparaat beschadigen.
4. Bereid de rijst nooit toe met ei,
melkproducten of andere, schuimvormende ingrediënten. Het
schuim kan overkoken en schade
aan het apparaat veroorzaken.
5. Het kookreservoir mag nooit als
kookpan op kookplaten en dergelijke worden ingezet.
6. Haal de rijst er nooit met harde
bestekonderdelen van bv. metaal
BEDIENEN – RIJST KOKEN
uit, omdat er anders krassen op de
coating kunnen ontstaan. Gebruik
uitsluitend bestekonderdelen
van kunststof of hout. Laat deze
bovendien niet te lang in contact
met de rijst om smaakschade te
voorkomen.
7. Wij adviseren om de rijst vóór het
koken met koud water te wassen,
zodat deze niet aan het kookreservoir blijft hangen.
8. Enkele rijst- en graansoorten moeten vóór het koken geweekt worden. Dit betreft bv. wilde rijst of
spelt.
Attentie: Houd het binnenste
van het apparaat altijd droog
en let erop dat er geen levensmiddelen of andere voorwerpen bin-
nenkomen. Neem het apparaat nooit
in bedrijf is als het binnenste van
het apparaat nat of verontreinigd is.
Reinig en droog het apparaat in dit
geval eerst zorgvuldig.
1. Zorg ervoor dat de stekker niet in
het stopcontact is gestoken.
2. Controleer of het apparaat op de
juiste wijze is gemonteerd en op
een egaal, stabiel en hittebestendig vlak staat.
3. Neem het kookreservoir eruit.
4. Meet de gewenste hoeveelheid
rijst af met de maatbeker.
54
5. Doe de rijst in het kookreservoir.
6. Meet nu de overeenkomstige hoeveelheid koud water af en doe deze
in het kookreservoir. Per maatbeker rijst dient te worden gevuld
met ca. 1,5 maatbekers water.
Doe echter nooit meer water in het
kookreservoir dan tot de Max-markering, om schade aan het apparaat te voorkomen. Onze adviezen
luiden:
Page 55

Rijsthoeveelheid Waterhoeveelheid
Copyright UNOLD AG | www.unold.de
1 maatbeker 1,5 maatbeker
2 maatbekers 2,5 maatbekers
3 maatbekers 3,5 maatbekers
4 maatbekers 4,5 maatbekers
5 maatbekers 5,5 maatbekers
6 maatbekers 6,5 maatbekers
7. Zet nu het gevulde kookreservoir
in het apparaat en zet het deksel
erop. Draai het deksel met de wij-
zers van de klok mee om het deksel te vergrendelen.
8. Verbind de thermostaatstekker
met de buis aan de achterkant
van het apparaat.
9. Steek de stekker in een stop-
contact. Verbind het apparaat
a.u.b. altijd vlak voordat u het
gebruikt, met de stroomvoorziening! De apparaat wordt warm
wanneer deze is aangesloten op
het elektriciteitsnet! De rode controlelamp geeft aan dat het apparaat in bedrijf is.
10. Schakel het apparaat in met de
AAN/-toets door de toets omlaag
te drukken totdat deze vastklikt.
11. Als de rijst klaar is, gaat de groene
controlelamp branden en houdt
het apparaat de rijst warm, tot u
de netstekker uittrekt.
12. Roer de rijst nu zo mogelijk
onmiddellijk om, opdat de smaak
zich volledig ontplooit. Gebruik
hiervoor uitsluitend kookgerei van
hout of kunststof om de coating van het kookreservoir niet te
beschadigen. Als u de rijst nog
langer wilt warmhouden, sluit u
vervolgens het deksel weer. Let
er echter op dat de rijst nog een
beetje nazwelt, als u hem om
warm te houden in het apparaat
laat.
13. De temperatuur in de warmhoudmodus bedraagt ca. 70 °C.
14. Om hygiënische redenen adviseren wij om de rijst niet langer dan
10-12 uur warm te houden.
15. Om de warmhoudmodus te beëindigen en het apparaat definitief
uit te schakelen trekt u de stekker
uit het stopcontact.
16. Aanwijzing: Het apparaat is voorzien van een droogloopbeveiliging, die het apparaat uitschakelt als het verwarmingselement
te heet wordt (bv. als er geen water
meer inzit). Laat het apparaat in
dit geval minimaal 15 minuten
afkoelen voordat u het opnieuw
gebruikt.
17. Als u een kruidenaroma aan de
rijst wilt meegeven, vult u de
kleine meegeleverde schaal met
verse kruiden naar wens. Plaats
55
Page 56

deze nadat u het kookreservoir in
Copyright UNOLD AG | www.unold.de
het apparaat hebt gezet en ga door
zoals beschreven. De rijst zal na
de kooktijd een decent kruidenaroma bezitten. Tip: In de metalen
bak voor kruiden kunnen ook vrij
kleine hoeveelheden visfilet (max.
100-150 g) mee worden gegaard.
Dit lukt echter alleen als u maximaal 1-2 porties rijst bereidt.
MELKRIJST
ATTENTIE!
Het apparaat wordt tijdens het
gebruik zeer heet. Let daarom
op voldoende afstand tot alle
brandbare voorwerpen en op voldoende beluchting a.u.b.
Gebruik in beginsel pannenlappen
zolang het apparaat in gebruik is
c.q. zolang het nog heet is.
Attentie: Houd het binnenste
van het apparaat altijd droog
en let erop dat er geen levens-
middelen of andere voorwerpen bin-
nenkomen. Neem het apparaat nooit
in bedrijf is als het binnenste van
het apparaat nat of verontreinigd is.
Reinig en droog het apparaat in dit
geval eerst zorgvuldig.
GRAAN
Attentie: Houd het binnenste
van het apparaat altijd droog
en let erop dat er geen levensmiddelen of andere voorwerpen binnenkomen. Neem het apparaat nooit
in bedrijf is als het binnenste van
het apparaat nat of verontreinigd is.
Reinig en droog het apparaat in dit
geval eerst zorgvuldig.
1. Gierst (goudgierst), bulgur en quinoa kunnen eveneens in de rijst-
1. Er kunnen maximaal 4 porties
melkrijst (4 maatbekers) in een
keer worden gemaakt. Voeg per
maatbeker rijst 2 bekers melk en
ca. 5 g boter (1/2 TL) toe. Als u
de melkrijst met suiker wilt zoeten, dan deze pas na het koken
toevoegen a.u.b.
koker worden gegaard. Gebruik de
volgende hoeveelheden:
Graan Water
1 maatbeker 1,5 maatbekers
2 maatbekers 3 maatbekers
3 maatbekers 4,5 maatbekers
4 maatbekers 6 maatbekers
56
Page 57

2. Om een ideaal kookresultaat te
Copyright UNOLD AG | www.unold.de
bereiken moet niet meer dan deze
hoeveelheden worden bereid.
RECEPT
3. U kunt uiteraard ook naar believen
zout toevoegen.
Gevulde zucchini
4 porties
2 maatbekers rijst met 3 maatbekers
water in de rijstkoker garen.
4 kleine zucchini, 5 gepelde en ontpitte tomaten, 1 bos lente-uien, 500 g
rundergehakt, zout, peper, oregano,
2 knoflooktenen, 200 g zure room,
100 g geraspte kaas
Zucchini halveren, het inwendige
vruchtvlees met een meloenuitsteker
uitkrabben. Dit vruchtvlees kleinsnijden.
De zucchinihelften in een ingevet-
te vuurvaste schaal zetten. Tomaten
in zeer kleine blokjes snijden, bij het
kleingesneden vruchtvlees doen, knof-
look schillen en in zeer fijne blokjes
snijden. Lente-uien in ringen snijden,
met peper, zout, oregano kruiden, laten doortrekken. Gekookte rijst toevoegen.
Gehakt in een beetje olie aanbraden,
bijna doorbraden, onder de groente
mengen. In de zucchinihelften doen.
Kaas met zure room mengen en deze
crème over de gevulde zucchini verdelen.
De vuurvaste schaal op een rooster
op de middelste rail van de bakoven
plaatsen en op ca. 170 °C ca. 20-30
minuten garen.
Tip: U kunt de zucchini ook eenvoudig in schijven van ca. 8 mm snijden.
In een ingevette vuurvaste schaal opstapelen, met het mengsel bedekken,
met het mengsel van room en kaas bestrijken en bakken.
57
Page 58

REINIGEN EN ONDERHOUDEN
Copyright UNOLD AG | www.unold.de
Vóór het reinigen de netstekker uittrekken.
Het apparaat laten afkoelen
en evtl. resterend water uit het
kookreservoir doen.
1. Het apparaat nooit in water of
andere vloeistoffen dompelen.
2. Gebruik geen scherpe schuurmiddelen, staalwol, metalen voorwerpen, hete schoonmaakmiddelen of desinfecterende middelen,
omdat deze het apparaat kunnen
beschadigen.
3. Veeg de behuizing en het deksel
met een vochtige doek met een
beetje mild reinigingsmiddel af
en veeg ze droog met een zachte
doek.
4. Reinigingsmiddel nooit direct op
het apparaat, maar altijd op de
doek doen.
5. Het kookreservoir kan worden
afgewassen en met een zachte
doek worden afgedroogd.
6. Controleer zo nu en dan of de
afdichting in het deksel nog
intact is. Als u scheuren of andere
beschadigingen constateert, moet
de afdichting worden vervangen.
U krijgt nieuwe afdichtingen bij
onze klantenservive.
58
Page 59

STORINGEN VERHELPEN
Copyright UNOLD AG | www.unold.de
Storing Oorzaak Oplossing
Waterdruppels aan
het deksel
Water borrelt op uit
het apparaat
De rijst is na het koken nog hard
De rijst is na het koken waterig
De rijst heeft na het
koken een bruine
korst
De afdichting bij het deksel
is niet correct aangebracht.
Bevestig de afdichting
exact bij de dekselrand.
Verwijder het deksel en
Het deksel is niet correct
dichtgedraaid.
Er is teveel water bijgevuld
Er is teveel rijst bijgevuld
zet dit opnieuw op het ap-
paraat.
Corrigeer de water- en
rijsthoeveelheid; let op de
Max-markering.
Er is te weinig water bijge-
vuld
Corrigeer de waterhoe-
veelheid; let op de Min-
markering.
Er is teveel water bijgevuld Corrigeer de waterhoe-
veelheid; let op de Max-
markering.
De rijst is vóór het koken
niet gewassen
Was de rijst vóór het ko-
ken altijd met helder,
koud water.
De controlelamp
brandt, maar het ap-
paraat verwarmt niet
Technische problemen bij
het apparaat
Neem contact op met
onze klantenservice.
59
Page 60

GARANTIEVOORWAARDEN
Copyright UNOLD AG | www.unold.de
Wij geven op onze apparaten een garantietermijn van 24 maanden (12 maanden bij commerciële gebruik), gerekend vanaf de
dag van aanschaf. Deze garantie geldt voor schade, die bij correct gebruik aantoonbaar is veroorzaakt door een fout in de pro-
ductie. Binnen de garantietermijn verhelpen wij materiaal- en productiefouten door herstelling of vervanging naar onze keuze.
Onze garantie is slechts geldig voor in Duitsland en Oostenrijk verkopte apparaten. In andere landen a.u.b. de importeur
aanspreken. Apparaaten, waarvoor garantie in aanspraak wordt genomen, moeten ons samen met een kopie van de machineel
gegenereerde kassabon waaruit de koopdatum duidelijk wordt, alsmede een beschrijving van de fout goed verpakt aan onze
klantenservice worden toegezonden, porto betaald. Als er sprake van garantie is, worden de verzendingskosten in Duitsland
en Oostenrijk aan de klant vergoed. De garantie dekt geen schade veroorzaakt door slijtage, onbehoorlijk gebruik/foutieve han-
delingen en nietnaleving van de onderhouds- en reinigingsaanwijzingen. Het recht op garantie vervalt, wanneer reparaties of
manipulaties aan het apparaat door derden worden doorgevoerd. Eventuele rechten van de eindgebruiker t.o.v. de verkoper of
distributeur worden door deze garantie niet aangetast.
VERWIJDEREN VAN AFVAL / MILIEUBESCHERMING
Onze apparaten zijn geproduceerd met een hoge qualiteit voor een lange gebruik. Regelmatige onderhoud
en vakkundig reparaties door onze klantenservice verlengt de gebruiksduur. Wanneer het apparat defekt is
en kan niet meer gerepareerd worden, let op de volgende instructies. Dit product mag niet samen met het
normale huishoudelijke afval worden afgevoerd. U dient dit product bij een voor het recycleren van elektri-
sche of elektronische apparaten aangewezen verzamelplaats in te leveren. Door het separaat inzamelen en
recycleren van afvalproducten helpt u mee bij het zuinig omgaan met de natuurlijke hulpbronnen en zorgt u
ervoor dat het product op een gezondheids- en milieuvriendelijke manier afgevoerd wordt.
60
Page 61

ISTRUZIONI PER L’USO MODELLO 58315
Copyright UNOLD AG | www.unold.de
DATI TECNICI
Potenza: 250 Watt, 220 V~, 50 Hz
Misure: circa 23,0 x 23,0 x 26,0 cm (L/P/A)
Cavo di alimentazione: circa 100 cm
Peso: circa 1,4 kg
Materiale: Plastica/acciaio inox
Volume: 1,3 litri
Dotazioni: Cuociriso interamente automatico, adatto ad es. per riso integrale, da risotti
e basmati, bulgur, quinoa, farro verde, miglio, recipiente per cottura con
rivestimento antiaderente, protezione dai funzionamenti a secco
Accessori: Misurino, cucchiaio, recipiente per cottura, istruzioni per l'uso
Con riserva di modifiche ed errori relativi a caratteristiche delle dotazioni, tecnica, colore e design
SIGNIFICATO DEI SIMBOLI
Questo simbolo segnala possibili pericoli in grado di provocare lesioni a persone o danni
all‘apparecchio.
Questo simbolo indica un possibile pericolo di ustioni. In presenza di questo simbolo
agire sempre con la massima cautela.
AVVERTENZE DI SICUREZZA
Si raccomanda di leggere e
conservare le presenti istruzioni.
Avvertenze di sicurezza generali/
persone in ambito domestico
1. L'apparecchio può essere
utilizzato da bambini a par
tire dagli 8 anni di età e
da persone che presentano
ridotte
soriali o
capacità fisiche, sen
mentali o che difet-
tano della necessaria espe-
rienza e/o conoscenze solo
se adeguatamente sorvegliati
o addestrati sull'uso in sicu
rezza dell'apparecchio e se a
conoscenza dei rischi corre-
-
lati all'impiego dello stesso.
L'apparecchio non è un giocattolo. La pulizia e la manu-
-
tenzione dell'apparecchio
possono essere effettuate da
61
Page 62

bambini soltanto sotto sorve-
Copyright UNOLD AG | www.unold.de
glianza.
2.
L'apparecchio deve essere
tenuto fuori dalla portata dei
bambini di età inferiore a 3
anni oppure questi devono
essere costantemente sorve
gliati.
3.
I bambini di età compresa
tra 3 e 8 anni dovrebbero
accendere e spegnere l'ap
parecchio soltanto quando
questo si trova nella posizione d'uso normalmente
prevista, se sono sorvegliati
o se sono stati istruiti in rela
zione all'uso sicuro e hanno
compreso
i pericoli risultanti dall'impiego dell'appa-
recchio. I bambini di età
compresa tra 3 e 8 anni
non dovrebbero collegare,
comandare, pulire o sotto
porre a
manutenzione l'ap-
parecchio.
4.
I bambini vanno sorvegliati
per assicurarsi che non gio
chino con l'apparecchio.
5.
Conservare l'apparecchio
fuori dalla portata dei bam
bini.
6.
Collegare l’apparecchio sol-
tanto a corrente alternata
con la tensione indicata sulla
targhetta.
7.
Assicurarsi che tutte le per
sone che utilizzano l'appa-
recchio siano a conoscenza
del pericolo derivante dal
vapore fuoriuscente e dal
contatto con le parti calde.
8.
Questo apparecchio non
deve essere comandato tra
-
mite timer esterni o sistemi
di telecomando.
9.
Non immergere mai l'appa
recchio o il cavo di alimenta-
-
zione in acqua o altri liquidi.
10.
Non lavare in lavastoviglie
né la scocca né il cavo di ali
mentazione.
11.
La scocca non deve entrare
-
in contatto con acqua o altri
liquidi. Qualora ciò avve
nisse, prima del riutilizzo tutti
i componenti devono
perfettamente asciutti.
Non posizionare mai parti
12.
del corpo direttamente sopra
-
all'apparecchio quando que
sto è in funzione – Pericolo
di ustioni da vapore fuoriuscente!
13.
-
Le parti metalliche possono
essere molto calde – pericolo
di ustioni! Utilizzare sempre
-
presine adeguate ed even
tualmente asciugare l'acqua
fuoriuscente.
14.
Attenzione, non versare mai
liquidi direttamente nell'ap
parecchio aperto – Pericolo
-
di scosse elettriche!
deve essere messa esclusi
-
-
-
-
essere
-
-
-
L'acqua
-
62
Page 63

vamente nel recipiente per
Copyright UNOLD AG | www.unold.de
cottura in dotazione. Se del
liquido dovesse entrare in
contatto direttamente con
l'apparecchio, staccare
immediatamente quest'ul
timo dalla rete elettrica e
asciugare immediatamente
il liquido. Lasciar asciugare
completamente l'apparec
chio prima di rimetterlo in
funzione.
15.
L’apparecchio è progettato
esclusivamente per l’uso
domestico o per impieghi
similari, ad es.
in aree cucina di negozi,
uffici o altri luoghi di lavoro,
per l'uso da parte degli
ospiti di hotel, motel o altre
strutture ricettive,
in pensioni private o case di
vacanza.
16. Controllare regolarmente che
l’apparecchio, la spina e il
cavo di alimentazione non
presentino tracce di usura
o danni. In caso di danni
al cavo di collegamento o
ad altre parti, inviare l’ap
parecchio e il cavo di alimentazione al nostro servizio
clienti per il controllo o la
riparazione. Riparazioni non
idonee possono infatti cau
sare notevoli pericoli per l'u-
tente e comportano il decadere della garanzia.
17.
Se il cavo di collegamento di
questo apparecchio è dan
neggiato, al fine di evitare
-
pericolosità, deve essere
sostituito dal produttore, dal
servizio clienti o da una per
sona analogamente qualifi-
-
cata.
18.
Per evitare danni, non usare
l’apparecchio con accessori
di altri marchi o produttori.
19. Dopo l’utilizzo e prima della
pulizia, staccare la spina
dalla presa elettrica. Non
lasciare mai l’apparecchio
incustodito quando la spina
è inserita.
Avvertenze per l'installazione e
l'uso dell'apparecchio
20. L'apparecchio e il cavo di
alimentazione non devono
essere impiegati nei pressi
di fiamme.
21. Non toccare mai né l'appa
recchio né il cavo di alimentazione a mani bagnate.
22.
-
Per motivi di sicurezza non
posizionare mai l'apparec
chio su superfici calde, vassoi metallici o basi umide.
23.
Utilizzare l'apparecchio sem-
-
pre su superfici piane sgombre e resistenti al calore.
-
-
-
-
63
Page 64

24. Assicurarsi che il cavo di ali-
Copyright UNOLD AG | www.unold.de
mentazione non penda dal
piano di lavoro, in quanto ciò
potrebbe causare infortuni,
ad es. se un bambino piccolo
dovesse strattonarlo.
25.
Non avvolgere mai il cavo di
alimentazione attorno all'ap
-
parecchio.
26.
Il cavo di alimentazione deve
essere posato in modo che
non possa essere strattonato
o non ci si possa inciampare
sopra.
27. Usare il cuociriso solo in
interni.
28. Prima di montare o smon
-
tare gli accessori l'apparecchio deve essere spento e la
spina deve essere staccata
dalla presa elettrica.
29.
Per alimentare l'apparecchio
non utilizzare, se possibile,
prolunghe o prese multiple.
30. Prima di inserire il recipiente
per cottura nell'apparecchio
assicurarsi che all'esterno
sia sempre asciutto e pulito.
31. Per evitare danni all'appa
recchio controllare che al
suo interno non siano presenti chicchi di riso o altri
oggetti.
32.
Attenzione: Non usare mai
sacchetti per la cottura del
riso in quanto potrebbero
danneggiare l'apparecchio.
33. Non cuocere mai il riso
insieme a uova, latticini o
altri ingredienti che produ
cono schiuma. La schiuma
può traboccare e
danneg-
giare l'apparecchio.
34.
Il recipiente per cottura non
può mai essere usato come
pentola su piastre riscaldanti
o simili.
35. Non estrarre mai il riso
con posate dure, ad es. in
metallo, in quanto potreb
bero graffiare il rivestimento.
Utilizzare esclusivamente
posate di plastica o legno.
36.
Per prevenire danni al coper
chio e all'apparecchio non
trasportarlo mai per il coperchio.
37.
Durante l'utilizzo non traspor-
tare o spostare mai l'apparecchio per il manico. Acqua
o alimenti caldi potrebbero
fuoriuscire e causare ustioni.
38.
Dopo l'uso e prima della puli
zia la spina deve essere staccata dalla presa elettrica.
L'apparecchio è effettivamente spento soltanto dopo
tale operazione.
39.
L'apparecchio è idoneo sola
mente per lavorare alimenti.
40.
L'apparecchio deve essersi
completamente raffreddato
prima di venire spostato o
disassemblato.
64
Page 65

ATTENZIONE!
Copyright UNOLD AG | www.unold.de
Durante l'utilizzo l'apparecchio diventa molto caldo. Accertarsi
che vi siano una sufficiente distanza da tutti gli oggetti
combustibili ed un'aerazione adeguata.
Utilizzare presine finché l'apparecchio è in uso e fino a quando
è caldo.
Non posizionare mai parti del corpo direttamente sopra
all'apparecchio quando questo è in funzione – Pericolo di
ustioni da vapore fuoriuscente!
Non aprire mai la scocca dell'apparecchio. Sussiste il pericolo
di scosse elettriche.
Il produttore non si assume alcuna responsabilità per un montaggio scorretto, un utilizzo inappropriato o
errato oppure in seguito a riparazioni effettuate da officine o persone non autorizzate.
MESSA IN FUNZIONE
1. Rimuovere tutti i materiali da
imballo e le eventuali protezioni
da trasporto. Tenere il materiale
da imballo fuori dalla portata dei
bambini – Pericolo di soffocamento!
AVVERTENZE E CONSIGLI IMPORTANTI
1. Si tenga presente che la buona
riuscita della cottura dipende da
molti fattori. Il tempo di cottura
di ogni pietanza a base di riso può
essere diverso da quello da noi
2. Controllare che tutti gli accessori
menzionati siano disponibili.
3. Pulire tutte le parti asportabili con
un panno umido, come descritto
nel capitolo "Pulizia e cura".
indicato a seconda della varietà
di riso, la temperatura dell'acqua
e ovviamente anche delle preferenze personali. Il tempo di cot-
65
Page 66

tura per 2 misurini è di circa a
Copyright UNOLD AG | www.unold.de
15-30 minuti.
2. Con l'apparecchio si possono preparare non soltanto riso, bensì
anche bulgur, quinoa, farro verde,
miglio o porridge.
3. Consiglio: Se si preferisce il riso
più tenero, aggiungere un po'
d'acqua in più oppure lasciar gonfiare il riso ancora un po' dopo la
fine del processo di cottura.
Attenzione: Non usare mai sacchetti per la cottura del riso in
quanto potrebbero danneggiare l'apparecchio.
4. Non cuocere mai il riso insieme
a uova, latticini o altri ingre-
dienti che producono schiuma.
La schiuma può traboccare e dan-
neggiare l'apparecchio.
5. Il recipiente per cottura non può
mai essere usato come pentola su
piastre riscaldanti o simili.
6. Non estrarre mai il riso con posate
dure, ad es. in metallo, in quanto
potrebbero graffiare il rivestimento. Utilizzare esclusivamente
posate di plastica o legno. Non
lasciare le posate a contatto con il
riso troppo a lungo, per evitare che
ne alterino il sapore.
7. Si consiglia di sciacquare il riso
in acqua fredda prima della cottura, di modo che non si attacchi
al recipiente per cottura.
8. Alcune varietà di riso e cereali
devono essere messe in ammollo
prima della cottura. Ciò vale ad es.
per il riso selvatico o per il farro.
USO – COTTURA DEL RISO
Attenzione: Mantenere sempre asciutto l'interno dell'ap-
parecchio e assicurarsi che
non contenga residui di alimenti
o altri oggetti. Non mettere mai in
funzione l'apparecchio se l'interno
è bagnato o sporco. In questo caso
per prima cosa pulire e asciugare
accuratamente l'apparecchio.
1. Controllare che la spina non sia
inserita nella presa elettrica.
2. Assicurarsi che l'apparecchio sia
assemblato correttamente e che
sia posizionato su una superficie
66
piana, sgombra e resistente al
calore.
3. Rimuovere il recipiente per la cottura.
4. Mettere il riso nel recipiente per
cottura.
5. Misurare la corrispondente quantità d'acqua fredda e metterla nel
recipiente per cottura. Per ogni
misurino di riso servono circa 1,5
misurini d'acqua. Per prevenire
danni all'apparecchio non riempire mai il recipiente di cottura
Page 67

con acqua oltre alla tacca Max. I
Copyright UNOLD AG | www.unold.de
nostri consigli sono i seguenti:
Quantità di riso Quantità d'acqua
1 misurino 1,5 misurini
2 misurini 2,5 misurini
3 misurini 3,5 misurini
4 misurini 4,5 misurini
5 misurini 5,5 misurini
6 misurini 6,5 misurini
6. Inserire nell'apparecchio il recipiente per cottura pieno e appli-
care il coperchio. Per bloccare il
coperchio girarlo in senso orario.
7. Collegare la spina con termostato
alla presa nella parte posteriore
dell'apparecchio.
8. Inserire la spina in una presa
elettrica. Collegare l'apparecchio
all'alimentazione elettrica solo
poco prima di metterlo in funzione! L'apparecchio si riscalda
quando è collegato alla rete elettrica! La spia di controllo rossa
segnala che l'apparecchio è in
funzione.
9. Accendere l'apparecchio con il
tasto ON, spingendolo verso il
basso finché non scatta in posizione.
10. Quando il riso è pronto la spia di
controllo verde si accende e l'apparecchio tiene in caldo il riso fino
a quando non si stacca la spina.
11. Se possibile mescolare immediatamente il riso di modo che sprigioni tutto il suo sapore. Per fare
ciò usare solo utensili da cucina in
legno o plastica, di modo da non
danneggiare il rivestimento del
recipiente per cottura. Per tenere
in caldo il riso richiudere il coperchio. Si tenga presente che se il
riso è tenuto in caldo nell'apparecchio si gonfia ancora un po'.
12. Nella modalità tenuta in caldo la
temperatura è di circa 70 °C.
13. Per motivi igienici consigliamo di
non tenere mai in caldo il riso per
più di 10-12 ore.
14. Per terminare la modalità tenuta
in caldo e spegnere completamente l'apparecchio, staccare la
spina dalla presa elettrica.
15. Avvertenza: L'apparecchio è
dotato di una protezione dai funzionamenti a secco che lo disattiva quando l'elemento riscaldatore si surriscalda (ad es. non
contiene più acqua). In questo
caso lasciar raffreddare l'apparecchio per almeno 15 minuti prima
di rimetterlo in funzione.
16. Se si desidera conferire al riso un
aroma d'erbe riempire la ciotolina
fornita in dotazione con erbe aromatiche a piacere. Aggiungere le
67
Page 68

erbe aromatiche dopo aver inse-
Copyright UNOLD AG | www.unold.de
rito il recipiente nell'apparecchio
e proseguire come indicato. Al
termine della cottura il riso avrà
un delicato sapore di erbe aromatiche. Nel contenitore di metallo
per erbe aromatiche è possibile
cucinare anche piccole quantità
di filetto di pesce (max. 100-150
g). Tuttavia, ciò è possibile sola-
RISO AL LATTE
mente se si preparano al massimo
1-2 porzioni di riso.
ATTENZIONE! Durante l'utilizzo l'apparecchio diventa
molto caldo. Accertarsi che vi
siano una sufficiente distanza
da tutti gli oggetti combustibili ed
un'aerazione adeguata. Utilizzare
presine finché l'apparecchio è in
uso e fino a quando è caldo.
Attenzione: Mantenere sempre asciutto l'interno dell'ap-
parecchio e assicurarsi che
non contenga residui di alimenti
o altri oggetti. Non mettere mai in
funzione l'apparecchio se l'interno
è bagnato o sporco. In questo caso
per prima cosa pulire e asciugare
accuratamente l'apparecchio.
1. Nella stessa cottura è possibile
preparare al massimo 4 porzioni di
CEREALI
Attenzione: Mantenere sem-
pre asciutto l'interno dell'apparecchio e assicurarsi che non
contenga residui di alimenti o altri
oggetti. Non mettere mai in funzione l'apparecchio se l'interno è
bagnato o sporco. In questo caso
per prima cosa pulire e asciugare
accuratamente l'apparecchio.
riso al latte (4 misurini). Aggiungere 2 misurini di latte e circa
5 g di burro (1/2 cucchiaino) per
ogni misurino di riso. Se si desidera dolcificare il riso al latte con
lo zucchero, aggiungere quest'ultimo soltanto dopo aver terminato
la cottura.
1. Nel cuociriso si possono cuocere anche miglio (miglio dorato),
grano spezzato e quinoa. Utilizzare le seguenti quantità:
Cereali Acqua
1 misurino 1,5 misurini
2 misurini 3 misurini
68
Page 69

Cereali Acqua
Copyright UNOLD AG | www.unold.de
3 misurini 4,5 misurini
4 misurini 6 misurini
RICETTA
2. Per ottenere risultati di cottura
ideali non preparare quantità di
prodotto superiori a quella indicata.
3. Ovviamente è possibile aggiungere sale a piacere.
Zucchine ripiene
4 porzioni
Cuocere nel cuociriso 2 misurini di
riso con 3 misurini d'acqua.
4 zucchine piccole, 5 pomodori sbucciati e senza semi, 1 mazzetto di cipollotti, 500 g di carne bovina maci-
nata, sale, pepe, origano, 2 spicchi
d'aglio, 200 g di panna acida, 100 g
di formaggio grattugiato
Tagliare a metà le zucchine e rimuove-
re la polpa interna con uno scavino per
meloni. Sminuzzare la polpa.
Disporre le mezze zucchine in una te-
glia unta. Tagliare i pomodori a dadini
piccoli, aggiungerli alla polpa di zucchine sminuzzata, sbucciare l'aglio e
tagliarlo molto fine. Tagliare i cipollotti
ad anelli, condire con pepe, sale e origano e lasciarli insaporire. Aggiungere
il riso lesso.
Rosolare la carne macinata in un po'
d'olio, completare velocemente la cottura, mescolarla con le verdure. Farcire le mezze zucchine con questa
farcia. Mescolare il formaggio con la
panna acida e distribuire la crema così
ottenuta sulle zucchine ripiene.
Disporre la teglia sulla placca del forno in posizione centrale e cuocere a
circa 170 °C per 20-30 minuti.
Consiglio: E' anche possibile tagliare semplicemente le zucchine in fette
spesse circa 8 mm. Riporle a strati alternati in una teglia unta, coprirle con
la farcia, spennellarle con la crema di
formaggio e panna acida e cuocerle in
forno.
69
Page 70

PULIZIA E CURA
Copyright UNOLD AG | www.unold.de
Prima di procedere alla pulizia
staccare la spina.
Lasciar raffreddare l'apparecchio e eventualmente svuotare il recipiente per cottura
dall'acqua residua.
detersivo delicato e quindi asciugarli con un panno morbido.
4. Non mettere mai il detersivo direttamente sull'apparecchio, bensì
sul panno.
5. Il recipiente per cottura può
essere lavato e asciugato con un
1. Non immergere mai la macchina
in acqua o altri liquidi.
2. Non usare prodotti abrasivi,
lana d’acciaio, oggetti metallici,
detergenti caldi o disinfettanti in
quanto possono causare danni.
3. Strofinare la scocca e il coperchio
con un panno umido e un po' di
panno morbido.
6. Di tanto in tanto controllare che
la guarnizione del coperchio sia
ancora integra. Se si individuano
crepe o altri danni deve essere
sostituita. Per acquistare le nuove
guarnizioni rivolgersi al nostro servizio assistenza.
RISOLUZIONE DEI PROBLEMI
Problema Causa Rimedio
Gocce d'acqua sul
coperchio
70
La guarnizione del coperchio non è correttamente
applicata
Il coperchio non è avvitato
correttamente
Fissare la guarnizione
esattamente al bordo del
coperchio.
Rimuovere il coperchio
e quindi riapplicarlo
sull'apparecchio.
Page 71

Problema Causa Rimedio
Copyright UNOLD AG | www.unold.de
L'acqua trabocca
dall'apparecchio
Dopo la cottura il
riso è ancora duro
Dopo la cottura il
E' stata messa troppa acqua
E' stato messo troppo riso
E' stata messa troppo poca
acqua
E' stata messa troppa acqua Correggere la quantità
riso è ancora acquoso
Dopo la cottura il
riso presenta una
Il riso non è stato sciacqua-
to prima della cottura
crosticina marrone
La spia di controllo
rossa si accende ma
Problemi tecnici dell'appa-
recchio
l’apparecchio non
scalda
Correggere la quantità
d'acqua e di riso facendo
attenzione alla tacca Max.
Correggere la quantità
d'acqua facendo
attenzione alla tacca Min.
d'acqua facendo
attenzione alla tacca Max.
Prima della cottura sciacquare sempre il riso con
acqua fredda e pulita.
Contattare la nostra assistenza clienti.
71
Page 72

NORME DIE GARANZIA
Copyright UNOLD AG | www.unold.de
I nostri prodotti sono garantiti per 24 mesi, 12 mesi in caso di uso professionale, dalla data di acquisto per i guasti manifestatisi
durante un utilizzo conforme alle disposizioni e attribuibili in modo dimostrabile a difetti di fabbricazione. Nel periodo di garanzia
porremo rimedio ai difetti materiali e di produzione secondo la nostra valutazione, procedendo alla riparazione o alla sostituzione
dell’apparecchio. Le nostre prestazioni di garanzia valgono esclusivamente per gli apparecchi venduti in Germania e Austria. In tutti
gli altri casi rivolgersi all‘importatore. Gli apparecchi per i quali si richiede la riparazione di guasti ci devono essere inviati con spe-
dizione affrancata e debitamente imballati, unitamente a una copia del documento di acquisto redatto a macchina dal quale risulti
la data di vendita, nonché la descrizione del guasto. In caso di garanzia al cliente verranno rimborsati i costi di spedizione sostenuti
in Germania e Austria. Sono esclusi dalla garanzia i guasti dovuti all’usura, all’uso inappropriato o al mancato rispetto delle regole
di manutenzione. Il diritto di garanzia decade qualora siano state effettuate riparazioni o interventi da parte di terzi. Eventuali diritti
del consumatore finale verso il venditore o negoziante non vengono limitati dalla presente garanzia.
SMALTIMENTO / TUTELA DELL’AMBIENTE
I nostri apparecchi vengono prodotti rispettando un elevato standard qualitativo per una lunga durata
di utilizzo. Una corretta manutenzione e riparazioni adeguate a cura dal nostro servizio clienti possono
prolungare la durata di utilizzo del prodotto. Se un apparecchio è difettoso e non più riparabile, per il suo
smaltimento si presti attenzione ai punti che seguono. Questo prodotto non deve essere smaltito unitamente
ai comuni rifiuti domestici. Consegnare il prodotto a un centro di raccolta per il riciclaggio dei rifiuti elettrici
o elettronici. Con la raccolta differenziata dei rifiuti e dei prodotti riciclabili è possibile contribuire alla tutela
delle risorse naturali e far smaltire il prodotto nel rispetto dell’ambiente e della salute.
72
Page 73

MANUAL DE INSTRUCCIONES MODELO 58315
Copyright UNOLD AG | www.unold.de
DATOS TÉCNICOS
Potencia: 250 vatios, 220 V~, 50 Hz
Medidas: aprox. 23,0 x 23,0 x 26,0 cm (An/Pr/Al)
Cable de alimentación: aprox. 100 cm
Peso: aprox. 1,4 kg
Material: plástico/acero inoxidable
Volumen: 1,3 litros
Equipamiento: hervidor de arroz completamente automático apto para, por ejemplo, arroz
natural, risotto, Basmati, bulgur, quinoa, grano de espelta verde o mijo,
recipiente de cocción con revestimiento antiadherente, protección contra
marcha en seco
Accesorios: Vaso medidor, cuchara, recipiente de cocción, instrucciones de uso
Reservado el derecho de modificaciones y errores en características de equipamiento, técnica, colores
y diseño
EXPLICACIÓN DE LOS SÍMBOLOS
Este símbolo advierte de posibles riesgos que pueden traer consigo lesiones personales
o daños al aparato.
Este símbolo hace referencia a un eventual riesgo de quemaduras. Proceda siempre con
especial cuidado.
INDICACIONES DE SEGURIDAD
Por favor lea y guarde las
siguientes instrucciones.
Indicaciones generales de
seguridad/personas en el hogar
1. Este aparato puede ser
manejado por niños a partir
de 8 años y por personas con
una capacidad física, mental
o sensorial reducida o caren
tes de experiencia y/o conocimientos siempre que estén
supervisados o hayan sido
correspondientemente ins
truidos en el manejo seguro
de dicho aparato y comprendan los peligros resultantes
del uso del mismo. Este apa-
-
rato no es ningún juguete.
73
Page 74

Los niños solo pueden lle-
Copyright UNOLD AG | www.unold.de
var a cabo la limpieza y el
mantenimiento del mismo si
están
supervisados por un
adulto.
2. Mantener vigilados o aleja
dos del aparato a los niños
menores de 3 años.
3.
Los niños de entre 3 y 8
años solo deben conectar
y desconectar el aparato si
se encuentra en su posi
ción de manejo normal previsto, si son supervisados o
si han sido instruidos en el
manejo seguro del aparato
y han comprendido los peli
-
gros resultantes del uso del
mismo.
Los niños
y 8 años no deberán conec
de entre 3
-
tar, manejar, limpiar ni rea-
lizar el mantenimiento del
aparato.
4.
Los niños deben ser supervi
sados para asegurar que no
jueguen con el aparato.
5.
Guarde el aparato fuera del
alcance de los niños.
6. Conecte el aparato solo a
corriente alterna con una
tensión de acuerdo con la
placa de características.
7. Asegúrese de que todos los
usuarios del aparato conoz
can el peligro de la salida
de vapor y
el contacto de las
piezas calientes del aparato.
8. Este aparato no debe utili
zarse con un reloj programador externo ni con un sistema de mando a distancia.
9.
No sumerja nunca el aparato
o el cable de alimentación en
agua o en otros líquidos.
10. La carcasa y el cable de ali
mentación no se deben lavar
en el lavavajillas.
11.
La carcasa no debe entrar
en contacto con agua u otros
líquidos. Si a pesar de ello,
esto ocurriese alguna vez,
todas las piezas deberán
estar completamente secas
antes de un nuevo uso.
12. Nunca ponga partes del
cuerpo por encima del apa
rato cuando esté en funcionamiento. ¡Peligro de quemaduras por salida de vapor!
13.
El agua condensada que sale
puede estar muy caliente.
¡Peligro de quemaduras!
Utilice siempre agarraderas
adecuadas y de ser necesa
rio, recoja el agua que salga.
14.
Atención: no vierta nunca
líquido directamente en el
aparato abierto. ¡Peligro por
descarga eléctrica! El agua
solo se debe verter en el reci
piente de cocción suministrado. Sin embargo, si penetra líquido directamente en
el aparato, desconéctelo de
74
Page 75

inmediato de la red eléctrica
Copyright UNOLD AG | www.unold.de
y recoja inmediatamente el
líquido. Deje secar el aparato
por completo antes de volver
a ponerlo en marcha.
15. El aparato está destinado
exclusivamente al uso
doméstico o a fines de uso
similares, por ejemplo,
en cocinas tipo office en
comercios, oficinas u otros
lugares de trabajo,
para el uso por parte de
clientes en hoteles, moteles
u otros establecimientos de
alojamiento colectivo,
en pensiones privadas o en
casas vacacionales.
16. Revise periódicamente si el
aparato, el enchufe y el cable
de alimentación presentan
desgaste o daños. En caso
de daños en el cable de ali
-
mentación o en otras piezas,
le rogamos que envíe el aparato o el cable de alimentación para su verificación y
reparación a nuestro servicio
de atención al cliente. Las
reparaciones inadecuadas
pueden ocasionar considera
bles peligros para el usuario
y tienen como consecuencia
la exclusión de la garantía.
17.
En caso de que la línea
de alimentación del aparato
esté dañada, para evitar peli
-
gros la deberá cambiar el
fabricante, su Servicio Postventa u otra persona igualmente cualificada.
18.
Para evitar daños, no use
el equipo con accesorios de
otros fabricantes o marcas.
19. Después del uso, así como
antes de la limpieza, des
enchufe el aparato. No deje
nunca el aparato sin vigilancia cuando esté enchufado.
Indicaciones sobre la colocación
y el manejo del aparato
20.
El aparato o el cable de ali
mentación no deben utilizarse cerca de llamas.
21.
No toque nunca el aparato o
el cable de alimentación con
las manos húmedas.
22. Por razones de seguridad
jamás coloque el aparato
sobre superficies calientes,
sobre una bandeja metálica
o sobre una base mojada.
23. Use siempre el aparato sobre
una superficie libre, plana y
resistente al calor.
24. Preste atención a que el cable
de alimentación no cuelgue
sobre el borde de la superfi
cie de trabajo, dado que ello
puede conducir a
accidentes
si, p. ej., los niños pequeños
tiran de él.
75
Page 76

25. Nunca enrolle el cable de
Copyright UNOLD AG | www.unold.de
alimentación alrededor del
aparato.
26. El cable de alimentación
debe estar colocado de forma
que no se pueda tirar de él ni
tropezar con él.
27. Utilice el hervidor de arroz
solo en espacios interiores.
28. Antes de insertar o retirar los
accesorios, se debe desco
nectar el aparato y retirar la
clavija de la caja de enchufe.
29.
De ser posible, no use nin
gún cable de prolongación o
cajas de enchufes múltiples
para operar el aparato.
30.
Tenga en cuenta que el reci
piente de cocción debe estar
siempre seco y limpio en la
parte exterior antes de colo
-
carlo en el aparato.
31.
Además, compruebe que no
haya granos de arroz u otros
objetos en el interior del apa
rato para evitar daños en el
mismo.
32.
Atención: No utilice nunca
arroz en bolsa para cocción.
Puede deteriorar el aparato.
33. No prepare nunca arroz con
huevo, productos lácteos u
otros ingredientes que for
man espuma. La espuma
puede derramarse al hervir y
causar daños en el aparato.
34.
El recipiente de cocción
nunca se debe colocar como
una olla sobre placas de coc
-
ción o similares.
35.
No retire nunca el arroz
con cubiertos duros como,
p. ej., de metal, dado que
esto podría dañar el reves
-
timiento. Utilice exclusiva-
mente cubiertos de plástico
o de madera.
36.
No transporte el aparato
nunca cogiéndolo por la tapa
para evitar daños tanto en la
tapa como en el aparato.
37. Durante el funcionamiento,
no se debe transportar nunca
el aparato del asa ni agitarlo.
Puede salir agua caliente
o comida caliente y causar
quemaduras.
38. Después del uso y antes de
la limpieza se debe retirar la
clavija de la caja de enchufe.
Solo entonces estará com
pletamente apagado el aparato.
39.
El aparato solo es apto para
procesar productos alimen
ticios.
40.
Antes de desensamblar el
aparato o moverlo, deberá
estar completamente frío.
76
Page 77

¡ATENCIÓN!
Copyright UNOLD AG | www.unold.de
El aparato se calienta mucho durante el funcionamiento. Por
ello, asegúrese de que haya ventilación suficiente y bastante
distancia con respecto a todos los objetos inflamables.
Utilice principalmente agarradores mientras el aparato esté
funcionando y mientras esté caliente.
Nunca ponga partes del cuerpo por encima del aparato cuan
do esté en funcionamiento. ¡Peligro de quemaduras por salida
de vapor!
No abra la carcasa del aparato en ningún caso. Existe peligro
de descarga eléctrica.
El fabricante no asume ninguna responsabilidad en caso de montaje defectuoso, uso inapropiado o
incorrecto o después de reparaciones realizadas por terceros no autorizados.
PONER EN SERVICIO
-
1. Retire todos los materiales de
embalaje y, dado el caso, los segu-
ros de transporte. Mantenga el
material de embalaje alejado de
los niños.¡Peligro de asfixia!
2. Compruebe si están todos los
accesorios especificados.
INDICACIONES IMPORTANTES Y CONSEJOS
1. Tenga en cuenta que el resultado
óptimo de cocción depende de
muchos factores. El tiempo de
cocción para su plato de arroz
se puede diferenciar de nuestras
recomendaciones por el tipo de
arroz utilizado, por la temperatura
del agua y, por supuesto, también
por sus preferencias individuales.
El tiempo de cocción para 2 vasos
3. Limpie todas las piezas extraíbles
2. Con el aparato no solamente podrá
3. Consejo: Si prefiere arroz algo
con un paño húmedo como se
describe en el capítulo “Limpieza
y cuidado”.
medidores de arroz es de aprox. de
15 a 30 minutos.
cocer arroz, sino también preparar
bulgur, quinoa, grano de espelta
verde, mijo o gachas de avena
frescas.
más blando, añada más agua o
77
Page 78

deje reposar el arroz después de
Copyright UNOLD AG | www.unold.de
su cocción.
Atención: No utilice nunca
arroz en bolsa para cocción.
Puede deteriorar el aparato.
4. No prepare nunca arroz con huevo,
productos lácteos u otros ingredientes que forman espuma. La
espuma puede derramarse al hervir y causar daños en el aparato.
5. El recipiente de cocción nunca se
debe colocar como una olla sobre
placas de cocción o similares.
6. No retire nunca el arroz con
cubiertos duros como, p. ej., de
metal, dado que esto podría dañar
el revestimiento. Utilice exclusi-
MANEJO: COCER ARROZ
vamente cubiertos de plástico o
de madera. Además, no los deje
demasiado tiempo en contacto
con el arroz para evitar que alteren el sabor.
7. Recomendamos lavar el arroz con
agua fría ante de cocerlo para que
no se quede adherido al recipiente
de cocción.
8. Algunas clases de arroz y de
cereales se deben poner en remojo
antes de la cocción. Este es el
caso, p. ej., del arroz silvestre o
la espelta.
Atención: Mantenga el interior
de aparato siempre seco y ase-
gúrese de que no entren ali-
mentos u otros objetos en el mismo.
No ponga nunca el aparato en funcionamiento si el interior del mismo
está húmedo o sucio. En este caso,
primero limpie y seque el aparato
cuidadosamente.
1. Asegúrese de que la clavija no
esté enchufada en la caja de
enchufe.
2. Compruebe si el aparato está
correctamente ensamblado y colocado sobre una superficie plana,
estable y resistente al calor.
3. Extraiga el recipiente de cocción.
78
4. Mida la cantidad de arroz deseada
con el vaso medidor.
5. Vierta el arroz en el recipiente de
cocción.
6. Ahora, mida la cantidad correcta
de agua fría y añádala al recipiente de cocción. Por cada vaso
medidor de arroz se debe añadir
aprox. 1,5 de vaso medidor de
agua. Sin embargo, nunca añada
agua por encima del máximo marcado ( máx.) en el recipiente de
cocción para evitar deterioros del
aparato. Nuestras recomendaciones son:
Page 79

Cantidad de
Copyright UNOLD AG | www.unold.de
Cantidad de agua
arroz
1 vaso medidor 1,5 vasos medi-
dores
2 vasos medidores
3 vasos medidores
4 vasos medidores
5 vasos medidores
6 vasos medidores
2,5 vasos medidores
3,5 vasos medidores
4,5 vasos medidores
5,5 vasos medidores
6,5 vasos medi-
dores
7. Ahora, coloque el recipiente de
cocción lleno en el aparto y ponga
la tapa. Gire la tapa en el sentido
de las agujas del reloj para bloquearla.
8. Conecte el enchufe de termostato
con la hembrilla en la parte posterior del aparato.
9. Conecte el enchufe a una toma
de corriente. ¡Conecte el aparato
con la alimentación de corriente
solo justo antes de utilizarlo! El
aparato se calienta cuando está
conectado a la red eléctrica El
piloto de control rojo indica que el
aparato está en funcionamiento.
10. Encienda el aparato con la tecla
CON pulsando la tecla hacia abajo
hasta que encaje.
11. Cuando el arroz está listo, se ilumina el piloto de control verde y el
aparato mantiene caliente el arroz
hasta que retire el enchufe de red.
12. De ser posible, remueva inmediatamente el arroz para que desprenda todo su sabor. Para ello,
utilice solo un utensilio de cocina
de madera o de plástico para
no deteriorar el revestimiento
del recipiente de cocción. Si
desea mantener aún caliente el
arroz, vuelva a cerrar la tapa. Sin
embargo, tenga en cuenta que el
arroz sigue hinchándose algo más
si lo mantiene caliente en el aparato.
13. La temperatura del modo de conservación de calor es de aprox.
70 °C.
14. Por razones higiénicas le aconsejamos no mantener nunca el arroz
cliente durante más de 10-12
horas.
15. Para finalizar el modo de conservación de calor y desconectar el
aparato de forma definitiva, desenchufe la clavija.
16. Indicación: El aparato está equipado con una protección contra
marcha en seco que desconecta
el aparato si el elemento calefactor se calienta demasiado (p.
ej., si ya no contiene agua). En
79
Page 80

este caso, deje enfriar el aparato
Copyright UNOLD AG | www.unold.de
durante 15 minutos como mínimo
antes de volver a ponerlo en funcionamiento.
17. Si desea añadir un aroma de hierbas al arroz, llene el pequeño
cuenco suministrado con hierbas
frescas según desee. Inserte el
cuenco después de haber colocado el recipiente de cocción en el
aparato y siga como se describe.
El arroz tendrá un aroma de hierbas discreto después del tiempo
de cocción. : En el recipiente
metálico para hierbas aromáticas
también se pueden cocer filetes
de pescado (máx. 100-150 g).
ARROZ CON LECHE
No obstante, esto solo sale bien si
se preparan 1-2 raciones de arroz
como máximo.
¡ATENCIÓN!
El aparato se calienta mucho
durante el funcionamiento. Por
ello, asegúrese de que haya
ventilación suficiente y bastante distancia con respecto a
todos los objetos inflamables.
Utilice principalmente agarradores mientras el aparato esté
funcionando y mientras esté
caliente.
Atención: Mantenga el interior
de aparato siempre seco y ase-
gúrese de que no entren ali-
mentos u otros objetos en el mismo.
No ponga nunca el aparato en funcionamiento si el interior del mismo
está húmedo o sucio. En este caso,
primero limpie y seque el aparato
cuidadosamente.
CEREALES
Atención: Mantenga el interior
de aparato siempre seco y ase-
gúrese de que no entren alimentos u otros objetos en el mismo.
No ponga nunca el aparato en fun-
80
1. Se pueden preparar 4 raciones
de arroz con leche como máximo
(4 vasos medidores) de una sola
vez. Añada 2 vasos de leche por
cada vaso de arroz y 5 g aprox. de
mantequilla (1/2 cucharadita). Si
desea endulzar el arroz con leche,
añada el azúcar una vez terminada
la cocción.
cionamiento si el interior del mismo
está húmedo o sucio. En este caso,
primero limpie y seque el aparato
cuidadosamente.
Page 81

1. En el hervidor de arroz también se
Copyright UNOLD AG | www.unold.de
puede cocer mijo (pelado), bulgur
y quinoa. Utilice las siguientes
cantidades:
Cereales Agua
1 vaso 1,5 vasos
2 vasos 3 vasos
RECETA
Cereali Acqua
3 vasos 4,5 vasos
4 vasos 6 vasos
2. Para que el resultado sea perfecto, se recomienda no sobrepasar las cantidades indicadas.
3. Naturalmente, también se puede
añadir sal al gusto.
Calabacines rellenos
Cocer 2 vasos de arroz con 3 vasos de
agua en el hervidor de arroz.
4 calabacines pequeños, 5 tomates
pelados y sin pepitas, 1 manojo de ce-
bolletas, 500 g de carne picada de va-
cuno, sal, pimienta, orégano, 2 dien-
tes de ajo, 200 g de nata agria y 100 g
de queso rallado
Cortar los calabacines por la mitad y
extraer la pulpa con una cuchara parisina. Cortar la pulpa en trocitos.
Colocar los calabacines en un molde
para horno engrasado. Cortar los tomates en dados muy pequeños, mezclarlos con la pulpa picada, pelar los ajos
y picarlos muy bien. Cortar las cebolletas en aros, sazonar con pimienta,
sal y orégano y dejar reposar. Añadir el
arroz cocido.
Sofreír la carne picada con un poco de
aceite, freír hasta que esté en su punto y mezclar con la verdura. Rellenar
los calabacines con esta mezcla. Mezclar el queso con la nata agria y esparcir la crema sobre los calabacines
rellenos.
Colocar el molde sobre una rejilla en
el carril medio del horno y cocinar a
170 °C aprox. durante unos 20-30 minutos.
Consejo: Otra opción es cortar simplemente los calabacines en rodajas de 8
mm aprox. Cubrir un molde para horno engrasado con una capa de calabacines, cubrir con la mezcla, esparcir
por encima la mezcla de nata y queso
y hornear.
81
Page 82

LIMPIEZA Y CUIDADO
Copyright UNOLD AG | www.unold.de
Desenchufe el aparato antes
de la limpieza.
Deje enfriar el aparato y, en su
caso, vacíe el agua restante
del recipiente de cocción.
1. Nunca sumerja el aparato en agua
o en otros líquidos.
2. No utilice productos de limpieza
agresivos, lana o estopa de acero,
objetos metálicos, productos de
limpieza calientes ni desinfectantes, ya que pueden producir
daños.
3. Limpie la carcasa y la tapa con un
paño húmero y un poco de deter-
gente y séquelas con un paño
suave.
4. No ponga los detergentes nunca
directamente sobre el aparato
sino siempre sobre un paño.
5. El recipiente de cocción se puede
lavar y secar con un paño suave.
6. Compruebe de vez en cuando si
la junta de la tapa sigue estando
intacta. Si detecta fisuras u otros
deterioros, debe reemplazar la
junta. Puede adquirir juntas nuevas en nuestro servicio de atención al cliente.
82
Page 83

ELIMINACIÓN DE FALLOS
Copyright UNOLD AG | www.unold.de
Fallos Causa Solución
Gotas de agua en la
tapa
El agua sale del aparato
El arroz sigue estando duro después de
la cocción
El arroz está acuoso
después de la coc-
ción
El arroz tiene una
costra marrón des-
pués de la cocción
La junta en la tapa no está
correctamente colocada
La tapa no está correctamente cerrada
Fije la junta exactamente
en el borde de la tapa.
Retire la tapa y colóquela de nuevo sobre el aparato.
Se ha añadido demasiado
agua
Se ha añadido demasiado
Corrija la cantidad de
agua y de arroz y preste
atención al marcado máx.
arroz
Se ha añadido poca agua Corrija la cantidad de
agua y preste atención al
marcado mín.
Se ha añadido demasiado
agua
Corrija la cantidad de
agua y preste atención al
marcado máx.
No se ha lavado el arroz antes de la cocción
Lave el arroz antes de la
cocción siempre con agua
fría y limpia.
El piloto de control
se ilumina, pero el
aparato no se calienta
Problemas técnicos en el
aparato
Contacte con nuestro servicio de atención al cliente.
83
Page 84

CONDICIONES DE GARANTIA
Copyright UNOLD AG | www.unold.de
La garantía para nuestros equipos es de 24 meses, y de 12 meses en el caso de uso comercial, a partir de la fecha de
compra, cubriendo los daños que con un uso acorde a lo prescrito pueden atribuirse fehacientemente a defectos de fabri-
cación. Dentro del período de garantía, solucionamos errores de material y de fabricación a consideración nuestra mediante
reparación o cambio. Nuestros servicios de garantía son válidos únicamente para los aparatos que han sido vendidos en
Alemania y Austria. Para todos los demás casos diríjase por favor al importador correspondiente. Aquellos aparatos que se
presentan para eliminar errores, por favor enviarlos junto a una copia del comprobante de compra extendido a máquina, del
cual debe desprenderse la fecha de compra, así como una breve descripción de las deficiencias, apropiadamente embalado
y con los sellos correspondientes a nuestro servicio al cliente. En caso de garantía, los gastos de envío serán restituidos al
cliente solamente en Alemania y Austria. Aquellos daños causados por desgaste están excluidos de la garantía, así como
manipulación incorrecta, e incumplimiento de las condiciones de mantenimiento y cuidado. El derecho a garantía expira si las
reparaciones o mantenimiento son realizadas por terceros. Todo reclamo del consumidor final ante el vendedor, comerciante
no se ve afectado por esta garantía.
DISPOSICIÓN/PROTECCIÓN DEL MEDIO AMBIENTE
Nuestros aparatos se fabrican con un alto nivel de calidad por un largo período de uso. El mantenimiento
regular y las reparaciones de tipo técnico a través de nuestro servicio al cliente pueden prolongar la du-
ración del aparato. Cuando un aparato está defectuoso y ya no puede repararse, por favor considere en la
disposición final los siguientes puntos: Este producto no puede ser eliminado junto a la basura domiciliaria.
Usted debe entregar este producto a un lugar oficial para el reciclaje de aparatos eléctricos o electrónicos.
Mediante la clasificación por separado y el reciclaje de productos residuales, Usted contribuye a proteger
los recursos naturales y asegura que el producto sea eliminado de forma salubre y acorde con el medio
ambiente.
84
Page 85

NÁVOD K OBSLUZE MODEL 58315
Copyright UNOLD AG | www.unold.de
TECHNICKÉ ÚDAJE
Výkon: 250 W, 220 V~, 50 Hz
Rozměry: cca 23,0 x 23,0 x 26,0 cm (Š/H/V)
Přívod: cca 100 cm
Hmotnost: cca 1,4 kg
Materiál: plast/nerezová ocel
Objem: 1,3 litry
Vybavení: plně automatický rýžovar, vhodný např. pro přírodní rýži, rýži na rizoto, basmati,
bulgur, quinou, zelenou špaldu, jáhly, varná nádoba s nepřilnavou vrstvou, ochrana
proti provozu nasucho
Příslušenství: odměřovací nádoba, lžička, varná nádoba, návod k obsluze
Je vyhrazeno právo na omyly a změny vybavení, techniky, barev a designu
VYSVĚTLENÍ SYMBOLŮ
Tento symbol označuje případná ohrožení, která mohou způsobit poranění nebo poškození
přístroje.
Tento symbol poukazuje na eventuální nebezpečí popálení. Postupujte tu vždy zvláště
opatrně.
BEZPEČNOSTNÍ POKYNY
Následující pokyny si přečtěte a
uložte.
Všeobecné bezpečnostní pokyny /
osoby v domácnosti
1. Přístroj může být používán
dětmi od 8 let a osobami se
sníženými fyzickými, smyslo
vými nebo duševními schop-
nostmi nebo s nedostatkem
zkušeností
a/nebo nedostat
kem znalostí, pokud jsou pod
dohledem nebo pokud byly
poučeny
o bezpečném
žívání přístroje a porozuměly
rizikům vyplývajícím z
stroje. Přístroj není hračka.
Čištění
a údržbu
přístroje
smí provádět děti pouze pod
-
dohledem.
2. Děti do 3 let by se neměly k
přístroji přibližovat nebo být
-
pod trvalým dohledem.
3. Děti mezi 3 a 8 roky by
měly zapínat a vypínat pří
pou
pří-
-
-
85
Page 86

stroj pouze tehdy, když se
Copyright UNOLD AG | www.unold.de
nachází ve své určené normální pozici ovládání a když
jsou
pokud
pod dohledem nebo
byly poučeny o bez
pečném používání přístroje
a porozuměly rizikům
vyplývajícím z přístroje. Děti mezi
3
roky by neměly přístroj
a 8
ani připojovat ani ovládat,
čistit nebo provádět údržbu.
4. Je potřeba dohlížet na děti,
aby bylo zajištěno, že si s pří
strojem nehrají.
5.
Uchovávejte přístroj na místě
nepřístupném dětem.
6. Přístroj připojujte pouze na
střídavý proud s napětím
podle typového štítku.
7. Ujistěte se, že všem uži
vatelům přístroje je známo
nebezpečí v důsledku
unikající páry a dotyku horkých
částí přístroje.
8.
Tento přístroj nesmí být pou
žíván s externími časovými
spínacími hodinami nebo se
systémem pro dálkové
ovlá
dání.
9.
V žádném případě přístroj
nebo jeho přívod neponořujte
do vody nebo do jiné kapa
liny.
10.
Těleso a jeho přívod nesmí
být čištěny v myčce.
11. Těleso přístroje se nesmí
dostat do kontaktu s vodou
nebo jinými tekutinami.
Pokud by k tomu přesto
došlo, musí být před novým
použitím všechny díly zcela
-
suché.
12. Nikdy nemějte části těla
přímo nad přístrojem, když
je v provozu – nebezpečí opa
ření unikající párou!
13.
Unikající kondenzovaná
voda může být velmi horká
– nebezpečí opaření! Vždy
-
používejte vhodné kuchyň
ské chňapky a případnou
unikající vodu otřete.
14.
Pozor, nikdy nelijte teku
tiny přímo do otevřeného
přístroje – nebezpečí
elektrickým proudem! Vodou
-
smí být plněna výhradně
dodaná varná nádoba. Pokud
by se přesto dostala tekutina
přímo do přístroje, nepro
dleně jej odpojte od sítě a
-
hned tekutinu otřete.
opětným uvedením přístroje
do provozu jej nechte zcela
-
vyschnout.
15. Přístroj je určen výhradně
pro domácí použití nebo
podobné účely, např.
-
pro kuchyňky v obchodech,
kancelářích nebo podob
ných pracovištích,
pro použití hosty v hotelu,
motelu nebo jiných ubytova
cích zařízeních,
-
-
-
úderu
-
Před
-
-
86
Page 87

v soukromých penziónech
Copyright UNOLD AG | www.unold.de
nebo rekreačních objektech.
16. Pravidelně kontrolujte pří
stroj, zástrčku a přívodní
kabel, zda nejsou
opotřebeny
nebo poškozeny. Při poško
zení přívodního kabelu nebo
jiných dílů pošlete
přístroj
nebo přívod na kontrolu a
opravu do našeho servisu.
Neodborné opravy mohou
vést k značnému nebezpečí
pro uživatele a mají za násle
dek ztrátu záruky.
17.
Je-li přívodní vedení tohoto
přístroje poškozeno, musí
být vyměněno výrobcem,
jeho servisem nebo podobně
kvalifikovanou osobou, aby
se předešlo ohrožení.
18. Přístroj nesmí být použí
ván s příslušenstvím jiných
výrobců
nebo značek,
aby se
předešlo poškození.
19. Po použití i před čištěním
vyndejte síťovou zástrčku ze
zásuvky. Nikdy nenechávejte
přístroj bez dozoru, když je
připojen do sítě.
Pokyny k postavení a obsluze pří
stroje
20.
Přístroj ani přívodní kabel
nesmí být používány v blíz
kosti plamenů.
21.
Nikdy se přístroje popř. jeho
přívodu nedotýkejte mok-
-
rýma rukama.
22.
Z bezpečnostních důvodů
přístroj nikdy nestavte na
-
horké povrchy, kovový pod
nos nebo mokrý podklad.
23.
Přístroj vždy používejte na
volném, rovném a tepelně
odolném podkladu.
24. Dbejte na to, aby přívodní
kabel nevisel přes okraj pra
-
covní plochy, protože to může
vést
k nehodám,
např. za něj
mohou zatáhnout malé děti.
25. Nikdy nenavíjejte přívodní
vedení kolem přístroje.
26. Přívod musí být položen tak,
aby bylo vyloučeno zatažení
za něj nebo zakopnutí.
27. Používejte rýžovar pouze ve
-
vnitřních prostorech.
28. Před vložením nebo vyjmu
tím dílů příslušenství musí
být
přístroj vypnut
a vytažena
zástrčka ze zásuvky.
29. Pokud možno nepoužívejte
pro provoz přístroje prodlužo
vací kabel ani vícenásobnou
zásuvku.
30.
-
Dbejte na to, že varná nádoba
musí být na vnější straně
vždy suchá a čistá, než ji vlo
-
žíte do přístroje.
-
-
-
-
-
87
Page 88

31. Kromě toho zkontrolujte, že
Copyright UNOLD AG | www.unold.de
se uvnitř přístroje nenacházejí žádná zrnka rýže nebo
jiné
předměty, abyste přede
šli poškození přístroje.
32.
Pozor: Nikdy nepoužívejte
rýži ve varných sáčcích, které
mohou přístroj poškodit.
33. Nikdy rýži nepřipravujte s
vejci, mléčnými produkty
nebo jinými pěnivými přísa
dami. Pěna může překypět a
způsobit poškození přístroje.
34.
Varná nádoba se nikdy nesmí
používat jako hrnec na plot
nách sporáku nebo podobně.
35.
Nikdy rýži nevyjímejte
pomocí tvrdých příborů např.
z kovu, protože jinak dojde k
poškrábání povrchové vrstvy.
Používejte výhradně příbory z
plastu nebo dřeva.
36. Nikdy přístroj nenoste za
-
kryt, abyste předešli poško
zení krytu a přístroje.
37.
Během provozu nesmí být
přístroj nikdy nošen nebo
posunován za držadlo. Mohlo
by dojít k úniku horké vody
nebo horkých potravin a tím
-
k opaření.
38. Po použití a před čištěním
musí být vytažena zástrčka
ze zásuvky. Teprve pak je pří
-
stroj zcela vypnut.
39.
Přístroj je vhodný pouze pro
zpracování potravin.
40. Než budete přístroj rozebírat
nebo jím pohybovat, musí
být zcela vychladlý.
-
-
POZOR!
Přístroj je během provozu velmi horký. Dbejte proto na dostatečný
odstup od všech hořlavých předmětů a na dostatečné větrání.
Zásadně používejte kuchyňské chňapky, dokud je přístroj v
provozu popř. dokud je ještě horký.
Nikdy nemějte části těla přímo nad přístrojem, když je v provozu
– nebezpečí opaření unikající párou!
V žádném případě těleso přístroje neotevírejte. Je nebezpečí
úderu elektrickým proudem.
Výrobce nepřebírá záruku v případě chybné montáže, neodborného a chybného používání nebo po
provedení opravy ze strany neoprávněné třetí osoby.
88
Page 89

UVEDENÍ DO PROVOZU
Copyright UNOLD AG | www.unold.de
1. Odstraňte všechny části balení
a případné transportní pojistky.
Materiál balení udržujte mimo
dosah dětí – nebezpečí udušení!
2. Zkontrolujte, zda jsou všechny uvedené části příslušenství dodány.
DŮLEŽITÁ UPOZORNĚNÍ A TIPY
1. Dbejte na to, že ideální výsledek vaření závisí na mnoha faktorech. Doba vaření Vašeho rýžového pokrmu se může od našich
doporučení lišit podle použitého
druhu rýže, teploty vody a přiro-
zeně také podle Vašich osobních
preferencí. Doba varu pro 2 odmě-
řovací nádoby rýže činí cca 15-30
minut.
2. V zásadě můžete s přístrojem při-
pravovat nejenom rýži, nýbrž i bul-
gur, quinou, zelenou špaldu, jáhly
nebo ovesnou kaši.
3. Tip: Pokud dáváte přednost poněkud měkčí rýži, přidejte trochu
více vody nebo rýži nechte po
vaření ještě trochu dojít.
Pozor: Nikdy nepoužívejte
rýži ve varných sáčcích, které
mohou přístroj poškodit.
4. Nikdy rýži nepřipravujte s vejci,
mléčnými produkty nebo jinými
pěnivými přísadami. Pěna může
překypět a způsobit poškození pří-
stroje.
3. Všechny vyjímatelné díly vyčistěte
vlhkou utěrkou, jak je popsáno v
kapitole „Čištění a péče“.
5. Varná nádoba se nikdy nesmí používat jako hrnec na plotnách sporáku nebo podobně.
6. Nikdy rýži nevyjímejte pomocí tvrdých příborů např. z kovu, protože
jinak dojde k poškrábání povrchové vrstvy. Používejte výhradně
příbory z plastu nebo dřeva. Kromě
toho je v kontaktu s rýží nenechávejte příliš dlouho, abyste předešli
změnám chuti.
7. Doporučujeme rýži před vařením
omýt studenou vodou, aby se nelepila na varnou nádobu.
8. Některé druhy rýže a obilí musí
být před vařením namočeny. To
se týká např. divoké rýže nebo
špaldy.
89
Page 90

OBSLUHA – VAŘENÍ RÝŽE
Copyright UNOLD AG | www.unold.de
Pozor: Vnitřek přístroje udržujte vždy suchý a dbejte na
to, aby se tam nedostaly žádné
potraviny nebo jiné předměty. Nikdy
přístroj neuvádějte do provozu, když
je jeho vnitřek mokrý nebo znečištěný. V takovém případě přístroj
nejprve pečlivě vyčistěte a osušte.
1. Ujistěte se, že zástrčka není zastrčena v zásuvce.
2. Zkontrolujte, zda je přístroj
správně sestaven a stojí na rovné,
stabilní a tepelně odolné ploše.
3. Vyjměte varnou nádobu.
4. Odměřovací nádobou změřte
požadované množství rýže.
5. Naplňte rýži do varné nádoby.
6. Nyní odměřte příslušné množství
studené vody a přidejte je do
varné nádoby. Na každou odměřovací nádobu rýže byste měli
přidat 1,5 odměřovací nádoby
vody. Nikdy však nedávejte více
vody než ke značce Max ve varné
nádobě, abyste předešli poškození
přístroje. Naše doporučení zní:
Množství rýže Množství vody
1 odměřovací
nádoba
2 odměřovací
nádoby
1,5 odměřovací
nádoby
2,5 odměřovací
nádoby
3 odměřovací
nádoby
4 odměřovací
nádoby
5 odměřovacích
nádob
6 odměřovacích
nádob
3,5 odměřovací
nádoby
4,5 odměřovací
nádoby
5,5 odměřovacích nádob
6,5 odměřovacích nádob
7. Naplněnou varnou nádobu nyní
vložte do přístroje a nasaďte kryt.
Otočte krytem ve směru hodinových ručiček, abyste jej uzavřeli.
8. Spojte konektor termostatu se
zdířkou na zadní straně přístroje.
9. Zapojte zástrčku do zásuvky. Přístroj připojte do sítě vždy teprve
krátce před tím, než jej budete
používat! Jednotka ohřívá, když je
připojen k elektrické síti! Červená
kontrolka ukazuje, že přístroj je v
provozu.
10. Zapněte přístroj tlačítkem ZAP,
stisknutím tlačítka dolů, až aretuje.
11. Když je rýže hotová, rozsvítí se
zelená kontrolka a přístroj udržuje
rýži teplou, dokud nevytáhnete
síťovou zástrčku.
12. Podle možností rýži hned zamíchejte, aby se chuť plně rozvinula.
K tomu používejte pouze kuchyň-
90
Page 91

ské náčiní ze dřeva nebo plastu,
Copyright UNOLD AG | www.unold.de
abyste nepoškodili povrchovou vrstvu varné nádoby. Pokud
chcete rýži dále udržovat teplou,
opět zavřete kryt. Dbejte však na
to, že rýže ještě trochu dochází,
když ji necháte v přístroji s udržováním teploty.
13. Teplota v režimu udržování tepla
činí cca 70 °C.
14. Z hygienických důvodů doporučujeme nikdy neudržovat rýži teplou
déle než 10-12 hodin.
15. Pro ukončení režimu udržování
tepla a definitivní vypnutí přístroje
vytáhněte zástrčku ze zásuvky.
16. Upozornění: Přístroj je vybaven
ochranou proti provozu nasucho,
která přístroj vypne, když je topný
prvek příliš horký (např. když v
nádobě již není voda). V takovém
případě nechte přístroj nejméně
15 minut vychladnout, než jej
znovu uvedete do provozu.
17. Když chcete rýži doplnit o bylinné
aroma, naplňte malou doda-
nou misku čerstvými bylinkami
podle chuti. Vložte ji po vložení varné nádoby do přístroje a
postupujte tak, jak bylo popsáno.
Rýže bude mít po uplynutí doby
vaření decentní bylinné aroma.
Tip: V kovové nádobě na bylinky
je možné připravovat také menší
množství rybího filé (max. 100150 g). To se však povede jen
tehdy, pokud připravujete maximálně 1-2 porce rýže.
POZOR!
Přístroj je během provozu velmi
horký. Dbejte proto na dostatečný odstup od všech hořlavých předmětů a na dostatečné
větrání.
Zásadně používejte kuchyňské chňapky, dokud je přístroj
v provozu popř. dokud je ještě
horký.
91
Page 92

MLÉČNÁ RÝŽE
Copyright UNOLD AG | www.unold.de
Pozor: Vnitřek přístroje udržujte vždy suchý a dbejte na
to, aby se tam nedostaly žádné
potraviny nebo jiné předměty. Nikdy
přístroj neuvádějte do provozu, když
je jeho vnitřek mokrý nebo znečištěný. V takovém případě přístroj
nejprve pečlivě vyčistěte a osušte.
1. Jedním postupem lze připravit
maximálně 4 porce mléčné rýže (4
OBILÍ
Pozor: Vnitřek přístroje udr-
žujte vždy suchý a dbejte na to,
aby se tam nedostaly žádné potraviny nebo jiné předměty. Nikdy pří-
stroj neuvádějte do provozu, když je
jeho vnitřek mokrý nebo znečištěný.
V takovém případě přístroj nejprve
pečlivě vyčistěte a osušte.
1. V rýžovaru lze rovněž vařit jáhly
(zlaté jáhly), bulgur a quinou.
Použijte následující množství:
Obilí Vody
1 odměřovací
nádoba
1,5 odměřovací
nádoby
odměřovací nádoby). Na každou
odměřovací nádobu rýže přidejte
2 nádoby mléka a cca 5 g másla
(1/2 čajové lžičky). Pokud chcete
mléčnou rýži osladit cukrem, přidejte jej až po vaření.
Obilí Vody
2 odměřovací
nádoby
3 odměřovací
nádoby
4 odměřovací
nádoby
3 odměřovací ná-
doby
4,5 odměřovací
nádoby
6 odměřovací ná-
doby
2. Pro dosažení ideálního výsledku
vaření by se nemělo připravovat
více než tato množství.
3. Samozřejmě můžete přidat také
sůl podle chuti.
92
Page 93

RECEPT
Copyright UNOLD AG | www.unold.de
Plněné cukety
4 porce
2 odměřovací nádoby rýže se 3 odměřovacími nádobami vody povařte v rýžovaru.
4 malé cukety, 5 oloupaných rajčat
zbavených jader, 1 svazek jarní cibulky, 500 g mletého hovězího masa, sůl,
pepř, oregáno, 2 stroužky česneku,
200 g zakysané smetany, 100 g mle-
tého sýra
Cukety rozpůlte, vnitřní dužinu vyškrábejte škrabkou na melouny. Tuto dužinu jemně pokrájejte.
Poloviny cukety vložte do vymazané
formy na zapékání. Rajčata pokrájejte
na velmi malé kousky, přidejte je k po-
krájené dužině, oloupejte česnek a na-
krájejte jej na velmi malé kousky. Jarní
cibulku pokrájejte na kroužky, okořeňte pepřem, solí a oregánem a nechte
marinovat. Přidejte vařenou rýži.
Mleté maso opečte s trochou oleje, téměř propečte a promíchejte se zeleninou. Směsí naplňte poloviny cuket.
Promíchejte sýr se zakysanou smetanou a tento krém dejte na plněné cu-
kety.
Zapékací formu dejte na rošt na prostřední lištu trouby a připravujte při
170 °C cca 20-30 minut.
Tip: Také můžete cuketu jednoduše
pokrájet na plátky cca 8 mm. Naskládejte je do formy na zapékání, pokryjte
směsí, potřete směsí sýra a zakysané
smetany a pečte.
93
Page 94

ČIŠTĚNÍ A PÉČE
Copyright UNOLD AG | www.unold.de
Před čištěním vytáhněte síťovou zástrčku.
prostředku a osušte suchou utěrkou.
4. Čisticí prostředek nikdy nedávejte
Nechte přístroj vychladnout
a popř. z varné nádoby vylijte
zbylou vodu.
přímo na přístroj nýbrž vždy na
utěrku.
5. Varná nádoba může být opláchnuta a osušena měkkou utěrkou.
1. Nikdy přístroj neponořujte do vody
ani jiné tekutiny.
2. Nepoužívejte abrazivní čisticí pro-
středky, drátěnku, kovové předměty, horké čisticí prostředky ani
6. Občas zkontrolujte, zda těsnění v
krytu je neporušené. Když zjistíte
trhliny nebo jiná poškození, musí
být těsnění vyměněno. Nová těsnění obdržíte v našem servisu.
dezinfekční prostředky, protože
mohou způsobit poškození.
3. Těleso i kryt vyčistěte vlhkou utěr-
kou s trochou jemného čisticího
ODSTRAŇOVÁNÍ CHYB
Závada Příčina Řešení
Kapky vody na krytu Těsnění na krytu není správ-
Z přístroje uniká
voda
Rýže je po vaření
ještě tvrdá
94
ně umístěno
Kryt není správně otočen
Bylo naplněno příliš mnoho
vody
Bylo naplněno příliš mnoho
rýže
Bylo naplněno příliš málo
vody
Upevněte těsnění přesně
na okraji krytu.
Sundejte kryt a znovu jej
nasaďte na přístroj.
Upravte množství vody
a rýže, dbejte na značku
Max.
Upravte množství vody,
dbejte na značku Min.
Page 95

Rýže je po vaření
Copyright UNOLD AG | www.unold.de
rozbředlá
Bylo naplněno příliš mnoho
vody
Upravte množství vody,
dbejte na značku Max.
Rýže má po vaření
hnědý povlak
Rýže nebyla před vařením
omyta
Vždy omyjte rýži před vařením čistou, studenou
vodou.
Kontrolka svítí, přístroj však neohřívá
Technické problémy na pří-
stroji
Obraťte se na náš servis.
ZÁRUČNÍ PODMÍNKY
Na naše přístroje poskytujeme záruku v trvání 24 měsíců (u průmyslového využití 12 měsíců) od data koupě výrobku, záruka
se vztahuje na poškození, která prokazatelne vznikla při správném použití v důsledku výrobních vad. Po dobu záruky budeme
odstraňovat materiální i výrobní vady opravou nebo výměnou podle našeho uvážení. Poskytnutí záruky výhradně platí pro
zařízení prodány v Německu i Rakousku. V jiných zemích se obrat’te prosím na kompetentní dovozce. Přístroje, na které bylo
uplatňováno odstranění vad, zašlete prosím smechanicky vyhotovenou kopií nákupního dokladu, ze kterého musí být bez-
podmínečně patrný datum nákupu i s popisem vad, přístroj musí být bezpečně zabalen a nafrankován na náš záruční servis.
V připadě opravněné záruky jsou kupujícím vraceny poštovní poplatky v Německu i Rakousku. Tato záruka se nevztahuje na
poškození způsobená opotřebením, nesprávným zacházením a nedodržováním návodů kúdržbě a obsluze. Záruční doba
zaniká, když opravy nebo manipulace s přístrojem byly provedeny třetí osobou. Eventuální nároky zákazníka vůči prodejci/
obchodníku nejsou touhle zárukou omezeny.
LIKVIDACE / OCHRANA ŽIVOTNÉHO PROSTŘEDÍ
Naše vyrobené přístroje mají vysoce kvalitní standard pro zajišt’ění jejich dlouhé životnosti. Pravidelné údrž-
by i opravy odborně provedeny naším prodejním servisem mohou mít vliv na prodloužení provozní životnosti
přístroje. Když je přístroj vadný a už ho nelze opravit, neopomeňte prosím: Toto zařízení nepatří do běžného
domovního odpadku, ale musí být předáno do autorizované sběrny pro recyklování elektrických nebo elek-
tronických zařízení. Separátní sběr a recyklování odpadních produktů umožňuje šetření přírodních zdrojů a
zajišt’uje, aby byly odpady likvidovány způsobem, který je pro zdraví a kologii přijatelný.
95
Page 96

INSTRUKCJA OBSŁUGI MODEL 58315
Copyright UNOLD AG | www.unold.de
DANE TECHNICZNE
Moc: 250 W, 220 V~, 50 Hz
Wymiary: ok. 23,0 x 23,0 x 26,0 cm (szer./głęb./wys.)
Przewód zasilający: ok. 100 cm
Ciężar: ok. 1,4 kg
Materiał: Tworzywo sztuczne, stal szlachetna
Pojemność: 1,3 l
Wyposażenie: W pełni automatyczne urządzenie do gotowania ryżu, np. ryżu naturalnego,
ryżu do risotto, ryżu basmati, kaszy bulgur, kosmozy ryżowej, orkiszu zielonego,
prosa, wewnętrzny pojemnik z powłoką antyadhezyjną, ochrona przed pracą na
sucho
Akcesoria: Kubek z miarką, łyżka, wewnętrzny pojemnik, instrukcja obsługi
Zmiany i błędy w opisie wyposażenia, technice, kolorach i konstrukcji są zastrzeżone
OBJAŚNIENIE SYMBOLI
Symbol ten oznacza ewentualne niebezpieczeństwa, które mogą prowadzić do obrażeń
lub uszkodzenia urządzenia.
Symbol ten wskazuje na ewentualne niebezpieczeństwo poparzenia. Zawsze postępować
tutaj ze szczególną ostrożnością.
ZASADY BEZPIECZEŃSTWA
Prosimy przeczytać poniższe
instrukcje i zachować je.
Ogólne wskazówki bezpieczeństwa
/ wskazówki dotyczące osób w
gospodarstwie domowym
1. Urządzenie może być uży
wane przez dzieci w wieku
powyżej
8 lat
niczonej sprawności fizycz-
nej, sensorycznej lub umy-
96
i osoby o ogra-
słowej lub też nie posiadające
doświadczenia
jeśli
są one nadzorowane
i/lub wiedzy,
lub zostały poinstruowane w
zakresie bezpiecznego użyt
-
kowania i zrozumiały wyni-
-
kającego z tego zagrożenia.
Urządzenie
nie jest
Dzieci mogą czyścić i konser
zabawką.
-
Page 97

wować urządzenie tylko pod
Copyright UNOLD AG | www.unold.de
nadzorem.
2. Nie dopuszczać do urządze
-
nia dzieci w wieku poniżej 3
lat lub nadzorować
je przez
cały czas.
3. Dzieci w wieku od 3 do 8
lat mogą włączać i wyłączać
urządzenie tylko wtedy, gdy
znajduje się ono w swojej
normalnej pozycji obsługi, a
dzieci są nadzorowane lub
zostały poinstruowane w
zakresie bezpiecznego użyt
-
kowania i zrozumiały wynikającego z tego zagrożenia.
Dzieci w wieku od 3 do 8 lat
nie
powinny urządzenia
pod
-
łączać, obsługiwać, czyścić
ani konserwować.
4.
Pilnować, aby dzieci nie
bawiły się urządzeniem.
5. Urządzenie należy przecho
-
wywać w miejscu niedostępnym dla dzieci.
6.
Urządzenie należy podłączać
wyłącznie do prądu prze
miennego o napięciu podanym na tabliczce znamionowej.
7.
Upewnić się, że wszyscy
użytkownicy urządzenia są
świadomi niebezpieczeństwa
związanego z uchodzącą
parą oraz dotknięciem gorą
-
cych części urządzenia.
8.
Urządzenie nie może praco-
wać z zewnętrznym regulatorem czasowym lub systemem
zdalnego sterowania.
9.
W żadnym wypadku nie zanu
rzać urządzenia lub przewodu w wodzie lub w innych
cieczach.
10.
Obudowy i przewodu nie
wolno czyścić w zmywarce.
11. Obudowa nie może mieć
kontaktu z wodą ani z innymi
płynami. Jeśli doszło do kon
taktu, to przed ponownym
użyciem wszystkie części
należy całkowicie wysuszyć.
12.
Nigdy nie trzymać części
ciała bezpośrednio nad pra
cującym urządzeniem – niebezpieczeństwo poparzenia
uchodzącą parą!
13.
Wyciekająca woda konden
sacyjna może być bardzo
gorąca – niebezpieczeństwo
poparzenia!
Zawsze używać
odpowiednich łapek do garn
ków i wycierać ewentualnie
wyciekającą wodę.
14.
Uwaga! Nigdy nie wlewać
płynów bezpośrednio do
otwartego urządzenia – nie
bezpieczeństwo porażenia
prądem elektrycznym! W
odę
wolno nalewać wyłącznie do
dostarczonego pojemnika
wewnętrznego. W przypadku
-
-
-
-
-
-
97
Page 98

przedostania się cieczy bez-
Copyright UNOLD AG | www.unold.de
pośrednio do urządzenia,
wyłączyć je natychmiast
prądu i wytrzeć ciecz. Zacze
kać, aż urządzenie całko-
wicie wyschnie przed jego
ponownym uruchomieniem.
15.
Urządzenie przeznaczone
jest wyłącznie do użycia w
gospodarstwie domowym
lub w podobnych zastosowa
niach, np.
aneksach kuchennych
w sklepach, biurach lub
innych zakładach,
do użycia przez gości w hote
lach, motelach lub innych
noclegowniach,
w prywatnych pensjonatach
lub domach letniskowych.
16. Regularnie sprawdzać urzą
dzenie, wtyczkę i kabel zasilający pod kątem śladów
zużycia
lub uszkodzenia.
W przypadku uszkodzenia
kabla
lub innych części pro
simy odesłać urządzenie lub
kabel do naszego serwisu w
celu sprawdzenia i naprawy.
Nieprawidłowo
naprawy mogą
wykonane
powodować
znaczne niebezpieczeństwo
dla użytkownika i prowadzą
do unieważnienia gwarancji.
17. Uszkodzony kabel urządze
nia musi ze względów bez-
pieczeństwa wymienić pro-
ducent, serwis klienta lub
z
-
osoba o podobnych kwalifikacjach.
18.
Urządzenia nie wolno używać
z akcesoriami innych produ
centów lub marek, aby unik-
nąć szkód.
19.
Po użyciu urządzenia i
przed czyszczeniem urzą
-
dzenia wyciągnąć wtyczkę
z gniazda. Nigdy nie pozo-
stawiać urządzenia bez nadzoru, gdy wtyczka włożona
jest do gniazda.
-
Wskazówki
dotyczące ustawienia
i obsługi urządzenia
Nie wolno używać urządzenia
20.
ani kabla w pobliżu płomieni.
21. Nigdy nie dotykać urządzenia
-
ani kabla mokrymi dłońmi.
22. Ze względów bezpieczeń
stwa nigdy nie należy stawiać urządzenia na gorących
-
powierzchniach, metalowym
blacie lub
wilgotnym pod
łożu.
23.
Urządzenie należy używać
zawsze na wolnej, równej i
żaroodpornej powierzchni.
24. Zwrócić uwagę na to, aby
przewód nie zwisał z brzegu
powierzchni roboczej, gdyż
-
może to prowadzić do wypad
-
-
-
-
-
98
Page 99

ków, gdy np. pociągną za
Copyright UNOLD AG | www.unold.de
niego małe dzieci.
25. Nigdy nie owijać przewodu
wokół urządzenia.
26. Przewód zasilający musi być
tak ułożony, aby niemożliwe
było jego pociągnięcie lub
potknięcie się o niego.
27. Używać urządzenie wyłącz
nie wewnątrz pomieszczeń.
Przed włożeniem lub zdję-
28.
ciem akcesoriów należy wyłączyć urządzenie i wyciągnąć
wtyczkę z gniazda.
29.
Nie używać w miarę możli
wości przedłużaczy ani wie-
lokrotnych gniazd wtykowych
do
podłączenia urządzenia
do prądu.
Wewnętrzny pojemnik musi
30.
być z zewnątrz zawsze suchy
i czysty przed włożeniem do
urządzenia.
31. Sprawdzić, czy wewnątrz
urządzenia nie znajdują się
ziarenka ryżu lub inne przed
mioty, aby uniknąć uszkodzenia urządzenia.
32.
Uwaga: Nigdy nie używać
ryżu w woreczkach, gdyż
może to prowadzić do uszko
dzenia urządzenia.
33.
Nigdy nie gotować ryżu z
jajkiem, produktami mlecz
nymi lub innymi, pieniącymi
się składnikami. Piana
może
przelać się i prowadzić do
uszkodzenia urządzenia.
34. Nigdy nie używać wewnętrz
nego pojemnika jako garnka
na płytach kuchennych
podobnych.
35. Nigdy nie używać do wyjęcia
ryżu twardych sztućców, np. z
-
metalu, gdyż mogą one pory
sować powłokę pojemnika.
Używać
wyłącznie sztućców
z tworzywa sztucznego lub
drewna.
Nigdy nie przenosić urządze
36.
-
nia trzymając za pokrywę,
aby uniknąć uszkodzenia
pokrywy i urządzenia.
37.
Nigdy nie przenosić ani
nie wstrząsać pracującego
urządzenia trzymając je za
uchwyt. Gorąca woda lub
gorące artykuły spożywcze
mogą się wylać i prowadzić
do poparzenia.
38. Po użyciu urządzenia i przed
-
czyszczeniem urządzenia
należy je wyłączyć i wyciąg
nąć wtyczkę z gniazda.
Dopiero
wtedy urządzenie
jest wyłączone.
Urządzenie przeznaczone
39.
-
jest wyłącznie do obróbki
żywności.
40. Przed rozłożeniem urządze
-
nia na części lub jego przesunięciem, musi się ono całkowicie ochłodzić.
-
lub
-
-
-
-
99
Page 100

UWAGA!
Copyright UNOLD AG | www.unold.de
Urządzenie jest podczas pracy bardzo gorące. Z tego względu
należy zwracać uwagę na zachowanie wystarczającego odstę
pu od wszystkich palnych przedmiotów i wystarczającą wentylację.
Używać
zawsze łapek
do garnków, gdy urządzenie pracuje lub
jest jeszcze gorące.
Nigdy nie trzymać części ciała bezpośrednio nad pracującym
urządzeniem – niebezpieczeństwo poparzenia uchodzącą parą!
W żadnym wypadku nie wolno otwierać obudowy urządzenia.
Istnieje niebezpieczeństwo porażenia prądem elektrycznym.
Producent nie przejmuje odpowiedzialności za nieodpowiednie bądź wadliwe użytkowanie lub po
przeprowadzonych naprawach przez nieautoryzowane zakłady bądź niekompetentne osoby.
URUCHOMIENIE
-
1. Usunąć cały materiał opakowaniowy i ewentualne zabezpiecze-
nia transportowe. Przechowywać
opakowania poza zasięgiem dzieci
– niebezpieczeństwo uduszenia!
2. Sprawdzić, czy obecne są wszyst-
kie podane części.
WAŻNE WSKAZÓWKI I PORADY
1. Idealny wynik gotowania zależy od
wielu czynników. Czas gotowania
ryżu zależy od rodzaju ryżu, temperatury wody i naturalnie oso-
bistych upodobań. Z reguły czas
gotowania 2 kubków ryżu wynosi
ok. 15-30 minut.
2. W urządzeniu można gotować nie
tylko ryż, ale również kaszę bulgur,
100
3. Oczyścić wszystkie wyjmowane
części wilgotną ściereczką zgodnie z opisem podanym w rozdziale
„Czyszczenie i pielęgnacja“.
kosmozę ryżową, orkisz zielony,
proso lub owsiankę.
3. Porada: Jeżeli preferują Państwo nieco bardziej miękki ryż,
należy dodać trochę więcej wody
lub pozostawić ryż po ugotowaniu
przez chwilę w garnku.
 Loading...