

BÜGELAUTOMAT
Safety Lift
Bedienungsanleitung
Modell Safety Lift Exclusive 75025
Modell Safety Lift 75014
Instructions for use - Notice d´utilisation
Gebruiksaanwijzing - Istruzioni per l’uso
Manual de instrucciones - Návod k obsluze

Impressum:
Bedienungsanleitung Modell 75014/75025
Stand: Januar 2011 /nd
Copyright ©
Mannheimer Straße 4
68766 Hockenheim
Telefon +49 (0) 62 05/94 18-0
Telefax +49 (0) 62 05/94 18-12
E-Mail info@unold.de
Internet www.unold.de

SERVICE-HOTLINE
Bei Fragen zum Gebrauch des Gerätes können Sie sich direkt an unsere Beraterin
Montag und Dienstag von 8 bis 12 Uhr und 13 bis 17 Uhr
*derzeit 0,14 EUR/Minute aus dem Festnetz der Deutschen Telekom.
Bei Anrufen aus Mobilfunknetzen und aus dem Ausland (+49 18 05/94 18 99) können
abweichende Kosten anfallen. Ab 1.3.2010 Mobilfunkpreis maximal 0,42 EUR/Minute.
Frau Blum wenden:
Rufnummer: 0 18 05/94 18 99*

INHALTSVERZEICHNIS
Bedienungsanleitung Modell 75014/75025
Technische Daten ............................................................................................................... 6
Sicherheitshinweise ............................................................................................................ 6
Erklärung der Safety-Lift-Technologie ................................................................................... 7
Vor dem ersten Benutzen ..................................................................................................... 9
3 einfache Schritte zum Bügeln ........................................................................................... 9
Füllen des Wassertanks ....................................................................................................... 9
Bügeln............................................................................................................................... 10
Nach dem Bügeln ............................................................................................................... 10
Reinigen und Aufbewahren .................................................................................................. 11
Automatische Abschaltfunktion ............................................................................................ 11
Tipps für ein optimales Bügelergebnis ................................................................................... 12
Probleme lösen ................................................................................................................... 13
Garantiebestimmungen ....................................................................................................... 52
Service-Adressen ................................................................................................................ 54
Entsorgung / Umweltschutz ................................................................................................. 56
Instructions for use Model 75014/75025
Technical Specifications ...................................................................................................... 14
Safety Information .............................................................................................................. 14
Description of the Safety-Lift technology ............................................................................... 15
Before first use ................................................................................................................... 17
3 easy steps to ironing ........................................................................................................ 17
Filling the water tank .......................................................................................................... 17
Ironing............................................................................................................................... 18
After ironing ....................................................................................................................... 18
Cleaning and storage ........................................................................................................... 19
Automatic shutoff feature .................................................................................................... 19
Tips for an optimum ironing result ........................................................................................ 20
Trouble Shooting................................................................................................................. 21
Guarantee Conditions .......................................................................................................... 52
Waste Disposal / Environmental Protection ............................................................................ 56
Notice d´utilisation Modèle 75014/75025
Spécification technique ...................................................................................................... 22
Consignes de sécurité ......................................................................................................... 22
Explication de la fonction Safety-Lift ................................................................................... 23
Avant la première utilisation ................................................................................................ 25
Le repassage en trois étapes simples .................................................................................... 25
Remplissage du réservoir ..................................................................................................... 25
Repassage ......................................................................................................................... 26
Après le repassage .............................................................................................................. 26
Nettoyage et rangement ...................................................................................................... 27
Fonction d’arrêt automatique ............................................................................................... 27
Quelques conseils pour un repassage optimal ........................................................................ 28
Un problème avec votre fer ? ............................................................................................... 29
Conditions de Garantie ........................................................................................................ 52
Traitement des déchets / Protection de l’environnement ......................................................... 56
Gebruiksaanwijzing Model 75014/75025
Technische gegevens .......................................................................................................... 30
Veiligheidsinstructies .......................................................................................................... 30
Toelichting van de Safety-Lift-technologie ............................................................................. 31
Voor het eerste gebruik ........................................................................................................ 33
3 eenvoudige stappen om te beginnen .................................................................................. 33
Waterreservoir vullen ........................................................................................................... 33

INHALTSVERZEICHNIS
Strijken ............................................................................................................................. 34
Na het strijken ................................................................................................................... 34
Reinigen en opbergen ......................................................................................................... 35
Automatische uit-functie ..................................................................................................... 35
Tips voor een optimaal strijkresultaat .................................................................................... 36
Problemen oplossen ............................................................................................................ 37
Garantievoorwaarden ........................................................................................................... 52
Verwijderen van afval / Milieubescherming ............................................................................ 56
Istruzioni per l’uso Modello 75014/75025
Dati tecnici ....................................................................................................................... 38
Avvertenze di sicurezza ....................................................................................................... 38
Spiegazione della tecnologia Safety Lift ................................................................................ 39
Prima del primo utilizzo ...................................................................................................... 41
Guida veloce all’utilizzo del ferro ......................................................................................... 41
Riempimento del serbatoio .................................................................................................. 41
Stiratura ............................................................................................................................ 42
Dopo la stiratura ................................................................................................................. 42
Pulizia e manutenzione ....................................................................................................... 43
Funzione di spegnimento automatico .................................................................................... 43
Consigli per ottenere un ottimo risultato di stiratura ............................................................... 44
Risoluzione dei problemi ..................................................................................................... 45
Norme die garanzia ............................................................................................................. 53
Smaltimento / Tutela dell’ambiente ...................................................................................... 57
Manual de instrucciones Modelo 75014/75025
Datos técnicos ................................................................................................................... 46
Indicaciones de seguridad ................................................................................................... 46
Descripción de la tecnología Safety-Lift ................................................................................ 47
Puesta en servicio ............................................................................................................... 49
3 pasos simples al planchado ..............................................................................................49
Llenar el depósito de agua ................................................................................................... 49
Planchar ............................................................................................................................ 50
Después del planchado ....................................................................................................... 50
Limpieza y almacenamiento ................................................................................................. 51
Desconexión automática ...................................................................................................... 51
Consejos para un planchado perfecto .................................................................................... 52
Solución de problemas ........................................................................................................ 53
Condiciones de Garantia ...................................................................................................... 53
Disposición/Protección del medio ambiente ........................................................................... 57
Návod k obsluze Model 75014/75025
Technická data .................................................................................................................. 54
Bezpečnostní pokyny ........................................................................................................... 54
Objasnění technologie “Safety-Lift” .................................................................................... 55
Před prvním použitím .......................................................................................................... 57
Rychlý úvod – 3 jednoduché kroky k žehlení .......................................................................... 57
Naplnění nádržky na vodu ................................................................................................... 57
Žehlení ............................................................................................................................. 58
Po žehlení ......................................................................................................................... 58
Čištění a skladování ............................................................................................................ 59
Funkce automatického odpojení ........................................................................................... 59
Tipy pro optimální výsledek žehlení ....................................................................................... 60
Řešení problémů ............................................................................................................... 61
Záruční podmínky ............................................................................................................... 53
Likvidace / Ochrana životného prostředí ................................................................................ 57
BEDIENUNGSANLEITUNG MODELL 75014/75025
TECHNISCHE DATEN
Leistung: 2.000–2.400 W, 220–240 V~, 50 Hz
Maße: Ca. 29,5 x 12,6 x 15,3 cm (L/B/H)
Zuleitung: Ca. 300 cm
Gewicht: Ca. 1,64 kg
Volumen Wassertank: Ca. 325 ml
Ausstattung: Dampf- und Trockenbügeln
Zubehör: Bedienungsanleitung, Messbecher
Technische Änderungen vorbehalten.
SICHERHEITSHINWEISE
Konstante Dampfleistung 0-35 g
Automatische Sicherheits-Liftfunktion
Dampfstoß-Taste 100 g, Sprühnebel-Taste
Wasserstandsanzeige
Bewegliche Knickschutztülle
Vertikaldampf-Funktion
Automatische Abschaltung
5 Jahre Garantie (außer auf die Bügelsohle)
Modell 75014: Große hochglanzpolierte Edelstahl-Bügelsohle
Modell 75025: Kugelgestrahlte Edelstahl-Bügelsohle mit
Leichtlauf-Beschichtung und Präzisionsspitze
1. Bitte lesen Sie die folgenden Anweisungen
und bewahren Sie diese auf.
2. Dieses Gerät ist nicht dafür bestimmt, durch
Personen (einschließlich Kinder) mit eingeschränkten physischen, sensorischen oder
geistigen Fähigkeiten oder mangels Erfahrung und/oder mangels Wissen benutzt zu
werden, es sei denn, sie werden durch eine
für ihre Sicherheit zuständige Person beaufsichtigt oder erhielten von ihr Anweisungen,
wie das Gerät zu benutzen ist.
3. Kinder sollten beaufsichtigt werden, um
sicher zu stellen, dass sie nicht mit dem
Gerät spielen.
4. Das Gerät an einem für Kinder unzu-gänglichen Ort aufbewahren.
5. Gerät nur an Wechselstrom mit Spannung
gemäß Typenschild anschließen.
6. Dieses Gerät darf nicht mit einer externen
Zeitschaltuhr oder einem Fernbedienungssystem betrieben werden.
7. Das Gerät nie unbeaufsichtigt lassen, wenn
Kinder in der Nähe sind und nicht von Kindern bedienen lassen.
6
8. Das Gerät niemals in Wasser oder andere
Flüssigkeiten tauchen – es besteht die
Gefahr eines Stromschlags!
9. Fügen Sie dem Wasser für den Wassertank
keine Zusatzstoffe wie ätherische Öle, Essig
usw. bei, um Schäden am Gerät zu vermeiden.
10. Das Gerät ist ausschließlich für den Haushaltsgebrauch oder ähnliche Verwendungszwecke bestimmt, z. B.
Teeküchen in Geschäften, Büros oder
sonstigen Arbeitsstätten,
landwirtschaftlichen Betrieben,
zur Verwendung durch Gäste in Hotels,
Motels oder sonstigen Beherbergungs-
betrieben,
in Privatpensionen oder Ferienhäusern.
11. Die Zuleitung muss so verlegt sein, dass
man weder daran ziehen noch darüber stolpern kann.
12. Achten Sie darauf, dass die Zuleitung nicht
mit der heißen Bügelsohle in Berührung
kommt, um Schäden an der Zuleitung zu
vermeiden.
13. Das Gerät wird während des Betriebs sehr
heiß. Achten Sie darauf, nicht mit den
heißen Teilen des Gerätes in Berührung zu
kommen, um Verbrennungen zu vermeiden.
14. Der austretende Dampf ist ebenfalls sehr
heiß. Achten Sie darauf, nicht mit dem
Dampf in Berührung zu kommen und richten Sie den Dampfstrahl nie auf Personen,
um Verbrennungen zu vermeiden.
15. Ebenso können die frisch gebügelte Wäsche
und auch der Bezug des Bügelbrettes während dem Bügeln sehr heiß werden.
16. Das Gerät oder die Zuleitung dürfen nicht in
der Nähe von Flammen betrieben werden.
17. Benutzen Sie das Gerät stets auf einer
freien, ebenen und hitzebeständigen Oberfläche.
18. Schalten Sie das Gerät immer aus (Dreh-
schalter auf „AUS“), bevor Sie den Stecker
aus der Steckdose ziehen.
19. Den Stecker nie an der Anschlussleitung
aus der Steckdose ziehen.
20. Nach Gebrauch, während des (auch nur
kurzfristigen) Verlassens des Arbeitsplatzes
sowie vor dem Reinigen den Netzstecker
aus der Steckdose ziehen und das Gerät
abkühlen lassen.
21. Wenn Sie den Wassertank an einem Wasserhahn füllen, ziehen Sie aus Sicher-heitsgründen unbedingt vorher den Netz-stecker.
Der Hersteller übernimmt keine Haftung bei fehlerhafter Montage, bei unsachgemäßer oder fehlerhafter
Verwendung oder nach Durchführung von Reparaturen durch nicht autorisierte Dritte.
22. Das Gerät niemals unbeaufsichtigt lassen,
wenn der Netzstecker eingesteckt ist.
23. Wenn das Gerät abgekühlt ist, wickeln Sie
die Zuleitung lose um das Gerät, um es zur
Aufbewahrung wegzustellen.
24. Öffnen Sie auf keinen Fall das Gehäuse des
Gerätes. Es besteht Gefahr eines Stromschlags!
25. Prüfen Sie regelmäßig das Gerät, den Stecker und die Zuleitung auf Verschleiß oder
Beschädigungen. Bei Beschädigung des
Anschlusskabels oder anderer Teile senden Sie das Gerät oder den Sockel bitte
zur Überprüfung und Reparatur an unseren
Kundendienst (Anschrift siehe Garantiebestimmungen). Unsachgemäße Reparaturen
können zu erheblichen Gefahren für den
Benutzer führen und haben den Ausschluss
der Garantie zur Folge.
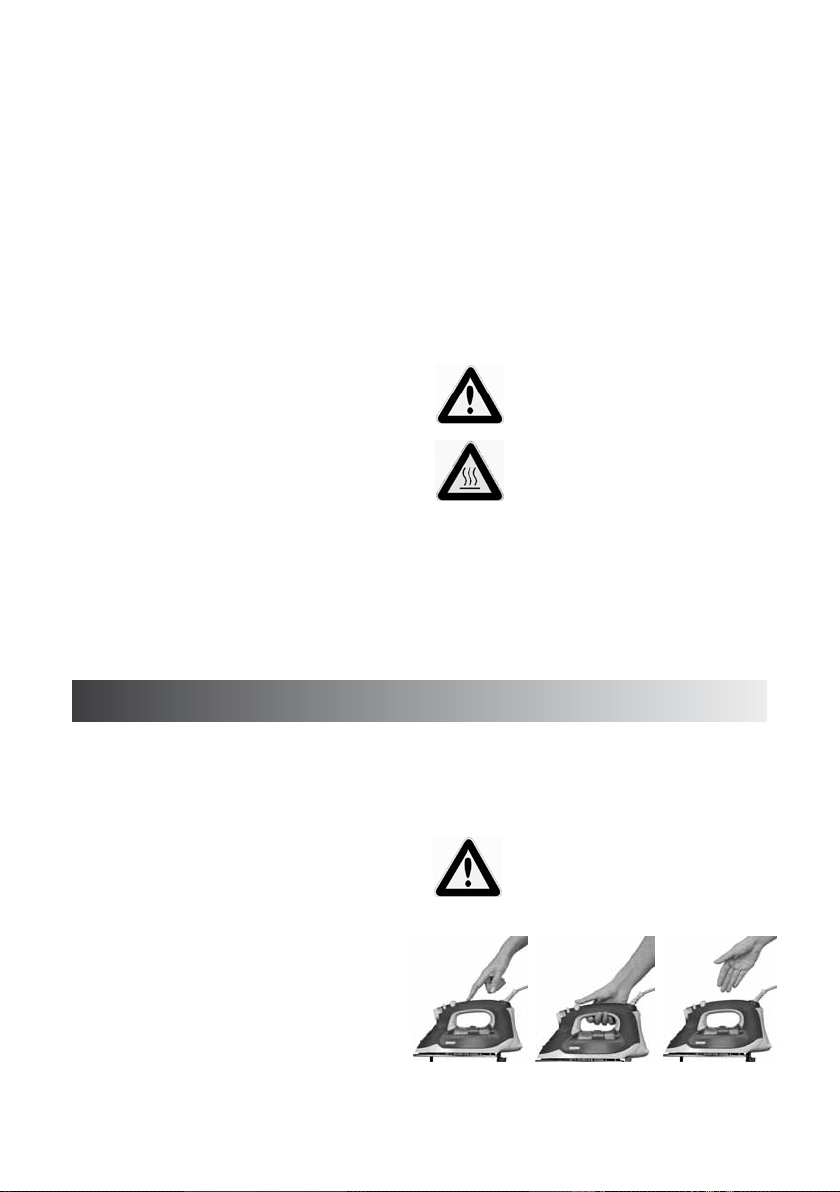
Achtung! Das Gerät verfügt durch den
Safety-Lift über eine zusätzliche Funktion, die das Bügeln erleichtert. Dennoch entbindet dies nicht von entsprechender Sorgfalt im Umgang mit dem
Gerät.
Das Gerät wird während des Betriebs
sehr heiß!
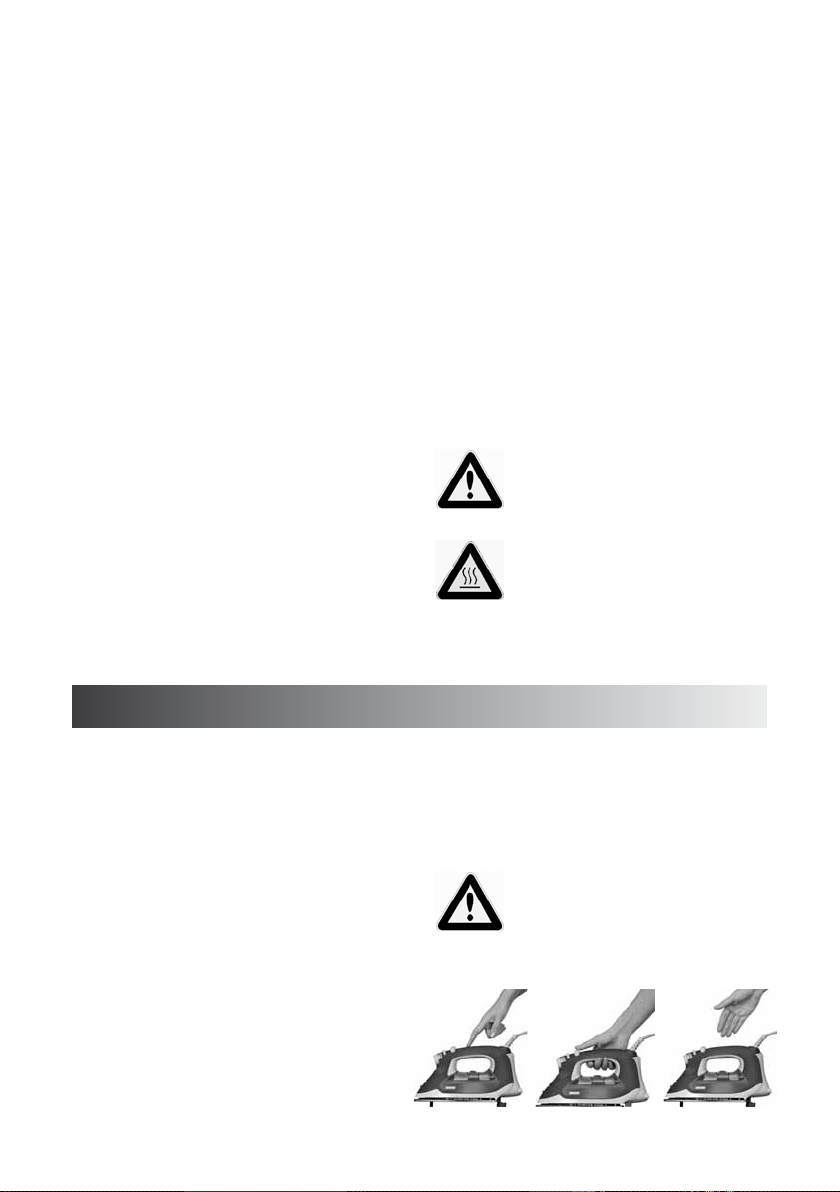
ERKLÄRUNG DER SAFETY-LIFT-TECHNOLOGIE
1. Stellen Sie den Bügelautomat auf eine
ebene Fläche. Stecken Sie den Stecker
in die Steckdose und prüfen Sie, ob der
Schalter für die Safety-Lift-Funktion auf
„EIN“ steht.
2. Sobald Sie den Griff des Bügelautomaten
berühren, senkt sich das Gerät ab und
Sie können wie gewohnt mit dem Bügeln
beginnen. Sobald Sie den Griff los lassen,
hebt die Safety-Lift-Funktion das Gerät
sofort wieder an. So wird vermieden, dass
der zu bügelende Stoff durch die heiße
Bügelsohle beschädigt wird.
Ausschalten der Safety-Lift-Funktion
1. Schalten Sie die Funktion aus, indem Sie
den Schalter auf „AUS“ stellen. Das Gerät
funktioniert nun wie ein herkömmlicher
Bügelautomat.
2. Eine zusätzliche Sicherheitseinrichtung
sorgt jedoch auch dann dafür, dass das
Gerät nach einer Minute ohne Berührung
des Griffes angehoben wird. Weitere Informationen zur automatischen Abschaltung
erhalten Sie auf Seite 11.
Achtung! Das Gerät verfügt durch den
Safety-Lift über eine zusätzliche Funktion, die das Bügeln erleichtert. Dennoch entbindet dies nicht von entsprechender Sorgfalt im Umgang mit dem
Gerät.
7
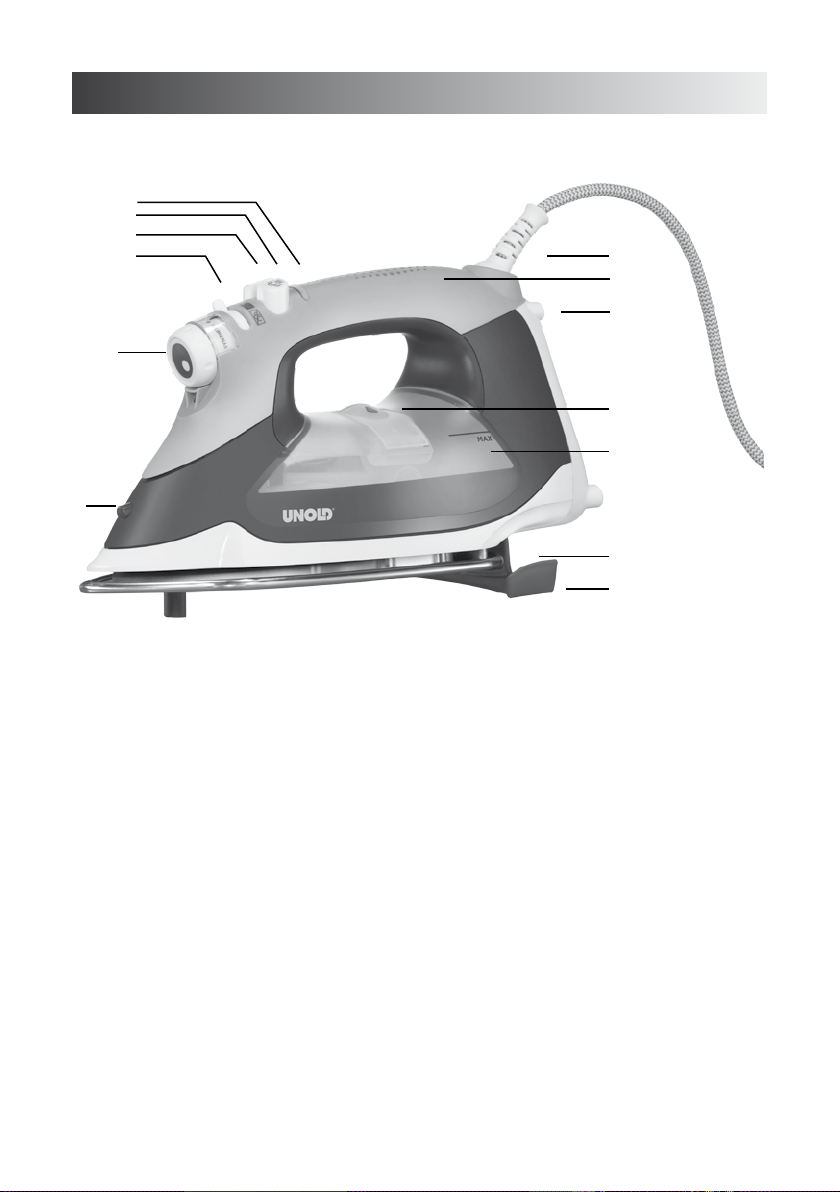
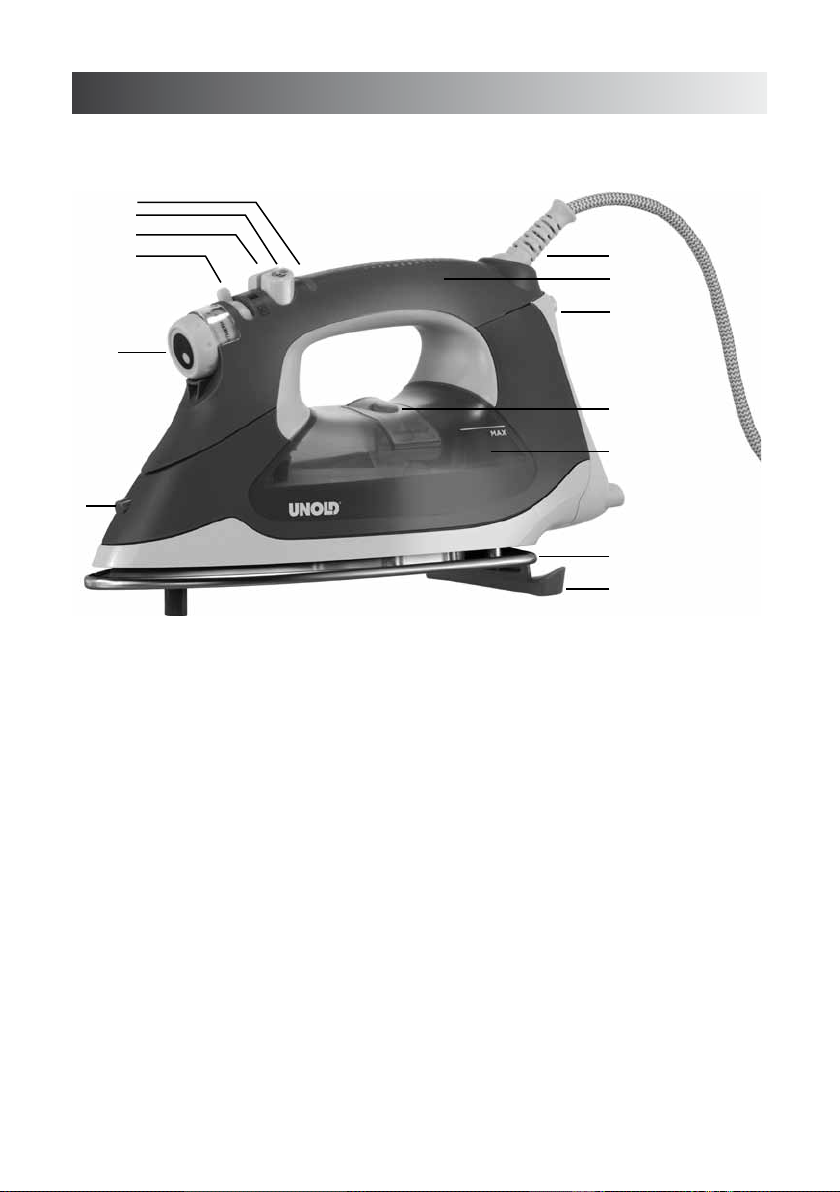
IHR NEUER BÜGELAUTOMAT
1
2
3
4
5
6
7
8
9
10
11
12
13
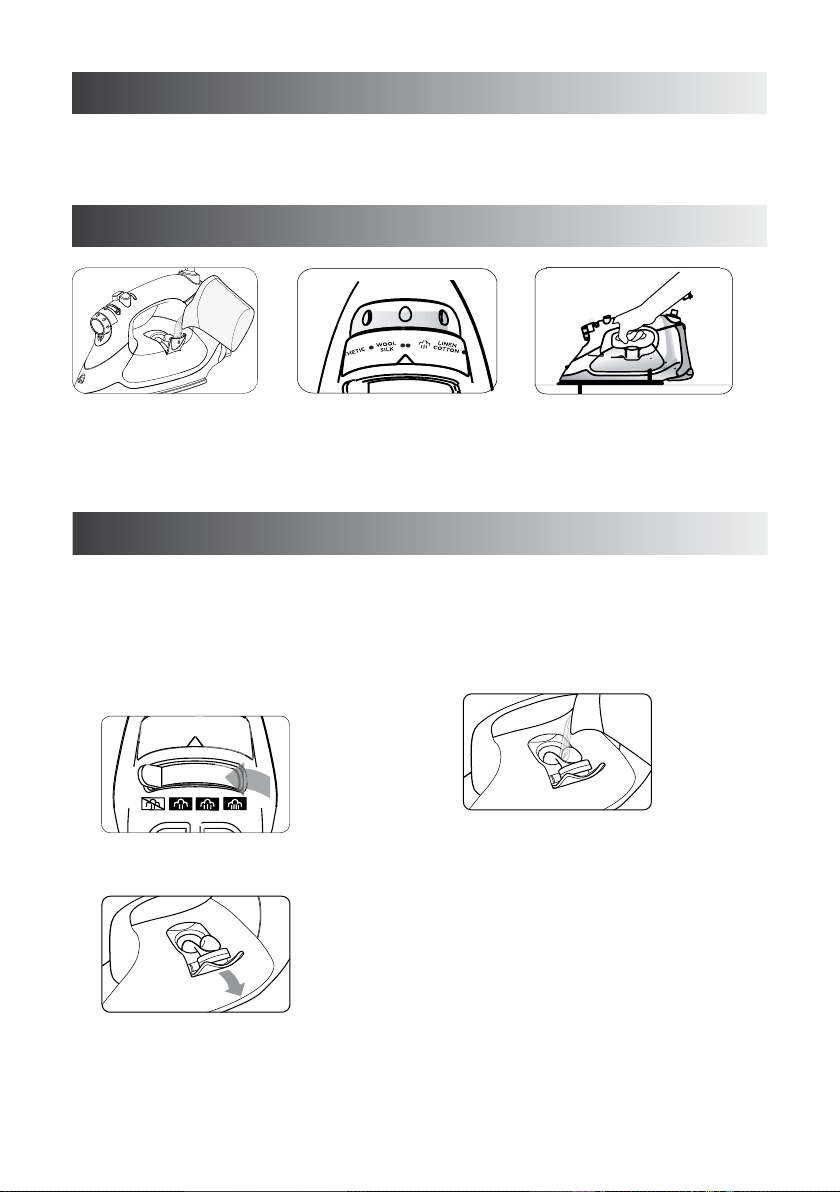
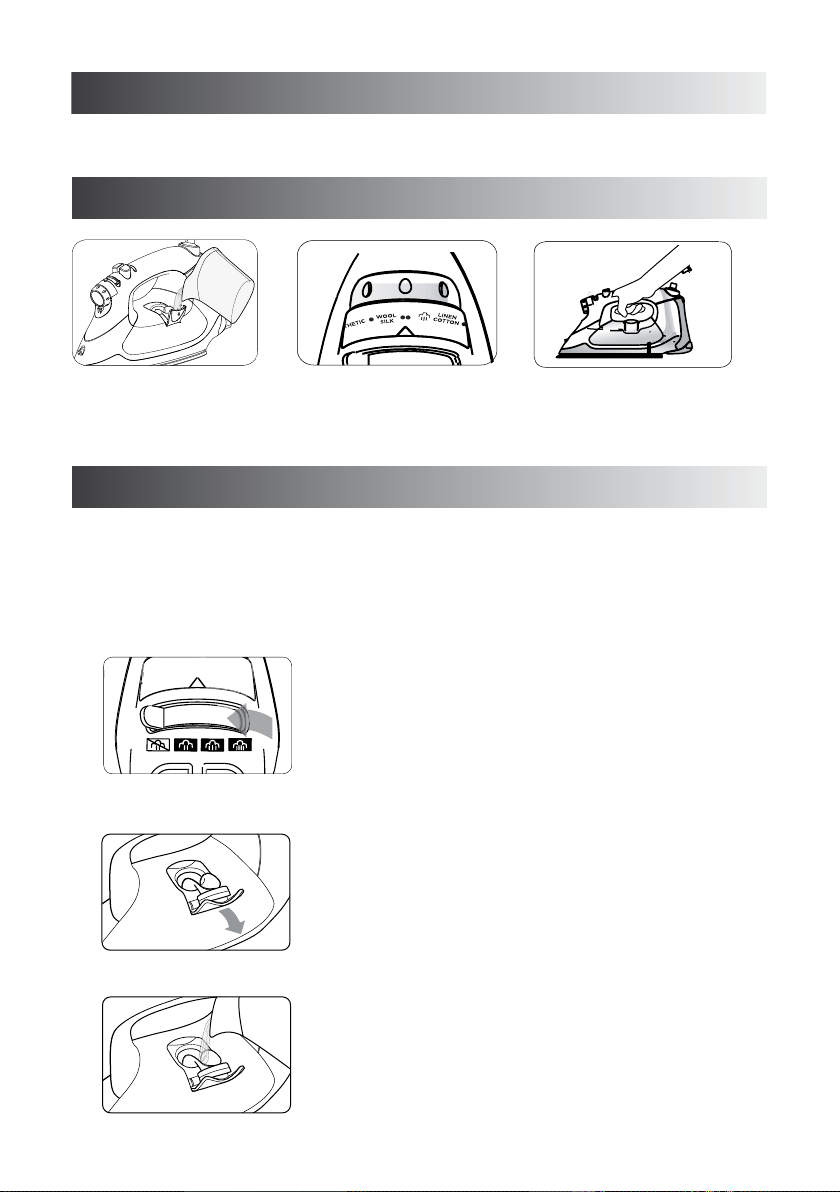
1 Kontrollleuchte
2 Dampfstoß-Taste
3 Sprühnebel-Taste
4 Dampfwahl-Taste
5 Materialwahl-Regler
6 Sprüh-Düse
7 Bewegliche Knickschutztülle
8 Griff mit Safety-Lift-Sensor
8
9 Wahlschalter für Safety-Lift (EIN/AUS)
10 Einfüllöffnung Wassertank
11 Wassertank
12 Bügelsohle
13 Safety-Lift
VOR DEM ERSTEN BENUTZEN
1. Entfernen Sie alle Verpackungsmaterialien
und ggf. Transportsicherungen.
2. Entfernen Sie bitte ebenfalls die Pappabdeckung, die eventuell an der Bügelsohle
befestigt ist!
3 EINFACHE SCHRITTE ZUM BÜGELN
Öffnen Sie die Einfüllöffnung und füllen Sie
Wasser bis zur MAXMarkierung ein
Stecken Sie den Stecker
in eine Steckdose,
wählen Sie die gewünschte Materialart
und Dampfart.
Wenn die Kontrollleuchte grün bleibt,
können Sie mit dem
Bügeln beginnen.
FÜLLEN DES WASSERTANKS
Sie können normales Leitungswasser benutzen. Wenn Sie in einer Gegend mit hartem Wassergrad
leben, empfehlen wir entweder stilles Wasser aus Flaschen zu verwenden, oder Leitungswasser und
destilliertes Wasser je zur Hälfte zu mischen. Verwenden Sie nie nur destilliertes Wasser, da dies zu
Schäden am Gerät führen kann!
1. Ziehen Sie den Stecker aus der Steckdose.
2. Stellen Sie die Dampfwahl-Taste (4) auf
„AUS“
6. Füllen Sie das Wasser vorsichtig in die Einfüllöffnung.
3. Öffnen Sie die Einfüllöffnung am Wassertank
(10).
4. Füllen Sie den mitgelieferten Messbecher
mit Wasser.
5. Achten Sie darauf, den Bügelautomat in
horizontale Position zu stellen.
7. Nicht über die Markierung „MAX“ füllen.
8. Schließen Sie die Einfüllöffnung mit leichtem Druck, bis sie einrastet.
9. Stecken Sie den Stecker in die Steckdose.
10. Die Kontrollleuchte leuchtet rot auf.
11. Wenn Sie während des Bügelns Wasser
nachfüllen müssen, ziehen Sie den Stecker
aus der Steckdose und wiederholen Sie die
genannten Schritte.
12. Stellen Sie sicher, dass der Bügelautomat
wieder aufgeheizt ist, bevor Sie mit dem
Bügeln fortfahren.
9
BÜGELN
Grundsätzliche Hinweise: Bitte prüfen Sie vorher, welche Bügeltemperatur für das jeweilige
Kleidungsstück die richtige ist. Testen Sie die richtige Einstellung im Zweifelsfall an einer nicht
sichtbaren Stelle des Kleidungsstückes. Empfindliche Gewebe bitte „auf links“ bügeln, so können
Sie Glanzstellen am Gewebe vermeiden.
1. Bereiten Sie das Gerät vor, indem Sie Wasser
wie im Kapitel „Füllen des Wassertanks“
beschrieben, einfüllen.
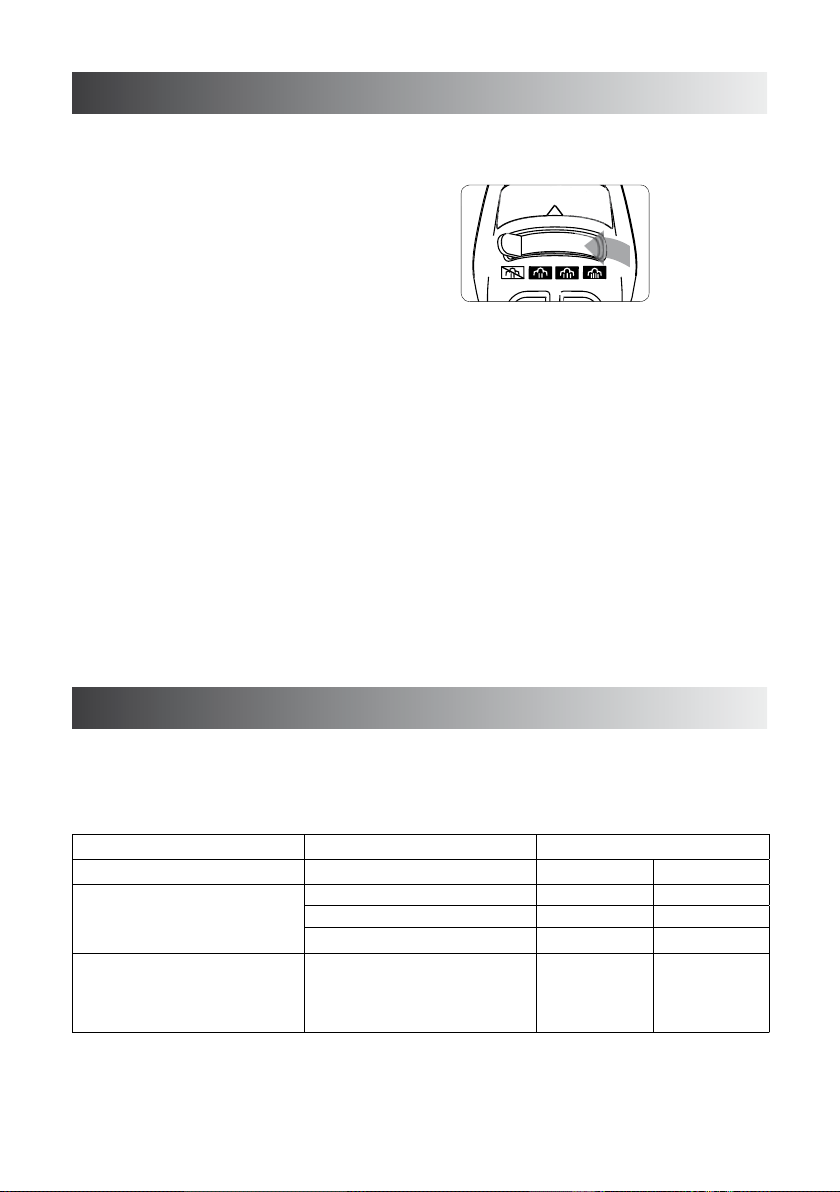
2. Drehen Sie den Materialwahl-Regler (5)
auf die gewünschte Materialart der zu
bügelnden Stücke.
3. Durch die grün blinkende Kontrollleuchte
wird angezeigt, dass das Gerät aufheizt.
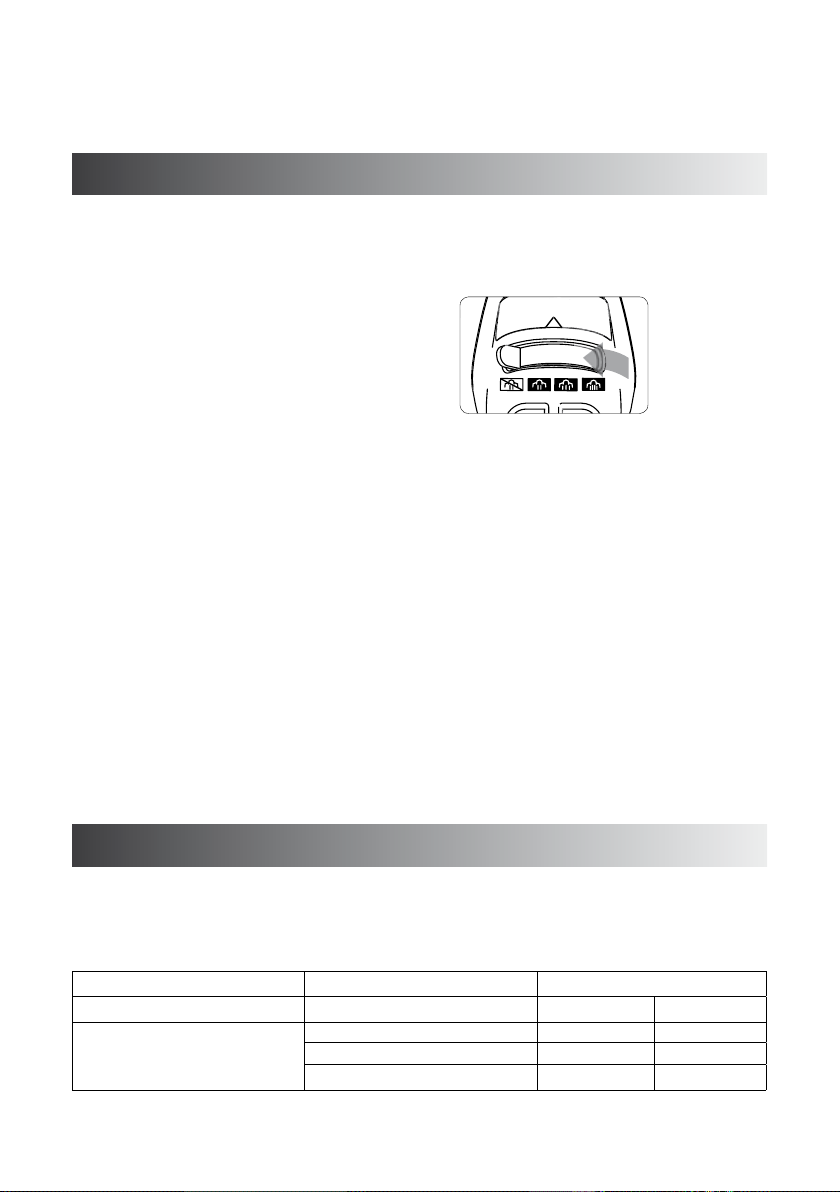
4. Sobald die Kontrollleuchte grün bleibt,
können Sie die gewünschte Dampfart
auswählen: Schieben Sie die DampfwahlTaste (4) auf die gewünschte Dampfart.
Möchten Sie permanent mit Dampf bügeln
oder die Dampfstoß-Funktion nutzen, ist dies
nur bei den Materialien Wolle, Baumwolle
oder Leinen möglich.
5. Der Bügelautomat produziert Dampf, solange
das Gerät abgesenkt ist. Möchten Sie die
Dampfproduktion ausstellen, schieben Sie
den Regler bitte auf
6. Sobald der Bügelautomat durch die SafetyLift Funktion angehoben wird, ist die
Dampffunktion deaktiviert. Sobald Sie
weiterbügeln, stellt der Automat wieder die
gewünschte Dampffunktion her.
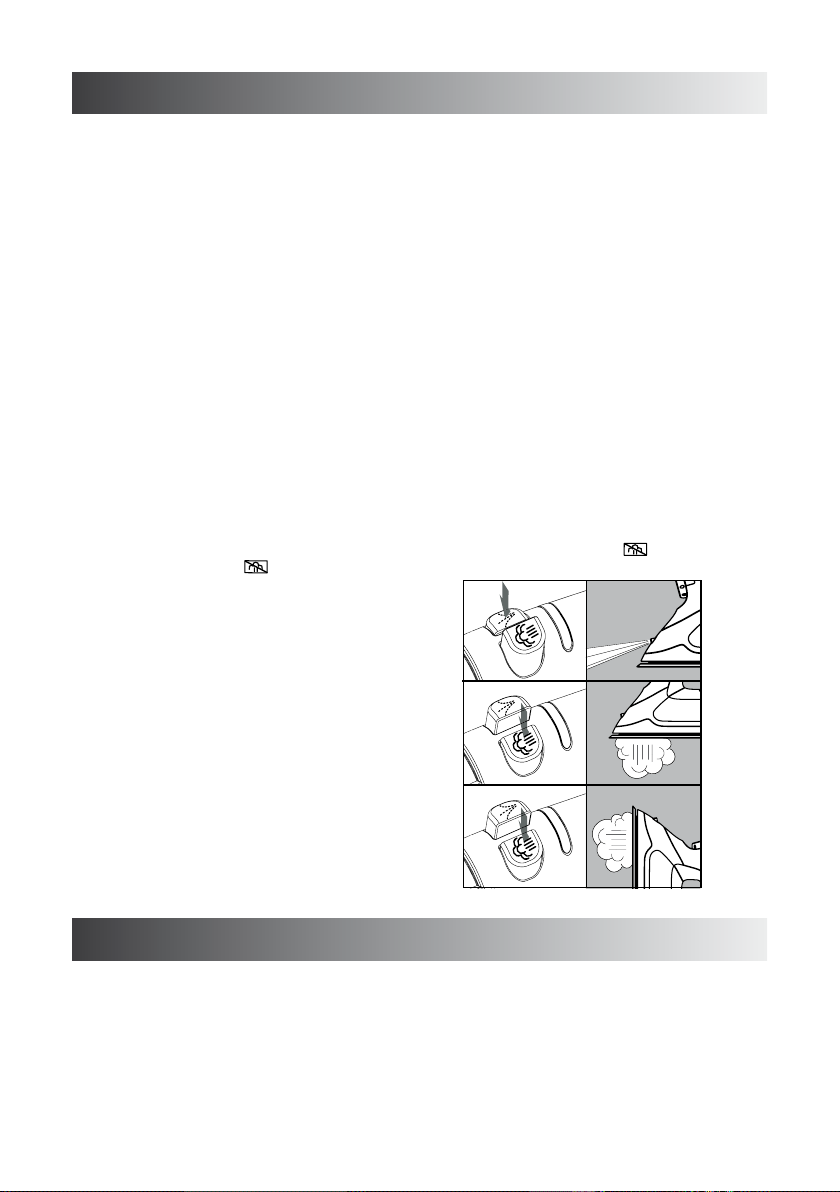
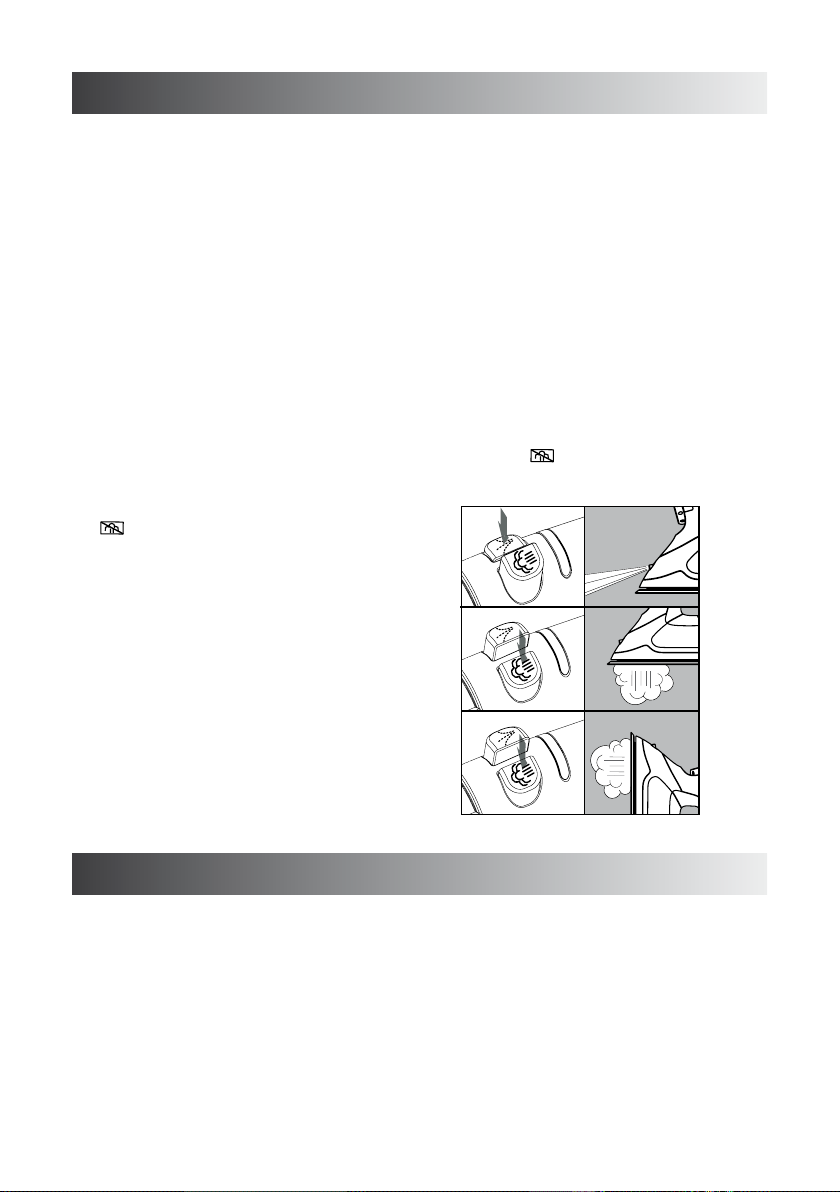
7. Sprühnebel-Funktion (A):
Drücken Sie die Sprühnebel-Taste (3),
wenn Sie kleinere Falten gezielt entfernen
möchten.
8. Dampfstoß-Funktion (B):
Drücken Sie die Dampfstoß-Taste (2),
wenn Sie einen starken Dampfstoß aus der
Bügelsohle benötigten. Diese Funktion hilft,
selbst hartnäckigste Falten aus dem Gewebe
zu entfernen. Sie ist nur möglich bei den
Materialien Wolle, Baumwolle oder Leinen.
.
Bitte warten Sie zwischen den einzelnen
Dampfstößen jeweils ca. drei Sekunden.
9. Vertikaler Dampf: (C)
Drücken Sie die Dampfstoß-Taste (2) wäh-
rend Sie den Bügelautomat senkrecht halten. So können Sie z. B. Falten aus hängenden Kleidungsstücken oder Vorhängen
entfernen. Bitte warten Sie zwischen den
einzelnen Dampfstößen jeweils ca. drei
Sekunden.
10. Auf keinen Fall Kleidungsstücke auf dem
Körper von Personen bügeln, es besteht
Verbrennungsgefahr! Hängen Sie die Kleidungsstücke, die Sie mit vertikalem Dampf
behandeln möchten, am besten auf Kleiderbügel.
11. Sie können das Gerät auch zum Trockenbügeln einsetzen. Stellen Sie die Dampfwahl-Taste einfach auf
A
B
C
.
NACH DEM BÜGELN
1. Lassen Sie das Gerät abkühlen, bevor Sie es
reinigen oder es zur Aufbewahrung wegstellen.
2. Vor dem Reinigen und Aufbewahren stets das
Gerät ausschalten und den Stecker aus der
Steckdose ziehen.
3. Wenn Sie den Stecker aus der Steckdose
ziehen, berühren Sie bitte das Gerät nicht,
10
da sonst die Safety-Lift-Funktion nicht aktiv
ist.
4. Der Bügelautomat sollte stets mit ausgefahrenem Safety-Lift aufbewahrt werden,
um Wassertropfenbildung an der Bügelsohle
zu vermeiden.
5. Entleeren Sie den Wassertank. Dies gelingt
einfach, wenn Sie die Klappe der Einfüll-
öffnung öffnen und den Bügelautomat vorsichtig nach links über einem Spülbecken
kippen, bis das Wasser herausläuft.
REINIGEN UND AUFBEWAHREN
6. Zur einfachen Aufbewahrung können Sie
die Zuleitung locker um das Gerät wickeln,
sobald dieses abgekühlt ist.
1. Lassen Sie das Gerät abkühlen, bevor Sie es
reinigen oder es zur Aufbewahrung wegstellen.
2. Vor dem Reinigen und Aufbewahren stets das
Gerät ausschalten und den Stecker aus der
Steckdose ziehen.
3. Wenn Sie den Stecker aus der Steckdose
ziehen, berühren Sie bitte das Gerät nicht,
da sonst die Safety-Lift-Funktion nicht aktiv
ist.
4. Der Bügelautomat sollte stets mit ausgefahrenem Safety-Lift aufbewahrt werden, um
Wassertropfenbildung an der Bügelsohle zu
vermeiden.
5. Entleeren Sie den Wassertank. Dies gelingt
einfach, wenn Sie die Klappe der Einfüllöffnung öffnen und das Bügeleisen vorsichtig
nach links über einem Spülbecken kippen,
bis das Wasser herausläuft.
6. Die Bügelsohle muss in regelmäßigen
Abständen gereinigt werden, spätestens aber
dann, wenn Rückstände auf der Bügelsohle
zu erkennen sind. Lassen Sie das Gerät
abkühlen und wischen Sie die Bügelsohle
mit einem feuchten Tuch ab. Verwenden Sie
keine kratzenden Schwämme, Scheuermittel, Stahlwolle, metallischen Gegenstände,
Desinfektionsmittel oder heiße Reinigungsmittel, da diese zu Beschädigungen führen
können.
7. Um eine optimale Dampfproduktion zu
gewährleisten, muss auch das Dampfventil
regelmäßig von Ablagerungen befreit werden.
Bewegen Sie hierfür den Dampfregler von der
AUS-Position bis zur stärksten Einstellung
mehrmals vor und zurück:
8. In den Dampföffnungen der Bügelsohle können sich Kalkablagerungen ansammeln. Um
diese Ablagerungen zu beseitigen, füllen
Sie bitte den Wassertank bis zur MAX-Markierung mit Wasser. Heizen Sie das Gerät
auf der Stufe für „Leinen“ auf. Wenn das
Gerät die Temperatur erreicht hat und die
Kontrollleuchte grün wird, schalten Sie das
Gerät am Materialwahl-Regler auf „AUS“
und halten Sie es über ein Spülbecken.
Drücken Sie mehrmals hintereinander die
Dampf-Taste, bis aus den Öffnungen an der
Bügelsohle Wasser austritt. Bitte beachten
Sie, dass der austretende Dampf sehr heiß
ist - Verbrennungsgefahr!
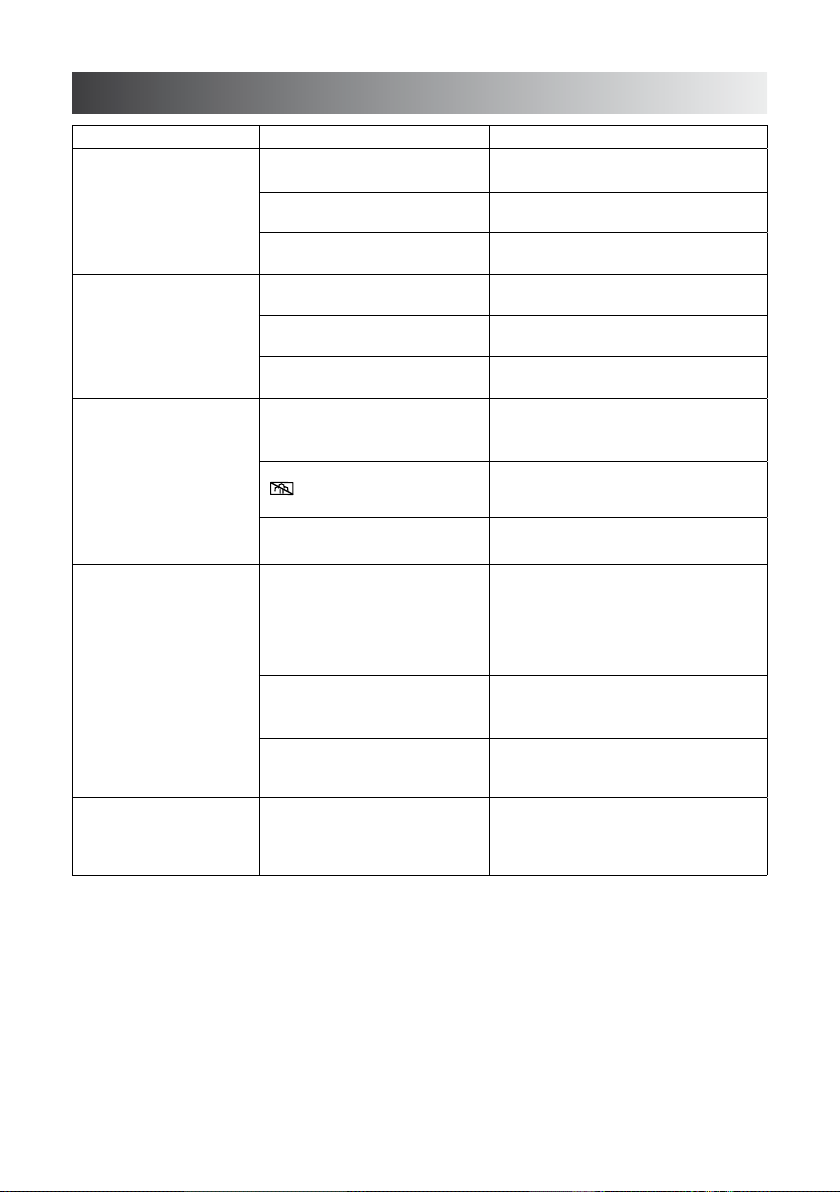
AUTOMATISCHE ABSCHALTFUNKTION
Wenn der Bügelautomat längere Zeit nicht benutzt wird, der Stecker jedoch noch in der Steckdose
ist, beginnt die Kontrollleuchte rot zu blinken und zeigt damit an, dass sich das Gerät automatisch
ausgeschaltet hat. Um den Bügelautomat wieder einzuschalten, genügt eine kurze Berührung des
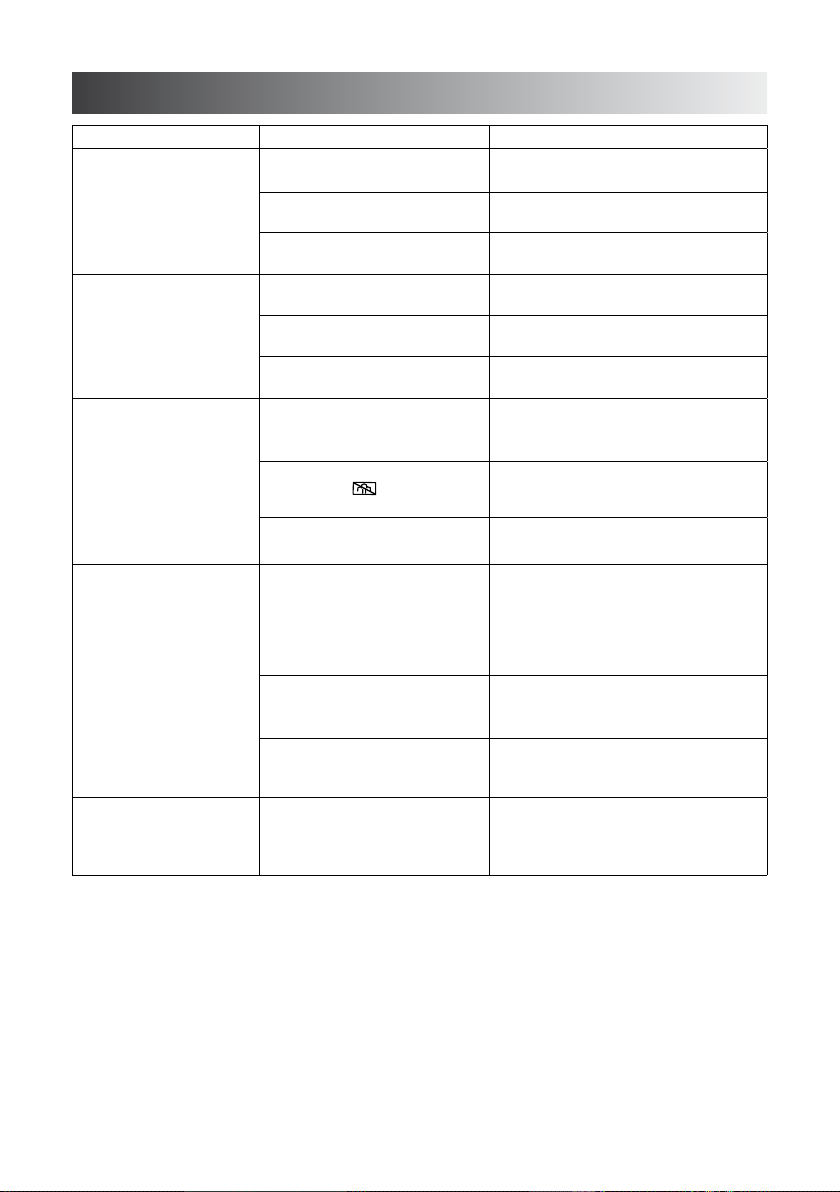
Griffs. In der folgenden Tabelle sind die verschiedenen Abschaltzeiten aufgeführt:
Bügelposition Abschaltung nach ca.
75014 75025
Safety-Lift eingeschaltet Horizontal, angehoben 8 Min. 8 Min.
Vertikal 8 Min. 8 Min.
Seitlich gekippt 30 Sek. 30 Sek.
11
Bügelposition Abschaltung nach ca.
75014 75025
Safety-Lift ausgeschaltet Horizontal, abgesenkt:
Aus Sicherheitsgründen wird
das Gerät mit dem Safety-Lift
angehoben
Achtung! Das Gerät verfügt durch den Safety-Lift über eine zusätzliche Funktion, die das Bügeln erleichtert.
Dennoch entbindet dies nicht von entsprechender Sorgfalt im Umgang mit dem Gerät.
1 Min. 1 Min.
TIPPS FÜR EIN OPTIMALES BÜGELERGEBNIS
1. Prüfen Sie vor dem Bügeln bei jedem
Kleidungsstück, ob ein Zettel mit Pflegehinweisen am Kleidungsstück angebracht
ist. Folgen Sie den darauf angebrachten
Pflegehinweisen.
2. Wenn kein Pflegezettel angebracht ist, testen Sie im Zweifelsfall an einer nicht sichtbaren Stelle des Kleidungsstückes, welche
Bügeleinstellung die richtige ist.
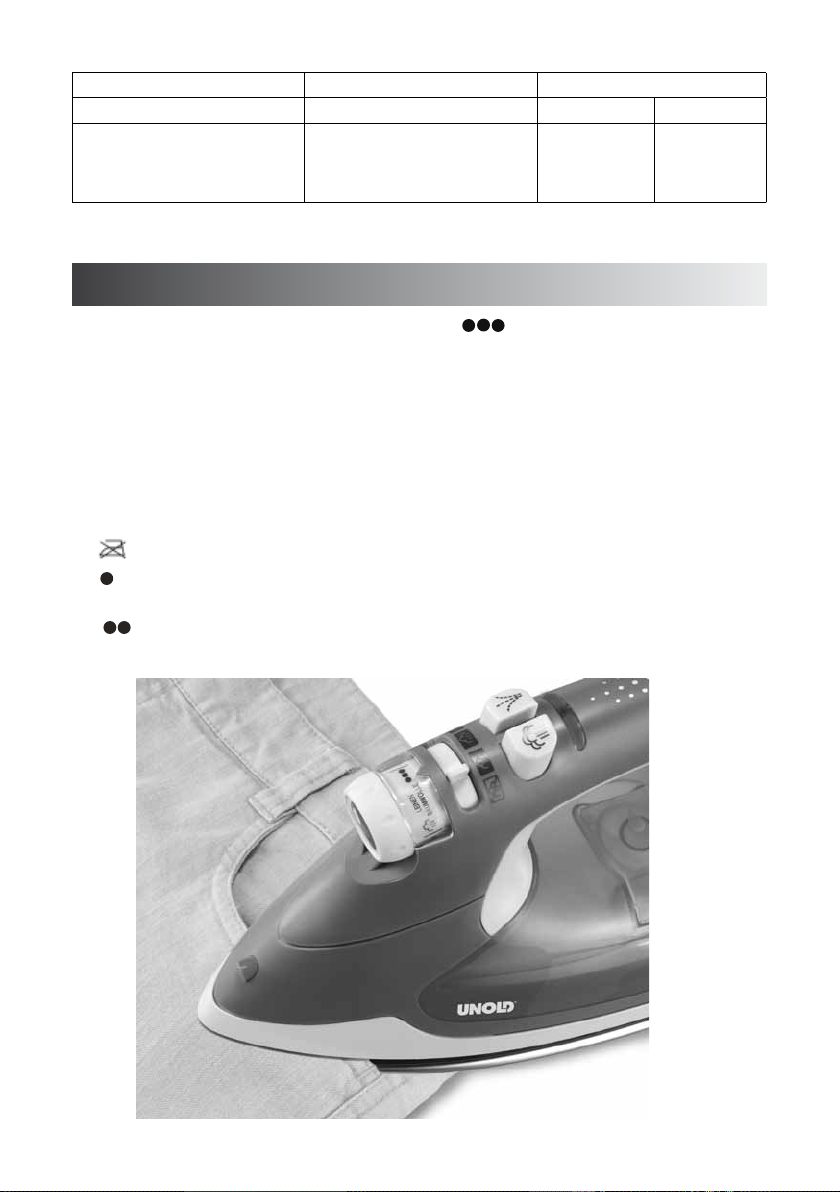
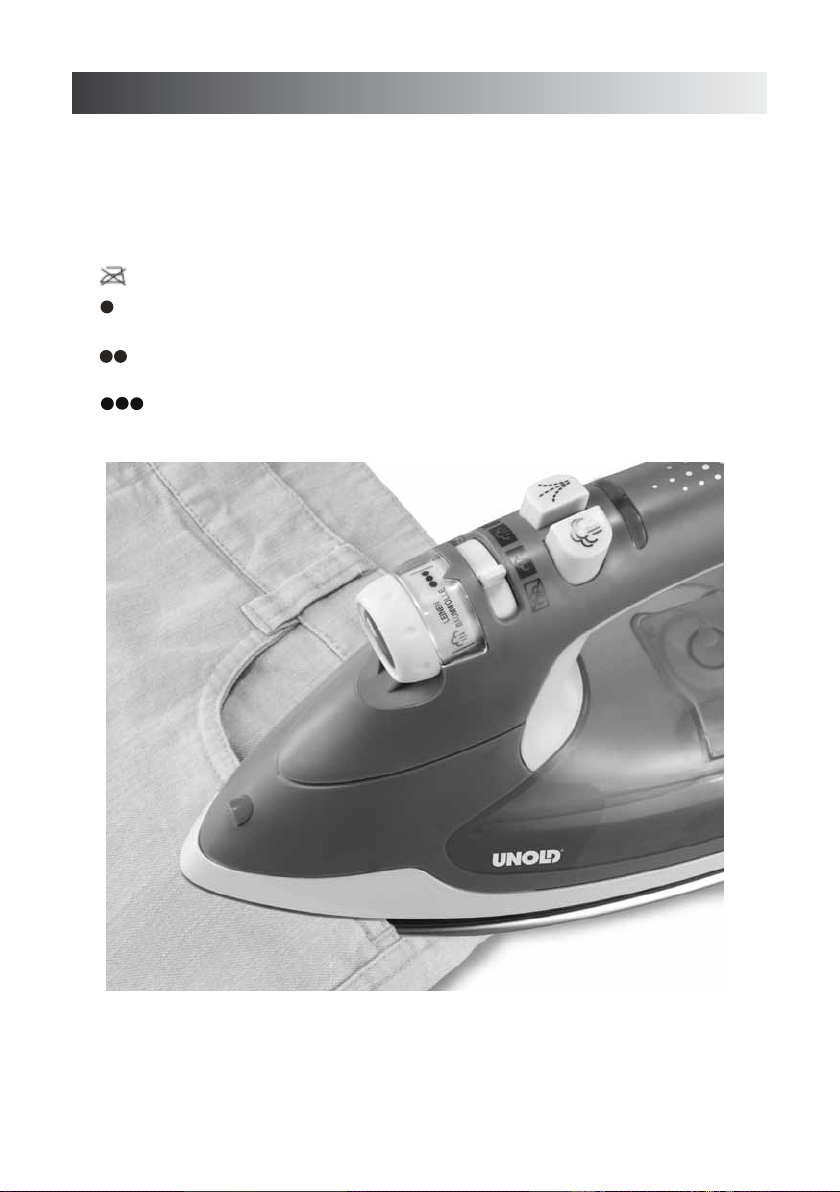
3. Die folgenden Symbole sind allgemein
üblich und auch auf Ihrem Bügelautomat
zu finden:
nicht bügeln
Ein Punkt: Synthetik-Stoffe, bügeln mit
niedriger Temperatur, ca. 100–120 °C
Zwei Punkte: Wolle und Seide, bügeln
mit mittlerer Temperatur, ca. 130–160 °C
Drei Punkte: Baumwolle und Leinen,
bügeln mit hoher Temperatur, ca. 180–
210 °C .
4. Sortieren Sie vor dem Bügeln die Wäschestücke nach der jeweils dafür benötigten
Temperatur und beginnen Sie mit den
Kleidungsstücken mit niedriger Temperatur.
5. Wenn Sie von einer höheren Temperatur auf
eine niedrige Temperatur wechseln, lassen
Sie das Gerät kurz abkühlen.
6. Achten Sie darauf, dass Wäsche, die im
Wäschetrockner getrocknet wird, nicht auf
„Schranktrocken“ getrocknet wird, da sich
sehr trockene Wäsche nicht optimal glätten
lässt.
12
PROBLEME LÖSEN
Problem Bitte prüfen Lösung
Der Bügelautomat wird
nicht heiß
Safety-Lift nicht aktiv Ist der Safety-Lift -Schalter
Es entsteht kein Dampf Ist die Temperatur des
Der Bügelautomat
tropft
Aus der Bügelsohle tritt
eine braune oder weiße
Substanz aus
Materialwahl-Regler auf
„AUS“?
Stecker richtig in der
Steckdose?
Ist die automatische
Abschaltung aktiv?
auf „AUS“?
Stecker richtig in der
Steckdose?
Befindet sich die Hand am
Griff?
Bügelautomaten hoch genug?
Ist der Dampfwahl-Regler auf
?
Ist das Dampfventil verstopft? Den Dampfwahl-Schalter mehrere
Steht der Bügelautomat bei
ausgeschalteter Safety-Lift
-Funktion horizontal?
Ist die Temperatur des
Bügelautomaten hoch genug?
Wurde die Dampfstoß-Taste
zu oft hintereinander genutzt?
Ist das verwendete Wasser
kalkhaltig?
Am Regler das gewünschte Material
auswählen
Stecker richtig einstecken
Den Griff berühren
Safety-Lift -Schalter auf „EIN“
schalten
Stecker richtig einstecken
Hand vom Griff nehmen, damit die
Safety-Lift -Funktion aktiviert wird.
Der Materialwahl-Schalter muss
auf Wolle, Baumwolle oder Leinen
stehen, um Dampf zu produzieren.
Der Dampfwahl-Schalter muss auf
eine Dampfeinstellung eingestellt
werden.
Male hin- und herbewegen.
Wenn die Safety-Lift -Funktion
ausgeschaltet ist, bitte das Gerät
immer vertikal aufbewahren! Wir
empfehlen, das Gerät immer mit
aktivierter Safety-Lift -Funktion
aufzubewahren.
Der Materialwahl-Schalter muss
auf Wolle, Baumwolle oder Leinen
stehen, um Dampf zu produzieren.
Bitte warten Sie zwischen den
einzelnen Dampfstößen immer ca.
drei Sekunden.
Benutzen Sie stilles FlaschenWasser oder mischen Sie das
Leitungswasser zur Hälfte mit
destilliertem Wasser.
13
INSTRUCTIONS FOR USE MODEL 75014/75025
TECHNICAL SPECIFICATIONS
Power rating: 2.000–2.400 W, 220–240 V~, 50 Hz
Dimensions: Approx. 29,5 x 12,6 x 15,3 cm (L/W/H)
Lead cable: Approx. 300 cm
Weight: Approx. 1,64 kg
Capacity of water tank: Approx. 325 ml
Equipment: Ironing with and without steam
Accessories: Instruction manual, measuring cup
We reserve the right to introduce technical modifications.
Constant steam generation 0-35 g
Automatic lift feature
Steam burst 100 g, spray mist
Water level indicator
Flexible protective sleeve
Vertical steam feature
Automatic shutoff
5 years warranty (apart from the sole plate)
Model 75014: Large mirror-polished stainless steel
surface for easy ironing
Modell 75025: Bead-blast scratch-resistant surface for
improved easy-glide with precision tip for precise ironing
SAFETY INFORMATION
1. Please read the following information and
keep it for future reference.
2. This appliance is not intended for use by
persons (including children) with reduced
physical, sensory or mental capabilities,
or lack of experience and knowledge,
unless they have been given supervision or
instruction concerning use of the appliance
by a person responsible for their safety.
3. Children should be supervised in order
to ensure that they do not play with the
appliance.
4. Keep the appliance out of reach of
children.
5. Connect the appliance only to an AC power
supply with the voltage indicated on the
rating plate.
6. Do not operate this appliance with an
external timer or remote control system.
7. Never leave the appliance unattended when
children are near and let children not handle
the appliance.
14
8. This appliance is intended for domestic and
similar use such as:
staff kitchen areas in shops, offices and
other working environments;
agricultural enterprises;
by clients in hotels, motels and other
accommodation facilities;
bed and breakfast accommodations and
holiday homes.
9. Never immerse the appliance or the lead
cable in water or other liquids. Danger of
electric shock!
10. To avoid damages to the appliance, never
add any additives like essential oils, vinagar,
etc. to the water for the water tank.
11. Route the lead cable so that it is prevented
from being pulled or tripped over.
12. Avoid any contact of the lead cable with the
hot ironing soleplate to avoid damages on
the lead cable.
13. The appliance becomes very hot during
operation. Do not touch any hot parts of the
appliance in order to avoid burns.
14. The released steam is also very hot. Avoid
any contact with the steam and never direct
the steam jet towards persons in order to
avoid burns.
15. The recently ironed clothes and the cover of
the ironing board may also become very hot
while ironing.
16. Do not place the appliance or lead cable
near open flames during operation.
17. Always use the appliance on a level,
uncluttered and heat-resistant surface.
18. Always switch the appliance off (turning
the rotary switch to „AUS/OFF“ before
disconnecting the plug from the wall
socket.
19. Always disconnect the lead cable from the
wall socket pulling on the plug, never on the
cable.
20. Always unplug the appliance even when you
leave the workplace for a short time and
before cleaning and let the appliance cool
off.
21. For safety reasons unplug the appliance
when filling the water tank directly from the
tap.
The manufacturer does not assume any warranty in case of improper or incorrect use or after repair by
unauthorized third parties.
22. Never leave the appliance unattended when
it is connected to the wall socket.
23. When the appliance has cooled off, loosely
wrap the cable around the appliance before
storing.
24. Never open the casing of the appliance to
prevent electric shock.
25. Check the appliance, the wall socket and
the lead cable regularly for wear or damage.
In case the lead cable or other parts present
damages, please send the appliance or the
base to our after sales service for inspection
and repair (for address, see warranty terms).
Unauthorised repairs can constitute serious
risks for the user and void the warranty.
Attention: The Safety-Lift feature is an
additional feature that facilitates ironing. Nevertheless, this is no release
from handling the appliance with the
corresponding care.
The appliance becomes very hot during
operation!
DESCRIPTION OF THE SAFETY-LIFT TECHNOLOGY
1. Put the iron on an even surface. Connect
the plug to a wall socket and check if the
switch for the Safety-Lift mode is adjusted
to „EIN/ON“.
2. As soon as you touch the handle of the
iron, the appliance lowers and you may
start ironing as usual. When you release
the handle, the Safety-Lift feature lifts the
appliance immediately. This avoids that
the hot iron soleplate damages to the cloth
being ironed.
Disconnecting the Safety-Lift mode
1. Cancel the mode by turning the switch to
„AUS/OFF“. The appliance now works like
a normal iron.
2. Even in this mode, an additional safety
device ensures that the appliance is lifted, if
the handle is not touched within 1 minute.
More information on the automatic shut-off
can be found on page 19.
Attention: The Safety-Lift feature is an
additional feature that facilitates ironing. Nevertheless, this is no release
from handling the appliance with the
corresponding care.
15
GETTING TO KNOW THE APPLIANCE
1
2
3
4
5
6
7
8
9
10
11
12
13
1 Indicator light
2 Steam burst
3 Spray mist
4 Steam selector
5 Fabric selector
6 Spray nozzle
7 Flexible protective sleeve
8 Handle with Safety-Lift sensor
9 Selector for Safety-Lift mode (ON/OFF)
10 Feed opening for water tank
11 Water tank
12 Sole plate
13 Safety-Lift
BEFORE FIRST USE
1. Remove all packaging material and any
transport safety devices.
2. Also remove the cardboard that might cover
the ironing soleplate.
3 EASY STEPS TO IRONING
Open the feed opening
and fill the water tank
with water up to the
MAX mark.
Connect the plug to a
wall socket, select the
desired type of fabric
and the steam type.
When the indicator light
stays green you can
start ironing.
FILLING THE WATER TANK
Normal tap water may be used. If you live in a region with hard water, we recommend to use Mineral
water or to mix tap water and distilled water in equal parts. Never use pure distilled water as this
may damage the appliance!
1. Unplug the appliance from the wall socket.
2. Adjust the steam selector button to „AUS/
OFF“.
3. Open the feed opening of the water tank
(10).
5. Mind bringing the iron in a horizontal position.
6. Carefully fill the water tank with water.
7. Do not exceed the MAX mark.
8. Close the feed opening by pressing slightly
until the lid latches into place.
9. Connect the plug to the wall socket.
10. The indicator light lights up red.
11. If you have to refill the water tank while
ironing, unplug the appliance from the wall
socket and repeat the aforementioned steps.
Take special care when filling the water tank
from the tap, in order to avoid burns and
possible damages to the washbasin or the
sink.
12. Make sure that the iron is heated up, before
starting ironing again.
4. Fill the measuring cup delivered with water.
17
IRONING
General instructions: Please check the ironing temperature indicated for the corresponding fabric
before you start ironing. In case of doubt, prove the right adjustment on a non-visible part of the
clothing. In order to avoid that delicate fabrics become shiny, always iron these clothes from the
left side.
1. Prepare the appliance by filling the water
tank as described in the chapter „Filling the
water tank“.
2. Turn the material selector (5) to the desired
fabric to iron.
3. The indicator light flashes green and
indicates that the heat up process of the
appliance is finished.
4. As soon as the indicator light shows a
permanent green light you may select the
steam type: move the steam selector button
(4) to the desired steam type. The use of the
steam or steam burst feature is only possible
with wool, cotton and linen fabrics.
5. The iron produces steam as long as it is
lowered. If you desire to switch off the steam
feature, please adjust the steam control to
.
6. As soon as the iron is lifted by the SafetyLift feature, the steam feature is activated.
As soon as you continue ironing, the iron
re-establishes the desired steam feature.
7. Spray mist feature: (A)
Press the spray mist feature button (3) to
eliminate cuttlings.
8. Steam burst feature (B):
Press the steam burst button (2) when a
strong steam burst is needed on the soleplate
of the iron. This feature eliminates even
persistent cuttlings/tuckings. This feature
is only available for wool, cotton and linen.
Please wait approx. 3 seconds between one
steam burst and another.
9. Vertical steam (C):
Press the steam burst button while
maintaining the iron in a vertical position.
This allows you to eliminate cuttlings from
cloths on coat hangers or curtains. Please
wait approx. 3 seconds between one steam
burst and another.
10. Never iron clothes when put on. Danger of
burns! In case you want to iron clothes in a
vertical position, please hang them on coat
hangers.
11. You may also use the iron without steam. In
this case simply adjust the steam selector
button to
A
B
C
.
AFTER IRONING
1. Allow the appliance to cool off before cleaning
it or store it.
2. Before cleaning and storing, always turn the
appliance off and unplug it from the wall
socket.
3. When disconnecting the plug from the wall
socket, do not touch the appliance as in this
case the Safety-Lift mode is not activated.
4. The iron should always be stored with the
Safety-Lift device extended in order to
18
avoid the generation of water drops on the
soleplate.
5. Discharge the water from the water tank. To
do so, just open the feed opening and tilt
the iron over a washbasin or sink until the
water runs out.
6. To store the appliance, wrap the cables
loosely around it after it has cooled off.
CLEANING AND STORAGE
1. Allow the appliance to cool off before cleaning
it or store it.
2. Before cleaning and storing, always turn the
appliance off and unplug it from the wall
socket.
3. When disconnecting the plug from the wall
socket, do not touch the appliance as in this
case the Safety-Lift mode is not activated.
4. The iron should always be stored with the
Safety-Lift device extended in order to
avoid the generation of water drops on the
soleplate.
5. Discharge the water from the water tank. To
do so, just open the feed opening and tilt
the iron over a washbasin or sink until the
water runs out.
6. The soleplate should be cleaned regularly,
but in any case when it shows residues.
Let the appliance cool off and clean the
soleplate with a damp cloth. Do not use any
scrubbing sponges, abrasive agents, steel
wool, metal objects, disinfectants or hot
cleaning agents, since they can damage the
appliance.
7. In order to guarantee an optimum steam
generation, also the steam valve has to
be regularly cleaned from accumulations/
deposits. To do so, adjust the steam control
AUTOMATIC SHUTOFF FEATURE
from the „AUS/OFF“ position to the highest
adjustment and back various times.
8. The steam openings on the soleplate may
accumulate scale. In order to remove these
accumulations, fill the water tank with
water to the MAX mark. Heat the appliance
up, adjusting it to „Leinen“ (Linen). When
the appliance has reached the indicated
temperature and the indicator light turns
green, adjust the material selector of the
appliance to „AUS/OFF“ and hold it over a
washbasin or sink. Press the steam button
various times until the water leaks from the
soleplate. Please remember that the released
steam is very hot. Danger of burns!
If you do not use the iron for a prolonged time and the plug is still connected to the wall socket,
the indicator light starts blinking in red and indicates that the appliance has been switched off
automatically. To switch it on again, just touch the handle shortly.
The following table shows the different shut-off times:
Ironing position Shut-off after
75014 75025
Safety-Lift mode activated Horizontal, lifted 8 min 8 min
Vertical 8 min 8 min
Tilted 30 sec 30 sec
Safety-Lift mode deactivated Horizontal, lowered: for safety
reasons, the appliance is
lifted by means of the SafetyLift device
Attention: The Safety-Lift feature is an additional feature that facilitates ironing. Nevertheless, this is no
release from handling the appliance with the corresponding care.
1 min 1 min
19
TIPS FOR AN OPTIMUM IRONING RESULT
1. Before ironing check each fabric for care
instructions and follow those instructions.
2. If there are no care instructions, prove the
right adjustment on a non-visible part of the
clothing.
3. The following symbols are generally used
and to be found on your iron as well:
Not to be ironed
Synthetic fabrics, to be ironed at low
temperature, approx. 100–120 °C
Wool and silk, to be ironed at medium
temperature, approx. 130–160 °C
Cotton and linen, to be ireoned at
high temperature, approx. 180–210 °C
4. Before ironing, separate the cloths according to the necessary temperature and
start with those cloths that need the lowest
temperature setting.
5. If you change from a higher temperature
to a lower one, let the appliance cool off a
while.
6. Remember not to dry clothes, which are
dried in a tumble dryer, to „ready to put
away“, as very dry clothes are not easy to
iron.
20
TROUBLE SHOOTING
Problem Please check Solution
The iron does not heat
up.
Safety-Lift mode is not
activated.
No steam is generated. Is the temperature of the iron
The iron leaks. Is the iron in a horizontal
Material selector adjusted to
"AUS/OFF“?
Plug properly connected? Connect the plug properly to the
Is the automatic shut-off
feature activated?
Is the Safety-Lift selector on
"AUS/OFF“?
Plug properly connected? Connect the plug properly to the
Does your hand touch the
handle?
high enough?
Is the steam selector
adjusted to
Is the steam nozzle clogged? Turn the steam selector various
position with the Safety-Lift
mode deactivated?
?
Select the desired material.
wall socket.
Touch the handle.
Switch the Safety-Lift selector to
"EIN/ON".
wall socket.
Take your hand off the handle to
activate the Safety-Lift mode.
The material selector must be
adjusted to wool, cotton or linen in
order to generate steam.
The steam selector must be
adjusted to a steam generating
position.
times to different positions.
With the Safety-Lift mode
deactivated, the iron always has
to be in an upright position! We
recommend to store the appliance
always in Safety-Lift mode.
A white or brown liquid
is leaking from the
soleplate of the iron.
Is the temperature of the iron
high enough?
Did you use the steam burst
button too frequently?
Is the water used calcerous? Use bottled mineral water or mix
The material selector must be
adjusted to wool, cotton or linen in
order to generate steam.
Please wait approx. 3 seconds
between one steam burst and
another.
your tap water with distilled water to
equal parts.
21

NOTICE D´UTILISATION MODÈLE 75014/75025
SPÉCIFICATION TECHNIQUE
Puissance : 2.000–2.400 W, 220–240 V~, 50 Hz
Dimensions : Env. 29,5 x 12,6 x 15,3 cm (L/l/H)
Cordon : Env. 300 cm
Poids : Env. 1,64 kg
Contenance du réservoir Env. 325 ml
Caractéristiques : Repassage à la vapeur et repassage à sec
Accessoires : Notice d’utilisation, récipient gradué
Sous réserve de modifications techniques.
Débit de vapeur constante 0-35 g
Fonction de relevage automatique (Safety-Lift)
Touche Jet de vapeur 100 g, touche Spray
Repère de niveau d’eau
Bec mobile anti-plis
Fonction vapeur verticale
Arrêt automatique
Garantie 5 ans (sauf sur la semelle)
Modèle 75014: Grande semelle de repassage en acier inoxydable
poli brillant
Modèle 75025: Semelle de repassage en acier inoxydable, passée
au jet de bille, facilitant le glissement
Revêtement et pointe de précision pour un repassage exact
CONSIGNES DE SÉCURITÉ
1. Veuillez lire attentivement les instructions
qui suivent et les ranger soigneusement.
2. Cet appareil n’est pas prévu pour être utilisé
par des personnes (y compris les enfants)
dont les capacités physiques, sensorielles
ou mentales sont réduites, ou par des
personnes ne disposant pas de l‘expérience
et/ou des connaissances nécessaires, sauf
si elles sont surveillées par une personne
responsable de leur sécurité, ou si cette
personne leur a appris à utiliser l’appareil.
3. Il convient de surveiller les enfants
pour s’assurer qu’ils ne jouent pas avec
l’appareil.
4. Conservez l’appareil hors de portée des
enfants.
5. Vérifiez que l’installation électrique est
compatible avec la puissance et la tension
indiquées sur la plaque signalétique. Ne
raccordez qu’à un courant alternatif.
6. Cet appareil n’est pas prévu pour être
commandé par une minuterie ou un
interrupteur à distance.
22
7. Ne laissez jamais l’appareil sans
surveillance lorsque des enfants se trouvent
à proximité, et ne laissez par des enfants
utiliser l’appareil.
8. L’appareil est exclusivement destiné à
un usage domestique ou similaire, par
exemple :
espaces thé et café (boutiques), coins
cuisine (bureaux et autres lieux de
travail),
exploitations agricoles,
mis à la disposition des clients séjournant
dans un hôtel, motel ou autre type
d’hébergement,
dans des chambres d’hôtes ou maisons
de vacances.
9. Ne plongez jamais l’appareil dans de l’eau ou
d’autres liquides – risque d’électrocution !
10. Pour éviter d’endommager l’appareil,
n’ajoutez jamais à l’eau remplie dans le
réservoir des additifs tels que des huiles
essentielles, du vinaigre, etc.

11. Le cordon doit être placé de façon qu’on ne
puisse pas le tirer ou trébucher sur lui.
12. Pour éviter d’endommager le cordon,
assurez-vous qu‘il n‘entre pas en contact
avec la semelle chaude.
13. L’appareil devient très chaud pendant son
fonctionnement. Pour éviter les brûlures,
veillez à ne pas entrer en contact avec les
parties chaudes de l’appareil.
14. La vapeur qui sort du fer est également très
chaude. Pour éviter les brûlures, veillez à
ne pas entrer en contact avec la vapeur et
ne dirigez jamais le jet de vapeur vers des
personnes.
15. Le linge qui vient d’être repassé, de même
que le revêtement de la table à repasser,
peuvent également être très chauds.
16. N’utilisez pas l’appareil ou le cordon près
d’une flamme.
17. Placez toujours l’appareil sur une surface
libre, plane et résistante à la chaleur.
18. Éteignez toujours l’appareil (interrupteur
rotatif sur AUS/ARRÊT) avant de retirer la
fiche électrique de la prise secteur.
19. Ne débranchez jamais l’appareil en tirant
sur le cordon.
20. Après utilisation, avant toute opération
de nettoyage et également si vous devez
vous éloigner même temporairement de
l’appareil, retirez la fiche électrique de la
prise secteur et laissez refroidir l’appareil.
Le producteur décline toute responsabilité en cas d’usage inapproprié ou incorrecte ou après des
réparations par des tiers.
21. Si vous remplissez le réservoir directement
au robinet, il est impératif pour des
raisons de sécurité de débrancher d’abord
l’appareil.
22. Ne laissez jamais l’appareil sans surveillance
lorsqu’il est branché.
23. Lorsque l’appareil est refroidi, enroulez le
cordon autour de l’appareil avant de ranger
ce dernier.
24. N’ouvrez jamais le boîtier de l’appareil.
Risque d’électrocution !
25. Contrôlez régulièrement l’état de l’appareil,
de la fiche électrique et du cordon
(usure, détériorations). En cas d’usure
ou de détérioration du cordon ou d’autres
éléments, veuillez retourner l’appareil ou
le cordon à notre service après-vente pour
le faire contrôler et réparer (vous trouverez
l’adresse dans les conditions de garantie).
Toute intervention inappropriée peut
s’avérer dangereuse pour l’utilisateur et
entraîne l’annulation de la garantie.
Attention ! La fonction Safety-Lift
dont est équipé l’appareil facilite le
repassage. Mais cela n’empêche pas
d’utiliser l’appareil avec les précau-
tions habituelles.
L’appareil devient très chaud pendant
son fonctionnement !
EXPLICATION DE LA FONCTION SAFETY-LIFT
1. Placez le fer sur une surface plane. Branchez
la fiche électrique dans la prise secteur et
vérifiez que le sélecteur Safety-Lift se trouve
sur EIN/MARCHE.
2. Dès que vous touchez la poignée du
fer, l’appareil s’abaisse et vous pouvez
commencer à repasser comme à votre
habitude. Dès que vous relâchez la poignée,
la fonction Safety-Lift relève immédiatement
l’appareil. Cela empêche que le tissu à
repasser soit endommagé par la semelle
brûlante du fer.
Désactivation de la fonction Safety-Lift
1. Désactivez la fonction Safety-Lift en plaçant
le sélecteur sur AUS/ARRÊT. L‘appareil
fonctionne maintenant comme un fer
classique.
2. Une sécurité supplémentaire assure
néanmoins le relevage de l’appareil au bout
de 1 min sans contact avec la poignée. Pour
plus d’informations sur l’arrêt automatique,
voir page 27.
Attention ! La fonction Safety-Lift
dont est équipé l’appareil facilite le
repassage. Mais cela n’empêche pas
d’utiliser l’appareil avec les précautions habituelles.
23

FAITES CONNAISSANCE AVEC VOTRE FER
1
2
3
4
5
6
7
8
9
10
11
12
13
1 Voyants de contrôle
2 Touche Jet de vapeur
3 Touche Spray
4 Sélecteur de vapeur
5 Sélecteur de tissu
6 Buse Spray
7 Bec mobile anti-plis
8 Poignée avec capteur Safety-Lift
24
9 Sélecteur Safety-Lift EIN/AUS
(MARCHE/ARRÊT)
10 Ouverture de remplissage du réservoir
11 Réservoir d’eau
12 Semelle
13 Safety-Lift

AVANT LA PREMIÈRE UTILISATION
1. Retirez tous les matériaux d’emballage et le
cas échéant les sécurités pour le transport.
2. Veuillez retirer également le revêtement en
carton qui est éventuellement fixé sur la
semelle du fer !
LE REPASSAGE EN TROIS ÉTAPES SIMPLES
Ouvrez l‘ouverture du
réservoir et remplissez
d‘eau jusqu‘au repère
MAX.
Branchez la fiche
électrique dans une prise
secteur, sélectionnez la
température souhaitée et
le type de vapeur.
Vous pouvez commencer
le repassage lorsque
le voyant de contrôle
reste allumé en vert en
continu.
REMPLISSAGE DU RÉSERVOIR
Vous pouvez utiliser de l’eau du robinet. Si l’eau de votre région est très calcaire, nous recommandons
soit d’utiliser de l’eau plate en bouteilles, soit de mélanger pour moitié de l’eau du robinet et de l’eau
déminéralisée. N’utilisez jamais uniquement de l’eau déminéralisée, car cela peut endommager
l’appareil !
1. Retirez la fiche électrique de la prise
secteur.
2. Placez le sélecteur de vapeur (4) sur AUS/
ARRÊT.
3. Ouvrez l’ouverture de remplissage du
réservoir d’eau (10).
6. Remplissez le réservoir par l’ouverture avec
précaution.
7. Ne remplissez pas au-delà du repère MAX.
8. Fermez l’ouverture de remplissage en
exerçant une légère pression, jusqu’à
enclenchement.
9. Branchez la fiche électrique dans la prise
secteur.
10. Le voyant de contrôle s’allume en rouge.
11. Si vous devez rajouter de l’eau pendant le
repassage, retirez la fiche électrique de la
prise secteur et répétez les étapes ci-dessus.
En cas de remplissage au robinet, soyez
particulièrement attentifs afin d’éviter des
brûlures et d’éventuels endommagements
du lavabo ou de l’évier.
12. Assurez-vous que le fer est à nouveau chaud
avant de poursuivre le repassage. Pour
des tissus délicats, nous recommandons
d’attendre la deuxième phase de chauffage
avant de commencer le repassage.
4. Remplissez d’eau le récipient gradué fourni
avec l‘appareil.
5. Veillez à bien mettre le fer à l’horizontale.
25

REPASSAGE
Remarques générales : Veuillez contrôler au préalable la bonne température de repassage pour le
tissu respectif. En cas de doute, testez le réglage du fer sur un emplacement non visible du tissu.
Repassez les tissus délicats sur l‘envers, vous éviterez ainsi la formation de marques.
1. Préparez l’appareil en remplissant le
réservoir comme indiqué dans le chapitre
« Remplissage du réservoir ».
2. Tournez le sélecteur de tissu (5) sur le type
de tissu correspondant au linge à repasser.
3. Le voyant de contrôle clignote en vert, ce
qui indique que l‘appareil chauffe.
4. Dès que le voyant de contrôle reste vert
en continu, vous pouvez choisir le type de
vapeur souhaité : déplacez le sélecteur de
vapeur (4) sur le type de vapeur souhaité.
Si vous souhaitez repasser en permanence
à la vapeur ou utiliser en permanence la
fonction Jet de vapeur, sachez que cela
n’est possible que pour la laine, le coton ou
le lin.
5. Le fer produit de la vapeur tant que l’appareil
est abaissé. Pour arrêter la production de
vapeur, déplacez le sélecteur sur
6. La fonction vapeur est désactivée dès que le
fer est relevé par la fonction Safety-Lift. Dès
que vous recommencez à repasser, l’appareil
rétablit la fonction vapeur souhaitée.
7. Fonction Spray (A) :
Appuyez sur la touche Spray (3) si vous
souhaitez supprimer des petits plis à des
endroits précis.
8. Fonction Jet de vapeur (B) :
Appuyez sur la touche Jet de vapeur (2) si
vous voulez que la semelle du fer projette un
puissant jet de vapeur. Cette fonction aide
à supprimer les plis les plus résistants. Elle
n’est possible que pour la laine, le coton
.
ou le lin. Veuillez attendre environ trois
secondes entre deux jets de vapeur.
9. Vapeur verticale (C):
Aappuyez sur la touche Jet de vapeur (2)
tout en maintenant le fer à la verticale.
Vous pouvez ainsi, par exemple, défroisser
des rideaux ou des vêtements suspendus à
des cintres. Veuillez attendre environ trois
secondes entre deux jets de vapeur.
10. Ne jamais repasser des vêtements sur des
personnes : risque de brûlures ! Pour traiter
des vêtements à la vapeur verticale, le mieux
est de les suspendre à des cintres.
11. Vous pouvez aussi utiliser le fer pour
repasser à sec. Pour cela, il suffit de placer
le sélecteur de vapeur sur
A
B
C
.
APRÈS LE REPASSAGE
1. Laissez l’appareil refroidir avant de le nettoyer
ou de le ranger.
2. Avant de nettoyer ou de ranger l’appareil,
veuillez systématiquement l’éteindre et retirer
la fiche électrique de la prise secteur.
3. Lorsque vous retirez la fiche électrique de
la prise secteur, veuillez ne pas toucher
l’appareil, afin que la fonction Safety-Lift
reste active.
4. Le fer doit toujours être rangé en position
relevée (fonction Safety-Lift), afin d‘éviter la
formation de gouttes d‘eau sur la semelle.
26
5. Videz le réservoir d’eau. Pour cela, il
suffit d’ouvrir le clapet de l’ouverture de
remplissage et de basculer avec précaution
le fer vers la gauche au-dessus d’un évier,
jusqu’à ce que l’eau s’en échappe.
6. Pour faciliter le rangement, vous pouvez
enrouler le cordon autour de l’appareil dès
que ce dernier est refroidi.

NETTOYAGE ET RANGEMENT
1. Laissez l’appareil refroidir avant de le nettoyer
ou de le ranger.
2. Avant de nettoyer ou de ranger l’appareil,
veuillez systématiquement l’éteindre et retirer
la fiche électrique de la prise secteur.
3. Lorsque vous retirez la fiche électrique de
la prise secteur, veuillez ne pas toucher
l’appareil, afin que la fonction Safety-Lift
reste active.
4. Le fer doit toujours être rangé en position
relevée (fonction Safety-Lift), afin d‘éviter la
formation de gouttes d‘eau sur la semelle.
5. Videz le réservoir d’eau. Pour cela, il
suffit d’ouvrir le clapet de l’ouverture de
remplissage et de basculer avec précaution
le fer vers la gauche au-dessus d’un évier,
jusqu’à ce que l’eau s’en échappe.
6. La semelle doit être nettoyée à intervalles
réguliers, et au plus tard lorsqu‘elle
présente des résidus visibles. Laissez
refroidir l’appareil et nettoyez la semelle
avec un chiffon humide. N’utilisez pas
d’éponges grattantes, de produits à récurer,
de paille de fer, d‘objets métalliques, de
désinfectants ou de produits de nettoyage
très chauds, sous peine de dégradations.
7. Pour garantir une production de vapeur
optimale, il faut aussi éliminer régulièrement
les dépôts qui obstruent la soupape de
FONCTION D’ARRÊT AUTOMATIQUE
vapeur. A cet effet, déplacez plusieurs fois
le sélecteur de vapeur en va-et-vient entre
la position AUS/ARRÊT et le réglage le plus
puissant.
8. Des dépôts de calcaire peuvent s’accumuler
dans les trous de la semelle. Pour les éliminer,
veuillez remplir le réservoir d’eau jusqu’au
repère MAX. Faites chauffer l’appareil en
réglant la température sur « lin ». Lorsque le
voyant s’allume en vert, placez le sélecteur
de tissu/température sur AUS/ARRÊT et
maintenez l’appareil au-dessus d’un évier.
Appuyez plusieurs fois successivement sur
la touche Jet de vapeur, jusqu’à ce que de
l’eau s’échappe par les trous de la semelle.
Veuillez noter que la vapeur qui s‘échappe
est très chaude - risque de brûlure !
Lorsque l‘appareil n’est pas utilisé pendant un certain temps mais qu’il est toujours branché sur le
secteur, le voyant de contrôle clignote en rouge et indique ainsi que l’appareil s’est automatiquement
arrêté. Pour remettre en marche le fer, il suffit de toucher brièvement la poignée.
Le tableau suivant indique les différents délais avant l’arrêt
Position du fer Arrêt au bout de
75014 75025
Fonction Safety-Lift activée horizontal, relevé 8 min 8 min
vertical 8 min 8 min
basculé sur le côté 30 sec 30 sec
Fonction Safety-Lift
désactivée
Attention ! La fonction Safety-Lift dont est équipé l’appareil facilite le repassage. Mais cela n’empêche pas
d’utiliser l’appareil avec les précautions habituelles.
horizontal, abaissé
Pour des raisons de sécurité,
l'appareil est relevé à l'aide
de la fonction Safety-Lift
1 min 1 min
27

QUELQUES CONSEILS POUR UN REPASSAGE OPTIMAL
1. Avant le repassage, veuillez consulter les
étiquettes d’entretien qui se trouvent sur
chaque vêtement. Suivez les instructions
qui s’y trouvent.
2. En l’absence d’étiquette et si vous avez
un doute, testez le réglage du fer sur un
emplacement non visible du tissu.
3. Les symboles suivants sont d’usage général,
vous les trouverez également sur votre fer
ne pas repasser
Synthétiques, à repasser à basse
température, env. 100–120 °C
Line et soie, à repasser à moyenne
température, env. 130–160 °C
Coton et lin, à repasser à haute
température, env. 180–210 °C
4. Avant le repassage, triez le linge en fonction
de la température nécessaire, et commencez
par les tissus qui se repassent à basse
température.
5. Si vous passez d’une température plus
élevée à une température moins élevée,
laissez refroidir l’appareil un court instant.
6. Pour le linge séché au sèche-linge, veuillez
à ne pas le sécher « prêt à ranger », car le
linge très sec ne peut pas être défroissé de
façon optimale.
28

UN PROBLÈME AVEC VOTRE FER ?
Problème Veuillez vérifier Solution
Le fer ne chauffe pas Sélecteur de tissu sur AUS/
Fonction Safety-Lift
non active
Le fer ne produit pas
de vapeur
ARRÊT ?
Fiche électrique correctement
branchée dans la prise
secteur ?
L’arrêt automatique est-il
actif ?
Le sélecteur Safety-Lift est-il
sur AUS/ARRÊT ?
Fiche électrique correctement
branchée dans la prise
secteur ?
Votre main est-elle sur la
poignée ?
La température du fer est-elle
suffisamment élevée ?
Le sélecteur de vapeur est-il
sur
?
Sélectionnez la température
souhaitée
Branchez correctement la fiche
électrique
Touchez la poignée
Placez le sélecteur Safety-Lift sur
EIN/MARCHE
Branchez correctement la fiche
électrique
Retirez votre main de la poignée,
afin d’activer la fonction Safety-Lift.
Pour produire de la vapeur, le
sélecteur de tissu doit être sur laine,
coton ou lin.
Le sélecteur de vapeur doit être
placé sur une position vapeur.
De l’eau coule par les
trous de la semelle
Des coulures brunes ou
blanches sortent de la
semelle
La soupape de vapeur est-elle
bouchée ?
Le fer se trouve-t-il à
l’horizontale avec la fonction
Safety-Lift désactivée ?
La température du fer est-elle
suffisamment élevée ?
La touche Jet de vapeur a-telle été utilisée trop de fois à
la suite ?
L’eau utilisée est-elle
calcaire ?
Déplacer plusieurs fois en va-etvient le sélecteur de vapeur.
Si la fonction Safety-Lift est
désactivée, veuillez toujours ranger
le fer en position verticale! Nous
recommandons de toujours ranger
l’appareil avec la fonction SafetyLift activée.
Pour produire de la vapeur, le
sélecteur de tissu/température doit
être sur laine, coton ou lin.
Veuillez attendre environ trois
secondes entre deux jets de vapeur.
Utilisez de l’eau plate en bouteilles,
ou mélangez l’eau du robinet pour
moitié à de l’eau déminéralisée.
29

GEBRUIKSAANWIJZING MODEL 75014/75025
TECHNISCHE GEGEVENS
Vermogen: 2.000–2.400 W, 220–240 V~, 50 Hz
Afmetingen: Ca. 29,5 x 12,6 x 15,3 cm (l/b/h)
Snoer: Ca. 300 cm
Gewicht: Ca. 1,64 kg
Inhoud waterreservoir: Ca. 325 ml
Uitrusting: Met stoom en droog strijken
Toebehoren: Gebruiksaanwijzing, maatbeker
Technische wijzigingen voorbehouden
VEILIGHEIDSINSTRUCTIES
Constante stoomcapaciteit 0-35 g
Automatische liftfunctie
Stoomstoot-toets 100 g, spuitnevel-toets
Waterpeilindicator
Beweegbare knikbescherming
Verticale stoomfunctie
5 jaar garantie (behalve op de zoolplaat)
Automatische uit-functie
Model 75014: Grote hoogglans gepolijste edelstalen zoolplaat
Model 75025: Kogelgestraalde edelstalen zoolplaat met coating en
spitse punt voor het soepele en nauwkeurige strijken
1. Lees a.u.b. de volgende instructies en
bewaar deze.
2. Dit apparaat is niet bedoeld om te worden
gebruikt door personen (kinderen inbegrepen) met een beperkt lichamelijk, sensorisch of geestelijk vermogen of bij gebrek
aan ervaring en/of kennis, tenzij deze personen door een voor hun veiligheid verantwoordelijke persoon onder toezicht gehouden
worden of door deze persoon geïnstrueerd
zijn over het gebruik van het apparaat.
3. Kinderen moeten onder toezicht gehouden
worden om ervoor te zorgen dat zij niet met
het apparaat spelen.
4. Bewaar het apparaat op een voor kinderen
niet toegankelijke plaats.
5. Sluit het apparaat alleen aan op wisselstroom
met spanning conform typeplaatje.
6. Dit apparaat mag niet met een externe
tijdschakelklok of een afstandsbedieningssysteem worden gebruikt.
30
7. Laat het apparaat nooit zonder toezicht
wanneer er kinderen in de buurt zijn, en laat
het apparaat niet door kinderen bedienen.
8. Het apparaat is uitsluitend bedoeld voor
huishoudelijke doeleinden of soortgelijke
doeleinden, bijv.
kitchenettes in winkels, kantoren of
andere werkplaatsen,
landbouwbedrijven,
voor gebruik door gasten in hotels, motels
of andere toeristische accomodaties,
in privé pensions of vakantiewoningen.
9. Dompel het apparaat nooit in water of een
andere vloeistof – risico op elektrische
schok!
10. Voeg aan het water voor het waterreservoir
geen stoffen toe zoals etherische oliën,
azijn, enz. om schade aan het apparaat te
voorkomen.
11. Het snoer moet zo worden geplaatst dat
eraan trekken of erover struikelen voorkomen wordt.

12. Let erop dat het snoer niet met de hete
zoolplaat in contact komt om schade aan
het snoer te voorkomen.
13. Het apparaat wordt tijdens het gebruik
zeer heet. Let erop dat u niet met de hete
onderdelen van het apparaat in contact
komt om verbrandingen te voorkomen.
14. De naar buiten komende stoom is ook zeer
heet. Let erop dat u niet met de stoom in
contact komt, en richt de stoom nooit op
personen, om verbrandingen te voorkomen.
15. Het gestreken wasgoed en de overtrek van de
strijkplank kunnen na het strijken eveneens
zeer heet worden.
16. Het apparaat of het snoer mogen niet in de
buurt van vlammen worden gebruikt.
17. Gebruik het apparaat steeds op een vrij, vlak
en hittebestendig oppervlak.
18. Schakel het apparaat steeds uit (draaischakelaar op UIT) voordat u de stekker uit de
contactdoos trekt.
19. Trek de stekker nooit aan het snoer uit de
contactdoos.
20. Na het gebruik, bij het verlaten van het
werkplek (ook voor een kort moment) en
vóór het reinigen de stekker uit de contactdoos trekken en het apparaat laten afkoelen.
21. Wanneer u het waterreservoir onder een
waterkraan vult, trek vooraf om veiligheidsredenen beslist de stekker uit de contactdoos.
De fabrikant is niet aansprakelijk, indien het apparaat verkeerd gemonteerd, ondeskundig of foutief
gebruikt of door niet geautoriseerde derden gerepareerd werd.
22. Laat het apparaat nooit zonder toezicht
wanneer de netstekker zich in de
contactdoos bevindt.
23. Wanneer het apparaat afgekoeld is, wikkel
het snoer losjes om het apparaat om dit op
te bergen.
24. Open in geen geval de behuizing van het
apparaat. Er bestaat risico op letsel door
elektrische schokken.
25. Controleer het apparaat, de stekker en het
snoer regelmatig op slijtage en beschadigingen. Stuur het apparaat of de basis in
geval van beschadigingen van het snoer of
andere onderdelen a.u.b. voor controle en/of
reparatie aan onze klantenservice (adres zie
garantievoorwaarden). Ondeskundig uitgevoerde reparaties kunnen aanzienlijke gevaren voor de gebruiker veroorzaken en leiden
tot het vervallen van de garantie.
Attentie! Met de Safety-Lift beschikt het
toestel over een aanvullende functie
die het strijken vergemakkelijkt. Dit
ontslaat u er echter niet van de nodige
zorgvuldigheid aan het gebruik van het
toestel te besteden.
Het toestel wordt tijdens het gebruik
zeer heet!
TOELICHTING VAN DE SAFETY-LIFT-TECHNOLOGIE
1. Plaats het strijkijzer op een vlak oppervlak.
Steek de stekker in een contactdoos en
controleer of de schakelaar voor de Safety-
Lift-functie op “EIN” (aan) staat.
2. Zodra u de handgreep van het strijkijzer
aanraakt, gaat het toestel omlaag en u kunt
zoals gewoonlijk met het strijken beginnen.
Zodra u de handgreep loslaat, wordt het toestel door de Safety-Lift-functie onmiddellijk weer omhoog gebracht. Daarmee wordt
voorkomen dat het strijkgoed door de hete
zoolplaat beschadigd wordt.
Safety-Lift-functie uitschakelen
1. Schakel de functie uit door de schakelaar op
“AUS” (uit) te zetten. Het toestel werkt nu
zoals een traditioneel strijkijzer.
2. Een aanvullende veiligheidsinrichting zorgt
er echter voor dat het toestel na 1 min.
zonder contact met de handgreep omhoog
gebracht wordt. Meer informatie m.b.t. de
automatische uit-functie vindt u op pagina
35.
Attentie! Met de Safety-Lift beschikt
het toestel over een aanvullende functie die het strijken vergemakkelijkt.
Dit ontslaat u er echter niet van de
nodige zorgvuldigheid aan het gebruik
van het toestel te besteden.
31

TOELICHTING VAN HET TOESTEL
1
2
3
4
5
6
7
8
9
10
11
12
13
1 Controlelampje
2 Stoomstoot-toets
3 Spuitnevel-toets
4 Stoomkeuze-toets
5 Materiaalregelaar
6 Sproeier
7 Beweegbare knikbescherming
8 Handgreep met Safety-Lift-sensor
32
9 Keuzeschakelaar voor Safety-Lift (EIN/
AUS) (aan/uit)
10 Vulopening waterreservoir
11 Waterreservoir
12 Zoolplaat
13 Safety-Lift

VOOR HET EERSTE GEBRUIK
1. Verwijder alle verpakkingsmaterialen en
eventuele transportbeveiligingen.
2. Verwijder ook de kartonnen afdekking die
eventueel aan de zoolplaat is bevestigd!
3 EENVOUDIGE STAPPEN OM TE BEGINNEN
Open de vulopening en
vul water in tot aan de
markering “MAX”.
Steek de stekker in
een contactdoos, kies
het gewenste soort
materiaal en stoom.
Wanneer het controlelampje constant groen
brandt, kunt u met het
strijken beginnen.
WATERRESERVOIR VULLEN
U kunt gewoon leidingwater gebruiken. Wanneer u in een regio met hard water woont, adviseren wij
om of mineraalwater zonder koolzuur uit flessen te gebruiken of leidingwater en gedestilleerd water,
elk voor de helft, te mengen. Gebruik nooit alleen gedestilleerd water, omdat dit tot schade aan het
toestel kan leiden!
1. Trek de stekker uit de contactdoos.
2. Zet de stoomkeuze-toets (4) op “Uit”
8. Sluit de vulopening met een lichte druk tot
deze inklikt.
3. Open de vulopening aan het waterreservoir
(10).
4. Vul de meegeleverde maatbeker met water.
5. Let erop dat het strijkijzer in een horizontale
positie staat.
6. Vul het water voorzichtig in de vulopening.
7. Vul het waterreservoir maximaal tot aan de
markering “Max”.
9. Steek de netstekker in de contactdoos.
10. Het controlelampje gaat rood branden.
11. Wanneer u tijdens het strijken water moet
bijvullen, trek de stekker uit de contactdoos
en herhaal de bovengenoemde stappen.
Wees bij het vullen onder de waterkraan
bijzonder voorzichtig om verbrandingen en
eventuele schade aan de was- of spoelbak
te voorkomen.
12. Zorg ervoor dat het strijkijzer weer opgewarmd
is voordat u met het strijken doorgaat. Bij
gevoelig strijkgoed adviseren wij om te
wachten tot de tweede verwarmingsfase
beëindigd is, voordat u met het strijken
begint.
33

STRIJKEN
Algemene aanwijzingen: Controleer vooraf de juiste strijktemperatuur voor het betreffende strijkgoed.
In geval van twijfel, test de juiste instelling eerst uit op een niet zichtbare plek van het strijkgoed.
Strijk gevoelige weefsels aan de binnenkant om glanzende plekken op het weefsel te voorkomen.
1. Bereid het toestel voor door er water in te
vullen zoals in het hoofdstuk “Waterreservoir
vullen” beschreven.
2. Draai de materiaalregelaar (5) op het
gewenste soort materiaal van het strijkgoed.
3. Het groen knipperende controlelampje geeft
aan dat het toestel opwarmt.
4. Zodra het controlelampje constant groen
brandt, kunt u het gewenste soort stoom
kiezen: Schuif de stoomkeuze-toets (4) op
het gewenste soort stoom. Het permanente
strijken met stoom of het gebruik van de
stoomstoot-functie is alleen bij de materialen
wol, katoen of linnen mogelijk.
5. Het strijkijzer produceert stoom zolang het
toestel omlaag gebracht is. Wanneer u de
stoomproductie wilt uitschakelen, schuif de
regelaar op
6. Zodra het strijkijzer door de SafetyLift-functie omhoog gebracht wordt, is
de stoomfunctie gedeactiveerd. Zodra
u doorgaat met strijken, wordt de
gewenste stoomfunctie automatisch weer
ingeschakeld.
7. Spuitnevel-functie (A):
Druk op de spuitnevel-toets (3), wanneer u
kleine kreukels gericht wilt verwijderen.
8. Stoomstoot-functie (B):
Druk op de stoomstoot-toets (2), wanneer
u een krachtige stoomstoot uit de zoolplaat
nodig hebt. Met deze functie kunt u zelf
hardnekkige kreukels uit het weefsel
verwijderen. Deze functie is alleen mogelijk
bij de materialen wol, katoen of linnen.
.
Wacht tussen de afzonderlijke stoomstoten
telkens ca. 3 seconden.
9. Verticale stoom (C):
Druk op de stoomstoot-toets (2) en houd
daarbij het strijkijzer in een verticale positie.
Op deze manier kunt u bijv. vouwen uit op
kleerhangers hangende kledingstukken of
uit gordijnen verwijderen. Wacht tussen
de afzonderlijke stoomstoten telkens ca.
3 seconden.
10. Strijk nooit kledingstukken op het
lichaam van personen, er bestaat risico op
verbranding! Hang de kledingstukken die
u met verticale stoom wilt behandelen, het
beste op kleerhangers.
11. U kunt het toestel ook gebruiken om droog
te strijken. Zet de stoomkeuze-toets (4) dan
gewoon op
A
B
C
.
NA HET STRIJKEN
1. Laat het toestel afkoelen alvorens dit te
reinigen of op te bergen.
2. Vóór het reinigen en het opbergen het toestel
steeds uitschakelen en de stekker uit de
contactdoos trekken.
3. Wanneer u de stekker uit de contactdoos
trekt, raak het toestel niet aan omdat anders
de Safety-Lift-functie niet actief is.
4. Het strijkijzer moet steeds met naar buiten
gebrachte Safety-Lift worden opgeborgen
34
om de vorming van waterdruppels aan de
zoolplaat te voorkomen.
5. Maak het waterreservoir leeg. Dat lukt
makkelijk, wanneer u de klep van de
vulopening opent en het strijkijzer boven
een spoelbak voorzichtig naar links kantelt
tot het water eruit loopt.
6. Voor het eenvoudige opbergen kunt u het
snoer losjes om het toestel wikkelen zodra
dit afgekoeld is.

REINIGEN EN OPBERGEN
1. Laat het toestel afkoelen alvorens dit te
reinigen of op te bergen.
2. Vóór het reinigen en het opbergen het toestel
steeds uitschakelen en de stekker uit de
contactdoos trekken.
3. Wanneer u de stekker uit de contactdoos
trekt, raak het toestel niet aan omdat anders
de Safety-Lift-functie niet actief is.
4. Het strijkijzer moet steeds met naar buiten
gebrachte Safety-Lift worden opgborgen
om de vorming van waterdruppels aan de
zoolplaat te voorkomen.
5. Maak het waterreservoir leeg. Dat lukt
makkelijk, wanneer u de klep van de
vulopening opent en het strijkijzer boven
een spoelbak voorzichtig naar links kantelt
tot het water eruit loopt.
6. De zoolplaat moet regelmatig gereinigd
worden, op zijn laatst wanneer er resten op
de zoolplaat te zien zijn. Laat het toestel
afkoelen en veeg de zoolplaat met een
vochtige doek af. Gebruik geen krassende
sponsen, schuurmiddelen, staalwol, metalen
voorwerpen, hete reinigingsmiddelen
of desinfectiemiddelen omdat deze tot
beschadigingen kunnen leiden.
7. Om voor een optimale stoomproductie te
zorgen moet ook de stoomklep regelmatig
van afzettingen worden ontdaan. Beweeg
hiervoor de stoomregelaar meermaals voor
en terug van de UIT-positie tot de hoogste
instelling.
8. In de stoomgaten van de zoolplaat
kunnen zich kalkafzettingen ophopen.
Om deze afzettingen te verwijderen, vul
het waterreservoir tot aan de markering
MAX met water. Verwarm het toestel op de
stand voor “Leinen” (linnen). Wanneer het
toestel de temperatuur heeft bereikt en het
controlelampje groen brandt, schakel het
toestel met de materiaalregelaar op “UIT”
en houd het toestel boven een spoelbak.
Druk herhaaldelijk op de stoomtoets tot er
uit de gaten aan de zoolplaat water naar
buiten komt. Denk er om dat de naar buiten
komende stoom zeer heet is – risico op
verbranding!
AUTOMATISCHE UIT-FUNCTIE
Wanneer het strijkijzer gedurende langere tijd niet wordt gebruikt, maar de stekker zich nog in de
contactdoos bevindt, begint het controlelampje rood te knipperen en geeft hierdoor aan dat het
toestel automatisch uitgeschakeld werd. Om het strijkijzer weer in te schakelen is het voldoende om
even de handgreep aan te raken. De volgende tabel geeft de verschillende uitschakeltijden weer:
Strijkpositie Uitschakeling na
75014 75025
Safety-Lift ingeschakeld Horizontaal, omhoog gebracht 8 min 8 min
Verticaal 8 min 8 min
Opzij gekanteld 30 sec 30 sec
Safety-Lift uitgeschakeld Horizontaal, omlaag gebracht:
Om veiligheidsredenen wordt
het toestel met de Safety-Lift
omhoog gebracht
Attentie! Met de Safety-Lift beschikt het toestel over een aanvullende functie die het strijken vergemakkelijkt.
Dit ontslaat u er echter niet van de nodige zorgvuldigheid aan het gebruik van het toestel te besteden.
1 min 1 min
35

TIPS VOOR EEN OPTIMAAL STRIJKRESULTAAT
1. Voordat u met het strijken begint, controleer
bij elk kledingstuk of dit is voorzien van
een waslabel. Volg de aanwijzingen op het
label.
2. Als er geen label is, test, in geval van twijfel,
de juiste strijkinstelling eerst uit op een niet
zichtbare plek van het kledingstuk.
3. De volgende symbolen zijn algemeen
gebruikelijk, en u vindt deze ook op uw
strijkijzer:
niet strijken
Synthetische stoffen, strijken op een lage
temperatuur, ca. 100–120 °C
Wol en zijde, strijken op een middelhoge
temperatuur, ca. 130–160 °C
Katoen en linnen, strijken op een
hoge temperatuur, ca. 180–210 °C
4. Sorteer voor het strijken het wasgoed op
de telkens vereiste temperatuur en begin
met de kledingstukken met een lage
strijktemperatuur.
5. Wanneer u van een hogere temperatuur naar
een lagere temperatuur wisselt, laat het
toestel even afkoelen.
6. Let erop dat wasgoed dat in de wasdroger
gedroogd wordt, niet op „kastdroog“
gedroogd wordt, omdat zeer droge was niet
optimaal kan worden gladgestreken.
36

PROBLEMEN OPLOSSEN
Probleem Controleren Oplossing
Het strijkijzer wordt
niet heet.
Safety-Lift is niet
actief.
Er wordt geen stoom
geproduceerd.
Materiaalregelaar op “UIT”? Aan de regelaar het gewenste
Stekker goed in contactdoos? Stekker correct in contactdoos
Is de automatische uitfunctie actief?
Staat de Safety-Lift-
schakelaar op “AUS” (uit)?
Stekker goed in contactdoos? Stekker correct in contactdoos
Bevindt zich uw hand aan de
handgreep?
Is de temperatuur van het
strijkijzer hoog genoeg?
Staat de stoomkeuze-regelaar
?
op
materiaal kiezen.
steken.
De handgreep aanraken.
Safety-Lift-schakelaar op “EIN”
(aan) zetten.
steken.
Hand van de handgreep wegnemen
opdat de Safety-Lift-functie
geactiveerd wordt.
De materiaalregelaar moet op wol,
katoen of linnen staan om stoom te
produceren.
De stoomkeuze-regelaar moet op
een stoominstelling gezet worden.
Er druppelt water uit
het strijkijzer.
Uit de zoolplaat komt
een bruine of witte stof
te voorschijn.
Is de stoomklep verstopt? De stoomkeuze-schakelaar
Bevindt zich het strijkijzer, bij
uitgeschakelde Safety-Liftfunctie, in een horizontale
positie?
Is de temperatuur van het
strijkijzer hoog genoeg?
Werd de stoomstoot-toets te
vaak achter elkaar bediend?
Zit er kalk in het gebruikte
water?
herhaaldelijk heen en weer
bewegen.
Bij uitgeschakelde Safety-Liftfunctie het toestel altijd in een
verticale positie plaatsen! Wij
adviseren om het toestel altijd met
geactiveerde Safety-Lift-functie op
te bergen.
De materiaalregelaar moet op wol,
katoen of linnen staan om stoom te
produceren.
Wacht tussen de afzonderlijke
stoomstoten altijd ca. 3 seconden.
Gebruik mineraalwater zonder
koolzuur uit flessen of meng het
leidingwater met gedestilleerd
water, elk voor de helft.
37

ISTRUZIONI PER L’USO MODELLO 75014/75025
DATI TECNICI
Potenza: 2.000–2.400 W, 220–240 V~, 50 Hz
Ingombro: Cm. 29,5 x 12,6 x 15,3 circa (L/P/A)
Cavo: Cm. 300 circa
Peso: Kg. 1,64 circa
Volume serbatoio: 325 ml circa
Dotazione: Funzione di sollevamento automatico
Accessori: Istruzioni d'uso, misurino
Con riserva di modifiche tecniche.
AVVERTENZE DI SICUREZZA
Potenza del vapore costante 0-35 g
Pulsante getto vapore 100 g, pulsante nebulizzatore
Indicatore di livello dell’acqua
Manicotto amovibile
Funzione vapore verticale
Spegnimento automatico
5 anni di garanzia (salvo la base del ferro)
Modello 75014: Ampia base in acciaio inox lucidato a specchio
Modello 75025: Base in acciaio inox pallinato con rivestimento
e punta di precisione per una stiratura
1. Si prega di leggere con attenzione le
seguenti istruzioni per l‘uso e di conservarle.
2. Questo apparecchio non è adatto all‘utilizzo
da parte di persone (inclusi bambini)
dalle limitate capacità fisiche, sensoriali
o mentali o prive di esperienza nonché di
conoscenza, salvo che l‘utilizzo non avvenga
sotto stretta sorveglianza di una persona
adulta che risponda della loro sicurezza
o che questa abbia provveduto a fornire
all‘utilizzatore istruzioni sul funzionamento
dell‘apparecchio.
3. I bambini devono essere sorvegliati, onde
evitare che giochino con l’apparecchio.
4. Conservare l‘apparecchio in luogo non
accessibile ai bambini.
5. Collegare l’apparecchio solo a una
presa di corrente alternata con tensione
corrispondente a quella riportata sulla
targhetta dati.
6. Questo apparecchio non deve essere usato
né con orologi programmabili esterni, né
con sistemi di comando a distanza.
38
7. Non lasciare incustodito l‘apparecchio in
presenza di bambini. L‘apparecchio non è
adatto all‘uso da parte dei bambini.
8. L‘apparecchio è destinato esclusivamente
all‘uso domestico o a finalità analoghe, p.
es.
angoli di ristoro in negozi, uffici o altri
posti di lavoro,
aziende agricole,
all’utilizzo da parte di ospiti in hotel,
motel o altre strutture ricettive,
in pensioni private o appartamenti di
vacanza.
9. Non immergere per nessun motivo
l’apparecchio o il cavo in acqua o in altri
liquidi. Pericolo di scossa elettrica!
10. Non aggiungere all’acqua del serbatoio
additivi, come oli essenziali, aceto o altro
per evitare danni all’apparecchio.
11. Il cavo deve essere sistemato in modo tale
da non essere tirato o da inciamparci.
12. Assicurarsi che il cavo non entri in contatto
con la piastra calda del ferro da stiro, onde
evitare danni al cavo di alimentazione.

13. Durante l’utilizzo l’apparecchio si riscalda
molto. Prestare attenzione a non toccare le
parti calde dell’apparecchio, onde evitare di
scottarsi.
14. Il vapore sprigionato è molto caldo. Non
entrare in contatto con il vapore e non
rivolgere mai il getto di vapore verso le
persone, onde evitare scottature.
15. Anche i capi appena stirati e il copriasse da
stiro possono diventare molto caldi.
16. L’apparecchio o il cavo di alimentazione non
devono essere utilizzati nelle vicinanze di
fonti di calore.
17. Utilizzare l’apparecchio sempre su una
superficie libera, piana e resistente alle alte
temperature.
18. Spegnere sempre l’apparecchio (interruttore
su spento “AUS”), prima di togliere la spina
dalla presa di corrente.
19. Non estrarre la spina dalla presa tirandola
dal cavo.
20. Dopo l‘utilizzo, quando ci si allontana
(anche per breve tempo) dal posto di lavoro
e prima di procedere con la pulizia, estrarre
la spina di corrente e lasciar raffreddare
l’apparecchio.
21. Se si riempie il serbatoio da un rubinetto,
per motivi di sicurezza togliere sempre
prima la spina dalla presa di corrente.
Il produttore non si assume alcuna responsabilità per un utilizzo inappropriato o scorretto, oppure
in seguito a riparazioni effettuate da officine o persone non autorizzate.
22. Non lasciare mai l’apparecchio incustodito
quando la spina è nella presa di corrente.
23. Quando l’apparecchio si è raffreddato,
arrotolare il cavo morbidamente attorno
all’apparecchio prima di riporlo.
24. Durante il funzionamento, non aprire per
nessun motivo il corpo dell’apparecchio.
Pericolo di scossa elettrica.
25. Verificare con regolarità che l’apparecchio,
la spina e il cavo non siano usurati o
danneggiati. Nel caso in cui il cavo di
connessione o altre parti siano danneggiati,
inviarli per il controllo o la riparazione al
nostro servizio clienti (all’indirizzo riportato
nelle norme di garanzia). Le riparazioni
effettuate da persone non competenti
possono esporre l‘utilizzatore a gravi pericoli
e comportano l’esclusione dalla garanzia.
Attenzione! L’apparecchio è dotato
della funzione supplementare Safety
Lift, che facilita l’operazione di
stiratura. Ciò tuttavia non esonera
l’utilizzatore a utilizzare la massima
cautela nel maneggiare l’apparecchio.
Durante l’utilizzo l’apparecchio si
riscalda molto.
SPIEGAZIONE DELLA TECNOLOGIA SAFETY LIFT
1. Posizionare il ferro da stiro su una superficie
piana. Inserire la spina nella presa di
corrente e verificare che l’interruttore della
funzione Safety Lift sia posizionato su
ACCESO (“EIN”).
2. Non appena si tocca l’impugnatura del
ferro da stiro, l’apparecchio si abbassa
ed è possibile riprendere a stirare come
di consueto. Non appena si lascia
l’impugnatura, la funzione Safety Lift solleva
subito l’apparecchio. In questo modo si evita
che il tessuto da stirare si danneggi a causa
della base del ferro incandescente.
Spegnimento della funzione Safety Lift
1. La funzione può essere disattivata
posizionando l“interruttore su SPENTO
(„AUS“). L’apparecchio funziona a questo
punto come un ferro da stiro tradizionale.
2. Un ulteriore dispositivo di sicurezza garantisce che l’apparecchio dopo 1 min. di inutilizzo si sollevi automaticamente. Ulteriori
informazioni sullo spegnimento automatico
sono riportate a pagina 43.
Attenzione! L’apparecchio è dotato
della funzione supplementare Safety
Lift, che facilita l’operazione di
stiratura. Ciò tuttavia non esonera
l’utilizzatore a utilizzare la massima
cautela nel maneggiare l’apparecchio.
39

LEGENDA
1
2
3
4
5
6
7
8
9
10
11
12
13
1 Spie di controllo
2 Pulsante getto vapore
3 Pulsante nebulizzatore
4 Pulsante selezione vapore
5 Selettore tessuto
6 Spruzzatore
7 Manicotto rimovibile
8 Impugnatura con sensore Safety Lift
40
9 Interruttore Safety Lift (EIN/AUS =
ACCESO/SPENTO)
10 Foro di riempimento serbatoio
11 Serbatoio
12 Base del ferro da stiro
13 Safety Lift

PRIMA DEL PRIMO UTILIZZO
1. Rimuovere tutto il materiale di imballaggio
e le eventuali protezioni dalle aperture.
2. Rimuovere anche la protezione residua
eventualmente rimasta sulla base del ferro!
GUIDA VELOCE ALL’UTILIZZO DEL FERRO
Aprire il foro di
riempimento e versare
dell’acqua fino a
raggiungere il livello
MAX
Inserire la spina nella
presa di corrente,
selezionare il tipo di
materiale desiderato e
di vapore.
Quando la spia di
controllo rimane verde
è possibile iniziare con
l’operazione di stiratura.
RIEMPIMENTO DEL SERBATOIO
È possibile usare normale acqua di rubinetto. Se si abita in una zona con acqua dura, consigliamo di
utilizzare acqua liscia di bottiglia oppure acqua di rubinetto miscelata a metà con acqua distillata.
Mai utilizzare solo acqua distillata, poiché può danneggiare l’apparecchio!
1. Estrarre la spina dalla presa di corrente.
2. Posizionare il pulsante di selezione vapore
(4) su SPENTO (“AUS”) (inserire il
simbolo)
6. Versare l’acqua con attenzione nel foro di
riempimento.
7. Non riempire oltre il livello “Max”.
3. Aprire il foro di riempimento del serbatoio
(10).
4. Riempire il misurino in dotazione con
acqua.
5. Ricordarsi di porre il ferro da stiro in
posizione orizzontale.
8. Chiudere il foro di riempimento premendo
leggermente, finché si incastra.
9. Inserire la spina nella presa di corrente.
10. La spia di controllo diventa rossa.
11. Se si rende necessario effettuare un rabbocco
dell’acqua, estrarre la spina dalla presa di
corrente e ripetere le operazioni descritte.
Nel riempiere la serbatoio dal rubinetto si
raccomanda la massima prudenza onde
evitare bruciature e danni al lavello.
12. Accertarsi che il ferro da stiro sia nuovamente
caldo prima di riprendere con la stiratura. In
caso di capi delicati suggeriamo di attendere
la seconda fase di riscaldamento prima di
ricominciare a stirare.
41

STIRATURA
Istruzioni generali: prima di iniziare, informarsi sulla temperatura da impostare per ciascun capo
d’abbigliamento. In caso di dubbio, provare l’impostazione in un punto non visibile del capo da
stirare. I tessuti delicati vanno stirati “al rovescio”, onde evitare che le stoffe diventino lucide.
1. Preparare il ferro da stiro versando l’acqua
come descritto nel capitolo “Riempimento
del serbatoio”.
2. Ruotare il selettore tessuto (5) e posizionarlo
sul tessuto del capo da stirare.
3. La spia di controllo verde lampeggiante
indica che il ferro si sta riscaldando.
4. Quando la spia di controllo rimane verde
è possibile selezionare il tipo di vapore
desiderato: posizionare il pulsante di
selezione vapore (4) sul tipo di vapore
desiderato. Se si desidera stirare sempre
a vapore o utilizzare la funzione di getto
vapore, ciò è possibile solo con cotone, lana
e lino.
5. Il ferro da stiro produce vapore solo finché
l’apparecchio è abbassato. Se si desidera
disattivare la produzione di vapore, spostare
il regolatore su
6. Non appena il ferro da stiro viene rialzato con
la funzione Safety Lift, la funzione vapore
viene disattivata. Quando si riprende con la
stiratura, il ferro ripristina automaticamente
la funzione vapore desiderata.
7. Funzione nebulizzazione (A):
Premere il pulsante nebulizzatore (3), se si
desidera rimuovere piccole pieghe.
8. Funzione getto vapore (B):
Premere il pulsante getto vapore (2), qualora
si desideri un getto vapore più forte. Questa
funzione è utile per rimuovere dal tessuto
le pieghe più ostinate. Questa funzione è
possibile solo con cotone, lana e lino. Tra
.
un getto vapore e l’altro attendere circa tre
secondi.
9. Vapore verticale (C):
Premere il pulsante getto vapore (2), quando
il ferro da stiro è in posizione verticale. In
questo modo è possibile rimuovere le pieghe
per esempio dai capi appesi alle grucce
oppure dalle tende. Tra un getto vapore e
l’altro attendere circa tre secondi.
10. In nessun caso stirare i capi addosso alle
persone. Pericolo di bruciatura! Appendere
preferibilmente gli abiti che si desidera
trattare a vapore sulle grucce.
11. Il ferro da stiro può essere utilizzato anche
per la stiratura a secco. Posizionare il
pulsante di selezione vapore su
A
B
C
.
DOPO LA STIRATURA
1. Lasciar raffreddare l’apparecchio prima di
pulirlo o di riporlo.
2. Spegnere l‘apparecchio ed estrarre la spina
dalla presa di corrente prima di iniziare le
operazioni di pulizia e di riporlo.
3. Nell’estrarre la spina dalla presa di
corrente, prestare attenzione a non toccare
l’apparecchio, poiché altrimenti la funzione
Safety Lift non è attiva.
4. Il ferro da stiro deve essere riposto sempre
con la funzione Safety Lift disattivata, per
42
evitare che sulla base del ferro si formino
delle gocce d’acqua.
5. Svuotare il serbatoio dell’acqua. Per farlo,
aprire il foro per l’inserimento dell’acqua
e tenere piegato il ferro con attenzione
a sinistra sopra un lavello, finché non
fuoriesce tutta l’acqua.
6. Quando l’apparecchio si è raffreddato,
arrotolare il cavo morbidamente attorno
all’apparecchio prima di riporlo.

PULIZIA E MANUTENZIONE
1. Lasciar raffreddare l’apparecchio prima di
pulirlo o di riporlo.
2. Spegnere l‘apparecchio ed estrarre la spina
dalla presa di corrente prima di iniziare le
operazioni di pulizia e di riporlo.
3. Nell’estrarre la spina dalla presa di
corrente, prestare attenzione a non toccare
l’apparecchio, poiché altrimenti la funzione
Safety Lift non è attiva.
4. Il ferro da stiro deve essere riposto sempre
con la funzione Safety Lift disattivata, per
evitare che sulla base del ferro si formino
delle gocce d’acqua.
5. Svuotare il serbatoio dell’acqua. Per farlo,
aprire il foro per l’inserimento dell’acqua
e tenere piegato il ferro con attenzione
a sinistra sopra un lavello, finché non
fuoriesce tutta l’acqua.
6. La base del ferro deve essere pulita a
intervalli regolari, al più tardi quando
sulla base si riconoscono dei residui. Far
raffreddare l’apparecchio e pulirne la base
con un panno umido. Non utilizzare sostanze
abrasive, lana d‘acciaio, oggetti metallici,
disinfettanti o detergenti caldi, poiché
questi possono danneggiare l’apparecchio.
7. Per garantire una produzione ottimale di
vapore, anche la valvola del vapore deve
essere pulita regolarmente dai depositi.
Portare più volte avanti e indietro il
regolatore del vapore dalla posizione di
SPENTO (“AUS”) alla posizione più alta
8. Nei fori di fuoriuscita del vapore sulla base
del ferro possono formarsi dei depositi di
calcare. Per rimuovere questi depositi,
riempire il serbatoio con acqua fino a
raggiungere il livello MAX. Riscaldare
l’apparecchio con il livello impostato per il
lino. Quando l’apparecchio ha raggiunto la
temperatura impostata e la spia di controllo
è diventata verde, portare il selettore
tessuti su SPENTO (“AUS”) e tenere il
ferro sopra un lavello. Premere più volte il
pulsante vapore consecutivamente finché
dai fori della base fuoriesca dell’acqua. Si
raccomanda la massima attenzione, poiché
il vapore sprigionato è molto caldo. Pericolo
di bruciatura!
FUNZIONE DI SPEGNIMENTO AUTOMATICO
Se il ferro rimane inutilizzato a lungo ma la spina è ancora nella presa di corrente, la spia di controllo
rossa inizia a lampeggiare indicando che l’apparecchio si è spento automaticamente. Per riaccendere
il ferro da stiro basta toccare brevemente l’impugnatura.
Nella seguente tabella sono riportati i diversi tempi di spegnimento:
Posizione di stiratura Spegnimento dopo
75014 75025
Safety Lift attivato Orizzontale, sollevato 8 min 8 min
Verticale 8 min 8 min
Inclinato lateralmente 30 sec 30 sec
Safety Lift disattivato Orizzontale, abbassato:
per motivi di sicurezza
l’apparecchio viene sollevato
con il Safety Lift
Attenzione! L’apparecchio è dotato della funzione supplementare Safety Lift, che facilita l’operazione
di stiratura. Ciò tuttavia non esonera l’utilizzatore a utilizzare la massima cautela nel maneggiare
l’apparecchio.
1 min 1 min
43

CONSIGLI PER OTTENERE UN OTTIMO RISULTATO DI STIRATURA
1. Prima di stirare controllare se i capi sono
muniti dell’etichetta con le istruzioni di
lavaggio e pulitura. In tal caso seguire le
istruzioni riportate.
2. Qualora non vi sia alcuna etichetta, in caso
di dubbio, provare l’impostazione del ferro
da stiro in un punto non visibile del capo
da stirare.
3. I seguenti simboli sono conosciuti universalmente e si trovano anche sul vostro ferro da
stiro:
non stirare
Tessuti sintetici, stirare a bassa
temperatura, ca. 100–120 °C
Lana e seta, stirare a media temperatura,
ca. 130–160 °C
Cotone e lino, stirare ad alta
temperatura, ca. 180–210 °C (verificare
eventualmente la temperatura?)
4. Prima di stirare, suddividere i capi in base
alla temperatura da usare e iniziare con i
capi che richiedono la temperatura più
bassa.
5. Se si passa da una temperatura più alta
a una temperatura più bassa, lasciare
raffreddare brevemente l’apparecchio.
6. In caso di utilizzo di asciugatrice, non
asciugare la biancheria con la funzione
“Pronto asciutto”, poiché i capi troppo
asciutti non si riescono a stirare in modo
ottimale.
44

RISOLUZIONE DEI PROBLEMI
Problema Verificare Soluzione
Il ferro da stiro non si
riscalda
Il Safety Lift non è
attivo
Non si forma vapore La temperatura del ferro da
Il ferro da stiro gocciola Il ferro da stiro in funzione
Dalla base del ferro
fuoriesce una sostanza
marrone o bianca.
Il selettore tessuti è su
“AUS” (spento)?
La spina è correttamente
inserita nella presa di
corrente?
Lo spegnimento automatico
è attivo?
L’interruttore del Safety Lift è
su “AUS” (spento)?
La spina è correttamente
inserita nella presa di
corrente?
La mano è sull’impugnatura? Togliere la mano dall’impugnatura in
stiro è sufficientemente alta?
Il pulsante di selezione del
vapore è
La valvola del vapore è
ostruita?
Safety Lift disattivata è
orizzontale?
La temperatura del ferro da
stiro è sufficientemente alta?
Il pulsante del getto vapore è
stato utilizzato troppo spesso
consecutivamente?
L’acqua utilizzata contiene
calcare?
?
Selezionare il tessuto desiderato
servendosi dell’apposito selettore
Inserire correttamente la spina
Toccare l’impugnatura
Posizionare l’interruttore del Safety
Lift su “EIN” (acceso)?
Inserire correttamente la spina
modo da attivare la funzione Safety
Lift.
Per produrre vapore, il selettore
tessuti deve essere impostato su
lana, cotone o lino.
Il pulsante di selezione del vapore
deve essere impostato su una
funzione vapore.
Muovere più volte il pulsante di
selezione del vapore.
Con la funzione Safety Lift
disattivata, l'apparecchio deve
essere tenuto sempre in posizione
verticale! Consigliamo di tenere
l’apparecchio sempre con la
funzione Safety Lift attivata.
Per produrre vapore, il selettore
tessuti deve essere impostato su
lana, cotone o lino.
Tra un getto vapore e l’altro
attendere sempre circa tre secondi.
Utilizzare acqua liscia in bottiglia
oppure un misto per metà di acqua
di rubinetto e per metà di acqua
distillata.
45

MANUAL DE INSTRUCCIONES MODELO 75014/75025
DATOS TÉCNICOS
Potencia: 2.000–2.400 W, 220–240 V~, 50 Hz
Dimensiones: Aprox. 29,5 x 12,6 x 15,3 cm (largo/ancho/alto)
Cable de alimentación: Aprox. 300 cm
Peso: Aprox. 1,64 kg
Volumen depósito de agua: Aprox. 325 ml
Equipamiento: Planchar con y sin vapor
Accesorios: Manual de instrucciones, recipiente graduado
Se reservan las modificaciones técnicas
INDICACIONES DE SEGURIDAD
Potencia constante de vapor 0 a 35 g
Función de elevación automática
Botón de golpe de vapor 100 g, botón de rociado
Indicador de nivel de agua
Protector flexible del cable
Función de vapor en vertical
Desconexión automática
5 años de garantía (excepto a la suela de planchado)
Modelo 75014: Suela grande de acero inoxidable pulido
al brillo intenso
Modelo 75025: Suela de acero inoxidable granallada con
superficie de deslizamiento y punta de precisión para un
planchado perfecto
1. Rogamos lea atentamente el manual de
instrucciones y consérvelo.
2. No deben usar este equipo aquellas personas
(incluidos los niños) cuya capacidad física,
sensorial o mental esté limitada ni aquellas
personas que carecen de la experiencia y/o
los conocimientos necesarios, salvo bajo la
supervisión de la persona encargada de su
seguridad y que las instruya debidamente
en el uso del equipo.
3. Los niños deberían vigilarse para garantizar
que no jueguen con el equipo.
4. Guarde el equipo en un lugar inalcanzable
para los niños.
5. Conecte el equipo siempre a corriente
alterna de acuerdo con las indicaciones en
la placa indicadora.
6. Este equipo no debe operarse mediante
temporizador externo ni sistema de mando
a distancia.
7. No deje el equipo sin vigilancia cuando hay
niños cerca y no deje que los niños manejen
el equipo.
46
8. El equipo está diseñado exclusivamente
para el uso doméstico o usos similares como
cocinas en negocios, oficinas u otros
lugares de trabajo,
establecimientos rurales,
para el uso por huéspedes en hoteles,
moteles y establecimientos hoteleros
similares,
en pensiones privadas o casas
vacacionales.
9. No sumerja el equipo en agua u otros
líquidos. ¡Existe peligro por descarga
eléctrica!
10. Para evitar dañar el equipo, no añada
aditivos como aceites aromáticos, vinagre,
etc. al agua para el depósito.
11. El cable de alimentación debe tenderse de
tal forma que no sea posible tirar del mismo
o quedarse enganchado en él.
12. Para evitar daños en el cable de alimentación,
procure que el cable de alimentación no
tenga contacto don la suela caliente de la
plancha.

13. El equipo alcanza unas temperaturas muy
altas durante el funcionamiento. Para evitar
quemaduras, procure no tocar las partes
calientes del equipo.
14. El vapor saliente también alcanza unas
temperaturas muy altas. Para evitar
quemaduras, evite el contacto con el vapor
y no dirija el vapor saliente nunca hacia
personas.
15. Asimismo, puede que la ropa recién
planchada y la funda de la tabla de planchar
alcancen unas temperaturas muy altas
durante el planchado.
16. Tanto el equipo como el cable de
alimentación no deben operarse nunca
cerca de llamas abiertas.
17. Utilice el equipo siempre en una superficie
despejada, plana y resistente al calor.
18. Siempre apague el equipo (interruptor
giratorio en posición „AUS/DESCONEXIÓN“
antes de desconectar el conector de red de
la toma de corriente.
19. Al desconectar el equipo, siempre tire del
conector del cable de alimentación, nunca
del cable.
20. Si deja el lugar de trabajo desatendido
(incluso si es por un tiempo corto) y antes
de limpiar el equipo, desconecte el conector
de red de la toma de corriente.
21. Por razones de seguridad, debe desconectar
el conector de red de la toma de corriente si
llena el depósito de agua bajo un grifo.
El fabricante no asume ninguna responsabilidad en caso de utilización indebida o de mal uso o tras
reparaciones efectuadas por talleres o personas no autorizadas.
22. Nunca deje el equipo sin control si está
conectado a la toma de corriente.
23. Cuando el equipo se haya enfriado, enrolle
el cable si presión alrededor del equipo para
guardarlo.
24. No abra la carcasa del equipo bajo ningún
concepto. Existe peligro por descarga
eléctrica.
25. Compruebe regularmente si el equipo,
el conector o el cable de alimentación
presentan señales de desgaste o daños. Si
detecta daños en el cable de alimentación
u otras piezas, envíe el equipo o la base
a nuestro servicio técnico de postventa
para su debida comprobación y reparación
(encontrará la dirección en nuestras
condiciones de garantía). Las reparaciones
inapropiadas pueden causar situaciones
peligrosas para el usuario y llevan a la
extinción de la garantía.
Atención: Con la función Safety-Lift,
el equipo dispone de una función
adicional que facilita el planchado.
Aún así se mantiene la obligación
de manejar el equipo con el cuidado
correspondiente.
¡El equipo alcanza unas temperaturas
muy altas durante el funcionamiento!
DESCRIPCIÓN DE LA TECNOLOGÍA SAFETY-LIFT
1. Ponga la plancha en una superficie plana.
Conecte el conector de red a la toma de
corriente y compruebe si el interruptor de
la función Safety-Lift se encuentra en la
posición „EIN/CONEXIÓN“.
2. En cuanto toque el mango del equipo, la
plancha baja y podrá empezar a planchar
como siempre. En cuanto suelte el mango,
la función Safety-Lift eleva el equipo
inmediatamente. Así se evita que la suela
caliente de la plancha dañe la tela a
planchar.
Desactivar la función Safety-Lift
1. Desactive la función poniendo del interruptor
en la posición „AUS/DESCONEXIÓN“. Así el
equipo funciona como una plancha normal.
2. No obstante, un dispositivo de seguridad
adicional se encarga de elevar el equipo
después de 1 min. en los que no se toque
el mango. Encontrará más informaciones
acerca de la desconexión automática en la
página 51.
Atención: Con la función Safety-Lift,
el equipo dispone de una función
adicional que facilita el planchado.
Aún así se mantiene la obligación
de manejar el equipo con el cuidado
correspondiente.
47

CONOZCA SU PLANCHA
1
2
3
4
5
6
7
8
9
10
11
12
13
1 Piloto de control
2 Botón de golpe de vapor
3 Botón de rociado
4 Selector de vapor
5 Selector de material
6 Tobera de rociado
7 Protector flexible del cable
8 Mango con sensor Safety-Lift
48
9 Selector para Safety-Lift EIN/AUS
(CONEXIÓN/DESCONEXIÓN)
10 Orificio de llenado del depósito de
agua
11 Depósito de agua
12 Suela
13 Safety-Lift

PUESTA EN SERVICIO
1. Retire todo el material de embalaje así
como los seguros de transporte y el protector
de cartón de la suela de la plancha, si los
hubiera.
3 PASOS SIMPLES AL PLANCHADO
Destape el orificio
de llenado y llene el
depósito de agua hasta
la marca MAX.
Conecte el conector
de red a la toma de
corriente y seleccione
los ajustes de material y
vapor deseados.
Podrá iniciar el
planchado cuando
el piloto de control
emite una luz verde
permanente.
LLENAR EL DEPÓSITO DE AGUA
Puede utilizar agua de grifo. Si vive en una región con agua dura, recomendamos utilice agua mineral
embotellada o mezcle el agua de grifo con agua destilada a partes iguales. No utilice sólo agua
destilada, ya que puede dañar el equipo.
1. Desconecte el conector de red de la toma
de corriente.
2. Ajuste el selector de vapor (4) a „AUS/
DESCONEXIÓN“.
8. Cierre la tapa del orificio de llenado,
presionándola ligeramente y hasta que
encastre.
3. Destape el orificio de llenado del depósito
de agua (10).
4. Llene el recipiente graduado con agua.
5. Ponga la plancha en posición horizontal.
6. Llene cuidadosamente el depósito de agua.
7. Al llenar el depósito, no sobrepase la marca
„MAX“.
9. Conecte el cable de alimentación a la toma
de corriente.
10. El piloto de control se vuelve rojo.
11. Si tiene que rellenar el depósito mientras
esté planchando, desconecte el conector de
red de la toma de corriente y rapita los pasos
anteriormente mencionados. Tenga especial
cuidado al llenar el depósito directamente
del grifo para evitar quemaduras y posibles
daños en el lavabo o la pila.
12. Antes de continuar el planchado, asegúrese
de que la plancha se haya calentado
debidamente. Para telas delicadas recomendamos esperar hasta el segundo proceso de
calentamiento para continuar el planchado.
49

PLANCHAR
Instrucciones generales: Antes de empezar a planchar, compruebe si la temperatura ajustada es la
adecuada para cada prenda. En caso de duda, compruebe el ajuste correcto en una parte no visible
de la prenda. Planche las telas delicadas al revés para evitar que brillen.
1. Prepare el equipo llenándolo con agua tal y
como se describe en el capítulo „Llenar el
depósito de agua“.
2. Ajuste el selector giratorio de material (5) al
material de las prendas a planchar.
3. El piloto de control que parpadea en verde
indica que el equipo se está calentando.
4. En cuanto el piloto de control emita luz verde
permanentemente podrá seleccionar el tipo
de vapor deseado. Ajuste el interruptor de
vapor (4) al tipo de vapor deseado. Planchar
con vapor o utilizar la función del golpe de
vapor sólo es posible con el selector ajustado
a lana, algodón o lino.
5. La plancha genera vapor mientras el
equipo esté bajado. Si quiere desactivar la
generación de vapor, desplace el selector a
.
6. La función de vapor quedará desactivada, en
cuanto la plancha se eleva con la ayuda de la
función Safety-Lift. La plancha restablecerá
la generación de vapor en cuanto continúe
el planchado.
7. Rociado (A):
Pulse el botón de rociado (3) si desea
eliminar arrugas pequeñas.
8. Golpe de vapor (B):
Pulse el botón de golpe de vapor (2) si
necesita un golpe de vapor de la suela de
la plancha. Esta función ayuda a eliminar
hasta arrugas persistentes de los tejidos.
Esta función sólo está disponible en los
ajustes para lana, algodón y lino. Espere
unos tres segundos entre cada golpe de
vapor.
9. Vapor vertical (C):
Pulse el botón de golpe de vapor (2) mientras
mantenga la plancha en posición vertical.
Así podrá eliminar las arrugas de prendas
colgadas en una percha o de las cortinas.
Espere unos tres segundos entre cada golpe
de vapor.
10. No planche nunca la ropa mientras alguien
la lleve puesta. ¡Peligro de quemaduras! Si
desea planchar alguna prenda verticalmente
con vapor cuélguela en una percha.
11. También puede utilizar el equipo para
planchar en seco, simplemente ajustando el
selector de vapor a
A
B
C
.
DESPUÉS DEL PLANCHADO
1. Deje que el equipo se enfríe antes de limpiarlo
o guardarlo.
2. Previo a limpiar y guardar el equipo, apáguelo
siempre y desconecte el conector de red.
3. Cuando desconecta el conector de red de
la toma de corriente no toque el equipo,
ya que de lo contrario anularía la función
Safety-Lift.
4. Debería guardar la plancha siempre con el
dispositivo Safety-Lift extendido, para evitar
50
que se formen gotas de agua en la suela de
la plancha.
5. Vacíe el depósito de agua, abriendo la
tapa del orificio de llenado del depósito e
inclinando la plancha hacia la izquierda
hasta que el agua salga mientras la mantiene
sobre de la pila.
6. Cuando la plancha se haya enfriado y la desea
guardar, enrolle el cable de alimentación
alrededor del equipo sin estirar.

LIMPIEZA Y ALMACENAMIENTO
1. Deje que el equipo se enfríe antes de limpiarlo
o guardarlo.
2. Previo a limpiar y guardar el equipo, apáguelo
siempre y desconecte el conector de red.
3. Cuando desconecta el conector de red de
la toma de corriente no toque el equipo,
ya que de lo contrario anularía la función
Safety-Lift.
4. Debería guardar la plancha siempre con el
dispositivo Safety-Lift extendido, para evitar
que se formen gotas de agua en la suela de
la plancha.
5. Vacíe el depósito de agua, abriendo la
tapa del orificio de llenado del depósito e
inclinando la plancha hacia la izquierda
hasta que el agua salga mientras la mantiene
sobre de la pila.
6. La suela de la plancha debe limpiarse
regularmente, y como muy tarde cuando
se detecten residuos en la misma. Deje
que el equipo se enfríe y limpie la suela
de la plancha con un paño humedecido.
No utilice estropajos, agentes limpiadores
abrasivos, lana de acero, objetos metálicos,
desinfectantes o agentes limpiadores
calientes, ya que pueden dañar el equipo.
7. Para garantizar una generación de vapor
óptima, deben eliminarse regularmente
las calcificaciones de la válvula de vapor,
moviendo el selector de vapor varias veces
entre las posiciones „AUS/DESCONEXIÓN“
8. En los orificios de salida de vapor en la
suela de la plancha pueden formarse
calcificaciones. Para eliminar dichas
calcificaciones, llene el depósito de agua
con agua hasta la marca MAX. Caliente
la plancha ajustando el selector de
temperatura a „Leinen“ [„Lino“]. Cuando
el equipo haya alcanzado la temperatura
deseada y el piloto de control emita una luz
verde, ajuste el selector de material a „AUS/
DESCONEXIÓN“ y manténgalo sobre la
pila. Pulse el botón de golpe de vapor varias
veces hasta que por la suela de la plancha
salga agua. Tenga en cuenta que el vapor
que sale por la suela de la plancha está muy
caliente. ¡Peligro de quemaduras!
DESCONEXIÓN AUTOMÁTICA
Si no va a utilizar la plancha durante un tiempo prolongado y el conector de red sigue conectado a
la toma de corriente, el piloto de control empieza a parpadear en rojo, indicando que el equipo se
ha desconectado automáticamente. Para volver a conectar la plancha basta con tocar brevemente el
mango. La siguiente tabla muestra los diferentes tiempos de desconexión:
Posición de planchado Tiempo hasta la desconexión
75014 75025
Safety-Lift activado Horizontal, elevada 8 min 8 min
Vertical 8 min 8 min
Inclinada hacia un lado 30 seg 30 seg
Safety-Lift desactivado Horizontal, bajada. Por
razones de seguridad, la
función Safety-Lift eleva el
equipo.
Atención: Con la función Safety-Lift, el equipo dispone de una función adicional que facilita el planchado.
Aún así se mantiene la obligación de manejar el equipo con el cuidado correspondiente.
1 min 1 min
51

CONSEJOS PARA UN PLANCHADO PERFECTO
1. Previo al planchado compruebe si cada
prenda dispone de instrucciones de cuidado
y sígalas.
2. Si la prenda no dispone de las instrucciones
de cuidado, pruebe en una parte no visible
de la prenda el ajuste para plancharla.
3. Encontrará los siguientes símbolos de uso
general en su plancha:
No planchar
Telas sintéticas a planchar a temperaturas
bajas, aprox. 100–120 °C
Lana y seda a planchar a temperaturas
medianas, aprox. 130–160 °C
Algodón y lino a planchar a temp-
eraturas altas, aprox. 180–210 °C
4. Antes del planchado ordene las prendas
según su temperatura de planchado y
comience con las prendas a planchar a
temperatura baja.
5. Si cambia de una temperatura superior a
una inferior, deje que el equipo se enfríe
durante un rato.
6. Cuando seca la ropa en una secadora,
procure no secarla al nivel más alto, ya que
es más difícil planchar la ropa demasiado
seca.
52

SOLUCIÓN DE PROBLEMAS
Problema A comprobar Solución
La plancha no se
calienta.
El Safety-Lift no está
activado.
No se genera vapor. La temperatura seleccionada
La plancha gotea. La plancha se encuentra en
El selector de material se
encuentra ajustado a AUS/
DESCONEXIÓN.
El conector no está
debidamente conectado a la
toma de corriente.
La desconexión automática
está activada.
El selector del Safety-Lift se
encuentra ajustado a "AUS/
DESCONEXIÓN".
El conector no está
debidamente conectado a la
toma de corriente.
La mano se encuentra en el
mango.
es insuficiente.
El selector de vapor se
encuentra ajustado a
La válvula de vapor está
obstruida.
posición horizontal con el
Safety-Lift desactivado.
Seleccione el material deseado.
Conectar el conector de red
correctamente a la toma de
corriente.
Tocar el mango.
Cambiar el selector del Safety-Lift a
"EIN/CONEXIÓN".
Conectar el conector de red
correctamente a la toma de
corriente.
Quitar la mano del mango para
activar el Safety-Lift.
El selector de material debe estar
ajustado a lana, algodón o lino para
generar vapor.
El selector de vapor debe
encontrarse ajustado a una posición
de vapor.
Mover el selector de vapor varias
veces en ambas direcciones.
La plancha debe guardarse siempre
en posición vertical, si el Safety-Lift
está desactivado. Recomendamos
guardar el equipo siempre con el
Safety-Lift activado.
Sale una sustancia
blanca o marrón de la
suela de la plancha.
La temperatura seleccionada
es insuficiente.
Se ha pulsado el botón de
golpe de vapor varias veces
sin observar el periodo de
espera.
El agua utilizado contiene
mucha cal.
El selector de material debe estar
ajustado a lana, algodón o lino para
generar vapor.
Esperar siempre unos tres segundos
entre cada golpe de vapor.
Utilizar agua mineral embotellada
o mezclar al agua de grifo y agua
destilada a partes iguales.
53

NÁVOD K OBSLUZE MODEL 75014/75025
TECHNICKÁ DATA
Výkon: 2.000–2.400 W, 220–240 V~, 50 Hz
Rozměry: Cca 29,5 x 12,6 x 15,3 cm (D/Š/V)
Přívod: Cca 300 cm
Hmotnost: Cca 1,64 kg
Objem nádržky na
vodu:
Vybavení: Žehlení s párou a nasucho
Příslušenství: Návod k obsluze, odměrka
Bezpečnostní pokyny
Cca 325 ml
Konstantní parní výkon 0-35 g
Automatická funkce „Lift“
Tlačítko parního rázu 100 g, tlačítko rozprašování
Ukazatel hladiny vody
Pohyblivá ochrana přívodního kabelu
Funkce vertikálního působení páry
Automatické odpojení
5 let záruka (mimo žehlící plochu)
Model 75014: Velká vysoce lesklá nerezová žehlící plocha
Model 75025: Žehlící plocha z brokované nerezové oceli s vrstvou
ulehčující skluz a precizní špičkou pro přesné žehlení
1. Přečtěte si následující pokyny a pečlivě je
uschovejte.
2. Tento přístroj není určen k tomu, aby jej
používaly osoby (včetně dětí) s omezenými
fyzickými, senzorickými, nebo duševnímu
schopnostmi nebo s nedostatkem zkušeností
a/nebo s nedostatečnými znalostmi, ledaže
by byly pod dozorem osoby zodpovědné
za jejich bezpečnost, anebo od této osoby
dostaly pokyny, jak přístroj obsluhovat.
3. Děti musí být pod dohledem, aby se zajistilo,
že si nebudou hrát s přístrojem.
4. Přechovávejte na místě nepřístupném
dětem.
5. Přístroj připojte jen na střídavý proud s
napětím dle typového štítku.
6. Tento přístroj nesmí být provozován s
externími spínacími hodinami nebo
systémem dálkového ovládání.
7. Přístroj nikdy nenechávejte bez dohledu,
pokud jsou poblíž děti a dětem nedovolte
tento přístroj obsluhovat.
54
8. Tento přístroj je určený výhradně k
domácímu nebo podobnému použití, např.
kuchyňky v obchodech, v kancelářích
nebo jiných pracovištích,
zemědělské provozy,
k použití hosty v hotelích, motelech a
jiných ubytovacích zařízeních,
soukromé penziony nebo prázdninové
ubytovny.
9. Přístroj nikdy nenamáčejte do vody či jiné
kapaliny – hrozí nebezpečí úderu elektrickým
proudem.
10. Do vody nepřidávejte žádné látky jako
éterické oleje, ocet atd, abyste zamezili
poškození přístroje.
11. Přívod musí být položen tak, aby se zabránilo
potažení za něj nebo zakopnutí o něj.
12. Dbejte na to, aby nedošlo ke kontaktu
přívodní šňůry s žehlící plochou, abyste
zamezili poškození přívodu.

13. Přístroj se za provozu silně zahřívá. Dbejte
na to, abyste se nedotkli žehlící plochy a
nepřivodili si tak popálení.
14. Vystupující pára je rovněž velmi horká.
Dbejte na to, abyste zamezili zasažení
horkou párou a nikdy nesměrujte proud
páry na ostatní osoby , abyste takto předešli
možným opařením.
15. Stejně tak může být čerstvě vyžehlené
prádlo a také povrch žehlícího prkna po
žehlení velmi horký.
16. Přístroj nebo jeho přívody nesmí být
provozovány v blízkosti plamenů.
17. Přístroj používejte vždy na volném, rovném a
žáruvzdorném povrchu.
18. Před vytažením zástrčky ze zásuvky přístroj
vždy vypněte (otočný spínač na „VYP).
19. Zástrčku ze sítě nikdy nevytahujte za
přívodní šňůru.
20. Po použití, při odchodu od přístroje (byť
krátkodobého) a před čištěním vytáhněte
zástrčku ze zásuvky a přístroj nechte
vychladnout.
21. Plníte-li nádržku na vodu přímo z vodovodní
baterie, vytáhněte bezpodmínečně z
bezpečnostních důvodů nejprve zástrčku ze
zásuvky.
firmou nebo osobou.
22. Přístroj nenechávejte bez dozoru, pokud je
zástrčka v zásuvce.
23. Po vychladnutí omotejte před uskladněním
přívodní šňůru volně kolem přístroje.
24. V žádném případě neotevírejte kryt přístroje.
Hrozí nebezpečí zasažení proudem.
25. Pravidelně u přístroje, zástrčky a přívodu
kontrolujte opotřebení a poškození. Při
poškození přívodního kabelu nebo jiných
součástí zašlete prosím přístroj ke kontrole
a opravě našemu zákaznickému servisu
(adresa viz záruční podmínky). Neodborné
opravy mohou vést ke vzniku závažných
nebezpečí pro uživatele a mají za následek
ztrátu záruky.
povinnosti opatrného zacházení s
oBjasnění technologie “safety-lift”
1. Žehlící automat postavte na rovný podklad.
Zástrčku zasuňte do zásuvky a zkontrolujte,
zda je spínač pro funkci „Safety-Lift“
nastaven na „ZAP“.
2. Jakmile se dotknete rukojeti žehlícího
automatu, přístroj klesne a vy můžete začít
žehlit tak, jak jste zvyklí. Jakmile rukojeť
pustíte, zvedne funkce „Safety-Lift” přístroj
opět nahoru. Takto se zamezí tomu, aby byla
žehlená látka poškozena žehlící plochou.
Vypnutí funkce „Safety-Lift“
1. Funkci vypnete tak, že spínač přepnete do
polohy „VYP“. Přístroj nyní funguje jako
běžný žehlící automat.
2. Dodatečné bezpečnostní zařízení se však
i poté postará o to, aby byl přístroj po 1
min bez dotyku s rukojetí nadzvednut.
Další informace k automatickému vypnutí
obdržíte na straně 59.
povinnosti opatrného zacházení s
55

1
2
3
4
5
6
7
8
9
10
11
12
13
1 Kontrolky
2 Tlačítko parního rázu
3 Tlačítko rozprašování
4 Tlačítko navolení páry
5 Regulátor volby materiálu / regulátor
teploty
6 Rozprašovací tryska
7 Pohyblivá ochrana přívodního kabelu
8 Rukojeť se senzorem “Safety-Lift”
56
9 Volící tlačítko pro “Safety-Lift” (ZAP/
VYP)
10 Otvor pro plnění vodou
11 Nádržka na vodu
12 Žehlící plocha
13 Safety-Lift

před prvním použitím
1. Odstraňte všechen obalový materiál popř.
přepravní zajištění.
2. Odstraňte také prosím krycí karton, který je
upevněn na žehlící ploše!
rychlý úvod – 3 jednoduché kroky k žehlení
Otevřete otvor pro
naplnění a nádržku
naplňte vodou až po
značku MAX.
Zástrčku zasuňte
do zásuvky, navolte
požadovaná druh
materiálu a typ páry.
Zůstane-li kontrolka
zelená, můžete začít se
žehlením.
naplnění nádržky na vodu
Můžete použít běžnou vodu z vodovodu. Žijete-li v oblasti s tvrdou vodou, doporučujeme Vám použít
buď odstátou vodu z lahví nebo smíchat vodu destilovanou s vodou z vodovodu v poměru půl na půl.
Nikdy nepoužívejte pouze destilovanou vodu, protože ta by mohla vést k poškození přístroje!
1. Vytáhněte zástrčku ze zásuvky.
2. Přepněte tlačítko volby páry (4) na „VYP“.
6. Vodu opatrně naplňte do otvoru pro plnění.
7. Nenaplňujte nad značku „Max“.
3. Otevřete otvor pro plnění u nádržky na vodu
(10).
4. Odměrku dodanou s přístrojem naplňte
vodou.
5. Dbejte na to, abyste žehlící automat postavili
do horizontální polohy.
8. Lehkým přitlačením uzavřete otvor pro
plnění, dokud nezaskočí.
9. Zástrčku zasuňte do zásuvky.
10. Rozsvítí se červená kontrolka.
11. Musíte-li vodu doplnit během žehlení,
vytáhněte zástrčku ze zásuvky a zopakujte
popsané kroky. Přístroj podržte pod
vodovodní baterií zvláště opatrně, abyste
zabránili popálení a příp. poškození dřezu
či umyvadla.
12. Zajistěte, aby se žehlící automat před dalším
žehlením opět nahřál. U citlivých materiálů
doporučujeme vyčkat před vlastním žehlením
druhé nahřívací fáze.
57

žehlení
Základní pokyny: Nejprve prosím ověřte, jaká teplota žehlení je pro příslušné kusy oblečení ta
správná. V případě pochybností vyzkoušejte správnost nastavení na skrytém místě kusu oděvu. Citlivé
materiály žehlete z rubové strany, tak se můžete vyhnout vzniku lesklých míst.
1. Přístroj připravte naplněním vody popsaným
v kapitole „Plnění vody“.
2. Regulátor volby materiálu (5) otočte na
požadovaný druh materiálu oděvů určených
k žehlení.
3. Blikající kontrolka signalizuje, že se přístroj
nahřívá.
4. Jakmile zůstane kontrolka zelená, můžete
navolit požadovaný typ páry. Posuňte
tlačítko volby páry (4) na požadovaný typ
páry. Chcete-li žehlit se stálým proudem
páry a nebo využít funkci parního rázu, je
toto možní jen u materiálů vlna, bavlna nebo
len.
5. Žehlící automat vytváří páru tak dlouho,
dokud je přístroj spuštěn směrem dolů.
Chcete-li tvorbu páry zastavit, posuňte
prosím regulátor na
6. Jakmile je žehlící automat pomocí funkce
„Safety-Lift“ nadzvednut, funkce páry se
deaktivuje. Jakmile pokračujete v žehlení,
aktivuje automat opět požadovanou funkci
páry.
7. Funkce rozprašování (A):
Stiskněte tlačítko pro rozprašování (3),
pokud chcete cíleně žehlit malé záhyby.
8. Funkce parního rázu (B):
Potřebujete-li silný ráz páry z žehlící plochy,
stiskněte tlačítko rázu páry (2). Tato funkce
pomáhá vyžehlit i velmi silné pokrčení
tkanin. Je možné ji využít jen u materiálů
vlna, bavlna nebo len. Mezi jednotlivými
.
parními rázy prosím vyčkejte vždy cca tři
sekundy.
9. Vertikální pára (C):
Zatímco držíte žehlící automat svisle,
stiskněte tlačítko rázu páry (2). Takto
můžete vyžehlit např. pověšené kusy oděvů
nebo závěsy. Mezi jednotlivými parními rázy
prosím vyčkejte vždy cca tři sekundy.
10. V žádném případě nežehlete oblečení přímo
na osobách, hrozí nebezpečí popálení!
Oděvy, které chcete žehlit pomocí vertikální
páry pověste nejlépe na ramínko.
11. Přístroj můžete použít i k žehlení nasucho.
Tlačítko volby páry jednoduše přepněte na
.
A
B
C
po žehlení
1.
2.
3. Pokud vytahujete zástrčku ze zásuvky,
nedotýkejte se prosím přístroje, protože pak
by nebyla aktivní funkce „Safety-Lift“.
4. Žehlící automat by měl být stále skladován
s vyjetým „Safety-Lift“ , aby se zamezilo
tvorbě kapek páry na žehlící ploše.
58
5. Vyprázdněte nádržku na vodu. To provedete
jednoduše tak, že otevřete záklopku otvoru
pro plnění a žehličku opatrně naklopíte
směrem doleva nad umyvadlo a počkáte, až
voda vyteče.
6. Pro jednoduché skladování obtočte kabel
zlehka kolem přístroje, jakmile tento
vychladne.

čištění a skladování
1.
2.
3. Pokud vytahujete zástrčku ze zásuvky,
nedotýkejte se prosím přístroje, protože pak
by nebyla aktivní funkce „Safety-Lift“.
4. Žehlící automat by měl být stále skladován
s vyjetým „Safety-Lift“ , aby se zamezilo
tvorbě kapek páry na žehlící ploše.
5. Vyprázdněte nádržku na vodu. To provedete
jednoduše tak, že otevřete záklopku otvoru
pro plnění a žehličku opatrně naklopíte
směrem doleva nad umyvadlo a počkáte, až
voda vyteče.
6. Žehlící plochu musíte v pravidelných
intervalech čistit, nejpozději však tehdy,
pokud jsou zbytky na žehlící ploše viditelné.
Přístroj nechte vychladnout a žehlící plochu
otřete vlhkým hadříkem. Nepoužívejte žádné
houby s možností poškrábání, abrazivní
prostředky, ocelovou vatu, kovové předměty,
desinfekční prostředky nebo horké čistící
prostředky , protože tyto mohou vést k
poškození.
7. Pro zajištění optimální tvorby páry, musíte i
parní ventil pravidelně očistit od usazenin.
Pohybujte za tímto účelem regulátorem
FUNKCE AUTOMATICKÉHO ODPOJENÍ
páry z pozice „VYP“ až do nejsilnější pozice
několikrát tam a zpět.
8. V parních otvorech se mohou hromadit
usazeniny vodního kamene. Pro odstranění
těchto usazenin naplňte prosím nádržku
na vodu vodou až po značku MAX. Přístroj
nahřejte na teplotu pro „Len“. Dosáhne-li
přístroj zvolené teploty a kontrolka svítí
zeleně, přepněte regulátor volby materiálu
na „VYP“ a podržte jej nad umyvadlem.
Několikrát stiskněte tlačítko rázu páry,
až začne z otvorů pro páru vytékat voda.
Uvědomte si, že vystupující pára je velmi
horká – nebezpečí popálení!
Není-li žehlící automat delší dobu používán, ale zástrčka zůstává v zásuvce, začne kontrolka blikat
červeně a signalizuje tím, že se přístroj automaticky vypnul. Pro opětovné zapnutí žehlícího automatu
postačí krátký dotek rukojeti.
V následující tabulce jsou uvedeny různé časy vypnutí
Vypnutí po
75014 75025
Zapnuto „Safety-Lift“ Horizontálně zvednuto 8 min 8 min
Vertikálně 8 min 8 min
Naklopeno do strany 30 sek 30 sek
Vypnuto „Safety-Lift“ Horizontálně spuštěno dolů:
Z bezpečnostních důvodů
je přístroj zvednut pomocí
„Safety-Lift“
1 min 1 min
59

tipy pro optimální výsledek žehlení
1. Před každým žehlením se podívejte, zda
je na daném kusu oděvu lísteček s pokyny
pro ošetření. Postupujte podle pokynů zde
uvedených.
2. Není-li na oděvu lísteček umístěn,
vyzkoušejte v případě pochybností správnost
nastavení na skrytém místě kusu oděvu.
3. Následující symboly jsou obecně platné
a najdete je také na Vašem žehlícím
automatu:
nežehlit
Syntetické látky, žehlení s nízkou teplotou,
cca 100–120 °C
Vlna a hedvábí, žehlení se střední
teplotou, cca 130–160 °C
Bavlna a lení, žehlení s vysokou
teplotou, cca 180–210 °C (popř. prověřit
teploty)
4. Před žehlením si rozdělte oděvy dle potřebné
teploty žehlení a začínejte těmi, které
potřebují nejnižší teplotu.
5. Pokud chcete přejít z vyšší teploty na teplotu
nízkou, nechte přístroj krátce vychladnout.
6. Dbejte na to, aby prádlo sušené v sušičce
nebylo sušeno na úroveň „suché do skříně“,
protože velmi suché prádlo se špatně žehlí.
60

řešení proBlémů
Problém Zkontrolujte prosím
Žehlící automat se
nezahřívá
Regulátor volby materiálu na
„VYP“?
Zástrčka správně v zásuvce? Zasuňte zástrčku správně
Na regulátoru nastavte požadovaný
materiál
Je aktivní automatické
odpojení
Neaktivní „Safety-Lift“ Volící tlačítko pro “Safety-
Netvoří se pára Je dostatečně vysoká teplota
Z žehlícího automatu
kape voda
Ze žehlící plochy
uniká hnědá nebo bílá
substance
Lift” na VYP?
Zástrčka správně v zásuvce? Zasuňte zástrčku správně
Máte ruku na rukojeti? Pusťte rukojeť, aby se aktivovala
žehlícího automatu?
Regulátor volby páry je
nastaven na
Je ucpán parní ventil? Posuňte spínač volby páry několikrát
Stojí žehlící automat při
vypnuté funkci „Safety-Lift“
horizontálně?
Je dostatečně vysoká teplota
žehlícího automatu?
Použili jste tlačítko rázu páry
příliš často za sebou?
Obsahuje používaná voda
vodní kámen?
?
Dotkněte se rukojeti
Volící tlačítko pro “Safety-Lift”
přepněte na „ZAP“?
funkce „Safety-Lift“.
Regulátor volby materiálu musí být
nastaven na vlna, bavlna nebo len,
aby docházelo ke tvorbě páry.
Regulátor volby páry musí být
nastaven na stupeň s párou.
tam a zpět.
Je-li vypnutá funkce „Safety-Lift“,
skladujte prosím přístroj vždy
vertikálně! Doporučujeme přístroj
skladovat vždy s aktivovanou funkcí
„Safety-Lift“.
Regulátor volby materiálu musí být
nastaven na vlna, bavlna nebo len,
aby docházelo ke tvorbě páry.
Mezi jednotlivými parními rázy
prosím vyčkejte vždy cca tři
sekundy.
Použijte odstátou vodu nebo
smíchejte vodu z vodovodu napůl s
vodou destilovanou.
61

GARANTIEBESTIMMUNGEN
Wir gewähren auf dieses Gerät eine Garantie von 5 Jahren, bei gewerblichem Gebrauch 12 Monate, ab dem Kaufdatum für
Schäden, die bei bestimmungsgemäßem Gebrauch nachweislich auf Werksfehler zurückzuführen sind. Ausgenommen hiervon
ist die Bügelsohle. Innerhalb der Garantiezeit beheben wir Material- und Herstellungsfehler nach unserem Ermessen durch
Reparatur oder Umtausch. Unsere Garantieleistungen gelten ausschließlich für in Deutschland und Österreich verkaufte
Geräte. Bei anderen Ländern wenden Sie sich bitte an den zuständigen Importeur. Geräte, für die eine Mängelbeseitigung
beansprucht wird, senden Sie bitte zusammen mit einer Kopie des maschinell erstellten Kauf belegs, aus dem das Kaufdatum
ersichtlich sein muss, sowie einer Fehlerbeschreibung gut verpackt und freigemacht an unseren Kundendienst. Im Garantiefall werden dem Kunden entstandene Versandkosten zurückerstattet. Von der Garantie ausgeschlossen sind Schäden durch
Verschleiß, unsachgemäße Handhabung und Nichteinhaltung der Wartungs- und Pflegeanweisungen. Der Garantieanspruch
erlischt, wenn Reparaturen oder Eingriffe am Gerät von dritter Stelle vorgenommen werden.
Eventuelle Ansprüche des Endverbrauchers gegenüber dem Verkäufer oder Händler werden durch diese Garantie nicht eingeschränkt.
GUARANTEE CONDITIONS
We guarantee this appliance for 5 years, or in the case of commercial use for 12 months, from the date of purchase in case of
defects that occur in normal use and are demonstrably due to a factory fault. The sole plate is excluded. Within the warranty
period we will remedy defective materials or workmanship through repair or replacement, at our option.
Our warranty terms apply only to appliances sold in Germany and Austria. For other countries, please contact the responsible
importer. In the event of a claim for remedy of defects, please send the appliance to our after sales service, properly packaged
and postage paid, together with a copy of the automatically generated sales receipt, which must show the date of purchase,
and a description of the defect. If the defect is covered by the warranty, the customer will be reimbursed for the shipping
costs. The warranty does not cover damage from normal wear, improper handling and failure to comply with the maintenance
and care instructions. The warranty is void if repairs or modifications are made to the appliance by third parties.
Any claims of the end consumer vis-à-vis the retailer are not limited by this warranty.
CONDITIONS DE GARANTIE
Nous accordons sur cet appareil une garantie de 5 ans, de 12 mois en cas d’utilisation commerciale, à compter de la date
d’achat pour tout dommage survenu lors de l’emploi conforme aux fins d’utilisation et incontestablement dû à un défaut
de fabrication. Cette garantie ne s’applique pas à la semelle. Notre garantie n’est valide que pour les appareils vendus
en Allemagne et en Autriche. Dans tout autre pays veuillez contacter l’importateur. Veuillez envoyer à notre adresse les appareils, pour lesquels vous réclamez une suppression de défauts, avec le bon d’achat montrant la date d’achat, port payé et
proprement emballé. Les coûts de transport seront remboursés en cas de garantie en Allemagne et en Autriche. Les défauts
causés par usure, utilisation incorrecte ou non-respect des instructions de maintenance sont exclus. Notre obligation de
garantie cesse, si de réparations ou des interventions sont accomplies par des tiers. Cette garantie n’affecte pas les droits
du consommateur contre le commerçant.
GARANTIEVOORWAARDEN
Wij verlenen voor dit apparaat een garantie van 5 jaar, bij commercieel gebruik 12 maanden, gerekend vanaf de koopdatum,
voor defecten waarvan kan worden aangetoond dat zij bij reglementair gebruik zijn te wijten aan fabricagefouten. Hiervan
uitgezonderd is de zoolplaat. Deze garantie geldt voor schade, die bij correct gebruik aantoonbaar is veroorzaakt door een
fout in de productie. Binnen de garantietermijn verhelpen wij materiaal- en productiefouten door herstelling of vervanging
naar onze keuze.
Onze garantie is slechts geldig voor in Duitsland en Oostenrijk verkopte apparaten. In andere landen a.u.b. de importeur
aanspreken. Apparaaten, waarvoor garantie in aanspraak wordt genomen, moeten ons samen met een kopie van de machineel
gegenereerde kassabon waaruit de koopdatum duidelijk wordt, alsmede een beschrijving van de fout goed verpakt aan onze
klantenservice worden toegezonden, porto betaald. Als er sprake van garantie is, worden de verzendingskosten in Duitsland
en Oostenrijk aan de klant vergoed. De garantie dekt geen schade veroorzaakt door slijtage, onbehoorlijk gebruik/foutieve handelingen en niet-naleving van de onderhouds- en reinigingsaanwijzingen. Het recht op garantie vervalt, wanneer reparaties
of manipulaties aan het apparaat door derden worden doorgevoerd. Eventuele rechten van de eindgebruiker t.o.v. de verkoper
of distributeur worden door deze garantie niet aangetast.
62

NORME DIE GARANZIA
Questo prodotto è garantito per 5 anni (in caso di utilizzo professionale per 12 mesi) dalla data di acquisto per i guasti manifestatisi nel corso di un utilizzo conforme alle disposizioni e attribuibili in modo dimostrabile a difetti di fabbricazione. Fatta
eccezione per la base del ferro. Nel periodo di garanzia porremo rimedio ai difetti materiali e di produzione secondo la nostra
valutazione, procedendo alla riparazione o alla sostituzione dell’apparecchio.
Le nostre prestazioni di garanzia valgono esclusivamente per gli apparecchi venduti in Germania e Austria. In tutti gli altri
casi rivolgersi all‘importatore. Gli apparecchi per i quali si richiede la riparazione di guasti ci devono essere inviati con
spedizione affrancata e debitamente imballati, unitamente a una copia del documento di acquisto redatto a macchina dal
quale risulti la data di vendita, nonché la descrizione del guasto. In caso di garanzia al cliente verranno rimborsati i costi di
spedizione sostenuti. Sono esclusi dalla garanzia i guasti dovuti all’usura, all’uso inappropriato o al mancato rispetto delle
regole di manutenzione. Il diritto di garanzia decade qualora siano state effettuate riparazioni o interventi da parte di terzi.
Eventuali diritti del consumatore finale verso il venditore o negoziante non vengono limitati dalla presente garanzia.
CONDICIONES DE GARANTIA
Otorgamos a este aparato una garantía de 5 años, en caso de uso industrial una garantía de 12 meses, a partir de la fecha
de compra por daños que durante su uso comprobadamente tengan que ver con fallos de fábrica. La garantía no se aplica
a la suela de planchado. Dentro del período de garantía, solucionamos errores de material y de fabricación a consideración
nuestra mediante reparación o cambio. Nuestros servicios de garantía son válidos únicamente para los aparatos que han
sido vendidos en Alemania y Austria. Para todos los demás casos diríjase por favor al importador correspondiente. Aquellos
aparatos que se presentan para eliminar errores, por favor enviarlos junto a una copia del comprobante de compra extendido
a máquina, del cual debe desprenderse la fecha de compra, así como una breve descripción de las deficiencias, apropiadamente embalado y con los sellos correspondientes a nuestro servicio al cliente.
En caso de garantía, los gastos de envío serán restituidos al cliente. Aquellos daños causados por desgaste están excluidos
de la garantía, así como manipulación incorrecta, e incumplimiento de las condiciones de mantenimiento y cuidado. El derecho a garantía expira si las reparaciones o mantenimiento son realizadas por terceros. Todo reclamo del consumidor final
ante el vendedor, comerciante no se ve afectado por esta garantía.
záruční podmínky
Na tento přístroj poskytujeme záruku v délce 5 let, při průmyslovém použití 12 měsíců, od data zakoupení na škody, které při
řádném používání prokazatelně způsobily chyby ze závodu. Výjimku tvoří žehlící plocha.Po dobu záruky budeme odstraňovat
materiální i výrobní vady opravou nebo výměnou podle našeho uvážení.
Poskytnutí záruky výhradně platí pro zařízení prodány v Německu i Rakousku. V jiných zemích se obrat’te prosím na kompetentní dovozce. Přístroje, na které bylo uplatňováno odstranění vad, zašlete prosím smechanicky vyhotovenou kopií nákupního
dokladu, ze kterého musí být bezpodmínečně patrný datum nákupu i s popisem vad, přístroj musí být bezpečně zabalen a
nafrankován na náš záruční servis. V připadě opravněné záruky jsou kupujícím vraceny poštovní poplatky.
Tato záruka se nevztahuje na poškození způsobená opotřebením, nesprávným zacházením a nedodržováním návodů kúdržbě
a obsluze. Záruční doba zaniká, když opravy nebo manipulace s přístrojem byly provedeny třetí osobou.
Eventuální nároky zákazníka vůči prodejci/obchodníku nejsou touhle zárukou omezeny.
WARUNKI GWARANCJI
Udzielamy na nasze produkty 24 miesięcznej gwarancji od daty zakupu (warunkiem jest zachowanie faktury zakupu lub paragonu) na szkody, które przy użytkowaniu zgodnym z przeznaczeniem wskazują na wadę fabryczną. W czasie trwania gwarancji
usuniemy wady materiałowe bądź fabryczne zgodnie z naszym osądem poprzez naprawę lub wymianę.
Gwarancja udzielana jest na produkty sprzedawane na terenie Polski, Niemiec i Austrii. W innych krajach proszę zwrócić się do
właściwego Importera. Urządzenia, w których wymagane jest usunięcie wady, proszę przesłać razem z kopią faktury zakupu,
na której musi być widoczna data zakupu, z załączonym opisem wady, w oryginalnym pudełku, dobrze zapakowane i na własny
koszt na adres serwisu.. Gwarancja nie obejmuje szkód wynikających ze zużycia, użytkowania niezgodnie z przeznaczeniem
i nieprzestrzegania wskazówek dotyczących konserwacji i pielęgnacji. Roszczenie gwarancji wygasa, jeżeli naprawa bądź
otwarcie przedmiotu będą przeprowadzone przez stronę trzecią. Ewentualne roszczenia użytkownika końcowego wobec sprzedawcy/dealera nie są ograniczone tą gwarancją.
63

SERVICE-ADRESSEN
DEUTSCHLAND
Mannheimer Straße 4
68766 Hockenheim
Kundendienst Deutschland
Telefon +49 (0) 62 05/94 18-27
Telefax +49 (0) 62 05/94 18-22
E-Mail service@unold.de
Internet www.unold.de
ÖSTERREICH
Kundendienst-Annahme Österreich
ESC Electronic Service Center GmbH
Molitorgasse 15
A-1110 Wien
Telefon +43 (0) 1/9 71 70 59
Telefax +43 (0) 1/9 71 70 59
E-Mail office@esc-service.at
SCHWEIZ
MENAGROS SA
Route der Servion
CH - 1083 Mezières
Telefon +41 (0) 21 9 03 01-15
Telefax +41 (0) 21 9 03 01-11
E-Mail info@menagros.ch
Internet www.menagros.ch

NOTIZEN

ENTSORGUNG / UMWELTSCHUTZ
Unsere Geräte werden auf hohem Qualitätsniveau für eine lange Nutzungsdauer
her ge stellt. Regelmäßige Wartung und fachge rechte Reparaturen durch unseren
Kunden dienst können die Nutzungsdauer des Gerätes verlängern. Wenn ein Gerät defekt
und nicht mehr zu reparieren ist, beachten Sie bitte:
Dieses Produkt darf nicht zusammen mit dem normalen Hausmüll entsorgt werden.
Sie müssen dieses Produkt an einer ausgewiesenen Sammelstelle zum Recycling
von elektrischen oder elektronischen Geräten ab liefern.
Durch das separate Sammeln und Recyceln von Abfallprodukten helfen Sie mit, die natürlichen Ressourcen zu schonen und
stellen sicher, dass das Produkt in gesundheits- und umweltverträglicher Weise entsorgt wird.
WASTE DISPOSAL / ENVIRONMENTAL PROTECTION
Our appliances are produced on a high quality level for a long lifetime. Regular maintenance and expert repairs by our aftersales service can extend the useful life of the appliance. If an appliance is defective and repair is not possible we ask you to
follow the following instructions for disposal.
Do not dispose this appliance together with your standard household waste. Please bring this product to an approved collection point for recycling of electric and electronic products.
By separate collection and disposal of waste products you help to protect natural resources and ensure, that the product is
disposed in an adequate way to protect health and environment.
TRAITEMENT DES DÉCHETS / PROTECTION DE L’ENVIRONNEMENT
Nos appareils sont produits selon un standard élevé de qualité pour une longue durée d’utilisation. Un entretien régulier et
des réparations compétentes par notre service après-vente prolongent cette durée d’utilisation. Si néanmoins l’appareil est
endommagé et ne peut plus être réparé, veuillez suivre les instructions suivantes.
Ne jamais disposer ce produit avec les dégâts de ménage. Apportez ce produit à une station de collection pour récupération
de produits électriques et électroniques.
Par la collection séparée vous aidez à protéger les ressources naturelles et prenez soin, que le produit est démonté sans risque
pour la santé et l’environnement.
VERWIJDEREN VAN AFVAL / MILIEUBESCHERMING
Onze apparaten zijn geproduceerd met een hoge qualiteit voor een lange gebruik. Regelmatige onderhoud en vakkundig
reparaties door onze klantenservice verlengt de gebruiksduur. Wanneer het apparat defekt is en kan niet meer gerepareerd
worden, let op de volgende instructies.
Dit product mag niet samen met het normale huishoudelijke afval worden afgevoerd. U dient dit product bij een voor het
recycleren van elektrische of elektronische apparaten aangewezen verzamelplaats in te leveren.
Door het separaat inzamelen en recycleren van afvalproducten helpt u mee bij het zuinig omgaan met de natuurlijke hulpbronnen en zorgt u ervoor dat het product op een gezondheids- en milieuvriendelijke manier afgevoerd wordt.
66

SMALTIMENTO / TUTELA DELL’AMBIENTE
I nostri apparecchi vengono prodotti rispettando un elevato standard qualitativo per una lunga durata di utilizzo. Una corretta
manutenzione e riparazioni adeguate a cura dal nostro servizio clienti possono prolungare la durata di utilizzo del prodotto. Se
un apparecchio è difettoso e non più riparabile, per il suo smaltimento si presti attenzione ai punti che seguono.
Questo prodotto non deve essere smaltito unitamente ai comuni rifiuti domestici. Consegnare il prodotto a un centro di raccolta per il riciclaggio dei rifiuti elettrici o elettronici.
Con la raccolta differenziata dei rifiuti e dei prodotti riciclabili è possibile contribuire alla tutela delle risorse naturali e far
smaltire il prodotto nel rispetto dell’ambiente e della salute.
DISPOSICIÓN / PROTECCIÓN DEL MEDIO AMBIENTE
Nuestros aparatos se fabrican con un alto nivel de calidad por un largo período de uso. El mantenimiento regular y las reparaciones de tipo técnico a través de nuestro servicio al cliente pueden prolongar la duración del aparato. Cuando un aparato
está defectuoso y ya no puede repararse, por favor considere en la disposición final los siguientes puntos:
Este producto no puede ser eliminado junto a la basura domiciliaria. Usted debe entregar este producto a un lugar oficial para
el reciclaje de aparatos eléctricos o electrónicos.
Mediante la clasificación por separado y el reciclaje de productos residuales, Usted contribuye a proteger los recursos naturales y asegura que el producto sea eliminado de forma salubre y acorde con el medio ambiente.
likvidace / ochrana životného prostředí
Naše vyrobené přístroje mají vysoce kvalitní standard pro zajišt’ění jejich dlouhé životnosti. Pravidelné údržby i opravy odborně
provedeny naším prodejním servisem mohou mít vliv na prodloužení provozní životnosti přístroje. Když je přístroj vadný a už
ho nelze opravit, neopomeňte prosím:
Toto zařízení nepatří do běžného domovního odpadku, ale musí být předáno do autorizované sběrny pro recyklování elektrických
nebo elektronických zařízení.
Separátní sběr a recyklování odpadních produktů umožňuje šetření přírodních zdrojů a zajišt’uje, aby byly odpady likvidovány
způsobem, který je pro zdraví a kologii přijatelný.
utylizacja / ochrona środowiska
Nasze urządzenia wyprodukowane zostały na wysokim poziomie do długiego użytkowania. Regularna konserwacja i fachowe
naprawy poprzez nasz serwis mogą wydłużyć pracę urządzenia. W razie kiedy urządzenie jest uszkodzone i nie nadaje się do
naprawy, proszę przestrzegać zaleceń:
Ten produkt nie może być zutylizowany razem z normalnymi odpadami domowymi. Muszą Państwo dostarczyć ten produkt do
zbiorczego punktu recyklingowego dla urządzeń elektrycznych i elektronicznych.
Poprzez oddzielne zbieranie i recykling odpadów pomagają Państwo chronić naturalne zasoby i sprawiają, że ten produkt
będzie zutylizowany w sposób bezpieczny dla zdrowia i środowiska naturalnego.
67

Aus dem Hause
 Loading...