


Frequently asked questions:
www.trust.com/22089/faq
X-RAY Gaming
Mouse
1 |
2 |
|
|
|
|
|
|
|
a |
||||||||||||||
|
|
|
|
|
|
|
|
|
|
||||||||||||||
|
|
|
|
|
|
|
|
|
|
|
|
|
|
|
|
|
|
|
|
|
|
|
|
|
|
|
|
|
|
|
|
|
|
|
|
|
|
|
|
|
|
|
|
|
|
|
|
|
|
|
|
|
|
|
|
|
|
|
|
|
|
|
|
|
|
|
|
|
|
|
|
|
|
|
|
|
|
|
|
|
|
|
|
|
|
|
|
|
|
|
|
|
|
|
|
|
|
|
|
|
|
|
|
|
|
|
|
|
|
|
|
|
|
|
|
|
|
|
|
|
|
|
|
|
|
|
|
|
|
|
|
|
|
|
|
|
|
|
|
|
|
|
|
|
|
|
|
|
|
|
|
|
|
|
|
|
|
|
|
|
|
|
|
|
|
|
|
|
|
|
|
|
|
|
|
|
|
|
|
|
|
|
|
|
|
|
|
|
|
|
|
|
|
|
|
|
|
|
|
|
|
|
|
|
|
|
|
|
|
|
|
|
|
|
|
|
|
|
|
|
|
|
|
|
|
|
|
|
|
|
|
|
|
|
|
|
|
|
|
|
|
|
|
|
|
|
|
|
|
|
|
|
|
|
|
|
|
|
|
|
|
|
|
|
|
|
|
|
|
|
|
|
|
|
|
|
|
|
|
|
|
|
|
|
|
|
|
|
|
|
|
|
|
|
|
|
|
|
|
|
|
|
|
|
|
|
|
|
|
|
|
|
|
|
|
|
|
|
|
|
|
|
|
|
|
|
|
|
|
|
|
|
|
|
|
|
|
|
|
|
|
|
|
|
|
|
|
|
|
|
|
|
|
|
|
|
|
|
|
|
|
|
|
|
|
|
|
|
|
|
|
|
|
|
|
|
|
|
|
|
|
|
|
|
|
|
|
|
|
|
|
|
|
|
|
|
|
|
|
|
|
|
|
|
|
|
|
|
|
|
|
|
|
|
|
|
|
|
|
|
|
|
|
|
|
|
|
|
|
|
|
|
|
|
|
|
|
|
|
|
|
|
|
|
|
|
|
|
|
|
|
|
|
|
|
|
|
|
|
|
|
|
|
|
|
|
|
|
|
|
|
|
|
|
|
|
|
|
|
|
|
|
|
|
|
|
|
|
|
|
|
|
|
|
|
|
|
|
|
|
|
|
|
|
|
|
|
|
|
|
|
|
|
|
|
|
|
|
|
|
|
|
|
|
|
|
|

6
b
4 |
5 |
7 |
|
|
|
|
|
|
|||
|
|
|
|||
|
|
|
|||
|
|
|
|||
|
|
|
|||
|
|
|
|
c
 b
b
a
8 |
9 |
d
b
a
c 
8 |
9 |
d
f
c
e 
d
g 

GXT 138 Gaming Mouse - USER’S MANUAL
1.Button layout (default)
-Button 1 (Default = Left mouse button)
-Button 2 (Default = Right mouse button)
-Button 3 (Default = Mid Click )
-Button 4 (Default = DPI -)
-Button 5 (Default = DPI +)
-Button 6 (Default = DPI Loop)
-Button 7 (Default = Shift DPI)
-Button 8 (Default = Forward)
-Button 9 (Default = Backward)
-Button 10 (Default = RGB On/Off)
Installation
2.- Open the internet browser and go to www.trust.com/22089/driver.
a- Choose your operation system and click the “Download EXE” button to download the software.
b- Click on the “Setup GXT 138.exe” and follow the installation wizard.
c- Click on the “GXT 138.exe” shortcut to start the software.
d- You can now start to configure the mouse. In the manual will be referred to ‘Apply’ to update settings
eto the mouse.
1

GXT 138 Gaming Mouse - USER’S MANUAL
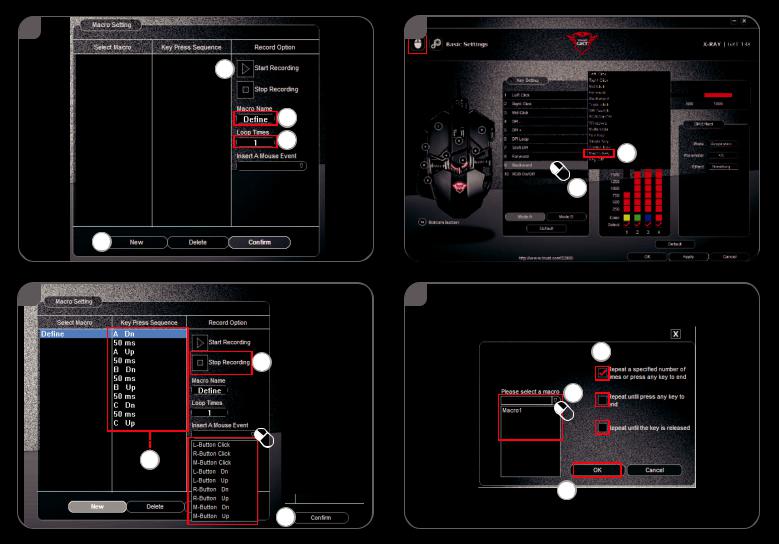
Button Programming
3.Key Setting
a- Click on ‘Mode A’ or ‘Mode B’ to swap between key profiles.
b- Click on the key setting you want to re-assign.
c- Click on function you want to assign.
- Click on ‘Apply’, the mouse is being updated. (The selected key mode mode will be active)
-At least one button has to be assigned as “Left Click”.
-Click on the ‘Default’ below to reset key settings to factory default.
2
GXT 138 Gaming Mouse - USER’S MANUAL
Report rate, DPI settings & DPI Effect
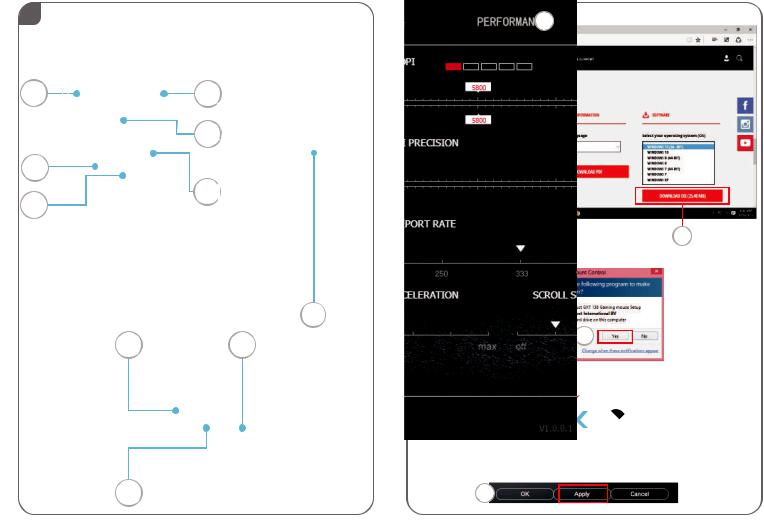
4.Report Rate
a- Pick your report rate between 125-1000Hz. - Click on ‘Apply’, the mouse is being updated.
5. DPI Setting
a - Assign up to 4 DPI variables (Check/uncheck boxes). b - Choose a LED color for each DPI setting.
c - Choose a DPI speed for each DPI setting (min 250 / max 4000 DPI). - Click on ‘Apply’, the mouse is being updated.
6. |
Light Effect |
|
a |
Select between mode: |
|
|
- Standard |
: Constant light according to assigned DPI color (step 5b). |
|
- Respiration |
: Breathing lightmode according to assigned colors (step 5b). |
|
- Neon |
: Blinking neon effect according to assigned colors (step 5b). |
b |
Change parameter of mode: |
|
|
- Standard |
: Choose LED brightness 5-100%. |
|
- Respiration |
: Choose breathing interval time between 4-8 seconds. |
|
- Neon |
: Choose RGB cycle time between 0.5-6.0 seconds. |
c |
Change Effect of mode: |
|
|
- Standard |
: Constant only |
|
- Respiration |
: Choose between Breathing/RGB Cycle. |
|
- Neon |
: RGB Flash. |
-Click on ‘Apply’, the mouse is being updated.
-Click on the ‘Default’ button below to reset the report rate and DPI Settings to factory default.
3
GXT 138 Gaming Mouse - USER’S MANUAL
Mouse, Scroll & Double-click Speed
7. |
- Click on the |
icon to switch to advanced settings. |
|
|
aMouse Speed
-Click on box 1 (slow) to 11 (fast) to adjust windows mouse speed.
-Check the box to improve mouse pointer precision (software enhance).
bScrolling Speed
-Click on box 1 (slow) to 11 (fast) to adjust windows scrolling speed.
-Check the box to scroll one screen view at a time while scrolling.
cDouble-click Speed
Click on box 1 (slow) to 11 (fast) to adjust windows double-click registration speed.
-Click on ‘Apply’, the mouse is being updated.
- Click on the ‘Default’ button below to reset the Mouse speed, Scrolling speed and Double-click speed.
Macro Settings
8.Create a Macro (Store a sequence of keys in the software)
a- Enter Macro Name
b- Enter the prefered loop times
c- Click on ‘New’
d- Click on ‘Start Recording’ to start recording the macro.
e- Now enter your preferred macro sequence (Combine or choose between Keyboard or Mouse events) (max. 32 actions).
f- Click on ‘Stop Recording’ to stop recording the macro.
g- Click on ‘Confirm’ to save the macro.
- The next step shows how to assign your recorded macro.
4
GXT 138 Gaming Mouse - USER’S MANUAL
Assign a Macro
- Click on the  icon to switch to basic settings.
9.Assign a Macro (Store a sequence of keys in the software)
a- Click on the key you want to assign a macro.
b- Click on ‘Macro Key’.
c- Select your preferred macro.
d- Pick your repeat setting.
e- Click on ‘OK’.
- Click on ‘Apply’, the mouse is being updated.
5

GXT 138 Gaming Mouse - USER’S MANUAL
Trouble shooting
Problem |
Solution |
The LED’s of the mouse are not working.
The software is not starting.
-Press button 10 on the bottom side of the mouse to switch on/off the LED’s (Only with default mouse settings).
-Make sure the GXT 138 mouse is connected and try to start the software again.
If your problem is not solved, please contact the help desk at www.trust.com/22089/faq.
6
GXT 138 Gaming Mouse - USER’S MANUAL
1.Tastenanordnung (Standardfunktionen)
-Taste 1 (Standardfunktion = linke Maustaste)
-Taste 2 (Standardfunktion = rechte Maustaste)
-Taste 3 (Standardfunktion = Mittelklick)
-Taste 4 (Standardfunktion = DPI-Wert verringern)
-Taste 5 (Standardfunktion = DPI-Wert erhöhen)
-Taste 6 (Standardfunktion = DPI-Wert weiterschalten)
-Taste 7 (Standardfunktion = DPI-Wert umschalten)
-Taste 8 (Standardfunktion = vorwärts)
-Taste 9 (Standardfunktion = rückwärts)
-Taste 10 (Standardfunktion = RGB ein/aus)
Installation 2.
a- Besuchen Sie mit Ihrem Internetbrowser die Website www.trust.com/22089/driver.
b- Wählen Sie Ihr Betriebssystem aus und klicken Sie auf die Schaltfläche „Download EXE“, um die
Software herunterzuladen.
c- Klicken Sie auf „Setup-GXT 138.exe“ und folgen Sie den Anweisungen des Installationsassistenten.
d- Klicken Sie auf die Verknüpfung „GXT 138.exe“, um die Software zu starten.
e- Sie können nun mit der Konfiguration der Maus beginnen. In der Bedienungsanwendung wird in diesem Zusammenhang auf „Apply“ verwiesen, um die Maus zu aktualisieren.
7
GXT 138 Gaming Mouse - USER’S MANUAL
Tastenprogrammierung
3.Tasteneinstellung
a- Klicken Sie auf „Mode A“ oder „Mode B“, um zwischen den Tastenprofilen zu wechseln.
b- Klicken Sie auf die Tasteneinstellung, deren Funktion Sie ändern möchten.
c- Klicken Sie auf die Funktion, die Sie der Taste zuweisen möchten.
- Klicken Sie auf „Apply“. Die Maus wird nun aktualisiert. (Der ausgewählte Tastenmodus wird aktiviert.)
-Mindestens eine Taste muss als „Left Click“ konfiguriert sein.
-Klicken Sie unten auf die Schaltfläche „Default“, um die Tasteneinstellungen auf ihre werkseitigen Grundwerte zurückzusetzen.
8

GXT 138 Gaming Mouse - USER’S MANUAL
Abtastrate, DPI-Einstellungen und DPI-Effekt
4.Abtastrate
a- Wählen Sie eine Abtastrate zwischen 125 und 1.000 Hz aus. - Klicken Sie auf „Apply“. Die Maus wird nun aktualisiert.
5. |
DPI-Einstellung |
a |
- Weisen Sie bis zu 4 DPI-Variablen zu (Häkchen in die betreffenden Auswahlkästchen setzen oder |
|
daraus entfernen). |
b |
- Wählen Sie für jede DPI-Einstellung eine LED-Farbe aus. |
c |
- Wählen Sie für jede DPI-Einstellung eine DPI-Geschwindigkeit aus (min 250/max. 4.000 DPI). |
|
- Klicken Sie auf „Apply“. Die Maus wird nun aktualisiert. |
6. |
Lichteffekt |
|
a |
Wählen Sie einen der folgenden Modi: |
|
|
- Standard |
: Leuchtet permanent in der zugewiesenen DPI-Farbe (Schritt 5b). |
|
- Respiration : Pulsierender Lichtmodus unter Verwendung der zugewiesenen Farben (Schritt 5b). |
|
|
- Neon |
: Blinkender Neon-Effekt unter Verwendung der zugewiesenen Farben (Schritt 5b). |
b |
Modus-Parameter ändern: |
|
|
- Standard |
: Wählen Sie eine LED-Helligkeit zwischen 5 und 100 % aus. |
|
- Respiration : Wählen Sie ein Pulsierintervall zwischen 4 und 8 Sekunden aus. |
|
|
- Neon |
: Wählen Sie eine RGB-Zyklusdauer zwischen 0,5 und 6,0 Sekunden aus. |
c |
Modus-Effekt ändern: |
|
|
- Standard |
: Nur permanent. |
|
- Respiration : Wählen Sie zwischen Breathing/RGB Cycle. |
|
|
- Neon |
: RGB Flash. |
-Klicken Sie auf „Apply“. Die Maus wird nun aktualisiert.
-Klicken Sie unten auf die Schaltfläche „Default“, um die Abtastrate und die DPI-Einstellungen auf ihre werkseitigen Grundwerte zurückzusetzen.
9
GXT 138 Gaming Mouse - USER’S MANUAL
Maus-, Scrollund Doppelklickgeschwindigkeit
7. |
- Klicken Sie auf das |
-Symbol, um zu den erweiterten Einstellungen zu wechseln. |
|
|
aMausgeschwindigkeit
-Klicken Sie auf das Kästchen 1 (langsam) bis 11 (schnell), um die Windows-Mausgeschwindigkeit anzupassen.
-Setzen Sie ein Häkchen in das Auswahlkästchen, um die Mauszeigerpräzision (Softwareoptimierung) zu verbessern.
bScrollgeschwindigkeit
-Klicken Sie auf das Kästchen 1 (langsam) bis 11 (schnell), um die Windows-Scrollgeschwindigkeit anzupassen.
-Setzen Sie ein Häkchen in das Auswahlkästchen, um beim Scrollen jeweils eine Ansicht weiter zu scrollen.
cDoppelklickgeschwindigkeit
-Klicken Sie auf das Kästchen 1 (langsam) bis 11 (schnell), um die Windows-Doppelklick- Registrierungsgeschwindigkeit anzupassen.
-Klicken Sie auf „Apply“. Die Maus wird nun aktualisiert.
- Klicken Sie unten auf die Schaltfläche „Default“, um die Maus-, Scrollund Doppelklickgeschwindigkeit auf ihre werkseitigen Grundwerte zurückzusetzen.
Makro-Einstellungen
8.Erstellen eines Makros (Speichern einer Tastenfolge in der Software)
a- Geben Sie einen Namen für das Makro ein.
b- Geben Sie ein, wie oft das Makro wiederholt werden soll.
c- Klicken Sie auf „New“.
d- Klicken Sie auf „Start Recording“, um mit der Aufzeichnung des Makros zu beginnen.
e- Geben Sie nun Ihre gewünschte Makrosequenz ein (max. 32 Aktionen, Sie können dabei zwischen Tastaturund Mausereignissen wählen oder diese kombinieren).
f- Klicken Sie auf „Stop Recording“, um die Aufzeichnung des Makros zu beenden.
g- Klicken Sie auf „Confirm“, um das Makro zu speichern.
- Der nächste Schritt erklärt Ihnen, wie Sie Ihr aufgezeichnetes Makro zuweisen.
10

GXT 138 Gaming Mouse - USER’S MANUAL
Zuweisen eines Makros
-Klicken Sie auf das  -Symbol, um zu den Grundeinstellungen zu wechseln.
9.Zuweisen eines Makros (Speichern einer Tastenfolge in der Software) a - Klicken Sie auf die Taste, der Sie ein Makro zuweisen möchten.
b - Klicken Sie auf „Macro Key“.
c - Wählen Sie das gewünschte Macro aus.
d - Wählen Sie die Anzahl der gewünschten Wiederholungen aus. e – Klicken Sie auf „OK“.
-Klicken Sie auf „Apply“. Die Maus wird nun aktualisiert.
11

GXT 138 Gaming Mouse - USER’S MANUAL
Fehlerbehebung
Problem |
Lösung |
Die LEDs der Maus funktionieren nicht.
Die Software startet nicht.
-Drücken Sie die Taste 10 auf der Unterseite der Maus, um die LEDs einoder auszuschalten (funktioniert nur in den MausGrundeinstellungen).
-Vergewissern Sie sich, dass die GXT 138 Maus angeschlossen ist und versuchen Sie, die Software erneut zu starten.
Falls das Problem fortbesteht, wenden Sie sich bitte unter www.trust.com/22089/faq an unseren Helpdesk.
12

GXT 138 Gaming Mouse - USER’S MANUAL
1.Configuration des boutons (par défaut)
-Bouton 1 (fonction par défaut = clic gauche de la souris)
-Bouton 2 (fonction par défaut = clic droit de la souris)
-Bouton 3 (fonction par défaut = clic milieu)
-Bouton 4 (fonction par défaut = DPI-)
-Bouton 5 (fonction par défaut = DPI+)
-Bouton 6 (fonction par défaut = DPI Boucle)
-Bouton 7 (fonction par défaut = Alterner DPI)
-Bouton 8 (fonction par défaut = suivant)
-Bouton 9 (fonction par défaut = précédent)
-Bouton 10 (fonction par défaut = RGB marche/arrêt)
Installation |
||
2. |
- Ouvrez le navigateur Internet et allez à l’adresse www.trust.com/22089/driver. |
|
a |
||
- Choisissez votre système d’exploitation et cliquez sur le bouton « Download EXE » pour télécharger le |
||
b |
||
logiciel. |
||
|
||
c |
- Cliquez sur « Setup GXT 138.exe » et suivez l’assistant d’installation. |
|
- Cliquez sur le raccourci « GXT 138.exe » pour démarrer le logiciel. |
||
d |
||
- Vous pouvez maintenant configurer la souris. Conformément au manuel, le bouton « Apply » permet |
||
e |
||
de mettre à jour la souris. |
||
|
||
|
|
|
13

GXT 138 Gaming Mouse - USER’S MANUAL
Programmation des boutons
3.Paramètres des touches
a- Cliquez sur « Mode A » ou « Mode B » pour basculer entre les profils de touches.
b- Cliquez sur le paramètre de touche que vous souhaitez réattribuer.
c- Cliquez sur la fonction que vous souhaitez attribuer.
- Cliquez sur « Apply », la souris est mise à jour. (Le mode de touche sélectionné sera activé)
-Au moins un bouton doit être attribué comme « Left Click ».
-Cliquez sur « Default » en dessous pour restaurer les paramètres d’usine.
14

GXT 138 Gaming Mouse - USER’S MANUAL
Le taux de rapport, les paramètres DPI et les effets DPI
4.Taux de rapport
a- Choisissez votre taux de rapport entre 125 et 1000 Hz. - Cliquez sur « Apply », la souris est mise à jour.
5. Paramètres DPI
a - Attribuez jusqu’à 4 variables DPI (cochez/décochez les cases). b - Choisissez une couleur LED pour chaque paramètre DPI.
c - Choisissez une vitesse DPI pour chaque paramètre DPI (min. 250/max. 4000 DPI). - Cliquez sur « Apply », la souris est mise à jour.
6. |
Effets de lumière |
|
a |
Sélectionnez entre les modes : |
|
|
- Standard |
: Lumière constante conformément à la couleur DPI attribuée (étape 5b). |
|
- Respiration : Lumière clignotante conformément aux couleurs attribuées (étape 5b). |
|
|
- Neon |
: Effet de néon clignotant conformément aux couleurs attribuées (étape 5b). |
b |
Modifier les paramètres du mode : |
|
|
- Standard |
: Choisissez la luminosité des LED entre 5 et 100 %. |
|
- Respiration : Choisissez l’intervalle de clignotement entre 4 et 8 secondes. |
|
|
- Neon |
: Choisissez la durée du cycle RGB entre 0,5 et 6 secondes. |
c |
Modifier les effets du mode : |
|
|
- Standard |
: Constant only |
|
- Respiration : Choisissez entre Breathing/RGB Cycle. |
|
|
- Neon |
: RGB Flash. |
-Cliquez sur « Apply », la souris est mise à jour.
-Cliquez sur le bouton « Default » en dessous pour restaurer le taux de rapport et les paramètres DPI aux paramètres d’usine.
15
GXT 138 Gaming Mouse - USER’S MANUAL
Vitesse de souris, de défilement et de double-clic
- Cliquez sur l’icône pour passer aux paramètres avancés.
7.
aVitesse de la souris
-Cliquez sur la case 1 (lent) à 11 (rapide) pour régler la vitesse de la souris Windows.
-Cochez la case pour améliorer la précision du pointeur de la souris (optimisation logicielle).
bVitesse de défilement
-Cliquez sur la case 1 (lent) à 11 (rapide) pour régler la vitesse de défilement Windows.
-Cochez la case pour faire défiler une seule vue d’écran à la fois lors du défilement.
cVitesse du double-clic
Cliquez sur la case 1 (lent) à 11 (rapide) pour régler la vitesse du double-clic Windows.
-Cliquez sur « Apply », la souris est mise à jour.
- Cliquez sur le bouton « Default » en dessous pour réinitialiser la vitesse de la souris, la vitesse de défilement et la vitesse du double-clic.
Paramètres des macros
8.Créer une macro (enregistrer une série de touches dans le logiciel)
a- Saisissez le nom de la macro
b- Saisissez le nombre de boucles souhaité
c- Cliquez sur « New ».
d- Cliquez sur « Start Recording » pour commencer à enregistrer la macro.
e- Saisissez à présent la séquence de macro souhaitée (combinez, ou choisissez entre, des actions de clavier ou de souris) (32 actions max.).
f- Cliquez sur « Stop Recording » pour arrêter l’enregistrement de la macro.
g- Cliquez sur « Confirm » pour enregistrer la macro.
- L’étape suivante montre comment attribuer votre macro enregistrée.
16
GXT 138 Gaming Mouse - USER’S MANUAL
Attribuer une macro
- Cliquez sur l’icône  pour passer aux paramètres de base.
9.Attribuer une macro (enregistrer une série de touches dans le logiciel)
a- Cliquez sur la touche à laquelle vous souhaitez attribuer une macro.
b- Cliquez sur « Macro Key ».
c- Sélectionnez la macro souhaitée.
d- Sélectionnez votre paramètre de répétition.
e- Cliquez sur « OK ».
- Cliquez sur « Apply », la souris est mise à jour.
17

GXT 138 Gaming Mouse - USER’S MANUAL
Dépannage
Problème |
Solution |
Les LED de la souris ne fonctionnent pas.
Le logiciel ne démarre pas.
-Appuyez sur le bouton 10 sur le dessous de la souris pour allumer/éteindre les LED (uniquement avec des paramètres de souris par défaut).
-Assurez-vous que la souris GXT 138 est connectée et réessayez de démarrer le logiciel.
Si votre problème persiste, veuillez contacter l'assistance technique via l'adresse www.trust.com/22089/faq.
18

GXT 138 Gaming Mouse - USER’S MANUAL
1.Disposizione dei pulsanti (impostazione predefinita)
-Pulsante 1 (funzione predefinita = Pulsante sinistro del mouse)
-Pulsante 2 (funzione predefinita = Pulsante destro del mouse)
-Pulsante 3 (funzione predefinita = Pulsante centrale)
-Pulsante 4 (funzione predefinita = DPI -)
-Pulsante 5 (funzione predefinita = DPI +)
-Pulsante 6 (funzione predefinita = Ciclo DPI)
-Pulsante 7 (funzione predefinita = DPI Shift)
-Pulsante 8 (funzione predefinita = Avanti)
-Pulsante 9 (funzione predefinita = Indietro)
-Pulsante 10 (funzione predefinita = RGB On/Off)
Installazione
2.- Aprire il browser internet e andare a www.trust.com/22089/driver.
a- Scegliere il sistema operativo e fare clic sul pulsante "Download EXE" per scaricare il software.
b- Fare clic su "Setup GXT 138.exe" e seguire la procedura di installazione guidata.
c- Fare clic sul collegamento "Trust GXT 138.exe" per avviare il software.
d- Ora è possibile iniziare a configurare il mouse. Per aggiornare le impostazioni nel mouse, in questo
emanuale si farà riferimento al comando 'Apply'.
19

GXT 138 Gaming Mouse - USER’S MANUAL
Programmazione dei pulsanti
3.Impostazione dei tasti
a- Fare clic su "Mode A" o "Mode B" per passare da un profilo tasti all'altro.
b- Fare clic sull'impostazione del tasto che si desidera riassegnare.
c- Fare clic sulla funzione che si desidera assegnare.
- Fare clic su ‘Apply’. Il mouse viene aggiornato. (La modalità del tasto selezionata sarà attiva)
-Almeno un pulsante deve essere assegnato come "Left Click".
-Fare clic sul pulsante ‘Default’ in basso per ripristinare le impostazioni di fabbrica dei tasti.
20

GXT 138 Gaming Mouse - USER’S MANUAL
Report rate, Impostazioni DPI e Effetto DPI
4.Impostazione del Report rate
a- Scegliere una frequenza di risposta tra 125 e 1000 Hz. - Fare clic su ‘Apply’. Il mouse viene aggiornato.
5.Impostazioni DPI
a- Assegnare fino a 4 variabili DPI (Selezionare/deselezionare le caselle di controllo).
b- Scegliere un colore LED per ciascuna impostazione DPI.
c- Scegliere una velocità DPI per ciascuna impostazione DPI (min 250 / max 4000 DPI). - Fare clic su ‘Apply’. Il mouse viene aggiornato.
6. a
b
c
Effetti luminosi
Selezionare la modalità:
- Standard |
: Luce costante secondo il colore DPI assegnato (passo 5b). |
- Respiration : Modalità di pulsazione secondo i colori assegnati (passo 5b). |
|
- Neon |
: Effetto neon intermittente secondo i colori assegnati (passo 5b). |
Parametri delle modalità: |
|
- Standard |
: Impostare luminosità dei LED tra 5 e 100%. |
- Respiration : Impostare l'intervallo di dissolvenza tra 4 e 8 secondi. |
|
- Neon |
: Impostare la durata del ciclo RGB tra 0,5 e 6,0 secondi. |
Effetti delle modalità: |
|
- Standard |
: Constant only |
- Respiration : Scegliere Breathing o RGB Cycle. |
|
- Neon |
: RGB Flash. |
-Fare clic su ‘Apply’. Il mouse viene aggiornato.
-Fare clic sul pulsante ‘Default’ in basso per ripristinare le impostazioni di fabbrica della frequenza di aggiornamento e del DPI.
21
GXT 138 Gaming Mouse - USER’S MANUAL
Velocità Mouse, Scorrimento e Doppio clic
7. |
- Fare clic sull'icona |
per passare alle impostazioni avanzate. |
|
|
aMouse Speed [Velocità mouse]
-Fare clic su una delle caselle da 1 (lento) a 11 (veloce) per regolare la velocità del mouse.
-Selezionare la casella per migliorare la precisione del puntatore del mouse (miglioramento software).
bScrolling Speed [Velocità di scorrimento]
-Fare clic su una delle caselle da 1 (lento) a 11 (veloce) per regolare la velocità di scorrimento delle finestre.
-Selezionare la casella per scorrere di una schermata alla volta.
cDouble-click time [Velocità doppio clic]
-Fare clic su una delle caselle da 1 (lento) a 11 (veloce) per regolare la velocità di esecuzione del doppio clic.
-Fare clic su ‘Apply’. Il mouse viene aggiornato.
- Fare clic sul pulsante ‘Default’ in basso per ripristinare le impostazioni di fabbrica di Mouse speed, Scrolling speed e Double-click speed.
Impostazioni delle macro
8.Creare una macro (memorizzare una sequenza di tasti nel software)
aImmettere il nome della macro
b- Immettere i tempi di ciclo desiderati
c- Fare clic su ‘New’
d- Fare clic su 'Start recording' per iniziare a registrare la macro.
e- Ora immettere la sequenza macro desiderata (scegliendo eventi tastiera, eventi mouse o una combinazione di entrambi, per un massimo di 32 azioni in totale).
f- Fare clic su 'Start recording' per iniziare la registrazione della macro.
g- Fare clic su ‘Confirm’ per salvare la macro.
- Il passo successivo è l'assegnazione della macro registrata.
22
GXT 138 Gaming Mouse - USER’S MANUAL
Assegnazione di una macro
- Fare clic sull'icona  per passare alle impostazioni di base.
9.Assegnare una macro (a un tasto da usare per l'esecuzione della macro)
a- Fare clic sul tasto cui si desidera assegnare la macro.
b- Click su ‘Macro Key’.
c- Selezionare la macro desiderata.
d- Scegliere l'impostazione di ripetizione desiderata [Numero di ripetizioni specificato, Fino alla pressione di qualsiasi tasto, o Finché il tasto è premuto].
e- Fare clic su 'OK'.
- Fare clic su ‘Apply’. Il mouse viene aggiornato.
23
GXT 138 Gaming Mouse - USER’S MANUAL
Risoluzione dei problemi
Problema |
Soluzione |
I LED del mouse non funzionano.
Il software non si avvia.
-Premere il pulsante 10 sul lato inferiore del mouse per accendere/spegnere i LED (solo con le impostazioni predefinite del mouse).
-Assicurarsi che il mouse GXT 138 sia collegato e riprovare a avviare il software.
Se il problema persiste, contattare il servizio di assistenza tecnica su www.trust.com/22089/faq.
24
GXT 138 Gaming Mouse - USER’S MANUAL
1.Distribución de los botones (predeterminada)
-Botón 1 (predeterminado = botón izquierdo del ratón)
-Botón 2 (predeterminado = botón derecho del ratón)
-Botón 3 (predeterminado = clic central)
-Botón 4 (predeterminado = DPI -)
-Botón 5 (predeterminado = DPI +)
-Botón 6 (predeterminado = ciclo de DPI)
-Botón 7 (predeterminado = cambio de DPI)
-Botón 8 (predeterminado = avance)
-Botón 9 (predeterminado = retroceso)
-Botón 10 (predeterminado = RGB activado/desactivado)
Instalación
2.- Abra el navegador de Internet y visite www.trust.com/22089/driver.
a- Elija su sistema operativo y haga clic en el botón “Download EXE” para descargar el software.
b- Haga clic en el archivo “Setup GXT 138.exe” y siga el asistente de instalación.
c- Haga clic en el acceso directo “GXT 138.exe” para iniciar el software.
d- Ahora podrá comenzar a configurar el ratón. En el manual se hará referencia a la función “Apply” para
eactualizar la configuración en el ratón.
25

GXT 138 Gaming Mouse - USER’S MANUAL
Programación de botones
3.Configuración de teclas
a- Haga clic en “Mode A” o “Mode B” para cambiar de un perfil de tecla a otro.
b- Haga clic en el ajuste de tecla que desee reasignar.
c- Haga clic en la función que desee asignar.
- Haga clic en “Apply” y el ratón se actualizará (el modo de tecla seleccionado será el modo activo).
-Al menos un botón se debe asignar como “Left Click”.
-Haga clic en el botón “Default” para restablecer la configuración a los valores predeterminados de fábrica.
26
 Loading...