

TRENDnet TV-IP322WI User Manual

TRENDnet User’s Guide
Table of Contents
i
Contents
Contents ............................................................................................... i
Product Overview ................................................................................ 3
Package Contents ........................................................................................................... 3
Features .......................................................................................................................... 3
Product Hardware Features ........................................................................................... 4
Warnings: ....................................................................................................................... 5
Cautions: ......................................................................................................................... 5
Plan for Installation .............................................................................. 5
Setup Camera with CD.......................................................................... 6
Option 1: Manually Connect Camera to Wireless Network ........................................... 6
Option 2: Connect Camera to a Wireless Network by WPS Button ............................. 10
Option 3: Connect Camera by Using a Network Cable (PoE)........................................ 14
Install Web Browser Plug-In for Camera Management Interface ......... 17
User Accounts .............................................................................................................................. 28
Time Settings ............................................................................................................................... 29
Daylight Savings ........................................................................................................................... 29
Live View Settings ........................................................................................................................ 30
Maintenance ................................................................................................................................ 31
Network ............................................................................................. 32
TCP/IP .......................................................................................................................................... 32
Port .............................................................................................................................................. 33
DDNS ............................................................................................................................................ 33
PPPoE (ADSL) ............................................................................................................................... 34
SNMP ........................................................................................................................................... 34
802.1X .......................................................................................................................................... 36
IP Address Filter ............................................................................................................ 36
QoS (Quality of Service)................................................................................................ 37
UPnP ............................................................................................................................. 38
Wi-Fi ............................................................................................................................. 38
WiFi Camera Mounting ...................................................................... 19
Video .................................................................................................. 39
Access Camera through the Web Browser .......................................... 20
System Management and Default Settings ................................................................. 20
Logging-in to the Camera ............................................................................................. 20
Basic Settings ..................................................................................... 22
Live View ....................................................................................................................... 22
Playback ........................................................................................................................ 23
Video Format ................................................................................................................ 39
Display Settings ............................................................................................................ 40
On Screen Display (OSD) Settings ................................................................................................ 43
Text Overlay ................................................................................................................................. 43
Privacy Mask ................................................................................................................................ 44
Video Recording ........................................................................................................................... 44
Log ................................................................................................................................ 26
System .......................................................................................................................... 27
Advanced Settings .............................................................................. 27
System ............................................................................................... 27
Device Settings ............................................................................................................................ 27
© Copyright 2015 TRENDnet. All Rights Reserved.
Event .................................................................................................. 45
Motion Detection......................................................................................................................... 45
Exception ..................................................................................................................................... 49
Snapshot ...................................................................................................................................... 49
Email ............................................................................................................................................ 50

TRENDnet User’s Guide
Table of Contents
ii
Storage .............................................................................................. 51
Storage Management .................................................................................................................. 51
SD Card Slot ................................................................................................................................. 52
Network Storage .......................................................................................................................... 52
FTP Server ..................................................................................................................... 53
Troubleshooting ................................................................................. 54
© Copyright 2015 TRENDnet. All Rights Reserved.
TRENDnet User’s Guide
TV-IP322WI
3
Product Overview
Package Contents
TV-IP322Wi
Quick Installation Guide
CD-ROM (Utility, Software & User's guide)
Camera Mounting hardware (Drill template, mounting screws, network
cable waterproof cap)
Network cable (6 ft / 2M)
Power Adapter (12V 1A)
TV-IP322WI
Features
TRENDnet’s Outdoor 1.3 MP HD WiFi IR Network Camera, model TV-IP322WI, provides
powerful 1.3 megapixel night vision (higher than 720p) in complete darkness for up to
30 meters (100 ft.). This ultra-compact camera is outdoor ready with an IP66 weather
rated housing, embedded WiFi N, and a MicroSD card slot. It comes with a free iOS and
Android™ mobile app and complimentary pro-grade software to manage up to 32
TRENDnet cameras.
.
1.3 Megapixel
Record up to 1280 x 960 pixel video (higher than 720p) at 30 fps in H.264 compression
Night Vision
Night vision up to 30 meters (100 ft.) in complete darkness
Adjustable Bracket
Adjustable integrated mounting bracket provides installation flexibility
WiFi N
Network the camera to an existing Wireless N (2.4 GHz) network
PoE
Supports a Power over Ethernet (IEEE 802.3af) network connection for an optional PoE
installation
Outdoor Ready
Outdoor IP66 weather rated and an operating temperature range of -30 – 60 °C (-22 –
140 °F)
Storage
Store video to a MicroSD (SDHC, SDXC) card up to 64 GB (sold separately) or set up SMB
or FTP Server storage
© Copyright 2015 TRENDnet. All Rights Reserved.
TRENDnet User’s Guide
TV-IP322WI
4
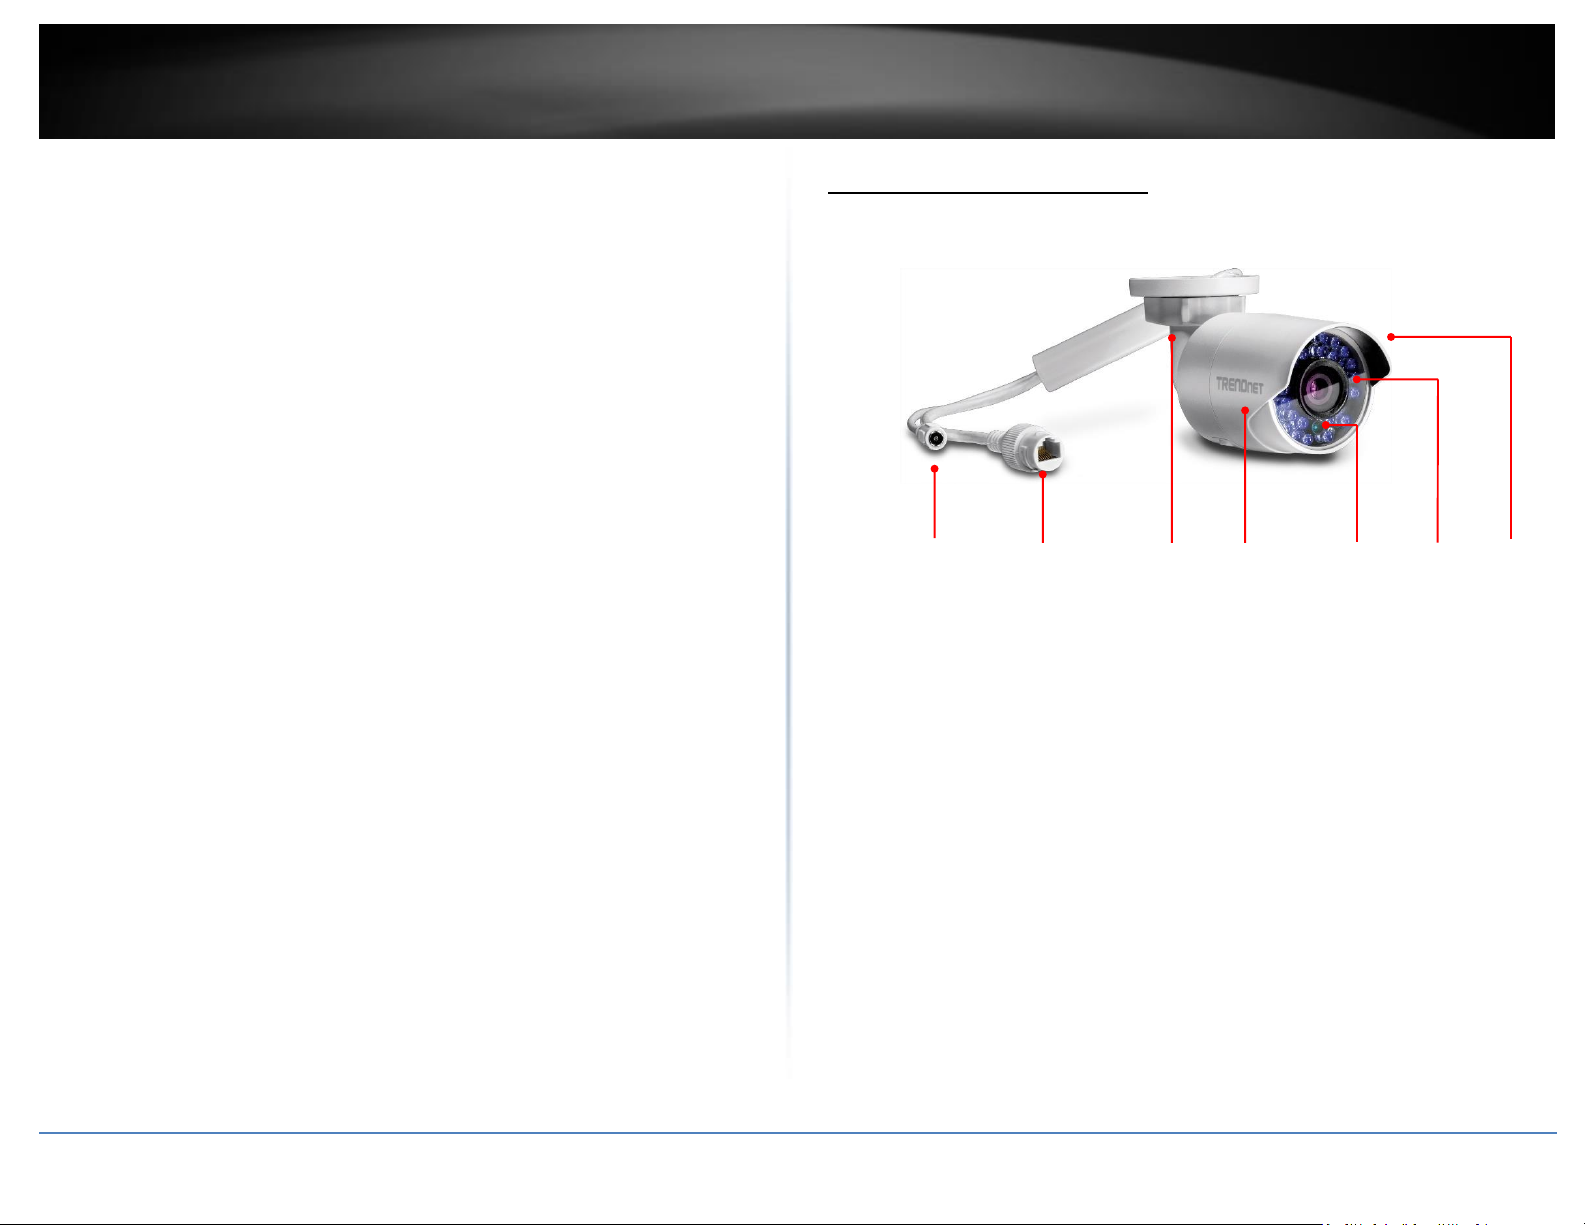
IR
Sensor
IR
LEDs
Sun Visor
IP66
Housing
Mounting
Lock Ring
Power
Connector
Ethernet/PoE
Port
Smart IR
Dynamic IR adjustment optimizes night visibility
D-WDR
Product Hardware Features
Camera Overview
Digital Wide Dynamic Range improves video quality in high contrast lighting
environments
Advanced Playback
Advanced in-camera archived video review functionality
Motion Detection
Create motion detection windows with separate sensitivity settings and event triggers
Recording Schedule
Define a weekly recording schedule with a mixture of continuous and motion detection
recording
IPv6
IPv6 support
Power Connector: This model is designed to work on wireless or PoE. For
wireless PoE user, please connects the power adapter to camera.
Ethernet/PoE Port: Plug the network cable to connect to supply power to the
ONVIF
ONVIF Profile S compliant
Free Apps
See live video on a mobile device with free iOS and Android® apps
camera if using PoE connection.
Mounting Lock Ring: Loosen the lock ring to adjust and tighten the camera
position.
IP66 Housing: Housing is rated with IP66.
Complimentary Software
Complimentary pro-grade software to manage up to 32 TRENDnet cameras
IR Sensor: Detect the light source.
IR LEDs: The IR LEDs will be on when the sensor detect low light source.
Sun Visor: Sun visor to prevent direct sun to the camera.
© Copyright 2015 TRENDnet. All Rights Reserved.

TRENDnet User’s Guide
TV-IP322WI
5
Warnings:
For PoE user, it is recommended to use the PoE injector or an IEEE 802.3at
compliant PoE switch.
If the product does not work properly, please contact your dealer or the
nearest service center. Never attempt to disassemble the camera yourself.
Disassembling the product will void the warranty and may cause harm or
injury.
The installation should be done by a qualified service person and should
conform to all construction and electric regulations and other local codes.
Cautions:
Make sure the power supply voltage is correct before using the camera.
Do not drop the camera or subject to physical shock.
Do not touch sensor modules with fingers. If cleaning is necessary, use a clean
cloth with a bit of ethanol and wipe it gently. If the camera will not be used for
an extended period of time, put on the lens cap to protect the sensor from dirt.
Do not aim the camera lens at the strong light such as the Sun or an
incandescent lamp. Strong light can damage the camera sensor.
The sensor may be burned out by a laser beam. When any laser equipment is
being used, make sure that the surface of the sensor will not be exposed to the
laser beam.
Do not place the camera in extremely hot, cold temperatures (the operating
temperature should be between -30°C to 65°C), dusty or damp environment,
and do not expose it to high electromagnetic radiation.
To avoid heat accumulation, good ventilation is required for a proper operating
environment.
While shipping, the camera should be packed in its original packing.
Use water proof tape to cover all the wires, cables which will be exposed
outdoor after the camera installation.
There are a number of factors involved in successful camera installation. Follow the
suggested installation steps and go through the check lists. This guide will help you to
make your camera installation smooth and easy.
Plan for installation location
Setup Camera with CD
Hardware Installation
Plan for Installation
Viewing angle
The TV-IP322WI is a bullet camera with a focused viewing angle (71.6 horizontal) that
provides non-distorted and detailed images. Choose the location where has good angle
to shoot the image you expect to see. The motion detection area should also be
considered when installing the camera.
Weather Conditions
The camera is an outdoor dome camera, which fits most installations indoor and
outdoor. The camera can work under a wide range of weather conditions. For severe
weather conditions. Using the camera in milder weather conditions will help extend the
camera’s life and preserve the quality of the camera image.
Moisture: Avoid damp or moist environments whenever you can. The camera is an IP66
grade water proof camera, and it will work in moist environments. However, rain may
affect the picture quality, especially at night, water may reflect the light from the infrared illumination and degrade picture quality.
Temperature: Camera works within a specified temperature range. Areas with severe
temperatures should be avoided when installing the camera. It’s recommended that you
use an enclosure with a heater and blower if you plan on using this camera outside of
the specified temperature range.
© Copyright 2015 TRENDnet. All Rights Reserved.
TRENDnet User’s Guide
TV-IP322WI
6
Sunlight: Avoid direct sun light exposure. Direct sun light will damage the image sensor.
If sunlight is necessary for your viewing purposes, provide protection for the image
sensor.
Lighting: Consider installing your camera faces the same direction of the light sources.
Shooting images with top-down position outdoor or next to the existing light source are
good choices. Avoid the light source if it creates a shade that darkens the viewing area.
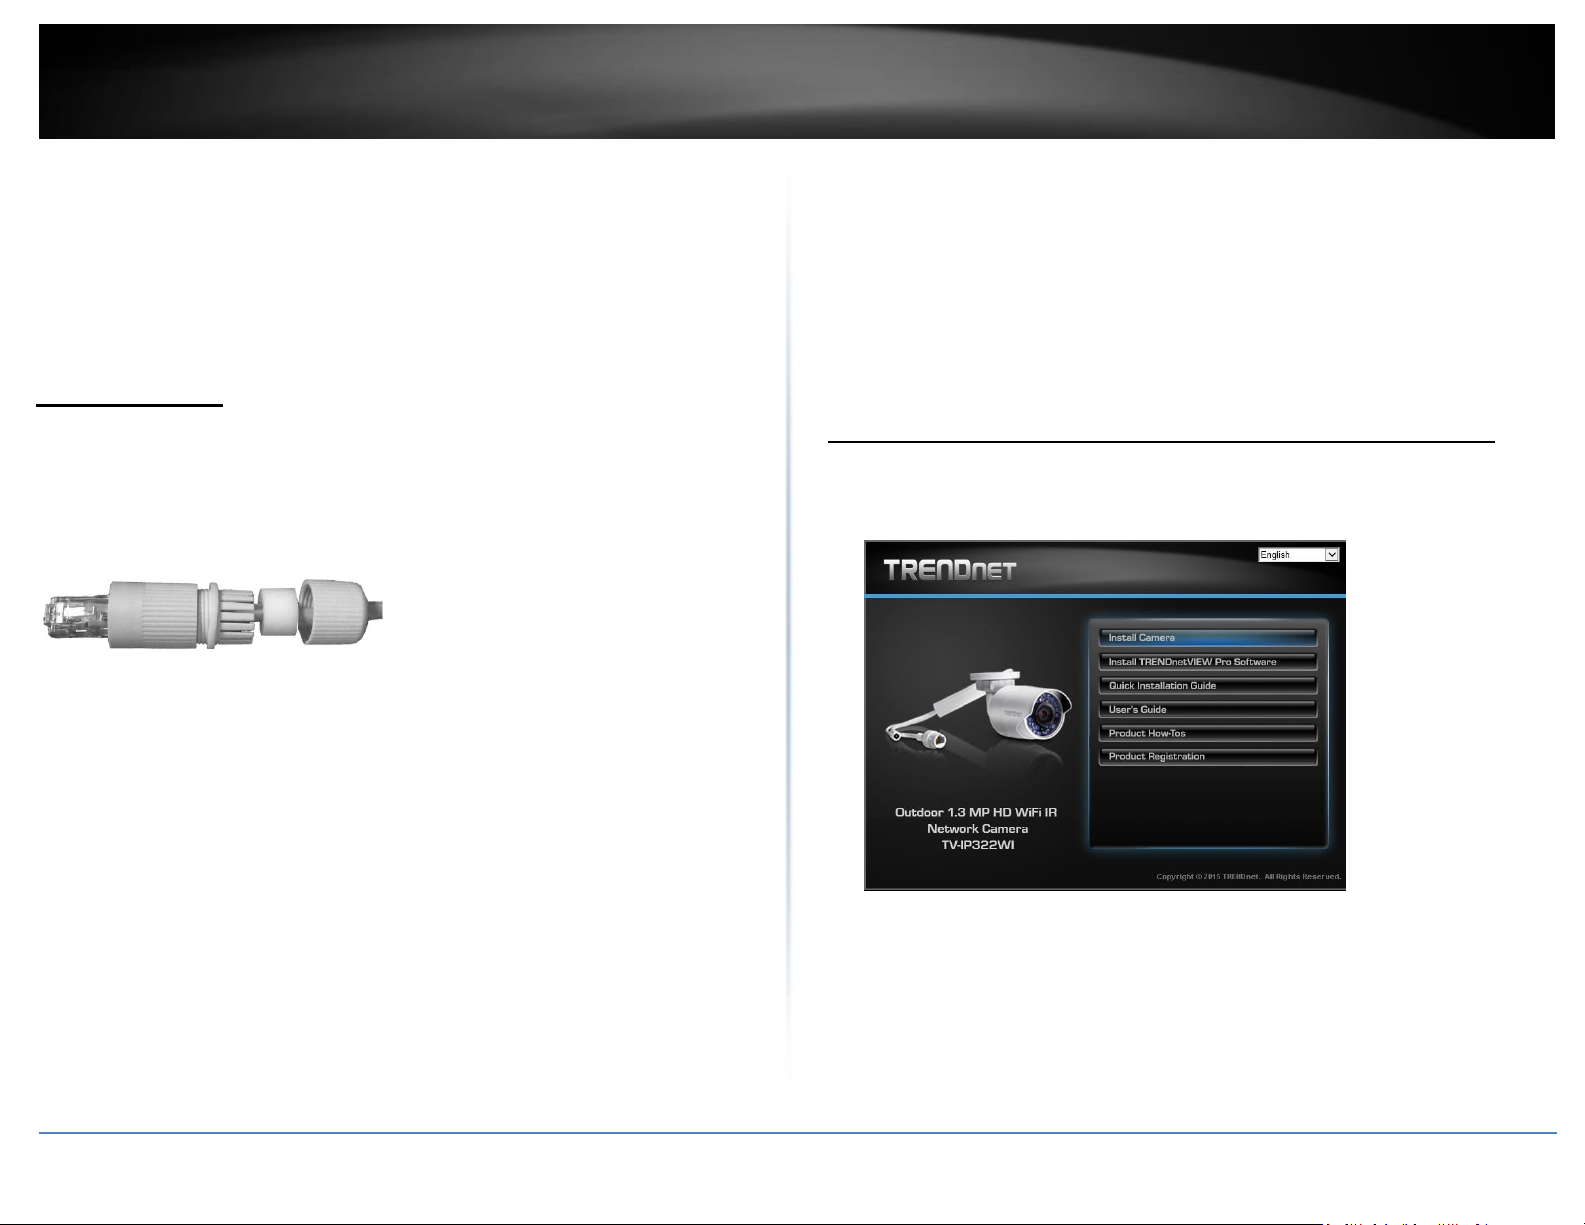
Waterproof Cap
The TV-IP312PI is IP66 weather rated camera. There is a set of network cable
waterproof cap that comes with the package. Run the network cable going through the
cap and then using crimp the tool to crimp the cable with an RJ-45 modular. Plug in the
network cable and then tighten the waterproof cap to prevent water running into the
camera through the cable.
Setup Camera with CD
The autorun supports Windows operating system and included three types of network
connection method. Select your desire connection method and follow the instruction.
Option1: Manually Connect Camera to Wireless Network.
Option2: Connect Cameras to a wireless Network by WPS Button
Option3: Connect Camera by Using a Network Cable (PoE)
Option 1: Manually Connect Camera to Wireless Network
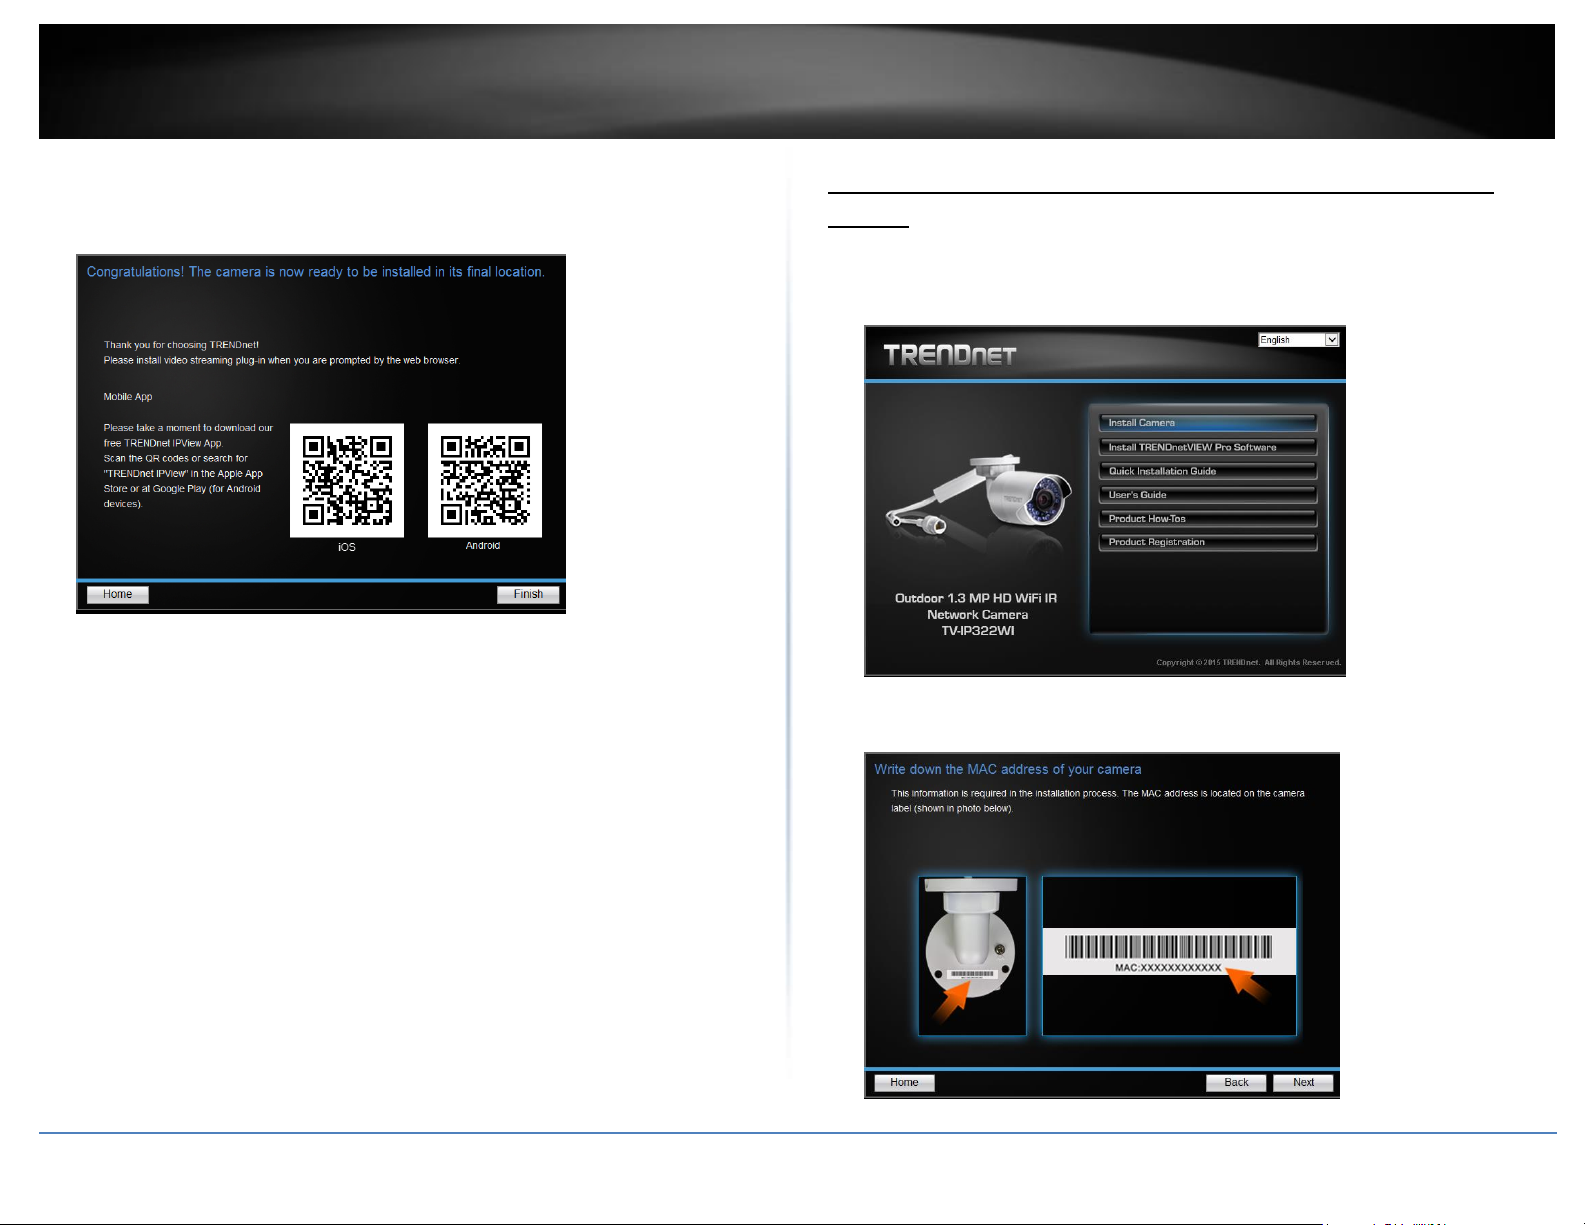
1. Insert the Installation CD into your computer’s CD-ROM drive to initiate the Auto-Run
program. Click the Install Camera.
© Copyright 2015 TRENDnet. All Rights Reserved.
TRENDnet User’s Guide
TV-IP322WI
7
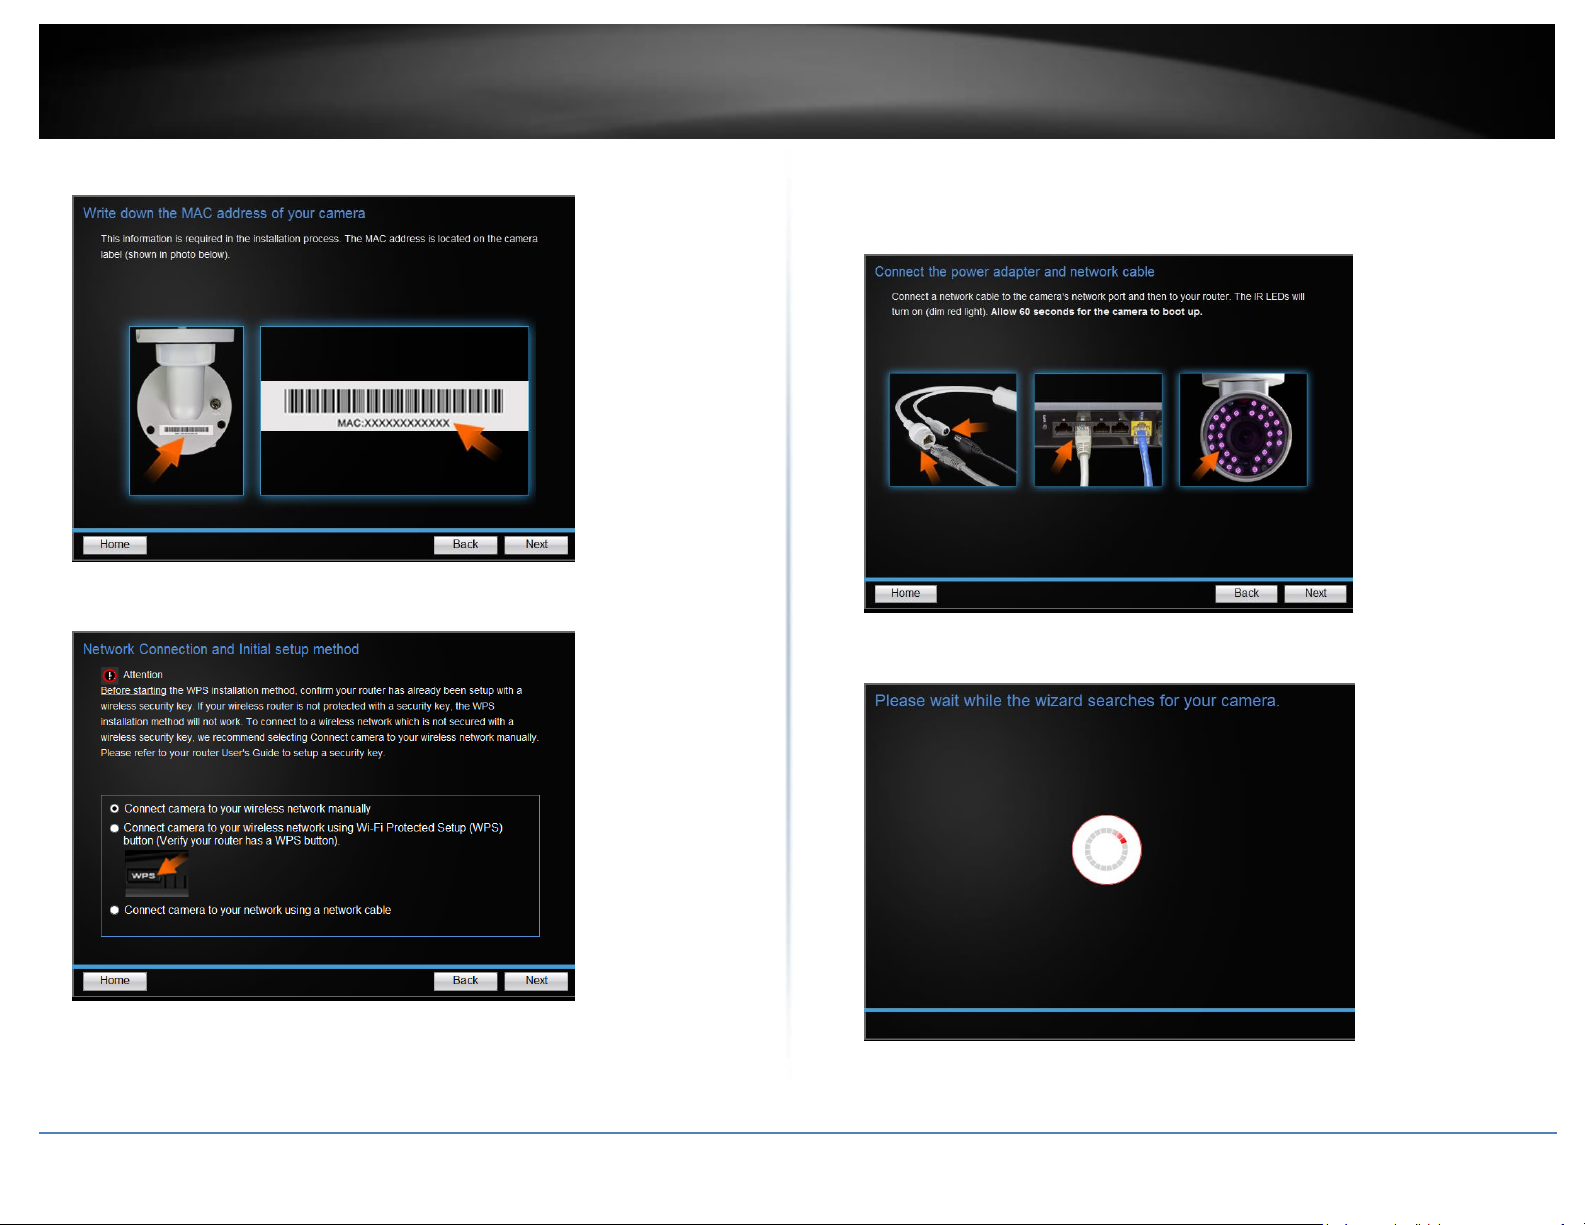
2. Write down the MAC ID of the camera. Click Next.
Select “
3.
Connect camera to your wireless network manually
”.
4. Connect a network cable to the camera’s network port and then to the router.
Connect the power adapter to the camera. The IR LEDs will turn on dime red light.
Allow 60 seconds for the camera to boot up. Click Next.
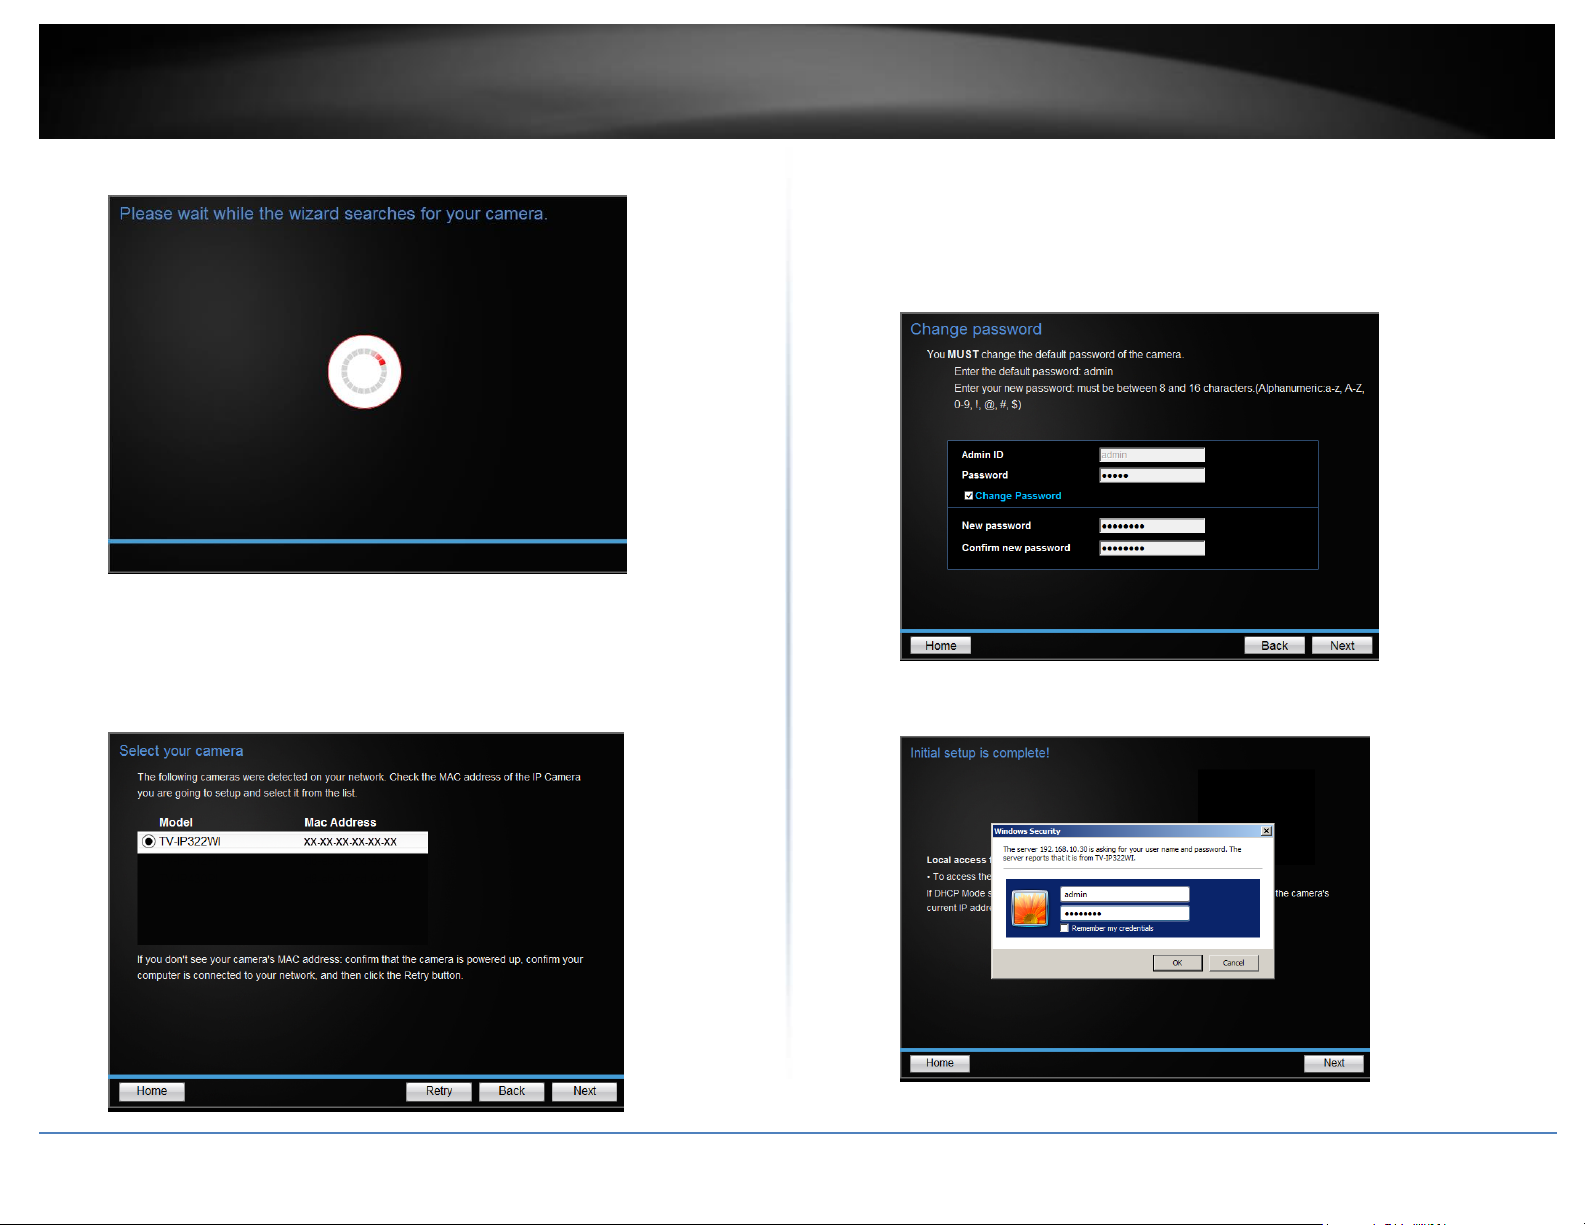
5. Wait while searching the cameras.
© Copyright 2015 TRENDnet. All Rights Reserved.
TRENDnet User’s Guide
TV-IP322WI
8
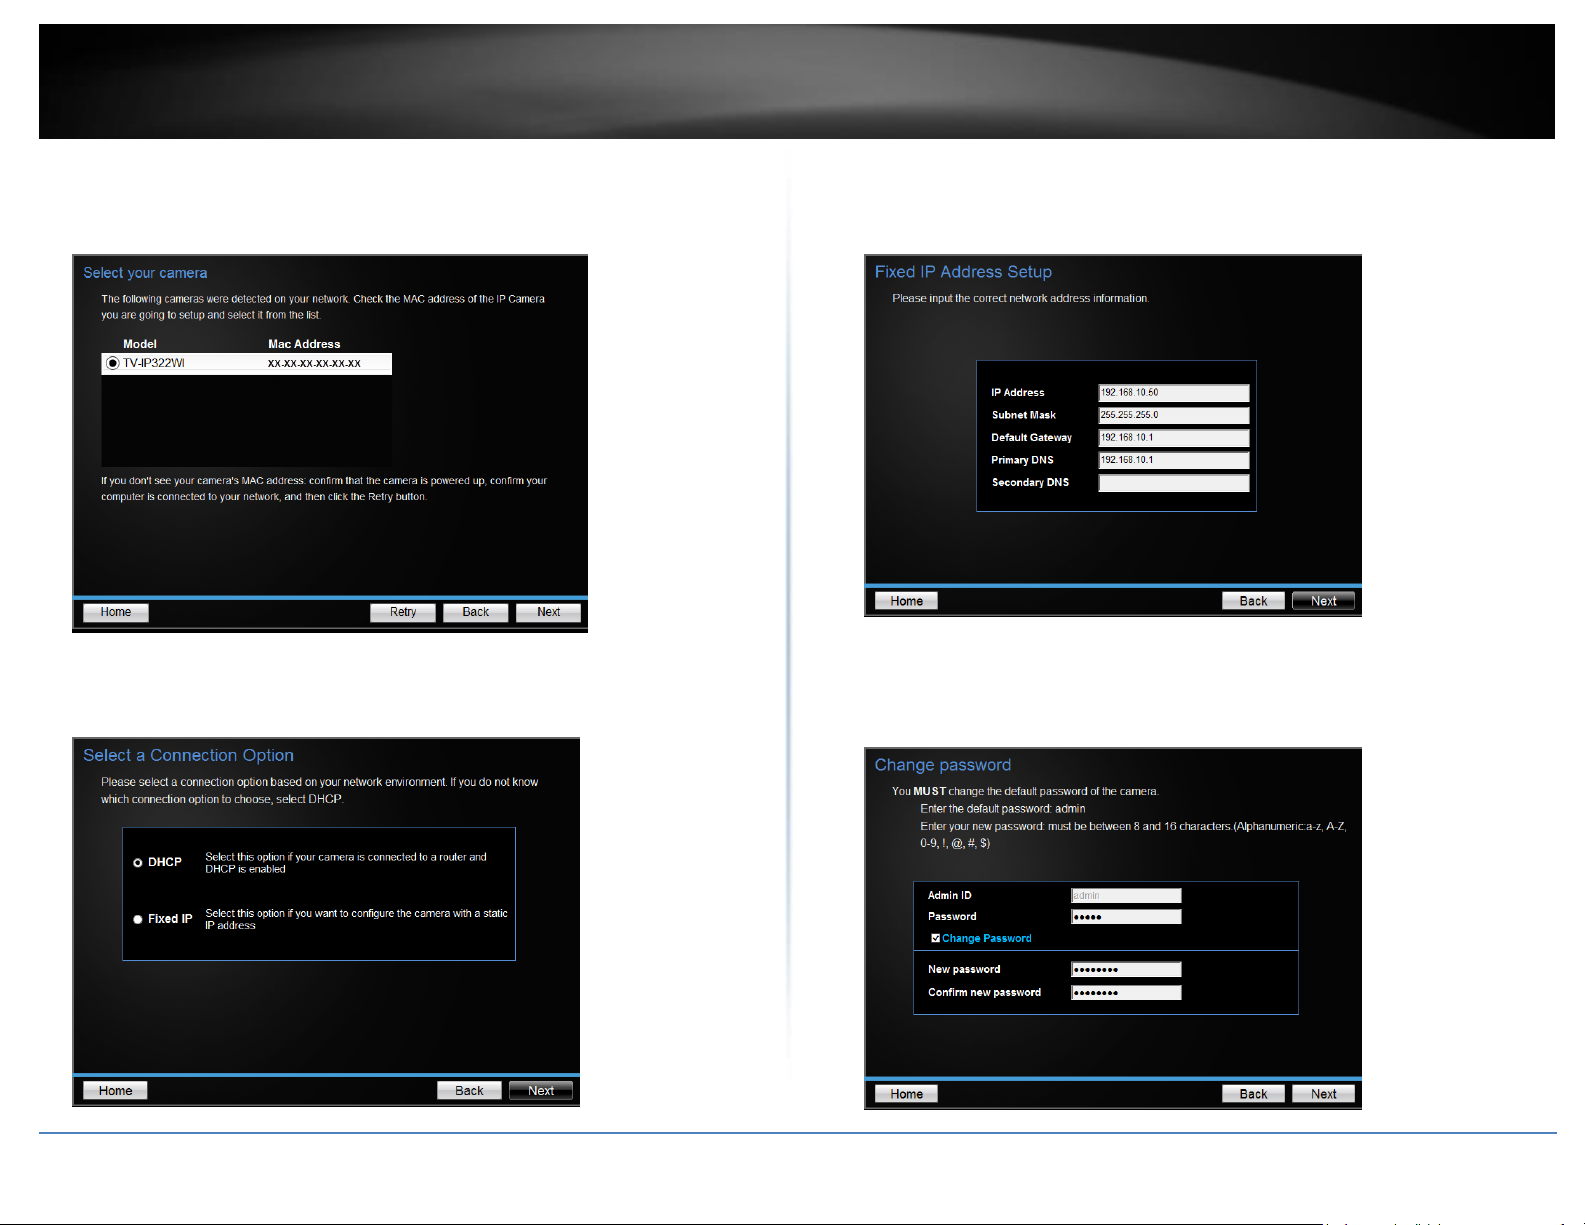
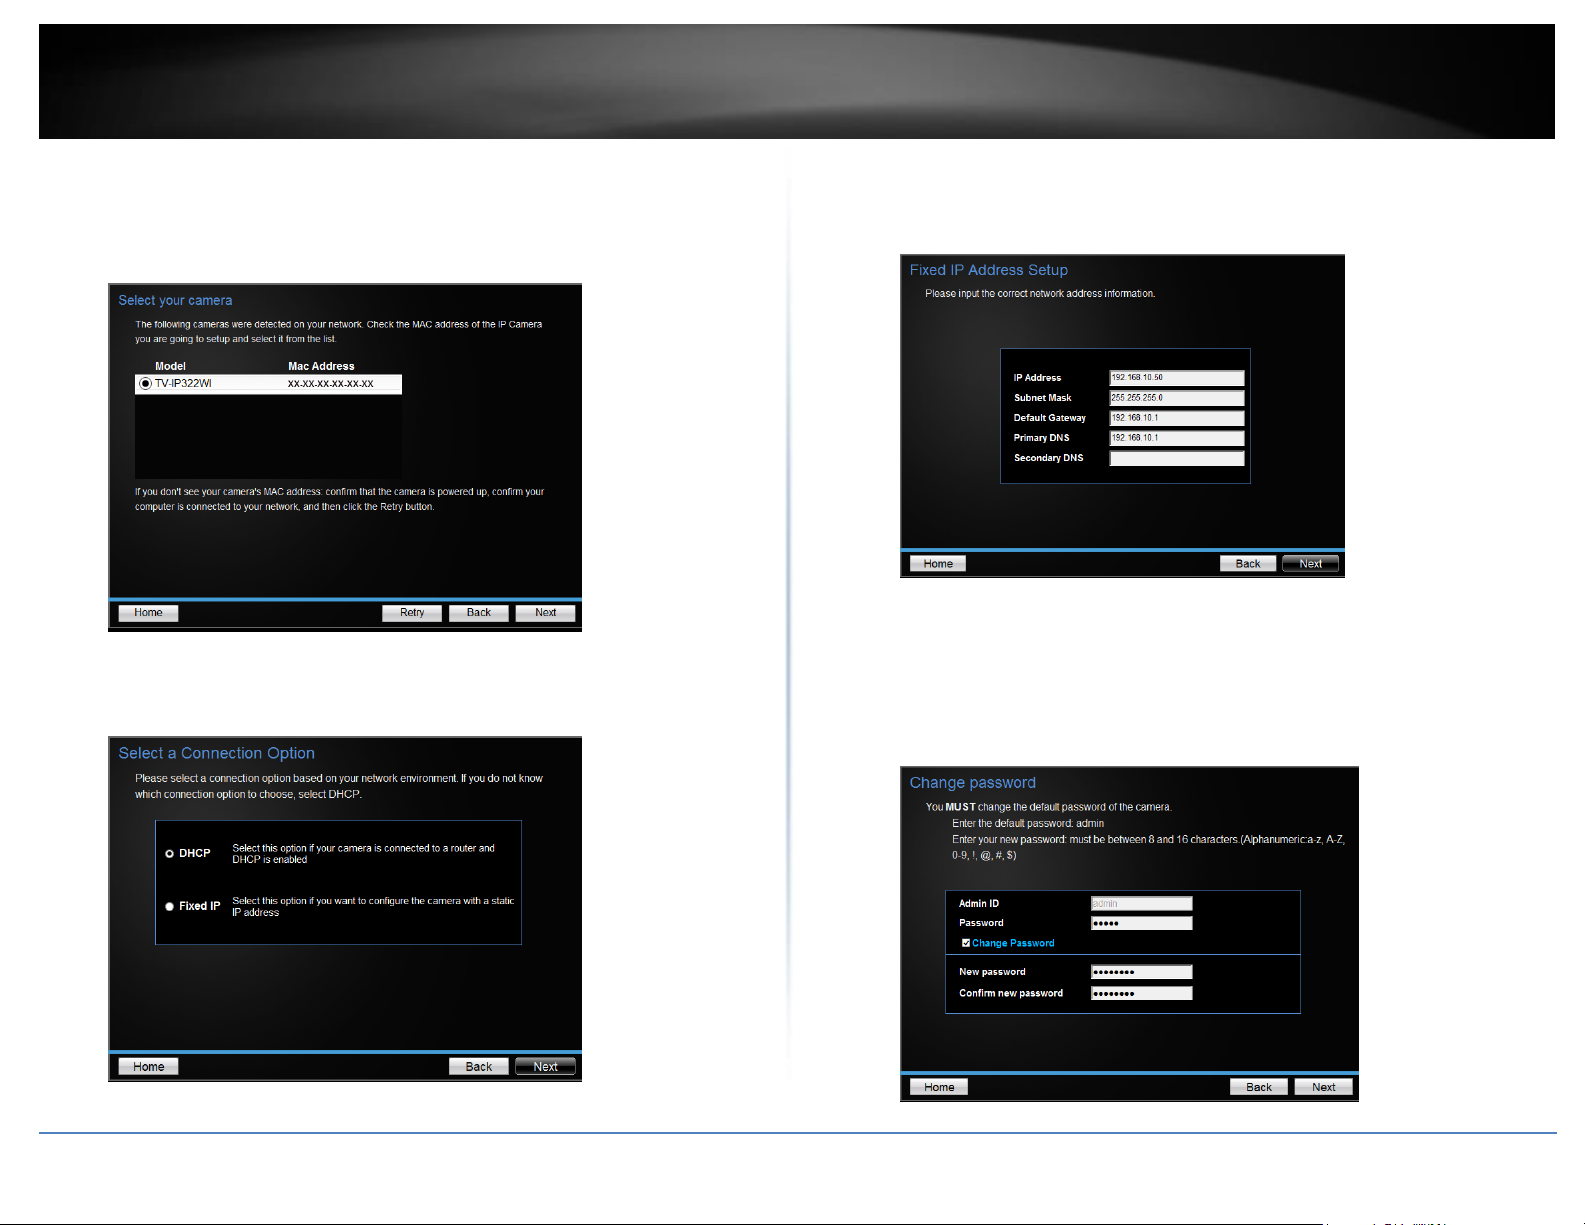
6. The founded cameras will show on the screen. The camera already selected by
default if you have only one camera installed. If you have more than one camera in
the same Network, you will need to identify the camera by the MAC ID. Click Next.
8. If you select "Fixed IP", fill out the IP address, subnet mask, default gateway, DNS
server. Please ensure that the IP address of the camera and the computer must
within the same network. Click Next.
7. Select "DHCP" option to assign an IP by DHCP server or Select "Fixed IP" to set IP
address manually. Click Next.
9. Enter Password. The default password is “admin”. You must change the default
password of the camera. Enter the default password: admin and enter the new
password. The password must be between 8 and 16 characters. (Alphanumeric: a-z,
A-Z, 0-9, !, @, #, $), and confirm the new password by entering the password twice.
© Copyright 2015 TRENDnet. All Rights Reserved.
TRENDnet User’s Guide
TV-IP322WI
9
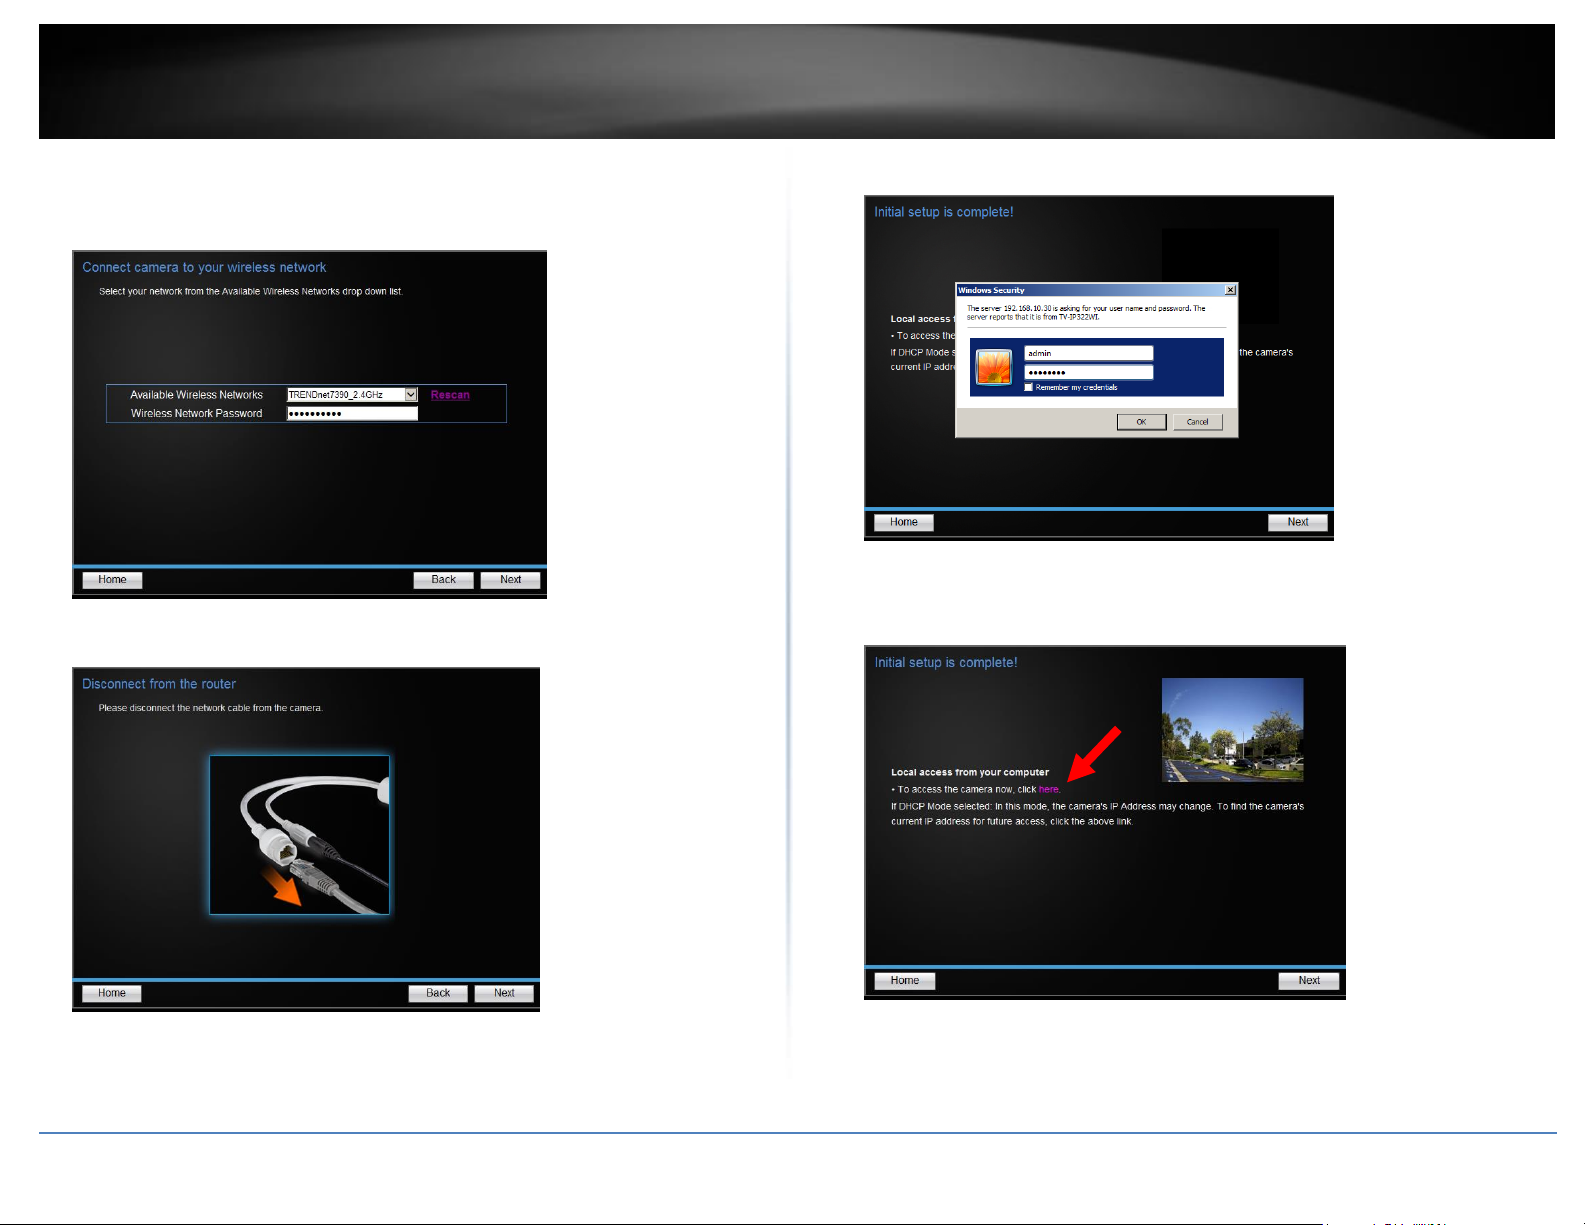
10. Select your wireless network from the Available Wireless Network dropdown
menu. If you don’t see your wireless station on the list, click Rescan. Enter
Wireless Network Password, then click Next.
11. Disconnect the network cable from the camera. Then click Next.
12. Enter “admin” on username and enter new password you just created.
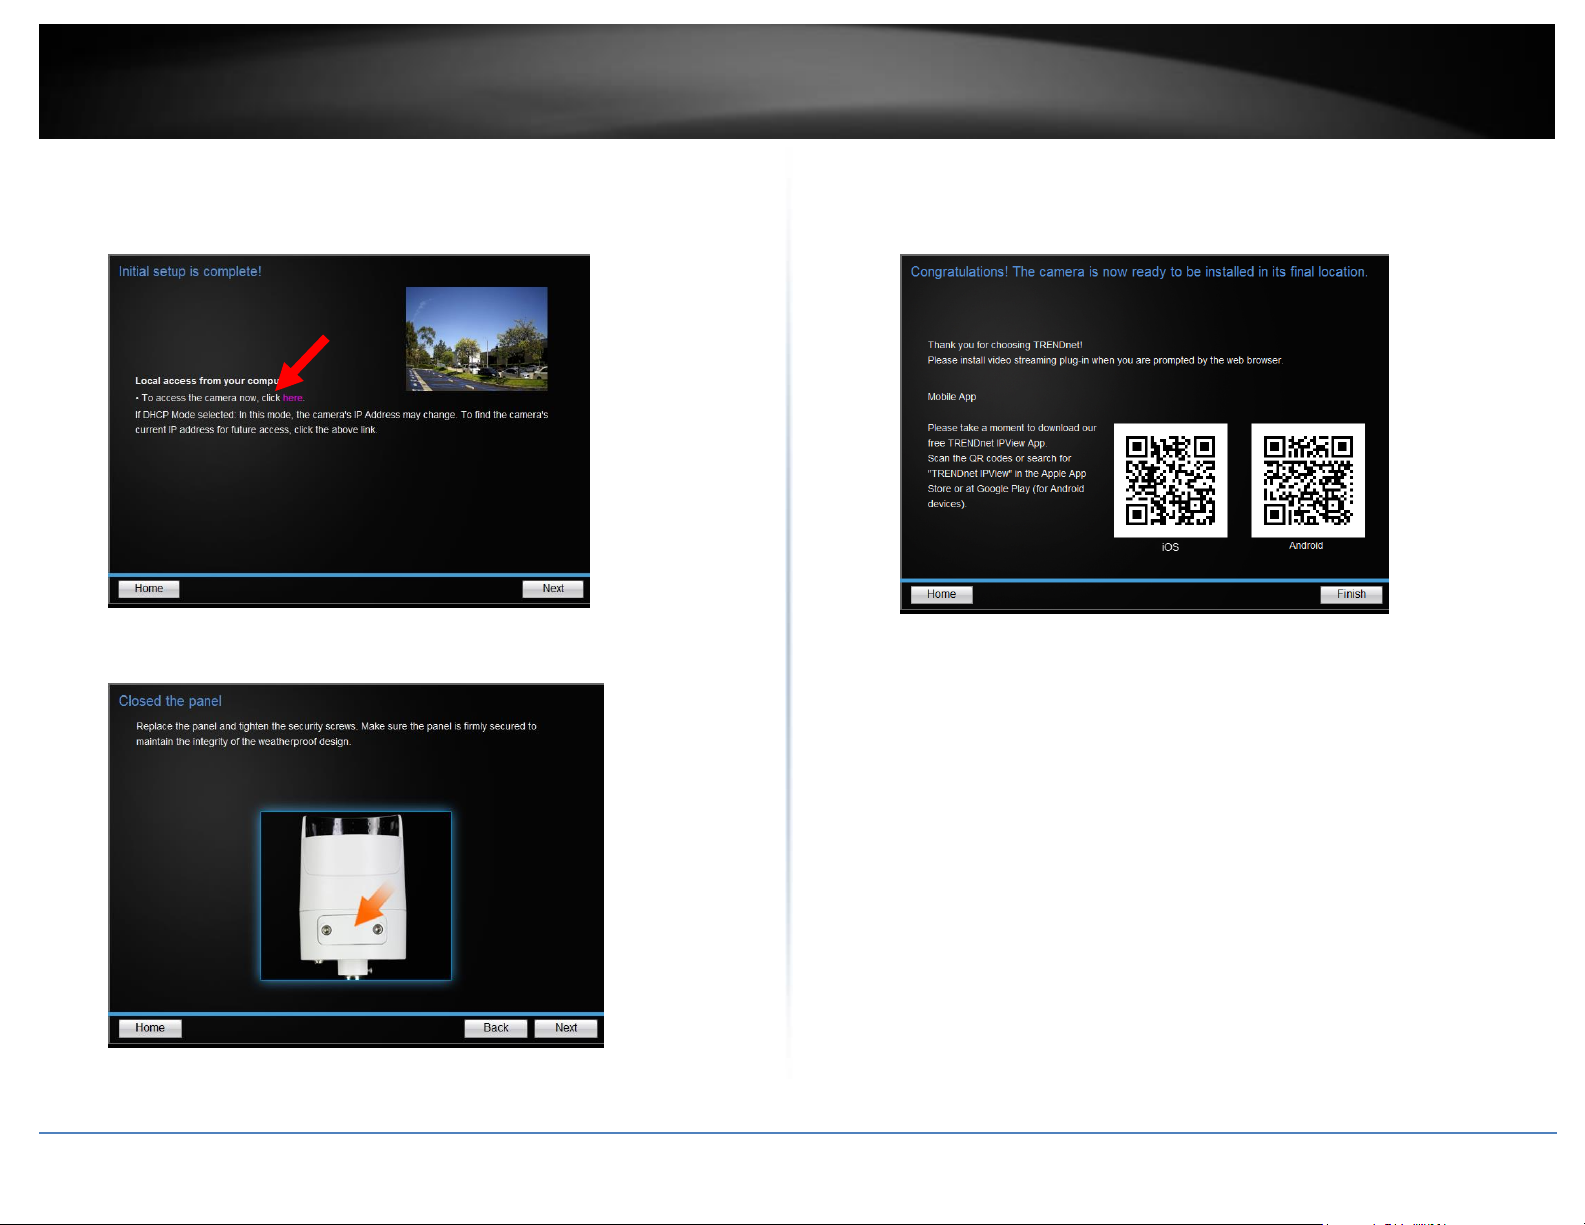
13. Click the hyperlink to access to the camera’s web page or click Next. It is
recommended that you access the IP camera now if it was using a DHCP connection.
© Copyright 2015 TRENDnet. All Rights Reserved.
TRENDnet User’s Guide
TV-IP322WI
10
14. Click Finish to exit the program or click Home to return to the main screen.
This device also supports the Mobile App. Using your mobile device to scan the QR
code to install the App.
Option 2: Connect Camera to a Wireless Network by WPS
Button
1. Insert the Installation CD into your computer’s CD-ROM drive to initiate the
Auto-Run program. Click the Install Camera.
2. Write down the MAC ID of the camera. Click Next.
© Copyright 2015 TRENDnet. All Rights Reserved.

TRENDnet User’s Guide
TV-IP322WI
11
Select “
3.
Protected Setup (WPS)
Connect camera to your wireless network using Wi-Fi
”.
5. Connect the power adapter to the camera. The IR LEDs will turn on dime red
light. Allow 60 seconds for the camera to boot up. Click Next.
4. Using the include security wrench to loosen the screws and remove the panel on
the bottom of the camera. If you plan on using an SD card, insert an SD card into
the SD card slot.
6. Press the WPS button on your wireless router for 5 seconds. Within 2 minutes,
press and hold the WPS button on the camera for 5 seconds.
© Copyright 2015 TRENDnet. All Rights Reserved.
TRENDnet User’s Guide
TV-IP322WI
12
7. Wait while searching the cameras.
8. The founded cameras will show on the screen. The camera already selected by
default if you have only one camera installed. If you have more than one camera
in the same Network, you will need to identify the camera by the MAC ID. Click
Next.
9. Enter Password. The default password is “admin”. You must change the default
password of the camera. Enter the default password: admin and enter the new
password. The password must be between 8 and 16 characters. (Alphanumeric:
a-z, A-Z, 0-9, !, @, #, $), and confirm the new password by entering the password
twice.
10. Enter “admin” on username and enter new password you just created.
© Copyright 2015 TRENDnet. All Rights Reserved.
TRENDnet User’s Guide
TV-IP322WI
13
11. Click the hyperlink to access to the camera’s web page or click Next. It is
recommended that you access the IP camera now if it was using a DHCP
connection.
13. Click Finish to exit the program or click Home to return to the main screen.
This device also supports the Mobile App. Using your mobile device to scan the
QR code to install the App.
12. Close the panel.
© Copyright 2015 TRENDnet. All Rights Reserved.

TRENDnet User’s Guide
TV-IP322WI
14
Option 3: Connect Camera by Using a Network Cable (PoE)
1. Insert the Installation CD into your computer’s CD-ROM drive to initiate the
Auto-Run program. Click the Install Camera.
2. Write down the MAC ID of the camera. Click Next.
3. Connect a network cable to the camera’s network port to a PoE switch. The IR
LED will be on. Allow 60 seconds for the camera to boot up. Click Next.
4. Wait while searching the cameras.
© Copyright 2015 TRENDnet. All Rights Reserved.
TRENDnet User’s Guide
TV-IP322WI
15
5. The founded cameras will show on the screen. The camera already selected by
default if you have only one camera installed. If you have more than one camera
in the same Network, you will need to identify the camera by the MAC ID. Click
Next.
6. Select "DHCP" option to assign an IP by DHCP server or Select "Fixed IP" to set IP
address manually. Click Next.
7. If you select "Fixed IP", fill out the IP address, subnet mask, default gateway, DNS
server. Please ensure that the IP address of the camera and the computer must
within the same network. Click Next.
8. Enter Password. The default password is “admin”. You must change the default
password of the camera. Enter the default password: admin and enter the new
password. The password must be between 8 and 16 characters. (Alphanumeric:
a-z, A-Z, 0-9, !, @, #, $), and confirm the new password by entering the password
twice.
© Copyright 2015 TRENDnet. All Rights Reserved.

TRENDnet User’s Guide
TV-IP322WI
16
9. Enter “admin” on username and enter new password you just created.
11. Click Finish to exit the program or click Home to return to the main screen.
This device also supports the Mobile App. Using your mobile device to scan the
QR code to install the App.
10. Click the hyperlink to access to the camera’s web page or click Next. It is
recommended that you access the IP camera now if it was using a DHCP
connection.
© Copyright 2015 TRENDnet. All Rights Reserved.
TRENDnet User’s Guide
TV-IP322WI
17
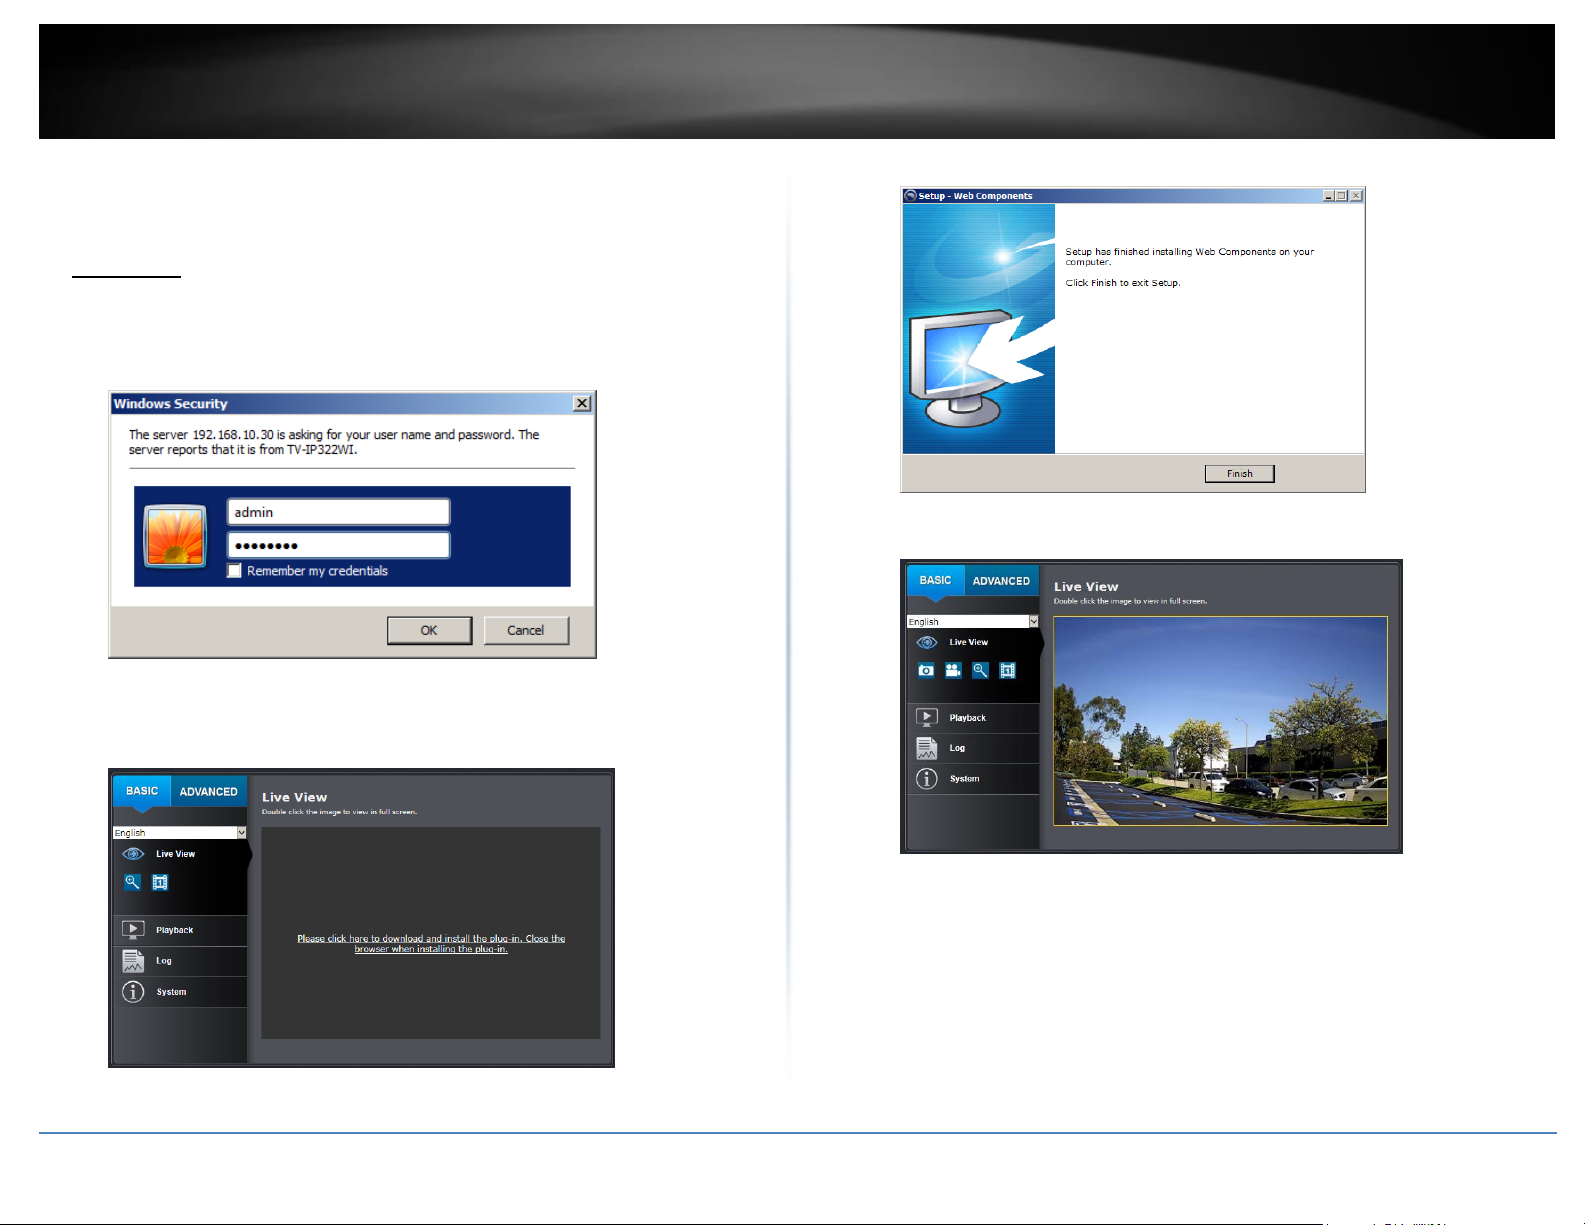
Install Web Browser Plug-In for Camera Management
4. Click Finish.
Interface
Windows
1. Access the camera management interface.
2. Enter your username and password. Then press OK.
5. Restart the browser to live view.
3. Click on the link to download the plug-in and follow the instructions to
continue the installation.
© Copyright 2015 TRENDnet. All Rights Reserved.
TRENDnet User’s Guide
TV-IP322WI
18
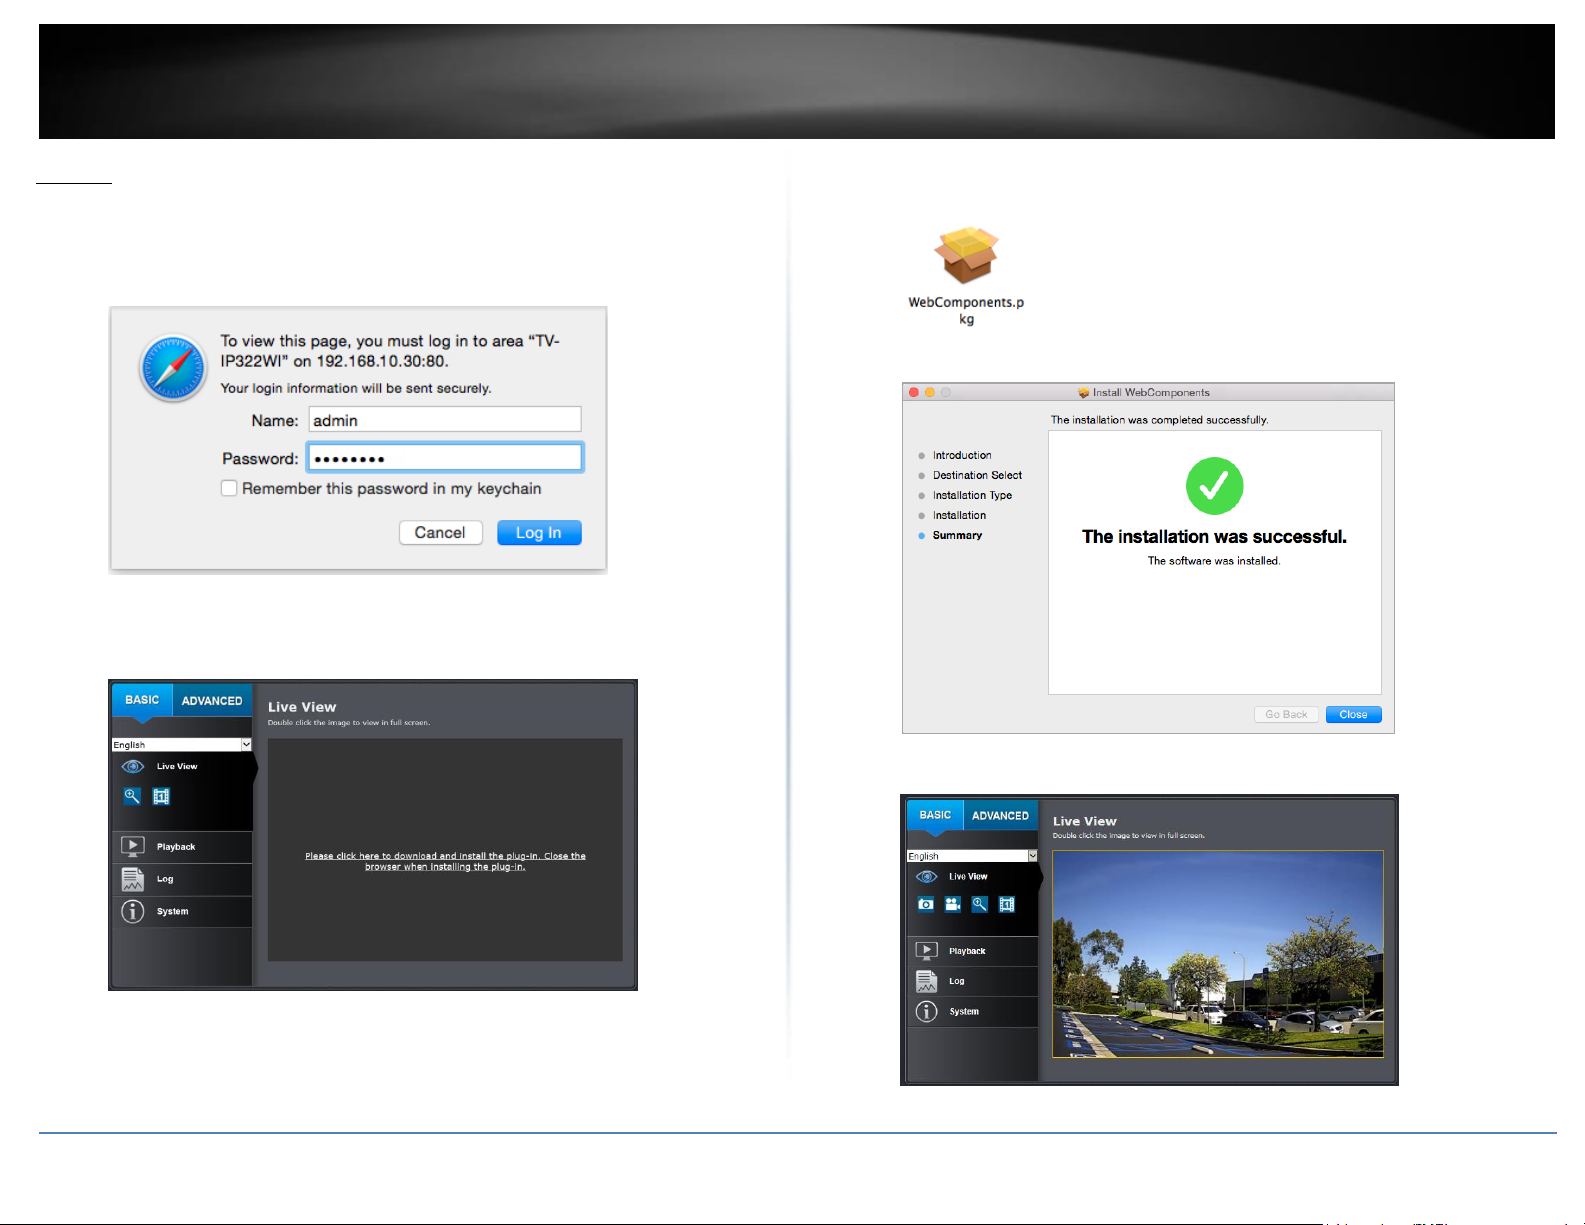
Mac OS X
1. Access the camera management interface.
2. Enter your username and password. Then press Login.
4. Double click on the WebComponents.pkg file and follow the instructions to proceed the
installation.
5. Click Close.
3. Click on the link to download the plug-in. (If you don’t have the Internet access at the
time you are seting up, please find the plug-in on the CD. Under /Mac directory.)
© Copyright 2015 TRENDnet. All Rights Reserved.
6. Restart the browser to live view.
 Loading...