

TRENDnet TV-IP322WI Installation Guide
Ÿ Outdoor 1.3 MP HD WiFi IR Network Camera
TV-IP322WI
Ÿ Quick Installation Guide (1)
TV-IP322WI (V1) /07.27.2015
1. Before You Start
Supported Operating Systems
1-8 Cameras
CPU CPU
9-32 Cameras
Memory Memory
Windows 10 / Windows 8.1
Windows 8 / Windows 7
Windows Server 2008
Windows Vista
Windows Server 2003
Windows XP
2GHz 2GHz2GB RAM
or above
4GB RAM
or above
Supported Operating Systems
Android (version 4 or above)
iOS (version 8 or above)
Package Contents
Ÿ TV-IP322WI
Ÿ CD-ROM (Utility and User's Guide)
Ÿ Quick Installation Guide
Ÿ Network cable (2 m / 6.5 ft.)
Ÿ Power adapter (12 V DC, 1 A)
Minimum Requirements
Ÿ A computer with web browser
Ÿ CD-ROM Drive
Ÿ Wired or wireless network (wireless router or access point with DHCP server)
Ÿ Windows® 10, 8.1, 8, 7, Vista, Mac OS® X (10.6 or above)
Ÿ Internet Explorer® 9.0 or higher, Firefox® 13.0 or higher, Safari® 4.0 or higher, Chrome™ 24.0 or
higher
Note: The TV-IP322WI supports both external power supply and Power over Ethernet (PoE). When
using PoE network connection, please connect to a standard IEEE 802.3af network.
Free Management Software: TRENDnetVIEW Pro Requirements
Free Mobile App: TRENDnet IPView Requirements
1
1
2. WiFi Installation
1. Connect your computer to your network.
2. Do not install or mount the IP camera before you complete the installation steps below. Temporarily
place the IP camera next to your computer.
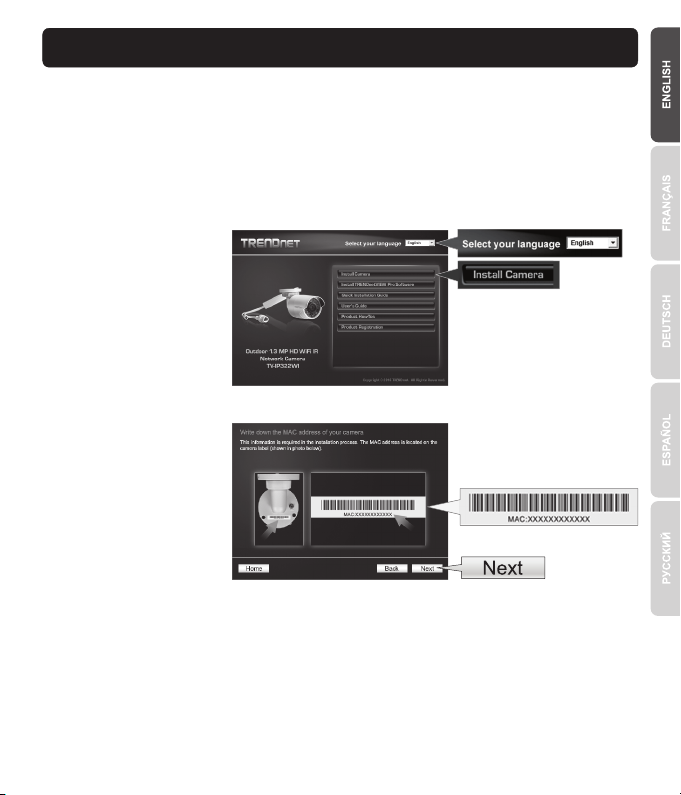
3. Insert the CD into your CD-ROM drive and launch the setup utility.
4. Select the desired language from the drop down menu.
5. Click Install Camera.
6. Write down the MAC address.
2

7. Select “Connect camera to your wireless network manually”. (For a WPS WiFi installation refer
to User's Guide.)
8. Connect a network cable to the camera's network port and then to your router. Connect the power
adapter to the camera. The IR LEDs will turn on a dim red light. Allow 60 seconds for the camera to
boot up, and then click Next.
9. Select your camera, then click Next.
3
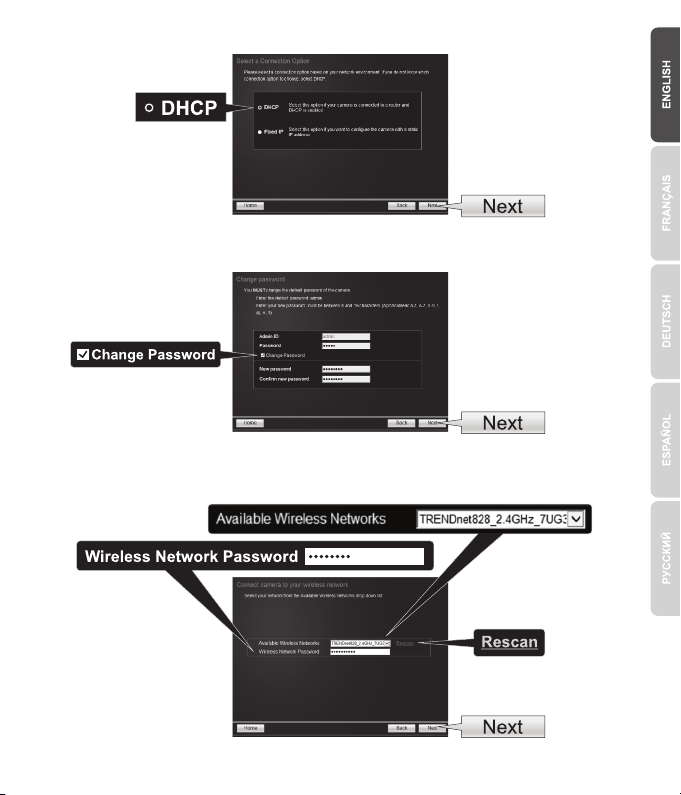
10. Select DHCP and then click Next.
11. Select the Change Password box to change the camera's management interface access
password. Enter a new password, confirm new password, and click Next.
12. Select your wireless network from the Available Wireless Network dropdown menu. If you don't
see your wireless station on the list, click Rescan. If you have encryption enabled, enter your
Wireless Network Password. Then click Next.
4
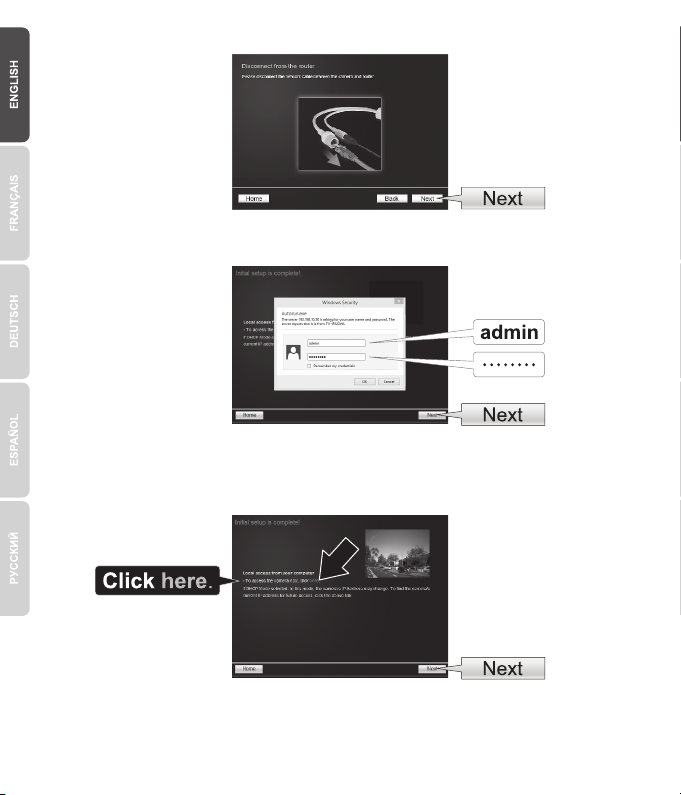
13. Disconnect the network cable from the camera. Then click Next.
14. The initial setup is now completed. Your camera is now connected to your network. Enter
username “admin” and the password that you have just changed.
15. Click the hyperlink to confirm access to the management page. This will open a web browser. You
will need to download and install a plug-in to view video. Please refer to the next session Install
Web Browser Plug-in for Camera Management Interface. To resume installation, minimize the
web browser and then click Next.
5
 Loading...