


TP-Link Omada SDN Controller User Manual
User Guide
Omada SDN Controller
1910012864 REV4.0.1
August 2020

About this Guide
This User Guide provides information for centrally managing TP-Link devices via Omada SDN Controller. Please read this guide carefully before operation.
Intended Readers
This User Guide is intended for network managers familiar with IT concepts and network terminologies.
Conventions
When using this guide, notice that:
■Features available in Omada SDN Controller may vary due to your region, controller version, and device model. All images, steps, and descriptions in this guide are only examples and may not reflect your actual experience.
■The information in this document is subject to change without notice. Every effort has been made in the preparation of this document to ensure accuracy of the contents, but all statements, information, and recommendations in this document do not constitute the warranty of any kind, express or implied. Users must take full responsibility for their application of any products.
■This guide uses the specific formats to highlight special messages. The following table lists the notice icons that are used throughout this guide.
|
|
|
|
Note |
Remind to take notice. The note contains the helpful information for a better use of the |
|
|
|
|
|
|
||
|
|
|
|
|
controller. |
|
|
|
|
|
|
|
|
|
|
|
|
|
|
|
|
|
|
|
Configuration Guidelines |
Provide tips for you to learn about the feature and its configurations. |
|
|
|
|
|
|
||
|
|
|
|
|
|
|
More Information
■For technical support, the latest version of the User Guide and other information, please visit https://www.tp-link.com/support.
■To ask questions, find answers, and communicate with TP-Link users or engineers, please visit https://community.tp-link.com to join TP-Link Community.
CONTENTS |
|
About this Guide |
|
Omada SDN Controller Solution Overview |
|
Overview of Omada SDN Controller Solution............................................................................................................... |
2 |
Core Components................................................................................................................................................................... |
3 |
Get Started with Omada SDN Controller |
|
Set Up Your Software Controller....................................................................................................................................... |
9 |
Determine the Network Topology...................................................................................................................................................... |
9 |
Install Omada Software Controller ................................................................................................................................................. |
10 |
Start and Log In to the Omada Software Controller.............................................................................................................. |
12 |
Set Up Your Hardware Controller................................................................................................................................... |
17 |
Determine the Network Topology................................................................................................................................................... |
17 |
Deploy Omada Hardware Controller.............................................................................................................................................. |
17 |
Start and Log in to the Controller..................................................................................................................................................... |
18 |
Set up Your Cloud-Based Controller............................................................................................................................. |
22 |
Manage Omada Managed Devices and Sites |
|
Create Sites............................................................................................................................................................................ |
24 |
Adopt Devices....................................................................................................................................................................... |
28 |
For Omada Software Controller / Omada Hardware Controller...................................................................................... |
28 |
For Omada Cloud-Based Controller............................................................................................................................................... |
40 |
Configure the Network with Omada SDN Controller |
|
Navigate the UI...................................................................................................................................................................... |
44 |
Modify the Current Site Configuration......................................................................................................................... |
47 |
Site Configuration..................................................................................................................................................................................... |
47 |
Services.......................................................................................................................................................................................................... |
47 |
Advanced Features.................................................................................................................................................................................. |
50 |
Device Account.......................................................................................................................................................................................... |
52 |
Configure Wired Networks............................................................................................................................................... |
53 |
Set Up an Internet Connection.......................................................................................................................................................... |
53 |
Configure LAN Networks...................................................................................................................................................................... |
67 |
Configure Wireless Networks.......................................................................................................................................... |
76 |
Set Up Basic Wireless Networks...................................................................................................................................................... |
76 |
Advanced Settings................................................................................................................................................................................... |
82 |
WLAN Schedule......................................................................................................................................................................................... |
84 |
802.11 Rate Control................................................................................................................................................................................ |
84 |
MAC Filter...................................................................................................................................................................................................... |
85 |
Network Security.................................................................................................................................................................. |
87 |
ACL.................................................................................................................................................................................................................... |
87 |
URL Filtering................................................................................................................................................................................................. |
95 |
Attack Defense........................................................................................................................................................................................... |
98 |
Transmission........................................................................................................................................................................ |
103 |
Routing......................................................................................................................................................................................................... |
103 |
NAT................................................................................................................................................................................................................ |
106 |
Session Limit............................................................................................................................................................................................ |
109 |
Bandwidth Control................................................................................................................................................................................. |
110 |
Configure VPN..................................................................................................................................................................... |
114 |
Create Profiles..................................................................................................................................................................... |
141 |
Time Range................................................................................................................................................................................................ |
141 |
Groups.......................................................................................................................................................................................................... |
143 |
Authentication..................................................................................................................................................................... |
147 |
Portal............................................................................................................................................................................................................. |
147 |
802.1X.......................................................................................................................................................................................................... |
178 |
MAC-Based Authentication............................................................................................................................................................. |
181 |
RADIUS Profile......................................................................................................................................................................................... |
182 |
Services................................................................................................................................................................................. |
185 |
Dynamic DNS........................................................................................................................................................................................... |
185 |
SNMP............................................................................................................................................................................................................ |
187 |
UPnP.............................................................................................................................................................................................................. |
188 |
SSH................................................................................................................................................................................................................ |
189 |
Reboot Schedule.................................................................................................................................................................................... |
189 |
PoE Schedule........................................................................................................................................................................................... |
190 |
Export Data................................................................................................................................................................................................ |
191 |
Configure the Omada SDN Controller |
|
Manage the Controller...................................................................................................................................................... |
194 |
General Settings..................................................................................................................................................................................... |
194 |
Mail Server................................................................................................................................................................................................. |
195 |
History Data Retention........................................................................................................................................................................ |
197 |
Customer Experience Improvement Program...................................................................................................................... |
197 |
HTTPS Certificate.................................................................................................................................................................................. |
198 |
Access Port Config............................................................................................................................................................................... |
198 |
Manage Your Controller Remotely via Cloud Access........................................................................................... |
200 |
Maintenance......................................................................................................................................................................... |
202 |
Controller Status.................................................................................................................................................................................... |
202 |
User Interface........................................................................................................................................................................................... |
202 |
Backup & Restore................................................................................................................................................................................... |
204 |
Migration................................................................................................................................................................................ |
205 |
Site Migration........................................................................................................................................................................................... |
205 |
Controller Migration.............................................................................................................................................................................. |
210 |
Auto Backup......................................................................................................................................................................... |
217 |
Configure and Monitor Omada Managed Devices |
|
Introduction to the Devices Page................................................................................................................................ |
220 |
Configure and Monitor the Gateway........................................................................................................................... |
224 |
Configure the Gateway....................................................................................................................................................................... |
224 |
Monitor the Gateway............................................................................................................................................................................ |
228 |
Configure and Monitor Switches.................................................................................................................................. |
232 |
Configure Switches............................................................................................................................................................................... |
232 |
Monitor Switches................................................................................................................................................................................... |
249 |
Configure and Monitor EAPs.......................................................................................................................................... |
253 |
Configure EAPs....................................................................................................................................................................................... |
253 |
Monitor EAPs............................................................................................................................................................................................ |
263 |
Monitor and Manage the Clients |
|
Manage Wired and Wireless Clients in Clients Page............................................................................................ |
271 |
Introduction to Clients Page............................................................................................................................................................ |
271 |
Using the Clients Table to Monitor and Manage the Clients......................................................................................... |
271 |
Using the Properties Window to Monitor and Manage the Clients............................................................................ |
273 |
Manage Client Authentication in Hotspot Manager.............................................................................................. |
278 |
Authorized Clients ................................................................................................................................................................................ |
278 |
Vouchers..................................................................................................................................................................................................... |
278 |
Local Users ............................................................................................................................................................................................... |
281 |
Operators................................................................................................................................................................................................... |
284 |
Monitor the Network |
|
View the Status of Network with Dashboard........................................................................................................... |
288 |
Page Layout of Dashboard............................................................................................................................................................... |
288 |
Explanation of Widgets....................................................................................................................................................................... |
290 |
View the Statistics of the Network............................................................................................................................... |
298 |
Performance............................................................................................................................................................................................. |
298 |
Switch Statistics .................................................................................................................................................................................... |
301 |
Speed Test Statistics......................................................................................................................................................................... |
303 |
Monitor the Network with Map...................................................................................................................................... |
305 |
Topology..................................................................................................................................................................................................... |
305 |
Map................................................................................................................................................................................................................ |
307 |
View the Statistics During Specified Period with Insight.................................................................................... |
310 |
Known Clients.......................................................................................................................................................................................... |
310 |
Past Portal Authorizations................................................................................................................................................................. |
311 |
Rogue APs.................................................................................................................................................................................................. |
312 |
View and Manage Logs.................................................................................................................................................... |
314 |
Alerts............................................................................................................................................................................................................. |
315 |
Events........................................................................................................................................................................................................... |
316 |
Notifications.............................................................................................................................................................................................. |
317 |
Manage Administrator Accounts of Omada SDN Controller |
|
Introduction to User Accounts...................................................................................................................................... |
324 |
Manage and Create Local User Accounts ............................................................................................................... |
325 |
Edit the Master Administrator Account..................................................................................................................................... |
325 |
Create and Manage Administrator and Viewer .................................................................................................................... |
327 |
Manage and Create Cloud User Accounts .............................................................................................................. |
330 |
Set Up the Cloud Master Administrator.................................................................................................................................... |
330 |
Create and Manage Cloud Administrator and Cloud Viewer......................................................................................... |
330 |

1
Omada SDN Controller Solution
Overview
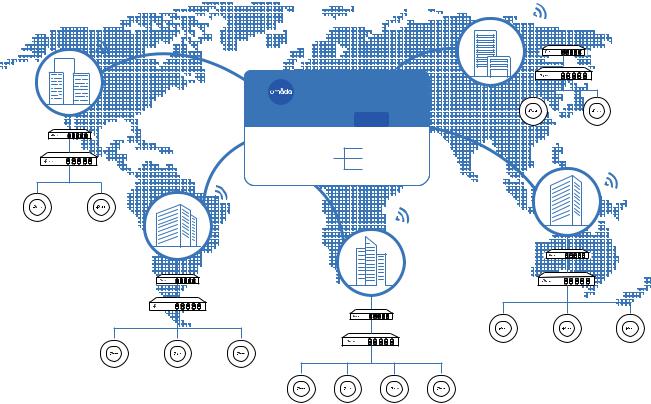
Omada SDN Controller Solution offers centralized and efficient management for configuring enterprise networks comprised of security gateways, switches, and wireless access points.
With a reliable network management platform powered by TP-Link Omada SDN Controller, you can develop comprehensive, software-defined networking across demanding, high-traffic environments with robust wired and wireless solutions.
The chapter includes the following sections:
•Overview of Omada SDN Controller Solution
•Core Components
Chapter 1 |
Omada SDN Controller Solution Overview |
 1. 1 Overview of Omada SDN Controller Solution
Omada SDN Controller Solution is designed to provide business-class networking solutions for demanding, high-traffic environments such as campuses, hotels, malls, and offices. Omada SDN Controller Solution simplifies deploying and managing large-scale enterprise networks and offers easy maintenance, ongoing monitoring, and flexible scalability.
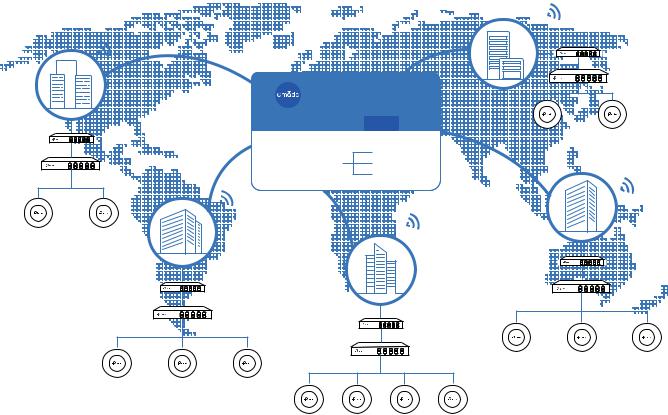
This figure shows a sample architeture of an Omada SDN enterprise network:
|
|
|
|
|
|
Site D |
|
|
|
Site C |
|
|
|
|
|
|
Router |
|
|
|
|
|
|
|
|
|
|
|
|
|
|
|
|
|
Switch |
|
|
|
Omada SDN Controller |
|
|
|
||
|
Router |
|
Site A Site B |
Site C |
Site D Site E |
AP |
|
AP |
|
|
Unified |
|
Gateways |
|
|||
|
Switch |
|
|
|
Site E |
|
||
|
|
Management from |
Switches |
|
|
|||
|
|
Site B |
One Interface |
|
Access Points |
|
|
|
|
|
|
|
|
|
|
|
|
AP |
AP |
|
|
Site A |
|
|
|
|
|
|
|
|
|
|
|
||
|
|
|
|
|
|
|
|
Router |
|
|
|
Router |
|
|
|
|
Switch |
|
|
|
Switch |
|
Router |
|
|
|
|
|
|
|
|
|
|
|
|
|
|
|
|
|
Switch |
AP |
AP |
AP |
|
|
|
|
|
|
|||
|
AP |
AP |
AP |
|
|
|
|
|
|
|
|
AP |
AP |
AP |
AP |
|
|
The interconnected elements that work together to deliver a unified enterprise network include: Omada SDN Controller, gateways, switches, access points, and client devices. Beginning with a base of client devices, each element adds functionality and complexity as the network is developing, interconnecting with the elements above and below it to create a comprehensive, secure wired and wireless solution.
Omada SDN Controller is a command center and management platform at the heart of the Omada network. With a single platform, the network administrators configure and manage enterprise networks comprised of routers, switches, and wireless access points in batches. This unleashes new levels of management to avoid complex and costly overprovisioning.
2
Chapter 1 |
Omada SDN Controller Solution Overview |
 1. 2 Core Components
An Omada SDN network consists of the following core components:
■Omada SDN Controller—a command center and management platform at the heart of Omada network solution for the enterprise. With a single platform, the network administrators configure and manage all Omada products which have all your needs covered in terms of routing, switching and Wi-Fi.
■Gateways—boast excellent data processing capabilities and an array of powerful functions, including IPsec/OpenVPN/PPTP/L2TP VPN, Load Balance, and Bandwidth Control, which are ideal for the business network where a large number of users require a stable, secure connection.
■Switches—offer flexible and cost-effective network solution with powerful Layer 2 features and PoE options. Advanced features such as Access Control, QoS, LAG and Spanning Tree will satisfy advanced business networks.
■Access Points (Omada EAPs)—satisfy the mainstream Wi-Fi Standard and address your highdensity access needs with TP-Link’s innovation to help you build the versatile and reliable wireless network for all business applications.
Omada SDN Controller
Tailored to different needs and budgets, Omada SDN Controller offers diverse deployment solutions. Omada Software Controller, Omada Hardware Controller, and Omada Cloud-Based Controller, each have their own set of advantages and applications.
■Omada Software Controller
Omada Software Controller is totally free, as well as all upgrades. The controller can be hosted on any computers with Windows or Linux systems on your network.
3
Chapter 1 |
Omada SDN Controller Solution Overview |
|
Internet |
|
SafeStream Gateway |
|
JetStream Switch |
|
Omada Software Controller |
Omada Access Points
■Omada Hardware Controller
Omada Hardware Controller is the management device which is pre-installed with Omada Software Controller. You just need to pay for the device, then the built-in Omada Controller software is free to use, no license fee or extra cost required. About the size of a mobile phone, the device is easy to deploy and install on your network.
 Internet
SafeStream Gateway
JetStream Switch
Omada Hardware Controller
Omada Access Points
■Omada Cloud-Based Controller
Omada Cloud controller is deployed on the Omada Cloud server, providing paid service with tiered pricing. With a paid subscription to the Omada Cloud Service, you need not purchase an additional hardware device or install the software on the host.
4
Chapter 1 |
Omada SDN Controller Solution Overview |
Omada Cloud Server
Omada Cloud Controller

 Internet
SafeStream Gateway
JetStream Switch
Omada Access Points
The controllers differ in forms, but they have almost the same browser–based management interface and serve the same functions of network management. In this guide, Omada Software Controller, Omada Hardware Controller, and Omada Cloud-Based Controller are referred to as the controller, unless we mention otherwise.
Omada Managed Gateways
TP-Link’s SafeStream VPN Router supports Gigabit Ethernet connections on both WAN and LAN ports which keep the data moving at top speed. Including all the routing and network segmentation functions that a business router must have, SafeStream VPN Router will be the backbone of the Omada SDN network. Moreover, the router provides a both secure and easy approach to deploy site-to-site VPN tunnels and access for remote clients.
Managing the gateway centrally through Omada SDN Controller is available on certain models only. The following table provides specific information of the router which can be managed by the controller.
Omada Supported Gateways |
TL-R605(UN) V1 (default factory version or above) |
|
|
|
|
|
TL-ER7206(UN) V1 (default factory version or above) |
|
|
|
|
Omada Managed Switches
TP-Link’s JetStream Switch provides high-performance and enterprise-level security strategies and a numble of advanced features, which is ideal access-edge for the Omada SDN network.
Managing the switch centrally through Omada SDN Controller is available on certain models only. The following table provides specific information of the switch which can be managed by the controller.
5

Chapter 1 |
|
Omada SDN Controller Solution Overview |
|||
|
|
|
|
|
|
|
Omada Supported Switches |
TL-SG2210MP V1 (default factory version or above) |
|||
|
|
|
|
||
|
|
TL-SG2428P V1 (default factory version or above) |
|||
|
|
|
|
||
|
|
TL-SG2008P V1 (default factory version or above) |
|||
|
|
|
|
|
|
|
|
TL-SG2008 V3 |
(version 3.0.0 or above) |
||
|
|
|
|
||
|
|
TL-SG2210P V3.20 (version 3.2.0 or above) |
|||
|
|
|
|
|
|
|
|
TL-SG3428 V1 |
(default factory version or above) |
||
|
|
|
|
||
|
|
TL-SG3428MP V1 (default factory version or above) |
|||
|
|
|
|
|
|
|
|
TL-SG3452 V1 |
(default factory version or above) |
||
|
|
|
|
||
|
|
TL-SG3452P V1 (default factory version or above) |
|||
|
|
|
|
||
|
|
TL-SG3428X V1 (default factory version or above) |
|||
|
|
|
|
||
|
|
TL-SG3428XMP V1 (default factory version or above) |
|||
|
|
|
|
||
|
|
TL-SG3210XHP-M2 V1 (default factory version or above) |
|||
|
|
|
|
|
|
6

Chapter 1 |
Omada SDN Controller Solution Overview |
Omada Access Points
TP-Link’s Omada Access Point provides business-class Wi-Fi with superior performance and range which guarantees reliable wireless connectivity for the Omada SDN network.
Managing the access points centrally through Omada SDN Controller is available on certain models only. The following table provides specific information of the access points which can be managed by the controller.
Omada Supported APs |
EAP660 HD V1 (default factory version or above) |
|
|
|
|
|
EAP620 HD V1 (default factory version or above) |
|
|
|
|
|
EAP265HD V1 (1.0.0 Build 20200424 or above) |
|
|
|
|
|
EAP245 V3 (2.20.0 Build 20200423 or above) |
|
|
|
|
|
EAP235-Wall (1.0.1 Build 20200618 or above) |
|
|
|
|
|
EAP230-Wall (1.0.0 Build 20200618 or above) |
|
|
|
|
|
EAP225 V3 (2.20.0 Build 20200630 or above) |
|
|
|
|
|
EAP225-Wall V2 (1.20.0 Build 20200422 or above) |
|
|
|
|
|
EAP225-Outdoor V1 (1.20.0 Build 20200422 or above) |
|
|
|
|
|
EAP115 V4 (3.20.0 Build 20200525 or above) |
|
|
|
|
|
EAP115-Wall V1 (1.20.0 Build 20200619 or above) |
|
|
|
|
|
EAP110 V4 (3.20.0 Build 20200525 or above) |
|
|
|
|
|
EAP110-Outdoor V3 (3.20.0 Build 20200511 or above) |
|
|
|
|
7

2
Get Started with Omada SDN Controller
This chapter guides you on how to get started with Omada SDN Controller to configure the network. Omada Software Controller, Omada Hardware Controller, and Omada Cloud-Based Controller differ in forms, but they have almost the same browser–based management interface for network management. Therefore, they have almost the same initial setup steps, including building your network topology, deploying your controller, and logging in to the controller. The chapter includes the following sections:
•Set Up Your Software Controller
•Set Up Your Hardware Controller
•Set up Your Cloud-Based Controller
Chapter 2 |
Get Started with Omada SDN Controller |
 2. 1 Set Up Your Software Controller
Omada SDN Controller Solution is designed for scalable networks. Deployments and configurations vary according to actual situations. Understanding your network requirements is the first step when planning to provision any project. After you have identified these requirements, follow the steps below to initially set up Omada Software Controller:
1 ) Determine the network topology.
2 ) Install Omada Software Controller.
3 ) Start and log in to the controller.
2. 1. 1 Determine the Network Topology
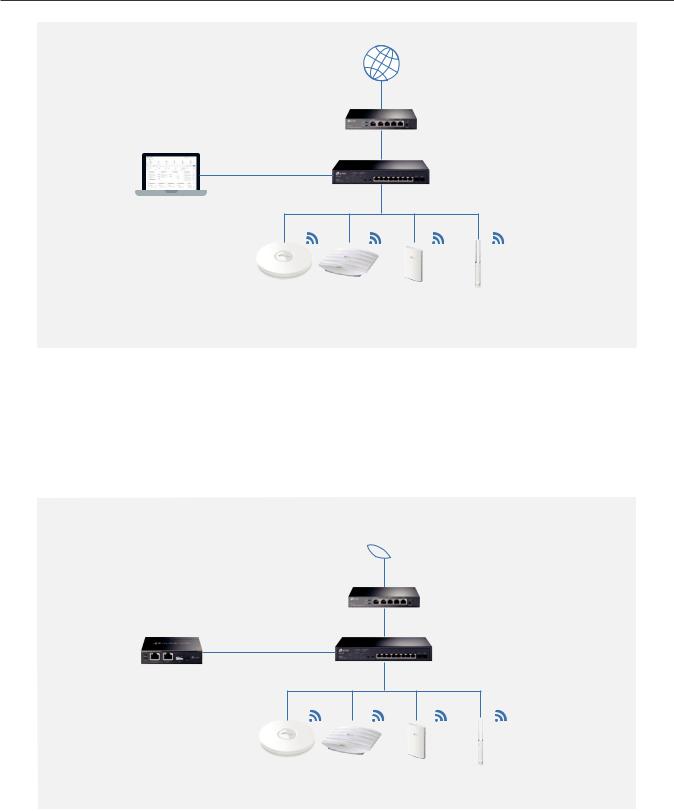
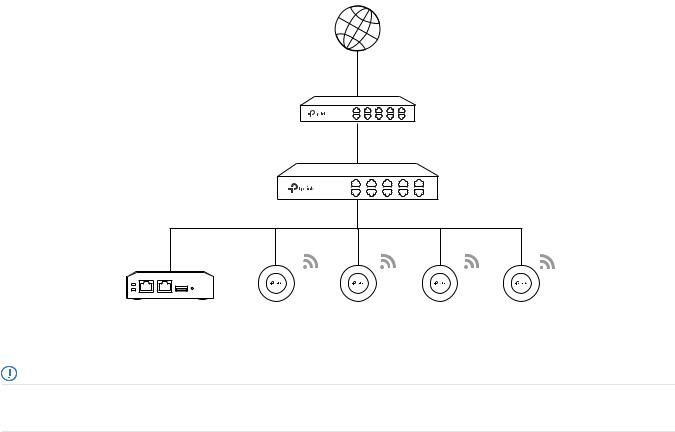
The network topology that you create for Omada SDN Controller varies depending on your business requirements. The following figure shows a typical topology for a high-availability use case.
Internet
SafeStream Gateway
JetStream Switch
 Omada SDN Controller
Site A |
Site B |
Site C |
Site D |
Site E |
|
Unified |
Gateways |
||||
Management from |
Switches |
||||
One Interface |
Access Points |
||||
Omada Software Controller Omada Access Points
Note:
When using Omada SDN Controller, we recommend that you deploy the full Omada topology with supported TP-Link devices. If you use third-party devices, Omada SDN Controller cannot discover and manage them.
9
Chapter 2 |
Get Started with Omada SDN Controller |
2. 1. 2 Install Omada Software Controller
Omada Software Controller is provided for both Windows and Linux operating systems. Determine your operating system and follow the introductions below to install Omada Software Controller.
Installation on Windows Host
Omada Software Controller can be hosted on any computers with Windows systems on your network. Make sure your PC’s hardware and system meet the following requirements, then properly install the Omada Software Controller.
■■ Hardware Requirements
Omada Software Controller can manage up to 1500 EAPs if the Controller Host has enough hardware resources. To guarantee operational stability for managing 1500 EAPs, we recommend that you use the hardware which meets or exceeds the following specifications:
CPU: Intel Core i3-8100, i5-6500, or i7-4700 with 2 or more cores and 4 or more threads. Memory: 6 GB RAM or more.
■■ System Requirements
Operating System: Microsoft Windows 7/8/10/Server. (We recommend that you deploy the controller on a 64-bit operating system to guarantee the software stability.)
Web Browser: Mozilla Firefox 32 (or above), Google Chrome 37 (or above), Opera 24 (or above), or Microsoft Internet Explorer 11 (or above).
■■ Install Omada Software Controller
Download the installation file of Omada Software Controller from the website. Then follow the instructions to properly install the Omada Software Controller. After a successful installation, a shortcut icon 
 of the Omada Software Controller will be created on your desktop.
Installation on Linux Host
Two versions of installation package are provided: .tar.gz file and .deb file. Both of them can be used in multiple versions of Linux operating system, including Ubuntu, CentOS, Fedora, and Debian.
Make sure your PC’s hardware and system meet the following requirements, then choose the proper installation files to install the Omada Software Controller.
■■ Hardware Requirements
Omada Software Controller can manage up to 1500 EAPs if the Controller Host has enough hardware resources. To guarantee operational stability for managing 1500 EAPs, we recommend that you use the hardware which meets or exceeds the following specifications:
CPU: Intel Core i3-8100, i5-6500, or i7-4700 with 2 or more cores and 4 or more threads. Memory: 6 GB RAM or more.
10
Chapter 2 |
Get Started with Omada SDN Controller |
■■ System Requirements
Operating System: 64-bit Linux operating system, including Ubuntu 14.04/16.04/17.04/18.04, CentOS 6.x/7.x, Fedora 20 (or above), and Debian 9.8.
Web Browser: Mozilla Firefox 32 (or above), Google Chrome 37 (or above), Opera 24 (or above), or Microsoft Internet Explorer 11 (or above).
■■ Install Omada Software Controller
Download the installation file of Omada Software Controller from the website. Check the prerequisites and follow the steps based on your file version to install the controller.
•Prerequisites for installing
To successfully install Omada Software Controller, ensure that you have performed the following tasks before your installation:
1.Ensure that the Java Runtime Environment (JRE) have been installed in your system. The controller requires that the system have Java 8 installed. Download the file according to your operating system from the website and follow the instructions to install the JRE.
For Ubuntu16.04 or above, you can use the command: apt-get install openjdk-8-jre-headless to get the Java 8 installed.
2.Ensure that MongoDB has been installed in your system. The controller works when the system runs MongoDB 3.0.15–3.6.18. Download the file according to your operating system from the website and follow the instructions to install the MongoDB.
3.Ensure that you have jsvc and curl installed in your system before installation, which is vital to the smooth running of the system. If your system does not have jsvc or curl installed, you can install it manually with the command: apt-get install or yum install. For example, you can use the command: apt-get install jsvc or yum install jsvc to get jsvc installed. And if dependencies are missing, you can use the command: apt-get -f install to fix the problem.
• Install the .tar.gz file
1. Make sure your PC is running in the root mode. You can use this command to enter root mode: sudo
2. Extract the tar.gz file using the command:
tar zxvf Omada_Controller_v4.1.5_linux_x64_targz.tar.gz
3. Install Omada Controller using the command: sudo bash ./install.sh
• Install the .deb file
1.Make sure your PC is running in the root mode. You can use this command to enter root mode: sudo
2.Install the .deb file using the command:
dpkg -i Omada_Controller_v4.1.5_linux_x64.deb
If dependencies are missing during the installation, you can use the command: apt-fix-broken install to fix the problem.
11
Chapter 2 |
Get Started with Omada SDN Controller |
After installing the controller, use the following commands to check and change the status of the controller.
1.tpeap start — start the controller, use the command.
2.tpeap stop — stop running the Omada Controller.
3.tpeap status — show the status of Controller.
Note:
•For installing the .tar.gz, if you want Omada Controller to run as a user (it runs as root by default) you should modify OMADA_ USER value in bin/control.sh.
•To uninstall Omada Controller, go to the installation path: /opt/tplink/EAPController, and run the command: sudo bash ./uninstall. sh.
•During uninstallation, you can choose whether to back up the database. The backup folder is /opt/tplink/eap_db_backup.
•During installation, you will be asked whether to restore the database if there is any backup database in the folder /opt/tplink/ eap_db_backup.
2.1. 3 Start and Log In to the Omada Software Controller
Launch Omada Software Controller and follow the instructions to complete the basic configurations, and then you can log in to the management interface.
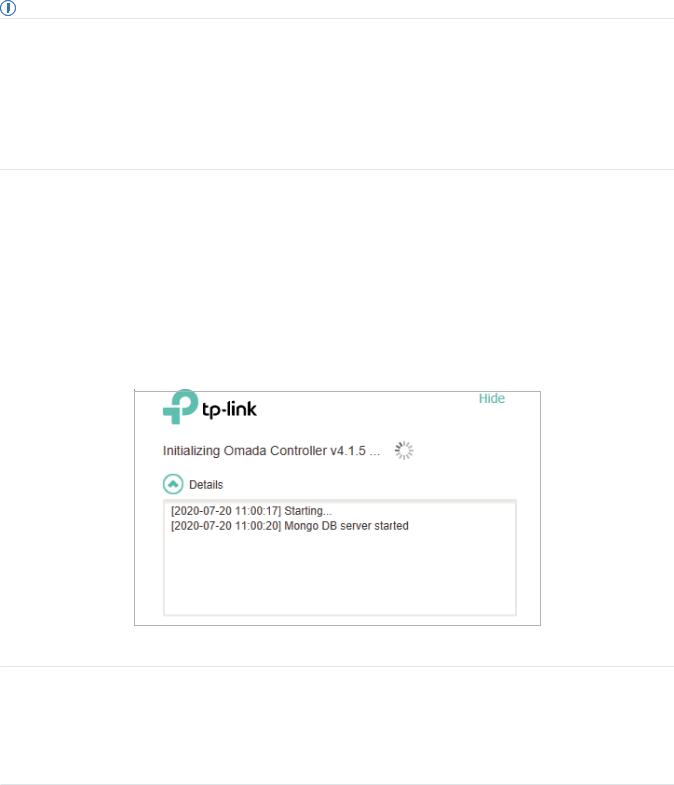
Launch Omada Software Controller
Double click the icon 
 and the following window will pop up. You can click Hide to hide this window but do not close it. After a while, your web browser will automatically open.
 Note:
Note:
•If your browser does not open automatically, click Launch a Browser to Manage the Network. You can also launch a web browser and enter http://127.0.0.1:8088 in the address bar.
•If your web browser opens but prompts a problem with the website’s security certificate, click Continue.
•Only one Omada Controller can run in a LAN. If an Omada Controller has already been running on a host that is in your LAN, you will be redirected to the Omada Controller interface on that host.
12
Chapter 2 |
Get Started with Omada SDN Controller |
Do the Basic Configurations
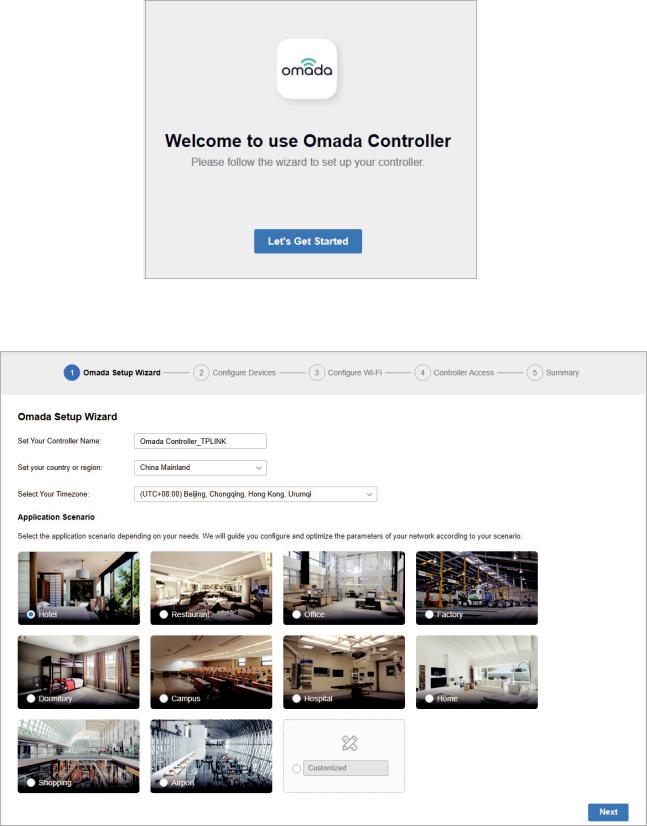
In the web browser, you can see the configuration page. Follow the setup wizard to complete the basic settings for Omada Controller.
1. Click Let’s Get Started.
2.Specify a name for Omada Controller, and set your region and timezone. Then select the application scenario depending on your needs. Click Next.
13
Chapter 2 |
Get Started with Omada SDN Controller |
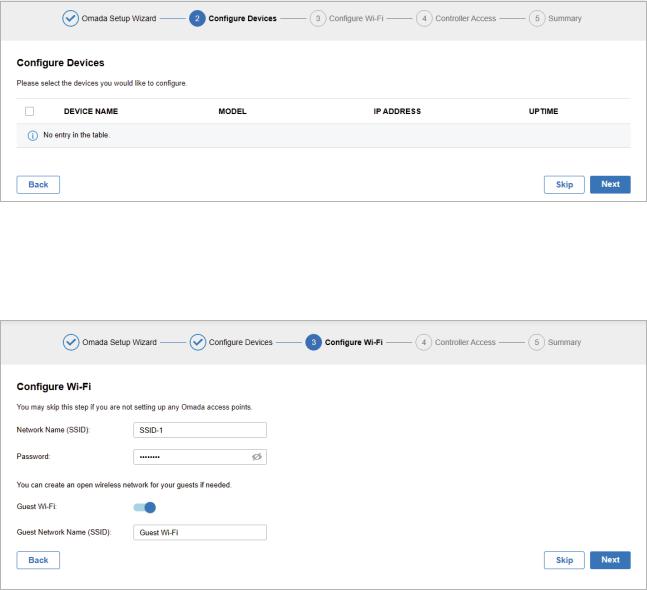
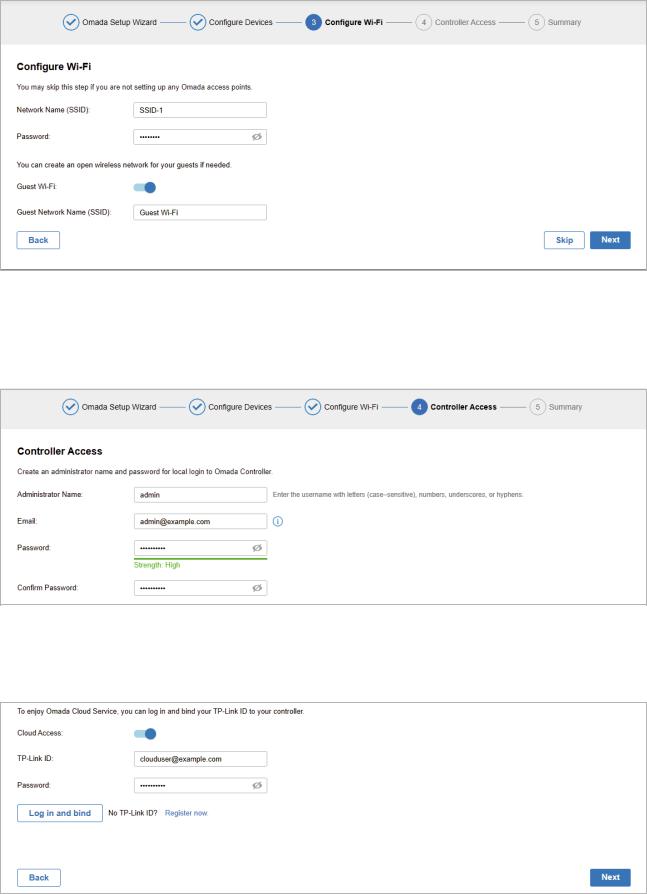
3.The setup page displays all the discovered devices in the network. Select one or more devices to be managed and click Next.
4.Set a wireless network name (SSID) and password for the EAPs to be managed. Omada Controller will create two wireless networks, a 2.4GHz one and a 5GHz one, both encrypted in WPA-Personal mode. You can set Guest Wi-Fi to provide open Wi-Fi access for guests without disclosing your main network if needed. Click Next.
5.Set a username and password for the login account. Specify the email address for resetting your password in case that you forget the password. After logging in Omada Controller, set a mail server so that you can receive emails and reset your password. For how to set a mail server, refer to Notifications.
14
Chapter 2 |
Get Started with Omada SDN Controller |
|
|
|
|
|
|
|
6.If you want to access the controller to manage networks remotely, enable the Cloud Access button, and bind your TP-Link ID to your Omada Controller, and then click Next. If not, click Next directly. For more details about Omada Cloud, please refer to Omada Cloud Service.
7. Review your settings and click Finish.
15
Chapter 2 |
Get Started with Omada SDN Controller |
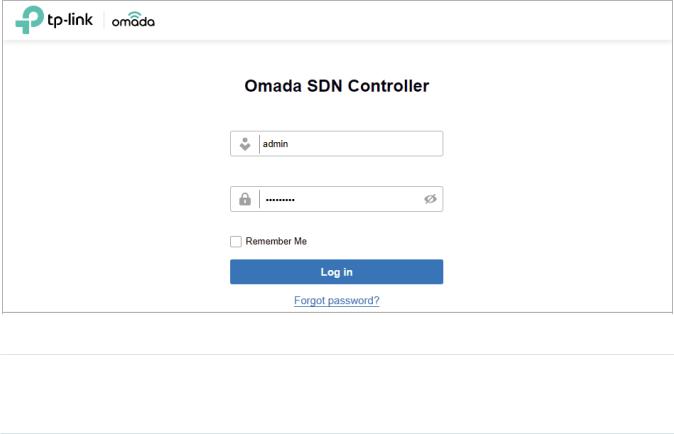
Log In to the Management Interface
Once the basic configurations are finished, the browser will be redirected to the following page. Log in to the management interface using the username and password you have set in the basic configurations.
 Note:
Note:
In addition to the Controller Host, other hosts in the same LAN can also manage EAPs via remote access to the Controller Host. For example, if the IP address of the Controller Host is 192.168.0.100 and Omada Controller is running normally on this host, you can enter https://192.168.0.100:8043, or http://192.168.0.100:8088 in the web browser of other hosts in the same LAN to log in to the Omada Controller and manage EAPs. Or you can log in to Omada Controller using other management devices through Omada Cloud service.
16
Chapter 2 |
Get Started with Omada SDN Controller |
 2. 2 Set Up Your Hardware Controller
Omada SDN Controller Solution is designed for scalable networks. Deployments and configurations vary according to actual situations. Understanding your network requirements is the first step when planning to provision any project. After you have identified these requirements, follow the steps below to initially set up Omada Hardware Controller:
1 ) Determine the network topology.
2 ) Deploy Omada Hardware Controller.
3 ) Start and log in to the controller.
2. 2. 1 Determine the Network Topology
The network topology that you create for Omada SDN Controller varies depending on your business requirements. The following figure shows a typical topology for a high-availability use case.
Internet
SafeStream Gateway
JetStream Switch
|
|
|
|
Omada Hardware Controller |
Omada Access Points |
||
Note:
When using Omada SDN Controller, we recommend that you deploy the full Omada topology with supported TP-Link devices. If you use third-party devices, Omada SDN Controller cannot discover and manage them.
2. 2. 2 Deploy Omada Hardware Controller
Omada Hardware Controller comes with the pre-installed controller software, so installation is not necessary. After deploying Omada Hardware Controller on your network infrastructure, proceed to configure the controller.
17

Chapter 2 |
Get Started with Omada SDN Controller |
2. 2. 3 Start and Log in to the Controller
Log In to the Management Interface
Follow the steps below to enter the management interface of Omada Hardware Controller:
1.Make sure that your management device has the route to access the controller.
2.Check the DHCP server (typically a router) for the IP Address of the controller. If the controller fails to get a dynamic IP address from the DHCP server, the default fallback IP address 192.168.0.253, is used.
3.Launch a web browser and type the IP address of the controller in the address bar, then press Enter (Windows) or Return (Mac).
Do the Basic Configurations
In the web browser, you can see the configuration page. Follow the setup wizard to complete the basic settings for Omada Controller.
1. Click Let’s Get Started.
18

Chapter 2 |
Get Started with Omada SDN Controller |
2.Specify a name for Omada Controller, and set your region and timezone. Then select the application scenario depending on your needs. Click Next.
3.The setup page displays all the discovered devices in the network. Select one or more devices to be managed and click Next.
4.Set a wireless network name (SSID) and password for the EAPs to be managed. Omada Controller will create two wireless networks, a 2.4GHz one and a 5GHz one, both encrypted in WPA-Personal
19
Chapter 2 |
Get Started with Omada SDN Controller |
mode. You can set Guest Wi-Fi to provide open Wi-Fi access for guests without disclosing your main network if needed. Click Next.
5.Set a username and password for the login account. Specify the email address for resetting your password in case that you forget the password. After logging in Omada Controller, set a mail server so that you can receive emails and reset your password. For how to set a mail server, refer to Notifications.
6.If you want to access the controller to manage networks remotely, enable the Cloud Access button, and bind your TP-Link ID to your Omada Controller, and then click Next. If not, click Next directly. For more details about Omada Cloud, please refer to Omada Cloud Service.
20
Chapter 2 |
Get Started with Omada SDN Controller |
7. Review your settings and click Finish.
Log In to the Management Interface
Once the basic configurations are finished, the browser will be redirected to the following page. Log in to the management interface using the username and password you have set in the basic configurations.
 Note:
Note:
In addition to the Controller Host, other hosts in the same LAN can also manage EAPs via remote access to the Controller Host. For example, if the IP address of the Controller Host is 192.168.0.100 and Omada Controller is running normally on this host, you can enter https://192.168.0.100:8043, or http://192.168.0.100:8088 in the web browser of other hosts in the same LAN to log in to the Omada Controller and manage EAPs. Or you can log in to Omada Controller using other management devices through Omada Cloud service.
21
Chapter 2 |
Get Started with Omada SDN Controller |
 2. 3 Set up Your Cloud-Based Controller
Omada SDN Controller Solution is designed for scalable networks. Deployments and configurations vary according to actual situations. Understanding your network requirements is the first step when planning to provision any project. After you have identified these requirements, follow the steps below to initially set up Omada Cloud-Based Controller:
1 ) Create a TP-Link ID.
2 ) Subscribe to Omada Cloud Service.
3 ) Start and log in to the controller.
The get-started configuration steps of Omada Cloud-Based Controller are similar to Omada Software Controller, refer to the Start and Log In to the Omada Software Controller to get detailed information.
22

3
Manage Omada Managed Devices and
Sites
Start managing your network by creating sites and adopting devices so that you can configure and monitor your devices centrally while keeping things organized. The chapter includes the following sections:
•Create Sites
•Adopt Devices
Chapter 3 |
Manage Omada Managed Devices and Sites |
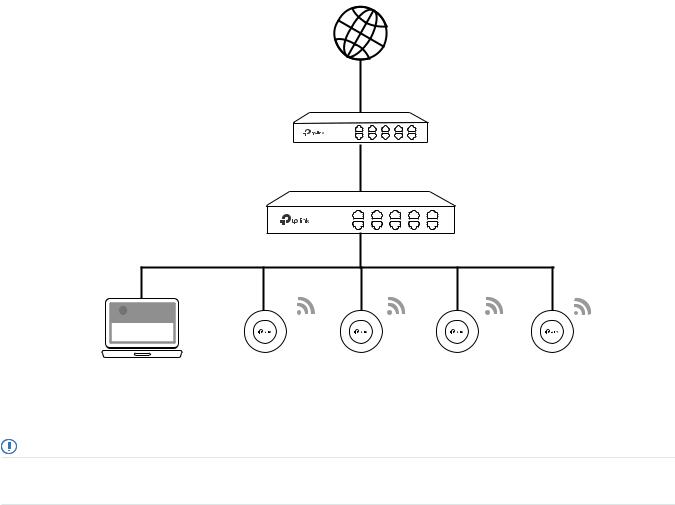
 3. 1 Create Sites
Overview
Different sites are logically separated network locations, like different subsidiary companies or departments. It’s best practice to create one site for each LAN (Local Area Network) and add all the devices within the network to the site, including the router, switches and APs.
|
|
|
|
|
|
Site D |
|
|
Site C |
|
|
|
|
|
|
|
Router |
|
|
|
|
|
|
|
|
|
|
|
|
|
|
|
|
|
Switch |
|
|
|
Omada SDN Controller |
|
|
LAN 4 |
||
|
Router |
|
Site A Site B |
Site C Site D Site E |
AP |
|
AP |
|
|
|
Unified |
|
Gateways |
|
|||
|
Switch |
|
|
|
Site E |
|
||
|
|
Management from |
Switches |
|
|
|||
LAN 3 |
|
Site B |
One Interface |
|
Access Points |
|
|
|
|
|
|
|
|
|
|
||
|
|
|
|
|
|
|
|
|
AP |
AP |
|
|
Site A |
|
|
|
|
|
|
|
|
|
|
|
||
|
|
|
|
|
|
|
|
Router |
|
|
|
Router |
|
|
LAN 5 |
Switch |
|
|
|
|
Switch |
|
|
|
||
|
|
LAN 2 |
|
Router |
|
|
|
|
|
|
|
|
|
|
|
||
|
|
|
|
LAN 1 |
Switch |
AP |
AP |
AP |
|
|
|
|
|
||||
|
AP |
AP |
AP |
|
|
|
|
|
|
|
|
AP |
AP |
AP |
AP |
|
|
Devices at one site need unified configurations, whereas those at different sites are not relative. To make the best of a site, configure features simultaneously for multiple devices at the site, such as VLAN and PoE Schedule for switches, and SSID and WLAN Schedule for APs, rather than set them up one by one.
Configuration
To create and manage a site, follow these steps: 1 ) Create a site.
2 ) View and edit the site.
3 ) Go into the site.
24
 Loading...