


TNS400
Owner’s manual Bedienungsanleitung Mode d’emploi Gebruikershandleiding

OPERATING INSTRUCTIONS ........................................................................................ |
Page |
3 |
BEDIENUNGSANLEITUNG ............................................................................................. |
Seite |
55 |
MODE D’EMPLOI .............................................................................................................. |
Page |
107 |
BEDIENINGSHANDLEIDING ......................................................................................... |
Pagina |
161 |
ISTRUZIONI PER L’USO ................................................................................................... |
Pagina |
215 |
m |
|
|
Read this manual thoroughly before using the TNS400. |
|
|
Always keep this owner’s manual in the vehicle. |
|
|
Lesen Sie diese Anleitung vor Benutzung der TNS400 gründlich. |
|
|
Bewahren Sie diese Anleitung immer im Fahrzeug auf. |
|
|
Lisez ce manuel dans son intégralité avant d’utiliser le TNS400. |
|
|
Conservez toujours ce mode d'emploi dans le véhicule. |
|
|
Lees deze handleiding grondig voordat u de TNS400 gebruikt. |
|
|
Bewaar deze gebruikshandleiding altijd in uw voertuig. |
|
|
Leggere con attenzione e per intero questo manuale prima di utilizzare il TNS400. Tenere sempre nel veicolo il presente manuale d’uso.
TNS400

© 2007 TOYOTA MOTOR CORPORATION
All rights reserved. This material may not be reproduced or copied, in whole or in part, without the written permission of Toyota Motor Corporation.
Alle Rechte vorbehalten. Diese Unterlagen dürfen nicht vervielfältigt oder kopiert werden, auch nicht in Auszügen, ohne die schriftliche Genehmigung der Toyota Motor Corporation
Tous droits réservés. Ce document ne peut pas être reproduit ou copié, en tout ou en partie, sans la permission écrite de Toyota Motor Corporation.
Alle rechten voorbehouden. Dit materiaal mag niet vermenigvuldigd of gekopieerd worden, noch geheel noch gedeeltelijk, zonder de schriftelijke toestemming van Toyota Motor Corporation. Tutti i diritti riservati. Questo materiale non può essere riprodotto o copiato, in tutto o in parte, senza l’autorizzazione scritta della Toyota Motor Corporation.
© 2007 TomTom International B.V.
TomTom® and the “two hands” logo are among the trademarks or registered trademarks owned by TomTom International B.V.
TomTom® und das “Zwei Hände”-Logo gehören zu den Warenzeichen oder den eingetragenen Warenzeichen von TomTom International B.V.
TomTom® et le logo « deux mains » sont des marques ou des marques déposées de TomTom International B.V.
TomTom® en het logo met de “twee handen” zijn twee van de handelsmerken of geregistreerde handelsmerken van TomTom International B.V.
TomTom® e il logo delle “due mani” sono tra i marchi di fabbrica o marchi di fabbrica depositati di proprietà della TomTom International B.V.
TNS400

Contents
1. |
Introduction.......................................................................................................... |
7 |
|
2. |
Safety precautions................................................................................................ |
8 |
|
|
2.1. |
Safety symbols.......................................................................................................... |
8 |
|
2.2. |
Warning.................................................................................................................... |
8 |
|
2.3. |
Caution..................................................................................................................... |
9 |
3. Operating precautions.......................................................................................... |
11 |
|
3.1. |
Notes on operation................................................................................................... |
11 |
4. Names of controls and parts................................................................................. |
12 |
|
4.1. |
Turning the power on and off.................................................................................... |
14 |
4.2. |
Switching audio sources............................................................................................ |
14 |
4.3. |
Adjusting the sound.................................................................................................. |
14 |
4.4. |
Switching audio control modes................................................................................. |
15 |
4.5. |
Telephone muting function ...................................................................................... |
16 |
4.6. |
Steering remote switch controls ............................................................................... |
16 |
4.7. |
Switching between the audio and navigation screen ................................................ |
18 |
4.8. |
Turning the TomTom display on and off ................................................................... |
18 |
4.9. |
Switching between left and right speaker output for the navigation voice ................ |
18 |
4.10. Selecting the dimmer setting .................................................................................... |
19 |
|
4.11. Detaching the TomTom............................................................................................. |
19 |
|
4.12. How to tilt the front panel ........................................................................................ |
20 |
|
4.13. About the hands-free microphone ............................................................................ |
21 |
|
4.14. Common operations ................................................................................................ |
21 |
|
5. How to operate the tuner..................................................................................... |
22 |
|
5.1. Listening to the tuner ............................................................................................... |
22 |
|
5.2. Tuning to a station ................................................................................................... |
22 |
|
5.3. Calling up preset channels ....................................................................................... |
22 |
|
5.4. Calling up a preset channel from the TomTom display ............................................. |
23 |
|
5.5. |
Memorizing stations ................................................................................................. |
23 |
5.6. |
Preset station scan .................................................................................................... |
24 |
5.7. |
Receiving rds data .................................................................................................. |
25 |
5.8. EON (enhanced other network) ............................................................................... |
26 |
|
5.9. Setting PTY (program type) ...................................................................................... |
26 |
|
6. How to operate the CD/MP3/WMA player........................................................... |
27 |
|
6.1. |
About compact discs ................................................................................................ |
27 |
6.2. About cleaning a CD ................................................................................................ |
28 |
|
6.3. |
About MP3/WMA ..................................................................................................... |
29 |
|
TNS400 |
|

6.4. |
Making and playing MP3/WMA files ........................................................................ |
31 |
6.5. |
Listening to a CD, MP3/WMA .................................................................................. |
33 |
6.6.Skipping to the next track (file)/returning
|
to the beginning of a track (file) ............................................................................... |
34 |
6.7. |
Fast forward/rewind ................................................................................................. |
34 |
6.8. |
Random track order ................................................................................................. |
34 |
6.9. |
Random file/folder order .......................................................................................... |
35 |
6.10. Repeat track ............................................................................................................. |
35 |
|
6.11. Repeat file/folder ...................................................................................................... |
35 |
|
6.12. Scan tracks ............................................................................................................... |
36 |
|
6.13. Scan files/folders....................................................................................................... |
36 |
|
6.14. Returning to the root directory ................................................................................. |
36 |
|
6.15. Selecting the display during play .............................................................................. |
37 |
|
6.16. Switching between CD-DA and MP3/WMA .............................................................. |
37 |
|
7. How to operate the USB music file player............................................................ |
38 |
|
7.1. |
About playable USB memory standards..................................................................... |
38 |
7.2. |
Listening to music files in USB memory .................................................................... |
39 |
7.3. |
Skipping to the next file/returning to the beginning of the file ................................. |
40 |
7.4. |
Fast forward/rewind ................................................................................................. |
40 |
7.5. |
Random file order (shuffle songs) ............................................................................. |
40 |
7.6. |
Repeat song ............................................................................................................. |
41 |
7.7. |
File search ................................................................................................................ |
41 |
8. How to operate with an iPod® ............................................................................. |
43 |
|
8.1. |
Listening to iPod music files ...................................................................................... |
43 |
8.2. |
Going to the next file/returning to the beginning of a file ........................................ |
43 |
8.3. |
Fast forward/rewind ................................................................................................. |
44 |
8.4. |
Random file order (shuffle songs) ............................................................................. |
44 |
8.5. |
Repeat song ............................................................................................................. |
44 |
8.6. |
File search ................................................................................................................ |
45 |
9. How to operate the portable audio player........................................................... |
47 |
|
9.1. |
Switching the AUX mode on and off ........................................................................ |
47 |
9.2. |
When using AUX ...................................................................................................... |
47 |
10. Troubleshooting.................................................................................................... |
48 |
|
10.1. If one of these messages appears .............................................................................. |
48 |
|
10.2. Before asking for repairs ........................................................................................... |
49 |
|
11. Technical data....................................................................................................... |
52 |
|
TNS400

Recommendation
Please read this manual to get the full benefit of the system.
We suggest you keep this manual in the car. It will be easier for you to find the information in case of an emergency.
Your local authorised retailer will be pleased to clarify any queries you may have with the system or its operation if you cannot find the information you need in this manual or in the chapter ‘Troubleshooting’.
Toyota recommends that only parts and accessories that have been tested and approved by Toyota in terms of their safety, function and suitability should be used.
These operating instructions are designed to ensure that you can operate the TNS400 system safely and easily.
These operating instructions describe the functions of the TNS400 system.
It is illegal to steal films and music, and also to download illegal content.
TNS400

TNS400

1. Introduction
Congratulations on your purchase of a Toyota TNS400 (Navigation system with integral CD player and tuner) system. This system has been developed to combine the navigation system with your in-car entertainment system, to provide an integral and adaptive information and entertainment system while you are on the road.
The TNS400 incorporates the navigation function with in-car hands-free telephone, radio, CD player, and a USB port for an MP3/WMA player, iPod® or other device. Use it to listen to your favourite music, or tune into your favourite radio station; navigation instructions are still clearly heard because the sound mutes temporarily while an instruction is given, or while the hands-free telephone is active.
This instruction manual explains the basic instructions for the TNS400. The system may not respond to every operating command. Please refer to the instruction notes for the relevant CD or USB device. Before operating the system, please read the safety instructions on page 8, and the explanations of the controls on page 12 onwards.
TNS400

2. Safety precautions
2.1. Safety symbols
Warnings and caution notices, illustrated below, are posted throughout this manual as well as on the main unit. They show the safe and correct ways to handle the product so as to prevent personal injury to you and others, and to avoid property damage.
Before reading through the manual, take the time to read through this section and familiarise yourself with the important information it contains.
mWarning: This notice indicates a situation in which incorrect handling or failure to observe the notice might result in death or serious personal injury.


 Caution: This notice indicates a situation in which incorrect handling or failure to observe the notice might result in personal injury or may result solely in damage to property.
Disposal: When this symbol appears in front of a text, you are recommended or warned to 
 follow the legislator’s rules for disposal of electrical equipment.
 Attention: This symbol indicates that the following remark requires special attention.


 Note: A simple recommendation for your convenience and for an optimal working of your system.
Please read all material, such as manuals and warranties, that has come with the product. TOYOTA EUROPE will not be liable for unsatisfactory product performance due to failure to follow these instructions.
2.2. Warning
m
•Do not modify this system for any use other than that specified herein. TOYOTA EUROPE will not be held liable for damage including, but not limited to, serious injury, death or property damage resulting from installations that enable unintended operation.
•Some main units use batteries. Never install main units where young children can get access to batteries. If a battery is swallowed, seek medical attention immediately.
•When the vehicle is moving, never take your eyes off the road to make adjustments to the main unit. You must pay attention to the road to avoid accidents. Do not let the operation or adjustment of the main unit distract you from proper vehicle operation.
TNS400

•The driver should not look at the screen while driving. Accidents may result if you are not paying attention to the road ahead.
•Do not put foreign objects in the disc loading slot or USB input terminal. Fires or electric shocks may result.
•Do not disassemble or alter this main unit. Accidents, fires or shocks may result.
•Do not let water or foreign objects enter the internal parts of this main unit. Smoke generation, fires or electric shocks may result.
•Do not use the main unit when it is broken (the screen is not lit or no sound is emitted). Accidents, fires or electric shocks may result.
•Always replace fuses with fuses of identical capacity and characteristics. Never use a fuse of a higher capacity than the original. Using the wrong type of fuse may cause a fire or severe damage.
•If a foreign object or water enters the main unit, smoke is emitted or there is a strange odour, stop using it immediately, and contact your dealer. Accidents, fires or electric shocks may result if you continue to use it in these conditions.
•The driver should not change the CD or USB memory while driving, as accidents may result if you are not paying attention to the road ahead. First stop the car at a safe location and then proceed.
•Plastic bags and wrappings may cause suffocation and death. Keep away from babies and children. Never place a bag over your head or mouth.
2.3. Caution
•Do not block the fan, heat sink or vents of this main unit. When a fan, heat sink or vent is blocked, the interior overheats and fires may result.
•Keep the volume to a reasonable level so that you can hear sounds from outside the vehicle, including warning sounds, voices and sirens. Failure to do so may cause an accident.
•Take care that your hands and fingers are not pinched when adjusting the tilting angle or closing the display. Injuries may result.
•Do not put your hands or fingers into the disc loading slot or USB input terminal. Injuries may result.
•Do not touch the heat dissipating part of the amplifier. Burns may result from the heat of this part.
•If alkaline solution from alkaline dry batteries makes contact with your skin or clothes, flush clean with water. If any of the solution gets in your eyes, also flush clean with water and then seek medical attention.
•When disposing of lithium dry batteries, affix insulating tape to the positive and negative terminals, and after they are insulated, dispose of them according to the local municipal ordinances. Shorts, fires and ruptures may result from disposal if the terminals come into contact with other electrically conductive objects such as metal parts, etc.
•Do not short, disassemble or heat the batteries or place them in fire or water. Fire and injuries may result from battery rupture and leakage.
•Do not use this main unit except for in-vehicle use. Electric shocks or injuries may result.
•Be careful about the position of the volume control when turning the power source ON. Hearing damage may result if a very loud noise is emitted when the power is turned ON.
TNS400
•Do not operate under abnormal conditions such as when the sound is broken or distorted. Fires may result.
•This main unit uses invisible laser light. Do not disassemble or alter this main unit. If a problem occurs, contact the dealer where you bought the main unit.
•Altering this main unit may cause exposure to laser emissions (impairing eyesight) or result in accidents, fires or electric shocks.
•If the main unit is dropped or it appears broken, turn off the power to the main unit and contact your dealer. If it is used in this condition, fires or electric shocks may result.
•Using the vehicle speed pulse signal, you can use the route guidance function even in locations where usually no guidance is given (for example: in a tunnel). However, the accuracy of the guidance is not guaranteed since the guidance is based on information about the road surface condition and vehicle speed.
•A CLASS 1 LASER PRODUCT label is affixed to the top of this unit.
In accordance with the European Directive 2002/96/EC (for Waste Electric and Electronic

 Equipment=WEEE), this product, which is labeled with a crossed-out wheeled bin, may not be disposed of with household waste in member states of the EU.
WEEE : Waste Electrical and Electronic Equipment
When disposing of this product in an EU member state, dispose of it properly in accordance with the laws of that state, for example by returning it to the distributor.
WEEE has potential effects on the environment and human health as a result of the presence of hazardous substances. You can help to eliminate these effects and to enhance reuse/recycling other forms of recovery by your cooperation.
10 TNS400
3. Operating precautions
<With correct handling and care, the main unit will perform well over a long period of time.>
3.1. Notes on operation
•For your safety, play only at moderate volumes so that you can still hear exterior sounds.
TEXT |
•Discs with the logo shown to the left can be played.
•You can play music CDs (CD-R/CD-RW) on this player. Be sure to use discs that have been properly processed.
Depending on the editing format and software used, some discs may not play properly.
•Do not insert anything other than a CD into the main unit.
Do not insert any foreign objects, such as coins or credit cards, into the disc slot.
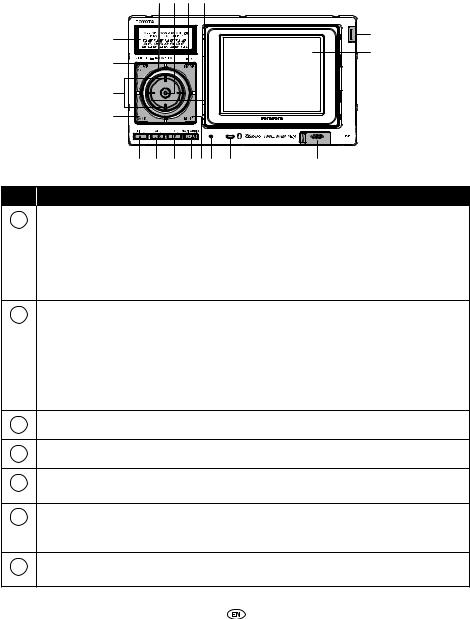
•Avoid severe mechanical shock.
When the player is subjected to severe vibration while traveling over a rough surface, playback may be intermittent. When a situation like this occurs, resume playback after returning to a smoother road.
•About dew condensation.
In cold or rainy weather, just as the interior glass surface gets fogged, dew (water condensation) may also settle on the main unit. When this happens, disc playback may become intermittent or impossible. Dehumidify the air in the vehicle for a while before resuming playback.
•Cleaning the disc slot.
The disc slot tends to get dusty. Clean it occasionally to prevent accumulated dust from scratching the discs.
TNS400 11
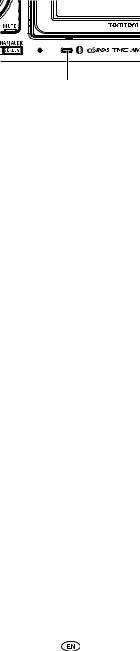
4. Names of controls and parts
|
|
|
|
Front view |
|
|
7 |
5 |
2 |
6 |
|
|
Sub display |
|
|
|
C |
|
|
|
|
|
|
|
|
|
|
|
TomTom display |
|
1 |
|
|
|
|
|
8 |
|
|
|
|
|
4 |
|
|
|
|
|
9 0 |
A |
B 3 D Microphone |
USB slot |
|
No. |
|
|
|
Name/Functions |
|
1 |
[SOURCE/PWR] button |
|
|
Pressing briefly: Switches among items in the |
|
|
|
|
audio mode. |
|
|
|
|
|
|
|
|
|
|
|
|
Press and hold (more than one second): Turns the |
|
|
|
|
|
audio mode OFF. |
|
|
|
|
|
Press and hold (more than 5 seconds): Turns the |
|
|
|
|
|
power completely OFF. |
|
2 |
[MODE/PTY] button |
|
|
Pressing briefly: Switches to the preset channel |
|
|
|
|
select mode or CD track select mode (Hereafter, |
||
|
|
|
|
||
|
|
|
|
the “preset channel select mode” and “CD track |
|
|
|
|
|
select mode” are referred to as “rotary select |
|
|
|
|
|
mode”.) |
|
|
|
|
|
Press and hold: Switches the PTY selection at each |
|
|
|
|
|
pressing of the button. |
|
3 |
[MUTE] button |
|
|
Activates and deactivates mute. |
|
|
|
|
|
|
|
4 |
[BAND] button |
|
|
Switches radio bands. |
|
|
|
|
|
|
|
5 |
[ENTER] button |
|
|
Enters the selected item. Activates and switches |
|
|
|
|
the audio control mode. |
||
|
|
|
|
||
6 |
[SELECT (Right/Left)] button |
Selects radio station, CD tracks, USB music files |
|||
|
|
|
and iPod music files. |
||
|
|
|
|
||
|
|
|
|
In the function mode, selects setting items. |
|
7 |
[VOL] rotary knob |
|
|
Adjusts the volume. In the rotary select mode, |
|
|
|
|
used to select the item you want. |
||
|
|
|
|
||
12 TNS400

No. |
|
Name/Functions |
|
|
|
||
8 |
[SELECT (Upper/Lower)] button Selects the folder in the CD (MP3/WMA) mode. |
||
|
|
||
|
|
|
|
9 |
[ (OPEN/EJECT)] button |
Pressing briefly: Ejects the disc or opens/closes the |
|
front panel. |
|||
|
|
||
|
|
Press and hold: Tilts the front panel by one step |
|
|
|
each time the button is pressed. |
|
|
|
|
|
10 |
[FUNC/AF] button |
Pressing briefly: Switches the items in the |
|
|
FUNCTION mode each time the button is |
||
|
|
||
|
|
pressed. |
|
|
|
Press and hold: Switches AF and REG settings for |
|
|
|
RDS each time the button is pressed. |
|
|
|
|
|
11 |
[TP/TEXT] button |
Pressing briefly: Switches TP and TA settings for |
|
|
RDS each time the button is pressed. |
||
|
|
||
|
|
Press and hold: Switches the title display of the |
|
|
|
sub display. |
|
|
|
|
|
12 |
[SCREEN] button |
Pressing briefly: Switches the TomTom display |
|
|
between navigation functions and audio |
||
|
|
||
|
|
functions. |
|
|
|
Press and hold: Turns the TomTom display off. |
|
|
|
|
|
13 |
[Release] button |
Detaches the right end of the TomTom from the |
|
|
body of the main unit. |
||
|
|
||
|
|
|
|
14 |
[Reset] button |
Resets the unit. |
|
|
|
||
|
|
|
|
|
|
Disc slot |
|


 Caution: Never place an object on the front panel or rest your hands on it.
TNS400 13

4.1. Turning the power on and off
When the power is turned on, the status in use when the power was last turned off, such as CD and tuner playback, is restored.
1.When the power is OFF, press the [SOURCE/PWR] button.
The power will come ON.
2.When the power is ON, press the [SOURCE/PWR] button for more than one second.
All audio sources will be turned OFF. “GOOD BYE” will be displayed.
3.When the power is ON, press the [SOURCE/PWR] button for more than 5 seconds.
The power will go completely OFF. “ACC OFF” will be displayed.
 Attention:
•When the main unit’s power is turned on for the first time or if the battery terminals have been disconnected, e.g. for vehicle maintenance, and the power is then turned back on, the main unit will start up in FM mode. After this, the broadcast stations will be searched for automatically (ASM - Automatic Search Mode) and registered to preset numbers [1] to [6].
•If your vehicle is not equipped with the “ACC” position, press the [SOURCE/PWR] button until “ACC OFF” is displayed.
4.2. Switching audio sources
Press the [SOURCE/PWR] button to switch the audio source in the following sequence:
TUNER → CDP*2 → USB*1*4 → AUX*3 → iPod*1*4 → TUNER → ...
*1: Cannot be selected if the corresponding device is not connected to the main unit.
*2: Cannot be selected if no CD is inserted.
*3: Cannot be selected if the AUX setting is set to OFF.
*4: If the TomTom is not connected to the main unit, you cannot select the USB mode or iPod mode.
4.3.Adjusting the sound
Adjusting the volume
Turn the [VOL] rotary knob.
Turn to the right: Increases the volume.
Turn to the left: Decreases the volume.


 Caution: Do not adjust the volume or other controls while driving the vehicle. Do so only while parked in a safe location.
14 TNS400

Muting the volume
Press the [MUTE] button.
To cancel muting, either press the [MUTE] button again or turn the [VOL] rotary knob to the right. While the audio system is muted, navigation voice guidance continues unmuted.
Setting guide tone
1.Press the [FUNC/AF] button to establish the FUNCTION mode.
2.Press the [FUNC/AF] button until the indication on the sub display switches to BEEP.
3.Press the [SELECT (Right/Left)] button to switch between ON and OFF statuses for BEEP.
Right : ON Left : OFF
4.Press the [ENTER] button.
4.4. Switching audio control modes
The modes will switch one step in the order shown below each time the [ENTER] button is pressed.
BASS → MID → TREB → BAL → FAD → LOUD → SVC → VOL → BASS → ...
Turn the [VOL] rotary knob to the right or left in the audio mode while referring to the table below to adjust the sound.
Mode |
Function |
[VOL] Rotary knob/Function |
||
|
|
|
|
|
BASS |
Adjusts bass level. |
Turn to the right |
Emphasizes low sounds. |
|
|
|
|||
Turn to the left |
Softens low sounds. |
|||
|
|
|||
|
|
|
|
|
|
|
Turn to the right |
Emphasizes |
|
MID (MIDDLE) |
Adjusts middle level. |
mid-range sounds. |
||
|
||||
|
|
Turn to the left |
Softens mid-range sounds. |
|
|
|
|
|
|
TREB (TREBLE) |
Adjusts treble level. |
Turn to the right |
Emphasizes high sounds. |
|
|
|
|||
Turn to the left |
Softens high sounds. |
|||
|
|
|||
|
|
|
|
|
BAL (BALANCE) |
Adjusts left/right speaker |
Turn to the right |
Emphasizes right speakers. |
|
balance (BALANCE). |
Turn to the left |
Emphasizes left speakers. |
||
|
||||
|
|
|
|
|
FAD (FADER) |
Adjusts front/rear speaker |
Turn to the right |
Emphasizes front speakers. |
|
balance (FADER). |
Turn to the left |
Emphasizes rear speakers. |
||
|
||||
|
|
|
|
|
TNS400 15

Mode |
Function |
[VOL] Rotary knob/Function |
||
|
|
|
|
|
|
Accentuates low |
|
|
|
|
and high frequencies when |
Turn to the right |
ON |
|
LOUD |
the volume is low. |
|
|
|
When loudness is ON, |
|
|
||
(LOUDNESS) |
|
|
||
the apparent deficiency |
|
|
||
|
Turn to the left |
OFF |
||
|
in the high sounds is |
|||
|
|
|
||
|
compensated for. |
|
|
|
|
|
|
|
|
SVC |
Sets the volume for each of |
Turn to the right |
Increases the SVC setting |
|
level |
||||
(Source Volume |
the audio sources. (Except |
|
||
|
|
|||
Turn to the left |
Decreases the SVC setting |
|||
Control) |
for FM) |
|||
|
level |
|||
|
|
|
||
|
|
|
|
|
4.5. Telephone muting function
When you receive an incoming phone call, the volume of the audio function is reduced to zero. This function is effective when the car telephone is connected to the main unit with a cable. Upon receiving a telephone call, the sound muting function comes ON. When the mute function is ON, “TELMUTE” is displayed. When the telephone call ends, the mute function goes OFF and the volume setting in use immediately before the phone call was received is restored.


 Caution: While driving a vehicle, use a hands-free kit for phone calls to avoid danger.
4.6. Steering remote switch controls
The compatibility of the main unit’s various modes and the steering remotes installed on your vehicle are as follows:
Switch |
Button |
|
|
|
Mode |
|
|
|
|
|
|
|
|
|
|
|
|||
Name*1 |
operation |
Tuner |
CD |
MP3/ |
AUX |
iPod |
USB |
Power |
|
|
|
WMA |
OFF |
||||||
|
|
|
|
|
|
|
|||
|
|
|
|
|
|
|
|
|
|
|
|
PRESET |
|
|
|
|
|
|
|
< |
Press |
CHANNEL |
TRACK UP |
FILE UP |
- |
TRACK UP |
FILE UP |
- |
|
|
UP |
|
|
|
|
|
|
||
(TRACK) |
|
|
|
|
|
|
|
||
|
|
|
|
|
|
|
|
||
Press and |
SEEK UP |
FAST UP |
FOLDER |
- |
FAST UP |
FAST UP |
- |
||
|
|||||||||
|
hold |
UP |
|||||||
|
|
|
|
|
|
|
|||
|
|
|
|
|
|
|
|
|
|
|
|
PRESET |
TRACK |
FILE |
|
TRACK |
FILE |
|
|
|
Press |
CHANNEL |
- |
- |
|||||
< |
DOWN |
DOWN |
DOWN |
DOWN |
|||||
|
DOWN |
|
|
||||||
(TRACK) |
|
|
|
|
|
|
|
||
|
|
|
|
|
|
|
|
||
Press and |
SEEK |
FAST |
FOLDER |
- |
FAST |
FAST |
- |
||
|
|||||||||
|
hold |
DOWN |
DOWN |
DOWN |
DOWN |
DOWN |
|||
|
|
|
|||||||
|
|
|
|
|
|
|
|
|
16 TNS400

Switch |
Button |
|
|
|
Mode |
|
|
|
|
|
|
MP3/ |
|
|
|
Power |
|||
Name*1 |
operation |
Tuner |
CD |
AUX |
iPod |
USB |
|||
WMA |
OFF |
||||||||
|
|
|
|
|
|
|
|||
|
|
|
|
|
|
|
|
|
|
|
Press |
VOLUME |
VOLUME |
VOLUME |
VOLUME |
VOLUME |
VOLUME |
- |
|
|
UP |
UP |
UP |
UP |
UP |
UP |
|||
+ |
|
|
|||||||
|
|
|
|
|
|
|
|
||
|
GRADUALLY |
GRADUALLY |
GRADUALLY |
GRADUALLY |
GRADUALLY |
GRADUALLY |
|
||
(VOL) |
Press and |
|
|||||||
INCREASES |
INCREASES |
INCREASES |
INCREASES |
INCREASES |
INCREASES |
- |
|||
|
hold |
||||||||
|
VOLUME |
VOLUME |
VOLUME |
VOLUME |
VOLUME |
VOLUME |
|
||
|
|
|
|||||||
|
|
|
|
|
|
|
|
|
|
|
Press |
VOLUME |
VOLUME |
VOLUME |
VOLUME |
VOLUME |
VOLUME |
- |
|
|
DOWN |
DOWN |
DOWN |
DOWN |
DOWN |
DOWN |
|||
- |
|
|
|||||||
|
|
|
|
|
|
|
|
||
|
GRADUALLY |
GRADUALLY |
GRADUALLY |
GRADUALLY |
GRADUALLY |
GRADUALLY |
|
||
(VOL) |
Press and |
|
|||||||
DECREASES |
DECREASES |
DECREASES |
DECREASES |
DECREASES |
DECREASES |
- |
|||
|
hold |
||||||||
|
VOLUME |
VOLUME |
VOLUME |
VOLUME |
VOLUME |
VOLUME |
|
||
|
|
|
|||||||
|
|
|
|
|
|
|
|
|
|
|
Press |
CHANGE |
CHANGE |
CHANGE |
CHANGE |
CHANGE |
CHANGE |
POWER |
|
|
|
ON IN |
|||||||
|
|
||||||||
|
|
TO THE |
TO THE |
TO THE |
TO THE |
TO THE |
TO THE |
||
MODE |
Press and |
THE |
|||||||
NEXT |
NEXT |
NEXT |
NEXT |
NEXT |
NEXT |
||||
|
hold |
LAST |
|||||||
|
MODE |
MODE |
MODE |
MODE |
MODE |
MODE |
|||
|
|
MODE |
|||||||
|
|
|
|
|
|
|
|
||
|
|
|
|
|
|
|
|
|
|
|
Press |
MUTE |
MUTE |
MUTE |
MUTE |
MUTE |
MUTE |
- |
|
MUTE |
|
|
|
|
|
|
|
|
|
Press and |
- |
- |
- |
- |
- |
- |
- |
||
|
hold |
||||||||
|
|
|
|
|
|
|
|
||
|
|
|
|
|
|
|
|
|
|
|
|
|
|
|
|
|
|
POWER |
|
|
|
POWER |
POWER |
POWER |
POWER |
POWER |
POWER |
ON IN |
|
|
Press |
THE |
|||||||
|
OFF |
OFF |
OFF |
OFF |
OFF |
OFF |
|||
POWER |
|
LAST |
|||||||
|
|
|
|
|
|
|
|||
|
|
|
|
|
|
|
|
MODE |
|
|
|
|
|
|
|
|
|
|
|
|
Press and |
- |
- |
- |
- |
- |
- |
- |
|
|
hold |
||||||||
|
|
|
|
|
|
|
|
||
|
|
|
|
|
|
|
|
|
*1: Switch names change depending on vehicle model.
TNS400 17

4.7. Switching between the audio and navigation screen
Each time you press the [SCREEN] button the display switches between the audio screen and the navigation screen.
4.8.Turning the TomTom display on and off
1.While the TomTom display is OFF, press the [SCREEN] button.
The TomTom display will come ON.
2.Press the [SCREEN] button for longer than one second while the TomTom display is ON.
The TomTom display will go OFF.


 Note: For details on using the TomTom, refer to the operation manual of the TomTom.
4.9.Switching between left and right speaker output for the navigation voice
Voice guidance speaker output can be switched between the right and left speakers.
1.Press the [SOURCE/PWR] button for more than one second to turn the audio mode OFF (“GOOD BYE” will momentarily be displayed).
18 TNS400

2.You can switch between right and left speakers by pressing the [FUNC/AF] button and the [SCREEN] button simultaneously for more than 3 seconds.
RIGHT ↔ LEFT
RIGHT: Output from the right front speaker LEFT: Output from the left front speaker
 Attention: The [SOURCE/PWR] button must be off prior to using this feature. (Press [SOURCE/ PWR] button for more than one second - “GOOD BYE” will momentarily be displayed).
4.10. Selecting the dimmer setting
In order to make the screen easier to view, the screen brightness will change when the vehicle lights (side lights, tail lights, license plate lamp) are lit.
1.Press the [SOURCE/PWR] button for more than one second to turn the audio mode OFF (“GOOD BYE” will momentarily be displayed).
2.You can switch the dimmer setting on or off by pressing the [MUTE] button and the [FUNC/AF] button simultaneously for more than 3 seconds.
DIMM ON ↔ DIMM OFF ON: Dimmed
OFF: Not dimmed
 Attention: The [SOURCE/PWR] button must be off prior to using this feature. (Press [SOURCE/ PWR] button for more than one second - “GOOD BYE” will momentarily be displayed).


 Note: The brightness and day/night view of the TomTom display can be changed in conjunction with the dimmer setting. They can also be changed manually from TomTom. See the manual for the TomTom for information about “Docking Preferences”.
4.11. Detaching the TomTom
Using the TomTom
The navigation function can still be used even if the TomTom is detached from the main unit.
How to detach the TomTom from the main unit
1.Press the [Release] button.
The right end of the TomTom detaches from the body of the main unit.
TNS400 19
2.Remove the TomTom.
Hold the TomTom on the right side, lift up and pull it toward you to remove it.
 Attention:
•When the TomTom is removed, do not touch the back of it.
•When attaching the TomTom, do not press the monitor display.
•If the TomTom gets wet, do not attach it to the main unit.
•After removing the TomTom from the main unit, you are recommended to use the optional Audio Cover for the main unit.
How to insert the TomTom
1.Insert the left end of the TomTom into the main unit.
Engage the catch at the left end of the TomTom with the lock on the main unit.
2.Insert the TomTom.
Press the right end of the TomTom until it clicks into place.
4.12.How to tilt the front panel
Press and hold the [  (OPEN/EJECT)] button.
The front panel will tilt upwards one step at a time into one of the 6 positions.


 Caution: When tilting the front panel, make sure that the USB memory is surely extracted. The USB memory may interfere with other objects and this may damage the USB memory.
20 TNS400
4.13. About the hands-free microphone
The main unit is equipped with a built-in hands-free microphone. For details on using the handsfree microphone, refer to the operation manual of the TomTom.
Built-in hands-free microphone
 Attention: If you mistake the hands-free microphone for the [Reset] button etc. and press the microphone with a sharp object, it may be damaged.
4.14. Common operations
About SCREEN button
Using the [SCREEN] button, the display on the TomTom can be switched between the audio and navigation screen.
About FUNC/AF button
Using the [FUNC/AF] button, various settings (e.g. random, scan) can be made.
•Press the [FUNC/AF] button repeatedly until the item you want to set is displayed.
•When the item you want to set is displayed, press the [SELECT (Right/Left)] button and then press the [ENTER] button to confirm.
About the rotary select mode
Pressing the [MODE/PTY] button will allow the channel or track select modes to be used. In the rotary select mode, you can select a preset channel (or a track) with the [VOL] rotary knob.
•Press the [MODE/PTY] button. In the rotary select mode, “ ” will blink on the sub display.
•Select an item (preset channel or a track) with the [VOL] rotary knob and then press the [ENTER] button to confirm.
Switching text display
By pressing the [TP/TEXT] button for a longer time, the displayed information can be scrolled to confirm and the display style of the audio related information can be changed.
TNS400 21

5. How to operate the tuner
5.1. Listening to the tuner
1. Press the [SOURCE/PWR] button to switch to tuner mode.
2. Press the [BAND] button to switch to the desired band.
Press the [BAND] button to switch the band in the following sequence: FM1 → FM2 → FM3 → AM (LW/MW) → FM1 → ...
5.2. Tuning to a station
Tuning to a station manually
Each pressing of the [SELECT(Right/Left)] button will change the frequency by one step.
Right: Tunes to higher frequencies. Left: Tunes to lower frequencies.
Tuning to a station automatically
Press the [SELECT(Right/Left)] button for more than one second.
Receives stations with strong reception.
Right: Starts searching toward higher frequencies.
Left: Starts searching toward lower frequencies.
 Attention: At times, it may be difficult to maintain optimum reception because the antenna affixed to your vehicle is constantly in motion (relative to the broadcast antenna), encountering continuous variation in the strength of the radio signals. Other factors affecting reception include interference from natural obstacles, sign posts, etc.
5.3. Calling up preset channels
1.Press the [MODE/PTY] button to select the preset channel mode.
2.Turn the [VOL] rotary knob to call up the station registered for a preset channel.
3.Press the [ENTER] button.
The registered preset channel will be selected and the corresponding station will be received. Six stations can be memorized for each of FM 1, 2 and 3, and six stations can be memorized for AM (LW/MW) making a total of 24 stations.
22 TNS400
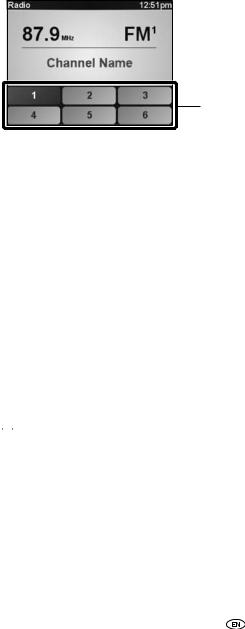
5.4. Calling up a preset channel from the TomTom display
Touch the relevant preset switch to call up the station on the audio screen.
Preset switches
5.5. Memorizing stations
Memorizing stations manually
1.Tune into the station to be memorized for the preset channel.
2.Press the [MODE/PTY] button to select the rotary select mode.
3.Turn the [VOL] rotary knob to select one of the preset switches P1 to P6.
4.Press the [ENTER] button until “P MEMORY” appears on the sub display.
The selected station is memorized and the preset registration number and frequency are indicated on the display.
To manually set additional selected stations for the remaining preset channels, repeat this procedure for each channel. If the stations have been stored in memory, pressing a switch from [1] to [6] will tune to that preset station.


 Caution: If the vehicle’s battery is disconnected (for repairs to the vehicle or for removal of the main unit), all stations in memory will be lost. In this case, set the stations in memory again.
Memorizing stations manually on the TomTom display
1.Tune into the station to be memorized.
2.Press the [SCREEN] button and switch the display to the audio screen.
TNS400 23

3.Touch the preset switch where you want to memorize the station until “P MEMORY” appears on the sub display.
The selected station will be memorized.To manually set additional selected stations at the remaining preset channels, repeat this procedure for each channel. Subsequently, when you listen to the radio you will be able to select stations by touching the preset switches.
Memorizing stations automatically
1.Press the [FUNC/AF] button to establish the FUNCTION mode.
2.Press the [FUNC/AF] button until the sub display switches to ASM.
3.Press the [ENTER] button.
After “ASM ON” is displayed, automatic station selection will start. A search will be conducted from the lowest frequency through progressively higher frequencies and stations with strong reception will be memorized for preset registration numbers [1] to [6]. When the operation has ended the “ASM ON” indication will be cleared and the station memorized last (i.e. the one memorized for P6) will continue to be received. Subsequently, when you listen to the radio you will be able to select stations by calling up preset numbers.
 Attention:
•Pressing the preset switches ([1] to [6]) allows you to make one-touch station selections. The frequency of the selected station is displayed on the preset switch.
•When a new station is set in memory, the station previously set in memory will be deleted.
•If there are fewer than six receivable stations, the stations set in the remaining switches will remain unchanged.


 Caution: If the vehicle’s battery is disconnected (for repairs to the vehicle or for removal of the main unit), all stations in memory will be lost. In this a case, set the stations in memory again.
5.6. Preset station scan
This function enables reception of all the stations in the preset switches to be played for five seconds each.
1.Press the [FUNC/AF] button to establish the FUNCTION mode.
2.Press the [FUNC/AF] button until the sub display switches to P SCAN.
3.Press the [ENTER] button.
“P SCAN” will be displayed and the stations memorized for preset channels P1 to P6 will be called up in order and received for five seconds each. To cancel the preset scan, press the [FUNC/AF] button.
24 TNS400

5.7. Receiving RDS data
Setting AF (Alternative Frequency) / REG (Regional)
When AF function is ON, the unit automatically switches to the frequency where the best reception status for the station you are currently listening to is found. By default, the AF function is ON. Some stations may broadcast different programs using different frequencies according to the area. When the REG function is ON, you can continue to listen to the same program.
Function |
Operation |
|
|
Setting AF |
Press the [FUNC/AF] button for longer than one second and select |
(Alternative |
an item. |
Frequency)/ Setting |
Repeatedly pressing the [FUNC/AF] button will cycle you through the |
REG (REGIONAL) |
following options. |
|
AF-ON/REG-OFF → AF-ON/REG-ON → AF-OFF/REG-OFF → |
|
AF-ON/REG-OFF... |
|
When the AF function is ON: The “AF” indicator is lit on the sub display. |
|
When the REG function is ON: The “REG” indicator is lit on the sub |
|
display. |
|
|
Setting TP (Traffic Program) / TA (Traffic Announcement) to receive traffic information
With the TP/TA function, you can receive the traffic information manually or automatically.
Function |
Operation |
|
|
Setting the TP |
Press the [TP/TEXT] button and select an item. |
(traffic program)/ |
In FM radio mode: |
TA (traffic |
TP OFF/TA OFF → TP ON/TA OFF → TP ON/TA ON* → TP OFF/TA OFF ... |
announcement) |
When TP is set to ON and TA is set to OFF, you can tune into a TP station |
|
by executing the SEEK operation (TP SEEK). |
|
“TP SEEK” is displayed during the search for the TP station. When both |
|
TP and TA are set to ON, the radio seeks a TP station automatically |
|
and “TA” blinks until the traffic information is received. The sounds are |
|
muted during the search for the TP station or when TA is set to on. |
|
* When both TP and TA are set to ON, only the “TA” is lit. |
|
Other than in AM/FM radio mode: |
|
TP OFF/TA OFF → TP ON/TA ON → TP OFF/TA OFF ... |
|
When both TP and TA are set to ON, “TA” lights and a TP station will be |
|
searched for in the background of the current source mode. |
|
If traffic information is received, the audio source mode is changed to |
|
FM radio automatically and you can listen to it. |
|
|
TNS400 25

5.8. EON (Enhanced other network)
If the current TP station is not broadcasting traffic information or if the signal becomes weak when TP or TA is set to ON, the system will automatically search for another suitable TP station that is broadcasting traffic information. “EON” is displayed while this function is operating. When the current traffic information broadcast is finished, the system returns to its previous TP station.
5.9. Setting PTY (program type)
With RDS stations, the name of the broadcasting program service (PS) and program type information (PTY) are transmitted and can be displayed on the unit’s sub display. PTY can be displayed by following the steps below.
Function |
|
|
|
|
|
Operation |
|||
|
|
|
|
|
|
|
|
|
|
Displaying the |
Press the [MODE/PTY] button for more than one second. |
||||||||
PTY of the current |
The PTY name of the RDS station currently being received is displayed, |
||||||||
station |
and the “PTY” indicator lights on the sub display. If the PTY signal |
||||||||
|
cannot be received, “NO PTY” is displayed. |
||||||||
|
|
|
|
|
|
|
|
|
|
PTY SEEK |
1. Press the [MODE/PTY] button while the genre name of the RDS |
||||||||
|
station is displayed. |
||||||||
|
Repeatedly pressing the [MODE/PTY] button will cycle you through |
||||||||
|
the following options. |
||||||||
|
NO-PTY |
|
NEWS |
|
SPORTS |
|
TALK |
||
|
|
|
|
||||||
|
|
|
|
|
|
|
|
|
|
|
|
|
|
|
|
|
|
POP |
|
|
|
|
|
|
|
|
|
||
|
|
|
|
|
|
|
|
|
|
|
|
|
|
|
|
|
CLASSICS |
||
|
|
|
|||||||
|
|
|
|
||||||
|
2. While the above (NEWS, SPORTS, TALK, POP and CLASSICS) are |
||||||||
|
displayed, press the [SELECT (Right/Left)] button for more than |
||||||||
|
one second. |
||||||||
|
The SEEK function will start within the selected PTY. |
||||||||
|
If an RDS station within the selected PTY cannot be found, |
||||||||
|
“NOTHING” will be displayed. |
||||||||
|
|
|
|
|
|
|
|
|
|
26 TNS400
6. How to operate the CD/MP3/WMA player
6.1. About compact discs
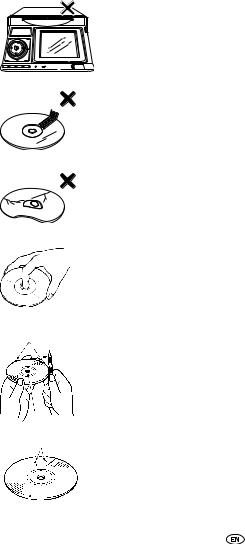
•The signal recorded on a compact disc is read by a laser beam, so nothing touches the disc surface. A scratch on the recorded surface or a badly warped disc may cause impaired sound quality or intermittent playback. Observe the following precautions to ensure high quality sound performance:
Rough edges
 Ballpoint
  pen
pen
Rough edges
Flakes
Recorded surface
•Do not leave an ejected disc in the disc slot for very long; the disc may warp. Discs should be stored in their cases and kept away from high temperature and humidity.
•Do not stick pieces of paper or tape on disc. Do not write on or scratch either side of a disc.
•Discs spin at a high speed inside the main unit. Keep cracked and warped discs out of the player to avoid damage to the main unit.
•Avoid touching the recorded surface when handling a disc; handle discs by their edges.
•You may notice that some brand new discs are rough around the center hole or outside edge. Remove the rough edges with the side of a ballpoint pen, etc. Rough edges may prevent proper loading in the main unit. Flakes from the rough edges may also stick to the recorded surface and interfere with playback.
TNS400 27
•Do not use accessories (stabilizers, protective seals, laser lens cleaners, etc.) sold for “improving sound performance” or “protecting CDs.” The changes in CD thickness or outside dimensions made by these accessories may cause problems in the player.
•Please be sure NOT to attach any ring-shape protector (or other accessory) to your discs. Those protectors are commercially available and said to protect disc and to improve sound quality (and
antivibration effect), but they can do more harm than good in regular use. The most common problems are disc insertion, disc ejections, and won’t play problems due to the protector ring coming off in the disc mechanism.
•Do not use a CD with glue or remnants of adhesive tape or labels adhering to it. They may cause the CD to get stuck inside or damage the main unit.


 OKAY
OKAY
NO
GOOD
•When removing the ejected disc, pull it straight out along the slot. Pressing downward in the process may scratch the recorded surface of the disc.
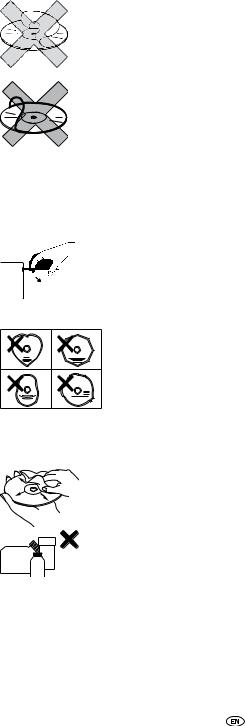
•Specially-shaped CDs, like heart-shaped or octagonal CDs, cannot be played. Do not attempt to play them, even with an adapter, since they may damage the player.
6.2. About cleaning a CD
• Use a commercially available compact disc cleaner to clean a CD, wiping gently from the center to the edge.
XXXX |
XXXX |
|
XXXX
•Do not use benzene, thinner, LP record spray or other cleaners on CDs. They may damage a CD’s finish.
28 TNS400

6.3. About MP3/WMA
 Attention: The making of MP3/WMA files by recording from sources such as broadcasts, records, recordings, videos and live performances without permission from the copyright holder for uses other than personal enjoyment is prohibited.
What is MP3/WMA?
MP3 (MPEG Audio Layer III) is a standard format for audio compression technology. By using MP3 a file can be compressed to one-tenth the size of the original.
WMA (Windows MediaTM Audio) is format for audio compression technology. WMA files can becompressed to a size smaller than MP3 files.This main unit has limitations on the MP3/WMA file standards and recorded media and formats that can be used.
Playable MP3 file standards
•Supported standards: MPEG-1 Audio Layer III
•Supported sampling frequencies: 44.1, 48 (kHz)
•Supported bit rate: 64, 80, 96, 112, 128, 160, 192, 224, 256, 288, 320 (kbps) * Supports VBR (64~320 kbps).
*Does not support free format.
•Supported channel modes: monaural, stereo, joint, dual
Playable WMA file standards
•Supported standards: WMA Ver. 7
WMA Ver. 8
WMA Ver. 9
•Supported sampling frequencies: 32, 44.1, 48 (kHz)
•Supported bit rate: 48, 64, 80, 96, 128, 160, 192, 256, 320 (kbps)
*Supports VBR (48~192 kbps).
*Does not support lossless compression.
*Does not support WMA files recorded at a frequency of 48 kHz with a bit rate of 96 kbps.
ID3/WMA tag
MP3/WMA files have an “ID3/WMA Tag” that allows input of information so that data such as songtitle and artist can be saved.This main unit supports ID3v. 1.0, 1.1 and WMA tags.
TNS400 29
 Loading...