


Blu-ray Disc Player
BDX1100KC
Owner’s Manual
TM

English
Contents |
|
|
1 |
Important.................................................................................................................. |
3-4 |
|
Safety and important notice........................................................................................... |
3-4 |
2 |
Your Product.............................................................................................................. |
5-7 |
|
Regions codes.................................................................................................................. |
5 |
|
Product overview.............................................................................................................. |
6 |
|
Remote Control................................................................................................................ |
7 |
3 |
Connections................................................................................................................ |
8-9 |
|
Connecting to a TV........................................................................................................... |
8 |
|
Optional Connection......................................................................................................... |
9 |
|
Inserting an SD Card........................................................................................................ |
9 |
|
Connect power................................................................................................................. |
9 |
4 |
Preparation.................................................................................................................. |
10 |
|
Prepare the remote control.............................................................................................. |
10 |
|
Setting up the player...................................................................................................... |
10 |
5 |
Playback................................................................................................................. |
11-13 |
|
Playback Functions..................................................................................................... |
11-13 |
6 |
Customizing............................................................................................................. |
14-20 |
|
General Setting.......................................................................................................... |
14-17 |
|
Display Setting........................................................................................................... |
18-19 |
|
Audio Setting............................................................................................................. |
19-20 |
|
System information......................................................................................................... |
20 |
7 |
Specification................................................................................................................ |
21 |
8 |
Troubleshooting...................................................................................................... |
22-23 |
9 |
Glossary................................................................................................................... |
24-25 |
10 License Information................................................................................................ |
26-44 |
|
11 Canadian Warranty Information........................................................................... |
45-46 |
|
1 Important
Safety and important notice
WARNING:TO REDUCE THE RISK OF FIRE OR ELECTRIC SHOCK, DO NOT EXPOSE THIS APPARATUS TO RAIN OR MOISTURE.
CAUTION
RISK OF ELECTRIC SHOCK
DO NOT OPEN
CAUTION:
TO REDUCE THE RISK OF ELECTRIC SHOCK, DO NOT
REMOVE COVER (OR BACK). NO USER SERVICEABLE
PARTS INSIDE. REFER SERVICING TO QUALIFIED
SERVICE PERSONNEL.
The important note is located on the rear or bottom of the cabinet.
The lightning flash with arrowhead symbol, within an equilateral triangle, is intended to alert the user of the presence of uninsulated 'dangerous voltage' within the product' s enclosure that may be of sufficient magnitude to constitute a risk of electric shock to people.
The exclamation point within an equila-teral triangle is intended to alert the user of the presence of important operating and maintenance (servicing) instructions in the literature accompanying the appliance.
The symbol for CLASS II (Double Insulation)
ENERGY STAR® qualified DVD. Products that earn the
ENERGY STAR prevent green house gas emissions by meeting strict energy efficiency guidelines set by the U.S.
Environmental Protection Agency and the U.S. Department of Energy. ENERGY STAR and the ENERGY STAR mark are registered U.S. marks.
WARNING: TO REDUCE THE RISK OF FIRE OR ELECTRIC SHOCK, DO NOT EXPOSE THIS APPLIANCE TO RAIN OR MOISTURE. DANGEROUS HIGH VOLTAGES ARE PRESENT INSIDE THE ENCLOSURE. DO NOT OPEN THE CABINET. REFER SERVICING TO QUALIFIED PERSONNEL ONLY. CAUTION: TO PREVENT ELECTRIC SHOCK, MATCH WIDE BLADE OF PLUG TO WIDE SLOT, FULLY INSERT. ATTENTION: POUR EVITER LES CHOCS ELECTRIQUES, INTRODUIRE LA LAME LA PLUS LARGE DE LA FICHE DANS LA BORNE CORRESPONDANTE DE LA PRISE ET POUSSER JUSQU' AU FOND.
CAUTION: PLEASE READ AND OBSERVE ALL WARNINGS AND INSTRUCTIONS GIVEN IN THIS OWNER' S MANUAL AND THOSE MARKED ON THE UNIT. RETAIN THIS BOOKLET FOR FUTURE REFERENCE.
CAUTION: USE OF ANY CONTROLS, ADJUSTMENTS, OR PROCEDURES OTHER THAN THOSE SPECIFIED HEREIN MAY RESULT IN HAZARDOUS RADIATION EXPOSURE.
IMPORTANT SAFETY INSTRUCTIONS
1.Read these instructions.
2.Keep these instructions.
3.Heed all warnings.
4.Follow all instructions.
5.Do not use this apparatus near water.
6.Clean only with dry cloth.
7.Do not block any ventilation openings. Install in accordance with the manufacturer’s instructions.
8.Do not install near any heat sources such as radiators, heat registers, stoves, or other apparatus
(including amplifiers) that produce heat.
9.Do not defeat the safety purpose of the polarized or grounding-type plug. A polarized plug has two blades with one wider than the other. A grounding type plug has two blades and a third grounding prong. The wide blade or the third prong are provided for your safety. If the provided plug does not fit into your outlet, consult an electrician for replacement of the obsolete outlet.
10.Protect the power cord from being walked on or pinched particularly at plugs, convenience receptacles, and the point where they exit from the apparatus.
11.Only use attachments/accessories specified by the manufacturer.
12.Use only with the cart,
stand, tripod, bracket, or table specified by the manufacturer, or sold with the apparatus.
When a cart is used, use caution when moving the cart/ apparatus combination to avoid injury from tip-over.
13.Unplug this apparatus during lightning storms or when unused for long periods of time.
14.Refer all servicing to qualified service personnel.
Servicing is required when the apparatus has been damaged in any way, such as power-supply cord or plug is damaged, liquid has been spilled or objects have fallen into the apparatus, the apparatus has been exposed to rain or moisture, does not operate normally, or has been dropped.
Additional Safety Instructions
15.Do not overload wall outlets; extension cords, or integral convenience receptacles as this can result in a risk of fire or electric shock.
16.Apparatus shall not be exposed to dripping or splashing and no objects filled with liquids, such as vases, shall be placed on the apparatus.
17.Keep your fingers well clear of the disc tray as it is closing. Neglecting to do so may cause serious personal injury.
18.Do not place a heavy object on or step on the apparatus. The object may fall, causing serious personal injury and serious damage to the apparatus.
19.Do not use a cracked , deformed, or repaired disc. These discs are easily broken and may cause serious personal injury and apparatus malfunction.
20.If the apparatus should smoke or smell,immediately disconnect the power cord from the wall outlet. Wait until the smoke or smell stops, then ask your dealer for a check and repair. Neglecting to do so may cause fire.
21.While it is thundering, do not touch the connecting cables or the apparatus.
22.Warning: To prevent the spread of fire, keep candles or other open flames away from this product at all times.
CAUTION:
-This Digital Video Disc Player employs a Laser System.
-To ensure proper use of this product, please read this owner’s manual carefully and retain for future reference Should the unit require maintenance, contact an authorized service location.
-Use of controls or adjustments or performance of procedures other than those specified herein may result
English
English
in hazardous radiation exposure.
-To prevent direct exposure to laser beam, do not try to open the enclosure.
-Visible and invisible laser radiation when open and interlocks defeated.
DO NOT STARE INTO BEAM.
FCC NOTICE:
This equipment has been tested and found to comply with the limits for a Class B digital device, pursuant to part 15 of the FCC Rule.
These limits are designed to provide reasonable protection against harmful interference in a residential installation. This equipment generates, uses, and can radiate radio frequency energy and, if not installed and used in accordance with the instructions, may cause harmful interference to radio communications.However, there is no guarantee that interference will not occur in a particular installation. If this equipment does cause harmful interference to radio or television reception, which can be determined by turning the equipment off and on, the user is encouraged to try to correct the interference by one or more of the following
measures:
-Reorient or relocate the receiving antenna.
-Increase the separation between the equipment and receiver.
-Connect the equipment into an outlet on a circuit different from that to which the receiver is connected.
-Consult the dealer or an experienced radio/TV technician for help.
Changes or modifications made to this equipment, not expressly approved by Toshiba, or parties authorized by Toshiba, could void the user' s authority to operate the equipment.
Be aware that this equipment is still powered when in standby mode. To disconnect this equipment completely from the mains power, pull out the power plug from the wall outlet.
The mains plug is used as the disconnect device, the disconnect device shall remain readily operable.
Note about Recycling
This unit’s packaging materials are recyclable and can be reused. Please dispose of any materials in accordance with your local recycling regulations.
Batteries should never be thrown away or incinerated but disposed of inaccordance with your local regulations concerning chemical wastes.
Copyright notice
This product incorporates copyright
protection technology that is protected by U.S. patents and other intellectual property rights. Use of this copyright protection technology must be authorized by Rovi Corporation, and is intended for home and other limited viewing uses only unless otherwise authorized by Rovi Corporation. Reverse engineering or disassembly is prohibited.
Notice for Trademark
HDMI, the HDMI logo and High-Definition Multimedia
Interface are trademarks or registered trademarks of HDMI Licensing LLC in the United States and other countries.
‘Blu-ray Disc’ and ‘Blu-ray Disc’ logo are trademarks.
Manufactured under license from Dolby Laboratories. Dolby and the double-D symbol are trademarks of Dolby Laboratories.
Manufactured under license under U.S. Patent #’s: 5,451,942; 5,956,674; 5,974,380; 5,978,762; 6,226,616; 6,487,535; 7,392,195; 7,272,567; 7,333,929; 7,212,872 & other U.S. and worldwide patents issued & pending. DTS and the Symbol are registered trade-marks, & DTSHD, DTS-HD Master Audio | Essential and the DTS logos are trademarks of DTS, Inc. Product includes software. © DTS, Inc. All Rights Reserved.
BONUSVIEW ™
‘BD-Live’ and the ‘BONUSVIEW’ are trademarks of Blu-ray Disc Association.
‘AVCHD’ and the ‘AVCHD’ logo are trademarks of Panasonic Corporation and Sony Corporation.
‘DVD Video’ is a trademark of DVD Format/Logo Licensing Corporation.
Oracle and Java are registered trademarks of Oracle and/or its affiliates. Other names may be trademarks of their respective owners.
2 Your Product
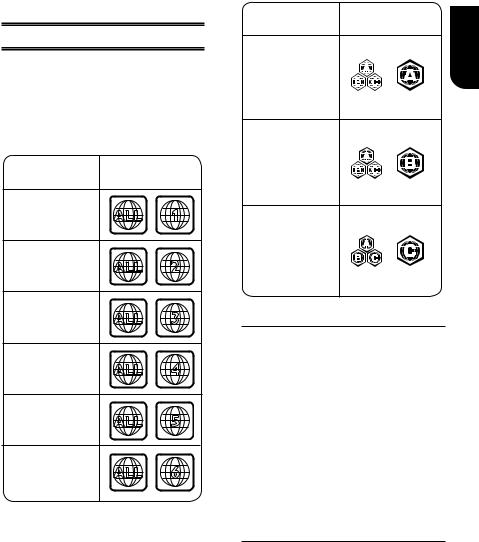
Regions Codes
Both the Blu-ray Disc player and the discs are coded by region. These regional codes must match in order to play the disc. If the codes do not match, the disc will not play. The Region Number for this Blu-ray Disc player is described on the rear panel of the Blu-ray Disc player.
Region |
DVD discs that |
||
|
can be played |
||
U.S.A. and |
ALL |
1 |
|
Canada regions |
|||
U.K., |
|
2 |
|
Europe regions and |
ALL |
||
Japan |
|||
|
|
||
Asia Pacific, |
|
|
|
Taiwan, Korea |
ALL |
3 |
|
|
|||
Australia, |
|
|
|
New Zealand, |
ALL |
4 |
|
Latin America |
|||
Russia and |
ALL |
5 |
|
India regions |
|||
China, Calcos Islands, |
ALL |
6 |
|
Walls and Futuna |
|||
Islands |
|
|
|
Region |
BD discs that |
|
|
can be played |
English |
||
|
|||
North America, |
|
||
|
|
||
Central America, |
|
|
|
South America, |
|
|
|
Korea, Japan, Taiwan, |
|
|
|
Hong Kong and |
|
|
|
South East Asia. |
|
|
|
Europe, Greenland, |
|
|
|
French territories, |
|
|
|
Middle East, Africa, |
|
|
|
Australia and |
|
|
|
New Zealand. |
|
|
|
India, China, Russia, |
|
|
|
Central and |
|
|
|
South Asia. |
|
|
Feature highlights
High-Definition entertainment
Watch high-definition content disc with HDTV (High Definition Television). Connect it through a high speed HDMI cable (1.3 or category 2). You can enjoy excellent picture quality up to 1080p
resolution with the frame rate of 24 frames per second with progressive scan output.
BD-Live
Connect this player to the movie studios website via the LAN jack to access a variety of up-to-date content (e.g. refreshed previews and exclusive special features).
Blu-ray Disc Java
Blu-ray Disc Java(BD-J) Application
The BD-ROM format supports Java for interactive functions. “BD-J” offers content providers almost unlimited functionality when creating interactive BD-ROM titles.
English
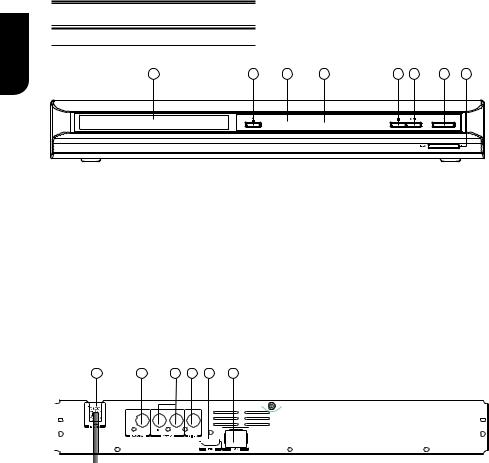
Product overview
Main Unit
8 |
7 |
6 |
5 |
4 |
3 |
2 |
1 |
NO |
Control |
Function |
|
|
|
A |
SD card slot |
Insert an SD card |
|
|
|
B |
1 |
Turns the power on or restores the unit to the standby mode. |
|
|
|
C |
B/X |
Playback/Pause. |
|
|
|
D |
x |
Stop play. |
|
|
|
E |
Display panel |
Show information about the current status of this unit. |
|
|
|
F |
IR Sensor |
Point the remote control at the IR sensor. |
|
|
|
G |
Z |
Open or close the disc compartment. |
|
|
|
H |
Disc compartment |
Loads a disc into the disc drive. |
|
|
|
1 2 3 4 5 6
|
|
|
|
|
|
|
|
|
|
|
|
|
|
|
|
|
|
|
|
|
|
|
|
|
|
|
|
|
|
|
|
|
|
|
|
|
|
|
|
|
|
|
|
|
|
|
|
|
|
|
|
|
|
|
|
NO |
Control |
Function |
|
||||||
|
|
|
|
|
||||||
|
A |
AC power cord |
Connects to a standard AC outlet. |
|
||||||
|
|
|
|
|
||||||
|
B |
COAXIAL jack |
Output digital audio signals when connecting the coaxial digital cable. |
|
||||||
|
|
|
|
|
||||||
|
C |
ANALOG AUDIO OUTPUT |
Outputs audio signals to a connected TV or AV amplifiier. |
|
||||||
|
|
|
jacks |
|
|
|
|
|||
|
|
|
|
|
||||||
|
D |
VIDEO OUTPUT jack |
Output video signals to a connected TV. |
|
||||||
|
|
|
|
|
||||||
|
E |
HDMI OUTPUT jack |
Outputs video/audio signals to a connected TV, monitor or AV amplifier. |
|
||||||
|
|
|
|
|
|
|
Connect to a TV, monitor or AV amplifier equipped with HDMI input. |
|
||
|
F |
LAN jack |
Use this to connect to a network with an always-on broadband connection. It is |
|
||||||
|
|
|
|
|
|
|
reserved for future usage of BD-Live.. |
|
||
|
|
|
|
|
|
|
|
|
|
|

Remote Control
REMOTE SIGNAL EMITTER
• Point remote control to the sensor on the front panel
ON / STANDBY
• To switch the BD player to ON or standby mode
SETUP
Enters or exits the system setup menu
MC(Media Center)
• To OPEN/CLOSE Media Center
PIP AUDIO
 Switch the secondary audio of secondary video(PIP) to on or off
SEARCH
• To search a title, chapter, track or playing time
HDMI
 To change resolution of HDMI video output to fit TV. Such as 1080P, 1080i… etc.
PREV & NEXT
• Skip to previous/next chapter/ title/track
 STOP
STOP
• Stop playback
 Instant replay/instant/ search
F.R & F.F
Fast reverse/ fast forward
PLAY/PAUSE
• Start/Pause playback
PROGRAM
• To access program list.
BOOKMARK
• To bookmark at any point during playback
ZOOM
• To zoom out/in
DIGEST
• To access JPEG thumbnail view during playback
Number Buttons
 Select numbered items in a menu
  Press to enter track/ chapter/ title
numbers/password directly
• Do a slow forward during normal
playback
• Advance the picture frame by frame during pause mode
English
OPEN/CLOSE
• Open/ Close the disc tray
AUDIO
• To select the sound stream; press repeatedly to select different audio streams available in your disc
SUBTITLE
• To display subtitle; press repeatedly to select different subtitles available in your disc
ANGLE
• Switch the camera angle during playback
CLEAR
• To clear an entry or the bookmark and program you set
REPEAT
• Selects various repeat mode.
REPEAT A-B
• To repeat from A to B
PIP (Picture in Picture)
• Switch on or off the secondary video
RETURN
• Return to previous menu
POP MENU/MENU
• To display a menu included on many BD/DVD video discs
TOP MENU
• To display the disc title during playback
DISPLAY
• To display a window to locate a title, chapter or track
OK
•Acknowledge/ Confirm menu selection
•Navigation/ Cursor buttons for moving
to the left / right / up / down
• Press
 during JPEG playback to rotate the
current photo track, but the JPEG playback will be paused

3 Connections
|
Make the following connection to use this |
|
English |
product. |
|
Connecting to a TV |
||
|
||
|
Connect the product to TV to view disc play, |
|
|
Select the best video connection that TV |
|
|
can support: |
|
|
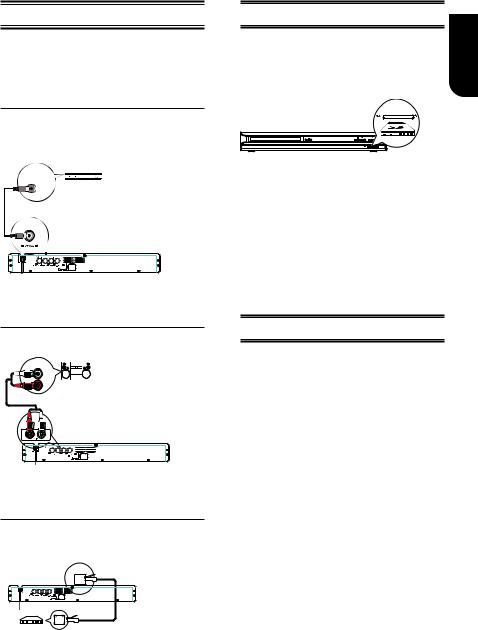
Option 1: Connect to the composite video |
|
|
jack(VIDEO) |
|
|
Option 2: Connect to the HDMI Jack |
|
|
Option 1: Connect to the composite |
|
|
video jack (VIDEO) |
|
|
You can connect this product to a TV |
|
|
through the composite video cable which |
|
|
provides standard picture quality. |
|
|
AUDIO IN |
|
|
VIDEO IN |
1. Connect a composite cable from the VIDEO OUTPUT jack and analogue AUDIO OUTPUT jacks on this product to the video input jack(yellow) and audio input
jacks(white/red) on the TV.
Note:
-Connect this unit directly to the TV. If the composite Audio / video cables are connected to a VCR, pictures may be distorted due to the copy right protection system.
Option 2: Connect to the HDMI Jack
This type of connection provides better picture quality
HDMI IN
1. Connect a HDMI cable from the HDMI output jack on this product to the HDMI input jack on the TV.
Notes:
–If the TV has a DVI connector only, connect via an HDMI/DVI adapter. Connect an audio cable for sound output.
–You can optimize the video output by pressing the HDMI button repeatedly to select the best resolution which the TV can support.
–When the player is connected to both VIDEO
OUTPUTjackandHDMIOUTPUTjack,resolutionis set to 720p/1080i/1080p, there will be no video output through VIDEO OUTPUT jack.
Optional Connection
Option 1: Connect to digital amplifier/ receiver
Option 2: Connect to analogue stereo system
Option 3: Connect to network
Option 1: Connect to the digital amplifer/receiver
Route the sound from this player to other device to enhance audio output.
DIGITAL AUDIO
INPUT
COAXIAL
1. Connect a coaxial cable from the COAXIAL jack on this product to the
COAXIAL jack on the device.
Option 2: Connect to an analogue stereo system
AUDIO IN
1. Connect the audio cable from the analogue AUDIO OUT jacks on this product
to the audio input jacks on the system.
Option 3: Connect to network
Connect this product to the network to enjoy BD-Live bonus content.
1. Connect the network cable from the LAN jack on the product to the LAN jack on the
network system.
Inserting an SD Card
An SD card provides an additional memory to software upgrade and enjoy BD-Live bonus content. You can also enjoy playing back MP3/JPEG/MPEG4 files stored in the card.
1. Gently push the SD card, with its label side facing up, into the SD card slot until it clicks.
Notes:
-Insert only SD Card to the SD card slot on this product.
-When you enjoy BD-live bonus content, as your local storage, use a 1 GB or larger SD
Card.
-TOSHIBA does not guarantee 100% compatibility with all SD Cards.
Connect Power
1.Connect the AC power cable to:
-the wall socket.
• The product is ready to be set up for use.
Notes:
–BeforeconnectingtheACpowercord,ensure youhavecompletedallotherconnections.
–Riskofproductdamage!Ensurethatthepower supply voltage corresponds to the voltage printed on the back of the unit.
–The type plate is located on the back of the unit.
English
4 Preparation
|
Always follow the instructions in this chapter |
|
English |
in sequence. |
|
Note: |
||
|
||
|
- Use of controls or adjustments or |
|
|
performance of procedures other than herein |
|
|
may result in hazardous radiation exposure or |
|
|
other unsafe operation. |
|
|
|
|
|
|
|
|
Prepare the remote control |
|
|
|
|
|
|
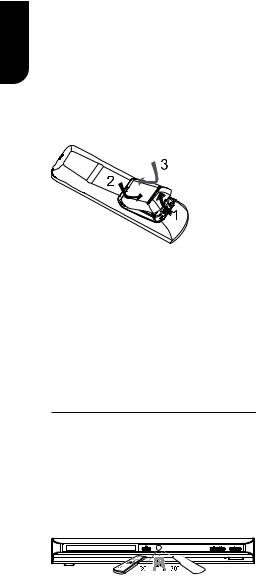
1.Open the battery compartment. 2.Insert two R03 batteries with correct polarity (+/-) as indicated.
3 Close the battery compartment.
Notes:
-If you are not going to use the remote control for a long time, remove the batteries.
-Do not use old and new or different types of batteries in combination.
-Risk of explosion! Keep batteries away from heat,sunshineorfire.Neverdiscardbatteriesin fire.
• The maximum operable ranges from the unit are as follows.
-Line of sight: approx. 9 m
-Either side of the centre: approx. 7 m within 30°
-Above: approx. 7 m within 30°
-Below: approx. 7 m within 30°
7 m |
9 m |
7 m |
Setting up the player
Find the correct viewing channel
1.Press 1 to turn on this product.
2.Turn on the TV and switch to the correct video-in channel (refer to the TV user manual on how to select the correct channel).
Initial Setting
When you turn on this unit for the first time, you need to follow these steps.
1.A welcome page will be displayed when this product is powered on.
2.Press OK to enter language setting.
3.Select your desired language,
resolution and aspect ratio using /, then press OK.
4. Press SETUP to exit the Setup menu.
Use the SETUP menu
1.Press SETUP to display the Setup menu when the BD Player is playing or no disc. And press SETUP to exit the Setup menu.
Tip:
- When playing a high-definition sources, you must press STOP buttontoenterSETUP interface.
Select menu display language
1.Press SETUP
[General Setting] menu is displayed 2.Select [Language], then press 3.Select [OSD], then press .
- The language options may vary for different regions.
4.Press / to select a language, then press OK
Note:
- If this disc player is connected to a HDMI CEC compliant TV, skip this setting. It switches automatically to the same OSD menu language as per your TV setting.
10
5 Playback
Playback Functions
Basic Playback
1.Press button on the front panel or the remote control, your BD player will turn on. The unit will take around 20 seconds to warm up.
2.Turn on the TV, and then select the input setting on the TV that matches the connection method you used to connect your player.
3.Press OPEN/CLOSE Z to slide out the disc tray.
4.Place a disc on the disc tray with the label facing up, and then press OPEN/CLOSE Z to slide back and close the disc tray.
The disc loading time depends on the types of disc you are loading, and loading a Blu-ray Disc will take longer time.
5.If the disc does not start playing
automatically, please press B/X to start playback.
6.If a Blu-ray disc or DVD menu displays, use cursor buttons to select PLAY. Then, press OK to confirm.
7.To eject the disc, press OPEN/CLOSE Z.
Pause playback
1.Press B/X to pause playback. The sound will be muted.
2.Press B/X to resume the playback.
Stop playback
1.Press STOP button once to go to resume mode, the TV screen will show the resume logo.
2.Press STOP twice to stop the playback completely.
3.Press B/X to resume playback from the point where playback is stopped or from the beginning of the disc after the playback is completely stopped.
Not all Blu-ray Discs support the resume feature.
Fast Forward and Fast Reverse
1.Press F.F Mto fast forward through the disc. The fast forward speed changes based on how many times you pressed the button. The speed will increase through the following sequence:
2X, 4X, 8X, 16X, 32X
2.Press B/X to resume playback.
3.Press F.R mto fast reverse through the disc. The fast reverse speed changes based on how many times you pressed the button. The speed will increase through the following sequence:
2X, 4X, 8X, 16X, 32X
4.Press B/X to resume playback.
Instant Search and Instant Replay
1.During playback, press and hold Mbutton, you can skip 30 seconds forward.
2.During playback, press and hold m button, you can instant replay the content from 10 seconds before.
Previous and Next
During playback, press PREV . button, and you can skip back to the previous chapter or track. Each press of this button will allow you to skip a chapter or track till the beginning of the disc.
Press of NEXT > button during playback will allow you to skip the playback to next chapter or track.
Slow Forward
1.Press =B during normal playback. The slow forward speed is 1/16 in default.
2.To change slow forward speed, press =B repeatedly, and the slow forward speed will be changed in the following sequence: 1/16, 1/8, 1/4, 1/2, normal.
3.To exit slow forward mode and return to normal playback, press B/X.
Step Forward
Use this feature to help you to enjoy the video frame by frame.
1.Press B/X during normal playback, then playback will change to pause state.
2.Press =B repeatedly to advance the picture frame by frame.
3.Press B/X to resume normal playback.
HDMI
When there is file or disc being played, it is not allowed to switch resolution through the HDMI button of the Remote Control.
English
11

English
Advanced Playback
DISPLAY
Press this button and the screen will display some information about disc, such as: Title number, Chapter number, Track number, Elapsed Time, Mode, Audio, Angle, and Subtitle languages. Press this button again to turn off the information display.
During DVD/CD playback, you may edit the chapter and track.
REPEAT
Press REPEAT repeatedly to select different repeat modes.
DVD:Repeat Chapter, Repeat Title, and All. VCD PBC Off/CD/JPEG/MP3:Repeat Track and All.
A-B
To play certain section within the video or song, press A-B button to set the start-point. Then, press A-B button again to set the endpoint and complete the setting. The selected section will be played repeatedly.
Press A-B button the third time to cancel this function.
The end point cannot be set until 5 seconds of playback has elapsed from the start point.
SEARCH
During playback, press SEARCH button to edit Title, Chapter, and Time.
Press / and OK button on the remote control to select Title, Chapter, or Time. Then press the numeric buttons or / and then press OK. The playback will skip to the desired location.
For Time Search, press / to select Title or Chapter time search.
SUBTITLE
Press this button repeatedly and the screen will display “X/XX XXX” or “Off”. The “X” indicates the current number of this language; “XX” indicates the total number of language; “XXX” indicates the language. The number of available languages depends on the disc.
RETURN
Press this button to return to the previous on-screen menu in setup menu such as Information, Parental Control, Country Code etc.
During MP3/JPEG/VIDEO playback , press return once, it will return back to Media Center page.
During VCD disc playback and PBC On is selected, press the button to return to PBC Menu.
ANGLE
During playback, press this button to change the angle of the picture. The screen will display “Angle X/X.” The first “X” indicates the
current number of angle, and the second “X” indicates total number of angle.
Not all BD or DVD has the multi-angle feature. The screen will take around 5
seconds to change.
TOP MENU
You may press this button at any time, and the BD or DVD video disc playback will pop up the disc menu.
POP MENU/MENU
During Blu-ray Disc playback, press POP MENU/MENU to display the disc title, and the playback will not be stopped even the menu is on the screen.
1.Press the / / / buttons to select an option, then press OK to confirm.
2.Press POP MENU/MENU to close the menu.
During DVD playback, press POP MENU/MENU to open the disc menu.
During VCD playback, press POP MENU/MENU to switch PBC On/Off.
During displaying SD card and Data Disc file content in media center, press POP MENU/
MENU to add the Photo/Music/Video files to the playlist.
1.Press / / / buttons to select an option under the Photo/Music/Video files.
2.In the file browser, press to select the file(s) to be added to the playlist. "√ "
will appear beside the selected files.
3.Press POP MENU/MENU button, a pop up menu will appear, then press / and OK button to select "Add to Playlist" to add the files to the Playlist. "Select all" and "Clear all" options are also available. Select "Cancel" to exit the pop up menu.
All the selected files will be added to the "Playlist" folder. You can play or delete the files in the playlist.
Press POP MENU/MENU to delete the selected files in"Playlist"
SETUP
Press the SETUP button, and the screen will display some information about the player, such as:
• General Setting
• Display Setting
• Audio Setting
• System Information
PROGRAM
During CD/DVD/VCD playback, you can press this button to edit the sequence of the playlist.
BOOKMARK
During VCD/DVD disc playback,press the BOOKMARK button to add the bookmark; press and hold for a few seconds to display the list of bookmark which you added before on the screen, then you can press the OK button to select the bookmark or CLEAR button to delete the bookmark.
12
AUDIO
Press AUDIO button on the remote control to select the audio streams that set within the Blu-ray or DVD disc.
The screen will display: AUDIO: X / XX XXX XXXX
“X” - the Current Audio Stream Number “XX” - The total number of Audio Stream “XXX” - Audio Language
“XXXX” - Audio Technology
MC
Press this button to play media files in the SD card.
ZOOM
1. Press ZOOM button repeatedly to Zoom in/ out playback in the video.
Zoom mode : Zoom 2x -> Zoom 3x -> Zoom 4x -> Zoom 1/2 -> Zoom 1/3 -> Zoom 1/4.
DIGEST
During playback of JPEG disc, press DIGEST to view a page of 12 thumbnail images.
- Use / / / to select an image. Press OK to view the selected image in fullscreen and subsequent images will be displayed one after another automatically. - Press PREV / NEXT to view the previous or next thumbnail screen.
PIP AUDIO
Press PIP AUDIO button to open the secondary audio of secondary video(PIP’s sub-window video).
OSC
Press OSC to open On Screen Control menu during playback. In this menu, you can make some playback-related control.
The on screen control contains following items:
[Title]: The title in current playback/titles in total. Select your desired title to playback. [Chapter]: The chapter in current playback/ chapters in total. Select your desired chapter to playback.
[Time]: View the elapsed/remaining playback time of title/chapter. Use / to view: the elapsed playback time of title, the remaining playback time of title, the elapsed playback time of chapter, and the remaining playback time of chapter.
[Mode]: Select playback mode among shuffle, random, and normal.
[Audio]: The BD/DVD disc’s soundtrack language. Use / to view the audio available in the disc and select your desired Audio type.
[Angle]: The angle view of current playback/ the angles in total. Please reference Playback>Angle to see more detailed info. Use / to select your desired angle view. [Subtitle]: The Subtitle in current playback. Use / to view the subtitles available in the disc and select your desired subtitle type or turn it off.
[Subtitle Style]: When you play the BD or DVD disc and if it has external subtitle, you will see it in OSC menu.
[Bitrate]:Use / to select your desired Bitrate. [Still Off]: Close the Still feature of DVD disc. For some DVD discs, a certain video picture will be freeze as a still picture during the process of playback to let user better view the certain picture. To continue playback, select Still Off.
[Ins Search]: Instant skip 30 seconds for search.
[Ins Replay]: Replay the content from 10 seconds before.
Tip:
-Thespecifiedoperationforeachitemwillvarywith disctypes.Andsomeitemsareavailableonlywhen the disc is supportable.
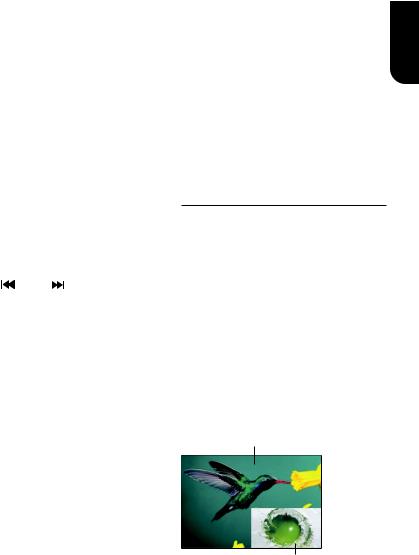
Blu-ray Disc Bonus View
Playing Secondary Video (Picture-in-Picture) and Secondary Audio is for Blu-ray Disc only. Secondary video can be played from a disc compatible with the Picture-in-Picture (PIP) function.
For the playback method, refer to the instructions for the disc.
1.Turn on secondary video by pressing the PIP button.
2.Press the PIP AUDIO button to select the secondary audio, and select an option except Off. The secondary audio is opened, you can hear the disc secondary video sound.
In order to hear the secondary audio, the PIP feature on the disc must be turned on.
3.Press the PIP AUDIO button again to turn off the secondary video.
Primary video
Secondary video
with Secondary Audio
This function is not available when the primary video is played in Search, SlowMotion, or Frame-by-Frame or Fast Forward/ Reverse mode.
To listen to the secondary audio, the digital audio output must be set to "Bitstream", "Re-encode" or "PCM". Otherwise, only the primary audio can be heard.
Notes:
-NotalltheBDdiscscansupportthisfunction. -HighDefinitionPIP(SecondVideo)isnotsupported.
English
13
English
6 Customizing
This section describes the various setting option of this BD player.
If the setup option is grayed out, it means the setting cannot be changed at the current state.
General Setting
1. Press SETUP button on the remote control.The Setup Menu appears.
... General Setting ...
System |
Screen Saver |
On |
Language |
Disc Auto Playback |
On |
Playback |
CEC |
On |
Security |
Easy Setup |
More... |
Network |
Load Default |
More... |
Move cursor key to select menu option |
SETUP |
Exit |
|
then use “OK” key to select |
|||
|
|
2. Press to select an option, then press
to access.
3. Press /to select a setup option and press
4. Select the setting you wish to change and press OK to confirm.
- Press to return to the previous menu.
[System]
To change the following system option to personalize your BD player.
•[Screen Saver]
Turn On or Off the screen saver mode. It helps to protect the TV screen.
{On } – Set the screen saver active after approximately 10 minutes with no operation.
- The BD player will switch to standby mode if there is no operation after the screen saver is engaged for approximately 10 minutes.
{Off } – Turn off the screen saver mode .
•[Disc Auto Playback]
Turn On or Off the disc automatic playback switching mode.
{On} – The disc playback automatically after loading.
{Off} – Turn off disc auto playback mode.
•[CEC]
This player supports REGZA-LINK which uses the HDMI CEC (Consumer
Electronics Control) protocol. You can
use one single remote control to control all REGZA-LINK-compliant devices that are connected through HDMI connectors. {On} - Turns on REGZA-LINK features. -With CEC on, during TV standby with the BD player on, pressing SETUP, PLAY/ PAUSE will power on the TV.
{Off} - Disables REGZA-LINK features.
•[Easy Setup]
Re-configure some settings. It is the same as "Load Default" of steps 4-8.
Tip:
ForsettingosdandTVresolutionandTVaspect.
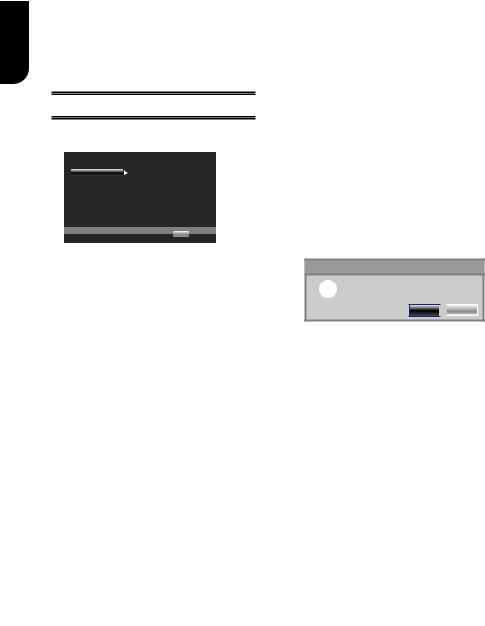
•[Load Default]
Reset all settings of BD player to initial default state.
- Follow the instruction on the TV screen to confirm the default setting operation.
1.Select Load Default.
2.A dialogue box pops up shown as below. Select OK .
Load Default
Do you want to load default?
OK 
 Cancel
3.It may take awhile when loading
default is in progress. Please wait...
Load Default
Loading default, please wait...
30%
4. TV will display as follow:
Welcome
to the Toshiba BD Player Setting Wizard.
Some simple settings are suggested before you begin. You can also access detailed settings from the Setup Menu.
OK Next
5. Press OK, enter language setting. Press/ to select a language option.
Choose |
|
|
EnJlish |
||
an OSD language before starting. |
Français |
|
The language selected will be applied not only |
||
|
||
here but also in other OSD windows, menus |
Español |
|
etc. |
||
|
||
Previous |
OK Next |
|
|
|
14
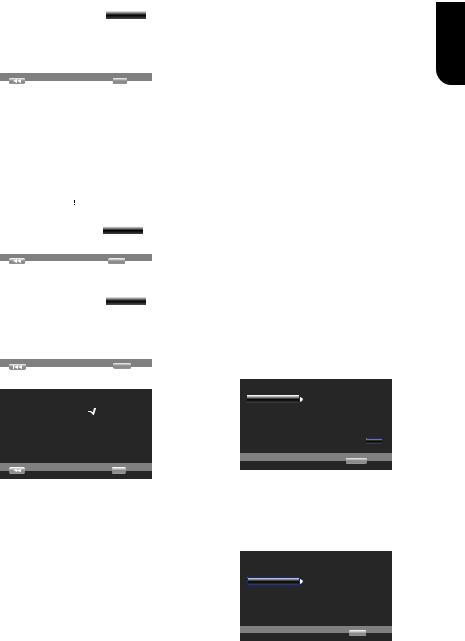
6. Press OK, enter Resolution setting.
|
|
Choose |
Auto |
a resolution that fits your TV. |
480I/576I |
Change will be applied immediately, you have |
480P/576P |
15s to determine whether to save the setting |
720P |
or rollback to prior resolution. Better |
|
performance will be provided by an HDMI |
1080I |
connection! |
1080P |
|
|
Previous |
OK Next |
|
|
Press /to select an option. Press OK.
Select "Yes" or "No" using /.
Note:
-When the player is connected to both VIDEO
OUTPUTjackandHDMIOUTPUTjack,resolutionis set to 720p/1080i/1080p, there will be no video output through VIDEO OUTPUT jack.
Resolution |
14s |
|
|
has been changed! |
|
|
|
|
|
|
|
Does everything looks all right with this |
|
|
|
resolution? Press Yes if you want to apply it. |
Yes |
|
|
Press No to rollback to previous one. |
|
|
|
|
|
No |
|
Previous |
|
OK |
Next |
|
|
|
|
7. Press OK, enter Aspect ratio setting.
Choose |
|
|
16:9 Full |
||
an aspect ratio that fits your TV. |
16:9 Normal |
|
|
||
The change will be applied in the next page. |
4:3 Pan&Scan |
|
Determine whether to save the setting or |
4:3 Letterbox |
|
rollback to the previous aspect ratio. |
||
Previous |
OK |
Next |
|
|
|
Press /to select an option. Press OK.
Setting
wizard is complete!
Now press the OK button to finish and return to the Setup Menu.
Previous |
OK Finish |
8. Press OK to return to [General Setting] Menu.
•[Upgrade]
For software upgrades to enhance performance, you could select the following upgrade method and start to
upgrade.
{ Disc }/{SD CARD}
Upgrade the software from the disc or SD card.
1.Insert the disc or connect the SD card which contains the upgrade file package.
2.Follow the instruction on the TV screen to confirm upgrade operation.
- The system will reboot after 5 seconds or OK key is pressed.
Notes: |
|
|
-Ifset[DiscAutoPlayback]to[Off],afteryouinsert |
|
|
thediscthatcontainstheupgradedinformation |
English |
|
to upgrade system, you have to start upgrade from |
||
|
||
thisoptionofSETUPMenu. |
|
|
-Iftheupgradefilepackagedidnotpassthe |
|
|
verification,errorpromptisdisplayed,checkthe |
|
|
packageagain(suchasthepackageisnotcomplete) |
|
|
-Makesurethefirmwareversionisnotanold |
|
|
version. |
|
|
- When you upgrade the system using SD card, you |
|
|
shouldmakeanewfoldernamedUPG_ALL,and |
|
|
copytheupgradefileintothisfolder. |
|
|
• [Disc Auto Upgrade] |
|
|
Turn On or Off the disc automatic upgrade |
|
|
switching mode. |
|
|
{On} - Start upgrading from the insert |
|
|
disc. |
|
|
{Off} - Disable disc auto upgrade mode. |
|
•[External Memory]
External Memory would be used in BD Live function. When you plug in the SD card which has at least 1GB free space to play BD-Live function, the BD system would make a directory named BUDA automatically. Information will display the Free size.
1.Press OK.
2.Follow the instruction on the TV
screen to select {Information}.
... General Setting ...
System |
Screen Save |
Off |
|
|
Information |
|
|
Language |
Disc Auto Playback |
On |
|
Playback |
CEC |
On |
|
|
Free size is : 0MB |
|
|
Security |
Disc Auto Upgrade |
On |
|
Network |
Load Default |
|
MoreErase... |
|
|||
|
|
|
|
Move cursor key to select menu option |
RETURN |
Return |
|
then use “OK” key to select |
|||
|
|
3.Press OK to select "Erase", the data in the BUDA folder will be cleared.
[Language]
Select the OSD(On-Screen Display), set up
Menu, Audio, Subtitle default language for the player.
... General Setting ...
System OSD
Language Menu
Playback Audio
Security Subtitle
Network
Move cursor key to select menu option then use “OK” key to select
(QJOLVK
(QJOLVK
(QJOLVK
(QJOLVK
SETUP Exit
• [OSD]
Select the default on-screen display language.
15
 Loading...