


20VL44/55 Series

List of contents |
|
Important Information............................................... |
4 |
Special features ......................................................... |
5 |
Safety instructions ..................................................... |
6 |
Where to install ......................................................... |
7 |
Getting started .......................................................... |
8 |
Aerial connection .................................................................. |
8 |
Switching on......................................................................... |
8 |
Battery fitting ........................................................................ |
8 |
Control unit................................................................ |
9 |
Front and rear panel.............................................................. |
9 |
External connections table ...................................................... |
9 |
Remote control .................................................................... |
10 |
Using the TV ............................................................ |
11 |
Tuning the TV...................................................................... |
12 |
Automatic tuning ................................................................. |
12 |
Manual tuning .................................................................... |
13 |
Program organising ............................................................. |
14 |
TV setup .................................................................. |
15 |
Sound menu ....................................................................... |
15 |
Sound Features............................................................... |
15-16 |
Picture menu ....................................................................... |
16 |
Features Menu .................................................................... |
17 |
Using teletext ..................................................... |
18-19 |
Connecting external equipment .......................... |
20-25 |
Help and service tips ............................................... |
26 |
Technical specifications table.................................... |
27 |
ENGLISH -3-

Important Information
The LCD display panels are manufactured using an extremely high level of precision technology, however sometimes some parts of the screen may be missing picture elements or have luminous spots. This is not a sign of a malfunction.
Please take note
EXCLUSION CLAUSE
Toshiba shall under no circumstances be liable for loss and/or damage to the product caused by ;
i)fire;
ii)earthquake;
iii)accidental damage;
iv)intentional misuse of the product;
v)use of the product in improper conditions;
vi)loss and/or damage caused to the product whilst in the possession of a third party;
vii)any damage or loss caused as a result of the owner’s failure and/or neglect to follow the instructions set out in the owner’s manual;
viii)any loss or damage caused directly as a result of misuse or malfunction of the product when used simultaneously with associated equipment;
Furthermore, under no circumstances shall Toshiba be liable for any consequential loss and/or damage including but not limited to the following, loss of profit, interruption of business, the loss of recorded data whether caused during normal operation or misuse of the product.
Stationary Image
If stationary images generated by teletext, channel identification logos, computer displays, video games, on screen menus, etc. are left on the TV screen for any length of time they could become conspicuous, it is always advisable to reduce both the brightness and contrast settings.
Cleaning the screen and the cabinet...
After turning off the power, clean the screen and the cabinet with a soft, dry cloth. We recommend that you do not use any proprietary polishes or solvents on the screen or cabinet as this may cause damage.
Disposal...
The cold cathode fluorescent lamp in the LCD panel contains a small amount of mercury, when the set reaches the end of its useful life please dispose of it in accordance with Local Government Regulations or at a recycling centre.
ENGLISH -4-

Television
Thank you for buying this television which is designed to give you many years of satisfactory service.
You may already be familiar with using a television but do please take time to read these instructions. They are designed to familiarise you with the unit’s many new features and to ensure you get the very best out of your purchase.
Special Features
•16,722,216 color (8 byte)
•Available for Cable Channels (A decoder may be required)
•Wide angle perspective
•2 SCART sockets for 20VL44/55, AV Socket and external sound system connection
•Minimum energy consumption
•AVL – Automatic Volume Limiting
•ATS – Automatic Tuning System
•Blue back
•Intelligent program switch
•Programmed power on
•Programmed power off
•Graphic equalizer
•On screen viewing of all control commands, program numbers and additional features
•Manual Fine Tuning
•100 Program memory
•Infrared Remote Control
•Child Lock
ENGLISH -5-

For your safety
This equipment has been designed and manufactured to meet international safety standarts but, like any electrical equipment, care must be taken if you are to obtain the best results and safety is to be assured. So, please read the points below for your own safety. They are of a general nature, intended to help you with all your electronic consumer products and some points may not apply to the goods you have just purchased.
Air Circulation...
Leave at least 10 cm clearance around the television to allow adequate ventilation. This will prevent the TV from overheating and consequential possible damage to the TV. Dusty places should also be avoided.
Heat Damage...
Damage may occur if you leave the TV in direct sunlight or near a heater. Avoid places subject to extremely high temperatures or humidity, or locations where the temperature is likely to fall below 5 C (41F).
Mains Supply...
The mains supply required for this equipment is 110 - 240 V AC 50 Hz. Your TV set is designed to operate with the adapter provided. The adaptor will become hot during use, this is normal. ONLY USE THE ADAPTOR SUPPLIED WITH THIS TV. Use only the power cord supplied with the unit. Never connect to a DC supply or any other power source. DO ensure that the TV is not standing on the mains lead. DO NOT cut off the mains plug from this equipment, this incorporates a special Radio Interference Filter, the removal of which will impair its performance. In the UK, the fuse fitted in this plug is approved by ASTA or BSI to BS1362. It should only be replaced by a correctly rated and approved type and the fuse cover must be refitted. IF IN DOUBT PLEASE CONSULT A COMPETENT ELECTRICIAN.
Do...
DO read the operating instructions before you attempt to use the equipment.
DO ensure that all electrical connections (including the mains plug, extension leads and inter-connections between pieces of equipment) are properly made and in accordance with the manufacturers instructions. Switch off and withdraw the mains plug before making or changing connections.
DO consult your dealer if you are ever in doubt about the installation, operation or safety of your equipment.
DO be careful with glass panels or doors on equipment.
Do not...
DON’T remove any fixed cover as this may expose dangerous voltages.
DON’T obstruct the ventilation openings of the equipment with items such as newspapers, tablecloths, curtains, etc. Overheating will cause damage and shorten the life of the equipment.
DON’T allow electrical equipment to be exposed to dripping or splashing or objects filled with liquids, such as vases, to be placed on the equipment.
DON’T place hot objects or naked flame sources, such as lighted candles or nightlights on, or close to equipment. High temperatures can melt plastic and lead to fires.
DON’T use makeshift stands and NEVER fix legs with wood screws. To ensure complete safety, always fit the manufacturer’s approved stand or legs with the fixings provided according to the instructions.
DON’T listen to headphones at high volume, as such use can permanently damage your hearing.
DON’T leave equipment switched on when it is unattended, unless it is specifically stated that it is designed for unattended operation or has a standby mode. Switch off using the switch on the equipment and make sure your family know how to do this. Special arrangements may need to be made for infirm or disabled people.
DON’T continue to operate the equipment if you are in anay doubt about it working normally, or it is damaged in any way – switch off, withdraw the mains plug and consult your dealer.
ABOVE ALL – NEVER let anyone, especially children, push anything into holes, slots or any other openings in the case – this could result in a fatal electric shock.
NEVER guess or take chances with electrical equipment of any kind – it is better to be safe than sorry.
THE MAINS PLUG IS USED TO COMPLETELY DISCONNECT THE TELEVISION AND THEREFORE SHOULD BE EASILY ACCESSIBLE.
ENGLISH -6-
Where to install
Locate the television away from direct sunlight and strong lights, soft, indirect lighting is recommended for comfortable viewing. Use curtains or blinds to prevent direct sunlight falling on the screen.
Place on a sturdy platform, the mounting surface should be flat and steady It should then be secured to the wall with a sturdy tie using the hook that is under the removable cover, or secured to the platform.
The LCD display panels are manufactured using an extremely high level of precision technology, however sometimes some parts of the screen may be missing picture elements or have luminous spots. This is not a sign of a malfunction.
Make sure the television is located in a position where it cannot be pushed or hit by objects, as pressure will break or damage the screen, and that small items cannot be inserted into slots or openings in the case.
ENGLISH -7-
Getting started
Remove your Television carefully from the box. You may wish to store the packaging for future use.
In the box
Inside the carton box you should have:
•Accessories box
•Power cord
•Adapter
•Remote control
•Batteries
Note: Scart, VGA and RCA leads are not supplied.
Aerial connection
To connect an aerial, plug the aerial lead into the aerial socket on the rear of the TV.
20VL44/55
You can use an outdoor or indoor aerial. However, if you use an indoor aerial the quality of the reception may be reduced and adjustment of the aerial may be required when changing programs.
Please note: If you live in a poor reception area or use an indoor aerial you may experience loss or corruption of teletext transmissions.
Switching on and First Use
1.Connect the power cord to the mains plug.
2.Connect the input socket of the adapter to the DC socket at the back panel of the LCD TV.
3.Connect adapter to the mains plug.
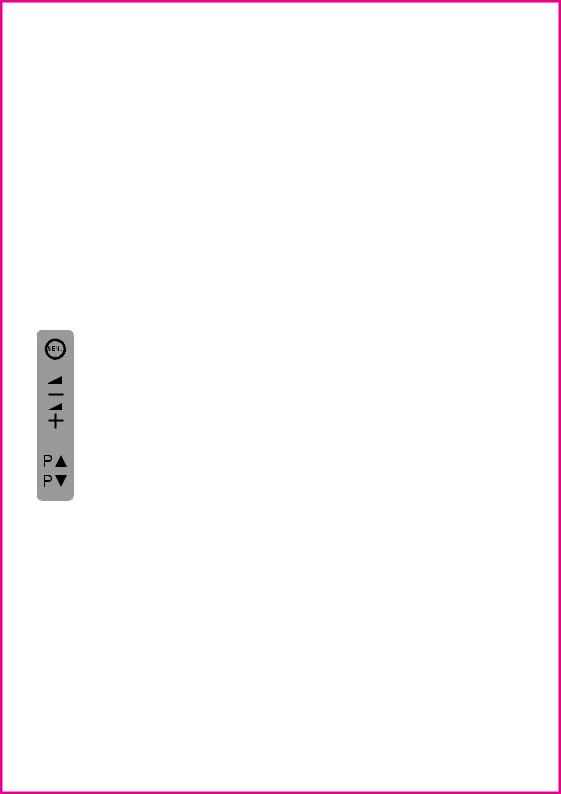
Note 1: Your TV will move to stand-by mode in five minutes when there is no broadcast signal. Note 2: Your TV is equiped to operate with front panel buttons, “MENU”, “

 ”, “-
”, “-  +” in case your R/C is broken or the batteries are exhausted.
Please Note: When not in use disconnect the plug from the mains power supply.
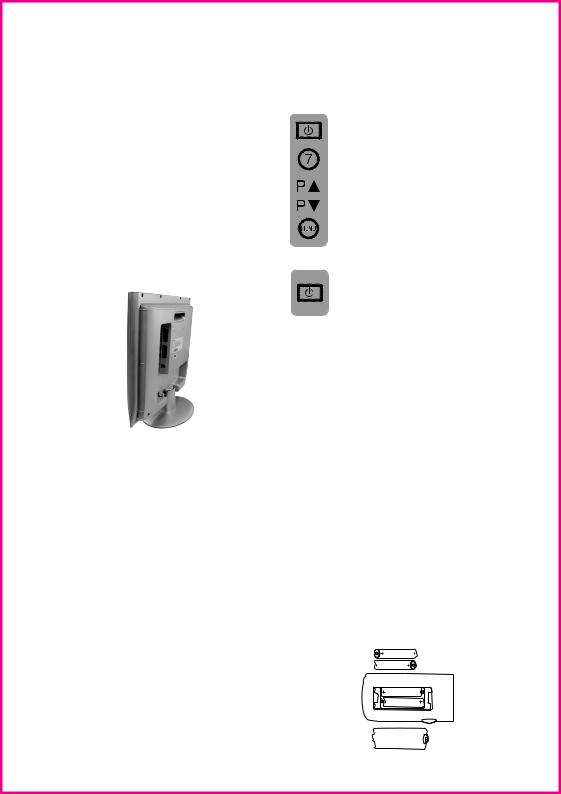
4. Press the Power button on the side of the TV. The standby indicator will turn red.
5. Press a Numeric button or the ( ) or (
 ) button on the remote handset or (
 ), (
), ( ) on the top panel to switch the TV on.
The standby indicator will turn blue. The picture will appear after a few seconds.
Press the ( ) button to switch the TV to standby. The standby indicator will turn red.
Please Note: Do not leave the television in standby unattended or overnight.
Switching the TV on for the first time
To install your TV, please read the sections “TV controls” and “Tuning the television”.
The batteries
Remove the back cover of your remote control to reveal the battery compartment and make sure you insert the batteries the right way round.
Suitable battery types for this remote are UM-4, IEC R03 or AAA 1.5V.
Do not throw your old batteries into a fire, dispose of them in a designated disposal area.
Do not combine a used, old battery with a new one or mix battery types.
The performance of the remote control will deteriorate beyond a distance of 8 metres or outside an angle of 30 degrees from the centre of the TV.
ENGLISH -8-
Control Unit
20VL44/55
16 17 18 19 20
1 |
2 |
3 |
4 |
5 |
Top control units
|
|
MENU |
|
P |
16 |
17 |
18 |
19 |
20 |
7 |
6 |
8 |
21 |
AV
AUDIO OUT |
|
|
|
AVS |
|
|
|
|
|
|
|
|
|
||
L |
R |
L |
R |
VIDEO |
S-VHS |
DC |
VGA |
|
9 |
10 |
11 |
12 |
13 |
14 |
15 |
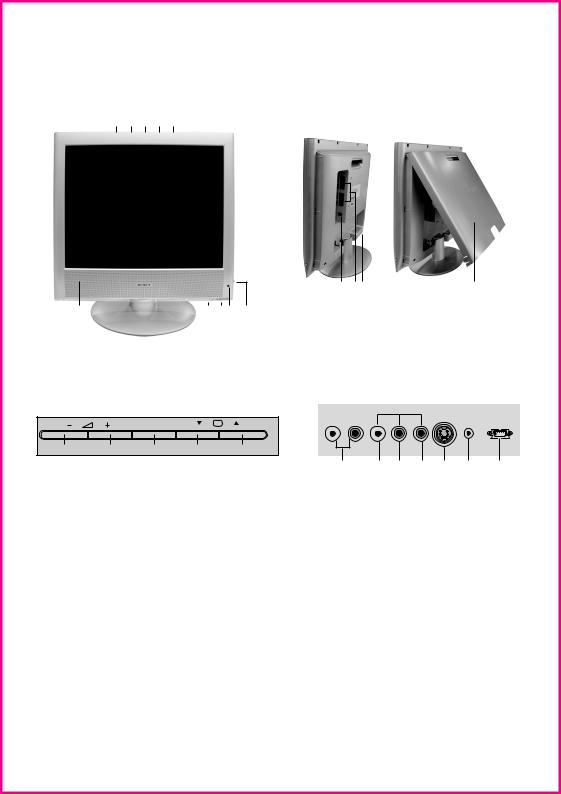
1.Speaker |
8. |
Headphone |
15. |
VGA |
2.Timer indicator |
9. |
Audio out (R,L) |
16. |
Volume down |
3.Stand-by |
10. |
Audio RCA (L) |
17. |
Volume up |
4.Remote control |
11. |
Audio RCA (R) |
18. |
Menu button |
5.Power on / off |
12. |
Video input PHONO connector |
19. |
Program down |
6.Scart (2 Scarts for 20VL44/55) 13. |
S-VHS |
20. |
Program up |
|
7.Antenna input |
14. |
DC Power supply input |
21. |
Removable back cover |
Please note
•Do not use Video RCA and S-Video connections at the same time, otherwise they will effect the picture.
•RGB inputs from scart will give you better picture quality.
ENGLISH -9-
Remote control
27
4
5
6
22
8
10
11
13
14
26
1
15
16
17
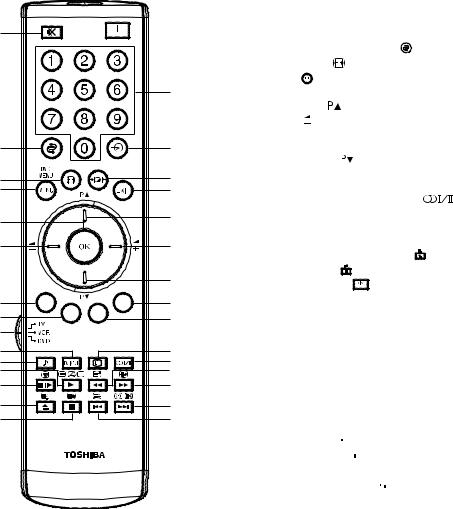
1.Teletext / TV choice buttons (
 )
)
2.Info button ( )
)

 18 3. Numeric buttons
|
4. |
Return to Selected Program Button ( ) |
|
|||
|
5. |
Picture Mode button ( |
) |
|
||
|
6. |
MENU button ( |
) |
|
|
|
3 |
7. |
Upward movement (Menu) |
|
|||
|
|
Program Up button ( |
) |
|
||
|
8. |
Left movement ( |
) (Menu) |
|
||
|
|
Volume down button |
|
|
||
19 |
9. |
Down button (Menu) |
) |
|
||
|
|
Program down button ( |
|
|||
20 |
10. |
Red Fastext Button |
|
|
||
11. |
Green Fastext Button |
|
|
|||
21 |
|
|
||||
12. |
Sound Type / Language choice button ( |
) |
||||
|
||||||
713. RC mode choice button
14. PC/TV mode button
23 |
15. |
No function at tv mode |
|
16. |
Txt Question/Answer button (Reveal) ( ) |
||
|
|||
9 |
17. |
Txt Stop Button (Hold) ( ) |
|
18. |
Stand-by On/Off button ( ) |
||
|
2419. External Input select button ( )
)
2520. Picture Format choice button ( )
)
21. Exit button ( )
)
2
12
28
29
31
30
CT-873
22.OK button ( )
)
23.Right button ( ) (Menu) Volume Up button
24.Blue Teletext Button
25.Yellow teletext Button
26.Sound Smart control button ( )
)
27.Mute button ( )
)
28.Teletext index button ( )
)
29.Teletext subpage button ( )
)
30.Teletext enlarge button (Double size) ( )
)
31.Teletext time / Update button ( )
)
Note: The switch on the lefthand side of your remote control is used to switch the bottom 8 keys between TV, VCR & DVD mode. In VCR & DVD mode these keys can be used to operate the basic functions of your Toshiba VCR & DVD.
ENGLISH -10-

Using the TV
Turning on for the first time and Tuning
TV controls
Temporary On-Off (STAND-BY)
When you press the red ( ) stand-by button (temporary on-off function) located on the upper right hand side of your remote control of your television when it is switched on; In that case, the power indicator of your television will turn red. To switch your television back on, either press the same button, any of the number buttons or one of the (
 /
/
 ) buttons.
Caution!
If you are not going to use your television for a long period of time, make sure to switch it off from the main power button.
Programme selection
Press the (
 /
/
 ) buttons on your remote control, or by selecting a numeric button in order to get the desired channel on your television. In order to select a program whose number is greater than 9, you can use the numeric buttons, punching in the desired numbers as required. For example, to select program 12, press the numeric buttons 1 and 2 one after another.
Mute
To temporarily mute the sound of your television, press the ( ) button, Where the ‘SOUND MUTE” on screen display will appear on screen as an indication of the application. When you press the same button again, the sound will return. During mute, when you press the (
 ) button the volume will decrease and automatically get out of the mute function if you press the (
 ) button the volume will increase and automatically get out of the mute function.
Return to Selected Button Program (SWAP)
If you wish to return to the previous program that you were watching then you have the ability to return with a single function, by pressing the ( ) button. Regardless of whether your are at AV, or any other program, by using the (
 ) function allows you to swap between the program you were watching and the last selected program. If you hit the same button again, you will return to the program or AV you were watching before.
E.G. 3 
 11
11 
 3
3
ENGLISH -11-
External Device
Your television has two (20VL44/55) SCART sockets. Every time you press the ( ) AV button, your default settings will change according to the socket connection below.
1.AV1 when using SCART socket 1 (with RGB support)
2.AV2 when using SCART socket 2 (20VL44/55)
3.AV3 when using RCA socket (20VL44/55)
4.AVS when using S-Video socket (20VL44/55) You can return to TV mode by pressing AV button again.
SETUP menu
Press ( ) button and select the Setup Menu. Highlight LANGUAGE bar in yellow by pressing (
 ) button. Using the right/left movement (
 )/(
)/( ) buttons
indicate the language you wish to use. All the function modes of your television will be displayed in the language that you have indicated. In the event that you wish to exit the application at any given stage, simply press the ( ) button.
Program tuning and saving into memory
You can either tune the programs automatically or manually storing them in your television. As a result of your television’s Automatic Tuning System (ATS), the programs found are automatically ordered in accordance to the selected country channels that send their title and teletext information, followed by those programs that do not provide teletext title information and those without the teletext features. Finally, foreign programs that send their teletext title information lined up.
Please note: In the event that your television does not receive a signal for 2 minutes it will automatically switch to the stand-by mode. The last 1 min. clock is shown on the screen.
Tuning The TV
Automatic tuning and storing of the television program channels
In the SETUP menu select the country of which you want to watch the program with priority by pushing the Right/Left movement button ( )/(
)/( ) in the Country bar. Pressing the down movement (
 ) button select the Auto Tuning title, press the (
 ) button or right button (
 ). The screen will display the Auto Tuning start
menu.
If you select Other for Country on the Set Up menu, you can determine it yourself with System buttons ( )/(
)/( ). If you select your home or any country, the system bar will display the name of the selected country and it can not be
changed.
Selecting Start bar with the down button (
 ),
),
and pressing the ( ) button once more, the program channels will be scanned automatically and channels will begin to be stored in the memory starting with the first one. At this point, the auto program menu appears showing an indication that displays the position of the auto tuning bar and the auto program operation as well as the system, channel number of the existing channels and, if present, their name information. To stop the process at any given time, press the (
 ) button.
The program numbers that have been stored are reflected in the Programme Sort, giving you the ability to assign any program number to the channel of your choice.
ENGLISH -12-
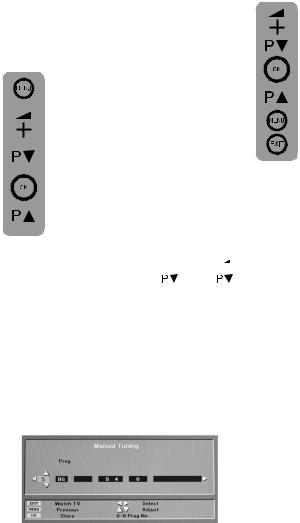
Manual Tuning
TV channel search by user and saving to memory
If you do not know the Channel number
By pressing the ( ) and (
 ) buttons of your remote control, you will bring up the SET UP menu on your television screen. Using the down button (
 ) on your remote control, highlight the Manual Tuning bar in yellow and press
( ) or (
 ) button. The Manual Tuning menu will appear on the screen. Select your desired program using the (
 )
)
and (
 ) or numerical keys. Press the (
 ) button. Access the System bar using
the right button ( ). Here your TV can be set to one system, you can also select multiple systems with the (
 ) and (
 ). (option)
access the Search bar using the right button ( |
|
|
|
). |
Scan the channels using the ( ) and ( |
) |
|||
buttons. If the program on the screen has the desired quality store it in the memory pressing the ( ) button.
Repeat the same operation for the next program. If you need to do Manual Fine Tuning on the current channel or to name the current channel refer to the fine tuning section.
If you already know the Channel number
By pressing the ( ) and (
 ) buttons of your remote control, you will bring up the SET UP menu on your television screen. Using the down button (
 ) on your remote control, highlight the
Manual Tuning bar in yellow and press
( ) or (
 ) button. The Manual Tuning menu will appear on the screen. Please select your desired program using the (
 ) and (
 ) buttons. Press the (
 ) button. Access the System bar using the
right button ( ). Here your TV can be set to one system, you can also select for other systems. (option) Select the Channel
Band bar pressing three times the right button
( ). Using the Up (
 ) or down (
 ) direction buttons select S for Cable channels and C for
terrestrial programs and press the right ( ) button. Here you can directly enter the channel number using the numbering buttons on RC, you can as well scan the channels in the ascending or descending order using the up (
 ) or down (
 ) direction buttons.
If the program found on screen is acceptable in quality, then press the ( ) button to store it in the memory and repeat the same operations for the next channel.
If you need to do Manual Fine Tuning on the current channel or to name the current channel refer to the fine tuning section.
To abort the menu and to return to the previous menu for any reason press the ( ) button. To exit completely press the (
 ) button.
ENGLISH -13-
Fine Tuning
If the current channel requires fine tuning, select the Manual Fine Tuning bar using the right ( ) button on the Manual Tuning menu. Using the up (
 ) and down (
 ) movement buttons on your remote control, adjust the program on the screen to the quality you wish. Under normal circumstances, you will not need to use
the Fine Tuning function.
The AFC values of your television will automatically adjust and lock themselves to the channel. However, in the event that the TV transmitters do not work, then you may need to use this process. The method of storing the applications above is the same process as all other tuning applications.
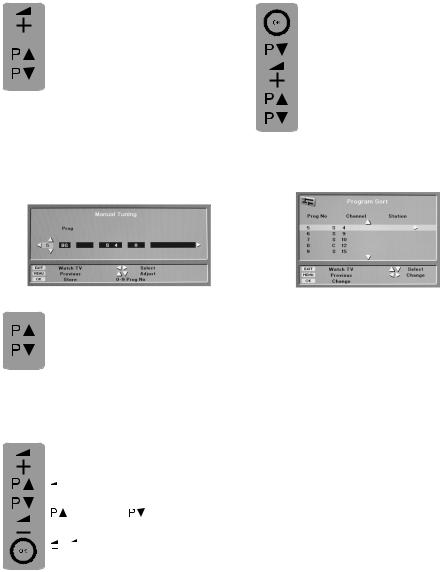
Programme Sorting
Select the program sorting bar using the ( ) or down button (
 ) in the Setup menu, then press the (
 ) or right button
( ). The Programme Sort menu will appear. Please select your desired
program using the (
 ) and (
 )
)
buttons, then press the ( ) or right (
 ) button. Match the program you have
selected using the (
 ) and (
 ) buttons with the program number you want. To complete the operation press again the
( ) button.
You can switch the next program you wish to another program number in the same way.
Program Skipping
If you want to skip some of the channels in the memory while selecting program with ( ) and (
 ) buttons, select the Program Skip bar using the right button on the Manual Tuning menu. Using the
Up ( ) and down (
 ) buttons, the program for which you select “*” mark will be skipped.
Naming Stations
If you wish to assign an 8- character labelling to the channels in the memory, select station bar using the right button
( ) on the Manual Tuning bar. Select the character you want using the Up ( ) and down ( ) buttons and select
the digit using the direction buttons ›
( )/( ). Press the (
 ) button It is stored in the memory.
You can assign labelling to the next program in the same way.
Teletext
Select the teletext bar using the ( ) or down button in the setup menu. If you select auto with the right button; the txt broadcast and Fastext or Toptext (option) features of the existing channels. When list is selected, if the current channel does not broadcast Fastext or Toptext, you can store the teletext page numbers you want with the colour buttons or (
 ) and (
 ) buttons in the section there are 4 different colour buttons when you select teletext.
While in the other pages of teletext, you can directly access this page you selected by pressing the colour button linked to them.
ENGLISH -14-
The setup of your television Setting up the Sound Menu
You can control the sound settings of your television by using the ( ) and (
 ) buttons on your remote control or the (
 ), (
), ( ) buttons directly on your television. You can control the other sound settings by entering the Sound menu For this application all you need to do is press the (
 ) button of your remote control. Then press (
 ) button to bring up the SOUND menu on your television screen and press (
 ). Using the up/down movement buttons (
 ) / (
) / (
 ) you can choose the features that you require.
Balance: To adjust the volume balance between the left and right speakers to the desired level, select the Balance bar
using the down ( ) button. Using the
right/left movement ( ), (
), ( ) buttons adjust the balance.
Sound Type: The program you watch might be stereo or in two different
languages. Using the right/left keys ( ),
),
( ) in sound type bar you can select Mono/Stereo or Dual-I/Dual-II language.
Note: You can make this selection without entering the menu with the ( ) button on your remote control.
Sound Mode: If you want to add depth to the sound of the program you watch, select Spatial
with the ( ) button.
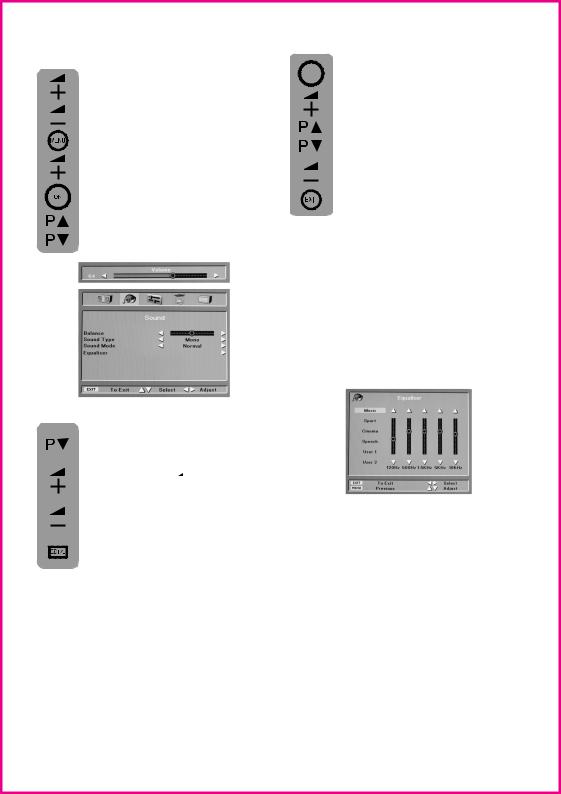
Equalizer: Selecting the Equalizer mark press ( ) or (
 ) button. The equalizer setting
  function will be displayed. Using the up/down movement (
 ) / (
) / (
 ) buttons
you choose between a series of preset
settings for different types of sound output such as Music, Sports, Cinema and Speech. Also you have the User 1 and User 2 option settings which are to be adjusted in accordance to your
preferences. Selecting one of the User options press the ( ) button. You can adjust the frequency levels with the (
 ) and (
 ) buttons. You can select 120Hz,
500Hz, 1.5KHz, 5KHz and 10KHz frequency bands with ( ) and (
 ) buttons. Storing the adjustment levels in memory press the menu button to exit the user option. You can exit the equalizer function pressing the “Exit” button at any time.
Furthermore, you can select one of the nonadjustable default settings in the memory (Sound Mode) by pressing the ( ) button on your remote control.
Music, Sports, Cinema and Speech, User 1 and User 2 are the values you store in the memory.
ENGLISH -15-

When you plug in the headset and press the MUTE button sound is transferred into the headset. The audio setting of the headset can be adjusted using the “VOL+” and “VOL-“ buttons.
Picture Set up
By pressing the ( ) and (
 ) or (
 ) button on your remote control please enter the Picture menu. Select the setting function you want using the Up and down buttons (
 )/(
)/(
 ) and adjust their levels with the right and left buttons (
 )/(
)/( ).
).
The picture brightness, contrast, color and sharpness levels can all be adjusted according to your desire.
 The changes you make in the picture settings will be automatically stored without any further actions necessary.
Furthermore, you can select one of the nonadjustable default settings in the memory (Picture Mode) by pressing the ( ) button on your remote control.
Picture Mode-1, 2 and 3 are preset values. Picture Mode-M is the value you store in the memory.
TINT: When the NTSC video is connected from the SCART, you can adjust the colour tint setting. If you do not connect this type of video, then the TINT option will not be displayed on the OSD menu.
ENGLISH -16-
Features
Special Features Timer
Select the Timer feature in the menu and press ( ) or (
 ) button. The Timer menu will be displayed. With this function, you will have the ability to automatically turn your television on or off at the time of your choice, or enable your television to shift from one channel to another at a time of your choice.
Off Timer: Selecting the Off Timer bar press direction button ( ). The changeable digit will be white. Enter the hour and minute for which you can set 12 hours 59 min. at most using the numerical buttons on the RC. Your TV will automatically switch to standby at the end of this period. The countdown OSD will appear 1 min. before the TV is turned off.
In the event that you wish to exit the application at any given stage, simply press the MENU button. On Timer: Selecting the On Timer bar press direction button ( ). The changeable digit will be white. Enter the hour and minute for which you can set 12 hours 59 min. at most using the numerical buttons on the RC. Your TV will be turned on with the program automatically selected on standby at the end of this period. If your TV is already on, it will switch to the automatically selected program at the end of this period. Using this function, you can automatically switch to the programs of which you know the start time.
If any of the Timers is activated, the green colour light on the bottom of your TV will illuminate.
Please note: If you turn your television off from the main power supply switch then the sleep timer modes selected will be reset and cancelled.
On Programme: You can insert the program number of the channel that your television will automatically open or switch to from the watched channel using the right-left movement ( )/(
)/( ) buttons.
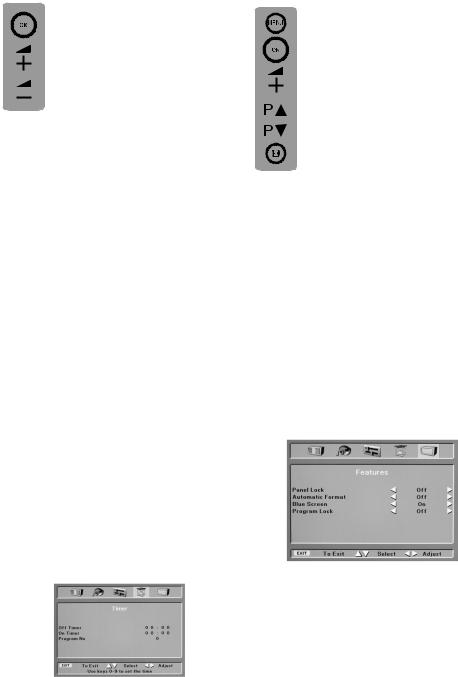
Features
Select the Features in the MENU and press ( ) or (
 ) button. The Features menu will be displayed.
Panel Lock: If you turn this feature On, your TV will not be turned on in the Stand-by state with the (
 ) and (
 ) buttons on TV.
Automatic Format: If you turn this feature On, your TV will switch to the automatic 16:9 format if it detects the 16:9 (wide) format on the broadcasts
you receive from the antenna.
If you turn it Off, the 4:3 broadcast will always be displayed regardless of the format of the broadcast received.
The picture format of your television is 4:3. However, for the 16:9 programs that do not send automatic format information, you can change the format of the program you watch with the ( ) button on the RC.
Blue Screen: Turning this feature On, you can select blue background instead of snowing for the programs that do not receive signals.
Program Lock: Using this feature, you can lock whichever program you want and block it being watched. Select the program you want to lock and turn it On with the Program Lock ( ) button.
ENGLISH -17-

Using Teletext
Teletext is an information system that displays text on your TV screen. Using the teletext control buttons you can view pages of information that are listed in the teletext index.
Please Note: No on screen display is available in text mode. The contrast, brightness and colour cannot be changed but the volume control is still available.
To enter Text mode
Please Note: Make sure the TV channel you are watching transmits teletext. If not NO TEXT sign will be shown on the screen.
Press the (
 ) button. The text page will appear, normally the index page.
To exit Text mode
Press the (

 ) button twice. The screen will return to the channel you were watching.
To select a page of text
Find the number of the page in the index and enter it using the Numeric buttons. The number of the page will appear in the top left hand corner of the screen.
The page counter will search for your page. When it finds it, the page will be displayed.
To move to the next page of text press the (
 ) button.
To move to the previous page press the (
 ) button.
To return to the index page press the ( ) button.
TV/text mix
To view a TV programme whilst in text mode, press the (

 ) button. The text will be superimposed over the TV programme.
Press the (

 ) button again to return to the text page.
Page search whilst watching TV
In Text mode press the ( ) button. The TV will return to TV mode with the text page number in the top left hand corner of the screen.
Enter the page number you want using the Numeric buttons.
The top line of the text page will appear whilst the text searches for your page. When the page is found the number will remain in the top left hand corner of the screen.
Press the ( ) button to view your selected page of text.
Double height text
If you have difficulty reading the text on the TV you can double the height of the text.
Press the ( ) button. The top half of the page will be displayed in double height text.
Press the ( ) button again. The bottom half of the page will be displayed in double height text.
Press the ( ) button again to return to the full page in normal text.
ENGLISH -18-

Page Stop
If the page of text you have selected contains sub pages, these sub pages will automatically be displayed in order with a delay to allow you to read the page.
To stop the move to the next sub page press the ( ) button. (
 ) symbol will appear in the top left hand corner.
To continue moving through the sub pages press the ( ) button again.
To reveal information
Press the ( ) button to reveal concealed information (quiz answers etc.).
Press the ( ) button again to conceal the information again.
Clock
Press the ( ) button, whilst watching a TV program, to display the time. When you press the (
 ) button again the clock will remove.
To select a sub page
If the page of text you are viewing contains sub pages, the number of the sub page you are on and the total number of sub pages is displayed on the right of the screen i.e. 1/7.
To select a sub page press the ( ) button. Press the green button to select next sub-page or press the red button to select the previous sub-page.
Enter the number of the sub page, using the Numeric buttons in the format S0001 for sub page 1.
The teletext will search for the sub page. This may take some time. To return to the TV whilst the teletext is searching press the ( ) button.
When the page number is found it will appear in the top left hand corner of the screen.
Press the ( ) button again to view the text page.
Fast text
At the bottom of the teletext screen is a row of subject headings in red, green yellow and blue.
The remote control has a row of coloured buttons corresponding to the row of coloured subjects on the screen.
Pressing one of the coloured buttons will take you directly to the page corresponding to the subject heading.
ENGLISH -19-
Connecting external equipment
You can connect a wide range of audio and video equipment to your TV.
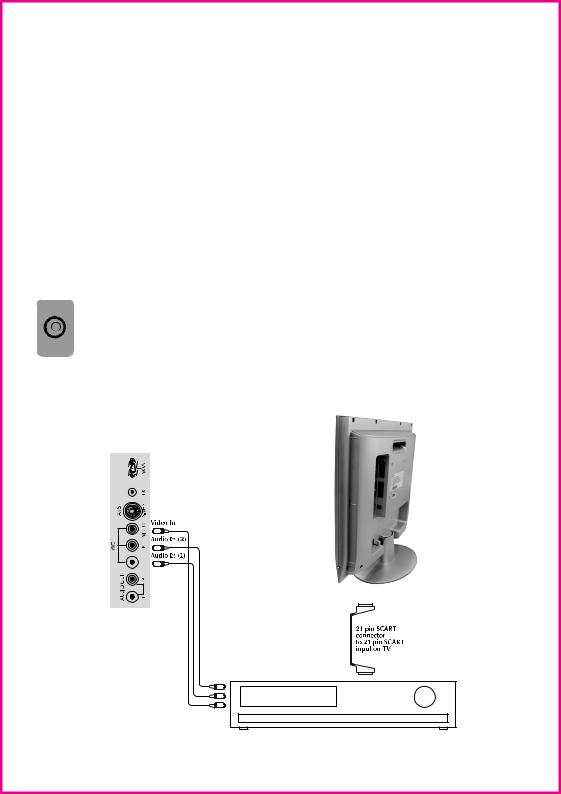
Connecting a video recorder
Via SCART
Make sure the TV and video recorder are both switched off.
Plug one end of the SCART lead (For connecting other equipment no leads are supplied) into the back of the video recorder and the other end into one of the SCART sockets on the back of the TV.
Switch on the video recorder and the TV. Press the ( ) button on the remote control to select EXT1 or EXT2 to
  correspond with the SCART socket you are using on the back of the TV.
Please note: You can connect RGB external equipment via Scart. It is necessary to you use a full Scart cable for this purpose.
Select the video output of the external device by using its menu, and set to RGB.
Via RCA lead (optional)
Make sure the TV and video recorder are both switched off.
Plug one end of the RCA lead into the video and audio out sockets on the back of the video recorder and plug the other end into the video and audio in sockets of the TV.
If the sound is mono, use the Audio Input L. and in the SOUND menu select the MONO feature.
Please note: If you want to use your VCR by connecting it to your TV at the modulator outlet with an antenna cable, select the program ‘0’ which is set for this type of connection.
20VL44/55
ENGLISH -20-
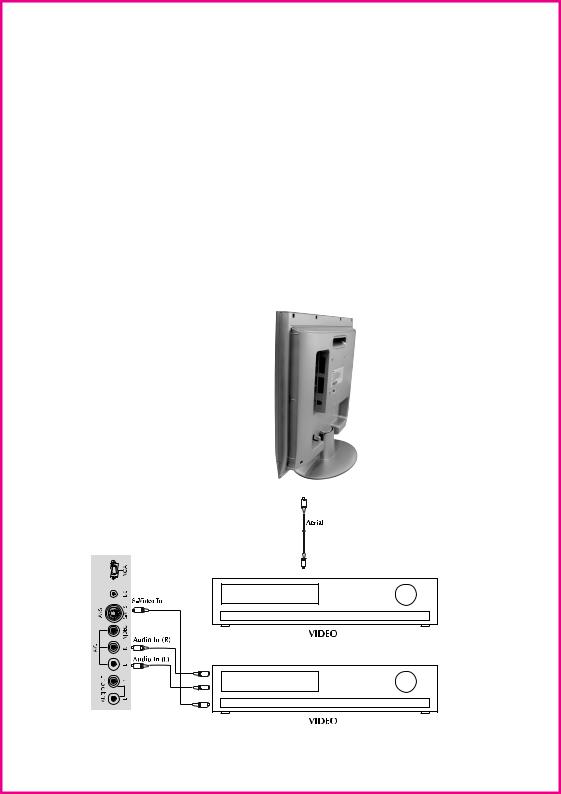
Via aerial socket |
Via RCA lead and S-Video socket |
Make sure the TV and video recorder are both switched off.
Unplug the aerial lead form the TV and plug it into the aerial socket on the video
recorder.
Plug a coaxial plug into the RF out socket on the rear of the video recorder and plug the other end into the aerial socket on the TV.
Switch on the video recorder and the TV. If your video recorder has a test signal, switch it on. (Refer to the video recorder user guide).
See ‘Tuning the TV’ and carry out the tuning procedure for the video recorder test signal. Select a programme number 0.
20VL44/55
You can also connect it through the S-Video socket of the TV.
Plug the S-Video plug into the S-Video socket and the audio leads into the audio sockets.
ENGLISH -21-
Connecting a DVD player
Via SCART
Make sure the TV and DVD player are both switched off.
Plug one end of the SCART lead (not supplied) into the back of the DVD player and the other end into the SCART socket on the back of the TV.
Switch on the DVD and the TV.
Via RCA lead
Make sure the TV and DVD player are both switched off.
Plug one end of the RCA lead into the video and audio out sockets on the back of the DVD player and plug the other end into the video and audio in sockets of the TV.
Via RCA lead and S-Video socket
You can also connect it through the S-Video socket of the TV.
Plug the S-Video plug into the S-Video socket and the audio leads into the audio sockets.
20VL44/55
ENGLISH -22-
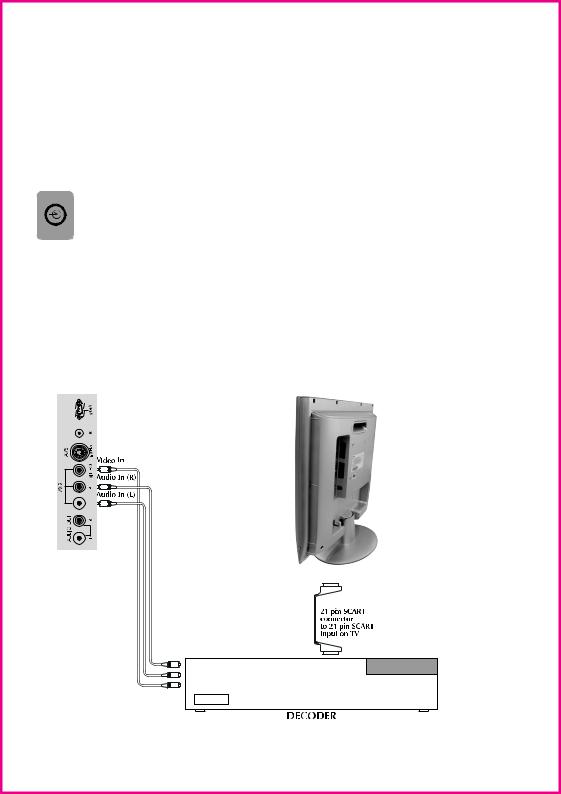
Connecting a decoder
Via SCART
Make sure the TV and decoder are both switched off.
Plug one end of the SCART lead (not supplied) into the back of the decoder and the other end into the SCART on the back of the TV.
Switch on the decoder and the TV.
Press the ( ) button on the remote control to select EXT1.
Via RCA lead
Make sure the TV and decoder are both switched off.
Note: For Decoder connection Via RCA lead your Decoder device must have the tuner built in.
Plug one end of the RCA lead into the video and audio out sockets on the back of the decoder and plug the other end into the video and audio in sockets on the TV.
AV Outputs
You can connect any device which is proper to Phono inputs via Phono Video and Audio Outs at the back of your TV set using proper AV cable (not available with the set).
Any programme or AV input which is seen on the main screen other than S-VHS, PC is available as picture and sound signals at Phono Video/Audio outs.
Scart sockets at the back of your TV set are always give the signals of selected programme from the set Tuner.
20VL44/55
ENGLISH -23-
Start Up
As your LCD-TV unit also enables VGA applications, it can also be used as a PC monitor.
Transition to the PC mode
In order for the LCD-TV to switch to the monitor (PC) mode, you can use the PC button on your remote control. In order to switch from the monitor mode back to the TV mode, use the TV button on your remote control.
NOTE 1: When the unit is switched to the monitor mode, EXT3 (Phono20VL44/55) can be heard from the speakers. When switched to this mode, the VOL+/VOLand MUTE buttons will be functional.
NOTE 2: When the unit is in monitor mode, the Stand-by button is functional. When the unit is switched back on from the stand-by function, it will open in the TV mode.
PC Mode MENU structure
When you press the ( ) button on your remote control while the unit is in the PC mode, the features available in the PC mode will appear on screen as the
PC MENU. In order to make the necessary adjustments in this menu, you can use the right-left, up-down movement
(
 )/(
)/(
 ), (
), ( )/(
)/( ) buttons on your remote control.
PHASE: ADC’s phase setting
H.POSITION: Horizontal position setting V.POSITION: Vertical position setting
AUTOMATIC CONFIGURATION: The most suitable geometric settings in accordance to the entry mode is configured by this function. For this application, highlight the AUTOMATIC CONFIGURATION option and
press the OK button.
Warning Messages:
1.NO SIGNAL: There is no VGA connection. Under these circumstances the on screen display will be “NO SIGNAL”. The message will be on screen for 15 seconds and if a suitable VGA attachment is not made to the indicated area, then the unit will switch itself to the POWER SAVING mode in order to protect the unit panel.
2.OUT OF RANGE: If the resolution application is not one of the graphic entry modes, then the on screen display will be “OUT OF RANGE”. The message will remain on screen until the necessary graphic entry mode is applied.
Important Cautions:
1.When a VGA mode is displayed for the first time, an AUTOMATIC CONFIGURATION application may be necessary.
2.According to the VGA power Saving standards, when there is no signal, for 15 seconds an on screen display of “NO SIGNAL” is shown after which the unit switches itself off in a 3,5 Watt power saving mode.
If you switch to the monitor model after adjusting the TIMER function available under the Special Features menu, the timer function and program switch will no longer function, however the automatic shut-down application will continue to function.
ENGLISH -24-

Connecting TV with video and satellite/digital receiver
20VL44/55
Connecting TV with camcorder
|
VGA |
|
DC |
AVS |
S-VHS |
|
VIDEO |
AV2 |
R |
|
L |
OUT |
R |
AUDIO |
L |
Connecting TV games and computer
|
VGA |
|
DC |
AVS |
S-VHS |
|
VIDEO |
AV2 |
R |
|
L |
OUT |
R |
AUDIO |
L |
ENGLISH -25-

Help and service tips
The TV does not work
Make sure it is plugged into the mains supply and switched on.
No sound
•Is the sound muted? Press the Mute button.
•Is the volume turned down?
•Are there headphones connected?
Poor picture
•Is the aerial plugged in?
•If you are using a set top aerial is it properly aligned for the best signal.
•Make sure the aerial is not to close to neon lights, loudspeakers etc.
•Try changing the direction of the outdoor aerial. High buildings and mountains can cause ghost pictures or double images.
•The picture quality may be reduced by connecting two external sources at once. Disconnect one of the sources.
•Adjust the fine tuning.
No picture
• Is the aerial plugged in properly?
•Is the aerial lead damaged?
•Are all the plugs in the aerial lead fitted correctly?
•Have you pressed the correct buttons on the remote control?
Sound coming from only one speaker
•Is the balance set to one side? See the sound menu.
No response to the remote control
•Try changing the batteries.
•Is there an obstruction between the remote control and the sensor on the TV.
If nothing works
If you have tried the above solutions and none seem to work, try switching the unit off and on again.
If this does not work contact your supplier or TV repair technician. Never attempt to repair a defective TV yourself.
Symptoms
No picture, no sound
Poor sound, picture OK
Poor Picture, sound OK
Weak picture
Blurred picture
Double image
Lines in picture
Distorted picture
Weak reception on some channels Horizontal bars
Picture rolls vertically
Poor colour
No colour
Remote control not working
TV does not accept any command Teletext rolling up/down
Solutions |
Checkifon/offswitchis“on” |
Try a different channel, if OK, probably station trouble
Check aerial connections on back of set
Checkaerialbrokenwires |
Reorientateaerial |
Probably local interference, such as an appliance
Adjust fine tuning control
brightnesscontrol |
contrastcontrol |
ifstationisbroadcastingcolour |
colourcontrol |
Adjust |
Adjust |
Check |
Adjust |
Check batteries in the remote control handset.
am sin
eth VT tes FFO dna NO mfro
wS hitc
ENGLISH -26-

Model |
20VL44/55 |
|||
Panel Type |
20” TFT LCD |
|||
Stand-by Power Consumption |
3,5 W Stand by power |
|||
Teletext |
10 page text |
|||
Sound Output (%10 THD) |
2x3W |
|||
|
|
|
|
|
|
|
|
|
|
|
|
|
|
|
|
|
|
|
|


 15V-4.6A (20VL44/55)
Following information is only for EU-member states:
The use of the symbol indicates that this product may not be treated as household waste. By ensuring this product is disposed of correctly, you will help prevent potential negative consequences for the environment and human health, which could otherwise be caused by inappropriate waste handling of this product. For more detailed information about recycling of this product, please contact your local city office, your household waste disposal service or the shop where you purchased the product.
Toshiba Information Systems (U.K.) Ltd.
Consumer Products Division European Service Centre Admiralty Way Camberley Surrey GU15 3DT
England
ENGLISH -27-
Inhaltsverzeichnis |
|
Wichtige Informationen ........................................... |
4 |
Sondereigenschaften .............................................. |
5 |
Sicherheitshinweise ................................................. |
6 |
Aufstellungsort ....................................................... |
7 |
Erste schritte ........................................................... |
8 |
Antennenanschluss ............................................................. |
8 |
Einschalten......................................................................... |
8 |
Einsetzen der batterien ........................................................ |
8 |
Fernbedienung ........................................................ |
9 |
Vorderund rückseite .......................................................... |
9 |
Tabelle der externen Anschlüsse ........................................... |
9 |
Fernbedienung ................................................................. |
10 |
Verwendung des TV-Geräts ................................... |
11 |
TV einstellen..................................................................... |
12 |
Automatische Einstellung ................................................... |
12 |
Manuelle Einstellung ........................................................ |
13 |
Programmorganisation ...................................................... |
14 |
TV einrichten ......................................................... |
15 |
Tonmenü.......................................................................... |
15 |
Klangfunktionen .......................................................... |
15-16 |
Bildmenü ......................................................................... |
16 |
Menü Eigenschaften .......................................................... |
17 |
Teletext verwenden ......................................... |
18-19 |
Anschließen von externen Geräten .................. |
20-25 |
Hilfeund Bedienungstipps .................................... |
26 |
Technische Daten ................................................... |
27 |
DEUTSCH -3-

Wichtige Informationen
Die LCD-Anzeigen werden mit extrem hoher technischer Präzision gefertigt. Dennoch können an einigen Stellen des Bildschirms Bildelemente fehlen oder leuchtende Punkte auftreten. Dies ist kein Hinweis auf eine Störung.
Bitte beachten Sie!
HAFTUNGSAUSSCHLUSSKLAUSEL
Toshiba ist unter keinen Umständen haftbar für Verluste und/oder Schäden am Produkt, die durch Folgendes verursacht werden:
i)Feuer;
ii)Erdbeben;
iii)Unbeabsichtigte Schäden;
iv)Absichtliche missbräuchliche Benutzung des Produkts;
v)Nutzung des Produkts unter unsachgemäßen Bedingungen;
vi)Verluste und/oder Schäden, die am Produkt verursacht wurden, während es sich im Besitz Dritter befand;
vii)Jegliche Verluste oder Schäden, die aus einem Versäumnis der Besitzers und/oder dessen Unterlassung, den Anweisungen im seinem Handbuch zu folgen, resultieren;
viii)Jegliche Verluste oder Schäden, die bei gleichzeitiger Verwendung dazugehöriger Geräte als direkte Folge falscher Bedienung oder Funktionsfehlern des Produkts verursacht wurden.
Darüber hinaus haftet Toshiba nicht für irgendwelche Folgeschäden und/oder Verluste, einschließlich, aber nicht beschränkt auf Folgende: Gewinnverlust, Betriebsunterbrechung, oder den Verlust aufgezeichneter Daten, egal ob sie während normalem Betrieb oder aufgrund falscher Bedienung verursacht wurden.
Stationäres Bild
Wenn stationäre Bilder, die durch Teletext, Kanal-ID-Logos, Computermonitore, Videospiele, On-Screen-Menüs, usw. entstehen, längere Zeit auf dem TV-Bildschirm angezeigt werden, könnten Sie deutlich sichtbar auf dem Bildschirm verbleiben. Wir empfehlen daher, Helligkeit und Kontrast zu verringern.
Reinigung des Bildschirm und des Gehäuses...
Schalten Sie das Gerät aus und reinigen Sie Bildschirm und Gehäuse mit einem weichen, trockenen Tuch. Wir empfehlen, keine Fertigpolituren oder -Lösungsmittel auf dem Bildschirm oder dem Gehäuse zu verwenden, da dies zu Schäden führen kann.
Entsorgung...
Die fluoreszierende Kaltkathodenlampe im LCD-Bildschirm wird gegen Ende der gewöhnlichen Nutzungsdauer des Geräts eine kleine Menge Quecksilber enthalten. Bitte entsorgen Sie sie gemäß der Vorschriften Ihrer Kommunalregierung oder bei einem Recyclingcenter.
DEUTSCH -4-

Fernseher
Vielen Dank für den Kauf dieses Fernseher, der Ihnen viele Jahre gute Dienste leisten wird.
Wahrscheinlich wissen Sie schon, wie man einen Fernseher bedient, aber nehmen Sie sich trotzdem bitte die Zeit, diese Anleitung durchzulesen. Sie wurden dazu erstellt, Ihnen die vielen neuen Funktionen des Geräts vorzustellen und sicher zu stellen, dass Sie für Ihr Geld das Allerbeste bekommen.
Sondereigenschaften
•16,722,216 farben (8 Byte)
•Verfügbar für Kabelfernsehkanäle (hierzu kann ein Decoder erforderlich sein)
•Breitwinkelperspektive
•2 SCART-Buchsen für 20VL44/55, AV-Buchse und externer Anschluss für ein Audiosystem.
•Geringer Energieverbrauch
•AVL – Automatische Tonbegrenzung
•ATS – Automatisches Abstimmungssystem
•Blauer Hintergrund
•Intelligenter Programmschalter
•Programmiertes Anschalten (AN)
•Programmiertes Ausschalten (AUS)
•Grafikentzerrer
•Bildschirmaufführung sämtlicher Steuerbefehle, Programmnummern und zusätzlichen Optionen
•Manuelle Feinabstimmung
•Speicher für 100 Programme
•Infrarote Fernbedienung
•Kindersperre
DEUTSCH -5-

Zu Ihrer Sicherheit
Dieses Gerät wurde unter Berücksichtigung internationaler Sicherheitsstandards konzipiert und produziert. Sie müssen jedoch - wie bei jedem anderen Elektrogerät - Vorsicht walten lassen, um beste Ergebnisse zu erzielen und Sicherheit zu gewährleisten. Lesen Sie deshalb aus Sicherheitsgründen die unten aufgeführten Hinweise. Das sind allgemeine Hinweise, die Ihnen bei der Bedienung elektrischer Geräte behilflich sein werden. Einige Hinweise sind nicht nur für das bereits gekaufte Gerät relevant.
Luftzirkulation...
Halten Sie um den Fernseher mindestens 10 cm Abstand zu Möbeln, etc. ein, um ausreichende Luftzirkulation zu gewährleisten. Damit wird vermieden, dass sich der Fernseher überhitzt und deshalb beschädigt wird. Staubige Standorte sollten ebenfalls vermieden werden.
Schaden durch Überhitzung...
Sie könnten den Fernseher beschädigen, wenn sie ihn direktem Sonnenlicht aussetzen oder in der Nähe eines Heizkörpers aufstellen. Vermeiden Sie Standorte, die sehr heiß oder feucht werden könnten, oder Standorte, bei denen die Temperatur auf weniger als 5°C absinken könnte.
Netzspannung...
Für dieses Gerät ist eine Netzspannung mit 110 - 240 V AC 50 Hz erforderlich. Ihr Fernseher ist für den Betrieb mit dem mitgelieferten Adapter ausgelegt. Der Adapter wird während der Benutzung heiß-das ist normal. VERWENDEN SIE NUR DEN ADAPTER, DER MIT DIESEM FERNSEHER MITGELIEFERT WIRD. Verwenden Sie nur das Netzkabel, das mit der Einheit geliefert wird. Schließen Sie das Gerät nie an eine Gleichstromversorgung oder irgendeine andere Stromquelle an. Stellen Sie sicher, dass das Fernsehgerät nicht auf dem Stromkabel steht. Schneiden Sie den Netzstecker NIE von diesem Gerät ab. Er hat einen speziellen Funkstörungsfilter und wenn dieser entfernt wird, könnte dies die Leistung des Geräts beeinträchtigen. In Großbritannien ist die Sicherung in diesem Stecker durch ASTA oder BSI bis BS1362 genehmigt. Er sollte nur durch einen korrekt bestimmten und genehmigten Typ ersetzt werden und die Sicherungsabdeckung muss neu angepasst werden. FALLS SIE ZWEIFEL HABEN, FRAGEN SIE BITTE EINEN SACHKUNDIGEN ELEKTRIKER.
Erlaubt...
LESEN Sie die Bedienungsanleitung vor Beginn des Betriebs.
VERGEWISSERN Sie sich, dass sämtliche elektrische Verbindungen (einschließlich Netzkabel, Verlängerungskabel und die Verbindungen zwischen den Geräteteilen) ordnungsgemäß und im Anklang mit den Anweisungen des Herstellers angeschlossen sind. Ziehen Sie den Netzstecker aus der Netzsteckdose bevor Sie mit dem Herstellen oder der Änderung von Anschlüssen ansetzen.
LASSEN Sie sich von Ihrem Händler beraten, wenn Sie Zweifel an der Installation, dem Betrieb oder der Sicherheit des Geräts haben.
Bei der Handhabung von Glasplatten oder - Türen an dem Gerät ist äußerste Vorsicht GEBOTEN.
Verboten...
Entfernen Sie KEINE fest angeschraubten Deckel, da sonst gefährliche Spannung austreten kann.
Die Ventilationsöffnungen des Geräts dürfen NICHT mit Gegenständen wie Zeitungen, Tischtüchern, Vorhängen, etc. blockiert werden. Die Überhitzung kann eine Beschädigung oder Kürzung der Lebenserwartung des Geräts zur Folge haben.
Setzen Sie das Gerät KEINEM Tropfoder Spritzwasser aus und stellen Sie keine mit Flüssigkeit gefüllten
Behälter, wie z.B. Vasen, auf das Gerät.
Das Gerät muss NICHT von Wärmeund Flammenquellen wie brennenden Kerzen oder Lampen ferngehalten werden. Hohe Temperaturen können das Plastik schmelzen und zu Bränden führen.
Verwenden Sie KEINE selbst gemachten Ständer. Benutzen Sie NIEMALS Holzschrauben zur Befestigung. Um Sicherheit zu gewährleisten, verwenden Sie nur vom Hersteller empfohlene Ständer oder Gestelle mit anweisungsgemäßer Befestigung.
Stellen Sie bei Kopfhörerbetrieb immer NUR einen mäßigen Lautstärkepegel ein.
Wenn Sie den Kopfhörer über längere Zeit mit sehr hoher Lautstärke betreiben, kann es zu dauerhaften Gehörschäden kömmen. Lassen Sie KEINE Geräte ohne Aufsicht angeschaltet, es sei denn es wird ausdrücklich darauf hingewiesen, dass diese für unbeaufsichtigten Betrieb konzipiert sind oder über einen Standby-Betriebsmodus verfügen. Schalten Sie das Gerät durch Betätigen der Netztaste auf dem Gerät aus. Vergewissern Sie sich, dass Ihre Familie damit vertraut ist, wie man das macht. Für kranke oder behinderte Menschen können Sondereinrichtungen erforderlich sein.
NICHT weitergehen, wenn Sie Zweifel an der ordnungsgemäßen Funktion des Gerätes haben oder das Gerät beschädigt ist. Schalten Sie gegebenenfalls das Gerät aus, ziehen Sie den Netzstecker aus der Netzsteckdose und wenden Sie sich an Ihren Händler.
AM ALLERWICHTIGSTEN - Lassen Sie NIEMALS zu, dass besonders Kinder irgendetwas in Löcher, Nuten oder sonstige Öffnungen am Gehäuse hineinstecken. Dies kann einen elektrischen Schlag hervorrufen .
Verlassen Sie sich NIEMALS auf Zufälle oder Glück beim Umgang mit Elektrogeräten beliebiger Art – Sicherheit ist besser als Reue!
DER NETZSTECKER DIENT DAZU, DAS FERNSEHGERÄT VOLLSTÄNDIG VOM NETZ ZU TRENNEN UND MUSS DAHER LEICHT ZUGÄNGLICH SEIN.
DEUTSCH -6-
 Loading...