


MODEL 21S23B2
3M50301C Cov-In |
1 |
10/1/06, 9:48 |
SETTING UP
For your safety
This equipment has been designed and manufactured to meet international safety standards but, like any electrical equipment, care must be taken if you are to obtain the best results and safety is to be assured. So, please read the points below for your own safety. They are of a general nature, intended to help you with all your electronic consumer products and some points may not apply to the goods you have just purchased.
AirCirculation……
Leave at least 10cm clearance around the television to allow adequate ventilation. This will prevent the TV from overheating and consequential possible damage to the TV. Dusty places should also be avoided.
Heat Damage…
Damage may occur if you leave the TV in direct sunlight or near a heater. Avoid places subject to extremely high temperatures or humidity, or locations where the temperature is likely to fall below 5°C (41 °F).
MainsSupply……
The mains supply required for this equipment is 230 - 240V AC 50Hz. Never connect to a DC supply
or any other power source. DO ensure that the TV is not standing on the mains lead. In the UK, the fusefitted in this plug is 5A, and is approved by ASTA or BSI to this plug is 5A, and is approved by ASTA or BSI to BS1362. It should only be replaced by a correctly rated and approved type and the fusecover must be refitted. IF IN DOUBT PLEASE CONSULT A COMPETENT ELECTRICIAN.
TO FULLY DISCONNECT THE TV, SWITCH OFF THE MAINS SOCKET AND REMOVE THE POWER PLUG.
Do…
DO read the operating instructions before you attempt to use the equipment.
DO ensure that all electrical connections (including the mains plug, extension leads and inter-connections between pieces of equipment) are properly made and in accordance with the manufacturers’ instructions. Switch off and withdraw the mains plug before making or changing connections.
DO consult your dealer if you are ever in doubt about the installation, operation or safety of your equipment.
DO be careful with glass panels or doors on equipment.
Do not…
DON'T remove any fixed cover as this may expose dangerous voltages.
DON'T obstruct the ventilation openings of the equipment with items such as newspapers, tablecloths, curtains, etc. Overheating will cause damage and shorten the life of the equipment.
DON'T allow electrical equipment to be exposed to dripping or splashing or objects filled with liquids, such as vases, to be placed on the equipment.
DON’T place hot objects or naked flame sources, such as lighted candles or nightlights on, or close to equipment. High temperatures can melt plastic and lead to fires.
DON'T use makeshift stands and NEVER fix legs with wood screws. To ensure complete safety, always fit the manufacturer’s approved stand or legs with the fixings provided according to the instructions.
DON'T listen to headphones at high volume, as such use can permanently damage your hearing.
DON'T leave equipment switched on when it is unattended, unless it is specifically stated that it is designed for unattended operation or has a standby mode. Switch off using the switch on the equipment and make sure your family know how to do this. Special arrangements may need to be made for infirm or handicapped people.
DON'T continue to operate the equipment if you are in any doubt about it working normally, or it is damaged in any way – switch off, withdraw the mains plug and consult your dealer.
DON'T throw your old batteries into a fire, dispose of them in a designated disposal area.
ABOVE ALL – NEVER let anyone, especially children, push anything into holes, slots or any other openings in the case – this could result in a fatal electric shock.
NEVER guess or take chances with electrical equipment of any kind – it is better to be safe than sorry.
3M50301C Cov-In |
2 |
10/1/06, 9:48 |

Features
•Your television has an Automatic Tuning System which makes tuning in your television easy. This Automatic Tuning System scans the entire reception range in your area and automatically stores all available channels of suitable signal strength. This will allow you to obtain the best possible sound and picture. Your television store BBC1 in channel position 1 and BBC 2 in channel position 2 etc. Channel 6 is reserved for the channel from satellite system, cable or digital terrestrial STB. Your television also has scart connecters allowing improved reception from a VCR, satellite system, a DVD player, cable or digital terrestrial STB connections.
•The programmable on and off timer can be set to switch your television automatically. If the channel being viewed stops broadcasting, your television will switch to standby after 15 minutes.
•The remote control allows you to operate the various functions of your television (when switched on) from the comfort of your favourite viewing position.
•The on screen display allows precise remote control adjustment of brightness, contrast, colour and sharpness. When you select a channel or make other changes, your television will show an indicator on the screen for a few seconds.
•Your TV can be connected to a video cassette recorder or to a hi-fi system for enhanced picture and sound quality using a SCART lead.
•Your television is fitted with a NICAM stereo decoder. NICAM provides a new dimension to your TV by enhancing the sound quality to the point where it compares to hi-fi audio systems. You have full control over sound balance, bass and treble.
•Your TV allows you to access Teletext, the magazine services operated by television companies. A variety of information is available including News, Weather, Financial and Travel information. In addition to Teletext your television incorporates Fastext. Using the four coloured Fastext buttons on the remote control you may move around Teletext services with greater ease and speed.
|
Contents |
Television and remote control ........................................................................................... |
2 |
How to insert batteries in the remote control ..................................................................... |
3 |
Connecting an aerial or a VCR ......................................................................................... |
4 |
Connecting a VCR and Satellite/Cable/Digibox using a SCART lead ............................... |
5 |
How to tune in television stations ...................................................................................... |
6 |
Channel Mapping .............................................................................................................. |
8 |
Manual Tuning ................................................................................................................ |
10 |
Operating your television ................................................................................................ |
12 |
NICAM stereo sound ....................................................................................................... |
14 |
Adjusting the picture ........................................................................................................ |
16 |
On screen information/EXT COLOUR Adjusting ............................................................. |
17 |
Setting the Panel Lock protection ................................................................................... |
18 |
EXT2 SET Menu Option .................................................................................................. |
19 |
Timer functions ................................................................................................................ |
20 |
Language selection ......................................................................................................... |
21 |
Teletext feature ............................................................................................................... |
22 |
Before requesting service please check the following points .......................................... |
26 |
Specifications .................................................................................................... |
back cover |
1
1
3M50301C P01-07 |
1 |
10/1/06, 9:48 |

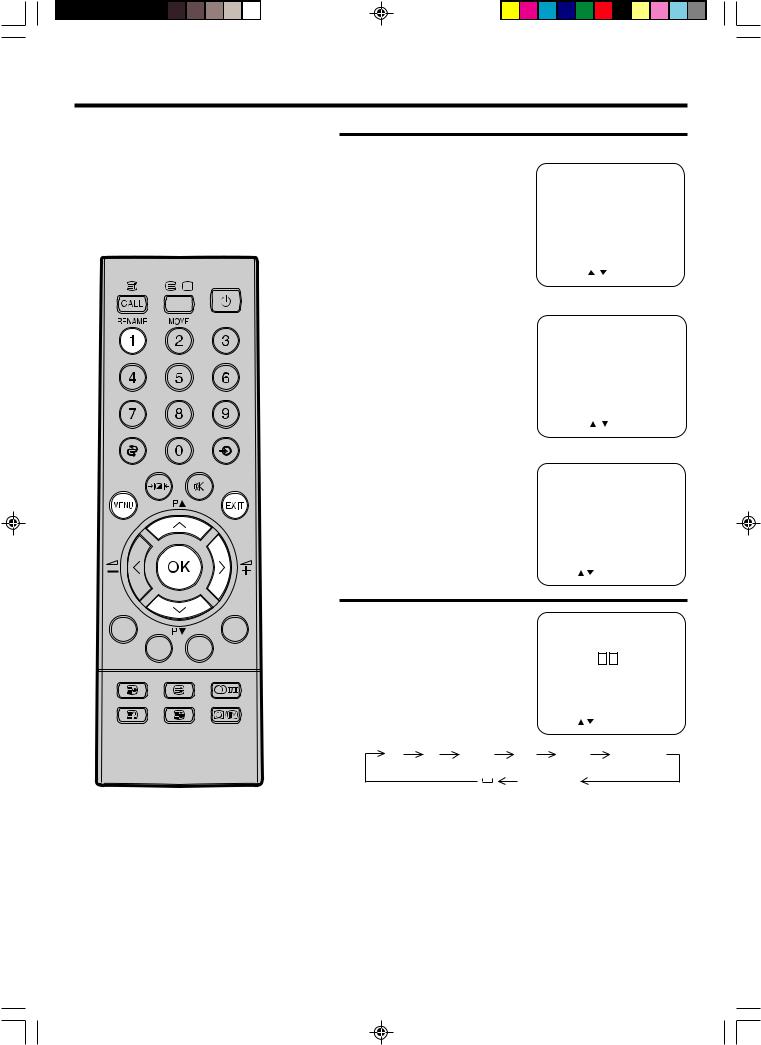
Television and remote control
The majority of buttons listed in this section have the same function as the corresponding buttons on the remote control.
Front view of your TV |
Back view of your TV |
P |
AUDIO |
|
|
|
|
VIDEO 3 L/MONO R |
|
|
|
|
|
Main power switch ON/OFF |
Aerial socket |
SCART (EXT2) socket |
|
||
Remote control sensor |
Headphone socket |
|
|
Mains lead |
|
Power indicator |
SCART (EXT1) socket |
|
|||
Video (EXT3)/Audio (L/R) sockets |
|
|
|
Page |
|
On Timer ( ) indicator Channel UP/DOWN buttons |
|
|
|
17, 24 |
|
Volume UP/DOWN buttons |
Call/Text Index |
|
|
||
|
|
|
|
|
|
Remote Control |
Text/Mix/TV |
|
|
22~24 |
|
|
Standby |
|
|
|
6, 12, 21 |
|
~ |
|
|
|
12 |
|
Previous |
|
|
|
17 |
|
Input Select |
|
|
13 |
|
|
|
|
|
7~11, 14~21 |
|
|
Selectable Picture |
|
16 |
||
|
Mute |
|
|
|
13 |
|
Exit |
|
|
6~9, 11, 14~21 |
|
|
CH Up |
|
|
7~12, 14~21, 23 |
|
|
CH Down |
|
7~12, 14~21, 23 |
||
|
Volume Down |
|
10~11, 13, 15~16 |
||
|
Volume Up |
8, 10~11, 13, 15~16 |
|||
|
|
|
|
6~11, 14~ 21 |
|
|
Four Coloured Fastext keys |
22, 23 |
|||
|
Sub Page |
|
|
24 |
|
|
F/T/B |
|
|
|
25 |
|
Audio Select |
|
|
15 |
|
2 |
Reveal |
|
|
|
25 |
Hold |
|
|
|
24 |
|
|
Time/Text Cancel |
|
|
24, 25 |
|
3M50301C P01-07 |
2 |
10/1/06, 9:48 |

How to insert batteries in the remote control
Push and lift the battery cover on the back of the remote control. Use two UM4 / AAA / IEC R03 1.5V batteries for the remote control. Insert the batteries according to the polarity illustration inside the battery compartment.
Make sure + matches + and – matches –.
NOTES: |
|
Remote control operation may |
|
The batteries may last approximately |
|
become erratic if direct sunlight, |
|
one year depending on how much |
|
fluorescent lamp, standard |
|
|
household lamp (incandescent) or |
||
the remote control is used. For best |
|
||
|
any other strong light source shines |
||
performance it is recommended that |
|
||
|
on the remote sensor on your TV. |
||
batteries are replaced on a yearly |
|
||
|
|
||
basis, or when remote control |
|
Make sure there are no obstacles |
|
operation becomes erratic. |
|
||
|
between your TV and the remote |
||
|
|
||
Do not mix old and new batteries or |
|
control. |
|
|
|
||
different types. |
|
Do not operate your TV from a |
|
Dispose of them in a designated |
|
distance greater than 5 metres. |
|
disposal area. |
|
Do not operate your TV away from |
|
|
|
||
Weak batteries can leak and |
5 metres |
the normal viewing angle; over 30o |
|
either side of the remote sensor on |
|||
severely damage your remote |
|
||
|
your TV. |
||
control. Always remove batteries |
|
||
|
|
||
immediately they become weak, or |
|
|
|
if your television is not to be used |
|
|
|
for a long time. |
|
|
3
3M50301C P01-07 |
3 |
10/1/06, 9:48 |
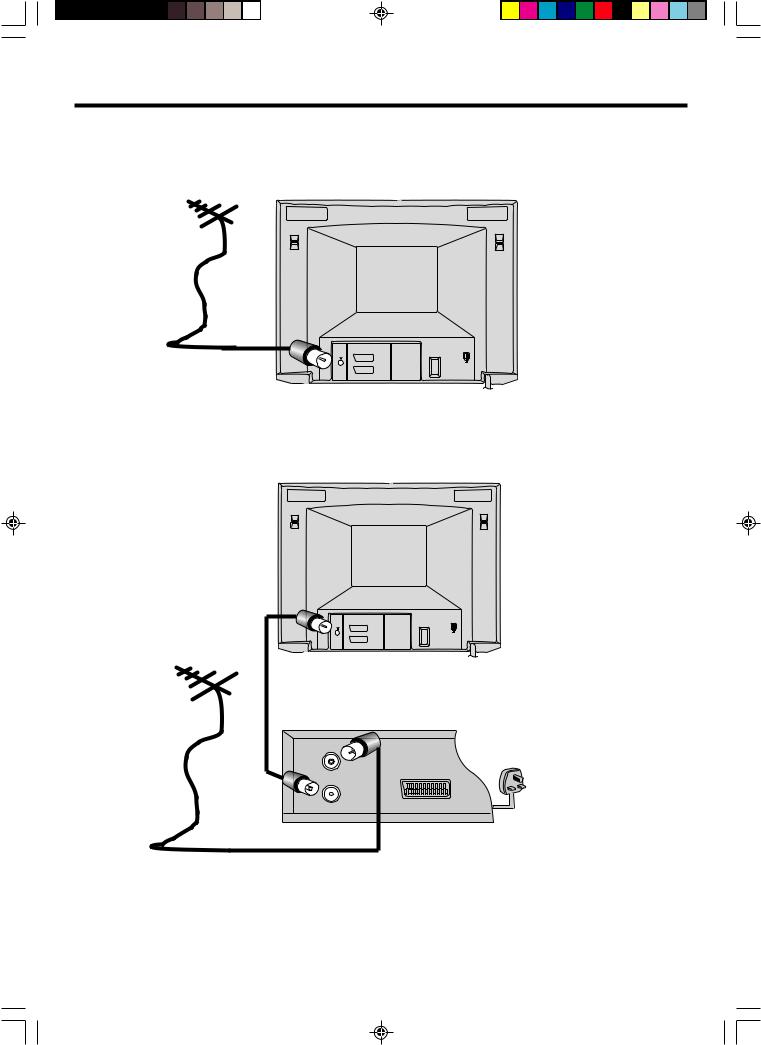
Connecting an aerial or a VCR
Your television can be tuned to receive up to 100 television broadcast stations (1-100). Before you can tune in these stations your television must be connected to an aerial. Using an external aerial instead of the loop aerial may improve the TV's reception.
Aerial(not supplied) |
Back view of your TV |
If you wish to record and playback through a VCR please follow the guidance given on this and the opposite page.
Back view of your TV
Aerial(not supplied)
Aerial connector lead(not supplied)
Back view of a VCR(not supplied)
IN
OUT
NOTES:
•All connections must be made with both your TV and VCR unplugged from the mains supply.
•The type of aerial required depends on the position of your home, it's distance from the transmitter and local interference. If you do not have an aerial and you are uncertain of what to buy, you should seek the advice of a local aerial contractor.
4
3M50301C P01-07 |
4 |
10/1/06, 9:48 |
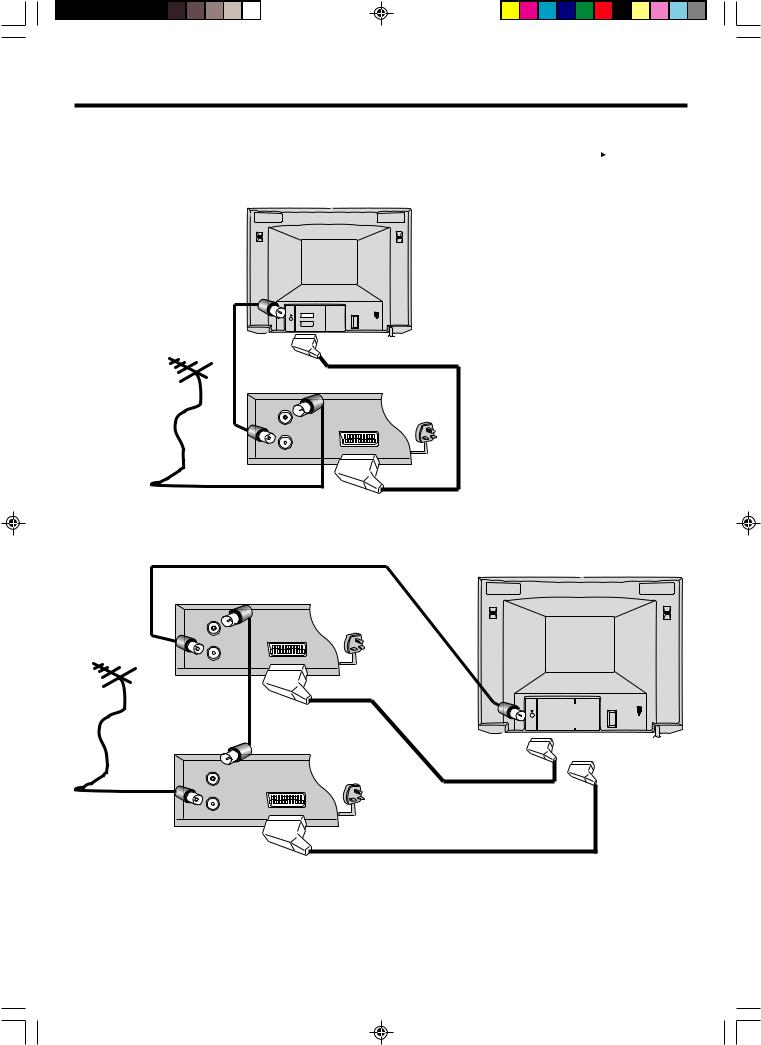
Connecting a VCR and Satellite/Cable/Digibox using a SCART lead
By using a SCART lead you can improve the quality of playback. Remember you must still have the "normal" aerial connector connected as shown on the opposite page. If you are using a SCART lead you should not have to tune your TV to your VCR; instead select the appropriate EXT input by repeatedly pressing the  (INPUT SELECT) button on the remote control until you see the signal from the VCR.
|
Back view of your TV |
If you want to enjoy Stereo sound |
|
|
|
|
|
|
|
|
you must select the AV channel on |
|
|
|
your TV and have your Stereo VCR |
|
|
|
connected using a SCART lead. |
|
|
|
Please note the AV channel is not |
|
|
|
the same as the channel you would |
|
|
|
normally view your video on using |
Aerial connector |
|
|
the "normal" aerial lead. Remember |
lead(not supplied) |
|
|
the programme you are viewing or |
|
|
|
video tape you are playing back |
Aerial(not supplied) |
To EXT2 |
SCART lead(not supplied) |
must be broadcast or recorded in |
|
|
stereo in order for you to enjoy |
|
|
Back view of a VCR(not supplied) |
stereo sound! |
|
|
IN |
To Aerial IN of VCR |
|
|
|
|
|
|
OUT |
|
|
To Aerial OUT of VCR |
|
|
|
Back view of your TV
Back view of a VCR(not supplied)
IN
To Aerial IN of VCR
Aerial(not supplied)
OUT
To Aerial OUT of VCR
 EXT2
EXT2
 EXT1
EXT1
To Aerial OUT |
Satellite/Cable/Digibox(not supplied) |
|
To EXT2 |
OUT |
To EXT1 |
|
To Aerial IN
IN
SCART lead(not supplied)
NOTES:
•All connections must be made with both your TV and VCR unplugged from the mains supply.
•The type of aerial required depends on the position of your home, it's distance from the transmitter and local
interference. If you do not have an aerial and you are uncertain of what to buy, you should seek the advice of a |
5 |
local aerial contractor. |
|
|
3M50301C P01-07 |
5 |
10/1/06, 9:48 |
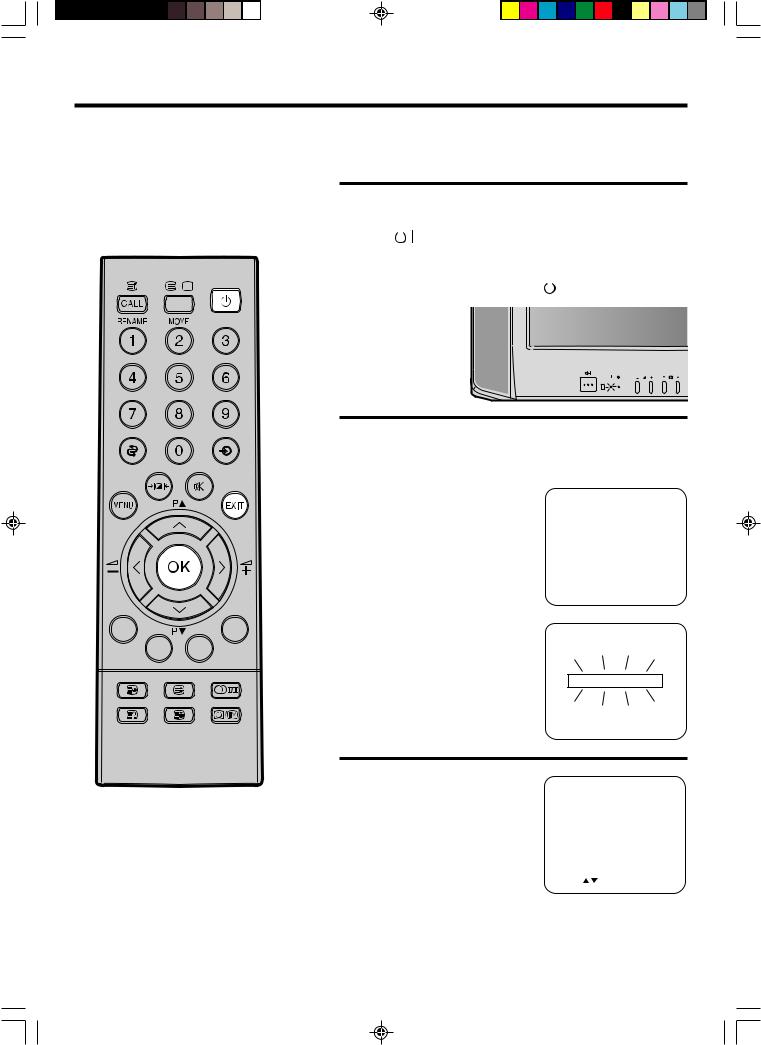
How to tune in television stations
Your television has an Automatic Tuning System which makes tuning in your television easy. This Automatic Tuning System scans the entire reception range in your area and automatically stores all available channels of suitable signal strength in the correct order e.g. BBC1 will tune into channel 1, BBC2 will tune into channel 2, etc.
NOTES:
•ONLY WHEN YOU TURN ON THIS SET FOR THE FIRST TIME, THE AUTOMATIC TUNING PROCESS WILL START AUTOMATICALLY.
•Please refer to your Satellite instruction book to see how to select Sky One.
6
Before you can view a television station it must be stored in your television memory, this section will show you how to achieve this. You cannot tune TV channels if the aerial is not connected to the aerial socket of your television.
1 Make sure that your TV is properly installed.
Press  (main power) switch on the front panel, the red standby indicator will light.
Switch on your television by pressing (standby) on the remote control.
P
2 If you have a VCR connected make sure that it is switched on and it's test pattern is switched on or a video is playing . . .
you will be unable to see anything at the moment!
If you have a Satellite system connected make sure that it is switched on and you have selected Sky One. . . you will be unable to see anything at the moment!
Press OK on your remote control!
Your TV will now automatically tune in all available channels.
AUTOMATIC TUNING
When the programme on the |
|
|
|
|
|
|
3 screen stops changing and the |
CHANNEL MAPPING |
|
||||
sound comes on, the tuning |
1 |
BBC1 |
6 |
SAT1 |
11 |
|
process is complete. |
2 |
BBC2 |
7 |
|
|
12 |
|
3 |
ITV |
8 |
|
|
13 |
|
4 |
CH4 |
9 |
|
|
14 |
Press EXIT to clear the |
5 |
CH5 |
10 |
|
|
15 |
|
|
|
|
|
|
|
CHANNEL MAPPING menu |
PRESS : / / RENAME / MOVE/MENU/EXIT |
display. |
|
Your TV is now tuned in and ready to watch...
If you wish to change the order that the stations are stored in, refer to the Channel Mapping section in this book.
3M50301C P01-07 |
6 |
10/1/06, 9:48 |

How to tune in television stations
NOTE:
Your TV stations, Video (if connected) and Satellite (if connected) should be tuned in the following order:
BBC 1 |
channel 1 |
BBC2 |
channel 2 |
ITV |
channel 3 |
CHANNEL 4 |
channel 4 |
CHANNEL 5 |
channel 5 (if receivable) |
SATELLITE |
channel 6 |
VCR |
channel 7 |
Your VCR will be stored in a channel position if connected with an aerial lead to the TV. If it is connected by just a SCART lead your VCR can be viewed by pressing
 .
.
1 Press MENU on your remote control. The on screen display will appear.
Press P ▲ or P ▼ on your remote control to select SETUP menu.
•When you plug the AC mains lead in for the first time, the Language menu will appear instead of the main control menu. Select the language required.
ON/OFF TIMER
SETUP
PICTURE
SOUND
NICAM AUTO OFF
EXT COLOUR AUTO
LANGUAGE
PANEL LOCK ON OFF
EXT2 SET
PRESS :  /
/ /OK/MENU/EXIT
Press OK to confirm. |
SETUP |
||||
2 The SETUP on screen display |
|||||
MANUAL TUNING |
|||||
will appear. |
|||||
AUTOMATIC TUNING |
|
|
|||
Press P ▲ or P ▼ to select |
|
||||
CHANNEL MAPPING |
|||||
AUTOMATIC TUNING. |
|||||
|
|
|
|
||
|
PRESS : / /OK/MENU/EXIT |
||||
|
|
|
|
|
|
3 Press OK to confirm. This will |
|
|
|
|
|
start the automatic tuning |
|
|
|
|
|
process. |
|
|
|
|
|
• This process will take a few |
|
|
|
|
|
minutes to complete ... please |
|
AUTOMATIC TUNING |
|
||
|
|
|
|
||
be patient. |
|
|
|
|
|
4 When the programme on the screen stops changing and the sound comes on, the tuning process is complete.
Press EXIT to clear the CHANNEL MAPPING menu display.
CHANNEL MAPPING |
|
|||||
1 |
BBC1 |
6 |
SAT1 |
11 |
||
2 |
BBC2 |
|
7 |
|
|
12 |
3 |
ITV |
8 |
|
|
13 |
|
4 |
CH4 |
9 |
|
|
14 |
|
5 |
CH5 |
10 |
|
|
15 |
|
PRESS : |
/ / RENAME / MOVE/MENU/EXIT |
|||||
Your TV is now tuned in and ready to watch ... If any stations have been missed refer to the manual tuning section in this book.
7
3M50301C P01-07 |
7 |
10/1/06, 9:48 |
Channel Mapping
Broadcast names can be changed or added by TO CHANGE A BROADCAST NAME using the Channel Mapping menu below.
1 Press MENU on your remote
control. The on screen display |
ON/OFF TIMER |
||||||||||||
will appear. |
|
||||||||||||
|
SETUP |
|
|
|
|
|
|
|
|
||||
|
|
|
|
|
|
|
|
|
|
||||
|
|
PICTURE |
|
|
|
|
|
|
|
||||
Then press P▲ or P▼ to select |
SOUND |
|
|
|
|
|
|
|
|||||
NICAM |
AUTO |
OFF |
|||||||||||
SETUP menu. Press OK to |
|||||||||||||
EXT COLOUR |
AUTO |
||||||||||||
confirm. |
LANGUAGE |
|
|
|
|
||||||||
PANEL LOCK ON |
OFF |
|
|||||||||||
|
|
EXT2 SET |
|
|
|
|
|
|
|
||||
|
|
PRESS : |
/ /OK/MENU/EXIT |
||||||||||
|
|
|
|
|
|
|
|
|
|
|
|
|
|
2 Press P▲ or P▼ to select |
|
|
|
|
|
|
|
|
|
|
|
||
CHANNEL MAPPING menu. |
SETUP |
|
|
|
|
|
|
|
|||||
Press OK to confirm. |
MANUAL TUNING |
||||||||||||
|
|
AUTOMATIC TUNING |
|||||||||||
|
|
CHANNEL MAPPING |
|
||||||||||
|
|
PRESS : |
/ |
|
/OK/MENU/EXIT |
||||||||
|
|
|
|
|
|
|
|
|
|
|
|
|
|
3 Press P▲ or P▼ to select the |
|
|
|
|
|
|
|
|
|
|
|
||
TV section to be named. |
CHANNEL MAPPING |
||||||||||||
Press the number “1” to |
1 |
BBC1 |
6 |
SAT1 11 |
|||||||||
rename a broadcast. The |
2 |
BBC2 |
|
7 |
|
|
12 |
||||||
CHANGE BROADCAST |
3 |
ITV |
8 |
13 |
|||||||||
NAME menu will appear. |
4 |
CH4 |
9 |
14 |
|||||||||
5 |
CH5 |
10 |
15 |
||||||||||
|
|
||||||||||||
|
|
PRESS : / |
/ RENAME / MOVE/MENU/EXIT |
||||||||||
4 Press P▲ or P▼ to name the desired letter, then press  + to store.
Repeat these steps for the next character, then press OK.
The display changes as follows:
CHANGE BROADCAST NAME
1 |
BBC1 |
6 |
SAT1 |
11 |
2 |
BBC2 |
7 |
A |
12 |
3 |
ITV |
8 |
|
13 |
4 |
CH4 |
9 |
|
14 |
5 |
CH5 |
10 |
|
15 |
PRESS : |
/ / + / - /OK/MENU/EXIT |
|||
A B … Z 0 … 9 .  /
/
–  +
+
(Space)
Repeat the step 3 and 4 for other TV stations.
Press EXIT to remove the menu from the screen.
8
3M50301C P08-11 |
8 |
10/1/06, 9:48 |
 Loading...