


 Loading...
Use and care |
|
|
G U I D E |
DWHD650W** DWHD660W** |
|
|
|
|
|
|
|
Dishwasher |
|
|
THERMADOR.COM

Table of
C O N T E N T S
Safety Definitions ............................................................ |
4 |
IMPORTANT SAFETY INSTRUCTIONS ........................... |
5 |
Causes of Damage .......................................................... |
7 |
Getting Started ............................................................... |
8 |
Home Connect™ .......................................................... |
11 |
Water softening system / special salt * ......................... |
13 |
Rinse Aid ....................................................................... |
15 |
Loading the Dishwasher ................................................ |
16 |
Detergent ...................................................................... |
26 |
Dishwasher Cycles ........................................................ |
28 |
Dishwasher Cycle Options ............................................ |
29 |
Operating the Dishwasher ............................................ |
31 |
Care and Maintenance .................................................. |
34 |
Troubleshooting ............................................................ |
37 |
Customer Service .......................................................... |
42 |
Statement of Limited Product Warranty ....................... |
43 |

Safety Definitions
9WARNING
This indicates that death or serious injuries may occur as a result of non-observance of this warning.
9CAUTION
This indicates that minor or moderate injuries may occur as a result of non-observance of this warning.
NOTICE: This indicates that damage to the appliance or property may occur as a result of non-compliance with this advisory.
Note: This alerts you to important information and/or tips.
4

9 IMPORTANT SAFETY INSTRUCTIONS
READ AND SAVE THESE INSTRUCTIONS
This dishwasher is provided with Installation Instructions and this Use and Care Manual. Read and understand all instructions before using the dishwasher.
This dishwasher is intended for use up to a maximum altitude of 13,000 ft (4,000 meters) above sea level.
To reduce the risk of fire, electrical shock, or serious injury, observe the following:
WARNING
RISK OF INJURY OR DEATH
Misuse of the dishwasher can result in serious injury or death. Do not use the dishwasher in any way not covered in this manual or for any purpose other than those explained in the following pages.
WARNING
RISK OF INJURY
Severe injury and/or product damage could result from the use of unauthorized service technicians or nonoriginal replacement parts. All repairs must be performed by an authorized service technician using only original equipment factory replacement parts.
Never use harsh chemicals to clean your dishwasher. Some bleach-based products can damage your dishwasher and may present health hazards!
GROUNDING INSTRUCTIONS
This appliance must be grounded to a metal, permanent wiring system or an equipment grounding conductor must be run with the circuit conductors and connected to the equipment grounding terminal or lead on the dishwasher. See the Installation Instructions included with this dishwasher for more information on electrical requirements.
WARNING
RISK OF ELECTRIC SHOCK
This appliance must be grounded. In the event of a malfunction or breakdown, grounding will reduce the risk of electric shock by providing a path of least resistance for electric current. This appliance is equipped with a cord having an equipment-grounding conductor. Improper connection of the equipment-grounding conductor can result in risk of electric shock. Check with a qualified electrician if you are in doubt whether the appliance is properly grounded.
WARNING
RISK OF ELECTRICAL SHOCK OR FIRE
Electrical shock or fire could result if the electrical supply for the dishwasher covered in this manual is incorrectly installed or if the dishwasher has been improperly grounded. Do not use the dishwasher covered in this manual unless you are certain the electrical supply has been correctly installed and the dishwasher has been properly grounded.
WARNING
HEALTH HAZARD
Safe Operation
Use this dishwasher only for its intended function, which is the washing of household dishware and kitchenware rated as dishwasher safe.
Use only detergents or rinsing agents recommended for use in a dishwasher, and keep them out of the reach of children.
CAUTION
When loading items to be washed:
Locate sharp items so they are not likely to damage the door seal.
Load knives and other sharp utensils with their HANDLES UP to reduce the risk of cut-type injuries.
Do not wash plastic items unless they are marked “dishwasher safe” or the equivalent. For plastic items not so marked, check the manufacturer’s recommendations.
Do not operate your dishwasher unless all enclosure panels are in place.
Do not tamper with or override controls and interlocks.
Do not abuse, sit or stand on the door or dish racks of the dishwasher.
5

9 IMPORTANT SAFETY INSTRUCTIONS
READ AND SAVE THESE INSTRUCTIONS
WARNING
RISK OF INJURY
To avoid risk of injury, always use caution when opening the door during or following a wash cycle as hot water or steam may escape. Do not fully open the door until water noises have stopped and steam has subsided.
To reduce risk of injury, do not allow children to play in or on the dishwasher.
When children become old enough to operate the appliance, it is the responsibility of the parents/legal guardians to ensure the children are instructed in safe practices by qualified persons.
NSF/ANSI 184 Certified residential dishwashers are not intended for licensed food establishments.
Proper Care and Maintenance
WARNING
RISK OF EXPLOSION
Under certain conditions, hydrogen gas may be produced in a hot water system that has not been used for two weeks or more. Hydrogen gas is explosive. Before using a dishwasher that is connected to a hot water system that has been unused for two weeks or longer, turn on all hot water faucets and let the water flow from each for several minutes. This will release any accumulated hydrogen gas. As the gas is explosive, do not smoke or use an open flame during this time.
Remove the dishwasher door to the washing compartment when removing an old dishwasher for service or discarding.
To avoid floor damage and possible mold growth, do not allow wet areas to remain around or under the dishwasher.
Note: To avoid dishwasher damage, do not allow water to remain in your dishwasher systems through extended periods of freezing temperatures. Freezing temperatures can damage the water fill valve and potentially other components of your dishwasher.
NOTICE: It is highly recommended for the end user to become familiar with the procedure to shut off the incoming water supply and the procedure to shut off the incoming power supply. See the Installation Instructions or contact your installer for more information.
State of California Proposition 65 Warning:
WARNING
This product can expose you to chemicals including vinyl chloride, which is known to the State of California to cause cancer and birth defects or other reproductive harm. For more information go to
www.P65Warnings.ca.gov.
6

Causes of Damage
NOTICES
Never use steam cleaning products to clean your dishwasher. The manufacturer will not be liable for the possible damages or consequences.
To avoid possible dishwasher damage, do not use harsh chemicals, bleach-based wipes, abrasive cleaners, scouring pads (metal or plastic), or abrasive cloths/paper towels to clean your dishwashers exterior door panel. Your dishwasher's exterior door panel can be damaged by doing so.
To avoid dishwasher damage, do not load the dishwasher with paper products, plastic bags, packing materials or anything other than normal, dishwasher safe dishware and kitchenware.
Protect your dishwasher from the elements. Protect against freezing to avoid possible damage to the fill valve. Damage caused by freezing is not covered by the warranty.
7
Getting Started
Appliance overview
|
|
|
|
|
6WDUW
6HWXS VHF 5HVHW VHF
|
|
|
|
|
|
|
|
|
|
|
|
|
|
8

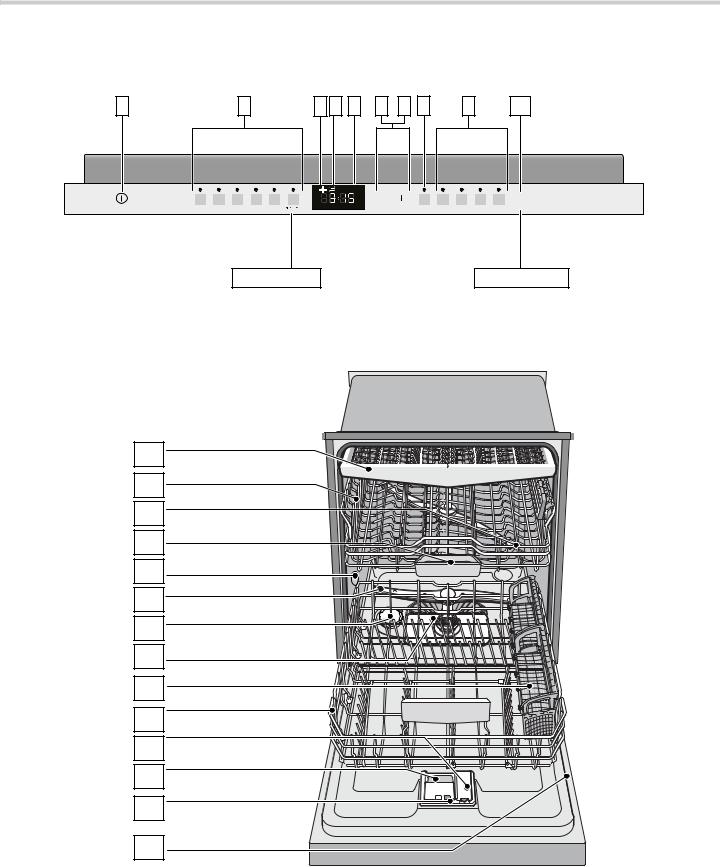
The numbers stated below refer to the overview images on the previous page of this manual.
Operating panel
( On/Off button
0 Wash cycles**
8 Rinse aid refill indicator
@Salt refill indicator
H Digital display
P Selection buttons
X Delay start button
`Remote start buttton
h Wash cycle options**
)" START button
Note: Some of the wash cycles and options will vary by model.
Dishwasher interior components
1* Third rack
12 Upper rack
1:Upper spray arm
1B |
Detergent tab tray |
1J |
Vent hole |
1R |
Lower spray arm |
1Z |
Dispenser for special salt * |
1b |
Filters |
1j |
Silverware basket * |
9" |
Lower rack |
9* |
Rinse aid dispenser |
92 |
Detergent dispenser |
9:Lock for detergent dispenser
9B Rating plate
* optional feature which may or may not be included with your dishwasher.
Display indicators
‹:‹‹ |
Cycle time remaining |
%Lights up when rinse aid is low
$ |
Lights up when salt is low |
| |
Lights up when wifi is connected |
9
Menu Overview
The dishwasher has been preset with certain settings for your convenience. You can change these factory settings.
Change the setting as follows:
1.Open the door.
2.Press the ON/OFF button (.
3.Press and hold the ‹button for 3 seconds until
•:‹... is shown on the display window H
4.Press the ‹button to access the individual settings.
5.Adjust the setting using the + and - buttons. P.
6.Press and hold the ‹button for 3 seconds. The chosen setting has now been stored.
Note: If you want to change several settings, first make all your changes one after the other. Then press the ‹button for 3 seconds. All the settings will then be stored in the dishwasher.
Setting |
Factory set- |
Description |
|
ting |
|
|
|
|
• Water hardness |
•:‹‹ |
Setting the water hardness. When using Multitabs, select the lowest setting. |
•:‹‹ - •:‹ˆ |
|
|
|
|
|
§ Rinse aid |
§:‹† |
Amount of rinse aid affects drying. |
§:‹‹ - §:‹‡ |
|
|
|
|
|
†“ Sensor setting |
†“:‹‹ |
Adjustment of the soil detection for optimum cleaning. |
†“:‹‹ -†“:‹ƒ |
|
|
|
|
|
š Intensive drying |
š:‹‹ / Off |
Improved drying for glasses and plasticware. |
š:‹‹ - š:‹‚ |
|
|
|
|
|
˜ Auto power off |
˜:‹‹ |
Dishwasher automatically switches off at the end of each cycle. |
˜:‹‹ - ˜:‹ƒ |
|
|
|
|
|
‚ Info light * |
‚:‹‚ / On |
Light is projected to signal an active wash cycle. |
‚:‹‹ - ‚:‹‚ |
|
|
|
|
|
à Time light * |
à:‹‚ |
Time light is on. |
à:‹‹ - à:‹‚ |
|
|
|
|
|
à˜ Last program |
à˜:‹‚ |
Defaults to last program used. |
used |
|
|
à˜:‹‹ - à˜:‹‚ |
|
|
|
|
|
à– Signal volume |
à–:‹ƒ |
Volume of the signal at the end of a program. |
à–:‹‹ - à–:‹„ |
|
|
|
|
|
›– Button volume |
›–:‹ƒ |
Volume of the button sound. |
›–:‹‹ - ›–:‹„ |
|
|
|
|
|
’Ÿ Wifi off/on |
’Ÿ:‹‹ |
Wifi connection is off. |
’Ÿ:‹‹ - ’Ÿ:‹‚ |
|
|
|
|
|
‘’ Auto Connect |
|
WPS: Auto pairing. |
|
|
|
à‘ Manual Connect |
|
SAP: Manual connection. |
|
|
|
‘˜:˜ App Pair |
|
Pair appliance to app. |
|
|
|
§“ Factory Reset |
|
“Yes” |
|
|
|
* optional feature which may or may not be included with your dishwasher.
10
Home Connect™
This dishwasher is Wi-Fi capable and can be remotely controlled via a mobile device.
If your dishwasher does not connect to the home network, you can also operate the dishwasher manually by pressing the buttons.
Refer to appliance overview for the location of the buttons. ~ "Appliance overview" on page 8
Wi-Fi |
You can activate wireless network connection with ’Ÿ:‹‚ or deactivate it with ’Ÿ:‹‹.
Activate Wi-Fi:
1.Press the on ON/OFF button (.
2.Press and hold the button ‹for 3 seconds.
In the display window Hyou will see •:‹... and ‘ .
3.Press the button ‹ repeatedly until ’Ÿ:‹‹ appears in the display window H.
4.Use the setting button + P to activate Wi-Fi ’Ÿ:‹‚.
5.Press and hold the button ‹ for 3 seconds.
The chosen setting has now been stored in your dishwasher.
Note: Remote control of the dishwasher requires a stable wireless network connection.
Network login
To connect the dishwasher to your home network, you can choose between automatic ‘’ and manual network login †‘. To do this, check to see if there is a WPS function on your router.
Automatic network login ‘’: Connect to the home network using the WPS function of your router. During connection press the WPS button on the router.
Manual network login †‘: Connect your mobile device to the network (SSID):__________, password (key):
__________. The network settings are then manually entered using the Home Connect App to connect to your home network.
Connect dishwasher to home network and app:
1.Switch on ON/OFF switch (.
2.Press and hold the button ‹for 3 seconds.
In the display window Hyou will see •:‹... and ‘ .
3.Press the button ‹ repeatedly until H ‘’ or †‘ appears in the display window.
4.Start connection with the setting button + P. In the display window H you will see ˜‘.
Following successful connection to your home network ™:©Ÿ appears briefly in the display window H.
The dishwasher then automatically starts connection to the app. During connection ‘˜:˜ appears in the display window H.Following successful connection to the app ™:©Ÿ appears in the display window H.
Observe the Home Connect documents supplied.
Note: The menu items ‘’ and †‘ are not available until Wi-Fi has been activated.
Connect to the app
The setting ‘˜:˜ establishes the link between the dishwasher, app and your user account.
Note: This step should only be carried out if the dishwasher has not yet automatically connected to the app.
Connect dishwasher to app:
1.Switch on ON/OFF switch (.
2.Press and hold the button ‹for 3 seconds.
In the display window Hyou will see •:‹... and ‘ .
3.Press the button ‹ repeatedly until ‘˜:˜ appears in the display window H.
4.Start connection with the setting button + P.
If connection is successful, ™:©Ÿ appears in the display window H.
Observe the Home Connect documents supplied.
Note: The menu item ‘˜: ˜ is not available until there is a connection to the home network.
About data protection:
When your Home Connect dishwasher is connected for the first time to a WLAN network which is connected to the Internet, your Home Connect dishwasher transmits the following categories of data to the Home Connect server (initial registration):
Unique appliance identification (consisting of appliance codes as well as the MAC address of the installed Wi-Fi communication module).
Security certificate of the Wi-Fi communication module (to ensure a secure IT connection).
The current software and hardware version of your dishwasher.
Status of any previous resetting to factory settings.
This initial registration prepares the Home Connect functions for use and is activated the first time you use these Home Connect functions. Please note that the Home Connect functions can be used only in conjunction with the Home Connect App. Information on data protection can be accessed in the Home Connect App.
11
Remote start button
If the dishwasher is connected to the home network, you can activate the dishwasher's remote control.To do so, press the remote start button `.
If the dishwasher has not yet logged into Home Connect, perform automatic network login ‘’ by pressing the remote start button `.
Observe the Home Connect documents supplied.
Notes
To remotely control the dishwasher, the remote start button ` must be activated.
The remote start button ` goes out when the login process is complete.
Opening the door deactivates remote control.
If the connection to the router fails, | flashes on the display.
Wi-Fi without a connection to the Home Connect server ƒ
You can use the Home Connect App to disconnect from the Home Connect server.
The appliance is then locally connected to your mobile device without any connection to the Home Connect server.
Note: If you did not deactivate the connection to the Home Connect server, check your Internet connection.
Remote diagnostics
Customer Service can use remote diagnostics to access your appliance if you contact them. In the display window H you will see ’†. Confirm Customer Service access using the setting button + P.
Note: You can switch off remote diagnostics using the ON/OFF switch ( or deactivate Customer Service access in the Home Connect app.
12

Water softening system / special salt *
To ensure good rinsing results, the dishwasher requires soft water, i.e. water which is low in lime, otherwise limescale will be deposited on the utensils and interior container. Tap water above 7° dH (1.2 mmol/l) must be softened. The water is softened with special salt (regeneration salt) in the water softening system
of the dishwasher. The setting and therefore the required amount of salt depends on the degree of hardness of your tap water (see following water hardness table).
* optional feature which may or may not be included with your dishwasher.
Adjusting the water softener settings
|
Using the test strip included with your |
Water soft- |
Add salt to salt |
Water hardness |
|||||
|
|
dishwasher |
ener setting |
dispenser |
|
|
|||
°E value |
mmol/l |
||||||||
|
(Purchased test strips may have a differ- |
|
|
|
|
||||
|
|
|
ent scale) |
|
|
|
|
||
|
|
|
|
|
|
|
|
|
|
|
|
|
|
|
|
•:‹‹ |
No |
0-8 |
0-1.1 |
|
|
|
|
|
|
||||
|
|
|
|
|
|
|
|
|
|
|
|
|
|
|
|
•:‹‚ |
Yes |
9-10 |
1.2-1.4 |
|
|
|
|
|
|
||||
|
|
|
|
|
|
|
|
|
|
|
|
|
|
|
|
•:‹ƒ |
Yes |
11-12 |
1.5-1.8 |
|
|
|
|
|
|
||||
|
|
|
|
|
|
|
|
|
|
|
|
|
|
|
|
•:‹„ |
Yes |
13-15 |
1.9-2.1 |
|
|
|
|
|
|
||||
|
|
|
|
|
|
|
|
|
|
|
|
|
|
|
|
•:‹… |
Yes |
16-20 |
2.2-2.9 |
|
|
|
|
|
|
||||
|
|
|
|
|
|
|
|
|
|
|
|
|
|
|
|
•:‹† |
Yes |
21-26 |
3.0-3.7 |
|
|
|
|
|
|
||||
|
|
|
|
|
|
|
|
|
|
|
|
|
|
|
|
•:‹‡ |
Yes |
27-38 |
3.8-5.4 |
|
|
|
|
|
|
||||
|
|
|
|
|
|
|
|
|
|
|
|
|
|
|
|
•:‹ˆ |
Yes |
39-62 |
5.5-8.9 |
|
|
|
|
|
|
||||
|
|
|
|
|
|
|
|
|
|
Adjusting the water softening system |
Top off the salt as follows: |
|
The amount of salt dispensed can be set from •:‹‹ to |
1. |
Undo the screw plug on the dispenser 1Z. |
•:‹ˆ. Salt is not required at the set value •:‹‹. |
2. |
Fill the dispenser with water (required only when |
Set the softening system as follows: |
|
switching on the appliance for the first time). |
1. |
Ask your local water utility company for the water |
3. |
Add salt as illustrated (do not use table salt or |
|
tablets). |
||
|
hardness value of the tap water. |
|
|
|
|
The water is displaced and runs out. |
|
2. |
Required setting can be found in the water hardness |
|
|
|
|
||
|
table. |
|
|
3. |
Open the door. |
|
|
4. |
Press the ON/OFF button (. |
|
|
5. |
Press the Setup button for 3 seconds until •:‹‹ is |
|
|
|
shown on the display window H. |
|
|
6. |
Make the selection with setting buttons + - P. |
|
|
7. |
Press and hold the Setup button for 3 seconds. |
|
|
The chosen setting has now been stored. |
|
|
|
Using special salt |
|
|
|
As soon as the low salt indicator @ lights up on the |
|
|
|
digital display, salt should be topped off. Refilling the salt |
For more information about buying dishwasher salt, |
||
dispenser should be done before switching on the |
|||
appliance. This ensures that extra salt water is washed |
please contact Customer Service 1-800-944-2904. |
||
out and will not corrode the rinsing tank. |
|
|
|
NOTICE: Detergent will destroy the water softening system! Never pour detergent into the salt dispenser.
13
Using detergents with salt component
If combined detergents with a salt component are used, special salt can usually be omitted up to a water hardness of 21° dH (37° fH, 26° Clarke, 3.7 mmol/l). If the water hardness is over 21° dH, salt must be used.
Switching off low salt indicator / water softening system
If the use of combined detergents with a salt component impairs the low salt indicator on the digital display H, the low salt indicator can be switched off.
Proceed as described under “Setting water softening system” and set the value to •:‹‹. The water softening system and salt refill indicator are now switched off.
14

Rinse Aid
As soon as the low rinse aid indicator 8 lights up on the control panel, rinse aid should be topped off.
The rinse aid is required for stain-free utensils and clear glasses. Use only rinse aid which the manufacturer designates as safe to use in domestic dishwashers. Combined detergents with rinse aid component may be used with soft to moderately hard water only (0-2 bands on test strip or up to an °E value of 20). For moderately hard to hard water (3 to 4 bands on test strip or °E value of 21 or higher), rinse aid must be used.
Adding rinse aid
NOTICE: To avoid oversudsing or clogging, do not overfill the rinse aid dispenser 9*. Wipe up any spills with a damp cloth.
1.Open the rinse aid dispenser 9* by pressing on the latch of the lid and pulling it open.
|
|
2.Add liquid rinse aid to the dispenser 9*until it is full. Do not overfill. Avoid spilling into air vent hole.
PD[ |
BJS |
WFOU |
3.Close the lid. Lid must be fully closed until it clicks in order to seal.
4.Wipe up any excess rinse aid that may have puddled when the dispenser reservoir is full.
This prevents excessive frothing during the next wash cycle. The indicator light will go out a few moments after the dishwasher door is shut.
Tip: For easier pouring, remove lid from the rinse aid bottle.
NOTICE: Do not fill the rinse aid dispenser 9* with detergent. Doing so will damage the dishwasher.
Setting the amount of rinse aid used
The amount of rinse aid to be dispensed can be set from §:‹‹ to §:‹‡. Set the amount of rinse aid to be dispensed to §:‹† to obtain a very good drying result. Do not change the amount of rinse aid unless there are streaks or water stains on the utensils. Set a lower level to avoid streaks. Set a higher level to avoid water stains.
Set the amount of rinse aid as follows:
1.Open the door.
2.Press on ON/OFF button (.
3.Press the Setup button for 3 seconds until •:‹‹ is shown on the display window H.
4.Keep pressing the Setup button until the rinse aid setting, §:‹† is displayed.
5.Change the setting with the setting buttons + - P.
6.Press and hold the Setup button for 3 seconds. The chosen setting has now been stored.
Note: Do not change the amount of rinse aid unless there are streaks (select lower setting) or water stains (select higher setting) visible on the utensils.
Turning off rinse aid indicator
Proceed as described in the section “Setting the amount of rinse aid used” and set value to §:‹‹. The rinse aid indicator is now turned off.
NOTICE: Using no rinse aid or setting the dispenser to §:‹‹ may result in longer cycle times consuming more energy and water. The higher temperatures and longer cycle times can damage fine china or glassware.
15

Loading the Dishwasher
Dishware material
Note: Before using your dishwasher for the first time, check the information in this section. Some items are not dishwasher-safe and should be hand washed; others require special loading.
Recommended |
Precaution |
|
|
Aluminum |
Colored anodized aluminum may |
|
fade over time. Minerals in your |
|
water may cause the aluminum to |
|
darken or spot. This can usually |
|
be removed with a soap-filled |
|
steel wool pad. |
|
|
China, Crystal, |
Some hand-painted utensils may |
Stoneware |
discolor, fade or spot. Hand wash |
|
these utensils. Position fragile |
|
glassware so that it will not topple |
|
over or come in contact with |
|
other utensils during the wash |
|
cycle. |
Glass |
Make sure to use dishwasher- |
|
safe glass. Milk glass may dis- |
|
color or become yellow. |
Non-stick Coatings |
Apply a light coating of vegetable |
|
oil to non-stick surfaces after dry- |
|
ing. |
Plastics |
Make sure the plasticware is dish- |
|
washer-safe. |
|
|
Stainless Steel, |
Load these so they do not come |
Sterling Silver and |
in contact with other metals, stain- |
Silver Plates |
less steel dishwasher tank walls |
|
or the inner door. |
|
|
Not |
Reason |
Recommended |
|
|
|
Acrylic |
Crazing or small cracks through- |
|
out the acrylic, may occur. |
Adhesive- |
Adhesives that join materials |
Joined Pieces |
such as plastic, wood, bone, |
|
steel, copper, tin, etc. may |
|
loosen. |
|
|
Bone-Handled |
Handles may separate. |
Utensils |
|
Iron |
Iron will rust. Hand wash and dry |
|
immediately. |
|
|
Non-Dishware |
Your dishwasher is intended for |
Items |
use in cleaning ONLY standard |
|
household dishware and kitchen- |
|
ware. |
Pewter, Brass, |
These items will tarnish. Hand |
Bronze |
wash and dry immediately. |
|
|
Loading the racks
For best dishwashing results, observe the following when loading the dishwasher:
Do not pre-wash items with loosely attached food soil.
Remove all food particles, bones, toothpicks and excessive grease.
Pre-treat items having burned-on, baked-on or starchy soils.
Load dishes in the dishwasher racks so the insides of bowls, pots and pans are facing the spray arms.
Avoid nesting and contact points between dishes.
Separate items of dissimilar metals. Use care to not block movement of the spray arms.
Only wash household dishware and kitchenware rated as dishwasher-safe.
Refer to the Dishware Materials section for more information about dishware suitability.
NOTICE: To avoid dishwasher damage, do not load the dishwasher with paper products, plastic bags, packing materials or anything other than normal, dishwasher safe dishware and kitchenware.
Loading the upper rack
Ensure items do not protrude through the bottom of the racks and block the spray arms.
Note: When pushing the upper rack 12 into the dishwasher, push it until it stops against the back of the tub so the upper rack spray arm 1: connects to the water supply at the back of the tub. Do not push racks in using the door.
Loading the lower rack
Place large items in the lower rack 9". Load pots, pans and bowls upside down. Do not block the vent hole 1J with tall baking sheets. Load these items on the right side of the dishwasher.
16

Suggested loading pattern
For daily, regular or typical use
10 place setting Lower rack 9"
Upper rack 12
Note: Folding the cup shelves down will allow the cups to sit at an increased angle and reduce water pooling on cup bottoms.
Third rack 1*
Additional loading pattern
12 place setting Lower rack 9"
Upper rack 12
Note: Folding the cup shelves down will allow the cups to sit at an increased angle and reduce water pooling on cup bottoms.
Third rack 1*
17

Loading the silverware basket
Place knives and sharp utensils with their handles up and forks and spoons with their handles down. If large or oddly-shaped items are loaded in the silverware basket, be sure they do not nest together.
9WARNING
RISK OF INJURY
The sharp points and edges of knives and other sharp utensils can cause serious injury. Load knives and other sharp utensils with edges down. Do not allow children to handle or play near knives and sharp utensils.
Long silverware basket *
Note: The silverware basket lid may also be folded downward in order to leave the basket open.
* optional feature which may or may not be included with your dishwasher.
Loading patterns silverware basket


1Salad fork
2Teaspoon
3Dinner fork
4Knife
5Tablespoon
6Serving spoon
7Serving fork
Suggested loading pattern - 10 place setting
|
|
|
|
|
|
|
|
|
|
|
|
|
|
|
|
|
|
|
|
|
|
|
|
|
|
|
|
|
|
|
|
|
|
|
|
|
|
|
|
|
|
|
|
|
|
|
|
|
|
|
|
|
|
|
|
|
|
|
|
|
|
|
|
|
|
|
|
|
|
|
|
|
|
|
|
|
|
|
|
|
|
|
|
|
|
|
|
|
|
|
|
|
|
|
|
|
|
|
|
|
|
|
|
|
|
|
|
|
|
|
|
|
|
|
|
|
|
|
|
|
|
|
|
|
|
|
|
|
|
|
|
|
|
|
|
|
|
|
|
|
|
|
|
|
|
|
|
|
|
|
|
|
|
|
|
|
|
|
|
|
|
|
|
|
|
|
|
|
|
|
|
|
|
|
|
|
|
|
|
|
|
|
|
|
|
|
|
|
|
|
|
|
|
|
|
|
|
|
|
|
|
|
Additional loading pattern - 12 place setting
|
|
|
|
|
|
|
|
|
|
|
|
|
|
|
|
|
|
|
|
|
|
|
|
|
|
|
|
|
|
|
|
|
|
|
|
|
|||||
|
|
|
|
|
|
|
|
|
|
|
|
|
|
|
|
|
|
|
|
|
|
|
|
|
|
||
|
|
|
|
|
|
|
|
|
|
|
|
|
|
|
|
|
|
|
|
|
|
|
|
|
|
|
|
|
|
|
|
|
|
|
|
|
|
|
|
|
|
|
|
|
|
|
|
|
|
|
|
|
|
|
|
|
|
|
|
|
|
|
|
|
|
|
|
|
|
|
|
|
|
|
|
|
|
|
|
|
|
|
|
|
|
|
|
|
|||||||
|
|
|
|
|
|
|
|
|
|
|
|
|
|
|
|
|
|
|
|
|
|
|
|
|
|
|
|
|
|
|
|
|
|
|
|
|
|
|
|
|
|
|
|
|
|
|
|
18
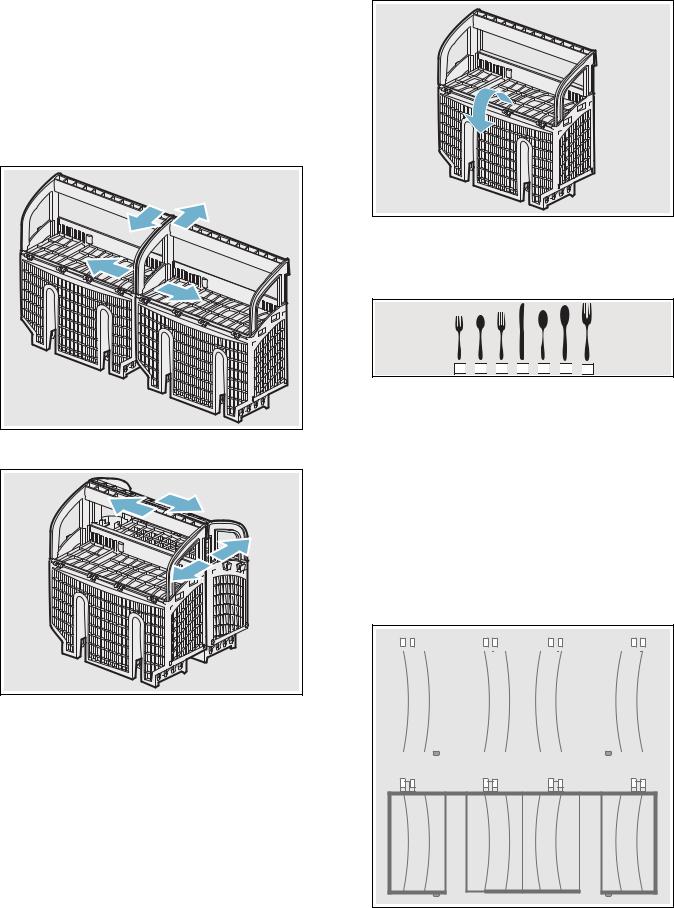
The Double Flex silverware basket *
This basket splits along its length, resulting in two halves that may be placed in a variety of positions in the lower rack 9", greatly increasing the lower rack’s loading versatility. The basket snaps together either side by side or back to back.
To split the Double Flex silverware basket:
Grasp the basket and slide the two halves in opposite directions and then pull the two halves apart.
Side by side
|
|
|
|
|
|
|
|
Back to back
|
|
|
|
|
|
To assemble the Double Flex silverware basket:
Hold the two halves side by side or back to back, so that the tab on one basket can slip into the notch on the other basket. Push the two halves in opposite directions until they click.
Note: The silverware basket lid may also be folded downward in order to leave the basket open.
* optional feature which may or may not be included with your dishwasher.
Loading patterns silverware basket


1Salad fork
2Teaspoon
3Dinner fork
4Knife
5Tablespoon
6Serving spoon
7Serving fork
Suggested loading pattern - 10 place setting
|
|
|
|
|
|
|
|
|
|
|
|
|
|
|
|
|
|
|
|
|
|
|
|
|
|
|
|
|
|
|
|
|
|
|
|
|
|
|
|
|
|
|
|
|
|
|
|
|
|
|
|
|
|
|
|
|
|
|
|
|
|
|
|
|
|
|
|
|
|
|
|
|
|
|
|
|
|
|
|
|
|
|
|
|
|
|
|
|
|
|
|
|
|
|
|
|
|
|
|
|
|
|
|
|
|
|
|
|
|
|
|
|
|
|
|
|
|
|
|
|
|
|
|
|
|
|
|
|
|
|
|
|
|
|
|
|
|
|
|
|
|
|
|
|
|
|
|
|
|
|
|
|
|
|
|
|
|
|
|
|
|
|
|
|
|
|
|
|
|
|
|
|
|
|
|
|
|
|
|
|
|
|
|
|
|
|
|
|
|
|
|
|
|
|
|
|
|
|
|
|
|
|
|
|
|
|
|
19

Additional loading pattern - 12 place setting
|
|
|
|
|
|
|
|
|
|
|
|
|
|
|
|
|
|
|
|
|
|
|
|
|
|
|
|
|
|
|
|
|
|
|
|
|
|
|
|
|
|
|
|
|
|
|
|
|
|
|
|
|
|
|
|
|
|
|
|
|
|
|
|
|
|
|
|
|
|
|
|
|
|
|
|
|
|
|
|
|
|
|
|
|
|
|
|
|
|
|
|
|
|
||||
|
|
|
|
|
|
|
|
|
|
|
|
|
|
|
|
|
|
|
|
|
|
|
|
|
|
|
|
|
|
|
|
|
|
|
|
|
|
|
|
|
|
|
|
|
|
|
|
|
|
|
|
|
|
|
|
|
|
|
|
|
|
|
|
|
|
|
|
|
|
|
|
|
|
|
|
|
|
|
|
|
|
|
|
|
|
|
|
|
|
|
|
|
|
|
|
|
|
|
|
||||
|
|
|
|
|
|
|
|
||||
Alternate loading patterns
Loading large items in the lower rack Alternate loading pattern with pots and pans
For best results, load large items face down in the lower rack.
Loading stemware in the upper rack
Alternate loading pattern with stemware
Use supports to load stemware glasses in the upper rack.
20
Unloading the dishwasher
9CAUTION
Dishes can be very hot immediately after cycle ends. Open the door slightly and allow dishes to cool for a few minutes before unloading.
Note: Dishes are more likely to chip when unloading before cooling.
When unloading the dishwasher, to prevent water from dripping onto dry dishes, unload the lower rack 9" first. Next, unload the silverware basket 1j followed by the upper rack 12, and then the third rack (if equipped).
RackMatic®
The height of the upper rack 12 can be adjusted in 3 steps to create more space for larger items in the lower rack.
1.Pull the upper rack out of the dishwasher until it stops.
2.To lower the rack, push the RackMatic® lever inward.
3.To raise the rack, hold the basket on the sides of the upper rack and lift it up.
Note: Check spray arm for clearance after adjustment.
Adjusting the height of the rack *
If required, the height of the upper rack 12 can be adjusted to create more space for taller utensils either in the upper or lower rack.
With silverware |
Upper rack |
Lower rack |
basket |
|
|
Setting 1 max. ø |
9.4 in (24 cm) |
13.4 in (34 cm) |
|
|
|
Setting 2 max. ø |
10.4 in |
12 in (30.5 cm) |
|
(26.5 cm) |
|
Setting 3 max. ø |
11.4 in (29 cm) |
11 in (28 cm) |
|
|
|
|
|
|
With |
Upper rack |
Lower rack |
third rack |
|
|
Setting 1 max. ø |
7 in (18 cm) |
13.4 in (34 cm) |
|
|
|
Setting 2 max. ø |
8 in (20.5 cm) |
12 in (30.5 cm) |
|
|
|
Setting 3 max. ø |
9 in (23 cm) |
11 in (28 cm) |
|
|
|
Arrange large plates up to a diameter of 13.4 in (34 cm) in the lower basket 9" as illustrated.
* optional feature which may or may not be included with your dishwasher.
21
Rack accessories
Flip tines*
Depending on the features of your dishwasher, the tines can be folded down. This facilitates arrangement of pots, bowls and glasses..
Fold down the flip tines as follows:
1.Pull flip tine gently forward and release it from the notch (1).
2.Push the flip tine downward to the desired position (2).
|
|
To fold up, push flip tines into an upright position until the holder engages in the notch.
* optional feature which may or may not be included with your dishwasher.
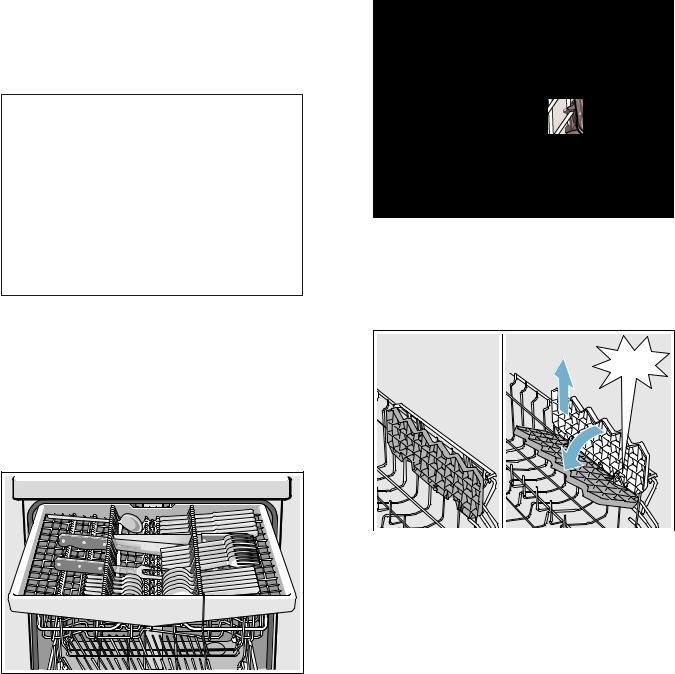
Third rack
The third rack horizontally positions knives, spatulas and other oversized tools for improved cleaning and easier loading and unloading. Arrange cutlery in third rack as illustrated.
Plastic item clips*
Light-weight plastic accessories (cups, lids, etc.) can be held securely by the plastic item clips.
Press the plastic item clip against the rack as shown until it clicks.
* optional feature which may or may not be included with your dishwasher.
Cup shelves*
The cup shelves and the space underneath them can be used for small cups or for larger serving utensils.
&/,&. |
* optional feature which may or may not be included with your dishwasher.
22

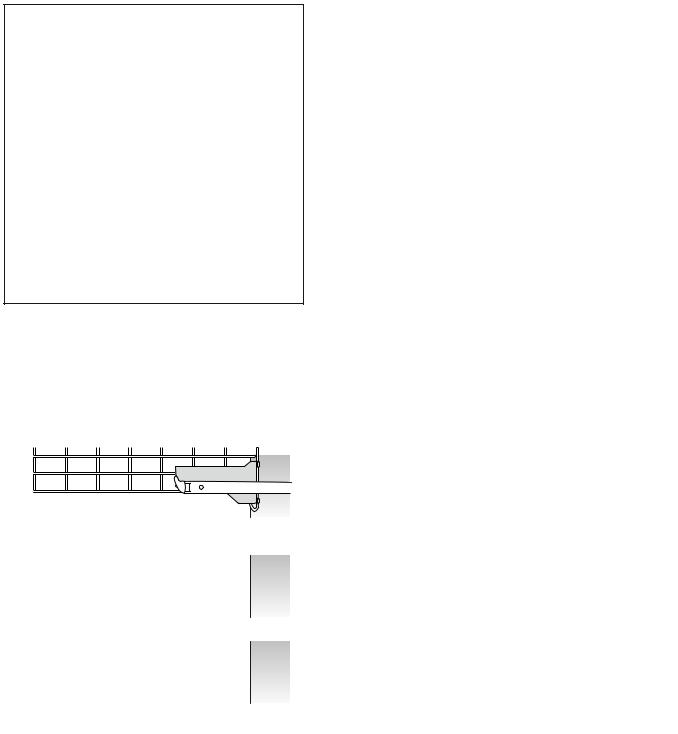
Extra tall item sprinkler*
If an item is too tall to be placed in the lower rack 9" even with the upper rack 12 in the raised position, remove the empty upper rack 12by pulling it out of the dishwasher until it stops. Pull the front of the rack upward and outward until the rack will not slide out anymore. Then lift it up and away from the dishwasher, until the rollers are completely free of the roller guides (A).
Set the upper rack 12 aside and push the roller guides (A) back into the dishwasher. Insert the extra tall item sprinkler (B) into the upper rack spray outlet (C) and turn the sprinkler clockwise to lock into position.
$ |
& |
|
$ |
|
% |
Note: Keep the vent hole 1Jon the tub’s left side clear by placing tall items such as plastic cutting boards and tall baking sheets on the lower rack’s right side or center.
NOTICE: To avoid dishwasher damage, do not reinstall the upper rack 12 without removing the extra tall item sprinkler (B).
* optional feature which may or may not be included with your dishwasher.
23

Removing/Installing third rack
Removing third rack 1*
1.Pull out third rack all the way (1).
2.Lift upper rollers over the stopper hooks of both rails
(2).
3.Pull third rack out forward and upward so that the holding hooks and the lower rollers of the rack slide over the stopper hooks of both rails (3).
Installing third rack 1*
1.Pull out third rack rails all the way (1).
2.Insert third rack at an angle. Make sure that the stopper hooks of both rails slide in between the holding hooks and the lower rollers of the third rack (2).
3.Slide third rack in and lift the upper rollers over the front stopper hooks of both rails (3).
4.Push in third rack (4).
|
|
|
|
24
Removing/Installing upper rack with Rackmatic®
Removing upper rack 12
1.Pull out upper rack all the way (1).
2.Lift front rollers over the stopper hook of the rail (2).
3.Pull out upper rack forwards and upwards so that the upper and lower rollers of the rack slide over the stopper hooks of both rails (3).
|
|
|
Installing upper rack 12
1.Pull out upper rack rails all the way (1).
2.Insert upper rack at an angle. Make sure that the stopper hooks of both rails slide in between the upper and lower rollers on the rear side of the rack (2).
3.Slide upper rack in and lift the upper rollers over the front stopper hooks of both rails (3).
4.Push in upper rack (4).
|
|
|
|
25
Detergent
Use only detergent specifically designed for dishwashers. For best results, use fresh powdered dishwashing detergent or detergent tabs.
NOTICE: To avoid damage to dishwasher or dishware:
Do not use hand dishwashing products in your dishwasher.
Do not use too much detergent if your water is soft. Using too much detergent with soft water may cause etching in glassware and fine china.
To best protect glassware, use a wash cycle with low temperatures or a specific glass-care cycle (depending on the model) and use a detergent that includes etch protection.
This dishwasher uses less water than most, therefore, less detergent is required. With soft water, 1 tablespoon (15 ml) of detergent will clean most loads. The detergent dispenser cup has lines that measure detergent to
1 tablespoon (15 ml) and 1.75 tablespoons (25 ml).
3 tablespoons (45 ml) of detergent will completely fill the detergent dispenser.
Note: If you do not know the hardness of your water supply, use 15 ml of detergent. Increase the amount if necessary to the least amount required to get your kitchenware clean.
Use the measuring lines in the detergent dispenser cup as a guide to measure the amount of detergent recommended in the following table.
Wash Cycle |
Hard Water/ |
Medium |
Soft Water/ |
|
Heavy Soil |
Water/ |
Little Soil |
|
|
Medium Soil |
|
|
|
|
|
Pots & Pans |
3 tbsp |
3 tbsp |
1.75-3 tbsp |
|
(45 ml) |
(45 ml) |
(25 - 45 ml) |
Auto |
3 tbsp |
1.75-3 tbsp |
1-1.75 tbsp |
|
(45 ml) |
(25 - 45 ml) |
(15 - 25 ml) |
|
|
|
|
Normal |
1.75-3 tbsp |
1.75 tbsp |
1-1.75 tbsp |
|
(25 - 45 ml) |
(25 ml) |
(15 - 25 ml) |
|
|
|
|
Hand Wash |
1.5-2.75 |
1.35-1.75 |
1-1.5 tbsp |
|
tbsp |
tbsp |
(15 - 22 ml) |
|
(22 - 40 ml) |
(20 - 25 ml) |
|
|
|
|
|
Quick |
1.75 tbsp |
1-1.75 tbsp |
1 tbsp |
|
(25 ml) |
(15 - 25 ml) |
(15 ml) |
|
|
|
|
Rinse |
none |
none |
none |
|
|
|
|
Adding detergent
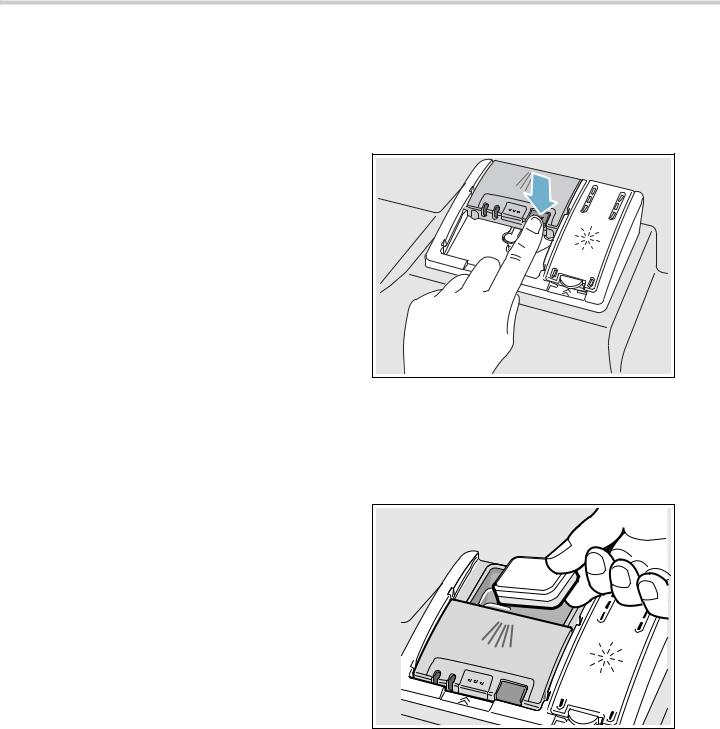
1.If the detergent dispenser 92is still closed, push the button 9: to open it.
Note: Make sure the detergent dispenser is dry and clear of detergent residue.
2.When using detergent tabs, lay them such that they do not come in contact with the cover, insert a detergent tab flat, not on its side.
Note: Do not place detergent tabs or utensils in the detergent tab tray 1B. Place tabs or other detergent forms directly in the detergent dispenser 92.
Pour detergent into the detergent dispenser 92only. Do not overfill the detergent dispenser.
26
PD[ |
WEVS PO |
WEVS PO |
WEVS PO |
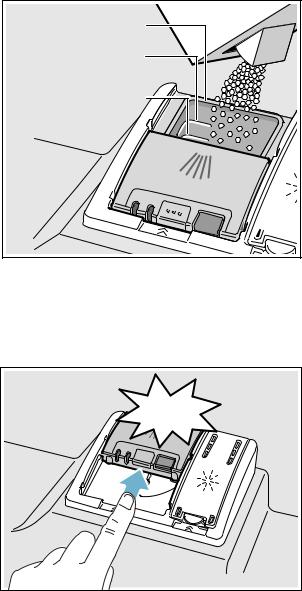
Dosage: see manufacturer’s instructions on the packaging.
3.Close the lid by placing the finger on the lid as shown. Slide the lid closed and press down firmly until it clicks.
&/,&. |
The detergent dispenser will open automatically at the ideal time for the set cycle. The powder or liquid detergent is distributed in the appliance and is dissolved, detergent tabs will fall into the detergent tab
tray 1B where it dissolves during the cycle.
Tip: If the dishware is only lightly soiled, slightly less than the indicated amount of detergent is usually adequate.
27

Dishwasher Cycles
Note: In order to save energy, it is recommended to set the Auto Power Off feature to “after one minute.”
Wash cycle |
Recommended use |
Possible wash cycle option |
|
|
|
Pots & Pans ** |
Best for cleaning items with baked-on food or |
all |
|
grease. These dishes would normally require |
|
|
soaking. |
|
Auto * |
Smartest cycle, with most flexible soil sensing, |
all |
|
which is ideal for mixed dishware and food soils. |
|
Normal * |
Recommended for daily, regular or typical use to |
(see note at bot- |
completely wash a full load of normally soiled |
tom of table) |
dishes. |
all
Note: : In order to obtain optimal performance with minimum energy consumption, it is recommended to disable all available options and settings, except Auto Power Offset to “after one minute.”
Hand Wash |
Gentle cleaning of your most precious dishes at |
all except Sanitize |
|
lower temperatures. |
|
Quick |
Cleans lightly soiled dishes and reduces overall |
Delay, Extra Dry |
|
wash time to 30 minutes. |
|
Rinse |
Use this cycle if you need to pre-rinse dishes to |
Delay |
|
avoid odors. Place unrinsed dishes inside the |
|
|
dishwasher and select the Rinse cycle. Uses less |
|
|
water than hand rinsing and very low energy. |
|
*The cycle is sanitized when Sanitize option is used. **The cycle is a sanitizing cycle.
Note: The Energy Guide label was based on the Normal soil sensing cycle as follows: The unit was tested without any rinse aid (liquid) in the rinse aid dispenser 9*. A single dose of detergent was inserted into the detergent dispenser 92, with no detergent being used in the prewash. The unit was not subjected to truncated testing per the definitions in the test procedure. We recommend that dish loads such as the one in the energy certification test have the rack position set in the highest position.
28

Dishwasher Cycle Options
PowerBoost ®
Perfect for a mixed load. You can wash very soiled pots and pans in the lower rack together with normally soiled utensils in the upper rack. The spray pressure in the lower rack is intensified, the rinsing temperature is increased slightly.
Half Load
Can reduce water consumption when washing small, lightly soiled loads that fill approximately half or less of the dishwasher’s capacity.
Sanitize
Increases the temperatures and retains them for an extra long time to obtain a defined disinfecting performance. Continuous use of this function increases the hygiene status. This additional option is ideal for cleaning items such as chopping boards and baby bottles.
“Sanitized” will appear in the display window when sanitation requirements are met. Using the Sanitize option may also improve drying. There is a slight increase in energy consumption.
Extra Dry
An increased temperature during the final rinse and an extended drying phase ensure that plastic parts dry better. There is a slight increase in the energy consumption.
29
Loading...