

Page 1
Bedienungsanleitung de
Instruction manual en
Mode d’emploi fr
Manual de instrucciones es
Manuale di istruzioni it
Manual de instruções pt
Руководство пользователя ru
testo 810
Page 2

2
Page 3
?? ?? nl sv pt it es fr en de
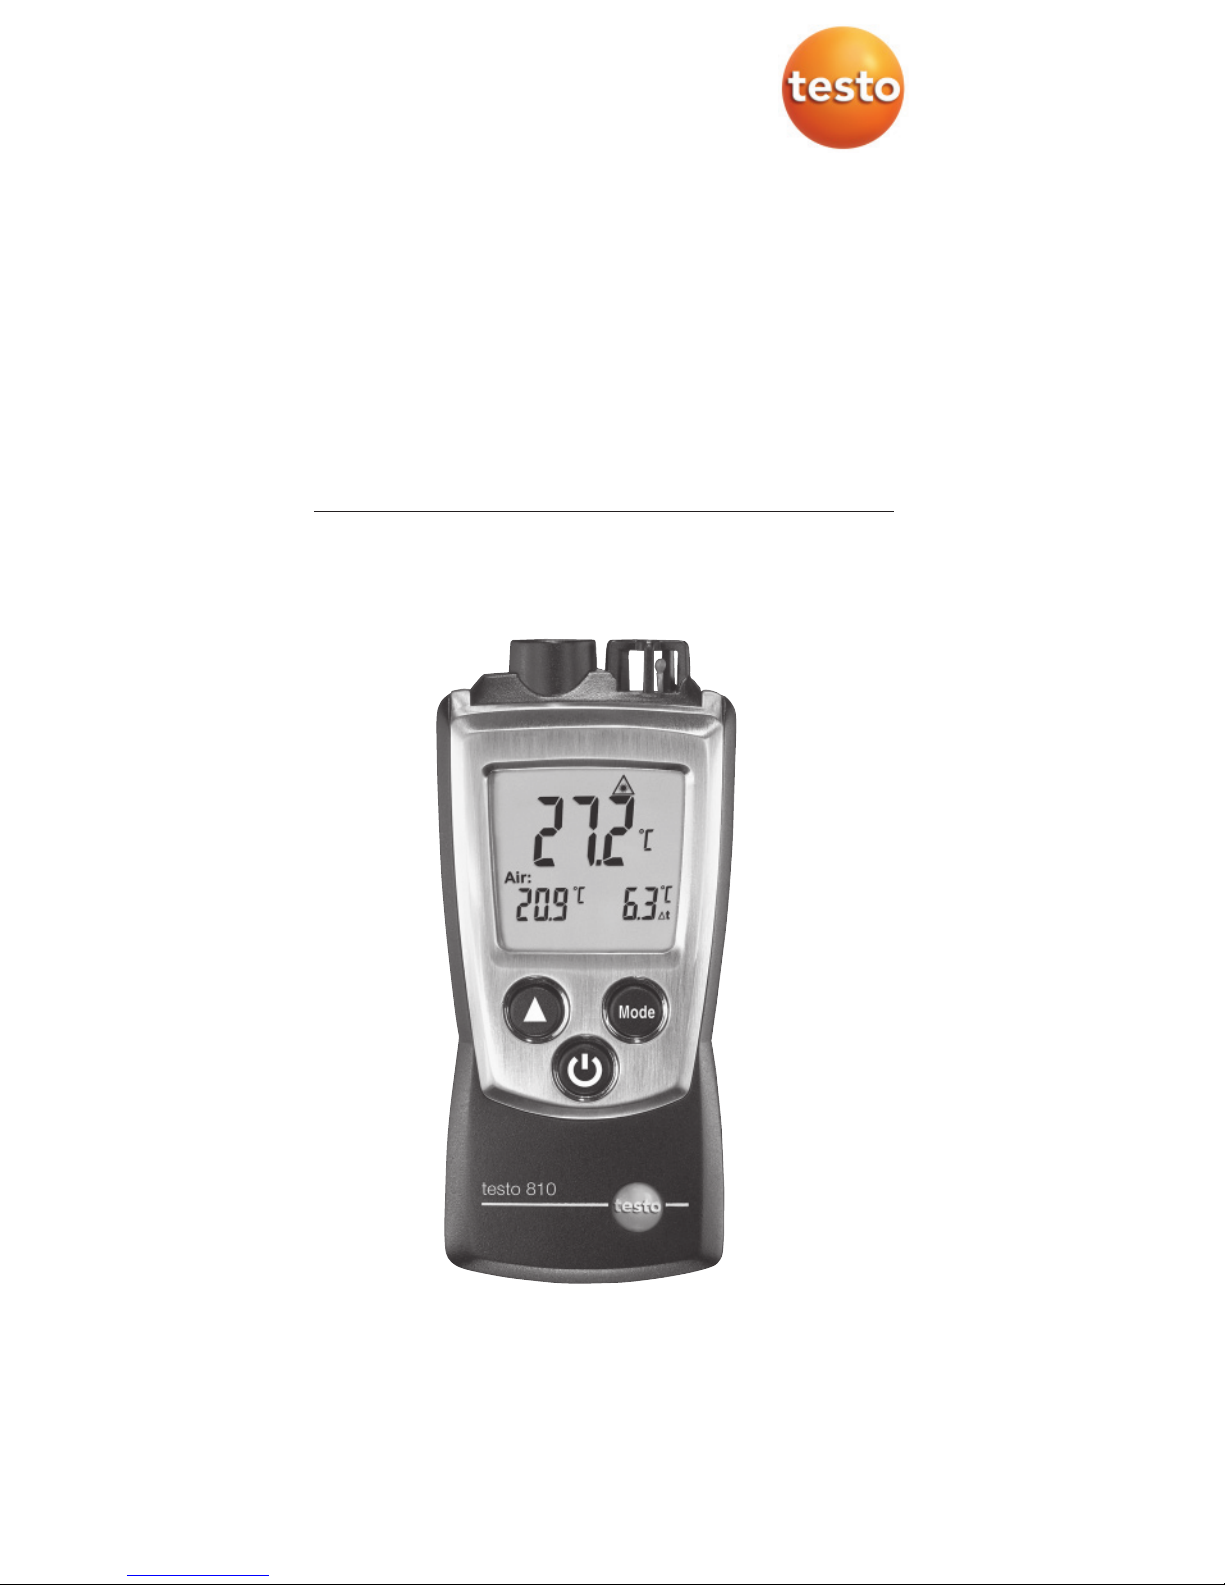
Kurzanleitung testo 810
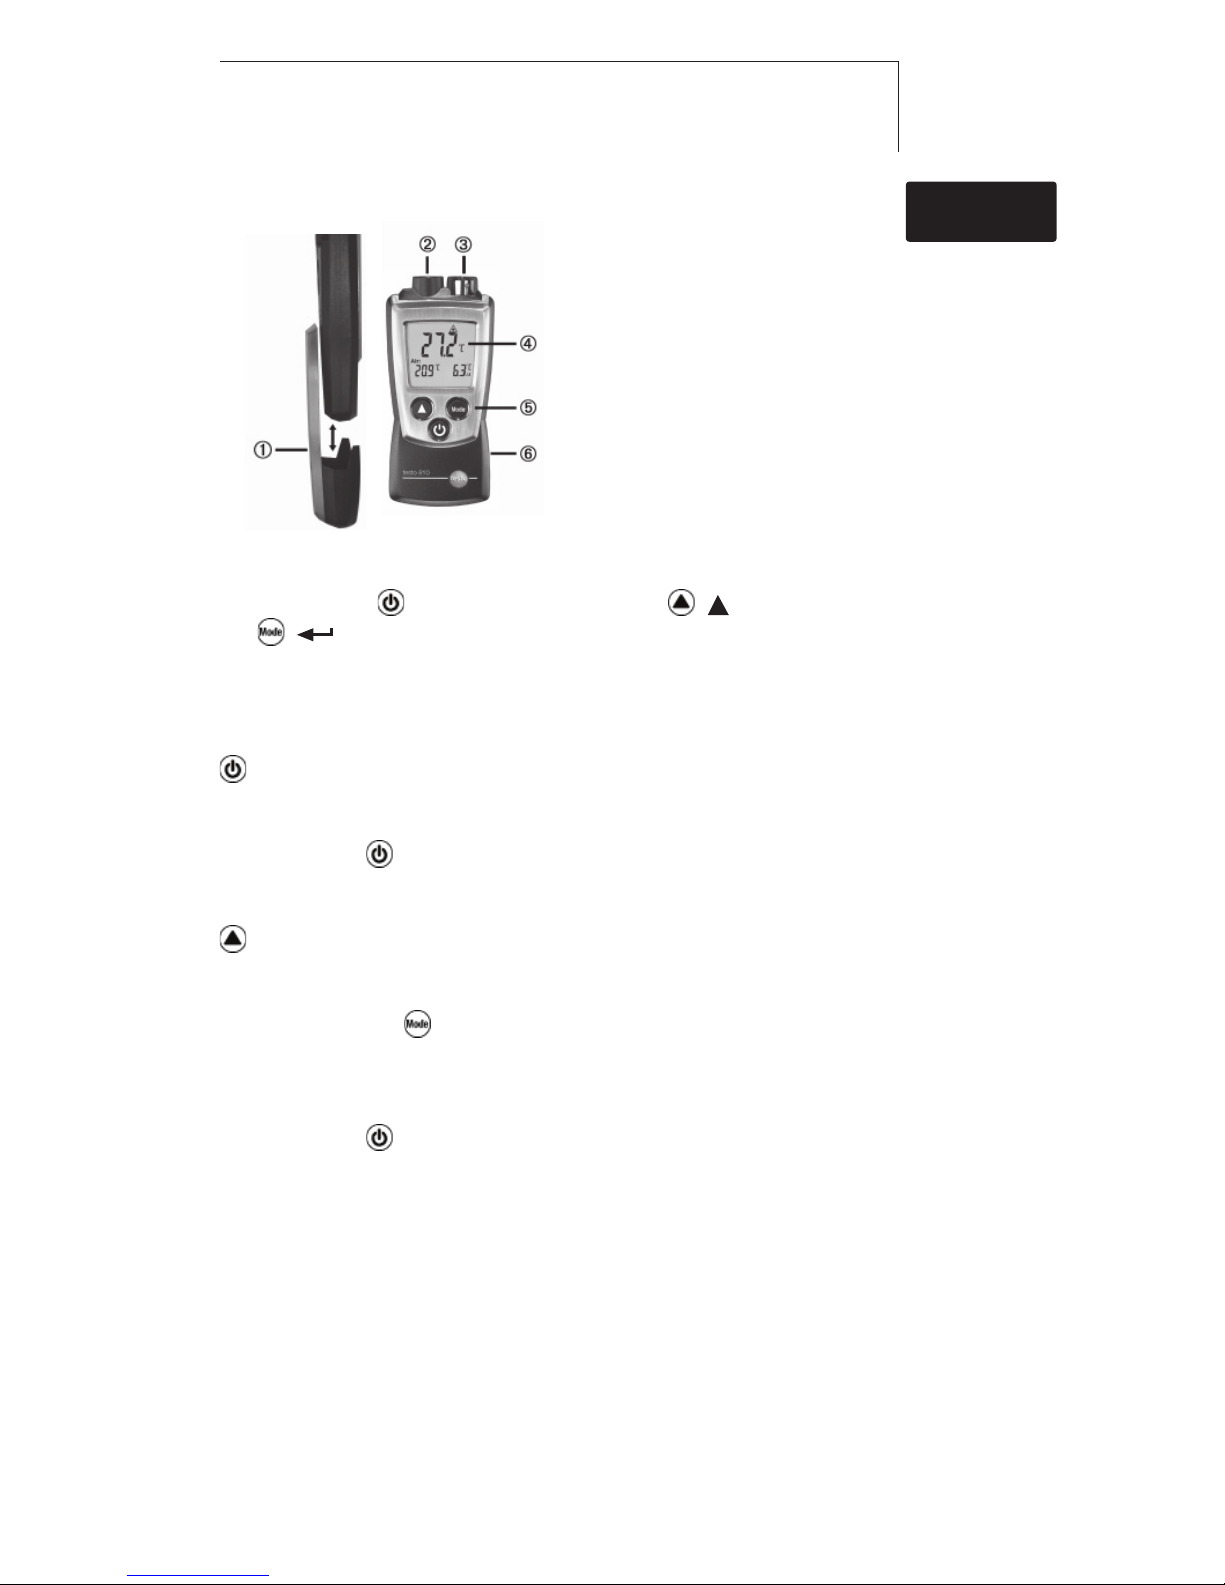
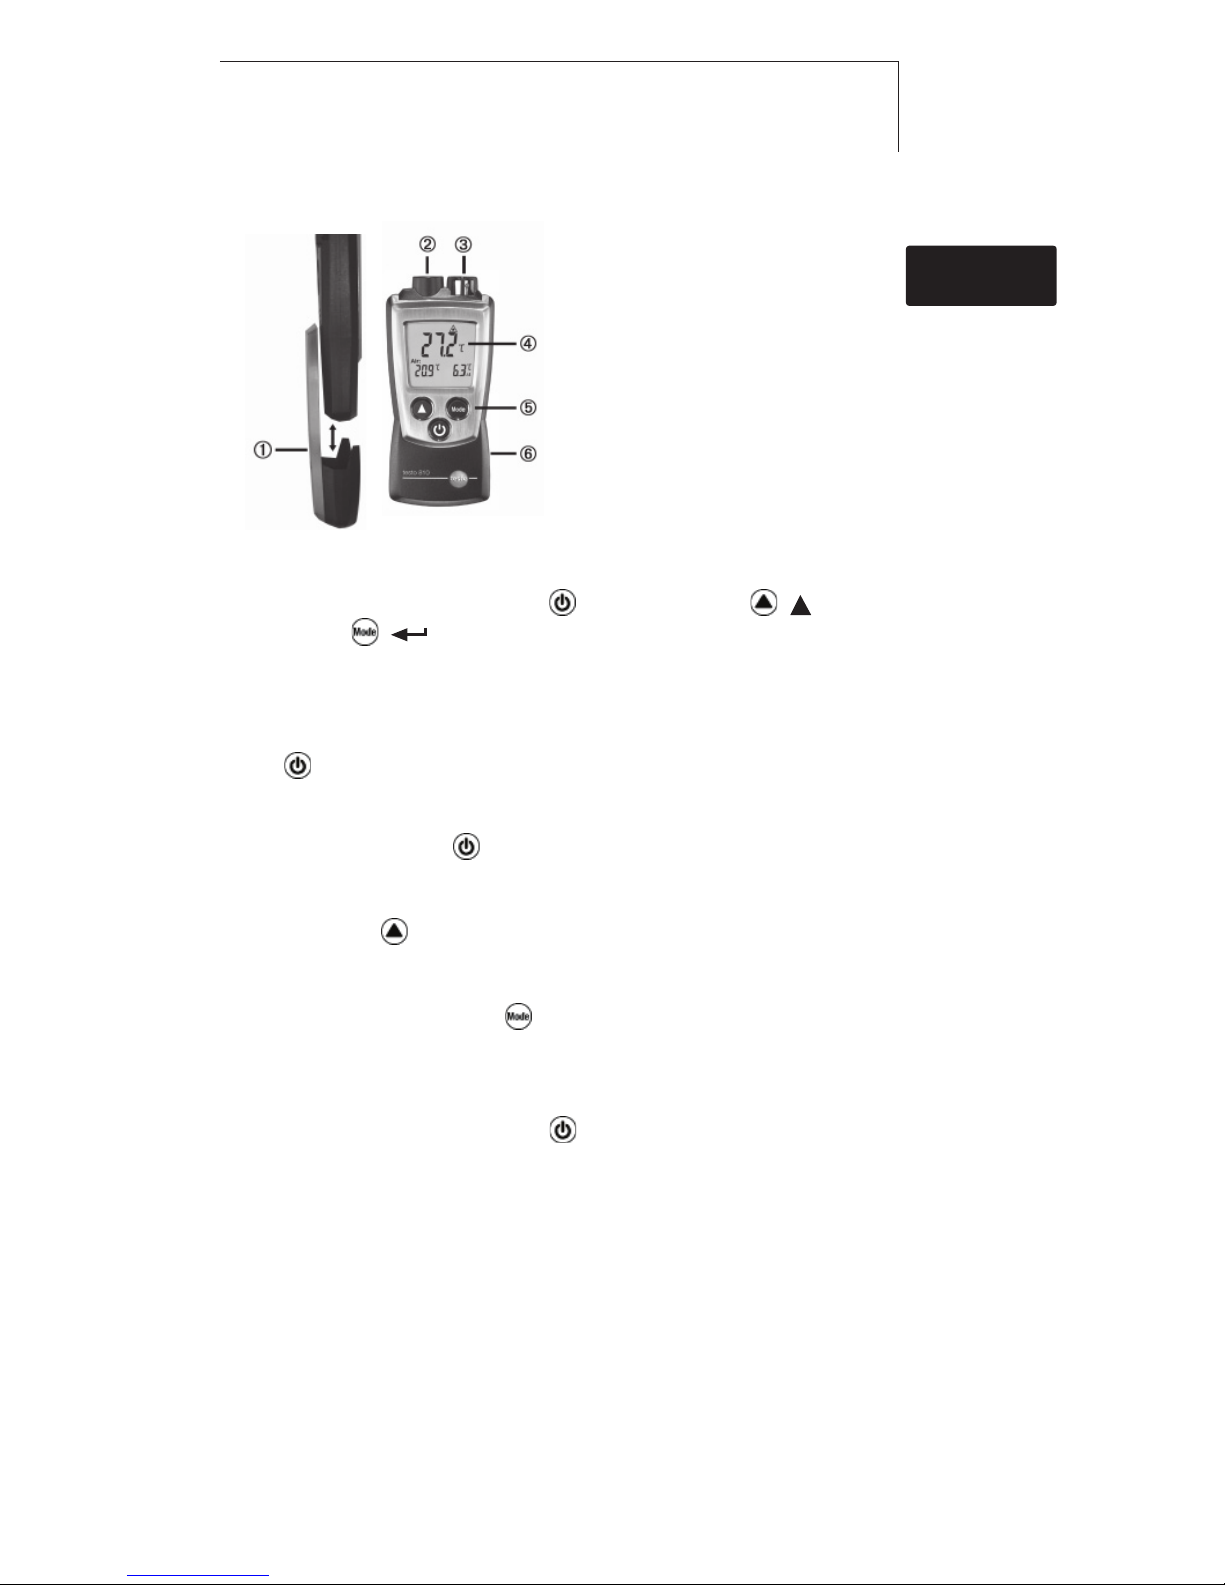
Schutzkappe: Parkposition
Infrarotsensor
Luft-Temperatur-Sensor
Display
Bedientasten
Batteriefach (Rückseite)
Grundeinstellungen vornehmen
Gerät ist aus >
2s gedrückt halten > Mit ( ) auswählen,
mit
( ) bestätigen:
Temperatureinheit: °C, °F > Differenztemperatur t: OFF (aus), ON (an) >
Emissonsfaktor: > Auto off-Funktion: OFF, ON
Gerät einschalten
drücken.
Displaybeleuchtung einschalten (für 10s)
Gerät ist an >
drücken.
IR-Messung durchführen
gedrückt halten.
Anzeigemodus wählen
Gerät ist an > Mit
auswählen:
Hold: Messwerte werden gehalten > Max: Maximalwerte > Min: Minimalwerte
Gerät ausschalten
Gerät ist an >
2s gedrückt halten.
3Kurzanleitung testo 810
Page 4

Sicherheit und Umwelt
.Sicherheit und Umwelt
Zu diesem Dokument
> Lesen Sie diese Dokumentation aufmerksam durch und
machen Sie sich mit dem Produkt vertraut, bevor Sie es
einsetzen. Bewahren Sie diese Doku menta tion griffbereit auf,
um bei Bedarf nachschlagen zu können. Geben Sie diese
Dokumentation an spätere Nutzer des Produkts weiter.
> Beachten Sie besonders die Informationen, welche durch
folgende Zeichen hervorgehoben sind:
Wichtiger Hinweis.
Personenschäden / Sachschäden vermeiden
> Das Produkt nur sach- und bestimmungsgemäß und innerhalb
der in den Technischen Daten vorgegebenen Parameter
betreiben. Keine Gewalt anwenden.
> Das Produkt nie zusammen mit Lösungs mitteln, Säuren oder
anderen aggressiven Stoffen lagern.
> Nur Wartungs- und Instandhaltungsarbeiten durchführen, die in
der Doku mentation beschrieben sind. Dabei die vor gegebenen
Handlungs schritte einhalten. Nur Original-Ersatzteile von Testo
ver wenden.
Umwelt schützen
> Defekte Akkus und leere Batterien an den dafür vorgesehenen
Sammelstellen abgeben.
> Produkt nach Ende der Nutzungszeit an Testo senden. Wir
sorgen für eine umwelt schonende Entsorgung.
4
Page 5

?? ?? nl sv pt it es fr en de
Leistungsbeschreibung
Funktionen und Verwendung
Das testo 810 ist ein Infrarot-Messgerät. Üblicher Verwendungszweck ist das Messen der Oberflächentemperatur zum Beispiel
an Heizungen und Kühlern und das gleichzeitige Messen der
Umgebungstemperatur.
Technische Daten
Messtechnische Daten
· Sensoren:
Infrarotsensor,
NTC-Temperatur sensor
· Messgrößen:
°C, °F
· Messbereiche:
IR: -30...300°C, -22...572°F,
Luftfühler: -10...50°C, 14...122°F
· Auflösungen:
0.1°C, 0.1°F,
· Genauigkeiten
(Nenntemperatur 22 °C, ±1 Digit):
Infrarot: ±2°C (-30...100°C),
±3.6°F (-22...212°F),
±2% v. Mw. (restl. Bereich)
Luftfühler: ±0.5°C, ±0.9°F
· Messrate:
0.5s
· Optik:
6 : 1
· Emissionsgrad:
einstellbar von 0,2 bis 0,99
Laser
· Klasse 2
· Leistung: <1 mW
· Wellenlänge: 645 bis 660 nm
· Norm: DIN EN 60825-1:2001-11
Weitere Gerätedaten
· Schutzart: IP40
· Umgebungsbedingungen:
-10...50°C, 14...122°F
· Lager- / Transportbedingungen:
-40...70°C, -40...158°F
· Spannungsversorgung:
2x 1,5V Typ AAA
· Batteriestandzeit:
50h (ohne Displaybeleuchtung)
· Abmessungen:
119x46x25mm (inkl. Schutzkappe)
· Gewicht: 90g (inkl. Batterien und
Schutzkappe)
Richtlinien, Normen und Prüfungen
· EG-Richtlinie: 2014/30/EU
Garantie
· Dauer: 2 Jahre, Garantiebedingungen:
siehe Internetseite
www.testo.com/warranty
5Leistungsbeschreibung
Page 6
Produktbeschreibung
Auf einen Blick
Schutzkappe: Parkposition
Infrarotsensor
Luft-Temperatur-Sensor
Display
Bedientasten
Batteriefach (Rückseite)
Erste Schritte
Batterien einlegen:
1 Batteriefach öffnen: Batteriedeckel nach unten schieben.
2 Batterien (2x 1,5V Typ AAA) einlegen. Polung beachten!
3 Batteriefach schließen: Batteriedeckel aufschieben.
Grundeinstellungen vornehmen (Konfigurationsmodus):
Einstellbare Funktionen
· Temperatureinheit: °C, °F
· Differenztemperatur t: OFF (aus), ON (an)
· Emissonsfaktor:
· Auto off-Funktion: OFF (aus), ON (an, Gerät schaltet 10min nach letzter Tasten-
betätigung automatisch aus)
Der Emissionsfaktor ist ab Werk auf 0,95 eingestellt. Dies ist
optimal zur Messung von Nichtmetallen (Papier, Keramik,
Gips, Holz, Farben und Lacke), Kunststoffen und Lebensmitteln.
6 Produktbeschreibung
Page 7
?? ?? nl sv pt it es fr en de
Blanke Metalle und Metalloxide sind aufgrund ihres niedrigen bzw. uneinheitlichen Emissionsfaktors nur bedingt für
die Infrarot-Messung geeignet: Emissionsfaktor erhöhen de
Beschichtungen wie z. B. Lack oder Emissions-Klebeband
(0554 0051) auf das Messobjekt aufbringen.
Emissionsfaktoren verschiedener Materialien (typische Werte):
Material (Temperatur)
Aluminium, walzblank (170°C) 0,04
Baumwolle (20°C) 0,77
Beton (25°C) 0,93
Eis, glatt (0°C) 0,97
Eisen, abgeschmirgelt (20)°C 0,24
Eisen mit Gusshaut (100°C) 0,80
Eisen mit Walzhaut (20°C) 0,77
Gips (20°C) 0,90
Glas (90°C) 0,94
Gummi, hart (23°C) 0,94
Gummi, weich-grau (23°C) 0,89
Holz (70°C) 0,94
Kork (20°C) 0,70
Kühlkörper, schwarz eloxiert (50°C) 0,98
Kupfer, leicht angelaufen (20°C) 0,04
Kupfer, oxidiert (130°C) 0,76
Kunststoffe: PE, PP, PVC (20°C) 0,94
Messing, oxidiert (200°C) 0,61
Papier (20°C) 0,97
Porzellan (20°C) 0,92
Schwarzer Lack, matt (80°C) 0,97
Stahl, wärmebeh. Oberfläche (200°C) 0,52
Stahl, oxidiert (200°C) 0,79
Ton, gebrannt (70°C) 0,91
Transformatorenlack (70°C) 0,94
Ziegelstein, Mörtel, Putz (20°C) 0,93
1 Beim Einschalten des Geräts gedrückt halten, bis im
Display
und erscheint (Konfigurationsmodus).
- Die einstellbare Funktion wird angezeigt. Die aktuelle
Einstellung blinkt.
2
( ) mehrmals drücken, bis die gewünschte Einstellung
blinkt.
3
( ) drücken, um die Eingabe zu bestätigen.
4 Schritte 2 und 3 für alle Funktionen wiederholen.
- Das Gerät wechselt in den Messmodus.
7Erste Schritte
Page 8
Produkt verwenden
Gerät einschalten:
>
drücken.
- Der Messmodus wird geöffnet.
Displaybeleuchtung einschalten
Gerät ist eingeschaltet.
>
drücken.
- Displaybeleuchtung erlischt automatisch 10s nach letzter
Tastenbetätigung.
IR-Messung durchführen:
Laserstrahlung! Nicht in den Laserstrahl blicken.
Laserklasse 2.
Zur Gewährleistung korrekter Messwerte:
· Die Messung verfälschende Temperatur- / Feuchtequellen (z. B. Hände)
vom Sensor fernhalten.
· Linse sauber halten, nicht mit beschlagener Linse messen.
· Messbereich (Bereich zwischen Gerät und Messobjekt) und Oberfläche
des Messobjekts von Störgrößen freihalten: Keine Staub- und Schmutzpartikel, keine Feuchtigkeit (Regen, Dampf) oder Gase.
· Bei Veränderung der Umgebungstemperatur (Wechsel des Messortes,
z. B. Innen-/ Außenmessung) benötigt das Messgerät eine Angleichzeit
von ca. 15min.
· Das Messgerät besitzt eine Optik (90%-Wert) von 6:1 (Entfernung
: Messfläche) + Öffnungsdurchmesser des Sensors (10mm):
Entfernung Durchmesser Messfläche
10cm 3cm
60cm 11cm
100cm 18cm
200cm 35cm
> gedrückt halten.
-
blinkt im Display. Der Laserpunkt markiert den
Mittelpunkt der Messfläche.
- Nach Beenden der IR-Messung (
loslassen) wechselt
das Gerät in die Displayansicht
Hold, die Messwerte
werden gehalten.
8 Produkt verwenden
Page 9
?? ?? nl sv pt it es fr en de
Displayansicht wechseln:
Einstellbare Ansichten
· Hold: Messwerte werden gehalten
· Max: Maximalwerte seit letztem Einschalten bzw. seit letztem Zurücksetzen.
· Min: Minimalwerte seit letztem Einschalten bzw. seit letztem Zurücksetzen.
> mehrmals drücken, bis gewünschte Ansicht erscheint.
Max-/ Min-Werte zurücksetzen:
1
mehrmals drücken, bis gewünschte Ansicht erscheint.
2
gedrückt halten bis - - - - erscheint.
3 Schritte 1 und 2 für alle Werte wiederholen, die zurück-
gesetzt werden sollen.
Gerät ausschalten:
>
gedrückt halten, bis das Display erlischt.
9Produkt verwenden
Page 10

Produkt instand halten
Batterien wechseln:
1 Batteriefach öffnen: Batteriedeckel nach unten schieben.
2 Verbrauchte Batterien entnehmen und neue Batterien
(2x 1,5V Typ AAA) einlegen. Polung beachten!
3 Batteriefach schließen: Batteriedeckel aufschieben.
Gehäuse reinigen:
> Gehäuse bei Verschmutzung mit einem feuchten Tuch
(Seifen lauge) reinigen. Keine scharfen Reinigungs- oder
Lösungsmittel verwenden!
10 Produkt instand halten
Page 11
?? ?? nl sv pt it es fr en de
Tipps und Hilfe
Fragen und Antworten
Frage Mögliche Ursachen / Lösungen
Hi oder Lo · Messwerte außerhalb des Messbereichs (zu hoch, zu
niedrig): Zulässigen Messbereich einhalten.
·
Restkapazität <10min: Batterien wechseln.
Falls wir Ihre Frage nicht beantworten konnten: Wenden Sie sich
bitte an Ihren Händler oder den Testo-Kundendienst. Kontaktdaten siehe Internetseite www.testo.com/service-contact
11Tipps und Hilfe
Page 12

12 Notizen
Page 13
?? ?? nl sv pt it es fr en de
Short manual testo 810
Protection cap: Park position
Infrared sensor
Air/temperature sensor
Display
Control keys
Battery compartment (on rear)
Basic settings
Instrument off >press and hold
2s > select with ( ),
confirm with
( ):
Unit of temperature: °C, °F > Differential temperature t: OFF, ON >
Emissonsfaktor: > Auto off-Funktion: OFF, ON
Switching the instrument on
Press
.
Switching the display light on (for 10s)
Instrument on > press
.
IR measurements
Press and hold
.
Select display mode
Instrument on > select with
:
Hold: Readings are held > Max: Maximum values > Min: Minimum values
Switching the instrument off:
Instrument on >press and hold
2s.
13Short manual testo 810
Page 14

Safety and the environment
About this document
> Please read this documentation through carefully and
familiarise yourself with the product before putting it to use.
Keep this document to hand so that you can refer to it when
necessary. Hand this documentation on to any subsequent
users of the product.
> Pay particular attention to information emphasised by the
following symbols:
Important.
Avoid personal injury/damage to equipment
> Only operate the measuring instrument properly, for its
intended purpose and within the parameters specified in the
technical data. Do not use force.
> Never store the product together with solvents, acids or other
aggressive substances.
> Only carry out the maintenance and repair work that is
described in the documentation. Follow the prescribed steps
when doing so. Use only OEM spare parts from Testo.
Protecting the environment
> Take faulty rechargeable batteries as well as spent batteries to
the collection points provided for them.
> Send the product back to Testo at the end of its useful life. We
will ensure that it is disposed of in an environmentally friendly
manner.
14 Safety and the enviroment
Page 15

?? ?? nl sv pt it es fr en de
Specifications
Functions and use
The testo 810 is an infrared measuring instrument. It is normally
used to measure surface temperature, e.g. on heaters and
radiators, and to measure the ambient temperature at the same
time.
Technical data
Measurement data
· Sensors:
Infrared sensor,
NTC temperature sensor
· Parameters:
°C, °F
· Measuring ranges:
IR: -30...300 °C, -20...575 °F,
Air probe: -10...50 °C, 14...122 °F
· Resolutions:
0.1 °C, 0.1 °F,
· Accuracies
(Nenntemperatur 22 °C, ±1 Digit):
Infrared: ±2 °C (-30...+100 °C),
±3.6 °F (-22...212 °F),
±2 % of reading (rest of range)
Air probe: ±0.5 °C, ±0.9 °F
· Measuring rate:
0.5 s
· Optics:
6 : 1
· Emissivity:
adjustable from 0.2 to 0.99
Laser
· Class 2
· Power: <1 mW
· Wavelength: 645 to 660 nm
· Standard: DIN EN 60825-1:2001-11
Further instrument data
· Protection class: IP40
· Ambient conditions:
-10...50 °C, 14...122 °F
· Storage/transport conditions:
-40...70 °C, -40...158 °F
· Voltage supply:
2x 1.5 V type AAA
· Battery life:
50 h (without display light)
· Dimensions:
119x46x25mm / 4.7x1.8x1.0 in (inc.
protection cap)
· Weight: 90 g / 3.2 oz (inc. batteries and
protection cap)
Directives, standards and tests
· EC Directive: 2014/30/EU
Warranty
· Duration: 2 years, warranty conditions:
see www.testo.com/warranty
15Specifications
Page 16

Product description
At a glance
Protection cap: Park position
Infrared sensor
Air/temperature sensor
Display
Control keys
Battery compartment (on rear)
First steps
Inserting batteries:
1 To open the battery compartment, push the battery cover
down.
2 Insert batteries (2x 1.5 V type AAA). Observe the polarity!
3 To close the battery compartment, push the battery cover
back on.
Basic settings (configuration mode):
Adjustable functions
·
Unit of temperature: °C, °F
· Differential temperature t: OFF, ON
· Emission factor:
· Auto off function: OFF, ON (instrument switches off automatically if no key is
pressed for 10 minutes)
The emission factor has a default setting of 0.95. This is
ideal for the measurement of non-metals (paper, ceramic,
gypsum, wood, paints and varnishes), plastics and
foodstuffs.
16 Product description
Page 17
?? ?? nl sv pt it es fr en de
Because of their low or non-uniform emission factor, bright
metals and metal oxides are of only limited use for infrared
measurement. Coatings that increase the emission factor,
e.g. paint or emission adhesive (0554 0051) must be
applied to the object being measured.
Emission factors of various materials (typical values):
Material (temperature)
Aluminium, bright rolled (170 °C) 0.04
Cotton (20 °C) 0.77
Concrete (25 °C) 0.93
Ice, smooth (0 °C) 0.97
Iron, emery ground (20 °C) 0.24
Iron with casting skin (100 °C) 0.80
Iron with rolling skin (20 °C) 0.77
Gypsum (20 °C) 0.90
Glass (90 °C) 0.94
Rubber, hard (23 °C) 0.94
Rubber, soft grey (23 °C) 0.89
Wood (70 °C) 0.94
Cork (20 °C) 0.70
Radiator, black anodised (50 °C) 0.98
Copper, slightly tarnished (20 °C) 0.04
Copper, oxidised (130 °C) 0.76
Plastics: PE, PP, PVC (20 °C) 0.94
Brass, oxidised (200 °C) 0.61
Paper (20 °C) 0.97
Porcelain (20 °C) 0.92
Black paint, matt (80 °C) 0.97
Steel, heat-treated surface (200 °C) 0.52
Steel, oxidised (200 °C) 0.79
Clay, burnt (70 °C) 0.91
Transformer paint (70 °C) 0.94
Brick, mortar, plaster (20 °C) 0.93
1 When switching the instrument on, press and hold until
and appear on the display (configuration mode).
- The adjustable function is displayed. The current setting
flashes.
2 Press
( ) several times until the desired setting flashes.
3 Press
( ) to confirm the input.
4 Repeat steps 2 and 3 for all functions.
- The instrument changes to measuring mode.
17Product description
Page 18

Using the product
Switching the instrument on:
> Press
.
- Measuring mode is opened.
Switching the display light on:
The instrument is switched on.
> Press
.
- The display light goes out automatically if no key is
pressed for 10 seconds.
IR measurements:
Laser radiation! Do not look into the laser beam.
Laser class 2.
To ensure correct readings:
· Keep temperature and humidity sources which may falsify the
measurement (e.g. hands) away from the sensor.
· Keep the lens clean and do not measure with foggy lenses.
· Keep the measuring range (the range between the instrument and the
object being measured) and the surface of the object free of obstacles.
There must be no particles of dust or dirt, no humidity (rain, steam) and
no gases.
· If the ambient temperature changes (change of location, e.g.
measurement indoors/outdoors), the instrument must be allowed to
equalise for aprox. 15 minutes.
· The instrument has a lens (90 % value) of 6:1 (distance : measuring
surface) + Opening diameter of the sensor (10mm / 0.39 in):
Distance Diameter of meas. surface Distance Diameter of meas. surface
10cm 3cm 4 in 1.06 in
60cm 11cm 25 in 4.56 in
100cm 18cm 40 in 7.06 in
200cm 35cm 80 in 13.72 in
> Press and hold .
-
flashes in the display. The laser dot marks the centre
of the measuring surface.
-
When IR measurement has been completed (release ),
the instrument changes to the
Hold display view and
the
readings are held.
18 Using the product
Page 19
?? ?? nl sv pt it es fr en de
Changing the display view:
Adjustable views
·
Hold: Readings are held.
· Max: Maximum values since the instrument was last switched on or last reset.
· Min: Minimum values since the instrument was last switched on or last reset.
> Press several times until the desired view appears.
Resetting Max/Min values:
1 Press
several times until the desired view appears.
2 Press
and hold until - - - - appears.
3 Repeat steps 1 and 2 for all values that are to be reset.
Switching the instrument off:
> Press
and hold until the display goes out.
19Using the product
Page 20

Maintaining the product
Changing batteries:
1 To open the battery compartment, push the battery cover
down.
2 Remove used batteries and insert new batteries
(2x 1.5 V type AAA). Observe the polarity!
3 To close the battery compartment, push the battery cover
back on.
Cleaning the housing:
> Clean the housing with a moist cloth (soap suds) if it is dirty.
Do not use aggressive cleaning agents or solvents!
20 Maintaining the product
Page 21
?? ?? nl sv pt it es fr en de
Tips and assistance
Questions and answers
Question Possible causes/solutions
Hi or Lo · Readings outside the measuring range (too high, too
low): Keep to the permitted measuring range.
·
Residual capacity <10 min: Change batteries.
If we could not answer your question, please contact your dealer
or Testo Customer Service. For contact details, please visit www.
testo.com/service-contact
21Tips and assistance
Page 22
22 Notes
Page 23

?? ?? nl sv pt it es fr en de
Instructions succinctes testo 810
Capot de protection: position de
rangement
Capteur infrarouge
Capteur de température d’air
Affichage
Touches de fonction
Compartiment pile (au dos)
Paramétrage
L’appareil est éteint > Maintenez la touche
enfoncée pendant
2 s > Sélectionnez avec
( ), confirmez avec ( ) :
Unité de température : °C, °F > Température différentielle t : OFF (désactivée), ON
(activée) > Facteur d’émission : > Fonction Auto Off : OFF, ON
Allumer l’appareil
Appuyez brièvement sur
.
Allumer l’éclairage de l’écran (pendant 10 s)
L’appareil est allumé > Appuyez sur
.
Effectuer une mesure infrarouge
Maintenez la touche
enfoncée.
Sélectionner le mode d’affichage
L’appareil est allumé > Sélectionnez avec
:
Hold : les valeurs sont conservées > Max : valeurs maximales > Min : valeurs
minimales
Éteindre l’appareil
L’appareil est allumé > Maintenez la touche
enfoncée pendant
2 s.
23Instructions succinctes testo 810
Page 24

Sécurité et environnement
Concernant ce document
> Veuillez, attentivement, prendre connaissance de ce document
et familiarisez-vous avec le maniement du produit avant de
l‘utiliser. Conservez-le à portée de main afin de pouvoir y
recourir en cas de besoin. Remettez cette documentation aux
utilisateurs ultérieurs de ce produit.
> Veuillez tenir compte en particulier des informations mises en
évidence par les symboles suivants :
Remarque importante.
Éviter les dommages corporels / matériels
> Utilisez toujours le produit conformément à l‘usage prévu et
dans les limites des caractéristiques techniques. Ne faites pas
usage de la force.
> Ne stockez jamais le produit conjointement avec des solvants,
des acides ou d‘autres substances agressives.
> N‘effectuez que les travaux de maintenance et d‘entretien
décrits dans la documentation. Respectez les étapes
indiquées. Utilisez seulement des pièces de rechange d‘origine
Testo.
Protéger l‘environnement
> Déposez les accus défectueux/les piles vides aux endroits
prévus à cet effet (points de collecte).
> Renvoyez le produit chez Testo au terme de sa durée
d‘utilisation. Nous assurons une élimination respectueuse de
l‘environnement.
24
Sécurité et environnement
Page 25

?? ?? nl sv pt it es fr en de
Description des appareils
Fonctions et utilisation prévue
Le testo 810 est un thermomètre infrarouge. Il est généralement
prévu pour mesurer la température superficielle d‘appareils de
chauffage ou de radiateurs, par exemple, en même temps que la
température environnante.
Caractéristiques techniques
Caractéristiques de mesure
· Capteurs :
Capteur infrarouge,
capteur de température CTN
· Grandeurs mesurables :
°C, °F
· Plages de mesure :
IR : -30...300 °C, -20...575 °F,
Capteur d‘air : -10...50 °C, 14...122 °F
· Résolution :
0.1 °C, 0.1 °F,
· Précision appareil (à température
nominale de 22 °C, ±1 chiffre) :
Infrarouge : ±2 °C (-30...+100 °C),
±3.6 °F (-22...212 °F),
±2 % val. moy. (plage restante)
Capteur d‘air : ±0.5 °C, ±0.9 °F
· Fréquence de mesure :
0.5 s
· Optique :
6 : 1
· Emissivité:
ajustable de 0.2 à 0.99
Laser
· Classe 2
· Alimentation: <1 mW
· Longueur d´onte: 645...660 nm
· Standard: DIN EN 60825-1:2001-11
Autres caractéristiques de l’appareil
· Type de protection : IP40
· Température d’utilisation :
-10...50 °C, 14...122 °F
· Température de stockage/transport :
-40...70 °C, -40...158 °F
· Alimentation électrique :
2 x 1,5 V type AAA
· Durée de vie des piles :
50 h (sans éclairage de l’écran)
· Dimensions :
119x46x25 mm (incl. capot de
protection)
· Poids : 90 g (incl. piles et capot de
protection)
Directives, normes et contrôles
· Directive 2014/30/UE
Garantie
·· Durée : 2 ans, conditions de garantie :
cf. site Internet
www.testo.com/warranty
25
Description des appareils
Page 26

Description du produit
Aperçu
Capot de protection: position de
rangement
Capteur infrarouge
Capteur de température d’air
Affichage
Touches de fonction
Compartiment pile (au dos)
Prise en main
Insérer les piles :
1 Ouvrez le compartiment pile : faites glisser le couvercle vers
le bas.
2 Insérez les piles (2 piles 1,5 V type AAA). Attention à la
polarité !
3 Fermez le compartiment pile : faites glisser le couvercle vers
le haut.
Paramétrage (mode configuration) :
Fonctions paramétrables
· Unité de température : °C, °F
· Température différentielle t OFF (désactivée), ON (activée)
· Facteur d’émission :
· Fonction Auto Off : OFF (désactivée), ON (activée, l‘appareil s‘éteint
automatiquement 10 min après le dernier actionnement de touche)
Le facteur d‘émission est paramétré sur 0,95 départ usine.
Cette valeur est idéale pour la mesure des non-métaux
(papier, céramique, plâtre, bois, peintures et vernis), des
matières plastiques et des produits alimentaires.
En raison de leur facteur d‘émission faible et/ou inégal,
les métaux nus et les oxydes métalliques ne se prêtent
26
Description du produit
Page 27

?? ?? nl sv pt it es fr en de
que sous réserve à la mesure par infrarouge. Appliquez
par conséquent sur l‘objet de mesure un revêtement qui
augmente le facteur d‘émission, tel que du vernis ou une
bande autocollante émissive (0554 0051).
Facteurs d‘émission de différents matériaux (valeurs types) :
Matériau (température)
Aluminium, laminé à froid (170 °C) 0,04
Coton (20 °C) 0,77
Béton (25 °C) 0,93
Glace lisse (0 °C) 0,97
Fer poncé (20 °C) 0,24
Fer avec peau de fonderie (100 °C) 0,80
Fer avec peau de laminage (20 °C) 0,77
Plâtre (20 °C) 0,90
Verre (90 °C) 0,94
Caoutchouc dur (23 °C) 0,94
Caoutchouc mou, gris (23 °C) 0,89
Bois (70 °C) 0,94
Liège (20 °C) 0,70
Radiateur noir anodisé (50 °C) 0,98
Cuivre légèrement terni (20 °C) 0,04
Cuivre oxydé (130 °C) 0,76
Plastiques : PE, PP, PVC (20 °C) 0,94
Laiton oxydé (200 °C) 0,61
Papier (20 °C) 0,97
Porcelaine (20 °C) 0,92
Peinture noire mate (80 °C) 0,97
Acier, surface trempée (200 °C) 0,52
Acier oxydé (200 °C) 0,79
Argile cuite (70 °C) 0,91
Vernis transformateur (70 °C) 0,94
Brique, mortier, enduit (20 °C) 0,93
1 Lors de l‘allumage de l‘appareil, maintenez la touche
enfoncée jusqu‘à ce que
et s‘affichent (mode
configuration).
- La fonction paramétrable est affichée. Le paramètre
actuel clignote.
2 Appuyez plusieurs fois sur
( ) jusqu‘à ce que le
paramètre désiré clignote.
3 Appuyez sur
( ) pour confirmer la saisie.
4 Répétez les étapes 2 et 3 pour toutes les fonctions.
- L‘appareil passe en mode mesure.
27Prise en main
Page 28

Utilisation du produit
Allumer l’appareil :
> Appuyez brièvement sur
.
- Le mode mesure s’ouvre.
Allumer l’éclairage de l’écran
L’appareil est allumé.
> Appuyez sur
.
- L’éclairage de l’écran s’éteint automatiquement 10 s
après le dernier actionnement de touche.
Effectuer une mesure infrarouge :
Rayonnement laser ! Ne pas regarder directement le
faisceau. Laser de classe 2.
Pour garantir des valeurs de mesure correctes :
· Tenez éloignées du capteur les sources d‘humidité et de température
(par exemple les mains) susceptibles de fausser la mesure.
· Veillez à ce que la lentille soit toujours propre, n‘effectuez pas de
mesure lorsqu‘elle est embuée.
· Protégez la zone de mesure (zone entre l‘appareil et l‘objet de mesure)
et la surface de l‘objet de mesure des perturbations : assurez-vous de
l‘absence de particules de poussière ou de saleté, d‘humidité (pluie,
vapeur) et de gaz.
· En cas de variation de la température ambiante (changement de lieu
de mesure, par exemple mesure à l‘intérieur/à l‘extérieur), l‘appareil
nécessite un temps d‘adaptation de env. 15 min.
· L‘appareil possède une optique (valeur 90 %) de 6:1 (distance : surface
de mesure) + ouverture diamètre de la sonde (10mm):
Distance Diamètre de surface à mesurer
10cm 3cm
60cm 11cm
100cm 18cm
200cm 35cm
28
Utilisation du produit
Page 29

?? ?? nl sv pt it es fr en de
> Maintenez la touche enfoncée.
-
clignote sur l‘écran. Le point laser définit le point
central de la surface à mesurer.
- Une fois la mesure infrarouge terminée (relâchez la
touche
), l‘appareil passe en mode d‘affichage Hold et
les valeurs sont conservées.
Changer l’affichage de l’écran :
Affichages paramétrables
· Hold : Les valeurs sont conservées
· Max : Valeurs maximales depuis la dernière mise en marche de l’appareil ou
depuis la dernière mise à jour.
· Min : Valeurs minimales depuis la dernière mise en marche de l’appareil ou
depuis la dernière mise à jour.
> Appuyez plusieurs fois sur jusqu’à ce que l’affichage
désiré apparaisse.
Mise à jour des valeurs maximales et minimales :
1 Appuyez plusieurs fois sur jusqu’à ce que l’affichage
désiré apparaisse.
2 Maintenez la touche
enfoncée jusqu’à ce que - - - -
s’affiche.
3 Répétez les étapes 1 et 2 pour toutes les valeurs que vous
désirez mettre à jour.
Éteindre l’appareil :
> Maintenez la touche
enfoncée jusqu’à ce que l’affichage
s’éteigne.
29Utilisation du produit
Page 30

Entretien du produit
Changer les piles :
1 Ouvrez le compartiment pile : faites glisser le couvercle vers le
bas.
2 Retirez les piles vides et insérez-en des nouvelles (2 piles
1,5 V type AAA). Attention à la polarité !
3 Fermez le compartiment pile : faites glisser le couvercle vers
le haut.
Nettoyer le boîtier :
> En cas de salissure, nettoyez le boîtier avec un linge humide
(eau savonneuse). N‘utilisez pas de solvants ni de produits
de nettoyage forts!
30
Entretien du produit
Page 31

?? ?? nl sv pt it es fr en de
Conseils et dépannage
Questions et réponses
Question Causes possibles
Hi ou Lo · Valeurs de mesure en dehors de la plage de mesure
(trop élevées, trop basses) : Respecter la plage de
mesure autorisée.
· Capacité restante <10 min : Changer les piles.
Si nous ne pouvons pas répondre à vos questions : veuillez vous
adresser à votre revendeur ou au service après-vente Testo.
Vous trouverez nos coordonnées sur Internet, à l’adresse
www.testo.com/service-contact.
31
Conseils et dépannage
Page 32

32 Notes
Page 33

?? ?? nl sv pt it es fr en de
Instrucciones breves del testo 810
Cubierta de protección: posición
de reposo
Sensor de infrarrojos
Sensor de temperatura del aire
Visualizador
Teclas de función
Compartimento para pilas (parte
posterior)
Efectuar los ajustes básicos
El instrumento está apagado > presionar
durante 2 s >
seleccionar con
( ) confirmar con ( ):
Unidad de temperatura: °C, °F > Temperatura diferencial t: OFF (desconectado), ON
(conectado) > Emisividad: > Función Auto off: OFF, ON
Encender el instrumento
Pulsar
.
Encender la iluminación del visualizador (durante 10 s)
El instrumento está encendido > pulsar
.
Medir por infrarrojos
Mantener
presionado.
Seleccionar modo de visualización
El instrumento está encendido > seleccionar con
:
Hold: se mantienen los valores de medición > Max: valores máximos > Min: valores
mínimos
Apagar el instrumento
El instrumento está encendido > presionar
durante 2 s.
33Instrucciones breves del testo 810
Page 34

Seguridad y medio
ambiente
Indicaciones sobre este documento
> Lea atentamente esta documentación y familiarícese con el
manejo del producto antes de utilizarlo. Guarde la presente
documentación en un lugar accesible de forma que se pueda
consultar cuando sea necesario. Entregue la documentación a
posteriores usuarios de este producto.
> Preste especial atención a la información resaltada mediante
los siguientes símbolos:
Indicación importante.
Evitar daños personales / materiales
> Utilizar el producto sólo de acuerdo con el uso previsto y
observando los parámetros predeterminados que figuran en
los datos técnicos. No forzar el instrumento.
> No almacenar nunca el producto junto con disolventes, ácidos
u otras substancias agresivas.
> Realizar únicamente los trabajos de mantenimiento que vienen
descritos en la documentación respetando siempre los pasos
indicados. Utilizar solamente piezas de repuesto originales de
Testo.
Protección del medio ambiente
> Llevar las baterías averiadas y las pilas agotadas a los puntos
de recogida previstos al efecto.
> Enviar el producto a Testo al término de su vida útil. Nosotros
nos ocuparemos de eliminarlo ecológicamente.
Atención: su producto está marcado con este símbolo.
Significa que los productos eléctricos y electrónicos
usados no deberían mezclarse con los residuos
domésticos generales. Existe un sistema de recogida
independiente para estos productos.
34
Seguridad y medio ambiente
Page 35

?? ?? nl sv pt it es fr en de
Descripción de los
instrumentos
Funciones y aplicación
El testo 810 es un instrumento de medición por infrarrojos.
Se utiliza generalmente para medir la temperatura superficial
de determinados sistemas, como, por ejemplo, sistemas de
calefacción, radiadores... Al mismo tiempo, el testo 810 también
mide la temperatura ambiente.
Este instrumento no es apto para los usos indicados en la orden
ITC/3701/2006, del 22 de Noviembre.
Datos técnicos
Datos técnicos
· Sensores:
Sensor de infrarrojos,
sensor de temperatura NTC
· Parámetros de medición:
°C, °F
· Rangos de medición:
IR: -30 - 300 °C; -20 - 575 °F
Sonda: -10 - 50 °C; 14 - 122 °F
· Resolución:
0,1 °C; 0,1 °F
· Exactitud (a temperatura nominal de
22 °C, ±1 dígito):
Infrarrojos: ±2 °C (-30...+100 °C);
±3,6 °F (-22 - 212 °F);
±2% del v. m. (rango restante)
Sonda: ±0,5 °C; ±0,9 °F
· Frecuencia de medición:
0,5 s
· Óptica:
6 : 1
· Emisividad:
ajustable de 0.2 a 0.99
Láser
· Clase 2
· Potencia: <1 mW
· Longitud de onda: 645...660 nm
· Estándar: DIN EN 60825-1:2001-11
Otros datos del instrumento
· Clase de protección: IP40
· Temperatura ambiental:
-10 - 50 °C; 14 - 122 °F
· Temperatura de almacenaje/transporte:
-40 - 70 °C; -40 - 158 °F
· Alimentación:
2 pilas de 1,5 V, tipo AAA
· Vida útil de las pilas:
50 h (sin iluminación del visualizador)
· Medidas:
119x46x25 mm (incl. pilas y cubierta
de protección)
· Peso: 90 g (incl. pilas y cubierta de
protección)
Directivas, normas y controles
· Directiva CE: 2014/30/UE
Garantìa
· Duración: 2 años, condiciones de
garantía: ver página de internet
www.testo.com/warranty
35
Descripción de los instrumentos
Page 36

Descripción del producto
Vista general
Cubierta de protección: posición
de reposo
Sensor de infrarrojos
Sensor de temperatura del aire
Visualizador
Teclas de función
Compartimento para pilas (parte
posterior)
Primeros pasos
Colocar las pilas:
1 Abrir el compartimento para pilas: deslizar hacia abajo la tapa.
2 Colocar las pilas (2 de 1,5 V, tipo AAA). Respetar la
polaridad.
3 Cerrar el compartimento para pilas: deslizar hacia arriba la tapa.
Efectuar los ajustes básicos (modo de configuración):
Funciones ajustables
· Unidad de temperatura: °C, °F
· Temperatura diferencial t: OFF (desconectado), ON (conectado)
· Emisividad:
· Función Auto off: OFF (desconectado), ON (conectado; el instrumento se desconecta
automáticamente 10 minutos después de la última pulsación de cualquier tecla).
El valor de emisividad se encuentra ajustado de fábrica en
0,95. Este valor es ideal para la medición de plásticos,
alimentos y materiales no metálicos (papel, cerámica, yeso,
madera, pinturas y barnices).
Debido a su baja o irregular emisividad, los metales
brillantes y óxidos de metal sólo son relativamente
adecuados para la medición por infrarrojos: aplicar
revestimientos que aumentan la emisividad, tales como
36
Descripción del producto
Page 37

?? ?? nl sv pt it es fr en de
barniz o cinta adhesiva (0554 0051) sobre el objeto que se
va a medir.
Valores de emisividad de diferentes materiales (valores típicos):
Material (temperatura)
Aluminio, laminado brillante (170 °C) 0,04
Algodón (20 °C) 0,77
Hormigón (25 °C) 0,93
Hielo, suave (0 °C) 0,97
Hierro, esmerilado (20 °C) 0,24
Hierro con capa de fundición (100 °C) 0,80
Hierro con capa laminada (20 °C) 0,77
Yeso (20 °C) 0,90
Vidrio (90 °C) 0,94
Caucho, duro (23 °C) 0,94
Caucho, gris blando (23 °C) 0,89
Madera (70 °C) 0,94
Corcho (20 °C) 0,70
Radiador, negro anodizado (50 °C) 0,98
Cobre, deslustrado (20 °C) 0,04
Cobre, oxidado (130 °C) 0,76
Plásticos: PE, PP, PVC (20 °C) 0,94
Latón, oxidado (200 °C) 0,61
Papel (20 °C) 0,97
Porcelana (20 °C) 0,92
Pintura negra, mate (80 °C) 0,97
Acero, superficie con tratamiento térmico (200 °C) 0,52
Acero, oxidado (200 °C) 0,79
Arcilla, cocida (70 °C) 0,91
Barniz para transformadores (70 °C) 0,94
Ladrillo, mortero, yeso (20 °C) 0,93
1 Al encender el instrumento, presionar hasta que
aparezca
y en el visualizador (modo de
configuración).
- Se mostrará la función que se puede ajustar. El ajuste
actual parpadea.
2 Pulsar
( ) varias veces hasta que parpadee el ajuste
deseado.
3 Pulsar
( ) para confirmar la entrada.
4 Repetir los pasos 2 y 3 para todas las funciones.
- El instrumento cambia al modo de medición.
37Primeros pasos
Page 38

Utilizar el producto
Encender el instrumento:
> Pulsar
.
- Se inicia el modo de medición.
Encender la iluminación del visualizador:
El instrumento está encendido.
> Pulsar
.
- La iluminación del visualizador se apaga
automáticamente 10 segundos después de la última
pulsación de cualquier tecla.
Medir por infrarrojos:
¡Radiación láser! No mirar al rayo láser.
Láser de clase 2.
Para garantizar la obtención de valores de medición correctos:
· No acercar al sensor fuentes de humedad y temperatura que
distorsionan la medición (p. ej., las manos).
· Mantener la lente limpia, no medir con la lente empañada.
· Evitar interferencias en la zona de medición (zona situada entre el
instrumento y el objeto de medición) y en la superficie del objeto de
medición: ausencia de partículas de polvo y suciedad, humedad (lluvia,
vapor) o gases.
· Si varía la temperatura ambiente (cambio del lugar de medición, por
ejemplo, medición en el interior/medición en el exterior), el instrumento
de medición requiere un tiempo de adaptación de aprox. 15 minutos.
· El instrumento de medición posee una óptica (valor 90%) de 6:1
(distancia : superficie de medición) + Apertura del diámetro del sensor
(10mm):
Distancia Diámetro de la superficie de medición
10cm 3cm
60cm 11cm
100cm 18cm
200cm 35cm
38 Utilizar el producto
Page 39

?? ?? nl sv pt it es fr en de
> Mantener presionado.
-
parpadea en el visualizador. El indicador láser marca
el centro de la superficie de medición.
- Tras finalizar la medición por infrarrojos (soltar
), el
instrumento cambia al modo de visualización
Hold; los
valores de medición se mantienen.
Cambiar el modo de visualización:
Modos de visualización ajustables
· Hold: se mantienen los valores de medición
· Max: valores máximos desde la última vez que se encendió el instrumento o se
efectuó un reset.
· Min: valores mínimos desde la última vez que se encendió el instrumento o se
efectuó un reset.
> Pulsar varias veces hasta que aparezca el modo de
visualización deseado.
Reposicionar los valores Max/Min:
1 Pulsar varias veces hasta que aparezca el modo de
visualización deseado.
2 Presionar
hasta que aparezca - - - -.
3 Repetir los pasos 1 y 2 para todos los valores que se deban
reposicionar.
Apagar el instrumento:
> Presionar
hasta que se apague el visualizador.
39Utilizar el producto
Page 40

Mantenimiento del
producto
Cambiar las pilas:
1 Abrir el compartimento para pilas: deslizar hacia abajo la
tapa.
2 Retirar las pilas agotadas e insertar pilas nuevas (2 de 1,5
V, tipo AAA). Respetar la polaridad.
3 Cerrar el compartimento para pilas: deslizar hacia arriba la
tapa.
Limpiar la carcasa:
> Limpiar la suciedad de la carcasa con un paño húmedo
(agua jabonosa). No utilizar productos de limpieza o
disolventes agresivos.
40
Mantenimiento del producto
Page 41

?? ?? nl sv pt it es fr en de
Consejos y ayuda
Problemas y soluciones
Problema Posibles causas/soluciones
Hi o Lo · Valores de medición fuera del rango de medición
(demasiado altos o demasiado bajos): respetar el
rango de medición permitido.
·
Capacidad restante <10 min: cambiar las pilas.
Si no hemos podido resolver sus dudas, por favor, póngase
en contacto con su distribuidor más cercano o con el Servicio
Técnico de Testo. Encontrará los datos de contacto en la página
de internet www.testo.com/service-contact.
41Consejos y ayuda
Page 42

42 Notes
Page 43

?? ?? nl sv pt it es fr en de
Guida rapida testo 810
Coperchio di
protezione: posizione aperta
Sensore a infrarossi
Sensore di temperatura dell’aria
Display
Tasti di comando
Vano batteria (lato posteriore)
Regolazioni base
Lo strumento è spento > mantenere premuto 2s > selezionare
con
( ), confermare con ( ):
Unità di misura della temperatura: °C, °F > Temperatura differenziale t: OFF, ON >
Emissività: > Funzione Auto Off: OFF, ON
Accendere lo strumento
Premere
.
Accendere l’illuminazione display (per 10s)
Lo strumento è acceso > premere
.
Eseguire la misurazione IR
Tenere premuto
.
Selezionare la modalità visualizzazione
Lo strumento è acceso > con
selezionare:
Hold: I valori misurati rimangono visualizzati > Max: Valori massimi > Min: Valori
minimi
Spegnere lo strumento
Lo strumento è acceso > premere
per 2s.
43Guida rapida testo 810
Page 44

Sicurezza e ambiente
In questo manuale
> Leggere attentamente il presente manuale per acquisire
familiarità con lo strumento prima della messa in funzione.
Conservare il manuale a portata di mano per consultarlo
in caso di necessità. Consegnare il presente manuale al
successivo utente dello strumento.
> Osservare attentamente le informazioni accompagnate dai
seguenti simboli:
Note importanti.
Evitare danni personali / e materiali
> Utilizzare lo strumento solo per gli scopi previsti e
conformemente ai parametri indicati nei dati tecnici. Non
forzare lo strumento.
> Non stoccare lo strumento insieme a solventi, soluzioni acide o
altre sostanze aggressive.
> Eseguire esclusivamente gli interventi di manutenzione e
riparazione descritti nel manuale, rispettando le fasi di lavoro
descritte. Utilizzare solo parti di ricambio originali Testo.
Proteggere l‘ambiente
> Smaltire le batterie ricaricabili difettose o le batterie esaurite
negli appositi contenitori.
> Rispedire lo strumento direttamente a Testo al termine della
sua vita operativa. Testo provvederà a smaltirlo nel rispetto
dell‘ambiente.
44 Sicurezza e ambiente
Page 45

?? ?? nl sv pt it es fr en de
Descrizione delle prestazioni
Funzioni e utilizzo
Testo 810 è uno strumento di misura della temperatura a
infrarossi. Lo scopo di utilizzo più diffuso è la misurazione senza
contatto della temperatura di superfici, ad esempio di impianti di
riscaldamento e radiatori nonché la misura contemporanea della
temperatura ambiente.
Dati tecnici di misurazione
Dati tecnici di misurazione
· Sensori:
sensore infrarossi,
sensore temperatura NTC
· Unità di misura:
°C, °F
· Campo di misura:
IR: -30...300 °C, -20...575 °F,
Sonda aria: -10...50 °C, 14...122 °F
· Risoluzioni:
0.1 °C, 0.1 °F,
· Precisione (a temperatura nominale
22 °C, ±1 Digit):
Infrarossi: ±2 °C (-30...+100 °C),
±3.6 °F (-22...212 °F),
±2 % del v. m. (campo rest.)
Sonda aria: ±0.5 °C, ±0.9 °F
· Velocità di misurazione:
0.5 s
· Ottica:
6 : 1
· Emissività:
regolabile da 0,2 a 0,99
Laser
· Classe 2
· Alimentazione: <1 mW
· Lunghezza d´onda: 645...660 nm
· Standard: DIN EN 60825-1:2001-11
Altri dati
· Classe di protezione: IP40
· Condizioni ambientali:
-10...50 °C, 14...122 °F
· Condizioni di stoccaggio/trasporto:
-40...70 °C, -40...158 °F
· Alimentazione:
2 x 1,5 V Tipo AAA
· Durata batteria:
50 h (senza illuminazione display)
· Dimensioni:
119x46x25 mm (incl. coperchio di
protezione)
· Peso: 90 g (incl. batterie e coperchio di
protezione)
Direttive, norme e collaudi
· Direttiva CE: 2014/30/UE
Garanzia
· Durata: 2 anni, condizioni di garanzia:
vedere il sito internet
www.testo.com/warranty
45
Descrizione delle prestazioni
Page 46

Descrizione del prodotto
Panoramica
Coperchio di
protezione: posizione aperta
Sensore a infrarossi
Sensore di temperatura dell’aria
Display
Tasti di comando
Vano batteria (lato posteriore)
Prima di utilizzare lo
strumento
Inserire le batterie:
1 Aprire il vano batterie: spingere verso il basso il coperchio
della batteria.
2 Inserire le batterie (2x 1,5V tipo AAA). Fare attenzione alle
polarità!
3 Chiudere il vano batteria: chiudere il coperchio.
Regolazioni base (modalità configurazione):
Funzioni regolabili
· Unità di misura della temperatura: °C, °F
· Temperatura differenziale t: OFF, ON
· Emissività:
· Funzione Auto Off: OFF, ON (acceso - se nessun tasto viene attivato, lo
strumento si spegne automaticamente dopo 10 minuti)
L‘emissività è impostata su un fattore di 0,95. Questo è il
valore ideale per i non-metalli (carta, ceramiche, legno e
vernici), plastiche e cibo.
46
Descrizione del prodotto
Page 47

?? ?? nl sv pt it es fr en de
Metalli brillanti e ossidi di metallo sono adatti solo
parzialmente al tipo di misurazione a infrarossi, a causa
della loro bassa e non uniforme emissività: per aumentare
l‘emissività, ricoprire la superficie degli oggetti da misurare
con vernice o l‘apposito nastro adesivo (0554 0051).
Emissività di diversi materiali (valori tipici):
Materiale (temperatura)
Alluminio laminato lucido (170 °C) 0,04
Cotone (20 °C) 0,77
Calcestruzzo (25 °C) 0,93
Ghiaccio liscio (0 °C) 0,97
Ferro smerigliato (20 °C) 0,24
Ferro con rivestimento a getto (100 °C) 0,80
Ferro con rivestimento laminato(20 °C) 0,77
Gesso (20 °C) 0,90
Vetro (90 °C) 0,94
Gomma dura (23 °C) 0,94
Gomma morbida (23 °C) 0,89
Legno (70 °C) 0,94
Sughero (20 °C) 0,70
Dissipatore di calore, anodiz. nero (50 °C) 0,98
Rame leggermente opaco (20 °C) 0,04
Rame, ossidato (130 °C) 0,76
Plastiche: PE, PP, PVC (20 °C) 0,94
Ottone, ossidato (200 °C) 0,61
Carta (20 °C) 0,97
Porcellana (20 °C) 0,92
Vernice nera opaca (80 °C) 0,97
Acciaio termotrattato(200 °C) 0,52
Acciaio, ossidato (200 °C) 0,79
Argilla refrattaria(70 °C) 0,91
Vernice per trasformatori (70 °C) 0,94
Mattone e malta, intonaco (20 °C) 0,93
1 All‘accensione dello strumento, tenere premuto finché
sul display non compare
e (modalità configurazione).
- Viene visualizzata la funzione regolabile. L‘impostazione
attuale lampeggia.
2 Premere
più volte ( ), finché l‘impostazione desiderata
non lampeggia.
3 Premere
( ) per confermare l‘inserimento.
4 Ripetere le fasi 2 e 3 per tutte le funzioni.
- Lo strumento passa alla modalità di misura.
47
Prima di utilizzare lo strumento
Page 48

Utilizzare il prodotto
Accendere lo strumento:
> Premere
.
- La modalità di misura si attiva.
Accendere l’illuminazione del display
Lo strumento è acceso.
> Premere
.
- L’illuminazione del display si spegne automaticamente
dopo 10 secondi dall’ultima attivazione di un tasto.
Eseguire la misurazione IR:
Radiazioni laser! Non guardare direttamente il raggio laser.
Laser classe 2.
Per garantire letture corrette:
· Tenere lontane dal sensore fonti di calor e umidità (ad es. mani) che
potrebbero alterare la misurazione.
· Tenere la lente pulita, non misurare se la lente è appannata.
· Tenere il campo di misura (l’area tra il sensore e l’oggetto misurato)
libera da interferenze: polvere o particelle di sporco, umidità (pioggia,
vapore) o gas.
· Se la temperatura ambiente varia (cambio di postazione, ad es. misure
all’aperto o in ambienti chiusi) lo strumento ha bisogno di circa 15
minuti di adattamento per la misura a infrarossi.
· Lo strumento ha un‘ottica (90% del valore) di 6:1 (distanza : area di
misura) + Diametro di apertura del sensore (10mm):
Distanza Diametro area di misura
10cm 3cm
60cm 11cm
100cm 18cm
200cm 35cm
> Tenere premuto .
-
lampeggia sul display. Il laser segnala il centro
dell’area di misura.
- Al termine della misurazione IR (rilasciare
) lo
strumento passa in modalità di visualizzazione
Hold, i
valori misurati rimangono visualizzati.
48
Utilizzare il prodotto
Page 49

?? ?? nl sv pt it es fr en de
Cambiare la modalità del display:
Modalità regolabili
· Hold: I valori misurati rimangono visualizzati
· Max: Valori massimi dall’ultima accensione o dall’ultimo reset.
· Min: Valori minimi dall’ultima accensione o dall’ultimo reset.
> Premere ripetutamente , fino a visualizzare la modalità
desiderata.
Resettare i valori massimi/minimi:
1 Premere ripetutamente , fino a visualizzare la modalità
desiderata.
2 Tenere premuto
finché non compare - - - -.
3 Ripetere le fasi 1 e 2 per tutti i valori da resettare.
Spegnere lo strumento:
> Tenere premuto
finché il display non si spegne.
49Utilizzare il prodotto
Page 50

Manutenzione del prodotto
Sostituzione delle batterie:
1 Aprire il vano batterie: spingere verso il basso il coperchio
della batteria.
2 Smaltire le batterie usate e inserire le batterie nuove
(2x 1,5 V tipo AAA). Fare attenzione alle polarità!
3 Chiudere il vano batteria: chiudere il coperchio.
Pulizia dell‘alloggiamento:
> Pulire l‘alloggiamento con un panno umido (acqua
saponata). Non utilizzare detergenti aggressivi o solventi!
50 Manutenzione del prodotto
Page 51

?? ?? nl sv pt it es fr en de
Consigli e risoluzione dei
problemi
Domande e risposte
Domanda Possibile causa / Soluzioni
Hi o Lo · fuori del campo di misura (troppo alti, troppo bassi):
rispettare i valori consentiti.
· capacità residua <10 min: sostituire le batterie:
Se la sua domanda non ha ricevuto risposta: rivolgersi al proprio
rivenditore o al servizio assistenza Testo. Per le informazioni di
contatto vedere il sito internet www.testo.com/service-contact.
51
Consigli e risoluzione dei problemi
Page 52

52 Notes
Page 53

?? ?? nl sv pt it es fr en de
Breve introdução testo 810
Tampa de protecção: posição de
encaixe
Sensor de infravermelhos
Sensor de ar/temperatura
Visor
Botões de comando
Compartimento para as pilhas
(na parte de trás)
Ajustes de funcionamento básicos
O instrumento está desligado > Manter a tecla
carregada
durante 2 segundos > Seleccionar através de
( ) confirmar
através de
( ):
Unidade de temperatura: °C, °F > Temperatura diferencial t: OFF (desligar), ON
(ligar) > Emissividade: > Função de desligar automático: OFF, ON
Ligar o instrumento
Carregar em
.
Ligar a iluminação do visor (durante 10 segundos)
O instrumento está ligado > Carregar em
.
Fazer medição por infra-vermelhos
Manter a tecla
carregada.
Seleccionar o modo de visualização
O instrumento está ligado > Seleccionar através de
:
Hold: mantêm-se os valores de medição > Max: Valores máximos > Min: Valores
mínimos
Desligar o instrumento
O instrumento está ligado > Manter a tecla
pressionada
durante 2 segundos.
53Breve introdução testo 810
Page 54

Segurança e meio
ambiente
Sobre esta documentação
> Leia com atenção toda a documentação e familiarize-se com o
manuseamento do produto antes de o utilizar. Mantenha esta
documentação à mão, de modo a poder consultá-la sempre
que necessário. Entregue-a aos próximos utilizadores deste
produto.
> Tenha especialmente em conta as informações realçadas
pelos seguintes símbolos:
Informação importante.
Evitar danos pessoais/danos materiais
> Utilizar o produto apenas de forma apropriada e de acordo
com a sua finalidade, dentro dos parâmetros mencionados no
capítulo „Dados Técnicos“. Não aplicar força.
> Nunca guardar este produto junto de dissolventes, ácidos ou
outros materiais agressivos.
> Levar a cabo apenas as tarefas de manutenção descritas na
documentação. Ao fazê-lo, respeitar os passos indicados.
Utilizar apenas peças de substituição originais Testo.
Protecção do meio ambiente
> Deitar fora as pilhas recarregáveis avariadas e as pilhas gastas
nos pontos de recolha previstos para tal.
> Enviar o produto à Testo após este ter chegado ao fim da
sua vida útil. Nós nos encarregaremos da sua eliminação
ecológica.
54 Segurança e meio ambiente
Page 55

?? ?? nl sv pt it es fr en de
Especificações
Funções e uso
O testo 810 é um instrumento de medição por infravermelhos.
Este instrumento utiliza-se normalmente para a medição
da temperatura de superfícies, p. ex., em aquecimentos e
radiadores, e para a medição simultânea da temperatura do
ambiente circundante.
Dados técnicos
Dados técnicos de medição
· Sensores:
Sensor de infravermelhos,
sensor de temperatura NTC
· Parâmetros:
°C, °F
· Gamas de medição:
IR: -30...300 °C, -20...575 °F,
Infravermelhos: -10...50 °C, 14...122 °F
· Resoluções:
0.1 °C, 0.1 °F,
· Exactidões (com temperatura nominal
de 22 °C, ±1 dígito)::
Infravermelhos: ±2 °C (-30...+100 °C),
±3.6 °F (-22...212 °F),
±2 % do v. m. (gama restante)
Sonda de ar: ±0.5 °C, ±0.9 °F
· Taxa de medição:
0.5 s
· Dispositivo ódeico:
6 : 1
· Emissividade:
ajustável de 0.2 a 0.99
Laser
· Classe 2
· Potência: <1 mW
· Comprimento de onda: 645...660 nm
· Standard: DIN EN 60825-1:2001-11
Outros dados do instrumento
· Tipo de protecção: IP40
· Temperatura do ambiente:
-10...50 °C, 14...122 °F
· Temperatura de armazenamento/
transporte:
-40...70 °C, -40...158 °F
· Alimentação de tensão:
2x 1,5V tipo AAA
· Autonomia da pilha:
50 h (iluminação do visor apagada)
· Dimensões:
119x46x25mm (incluindo tampa de
protecção)
· Peso: 90g (incluindo pilhas e capa de
protecção)
Directivas, normas e testes
· Directiva CE: 2014/30/UE
Garantia
· Duração: 2 anos, condições de
garantia: ver www.testo.com/warranty
55Especificações
Page 56

Descrição do produto
Breve descrição
Tampa de protecção: posição de
encaixe
Sensor de infravermelhos
Sensor de ar/temperatura
Visor
Botões de comando
Compartimento para as pilhas
(na parte de trás)
Os primeiros passos
Colocar as pilhas:
1 Abrir o compartimento para as pilhas: empurrar a tampa
para baixo.
2 Colocar pilhas (2x 1,5 V tipo AAA). Tenha em conta a
polaridade correcta.
3 Fechar o compartimento para as pilhas: fechar a tampa.
Ajustes de funcionamento básicos (modo de configuração):
Funções ajustáveis
· Unidade de temperatura: °C, °F
· Temperatura diferencial t: OFF (desligar), ON (an)
· Factor de emissividade:
· Função de desligar automático: OFF (desligar), ON (ligar; o instrumento desligase automaticamente depois de 10 minutos sem carregar numa tecla)
A emissividade vem regulada de fábrica e é de 0,95. Este
valor é ideal para a medição de não metais (papel,
cerâmica, gesso, madeira, cores e tinta), plásticos e
alimentos.
A medição por infravermelhos de metais polidos e de
óxidos metálicos pode ser feita apenas de forma limitada,
uma vez que estes materiais possuem uma emissividade
56 Descrição do produto
Page 57

?? ?? nl sv pt it es fr en de
baixa ou pouco consistente. Aplique ao objecto que deseja
medir um revestimento que aumente a emissividade, como
por exemplo tinta ou fita adesiva de emissão (0554 0051).
Tabela de emissividade de vários materiais (valores típicos):
Material (Temperatura)
Alumínio, não tratado (170 °C) 0,04
Algodão (20 °C) 0,77
Betão (25 °C) 0,93
Gelo, liso (0 °C) 0,97
Ferro, esmerilado (20 °C) 0,24
Ferro com crosta de fundição (100 °C) 0,80
Ferro com escamas de laminação (20 °C) 0,77
Gesso (20 °C) 0,90
Vidro (90 °C) 0,94
Borracha, dura (23 °C) 0,94
Borracha, cinzento, mole (23 °C) 0,89
Madeira (70 °C) 0,94
Cortiça (20 °C) 0,70
Dissipador de calor, preto anodizado (50 °C) 0,98
Cobre, levemente oxidado (20 °C) 0,04
Cobre, oxidado (130 °C) 0,76
Plásticos: PE, PP, PVC (20 °C) 0,94
Latão, oxidado (200 °C) 0,61
Papel (20 °C) 0,97
Porcelana (20 °C) 0,92
Tinta preta, mate (80 °C) 0,97
Aço, com tratamento de calor Superfície (200 °C) 0,52
Aço, oxidado (200 °C) 0,79
Barro, queimado (70 °C) 0,91
Verniz para transformadores (70 °C) 0,94
Tijolo, argamassa, reboco (20 °C) 0,93
1 Ao ligar o instrumento, manter a tecla pressionada até
que surjam no visor os símbolos
e (modo de
configuração).
- Pode visualizar-se a função ajustada. O actual ajuste
pisca.
2 Carregar várias vezes em
( ) até que o ajuste desejado
comece a piscar.
3 Carregar em
( ) para confirmar a indicação.
4 Repetir os passos 2 e 3 para todas as funções.
- O instrumento passa para o modo de medição.
57Os primeiros passos
Page 58

Utilizar o produto
Ligar o instrumento:
> Carregar em
.
- Inicia-se o modo de medição.
Ligar a iluminação do visor
O instrumento encontra-se ligado.
> Carregar em
.
- A iluminação do visor apaga-se automaticamente depois
de 10 segundos sem carregar numa tecla.
Fazer medição por infra-vermelhos:
Radiação laser! Não olhar para o raio laser.
Classe de laser: 2.
De modo a garantir valores de medição correctos:
· Manter afastadas do sensor fontes de temperatura e de humidade que
possam induzir a valores de medição errados (por ex., as mãos).
· Manter a lente limpa; não efectuar medições com a lente embaciada.
· Manter afastados da área de medição (área entre o instrumento e
o objecto que irá ser medido) e da superfície do objecto quaisquer
factores de interferência: elimine as partículas de pó ou de sujidade,
humidades (chuva, vapor) ou gases.
· No caso de haver uma alteração da temperatura do ambiente
circundante (p. ex., mudança do local de medição: medição no interior/
exterior), o instrumento necessita de um período de assimilação de
aprox. 15 minutos.
· O instrumento de medição possui um dispositivo óptico (valor 90%) de
6:1 (distância: superfície de medição) +Diâmetro de abertura do sensor
(10mm):
Distância Diâmetro da superfície
10cm 3cm
60cm 11cm
100cm 18cm
200cm 35cm
58 Utilizar o produto
Page 59

?? ?? nl sv pt it es fr en de
> Manter a tecla carregada.
- O símbolo
pisca no visor. O ponto de laser marca o
centro da superfície a ser medida.
- Após ter finalizado a medição por infravermelhos (soltar
a tecla
) o instrumento passa para o modo de
visualização
Hold e os valores de medição podem ser
mantidos.
Alterar o modo de visualização do visor:
Modos de visualização ajustáveis
· Hold: mantêm-se os valores de medição
· Max: valores máximos desde a última vez que se ligou o instrumento ou desde
a última vez que foi reiniciado.
· Min: valores mínimos desde a última vez que se ligou o instrumento ou desde a
última vez que foi reiniciado.
> Carregar várias vezes em até aparecer o modo de
visualização desejado.
Reiniciar os valores Máx/Mín:
1 Carregar várias vezes em até aparecer o modo de
visualização desejado.
2 Manter a tecla
carregada até que surja - - - -.
3 Repetir os passos 1 e 2 para todos os valores que devam
ser reiniciados.
Desligar o instrumento:
> Manter a tecla
carregada até que o visor se apague.
59Utilizar o produto
Page 60

Manutenção do produto
Substituir as pilhas:
1 Abrir o compartimento para as pilhas: empurrar a tampa
para baixo.
2 Retirar as pilhas gastas e colocar as novas (2x 1,5 V tipo
AAA). Tenha em conta a polaridade correcta.
3 Fechar o compartimento para as pilhas: fechar a tampa.
Limpar a carcaça:
> No caso de esta apresentar sujidade, limpar a carcaça com
um pano húmido (espuma de sabão). Não utilizar produtos
de limpeza ou solventes agressivos.
60 Manutenção do produto
Page 61

?? ?? nl sv pt it es fr en de
Conselhos e assistência
Perguntas e respostas
Pergunta Causas possíveis/Soluções
Hi ou Lo · Valores de medição fora da gama de medição
(demasiado elevados, demasiado baixos): respeitar a
gama de medição permitida.
· Capacidade residual <10 minutos: substituir a pilha
Se não respondermos às suas questões, por favor contacte
oseu distribuidor ou o Serviço Técnico da Testo.Para detalhes de
contactos, por favor visite www.testo.com/service-contact
61Conselhos e assistência
Page 62

Notes62
Page 63

63
Краткая инструкция testo 810
Защитный чехол: Рабочее
положение
ИК-сенсор
Cенсор температуры воздуха
Дисплей
Кнопки управления
Отсек батарей (сзади)
Базовые настройки
Прибор выключен >нажать и держать
2сек. > выбрать ( ),
подтвердить
( ):
Pазмерность: °C, °F > дифференциальная температура t: OFF(âûêë), ON(âêë) >
коэффициент эмиссии: > автовыключение: OFF(âûêë), ON(âêë)
Включение прибора
Нажать
.
Включение подсветки дисплея (на 10сек)
Прибор включен > нажать
.
ИК-измерения
Нажать и держать
.
Выбор режима отображения
Прибор включен > выбрать
:
Hold: фиксация измеренных значений > Max: максимальные > Min:минимальные
Выключение прибора:
Прибор включен >нажать и держать
2ñåê.
defresitpt
ru
????
Краткая инструкция testo 810
Page 64

Безопасность и окружающая среда
Безопасность и окружающая
среда
Об этой инструкции
> Пожалуйста внимательно изучите настоящую инструкцию пред тем как
приступить к работе с прибором. В дальнейшем, всегда держите
инструкцию “под рукой”. Если вы передаете прибор другому
пользователю, обязательно передайте ему инструкцию.
> Обратите особое внимание на разделы, отмеченные:
Важно.
Cобственная безопасность/повреждение прибора
> Используйте прибор только по его прямому назначению и с
параметрами, указанными в спецификации прибора. Не используйте
силу.
> Не храните прибор вместе с расстворителями, кислотами и другими
агрессивными веществами.
> Обслуживание и ремонт прибора разрешен только в объеме,
разрешенным данной инструкцией. Cоблюдайте порядок обслуживания.
Используйте только оригинальные запасные части Testo.
Защита окружающей среды
> Утилизируйте использованные батарейки/аккумуляторы только в
специально предназначенных для этого местах.
> Отправьте отслуживщий свой срок прибор обратно производителю
Testo, где позаботятся о его безопасной утилизации.
64
Page 65

Cпецификация
?? ?? nl ru pt it es fr de
Cпецификация
Область применения
testo 810 - прибор для ИК-измерения температуры. Прибор предназначен
для измерения температуры поверхности, например нагревателей и
радиаторов, а также измерения температуры окружающего воздуха.
Технические данные
Данные измерений
· Cенсоры:
ИК-сенсор,
NTC сенсор температуры
· Параметры:
°C, °F
· Диапазон измерения:
ИК: -30...300 °C, -20...575 °F,
Темп.воздуха: -10...50 °C, 14...122 °F
· Pазрешение:
0.1 °C, 0.1 °F,
· Точность
(При 22 °C, ±1 цифра):
ИК: ±2 °C (-30...+100 °C),
±3.6 °F (-22...212 °C),
±2 % измер. (до конца диап.)
Темп. воздуха: ±0.5 °C, ±0.9 °F
· Цикл измерения:
0.5 ñ
· Оптика:
6 : 1
Дополнительные данные
·Класс защиты: IP40
· Внешние условия:
-10...50 °C, 14...122 °F
· Условия хранения/транспортировки:
-40...70 °C, -40...158 °F
· Питание:
2x 1.5 В батарейки типа AAA
· Pесурс батарей:
около 50 часов (без подсветки диспл.)
· Pазмеры:
119x46x25 мм (с защитным чехлом)
· Вес: 90 г (с батарейками и защитным
чехлом)
Директивы, стандарты
·Требование EC: 2014/30/EU
Гарантии
·рок гарантии: 2 года. Условия гарантии:
ñì. www.testo.ru/warranty
65
Page 66

Описание прибора
Описание прибора
Внешний вид
Защитный чехол: Рабочее
положение
ИК-сенсор
Cенсор температуры воздуха
Дисплей
Кнопки управления
Отсек батарей (сзади)
Подготовка к работе
Установка батареек:
1 Откройте отсек батареек, сдвинув крышку отсека вниз.
2 установите батарейки (2x 1.5 В тип AAA). —облюдайте полярность!
3 Закройте отсек батареек, задвинув крышку.
Базовые настройки (конфигурация):
Изменяемые параметры
· Pазмерность температуры: °C, °F
· Pасчет дифференциальной температуры t: OFF(âûêë), ON(âêë)
· Коэффициент эмиссии:
· Автовыключение: OFF(âûêë), ON(âêë) (прибор автоматически выключится
через 10 минут после последнего нажатия на кнопки управления)
В приборе предустановлен коэффициент эмиссии 0.95. Это
идеальное значение для измерения температуры поверхности
неметаллов (бумага, керамика, гипс, дерево, краски и лаки),
пластика и продуктов питания.
66
Page 67

Описание прибора
?? ?? nl ru pt it es fr de
Ограничено ИК-измерение температуры поверхности блестящих
металлов и оксидов из-за их низкого и неоднородного коэффициента
эмиссии. В этом случае нанесите на поверхность специальную краску
или спец. наклейку с постоянным коэффициентом (кат. ¹0554 0051).
Коэффициент эмиссии для материалов (типчные значения):
Материал (температура)
Алюминий, прокатанный (170 °C) 0.04
Хлопок (20 °C) 0.77
Бетон (25 °C) 0.93
Лед, гладкий (0 °C) 0.97
Железо, полированное (20 °C) 0.24
Железо, литое (100 °C) 0.80
Железо, прокатанное (20 °C) 0.77
Ãèïñ (20 °C) 0.90
Cтекло (90 °C) 0.94
Каучук, твердый (23 °C) 0.94
Каучук, мягкий, серый (23 °C) 0.89
Дерево (70 °C) 0.94
Пробка (20 °C) 0.70
Pадиатор, черный, анодированный (50 °C) 0.98
Медь, матированная (20 °C) 0.04
Медь, оксидированная (130 °C) 0.76
Пластмасса: ПЭ, ПП, ПВХ (20 °C) 0.94
Латунь, окисленная (200 °C) 0.61
Бумага (20 °C) 0.97
Фарфор (20 °C) 0.92
Черная краска, матовая (80 °C) 0.97
Cталь, термообработанная (200 °C) 0.52
Cталь, окисленная (200 °C) 0.79
Глина, обоженая (70 °C) 0.91
Трансформаторная краска (70 °C) 0.94
Кирпич, раствор (20 °C) 0.93
1 При включении прибора, нажмите и держите ïîêà è íå
появятся на дисплее (режим конфигурации).
- Отображается изменяемый параметр. Мигает текущая установка.
2 Нажмите
( ) несколько раз для выбора необходимой установки.
3 Нажмите
( ) для подтверждения установки.
4 Повторите шаг 2 è 3 для остальных параметров.
- Прибор перейдет в режим измерений.
67
Page 68

Pабота с прибором
Pабота с прибором
Включение прибора:
> Нажмите
.
- Прибор в режиме измерений.
Включение подсветки дисплея:
- Прибор включен.
> Нажмите
.
- Подсветка автоматически выключится, если не нажимать на
кнопки, через 10 секунд.
ИК-измерения:
Лазерное излучение! Не направляйте лазерный луч в глаза.
Класс лазера 2.
Для получения корректных измерений:
· Посторонние источники тепла и влажности, могущие искажать
измерения(напр. руки) должны находится как можно дальше от
сенсора.
· Cодержите линзы в чистоте, не допускайте их запотевания.
· Зона измерения (пространство между прибором и измеряемой
поверхностью) и измеряемая поверхность должны быть чистыми
и не иметь препятствий. Не должно быть пыли и грязи, выпадения
влаги(дождь, пар) посторонних газов.
· Если изменилась внешняя температура (сменилось место измерения,
напр. в помещении/на улице),прибор необходимо выдержать в новой
температуре около15 минут.
· Пятно измерения расчитывается как (90 % значения) 6:1 (дистанция :
измеряемая поверхность) + диаметр сенсорв (10мм / 0.39 in):
Дистанция-Диам. пятна Дистанция-Диам. пятна
10cm 3cm 4 in 1.06 in
60cm 11cm 25 in 4.56 in
100cm 18cm 40 in 7.06 in
200cm 35cm 80 in 13.72 in
> Нажмите и держите .
- На дисплее мигает:
. Лазерный маркер указывает на центр
пятна измерения.
-
После завершения измерений (отпустите ), прибор перейдет в
режим
Hold,
результаты измерения зафиксированны на дисплее.
68
Page 69

–абота с прибором
?? ?? nl ru pt it es fr de
Выбор режима отображения параметров:
Выбираемые режимы отображения
· Hold: Фиксация измеренных значений.
· Max: Отображение максимальных измеренных значений( после последнего
включения прибора).
· Min: Отображение минимальных измеренных значений( после последнего
включения прибора).
> Нажмите несколько раз, пока не выберите необходимый режим
отображения.
Cброс сохраненных Макс/Мин значений:
1 Нажмите несколько раз, пока не отобразятся необходимые
значения.
2 Нажмите
и удерживайте, пока на дисплее не появится - - - -.
3 Повторите 1 è 2 для остальных значений.
Выключение прибора:
> Нажмите
и удерживайте, пока не погаснет дисплей.
69
Page 70

Обслуживание прибора
Обслуживание прибора
Замена батареек:
1 Откройте отсек батареек, сдвинув крышку отсека вниз.
2 установите батарейки (2x 1.5 В тип AAA). Cоблюдайте полярность!
3 Закройте отсек батареек, задвинув крышку.
Очистка корпуса:
‡ При загрязнении, очистите корпус влажным тампоном (мыльным
раствором). Не применяйте абразивные вещества и растворители!
70
Page 71

Подсказки и помощь
?? ?? nl ru pt it es fr de
Подсказки и помощь
Вопросы и ответы
На дисплее Возможная причина/решение
Hi èëè Lo Значение за пределом измерения (выше или ниже):
Cобдюдайте пределы измерения.
Питания осталось <10 мин: Замените батарейки.
При невозможности получить ответы на возникающие вопросы обратитесь
к официальному партн¸ру Testo или в Сервисную службу Testo.
Контактные сведения приведены на сайте www.testo.ru/service/contact
71
Page 72

0973 8100 de en fr es it pt ru 05
www.testo.com
testo SE & Co. KGaA
Postfach 11 40, 79849 Lenzkirch
Testo-Straße 1, 79853 Lenzkirch
Telefon: (0 76 53) 6 81 - 0
Fax: (0 76 53) 6 81 - 1 00
E-Mail: info@testo.de
Internet: http://www.testo.com
 Loading...