


User Manual
LP8 410 VR01/
EN
LP8 410 INOX VR01
www.teka.com

Dear Customer,
Please carefully read t his manual before using the
dishwasher, it will help you to use and maintain the
dishwasher properly.
Keep it to refer to it at a later date .
Pass it on to any subsequent o wn er of the appliance.
This manual contains sec ti ons on safety Instructions,
Operating I ns tr uc ti on s, I nsta ll ation Inst ru ctio ns and
Tro ubleshooting Tips, etc.
To review the section on t ro ub lesh oo ti ng Tips
will help you to solve some common problems
by you rself .
If you can no t s ol ve the problems by yourself ,
plea se ask for the help of professional t echn ic ia ns .
Control Panel...................... .......... .... ...... .... .....3
Dishwasher Features.................................... ...3
A Wat er So ften er....... .... .. .. ...... ........ ........ ..... 4、
B Loading the Salt into the Soften er........... ......5、
C Fill the Rin se Aid Dispenser.........................5、
D Function of D et ergent .................................6、
Atte ntio n befor e or after lo adin g the Dishwas her
Ba skets............. ...... .... ........ .. .... .. .... .. ...... .. ... 9
Loading t he upper Ba sket................ ...............10
Lo ading t he Lower Ba sk et.... .. .. ........ .. .. ........ .. .10
Cu tlery Baske t. .. .... .. .... .. .... .. .... ...... ...... ...... .. 10
Was h C ycle Tabl e.. .... .. .. .. ...... .. .. ........ .. ...........11
Turning on the A ppliance............ ........ .... .... .... 12
Ch ange the program. .......... ............................12
At the en d of the Wash Cy cle... .. .. ...... .. ...... .. ....12
The man ufacturer, fo llow in g a policy o f constant
developm en t an d u pd ating of the pr od uct, may
make modificatio ns without giving prior no ti ce.
This user m an ual shall also be g ot from the
manufacturer or responsible vendor.
Filtering S ystem.. .. .... .. .. .. ...... .. .. ........ .. .......... .13
Caring for the D ishwas he r.... .. .. .. ...... .. .. ........ .. .14
Posi tioning the Applian ce.. ...... ...... .. .... .. ...... .. .15
About Pow er Connection........ ........ ........ .. ...... 15
Wat er Co nnection... ...... .. ........ .......................16
Start of dishw ashe r.... .. .. .. .. .. .... .. .. .. .. .. .... .. .... .. 17
Before calling fo r service.................... .... .... .... .18
Error cod es. .... .. .. .. .... .... .. .. .. ............ .............. 19
Technical inf ormation.. .. .. .. .. .. .. .. .. .. .................20

When using your dishwasher,
follow the precautions listed below:
This appliance is intended to be used in household
and similar applications such as:
-staff kitchen areas in shops, offices and other
working environments;
-farm houses;
-by clients in hotels, motels and other residential type
environments;
-bed and breakfast type environments.
This appliance can be used by children aged from 8
years and above and persons with reduced physical,
sensory or mental capabilities or lack of experience
and knowledge if they have been given supervision
or instruction concerning use of the appliance in a
safe way and understand the hazards involved.
Children shall not play with the appliance. Cleaning
and user maintenance shall not be made by children
without supervision. For EN60335-1
( )
This appliance is not intended for use by persons
(including children )with reduced physical, sensory
or mental capabilities, or lack of experience and
knowledge ,unless they have been given supervision
or instruction concerning use of the appliance by a
person responsible for their safety. For IEC60335-1
( )
This appliance is for indoor use only, for household
use only.
To protect against the risk of electrical shock, do not
immerse the unit, cord or plug in water or other liquid.
Please unplug before cleaning and maintenance the
appliance .
Use a soft cloth moisten with mild soap, and then use
a dry cloth to wipe it again.

This appliance must be earthed. In the event of a
malfunction or breakdown, earthing will reduce the risk
of anelectric shock by providing a path of least
resistance of electric current. This appliance is equipped
with a cord having an equipment-earthing conductor
and a grounding plug.
The plug must be plugged into an appropriate outlet that
is installed and earthed in accordance with all local
codes and ordinances.
Improper connection of the equipment-earthing
conductor can result in the risk of an electric shock.
Check with a qualified electrician or service
representative if you are in doubt whether the appliance
is properly grounded.
Do not modify the plug provided with the appliance;
If it does not fit the outlet.
Have a proper outlet installed by a qualified electrician.
Do not abuse, sit on, or stand on the door or dish rack of
the dishwasher.
Do not operate your dishwasher unless all enclosure
panels are properly in place.
Open the door very carefully if the dishwasher is
operating, there is a risk of water squirting out.
Do not place any heavy objects on or stand on the door
when it is open. The appliance could tip forward.
When loading items to be washed:
1) Locate sharp items so that they are not likely to
damage the door seal;

2) Warning: Knives and other utensils with sharp points
must be loaded in the basket with their points down or
placed in a horizontal position.
Check that the detergent powder is empty after
completion of the wash cycle.
Do not wash plastic items unless they are marked
dishwasher safe or the equivalent.
For plastic items n
recommendations.
Use only detergent and rinse additives designed for
an automatic dishwasher.
Never use soap, laundry detergent, or hand washing
detergent in your dishwasher.
Children should be supervised to ensure that they do not
play with the appliance.
The door should not be left open, since this could increase
the risk of tripping.
If the supply cord is damaged, it must be replaced by the
manufacturer or its service agent or a similarly qualified
person in order to avoid a hazard.
During installation, the power supply must not be
ot so marked,
check the manufacturer's
excessively or dangerously bent or flattened.
Do not tamper with controls.
The appliance is to be connected to the water mains using
new hose sets and that old hose-sets should not be reused.
The maximum number of place settings to be washed
is 9.
The maximum permissible inlet water pressure is 1MPa.
The minimum permissible inlet water pressure is 0.04MPa.

Dispose of the dishwasher packaging material
correctly.
All packaging materials can be recycled.
Plastic parts are marked with the standard
international abbreviations:
PE for polyethylene, e.g. sheet wrapping material
PS for polystyrene, e.g. padding material
POM polyoxymethylene, e.g. plastic clips
PP polypropylene, e.g. Salt filler
ABS Acrylonitrile Butadiene Styrene, e.g. Control
Panel .
Packaging material could be dangerous for children!
For disposing of package and the appliance please
go to a recycling centre. Therefore cut off the power
supply cable and make the door closing device
unusable.
Cardboard packaging is manufactured from recycled
paper and should be disposed in the waste paper
collection for recycling.
By ensuring this product is disposed of correctly, you
will help prevent potential negative consequences
for the environment and human health, which could
otherwise be caused by inappropriate waste handling
of this product.
For more detailed information about recycling of this
product, please contact your local city office and your
household waste disposal service.
DISPOSAL: Do not dispose this product as unsorted
municipal waste. Collection of such waste separately
for special treatment is necessary.

To get the best performance fro m your dishwasher, read al l opera ti ng instruct ions
be fore u sing it for the first time.
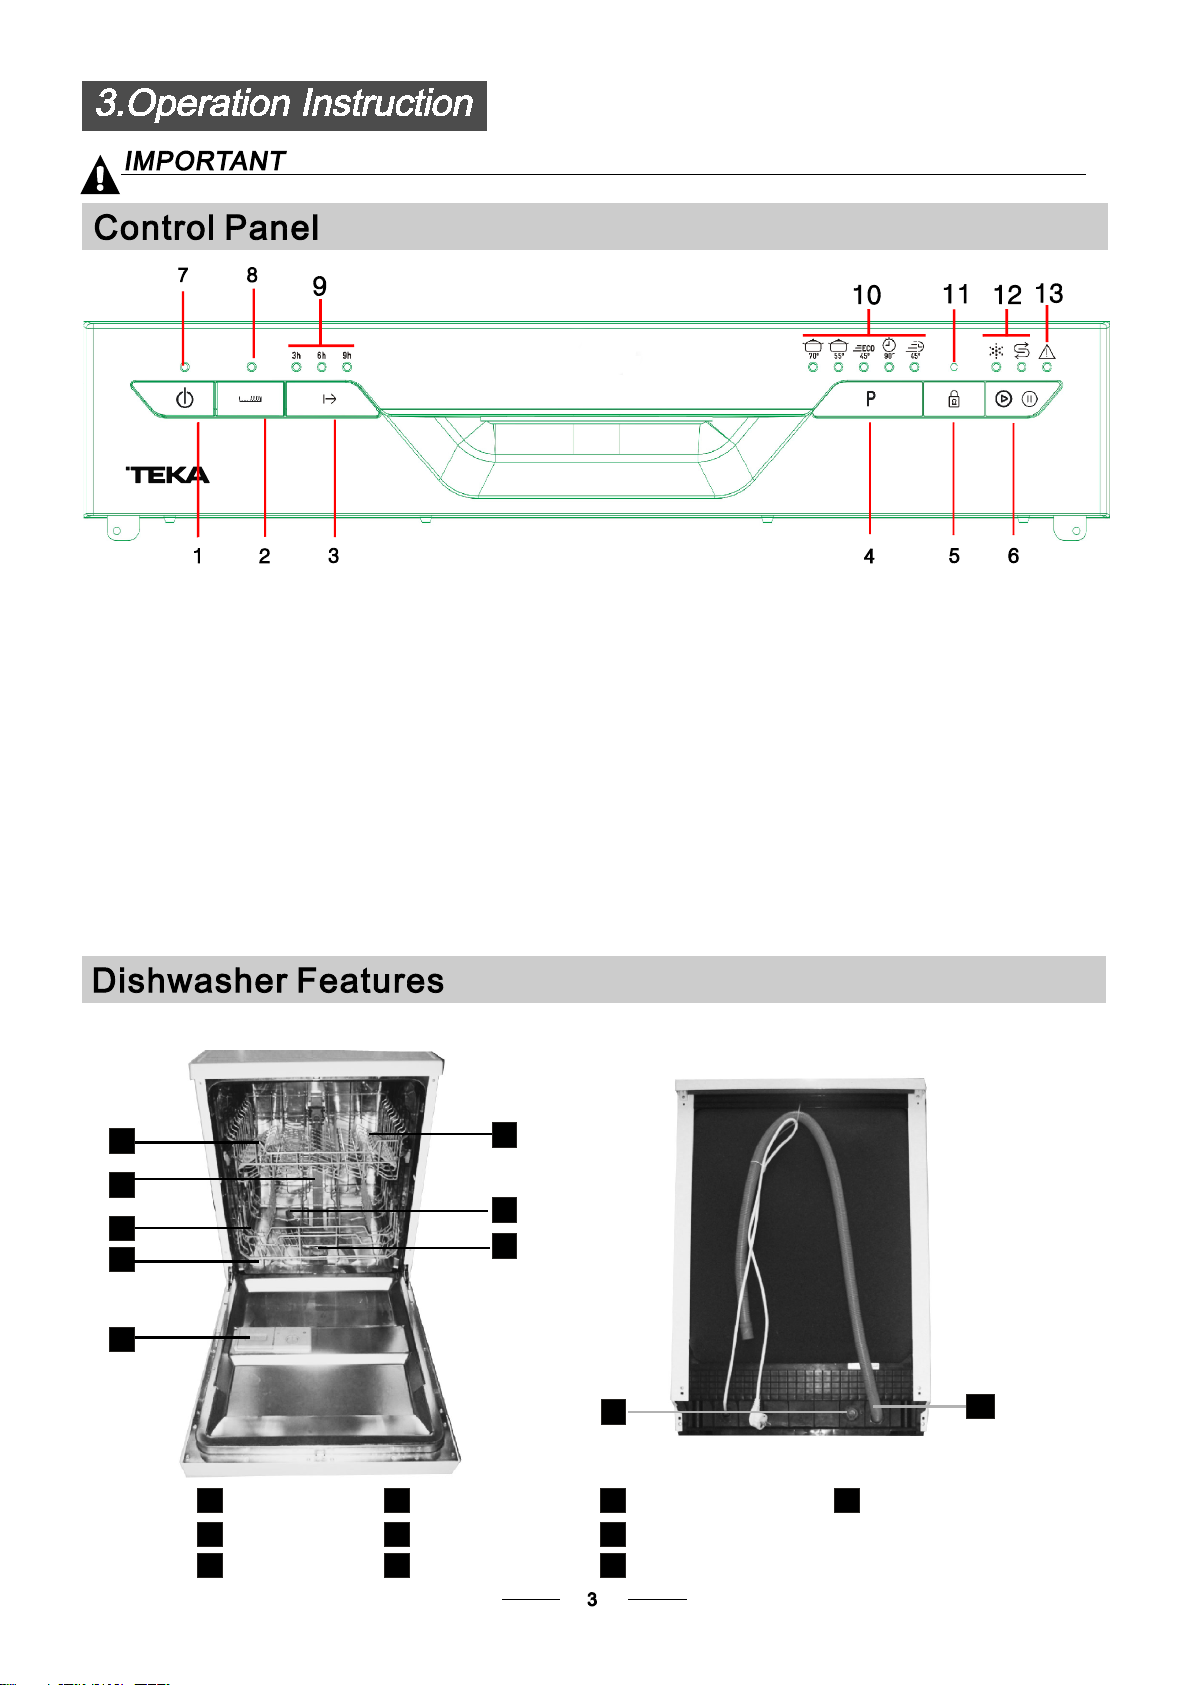
1---On /Off Button
2---Ha lf load functions Button: To select Half load
functions. (With this Half load function you can
only use it when you ha ve only about or less than
6 place setting dish wave, an d you will see less
water a nd energy consumption , ca n only be used with
Intensive, Normal, ECO,Glass an d 9 0 min .)
3---De lay B ut to n
4---Pr ogram B ut to n
5---Ch ild l oc k B utton
Front vi ew
1
6
6---
Start /Pause But to n: To start th e s el ec te d
washing p ro gr am or pause the wash in g p ro gr am
when the ma ch in e i s working.
7---Power indicator
8---Ha lf load indicator
9---De lay ind ic ator s: to show t he delay time
(3h/6h /9 h )
10---Pro gram indicator s
11--- Child l ock i nd icat or s
12---Sal t an d rin se aid warning li ght
13---Wa te r faucet indicator
Back Vie w
2
7
3
4
8
5
10
Upper Ba sket
1
Inner pi pe
2
Lower Ba sket
3
Salt Container
4
Di spens er
5
Cu p Shelf
6
9
Spray arms
7
Fi lter assemb ly
8
In le t pi pe c on ne ctor
9
10
Drain pipe

Before using your dishwasher for th e first time:
A. Set the water so ft ener
B. Add 1. 5K g dis hw as her s alt and t hen f ul l f ill the sal t c on ta in er with water
C. Fill the ri ns e a id di spenser
D. Fill in detergent
The w at er softener must be set manually, using th e water hardnes s d ia l.
The w at er softener is desig ned t o r em ov e m iner al s and s al ts from the water, whic h w ould have
a detrime nt al or adverse effe ct on t he operation of the ap plia nc e.
The hig he r t he content of these minerals a nd salts, the harder your water is.
The sof te ne r s ho uld be adjusted according to the ha rd ne ss of the wate r i n y our a rea. Your local Water Authority
can adv is e y ou on the hardness of the water in your area.
Adjusting Salt Consumption
The dis hw as her i s d esigned to allow for adju st me nt in the amount of salt consumed based on the ha rdness of
the w at er used. Th is is intended to optim is e a nd cust omise th e l ev el o f sa lt consumption.
Please follow the steps belo w f or adjustment i n s al t c on sumption.
1. S wi tch o n t he appliance;
2. P re ss the Start/Pause button for more than 5 se cond s to start th e water
soft ener set model within 60seconds af te r the app li ance was
switched on;
3. P re ss the button to select the proper set according to
your local envi ro nment, the se ts will change i n t he following
sequence : H 1- >H 2- >H 3- >H 4- >H5->H6;
4. P re ss the On/O ff b ut to n o r no operation fo r 5 sec on ds to end the se t u p model.
Start/Pause
WATER HARDN ESS
dH
6- 11
18 -22 31-40 22-28 3.1- 4. 0
23-34 4.1-6.0
35 -55 61-98 43-69 6.1- 9. 8
fH
0~ 90~5 0~ 0.94
10-20
21-3012-17 2.1-3.0
41-60
Clark e
0~6
7-14
15-21
29-42
mm ol/l
1.0-2.0
Selec to r Po sition
H1( Rap id Lig ht b right)
H2(90 Min )Light bright
H3( Ra pid )、90 M in Lig ht b right
H4(EC O )Li ght bri gh t
H5(EC O Rapi d Li gh t bright)、
H6(EC O 90 Mi n Light b ri ght)、
Sa lt consum ptio n
(gram /c ycle)
0
9
12
20
30
60
dH =1 .25 Clarke=1.78 fH=0. 178m mol/l1
DH: German de gree
fH: French degree
Clar k: British degr ee
The manufactory setting: H3(EN 50 24 2)
Contac t y ou r local water board for i nformati on on the ha rdne ss of your water supp ly.
If your model doe s not have any water softener, you ma y skip t his section.
WATER SOFTENER
The hardn ess of the water varies from place to place. If hard w ater is used in the di sh wash er, deposits will
form on the dishes and utensi ls .
The app li an ce is equipped with a sp ec ial softener that use s a salt container sp ec if ic ally designed to e limi na te
lime and minerals from the water.
 Loading...