

Page 1

User Manual
LP8 700 VR02
EN
www.teka.com
Page 2

Dear Cu stomer,
Pleas e care ful ly read this m anual bef ore using the
dishw asher, it wi ll hel p you to u se and main tain t he
dishw asher properly.
Keep it t o refe r to it at a l ater d ate .
Pass it on to any subse quent own er of th e app lian ce.
This ma nual cont ains s ecti ons on safe ty Ins tru ctions,
Opera ting I nst ruct ion s, Install ation Instructions and
Tro uble shootin g Tips, etc.
To review the section on tro ublesho oting Tips
will help you t o solve som e com mon pr oblems
by y ourself .
If you ca n not so lve the pro blems by yo urse lf ,
pleas e a sk for the help of prof essiona l t echnici ans.
Control Panel...... ... ....... . .. ........ ... .......... . ... ....... 5
Dishw asher Fea ture s.. . ...... . ...... . ...... . ...... . ..... ... 5
A Wat er So f tener..... ................... ...... . ...... . .... 6、
B Load ing th e Sal t into the Soften er...... .......... .7、
C Fill the Ri n se Aid D i spense r.......... . ...... .... ....7、
D Func tion of Deterg ent ..... .... .... ...... .............. 8、
Attention before or af ter l o ading the Dish was her
Ba skets...... ....... ...... . ...... . ...... ....... ................ 11
Loadi ng the uppe r Basket. .... .............. ... .........12
Lo ad ing the Lowe r Bas ket. ...... ............... ...... ...1 2
Cu tle ry Basket.... ... ....... . ...... ........... ... ....... . .. 12
Was h Cycl e Tabl e........... .... ... ....... ....... ....... ....13
Turning on the Appli a nce... . ... ... ....... ........... ....14
Ch ang e the progr am..... ....... .......... .... .... ... ......14
At the en d of the Wash Cyc le............... .... ... .... .14
The man u facture r, following a pol icy of constant
devel opment and updat ing o f the product, m ay
make mo difi cati ons witho ut giving prior noti ce.
This us er manu al shall also be g ot from the
manuf actu rer or r espo nsi ble ve ndor.
Filte rin g System... .......... .... ... ....... ....... ....... ....15
Cari ng for the Dis hwa sher. ... ........ ...... .... ...... ...1 6
Posit ion ing th e Applian c e.. . ...... . ...... . ...... . ...... . 17
About Power Connection....................... .... .....17
Wat er Co n nection........... ........ ... .... ... ....... ... ... 1 8
Start o f dishwasher..... ....... ....... ....... ....... ....... 19
Befor e calling for service.............. ... ........... ... ..20
Error c odes........... ... ........... ... .... ....... ... .... .....21
Technical informa tion...... ... ....... .... .... .......... ... 22
Page 3

When using your dishwasher,
follow the precautions listed below:
This appliance is intended to be used in household and similar
applications such as:
-staff kitchen areas in shops, offices and other working environments;
-farm houses;
-by clients in hotels, motels and other residential type environments;
-bed and breakfast type environments.
This appliance can be used by children aged from 8 years and above and
persons with reduced physical, sensory or mental capabilities or lack of
experience and knowledge if they have been given supervision or
instruction concerning use of the appliance in a safe way and understand
the hazards involved. Children shall not play with the appliance. Cleaning
and user maintenance shall not be made by children without supervision.
For EN60335-1
( )
This appliance is not intended for use by persons(including children )with
reduced physical, sensory or mental capabilities, or lack of experience and
knowledge ,unless they have been given supervision or instruction
concerning use of the appliance by a person responsible for their safety.
For IEC60335-1
( )
This appliance is for indoor use only, for household use only. To protect
against the risk of electrical shock, do not immerse the unit, cord or plug in
water or other liquid.
Please unplug before cleaning and maintenance the appliance .Use a soft
cloth moisten with mild soap, and then use a dry cloth to wipe it again .
This appliance must be earthed. In the event of a malfunction or breakdown,
earthing will reduce the risk of anelectric shock by providing a path of least
resistance of electric current. This appliance is equipped with a cord having
an equipment-earthing conductor and a earthing plug.
The plug must be plugged into an appropriate outlet that is installed and
earthed in accordance with all local codes and ordinances.
Improper connection of the equipment-earthing conductor can result
in the risk of an electric shock. Check with a qualified electrician or service
representative if you are in doubt whether the appliance is properly earthed.
Do not modify the plug provided with the appliance; If it does not fit the outlet.
Have a proper outlet installed by a qualified electrician.
Page 4

Do not abuse, sit on, or stand on the door or dish rack of the dishwasher.
Do not operate your dishwasher unless all enclosure panels are properly in place.
Open the door very carefully if the dishwasher is operating, there is a risk of water
squirting out.
Do not place any heavy objects on or stand on the door when it is open. The
appliance could tip forward.
When loading items to be washed:
1) Locate sharp items so that they are not likely to damage the door seal;
2) Warning: Knives and other utensils with sharp points must be loaded in the
basket with their points down or placed in a horizontal position.
Check that the detergent powder is empty after completion of the wash cycle.
Do not wash plastic items unless they are marked dishwasher safe or the
equivalent. For plastic items n
ot so marked,
check the manufacturer's
recommendations.
Use only detergent and rinse additives designed for an automatic dishwasher.
Never use soap, laundry detergent, or hand washing detergent in your dishwasher.
Children should be supervised to ensure that they do not play with the appliance.
The door should not be left open, since this could increase the risk of tripping.
If the supply cord is damaged, it must be replaced by the manufacturer or
its service agent or a similarly qualified person in order to avoid a hazard.
During installation, the power supply must not be excessively or dangerously
bent or flattened.
Do not tamper with controls.
The appliance is to be connected to the water mains using new hose sets and
that old hose-sets should not be reused.
The maximum number of place settings to be washed is 12.
The maximum permissible inlet water pressure is 1MPa.
The minimum permissible inlet water pressure is 0.04MPa.
Page 5

Dispose of the dishwasher packaging material correctly.
All packaging materials can be recycled.
Plastic parts are marked with the standard international
abbreviations:
PE for polyethylene, e.g. sheet wrapping material
PS for polystyrene, e.g. padding material
POM polyoxymethylene, e.g. plastic clips
PP polypropylene, e.g. Salt filler
ABS Acrylonitrile Butadiene Styrene, e.g. Control Panel .
Packaging material could be dangerous for children!
For disposing of package and the appliance please go to a
recycling centre. Therefore cut off the power supply cable
and make the door closing device unusable.
Cardboard packaging is manufactured from recycled paper
and should be disposed in the waste paper collection for
recycling.
By ensuring this product is disposed of correctly, you will
help prevent potential negative consequences for the
environment and human health, which could otherwise be
caused by inappropriate waste handling of this product.
For more detailed information about recycling of this
product, please contact your local city office and your
household waste disposal service.
DISPOSAL: Do not dispose this product as unsorted
municipal waste. Collection of such waste separately for
special treatment is necessary.
Page 6

For detailed operating meth od read the correspo nding content on the inst ructi on manu al.
Switch on the appliance Press the Power switch button to switch on the appliance, Open the door.
With each wash cycle.
Fill the detergent dispenser
Compartment
For programs with pre-wash only.
(Follow the user instructions!)
Check the rinse aid level
Check the regeneration
salt level
Load the baskets
Select a program
Running the dishwasher
Changing the program
Add forgotten dishes in the
dishwasher.
If the appliance is switched
off during a wash cycle.
Electric indicator on control panel (if provided).
(On models with water softener system only.)
Electric indicator on control panel (if provided).
If there is no salt warning light in the control panel
(for some models), you can estimate when to fill the salt into
the softener by the number of cycles the dishwasher has run.
Scrape off any large amount of leftover food. Soften remnants of burnt food in pans,
then load the baskets. Refer to the dishwasher loading instructions.
Close the door,press the program button until the selected program lights up.
( See the section entitled Operation instruction )“ ”
Turn on the water tap and press the Start/Pause button. The machine will start working .
1. A running cycle can only be modified if it has been running for a short time. Otherwise the detergent
may have already been released and the water already drained. If this is the case, the detergent
dispenser must be refilled.
2. Press the Start/Pause button ,than press the program button more than 3 seconds to cancel the
running program.
3. Select a new program.
4. Restart the dishwasher.
1.Press the start/pause button to stop the machine.
2.Open the door.
3.Add the forgotten dishes.
4.Close the door, then press the start/pause button, the dishwasher will
start running again after 10 seconds.
If the appliance is switched off during a wash cycle, when switched
on again, please re-select the washing cycle and operate the dishwasher
according to the original Power-on state ).
Op en th e do o r ca ref ully.
Ho t ste am ma y es cap e
wh en th e do or is opened!
Switch off the appliance
Turn off the water tap,
unload the baskets
When the working cycle has finished, the buzzer of the
dishwasher will sound 8 times, then stop.
Turn off the appliance using the Power button.
Since the appliance is standing by, it will power off automaticly after 30 minutes without any operation.
Warning: wait a few minutes (about 15 minutes) before unloading the dishwasher to avoid handling
the dishes and utensils while they are still hot and more susceptible to break.
They will also dry better.Unload the appliance, starting from the lower basket.
Page 7

To get th e best perfo rmance fro m yo ur d ishwasher, read all operating instruct ions
be fore using it for the first time.
1---O n/Off Button
2---H alf load fu nctions Button: To select H alf load
functions. (Wi th thi s Hal f load f unction you ca n only
use it wh en you have o nly about or less t han 6 place
setti ng dishwa re, an d you w ill use less wate r and
energ y consumption , can on ly be used wi th Intens ive,
EC O and 9 0 min.)
3---Salt an d rin se aid warn ing li ght s: To sho w
when th e salt container or di spen ser need to b e
refil led.
4---Progr am Bu tton
5 Start / Pause But ton: To star t the se lec ted
---
washi ng progra m or pause th e washing program
when th e machine i s work ing .
6---P ower indicator
7---H alf load in dicator
8---P r ogr am indicators
9---Was hing step i ndicato rs
Front v iew
1
6
Back Vie w
2
7
3
4
8
5
10
Upper B asket
1
Inner p ipe
2
Lower B asket
3
Salt Co ntainer
4
Dispe nser
5
Cup She lf
6
9
Spray a rms
7
Filte r assembl y
8
Inlet p ipe conne ctor
9
10
Drain p ipe
Page 8

Befor e using you r dishwas her for the first t ime :
A. Set the wa ter softe ner
B. Add 1.5Kg dishw asher sal t and then fu ll fil l the salt conta iner w ith water
C. Fill the r inse aid di spen ser
D. Fill in de tergent
The wat er soften er mus t be se t manually, usi ng the wate r hardnes s dial .
The wat er soften er is designed to r emo ve min erals and s alt s from t he water, which wo uld h ave
a detri mental or a dverse effect on the oper ation of the applian ce.
The hig her the content o f the se min erals and s alt s, the h arder you r water is.
The sof tene r sho uld be adju sted a cco rdin g to the hard ness of the w ater in you r area. Your lo cal Water Auth orit y
can adv ise you on th e hardnes s of the wate r in you r area.
Adjusting Salt Consumption
The dis hwas her i s desi gne d to all ow for adju stment in t he am ount o f salt c ons umed b ase d on the hard ness o f
the wat er used. This is i ntended t o opt imis e and cu sto mise the le vel o f sa lt co nsum ption.
Please foll ow th e steps bel ow for a dju stment in salt co nsumpti on.
1. Swit ch on the appliance;
2. Pres s the Start /Pause bu tton f or more than 5 seconds t o start the w ater
softener se t mod el within 60second s afte r the appli anc e was
switched on ;
3. Pres s the butto n to sel ect the pro per set acc ordi ng to
your lo cal en vir onme nt, the sets will chan ge in the fol lowing
seque nce: H 1->H2->H3- >H4- >H5->H6 ;
4. Pres s the butto n to end the set up mod el.
Start /Pa use
Start /Pa use
WATER HARDNESS
dH
6- 11
18 -22 31-40 22-28 3.1-4.0
23-3 4 4.1- 6.0
35 -55 61-98 43-69 6.1-9.8
fH
0~ 90~5 0~ 0.94
10-20
21-3012-1 7 2.1- 3.0
41-60
Clar ke
0~6
7-14
15-2 1
29-4 2
mm ol /l
1.0-2.0
Select or Po sitio n
H1( Rapi d Lig ht brig ht )
H2(90 Mi n )Ligh t br ight
H3( Ra pid )、90 Min Light b ri ght
H4(E CO )Light b ri ght
H5(E CO Rap id Lig ht b right )、
H6(E CO 90 Mi n Light bright )、
Sa lt c ons umpti on
(gra m/cyc le )
0
9
12
20
30
60
dH =1.25 Clarke=1.78 fH=0.178mmol/l1
dH: Germ an degree
fH: French degree
Clark: British de gree
The manufa ctory set tin g: (EN 50242)
Conta ct you r loc al water boa rd for info rmation on the ha rdness of your wa ter supply.
If your model does not have any water softener, you ma y skip this section.
WATER SOFT ENE R
The har dness of the w ater var ies from pl ace to p lace. If har d wat er is us ed in the di shwa she r, depo sits w ill
form on t he dishes and utensi ls.
The app lian ce is eq uipped with a special sof ten er tha t uses a salt containe r spec ifi call y designe d to elimina te
lime an d minerals f rom the water.
Page 9

Alway s use the sal t intended f or us e with dish washer.
The sal t c ont ainer is located ben eat h the lo wer b a ske t and shoul d be filled as e xpl ain ed
in the fo llo w ing :
Attention!
Only us e salt speci fic ally d esi gned f or the use in dishw ash ers! E very other type of
salt not spec ifically desi gne d for the use in a dis h was her, especi all y table sal t, wil l
da mage t he wa ter so ftener. In case of dama ges cause d by th e use of unsuitable
salt th e m anu facture r does n ot give an y w arr anty n or is liab l e for a ny dam ages caused.
Only fill with salt just befo re starting one of the co mple te washing pro gra m s.
Th is wi ll preven t any gr ains of salt or salty wa t er, which may ha v e been spilled,
re mai ning on the bo tto m of the mach ine for any period of tim e, which may cause
corrosion .
A Aft er the lower b asket has b een re moved, unscrew and r emove the c ap fro m the s alt conta i ner.
B Place the e nd of the fu n nel (supplie d) into the ho le an d int rodu ce about 1.5 kg of dish washer sal t.
Ful l fi ll the s alt container with water, It is normal for a sm all amou nt of water to come out of th e
C
salt container.
D Aft er fillin g the container , s cr ew the cap tightl y back cl ock wis e .
E The salt warning light will stop b eing a fter the salt conta iner has bee n filled with sal t.
F I mmediat e ly af ter fillin g th e salt in to th e salt conta iner, a washin g program should be sta rted
program Otherwise the fi lter system, pu mp or other i m por tan t p arts of the m achine ma y be damage d
by s alty wate r. This is out of warrant y.
).
1. The salt conta iner must only be refille d when the sa l t warn ing li ght i n the contr ol panel co mes on.
Depen ding on how well t he salt dis solves, t he salt warn ing li ght m ay still be on even t hou gh the
salt co ntainer i s filled .
If ther e is no salt warni ng light in t he contro l panel (for s ome Model s),you can estimat e when to fill
the sal t into the so fte ner by the cycles that the dishwas her has run.
2. If the re ar e spil ls of t he sa lt, a so ak or a rapid prog ram sho uld be run to r emo ve the e xcessiv e sal t.
(We su ggest to us e a sho rt
Page 10
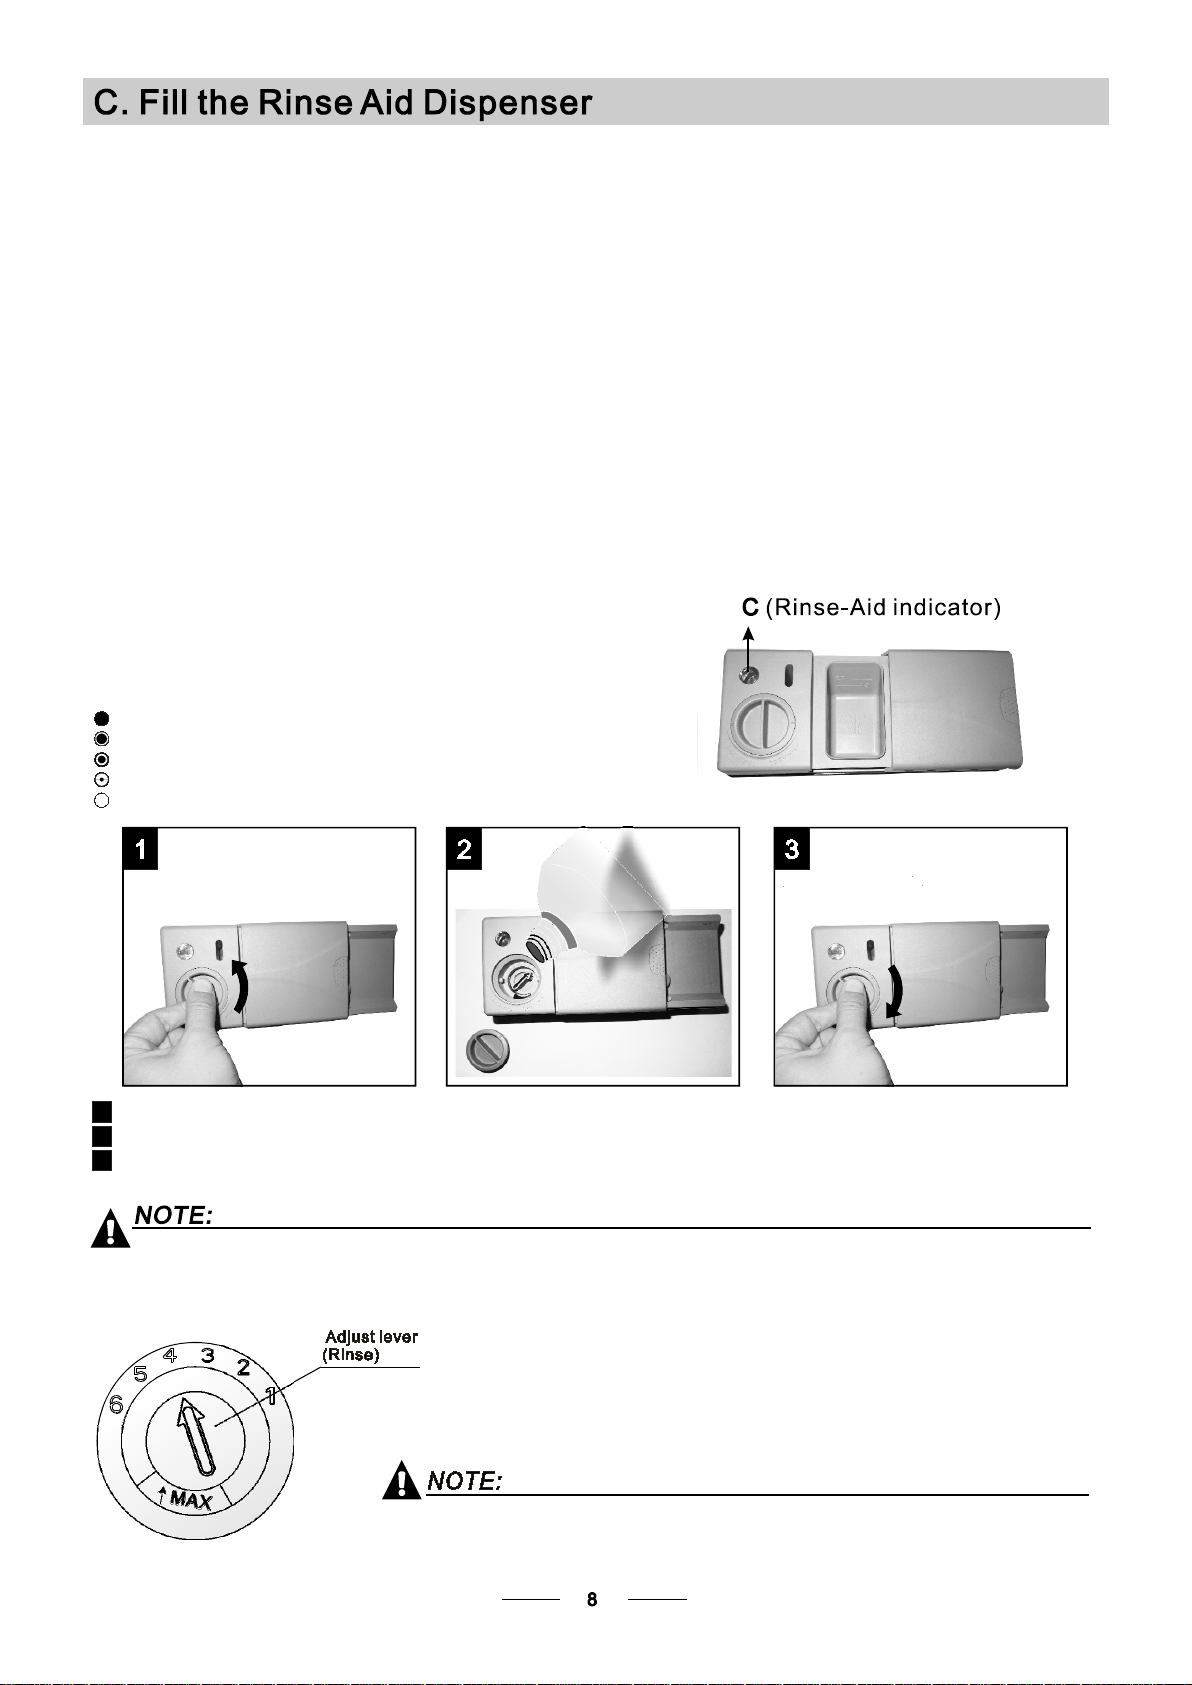
Rinse Aid Dispenser
The rinse aid i s released du ring the fi n al ri nse to prevent wa ter from forming droplets on your di s hes , which can
leave spot s and streaks. It also impr oves d rying by allowing water to roll off th e dishes. Your dishwash er is
desi g ned to use liquid rinse aids. The rinse aid dispenser is located ins ide th e doo r n ext to the deter gent dispense r.
To f ill the dis pen ser, open th e cap an d pou r the rinse a i d into the dispe n ser unti l the level indicator turn s complet ely
black. Th e vol u me of the rinse aid container is about 110ml.
Function of Rinse Aid
Rinse aid is autom ati call y added du ring t he last rinse, ensur ing thorou gh rin si n g, and spo t and streak free dr yi ng.
Attention!
Only use brande d r ins e aid for dis hwa s her. Never fill the rinse aid d ispens e r with any other substances
(e .g. Di shw asher cle a ning agent, li quid d etergent). This would damage th e appl iance.
When to Refill the Rinse Aid Dispenser
If ther e is no rinse -aid warn ing li ght i n the c ontrol pa nel, y ou can estimate the amount from th e colour
of the op tical lev el indica tor C locat ed next to t he cap . Whe n t he rin se-aid co nta iner i s full, the w hole
indic ator will b e dark .As th e rinse-a id diminishe s, th e size o f the dark dot d ecrease s. You should n ever let
the rin se ai d leve l fal l 1 / 4 full .
As the ri nse ai d dim inis hes, the si ze of the bla ck dot
on the ri nse ai d lev el ind ica tor changes, as i llustra ted below.
Full
3 / 4 full
1 / 2 full
1 / 4 full - Sh oul d refi ll to elimi nate s pot ting
Empty
" "
To open the dispenser, turn the ca p to th e "op e n" (le ft) arro w a nd lift it out.
1
Pour th e rins e aid in to the disp ense r, being car efu l not to overfill.
2
Replac e the cap by i n sert ing i t aligned with "o pen" a rro w and turning it to the closed ( rig ht) ar row.
3
Clean u p any ri nse ai d spilled w hile d uring fil ling with an absorbent clo th to av oid ex cessive foami ng
durin g the next was h. Do n't forge t to replace the ca p bef ore yo u close dis hwasher door.
Adjusting Rinse Aid Dispenser
The rin se ai d disp enser has s ix or fo ur settin gs. Al ways s tar t w ith t he dispenser
set on "4 ". If spots a nd poor drying are a prob le m, increas e the amount of rinse
ai d dispen s ed by remov ing the dis penser lid and rotat ing the dial to "5 " . If the
di sh es still are not drying prope rly or a re sh ow spots, adju s t the d i al to t he next
hi ghe r lever un t il you r di s hes ar e spot-free. The re comm end ed setting is "4" .
(Fact ory va lue is "4". )
Incre ase th e dose if there ar e drops of water or l ime spots o n the dishes a ft er was hing .
Reduc e it if there are stick y w hiti sh stains o n your dishes or a bluis h film o n gla ssware or
knife b lad es.
Page 11
Deter gents with its chemi cal i n gredients a re necessa ry to remove dir t, cru sh dir t and transpor t it out of the dishwashe r.
Most of the commercial qua l ity de ter gent s are suit a ble for this pur pose .
Attention!
Prope r Use of Dete rgen t
Use onl y deterge nt specif ical ly made for t he use in dis hwashers. Keep you r deterge nt fre sh and dry.
Don't p ut powdered deterg ent in to th e dispenser unt il you're r eady to was h dishes.
Detergents
There a re 3 sorts of d etergents
1.With p hosphat e and with ch lori ne
2.With phos phate an d without chlorine
3.With out ph osp hate and wi thout chlorine
Norma lly ne w pul veri sed deter gen t is wit hout phos phat e. Thus th e wat er sof tener fun ction of
phosp hate is not g iven. In th is cas e we re comm end to fill s alt in the salt contai ner even when
the har dnes s of wa ter is only 6 dH. If de terg ents with out phosp hate are us ed in th e case of har d wat er
often w hite s pot s appear on dishes and glass es. In this case pleas e add more de tergent t o reach
bette r res ults . Deterge nts wi tho ut chlori ne do on ly bleach a l ittl e. St rong a nd co loured sp ots wi ll not
be remo ved co mpl etel y. In this case please c hoose a pro gram w ith a highe r tempera ture.
°
Concentrated Detergent
Based o n the ir chemical com positio n, deterg ents c an be split i n two ba sic types :
conve ntio nal, alkaline dete rgents wi th causti c compone nts
low alkalin e concentrat ed deterg ents w ith natur al enz yme s
Detergent Tablets
Deter gent t abl ets of d iffere nt brands d issolve a t differ ent sp eed s. For this reaso n some
deter gent tabl ets canno t diss olve and de vel op their full cle aning pow er during short
progr ams . The refo re please use lo ng pro grams whe n using detergent ta blets, to
ensure the compl ete re mov al of de tergent residual s.
Detergent Dispenser
The dis penser mu st be refil led be fore the start o f each w ash cycle followin g the in str ucti ons
provi ded in the wa sh cycle ta ble . Your d ishwash er us es less deterge nt and rins e aid than
Conve ntional d ishwasher. Genera lly, only one tab lespoon of deterge nt is ne eded for
a norma l wash load . More heav ily soiled item s need more d etergen t. Always ad d the
deter gent just b efore sta rtin g the dishwasher, oth erwise it c ould g et da mp and w ill not
disso lve properly.
Page 12
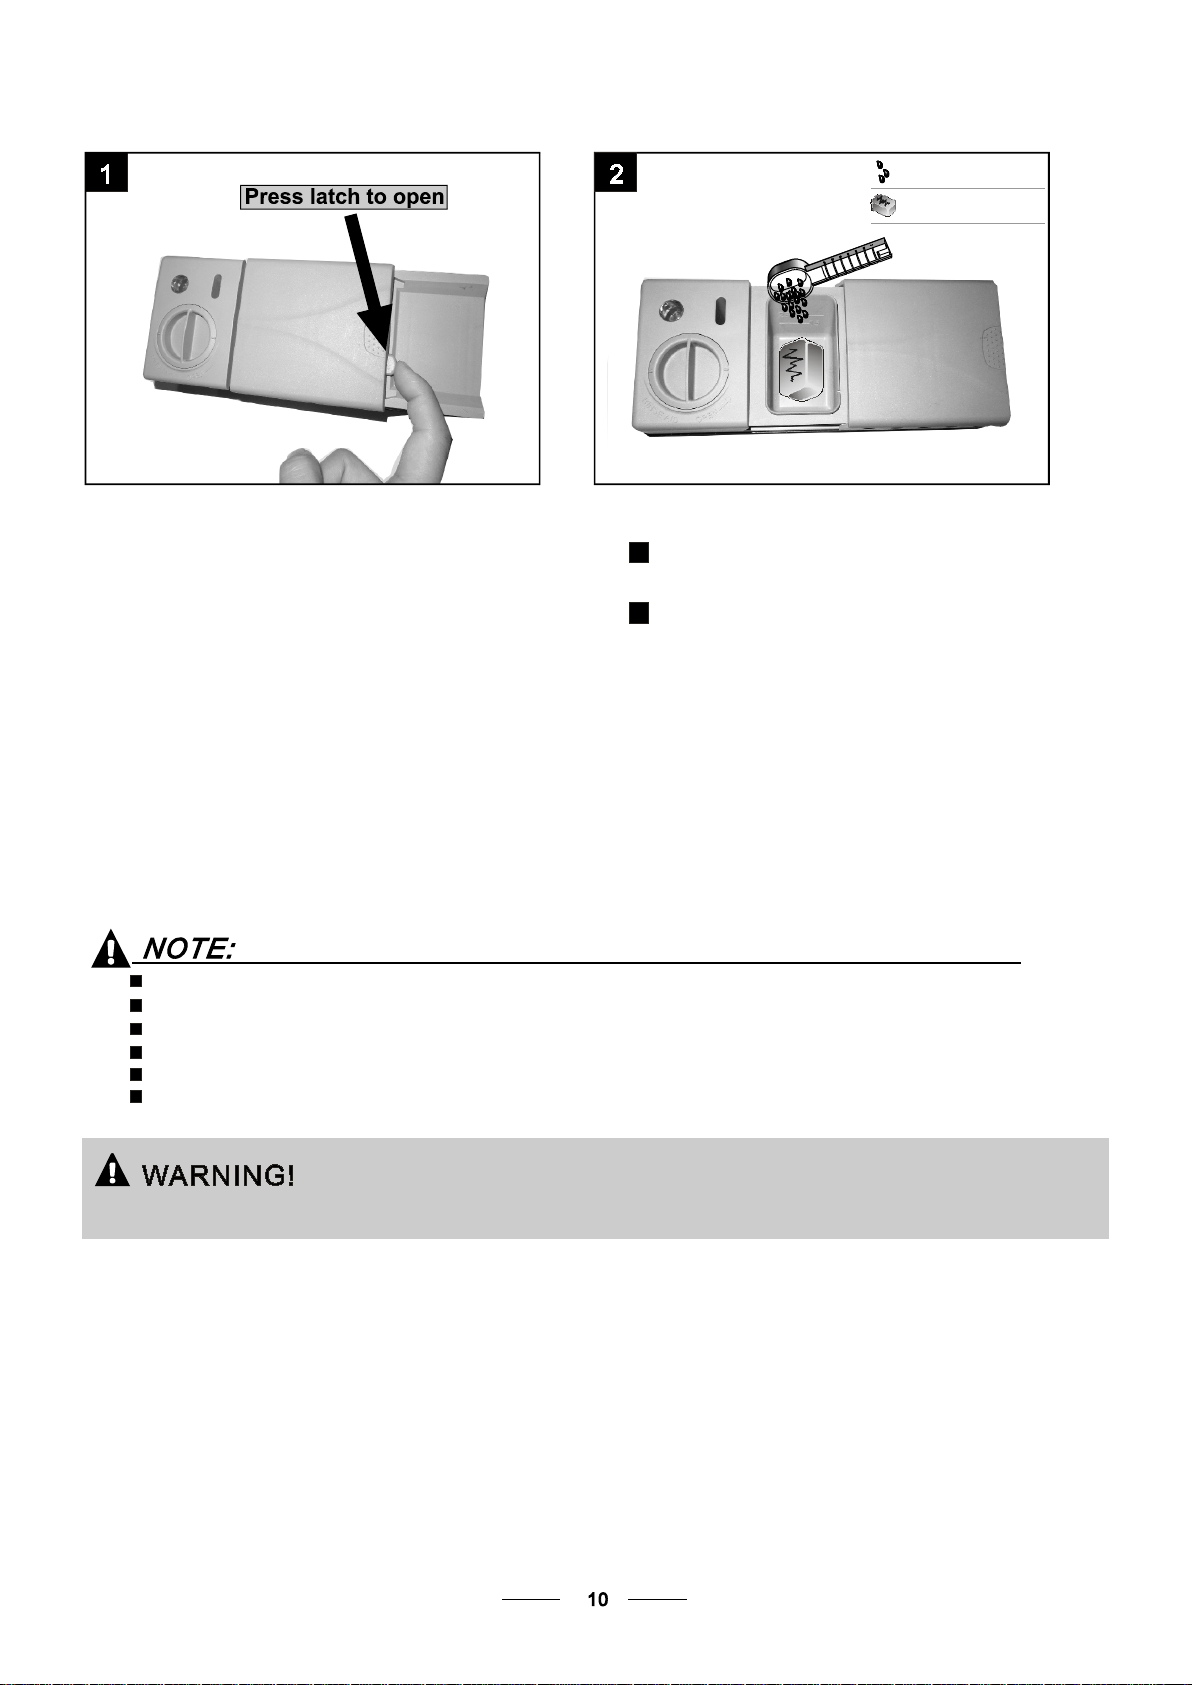
Amount of Detergent to Use
Dete r ge nt powde r
Dete r ge nt table t
Fill in Detergent
Fill th e deterge nt dispenser with detergent .
The mar king indicate s the dosin g levels , as
illus trated on t he right:
Please observe the manufa ctur ers dosing and stora ge
Recom mend ations as stat ed on the det erge nt packaging.
Close t he lid and pr ess un til it lock s in pl ace.
If the di she s are he avily soi led, place an add itional
deter gent dose in the pre-w ash deter gent c hamber. This deter gent w ill take effect dur ing th e pre -wash phase.
You find inf ormatio n about the amount of de tergent for the single pro gramme on t he last page.
Please aware, th at accord ing to the le vel so iling and t he specific ha r dne ss of wa ter diff erences are possib le.
Please observe the manufa ctur er's recommendat ions on the d eter gen t packaging.
If the li d is closed : pres s rel ease b utt on. The lid will s pring ope n.
Alway s add the det erge nt ju st bef ore starting each wa sh cy cle.
Only us e branded d eter gen t aid fo r dis hwas her.
A
For mai n was h deterge nt.
B
For pre-wash det erge nt .
Dishwasher detergent is corrosive!
Take care to keep it out of reach of children.
Page 13
Consider buyin g ute nsils whic h are ident ified as di shwashe r-pr oof .
Use a mil d det erge nt that is de scr ibed a s 'kin d to di shes '. If necessar y, seek further
information from the dete rgent man ufactur ers.
For partic ular i tems, sel ect a progr am with as lo w a temp erature as pos sibl e.
To preven t dama ge, do not ta ke glass an d cutlery out of the dis hwasher i mmed iately
after the program has ended .
Are not suitable Are of limited suitability
Cutle ry wit h woo den, horn c hina o r
mo the r-of-pe arl ha ndl es
Plast ic items th at are not he at res ist ant
Older c utl ery wi th glued pa rts that ar e not
tempe rature re sistant
Bonde d cutl ery items o r dis hes
Pewte r or co pper i tems
Cryst al glass
Steel i tems subject to rust ing
Wood en platte rs
Items m ade from sy nthetic f ibres
(For best perfor mance of th e dish was her, fo llo w thes e loading g uidelin es.
Features an d app eara nce of bask ets and cut lery bask ets may var y from y our m odel.)
Some ty pes of glas ses can become
dull af ter a large n umbe r of wa shes
Silve r and alumi num parts have a
tende ncy to disc olour dur ing wa shi ng
Glaze d pattern s may fade if m achi ne
washe d frequen tly
Scrap e off any la rge amoun ts of le ftover fo od. Softe n remnant s of burnt fo od in pa ns.
It is not n ecessar y to rin se th e dish es under running water.
Place o bjects in t he dis hwa sher i n fol lowi ng way:
1.Item s such as cup s, glasse s, pots/p ans, e tc. a re faced downwa rds.
2.Curv ed items, o r ones with recesses , shou ld be loade d aslant so that water c an run off.
3.All ut ensils ar e stacked s ecur ely and can n ot tip over.
4.All ut ensils ar e placed in the way that the spr ay arms can r otate freely durin g washing .
Very sma ll ite ms sh ould not be washe d in the dishwasher as t hey could e asily fal l out of t he ba sket.
Load ho llow item s such a s cups, gla sses, pan s etc. With t he openin g facing do wnwa rds s o that
water c annot col lect in the c ontaine r or a dee p base.
Di she s and items of cutlery must no t lie in sid e one an other, or cover each ot her.
To avoid da mage to gla sses , the y must not touch.
Load la rge it ems which a re mos t diffic ult to clean int o the lo wer baske t.
The upp er basket i s desi gned to hold mor e delicate and lighter dishware such as gla sse s, coffe e
and tea cups
Long bl aded knives stored in an upr ight p osi tion are a po tent ial hazar d!
Long an d/or s har p items of cutler y such as car ving kniv es must be po sitione d
horiz ontally i n the up per basket.
Pleas e do not overload y our dishw asher. Th is is im portant for goo d res ults a nd fo r
reaso nable con sumption of ene rgy.
To preven t wat er dri pping fro m the up per b aske t int o the lo wer baske t, we re com mend t hat you
em pty t he lower ba sket f irst and then th e upper basket.
Page 14
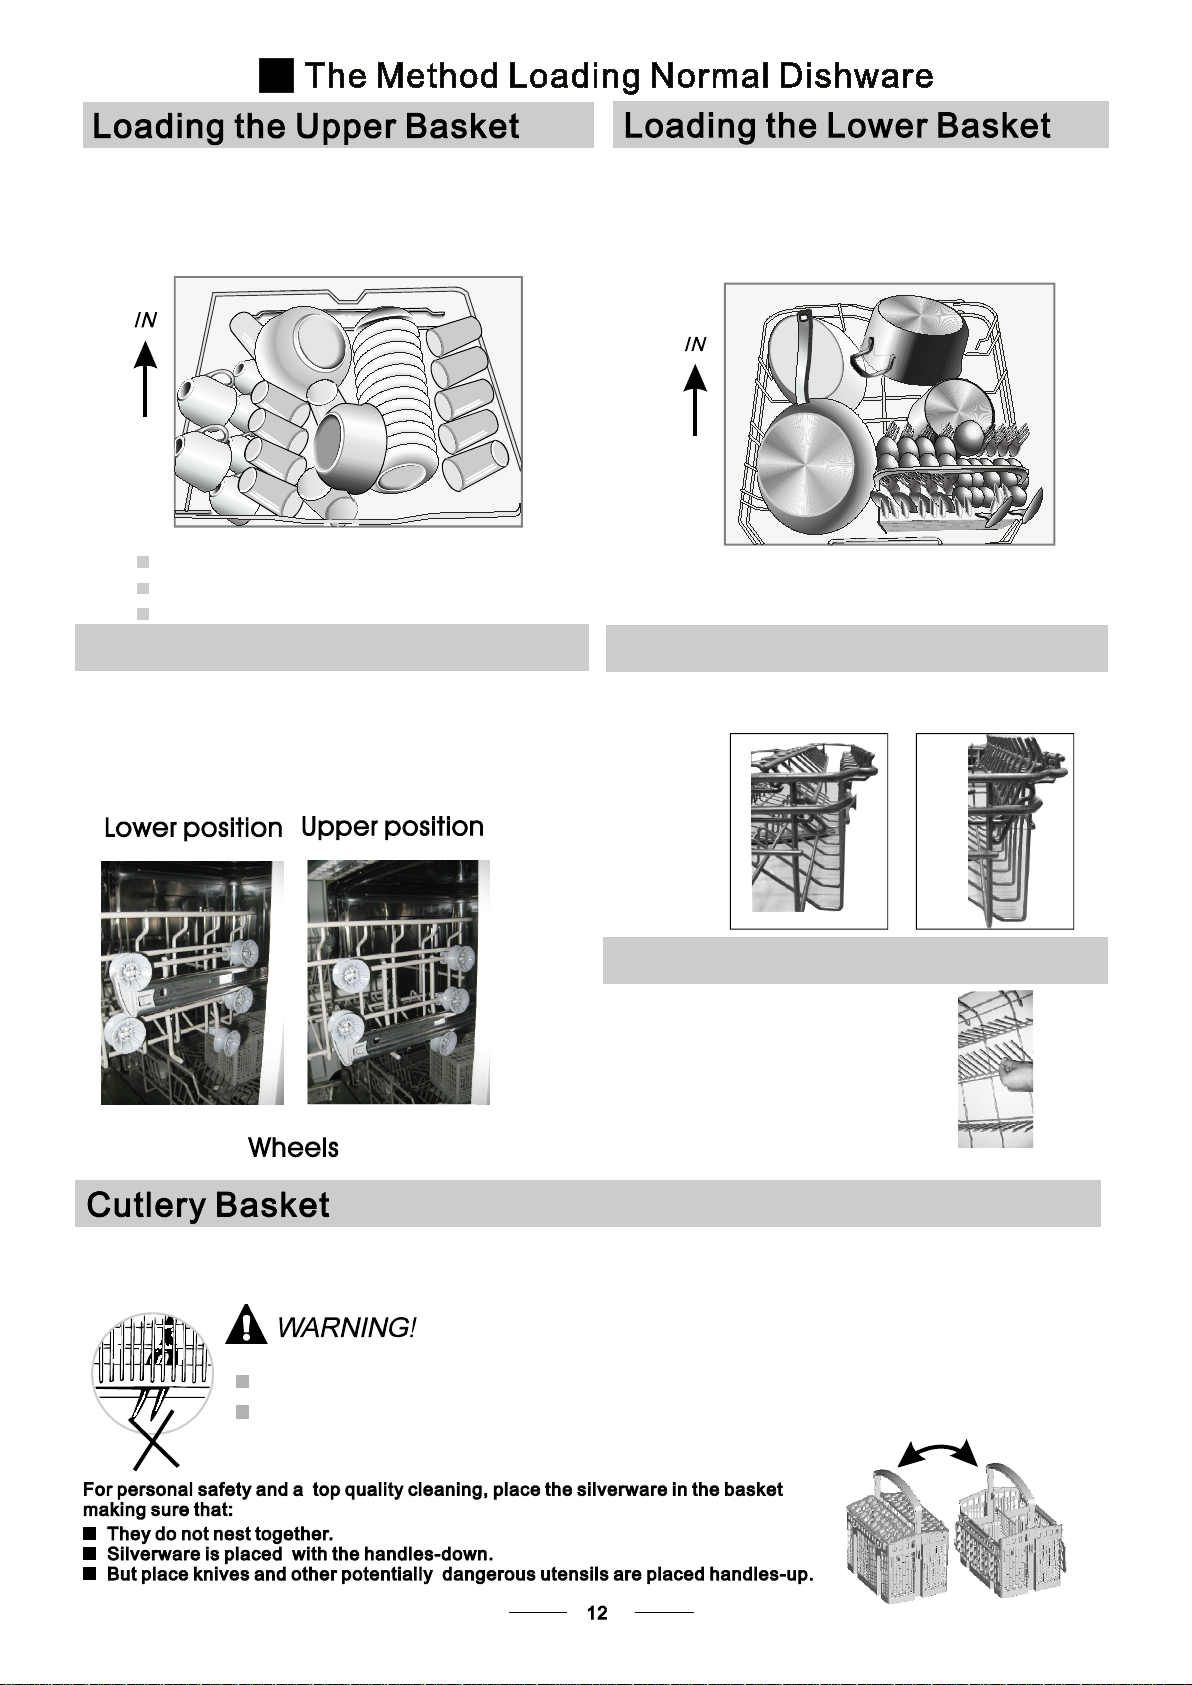
The upp er basket i s desi gned to hold mor e delicate
and lig hter dish ware such as glas ses , coffee and
tea cup s and saucers, as well as plat es, small b owl s
and sha llow pans ( as long as th ey are not to o dirty).
Posit ion the dis hes and cookware so th at they will
not get m oved by the spray of wat er.
Please be remind ed tha t:
Pots, s ervi ng bo wls, etc, must al way s be pla ced top down.
Deep pots should b e slanted to allow wate r to fl ow out.
The Bottom Ba ske t feature s folding spikes so that lar ger or more p ots an d pan s can be load ed.
We suggest t hat y ou pla ce large it ems and the most
diff icul t to cl ean items are to be p lac ed int o the lower
baske t: such as po ts, pans, lids, s erv ing di shes and
bowls , as shown in the figure b elow. It is prefer able to
place serv ing di shes a nd li ds on the sid e of the r ack s
in orde r to av oid bl ocking the rota tion of the t op sp ray
arm.
Adjusting the Upper Basket
The hei ght of the up per baske t can be a dju sted in order to
creat e more spac e for large u tensils both for the upper
/lowe r bas ket. The height of the u pper bask et can be
adjus ted by plac ing the wheels on d iffere nt hei ght o f the
rails . Long item s, ser vin g cutl ery, sala d servers a nd knives
shoul d be pla ced o n the shelf so that they do not ob struct
the rotation of th e spray arms..
Folding back the cup shelives
For better stacking of p o ts an d pan s ,
the spi kes ca n be fo lded down as
sh ow in the pic t ure right.
Folding Spikes of Lower Basket
Fo r better stack ing of p ots and pans,
the spikes can be fo l ded do wn as
sh ow in the pic ture righ t.
Cutle ry should be plac ed in the cut ler y bask et wit h the handl es at the bot tom. If the rack has sid e baskets , the
spoon s should be loade d separat ely into th e appropr iate slots, esp eci ally l ong utensils sh ould be pla ced i n the
horiz ontal pos itio n at the fron t of th e upper basket as show n in the p icture.
Do not let any item extend through the bottom.
Always load sharp utensils with the sharp
point down!
Page 15
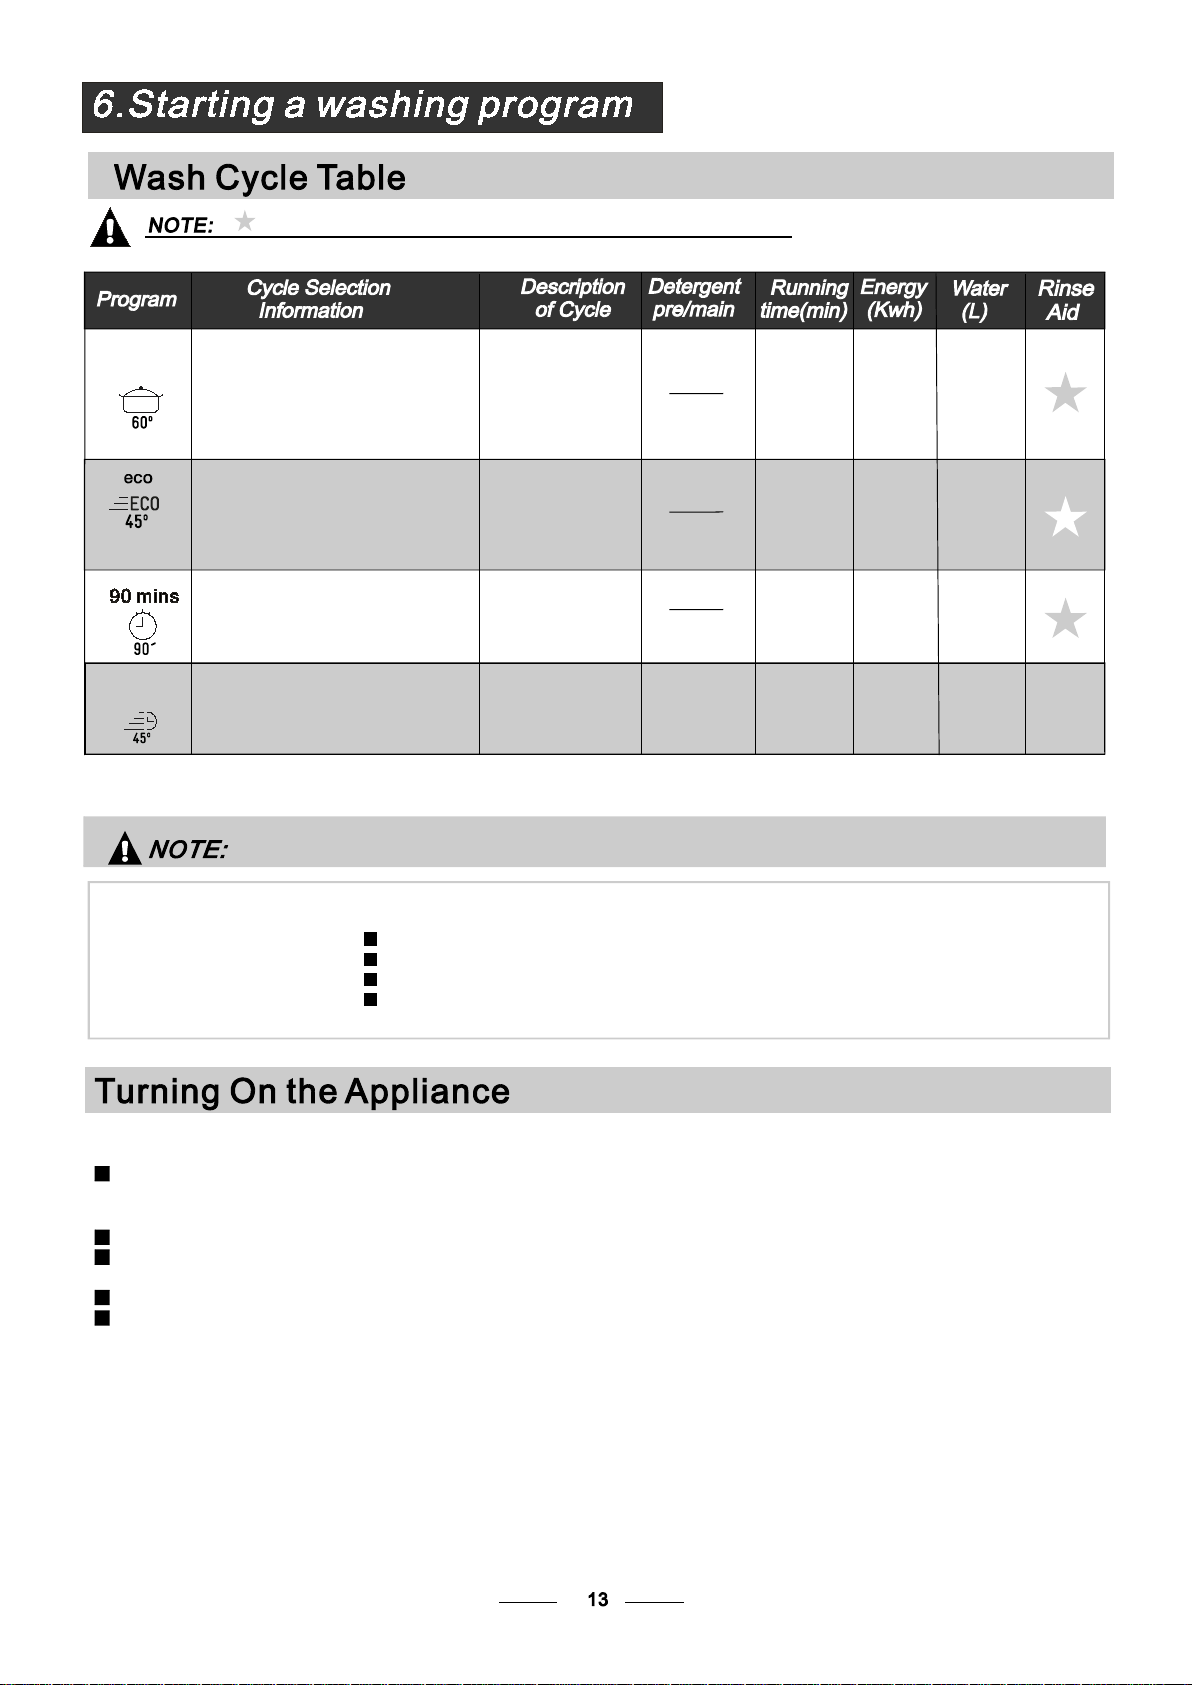
( )
Means: need to fill rinse i nto t he Rinse-Aid Dispe nser.
Intensi ve
(* EN 502 42 )
For hea viest soi led cr oc k ery,
and nor mally soi led po ts
pans dishe s etc with dried
、
、
on soi l ing.
This is s tandard prog ram me , i t is
suit abl e to clean nor mal ly so ile d
tablewa re an d it is the mos t effic ient
prog ram me in ter ms of its c omb in ed
en er gy an d wat er con sum pti on fo r
that type o f tab le war e.
For normally soile d loads
that need quick wash .
Pr e-wash(50 )
Was h (60 )
Rinse
Rinse
Rinse (70 )
Dryin g
Pr ewa sh
Was h (45 )
Rinse (65 )
Dryin g
Was h(65 )
Rinse
Rinse ( 65 )
℃
℃
℃
℃
℃
℃
℃
(1 or 2 pieces)
(1 o r 2 pieces)
(1 piece)
5/ 25 g
5/ 25 g
30 g
170
19 0
90
1. 6
0. 96
1.35
Dryin g
Rapid
A shorte r wash for lightly
soil e d loads that do not
need drying.
Was h (45 )
Rinse
(50 )℃
Rinse (55 )℃℃
25g
30
0. 75
*E N 50242 : This program is the test cycle . The in formation for comparability tes t
in acco rdance wi th EN 50 242 , a s follows :
Capac ity: 1 2 setting
Position Upper bask et: up per wheels on rai ls
Rinse a id setting: 6
PI:0. 49W; P O:0 .45W.
Left- on mod e dur atio n: Power wi ll be cut off automatical ly after pr ogram fin ished for 3 0 minu tes.
18 .5
11.5
12.5
11
Start ing a cycle w ash
Dr aw ou t the lower a nd upper basket , load t he dishes and pu sh them bac k.
1
It is com mended to l oad the low er ba sket first, then the up per one (see the section ent itled
Loadi ng the D ish wash er ).
“ ”
Pour in t he deterg ent (s ee th e sect ion e ntit led Salt, D etergent and Rinse Aid ).
2
Inser t the plug in to the sock et. The po wer sup ply i s 220 -240 VAC /50 HZ, th e specifi cation
3
“ ”
of the so cket is 10A 25 0VAC . Mak e sure th at the wat er supply i s turn ed on to full p ressure.
Close t he door, pre ss the P butto n, to swi tch o n the machi ne.
4
Press t he pro gra m butt on , th e wash prog ram wi ll be changed as follows direction:
5
ower
Intensive->ECO-> 90 Min ;->Rapid
If a prog ra
dishw asher beg ins to s tart.
m is sele cte d, the response light wi ll li ght. The n press the S tart/Pa use bu tton, the
Page 16
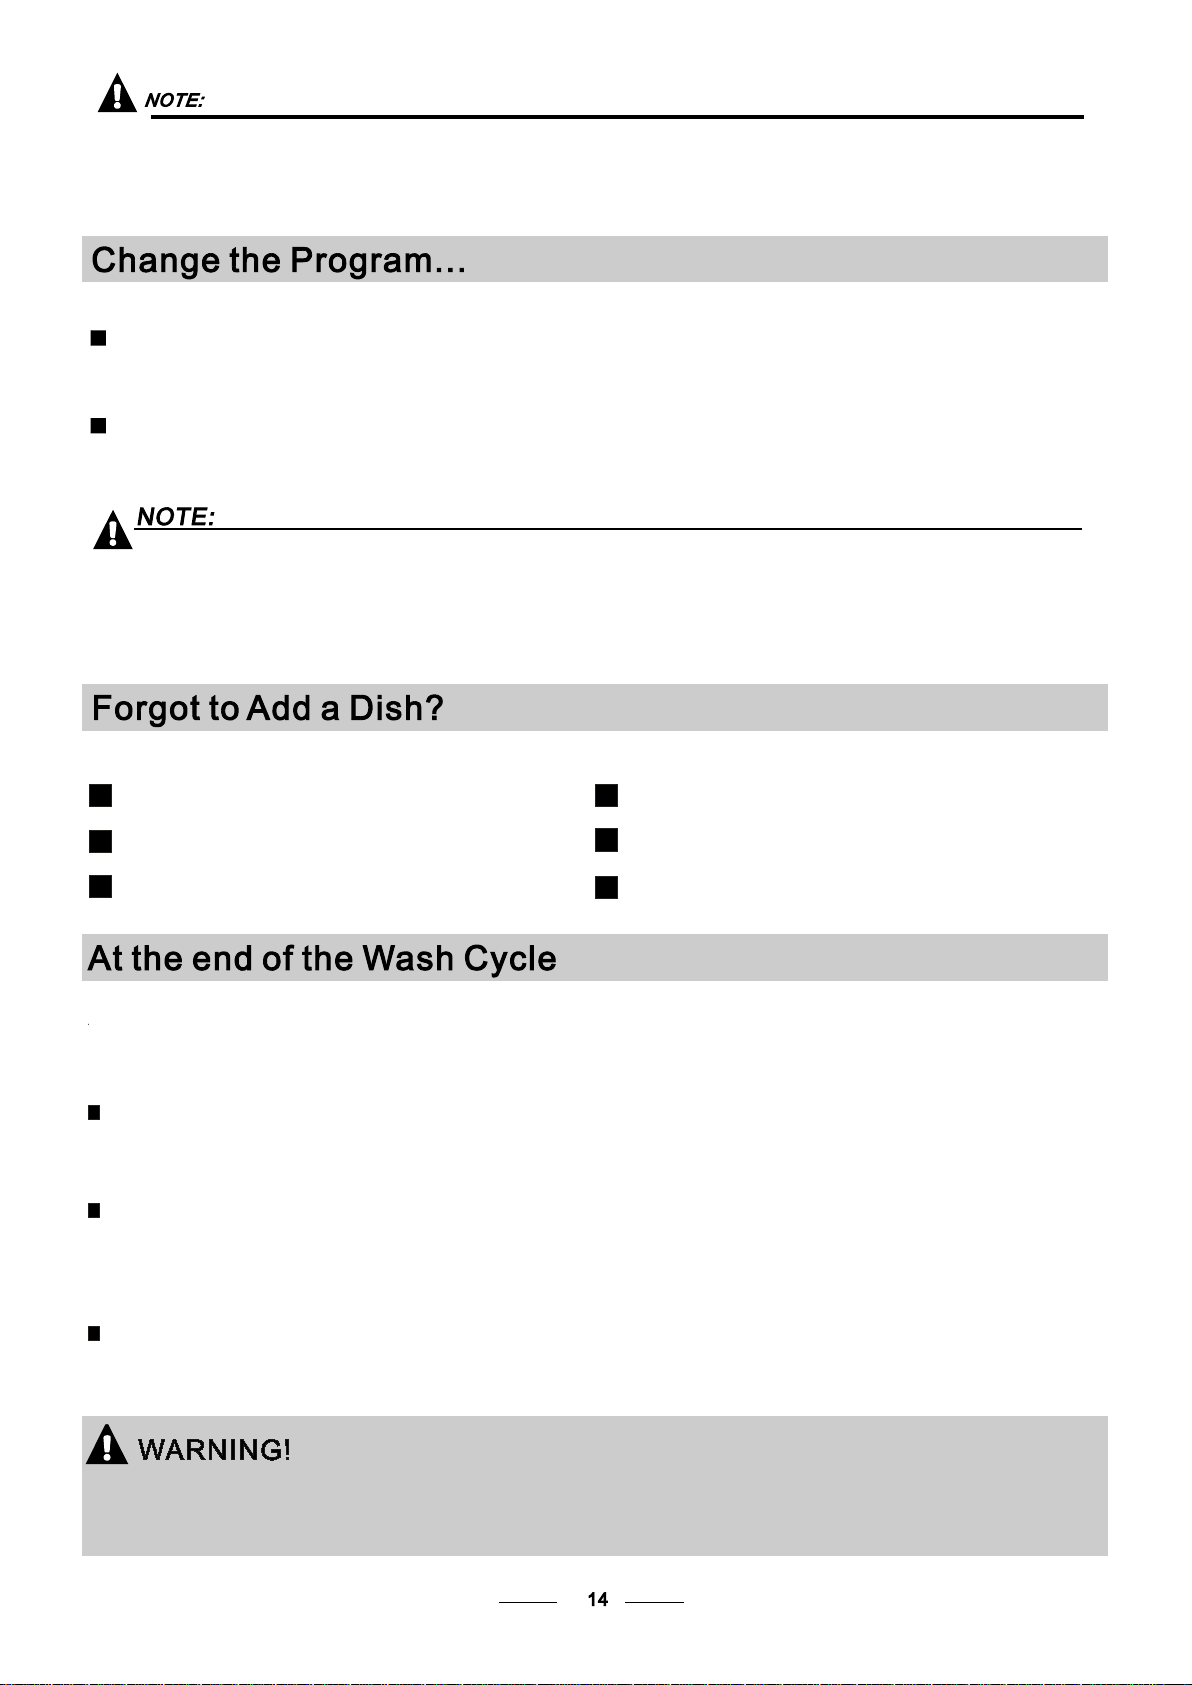
When you pre ss the Sta rt/Pause button to pa use duri ng washing, the runn ing indicator will
sto p blinking and the dishwasher will m ooing eve ry minute unles s you press the
button to start.Start/Pa use
Premise:
A cycle that is under way can only be modified if it h as on ly bee n running f or a sho rt ti me. Other wise , the
1
deter gent m ay ha ve already been rele ased, and the appliance ma y hav e already drain ed the w ash water.
If this i s the ca se, t he de terg ent dispenser m ust be refilled (see the sectio n enti tled " Loading t he
Detergen t " ).
Press the Sta rt/ Pause but ton , th e machine w ill be in sta ndb y stat e, pr ess the prog ram button more than
2
3s then you can chan ge the p rogram to the desired cyc le setting (see the se cti on enti tled " Starting a wash
cycle . . ." ).
If you ope n th e door , the machine will pau se. The program ligh t will
sto p b link ing an d t he buzzer will moo ing every min ute unles s you clo se the door . After
you close the door ,the mac h ine will keep on work ing after 10 seconds.
A forgotten dish can be added any time before the detergent cup opens.
Press the Start/Pause button
1
Open the door a little to stop the washing.
2
After the spray arms stop working,you can open the door
3
completely.
When th e working c ycle has fi nish ed, t he buz zer o f the di shw ashe r will soun d for 8 seconds, th en stop. Tur n off
the app liance using the Pow er swi tch butto n, shut off the water suppl y and open th e door o f the dishwasher.
Wai t for a fe w min utes b efore unl oadi ng th e dish was her to a voi d hand ling the di shes and ut ensils wh ile th ey
are sti ll hot and mo re sus cep tibl e to breaka ge. They w ill also dr y bett er.
during a wash cycle
Add forgotten dishes.
4
Close the door
5
Press the button, the dishwasher will run
6
after 10 seconds.
Start/Pause
Switch Off the Dishwasher
The pro gram ligh t is on but is not blin kin g, only in this cas e the progr amme h as en ded.
Power1.Swit ch off the d ishw ash er by pr ess ing th e button.
2.Turn off the water t ap!
Open the door carefully.
Hot dis hes are sen siti ve to k nocks. The dis hes shoul d ther efore be allow ed to co ol do wn aro und 15 minu tes
befor e removin g from the ap plia nce .
Open th e dishwas her' s doo r, leav e it ajar and w ait a fe w min utes befo re removing the dishes. In this way the y
will be c ooler and the drying will be i mproved .
Unloading the dishwasher
It is nor mal that th e dishwas her is w et in side.
Empty t he low er ba sket firs t and then the uppe r one . Thi s will avoi d water drippin g from the up per Baske t ont o
the dis hes in the lower one.
It is dangerous to open the door when washing,
because the hot water may scald you.
Page 17
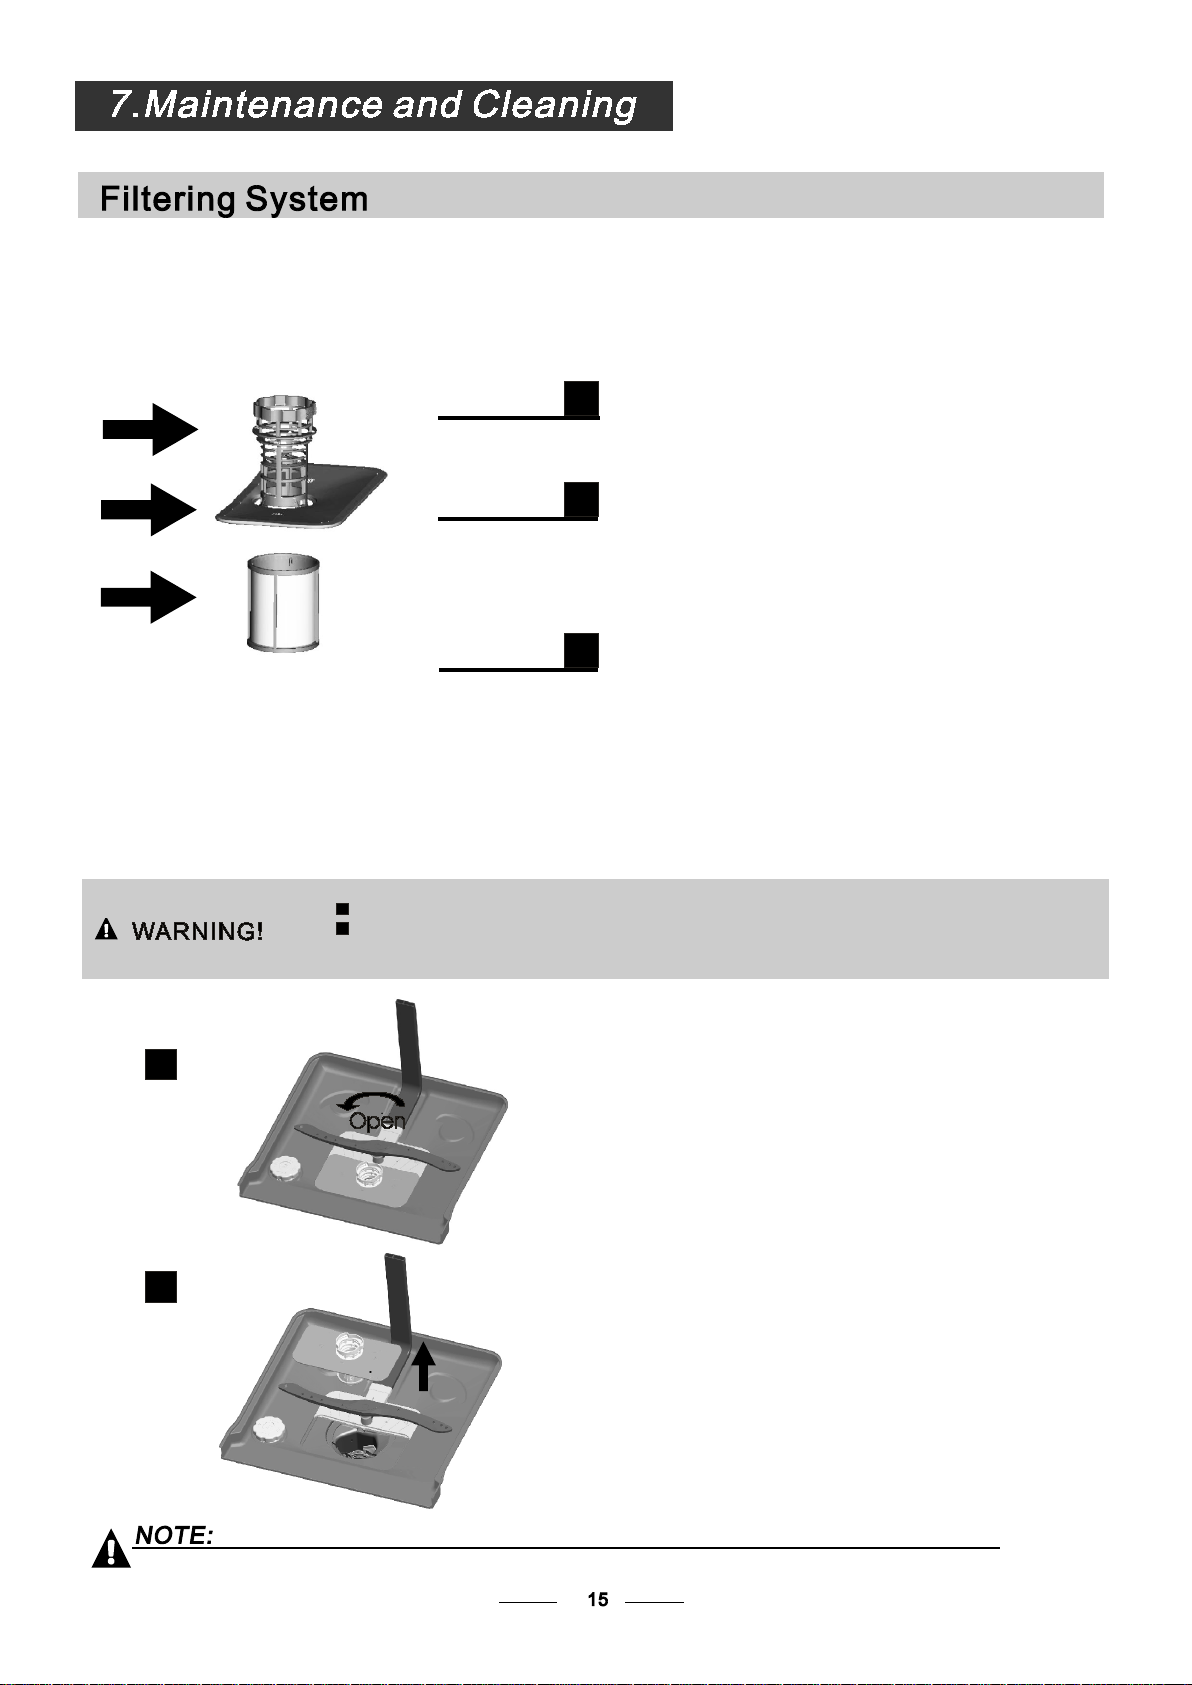
The fil ter preve nts large r remnant s of foo d or other objects fro m getting i nside the p ump.
The res idue s may b lock the fi lter, i n thi s case they must be r emo ved.
The fil ter syste m con sists of a coarse filter,a flat (Ma in filter )
And a mic rofilte r(Fine filter).
1
2
3
2
1
3
Main filter
Food an d soil part icles tra pped i n thi s filter ar e pulveri zed by a
speci al jet on the l owe r spra y arm and was hed down to d rain.
Coarse filter
Larger items, such as pi ece s of bones or glass, that coul d block
the dra in are trap ped in the co arse filter. To rem ove th e ite ms
caugh t by the filt er, ge ntly s queeze th e tap on the to p of this
filte r and lift ou t.
Fine filter
This fi lter h old s soil and food res idu es in th e sump area a nd
prevents it from b eing rede posit on th e dishes du ring w ash cycle .
Filter assembly
The fil ter effi ciently
For bes t perform ance and results, th e filter must be cl eaned reg ularly. this re ason, it is a g ood idea to
remov e the large r food p art icles trapped in the filte r after eac h wash cycl e by ri nsing the semicircu lar f ilte r and
cup und er runnin g wate r. To remove th e filter de vice, pul l the cup han dle in the up ward d irectio n.
remov es fo od particles fr om the wash w ater, a llo wing i t to be recycled d urin g the cycle .
For
The dis hwas her m ust ne ver be used w ithout the filters .
Impro per replaceme nt of the fil ter may reduce t he per formanc e leve l of the appl ian ce
and dam age di she s and ut ens ils.
2
1
St e p 1 Turn the filter in a nti-clo ckwise di rection ,:
Step 2 lift the f ilter as sy up:
When following this procedure from step1 to step 2, the filter system will be removed;
when following it from Step 2 to Step 1, the filter system will be installed.
Page 18
Remarks:
- Inspe ct th e filters fo r blo cking after eve ry time the d ishwasher has bee n used .
- By unsc rewi ng th e coarse fi lter, y ou can remo ve the filter sy ste m. Remove a n y foo d remn ants and
clean the filter s under run ning w ater.
The entire filter assembly should be cleaned once a week.
Cleaning the Filter
To clean th e coarse fi lter and th e fine f ilt er, use a cleaning b rush. Rea sse mble the filter p arts as sho wn in th e fig ures
on the la st pag e and r eins ert the ent ire assem bly in the di shwashe r, posi tio ning it in it s seat and pressi ng do wnwa rds.
When cleaning the filters, don't knock on them . Otherwise , the filters co uld be
contorted and the performanc e of the dishwasher coul d be decreased .
The con trol pane l can be c lea ned by u sin g a lightly dampe ned cl oth .
After c leaning , make s ure to dry it t hor oughly.
For the e xte rior, u se a go od app lian ce po lish w ax.
Never use sharp objects, sc ouring pads or harsh clean ers on any pa rt of th e dis hwasher.
Cleaning the Door
To clean th e edge a round the door, you sho uld use onl y a soft warm, damp clot h.
To avoid pe netr ation of wa ter i nto the door lock a nd el ectr ica l comp onents, do not
use a spr ay cleaner of any k ind .
Never use a spr ay cleane r to clean th e door pan el as it may damage the door lock
and ele ctri cal compo nents.
Abras ive ag ent s or som e paper tow els shou ld not b e used b ecause of t he risk of
scrat chin g or leavin g spots on th e stainless st eel s urface.
Protect Against Freezing
pleas e take fros t protection measu res on t he dishwasher in win ter. Ev ery fter wa shi ng cyc les,
pleas e ope rate a s foll ows
1.Cut off the electrical po wer to t he dishwa sher.
2.Turn off the water s upply and d isco nne ct the wate r inlet pipe from t he wa ter va lve.
3.Drai n the water f rom the inl et pipe and water v alv e. (Us e a pan to gath er the wate r)
4.Reconnect the w ater i nle t pipe to the w ater v alv e.
5.Remove the filt er at the bot tom of the tu b and us e a spo nge to s oak up w ate r in the s ump .
:
If your dishwasher can not wo rk bec ause of th e ice,
please con tact professi onal s ervice pe rso ns.
time a
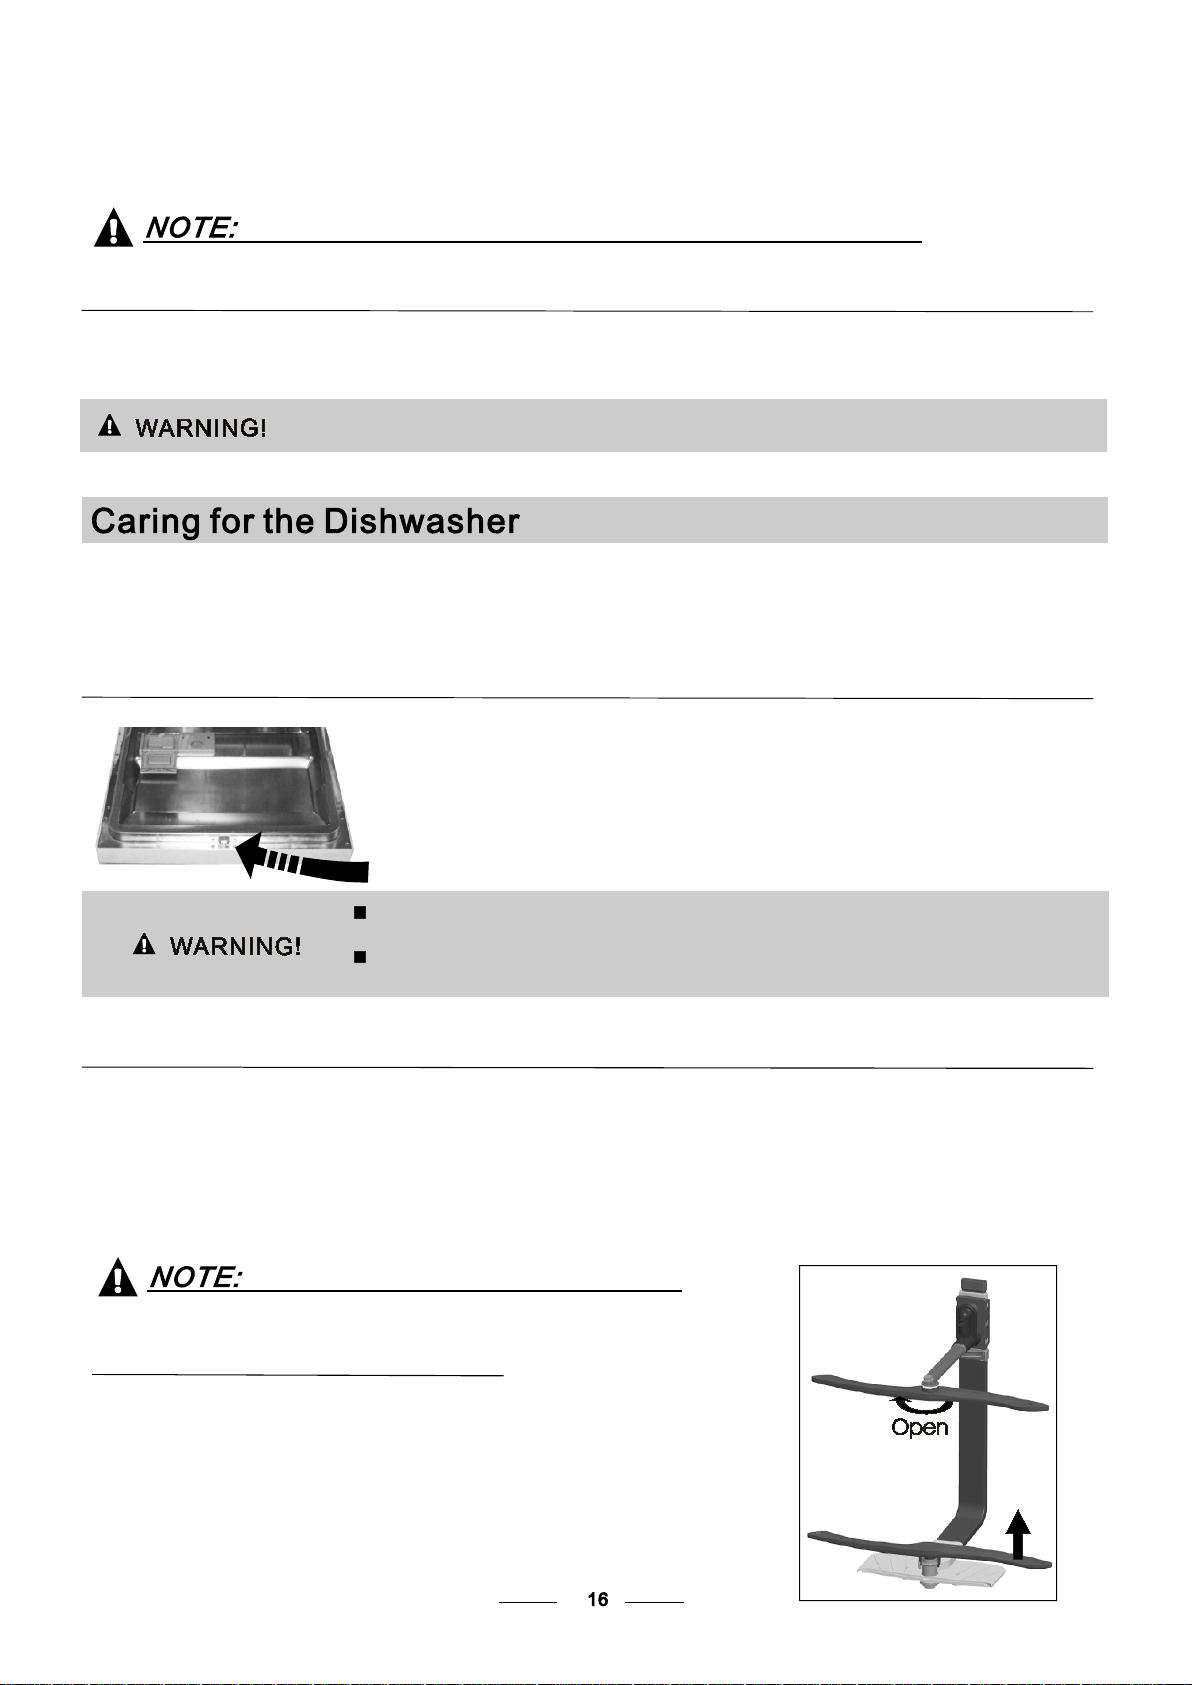
Cleaning the Spray Arms
It is nec essary to clean the sp ray ar ms regula rly for har d
water chemi cal s will c log the spr ay arm jet s and bea rings.
To remove t he upper sp ray ar m, ho ld the nut, rotat e the arm
clock wise to rem ove it.
To remove t he lower sp ray arm, pu ll out t he sp ray arm upw ard.
Was h the ar ms in soapy a nd wa rm wat er an d use a so ft bru sh to
clean t he jets. Replac e the m after rin sing t hem thoro ughly.
Page 19
After Every Wash
After e very wash , turn o ff t he wat er supply t o the
appli ance and le ave the door slightl y open so that
mo ist ure and odo urs are not t rapp ed in side .
Remove the Plug
Befor e cleaning or per forming maintenance, always
remov e the plug fr om the s ock et.
No Solvents or Abrasive Cleaning
To cle an th e exterior and ru bber parts of the dishw asher,
do not us e solvents or abr asi ve cle a nin g product s.
Only us e a clot h wit h warm soapy water.
To remove s pots o r sta ins from th e surf ace of t he
inter ior, us e a clo th dam pened wit h wate r an a little
vineg ar, or a clean ing product mad e specific all y for
dishw ashers.
Posit ion the app liance in t he desire d locatio n. The bac k shou ld rest ag ains t the wall be hind it, an d the sides ,
along t he adjace nt cabine ts or walls . The dishwasher is equip ped with water supply and d rain hose s that can
be posi tioned ei ther to the r ight or the l eft sides t o facilit ate pr op er ins tallati on.
When not in Use for a LongTime
It is recommend tha t you ru n a wash cycl e with the
dishw asher e mpt y and th en re move t he pl ug from the
socket, turn o ff the wat er su pply a nd leave th e door of
the appliance sli ghtl y open. Th is will hel p the do or
seals to l ast lo nger and pr event odo urs from fo rming
withi n the applia nce.
Moving the Appliance
If the ap pliance m ust be moved, try to ke ep it in the
ve rti cal posit ion. If absolutely necessa ry, it c an be
posit ione d on its back .
Seals
One of the factors t hat cause o dours to fo rm in the
dishw asher is fo od that rem ains trap ped in the se als.
Perio dic clean ing wi th a da mp sponge w ill pr eve nt this
from oc cur ring .
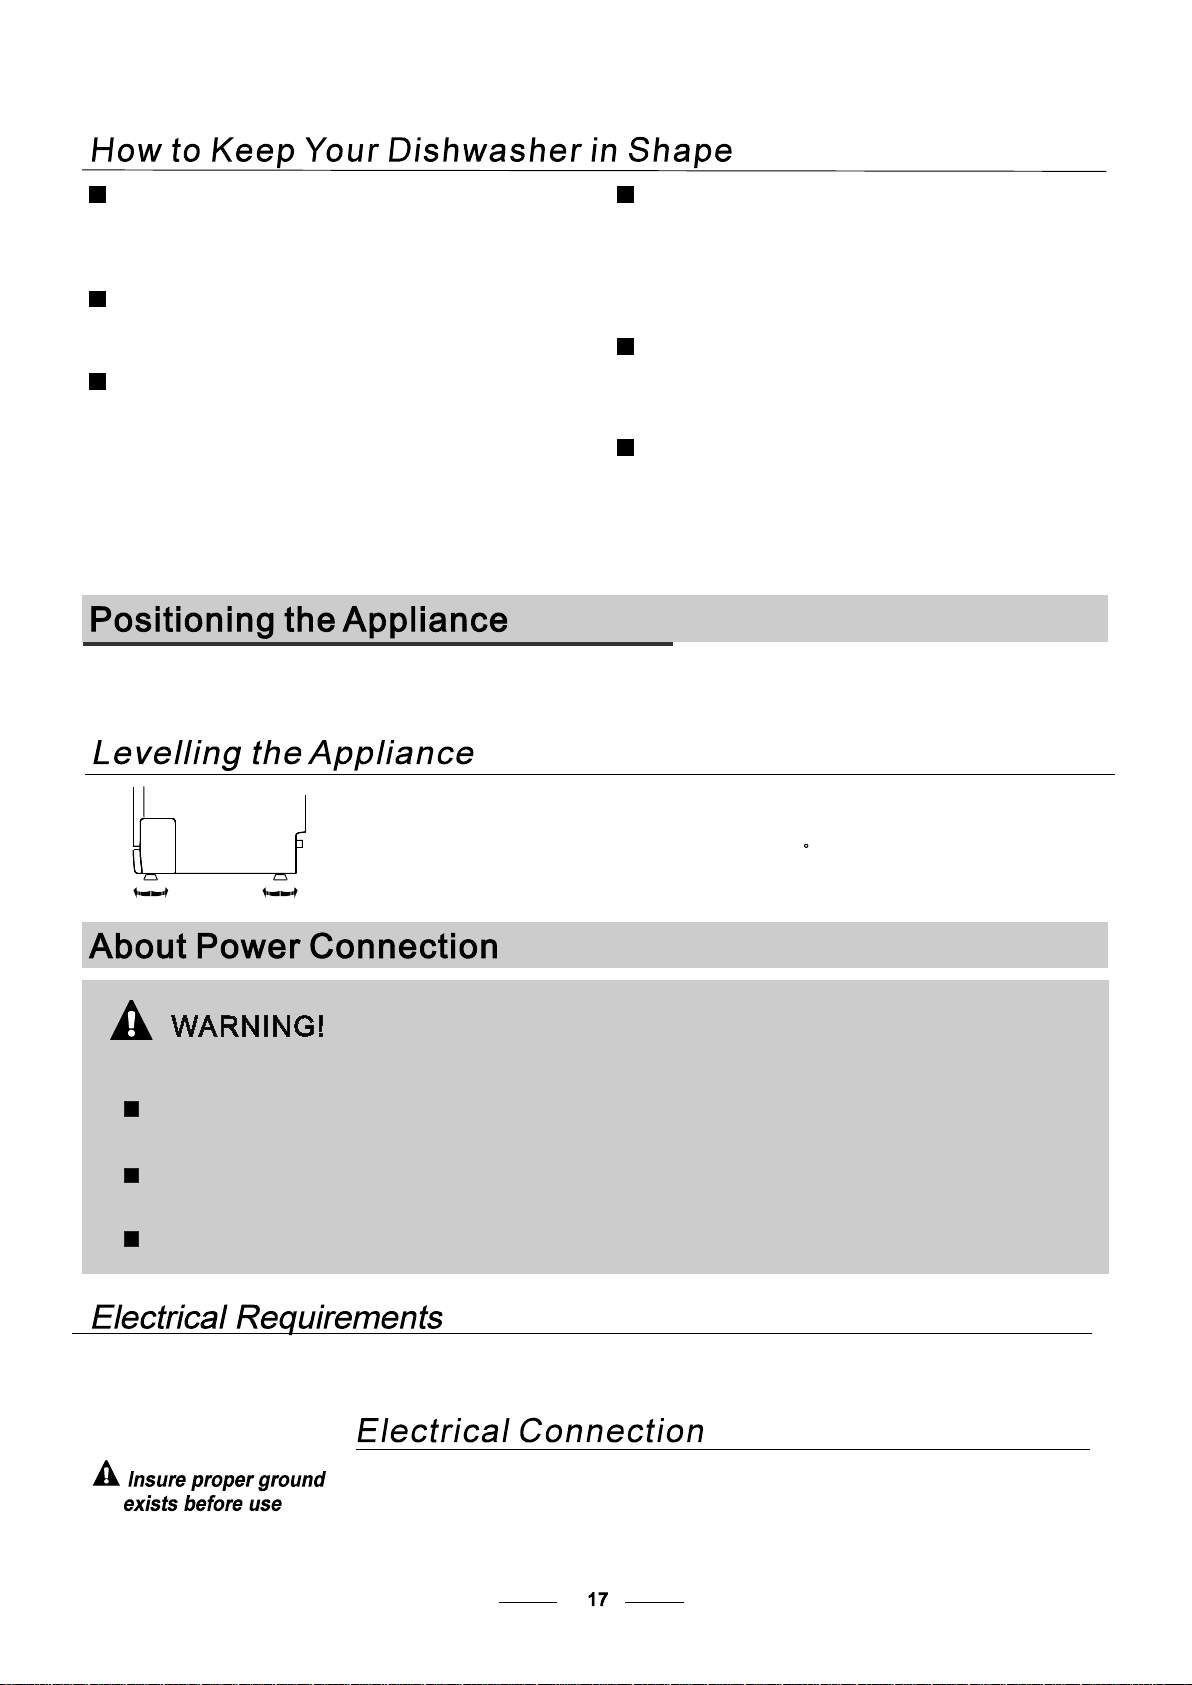
Once the applian ce is po sition ed for level lin g, the h eight of the dishwasher
ma y be al tere d via adjustment of th e screwin g leve l of the feet . In any case,
the app liance sh ould n ot be inclined more th an 2 .
For personal safety:
Do not use an extension cord or an adapter plug
with this appliance.
Do not, under any circumstances, cut or remove the
earthing
Connection from the power cord.
Pleas e look at the r ating label to kn ow the rati ng vo ltag e and conne ct the dis hwasher t o the appro pria te po wer suppl y.
Use the requ ired fuse 1 0 amp, time d elay f use or circ uit break er rec omm ended and prov ide se parate ci rcu it ser ving
only this ap pli ance .
Ensur e the volta ge and f requ enc y of th e power being cor respond s to
those o n the ra ting plat e. Only insert t he plu g int o an ele ctr ical s ocket whi ch is ea rthed
prope rly. If the elect rical soc ket to which the appli ance must be conn ecte d is no t
appro priate fo r the pl ug , replac e the socke t, rather t han using a a daptors or the li ke as
they co uld cause overh eati ng and bur ns.
Page 20
Conne ct the cold w ater supp ly hose to a thread ed 3/4(in ch) co nne ctor and make su re
that it i s fastened tightly in place.
If the water pipes a re new or hav e not be en used for a n extende d period of t ime , let th e
water r un to ma ke su re that the w ater is clear. Th is precaution i s nee ded to a voi d the
risk of t he wa ter in let to be blo cked a nd da mage t he applia nce .
Please c lose the hydrant afte r using .
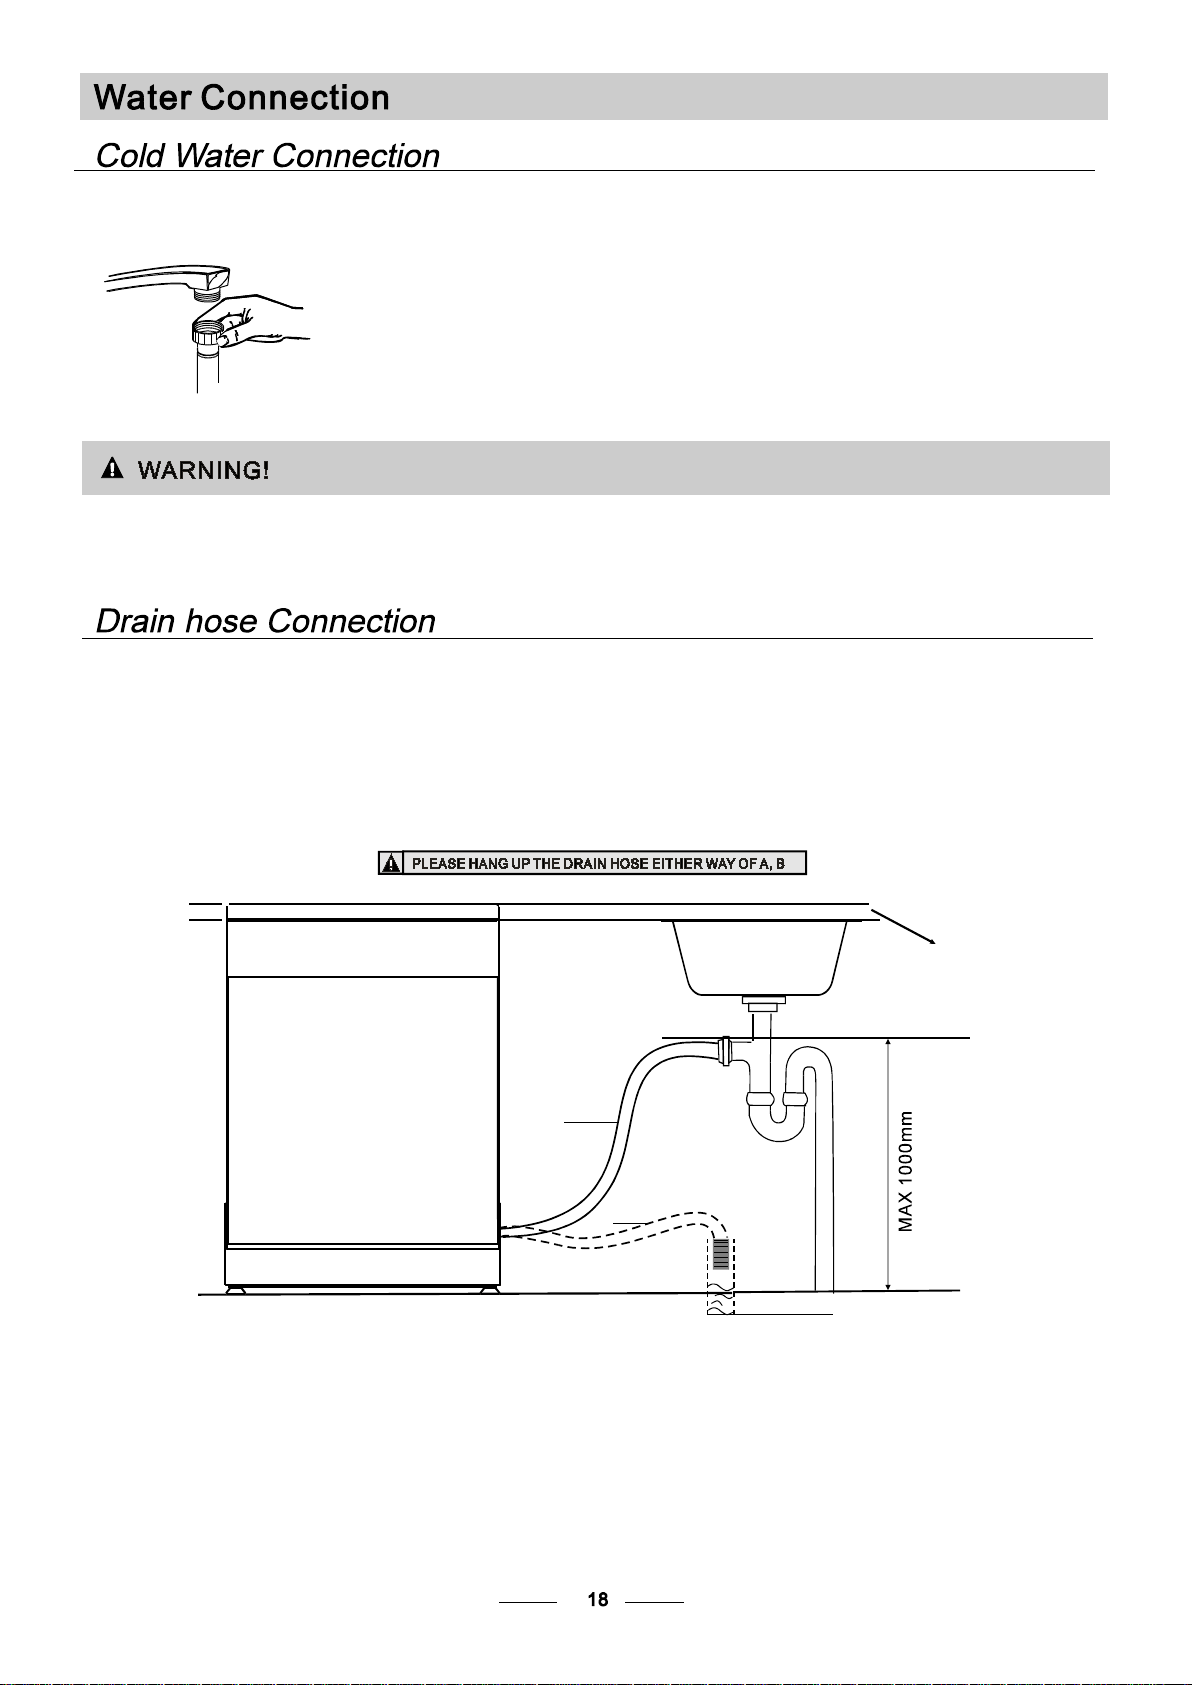
Inser t the drain h ose in to a drain pi pe wi th a min imu m diam eter of 40m m, or let it ru n into t he si nk, ma kin g sure t o
avoid b end ing or c rimping it. Th e top of the hose mus t be less than 1000mm.
Front
NOTE
The top of the hose
must be less than
1000mm.
Drain pipe
Counter
A
B
φ 40mm
Page 21
How to Drain Excess Water From Hoses
If the si nk is 1000 hi gher from the flo or, th e exce ss water in h oses cann ot be drain ed dir ectly
into th e sink. It wi ll be ne ces sary to drain exc ess water f rom hoses i nto a bowl or s uitable
conta iner that i s held outs ide an d low er tha n the sink.
Water Outlet
Conne ct the wate r drain hos e. Th e drain hos e mus t be cor rect ly fi tted to avo id wat er le aks.
Ensur e that the water drain h ose is not kinked or squashe d.
Extension Hose
If you ne ed a dr ain ho se extens ion, m ake sure to use a simila r drain hose.
It must be no longer than 4 me tre s; oth erwise the cle anin g eff ect o f the di shw ashe r cou ld be re duced.
Syphon Connection
The was te connec tion m ust b e at a hei ght less th an 10 00 mm (maximum) f rom the bot tom of the di sh.
The wat er drain ho se should be fixed .
The following things should be checked before starting the dishwasher.
The dishwasher is level and fixed properly
1
The inlet valve is open
2
Inlet hose co nnections are ful ly tightened and not leaking
3
The wires are tightly connected
4
The power is switched on
5
The inlet and drain hoses are knotted
6
All packing materials and printings should be taken out from the dishwasher
7
After installation, please make sure to keep this manual.
The content of this manual is very helpful to the users.
Page 22
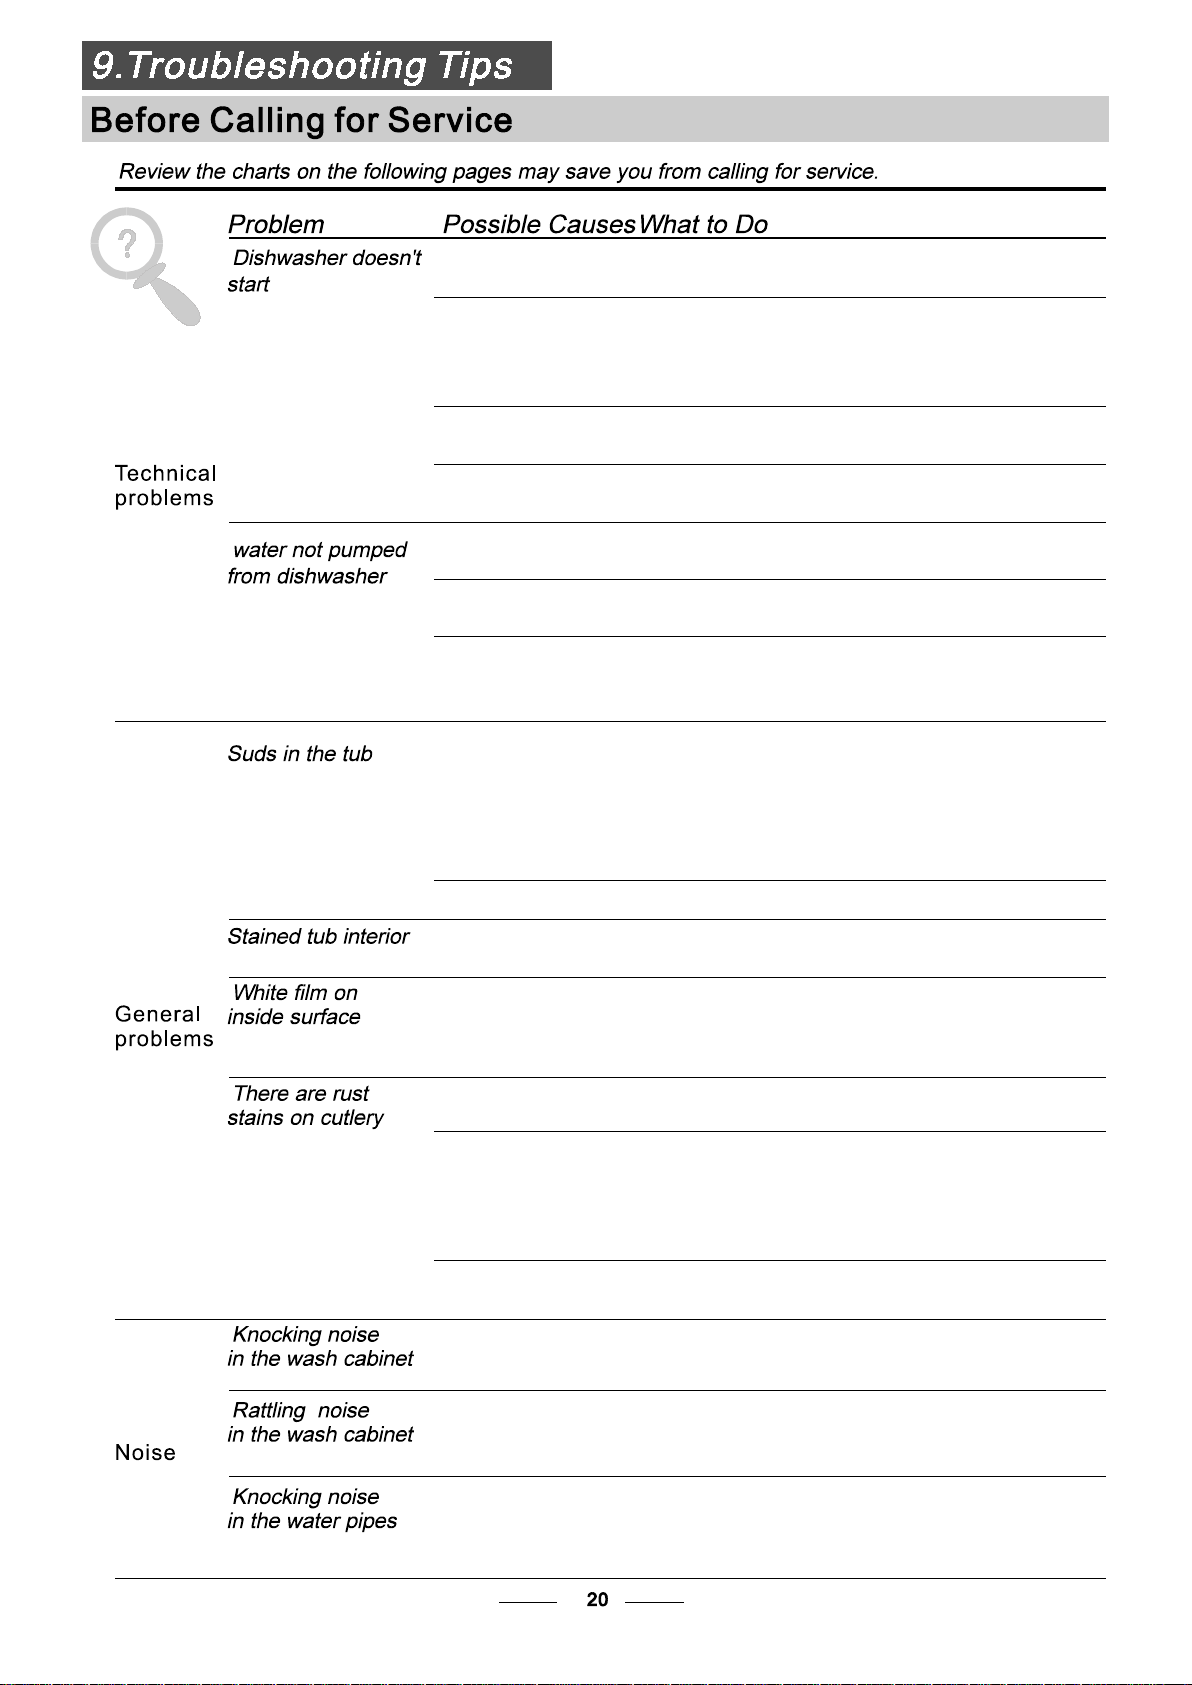
Fuse blown, or the
circuit breaker acted
Replace fuse or reset circuit breaker. Remove any other
appliances sharing the same circuit with the dishwasher
Power supply is not
turned on
Water pressure is low
Door of dishwasher
not properly closed.
Kink in drain hose
Filter clogged
Kitchen sink clogged
Improper detergent
Spilled rinse-aid
Make sure the dishwasher is turned on and the door is
closed securely.
Make sure the power cord is properly plugged into the
wall socket.
Check that the water supply is connected properly and
the water is turned on.
Make sure to close the door properly and latch it.
Check drain hose.
Check coarse filter
the
(see section titled )
Check the kitchen sink to make sure it is draining well.
If the problem is the kitchen sink not draining ,you may
need a plumber rather than a serviceman for dishwashers.
" Cleaning The Filter "
Use only the special dishwasher detergent to avoid suds.
If this occurs, open the dishwasher and let suds evaporate.
Add 1 gallon of cold water to the tub. Close and latch the
dishwasher, then select any cycle. Dishwasher will drain
out the water at the first step.Open the door after draining
is stop and check if the suds is disappeared.
Repeat if necessary.
Always wipe up rinse-aid spills immediately.
Detergent with
colourant was used
Hard water minerals
The affected items are
not corrosion resistant.
A program was not
run after dishwasher
salt was added.
Traces of salt have
gotten into the wash cycle.
The lid of the softer
is loose
A sp ay arm is
r
knocking against
an item in a basket
Items of crockery
are loose in the
wash cabinet
This may be caused
by on-site installation
or the cross-section of
the piping.
Make sure that the detergent is the one without
colourant.
To clean the interior, use a damp sponge with
dishwasher detergent and wear rubber gloves.
Never use any other cleaner than dishwasher
detergent for the risk of foaming or suds.
Always run the quick wash program .
without any crockery in the dishwasher and
without selecting the Turbo function (if present),
after adding dishwasher salt.
Check the lip .Ensure the fix is fine.
Interrupt the program, and rearrange the items
which are obstructing the sp ay arm.r
Interrupt the program,
and rearrange the items of crockery.
This has no influence on the dishwasher function.
if in doubt, contact a suitably qualified plumber.
Page 23
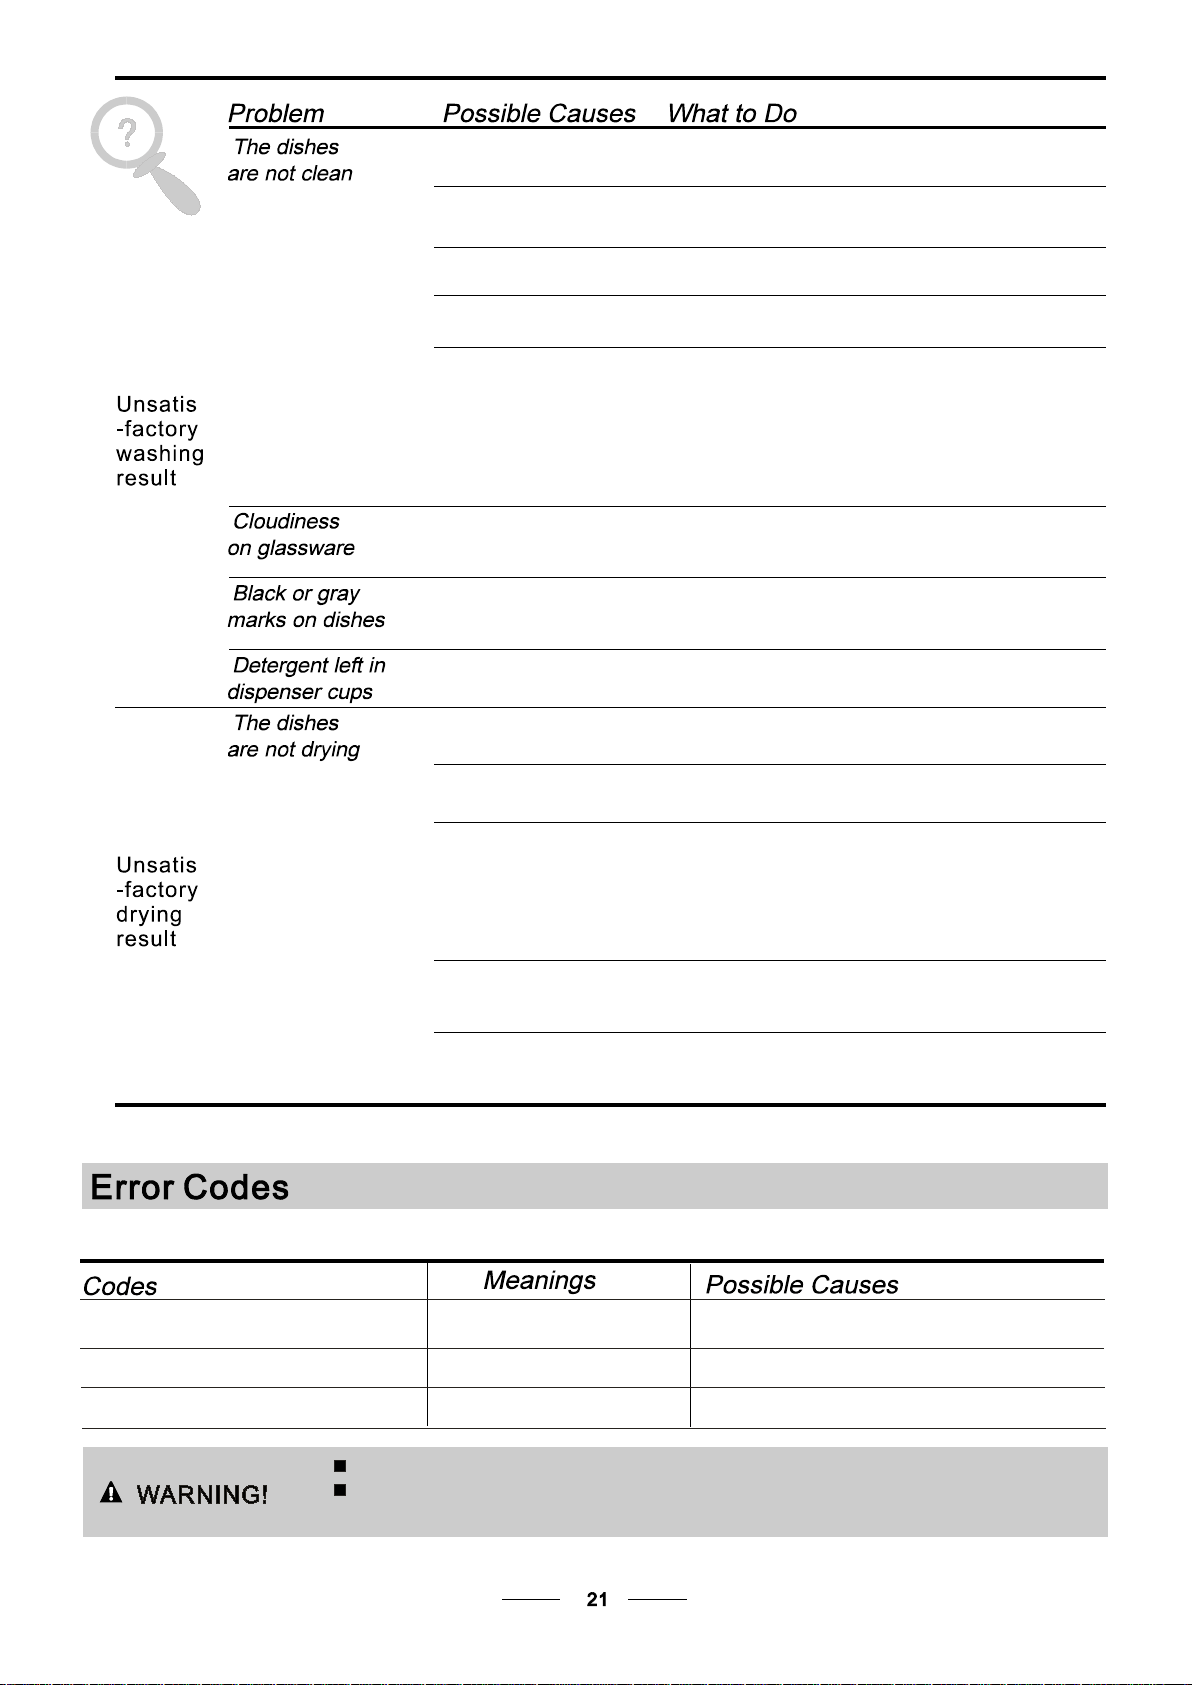
The dishes were not
loaded correctly.
See notes in " Loading the Dishwasher Baskets ".
The program was
not powerful enough.
Not enough detergent
was dispensed.
Items are blocking
the path of sp ay arms.r
The filter combination
in the base of wash
cabinet is not clean or
is not correctly fitted.
This may cause
the sp ay arm jets
r
to get blocked.
Combination of soft
water and too much
detergent.
Aluminum utensils
have rubbed against
dishes.
Dishes block
detergent cups.
Improper loading
Too little rinse-aid
Select a more intensive program.
See" Wash Cycle Table ."
Use more detergent, or change your detergent.
Rearrange the items so that the sp ay can rotate freely.r
Clean and/or fit the filter combination correctly.
Clean the sp ay arm jets. See "Cleaning the Spray
Arms".
Use less detergent if you have soft water and select
a shortest cycle to wash the glassware and to get
them clean.
Use a mild abrasive cleaner to eliminate those marks.
Re-loading the dishes properly.
Load the dishwasher as suggested in the directions.
Increase the amount of rinse-aid/refill the rinse-aid
dispenser.
r
Dishes are removed
too soon
Wrong program
has been selected
Use of cutlery with
a low-quality coating
Do not empty your dishwasher immediately after
washing. Open the door slightly so that the steam can
escape. Begin unloading the dishwasher only once t
he dishes are barely warm to the touch. Empty the low
basket first. This prevents water form dropping off
dishes in the upper basket.
In short program the washing temperature is lower.
This also lowers cleaning performance. Choose
a program with a long washing time.
Water drainage is more difficult with these items.
Cutlery or dishes of this type are not suitable for
washing in the dishwasher.
When some malfunctions come on, the appliance will display error codes to warn you:
The Rapid light fl icke r fle etly
The ECO l i ght flick er fle et ly
The Rapi d and 9 0Min l ight flic ker fleetly
Longer inlet time.
Overflow.
Not reaching required temperature.
Faucets is not opened, or water intake is
restricted,or water pressure is too low.
Some element of dishwasher leaks .
Malfunction of heating element.
If overflow occurs, turn off the main water supply before calling a service.
If there is water in the base pan because of an overfill or small leak,
the water should be removed before restarting the dishwasher.
Page 24
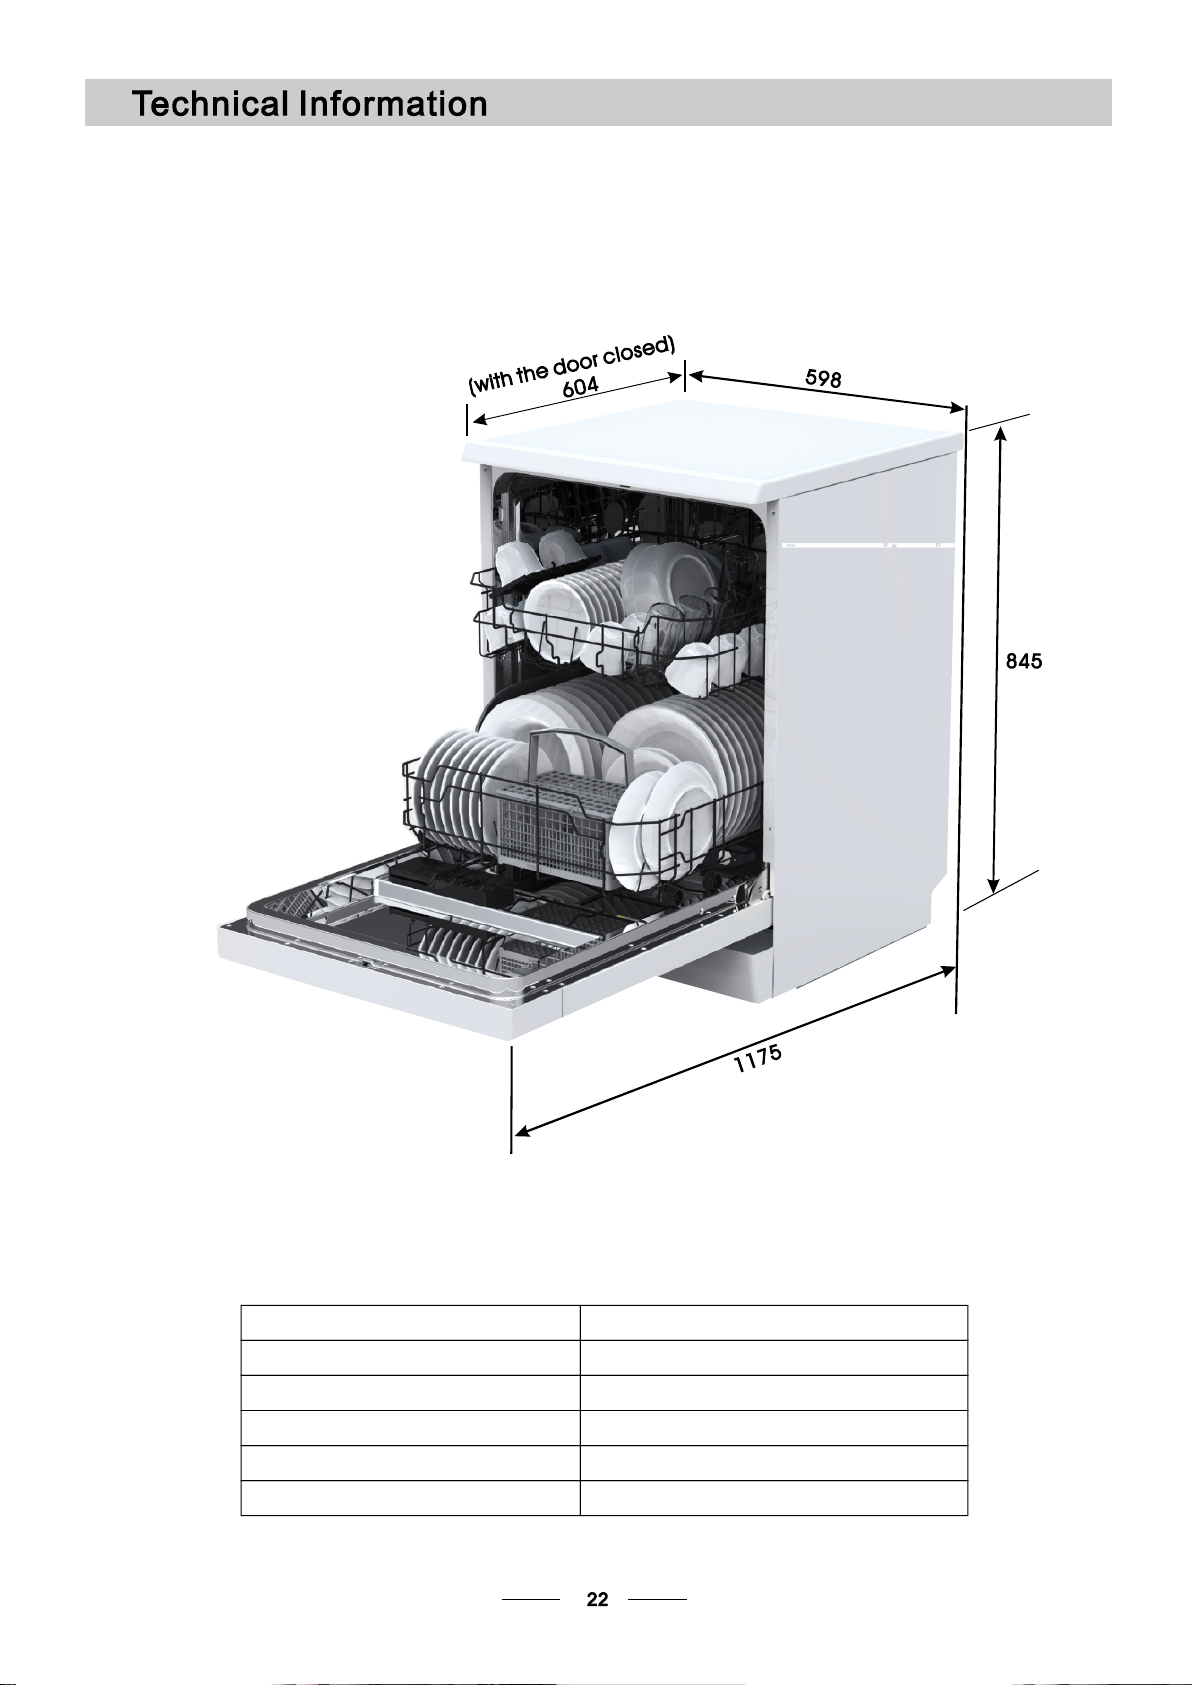
Height : 845mm
Width : 598 mm
Depth : 604mm(
with the door closed)
Water pressure: 0.04-1.0MPa
Power supply: see rating label
Capacity: 12 place settings
Page 25
Page 26
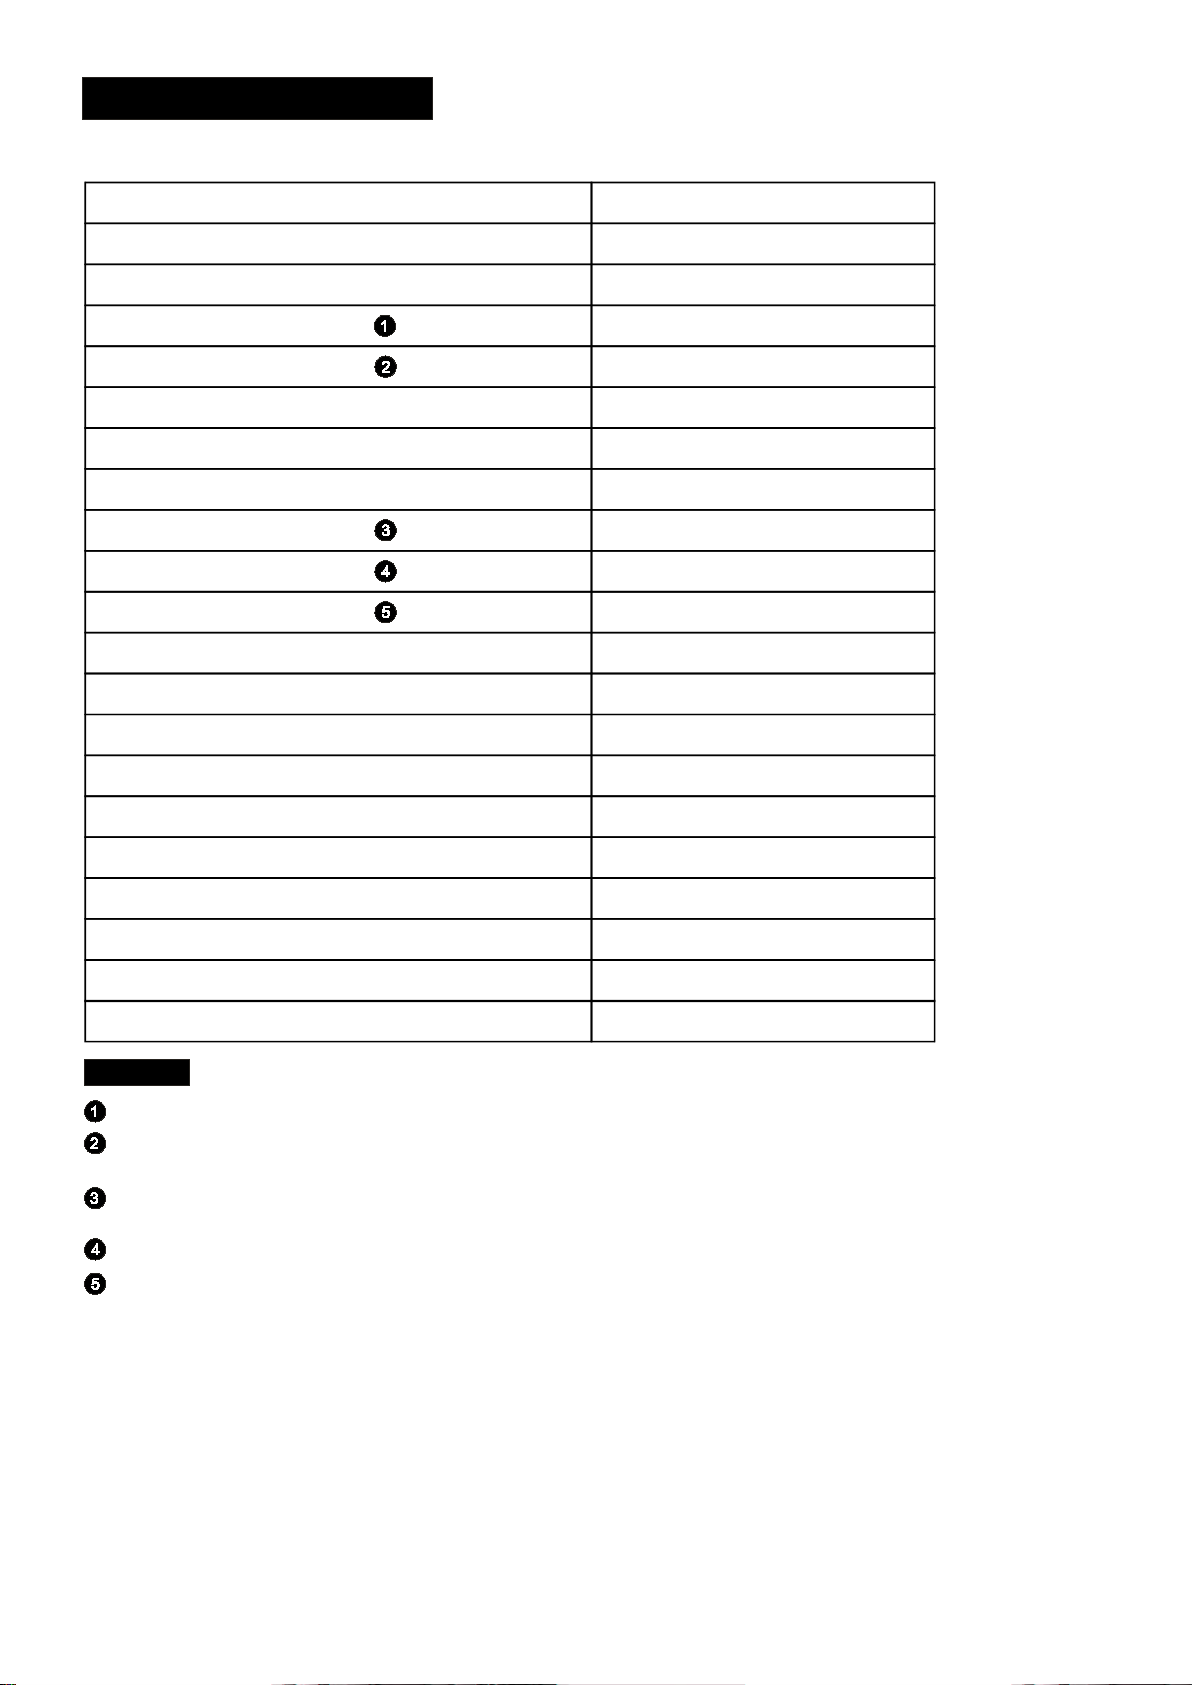
Technical Data Sheet
Sheet o f househo ld dis hwa sher a cco rdin g to EU D irec tive 1059 /20 10:
Ma nuf acturer
Type / Descriptio n
Stand ard place setti ngs
Energ y eff ici ency c las s
Annua l energy co nsum ption
Energ y consump tion of the s tandard c lean ing cycle
Power c onsumption of off-mode
Power c onsumption of left -on mode
Annua l water consump tio n
Dryin g eff ici ency c las s
Stand ard cleaning cycle
Progr am durati on of the sta ndar d cleaning cycle
Noise l evel
Mo unt ing
Could b e build-i n
TEKA
LP8 700 VR0 2
12
A+
273 kWh
0.96 kW h
0.45 W
0.49 W
3220 li tre
A
EC O 45℃
190 min
49dB( A) re 1 pW
Free st anding
Yes
Heigh t
Width
Depth ( with conn ectors)
Power c onsumption
Rated v oltage / fr eque ncy
Wat er pre ssure (fl ow pr essu re) 0.4-1 0 bar = 0.04- 1 Mpa
NOTE:
A + + + (highe st efficienc y) to D (lowe st efficiency)
Energ y consump tion 273 kWh per yea r, base d on 28 0 standar d clea ning cycl es using cold water fi ll and
the con sum ptio n of the low power modes. Actua l energy co nsumption will dep end on h ow th e applian ce is us ed.
Wat er consumptio n 32 20 litre pe r yea r, based on 280 stan dard clea ning cycl es. Actual water consumpt ion
will de pend on how the app lia nce is used.
A (highe st efficienc y) to G (lowe st efficienc y)
This pr ogram is su itable fo r clea nin g soil ed no rmal ly soiled t ablewar e and that it is the
mo st effic ient prog ramme in te rms of its combined en ergy and wa ter co nsu mpti on fo r
that ty pe of tableware .
The dev ice meets the European sta ndards an d the direc tives in th e current versi on at de liv ery:
- LVD 201 4/3 5 /EU
- EMC20 1 4/3 0/EU
- ErP 2009/125/EC
“ ”
“ ”
84.5 cm
59.8 cm
60.4 cm
1760-2100 W
AC 220 -240 V/ 50 Hz
The abo ve val ues h ave been measur ed in accor dance wit h standards und er sp ecified opera ting cond itions.
Resul ts may vary g reat ly accord ing to quantity and pollution o f the dishe s, water ha rdness,
am oun t of deterg ent, etc.
The man ual is based on the Euro pean U nio n's st and ards a nd rul es.
Page 27
Page 28

www.teka.com
Asped mos eriatius sit atet hicil et velit
 Loading...