

Page 1

D00933700A
Double Auto Reverse Cassette Deck
OWNER’S MANUAL
MANUEL DU PROPRIÉTAIRE
MANUAL DEL USUARIO
BEDIENUNGSANLEITUNG
MANUALE DI ISTRUZIONI
GEBRUIKSAANWIJZING
Z
W
-
865R
ENGLISH FRANÇAIS ESPAÑOL DEUTSCH
ITALIANO NEDERLANDS
Page 2

2
CAUTION: TO REDUCE TH
E RISK OF ELECTRIC SHOCK, DO NOT REMOVE COVER (OR
BACK). NO USER-SERVICEABLE PARTS INSIDE. REFER
SERVICING TO QUALIFIED SERVICE PERSONNEL.
The lightning flash with arrowhead symbol, within
an equilateral triangle, is intended to alert the user
to the presence of uninsulated “dangerous voltage”
within the product’s enclosure that may be of
sufficient magnitude to constitute a risk of electric
shock to persons.
The exclamation point within an equilateral triangle
is intended to alert the user to the presence of
important operating and maintenance (servicing)
instructions in the literature accompanying the
appliance.
IMPORTANT SAFETY INSTRUCTIONS
CAUTION
• Read all of these Instructions.
• Save these Instructions for later use.
• Follow all Warnings and Instructions marked on the audio
equipment.
1) Read Instructions — All the safety and operating
instructions should be read before the product is operated.
2) Retain Instructions — The safety and operating instructions
should be retained for future reference.
3) Heed Warnings — All warnings on the product and in the
operating instructions should be adhered to.
4) Follow Instructions — All operating and use instructions
should be followed.
5) Cleaning — Unplug this product from the wall outlet before
cleaning. Do not use liquid cleaners or aerosol cleaners. Use a
damp cloth for cleaning.
6) Attachments — Do not use attachments not recommended
by the product manufacturer as they may cause hazards.
7) Water and Moisture — Do not use this product near water
— for example, near a bath tub, wash bowl, kitchen sink, or
laundry tub; in a wet basement; or near a swimming pool; and
the like.
8) Accessories — Do not place this product on an unstable cart,
stand, tripod, bracket, or table. The product may fall, causing
serious injury to a child or adult, and serious damage to the
product. Use only with a cart, stand, tripod, bracket, or table
recommended by the manufacturer, or sold with the product.
Any mounting of the product should follow the manufacturer’s
instructions, and should use a mounting accessory
recommended by the manufacturer.
9) A product and cart combination should be
moved with care. Quick stops, excessive force, and
uneven surfaces may cause the product and cart
combination to overturn.
10) Ventilation — Slots and openings in the cabinet are
provided for ventilation and to ensure reliable operation of the
product and to protect it from overheating, and these openings
must not be blocked or covered. The openings should never be
blocked by placing the product on a bed, sofa, rug, or other
similar surface. This product should not be placed in a built-in
installation such as a bookcase or rack unless proper ventilation
is provided or the manufacturer’s instructions have been adhered
to.
11) Power Sources — This product should be operated only
from the type of power source indicated on the marking label. If
you are not sure of the type of power supply to your home,
consult your product dealer or local power company. For
products intended to operate from battery power, or other
sources, refer to the operating instructions.
12) Grounding or Polarization — This product may be
equipped with a polarized alternating-current line plug (a plug
having one blade wider than the other). This plug will fit into the
power outlet only one way. This is a safety feature. If you are
unable to insert the plug fully into the outlet, try reversing the
plug. If the plug should still fail to fit, contact your electrician to
replace your obsolete outlet. Do not defeat the safety purpose of
the polarized plug.
13) Power-Cord Protection — Power-supply cords should be
routed so that they are not likely to be walked on or pinched by
items placed upon or against them, paying particular attention
to cords at plugs, convenience receptacles, and the point where
they exit from the product.
14) Outdoor Antenna Grounding — If an outside antenna or
cable system is connected to the product, be sure the antenna or
cable system is grounded so as to provide some protection
against voltage surges and built-up static charges. Article 810 of
the National Electrical Code, ANSI/NFPA 70, provides information
with regard to proper grounding of the mast and supporting
structure, grounding of the lead-in wire to an antenna discharge
unit, size of grounding conductors, location of antennadischarge unit, connection to grounding electrodes, and
requirements for the grounding electrode.
Note to CATV system installer:
This reminder is provided to call the CATV system installer’s
attention to Section 820-40 of the NEC which provides
guidelines for proper grounding and, in particular, specifies that
the cable ground shall be connected to the grounding system of
the building, as close to the point of cable entry as practical.
ANTENNA
LEAD IN
WIRE
ANTENNA
DISCHARGE UNIT
(NEC SECTION 810-20)
GROUNDING CONDUCTORS
(NEC SECTION 810-21)
GROUND CLAMPS
POWER SERVICE GROUNDING
ELECTRODE SYSTEM
(NEC ART 250. PART H)
NEC - NATIONAL ELECTRICAL CODE
ELECTRIC
SERVICE
EQUIPMENT
Example of Antenna Grounding
as per National Electrical
Code, ANSI/NFPA 70
GROUND
CLAMP
Page 3

3
ENGLISH
CAUTION
<
DO NOT REMOVE THE EXTERNAL CASES OR CABINETS TO
EXPOSE THE ELECTRONICS. NO USER SERVICEABLE PARTS
ARE WITHIN!
<
IF YOU ARE EXPERIENCING PROBLEMS WITH THIS PRODUCT,
CONTACT TEAC FOR A SERVICE REFERRAL. DO NOT USE THE
PRODUCT UNTIL IT HAS BEEN REPAIRED.
<
Do not expose this apparatus to drips or splashes.
<
Do not place any objects filled with liquids, such as vases, on
the apparatus.
<
Do not install this apparatus in a confined space such as a
book case or similar unit.
<
The apparatus draws nominal non-operating power from the
AC outlet with its POWER switch in the off position.
<
The apparatus should be located close enough to the AC
outlet so that you can easily grasp the power cord plug at
any time.
<
An apparatus with Class !construction shall be connected to
an AC outlet with a protective grounding connection.
WARNING: TO PREVENT FIRE OR SHOCK
HAZARD, DO NOT EXPOSE THIS APPLIANCE
TO RAIN OR MOISTURE.
This equipment has been tested and found to comply with the
limits for a Class B digital device, pursuant to Part 15 of the
FCC Rules. These limits are designed to provide reasonable
protection against harmful interference in a residential
installation. This equipment generates, uses, and can radiate
radio frequency energy and, if not installed and used in
accordance with the instructions, may cause harmful
interference to radio communications. However, there is no
guarantee that interference will not occur in a particular
installation. If this equipment does cause harmful interference
to radio or television reception, which can be determined by
turning the equipment off and on, the user is encouraged to
try to correct the interference by one or more of the following
measures:
• Reorient or relocate the equipment and/or the receiving
antenna.
• Increase the separation between the equipment and
receiver.
• Connect the equipment into an outlet on a circuit different
from that to which the receiver is connected.
• Consult the dealer or an experienced radio/TV technician
for help.
CAUTION
Changes or modifications to this equipments not expressly
approved by TEAC CORPORATION for compliance will void the
user’s warranty.
For U.S.A.
15) Lightning — For added protection for this product during a
lightning storm, or when it is left unattended and unused for
long periods of time, unplug it from the wall outlet and
disconnect the antenna or cable system. This will prevent
damage to the product due to lightning and power-line surges.
16) Power Lines — An outside antenna system should not be
located in the vicinity of overhead power lines or other electric
light or power circuits, or where it can fall into such power lines
or circuits. When installing an outside antenna system, extreme
care should be taken to keep from touching such power lines or
circuits as contact with them might be fatal.
17) Overloading — Do not overload wall outlets, extension
cords, or integral convenience receptacles as this can result in
risk of fire or electric shock.
18) Object and Liquid Entry — Never push objects of any kind
into this product through openings as they may touch dangerous
voltage points or short-out parts that could result in a fire or
electric shock. Never spill liquid of any kind on the product.
19) Servicing — Do not attempt to service this product yourself
as opening or removing covers may expose you to dangerous
voltage or other hazards. Refer all servicing to qualified service
personnel.
20) Damage Requiring Service — Unplug this product from
the wall outlet and refer servicing to qualified service personnel
under the following conditions:
a ) when the power-supply cord or plug is damaged.
b ) if liquid has been spilled, or objects have fallen into the
product.
c ) if the product has been exposed to rain or water.
d ) if the product does not operate normally by following the
operating instructions. Adjust only those controls that are
covered by the operating instructions as an improper adjustment
of other controls may result in damage and will often require
extensive work by a qualified technician to restore the product to
its normal operation.
e ) if the product has been dropped or damaged in any way.
f ) when the product exhibits a distinct change in performance _
this indicates a need for service.
21) Replacement Parts — When replacement parts are
required, be sure the service technician has used replacement
parts specified by the manufacturer or have the same
characteristics as the original part. Unauthorized substitutions
may result in fire, electric shock, or other hazards.
22) Safety Check — Upon completion of any service or repairs
to this product, ask the service technician to perform safety
checks to determine that the product is in proper operating
condition.
23) Wall or Ceiling Mounting — The product should be
mounted to a wall or ceiling only as recommended by the
manufacturer.
24) Heat — The product should be situated away from heat
sources such as radiators, heat registers, stoves, or other
products (including amplifiers) that produce heat.
Page 4

4
Table of Contents
Thank you for choosing TEAC. Read this manual carefully
to get the best performance from this unit.
Before Use
Read this before operation
< As the unit may become warm during operation, always leave
sufficient space around the unit for ventilation.
< The voltage supplied to the unit should match the voltage as
printed on the rear panel. If you are in any doubt regarding
this matter, consult an electrician.
<
Choose the installation location of your unit carefully. Avoid
placing it in direct sunlight or close to a source of heat. Avoid
locations subject to vibrations and excessive dust, heat, cold
or moisture.
<
Do not place the unit on any other electronic components.
<
Do not open the cabinet as this might result in damage to the
circuitry or electrical shock. If a foreign object should fall into
the unit, contact your dealer or service company as soon as
possible.
<
When removing the power plug from a wall outlet, always
pull directly on the plug. Do not pull on the line cord.
< Do not attempt to clean the unit with chemical solvents as
this might damage the finish. Use a clean, dry, lint-free cloth.
< Keep this manual in a safe place for future reference.
Before Use . . . . . . . . . . . . . . . . . . . . . . . . . . . . . . . . . . . . . . . . 4
Handling Cassette Tapes. . . . . . . . . . . . . . . . . . . . . . . . . . . . . . 5
Connections . . . . . . . . . . . . . . . . . . . . . . . . . . . . . . . . . . . . . . . 6
Using the Remote Control Unit . . . . . . . . . . . . . . . . . . . . . . . . . 7
Identifying the Parts . . . . . . . . . . . . . . . . . . . . . . . . . . . . . . . . . 8
Display . . . . . . . . . . . . . . . . . . . . . . . . . . . . . . . . . . . . . . . . . . 10
Playback (either TAPE I or TAPE II) . . . . . . . . . . . . . . . . . . . . . . 11
Continuous Playback. . . . . . . . . . . . . . . . . . . . . . . . . . . . . . . . 13
Blank Scan . . . . . . . . . . . . . . . . . . . . . . . . . . . . . . . . . . . . . . . 13
Song Search . . . . . . . . . . . . . . . . . . . . . . . . . . . . . . . . . . . . . . 14
Intro Check. . . . . . . . . . . . . . . . . . . . . . . . . . . . . . . . . . . . . . . 15
Recording (either TAPE I or TAPE II) . . . . . . . . . . . . . . . . . . . . . 16
Mic Mixing Recording . . . . . . . . . . . . . . . . . . . . . . . . . . . . . . . 18
Continuous Recording . . . . . . . . . . . . . . . . . . . . . . . . . . . . . . 19
Dubbing (from TAPE I to TAPE II). . . . . . . . . . . . . . . . . . . . . . . 20
Parallel Recording . . . . . . . . . . . . . . . . . . . . . . . . . . . . . . . . . . 20
Editing during Dubbing (only at normal speed) . . . . . . . . . . . . 21
Synchro Reverse Dubbing (from TAPE I to TAPE II) . . . . . . . . . . 22
Timer-Controlled Playback and Recording . . . . . . . . . . . . . . . . 24
Troubleshooting . . . . . . . . . . . . . . . . . . . . . . . . . . . . . . . . . . . 25
Maintenance. . . . . . . . . . . . . . . . . . . . . . . . . . . . . . . . . . . . . . 26
Specifications . . . . . . . . . . . . . . . . . . . . . . . . . . . . . . . . . . . . . 27
Page 5

ENGLISH
5
Handling Cassette Tapes
Caution
< Do not open the cassette or pull the tape out of the cassette.
<
Do not touch the tape surface.
<
Do not use or store the tape in a humid or dusty place.
<
Keep the tape away from any magnetic sources, such as
speakers or TVs, otherwise noise may be produced during
playback or important recordings may be erased.
Cassette tapes that you should not use
Poor performance, errors, or malfunctions may result if you
use any of the tapes described below. Some of these tapes
may also cause tape clog problems that can damage the tape
transport mechanism.
Cassettes that are imperfectly shaped
Do not use a deformed cassette or one that has unstable tape
movement or makes a strange sound during fast-forward or
rewind.
Long play tapes
Do not use C-120 or longer tapes. These tapes are very thin
and can easily stretch or get tangled in the tape transport
mechanism.
Endless tapes
Do not use these tapes because they can easily get tangled in
the tape transport mechanism.
Automatic tape type detection function
This cassette deck can detect what type of tape is being used
based on the detection holes in the cassette shell. Be sure to
use cassettes with detection holes.
<
With this cassette deck, you can play back normal (Type I),
chrome (Type
II ) and metal (Type IV) tapes. For recording, use
normal (Type
I) or chrome (Type II ) tapes.
<
Each deck (TAPE I and TAPE II) is equipped with its own auto
tape type detection function, so you can use different types
of tape at the same time.
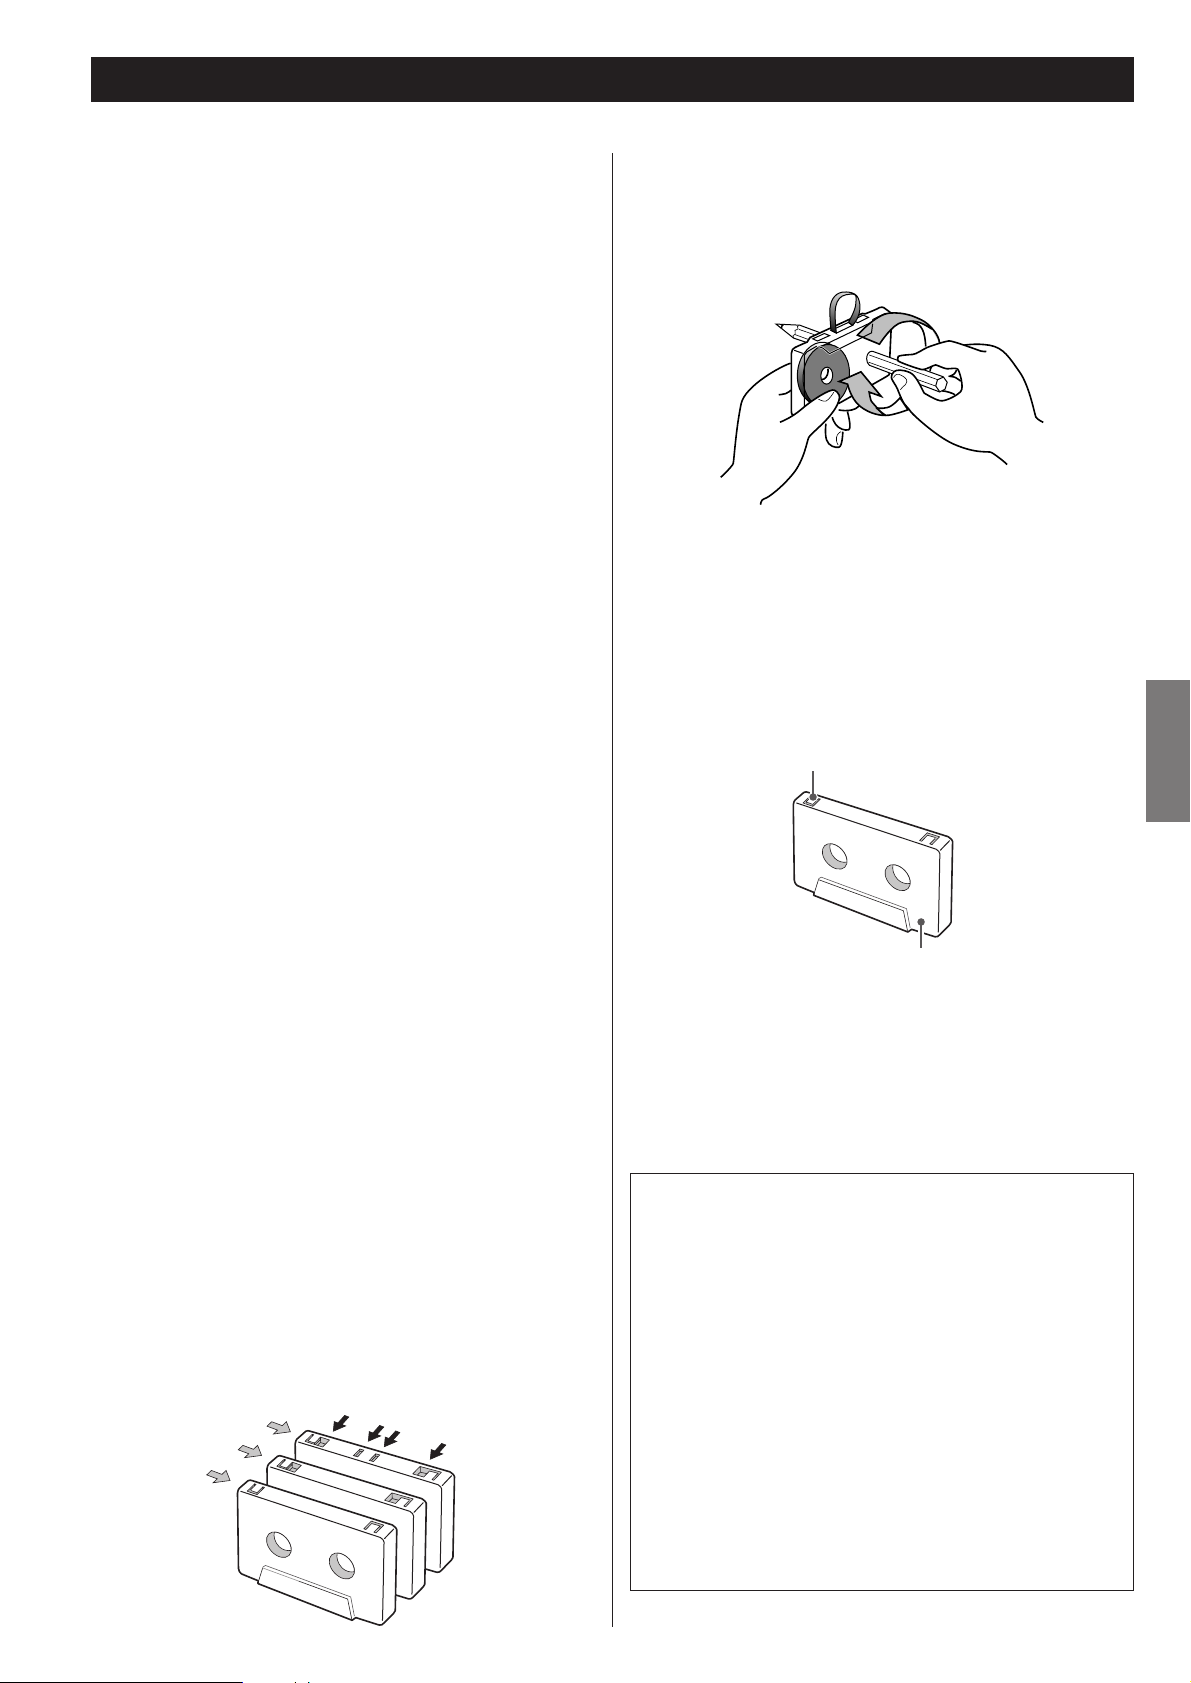
Tape slack
Slack can cause the tape to get tangled in the capstan or
other rotating parts. To prevent this, take up all tape slack
using a pencil or the like inserted into the reel hole.
Accidental erasure prevention tabs
Tabs on top of the cassette shell allow you to prevent
important recordings from being erased by mistake. There are
two tabs on each cassette shell: one for side “A” and the
other for side “B”.
Once these tabs have been removed using a screwdriver or
the like, there is absolutely no chance of the recording
function being activated.
To record on a cassette whose tab has been broken off, stick
a piece of adhesive tape over the hole. Be careful not to block
the tape type detection holes.
Dolby NR
Dolby NR is designed to reduce tape hiss, a noise introduced
during the recording and playback processes. This cassette
deck is equipped with Dolby B-type Noise Reduction.
The Dolby NR system affects both recording and playback
quality. In playback, be sure to set the DOLBY NR switch to
the same position used when the recording was made.
Manufactured under license from Dolby Laboratories.
HX Pro headroom extension originated by Bang and Olufsen.
Dolby, HX Pro, and the double-D symbol are trademarks of
Dolby Laboratories.
Accidental erasure prevention
tab for side “A”
Side “A”
CrO
Normal
Metal
2
(
Type
(
Type
I
)
(
Type IV
II
)
Automatic tape type detection holes
)
Page 6

6
Connections
Precautions
<
Plug the power cord into an AC outlet only after having made all other connections.
<
Read the instructions of each component you intend to use with this unit.
Voltage Conversion
(General export models only)
Be sure to remove the power cord from the AC outlet
before repositioning the voltage converter switch.
1. Locate the voltage selector on the rear panel.
2.Using a flat-bladed screwdriver, set to the
appropriate 230V or 120V position according to your
area.
IN NORTH AMERICA USE ONLY ON 120 V SUPPLY.
Amplifier
LLRR
PLAYREC
TAPE
BA
Page 7

ENGLISH
7
LINE IN and LINE OUT jacks
Use the supplied RCA cables to make connections between
this unit and your amplifier. Make sure to connect:
White plug to White jack (L: left channel)
Red plug to Red jack (R: right channel)
< Plugs must be firmly inserted into the corresponding jacks.
Do not bundle the RCA cables together with the power cord
and speaker cables. Doing so will degrade sound quality or
generate noise.
AC power cord
Plug this AC power cord into an AC wall socket.
<
Be sure to connect the power cord to an AC outlet which
supplies the correct voltage.
< Hold the power plug when plugging or unplugging the
power cord. Never pull or yank on the power cord.
< Unplug the power cord when you are not going to use the
unit for some time.
B
A
Using the Remote Control Unit
Cautions when using the remote control unit
<
Point the remote control unit at the remote sensor of the
cassette deck and operate the remote control unit at a
distance of no more than 5 meters. Do not place objects
between the remote control unit and remote sensor.
<
Direct sunlight or very bright light will reduce the sensitivity of
the remote sensor. If this is the case, use the control buttons
on the cassette deck instead of the remote buttons.
<
It is possible that other infrared-ray-sensitive equipment
nearby may malfunction when you operate the remote
control.
Loading batteries into the remote control unit
Remove the lid of the battery compartment, load two “AA”
sized batteries in the indicated directions, and then replace
the lid. When inserting batteries, be sure to observe proper
polarity (+ and –).
If you have to put the remote control unit quite close to the
remote sensor or if any remote buttons do not work, then
the batteries are no longer fit for use and must be
replaced.
Be sure to always replace both batteries at once.
Important Cautions for Handling Batteries
Improper battery use can result in leakage or rupture. Observe
the following instructions:
< Load the batteries in the correct direction as indicated in the
battery compartment.
< Do not mix old and new batteries, or mix different types or
brands of battery.
< Do not heat, disassemble, or throw batteries into fire or
water.
< Do not store or carry batteries together with other small metal
objects. Doing so can cause battery shorting, leakage or
rupture.
<
Do not try to recharge dry batteries.
<
When the cassette deck is not going to be used for a long
time (more than one month), take the batteries out of the
battery compartment.
<
If leakage into the battery compartment is observed, wipe up
any liquid inside the compartment and load new batteries.
Page 8

8
Identifying the Parts
O
Q
RSTO PP
A
C
B
D
E NF I J K L
MGGH
G
H
M
G
P
L
J
I
P
Page 9

ENGLISH
9
In this manual we only refer to the buttons on the cassette deck
itself. However, their remote counterparts can be used in the
same way.
Power switch
This switch toggles the unit on/off.
Reverse mode switch (REV MODE)
This switch is used to switch between reverse modes.
TIMER switch
This switch is provided for use with a commercially available
audio timer, to allow timer controlled recording or playback.
Normally, leave this switch to the OFF position.
DOLBY NR switch
This switch toggles the Dolby Noise Reduction system on/off.
In playback you need to set this switch to the same position
as when the recording was made.
TAPE I compartment
Remote sensor
This receives remote commands. When using the remote
control unit, point it at this sensor.
Counter clear buttons (CLEAR I and CLEAR II)
Pressing these buttons reset the tape counter readings for
TAPE I and TAPE II, respectively.
INTRO CHECK button
Pressing this button allows you to identify recorded segments
by listening to the first 15 seconds of each segment.
Synchro reverse button (SYNC REV)
Pressing this button activates the synchro reverse dubbing
function.
BLANK SCAN button
This button toggles Blank Scan on/off.
Display
This shows tape counters, level meters, etc.
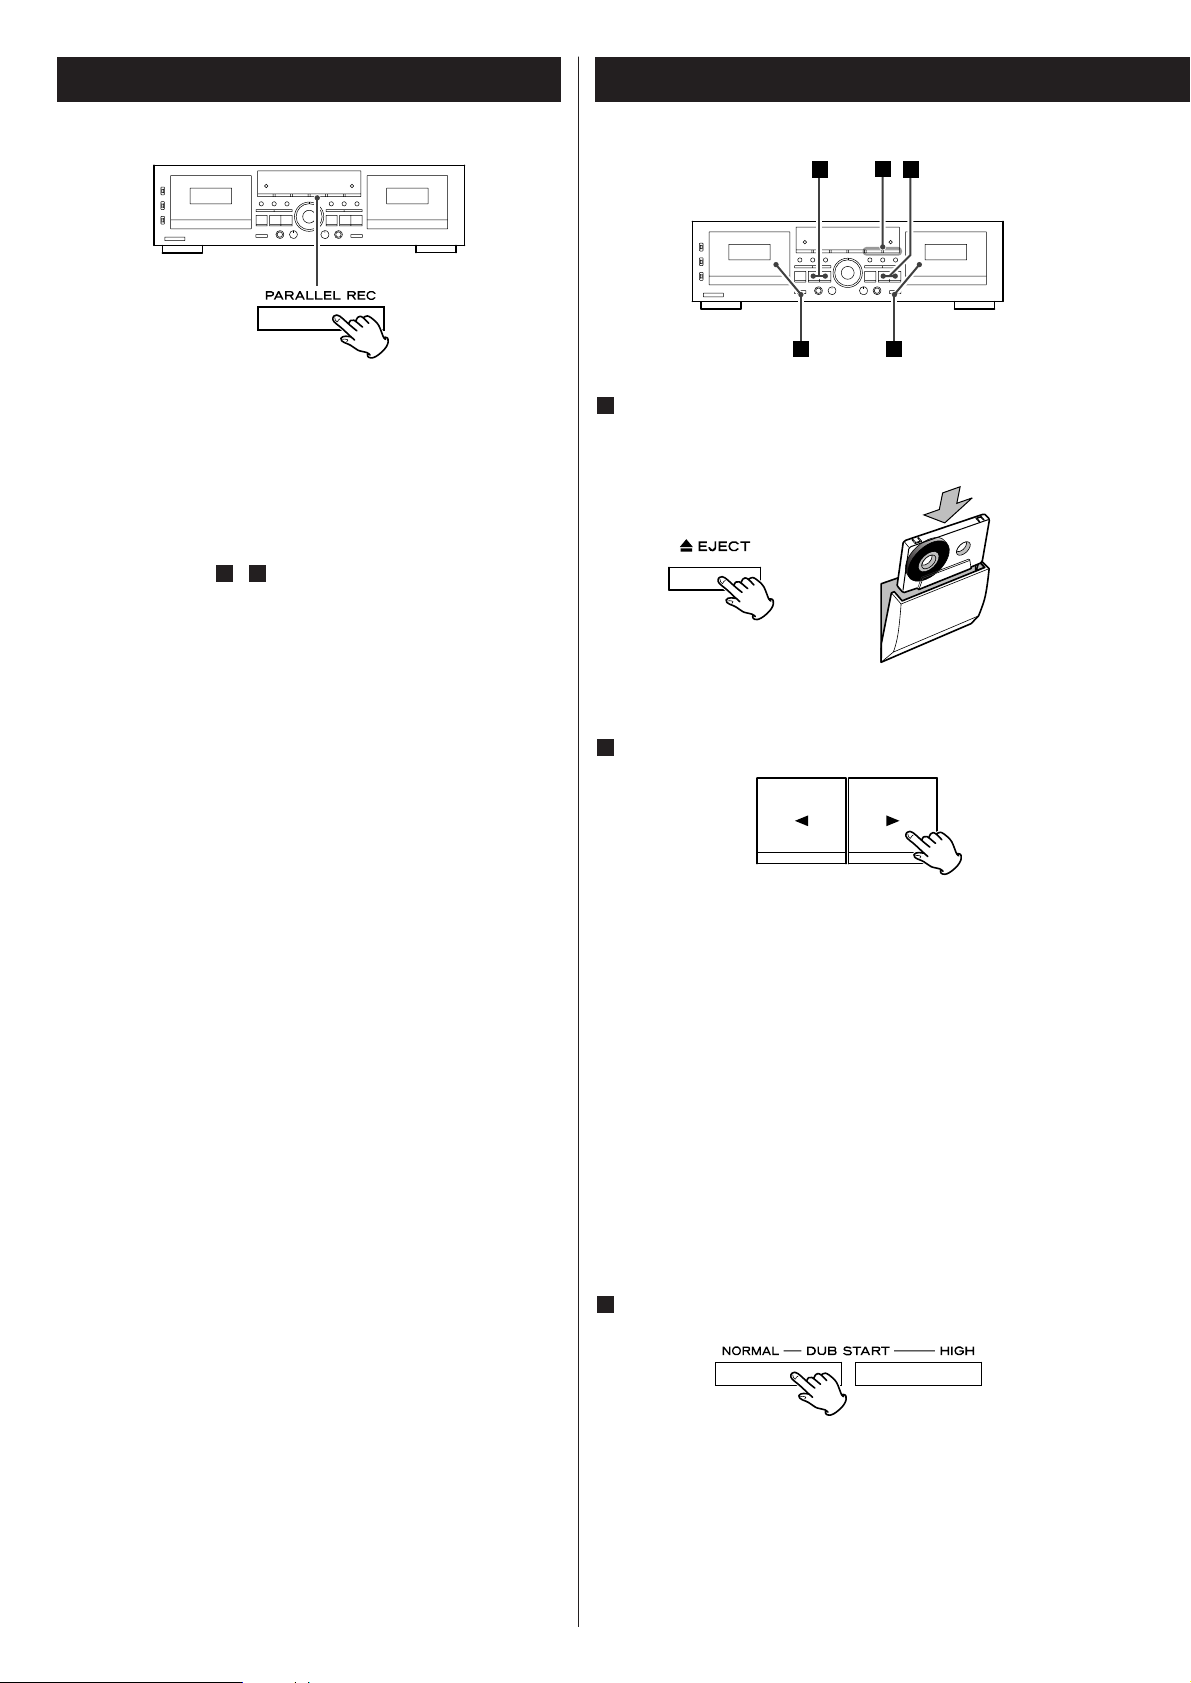
Parallel record button (PARALLEL REC)
This button lets you simultaneously record on both decks.
Dubbing start button (DUB START)
This button is used when copying the contents of a tape from
TAPE I to TAPE II, either at normal or high speed.
On the remote control unit a pair of buttons is provided for
each speed. You need to press both buttons at the same
time.
M
L
K
J
I
H
G
F
E
D
C
B
The equipment draws nominal non-operating power from
the AC outlet with its POWER switch in the OFF position.
A
TAPE II compartment
EJECT buttons
Pressing these buttons opens the TAPE I and TAPE II
compartments.
Tape transport control buttons
RECORD
Pressing this button shifts the corresponding deck to recordpause mode.
When you use the remote control unit, you need to press a
pair of buttons at the same time to shift either deck to recordpause mode.
PAUSE
Pressing this button temporarily stops playback or recording.
Recording mute (REC MUTE)
This button is for creating the 4-second blank space needed
for proper operation of the Computomatic Program Search
(CPS) function.
m
/,
Fast-forward/Rewind
H
Stop of playback/record
h
/ y
Reverse side play/Forward side play
Headphones jack (PHONES)
Plug your headphones into this jack.
PITCH CONTROL
This control is used to vary the playback speed.
REC LEVEL control
This control is used to adjust the recording level.
MIC jack and level control
Insert your microphone into this jack and use the knob to
adjust the level of mic input.
<
The MIC jack is mono. You cannot use a stereo microphone
with this cassette deck.
T
S
R
Q
P
O
N
Page 10

10
Peak level meter
This shows recording and playback levels.
SYNC REV
This indicator lights when the synchro reverse dubbing
function is switched on.
PARALLEL
This indicator lights to indicate parallel recording is taking
place.
BLANK SCAN
This indicator lights to indicate the corresponding function is
switched on.
Playback/recording direction indicator of TAPE I deck
Pause indicator
This indicator lights when the TAPE I deck is temporarily
stopped.
Tape counter of TAPE I deck
The tape counter indicates the relative position of the tape.
You can reset the counter to zero whenever you want.
During a CPS function, the tape counter shows “CP” and
your specified number of songs to skip ahead or back.
Record indicator
This indicator lights when the TAPE I deck is in record mode.
Play indicator
This indicator lights when the TAPE I deck is in play mode.
Dubbing indicator
“NORMAL DUB” lights during normal speed dubbing, and
“HIGH DUB” lights during high speed dubbing.
j
i
h
g
f
e
d
c
b
a
SYNC REV BLANK SCAN
PARALLEL
HIGH DUB
NORM DUB
REC
PLAY
REC
PLAY
g
i
j
k
m
e ohf n
l
a b dc
Display
Play indicator
This indicator lights when the TAPE II deck is in play mode.
Record indicator
This indicator lights when the TAPE II deck is in record mode.
Tape counter of TAPE II deck
The tape counter indicates the relative position of the tape.
You can reset the counter to zero whenever you want.
During CPS operation, the tape counter shows “CP” and the
number of songs you have specified to skip ahead or back.
Pause indicator
This indicator lights when the TAPE II deck is temporarily
stopped.
Playback/recording direction indicator of TAPE II deck
o
n
m
l
k
Page 11

Select a reverse mode setting using the REV MODE
switch.
You have a choice of three settings:
u
: One way mode
Set the switch to this position to play back only one side.
j
: Two way mode
Set the switch to this position to play back both sides of
the tape in one session. When playback reaches the end of
side “A”, the playback direction is automatically reversed,
and playback continues on side “B”.
p
: Repeat mode
Set the switch to this position and both sides of the tape
are played back as many as 5 times.
Set the DOLBY NR switch.
Set the switch to the ON position when playing back tapes
recorded with Dolby NR.
To play tapes recorded without Dolby NR, set the switch to
the OFF position.
Press the play button (h or y).
y
: Pressing this button starts playback from side “A”.
Playback stops when reaching the end of side “A” if the
reverse mode is set to u
. If the reverse mode is set to
j
, playback continues on side “B”, stopping at the end
of side “B”. If the reverse mode is set to p
, playback
cycles through both tape sides 5 times.
h
: Pressing this button starts playback from side “B”.
Playback stops when reaching the end of side “B” if the
reverse mode is set to either u
or j. If the reverse
mode is set to p
, side “B” is played back, and then
playback cycles through both tape sides 4 times.
5
4
3
ENGLISH
11
Playback (either TAPE I or TAPE II) 1
13
4
2 2
5 5
Switch on the power.
Load a pre-recorded tape into the TAPE I or II deck.
Press the EJECT button (L ) to open the cassette
compartment. Insert the cassette tape with its open edge
facing down, the desired side facing you. Then, close the
cassette compartment by pushing on its front part.
<
This cassette deck can play back Normal (Type I), Chrome
(Type II) and Metal (Type IV) tapes.
For the sake of simplicity, we refer to the tape side facing you
as Side “A” and to the tape side facing away as Side “B”.
When you insert a cassette with Sides “A” and “B” reversed,
Side “A” should read Side “B” and Side “B” should read Side
“A”.
2
1
Side “A” facing you
Page 12

12
Playback (either TAPE I or TAPE II) 2
EA A F
B D DBCC
To stop playback
Press the stop button (H).
To stop playback temporarily
Press the PAUSE button.
To resume playback, press the PAUSE button again, or press
the play button (h
or y).
< While playback is paused, pressing the play button whose
direction is opposite to the indicator (h
or y) on the display,
will switch the playback direction. This does not release the
pause function. Press PAUSE or the same play button (h
or
y
) again to start playback on the other side of the tape.
Fast forward/Rewind
Press the m or , button while in stop mode to fast wind
the tape.
To stop the fast winding tape, press the stop button (H).
C
B
A
Tape counter
Press the CLEAR I or II button to reset the tape counter to
0000. You can use this function for easy relocation of any
desired point on the tape.
Pitch control (TAPE I deck only)
This control varies the pitch of the music during playback.
(This control does not work during recording or dubbing.)
Turning the pitch control knob clockwise increases the
playback speed and raises the pitch up to +10%.
Turning the pitch control knob counterclockwise reduces the
playback speed and lowers the pitch by a maximum of –10%.
To listen through headphones
Plug your headphones into the PHONES jack, and put on the
headphones.
Plugging into the PHONES jack does not disable the line
outputs.
CAUTION
There is no level control for the headphones output. Beware
that sudden loud sounds may occur depending on recorded
material. You should avoid prolonged exposure to high
volume sound as this can damage your hearing.
F
E
SYNC REV BLANK SCAN
PARALLEL
HIGH DUB
NORM DUB
REC
PLAY
REC
PLAY
D
Page 13

ENGLISH
13
Continuous Playback
3
41 14
2
Continuous playback can be performed between TAPE I and
TAPE II. When one tape is played back to the end, the other tape
automatically starts playback, in a relay fashion.
Load pre-recorded tapes into the TAPE I and TAPE II
compartments.
Set the Dolby NR switch.
Always set the Dolby NR switch to the same position that was
used for recording.
Set the REV MODE switch to the p (CONT PLAY)
position.
Press the play button (h
or y) of the deck you want to
start first.
You can start continuous playback from either TAPE I or
TAPE II.
Playback cycles through four tape sides as follows:
Playback will automatically stop when both sides of both
tapes have been played back 5 times continuously.
TAPE I Side “A” w
Side “B”
2x
TAPE II Side “B” s Side “A”
4
3
2
1
Blank Scan
The Blank Scan function detects 10 seconds or more of blank
and skips over it.
To activate this function, press the BLANK SCAN button followed
by the desired play button (h
or y).
< The BLANK SCAN indicator lights when this function is
activated.
< To disable this function, press the BLANK SCAN button again.
The indicator turns off.
< Very quiet passages in music are likely to be identified as
blanks. If you are worried about this, switch off Blank Scan.
Page 14

14
Song Search
m,m,
This cassette deck is equipped with the Computomatic
Program Search (CPS) function. This function detects blank
spaces (longer than 4 seconds) between songs and fast-winds
the tape in the forward or backward direction skipping over
the specified number of songs, thus allowing direct access to
the beginning of a desired song. CPS can skip up to 20 songs
ahead of or behind the current song.
When you press the m
or , button during playback, the
tape counter reads “CP 01” and the tape starts running at
high speed in the pressed direction. Each time you press the
same direction button, the displayed number increases by one
integer. The number decreases as you press the opposite
direction button.
<
If you are listening to a song and want to go back to the
previous song, press the locator button opposite to the
playback direction twice. Pressing it just once will take you
back to the beginning of the current song. Each additional
press of the button will take you back one song.
Display of TAPE I
SYNC REV BLANK SCAN
PARALLEL
HIGH DUB
NORM DUB
REC
PLAY
REC
PLAY
The search range varies depending on REV MODE switch
settings.
u: Only one side of tape
j
: Both sides of the tape when searching in the same
direction as playback
OR
Only one side of the tape when searching in the opposite
direction as playback
p
: Both sides followed by the first side
(side “A” w
side “B” w side “A” if CPS is started when
the tape’s forward side (facing you) is playing; or side “B”
w
side “A” w side “B” if CPS is started when the tape’s
reverse side (facing away) is playing)
< The CPS function may not work properly if blanks between
songs are less than 4 seconds long or contain noise.
Page 15

ENGLISH
15
Intro Check
Intro Check plays the first 15 seconds of each song, allowing you
to quickly find the song you are looking for.
Press the INTRO CHECK button during playback or stop. The
tape will fast wind in the same direction as playback. When you
find the desired song, press the INTRO CHECK button again to
start playback.
The Intro Check range varies depending on REV MODE switch
settings:
u
: Checks one side of the tape
j
: Checks both sides of the tape
p
: Checks both sides of tape then double checks the first side
(side “A” w
side “B” w side “A” if Intro Check is started
on the tape’s forward side (facing you); or side “B” w
side
“A” w
side “B” if Intro Check is started on the tape’s
reverse side (facing away)
The tape automatically stops upon completion of the check
operation.
<
Make sure that the TAPE I compartment is empty when
starting Intro Check on TAPE II.
< The tape counter reports how many songs have been intro-
checked so far.
< Activating the Intro Check function during normal playback
will cause it to skip to the next song: playback of the current
song is interrupted midway.
<
The Intro Check function may not work properly if blanks
between songs are less than 4 seconds long or contain noise.
Page 16

16
Recording (either TAPE I or TAPE II)
13
4
2 2
5 5
8 8A A
67 7
Turn on the power.
Load a tape for recording.
Press the EJECT button (L ) to open the cassette
compartment. Insert the cassette tape with its open edge
facing down, side “A” facing you. Then close the cassette
compartment by pushing in the cassette door until it clicks
shut.
<
If the erasure prevention tabs of the loaded cassette tape
have been broken off, stick a piece of adhesive tape over the
hole(s).
<
With this cassette deck you can use Normal (Type I) and
Chrome (Type II) tapes for recording.
Set the REV MODE switch.
u
: Set to this position to record on one side only.
j
or p: Set to either of these positions to record on both
sides.
Set the DOLBY NR switch.
Set the switch to ON to record with Dolby Noise Reduction.
Set to OFF to record without Dolby Noise Reduction.
4
3
2
1
Press the RECORD button.
The deck enters the record-pause mode. “J” and “ ”
will light on the display.
Adjust the recording level.
Start playback of your recording source and set the REC
LEVEL control knob so that the level meter indicates “0 dB” at
peaks.
Set the recording direction.
Recording is made in the direction indicated by the
play/record direction indicator (h
or y). To change this
direction, press the opposite direction play button (h
or y).
When everything is ready, start recording by pressing
the PAUSE button or the play button whose arrow
points in the same direction as the indicator.
<
To record on both tape sides, set the REV MODE switch to
“j
” or “p” and press the forward play button (y). If
you press the reverse play button (h
), recording will be done
only on side “B”.
<
To stop recording, press the stop button (H).
8
Be careful not to press play button whose arrow points in
the same direction as the indicator. Doing so will start
recording.
7
6
REC
5
Side “A” facing you
Page 17

ENGLISH
17
Recording (either TAPE I or TAPE II)
To stop recording temporarily
Press the PAUSE button to stop recording temporarily.
A second press of the button resumes recording.
To Erase Recordings
When you make a recording, the tape is overwritten (previous
recording is erased). To erase a tape without making a new
recording, set the REC LEVEL control to the minimum (
∞)
position and press the RECORD button followed by the play
button (h
or y).
Quick Record Start
Hold down the RECORD button and press the play button (h
or y) corresponding to the direction you want the tape to
run.
Recording Silence
Use this function to create blanks between songs for proper
operation of the Computamatic Program Search (CPS)
function.
Press the REC MUTE button when recording reaches the
desired point. No signal is recorded for about 4 seconds and
then the deck enters the record-pause mode. To resume
recording, press the PAUSE button.
To create a blank of more than 4 seconds long
Hold down the REC MUTE button for the desired length of
time. When you release the button, the deck enters the
record-pause mode.
To create a blank of less than 4 seconds long
Press the PAUSE button within 3 seconds of pressing the REC
MUTE button.
< If you press the REC MUTE button when the deck is in the
record-pause mode, no signal is recorded for about 4
seconds, and then the deck shifts back to the record-pause
mode.
Page 18

18
Mic Mixing Recording
This function allows you to record your voice and another audio
source together on a cassette tape.
<
The mic sound is fed into both the Left and Right channels so
it is located in the center of the stereo image.
< You have the choice of either selecting the audio source you
want on the amplifier connected to the LINE IN jacks of the
deck, or plugging the desired source directly into the deck’s
LINE IN jacks.
<
To prevent feedback (howling), disable the speaker outputs
from the amplifier. Use headphones to monitor recording.
< This cassette deck is not compatible with stereo mics. Always
use a mono mic.
Adjusting Mix Recording Level
To record a mix of voice and another audio source, you need
to adjust the mic input level and then fine tune the overall
recording level.
1. Plug your microphone into the MIC jack on the front panel.
2.Start playing the audio source, switch the deck into the
record-pause mode (by pressing the RECORD button), and
temporarily adjust the REC LEVEL control to a relatively low
level.
3. Speak into the mic and adjust the MIC level control to get the
optimum balance between your voice and the other source.
4.Fine tune the overall recording level using the REC LEVEL
control so that the level meter reads 0 dB at peaks.
5. When everything is ready, start recording as instructed earlier
in this manual.
Audio source
Adjustment of
mic input level
Adjustment of overall
recording level
Page 19

ENGLISH
19
Continuous Recording
2
3
4
1 15AA
This function allows you to make uninterrupted recordings on
both sides of two tapes.
Load cassette tapes for recording into the TAPE I and
TAPE II compartments.
Set the REV MODE switch to the “p” (CONT PLAY)
position.
<
Set the DOLBY NR switch to the ON position if you want to.
Press the TAPE I deck’s RECORD button.
The deck enters the record-pause mode. “J” and “ ”
will light on the display. Now adjust the recording level and
any other settings, as required.
REC
3
2
1
Check the recording direction.
If an indicator is lit which points in the direction opposite to
the one desired, change the direction by pressing the
opposite direction play button (h
or y).
Recording is done in this order:
You can start recording from side “B” of TAPE I. But if you do
so, side “A” of this tape is not recorded: when recording
reaches the end of side “B”, the TAPE II deck starts recording.
< The TAPE II deck always starts recording from side “A”.
Start recording.
Recording starts when you press the PAUSE button or the
play button whose arrow points in the same direction as the
indicator on the TAPE I deck.
When recording is finished on the TAPE I deck, the TAPE II
deck automatically starts recording.
<
The transition from TAPE I to TAPE II takes several seconds.
To stop recording
Press the stop button (H) of the deck which is currently
recording.
A
5
TAPE I Side “A”
x
Side “B”
x
TAPE II Side “A”
x
Side “B”
Be careful not to press play button whose arrow points in
the same direction as the indicator. Doing so will start
recording.
4
Side “A” facing you
Page 20
20
Parallel Recording
3
2 2
1 1
This function allows you to record the same material
simultaneously on both TAPE I and TAPE II.
Load tapes into both decks and press the PARALLEL REC
button to start recording.
< Before starting recording, check and correct the following by
performing steps - on page 16.
Record direction, Reverse mode setting, Dolby NR setting,
Recording level, etc.
When everything is ready, get back into stop mode if the
deck is in another mode.
< During parallel recording, the PARALLEL indicator is lit on the
display.
< During parallel recording, only the following buttons work:
TAEP I deck: Stop (H
)
TAPE II deck: PAUSE, REC MUTE, stop (H
)
<
Pressing the stop button (H) on either deck stops both tapes
at once.
71
Insert a cassette tape for playback into the TAPE I
compartment and a cassette tape for recording into the
TAPE II compartment.
Set the tape transport direction on both decks.
If the play/record direction indicator (h or y) on the display
points in the direction opposite to the one desired, press the
PAUSE button followed play button (h
or y) corresponding
to the desired direction.
After changing the tape transport direction, be sure to press
the stop button (H
) to get out of the pause mode.
<
Be careful not to press play button whose arrow points in the
same direction as the indicator. Doing so will start playback.
< Set the REV MODE switch as required.
<
You don’t need to adjust the recording level or set the Dolby
NR system, as both depend on the pre-recorded source tape.
Press either DUB START button to start dubbing.
For normal speed dubbing, press the NORMAL button.
For high-speed dubbing, press the HIGH button.
High-speed dubbing makes a copy at approximately two
times the normal speed. We recommend normal speed
dubbing for best audio quality.
3
2
1
Dubbing (from TAPE I to TAPE II)
Page 21

ENGLISH
21
< During dubbing, either the NORM DUB or HIGH DUB
indicator lights steadily on the display.
< During normal speed dubbing, only the following buttons
work:
TAPE I deck: STOP (H
)
TAPE II deck: PAUSE, REC MUTE, STOP (H
)
During high-speed dubbing, only the stop button (H
) works.
<
Pressing the stop button (H) on either deck stops both tapes
at once.
< Neither DUB START button works immediately after the tape
is fast-forwarded or rewound to the end. Wait for 5 seconds
or more before pressing the button.
<
During dubbing, the pitch control does not work.
<
Recording level adjustment is not necessary for dubbing, as
the recording level is set to the level of the pre-recorded tape.
Operating the REC LEVEL control, before or after starting
dubbing, has no effect at all.
<
If a nearby television set is switched on during high-speed
dubbing, a high-pitched interference noise may be recorded
on the tape. To avoid this, either perform dubbing at normal
speed, or turn off the television.
Editing during Dubbing (only at normal speed)
You can prevent unwanted songs or unnecessarily long blanks
from being dubbed, or you can create blanks between songs.
1. At the desired point during dubbing, press the PAUSE
button on the TAPE II deck. The TAPE II deck only enters
the pause mode, allowing you to let unwanted songs
go by.
To create a 4-second blank between songs, press the
REC MUTE button on the TAPE II deck. The TAPE II deck
temporarily stops after recording no signal for 4
seconds.
<
The TAPE I deck continues playback when the TAPE II deck is
in pause mode.
2. To resume dubbing, press the PAUSE button on the
TAPE II deck.
Page 22

22
Synchro Reverse Dubbing (from TAPE I to TAPE II)
54
33
1 12
When you use this dubbing function and a shorter tape reaches
the end of side “A”, it momentarily stops until the other tape
reaches the end of side “A”. Then both tapes automatically
switch over to side “B” and recording and playback re-start
simultaneously.
If TAPE I is shorter than TAPE II:
1. When TAPE I reaches the end of side “A”, TAPE I stops and
TAPE II enters the “blank recording” mode.
2. When TAPE II reaches the end, both TAPE I and ll are reversed
simultaneously. TAPE l starts reverse play and TAPE II resumes
recording.
3. When TAPE I reaches the end of side “B”, both TAPE I and ll
stop simultaneously.
If TAPE I is longer than TAPE II:
1. When TAPE II reaches the end of side “A”, TAPE Il enters the
record-pause mode, while TAPE I continues playback.
2. When TAPE I reaches the end, TAPE I starts reverse play and
TAPE II starts recording .
3. When TAPE Il reaches the end of side “B”, both TAPE I and ll
stop simultaneously.
Insert a cassette tape for playback into the TAPE I
compartment and a cassette tape for recording into the
TAPE II compartment.
Set the REV MODE switch to the two-way (j
)
position.
Check the recording direction of both decks.
If the reverse direction indicator (h) lights on the display,
press the PAUSE button followed by the forward play button
(y
). Then, be sure to press the stop button (H) to get out of
the pause mode.
< Be careful not to press play button whose arrow points in the
same direction as the indicator. Doing so will start playback.
< You don’t need to adjust the recording level or set the Dolby
NR system, as both depend on the pre-recorded source tape.
3
2
1
Page 23

ENGLISH
23
Press the SYNC REV button.
The SYNC REV indicator will light on the display.
<
The SYNC REV button does not work if the reverse mode is
set to any positions other than “j
” or if the transport
direction of both decks is not set to forward (y
).
Press either DUB START button to start dubbing.
For normal speed dubbing, press the NORMAL button.
For high-speed dubbing, press the HIGH button.
High-speed dubbing makes a copy at approximately two
times the normal speed. We recommend normal speed
dubbing for best audio quality.
During dubbing, either the NORM DUB or HIGH DUB
indicator lights steadily on the display.
<
During normal speed dubbing, only the following buttons
work:
TAPE I deck: STOP (H)
TAPE II deck: PAUSE, REC MUTE, STOP (H
)
During high-speed dubbing, only the stop button (H
) works.
5
4
< Pressing the stop button (H) on either deck stops both tapes
at once.
< Neither DUB START button works immediately after the tape
is fast-forwarded or rewound to the end. Wait for 5 seconds
or more before pressing the button.
<
During dubbing, the pitch control does not work.
<
Recording level adjustment is not necessary for dubbing, as
the recording level is set to the level of the pre-recorded tape.
Operating the REC LEVEL control, before or after starting
dubbing, has no effect at all.
<
If a nearby television set is switched on during high-speed
dubbing, a high-pitched interference noise may be recorded
on the tape. To avoid this, either perform dubbing at normal
speed, or turn off the television.
Page 24

24
Timer-Controlled Playback and Recording
Connecting a commercially available timer to your audio setup
lets you wake up to your favorite cassette tape, or start
recording at specified times.
Refer to the illustration below, and connect your audio
components.
Audio source
(To make a timer-controlled
recording of a radio program,
set your tuner as required.)
Amplifier
(Set the input/output selectors
and others to the proper
positions.)
AC concent
Timer
At
playback
time
Signal flow
This cassette deck
At
recording
time
Timer-Controlled Playback
1. Connect this unit and stereo system to a commercially
available audio timer.
2. Set the power switch of all components to ON.
3. Load a prerecorded cassette tape in TAPE I or ll.
<
You can also insert tapes into both decks. In this case, TAPE I
starts first.
4. Set the REV MODE switch to the required position.
<
To let both decks play continuously, set the REV MODE switch
to the “p
” (CONT PLAY) position.
5. Set the DOLBY NR switch.
6. Set the TIMER switch to the PLAY position.
7. Set the audio timer to the required start (power on) and stop
(power off) times. When this setting is completed, the power
to all components will be switched off.
When a preset start time is reached, power will be supplied
and playback will start automatically.
<
Playback automatically starts also by simply pressing on the
POWER switch of this deck. When you don’t use the timer,
set the TIMER switch to the OFF position.
<
Playback always starts from side “A”.
Timer-Controlled Recording
(Example: Recording a broadcast program)
1. Connect this unit and stereo system to a commercially
available audio timer.
2. Set the power switch of all components to ON.
3. Load a recordable cassette tape(s) in TAPE I or ll (or both
decks for continuous recording).
4. Set the REV MODE switch to the required position.
<
For continuous recording on both decks, set the REV MODE
switch to the “p
” (CONT PLAY) position.
5. Set the DOLBY NR switch as required.
6. Tune in a broadcasting station to be recorded.
7. Press the RECORD button of the deck to be recorded to set
the deck to the record-pause mode.
8. Adjust the recording level.
9. Set the TIMER switch to the REC position.
10. Set the audio timer to the required start (power on) and stop
(power off) times. When this setting is completed, the power
to all components will be switched off .
When the preset start time is reached, power will be supplied
and recording will start automatically.
<
Recording automatically starts also by simply pressing on the
POWER switch of this deck. When you don’t use the timer for
a while, be sure to set the TIMER switch back to the OFF
position to prevent accidental erasure of your important tape.
<
Recording always starts from side “A”.
Page 25

ENGLISH
25
Troubleshooting
If you think that there is something wrong with this cassette
deck, make the checks listed below before contacting a repair
service. In some cases the problem may lie with another
component. Check all components.
If the problem cannot be solved with any of the following
checks, contact your nearest TEAC authorized service center or
your dealer for help.
Cannot switch on the power.
e
Check the connection to the AC power supply. Check and
make sure the AC source is not a switched outlet and that,
if it is, the switch is turned on. Make sure there is power to
the AC outlet by plugging another item such as a lamp or
fan into the outlet.
No sound
e
Check the connection to the amplifier.
e
Check the amplifier settings.
The remote control does not work.
e
Check that the deck is powered on.
e
If the batteries have run out, replace both batteries.
e
If there are obstacles between the deck and remote control,
remove them. Point the remote control at the remote sensor
of the deck from a distance of less than 5 meters.
e
If the remote sensor of the deck is exposed to direct sunlight
or very bright light, the remote control may not work. If this
is the case, use the control buttons of the deck itself instead.
Noisy playback
e
Keep away from equipment that generates a magnetic field,
such as a TV or microwave oven.
Transport control buttons don’t work.
e
Load a cassette tape if not loaded.
e
If a cassette tape is loaded, reinsert it.
The cassette compartment does not close.
e
The cassette is not properly loaded. Reinsert it.
Poor sound quality
e
Clean the heads.
e
Check that the Dolby NR switch is set to the same position
as when recording was made.
Cannot record.
e
If the erasure prevention tabs on top of the cassette are
broken off, cover the holes using pieces of adhesive tape.
e
Check the connection to the amplifier and to the source
equipment.
e
Set the amplifier input/output selectors correctly.
e
Check the recording level setting.
Playback speed seems somewhat fast or slow.
e
Check the pitch control setting.
Auto reverse does not occur
e
Set the REV MODE switch to “j” or “p”.
e
If the REV MODE switch is set to “j”, start playback from
the tape side facing you (side “A”).
Synchro reverse dubbing is not possible.
e
Set the REV MODE switch to the “j” position.
e
Load cassettes into both decks.
e
Set the tape transport direction to y on both decks.
Continuous play/record is not possible.
e
Set the REV MODE switch to the “p” position.
e
Load cassettes into both decks.
e
To make a continuous recording, start with TAPE I.
This cassette deck operates on a delicate microcomputer
and there may be occasions when the deck does not
function as expected because of external noise or
interference. Problems you encounter on such occasions
may be cured by turning off the power, waiting for 1
minute or more, then turning the power back on.
Page 26
26
Maintenance
If the surface of the deck becomes soiled, wipe it clean with a
dry, soft cloth. To remove stubborn dirt, wipe with a cloth
slightly moistened with a solution of mild detergent and
water, then moisten a cloth with water, wring it well, and rub
over the surface.
Do not allow the deck to remain in contact with rubber or
vinyl products for a long period of time, as these could
damage the surface finish.
Never use volatile cleaners like thinners, benzine or alcohol
because they will damage the surface finish.
CAUTION:
For safety, always unplug the power cord before performing
any maintenance.
Cleaning the heads
If the head section gets dirty, the recording quality will
deteriorate, resulting in degraded playback sound or “drops”
in sound. Also, if the tape transport path gets dirty, the tape
may get entangled in the rotating parts. It is therefore
recommended that the heads, pinch rollers and capstans be
cleaned regularly at intervals of 10-hour use with a cotton
swab moistened with a commercially available, appropriate
cleaning liquid.
NOTE:
Do not make a recording or play back tape when the tape
transport path is wet with cleaning liquid, as this could cause
the tape to jam or clog.
Pinch roller
Capstan
Erase head
Record/playback head
Pinch roller
Capstan
For European customers
Disposal of your old appliance
1. When this crossed-out wheeled bin symbol is
attached to a product it means the product is
covered by the European Directive
2002/96/EC.
2. All electrical and electronic products should be disposed of
separately from the municipal waste stream via designated
collection facilities appointed by the government or the
local authorities.
3. The correct disposal of your old appliance will help prevent
potential negative consequences for the environment and
human health.
4. For more detailed information about disposal of your old
appliance, please contact your city office, waste disposal
service or the shop where you purchased the product.
Page 27

ENGLISH
27
Specifications
Track System. . . . . . . . . . . . . . . . . . . . . . . . . . . . . . . . . 4-track, 2-channel stereo
Heads Construction . . . . . . . . . . . . . . . . . . Record/playback head x 1 (each deck)
Erase head x 1 (each deck)
Tape Speed. . . . . . . . . . . . . . . . . . . . . . . . . . . . . . . . . . . . . . . . . . . . . 4.8 cm/sec
9.5 cm/sec (high-speed dubbing mode)
Pitch Control . . . . . . . . . . . . . . . . . . . . . . . . . . . . . . . . . . . . . . . . . ±10% (±2%)
Fast Winding Time . . . . . . . . . . . . . . . . . . . . . approximately 110 sec (C-60 tape)
Motor. . . . . . . . . . . . . . . . . . . . . . . . . . . . . . . . . . . . . . DC servo motor (capstan)
Wow and Flutter . . . . . . . . . . . . . . . . . . . . . . . . . . . . . . . 0.09% (WRMS) ±0.1%
Frequency Response (Overall)
Metal tape (Type IV, playback only) . . . . . . . . . . . . . . . . . . . . . . 30 Hz-19 kHz
Chrome tape (Type II). . . . . . . . . . . . . . . . . . . . . . . . . . . . . . . . . 30 Hz-18 kHz
Normal tape (Type I). . . . . . . . . . . . . . . . . . . . . . . . . . . . . . . . . . 30 Hz-17 kHz
Signal to Noise Ratio (Overall) . . . . 59 dB (Dolby NR OFF, nominal recording level)
69 dB (Dolby NR ON, CCIR-ARM)
Line Input (RCA jack) . . . . . . . . . . . . . . . . . 100 mV (input impedance 50k ohms)
Mic Input (mono 1/4” Phone jack). . . . . . 0.38 mV (input impedance 200k ohms)
Line Output (RCA jack) . . . . . . . . . . . 0.46 V (load impedance 50k ohms or more)
Headphones Output (stereo 1/4” Phone jack) . . . . . . . . . . . . . . 0.95 mW/8 ohms
Power Requirements
U.S.A./Canada Model . . . . . . . . . . . . . . . . . . . . . . . . . . . . . . 120 V AC, 60 Hz
General Export Model . . . . . . . . . . . . . . . . . . . . . . 120 V/230 V AC, 50-60 Hz
European model . . . . . . . . . . . . . . . . . . . . . . . . . . . . . . . . . . 230 V AC, 50 Hz
Korea model . . . . . . . . . . . . . . . . . . . . . . . . . . . . . . . . . . . . . 220 V AC, 60 Hz
Power Consumption . . . . . . . . . . . . . . . . . . . . . . . . . . . . . . . . . . . . . . . . . . 22 W
Dimensions (including protruding parts) . . . . . . . 435 (W) x 127 (H) x 292 (D) mm
(17 1/8” x 5” x 11 1/2”)
Weight . . . . . . . . . . . . . . . . . . . . . . . . . . . . . . . . . . . . . . . . . 4.0 kg (8 13/16 lbs)
Standard Accessories
Remote control unit (RC-615A) x 1
Remote control battery (“AA”) x 2
User's manual x 1
Warranty card x 1
Stereo RCA cable x 2
• Illustrations in the manual may not be exactly the same as the product.
• Specifications and design are subject to change without notice or obligation.
Page 28

28
Table des matières
Merci d'avoir porté votre choix sur la platine cassette
double de TEAC. Veuillez lire la totalité de ce manuel pour
tirer le meilleur parti de votre appareil.
Avant l’usage
Veuillez d’abord lire ce guide.
< L’appareil peut devenir chaud durant le fonctionnement.
Laissez un espace suffisant tout autour de l’appareil pour
garantir une bonne ventilation.
<
Veuillez à ce que l’alimentation corresponde à la tension
indiquée sur le panneau arrière de l’appareil. Consultez un
électricien si vous avez un doute.
<
Choisissez l’endroit d’installation de l’appareil. Evitez d’utiliser
cet appareil dans la lumière du soleil directe ou près d’une
source de chaleur. Évitez en outre les endroits sujets aux
vibrations et la poussière excessive, le froid ou l’humidité.
<
Ne placez l’appareil sur aucun autre composant électronique.
<
N’ouvrez pas le coffret. Ceci pourrait avoir comme
conséquence les dommages aux circuits ou un choc
électrique. Si un objet étranger entre dans l’appareil,
contactez votre revendeur ou compagnie de services aussitôt
que possible.
<
Lorsque vous débranchez l’appareil de la prise murale, tirez
toujours sur la prise, jamais sur le câble.
< N’essayez pas de nettoyer l’appareil avec des dissolvants
chimiques car ceci pourrait endommager le revêtement.
Employez un chiffon doux non plucheux, propre et sec.
<
Conservez ce manuel afin de pouvoir le consulter
ultérieurement.
ATTENTION
<
N’exposez pas cet appareil au ruissellement ni aux
éclaboussures.
< Ne placez aucun objet contenant du liquide, tel qu’un vase,
sur l’appareil.
< N’installez pas cet appareil dans un espace confiné comme
une bibliothèque ou similaire.
< L’appareil tire un courant de veille nominal de la prise
secteur quand son interrupteur POWER est en position OFF.
< L’appareil doit être placé assez près de la prise de courant
pour que vous puissiez à tout moment attraper facilement
la fiche du cordon d’alimentation.
<
Un appareil de Classe ! doit être branché à une prise de
terre.
Avant l’usage . . . . . . . . . . . . . . . . . . . . . . . . . . . . . . . . . . . . . 28
Précautions de manipulation des bandes cassettes . . . . . . . . . 29
Branchements. . . . . . . . . . . . . . . . . . . . . . . . . . . . . . . . . . . . . 30
Instructions pour l’utilisation de la télécommande . . . . . . . . . . 31
Identification des pièces . . . . . . . . . . . . . . . . . . . . . . . . . . . . . 32
Afficheur . . . . . . . . . . . . . . . . . . . . . . . . . . . . . . . . . . . . . . . . 34
Lecture (TAPE I ou TAPE II) . . . . . . . . . . . . . . . . . . . . . . . . . . . 35
Lecture en continue . . . . . . . . . . . . . . . . . . . . . . . . . . . . . . . . 37
Scan des blancs. . . . . . . . . . . . . . . . . . . . . . . . . . . . . . . . . . . . 37
Localisation d’un morceau . . . . . . . . . . . . . . . . . . . . . . . . . . . 38
Recherche d’un morceau par INTRO CHECK . . . . . . . . . . . . . . 39
Enregistrement (sur TAPE I ou sur TAPE II) . . . . . . . . . . . . . . . . 40
Enregistrement d’un mixage de voix et de musique. . . . . . . . . 42
Enregistrement en continu . . . . . . . . . . . . . . . . . . . . . . . . . . . 43
Enregistrement parallèle . . . . . . . . . . . . . . . . . . . . . . . . . . . . . 44
Copie (de TAPE I à TAPE II) . . . . . . . . . . . . . . . . . . . . . . . . . . . 44
Montage directe durant la copie . . . . . . . . . . . . . . . . . . . . . . . 45
Copie à inversion synchronisée de défilement . . . . . . . . . . . . . 46
Lecture et enregistrement contrôlés par minuterie. . . . . . . . . . 48
Dépannage. . . . . . . . . . . . . . . . . . . . . . . . . . . . . . . . . . . . . . . 49
Entretient . . . . . . . . . . . . . . . . . . . . . . . . . . . . . . . . . . . . . . . . 50
Fiche téchnique. . . . . . . . . . . . . . . . . . . . . . . . . . . . . . . . . . . . 51
Page 29
29
FRANÇAIS
Précautions de manipulation des bandes cassettes
Instructions d’utilization
< Ne pas ouvrir la cassette ni tirer sur la bande pour la sortir de
la cassette.
<
Ne pas toucher la surface de la bande.
<
Ne pas employer ni stocker la bande dans un endroit humide
et poussiéreux.
<
Ranger la bande loin de sources magnétiques telles que hautparleurs, postes TV, etc. Sinon, des bruits seraient introduits
et vous perdriez vos enregistrements importants.
Bandes cassettes pas recommandables
Vous auriez des problèmes avec ce magétocassette ou celui-ci
n’offriez pas la performance prévue si vous utilisez des bandes
telles que décrit ci-dessous. De plus, ces bandes s’emmêlent
facilement, ce qui aurait pour résutlat des dommages
inattendues du mécanisme de transport de la bande.
Cassettes ayant des problème en précision de forme
N’employez pas une cassette déformée qui causent un
défilement instable de la bande ou produit un bruit étrange
pendant le défilement rapide en avant ou en arrière.
Cassettes d’une durée longue
N’utilisez pas des cassettes C-120 ou des cassettes d’une
durée plus longue parce que leur bande est très mince et peut
facilement s’étirer ou devenir enroulée dans le mécanisme de
transport de la bande.
Cassettes sans fin
L’extrême finesse de ces cassettes peut résulter dans des
cassures ou autres problèmes.
Détection automatique du type de bande
Ce magétocassette utilise les trous de détection sur la cassette
pour déterminer le type de la bande chargée.
Soyez donc sûr d’utiliser des cassettes avec des trous de
détection du type de bande.
<
Ce magétocassette est conçu pour la lecture des cassettes
normale (type
I), chrome (type II ) et métal (type IV).
Pour l’enregistrement, utilisez des bandes normale (type
I) et
chrome (type
II ).
<
Les deux platines sont chacune équipées du détecteur du type
de bande, de sorte que vous pouvez utiliser des bandes de
types différents simultanément.
Protection contre un effacement accidentel
Pour protéger une cassette contre l’effacement accidentel,
brisez à l’aide d’un tournevis ou un autre outil similare l’une
des languettes en plastique ou les deux (l’une pour la face A
et l’autre pour la face B de la cassette) sur le dessus de la
cassette. Lorsque cette languette est brisée, il n’est plus
possible d’enregistrer.
Si vous souhaitez par la suite enregistrer sur la cassette dont
les languettes sont brisées, fermez les trous avec du ruban
adhésif. En faisant cela, faites attention à ne pas fermer les
trous de détection du type de bande.
Réducteur de bruit Dolby
Les réducteurs de bruit Dolby sont conçu dans le but de
réduire le souffle (bruit de fond) de la bande. Ce
magétocassette bénéficie du réducteur de bruit Dolby B.
Le réducteur de bruit Dolby a un effet tant sur
l’enregistrement que sur la lecture. A la lecture d’une
cassette, vous vous assurez de régler le commutateur DOLBY
NR sur la même position que quand l’enregistrement a été
réalisé.
Fabriqué sous licence de Dolby Laboratories.
Technique d’extension de la bande passante HX Pro
développée par Bang et Olufsen.
Les termes Dolby et HX Pro, ainsi que le sigle double D sont
des marques commerciales de Dolby Laboratories.
Languette pour la face A
Face A
Relâchement de la bande
Une bande détendue pourrait s’enrouler sur le galet presseur
ou d’autres pièces tournantes. Vérifiez et éliminez tout
relâchement de la bande avec un crayon ou un outil similaire
inséré dans le trou de bobine.
Métal
(
type IV
)
Trous de détection automatique du type de bande
Chrome
(
type
II
)
Normale
(
type
I
)
Page 30

30
Branchements
Précautions
<
Branchez le câble d’alimentation sur une prise secteur seulement après qu’après avoir effectué tous les autres branchements.
<
Consultez le mode d’emploi de chacun des composants consituant votre système audio, et effectuez les branchements en
suivant les instructions.
Amplificateur
LLRR
PLAYREC
TAPE
BA
Conversion de tension
(Modèle d’exportation générale seulement)
Assurez-vous de débrancher l’appareil avant de changer
la position du convertisseur de tension.
1. Trouver le sélecteur de tension sur le panneau arrière.
2. Utilisant un tourne-vis à lame plate, placer en position
230V ou 120V selon votre local.
DANS L’AMÉRIQUE DU NORD: UTILISABLE SUR 120
V D’ALIMENTATION UNIQUEMENT.
Page 31

31
FRANÇAIS
Prises LINE IN et LINE OUT
Utilisez les câbles RCA fournis et etablissez un branchement
entre ce magétocassette et votre amplificateur.
Assurez vous de brancher:
la fiche blanche sur le connecteur blanc (L: canal gauche)
la fiche rouge sur le connecteur rouge (R: canal droit)
Les fiches doivent être insérées fermement dans les
connecteurs correspondants.
<
Ne liez pas les câbles RCA, le câble d’alimentation et les
câbles de haut-parleurs pour les tenir ensemble, ce qui
dégraderait la qualité sonore ou produirait du bruit.
Câble d’alimentation c.a.
Branchez le câble d'alimentation sur une prise secteur.
<
Soyez sûr de brancher le câble d’alimentation sur une prise
murale appropriée en termes de valeur de tension.
< Quand vous branchez et débranchez le câble d’alimentation,
tirez sur la prise, jamais sur le câble.
< Débranchez le câble d’alimentation quand vous n’utilisez
pas l’appareil pendant un temps prolongé.
B
A
Instructions pour l’utilisation de la télécommande
Emploi de la télécommande
<
Dirigez la télécommande directement vers le détecteur
infrarouge du magétocassette et manipulez la télécommande
à une distance inférieure à 5 m. Veillez à ce qu’il n’y ait pas
d’obstacles entre la télécommande et le détecteur infrarouge.
<
La lumière du soleil directe ou une forte éclairage peut
empêcher le détecteur infrarouge de fonctionner comme
prévu. Dans ce cas, utilisez les touches de commande du
magétocassette lui-même à la place de la télécommande.
<
S’il y a d’autres appareils sensibles au rayon infrarouge tout
près, il y aura des occasions où ils fonctionnent mal quand
vous manipulez la télécommande.
Chargement des piles dans la télécommande
Enlevez le couvercle du compartiment à piles, inséréz deux
piles de type AA en respectant la polarité (+ et –), et replacez
le couvercle.
Les piles ne sont plus bonnes et doivent être remplacées si
vous êtes forcé de mettre la télécommande tout près du
détecteur infrarouge ou qu’aucun bouton de la
télécommande ne fonctionne pas. Soyez sûr de remplacer
deux piles à la fois.
Conceils pour la manipulation des piles
Un usage inaproprié des piles pourrait entraîner une fuite de
liquide dans le compartiment à piles ou une rupture.
Respectez les instructions suivantes.
<
Insérez les deux piles dans la direction indiquée à l’intérieur
du compartiment à piles.
<
Ne mélangez pas des piles usagées et des piles neuves ou
différents types de piles.
<
N’approchez pas les piles d’une source de forte chaleur (feu,
radiateur, etc.), ni les démontez pas et ne les jetez au feu ou
dans l’eau.
<
Ne stockez pas ou ne portez pas sur vous les piles ensemble
avec des pièces de monnaie ou d’autres objets métalliques.
Sinon, il y aurait des riques de court-circuit, de fuite de liquide
ou d’explosion!
<
Ne rechargez pas les piles.
<
Retirez les piles si vous n’utilisez pas le magnétocassette
pendant une période prolongée (plus d’un mois).
<
Si vous remarquez une fuite de liquide dans le compartiment
à piles, essuyez-la bien et inséréz les piles neuves.
Page 32

32
Identification des pièces
O
Q
RSTO PP
A
C
B
D
E NF I J K L
MGGH
G
H
M
G
P
L
J
I
P
Dans ce manuel, nous nous référons seulement aux touches de
fonction du magétocassette lui-même, mais il vous est loisible
d’employer les touches correspondantes de télécommande de la
même manière qu’expliqué ci-dessous.
Commutateur secteur
Cette touche permet de mettre le magnétocassette sous ou
hors tension.
Commutateur de modes d’inversion de défilement (REV
MODE)
Ce commuateur permet de commuter entre trois modes
d’inversion de défilement.
Commutateur de minuterie (TIMER)
Ce commutateur doit être régé lors de la lecture ou
l’enregistrement contôlés par minuterie. Utilisez une minuterie
disponible dans la commerce.
Normalement, laissez ce commutateur en position OFF.
C
B
L’appareil tire de la prise secteur une puissance faible mais
non nulle lorsque l’interrupteur POWER est sur la position
OFF.
A
Page 33

33
FRANÇAIS
Commutateur DOLBY NR
Ce commutateur permet de mettre le réducteur de bruit
Dolby en ou hors circuit.
Lors de la lecture, vous devez régler ce commutateur à la
même position que quand vous avez effectué
l’enregistrement.
Compartimet à cassette (TAPE I)
Détecteur infrarouge
C’est un récepteur de signaux infrarouge de télécommande.
Quand vous ultilisez la télécommande, pointez-la vers ici.
Touche de remise à zéro du compteur de bande (CLEAR I
et CLEAR II)
Cette touche permet de remettre à zéro le compteur de
bande de chacune des platines.
Touche INTRO CHECK
Cette touche vous permet d’écouter les premières dizaines de
secondes de chaque morceaux et ainssi de faciliter l’accès à
des morceaux spécifiques.
Touche d’inversion synchronisée de défilement (SYNC
REV)
Cette touche permet de faire une copie à inversion
synchronisée de défilement.
Touche BLANK SCAN
Cette touche permet de mettre le scan des blancs en ou hors
service.
Afficheur
On voit le compteur bande, l’indicateur de niveaux, etc. sur
cet afficheur.
Touche d’enregistrement parallèle (PARALLEL REC)
Cette touche vous permet d’enregistrer des matériaux
sonores identiques sur les deux bandes simultanément.
Touche de copie (DUB START)
Cette touche permet de faire une copie des contenus d’une
bande sur une autre (TAPE I sur TAPE II), à une vitesse
normale ou élevée.
La télécommande comporte une paire de touches pour
chacune des vitesses. Vous devez appuyer sur les deux à la
fois.
Compartiment à cassette (TAPE II)
N
M
L
K
J
I
H
G
F
E
D
Touche EJECT
Cette touche permet d’ouvrir le compartiment à cassette de
l’une ou l’autre platine.
Touches de défilement de la bande
RECORD
A la pression de cette touche, la platine correspondante se
commute en mode d’attente d’enregistrement.
Quand vous utilisez la télécommande, vous devez appuyer
simultanément sur une paire de touches pour commuter l’une
ou l’autre platine en mode d’attente d’enregistrement.
PAUSE
Cette touche permet d’arrêter provisoirement la lecture ou
l’enregistrement.
Enregistrement muet (REC MUTE)
Cette touche permet d’enregistrer un « blanc » de 4 secondes
requis pour la fonction CPS (Computomatic Program Search).
m/,
Rembobinage/Avance rapide
H
Arrêt de lecture ou d’enregistrement
h
/ y
Lecture ou enregistrement du ou sur le côté frontal ou arrière
de la cassette
Prise casque (PHONES)
Branchez votre casque d’écoute sur cette prise.
Molette PITCH CONTROL
Cette molette permet de varier la vitesse de lecture.
Molette REC LEVEL
Cette molette permet de régler le niveau d’enregistrement.
Prise et molette MIC
Introduissez la fiche de votre micro d’enregistrement de la
voix dans cette prise. La molette sert à régler le niveau
d’entrée micro.
<
La prise MIC est mono. Vous n’avez pas de choix d’utiliser un
micro stéréo avec ce magnétocassette.
T
S
R
Q
P
O
Page 34

34
Crête-mètre
Cet indicateur affiche les variations instantanées du niveau de
l’enregistrement ou de la lecture.
SYNC REV
Ce témoin s’allume à l’activation de la fonction de copie à
inversement synchronisée.
PARALLEL
Ce témoin s’allume pour indiquer que l’enregistrement
parallèle est en fonction.
BLANK SCAN
Ce témoin s’allume à l’activation de la fonction de scan des
blancs.
Témoin de lecture ou d’enregistrement en avant ou en
arrière de la platine TAPE I
Témoin de pause
Ce témoin s’allume pour indiquer que la platine TAPE I est en
mode de pause.
Compteur de bande de la platine TAPE I
Ce compteur indique où vous êtes sur la bande en cours de
lecture ou d’enregistrement. Vous pouvez le remettre au zéro
n’importe quand vous voulez.
Quand la fonction CPS est en marche, le compteur de bande
affiche « CP » et le nombre de morceaux à sauter que vous
avez spécifié.
Témoin d’enregistrement
Ce témoin s’allume quand la platine TAPE I est en mode
d’enregistrement.
h
g
f
e
d
c
b
a
SYNC REV BLANK SCAN
PARALLEL
HIGH DUB
NORM DUB
REC
PLAY
REC
PLAY
g
i
j
k
m
e ohf n
l
a b dc
Afficheur
Témoin de lecture
Ce témoin s’allume quand la platine TAPE I est en mode de
lecture.
Témoin de copie
Le témoin NORMAL DUB s’allume pour indiquer que la copie
s’exécute à vitesse normale. Le témoin HIGH DUB s’allume
pour indiquer que la copie s’exécute à vitesse élevée.
Témoin de lecture
Ce témoin s’allume quand la platine TAPE II est en mode de
lecture.
Témoin d’enregistrement
Ce témoin s’allume quand la platine TAPE II est en mode
d’enregistrement.
Compteur de bande de la platine TAPE II
Ce compteur indique où vous êtes sur la bande en cours de
lecture ou d’enregistrement. Vous pouvez le remettre au zéro
n’importe quand vous voulez.
Quand la fonction CPS est en marche, le compteur de bande
affiche « CP » et le nombre de morceaux à sauter que vous
avez spécifié.
Témoin de pause
Ce témoin s’allume pour indiquer que la platine TAPE I est en
mode de pause.
Témoin de lecture ou d’enregistrement en avant ou en
arrière de la platine TAPE II
o
n
m
l
k
j
i
Page 35

Vous avez le choix entre trois modes:
u
: Mode d’une seule direction
Réglez le commmutateur sur cette position pour que seule
une face de la cassette soit reproduite.
j: Mode de deux direction
Réglez le commutateur sur cette position pour que les deux
faces de la cassette soient reproduites en une seule foulée.
Quand la face A de la cassette est reproduite jusqu’à la fin,
la direction de lecture est automatiquement inversée et la
face B sera mis en lecture.
p
: Mode de répétition
Réglez le commutateur sur cette position et les deux côtés
de la cassette seront reproduites 5 fois de suite.
Réglez l’interrupteur DOLBY NR.
Réglez cet interrupteur sur la position ON si la cassette a été
enregistrée avec le réducteur Dolby mis en circuit.
Pour la lecture d’une cassette enregistrée sans réducteur
Dolby, réglez l’interrupteur sur la position OFF.
Appuyez sur l’une ou l’autre touche de lecture (h ou
y
).
y
: La pression de cette touche provoque la lecture de la face
A de la cassette. La lecture s’arrête à la fin de la face A si
le commutatteur de mode d’inversion de défilement est
réglé sur la position u
. Si ce commutateur est réglé sur
la position j
, la lecture continue de la face B et s’arrête
à la fin de cette face. Si le commutateur est réglé sur la
position p
, la lecture se cycle entre les deux faces de la
cassette 5 fois de suite.
h
: La pression de cette touche provoque la lecture de la face
B de la cassette. La lecture s’arrête à la fin de la face B si
le commutatteur de mode d’inversion de défilement est
réglé sur la position u
ou j. Si le commutateur est
réglé sur la position p
, la face B est reproduite, puis la
lecture se cycle entre les deux faces de la cassette 4 fois
de suite.
5
4
35
FRANÇAIS
Lecture (TAPE I ou TAPE II) 1
13
4
2 2
5 5
Mettez le magnétocassete sous tension.
Introduissez une cassette pré-enregistrée dans le
compartiment de la platine TAPE I ou de la platine TAPE
II.
Appuyez sur la touche EJECT (L) pour ouvrir le compartiment
à cassette. Introduissez la cassette, l’ouverture vers le bas et le
côté désiré vers vous, puis fermez manuellement le
compartiment.
<
Ce magétocassette est en mesure de lire les cassettes Type I
(normal), Type II (chrome) et Type IV (métal).
Nous désignons par « face A » le côté de la cassette dirigé
vers vous, et par « face B » le côté dirigé contre vous. Quand
vous insérez une cassette inversement, la « face B » vers vous,
« face A » doit lire « face B » et « face B » doit lire « face
A».
Sélectionnez un des modes d’inversion de défilement à
l’aide du commutateur REV MODE.
3
2
1
Face A dirigée vers vous
Page 36

36
Lecture (TAPE I ou TAPE II) 2
EA A F
B D DBCC
Pour arrêter la lecture:
Appuyez sur la touche d’arrêt (H).
Pour arrêter provisoirement la lecture:
Appuyez sur la touche PAUSE.
Pour reprendre la lecture, appuyez à nouveau sur la touche
PAUSE, ou appuyez sur l’une ou l’autre touche de lecture (h
ou y).
< Durant la pause de lecture, si vous appuyez sur la touche de
lecture dont la direction est opposée à celle du témoin (h
ou
y
) allumée dans la fenêtre d’affichage, la direction de lecture
sera inversée. Ceci ne fait pas le magétocassette quitter le
mode de pause. Appuyez donc sur la touche PAUSE ou à
nouveau sur la même touche de lecture (h
ou y) pour
lancer la lecture de l’autre face de la cassette.
Avance rapide et remboninage
A la pression de l’une ou l’autre touche, la bande se met à
défiler à haute vitesse en avant ou en arrière.
Pour arrêter la bande défilant à grande vitesse, appuyez sur la
touche d’arrêt (H
).
C
B
A
Compteur de bande
Au point de la bande où vous désirez revenir plus tard,
appuyez sur la touche CLEAR I ou II pour remettre l’affichage
du compteur de bande à 0000. Vous pouvez ensuite revenir
sur ce point en consultant l’affichage du compteur.
Variateur de vitesse (sur la platine TAPE I seulement)
Cette molette permet de accélérer ou diminuer le tempo de
lecture des pièces musicales. (Cette molette ne fontionne pas
durant l’enregistrement ou durant la copie.)
En tournant la molette vers la droite, la vitesse de lecture
s’accélère et le tempo le fait aussi jusqu’à un maximum de
+10%.
En tournant la molette vers la gauche, la vitesse de lecture se
diminue et le tempo le fait aussi jusqu’à un maximum de
–10%.
Ecoute au casque
Branchez votre casque d’écoute sur la prise PHONES et
mettez le casque sur la tête.
Le fait de brancher le casque ne coupe pas les sorties ligne.
ATTENTION
Il n’y a pas de réglage de niveau de sortie casque. Nous vous
conseillons d’éviter l’exposition aux sons trop élevés. Ceci
pourrait causer des dommages à votre oreille.
F
E
SYNC REV BLANK SCAN
PARALLEL
HIGH DUB
NORM DUB
REC
PLAY
REC
PLAY
D
Page 37
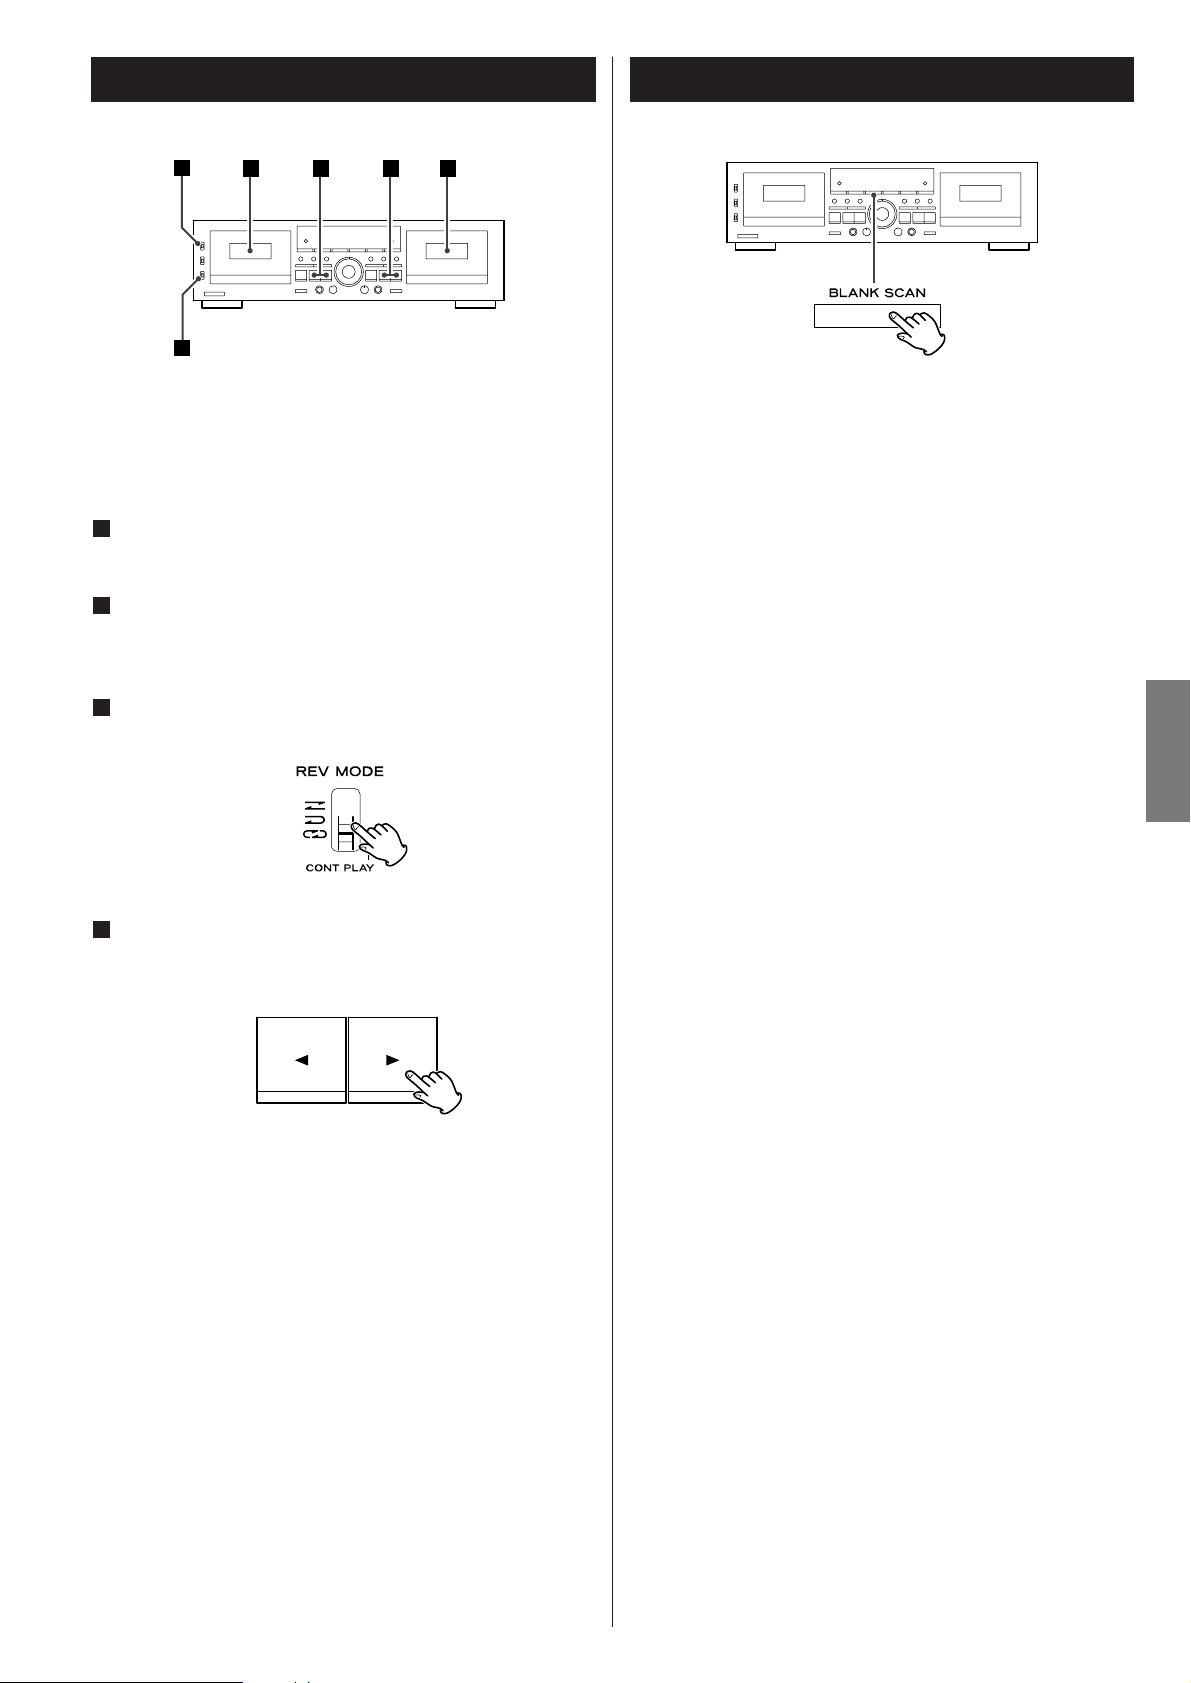
37
FRANÇAIS
Lecture en continue
3
41 14
2
La lecture peut se faire « cycler » entre TAPE I et TAPE II.
Quand une cassette atteint sa fin pendant la lecture, l’autre
cassette se met à être reproduite automatiquement, de façon
continue en relais.
Insérez une cassettes pré-enrégistrée dans l’un et l’autre
des compartiments TAPE I et TAPE II.
Régler l’interrupteur DOLBY NR.
Soyez sûr de régler l’interrupteur sur la même position que
quand l’enregistrement a été fait.
Réglez le commutateur REV MODE sur la position p
(CONT PLAY).
Appuyez sur la touche de lecture (h
ou y) de la
platine que vous voulez mettre en mode de lecture
avant l’autre.
Il vous est loisible de commencer la lecture par l’une ou
l’autre casssette (TAPE I ou TAPE II).
La lecture se cyclera entre quatres faces de cassette comme
suit:
Le magnétocassette passe automatiquement en mode d’arrêt
quand les deux faces de chacune des cassettes sont
reproduites 5 fois de suite.
TAPE I Face A w
Face B
2x
TAPE II Face B s Face A
4
3
2
1
Scan des blancs
La fonction BLANK SCAN fait défiler la bande à grande vitesse
chaque fois qu’elle détecte un blanc de 10 secondes ou plus
longues.
Pour mettre en marche le scan des blans, appuyez sur la
touche BLANK SCAN puis sur la touche de lecture désirée (h
ou y).
< Le témoin BLANK SCAN s’allume quand le scan des blancs est
mis en marche.
< Pour désactiver cette fonction, appuyez à nouveau sur la
touche BLANK SCAN. Le témoin s’éteindra.
< Des passages très silenceux pourraient être identifiés comme
des blancs. Si vous n’aimez pas cela, mettez le scan des blancs
hors service.
Page 38

38
Localisation d’un morceau
m,m,
Ce magnétocassette comprend la fonction Computomatic
Program Search (CPS). Cette fonction consiste à détecter des
blancs (de plus de 4 secondes) entre les morceaux et faire
défiler la bande à grande vitesse en avant ou en arrière en
sautant le nombre spécifié de morceaux, de sorte que vous
aurez un accès direct à un morceaux désiré. Vous pouvez
sauter un maximum de 20 morceaux situés avant ou après le
morceau en cours.
Quand vous appuyez sur l’une ou l’autre touche pendant la
lecture, le compteur de bande affiche « CP 01 » et la bande
se met à défiler à grande vitesse dans la même direction que
celle de la flèche de la touche appuyée. Le nombre affiché
s’accroît chaque fois que vous appuyez sur la touche de
recherche en avant. Le nombre diminue à la pression de la
touche de recherche en arrière.
<
Si vous êtes en train d’écouter un morceau et que vous voulez
revenir sur le morceau précédent, appuyez deux fois sur la
touche de recherche dont la flèche indique la direction
opposée à celle de la lecture en cours. Si vous appuyez sur la
touche seulement une fois, vous ne revenez que sur le début
du morceau actuel.
Afficheur sur la platine TAPE I
SYNC REV BLANK SCAN
PARALLEL
HIGH DUB
NORM DUB
REC
PLAY
REC
PLAY
La profondeur de la recherche varie en fonction du réglage du
commutateur REV MODE.
u: Seule une face de la cassette
j
: Deux faces de la cassette si la recherche se fait dans la
même direction que celle de la lecture.
OU
Seule une face de la cassette si la recherche se fait dans la
direction opposée à celle de la lecture.
p
: Deux faces suivies par la première face
(face A w
face B w face A si la recherche se met en
marche quand la face frontale de la cassette est en lecture;
ou face B w
face A w face B si la recherche se met en
marche quand la face derrière est en lecture.
< La fonction CPS ne pourrait pas fonctionner come il le faut si
des blancs entre les morceaux sont de moins de 4 secondes
en longueur ou contienent des bruits.
Page 39
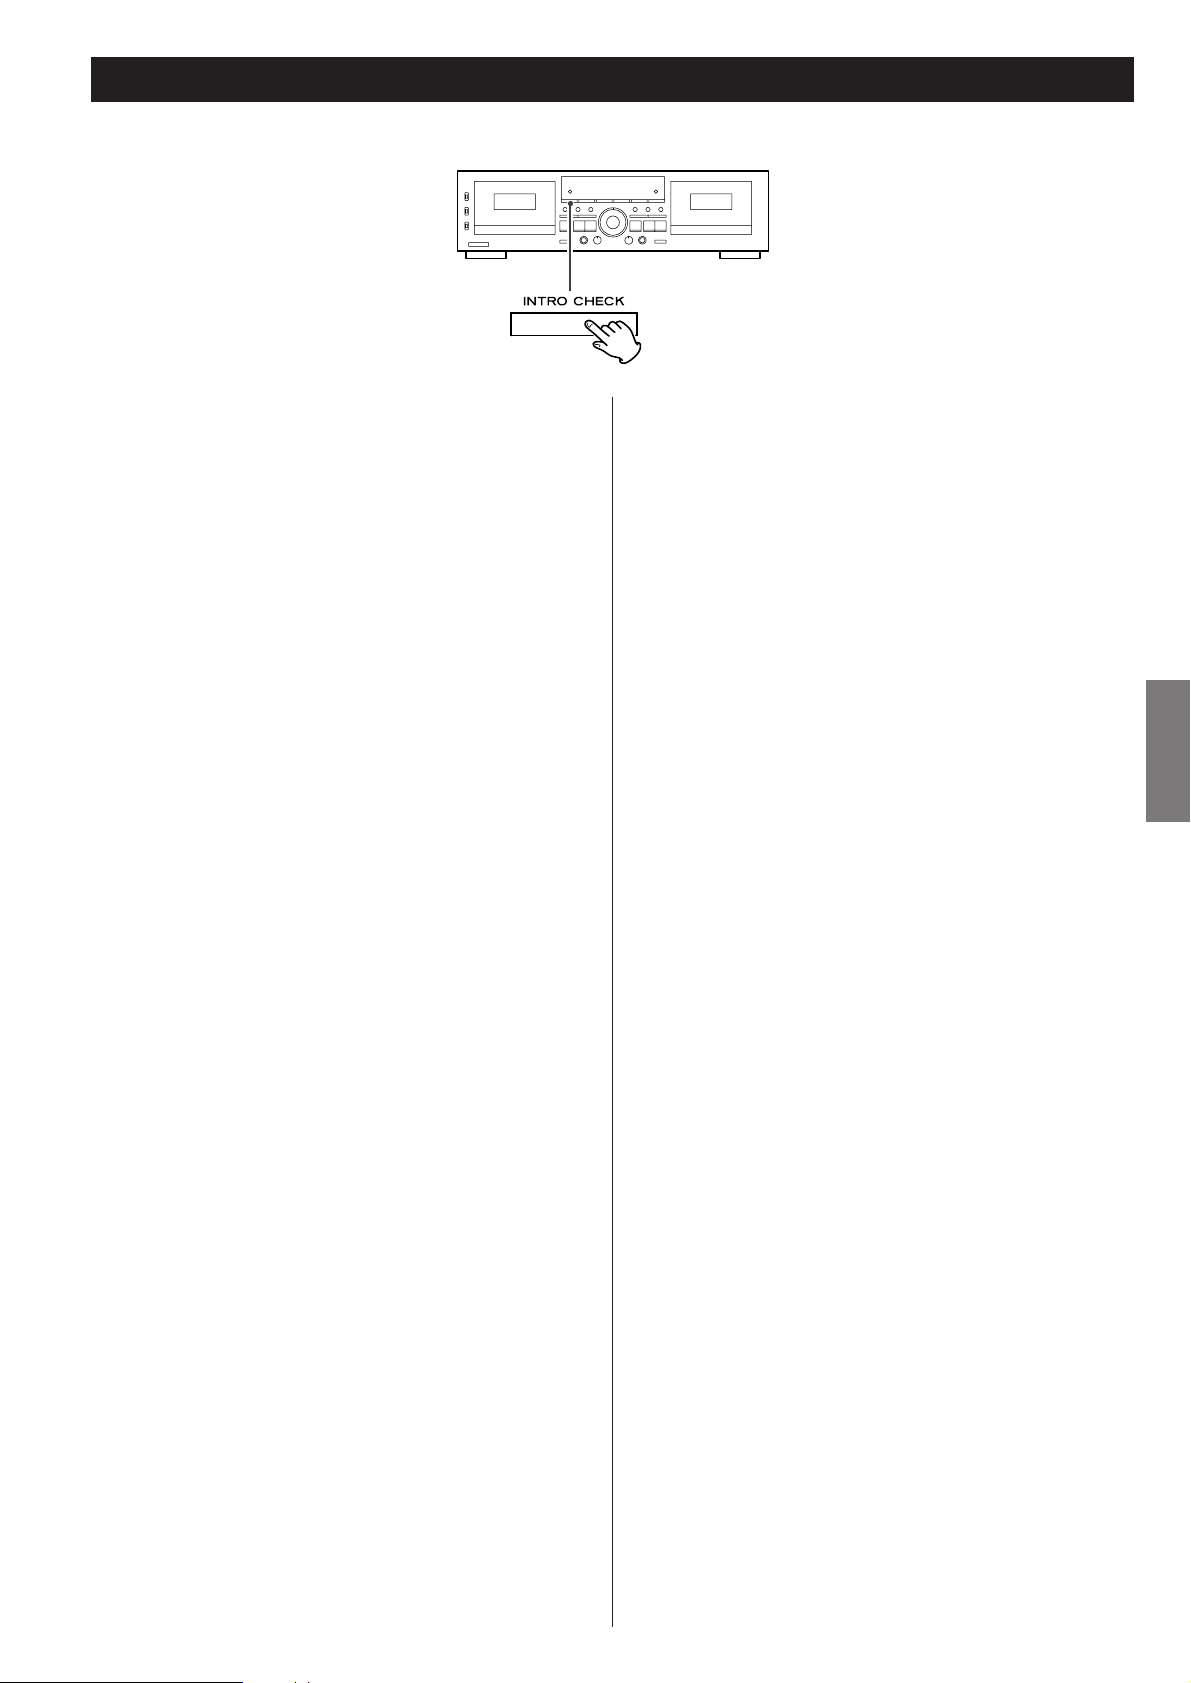
39
FRANÇAIS
Recherche d’un morceau par INTRO CHECK
La fonction INTRO CHECK « échantillonne » les premières 15
secondes de chaque morceau de sorte que vous en retrouvez un
recherché rapidement.
Appuyez sur la touche INTRO CHECK pendant la lecture ou
l’arrêt. La bande se met à défiler à grande vitesse dans la même
direction que celle de la lecture. Vous pouvez également appuyer
sur cette touche en mode d’arrêt. Dans ce cas, la bande ne défile
qu’en avant. A l’écoute du commencement du morceaux
recherché, appuyez à nouveau sur la touche INTRO CHECK de
sorte que vous en écoutez la suite.
La profondeur de la recherche varie en fonction du réglage du
commutateur REV MODE.
u
: Seule une face de la cassette
j
: Deux faces de la cassette
p
: Deux faces de la cassette suivies par la première face
(face A w
face B w face A si la recherche se met en
marche quand la face frontale de la cassette est en lecture;
ou face B w
face A w face B si la recherche se met en
marche quand la face derrière est en lecture.
La bande s’arrête automatiquement à la fin de la recherche.
<
Soyez sûr que le compartiment TAPE I est vide quand vous
mettez la fonction INTRO CHECK en marche sur la platine
TAPE II.
<
Le compteur de bande indique le nombre des morceaux dont
le commencement a été échantillonné.
< La mise en marche de la fonction INTRO CHECK pandant la
lecture provoque le saut sur le prochain morceau: la lecture
du morceau actuel est interrompue à mi-chemin.
<
La fonction INTRO CHECK ne pourrait pas fonctionner come il
le faut si des blancs entre les morceaux sont de moins de 4
secondes en longueur ou contienent des bruits.
Page 40

40
Enregistrement (sur TAPE I ou sur TAPE II)
13
4
2 2
5 5
8 8A A
67 7
Mettez le magnétocassette sous tension.
Chargez une cassette déstinée à l’enregistrement.
Appuyez sur la touche EJECT (L) pour ouvrir le compartiment
à cassette. Introduissez la cassette, l’ouverture vers le bas et le
côté A vers vous, puis fermez manuellement le compartiment.
<
Si la ou les languettes de la cassette sont brisées, fermez les
trous avec du ruban adhésif.
<
Avec ce magnétocassette, vous pouvez utiliser pour
l’enregistrement les cassettes normales (Type I) et chromes
(Type II).
Réglez le commutateur REV MODE en vous référant à ce
qui est décrit ci-dessous.
u
:
Pour faire l’enregistrement sur une seule face de la cassette.
j
ou p:
Pour faire l’enregistrement sur les deux faces de la cassette
(vous pouvez choisir l’une ou l’autre des deux positions sans
distinction)
Réglez l’interrupteur DOLBY NR comme il le faut.
Réglez-le sur ON pour mettre en service le réducteur de bruit
Dolby. Réglez-le sur OFF pour le mettre hors service.
4
3
2
1
Appuyez sur la touche RECORD.
Les témoins J et s’allument dans la fenêtre d’affichage
pour indiquer que la platine est en mode d’attente
d’enregistrement.
Réglez le niveau d’enregistrement.
Activez votre source d’enregistrement et réglez la molette
REC LEVEL pour que le crête-mètre indique 0 dB à des crêtes
de niveaux.
Réglez la direction de l’enregistrement.
L’enregistrement se fait dans la direction indiquée par le
témoin flèche (h
ou y). Pour permuter la direction, appuyez
sur la touche de défilement dont la flèche indique la direction
inversée (h
ou y).
Quand tout est prêt, commencez l’enregistrement en
appuyant à nouveau sur la touche PAUSE ou sur la
touche de défilement dont la flèche indique la même
direction que le témoin flèche.
<
Pour faire l’enregistrement sur les deux faces de la cassette,
réglez le commutateur REV MODE sur la position j
ou p,
et puis appuyez sur la touche de défilement en avant (y
). Si
vous appuyez sur la touche de défilement en arrière (h
),
l’enregistrement ne se fait que sur la face derrière de la
cassette.
<
Pour arrêter l’enregistrement, appuyez sur la touche d’arrêt (H).
8
Faites attention de ne pas appuyer sur la touche dont la
flèche indique la même direction que le témoin flèche
lumineux. Ceci pourrait démarrer l’enregistrement.
7
6
REC
5
Face A dirigée vers vous
Page 41
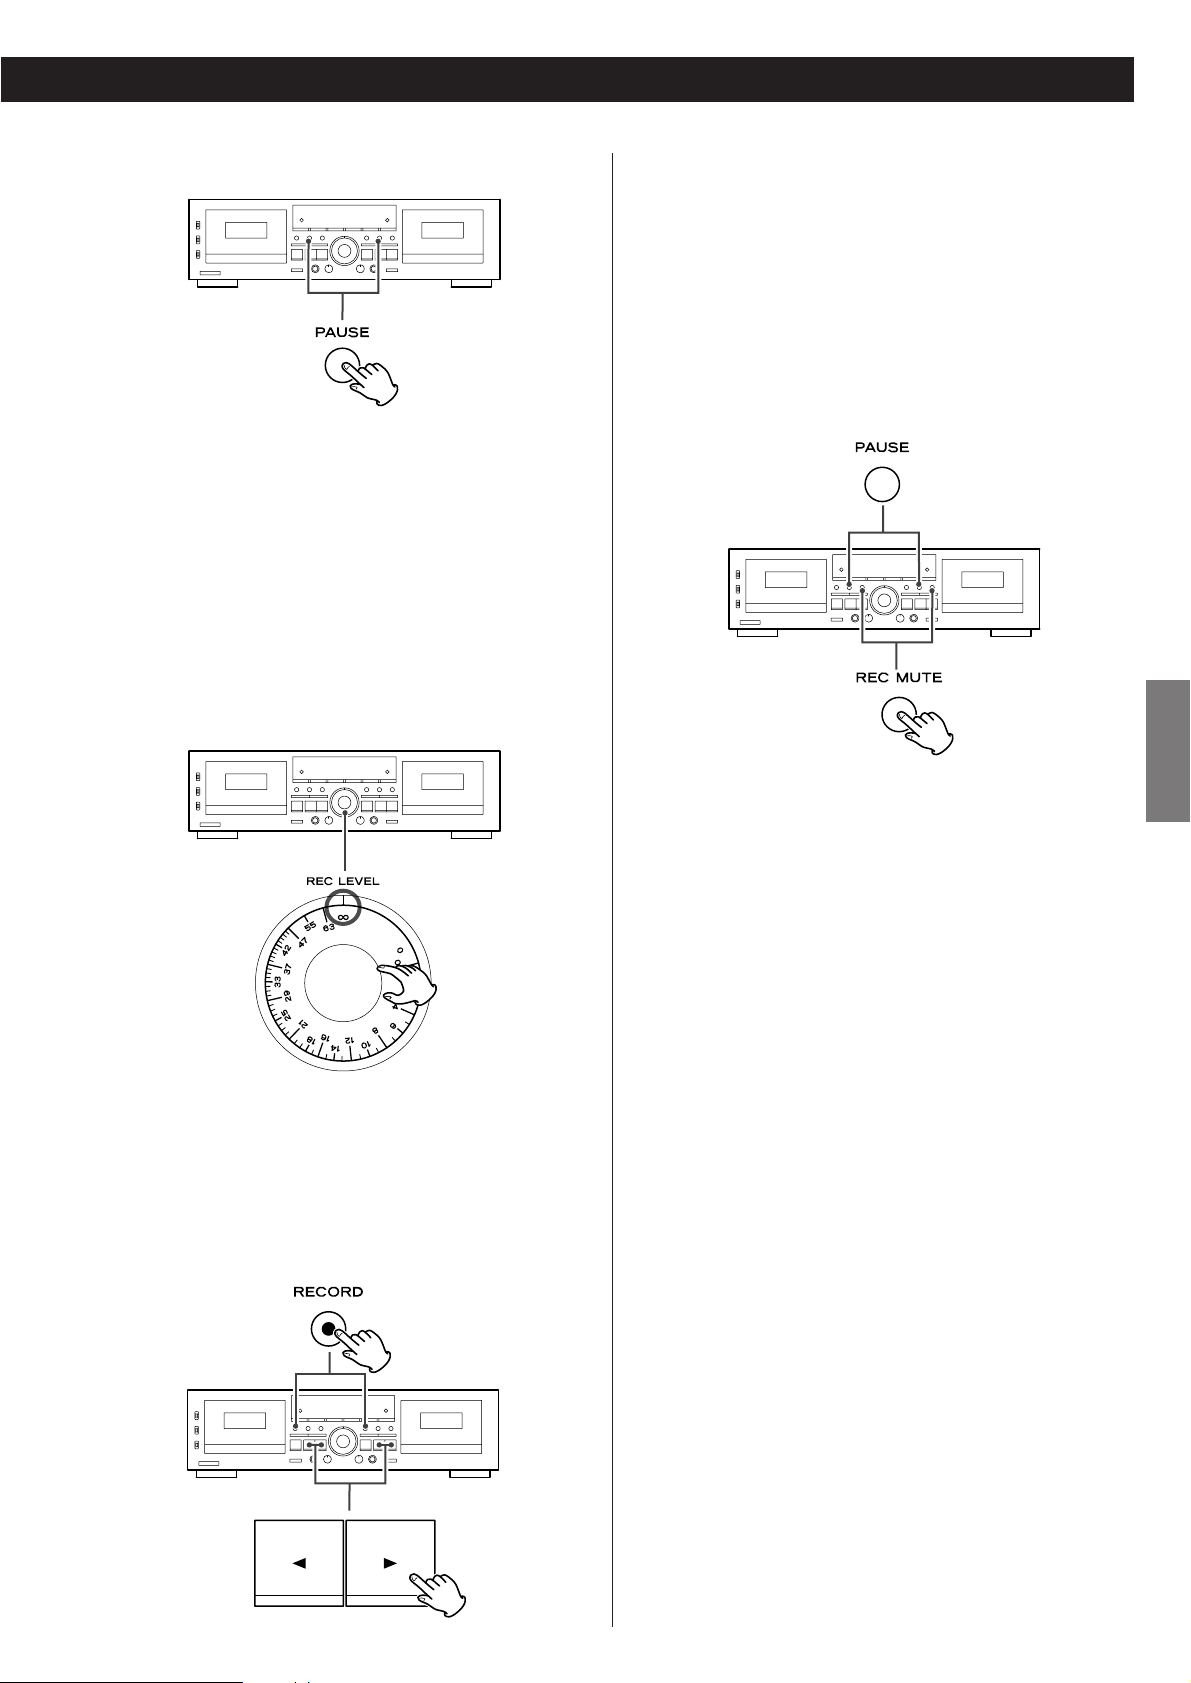
41
FRANÇAIS
Pour arrêter provisoirement l’enregistrement
Appuyez sur la touche PAUSE. Pour reprendre
l’enregistrement, appuyez à nouveau sur la même touche.
Effacement des enregistrements
Quand vous faites un enregistrement, la bande est surécrite
(l’enregistrement antérieur est effacé et remplacé par un
neuf). Pour effacer la bande sans faire aucun enregistrement
sur elle, réglez la molette REC LEVEL sur la position minimum
(
∞) et appuyez sur la touche RECORD, puis sur la touche de
lecture (h
ou y).
Mise en enregistrement rapide
Maintenez la touche RECORD appuyée et appuyez sur la
touche dont la flèche (h
ou y) indique la direction dans
laquelle vous voulez que la bande se défile.
Enregistrement de silence
Utilisez cette fonction pour enregistrer un blanc entre les
morceaux requis pour la fonction CPS (Proputamatic Program
Search).
Appuyez sur la touche REC MUTE quand vous avez atteint le
point désiré durant l’enregistrement. Aucun signal ne peut
être enregistré pendant approximativement 4 secondes, après
quoi la platine passe en mode d’attente d’enregistrement.
Pour reprendre l’enregistrement, appuyez sur la touche
PAUSE.
Pour enregistrer un blanc de plus que 4 secondes de
longueure
Maintenez la touche REC MUTE appuyée pendant la durée
désirée. Quand vous relâchez la touche, la platine passe en
mode d’attente d’enregistrement.
Pour enregistrer un blanc de moins que 4 secondes de
longueure
Appuyez sur la touche PAUSE dans les 3 secondes après la
pression de la touche REC MUTE.
<
Si vous appuyez sur la touche REC MUTE alors que la platine
est en mode d’attente d’enregistrement, aucun signal
n’enregistre pandant la dureé d’approximativement 4
secondes, après quoi la platine repasse en mode d’attente
d’enregistrement.
Page 42

42
Enregistrement d’un mixage de voix et de musique
Cette fonction vous permet d’enregistrer votre voix ensemble
avec une autre source sonore.
<
Le signal de micro est véhiculé dans les deux canaux de
gauche et de droite de sorte qu’il est localisé au centre de
l’image stéréo.
<
Vouz avez le choix soit de sélectionner la source sonore
désirée sur l’amplificateur branché sur les prises LINE IN du
magnétocassette, soit de brancher la source sonore
directement sur les prises LINE IN du magnétocassette.
<
Pour éviter l’effet Larsen (bouclage du son issus des hautparleurs qui est de nouveau capté par le micro), coupez les
sorties HP de votre amplificateur. Utilisez un casque pour
survéiller l’enregitrement.
<
Ce magnétocassette n’est pas compatible avec les
microphones stéréo. Utilisez toujours un microphone mono.
Réglage du niveau d’enregistrement de
mixage
Pour enregistrer un mixage de voix et d’autre source sonore,
vous devez d’abord régler le niveau d’entrée micro, puis le
niveau général d’enregistrement.
1. Branchez votre microphone sur la prise MIC située sur la face
frontale du magnétocassette.
2.Mettez la source sonore en marche, passez le
magnétocassette en mode d’attente d’enregistrement (en
appuyant sur la touche RECORD), et réglez provisoirement la
molette REC LEVEL pour un niveau relativement bas.
3. Parlez dans le micro et réglez la molette REC LEVEL de sorte à
obtenir un équilibre optimum entre votre voix et l’autre
source sonore.
4.Réglez précisément le niveau général d’enregistrement en
manipulant la molette REC LEVEL de sorte que le crête-mètre
indique 0dB à des crêtes de niveaux.
5. Quant tout est prêt, commencez l’enregistrement en suivant
les instructions décrites plus haut dans ce manuel.
Source sonore
Réglage du niveau
d’entrée micro
Réglage du niveau
général d’enregistrement
Page 43

43
FRANÇAIS
Enregistrement en continu
2
3
4
1 15AA
Cette fonction permet d’enregistrer quatre faces de deux
cassettes sans interruption.
Chargez une cassette déstinée à l’enregistrement dans
l’une et l’autre des platines TAPE I et TAPE II.
Réglez le commutateur REV MODE sur la position p
(CONT PLAY).
<
Réglez l’interrupteur DOLBY NR sur la position ON si vous le
voulez.
Appuyez sur la touche RECORD de la platine TAPE I.
La platine passe en mode d’attente d’enregistrement, comme
l’indique l’allumage des témoins J
et dans la fenêtre
d’affichage. Réglez maintenant le niveau d’enregistrement et
au besoins n’importe quels autres réglages.
REC
3
2
1
Vérifiez la direction d’enregistrement.
Si le témoin flèche indique la direction opposée à celle dans
laquelle vous allez faire l’enregistrement, appuyez sur la
touche dont la flèche indique la direction désirée (h
ou y).
L’enregistrement se fait dans cet ordre:
Il vous est loisible de commencer l’enregistrement par la face
B, mais dans ce cas, la face A de cette cassette n’est pas
enregistrée: quand l’enregistrement se fait jusqu’à la fin de la
face B, la platine TAPE II passe en enregistrement.
<
La platine TAPE II ne commence l’enregistrement que par la
face A.
Commencez l’enregistrement.
L’enregistrement se met en marche quand vous appuyez sur
la touche PAUSE ou sur la touche de lecture dont la flèche
indique la même direction que celle du témoin allumé dans la
fenêtre d’affichage de la platine TAPE I.
<
La transition d’une cassette à l’autre prend quelques
secondes.
Pour arrêter l’enregistrement
Appuyez sur la touche d’arrêt (H) de la platine qui est en
cours d’enregistrement.
A
5
TAPE I Face A
x
Face B
x
TAPE II Face A
x
Face B
Faites attention de ne pas appuyer sur la touche dont la
flèche indique la même direction que le témoin flèche
lumineux. Ceci pourrait démarrer l’enregistrement.
4
Face A dirigée vers vous
Page 44

44
Enregistrement parallèle
3
2 2
1 1
Cette fonction permet d’enregistrer un même contenu sur les
deux cassettes (TAPE I et TAPE II) simultanément.
Insérez une cassette dans l’une et l’autre des deux platines
et l’enregistrement parallèle commencera à la pression de
la touche PARALLEL REC.
<
Avant d’appuyer sur la touche PARALLEL REC, vérifiez les
réglages suivants en effectuant les étapes - décrites
dans la page 40.
Direction d’enregistrement, Mode d’inversement, Réducteur
de bruit Dolby, Niveau d’enregistrement, etc.
Quant tout est prêt, repassez en mode d’arrêt si besoin est.
< A la mise en marche de l’enregistrement parallèle, le témoin
PARALLEL s’allume dans la fenêtre d’affichage.
< Durant l’enregistrement parallèle, seules les touches suivantes
ont un effet:
Platine TAPE I : Touche d’arrêt (H)
Platine TAPE II : Touches PAUSE, REC MUTE et d’arrêt (H
)
<
A la pression de la touche d’arrêt (H) de l’une ou de l’autre
platine, les deux bandes s’arrêtent en même temps.
71
Insérez la bande source (destinée à la lecture) dans la
platine TAPE I et la bande receptrice (déstinée à
l’enregistrement) dans la platine TAPE II.
Réglez la direction de défilement de la bande sur les
deux platines.
Si le témoin flèche (h ou y) dans la fenêtre d’affichage
indique la direction opposée à celle désiréee, appuyez sur la
touche PAUSE, puis sur la touche dont la flèche (h
ou y)
indique la direction désirée. Quand vous avez changé de
direction de défilement de la bande, soyez sûr d’appuyer sur
la touche d’arrêt (H
) pour quitter le mode de pause.
<
Faites attention de ne pas appuyer sur la touche dont la
flèche indique la même direction que le témoin flèche
lumineux. Ceci pourrait mettre la platine concernée en
lecture.
<
Réglez le commutateur REV MODE au besoin.
<
Pour faire la copie, il n’y a pas de nécessité de régler le niveau
d’enregistrement et la touche DOLBY NR car les deux
dépendent de la cassette source pré-enregistrée.
Appuyez sur l’une ou l’autre touche DUB START pour
commencer la copie.
Pour faire la copie à vittesse normale, appuyez sur la touche
NORMAL. Pour faire la copie à grande vitesse, appuyez sur la
touche HIGH.
3
2
1
Copie (de TAPE I à TAPE II)
Page 45

45
FRANÇAIS
La copie à grande vitesse se fait approximativement deux fois
plus vite qu’à la vitesse normale. Nous vous recommendons
l’usage de la vitesse normale pour bénéficier d’une meilleure
qualité audio.
<
Durant la copie, l’un ou l’autre des témoins NORM DUB/HIGH
DUB est allumé.
< Durant la copie à vitesse normale, seules les touches suivantes
ont un effet:
Platine TAPE I : Touche d’arrêt (H)
Platine TAPE II : Touches PAUSE, REC MUTE et d’arrêt (H
)
Durant la copie à grande vitesse, seule la touche d’arrêt (H
) a
un effet.
< A la pression de la touche d’arrêt (H) de l’une ou de l’autre
platine, les deux cassettes s’arrêtent en même temps.
< Ni l’une ni l’autre des deux touches DUB START n’a pas
d’effet immédiatement après que la cassette est déroulée en
avant ou en arrière jusqu’à la fin. Attendez 5 secondes ou
plus avant d’appuyer sur la touche.
<
Durant la copie, le variateur de vitesse n’a pas d’effet.
<
Pour faire la copie, il n’y a pas de nécessité de régler le niveau
d’enregistrement car il dépend de la cassette source préenregistrée. Toute manipulation de la molette de réglage du
niveau (REC LEVEL), avant ou après le démarrage du
processus de copie, n’a aucun effet.
<
S’il y a tout près de vous un téléviseur et qu’il est sous tension
quand vous faites une copie à grande vitesse, il est possible
qu’un bruit d’interférence de fréquence aiguë soit enregistré
sur la bande. Pour éviter ceci, utilisez la vitesse normale ou
mettez le téléviseur hors tension.
Montage directe durant la copie
(à vitesse normale seulement)
Il vous est loisible d’éviter de copier les morceaux non désirés ou
des blancs plus longs qu’on n’en a besoin, ou d’insérer des
blancs entres les morceaux.
1. Au point désiré durant la copie, appuyez sur la touche
PAUSE de la platine TAPE II. Celle-ci passe en mode de
pause de sorte que vous peuvez attendre que les
morceaux non désirés soient passés.
Pour insérer un blanc de 4 secondes de longueure entre
les morceaux, appuyez sur la touche REC MUTE de la
platine TAPE II. Celle-ci passe en mode de pause après
d’enregistrer « un blanc » pendant 4 secondes.
<
La platine TAPE I continue la lecture alors que la platine TAPE
II est en mode de pause.
2. Pour reprendre la copie, appuyez sur la touche PAUSE
de la platine TAPE II.
Page 46

46
Copie à inversion synchronisée de défilement (de TAPE I à TAPE II)
54
33
1 12
Quand cette fonction est mise en œuvre et qu’une cassette plus
courte que l’autre atteint la fin de la face A (ou la face dirigée
vers vous), elle s’arrête momentanément jusqu’à ce que l’autre
cassette atteint la fin de la face A.
Puis la direction de défilement des deux cassettes s’inverse
automatiquement de sorte que l’enregistrement continue de la
face B (ou la face dirigée contre vous) simultanément.
Si la cassette TAPE I est plus courte que l’autre:
1. La cassette TAPE I s’arrête quand la fin de la face A est atteint
et la cassette TAPE II passe en monde d’enregistrement à son
tour et commence à enregistrer un « blanc ».
2. Quand la cassette TAPE II atteint la fin de la face A, les deux
cassettes changent automatiquement de sens de défilement
simultanément de sorte que la face B de la cassette TAPE I se
met en enregistrement et que la platine TAPE II repasse en
mode d’enregistrement.
3. Quant la face B de la cassette TAPE I est enregistrée jusqu’à la
fin, les platines passent en mode d’arrêt aimultanément.
Si la bande TAPE I est plus longue que l’autre:
1. La cassette TAPE II passe en mode de pause quand la fin de la
face A est atteint alors que la cassette TAPE I continue
l’enregistrement.
2. Quand la cassette TAPE I est reproduite jusqu’à la fin de la
face A, la face B commence à être reproduite et la cassette
TAPE II repasse en mode d’enregistrement et commence à
enregistrer sa face B.
3. Les deux cassettes s’arrêtent simultanément quand la face B
de la cassette TAPE II est renregistrée jusqu’à la fin.
Insérez une cassette déstinée à l’enregistrement dans la
platine TAPE I et une cassette déstinée à la lecture dans
la platine TAPE II.
Réglez le commutateur REV MODE sur la position de
deux sens (j
).
Vérifiez la direction de défilement de la bande sur les
deux platines.
Si le témoin flèche indique la direction inversée (h) dans la
fenêtre d’affichage, appuyez sur la touche PAUSE, puis sur la
touche avec la flèche vers la droite (y
). Apès quoi, soyez sûr
d’appuyer sur la touche d’arrêt (H
) pour quitter le mode de
pause.
< Faites attention de ne pas appuyer sur la touche dont la
flèche indique la même direction que le témoin flèche. Ceci
démarrerait la lecture.
<
Il n’y a pas de nécessité de régler le niveau d’enregistrement
et la touche DOLBY NR car les deux dépendent de la cassette
source pré-enregistrée.
3
2
1
Page 47

47
FRANÇAIS
Appuyez sur la touche SYNC REV.
Le témoin SYNC REV s’allumera dans la fenêtre d’affichage.
<
La touche SYNC REV n’a pas d’effet si le mode d’inversement
est réglé sur d’autres positions que j
ou bien si la direction
de défilement de la bande n’est pas réglée sur l’avance (y
).
Appuyez sur l’une ou l’autre des touches DUB START
pour commencer la copie.
Appuyez sur la touche NORMAL pour faire la copie à vitesse
normale.
Appuyez sur la touche HIGH pour faire la copie à grande
vitesse.
La copie à grande vitesse se fait approximativement deux fois
plus vite qu’à la vitesse normale. Nous vous recommendons
l’usage de la vitesse normale pour bénéficier d’une meilleure
qualité audio.
Durant la copie, l’un ou l’autre des témoins NORM DUB/HIGH
DUB est allumé.
<
Durant la copie à vitesse normale, seules les touches suivantes
ont un effet:
Platine TAPE I : Touche d’arrêt (H)
Platine TAPE II : Touches PAUSE, REC MUTE et d’arrêt (H
)
Durant la copie à grande vitesse, seule la touche d’arrêt (H
) a
un effet.
5
4
< A la pression de la touche d’arrêt (H) de l’une ou de l’autre
des platines, les deux cassettes s’arrêtent en même temps.
< Ni l’une ni l’autre des deux touches DUB START n’a pas
d’effet immédiatement après que la cassette est déroulée en
avant ou en arrière jusqu’à la fin. Attendez 5 secondes ou
plus avant d’appuyer sur la touche.
<
Durant la copie, le variateur de vitesse n’a pas d’effet.
<
Pour faire la copie, il n’y a pas de nécessité de régler le niveau
d’enregistrement car il dépend de la cassette source préenregistrée. Toute manipulation de la molette de réglage du
niveau (REC LEVEL), avant ou après le démarrage du
processus de copie, n’a aucun effet.
<
S’il y a tout près de vous un téléviseur et qu’il est sous tension
et que vous faites une copie à grande vitesse, il est possible
qu’un bruit d’interférence de fréquence aiguë soit enregistré
sur la bande. Pour éviter ceci, utilisez la vitesse normale ou
mettez le téléviseur hors tension.
Page 48
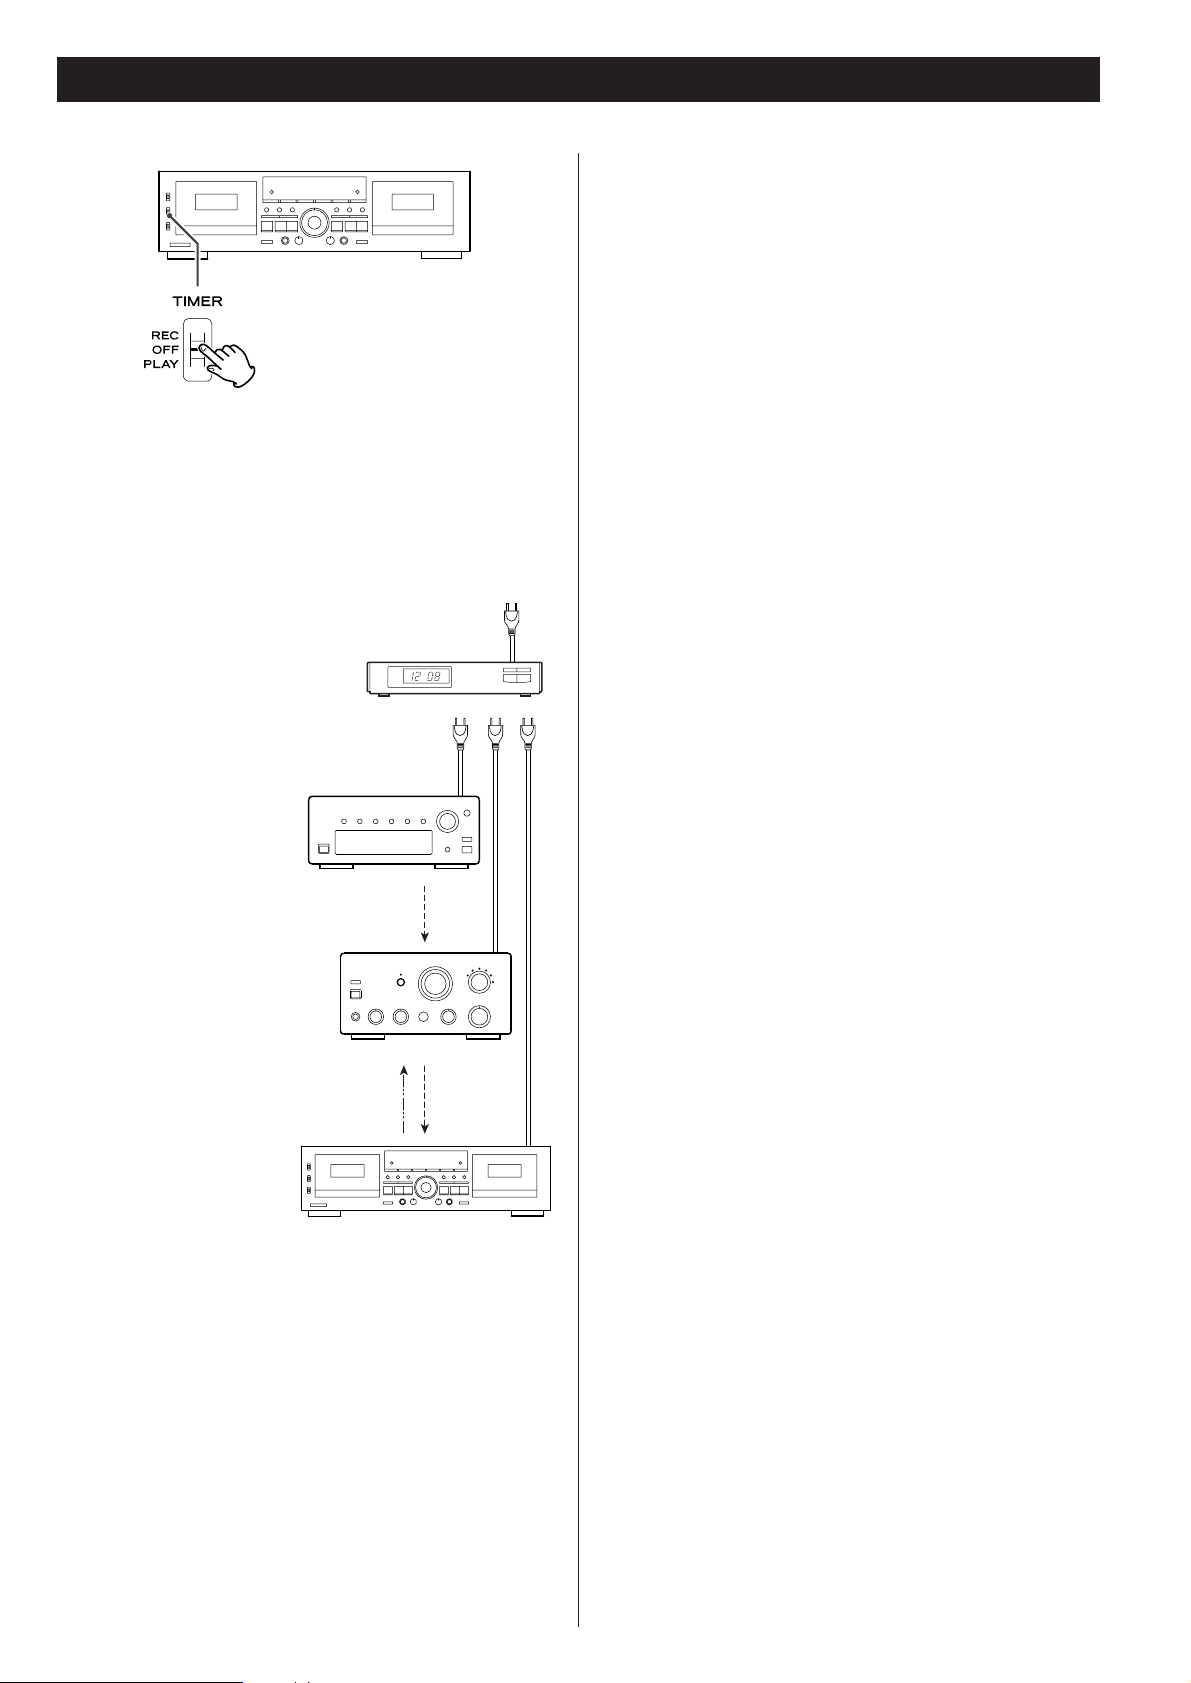
48
Lecture et enregistrement contrôlés par minuterie
Vous pouvez brancher une minuterie disponible dans la
commerce sur votre chaîne audio pour se réveiller en musique ou
programmer des enregistrements.
Branchez vos appareils comme le montre le schéma suivant.
Source audio
(Si vous allez faire un
enregistrement contrôlé par
minuterie, réglez votre
tuner au besoin.)
Amplificateur
(Réglez les sélecteurs d’entrée
et de sortie et d’autres réglages
sur les positions appropriées.)
Prise secteur
Minuterie
Au temps de
la lecture
Direction des signaux
Ce magnétocassette
Au temps de
l’enregistrement
Lecture contrôlée par minuterie
1. Branchez une minuterie disponible dans la commerce sur ce
magnétocassette et sur d’autres composants de votre chaîne
audio.
2. Mettez tous les compodants sous tension.
3. Chargez une cassette pré-enregistrée dans l’un ou l’autre
compartiment à cassette (TAPE I ou TAPE II).
< Si vous le voulez, vous peuvez charger une cassette dans l’un et
l’autre des compartiments. La TAPE I se mettra d’abord en
lecture.
4. Réglez le commutateur REV MODE sur la posotion désirée.
<
Si vous voulez que les deux cassettes soient reproduites en
séquence, réglez le commutateur sur la position p
(CONT
PLAY).
5. Réglez l’interrupteur DOLBY NR au besoin.
6. Réglez le commutateur TIMER sur la position PLAY.
7. Programmez la minuterie pour le moment précis de démarrage
de lecture (moment de mise sous tension) et le moment précis
d’arrêt (moment de mise hors tension). Quand vous avez
programmé la minuterie, les composants se remettront hors
tension automatiquement.
Quand le moment de démarrage programmé est arrivé, le
magétocassete se met sous tension et commence la lecture
automatiquement.
<
La lecture se déclenche aussi d’une simple pression sur
l’interrupteur d’alimentation de ce magnétocasstte. Ne le pressez
pas par mégarde. Quand vous n’utilisez pas la minuterie, réglez le
commutateur TIMER sur OFF.
<
La lecture ne commence que par la face A de la cassette.
Enregistrement contrôlé par minuterie
A titre d’exemple, voici la procédure pour enregistrer une
émission radio.
1. Branchez une minuterie disponible dans la commerce sur ce
magnétocassette et sur d’autres composants de votre chaîne
audio.
2. Mettez tous les composants sous tension.
3. Chargez une cassette desitnée à l’enregistrement dans l’un ou
l’autre compartiment à cassette (TAPE I ou TAPE II). Si vous le
voulez, chargez une cassette dans l’un et l’autre des
compartiments pour que l’enregistrement se fasse sur les deux
cassettes en séquence.
4. Réglez le commutateur REV MODE sur la position désirée.
<
Si vous voulez que les deux cassettes soient enregistrées en
séquence, réglez le commutateur sur la position p
(CONT
PLAY).
5. Réglez l’interrupteur DOLBY NR au besoin.
6. Syntonisez votre tuner sur la fréquence désirée.
7. Mettez le magnétocassette en mode d’attente d’enregistrement
en appuyant sur la touche RECORD.
8. Réglez le niveau d’enregistrement.
9. Réglez le commutateur TIMER sur la position REC.
10. Programmez la minuterie pour le moment précis de démarrage
d’enregistrement (moment de mise sous tension) et le moment
précis d’arrêt (moment de mise hors tension). Quand vous avez
programmé la minuterie, les composants se remettront hors
tension automatiquement.
Quand le moment de démarrage programmé est arrivé, le
magétocassete se met sous tension et commence
l’enregistrement automatiquement.
<
L’enregistrement se déclenche aussi d’une simple pression sur
l’interrupteur d’alimentation de ce magétocassete. Si vous le
pressez par mégarde, vos enregistrements importants seront
perdus. Soyez donc sûr de régler le commutateur TIMER sur OFF
quand vous n’utilisez pas la minuterie.
<
L’enregistrement ne commence que par la face A de la cassette.
Page 49

49
FRANÇAIS
Dépannage
Si vous rencontrez des problèmes de fonctionnement avec ce
magnétocassette, essayez les conseils de dépannage décrits cidessous avant de demander une réparation. Il se peut que
d’autres appareils branchés sur le magétocassette soient la cause
des problèmes. Vérifiez tous les autres appareils, également.
Si le problème persiste, veuillez vous adresser au centre de
service agréé par TEAC le plus proche de chez vous ou à votre
distributeur.
Le magétocassette se peut pas se mettre sous tension.
e
Vérifiez la connexion à la prise secteur. Si le magnétocasset
est branché sur une prise d’alimentation munie d’un
interrupteur, vérifiez si cette prise est sous tension.
Déterminez aussi si la prise secteur fournit un courant
électrique en y branchant une lampe ou d’autres pièces
électriques.
Pas de son
e
Vérifiez la connexion à l’amplificateur.
e
Vérifiez les réglages de l’amplificateur.
La télécommande n’a pas d’effet.
e
Vérifiez si le magnétocassette est mis sous tension.
e
Si les piles sont usées, remplacez-les.
e
S’il y a des obstacles entre la télécommande et le détecteur
infrarouge du magnétocassette, débarrassez-les. Pointez la
télécommande vers le détecteur infrarouge du
magnétocassette dans un rayon d’au plus de 5 mètres.
e
Si le détecteur infrarouge est exposé en plein soleil ou à une
lumière très forte, la télélcommande ne fonctionne pas.
Dans ce cas, utilisez les touches de fonctionnement du
magnétocassette à la place de la télécommande.
Des bruits dans le son reproduit
e
Eloignez tous les appareils électriques qui génèrent un
champ magnétique, tels qu’un téléviseur ou un four à
micro-ondes.
Des touches de transport de la bande n’ont pas d’effet.
e
Chargez une cassette si le compartiment est vide.
e
Si une cassette est déjà chargée, retirez et ré-insérez-la.
Le compartiment à cassette ne se ferme pas.
e
La cassette n’est pas chargée correctement. Retirez et réinsérez-la.
Pauvre qualité sonore
e
Nettoyez les têtes.
e
Vérifiez si l’interrupteur DOLBY NR est réglé sur la même
position que lorsque l’enregistrement a été fait.
Enregistrement irréalisable
e
Si les languettes de la cassette sont brisées, fermez les trous
avec du ruban adhésif.
e
Vérifiez la connexion à l’amplificateur et à l’appareil de
source sonore.
e
Réglez les réglages d’entrée et de sortie de l’amplificateur.
e
Vérifiez le niveau d’enregistrement et augmentez-le si
besoin est.
La vitesse de lecture semble quelque peu rapide ou lente.
e
Vérifiez le réglage du variateur de vitesse.
L’inversement automatique n’est pas provoqué.
e
Réglez le commutateur REV MODE sur la position j ou
p
.
e
Si le commutateur REV MODE est réglé sur la position j,
commencez la lecture par la face frontale de la cassette.
Copie à inversement synchronisé irréalisable
e
Réglez le commutateur REV MODE sur la position j.
e
Chargez une cassette de bande dans l’une et l’autre des
deux platines.
e
Réglez la direction de défilement de la bande sur l’avance
(y
) sur les deux platines.
Lecture/enregistrement en continue irréalisable
e
Réglez le commutateur REV MODE sur la position p.
e
Chargez une cassette de bande dans l’une et l’autre des
deux platines.
e
Pour faire un enregistrement en séquence, commencez par
TAPE I.
Ce magnétocassette comprend un mini-ordinateur
sophistiqué et il y aurait des occasions où il ne fonctionne
pas comme prévu à cause d’un bruit ou interférence
externes. Des problèmes que vous rencontrez dans ces
occassions pourraient être résolus en mettant le
magnétocassette hors tension, en attendant 1 minute ou
plus, et en le remettant sous tension.
Page 50

50
Entretient
Si la surface du magnétocassette se salit, essuyez-la avec un
chiffon doux et sec. Pour enlever des taches plus résistantes,
utilisez un chiffon doux légèrement imbibé de détergent non
abrasif et d’eau, puis imbibez un autre chiffon d’eau, tordezle bien et frottez la tache.
Ne laissez pas le magnétocassette rester en contact avec des
produits en caoutchouc ou de vinyle pendant une longue
période, sous peine de détériorer le revêtement.
N’employez jamais des agens volatils, tels que des diluants,
benzine ou alcool, sous peine de détériorer le revêtement.
ATTENTION
Pour une raison de sécurité, débranchez toujours le
magnétocassette de la prise de courant électrique avant
d’exécuter n’importe quel entretien.
Nettoyage des têtes
Si les têtes deviennent sales, la qualité d’enregistrement
détériorera, ayant pour résultat le bruit ou des « trous » dans
le son reproduit. En outre, si le chemin de bande devient sale,
la bande peut s’emmêler sur des pièces tournantes. Nous
vous recommandons donc que les têtes, les galet-presseurs et
les cabestans soient nettoyés régulièrement à des intervalles
de dix heures d’usage, à l’aide d’un coton-tige imbibé de
liquide de nettoyage approprié disponible dans la commerce.
REMARQUE:
Evitez de faire un enregistrement ou de mettre une cassette
en lecture quand le chemin de bande est encore humide de
liquide de nettoyage. Ceci provoquerait le coinçage de
cassette.
Galet-presseur
Cabestan
Tête d’effacement
Tête d’enregistrement et de lecture
Galet-presseur
Cabestan
Pour l’Europe
Mise au rebut de votre ancien appareil
1.Quand ce symbole de poubelle sur roues
barrée d’une croix est joint à un produit, cela
signifie que ce produit est couvert par la
Directive Européenne 2002/96/EC.
2. Tous les produits électriques et électroniques doivent être
jetés séparément des ordures ménagères via des collecteurs
désignés agréés par le gouvernement ou les autorités
locales.
3. La gestion correcte de l’élimination de votre ancien appareil
aide à prévenir les conséquences potentiellement négatives
pour l’environnement et la santé humaine.
4. Pour des informations plus détaillées sur la mise au rebut de
votre ancien appareil, veuillez contacter votre mairie, le
service de traitement des ordures ou le magasin dans lequel
vous avez acheté le produit.
Page 51

FRANÇAIS
51
Fiche téchnique
Disposition de pistes. . . . . . . . . . . . . . . . . . . . . . . . . . . . . . . . . . . . . . . 4 pistes, 2 canaux stéréo
Composition de têtes . . . . . . . . . . . . . . Tête d’enregistrement et de lecture x 1 (chaque platine)
Tête d’effacement x 1 (chaque platine)
Vitesse de défilement . . . . . . . . . . . . . . . . . . . . . . . . . . . . . . . . . . . . . . . . . . . . . . . . 4,8 cm/sec.
9,5 cm/sec. (en mode de copie à grande vitesse)
Variateur de vitesse . . . . . . . . . . . . . . . . . . . . . . . . . . . . . . . . . . . . . . . . . . . . . . . . ±10% (±2%)
Temps de défilement rapide . . . . . . . . . . . . . . approximativement 110 secondes (cassette C-60)
Moteur . . . . . . . . . . . . . . . . . . . . . . . . . . . . . . . . . . . . . . . . . . . . . . Moteur servo CC (cabestan)
Pleurage et scintillement. . . . . . . . . . . . . . . . . . . . . . . . . . . . . . . . . . . . . 0,09% (WRMS) ±0,1%
Réponse en fréquence (générale)
Avec cassette métal (type IV, lecture uniquement). . . . . . . . . . . . . . . . . . . . . . . 30 Hz-19 kHz
Avec cassette chrome (type II). . . . . . . . . . . . . . . . . . . . . . . . . . . . . . . . . . . . . . 30 Hz-18 kHz
Avec cassette normale (type I). . . . . . . . . . . . . . . . . . . . . . . . . . . . . . . . . . . . . . 30 Hz-17 kHz
Rapport signal-bruit (générale)
59 dB (avec le réducteur Dolby mis hors circuit, au niveau nominale)
69 dB (avec le réducteur Dolby mis en circuit, CCIR-ARM)
Entrée ligne (prise RCA) . . . . . . . . . . . . . . . . . 100 mV (à une impédance d’entrée de 50k ohms)
Entrée micro (prise mono, quart de pouce) . 0,38 mV (à une impédance d’entrée de 200k ohms)
Sortie ligne (prise RCA) . . . . . . . . . . . 0,46 V (à une impédance de charge de 50k ohms ou plus)
Sortie casque (prise stéréo, quart de pouce). . . . . . . . . . . . . . . . . . . . . . . 0,95 mW sous 8 ohms
Alimentation électrique
Modèle pour les Etats-Unis et la Canada . . . . . . . . . . . . . . . . . . . . . . . . . . . 120 V CA, 60 Hz
Modèle d’exportation générale. . . . . . . . . . . . . . . . . . . . . . . . . . . 120 V/230 V CA, 50-60 Hz
Modèle pour l’Europe . . . . . . . . . . . . . . . . . . . . . . . . . . . . . . . . . . . . . . . . . 230 V CA, 50 Hz
Consommation électrique . . . . . . . . . . . . . . . . . . . . . . . . . . . . . . . . . . . . . . . . . . . . . . . . . 22 W
Dimensions (l/h/p) (saillies comprises) . . . . . . . . . . . . . . . . . . . . . . . . . . . . . 435 x 127 x 292 mm
Poids . . . . . . . . . . . . . . . . . . . . . . . . . . . . . . . . . . . . . . . . . . . . . . . . . . . . . . . . . . . . . . . . 4,0 kg
Pays d'origine . . . . . . . . . . . . . . . . . . . . . . . . . . . . . . . . . . . . . . . . . . . . . . . . . . . . . . . . . . Chine
Accessoires fournis
Télécommande (RC-615A) x 1
Piles pour la télécommande (format AA) x 2
Mode d’emploi x 1
Carte de garantie x 1
Câble RCA stéréo x 2
• Il est possible que certaines illustrations dans ce manuel soient différentes du véritable
appareil.
• Les spécifications et le design sont susceptibles d’être modifiés sans préavis ni obligation de
la part du fabricant.
Page 52

52
Tabla de Contenidos
Gracias por escoger este producto de TEAC.
Lea este manual cuidadosamente para obtener el mejor
funcionamiento de esta unidad.
Antes de Usar el Producto
Lea esto antes de operar el producto
< Debido a que la unidad puede recalentarse durante la
operación, deje siempre espacio suficiente alrededor de la
unidad para su ventilación.
<
El voltaje suministrado de la unidad debe corresponder al
voltaje impreso en el panel trasero. Si tiene alguna duda al
respecto, consulte a un electricista.
<
Elija cuidadosamente el lugar de instalación de la unidad.
Evite colocarla bajo la luz solar directa o cerca de fuentes de
calor. Evite lugares sujetos a vibraciones y polvo, frío o
humedad excesiva.
<
No coloque la unidad encima de ningún otro componente
electrónico.
< No abra el compartimiento ya que esto podría resultar en
daños al circuito o choques eléctricos. Si algún objeto extraño
cae en el interior de la unidad, sírvase contactar á su
distribuidor o compañía de servicio lo más pronto posible.
<
Al remover el enchufe de alimentación del tomacorriente de
pared, siempre tire directamente del enchufe. No tire del
cable de alimentación.
<
No intente limpiar la unidad con solventes químicos ya que
esto podría dañar su revestimiento. Use un paño limpio, seco
y sin hilachas.
<
Conserve este manual en un lugar seguro para futuras
referencias.
PRECAUCIÓN
<
No permita que ningún líquido se derrame o salpique este
aparato.
< No coloque objetos que contengan líquidos, como jarrones,
encima de este aparato.
< No instale este aparato confinado en un espacio reducido,
como podría ser encastrado en una estantería o lugar
similar.
<
Este aparato recibe corriente nominal no operativa de la
salida de corriente AC aun cuando su interruptor POWER
esté en la posición off.
<
El aparato debe estar colocado lo suficientemente cerca de
la salida de corriente como para poder acceder al enchufe
en cualquier momento.
<
Conecte siempre los aparatos de clase ! como este a salidas
de corriente con toma de tierra.
Antes de Usar el Producto. . . . . . . . . . . . . . . . . . . . . . . . . . . . 52
Manejando las Cintas del Casete. . . . . . . . . . . . . . . . . . . . . . . 53
Conexiones. . . . . . . . . . . . . . . . . . . . . . . . . . . . . . . . . . . . . . . 54
Usando la Unidad de Control Remoto. . . . . . . . . . . . . . . . . . . 55
Identificando las Partes . . . . . . . . . . . . . . . . . . . . . . . . . . . . . . 56
Pantalla. . . . . . . . . . . . . . . . . . . . . . . . . . . . . . . . . . . . . . . . . . 58
Reproducción (TAPE I o TAPE II). . . . . . . . . . . . . . . . . . . . . . . . 59
Reproducción Continuada. . . . . . . . . . . . . . . . . . . . . . . . . . . . 61
Blank Scan . . . . . . . . . . . . . . . . . . . . . . . . . . . . . . . . . . . . . . . 61
Búsqueda de Canciones . . . . . . . . . . . . . . . . . . . . . . . . . . . . . 62
Intro Check. . . . . . . . . . . . . . . . . . . . . . . . . . . . . . . . . . . . . . . 63
Grabación (TAPE I o TAPE II) . . . . . . . . . . . . . . . . . . . . . . . . . . 64
Grabación Mezclando Micrófono . . . . . . . . . . . . . . . . . . . . . . 66
Grabación Continua . . . . . . . . . . . . . . . . . . . . . . . . . . . . . . . . 67
Grabación Paralela . . . . . . . . . . . . . . . . . . . . . . . . . . . . . . . . . 68
Copiado (desde TAPE I a TAPE II). . . . . . . . . . . . . . . . . . . . . . . 68
Edición durante el Copiado (solamente a velocidad normal) . . 69
Copiado Sincronizado en Reversa (desde TAPE I a TAPE II). . . . 70
Reproducción y Grabación Cronometradas . . . . . . . . . . . . . . . 72
Solucionador de Problemas. . . . . . . . . . . . . . . . . . . . . . . . . . . 73
Mantenimiento. . . . . . . . . . . . . . . . . . . . . . . . . . . . . . . . . . . . 74
Especificaciones . . . . . . . . . . . . . . . . . . . . . . . . . . . . . . . . . . . 75
Page 53
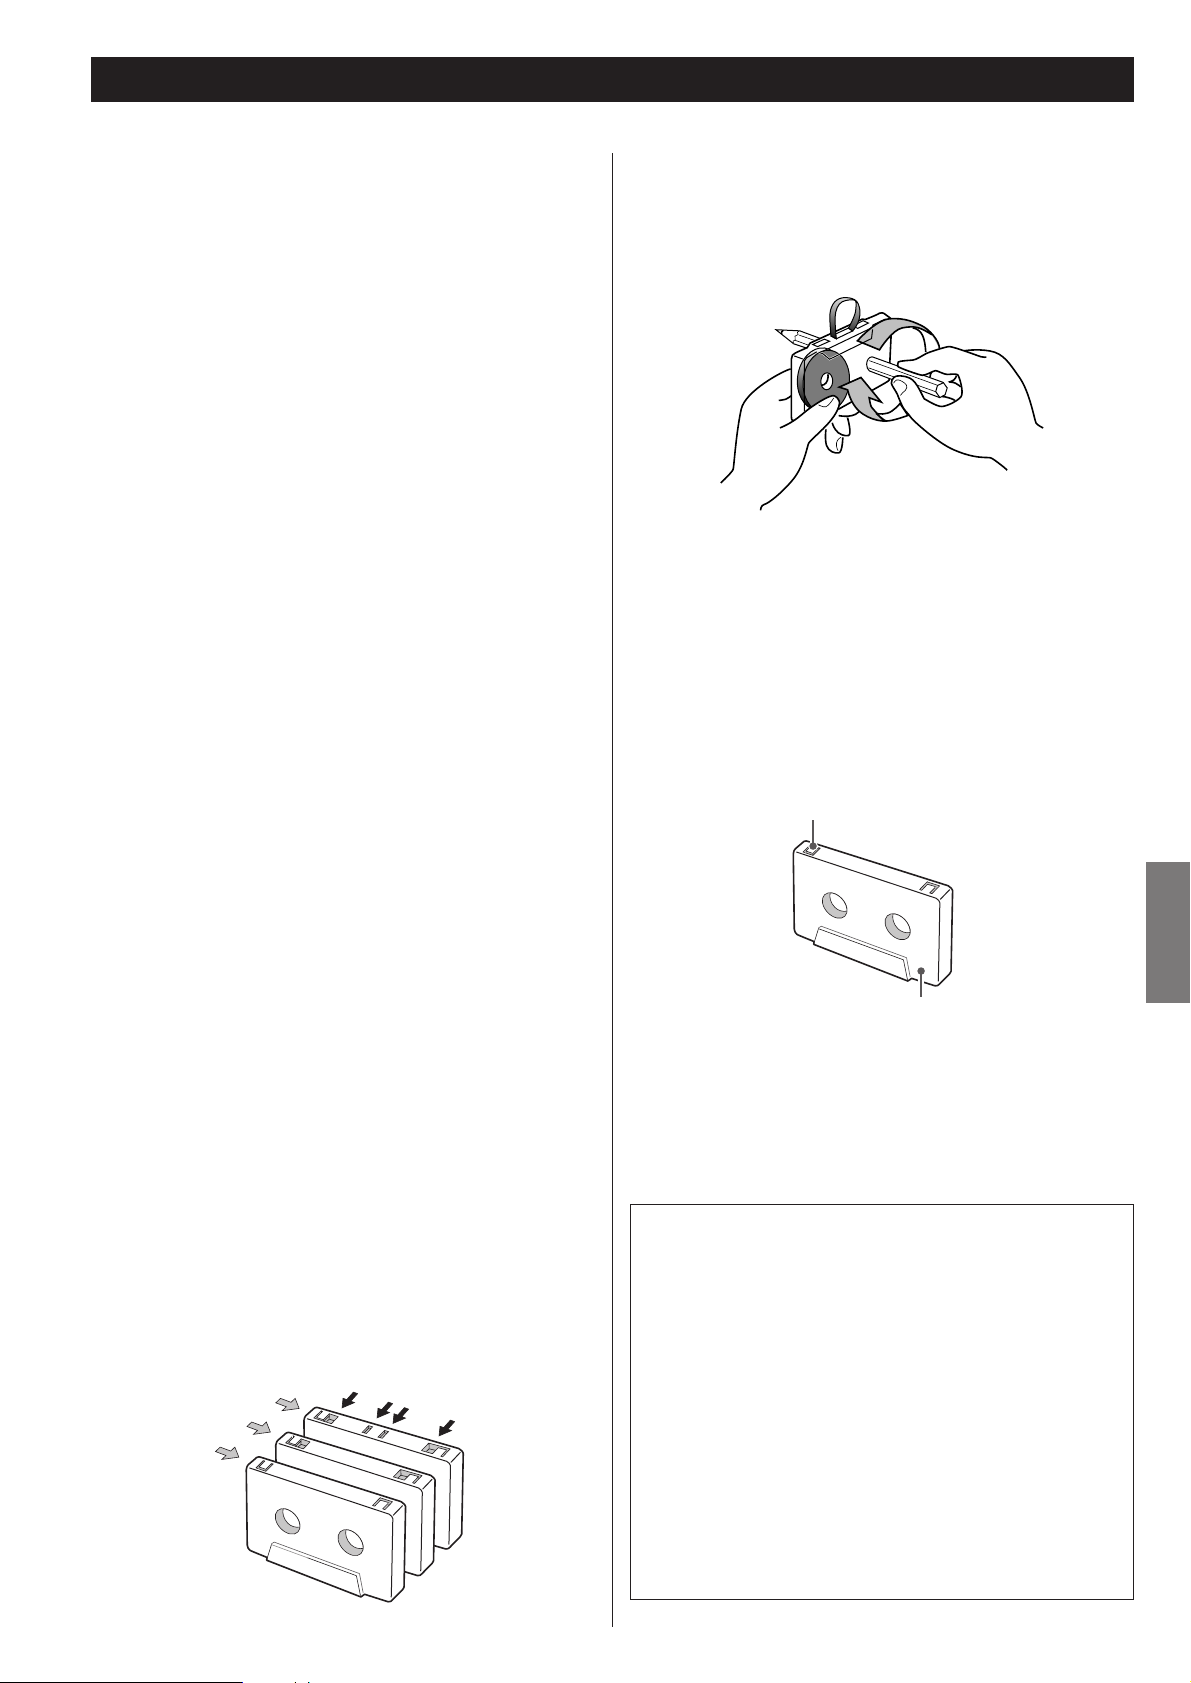
53
ESPAÑOL
Manejando las Cintas del Casete
Precauciones
< No abra el casete ni extraiga la cinta del casete.
<
No toque la superficie de la cinta.
<
No use o guarde la cinta en un lugar húmedo o polvoriento.
<
Guarde la cinta fuera de cualquier fuente magnética, como
portavoces o Televisores, por otra parte la cinta puede
borrarse por el ruido producido durante las grabaciones
importantes.
Casetes que no se deben utilizar
Bajo rendimiento, errores o mal funcionamiento puede
originarse si usted usaría alguna de las cintas descriptas más
abajo.
Algunas de estas cintas también pueden causar problemas de
traba de cinta que pueden dañar el mecanismo de transporte
de cinta.
Casetes deformados
No use un casete deformado o uno que tenga la cinta con
movimiento inestable o hace un sonido extraño durante el
avance o rebobinado rápido.
Cintas largas
No use cintas C-120 o cintas más largas. Estas cintas son muy
delgadas y pueden estirarse fácilmente o enredarse en el
mecanismo de transporte de cinta.
Las cintas interminables
No use estas cintas porque pueden fácilmente enredarse en el
mecanismo de transporte de la cinta.
Función de detección automática del tipo de
cinta
Esta casetera puede detectar qué tipo de cinta está siendo
usada basada en la detección de orificios en la carcasa del
casete. Asegúrese de usar las casetes con los orificios de
detección.
<
Con esta casetera usted puede reproducir cintas normales
(Tipo
I), de cromo (Tipo II ) y de metal (Tipo IV). Para
grabación, use cintas normales (Tipo
I) o de cromo (Tipo II ).
<
Cada casetera (CINTA I y CINTA II) está equipada con su
propia función de autodetección de tipo de cinta, así que
usted puede usar tipos diferentes de cinta al mismo tiempo.
Cinta floja
La flojera de la cinta puede causar que la cinta se enrede en el
cabezal u otras partes rodantes. Para prevenir esto, ajuste
toda la cinta floja usando un lápiz insertado en el agujero de
la bobina.
Las pestañas de prevención de borrado
accidental
Las pestañas sobre el casete le permite prevenir que las
grabaciones importantes sean borradas por equivocación. Hay
dos pestañas en cada casete: una para el lado A y la otra para
el lado B. Una vez que estas pestañas han sido retiradas
usando un destornillador o algo similar, no tiene oportunidad
de activar la función de grabación.
Para registrar sobre una casete a la cual le ha sido retirada la
pestaña, pegue un trozo de cinta adhesiva sobre el orificio.
Asegúrese de no tapar los orificios de detección del tipo de
cinta.
Reductor de ruido Dolby
El reductor de ruido Dolby está diseñado para reducir el siseo
de la cinta, un ruido introducido durante el proceso de
grabación y reproducción. Esta casetera está equipada con el
reductor de ruido Dolby B.
El reductor de ruido Dolby verifica la calidad de grabación y
reproducción. Para la reproducción, asegúrese de poner la
tecla de DOLBY NR en la misma posición que fue usada
cuando se hizo el registro.
Fabricado bajo licencia de Dolby Laboratories. Extensión de
rango dinámico de HX Pro originada por Bang y Olfusen.
Dolby, HX Pro y el símbolo de la doble D son marcas
comerciales de Dolby Laboratories.
Pestaña de prevención de borrado
accidental para el lado A
Lado A
Metal (Tipo
Cromo (Tipo
Normal (Tipo
Orificios de detección automatica del tipo de cinta
IV
)
II
)
I
)
Page 54

54
Conexiones
Precauciones
<
Inserte el cable de alimentación eléctrica en un tomacorriente de CA solamente después de haber hecho
todas las demás conexiones.
<
Refiérase al manual de instrucciones de cada unidad que usted desee usar con esta casetera, y haga las
conexiones como se indique.
Amplificador
LLRR
PLAYREC
TAPE
BA
Conversión de voltaje
(Únicamente modelos de exportación en general)
Asegúrese de retirar el cable de energía de la salida CA
antes de volver a colocar el interruptor convertidor de
voltaje.
1. Ubique el selector de voltaje en el tablero posterior.
2. Utilice un desarmador plano, ajuste la posición
apropiada para 230V o 120V de acuerdo con su área.
EN NORTEAMÉRICA UTILICE ÚNICAMENTE
SUMINISTRO DE 120V.
Page 55

55
ESPAÑOL
Enchufes LINE IN y LINE OUT
Use los cables RCA provistos para hacer las conexiones entre
esta unidad y su amplificador. Asegúrese de conectar:
Enchufe blanco al toma blanco (L: canal izquierdo)
Enchufe rojo al toma rojo (R: canal derecho)
< Los enchufes deben estar insertados firmemente en los
correspondientes tomas. No junte los cables RCA al cable de
alimentación eléctrica y al cable del micrófono. Esto degrada
la calidad del sonido o genera ruidos.
Cable de alimentación de CA
Enchufe este cable de alimentación de CA en un
tomacorriente de pared de CA.
< Asegúrese de conectar el cable de alimentación en un
tomacorriente de CA que suministre el voltaje correcto.
< Segure el enchufe de alimentación durante la colocación o
remoción del cable de alimentación. Nunca extraiga ni tire
del cable de alimentación.
<
Desenchufe el cable de alimentación cuando no tenga
intenciones de usar la unidad por algún tiempo.
B
A
Usando la Unidad de Control Remoto
Precauciones durante el uso de la unidad de control
remoto
<
Apunte la unidad de control remoto al sensor de la casetera y
opere la unidad del control remoto a una distancia de no más
de 5 metros. No ubique objetos entre la unidad de control
remoto y el sensor remoto.
<
La luz directa del sol o la luz muy luminosa reducirán la
sensibilidad del sensor remoto. Si éste es el caso, use los
botones de control en la casetera en lugar de los botones
remotos.
<
Es posible el mal funcionamiento de otro equipo cercano
sensible a los rayos infrarrojos cuando usted opera el control
remoto.
Colocación de las baterías en la unidad de control remoto
Quite la tapa del compartimiento de baterías, cargue dos
baterías tipo “AA” en las direcciones indicadas, y reubique la
tapa. Cuando inserte las baterías, asegúrese de observar la
polaridad correcta (+ y –).
Si usted tiene que colocar la unidad del control remoto cerca
del sensor remoto o si cualquier botón remoto no funciona,
entonces las baterías están agotadas para usar y deben ser
reemplazadas. Asegúrese siempre de reemplazar ambas
baterías de inmediato.
Precauciones Importantes para el manejo de las baterías
El uso de la batería inadecuada puede producir pérdida de
fluido o su ruptura. Observe las instrucciones siguientes:
< Coloque las baterías en la dirección correcta tal como se
indica en el compartimiento de baterías.
<
No mezclar baterías viejas y nuevas, o mezclar distintos tipos o
marcas de baterías.
<
No caliente, desmonte o arroje las baterías al fuego o agua.
<
No guarde o lleve las baterías junto con otros objetos
pequeños de metal. Esto puede poner en cortocircuito a la
batería, causar pérdida de fluido o ruptura.
<
No intente recargar las baterías secas.
<
Cuando la casetera no va a ser usado durante mucho tiempo
(más de un mes), saque las baterías de su compartimiento.
<
Si observa pérdida de fluido en el compartimiento de la
batería, limpie todo líquido dentro del compartimiento y
cargue baterías nuevas.
Page 56
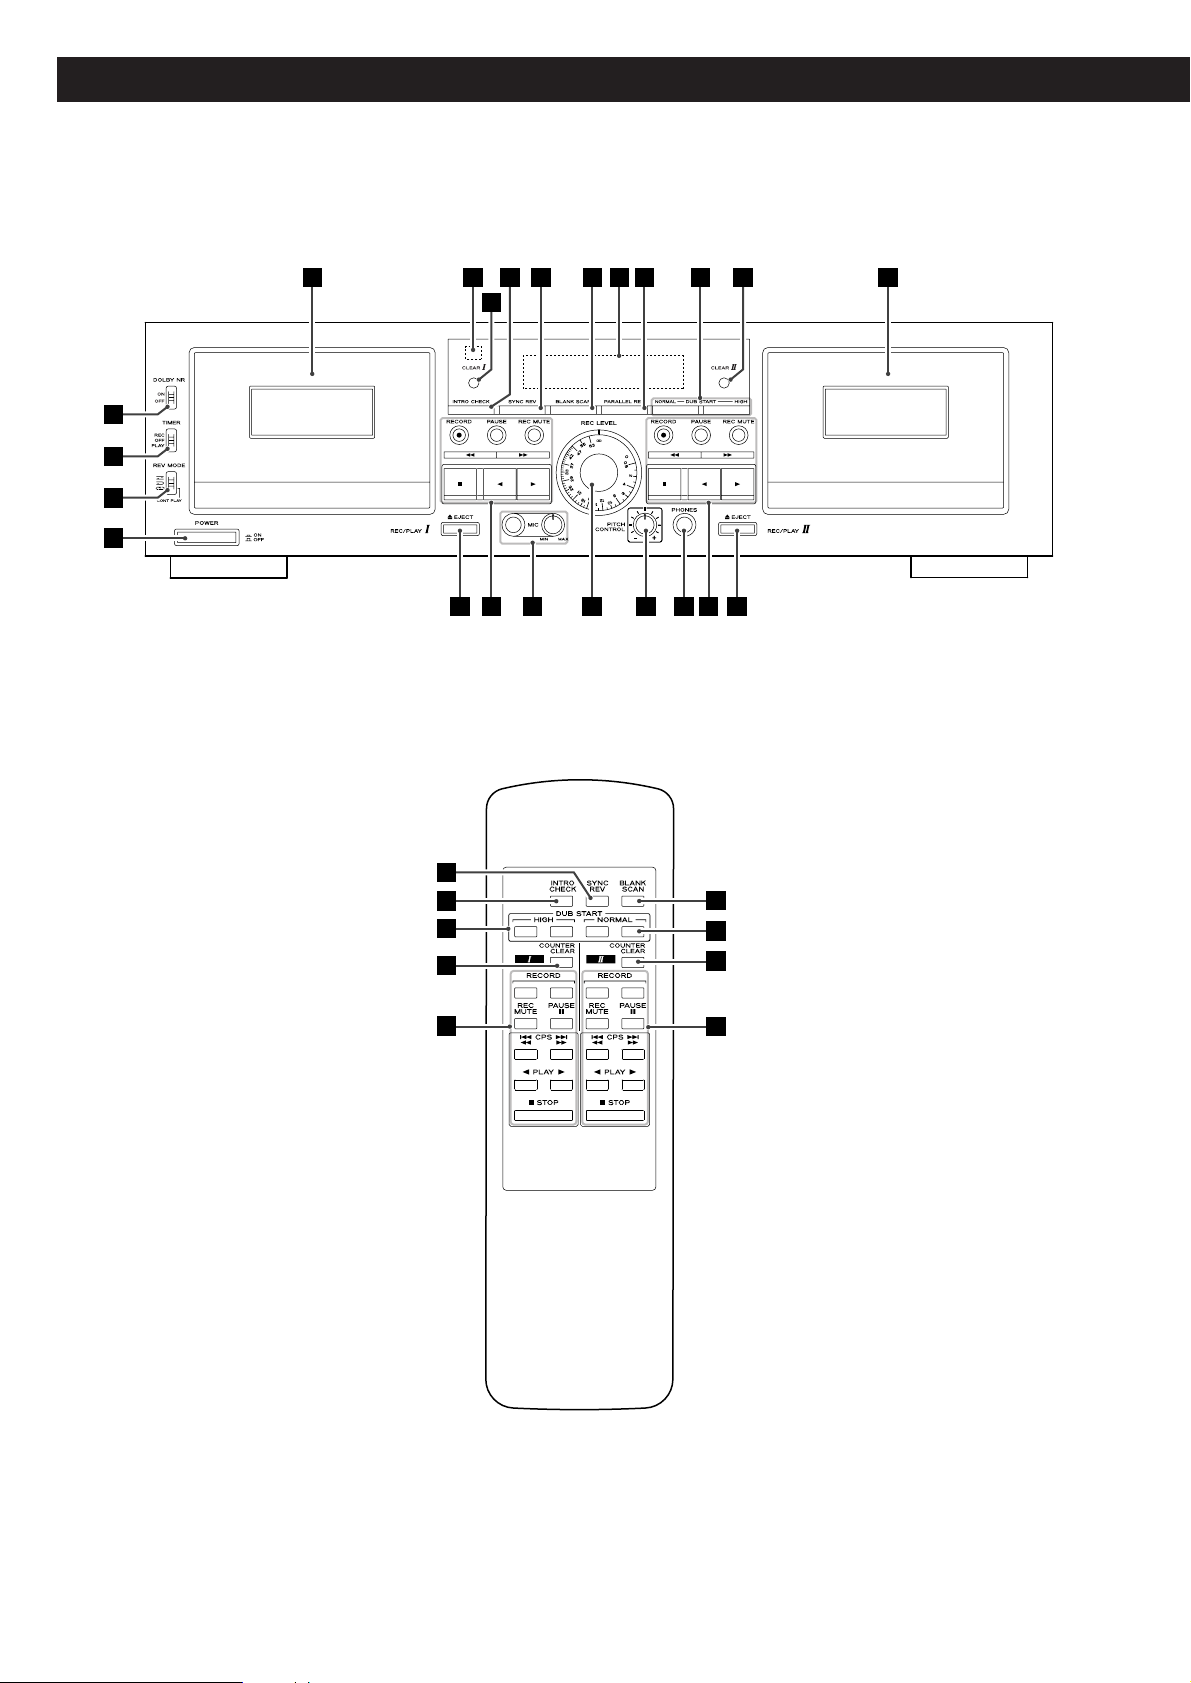
56
Identificando las Partes
O
Q
RSTO PP
A
C
B
D
E NF I J K L
MGGH
G
H
M
G
P
L
J
I
P
Page 57

57
ESPAÑOL
En este manual nosotros nos referimos sólo a los botones en la
casetera. Sin embargo, sus similares remotos pueden usarse de la
misma manera.
Interruptor de encendido
Este interruptor alterna la unidad en encendido/apagado
(on/off).
Interruptor de modo reverso (REV MODE)
Este interruptor se usa para cambiar entre los modos reversos.
Interruptor TIMER
Este interruptor se proporciona para usar con un cronómetro
de audio disponible en el comercio, para permitir controlar el
tiempo de grabación o reproducción,.
Normalmente, deje este interruptor en posición OFF.
Interruptor DOLBY NR
Este interruptor alterna el reductor de ruido Dolby en on/off.
En reproducción usted debe colocar este interruptor en la
misma posición tal como cuando fue hecha la grabación.
Compartimiento TAPE I
Sensor remoto
Este recibe las órdenes remotas. Al usar la unidad del control
remoto, apúntelo a este sensor.
Botones limpia contadores (CLEAR I y CLEAR II)
Pulsando estos botones restablece la lectura de los contadores
de cinta para TAPE I y TAPE II, respectivamente,.
Botón INTRO CHECK
Pulsando este botón le permite identificar los segmentos
grabados escuchando los primeros 15 segundos de cada
segmento.
Botón de reversa automático (SYNC REV)
Pulsando este botón activa la función de reversa automática.
Botón BLANK SCAN
Este botón alterna la función Blank Scan en on/off.
Pantalla
Esta muestra a los contadores de cintas, los contadores de
nivel, etc,
Botón de grabación paralela (PARALLEL REC)
Este botón le permite crear copias simultáneas en ambas
caseteras.
L
K
J
I
H
G
F
E
D
C
B
El equipo suministra una energía no operativa nominal
desde la toma de CA con su interruptor POWER en la
posición OFF.
A
Botón de inicio de copiado (DUB START)
Este botón se usa cuando se desea copiar el contenido de una
cinta desde TAPE I a TAPE II, a velocidad normal o alta,
En la unidad de control remoto hay un par de botones para
cada velocidad. Usted debe pulsar ambos botones al mismo
tiempo.
Compartimiento TAPE II
Botones EJECT
Pulsando estos botones abre los compartimientos TAPE I y
TAPE II.
Botones de mando de transporte de cinta
RECORD
Pulsando este botón cambia a modo de espera de grabación
la correspondiente casetera.
Cuando usted usa la unidad de control remoto, necesitará
pulsar un par de botones al mismo tiempo para cambiar
cualquier casetera a modo de espera de grabación.
PAUSE
Pulsando este botón suspende temporalmente la lectura o
grabación.
Silenciar Grabación (REC MUTE)
Este botón es para la creación de un espacio en blanco de
cuatro segundos necesitado para la operación adecuada de la
función Búsqueda de Canciones Computomatic (CPS).
m
/,
Avance rápido/Rebobinado
H
Parada de lectura/grabación
h
/ y
Operar lado reverso/operar lado avance
Enchufe para Auriculares (PHONES)
Inserte sus auriculares en este enchufe.
Control de altura tonal (PITCH CONTROL)
El control es usado para cambiar la velocidad de lectura.
Control REC LEVEL
Este control se utiliza para ajustar el nivel de grabación.
Toma del micrófono y control de nivel
Inserte su micrófono en esta toma y use el botón para ajustar
el nivel de entrada del micrófono.
< La toma del micrófono es mono. Usted no puede usar un
micrófono estéreo con estas caseteras.
T
S
R
Q
P
O
N
M
Page 58

58
Medidor de nivel
Este muestra los niveles de grabación y reproducción.
SYNC REV
Este indicador enciende cuando la función de copiado inversa
sincronizada está seleccionada.
PARALLEL
Este indicador enciende para indicar que tiene lugar la
grabación paralela.
BLANK SCAN
Este indicador enciende para indicar que la función
correspondiente está seleccionada.
Indicador de dirección de reproducción/grabación de la
casetera TAPE I
Indicador de pausa
Este indicador enciende cuando la casetera TAPE I está
detenida temporalmente.
Contador de cinta de la casetera TAPE I
El contador de la cinta indica la posición relativa de la cinta.
Usted puede restablecer al contador para poner a cero todas
las veces que quiera.
Durante una función CPS, el contador de la cinta muestra
“CP” y el número específico de canciones para saltar delante
o atrás.
Indicador de grabación
Este indicador enciende cuando la casetera TAPE I está en el
modo de grabación.
Indicador de reproducción
Este indicador enciende cuando la casetera TAPE I está en el
modo de reproducción.
i
h
g
f
e
d
c
b
a
SYNC REV BLANK SCAN
PARALLEL
HIGH DUB
NORM DUB
REC
PLAY
REC
PLAY
g
i
j
k
m
e ohf n
l
a b dc
Pantalla
Indicador de copiado
El indicador “NORMAL DUB” se enciende durante el
copidado a velocidad normal, y el indicador “HIGH DUB” se
enciende durante el copiado a alta velocidad.
Indicador de reproducción
Este indicador enciende cuando la casetera TAPE II está en el
modo de reproducción.
Indicador de grabación
Este indicador enciende cuando la casetera TAPE II está en el
modo de grabación.
Contador de cinta de la casetera TAPE II
El contador de la cinta indica la posición relativa de la cinta.
Usted puede restablecer al contador para poner a cero todas
las veces que quiera.
Durante una función CPS, el contador de la cinta muestra
“CP” y el número específico de canciones para saltar delante
o atrás.
Indicador de pausa
Este indicador se enciende cuando la casetera TAPE II está
detenida temporalmente.
Indicador de dirección de reproducción/grabación de la
casetera TAPE II
o
n
m
l
k
j
Page 59

Seleccione un modo reverso usando el interruptor REV
MODE.
Usted tiene tres opciones
u
: Modo de una vía
Ponga el interruptor en esta posición para reproducir sólo un
lado.
j
: Modo de dos vías
Ponga el interruptor en esta posición para reproducir ambos
lados de la cinta en una sesión. Cuando la cinta alcanza el
extremo del lado A, la dirección de la cinta se invierte
automáticamente, y la reproducción continúa en el lado B.
p
: Modo repetición
Ponga el interruptor en esta posición y ambos lados de la
cinta se reproducen 5 veces.
Poner el interruptor DOLBY NR.
Ponga el interruptor en posición ON cuando reproduce cintas
grabadas con Dolby NR.
Para reproducir cintas grabadas sin Dolby NR, ponga el
interruptor en la posición OFF.
Pulsar el botón de dirección de funcionamiento (h o
y
).
y
: Presionando este botón empezará la reproducción del
lado A. La reproducción se detiene al finalizar el lado A si
el modo de rebobinado está ajustado en u
. Si el modo
de rebobinado está ajustado en j
, la reproducción
continua en el lado B, y se detiene al finalizar el lado B. Si
el modo de rebobinado está ajustado en p
, la
reproducción cumple el ciclo a través de ambos lados de
la cinta 5 veces.
h
: Presionando este botón empezará la reproducción del
lado B. La reproducción se detiene al finalizar el lado B si
el modo de rebobinado está ajustado en u
o j. Si el
modo de rebobinado está ajustado en p
, se reproduce
el lado B, y luego la reproducción cumple el ciclo a través
de ambos lados de la cinta 4 veces.
5
4
3
59
ESPAÑOL
Reproducción (TAPE I o TAPE II) 1
13
4
2 2
5 5
Encienda la unidad.
Cargue una cinta pre-grabada en la casetera TAPE I o II.
Pulse el botón EJECT (L) para abrir el compartimiento del
casete. Inserte la cinta del casete con su borde abierto hacia
abajo, el lado A (o el lado deseado) que lo enfrente. Entonces,
cierre el compartimiento de la casetera empujando en su
parte delantera.
<
Esta casetera puede reproducir cintas Normal (Tipo I), Cromo
(Tipo II) y Metal (Tipo IV).
Por motivos de practicidad, nos referimos al lado de la cinta
frente suyo, como Lado A y el lado de la cinta de lado
contrario, como Lado B. Al insertar un casete con los lados A
y B en sentido contrario, en el Lado A deberá leerse Lado B y
en el Lado B deberá leerse Lado A.
2
1
Lado A enfrentándolo
Page 60

60
Reproducción (TAPE I o TAPE II) 2
EA A F
B D DBCC
Para detener la reproducción:
Pulse el botón de parada (H).
Para detener la cinta temporalmente:
Pulse el botón PAUSE.
Para reanudar la reproducción, pulse el botón PAUSE
nuevamente, o pulse el botón de funcionamiento (
h
o y).
< Mientras que la reproducción está detenida, pulsando el
botón de funcionamiento cuya dirección es opuesta al
indicador (
h
o y), cambiará la dirección de la cinta. Esto no
habilita la función de pausa. Pulse el botón PAUSE o el mismo
botón de funcionamiento (
h
o y) otra vez para empezar la
reproducción en el otro lado de la cinta.
Avance rápido/rebobinado
Pulse el botón (m o ,) mientras está en el modo de
parada y la cinta avanzará o invertirá rapidamente.
Para detener la cinta en avance rápido, pulse el botón de
parada (H
).
C
B
A
Contador de cinta
Pulse el botón CLEAR I o II para restablecer el contador de
cinta a 0000. Usted puede usar esta función para la
localización fácil de algún punto deseado en la cinta.
Control de altura tonal (casetera TAPE I solamente)
Este mando varía la altura tonal de la música durante la
reproducción. (Este mando no funciona durante grabación o
copiado.)
Girando el botón de ajuste de la altura tonal en el sentido de
las agujas del reloj incrementa la velocidad de la reproducción
y aumenta la altura tonal hasta un máximo de +10%.
Girando el botón de ajuste de la altura tonal en sentido
contrario a las agujas del reloj reduce la velocidad de la
reproducción y disminuye la altura tonal hasta un máximo de
–10%.
Para escuchar a través de los auriculares
Enchufe sus auriculares en la toma PHONES, y póngase los
auriculares.
Enchufando en el toma PHONES no desactiva la línea de
salida.
PRECAUCIÓN:
No hay control de nivel para la salida de audífonos.
Tenga cuidado ya que pueden producirse sonidos fuertes
repentinos, dependiendo del material grabado. Usted debe
evitar la exposición prolongada al sonido de volumen alto
pues esto puede dañar sus oídos.
F
E
SYNC REV BLANK SCAN
PARALLEL
HIGH DUB
NORM DUB
REC
PLAY
REC
PLAY
D
Page 61

61
ESPAÑOL
Reproducción Continuada
3
41 14
2
La reproducción continuada puede realizarse entre la TAPE I y
TAPE II. Cuando se reproduce una cinta hasta el fin, la otra cinta
automáticamente arranca la reproducción, en un modo de
posta.
Carga de cintas pre-grabadas en los compartimientos
TAPE I and TAPE II.
Colocar el interruptor Dolby NR.
Siempre coloque el interruptor Dolby NR en la misma posición
como cuando fue usado para la grabación.
Coloque el interruptor REV MODE en posición p
(CONT PLAY).
Pulse el botón de dirección de funcionamiento (
h
o y)
de la casetera que usted desea empezar primero.
Usted puede empezar la reproducción continua desde TAPE I
o TAPE II.
Los ciclos de reproducción para cuatro lados de cinta son
como sigue:
La reproducción se detendrá automáticamente cuando se han
ejecutado ambos lados de ambas cintas continuamente
durante 5 veces.
TAPE I Lado A w
Lado B
2x
TAPE II Lado B s Lado A
4
3
2
1
Blank Scan
La función Blank Scan detecta 10 segundos o más de cinta en
blanco y salta sobre ella.
Para activar esta función, pulse el botón BLANK SCAN
seguido por el botón play deseado (
h
o y).
< El indicador BLANK SCAN se enciende cuando esta función
está activada.
< Para desactivar esta función, pulse el botón BLANK SCAN otra
vez. El indicador se apagará.
< Los pasajes muy suaves en la música serán probablemente
identificados como espacios en blanco. Si usted detecta esto,
apague el Blank Scan.
Page 62

62
Búsqueda de Canciones
m,m,
Esta casetera está provista con la función Búsqueda de
Canciones Computomatic (CPS). Esta función detecta los
espacios no grabados (más largos que 4 segundos) entre las
canciones y avanza rápido la cinta hacia adelante o hacia
atrás saltando sobre el número especificado de canciones,
permitiendo el acceso directo al principio de una canción
deseada. CPS puede saltar hasta 20 canciones hacia adelante
o detrás de la canción actual.
Cuando usted pulsa cualquier botón de avance rápido (m
o
,
) durante la reproducción, el contador de la cinta lee “CP
01” y la cinta avanza a alta velocidad en la dirección pulsada.
Cada vez que usted pulsa el botón de la dirección hacia
adelante, el número desplegado aumenta por un entero. El
número disminuye cuando usted pulsa el botón de la
dirección opuesta.
<
Si usted está escuchando una canción y quiere regresar a la
canción anterior, pulse dos veces el botón localizador opuesto
a la dirección de la cinta. Pulsándolo sólo una vez lo devolverá
al principio de la canción actual. Cada presión adicional del
botón lo regresará una canción.
Pantalla de TAPE I
SYNC REV BLANK SCAN
PARALLEL
HIGH DUB
NORM DUB
REC
PLAY
REC
PLAY
El rango de búsqueda varía dependiendo de la posición del
interruptor REV MODE.
u: Un lado de la cinta solamente
j
: Ambos lados de la cinta cuando buscamos en la misma
dirección de la reproducción
O
Un lado de la cinta solamente cuando buscamos en la
dirección opuesta a la reproducción
p
: Ambos lados seguidos por el primer lado
(lado A w
lado B w lado A si CPS está conectado cuando
el lado delantero de la cinta (enfrentándolo) está
ejecutándose; o lado B w
lado A w lado B si CPS está
conectado cuando el lado inverso de la cinta (enfrentando
lejos) está ejecutándose.
<
La función de CPS no puede trabajar apropiadamente si los
espacios en blanco entre las canciones son menores de 4
segundos o contienen ruido.
Page 63

63
ESPAÑOL
Intro Check
Intro Check ejecuta los primeros 15 segundos de cada canción,
permitiéndole encontrar rápidamente la canción que usted está
buscando.
Pulse el botón INTRO CHECK durante la reproducción o el modo
parada. La cinta avanzará rápidamente en la misma dirección a la
reproducción. Cuando usted encuentra la canción deseada,
pulse el botón INTRO CHECK para empezar la reproducción de
nuevo.
El rango de Intro Check varía dependiendo de la posición del
interruptor REV MODE:
u
: Revisa un lado de la cinta
j
: Revisa ambos lados de la cinta
p
: Cuando revisa ambos lados de la cinta realiza una revisión
doble del primer lado
(lado A w
lado B w lado A si Intro Check se empieza en el
lado delantero de la cinta (enfrentándolo); o lado B w
lado
A w
lado B si Intro Check se empieza en el lado inverso de
la cinta (enfrentando lejos)
La cinta se detiene automáticamente una vez completada la
operación de revisión.
<
Asegúrese que el compartimiento TAPE I está vacío al
empezar Intro Check en TAPE II.
< El contador de la cinta informa cuántas canciones se han
verificado hasta ahora.
< Activando la función Intro Check durante la reproducción
normal producirá el salto a la próxima canción: la
reproducción de la canción actual se interrumpe a la mitad.
<
La función Intro Check puede no operar apropiadamente si
los espacios en blanco entre canciones son menores a 4
segundos o contiene ruido.
Page 64
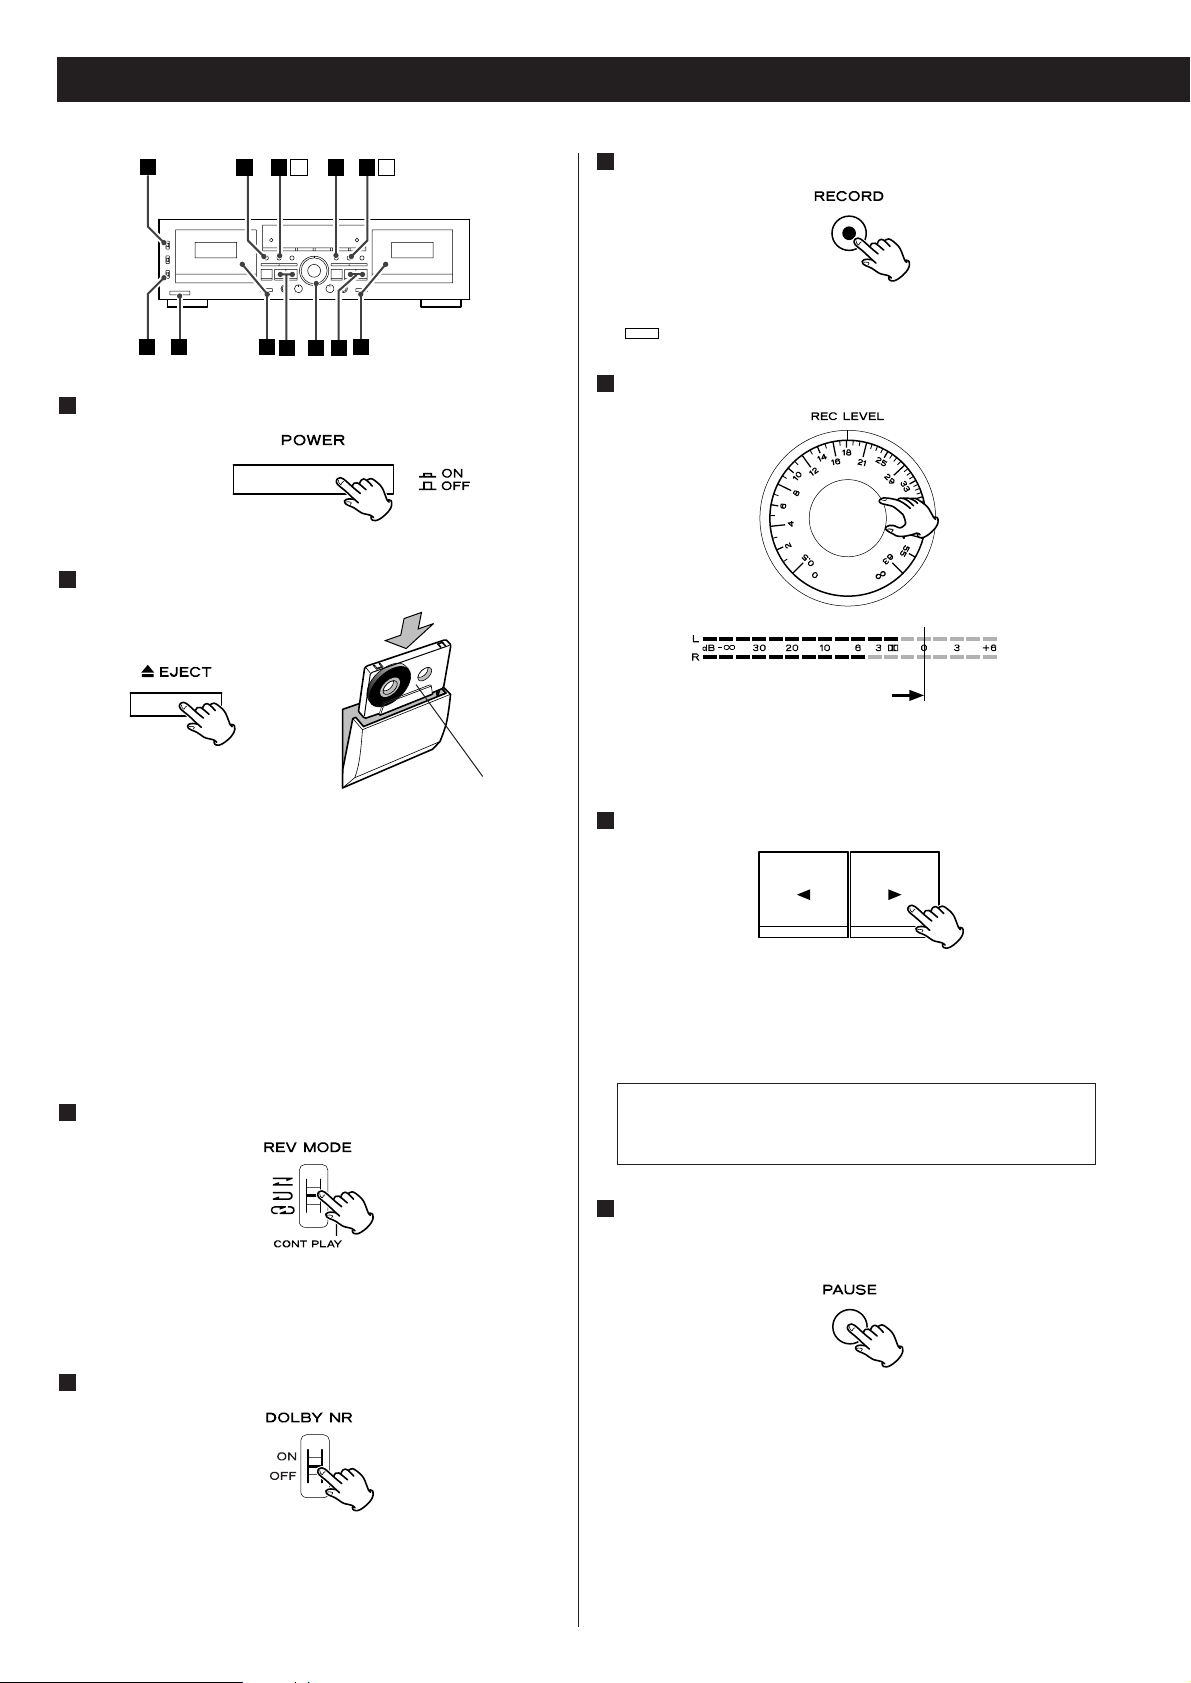
64
Grabación (TAPE I o TAPE II)
13
4
2 2
5 5
8 8A A
67 7
Encienda la unidad.
Cargue una cinta para grabar.
Pulse el botón EJECT (L) para abrir el compartimiento de la
casetera. Inserte el casete de cinta con su borde abierto hacia
abajo, el lado A que lo enfrente. Entonces cierre el
compartimiento de la casetera empujando en la puerta hasta
que esté cerrado.
<
Si las pestañas de prevención de borrado del casete cargado
han sido retirados, pegue un pedazo de cinta adhesiva
encima del orificio(s).
<
Con esta casetera usted puede usar cintas para grabación
Normal (Tipo I) y de Cromo (Tipo II).
Coloque el interruptor REV MODE.
u
: Coloque en esta posición para grabar sobre un sólo lado.
j
o p:
Coloque a ambas posiciones grabar sobre ambos lados.
Coloque el interruptor DOLBY NR.
Coloque el interruptor en la posición ON para grabar con el
reductor de ruido Dolby.
Coloque el interruptor en la posición OFF para grabar con el
reductor de ruido Dolby.
4
3
2
1
Pulse el botón RECORD.
La casetera entra en el modo de espera de grabación. J y
se enciende en la pantalla.
Ajuste el nivel de grabación.
Empiece la reproducción de su registro fuente y coloque el
botón de control REC LEVEL para que el medidor de nivel
indique “0 dB” como tope.
Coloque la dirección de grabación.
La grabación es hecha en la dirección indicada por el
indicador de dirección play/record (
h
o y). Para cambiar
esta dirección, pulse la direción opuesta en el botón de
función (
h
o y).
Cuando todo esté listo, comience la grabación pulsando
el botón PAUSE o el botón de función cuya flecha
apunta en la misma dirección como el indicador.
<
Para grabar sobre ambos lados de la cinta, coloque el
interruptor REV MODE en j
o p y pulse el botón
ejecución hacia adelante (y
). Si usted pulsa el botón
ejecución en reversa (h
), la grabación será hecha solamente
sobre el lado de la cinta inverso.
< Para detener la grabación, pulse el botón de parada (H).
8
Tenga el cuidado para no pulsar el botón de función cuya
flecha apunta en la misma dirección como el indicador.
Haciendo así empezará la grabación.
7
6
REC
5
Lado A enfrentándolo
Page 65

65
ESPAÑOL
Para Detener la Grabación Temporalmente
Pulse el botón PAUSE para detener la grabación
temporalmente. Una segunda presión del botón reanuda la
grabación.
Para Borrar las Grabaciones
Cuando usted hace una grabación, la cinta es sobreescrita (la
grabación previa es borrada). Para borrar una cinta sin hacer
una nueva grabación, coloque el control REC LEVEL en la
posición mínima (
∞) y pulse el botón RECORD seguido por el
botón de ejecución (
h
o y).
Inicio de Grabación Rápida
Sujete el botón RECORD y pulse el botón de dirección de
funcionamiento (
h
o y) que corresponde a la dirección en
que usted quiere avanzar la cinta.
Grabación de Silencio
Use esta función para crear los espacios en blanco entre las
canciones para el funcionamiento apropiado de la función
Búsqueda de Canciones Computomatic (CPS).
Pulse el botón REC MUTE cuando la grabación alcance el
punto deseado. Ninguna señal se graba durante
aproximadamente 4 segundos y entonces la casetera entra en
el modo de espera de grabación. Para reanudar la grabación,
pulse el botón PAUSE.
Para crear un espacio en blanco de más de 4 segundos
Sujete el botón REC MUTE durante el tiempo deseado.
Cuando usted libera el botón, la casetera entra en el modo de
espera de grabación.
Para crear un espacio en blanco de menos de 4 segundos
Pulse el botón de PAUSE dentro de los 3 segundos de haber
pulsado el botón REC MUTE.
< Si usted pulsa el botón REC MUTE cuando la casetera está en
el modo de espera de grabación, ninguna señal será grabada
durante más de 4 segundos, y la casetera regresa al modo de
espera de grabación.
Page 66
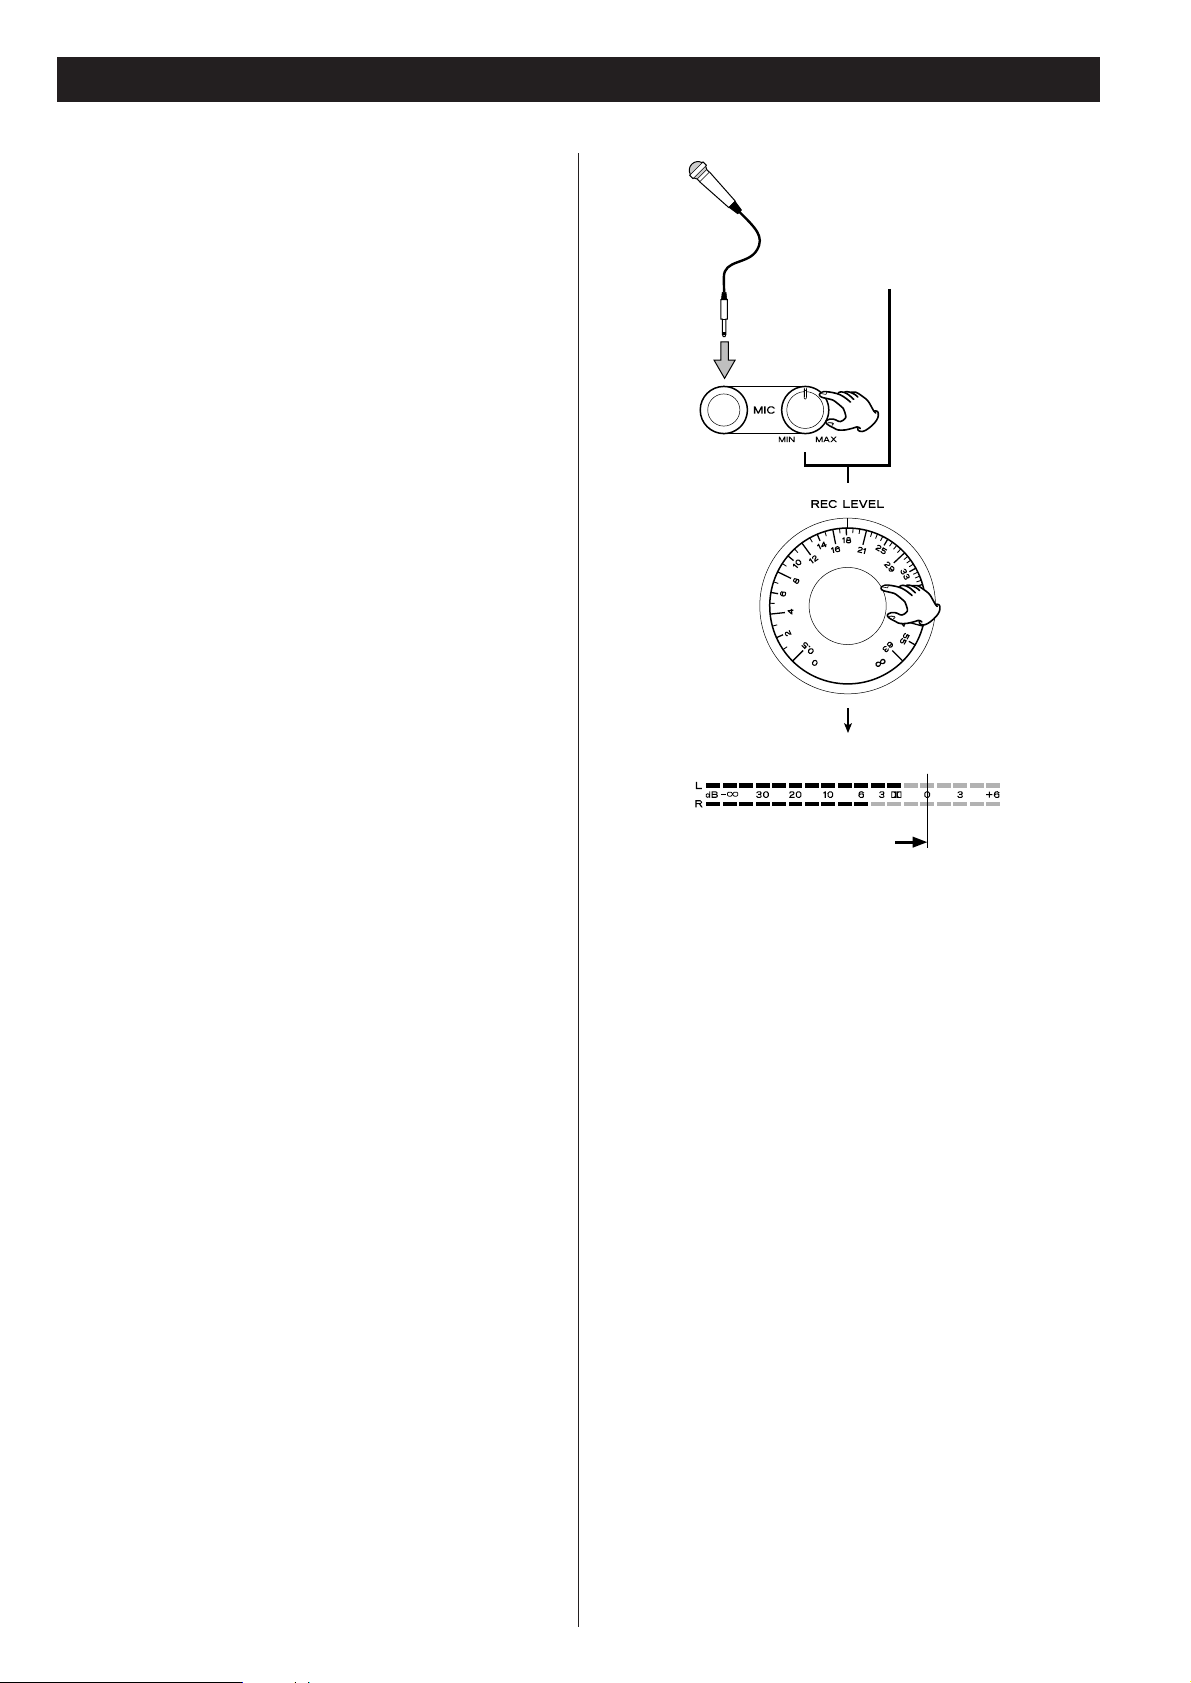
66
Grabación Mezclando Micrófono
< El sonido del micrófono es dirigido a los canales derecho e
izquierdo así es localizado en el centro de la imagen
estereofónica.
<
Usted tiene la opción de seleccionar la fuente de audio que
desea en el amplificador conectado al toma LINE IN de la
casetera, o conectando la fuente deseada directamente en el
toma LINE IN de la casetera .
<
Para prevenir la retroalimentación (ecos), desactive los
parlantes del amplificador. Use los auriculares para supervisar
la grabación.
<
Esta casetera no es compatible con micrófonos estéreos.
Siempre use un micrófono mono.
Ajustando el Nivel de Grabación de la
Mezcla
Para grabar una mezcla de voz y otra fuente de audio,
necesitará ajustar el nivel de entrada del micrófono y luego el
nivel de grabación global.
1. Enchufe su micrófono en la toma MIC del panel frontal.
2. Comience ejecutando la fuente de audio, cambie la casetera
dentro del modo de espera de grabación (pulsando el botón
RECORD), y temporalmente ajuste el control REC LEVEL a un
nivel relativamente bajo.
3. Hable en el micrófono y ajuste el control de nivel MIC para
obtener el balance óptimo entre su voz y la otra fuente.
4.Afine el nivel de grabación global usando el control REC
LEVEL para que el indicador de nivel lea 0 dB como tope.
5.Cuando todo está listo, inicie la grabación como está
instruido anteriormente en este manual.
Fuente de audio
Ajuste del nivel de
entrada del micrófono
Ajuste del nivel de la
grabación global
Page 67

67
ESPAÑOL
Grabación Continua
2
3
4
1 15AA
Esta función le permite hacer una grabación ininterrumpida
sobre ambos lados de las dos cintas.
Cargar casetes para grabar en los compartimientos TAPE
I y TAPE II.
Coloque el interruptor REV MODE en p posición
(CONT PLAY).
<
Coloque el interruptor DOLBY NR en posición ON si lo desea.
Pulse el botón RECORD de la casetera TAPE I
La casetera entra en el modo de espera de grabación. J y
se encenderán en la pantalla. Ahora ajuste el nivel de
grabación y cualquier otra característica, como requiera.
REC
3
2
1
Verifique la dirección de la grabación.
Si el indicador de dirección de funcionamiento (ho y)
apunta en dirección opuesta a la deseada, cambie la dirección
pulsando el botón de la dirección inversa (
h
o y).
La grabación es hecha en este orden:
Usted puede iniciar la grabación desde el lado B de TAPE I.
Pero si hace así, el lado A de esa cinta no es grabado: cuando
la grabación llegue al fin del lado B, la casetera TAPE II iniciará
la grabación.
<
La casetera TAPE II siempre iniciará la grabación desde el lado
A.
Inicio de la grabación.
La grabación se inicia cuando usted pulsa el botón PAUSE en
la casetera TAPE I o el botón de función cuya flecha apunta
en la misma dirección como el indicador.
Cuando termina la grabación en la casetera TAPE I, la
casetera TAPE II automáticamente inicia la grabación.
<
La transición desde TAPE I a TAPE II demanda varios
segundos.
Detener la grabación
Pulse el botón de parada (H ) de la casetera que está
grabando en este momento.
A
5
TAPE I Lado A
x
Lado B
x
TAPE II Lado A
x
Lado B
Tenga el cuidado para no pulsar el botón de función cuya
flecha apunta en la misma dirección como el indicador.
Haciendo así empezará la grabación.
4
Lado A enfrentándolo
Page 68

68
Grabación Paralela
3
2 2
1 1
Esta función le permite grabar el mismo material en ambas TAPE
I y TAPE II simultáneamente.
Cargue las cintas en ambas caseteras y pulse el botón
PARALLEL REC para iniciar la grabación.
< Antes de iniciar la grabación, verifique y corrija lo siguiente
realizando los pasos - de página 64:
Dirección de la grabación, colocando el modo inverso,
colocando Dolby NR, el nivel de Grabación, etc,
Cuando todo está preparado, vuelva al modo de parada si la
unidad está en otros modos.
< Durante la grabación en paralelo, el indicador PARALLEL está
iluminado en la pantalla.
< Durante la grabación en paralelo, solamente operan los
siguientes botones:
casetera TAPE I: parada (H)
casetera TAPE II: PAUSE, REC MUTE y parada (H
)
<
Pulsando el botón de parada (H) en cualquiera de las
caseteras detendrá ambas cintas al mismo tiempo.
71
Cargue su cinta fuente (para reproducir) en la casetera
TAPE I y su cinta a grabar en la casetera TAPE II.
Coloque la dirección de la cinta en ambas caseteras.
Si el indicador de dirección de la ejecución/grabación (ho
y
) apunta en dirección opuesta a la deseada, pulse el botón
PAUSE y luego el botón de ejecución (
h
o y) que
corresponde a la dirección deseada.
Después de cambiar la dirección de transporte de la cinta,
asegúrese de pulsar el botón de parada (H
) para salir del
modo de pausa.
< Tenga el cuidado para no pulsar el botón de función cuya
flecha apunta en la misma dirección como el indicador.
Haciendo así empezará la reproducción
<
Coloque el interruptor REV MODE como requiera.
<
Usted no necesita ajustar el nivel de grabación o colocar el
sistema Dolby NR, ambos dependen de la cinta fuente pregrabada.
Pulse cualquier botón DUB START para iniciar el
copiado.
Para copiado a velocidad normal, pulse el botón NORMAL.
Para copiado a alta velocidad, pulse el botón HIGH.
El copiado a alta velocidad produce la copia en
aproximadamente la mitad del tiempo que a velocidad
normal. Recomendamos el copiado a velocidad normal para
obtener mejor calidad de audio.
3
2
1
Copiado (desde TAPE I a TAPE II)
Page 69

69
ESPAÑOL
< Durante el copiado, el indicador NORM DUB o HIGH DUB
permanece encendido en la pantalla.
< Durante el copiado a velocidad normal, solamente los
siguientes botones operan:
casetera TAPE I : parada (H)
casetera TAPE II : PAUSE, REC MUTE y parada (H
)
Durante el copiado a alta velocidad, solamente opera el botón
de parada (H).
<
Pulsando el botón de parada (H) en cualquier casetera
detiene ambas cintas al mismo tiempo.
< Ningún botón DUB START opera inmediatamente después de
que la cinta avanzó rápido o rebobinó hasta el fin. Espere 5
segundos o más antes de pulsar el botón
<
Durante el copiado, el control de altura tonal no opera.
<
El ajuste de nivel de grabación no es necesario para el
copiado, ya que el nivel de grabación es colocado al mismo
nivel de la cinta pre-grabada. La operación del control REC
LEVEL, antes o después del inicio del copiado, no tiene efecto
en absoluto.
<
Si se enciende un televisor cerca durante el copiado a alta
velocidad, una interferencia de tono alto puede ser grabado
en la cinta. Para evitar esto, realice el copiado a velocidad
normal, o apague el televisor.
Edición durante el Copiado
(solamente a velocidad normal)
Usted puede evitar el copiado de las canciones no deseadas o los
espacios en blanco innecesariamente largos, o usted puede crear
los espacios en blanco entre las canciones.
1. En el momento deseado durante el copiado, pulse el
botón PAUSE en la casetera TAPE II. Esta casetera sólo
acepta el modo pausa, permitiéndole avanzar las
canciones no deseadas.
Para crear un blanco de 4 segundos entre canciones,
pulse el botón REC MUTE en la casetera TAPE II. Esta
casetera se detendrá temporalmente después de grabar
blancos durante 4 segundos.
<
La casetera TAPE I continua la reproducción cuando la
casetera TAPE II está en el modo de pausa.
2. Para reanudar el copiado, pulse el botón PAUSE en la
casetera TAPE II.
Page 70

70
Copiado Sincronizado en Reversa (desde TAPE I a TAPE II)
54
33
1 12
Cuando usted usa esta función de copiado y una cinta más corta
alcanza su fin del lado A, momentáneamente se detendrá hasta
que la otra cinta alcance el fin de su lado A. Entonces ambas
cintas automáticamente conmutarán al lado B y reiniciarán la
grabación y reproducción simultáneamente.
Si TAPE I es más corto que TAPE II:
1. Cuando TAPE I finaliza el lado A, TAPE I se detiene y TAPE II
ingresa en el modo de “grabación en blanco”.
2.Cuando TAPE II finaliza, tanto TAPE I como TAPE ll son
rebobinados simultáneamente. TAPE l empieza la
reproducción inversa y TAPE II retoma la grabación.
3. Cuando TAPE I finaliza el lado B, tanto TAPE I como TAPE II se
detienen simultáneamente.
Si TAPE I es más largo que TAPE II:
1. Cuando TAPE II alcanza el final del lado A, TAPE Il ingresa en
el modo de espera de grabación, mientras TAPE I continua la
reproducción.
2. Cuando TAPE I finaliza, TAPE I empieza la reproducción a la
inversa y TAPE II empieza la grabación.
3. Cuando TAPE Il finaliza el lado B, tanto TAPE I como TAPE II
se detienen simultáneamente.
Inserte una cinta de casete para reproducción en el
compartimiento TAPE I y una cinta de casete para
grabación en el compartimiento TAPE II.
Coloque el interruptor REV MODE en la posición dosvías (j
).
Verifique la dirección de grabación en ambas caseteras.
Si el indicador de dirección inversa (h) se enciende sobre la
pantalla, pulse el botón PAUSE seguido por el botón avance
adelante (y
). Entonces, asegúrese de pulsar el botón parada
(H
) para salir del modo de detención.
<
Tenga el cuidado para no pulsar el botón de función cuya
flecha apunta en la misma dirección como el indicador.
Haciendo así empezará la reproducción.
<
Usted no necesita ajustar el nivel de grabación o colocar el
sistema Dolby NR, pues ambos dependen de la cinta fuente
pre-grabada.
3
2
1
Page 71
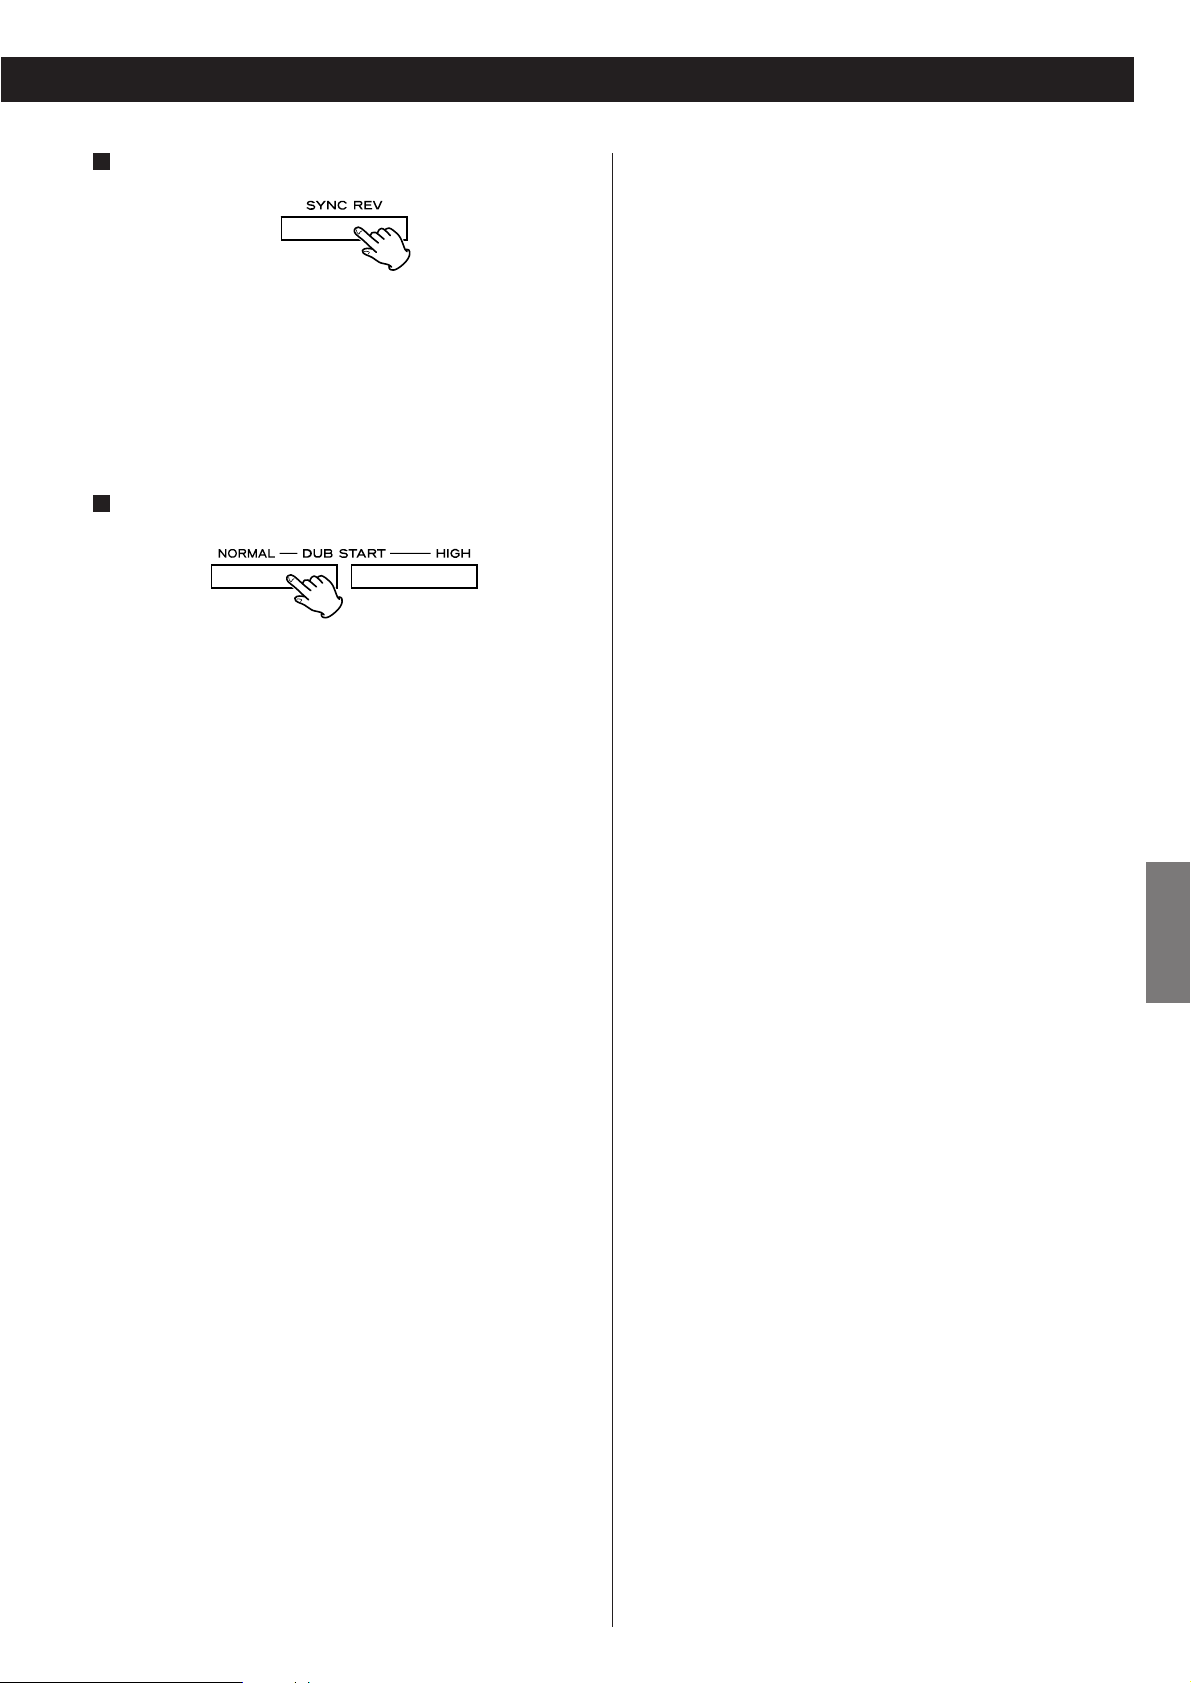
71
ESPAÑOL
Pulse el botón SYNC REV.
El indicador SYNC REV se iluminará en la pantalla.
<
El botón SYNC REV no opera si el modo reversa está colocado
en una posición distinta a j
o si la dirección de transporte
de ambas caseteras no está colocada hacia delante (y
).
Pulse algún botón DUB START para iniciar el copiado.
Para copiado a velocidad normal, pulse el botón NORMAL.
Para copiado a alta velocidad, pulse el botón HIGH.
El copiado a alta velocidad produce una copia en
aproximadamente la mitad del tiempo que a la velocidad
normal. Nosotros recomendamos el copiado a velocidad
normal para una mejor calidad de audio.
Durante el copiado, alguno de los indicadores NORM DUB o
HIGH DUB permanecerá encendido en la pantalla.
<
Durante el copiado a velocidad normal, solamente los
siguientes botones operarán:
casetera TAPE I : parada (H)
casetera TAPE II : PAUSE, REC MUTE y parada (H
)
Durante el copiado a alta velocidad solamente operará el
botón de parada (H).
5
4
< Pulsando el botón de parada (H) de alguna casetera se
detendrán ambas cintas al mismo tiempo.
< Ningún botón DUB START opera inmediatamente después de
que la cinta es avanzada o rebobinada hasta el fin. Esperar 5
segundos o más antes de pulsar el botón.
<
Durante el copiado, el control de altura tonal no opera.
<
El ajuste de nivel de grabación no es necesario para el
copiado, ya que el nivel de grabación está establecido por el
nivel de la cinta pre-grabada. La operación del control REC
LEVEL, antes o después del inicio del copiado, no tiene ningún
efecto.
<
Si se enciende un televisor cerca durante el copiado a alta
velocidad, una interferencia de tono alto puede ser grabada
en la cinta. Para evitarlo, realice el copiado a velocidad
normal, o apague el televisor.
Page 72

72
Reproducción y Grabación Cronometradas
Conectando un cronómetro disponible en el comercio a su
equipo de audio le permite despertarse con su cinta de casete
favorita, o iniciar grabación en momentos específicos.
Refiérase a la ilustración debajo, y conecte sus componentes de
audio.
La fuente de audio
(Para hacer una grabación
cronometrada de un programa
de radio, coloque su receptor
según se requiere.)
Amplificador
(Coloque los selectores de
entrada/salida y otros en las
posiciones apropiadas.)
Tomacorriente de CA
Cronómetro
Al momento de
reproducción
Flujo de la señal
Esta casetera
Al momento
de grabación
Reproducción Cronometrada
1. Conecte esta unidad y el sistema estéreo a un temporizador
de audio disponible comercialmente.
2. Ajuste los interruptores de alimentación de todos los
componentes en ON.
3. Coloque una cinta casete pregrabada en TAPE I o TAPE II.
<
También podrá insertar cintas en ambos decks. En este caso,
TAPE I empezará primero.
4. Ajuste el interruptor REV MODE en la posición requerida.
<
Para reproducir ambos decks continuamente, ajuste el
interruptor REV MODE en la posición p
(CONT PLAY).
5. Ajuste el interruptor DOLBY NR.
6. Ajuste el interruptor TIMER en la posición PLAY.
7. Ajuste el temporizador de audio en los tiempos de inicio
(encendido de la alimentación) y parada (apagado de la
alimentación). Cuando se complete este ajuste, la
alimentación de todos componentes se apagará.
Cuando alcance el tiempo de inicio programado, la
alimentación será suministrada y se iniciará la reproducción
automáticamente.
<
La reproducción también empezará automáticamente al
presionar el interruptor POWER de este deck. Cuando usted
no utilice el temporizador, ajuste el interruptor TIMER en la
posición OFF.
<
Las reproducciones siempre comienzan del lado A.
Grabación Cronometrada
(Ejemplo: Grabación de un programa de radiodifusión)
1. Conecte esta unidad y el sistema estéreo en un temporizador
de audio disponible comercialmente.
2. Ajuste los interruptores de alimentación de todos
componentes en ON.
3. Coloque una cinta(s) casete(s) grabable(s) en TAPE I o TAPE ll
(o en ambos decks para la grabación continua).
4. Ajuste el interruptor REV MODE en la posición requerida.
<
Para la grabación continua en ambos decks, ajuste el
interruptor REV MODE en la posición p
(CONT PLAY).
5. Ajuste el interruptor DOLBY NR conforme se requiera.
6. Sintonice en la estación de transmisión a ser grabada.
7. Presione el botón RECORD del deck a ser grabado para
ajustar el deck al modo deespera de grabación.
8. Ajuste el nivel de grabación.
9. Ajuste el interruptor TIMER en la posición REC.
10. Ajuste el temporizador de audio en los tiempos requeridos
de inicio (encendido de la alimentación) y parada (apagado de
la alimentación). Cuando se completa el ajuste, la
alimentación de todos componentes se apagará.
Cuando alcance el tiempo de inicio programado, la
alimentación será suministrada y la grabación se iniciará
automáticamente.
<
La grabación también empezará automáticamente
simplemente al presionar el interruptor POWER de este deck.
Asegúrese de reajustar el interruptor TIMER en la posición OFF
cuando no utilice el temporizador por algún tiempo, para
evitar borrados accidentales de su cinta importante.
<
Las grabaciones siempre comienzan del lado A.
Page 73

73
ESPAÑOL
Solucionador de Problemas
Si usted piensa que hay alguna cosa dañada en esta casetera,
verifique el listado de abajo antes de contactar a un servicio de
reparación. En algunos casos el problema puede estar en otro
componente. Verifique todos los componentes
Si el problema no puede resolverse con alguno de los cheques
siguientes, contacte a su centro de servicios autorizado TEAC
más cercano o a su distribuidor para la ayuda.
No puede encender el equipo.
e
Verifique la conexión con el suministro de alimentación de
CA. Verifique y asegúrese de que la fuente de CA no esté
conectada a un tomacorriente y si, está, que el interruptor
esté encendido. Asegúrese de que haya alimentación en el
tomacorriente de CA, enchufando otro producto, como por
ejemplo, una lámpara o ventilador en el tomacorriente.
No suena
e
Verifique la conexión al amplificador.
e
Verifique los controles del amplificador.
El control remoto no funciona.
e
Verifique que la casetera esté encendida.
e
Si las baterías están consumidas, reemplace ambas baterías.
e
Si hay obstáculos entre la casetera y el control remoto,
retírelos. Dirija el control remoto al sensor remoto de la
casetera desde una distancia menor a 5 metros.
e
Si el sensor remoto de la casetera está expuesto a luz directa
del sol o luz muy brillante, el control remoto puede no
operar. Si éste es el caso, use los botones de control de la
casetera en su lugar.
Reproducción ruidosa
e
Mantener alejado de equipos que generan un campo
magnético, tales como un televisor u horno de microondas.
Los botones de control de transporte no funcionan.
e
Cargar una cinta de casete si no está cargada.
e
Si una cinta de casete está cargada, reinsertarla.
El compartimiento del casete no cierra.
e
La casete no está apropiadamente cargada. Reinsertarla.
Pobre calidad de sonido
e
Limpiar las cabezas.
e
Verificar que el interruptor Dolby NR está colocado en la
misma posición como cuando fue hecha la grabación.
No puede grabar.
e
Si las pestañas de prevención de borrado en el tope del
casete fueron retiradas, cubra los orificios usando un trozo
de cinta adhesiva.
e
Verifique la conexión al amplificador y al equipo fuente.
e
Coloque correctamente los selectores de entrada/salida del
amplificador.
e
Verifique el nivel de grabación.
La velocidad de la cinta parece algo rápida o lenta.
e
Verifique la colocación del control de altura tonal.
La función de reversa automática no occure.
e
Coloque el interruptor REV MODE en j o p.
e
Si el interruptor REV MODE está colocado en j, inicie la
reproducción desde la cinta que lo enfrenta (lado A).
La duplicación sincronizada en reversa no es posible.
e
Coloque el interruptor REV MODE en la posición j.
e
Cargue casetes en ambas caseteras.
e
Coloque la dirección de transporte de la cinta hacia adelante
(>) en ambas caseteras.
La reproducción/grabación continuada no es posible.
e
Coloque el interruptor REV MODE en la posición p .
e
Cargue casetes en ambas caseteras.
e
Haga una grabación continua, comience con TAPE I.
Esta casetera opera con un microcomputador delicado y
puede haber ocasiones en las cuales la casetera no
funciona como se espera debido a ruidos externos o
interferencia. Los problemas que usted encuentra en tales
ocasiones pueden ser solucionados apagando el equipo,
esperando por 1 minuto o más, y luego volviendo a
encenderlo.
Page 74

74
Mantenimiento
Si la superficie de la casetera se ensuciase, límpiela con una
tela seca, suave. Para quitar la suciedad rebelde, limpie con
una tela ligeramente humedecida en una solución de
detergente suave y agua, luego humedezca una tela con
agua, retuérzala bien, y frote encima de la superficie.
No deje la casetera en contacto con caucho o productos de
vinilo por un periodo largo de tiempo, ya que éstos podrían
dañar el acabado de la superficie.
Nunca use limpiadores volátiles tales como tiner, bencina o
alcohol porque dañarán el acabado de la superficie.
PRECAUCIÓN:
Por seguridad, siempre desenchufe el cable de alimentación
antes de realizar algún mantenimiento.
Limpiando las cabezas
Si la sección de cabezas se ensucia, la calidad de grabación se
deteriorará, produciendo sonido de reproducción degradado
o “gotas” en el sonido. También, si la pista de transporte de
cinta se ensucia, la cinta puede enredarse en las partes
rodantes. Por consiguiente se recomienda que las cabezas,
rodillos y cabrestantes se limpien regularmente a intervalos de
uso de 10 horas con un isopo de algodón humedecida con un
líquido de limpieza apropiado disponible en el comercio.
NOTA:
No realice grabación o reproducción cuando la pista de
transporte de cinta esté húmeda con líquido de limpieza, ya
que esto podría originar estrujamiento o atascamiento de la
cinta.
Bobina
Cabrestante
Cabeza borradora
Cabeza lectograbadora
Bobina
Cabrestante
Sólo modelos europeos
Reciclaje de su producto viejo
1.Cuando se adjunta a un producto este
símbolo tachado de un contenedor con
ruedas, significa que el producto está cubierto
por la Directiva Europea 2002/96/EC.
2.Todos los productos eléctricos y electrónicos se deben
reciclar de un modo separado del sistema municipal de
basura, a través de las instalaciones de recogida señaladas
por el gobierno o las autoridades locales
3. El reciclaje correcto de su producto viejo ayudará a prevenir
las consecuencias negativas potenciales para el ambiente y la
salud humana.
4. Para una información más detallada sobre el reciclaje de su
producto viejo, contacte por favor con su ayuntamiento,
servicio de basuras o la tienda en donde usted compró el
producto.
Page 75

ESPAÑOL
75
Especificaciones
Sistema de pistas . . . . . . . . . . . . . . . . . . . . . . . . . . . . . . . . . . . . . . . . 4-pistas, 2-canales estéreo
Estructura de cabezas . . . . . . . . . . . . . . . . . . . . . . . . Cabeza lectograbadora x 1 (cada casetera)
Cabeza borradora x 1 (cada casetera)
Velocidad de la cinta . . . . . . . . . . . . . . . . . . . . . . . . . . . . . . . . . . . . . . . . . . . . . . . . . 4,8 cm/seg
9,5 cm/seg (modo de copiado a alta velocidad)
Control de altura tonal . . . . . . . . . . . . . . . . . . . . . . . . . . . . . . . . . . . . . . . . . . . . . ±10% (±2%)
Tiempo de bobinado rápido . . . . . . . . . . . . . . . . . . . . . . . . . approximately 110 seg (cinta C-60)
Motor . . . . . . . . . . . . . . . . . . . . . . . . . . . . . . . . . . . . . . . . . . . . . . servomotor DC (cabrestante)
Ululación y vibración . . . . . . . . . . . . . . . . . . . . . . . . . . . . . . . . . . . . . . . . . 0,09% (WRMS) ±1%
Frecuencia de respuesta (global)
cinta de metal (Tipo IV, sólo reproducción) . . . . . . . . . . . . . . . . . . . . . . . . . . . . 30 Hz-19 kHz
Cinta de cromo (Tipo II) . . . . . . . . . . . . . . . . . . . . . . . . . . . . . . . . . . . . . . . . . . 30 Hz-18 kHz
Cinta normal (Tipo I). . . . . . . . . . . . . . . . . . . . . . . . . . . . . . . . . . . . . . . . . . . . . 30 Hz-17 kHz
Proporción de señal a ruido (Global) . . . . . . . 59 dB (Dolby NR OFF, nivel de grabación nominal)
69 dB (Dolby NR ON, CCIR-ARM)
Entrada de línea (toma RCA) . . . . . . . . . . . . . . . . . . 100 mV (impedancia de entrada 50k ohms)
Entrada de micrófono (toma mono de 6.3mm) . . . 0,38 mV (impedancia de entrada 200k ohms)
Salida de línea (toma RCA) . . . . . . . . . . . . . . . . . 0,46 V (impedancia de carga 50k ohms o más)
Salida de auriculares (toma estéreo de 6.3mm) . . . . . . . . . . . . . . . . . . . . . . . . 0,95 mW/8 ohms
Requerimientos de línea eléctrica
Modelo U.S.A./Canadá . . . . . . . . . . . . . . . . . . . . . . . . . . . . . . . . . . . . . . AC 120 volts, 60 Hz
Modelo general de exportación . . . . . . . . . . . . . . . . . . . . . . . . . . . . 120/230 volts, 50-60 Hz
Modelo europeo. . . . . . . . . . . . . . . . . . . . . . . . . . . . . . . . . . . . . . . . . . . AC 230 volts, 50 Hz
Consumo eléctrico. . . . . . . . . . . . . . . . . . . . . . . . . . . . . . . . . . . . . . . . . . . . . . . . . . . . . . . 22 W
Dimensiones (incluyendo las partes sobresalientes)
435 (ancho) x 127 (alto) x 292 (profundidad) mm
Peso . . . . . . . . . . . . . . . . . . . . . . . . . . . . . . . . . . . . . . . . . . . . . . . . . . . . . . . . . . . . . . . . . 4,0 kg
Accesorios estándar:
Unidad de control remoto (RC-615A) x 1
Batería del control remoto (“AA”) x 2
Manual del usuario x 1
Tarjeta de garantía x 1
Cable RCA estéreo x 2
• Las ilustraciones en este manual pueden no ser exactamente las mismas como el producto.
• Las especificaciones y modelo están sujeto al cambio sin aviso u obligación.
Page 76

76
Inhaltsverzeichnis
Wir bedanken uns für den Kauf dieses TEAC Produktes.
Bitte lesen Sie diese Bedienungsanleitung sorgfältig durch,
um die Funktionen dieses Geräts stets optimal nutzen zu
können.
Vor dem Gebrauch
Bitte vor dem Gebrauch durchlesen
< Dieses Gerät kann sich bei Betrieb erwärmen. Daher sollte auf
eine ausreichend freie Fläche und genügend Abstand in der
Umgebung geachtet werden, damit kein Hitzestau auftreten
kann.
<
Die an dieses Gerät angelegte Netzspannung muss mit der an
der Geräterückseite angegebenen Netzspannung
übereinstimmen. Falls Sie diesbezüglich Fragen haben,
wenden Sie sich bitte an einen Elektrofachmann.
<
Wählen Sie einen geeigneten Aufstellungsort. Vermeiden Sie
einen Aufstellungsort, der direkter Sonneneinstrahlung
ausgesetzt ist oder sich nahe zu einer Heizquelle befindet.
Vermeiden Sie zudem Aufstellungsorte, die Vibrationen,
hoher Staubeinwirkung, besonders hohen/niedrigen
Temperaturen oder Feuchtigkeit ausgesetzt sind.
<
Dieses Gerät darf nicht direkt auf einem anderen
elektronischen oder elektrischen Gerät platziert werden.
< Niemals das Gehäuse öffnen. Andernfalls können die
elektronischen Schaltkreise beschädigt werden und/oder es
besteht Stromschlaggefahr. Falls ein Fremdkörper in das
Geräteinnere eindringt, wenden Sie sich bitte umgehend an
Ihren Fachhändler oder Kundendienst.
<
Beim Abziehen von der Netzsteckdose muss das Netzkabel
stets am Stecker gehalten werden. Niemals am Kabel ziehen.
< Zur Reinigung des Geräts niemals chemische Reiniger
verwenden. Andernfalls kann die Gehäuseoberfläche
beschädigt werden. Verwenden Sie zur Reinigung ein
sauberes, trockenes und fusselfreies Tuch.
<
Bitte bewahren Sie diese Anleitung zur späteren Bezugnahme
an einem sicheren Ort auf.
ACHTUNG
<
Vermeiden Sie Aufstellungsorte, an denen diese
Komponente Tropf- oder Spritzwasser ausgesetzt ist.
<
Platzieren Sie keine mit Flüssigkeiten gefüllten Objekte, wie
etwa Vasen, auf der Komponente.
<
Installieren Sie diese Komponente nicht in geschlossenen
Möbeln, wie etwa einem Bücherschrank oder einem
geschlossenen Regalsystem.
<
Auch in ausgeschaltetem Zustand - der POWER-Schalter
befindet sich in der Stellung „OFF“ - bezieht diese
Komponente einen geringen Ruhestrom aus dem
Stromnetz.
<
Platzieren Sie diese Komponente so, dass die
Wandsteckdose, an der Sie das Gerät angeschlossen haben,
jederzeit leicht zugänglich ist.
<
Achten Sie darauf, dass die Wandsteckdose, an der Sie die
Komponente anschließen, geerdet ist
(Schutzkontaktsteckdose).
Vor dem Gebrauch . . . . . . . . . . . . . . . . . . . . . . . . . . . . . . . . . 76
Handhabung von Cassettentonbändern . . . . . . . . . . . . . . . . . 77
Anschlüsse . . . . . . . . . . . . . . . . . . . . . . . . . . . . . . . . . . . . . . . 78
Gebrauch der Fernbedienungseinheit . . . . . . . . . . . . . . . . . . . 79
Beschreibung der Teile . . . . . . . . . . . . . . . . . . . . . . . . . . . . . . 80
FL-Display . . . . . . . . . . . . . . . . . . . . . . . . . . . . . . . . . . . . . . . . 82
Wiedergabe (mit Deck TAPE I oder TAPE II) . . . . . . . . . . . . . . . 83
Kontinuierliche Wiedergabe . . . . . . . . . . . . . . . . . . . . . . . . . . 85
Leerband-Suche . . . . . . . . . . . . . . . . . . . . . . . . . . . . . . . . . . . 85
Titelsuche . . . . . . . . . . . . . . . . . . . . . . . . . . . . . . . . . . . . . . . . 86
Intro Check. . . . . . . . . . . . . . . . . . . . . . . . . . . . . . . . . . . . . . . 87
Aufnahme (mit dem TAPE I oder TAPE II Deck) . . . . . . . . . . . . 88
Aufnahme mit Mikrofoneinblendung . . . . . . . . . . . . . . . . . . . 90
Kontinuierliche Aufnahme . . . . . . . . . . . . . . . . . . . . . . . . . . . 91
Parallelaufnahme . . . . . . . . . . . . . . . . . . . . . . . . . . . . . . . . . . 92
Dubbing (Überspielen vom TAPE I auf das TAPE II Deck) . . . . . 92
Dubbing Editierfunktionen (nur bei Normal Speed Dubbing) . . 93
Synchro Reverse Dubbing . . . . . . . . . . . . . . . . . . . . . . . . . . . . 94
Timer-gesteuerte Wiedergabe und Aufnahme. . . . . . . . . . . . . 96
Störungsbeseitigung . . . . . . . . . . . . . . . . . . . . . . . . . . . . . . . . 97
Wartung und Pflege . . . . . . . . . . . . . . . . . . . . . . . . . . . . . . . . 98
Technische Daten . . . . . . . . . . . . . . . . . . . . . . . . . . . . . . . . . . 99
Page 77

77
DEUTSCH
Handhabung von Cassettentonbändern
ACHTUNG
< Niemals das Cassettengehäuse öffnen und/oder das Band aus
der Cassette ziehen.
<
Niemals die Bandoberfläche berühren.
<
Cassetten niemals an Orten aufbewahren, die
Staubeinwirkung oder Feuchtigkeit ausgesetzt sind.
<
Cassetten stets von magnetischen Objekten jeder Art, wie
Lautsprechern, Fernsehgeräten etc., entfernt halten.
Andernfalls kann es zu erhöhtem Bandrauschen und/oder
Löschung von Bandsignalen kommen.
Nicht alle Cassetttentonbänder sind
geeignet
Falls die nachfolgend beschriebenen Cassettenausführungen
verwendet werden, kann es zu Leistungseinbußen, Fehlern
und Betriebsstörungen kommen. Einige dieser
Cassettenausführungen können Bandverschlingungen
verursachen, wobei schwerwiegende Störungen und Schäden
im Bandlaufmechanismus auftreten können.
Verformte Cassetten
Niemals Cassetten verwenden, bei denen Verformungen oder
unregelmäßiger Bandlauf und/oder ungewöhnliche
Geräusche beim Umspulen vorwärts/rückwärts festgestellt
werden.
Long Play-Cassetten
Niemals Cassetten mit einer Bandlänge von 120 Minuten (C-
120) oder länger verwenden. Das in diesen Cassetten
enthaltene Bandmaterial ist besonders dünn und kann sich
leicht dehnen oder im Bandlaufmechanismus verfangen.
Endlostonband-Cassetten
Niemals verwenden, weil das in diesen Cassetten enthaltene
Bandmaterial sich leicht im Bandlaufmechanismus verfangen
kann.
Automatische Bandsortenwahl
Dieses Cassettendeck identifiziert die Bandsorte anhand der
am Cassettengehäuse vorhandenen Identifikationsöffnungen
automatisch. Verwenden Sie ausschließlich Cassetten mit
Identifikationsöffnungen.
<
Dieses Cassettendeck ist für Normalband (Typ I), Chromband
(Typ
II ) und Metallband (Typ IV) ausgelegt. Verwenden Sie zur
Aufnahme Cassetten mit Normalband (Typ
I) oder
Chromband (Typ
II ).
<
Beide Laufwerke (Deck TAPE I und TAPE II) arbeiten mit
automatischer Bandsortenwahl. Dementsprechend können
Sie gleichzeitig in den beiden Laufwerken unterschiedliche
Bandsorten verwenden.
Gelockertes Band
Gelockertes Band kann sich an der Tonwelle oder sonstigen
rotierenden Teilen verfangen. Um dies zu vermeiden, sollten
Sie mit einem in die Cassettennabe eingeführten Bleistift oder
ähnlichen Gegenstand das Band straffen.
Löschschutzzungen
Zwei am Cassettenrücken (jeweils eine für Bandseite A und
Bandseite B) vorhandene Löschschutzzungen können mit
einem Schraubenzieher herausgebrochen werden, um die
aufgezeichneten Signale der zugehörige Bandseite vor
Löschung durch neue Aufnahmen zu schützen. Cassetten
ohne Löschschutzzungen können nicht mehr zur Aufnahme
verwendet werden.
Soll eine Cassette, deren Löschschutzzungen entfernt
wurden, erneut zur Aufnahme verwendet werden, können
Sie die Löschschutzöffnungen mit Klebeband abdecken.
Achten Sie darauf, dass hierbei nicht die BandsortenIdentifikationsöffnungen mit abgedeckt werden.
Dolby Rauschunterdrückung
Die Dolby Rauschunterdrückung vermindert Bandrauschen,
das beim Aufnahme- und Wiedergabevorgang auftritt. Dieses
Cassettendeck ist mit Dolby B-Rauschunterdrückung
ausgerüstet.
Die Dolby Rauschunterdrückung wirkt sich auf Aufnahmeund Wiedergabequalität aus. Daher muss bei der Wiedergabe
der DOLBY NR-Schalter in die gleiche Position wie bei der
Aufnahme gebracht werden.
Hergestellt unter Lizenz von Dolby Laboratories.
HX Pro Dynamik-Erweiterung beruht auf einer Entwicklung
von Bang und Olufsen.
Dolby, HX Pro und das Doppel-D-Symbol sind Warenzeichen
von Dolby Laboratories.
Löschschutzzunge für Bandseite A
Seite A
Metallband
Chromband
Normalband
(
Typ
(
Typ
I
)
Öffnumgen für die Bandsortenidentifikation
(
Typ IV
)
II
)
Page 78

78
Anschlüsse
Vorsichtsmaßregeln
<
Schließen Sie das Netzkabel erst dann an eine Netzsteckdose an, nachdem Sie alle anderen
Anschlüsse hergestellt haben.
<
Beziehen Sie sich für alle an diesem Cassettendeck anzuschließenden Komponenten jeweils auf die
zugehörige Bedienungsanleitung, bevor Sie die erforderlichen Anschlüsse herstellen.
Line-Eingangs/-Ausgangsbuchsen
(LINE IN und LINE OUT)
Verwenden Sie die mitgelieferten Cinchkabel (RCA), um
dieses Gerät an Ihren Verstärker anzuschließen. Bitte beim
Anschluss unbedingt beachten:
Weißer Stecker an weiße Buchse (L: linker Stereokanal)
Roter Stecker an rote Buchse (R: rechter Stereokanal)
<
Darauf achten, dass die Stecker fest an den zugehörigen
Buchsen angebracht sind. Niemals das Cinchkabel mit den
Netz- und Lautsprecherkabeln bündeln. Andernfalls können
Brummeinstreuungen und sonstige Klangbeeinträchtigungen
auftreten.
A
Verstärker
LLRR
PLAYREC
TAPE
BA
Netzkabel
Bringen Sie dieses Netzkabel an einer Netzsteckdose an.
<
Achten Sie darauf, dass die verwendete Netzsteckdose die
erforderliche Netzspannung liefert.
< Halten Sie das Netzkabel beim Anbringen oder Abziehen
von der Netzsteckdose stets am Stecker. Niemals am Kabel
ziehen oder zerren.
<
Wenn Sie das Gerät für längere Zeit nicht verwenden, sollte
das Netzkabel abgezogen werden.
B
Page 79

79
DEUTSCH
Gebrauch der Fernbedienungseinheit
Bitte bei Gebrauch der Fernbedienungseinheit beachten:
<
Richten Sie die Fernbedienungseinheit auf den Infrarotsensor
am Cassettendeck und halten Sie dabei einen Abstand bis zu
5 Metern ein. Achten Sie darauf, dass sich zwischen
Fernbedienungseinheit und Infrarotsensor keine Objekte,
Möbelstücke etc. befinden.
<
Bei direkter Einwirkung von extrem hellen Lichtquellen oder
Sonnenlicht kann sich die Empfindlichkeit des Infrarotsensors
verringern. Verwenden Sie in diesem Fall anstelle der
Fernbedienungseinheit die am Cassettendeck befindlichen
Bedienungselemente.
<
Bei Verwendung dieser Fernbedienungseinheit kann es ggf.
zu Störungen bei weiteren in der Nähe befindlichen
infrarotsignalgesteuerten Geräten kommen.
Einlegen von Batterien in die Fernbedienungseinheit
Entfernen Sie den Batteriefachdeckel, legen Sie zwei Batterien
der Ausführung „AA“ unter Beachtung der angezeigten
Polaritätsausrichtung (+ und –) ein und bringen Sie den
Batteriefachdeckel erneut an.
Falls der Abstand zwischen Fernbedienungseinheit und Gerät
zur Funktionsausführung verkürzt werden muss oder mit den
Bedienungselementen der Fernbedienungseinheit keine
Funktionsausführung möglich ist, sind die Batterien zu
schwach oder entladen und müssen ausgewechselt werden.
Wechseln Sie stets beide Batterien gleichzeitig aus!
Wichtige Sicherheitshinweise zum Batteriegebrauch
Bei unsachgemäßem Batteriegebrauch kann es zum Platzen
der Batterien und zum Auslaufen von Batterieflüssigkeit
kommen. Beachten Sie unbedingt die folgenden Hinweise:
<
Batterien stets in der im Batteriefach angezeigten Richtung
und Anordnung einlegen.
< Niemals gleichzeitig alte und neue Batterien oder Batterien
unterschiedlicher Ausführung bzw. verschiedener Hersteller
verwenden.
<
Batterien niemals erhitzen, zerlegen oder in offenes Feuer
oder Wasser werfen.
< Batterien niemals zusammen mit metallischen Objekten
aufbewahren. Andernfalls kann es zu Kurzschlüssen und zum
Platzen der Batterien und/oder zum Auslaufen von
Batterieflüssigkeit kommen.
<
Niemals versuchen, Batterien (Trockenzellen)
wiederaufzuladen.
< Falls das Cassettendeck für längere Zeit (mehr als ein Monat)
nicht verwendet werden soll, sollten die Batterien aus dem
Batterienfach entnommen werden.
<
Falls Batterieflüssigkeit im Batteriefach festgestellt wird, muss
das Batteriefach sorgfältig ausgewischt werden. Legen Sie
hierauf neue Batterien ein.
Page 80

80
Beschreibung der Teile
O
Q
RSTO PP
A
C
B
D
E NF I J K L
MGGH
G
H
M
G
P
L
J
I
P
In dieser Anleitung werden ausschließlich die am Cassettendeck
befindlichen Bedienungselemente beschrieben. Die an der
Fernbedienungseinheit vorzufindenden Bedienungselemente
lassen sich auf die gleiche Weise verwenden.
Hauptschalter
Hiermit kann das Gerät ein- und ausgeschaltet werden.
Reverse Modus-Schalter (REV MODE)
Mit diesem Schalter können Sie den Reverse Modus wählen.
Timerschalter (TIMER)
Verwenden Sie diesen Schalter, wenn Sie bei Verwendung
eines optional erhältlichen Audio Timers Timer-gesteuerte
Aufnahme oder Wiedergabe durchführen möchten.
Im Normalfall sollte dieser Schalter auf OFF gestellt sein.
C
B
Auch wenn der POWER-Schalter auf OFF gestellt ist, d.h.,
die Ausrüstung nicht in Betrieb ist, verbraucht sie eine
kleine Strommenge.
A
Page 81

81
DEUTSCH
Dolby-Rauschunterdrückungsschalter (DOLBY NR)
Mit diesem Schalter können Sie die DolbyRauschunterdrückung aktivieren/deaktivieren. Bei Wiedergabe
muss dieser Schalter in der gleichen Stellung verwendet
werden wie bei der Aufnahme.
Cassettenfach I (TAPE I)
Infrarotsensor
Empfängt die Fernbedienungssignale. Die
Fernbedienungseinheit muss bei Gebrauch auf diesen Sensor
ausgerichtet werden.
Bandzählwerk-Rückstelltasten (CLEAR I und CLEAR II)
Mit diesen Tasten können Sie die Bandzählwerkanzeige
jeweils für Deck I und II (TAPE I und TAPE II) auf null
zurückstellen.
Intro Check-Taste (INTRO CHECK)
Wenn Sie diese Taste drücken, werden die auf dem Band
enthaltenen Aufnahmesegmente nacheinander für jeweils 15
Sekunden angespielt.
Synchro Reverse-Taste (SYNC REV)
Mit dieser Taste können Sie die Synchro Reverse-Funktion für
den Überspielmodus (Dubbing) aktivieren.
Leerband-Suchfunktionstaste (BLANK SCAN)
Mit dieser Taste wird die Leerband-Suchfunktion
aktiviert/deaktiviert.
FL-Display
Umfasst Anzeigen wie Bandzählwerk, Pegelmeter etc.
Parallelaufnahmetaste (PARALLEL REC)
Mit dieser Taste können Sie eine Audio-Signalquelle
gleichzeitig auf beiden Cassettendecks aufnehmen.
Dubbing Starttaste (DUB START)
Mit dieser Taste können Sie den Überspielvorgang
(High/Normal Speed Dubbing) von Deck I zu Deck II (TAPE I zu
TAPE II) starten.
An der Fernbedienungseinheit befinden sich zwei Tastenpaare
für jede Überspielgeschwindigkeit. Es müssen jeweils beide
Tasten gleichzeitig gedrückt werden.
Cassettenfach II (TAPE II)
Auswurftasten (EJECT)
Mit diesen Tasten können Sie jeweils Cassettenfach I oder II
(TAPE I und TAPE 2) öffnen.
O
N
M
L
K
J
I
H
G
F
E
D
Bandlaufsteuertasten
Aufnahme (RECORD)
Mit dieser Taste können Sie das zugehörige Deck jeweils auf
Aufnahmebereitschaft schalten.
An der Fernbedienungseinheit müssen zwei Tasten
gleichzeitig gedrückt werden, um je ein Deck auf
Aufnahmebereitschaft zu schalten.
Pause (PAUSE)
Mit dieser Taste können Sie die Aufnahme oder Wiedergabe
kurzzeitig unterbrechen.
Aufnahmestummschaltung (REC MUTE)
Mit dieser Taste können Sie 4 Sekunden dauernde
Leerabschnitte zwischen den einzelnen Aufnahmetiteln
einfügen, damit die CPS-Titelsuche einwandfrei arbeiten
kann.
Umspulen (m/,)
Zum Umspulen vorwärts/rückwärts.
Stopp (H)
Zum Stoppen der Wiedergabe/Aufnahme.
Bandlaufrichtung (h / y)
Zur Wiedergabe in Vorwärts- oder Rückwärtsrichtung.
Kopfhörerbuchse (PHONES)
Hier kann ein Kopfhörer angeschlossen werden.
Regler für variable Bandgeschwindigkeit (PITCH
CONTROL)
Hiermit können Sie die Bandgeschwindigkeit bei Aufnahme
feinregulieren.
Aussteuerungsregler (REC LEVEL)
Mit diesem Regler wird der Aufnahmepegel ausgesteuert.
Mikrofonbuchse mit Pegelregler (MIC)
Hier kann ein Mikrofon zur Aufnahme angeschlossen werden.
Der Mikrofoneingangspegel kann mit dem Pegelregler
eingestellt werden.
<
Die MIC-Buchse ist eine Mono-Ausführung. An dieses Deck
kann kein Stereomikrofon angeschlossen werden.
T
S
R
Q
P
Page 82

82
Spitzenwertanzeige
Zeigt die Pegel von Aufnahme- und Wiedergabesignal an.
Synchronumkehr (SYNC REV)
Diese Anzeige leuchtet, wenn die Auto-Reverse-Funktion im
Dubbing Modus aktiviert ist.
Parallelaufnahme (PARALLEL)
Diese Anzeige leuchtet, wenn die Parallelaufnahmefunktion
aktiviert ist.
Leerband-Suche (BLANK SCAN)
Diese Anzeige leuchtet, wenn die zugehörige Funktion
aktiviert ist.
Wiedergabe-/Aufnahmerichtungsanzeige für Deck TAPE I
Pauseanzeige
Diese Anzeige leuchtet, wenn Deck TAPE I auf Pause
geschaltet ist.
Bandzählwerk für Deck TAPE I
Das Bandzählwerk gibt die relative Bandposition des bereits
bespielten Bandabschnittes an und kann an jeder beliebigen
Position auf null zurück gestellt werden. Bei aktivierter CPSTitelsuche wird „CP“ zusammen mit der Anzahl der zu
überspringenden Titel angezeigt.
Aufnahmeanzeige
Leuchtet, wenn Deck TAPE I auf den Aufnahmemodus
geschaltet ist.
Wiedergabeanzeige
Leuchtet, wenn Deck TAPE I auf den Wiedergabemodus
geschaltet ist.
i
h
g
f
e
d
c
b
a
SYNC REV BLANK SCAN
PARALLEL
HIGH DUB
NORM DUB
REC
PLAY
REC
PLAY
g
i
j
k
m
e ohf n
l
a b dc
FL-Display
Dubbing Geschwindigkeitsanzeige
Beim Überspielen in Normalgeschwindigkeit (Normal
Dubbing) wird „NORMAL DUB“ angezeigt. Entsprechend
leuchtet beim Überspielen in hoher Geschwindigkeit (High
Speed Dubbing) die Anzeige „HIGH DUB“.
Wiedergabeanzeige
Leuchtet, wenn Deck TAPE II auf den Wiedergabemodus
geschaltet ist.
Aufnahmeanzeige
Leuchtet, wenn Deck TAPE II auf den Aufnahmemodus
geschaltet ist.
Bandzählwerk für Deck TAPE II
Das Bandzählwerk gibt die relative Bandposition des bereits
bespielten Bandabschnittes an und kann an jeder beliebigen
Position auf null zurück gestellt werden.
Bei aktivierter CPS-Titelsuche wird „CP“ zusammen mit der
Anzahl der zu überspringenden Titel angezeigt.
Pauseanzeige
Diese Anzeige leuchtet, wenn Deck TAPE II auf Pause
geschaltet ist.
Wiedergabe-/Aufnahmerichtungsanzeige für Deck TAPE II
o
n
m
l
k
j
Page 83

Wählen Sie mit dem Schalter REV MODE den
gewünschten Reverse-Modus.
Sie können eine von drei Einstellungen wählen:
u
: Wiedergabe einer Bandseite
In dieser Schalterstellung wird ausschließlich eine Bandseite
abgespielt.
j
: Wiedergabe beider Bandseiten
In dieser Schalterstellung werden beide Bandseiten
nacheinander abgespielt. Bei Erreichen des Bandendes wird
die Bandlaufrichtung automatisch umgekehrt und die
Wiedergabe für die zweite Bandseite fortgesetzt.
p
: Wiedergabewiederholung
In dieser Schalterstellung werden beide Bandseiten
wiederholt bis zu 5 Mal abgespielt.
Wählen Sie die erforderliche Rauschunterdrückung mit
dem Schalter DOLBY NR.
Ein mit Dolby Rauschunterdrückung bespieltes Band muss
auch mit Dolby Rauschunterdrückung abgespielt werden
(Schalterposition ON).
Entsprechend wählen Sie für ohne Dolby
Rauschunterdrückung bespielte Bänder die Schalterposition
OFF.
Drücken Sie die Wiedergabetaste (hoder y).
y
: Durch Drücken dieser Taste wird die Wiedergabe für Seite
„A“ gestartet. Wenn der Reverse-Modus u
gewählt wurde,
stoppt die Wiedergabe bei Erreichen des Banden des von
Seite „A“. Wenn der Reverse-Modus j
gewählt wurde,
wird die Wiedergabe auf Seite „B fortgesetzt und stoppt
dann bei Ereichen des Bandendes von Seite „B“. Wenn der
Reverse-Modus p
gewählt wurde, werden beide Bandseiten
nacheinander 5 Mal abgespielt.
h
: Durch Drücken dieser Taste wird die Wiedergabe für Seite
„B“ gestartet. Wenn der Reverse-Modus u
oder j
gewählt wurde, stoppt die Wiedergabe bei Erreichen des
Bandendes von Seite „B“. Wenn der Reverse-Modus p
gewählt wurde, erfolgt die Wiedergabe für Seite „B“. Hierauf
werden beide Bandseiten nacheinander 4 Mal abgespielt.
5
4
3
83
DEUTSCH
Wiedergabe (mit Deck TAPE I oder TAPE II) 1
13
4
2 2
5 5
Schalten Sie das Gerät ein.
Legen Sie eine bereits bespielte Cassette in Deck TAPE I
oder TAPE II ein.
Drücken Sie die Taste EJECT (L), um das Cassettenfach zu
öffnen. Legen Sie die Cassette mit nach unten weisender
Bandöffnung ein, wobei die gewünschte Seite nach außen
weist. Schließen Sie das Cassettenfach durch Andrücken an
der Vorderseite.
<
Dieses Deck ist zur Wiedergabe für die folgenden Bandsorten
geeignet: Normalband(Typ I), Chromband (Typ II) und
Metallband (Typ IV).
Zur Vereinfachung bezeichnen wir die nach außen weisende
Bandseite als „Seite A“ und die nach innen weisende
Bandseite als „Seite B“. Falls Sie eine Cassette mit
umgekehrter Anordnung einlegen, muss „Seite A“ als „Seite
B“ gelten und umgekehrt „Seite B“ als „Seite A“.
2
1
Seite „A“ weist
nach außen
Page 84

84
Wiedergabe (mit Deck TAPE I oder TAPE II) 2
EA A F
B D DBCC
Wiedergabestopp
Drücken Sie die Stopptaste (H).
Wiedergabepause
Drücken Sie die Taste PAUSE.
Zur Wiedergabefortsetzung drücken Sie nochmals die Taste
PAUSE oder die Wiedergabetaste (
h
oder y).
< Bei auf Wiedergabepause geschaltetem Deck wird bei
Betätigen der Wiedergabetaste, die nicht mit der angezeigten
Wiedergaberichtung (
h
oder y) übereinstimmt, die
Wiedergaberichtung gewechselt. Die Wiedergabepause wird
hierbei nicht deaktiviert. Soll die Wiedergabe in der neu
gewählten Wiedergaberichtung fortgesetzt werden, drücken
Sie nochmals PAUSE oder nochmals die gleiche
Wiedergabetaste (
h
oder y).
Umspulen vorwärts/rückwärts
Drücken Sie im Stoppmodus die Taste (m oder ,), um
das Band schnell zu spulen.
Zum Bandstopp beim Umspulen drücken Sie die Stopptaste
(H
).
C
B
A
Bandzählwerk
Zur Nullrückstellung (0000) des Bandzählwerks drücken Sie
die Taste CLEAR I oder II. Nutzen Sie diese Funktion, um
beliebige Bandstellen vorübergehend zu markieren.
Variable Bandgeschwindigkeit (Nur für das TAPE I Deck)
Bei Wiedergabe können Sie die Bandgeschwindigkeit
feinregulieren. (Dieser Regler arbeitet nicht im Aufnahmeoder Dubbing-Modus.)
Durch Drehen dieses Reglers im Uhrzeigersinn kann die
Wiedergabebandgeschwindigkeit (Tonlage) um bis zu ca. +10
% beschleunigt werden.
Durch Drehen dieses Reglers gegen den Uhrzeigersinn kann
die Wiedergabebandgeschwindigkeit (Tonlage) um bis zu ca.
–10 % verlangsamt werden.
Wiedergabe über Kopfhörer
Schließen Sie Ihren Kopfhörer an die Buchse PHONES an.
Ist ein Kopfhörer an die Buchse PHONES angeschlossen,
bleiben die Line-Ausgänge aktiv.
VORSICHT:
An diesem Gerät kann die Kopfhörerlautstärke nicht
eingestellt werden. Je nach Wiedergabematerial können laute
Signale auftreten. Ungeachtet der Kopfhörerausführung
sollten Sie die längere Wiedergabe bei hoher
Kopfhörerlautstärke vermeiden. Andernfalls können Sie
Gehörschäden davontragen.
F
E
SYNC REV BLANK SCAN
PARALLEL
HIGH DUB
NORM DUB
REC
PLAY
REC
PLAY
D
Page 85

85
DEUTSCH
Kontinuierliche Wiedergabe
3
41 14
2
Die kontinuierliche Wiedergabe zwischen dem TAPE I und TAPE II
Deck ist möglich. Sobald das Band in einem Deck vollständig
abgespielt wurde, startet die Bandwiedergabe für das andere
Deck automatisch wie bei einer Staffelschaltung.
Legen Sie jeweils eine bespielte Cassette in das
Cassettenfach von TAPE I und TAPE II Deck ein.
Wählen Sie die erforderliche Einstellung, d. h. stets die
gleiche Einstellung wie bei der Aufnahme, für den
Schalter DOLBY NR.
Stellen Sie den Schalter REV MODE auf die Position p
(CONT PLAY).
Drücken Sie die Wiedergabetaste (
h
oder y) für das
Deck, das mit der Wiedergabe beginnen soll.
Die kontinuierliche Wiedergabe kann beliebig sowohl für das
TAPE I oder TAPE II Deck gestartet werden.
Die Wiedergabeabfolge erfolgt für die vier Bandseiten wie
folgt:
Die Wiedergabe wird automatisch beendet, wenn beide
Seiten beider Cassetten insgesamt 5 Mal durchgehend
abgespielt wurden.
TAPE I Deck Seite A w
Seite B
2x
TAPE II Deck Seite B s Seite A
4
3
2
1
Leerband-Suche
Im Leerband-Suchmodus werden unbespielte Bandabschnitte
von mindestens 10 Sekunden Dauer erfasst und
übersprungen.
Um die Leerband-Suche zu aktivieren, drücken Sie die Taste
BLANK SCAN und anschließend die gewünschte
Wiedergabetaste (
h
oder y).
<
Bei aktivierter Leerband-Suche leuchtet die Anzeige BLANK
SCAN.
< Um die Leerband-Suche zu deaktivieren, drücken Sie
nochmals die Taste BLANK SCAN. Die Anzeige erlischt.
< Extrem leise Musikpassagen in einem Titel können ggf., als
Leerband-Stelle identifiziert werden. Falls dies der Fall sein
kann, sollten Sie die Leerband-Suche nicht verwenden.
Page 86

86
Titelsuche
m,m,
Dieses Gerät bietet eine CPS-Titelsuchfunktion (Compumatic
Program Search). Diese Funktion erfasst unbespielte
Abschnitte (von mindestens 4 Sekunden Dauer) zwischen den
einzelnen Titeln, so dass eine vom Benutzer vorbestimmte
Anzahl von Titeln im schnellen Vor- oder Rücklauf
übersprungen werden kann, um einen gewünschten Titel
schnell zu erreichen. Die CPS-Titelsuche kann bis zu 20 Titel in
Vorwärts- oder Rückwärtsrichtung ab dem jeweils
vorliegenden Titel überspringen.
Bei der Wiedergabe dienen die Umspultasten (m
und ,)
als Suchtasten (Zieltasten). Wird eine Umspultaste betätigt,
erscheint die Bandzählwerkanzeige „CP 01“ und das Band
wird in der gewählten Richtung umgespult. Bei jedem
Betätigen der Vorwärtstaste wird die angezeigte Zahl der
Sprungtitel um eins erhöht. Beim Betätigen der
Gegenrichtungstaste wird die Zahl entsprechend verringert.
<
Sie z. B. von einem Titel, der gerade wiedergegeben wird,
auf den jeweils vorherigen Titel wechseln möchten, drücken
Sie die Zieltaste der entgegengesetzten Richtung zweimal.
Durch einmaliges Drücken gelangen Sie zum Anfang des
gerade wiedergegebenen Titels. Jedes weitere Betätigen der
Taste setzt die Titelsuche um jeweils einen Titel zurück.
Anzeige für das TAPE I Deck
SYNC REV BLANK SCAN
PARALLEL
HIGH DUB
NORM DUB
REC
PLAY
REC
PLAY
Die Titelsuchrecihweite schwankt in Abhängigkeit von der
Einstellung des Schalters REV MODE.
u: Titelsuche nur für eine Bandseite
j
: Titelsuche in beiden Bandlaufrichtungen, wenn in der zur
Wiedergabe gleichen Richtung gesucht wird.
ODER
Titelsuche nur für eine Bandseite, wenn in der zur
Wiedergabe entgegengesetzten Richtung gesucht wird.
p
: Beide Seiten, die auf die erste Seite folgen (Seite „A“ w
Seite „B“ w Seite „A“), werden einbezogen, wenn die
CPS-Titelsuche während der Wiedergabe für die
Vorwärtsseite (nach außen weisende Cassettenseite)
gestartet wird. Wird die CPS-Titelsuche während der
Wiedergabe für die Rückwärtsseite (nach innen weisende
Cassettenseite) gestartet, erfolgt die Titelsuche in der
Abfolge Seite „B“ w
Seite „A“ w Seite „B“
<
Die CPS-Titelsuche arbeitet ggf. nicht einwandfrei, falls die
unbespielten Abschnitte zwischen den Titeln kürzer als 4
Sekunden sind oder Störgeräusche enthalten.
Page 87

87
DEUTSCH
Intro Check
Der Intro Check (Anspielsuchlauf) spielt alle Titel nacheinander
für jeweils ca. 15 Sekunden an, so dass Sie schnell einen
bestimmten Titel auffinden können.
Drücken Sie während der Wiedergabe oder im Stoppmodus die
Taste INTRO CHECK. Das Band wird in Wiedergaberichtung
schnell vorgespult. Wenn der von Ihnen gewünschte Titel
erreicht wurde, drücken Sie nochmals die Taste INTRO CHECK,
um auf normale Wiedergabe zu wechseln.
Der Intro Check-Suchbereich schwankt in Abhängigkeit von der
Einstellung des Schalters REV MODE:
u
: Intro Check für eine Bandseite
j
: ntro Check für beide Bandseiten
p
: Intro Check für beide Bandseiten. Wird der Intro Check
während der Wiedergabe für die Vorwärtsseite (nach
außen weisende Cassettenseite) gestartet, erfolgt die
Suche in der Abfolge Seite „A“ w
Seite „B“ w Seite „A“.
Wird der Intro Check während der Wiedergabe für die
Rückwärtsseite (nach innen weisende Cassettenseite)
gestartet, erfolgt die Suche in der Abfolge Seite „B“ w
Seite „A“ w Seite „B“
Das Band wird automatisch nach der kompletten Durchführung
der Intro Check-Funktion gestoppt.
<
Soll der Intro Check für das TAPE II Deck durchgeführt
werden, darf im Cassettenfach des TAPE I Decks keine
Cassette eingelegt sein!
<
Das Bandzählwerk zeigt an, wie viele Titel zum vorliegenden
Zeitpunkt bereits im Intro Check erfasst wurden.
< Wird der Intro Check bei normaler Wiedergabe ausgelöst,
wird die Wiedergabe des aktuellen Titels abgebrochen und
zum nächsten Titel gewechselt.
<
Der Intro Check arbeitet ggf. nicht einwandfrei, falls die
unbespielten Abschnitte zwischen den Titeln kürzer als 4
Sekunden sind oder Störgeräusche enthalten.
Page 88
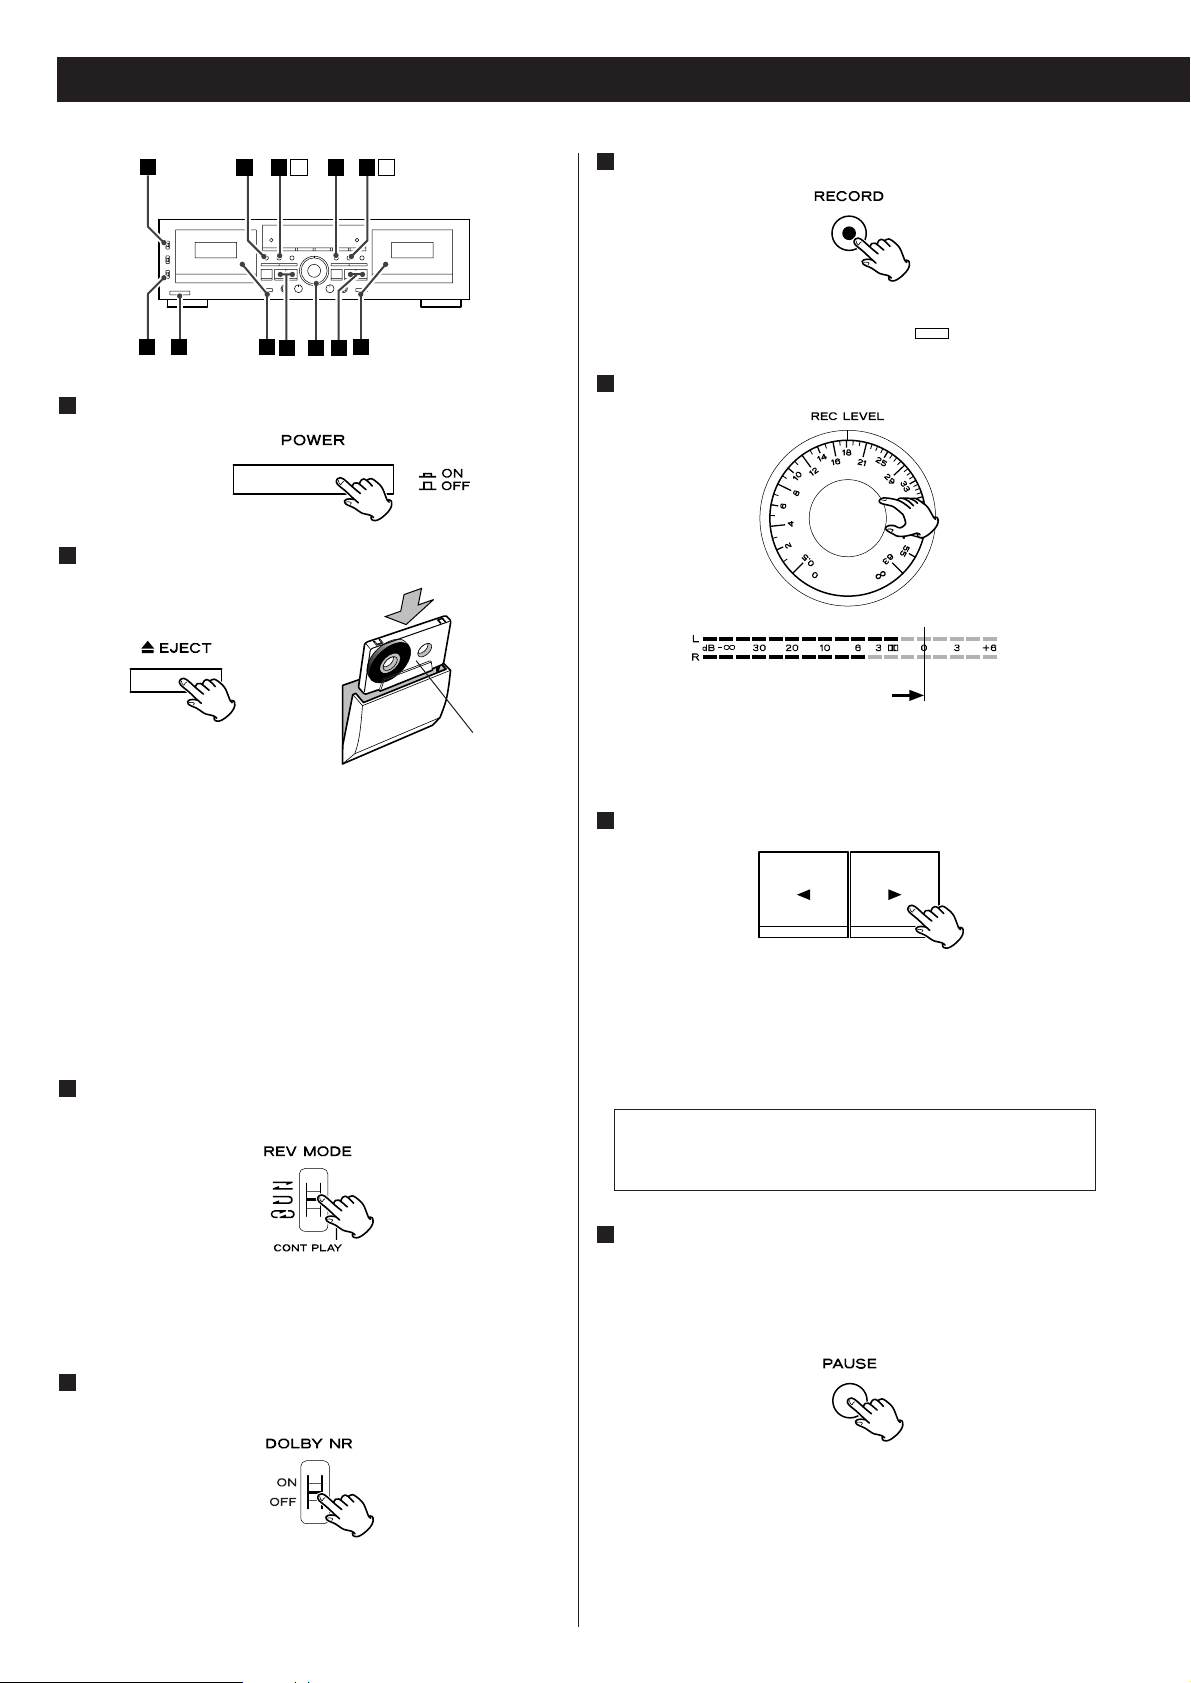
88
Aufnahme (mit dem TAPE I oder TAPE II Deck)
13
4
2 2
5 5
8 8A A
67 7
Schalten Sie das Gerät ein.
Legen Sie eine zu bespielende Cassette ein.
Drücken Sie die Taste EJECT (L), um das Cassettenfach zu
öffnen. Legen Sie die Cassette mit nach unten weisender
Bandöffnung und der nach außen weisenden Seite „A“ ein.
Schließen Sie das Cassettenfach durch Andrücken der
Cassettenfachklappe, bis diese einrastet.
<
Falls die Löschschutzzungen der Cassette entfernt sind,
müssen Sie die Löschschutzöffnung(en) mit Klebeband
abdecken.
<
Dieses Deck ist zur Aufnahme für die folgenden Bandsorten
geeignet: Normalband (Typ I) und Chromband (Typ II).
Wählen Sie mit dem Schalter REV MODE den
gewünschten Reverse-Modus.
u
: Position, wenn eine Bandseite bespielt werden soll.
j
oder p:
Position, wenn beide Bandseiten bespielt werden sollen.
Wählen Sie die Rauschunterdrückung mit dem Schalter
DOLBY NR.
In der Schalterposition ON wird mit Dolby
Rauschunterdrückung aufgenommen. In der Schalterposition
OFF wird ohne Dolby Rauschunterdrückung aufgenommen.
4
3
2
1
Drücken Sie die Taste RECORD.
Das Deck wechselt auf Aufnahmebereitschaft. Auf dem FLDisplay leuchten die Anzeigen J
und .
Steuern Sie den Aufnahmepegel aus.
Schalten Sie die Audio-Signalquelle auf Wiedergabe wählen
Sie mit dem Regler REC LEVEL eine Einstellung, so dass
Pegelspitzen mit „0 dB“ angezeigt werden.
Wählen Sie die Aufnahmerichtung.
Die Aufnahme erfolgt in der Richtung, die mit dem
Wiedergabe-/Aufnahmerichtungssymbol (
h
oder y)
angezeigt wird. Soll in der zur Anzeige entgegengesetzten
Richtung aufgenommen werden, drücken Sie die
entsprechende Wiedergabetaste (
h
oder y).
Wenn alle Vorbereitungen abgeschlossen sind, starten
Sie die Aufnahme durch nochmaliges Drücken der Taste
PAUSE oder Drücken der Wiedergabetaste, dessen
Pfeilsymbol mit der angezeigten Richtung
übereinstimmt.
<
Soll die Aufnahme für beide Bandseiten erfolgen, stellen Sie
den Schalter REV MODE auf j
oder p und drücken dann
die Vorwärts-Wiedergabetaste (y
). Falls Sie die Reverse
Wiedergabetaste (h
) drücken, erfolgt die Aufnahme
ausschließlich für die nach innen weisende Cassettenseite.
<
Zum Aufnahmestopp drücken Sie die Stopptaste (H).
8
Achten Sie darauf, dass Sie nicht die Wiedergabetaste, dessen
Pfeilsymbol mit der angezeigten Richtung übereinstimmt,
betätigen. Andernfalls wird die Aufnahme gestartet.
7
6
REC
5
Seite „A“ weist
nach außen
Page 89

89
DEUTSCH
Kurzzeitige Aufnahmeunterbrechung
Drücken Sie hierzu die Taste PAUSE. Durch nochmaliges
Betätigen dieser Taste wird die Aufnahme fortgesetzt.
Löschung von Aufnahmen
Bei jeder Aufnahme werden bereits auf dem Band enthaltene
Signale gelöscht (überschrieben). Soll der Bandinhalt gelöscht
werden, ohne gleichzeitig eine neue Aufnahme
durchzuführen, stellen Sie den Regler REC LEVEL auf den
Minimalpegel (
∞) und drücken dann die Taste RECORD und
anschließend die Wiedergabetaste (
h
oder y).
Schnellstartaufnahme
Halten Sie die Taste RECORD gedrückt und drücken Sie die
Wiedergabetaste (
h
oder y) der gewünschten
Bandlaufrichtung.
Stummaufnahme
Verwenden Sie diese Funktion, um Leerbandabschnitte
zwischen den einzelnen Titeln zu erzeugen, die zum
einwandfreien Betrieb der CPS-Titelsuche erforderlich sind.
Drücken Sie die Taste REC MUTE, wenn die Aufnahme durch
einen 4 Sekunden dauernden Leerabschnitt unterbrochen
werden soll. Hierbei wird kein Signal aufgezeichnet. Nach ca.
4 Sekunden wechselt das Gerät auf Aufnahmebereitschaft.
Zur Aufnahmefortsetzung drücken Sie die Taste PAUSE.
Stummaufnahme von über 4 Sekunden Dauer
Halten Sie die Taste REC MUTE für die Dauer des
gewünschten Leerbandabschnittes gedrückt. Bei
Tastenfreigabe wechselt das Deck auf Aufnahmebereitschaft.
Stummaufnahme von weniger als 4 Sekunden Dauer
Betätigen Sie Taste PAUSE innerhalb von 3 Sekunden nach
Betätigen der Taste REC MUTE.
< Wird die Taste REC MUTE bei auf Aufnahmebereitschaft
geschaltetem Deck betätigt, wird eine Stummaufnahme von 4
Sekunden Dauer durchgeführt, bevor das Deck erneut auf
Aufnahmebereitschaft wechselt.
Page 90

90
Aufnahme mit Mikrofoneinblendung
Sie können das Mikrofonsignal und eine andere AudioSignalquelle zusammen auf einer Cassette aufnehmen.
< Das Mikrofonsignal wird an beide Kanäle (rechts/links)
angelegt und ist dementsprechend in der Mitte des
Stereoklangfeldes angeordnet.
<
Sie können eine Audio-Signalquelle des an den Buchsen LINE
IN dieses Geräts angeschlossenen Verstärkers wählen oder die
Audio-Signalquelle direkt an die Buchsen LINE IN dieses
Geräts anschließen.
<
Zur Vermeidung von Rückkopplungsstörungen (Pfeiftönen)
sollten Sie die Lautsprecher des Verstärkers ausschalten.
Verwenden Sie einen Kopfhörer zur Überwachung des
Aufnahmesignals.
<
Dieses Cassettendeck ist nicht für ein Stereo-Mikrofon
ausgelegt. Verwenden Sie ausschließlich ein Mono-Mikrofon.
Aussteuerung des Mischaufnahmepegels
Sie müssen zuerst den Mikrofoneingangspegel einstellen und
dann den Gesamtaufnahmepegel, um das Mischsignal
aufzunehmen.
1.Schließen Sie das Mikrofon an die an der Vorderseite
befindliche Buchse MIC an.
2. Starten Sie die Wiedergabe der Audio-Signalquelle, schalten
Sie das Deck auf Aufnahmebereitschaft (drücken Sie hierzu
die Taste RECORD) und stellen Sie mit dem Regler REC LEVEL
vorübergehend einen relativ niedrigen Aufnahmepegel ein.
3.Sprechen Sie in das Mikrofon und steuern Sie das
Mikrofonsignal mit dem Regler MIC aus, um die Pegel von
Sprechstimme und Audio-Signalquelle aufeinander
abzustimmen.
4. Steuern Sie nun den Gesamtaufnahmepegel mit dem Regler
REC LEVEL so aus, dass Spitzenpegelsignale mit 0 dB
angezeigt werden.
5. Wenn alle Vorbereitungen abgeschlossen sind, starten Sie die
Aufnahme wie zuvor in dieser Anleitung beschrieben.
Audio-Signalquelle
Aussteuerung des
Mikrofoneingangspegels
Aussteuerung des
Gesamtaufnahmepegels
Page 91
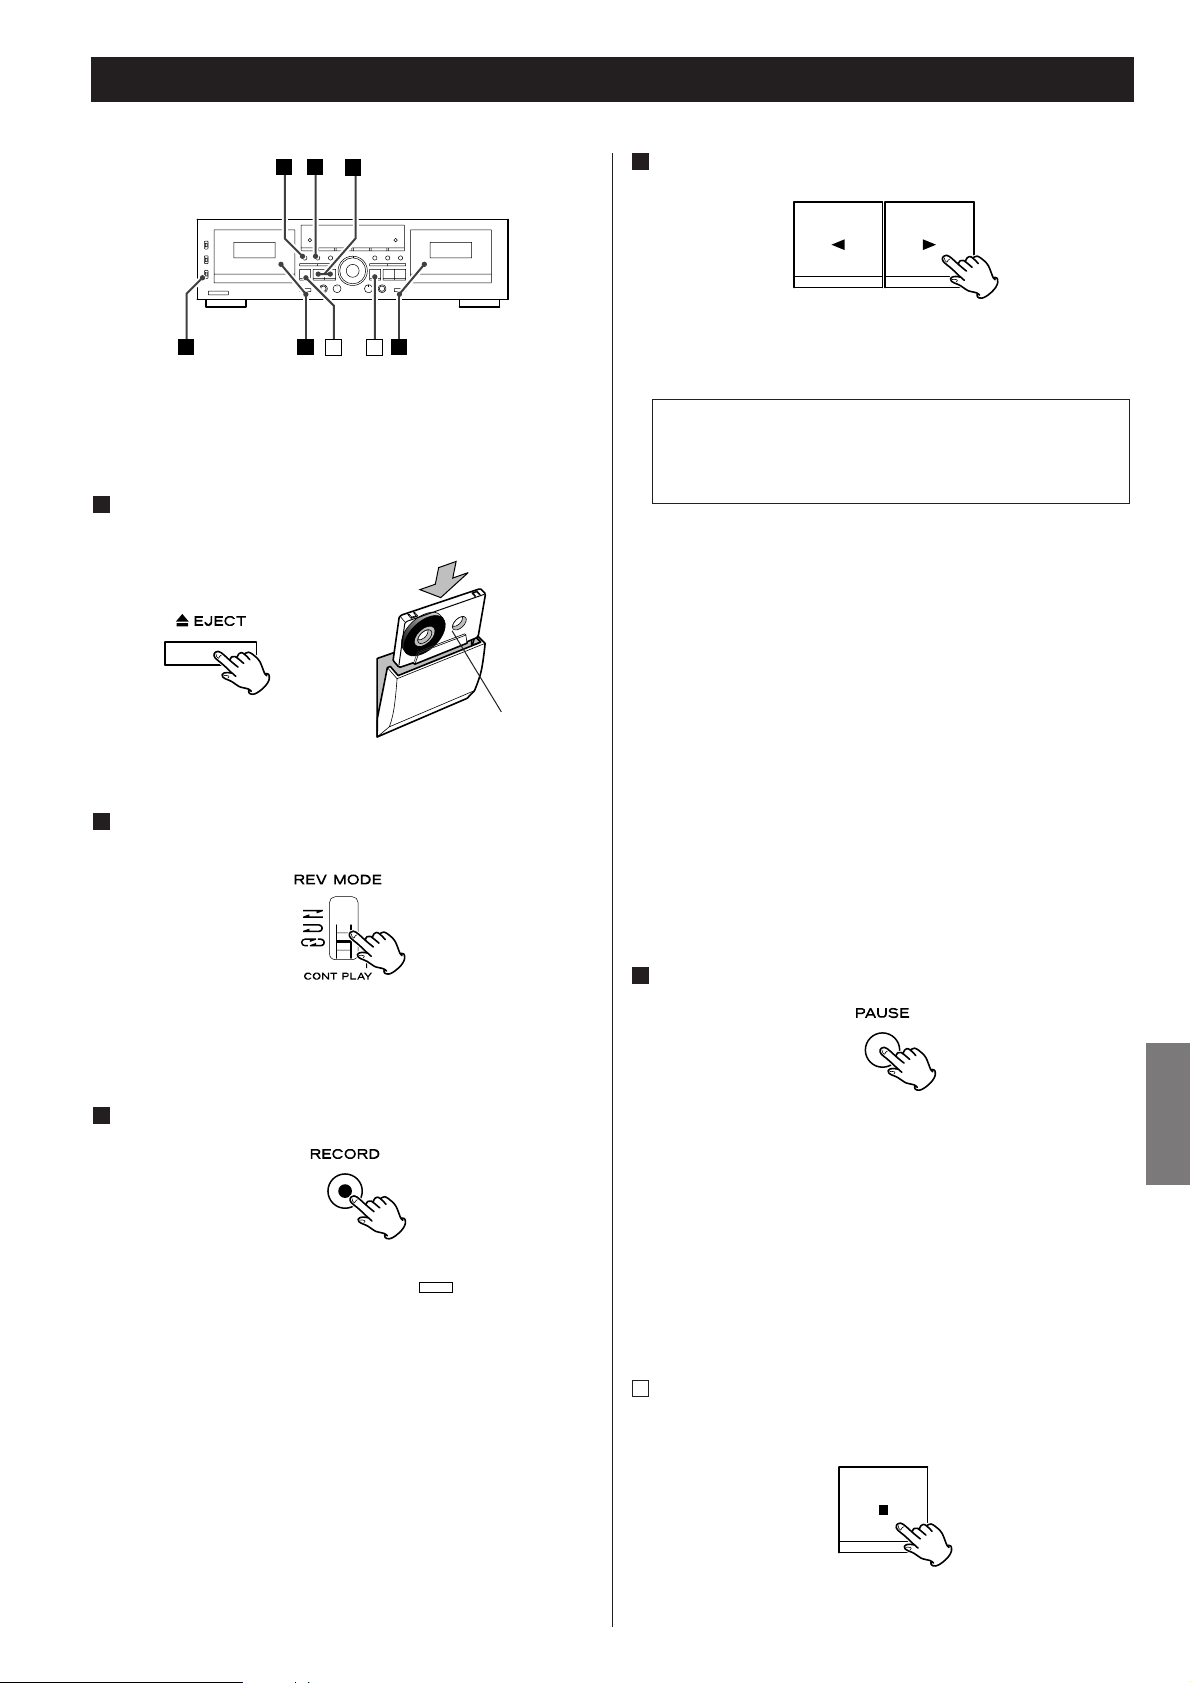
91
DEUTSCH
Kontinuierliche Aufnahme
2
3
4
1 15AA
Diese Funktion ermöglicht es Ihnen, unterbrechungsfreie
Aufnahmen für beide Seiten von zwei eingelegten Cassetten
herzustellen.
Legen Sie zwei zur Aufnahme vorgesehenen Cassetten
in die Cassettenfächer des TAPE I und TAPE II Decks ein.
Stellen Sie den Schalter REV MODE auf die Position p
(CONT PLAY).
<
Stellen Sie den Schalter DOLBY NR auf Position ON, wenn Sie
mit Rauschunterdrückung aufnehmen möchten.
Drücken Sie die Taste RECORD von Deck TAPE I.
Das Deck schaltet auf Aufnahmebereitschaft. Auf dem FLDisplay leuchten die Anzeigen J
und . Nun können Sie
den Aufnahmepegel aussteuern und weitere Einstellungen,
falls erforderlich, vornehmen.
REC
3
2
1
Überprüfen Sie die Aufnahmerichtung.
Falls die nicht gewünschte Aufnahmerichtung angezeigt wird,
wählen Sie die neue Aufnahmerichtung mit der entgegen
gesetzten Wiedergaberichtungstaste (
h
oder y).
Die Aufnahme der Bandseiten erfolgt in dieser Reihenfolge:
Sie können die Aufnahme auf Seite „B“ des TAPE I Decks
beginnen. In diesem Fall bleibt jedoch die Seite „A“ dieser
Cassette unbespielt. Wenn das Ende von Seite „B“ erreicht
wird, setzt das TAPE II Deck die Aufnahme fort.
<
Das TAPE II Deck beginnt die Aufnahme stets ab Bandseite
„A“.
Starten Sie die Aufnahme.
Die Aufnahme startet, sobald Sie die Taste PAUSE des TAPE I
Decks oder die Wiedergabetaste, dessen Pfeilsymbol mit der
angezeigten Richtung übereinstimmt, betätigen.
Wenn das TAPE I Deck die Aufnahme beendet, setzt das TAPE
II Deck automatisch die Aufnahme fort.
<
Der Übergang vom TAPE I zum TAPE II Deck dauert einige
Sekunden.
Aufnahmestopp
Drücken Sie die Stopptaste (H) des zu diesem Zeitpunkt auf
Aufnahme geschalteten Decks.
A
5
TAPE I Seite „A“
x
Seite „B“
x
TAPE II Seite „A“
x
Seite „B“
Achten Sie darauf, dass Sie nicht die Wiedergabetaste,
dessen Pfeilsymbol mit der angezeigten Richtung
übereinstimmt, betätigen. Andernfalls wird die Aufnahme
gestartet.
4
Seite „A“ weist
nach außen
Page 92

92
Parallelaufnahme
3
2 2
1 1
Diese Funktion ermöglicht es Ihnen, das Signal einer AudioSignalquelle gleichzeitig auf der in das TAPE I und TAPE II Deck
eingelegten Cassetten aufzuzeichnen.
Legen Sie Cassetten in beide Decks ein und drücken zum
Aufnahmestart die Taste PARALLEL REC.
<
Vor dem Aufnahmestart müssen Sie die Angaben zu den
Schritten - von Seite 88 befolgen:
Aufnahmerichtung, Reverse-Einstellung, DolbyRauschunterdrückung, Aufnahmepegel etc.
Wenn alle Vorbereitungen abgeschlossen sind, schalten Sie
erneut auf Stopp, falls erforderlich.
< Während der Parallelaufnahme leuchtet die Anzeige
PARALLEL auf dem FL-Display.
< Während der Parallelaufnahme können ausschließlich die
folgenden Tasten verwendet werden:
TAPE I Deck: Stopptaste (H)
TAPE II Deck: PAUSE, REC MUTE und Stopptaste (H
)
<
Wird die Stopptaste (H) an einem der Decks betätigt, werden
beide Decks auf Stopp geschaltet.
71
Legen Sie die Wiedergabecassette (Audio-Signalquelle)
in das TAPE I Deck und die Aufnahmecassette in das
TAPE II Deck ein.
Stellen Sie an beiden Decks die Bandlaufrichtung ein.
Falls die Wiedergabe- oder Aufnahmerichtung am FL-Display
nicht die gewünschte Richtung anzeigt (
h
oder y), drücken
Sie die Taste PAUSE und anschließend die Wiedergabetaste
(
h
oder y) der gewünschten Bandlaufrichtung.
Wenn Sie die Bandlaufrichtung geändert haben, müssen Sie
die Stopptaste (H
) drücken, um den Pausemodus zu beenden.
<
Achten Sie darauf, dass Sie nicht die Wiedergabetaste, dessen
Pfeilsymbol mit der angezeigten Richtung übereinstimmt,
betätigen. Andernfalls wird die Aufnahme gestartet.
<
Stellen Sie den Schalter REV MODE wie erforderlich ein.
<
Die Aufnahmepegelaussteuerung oder Wahl der DolbyRauschunterdrückung ist nicht erforderlich, da diese
Einstellungen automatisch vom Wiedergabeband
übernommen werden.
Zum Dubbing-Start drücken Sie die Taste DUB START.
Zum Normal Speed Dubbing drücken Sie die Taste NORMAL.
Zum High Speed Dubbing drücken Sie die Taste HIGH.
Bei High Speed Dubbing erfolgt der Überspielvorgang in etwa
zweifacher Normalgeschwindigkeit. Wir empfehlen den
Normal Speed Dubbing Modus, wenn die optimale
Audioqualität erzielt werden soll.
3
2
1
Dubbing
(Überspielen vom TAPE I auf das TAPE II Deck)
Page 93

93
DEUTSCH
< Während des Überspielvorganges leuchtet die Anzeige NORM
DUB oder HIGH DUB auf dem FL-Display.
<
Bei Normal Speed Dubbing können ausschließlich die
folgenden Tasten verwendet werden:
TAPE I Deck: Stopptaste (H)
TAPE II Deck: PAUSE, REC MUTE und Stopptaste (H
)
Bei High Speed Dubbing arbeitet ausschließlich die Stopptaste
(H).
<
Wird die Stopptaste (H) an einem der Decks betätigt, werden
beide Decks auf Stopp geschaltet.
< Unmittelbar nachdem das Band vollständig bis zum Bandende
vorwärts oder rückwärts umgespult wurde, arbeitet keine der
Tasten DUB START. Warten Sie mindestens 5 Sekunden,
bevor Sie diese Taste betätigen.
<
Während des Dubbing-Vorganges kann die variable
Geschwindigkeitseinstellung (Pitch) nicht verwendet werden.
< Die Aufnahmeaussteuerung ist nicht erforderlich, da der
Aufnahmepegel mit dem Signalpegel der Wiedergabecassette
übereinstimmt. Die Verwendung von Regler REC LEVEL vor
oder während des Dubbing-Vorganges hat keinerlei
Auswirkung auf das Aufnahmeresultat.
<
Falls während des High Speed Dubbing-Vorganges ein in der
Nähe befindliches Fernsehgerät eingeschaltet ist, kann es zur
Störeinstreuung eines Hochfrequenzsignals in der Aufnahme
kommen. Um dies zu vermeiden, sollten Sie Normal Speed
Dubbing verwenden oder das Fernsehgerät ausschalten.
Dubbing Editierfunktionen
(nur bei Normal Speed Dubbing)
Sie können vermeiden, dass unerwünschte Titel oder längere
leere Passagen überspielt werden, oder Sie können
Leerabschnitte zwischen den einzelnen Titeln einfügen.
1. Drücken Sie während des Dubbing-Vorganges zum
gewünschten Zeitpunkt am TAPE II Deck die Taste
PAUSE. Hierbei schaltet das TAPE II Deck auf
Aufnahmepause, so dass ein unerwünschter Titel nicht
aufgenommen wird.
Soll ein Leerabschnitt von 4 Sekunden Dauer zwischen
Titeln eingefügt werden, drücken Sie am TAPE II Deck
die Taste REC MUTE. Nach der 4 Sekunden dauernden
Stummaufnahme schaltet dieses Deck kurzzeitig auf
Pause.
<
Wenn das TAPE II Deck auf Pause geschaltet ist, setzt das
TAPE I Deck die Wiedergabe fort.
2. Zur Dubbing-Fortsetzung drücken Sie am TAPE II Deck
die Taste PAUSE.
Page 94

94
Synchro Reverse Dubbing (Überspielen vom TAPE I auf das TAPE II Deck mit Umkehrsynchronisierung)
54
33
1 12
Diese Funktion stellt sicher, dass die Cassette mit dem kürzeren
Band bei Erreichen des Bandendes in Vorwärtsrichtung kurzzeitig
auf Pause schaltet, bis das Band der anderen Cassette das
Bandende in Vorwärtsrichtung erreicht. Hierauf wechseln beide
Decks die Laufrichtung und Wiedergabe und Aufnahme werden
gleichzeitig fortgesetzt.
Falls das Band von TAPE I kürzer als TAPE II ist:
1.Wenn für TAPE I das Bandende von Seite A erreicht wird,
schaltet Deck TAPE I auf Stopp und Deck TAPE II wechselt auf
den „Stummaufnahme“ Modus.
2.Wenn die Cassette von TAPE II das Bandende erreicht,
wechseln Deck TAPE I und ll gleichzeitig die Bandlaufrichtung
Deck TAPE I startet die Reverse-Wiedergabe und Deck TAPE II
setzt die Aufnahme fort.
3.Wenn für TAPE I das Bandende von Seite B erreicht wird,
schalten Deck TAPE I und II gleichzeitig auf Stopp.
Falls das Band von TAPE I länger als TAPE II ist:
1. Wenn für TAPE II das Bandende von Seite A erreicht wird,
schaltet Deck TAPE II auf Aufnahmepause, während TAPE I
weiter auf Wiedergabe geschaltet bleibt.
2.Wenn die Cassette von TAPE I das Bandende erreicht,
wechselt Deck TAPE I auf Reverse-Wiedergabe und Deck TAPE
II startet die Aufnahme.
3. Wenn für TAPE II das Bandende von Seite B erreicht wird,
schalten Deck TAPE I und II gleichzeitig auf Stopp.
Legen Sie eine zur Wiedergabe vorgesehenen Cassette
in das TAPE I Deck und eine zur Aufnahme
vorgesehenen Cassette in das TAPE II Deck ein.
Stellen Sie den Schalter REV MODE auf die Position für
beide Bandseiten (j
).
Überprüfen Sie die Bandlaufrichtung beider Decks.
Falls die Rückwärtsrichtungsanzeige (h) auf dem FL-Display
leuchtet, drücken Sie die Taste PAUSE und anschließend die
Vorwärtswiedergabetaste (y
). Anschließend müssen Sie die
Stopptaste (H
) drücken, um den Pausemodus zu deaktivieren.
<
Achten Sie darauf, dass Sie nicht die Wiedergabetaste, dessen
Pfeilsymbol mit der angezeigten Richtung übereinstimmt,
betätigen. Andernfalls wird die Aufnahme gestartet.
<
Die Aufnahmepegelaussteuerung oder Wahl der DolbyRauschunterdrückung ist nicht erforderlich, da diese
Einstellungen automatisch vom Wiedergabeband
übernommen werden.
3
2
1
Page 95

95
DEUTSCH
Drücken Sie die Taste SYNC REV.
Die Anzeige SYNC REV leuchtet auf dem FL-Display.
<
Die Taste SYNC REV arbeitet nicht, falls ein anderer ReverseModus als j
gewählt wurde oder falls eines der oder beide
Decks nicht auf die Vorwärtsbandlaufrichtung (y
) eingestellt
sind.
Zum Dubbing-Start drücken Sie die Taste DUB START.
Zum Normal Speed Dubbing drücken Sie die Taste NORMAL.
Zum High Speed Dubbing drücken Sie die Taste HIGH.
Bei High Speed Dubbing erfolgt der Überspielvorgang in etwa
zweifacher Normalgeschwindigkeit. Wir empfehlen den
Normal Speed Dubbing Modus, wenn die optimale
Audioqualität erzielt werden soll.
Während des Überspielvorganges leuchtet die Anzeige NORM
DUB oder HIGH DUB auf dem FL-Display.
<
Bei Normal Speed Dubbing können ausschließlich die
folgenden Tasten verwendet werden:
TAPE I Deck: Stopptaste (H)
TAPE II Deck: PAUSE, REC MUTE und Stopptaste (H
)
Bei High Speed Dubbing arbeitet ausschließlich die Stopptaste
(H).
5
4
< Wird die Stopptaste (H) an einem der Decks betätigt, werden
beide Decks auf Stopp geschaltet.
< Unmittelbar nachdem das Band vollständig bis zum Bandende
vorwärts oder rückwärts umgespult wurde, arbeitet keine der
Tasten DUB START. Warten Sie mindestens 5 Sekunden,
bevor Sie diese Taste betätigen.
<
Während des Dubbing-Vorganges kann die variable
Geschwindigkeitseinstellung (Pitch) nicht verwendet werden.
< Die Aufnahmeaussteuerung ist nicht erforderlich, da der
Aufnahmepegel mit dem Signalpegel der Wiedergabecassette
übereinstimmt. Die Verwendung von Regler REC LEVEL vor
oder während des Dubbing-Vorganges hat keinerlei
Auswirkung auf das Aufnahmeresultat.
<
Falls während des High Speed Dubbing-Vorganges ein in der
Nähe befindliches Fernsehgerät eingeschaltet ist, kann es zur
Störeinstreuung eines Hochfrequenzsignals in der Aufnahme
kommen. Um dies zu vermeiden, sollten Sie Normal Speed
Dubbing verwenden oder das Fernsehgerät ausschalten.
Page 96

96
Timer-gesteuerte Wiedergabe und Aufnahme
Wenn Sie ein im Fachhandel erhältliches Zeitsteuergerät (Timer)
an Ihre Audioanlage anschließen, können Sie sich von Ihrer
bevorzugten Cassette wecken lassen. Oder Sie können die
Aufnahme zu einem von Ihnen vorbestimmten Zeitpunkt starten.
Die nachfolgenden Abbildungen zeigen Ihnen, wie Sie Ihre
Audio-Komponenten anschließen müssen.
Audio-Signalquelle
(Soll eine Radiosendung per
Timer-Aufnahme
aufgezeichnet werden,
müssen Sie am Tuner den
erforderlichen Sender wählen.)
Verstärker
(Wählen Sie die erforderlichen
Eingangs- und
Ausgangseinstellungen sowie
weitere erforderlichen
Einstellungen.)
Netzsteckdose
Timer
Zum
Wiedergabezeitpunkt
Signalfluss
Dieses Cassettendeck
Zum
Aufnahmezeitpunkt
< Sollen beide Decks kontinuierlich wiedergeben, stellen Sie den
Schalter REV MODE auf die Position p
(CONT PLAY).
5. Stellen Sie den Schalter DOLBY NR wie erforderlich ein.
6. Stellen Sie den Schalter TIMER auf PLAY.
7. Geben Sie am Audio Timer die gewünschte Startzeit
(Einschalten) und Stoppzeit (Ausschalten) ein. Anschließend
an diese Einstellung wird die Spannungsversorgung für alle
angeschlossenen Komponenten ausgeschaltet.
Zum voreingestellten Startzeitpunkt wird die
Spannungsversorgung eingeschaltet und die Wiedergabe
startet automatisch.
<
Die Wiedergabe kann auch direkt aktiviert werden, indem Sie
einfach den Schalter POWER an diesem Gerät betätigen. Soll
die Timerfunktion nicht weiter verwendet werden, stellen Sie
den Schalter TIMER auf OFF.
<
Die Wiedergabe startet jeweils für die Cassettenseite „A“.
Timer-gesteuerte Aufnahme
(Bespiel: Aufnahme einer Radiosendung)
1. Schließen Sie dieses Gerät und Ihr Stereo-System an einen im
Fachhandel erhältlichen Audio Timer (Zeitschaltuhr) an.
2. Schalten Sie alle erforderlichen Stereo-Komponenten ein
(ON).
3. Legen Sie eine bespielbare Cassette in Deck TAPE I und/oder ll
ein (in beide Decks, um kontinuierliche Aufnahme
durchzuführen).
4. Bringen Sie den Schalter REV MODE in die erforderliche
Stellung.
<
Sollen beide Decks kontinuierlich aufnehmen, stellen Sie den
Schalter REV MODE auf die Position p
(CONT PLAY).
5. Stellen Sie den Schalter DOLBY NR wie erforderlich ein.
6. Stellen Sie den gewünschten Sender ein.
7. Drücken Sie am zur Aufnahme zu verwendenden Deck die
Taste RECORD. Hierdurch wird dieses Deck auf
Aufnahmebereitschaft geschaltet.
8. Steuern Sie den Aufnahmepegel aus.
9. Stellen Sie den Schalter TIMER auf REC.
10. Geben Sie am Audio Timer die gewünschte Startzeit
(Einschalten) und Stoppzeit (Ausschalten) ein. Anschließend
an diese Einstellung wird die Spannungsversorgung für alle
angeschlossenen Komponenten ausgeschaltet.
Zum voreingestellten Startzeitpunkt wird die
Spannungsversorgung eingeschaltet und die Aufnahme
startet automatisch.
<
Die Aufnahme kann auch direkt aktiviert werden, indem Sie
einfach den Schalter POWER an diesem Gerät betätigen. Soll
die Timerfunktion nicht weiter verwendet werden, stellen Sie
den Schalter TIMER auf OFF. Andernfalls besteht die Gefahr,
dass durch die automatische Timer-gesteuerte Aufnahme eine
bereits bereits bespielte Cassetten neu bespielt wird und
hierbei wichtige Aufnahmen unbeabsichtigt gelöscht werden.
<
Die Aufnahme startet jeweils für die Cassettenseite „A“.
Timer-gesteuerte Wiedergabe
1. Schließen Sie dieses Gerät und Ihr Stereo-System an einen im
Fachhandel erhältlichen Audio Timer (Zeitschaltuhr) an.
2. Schalten Sie alle erforderlichen Stereo-Komponenten ein
(ON).
3. Legen Sie eine bespielte Cassette in Deck TAPE I oder ll ein.
<
Sie können wahlweise Cassetten in beide Decks einlegen. In
diesem Fall beginnt die Wiedergabe bei Deck TAPE I.
4. Bringen Sie den Schalter REV MODE in die erforderliche
Stellung.
Page 97

97
DEUTSCH
Störungsbeseitigung
Falls Sie am Cassettendeck eine Funktionsbeeinträchtigung
feststellen, beziehen Sie sich bitte erst auf die nachfolgenden
Checkliste, bevor Sie sich an Ihren Kundendienst wenden. In
manchen Fällen liegt die Störungsursache an einem anderen
Gerät Ihres Audiosystems. Überprüfen Sie stets alle
Komponenten.
Falls die Störung entsprechend der nachfolgend aufgelisteten
Prüfschritte nicht beseitigt werden kann, wenden Sie sich bitte
an Ihren offiziellen TEAC Kundendienst oder Fachhändler.
Cassettendeck kann nicht eingeschaltet werden.
e
Überprüfen Sie den Netzanschluss. Vergewissern Sie sich,
dass der Netzanschluss nicht geschaltet ist. Falls es sich um
einen geschalteteten Netzanschluss handelt, muss dieser
aktiviert sein. _berprüfen Sie dies, indem Sie eine Lampe etc.
an diesem Netzanschluss anbringen.
Kein Tonsignal
e
Überprüfen Sie die Anschlüsse zum Verstärker.
e
Überprüfen Sie die Verstärkereinstellungen.
Die Fernbedienungseinheit arbeitet nicht.
e
Vergewissern Sie sich, dass das Cassettendeck eingeschaltet
ist.
e
Falls die Batterien schwach oder entladen sind, neue
Batterien einlegen.
e
Falls sich zwischen Fernbedienungseinheit und
Cassettendeck Hindernisse befinden, müssen diese beseitigt
werden. Richten Sie die Fernbedienung auf den
Infrarotsensor am Cassettendeck und halten Sie dabei einen
Abstand bis zu 5 Metern ein.
e
Bei direkter Einwirkung von extrem hellen Lichtquellen oder
Sonnenlicht kann sich die Empfindlichkeit des
Infrarotsensors verringern. Verwenden Sie in diesem Fall
anstelle der Fernbedienungseinheit die am Cassettendeck
befindlichen Bedienungselemente.
Störeinstreuungen bei Wiedergabe
e
Ausreichenden Abstand zu Geräten, die magnetische oder
elektromagnetische Wellen erzeugen, wie Mikrowellenherd
oder Fernsehgerät etc., einhalten.
Die Bandlaufsteuertasten arbeiten nicht.
e
Falls noch nicht geschehen, eine Cassette einlegen.
e
Falls bereits eine Cassette eingelegt ist, diese entnehmen
und erneut einlegen.
Das Cassettenfach kann nicht geschlossen werden.
e
Die Cassette ist nicht einwandfrei eingelegt. Nochmals
einlegen.
Unbefriedigende Tonqualität
e
Die Tonköpfe reinigen.
e
Vergewissern Sie sich, dass bei Wiedergabe die gleiche
Einstellungen für die Dolby-Rauschunterdrückung wie bei
der Aufnahme gewählt wird.
Die Aufnahme ist nicht möglich
e
Falls die Löschschutzzungen der Cassette entfernt sind,
müssen Sie die Löschschutzöffnungen mit Klebeband
abdecken.
e
Überprüfen Sie die Anschlüsse zum Verstärker und die
Audio-Signalquelle.
e
Nehmen Sie am Verstärker die erforderlichen Eingangs/Ausgangseinstellungen vor.
e
Wählen Sie einen höheren Aussteuerungspegel.
Leicht überhöhte oder verlangsamte
Wiedergabegeschwindigkeit.
e
Überprüfen Sie die Einstellung des variablen
Geschwindigkeitsreglers (Pitch).
Die Bandlaufrichtung wird nicht automatisch gewechselt.
e
Stellen Sie den Schalter REV MODE auf j oder p.
e
Falls der Schalter REV MODE auf j gestellt ist, wird die
Wiedergabe für die Cassettenseite „A“ gestartet.
Synchro Reverse Dubbing ist nicht möglich.
e
Stellen Sie den Schalter REV MODE auf j.
e
Legen Sie jeweils eine Cassette in beide Decks ein.
e
Stellen Sie für beide Decks die Vorwärtsbandlaufrichtung
(y
) ein.
Kontinuierliche Wiedergabe/Aufnahme ist nicht möglich.
e
Stellen Sie den Schalter REV MODE auf p.
e
Legen Sie jeweils eine Cassette in beide Decks ein.
e
Bei kontinuierlicher Aufnahme müssen Sie die Aufnahme bei
Deck TAPE I starten.
Dieses Cassettendeck arbeitet mit empfindlichen
Mikrocomputerschaltkreisen. Gelegentlich kann es daher
zu Funktionsstörungen infolge von Störeinstreuungen und
Interferenzen kommen. Derartige Probleme lassen sich oft
beseitigen, indem Sie das Cassettendeck ausschalten und
mindestens 1 Minute bis zur erneuten Einschaltung
warten.
Page 98

98
Wartung und Pflege
Gehäuseverunreinigungen entfernen Sie mit einem trockenen
weichen und fusselfreien Tuch. Zum Entfernen von
anhaftenden Verschmutzungen können Sie ein mit einem
milden Reinigungsmittel befeuchtetes Tuch verwenden und
dann mit einem mit klarem Wasser befeuchteten Tuch
nachwischen.
Achten Sie darauf, dass das Gerät nicht für längere Zeit mit
Gummi- oder Vinylgegenständen in Berührung bleibt.
Andernfalls kann es zu Schäden an der Gehäuseoberfläche
kommen.
Verwenden Sie nie flüchtige Reinigungsmittel wie Benzin oder
Alkohol. Andernfalls kann es zu Schäden an der
Gehäuseoberfläche kommen.
VORSICHT:
Vor Wartungs- und Pflegearbeiten aus Sicherheitsgründen
unbedingt erst das Netzkabel abziehen.
Reinigen der Tonköpfe
Verschmutzte Tonköpfe verursachen Tonqualitätseinbußen
einschließlich Tonausfall. Falls Verunreinigungen am Bandpfad
auftreten, kann sich das Band in den rotierenden Teilen
verfangen. Es wird empfohlen, dass die Tonköpfe,
Andruckrollen und Tonwellen jeweils alle 10 Betriebsstunden
gereinigt werden. Verwenden Sie hierzu ein Wattestäbchen,
das mit einer im Fachhandel erhältlichen geeigneten
Reinigungsflüssigkeit befeuchtet wurde.
HINWEIS:
Aktivieren Sie niemals den Bandtransport zur Wiedergabe
oder Aufnahme, solange an den Bandpfadteilen und
Tonköpfen noch Reinigungsflüssigkeit anhaftet. Andernfalls
kann es zu Bandverschlingungen oder sonstigen
Beeinträchtigungen an der Cassette oder dem Bandpfad
kommen.
Andruckrolle
Tonwelle
Löschkopf
Aufnahme-/Wiedergabekopf
Andruckrolle
Tonwelle
Entsorgung ihrer alten elektrischen oder elektronischen
Geräte
1.Sofern ein Gerät mit dem Symbol einer
durchkreuzten Abfalltonne gekennzeichnet
ist, bedeutet dies, dass dessen Entsorgung
gemäß der „RICHTLINIE 2002/96/EG DES
EUROPÄISCHEN PARLAMENTS UND DES
RATES vom 27. Januar2003 über Elektro- und
Elektronik-Altgeräte“ geregelt ist.
2. Sämtliche elektrischen und elektronischen Geräte müssen
dementsprechend, getrennt vom Restmüll, den von der
jeweils zuständigen städtischen oder Bundesbehörde dazu
bestimmten, gesonderten Wertstoffsammlungen zugeführt
werden.
3.Eine korrekte Entsorgung ihrer alten elektrischen oder
elektronischen Geräte trägt in hohem Maße der
Vermeidung möglicher negativer Konsequenzen für die
Umwelt und damit auch für ihre eigene sowie die
Gesundheit Anderer bei.
4. Weiterführende Informationen bezüglich der Entsorgung
ihrer alten elektrischen oder elektronischen Geräte erhalten
Sie auf Anfrage bei ihrem zuständigen Stadtbüro,
Abfallentsorgungsgesellschaft oder dem Händler, bei dem
Sie das Gerät ursprünglich erworben haben.
Page 99

DEUTSCH
99
Technische Daten
Tonspur-System . . . . . . . . . . . . . . . . . . . . . . . . . . . . . . . . 4-Spur, 2-Kanal-Stereo
Tonkopfkonfiguration . . . . . . . . . . . . . Aufnahme-/Wiedergabekopf x 1 (je Deck)
Löschkopf x 1 (je Deck)
Bandgeschwindigkeit. . . . . . . . . . . . . . . . . . . . . . . . . . . . . . . . . . . . . 4,8 cm/Sek.
9,5 cm/Sek. (High-Speed Dubbing)
Geschwindigkeitsfeinregler . . . . . . . . . . . . . . . . . . . . . . . . . . . . . . . ±10% (±2%)
Umspuldauer. . . . . . . . . . . . . . . . . . . . . . . . . . . . . . Ca. 110 Sek. (C-60 Cassette)
Antrieb . . . . . . . . . . . . . . . . . . . . . . . . . . . . . Gleichstrom-Servomotor (Tonwelle)
Gleichlaufschwankungen . . . . . . . . . . . 0,09% ±0,1% (gewichteter Effektivwert)
Frequenzgang (gesamt)
Metallband (Typ IV, nur Wiedergabe) . . . . . . . . . . . . . . . . . . . . 30 Hz - 19 kHz
Chromband (Typ II) . . . . . . . . . . . . . . . . . . . . . . . . . . . . . . . . . 30 Hz - 18 kHz
Normalband (Typ I) . . . . . . . . . . . . . . . . . . . . . . . . . . . . . . . . . 30 Hz - 17 kHz
Signal/Rausch-Abstand (gesamt)
59 dB (ohne Rauschunterdrückung, Nennaufnahmepegel)
69 dB (mit Rauschunterdrückung, CCIR-ARM)
Line-Eingang (Cinchbuchse) . . . . . . . . . . . 100 mV (Eingangsimpedanz 50 kOhm)
Mikrofoneingang (6,3 mm-Monobuchse) . . . . . 0,38 mV (Eingangsimpedanz 200
kOhm)
Line-Ausgang (Cinchbuchse) . . . . . . . 0,46 V (Lastimpedanz 50 kOhm oder mehr)
Kopfhörerausgang (6,3 mm-Monobuchse) . . . . . . . . . . . . . . . . 0,95 mW/8 Ohm
Netzspannung
Modell für USA/ Kanada. . . . . . . . . . . . . . . . . . 120 Volt Wechselstrom, 60 Hz
Allgemeines Exportmodell . . . . . . . . . . 120/230 Volt Wechselstrom, 50/60 Hz
Modell für Europa . . . . . . . . . . . . . . . . . . . . . . 230 Volt Wechselstrom, 50 Hz
Leistungsaufnahme . . . . . . . . . . . . . . . . . . . . . . . . . . . . . . . . . . . . . . . . . . . 22 W
Abmessungen (einschl. hervorstehender Teile) . . . 435 (B) x 127 (H) x 292 (T) mm
Gewicht. . . . . . . . . . . . . . . . . . . . . . . . . . . . . . . . . . . . . . . . . . . . . . . . . . . 4,0 kg
Standardzubehör
Fernbedienungseinheit (RC-615A) x 1
Batterie für Fernbedienungseinheit („AA“) x 2
Bedienungsanleitung x 1
Garantiebescheinigung x 1
Stereo-Cinchkabel x 2
• Die in der Anleitung enthaltenen Abbildungen können vom tatsächliche
Modell abweichen.
• Änderungen der technischen Daten und der Konstruktion jederzeit ohne
Vorankündigung oder Verpflichtung des Herstellers vorbehalten.
Page 100

100
Indice
Grazie di aver scelto questo prodotto TEAC.
Leggere attentamente questo manuale per poter utilizzare
l’apparecchio al massimo delle sue prestazioni.
Prima dell’uso
Leggere attentamente prima di passare
all’uso
< Poiché l’apparecchio si riscalda nel corso del funzionamento,
lasciare sempre uno spazio adeguato intorno, per garantire
una buona ventilazione.
<
La tensione della corrente di alimentazione deve essere quella
indicata sull’etichetta presente sul retro dell’apparecchio. In
caso di dubbi, rivolgersi ad un elettricista.
<
Scegliere con attenzione il luogo in cui installare
l’apparecchio. Evitare di posizionarlo esposto alla diretta luce
del sole, o a sorgenti di calore. Evitare inoltre luoghi soggetti
a vibrazioni, o luoghi particolarmente polverosi, caldi, freddi o
umidi.
<
Non posizionare l’apparecchio sopra altri dispositivi o
componenti elettronici.
< Non aprire il mobiletto perché ciò può causare danni ai circuiti
o scariche elettriche e folgorazioni. In caso di accidentale
caduta all’interno dell’apparecchio di oggetti estranei,
rivolgersi al più presto al negoziante presso il quale è stato
effettuato l’acquisto, o ad un centro di servizio.
<
Per staccare il cavo di alimentazione dalla presa di corrente di
rete agire sempre sulla spina e non tirare mai il cavo.
< Per la pulizia dell’apparecchio non utilizzare mai solventi
chimici, che possono danneggiarne le rifiniture. Usare
solamente un panno pulito, asciutto e senza lanugine.
<
Conservare questo manuale in un posto sicuro, per eventuali
future consultazioni.
ATTENZIONE
<
Non esporre questo apparecchio a schizzi nè permettere
che vi entrino acqua o altri liquidi.
< Non mettere vasi o altri contenitori di liquidi sopra
l’apparecchio.
< Utilizzare questo apparecchio solo in spazi aperti. Non
metterlo in funzione se si trova all’interno di mobili chiusi
ove non possa circolare liberamente l’aria
<
Nella posizione di STAND-BY e di OFF il consumo di
corrente di questo apparecchio è del tutto irrisorio.
< L’apparecchio deve essere posizionato nei pressi della presa
di corrente in modo che Vi sia sempre facile raggiungere il
cavo di alimentazione.
<
Apparecchi appartenenti alla Classe ! devono essere sempre
collegati a prese di corrente dotate di messa a terra.
Prima dell’uso . . . . . . . . . . . . . . . . . . . . . . . . . . . . . . . . . . . . 100
Manipolazione delle nastrocassette . . . . . . . . . . . . . . . . . . . . 101
Collegamenti . . . . . . . . . . . . . . . . . . . . . . . . . . . . . . . . . . . . 102
Uso del telecomando . . . . . . . . . . . . . . . . . . . . . . . . . . . . . . 103
Denominazione delle parti e dei comandi . . . . . . . . . . . . . . . 104
Quadrante delle indicazioni. . . . . . . . . . . . . . . . . . . . . . . . . . 106
Riproduzione (per entrambi i deck, TAPE I o TAPE II) . . . . . . . 107
Riproduzione continua . . . . . . . . . . . . . . . . . . . . . . . . . . . . . 109
Individuazione degli spazi non registrati . . . . . . . . . . . . . . . . 109
Ricerca dei brani . . . . . . . . . . . . . . . . . . . . . . . . . . . . . . . . . . 110
Individuazione degli inizi . . . . . . . . . . . . . . . . . . . . . . . . . . . . 111
Registrazione (TAPE I o TAPE II) . . . . . . . . . . . . . . . . . . . . . . . 112
Registrazione con missaggio dal microfono . . . . . . . . . . . . . . 114
Registrazione continua . . . . . . . . . . . . . . . . . . . . . . . . . . . . . 115
Registrazione in parallelo . . . . . . . . . . . . . . . . . . . . . . . . . . . 116
Duplicazione (dal deck TAPE I al deck TAPE II) . . . . . . . . . . . . 116
Montaggio nel corso della duplicazione . . . . . . . . . . . . . . . . 117
Duplicazione con sincronizzazione all’inverso . . . . . . . . . . . . 118
Riproduzione e registrazione a mezzo timer . . . . . . . . . . . . . 120
Diagnostica. . . . . . . . . . . . . . . . . . . . . . . . . . . . . . . . . . . . . . 121
Manutenzione . . . . . . . . . . . . . . . . . . . . . . . . . . . . . . . . . . . 122
Specifiche tecniche . . . . . . . . . . . . . . . . . . . . . . . . . . . . . . . . 123
 Loading...