

Page 1

Z
77-20MD80001002
MC-D800
TURNTABLE AUDIO SYSTEM
OWNER'S MANUAL
MODE D’EMPLOI
MANUAL DEL USUARIO
BEDIENUNGSANLEITUNG
MANUALE DI ISTRUZIONI
GEBRUIKSAANWIJZING
BRUKSANVISNING
ENGLISH FRANÇAIS
Z
NEDERLANDS ITALIANOESPAÑOL DEUTSCH
SVENSKA
Page 2
IMPORTANT SAFETY INSTRUCTIONS
CAUTION: TO REDUCE THE RISK OF ELECTRIC
SHOCK, DO NOT REMOVE COVER (OR BACK).
NO USER-SERVICEABLE PARTS INSIDE. REFER
SERVICING TO QUALIFIED SERVICE PERSONNEL.
WARNING: TO PREVENT FIRE OR SHOCK HAZARD,
DO NOT EXPOSE THIS APPLIANCE TO RAIN OR
MOISTURE.
CAUTION
M
V
The lightning flash with arrowhead in an
equilateral triangle is intended to alert the
user to the presence of uninsulated “dangerous voltage” within the product’s enclosure
that could be of sufficient magnitude to constitute a risk of electric shock to persons.
The exclamation point in an equilateral triangle is intended to alert the user to the
presence of important operating and maintenance (servicing) instructions in the literature
accompanying the appliance.
o DO NOT REMOVE THE EXTERNAL CASES OR
CABINETS TO EXPOSE THE ELECTRONICS. NO USER
SERVICEABLE PARTS ARE INSIDE.
o IF YOU ARE EXPERIENCING PROBLEMS WITH THIS
PRODUCT, CONTACT THE STORE WHERE YOU
PURCHASED THE UNIT FOR A SERVICE REFERRAL.
DO NOT USE THE PRODUCT UNTIL IT HAS BEEN
REPAIRED.
o USE OF CONTROLS OR ADJUSTMENTS OR
PERFORMANCE OF PROCEDURES OTHER THAN
THOSE SPECIFIED HEREIN MAY RESULT IN
HAZARDOUS RADIATION EXPOSURE.
2
Page 3

This product contains a semiconductor laser system
inside the cabinet and is classified as a “CLASS 1 LASER
PRODUCT”.
To prevent being exposed to the laser beam, do not try
to open the enclosure.
V Precautions concerning batteries
Misuse of batteries could cause them to rupture or
leak leading to fire, injury or the staining of nearby
things. Please read and observe the following precautions carefully.
Laser:
Type: EP-C101
Manufacturer: GUANGDONG EVER BRIGHT GROUP
CO.,LTD.
Laser output: Less than 0.5 mW
Wavelength: 790±25 nm
o Be sure to insert the batteries with correct positive
(¥) and negative (^) orientations.
o Use batteries of the same type. Never use different
types of batteries together.
o If the remote control is not used for a long time (more
than a month), remove the batteries to prevent them
from leaking.
o If the batteries leak, wipe away the leakage inside the
battery compartment and replace the batteries with
new ones.
o Do not use batteries of types other than those speci-
fied. Do not mix new batteries with old ones or use
different types of batteries together.
o Do not heat or disassemble batteries. Never throw
batteries into fire or water.
o Do not carry or store batteries with other metal-
lic objects. The batteries could short circuit, leak or
explode.
ENGLISH
o Never recharge a battery unless it is confirmed to be
a rechargeable type.
3
Page 4

IMPORTANT SAFETY INSTRUCTIONS (continued)
1) Read these instructions.
2) Keep these instructions.
3) Heed all warnings.
4) Follow all instructions.
5) Do not use this apparatus near water.
6) Clean only with dry cloth.
7) Do not block any ventilation openings. Install in
accordance with the manufacturer's instructions.
8) Do not install near any heat sources such as radiators,
heat registers, stoves, or other apparatus (including
amplifiers) that produce heat.
9) Do not defeat the safety purpose of the polarized
or grounding-type plug. A polarized plug has two
blades with one wider than the other. A grounding type plug has two blades and a third grounding
prong. The wide blade or the
third prong are provided for your
safety. If the provided plug does
not fit into your outlet, consult an
electrician for replacement of the
obsolete outlet.
10) Protect the power cord from being walked on or
pinched particularly at plugs, convenience receptacles, and the point where they exit from the
apparatus.
11) Only use attachments/accessories specified by the
manufacturer.
o The apparatus draws nominal non-operating
power from the AC outlet with its POWER or
STANDBY/ON switch not in the ON position.
o The mains plug is used as the disconnect device,
the disconnect device shall remain readily
operable.
o Caution should be taken when using earphones or
headphones with the product because excessive
sound pressure (volume) from earphones or headphones can cause hearing loss.
CAUTION
o Do not expose this apparatus to drips or splashes.
o Do not place any objects filled with liquids, such
as vases, on the apparatus.
o Do not install this apparatus in a confined space
such as a book case or similar unit.
o The apparatus should be located close enough
to the AC outlet so that you can easily reach the
power cord plug at any time.
o If the product uses batteries (including a battery
pack or installed batteries), they should not be
exposed to sunshine, fire or excessive heat.
o CAUTION for products that use replaceable lithium
batteries: there is danger of explosion if a battery is
replaced with an incorrect type of battery. Replace
only with the same or equivalent type.
12) Use only with the cart, stand, tripod, bracket, or
table specified by the manufacturer, or sold with the
apparatus. When a cart is used, use caution when
moving the cart/apparatus combination to avoid
injury from tip-over.
13) Unplug this apparatus during lightning storms or
when unused for long periods of time.
14) Refer all servicing to qualified service personnel.
Servicing is required when the apparatus has been
damaged in any way, such as power-supply cord or
plug is damaged, liquid has been spilled or objects
have fallen into the apparatus, the apparatus has
been exposed to rain or moisture, does not operate
normally, or has been dropped.
4
The Bluetooth® word mark and logos are registered trademarks
owned by Bluetooth SIG, Inc. and any use of such marks by TEAC is
under license.
This product is protected by certain intellectual property rights of
Microsoft. Use or distribution of such technology outside of this
product is prohibited without a license from Microsoft.
Other company names, product names and logos in this document
are the trademarks or registered trademarks of their respective
owners.
Page 5
Wireless equipment precautions
Compliance of radio transmitter and
interference
Model for EEA (European Economic Area)
This product has the function of broadband transmitter
using 2.4GHz Band.
Use frequency range: 2400 MHz – 2480 MHz
Maximum output power: Bluetooth® Class 2 (less than
2.5 mW)
Hereby, TEAC Corporation declares that
the radio equipment type is in compliance with Directive 2014/53/EU., and
the other Directives, and Commission
Regulations.
The full text of the EU declaration of conformity is available at the following internet address: Please contact us
by e-mail.
http://www.teac-audio.eu/en/
CAUTION
Changes or modifications not expressly approved by
the party responsible for compliance could void the
user’s authority to operate the equipment.
CAUTION
Authorization of wireless devices are different in countries or regions. Please use only in the country where
you purchased the product.
o Depending on the country, restrictions on the use
of Bluetooth wireless technology might exist.
ENGLISH
TEAC Corporation
1-47 Ochiai, Tama-shi, Tokyo, 206-8530, Japan
5
Page 6

Wireless equipment precautions (cont'd)
Bluetooth® notes
Radiation Exposure requirements
This equipment meets the regulation, which is recognized internationally, for the case of human exposure to
radio waves generated by the transmitter.
Statement of compliance
EEA (European Economic Area) model
This equipment complies with EN.62311; Assessment
of electronic and electrical equipment related to
human exposure restrictions for electromagnetic fields;
the harmonised standard of DIRECTIVE 1999/5/EC.
When using this unit with a mobile phone or other
Bluetooth devices, they should be no more than about
10 m (33 ft) apart. Depending on the circumstances of
use, however, the effective transmission distance might
be shorter.
Wireless communication with every device that supports Bluetooth wireless technology is not guaranteed.
To determine the compatibility between this unit
and another device that supports Bluetooth wireless
technology, refer to that device's operation manual or
contact the shop where you purchased it.
6
Page 7
For European Customers
Pb, Hg, Cd
Disposal of electrical and electronic equipment
(a) All electrical and electronic equipment should be disposed of
separately from the municipal waste stream via collection
facilities designated by the government or local authorities.
(b) By disposing of electrical and electronic equipment correctly,
you will help save valuable resources and prevent any potential negative effects on human health and the environment.
(c) I mproper disposal of waste electrical and electronic equipment
can have serious effects on the environment and human
health because of the presence of hazardous substances in
the equipment.
(d) The Waste Electrical and Electronic Equipment
(WEEE) symbol, which shows a wheeled bin that has
been crossed out, indicates that electrical and electronic equipment must be collected and disposed of
separately from household waste.
(e) Return and collection systems are available to end users. For
more detailed information about the disposal of old electrical and electronic equipment, please contact your city office,
waste disposal service or the shop where you purchased the
equipment.
ENGLISH
Disposal of batteries and/or accumulators
(a) Waste batteries and/or accumulators should be disposed of
separately from the municipal waste stream via collection
facilities designated by the government or local authorities.
(b) By disposing of waste batteries and/or accumulators correctly,
you will help save valuable resources and prevent any potential negative effects on human health and the environment.
(c) Improper disposal of waste batteries and/or accumulators can
have serious effects on the environment and human health
because of the presence of hazardous substances in them.
(d) The WEEE symbol, which shows a wheeled bin that
has been crossed out, indicates that batteries and/
or accumulators must be collected and disposed of
separately from household waste.
If a battery or accumulator contains more than the
specified values of lead (Pb), mercury (Hg), and/or cadmium
(Cd) as defined in the Battery Directive (2006/66/EC), then
the chemical symbols for those elements will be indicated
beneath the WEEE symbol.
(e) Return and collection systems are available to end users. For
more detailed information about the disposal of waste batteries and/or accumulators, please contact your city office, waste
disposal service or the shop where you purchased them.
7
Page 8

Contents
Before use
Thank you for choosing TEAC. Read this manual carefully to get the best performance from this unit.
IMPORTANT SAFETY INSTRUCTIONS ..................2
Wireless equipment precautions ......................5
Bluetooth® notes .....................................6
Before use ............................................8
Automatic power saving function ....................10
Discs ................................................10
MP3/WMA files ......................................12
Handling records ....................................13
Connections .........................................14
Replacing the stylus .................................17
Names and functions of parts (main unit) ............18
Names and functions of parts (remote control) .......20
Using the remote control ............................22
Names and functions of parts (turntable) ............23
Turntable cover ......................................24
Included items
Check to be sure the box includes all the supplied
accessories shown below. Please contact the store
where you purchased this unit if any of these accessories are missing or have been damaged during
transportation.
Speakers × 1 pair
Remote control (RC-1316) × 1
45 RPM adapter × 1
Sapphire stylus for LP and EP records (already
installed)
Turntable cover × 1
Hinges × 2
Batteries for remote control (AA) × 2
Setting the clock. . . . . . . . . . . . . . . . . . . . . . . . . . . . . . . . . . . . . 25
Basic operation ......................................27
Listening to a CD ....................................30
Listening to files on a USB flash drive .................32
Listening to a CD/files on a USB flash drive ...........33
Programmed playback (CD/USB) .....................34
Repeat and shuffle playback (CD/USB) ...............38
About MP3/WMA file playback .......................39
Listening to audio from a Bluetooth device ..........42
Pairing with another Bluetooth device ...............44
Listening to records. . . . . . . . . . . . . . . . . . . . . . . . . . . . . . . . . . 45
Listening to the radio ................................48
Preset tuning ........................................50
RDS .................................................52
PTY search ...........................................54
Wakeup timer .......................................56
AM antenna × 1
FM antenna (wire type) × 1
Owner’s manual (this document) × 1
o Keep this manual in a safe place for future reference.
o See the back of this document for information about
the warranty in Europe and other countries or areas.
Sleep timer ..........................................59
Listening to a connected device .....................60
Troubleshooting .....................................61
Specifications ........................................63
8
Page 9

Precautions for use
o Do not place anything on the turntable cover.
Objects on the cover might cause noise due to vibrations or fall off, especially during playback.
o Avoid placing the unit in direct sunlight, close to
a source of heat or in other similar conditions. Do
not place the unit on top of an amplifier or other
equipment that might generate heat that exceeds
the operating temperature range of this unit.
Doing so could cause discoloration, deformation or
malfunction.
o As the unit could become warm during operation,
always leave sufficient space around it for ventilation. When installing this unit, leave at least 20 cm
(8") between it and walls. To allow good heat dissipation, leave a little space between it and other
devices. When placing it in a rack, for example, leave
at least 40 cm (16") open above it and 10 cm (4")
open behind it. Failure to provide these gaps could
cause heat to build up inside and result in fire.
o Do not open the cabinet as this might result in dam-
age to the circuitry or electrical shock. If a foreign
object should get into the unit, contact your dealer.
o When removing the power plug from the wall outlet,
always pull directly on the plug, never yank on the
cord.
o If a TV is turned on while the unit is on, static might
appear on the TV screen depending on the characteristics of the TV broadcast signal. If this occurs, put
this unit into standby mode (off) when using the TV.
Maintenance
If the surface of the unit gets dirty, wipe it with a soft
cloth or use diluted mild liquid soap. Allow the surface
of the unit to dry completely before using.
Do not use chemical cleaning cloths, thinner or similar
substances as they could damage the surface of the
unit.
ENGLISH
o DO NOT MOVE THE UNIT DURING PLAYBACK. During
playback, the disc or the record rotates. Do not lift or
move the unit during playback. Doing so may damage the disc, the record, the stylus, the cartridge or
the unit.
o Always remove the disc or the record before relocat-
ing or moving this unit. Moving the unit with a disc
inside or a record on the turntable could damage the
disc, the record, the stylus and the cartridge or could
cause a malfunction.
o The voltage supplied to the unit should match the
voltage as printed on the rear panel. If you are in any
doubt regarding this matter, consult an electrician.
V
CAUTION
For safety, disconnect the power cord from
the socket before cleaning.
9
Page 10
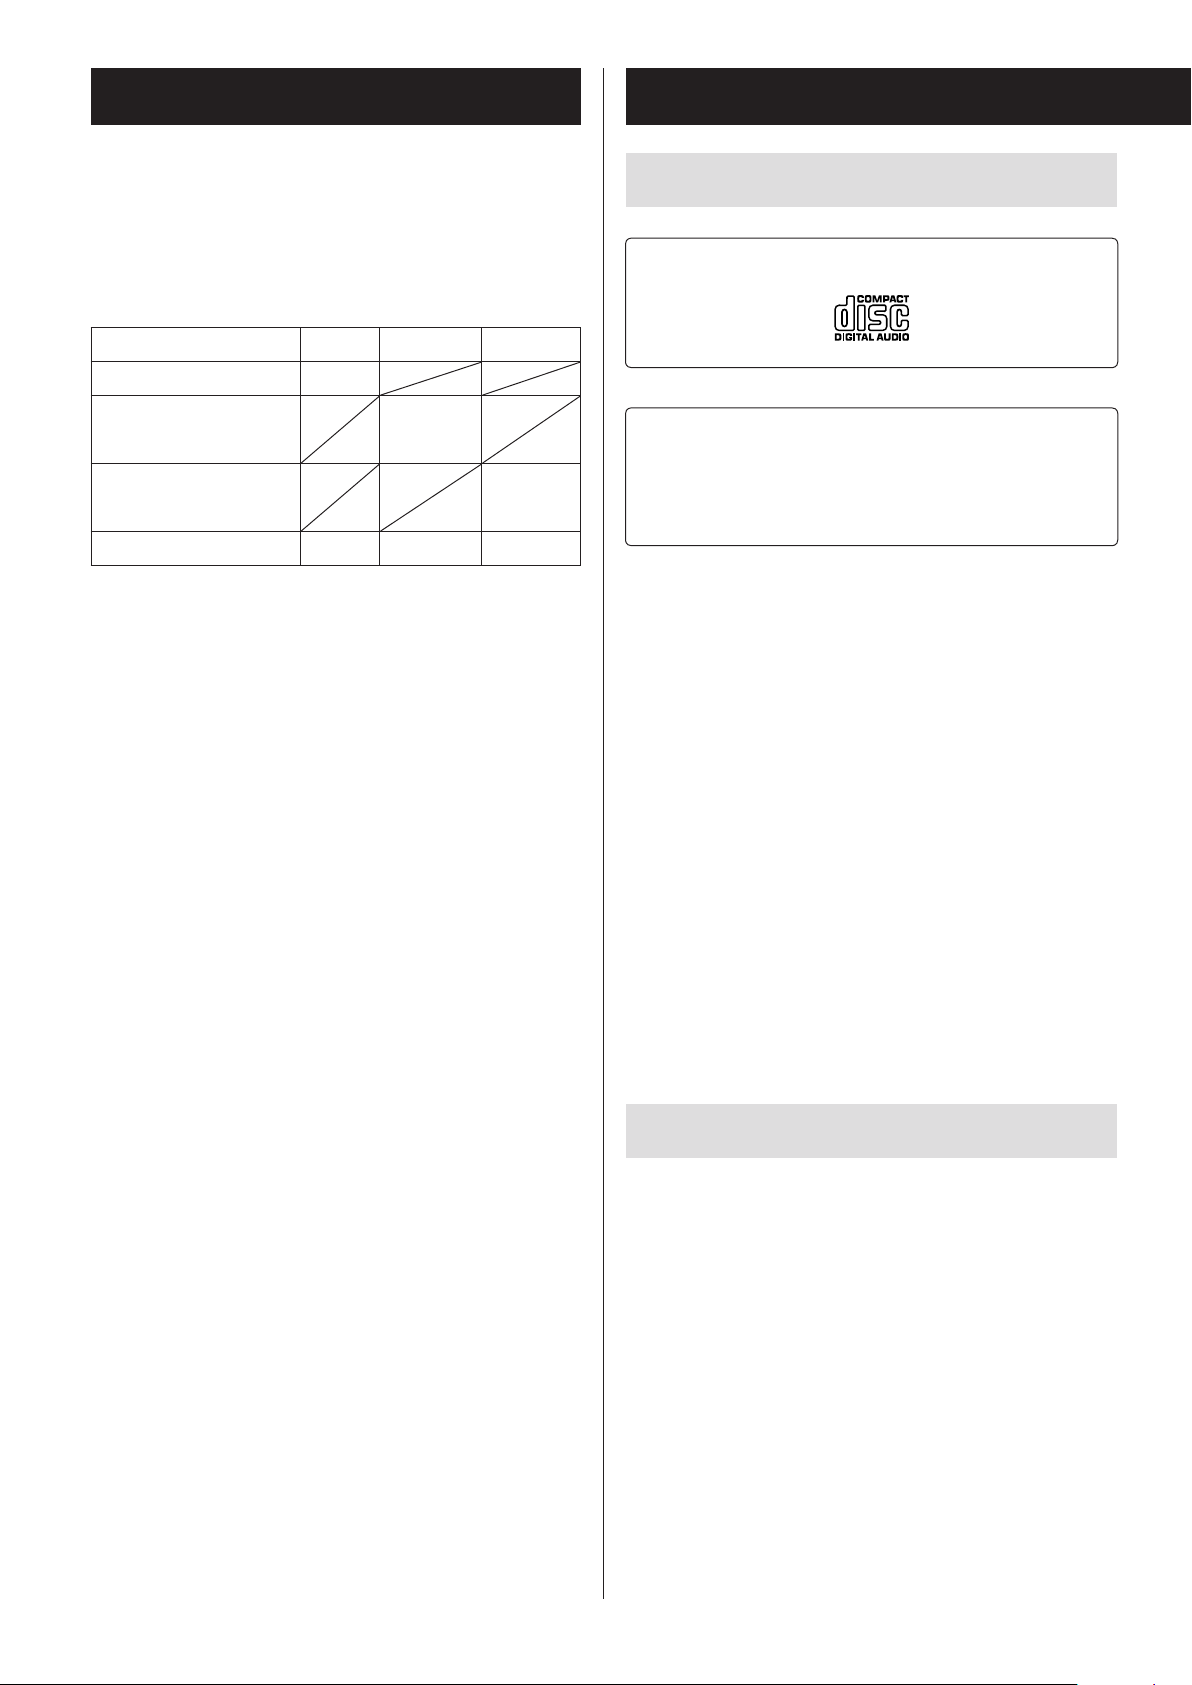
Automatic power saving function
Discs
This unit has an automatic power saving function. The
automatic power saving function is ON when this unit
is shipped new, so it will automatically enter standby if
30 minutes pass under the conditions shown in the following table.
Status CD/USB Bluetooth PHONO*
No disc/USB flash drive
No device connected
Turntable not turning
Stopped/paused
Automatic power saving function active
— Automatic power saving function not active
/ Not applicable
* When set to PHONO, this function is only enabled if
the tonearm is returned to the tonearm holder.
o When AUX is selected, the unit will automatically
enter standby if there is no input for eight hours.
o This function is disabled when the unit is set to FM/
AM.
If you want to disable the automatic power saving function, do the following.
1. Connect the AC power cord.
—
Discs that can be played on this unit
CDs with the Compact disc Digital Audio logo
CD-R and CD-RW discs that have been created in
the audio CD format and finalized correctly.
CD-R and CD-RW discs that have been written
with MP3 or WMA files and finalized.
This unit can play the above types of discs (without
adapters). This unit cannot play any other types of discs.
V
CAUTION
If you try to play any other type of disc with
this unit, loud noises that damage speakers
or harm hearing could occur. Never try to
play any other type of disc with this unit.
o This unit might not be able to properly play back
Copy Control CDs, Dual Discs and other special CDs
that do not conform to the Red Book CD standard.
Operation and sound quality cannot be guaranteed
when special discs are used in this unit. If playback of
a special disc should cause trouble, contact the seller
of the disc.
2. Press the STANDBY/ON button.
3. Press the PHONO/AUX button to select AUX.
4. Press and hold the play/pause (y/9) button for at
least two seconds.
5. When “ERP-ON” is displayed, press a skip/search
(.m/,/) button on the remote control
or turn the main unit's skip (.// ) knob to
select “ERP-OFF”.
6. Press the play/pause (y/9) button to exit setting
mode.
10
CD-R/CD-RW discs
This unit can play back CD-R and CD-RW discs that have
been recorded in the audio CD format (CD-DA) and the
MP3 or WMA format.
o Discs created by a CD recorder must be finalized with
the CD recorder that was used to create the discs
before being used with this unit.
o Depending on disc quality and recording conditions,
playback of some discs might not be possible. Please
see the manual for the device that you used to create
the disc.
o If you are uncertain about the handling of a CD-R
or CD-RW disc, please contact the seller of the disc
directly.
Page 11

Precautions for use
Storage precautions
o Do not use cracked discs because they could dam-
age the unit.
o When writing something on the label side of a disc,
use a felt tip permanent marker. The use of a ballpoint pen or other pen with a hard tip could damage
the disc, making it unplayable.
o Never use commercially available CD stabilizers.
Doing so could make the disc unplayable or damage
the unit.
o Never use CDs with irregular shapes, including heart-
shaped and octagonal discs because such discs
could damage the unit.
o Discs should be stored in their cases when not being
used. Failure to do so could result in warping and
scratches.
o Do not leave discs in places that are exposed to direct
sunlight or that are very humid or hot. Long exposure
to such conditions could warp or degrade discs, making them unplayable.
o Since CD-R/CD-RW discs are more susceptible to the
effects of heat and ultraviolet rays compared to commercial CDs, do not leave them for long periods of
time in places that are, for example, exposed to direct
sunlight or near equipment that generate heat.
o Smudges on a disc might cause the sound to skip or
degrade the sound quality. Always clean discs before
storing them.
ENGLISH
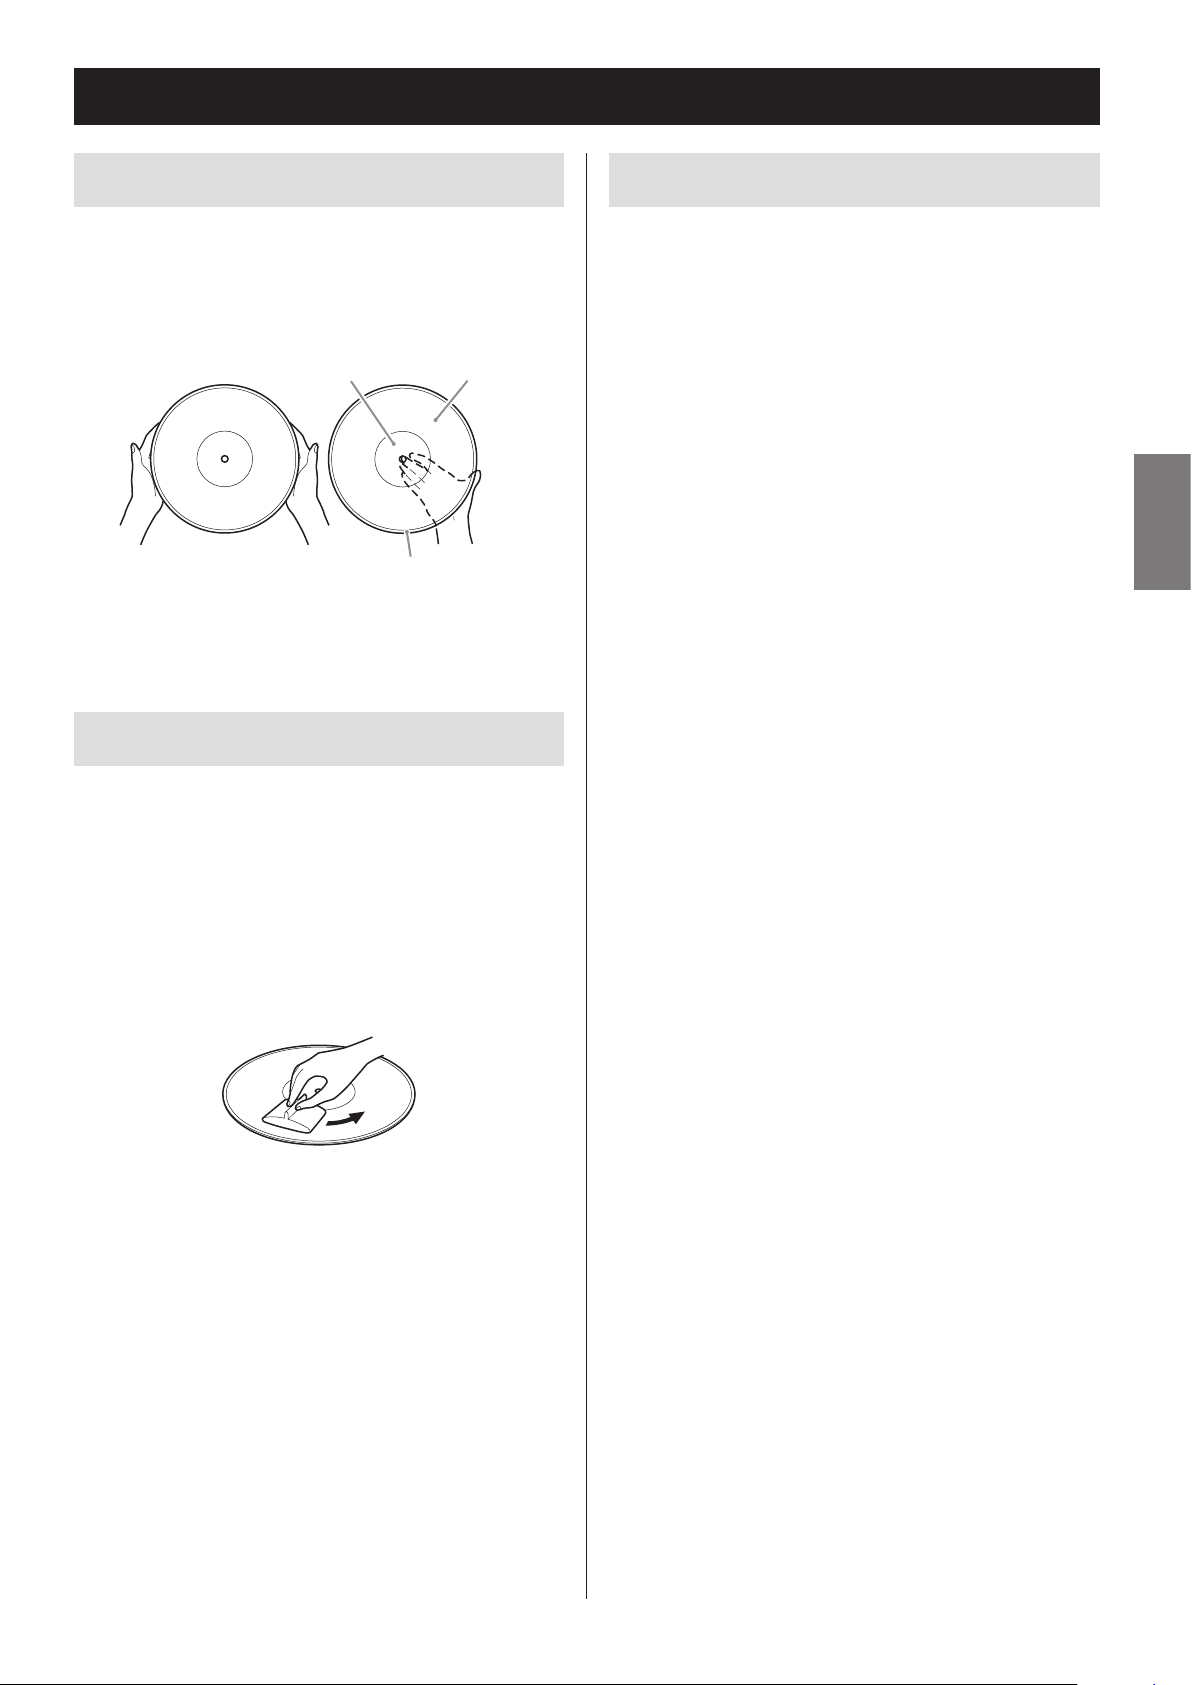
Handling precautions
o Always insert the disc into the disc tray with the label
side up.
o If the side of the disc that the signal is recorded on
(unlabeled side) has scratches, fingerprints or dirt on
it, for example, playback errors could occur. Please
handle discs with care.
o To remove a disc from its case, press down on the
center of the case and hold the disc by its edges.
Do not touch the side of the disc that has the data
encoded on it (unlabeled side).
Removal from case Holding by edges
Maintenance
o If the side of the disc that has the data encoded on
it (unlabeled side) becomes dirty with fingerprints
or dust, use a soft cloth to wipe the surface from the
center directly toward the edge.
o Never use record cleaners, antistatic treatments,
thinners or similar chemicals to clean discs. Such
chemicals could harm the surface of the disc.
11
Page 12

MP3/WMA files
This unit can play MP3 and WMA files that are on CD-R/
CD-RW discs and USB flash drives.
o Audio file formats that can be played back
MP3 (file extension: .mp3)
Bit rate: 8 kbps to 320 kbps
Sampling frequency: 16 kHz to 48 kHz
WMA (file extension: .wma)
Bit rate: 8 kbps to 320 kbps
Sampling frequency: 32 kHz, 44.1 kHz, 48 kHz
Note: Digital Rights Management (DRM) is not
supported.
o Up to eight levels of folders supported.
File information shown on the display
The display of this unit can only show single-byte alphanumeric characters.
o If the file information uses Japanese, Chinese or other
double-byte characters, playback is possible but the
name will not be shown correctly.
Precautions when creating MP3/WMA
files on a computer
o Only discs that have been recorded using the ISO
9660 standard can be played by this unit.
o MP3 and WMA files are recognized by their file exten-
sions (“.mp3” for MP3 files and “.wma” for WMA files.)
Always include the extension in the file name.
o Files without extensions cannot be recognized. A file
cannot be played back regardless of the file name
extension, if the data is not in the MP3 or WMA
format.
o After recording to a CD-R/CD-RW, always close the
session (complete disc creation). This unit cannot
play a disc if its session has not been closed.
o A maximum of 999 files and 99 folders on a disc can
be played. If the media has more than these maximums, this unit might not be able to correctly play
any file that is the 1000th or higher or any folder that
is the 100th or higher.
o Discs made with multi-session recording are not sup-
ported. Only the first session can be played back.
o Depending on the condition of the disc, playback
might not be possible or the sound might skip.
o This unit cannot play copyright-protected audio files.
12
Page 13
Handling records
Holding records
When holding a record or removing it from its sleeve,
avoid touching the grooves by holding the record by
its label and edge with one hand or by holding it by its
edge with both hands.
Label Grooves
Outer edge
Cleaning
Precautions
o Do not leave records in places that are exposed to
direct sunlight or are very hot or very humid. Leaving
a record in such a condition for a long time could
result in warping or other damage.
o Do not stack multiple records or place heavy objects
on top of them. Do not leave records at an angle for
long amounts of time either. Doing so could result in
warping or other damage.
o Do not allow hard objects to directly touch the audio
grooves. Doing so could cause scratches.
o After you finish playing a record, always put it back
into its sleeve for storage. Leaving a record unprotected could result in warping or scratching.
o Do not use cracked records.
ENGLISH
o Fingerprints and dust on a record can cause noise
and the sound to skip, as well as damage the record
itself and the stylus. Use a commercially available
record cleaner to clean records. Do not use thinner or
anything other than a record cleaner. Such chemicals
could harm the surface of the record.
o When using a record cleaner, wipe the surface of the
record in a circular motion, following the grooves.
13
Page 14
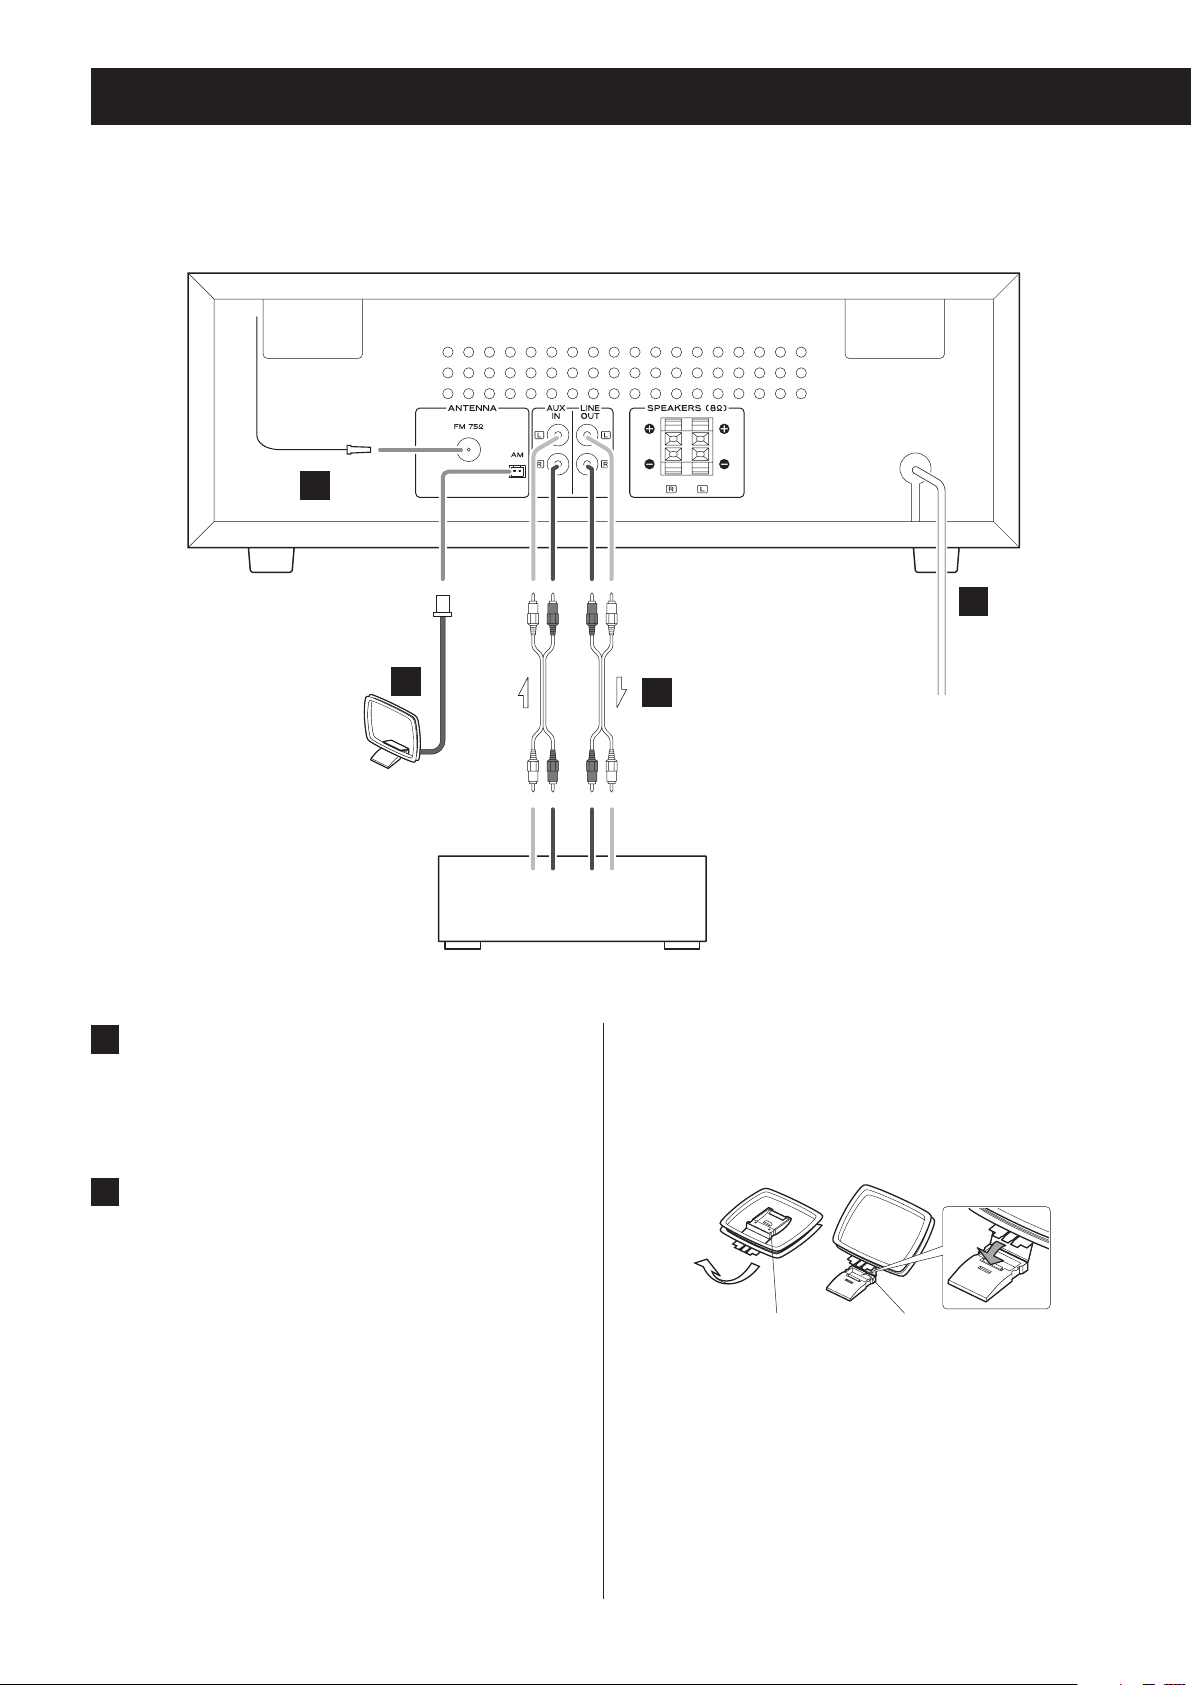
Connections
V
Precautions when making connections
o Do not turn the unit on until after making all connections.
o Carefully read the manuals of the devices that you are connecting and
follow their instructions when making connections.
A
D
B
LLR
Audio output
jacks
A
FM antenna connector
Extend the FM antenna and fix it in the position
where the reception is best (on a window frame or
wall, for example).
B
AM antenna connector
Assemble the included AM loop antenna and connect it to the AM antenna jack on the back of the
unit.
Place the antenna in the position that provides the
best AM reception.
C
Wall outlet
Audio input
jacks
Assembling the AM antenna
To assemble the AM antenna, turn the base in the direction of the arrow. Then, insert the hook at the bottom of
the loop into the slot in the base.
Recording device
Cassette deck, CD recorder, etc.
1
Antenna base Hook
2
14
Page 15
C
Analog audio input and output jacks
(AUX IN/LINE OUT)
These input and output analog audio signals.
Use commercially available audio cables to connect
other equipment to the input and output jacks of
this unit.
White (L)
Red (R)
o To connect and use a cassette deck, CD recorder
or other recording device, connect that device’s
output jacks to this unit’s AUX IN jacks, and that
device’s input jacks to this unit’s LINE OUT jacks.
o Insert the plugs completely. Do not bundle these
cords with power cords or speaker cables. Doing
so could reduce the audio quality or cause noise.
White (L)
Red (R)
D
AC power cord
Confirm that the power plug is plugged into a
working outlet.
V
Be sure to connect the power cord to an AC
outlet that supplies the correct voltage.
Connection to an outlet that supplies incorrect voltage could cause fire or electric shock.
Hold the power plug when plugging it into an
outlet or unplugging it. Never pull or yank on
the power cord. Unplug the power cord from
the outlet when you are not planning to use
the unit for an extended period of time.
ENGLISH
15
Page 16
Connections (continued)
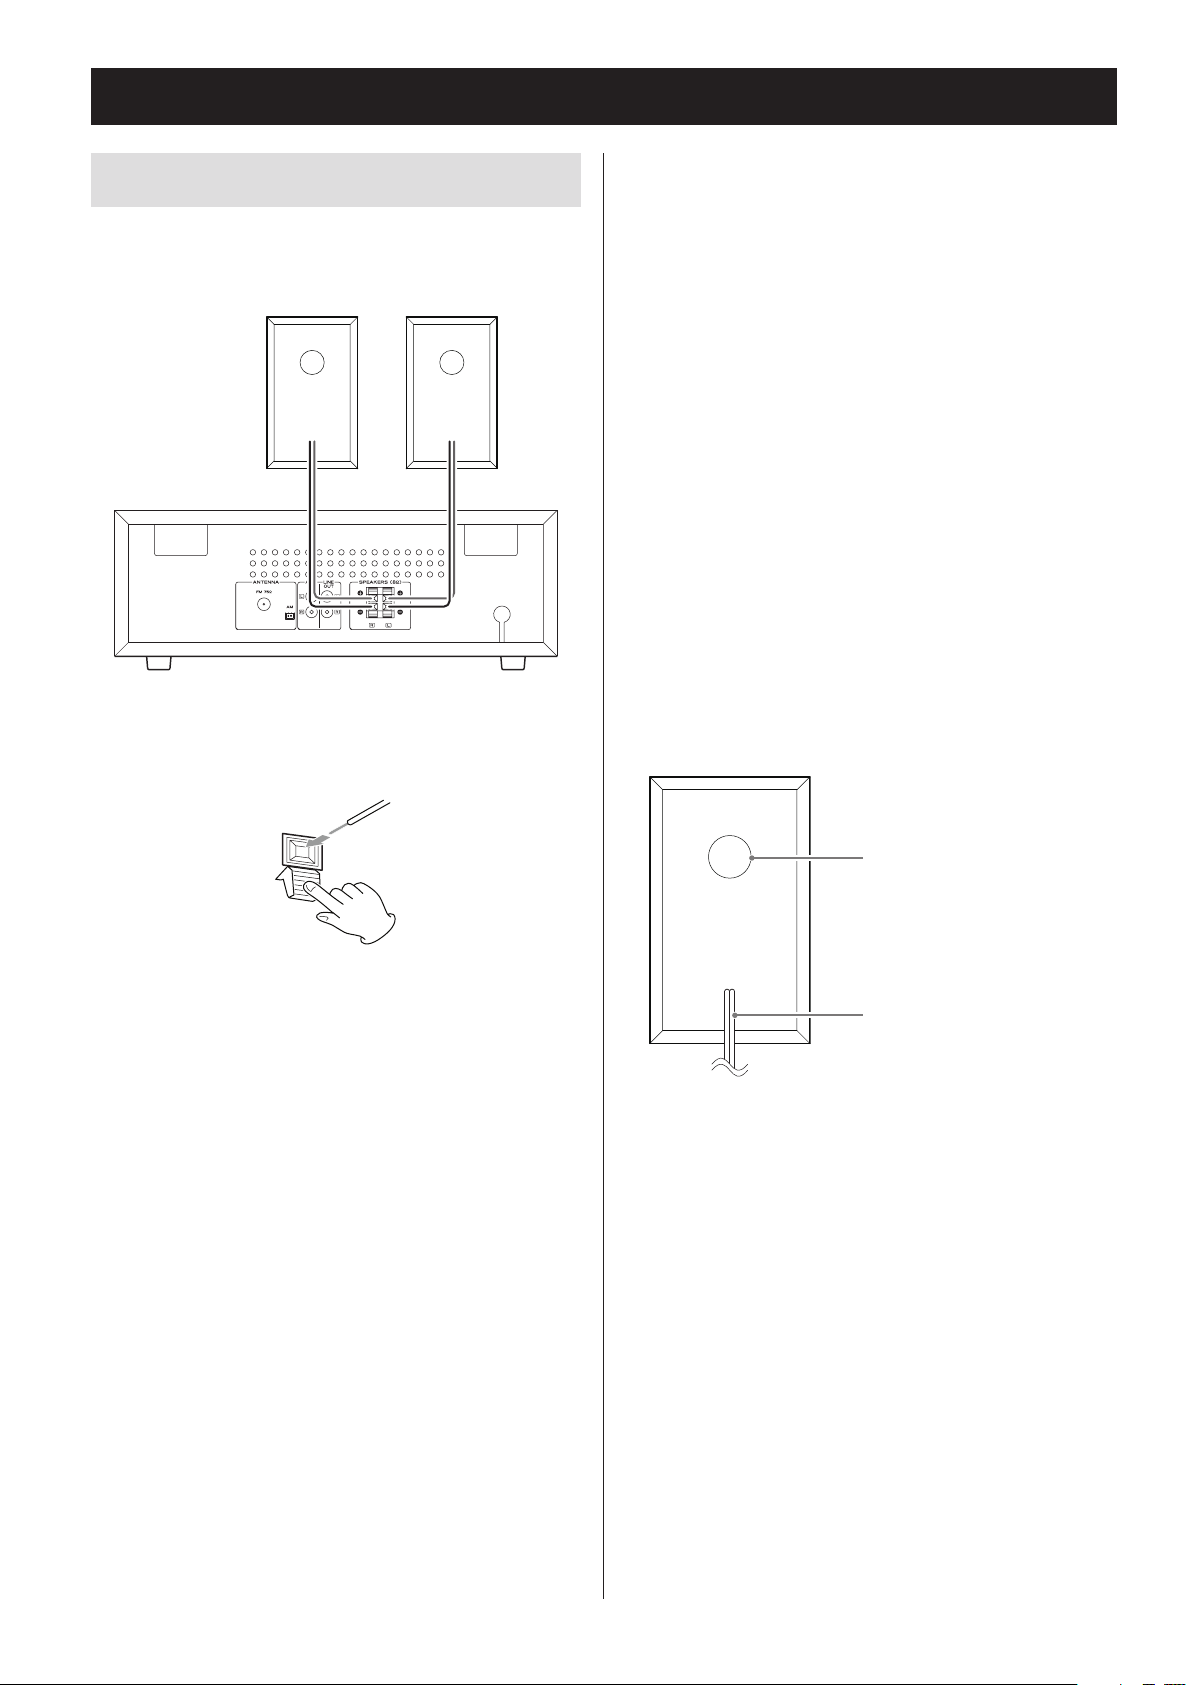
Connecting the speakers
Connect the speaker cables that are already attached to
the included speakers to this unit's speaker terminals.
Right speaker Left speaker
While pressing the lever, insert the end of the cable
(where the wire is exposed). Release the lever to connect the speaker cable.
Connect the end of the ¥ speaker cable with the red
mark to the red speaker terminal of the unit.
Connect the end of the ^ speaker cable with no mark
to the black speaker terminal of the unit.
o Gently pull the cables to make sure they are con-
nected firmly.
o Confirm that only the exposed part of the wire is
inserted into the terminal and that the cable sheath
is not touching the terminal.
o A short could occur if the exposed core wire at the
tip of a speaker cable touches another cable or
terminal.
o Never let the speaker cables short.
o In order to avoid noise, do not bundle speaker cables
with power cords or other cables.
The included speakers have bass ports in their backs.
Place the speakers so that these ports are not blocked
by, for example, other objects or walls.
Bass port
Speaker cable
16
Page 17
Replacing the stylus
o Record styluses are precision parts, so handle them
carefully to avoid bending or damaging their tips. If
a stylus becomes bent or damaged, it might not be
able to follow the audio groove precisely and could
damage records or cause other malfunction.
o If a stylus becomes dirty, use a commercially avail-
able stylus cleaner or similar product to clean it.
o Do not rub the stylus tip forcefully with anything
hard. Do not wipe the stylus with thinner or other
chemicals. Doing so could harm it.
Replacing the stylus
Using a record stylus wears it down, which could cause
the sound quality to worsen and possibly damage
records. Replace the stylus with a replacement stylus
specified by TEAC as soon as possible.
In general, you should replace a sapphire stylus for LP
and EP records after about 50 hours of use and a diamond stylus for SP records after about every 100 hours.
Removing the stylus (red part)
1 Press the STANDBY/ON button to put
the unit into standby.
2 Hold the cartridge with one hand, and
use a small screwdriver or other tool to
push the level difference at the front
of the stylus down in the “A” direction.
Then, pull it forward and o.
ENGLISH
Screwdriver
Attaching a new stylus
1 Insert it in the “B” direction so that the
end of the stylus ts into the cartridge.
CAUTION
o Since loud noises could suddenly occur, put the unit
into standby before changing the stylus.
o Be careful not to hurt your hand or the equipment.
o Be careful not to allow small children to accidentally
swallow styluses.
Replacement styluses (sold separately)
STL-103: Sapphire stylus for LP and EP records
(3 per set)
SPL-102: Diamond stylus for SP records
(2 per set)
For replacement styluses, contact your dealer.
2 Push in the “C” direction until it snaps
into place.
17
Page 18
Names and functions of parts (main unit)
A B C D HE F G I J
Z
P P
A
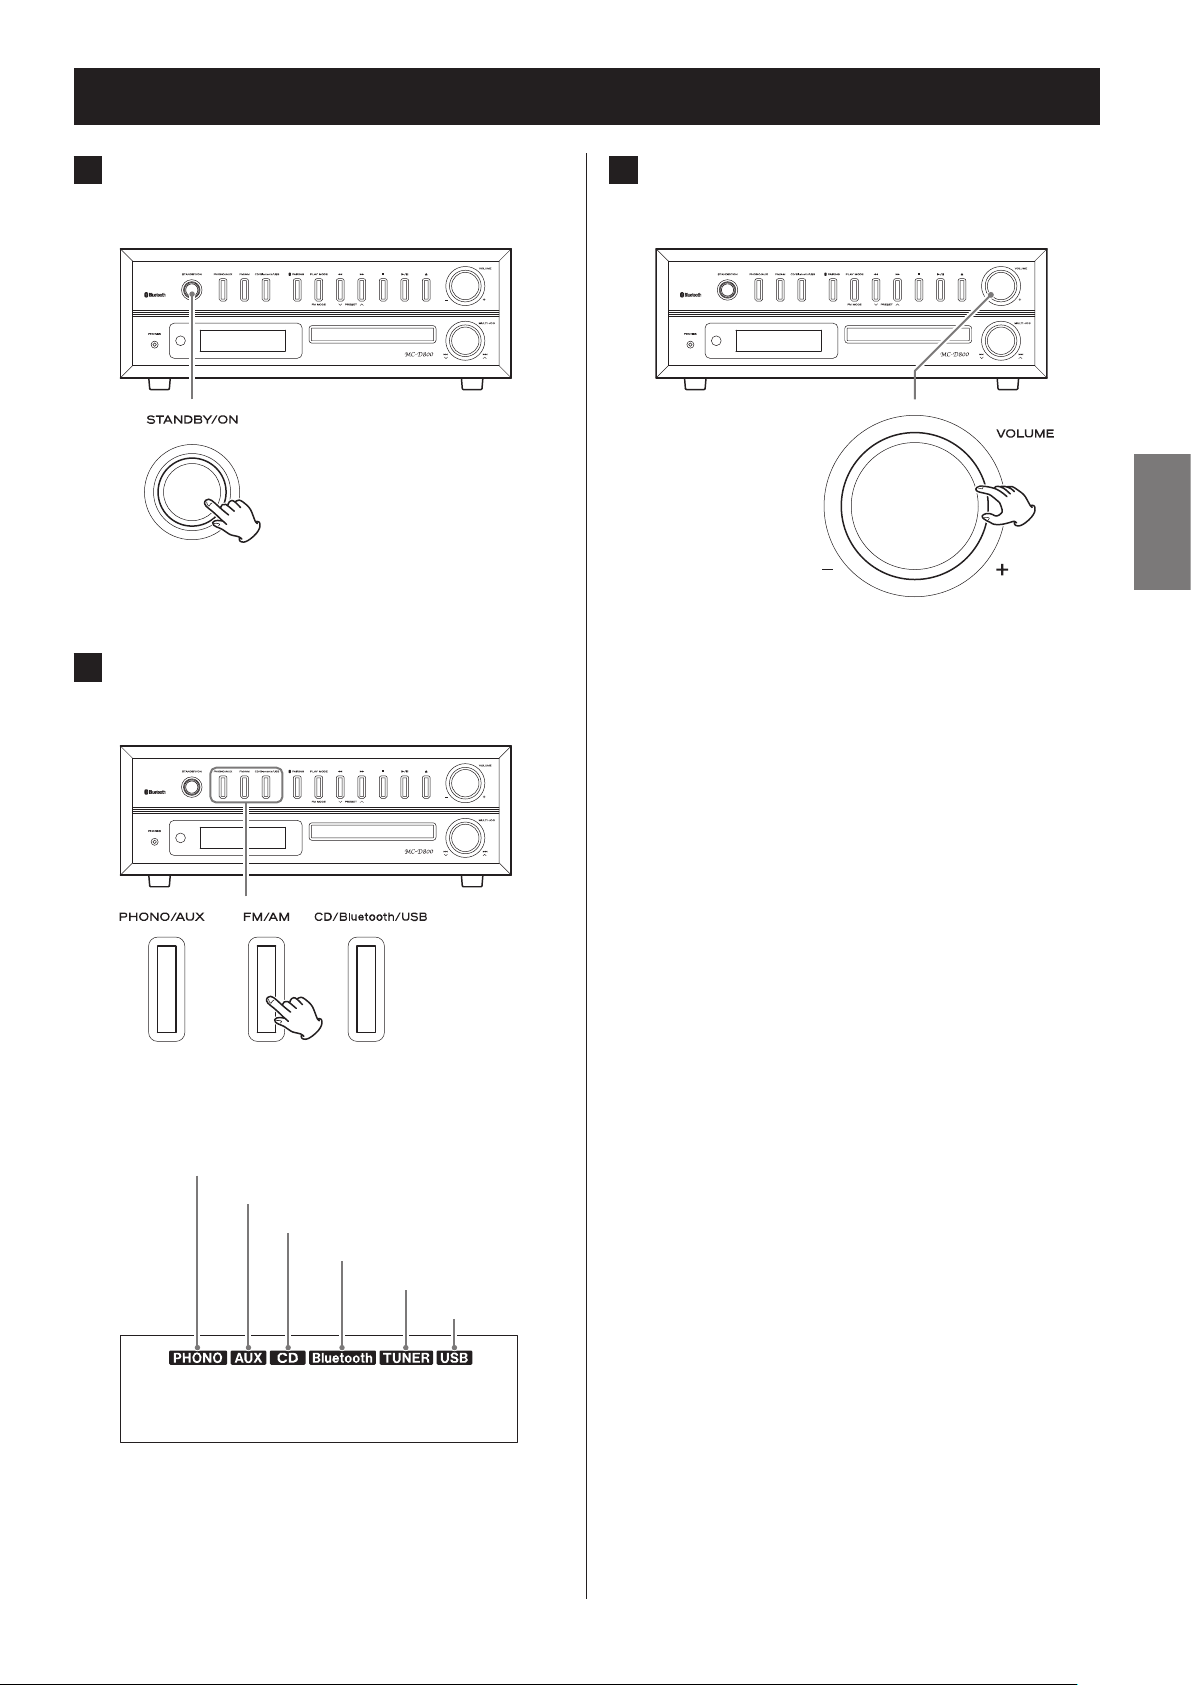
STANDBY/ON button
Press this button to turn the unit on or put it in
standby.
B
FUNCTION buttons
K L M N O
(PHONO/AUX, FM/AM, CD/Bluetooth/
USB)
Press the PHONO/AUX button to switch between
PHONO and AUX as shown below.
PHONO AUX
To listen to a record, press the PHONO/AUX button
and select “PHONO”.
To listen to a device connected to the auxiliary
input (AUX IN) jacks, press the PHONO/AUX button
and select “AUX”.
Each time you press the FM/AM button, the unit will
switch between FM and AM broadcast reception as
shown below.
FM AM
To listen to an FM station, press the FM/AM button
and select “FM”.
To listen to an AM station, press the FM/AM button
and select “AM”.
Each time you press the CD/Bluetooth/USB button,
the function will change as shown below.
CD Bluetooth USB
To listen to a CD, press the CD/Bluetooth/USB button and select “CD”.
To listen to a Bluetooth device, press the CD/
Bluetooth/USB button and select “Bluetooth”.
To listen to a USB flash drive, press the CD/Bluetooth/
USB button and select “USB”.
C
PAIRING button
Use this when pairing with other Bluetooth devices
and when ending Bluetooth connections (pages
44 and 43).
D
PLAY MODE button
FM MODE button
When listening to a CD/MP3/WMA file, use to
change the play mode (normal, repeat, shuffle)
(page 38).
When listening to FM radio, use to switch between
stereo and mono (page 49).
18
Page 19

E
Search (m/,) buttons
L
Remote control signal receiver
PRESET (j/k) buttons
Press and hold during CD or MP3/WMA file playback to search forward/backward (page 33).
When listening to the radio, use to select preset stations (page 51).
F
Stop (8) button
Press to stop CD/USB/Bluetooth playback.
G
Play/pause (y/9) button
Press when the CD, USB or a supported Bluetooth
device is stopped or paused to start playback.
Use this button to pause playback during playback.
H
Open/close button (-)
Press to open and close the disc tray.
Signals sent from the remote control are received
here. When using a remote, point it toward this
spot.
M
Display
This shows the track number, time, FM/AM frequency and other information.
N
Disc tray
O
Scroll/skip (MULTI JOG/. //j k)
knob
Use when tuning the radio to select stations (page
49).
Use this also to set the current time and the
wakeup timer (pages 25 and 56).
When listening to a CD or USB flash drive, use to
skip to the previous or next track/file (page 33).
ENGLISH
I
Turntable cover
J
VOLUME knob
Use to adjust the volume. Turn right to raise the
volume and left to lower it.
K
PHONES jack
When you use headphones, first reduce the volume
level to minimum. Then, insert the plug from your
headphones into the PHONES jack, and turn the
volume up gradually by turning the VOLUME knob.
o Do not turn the unit on and put it into standby
or connect and disconnect the headphones
plug while wearing headphones. (Doing so
could cause loud noise to be output from the
headphones.)
o When a plug is in the headphones jack, no sound
will be output from the speakers.
P
Right/left speakers
Place the speakers as desired.
19
Page 20
b
d
g
h
Names and functions of parts (remote control)
a
STANDBY/ON button
b
DIMMER button
Use to adjust the display brightness (page 29).
c
TIMER button
m
n
o
p
l
Use to turn the wakeup timer on and off (pages
56 and 59).
d
SLEEP button
Use to set the sleep timer (page 59).
e
PRESET/MP3 (j/k) buttons
When listening to the radio, use to select preset
radio stations (page 51).
When listening to an MP3/WMA file, use to select
the folder number (page 34).
a
c
e
f
i
f
TUNING/TIME (j/k) buttons
Skip/search (.m/,/) buttons
j
q
k
When listening to the radio, use for manual and
auto station tuning (pages 49 and 48).
When listening to an MP3/WMA file, use to select
the file number (page 34).
When setting the clock and the wakeup timer, use
to set the time (pages 25 and 56).
When listening to a CD or USB flash drive, use to
skip to the previous or next track/file. Press and hold
during CD or MP3/WMA file playback to search forward/backward (page 33).
g
Stop (8) button
Press to stop playback.
h
Play/pause (y/9) button
Press when stopped or paused to start playback.
Use this button to pause playback during playback
(page 33).
When both the main unit and the remote control
have buttons with the same functions, the instructions in this manual refer to only one set of buttons,
but the other set of buttons can be used in the same
way.
20
i
Function buttons
(PHONO/AUX, FM/AM, CD/Bluetooth/
USB)
Press the PHONO/AUX button to switch between
PHONO and AUX.
To listen to a record, press the PHONO/AUX button
and select “PHONO”.
Page 21
To listen to a device connected to the auxiliary
input (AUX IN) jacks, press the PHONO/AUX button
and select “AUX”.
station presets (pages 50 and 51).
Use this when programming tracks/files and check-
ing programmed tracks/files (pages 34 to 37).
Each time you press the FM/AM button, the unit will
switch between FM and AM broadcast reception.
To listen to an FM station, press the FM/AM button
and select “FM”.
To listen to an AM station, press the FM/AM button
and select “AM”.
Each time you press the CD/Bluetooth/USB button,
the function will change as shown below.
CD Bluetooth USB
To listen to a CD, press the CD/Bluetooth/USB button and select “CD”.
To listen to a Bluetooth device, press the CD/
Bluetooth/USB button and select “Bluetooth”.
To listen to a USB flash drive, press the CD/
Bluetooth/USB button and select “USB”.
j
SOUND button
Use to adjust the clock (pages 25 and 26).
p
PLAY MODE/FM MODE button
When listening to a CD or USB flash drive, use to
change the play mode (normal, repeat, shuffle)
(page 38).
When listening to FM radio, use to switch between
stereo and mono (page 49).
q
VOLUME (+/−) buttons
Use to adjust the volume. Press the + button to
raise the volume, and press the − button to lower
the volume.
ENGLISH
Use to adjust the bass and treble, as well as the leftright volume balance (page 28).
k
MUTE button
Use to temporarily silence the output (page 29).
l
PAIRING button
Use this when pairing with other Bluetooth devices
and when ending Bluetooth connections (pages
44 and 43).
m
DISPLAY button
Press when FM/AM or CD/Bluetooth/USB is selected
to show the current time.
Use to search for stations by program type (PTY)
(page 54).
n
INFO button
When listening to an MP3/WMA file, use to change
the information shown on the display (page 40).
When listening to FM radio, use this button to select
an RDS mode (page 52).
o
MEMORY/CLOCK ADJ button
When listening to the radio, use when setting radio
21
Page 22
Using the remote control
Precautions for use
o When using the remote control, point it toward the
remote control signal receiver on the main unit from
a distance of 5 m (16 ft) or less. Do not place obstructions between the main unit and the remote control.
o The remote control might not work if the remote
control signal receiver on the main unit is exposed to
sunlight or bright lights. In this case, try moving the
main unit.
o Beware that use of this remote control could cause
the unintentional operation of other devices that can
be controlled by infrared rays.
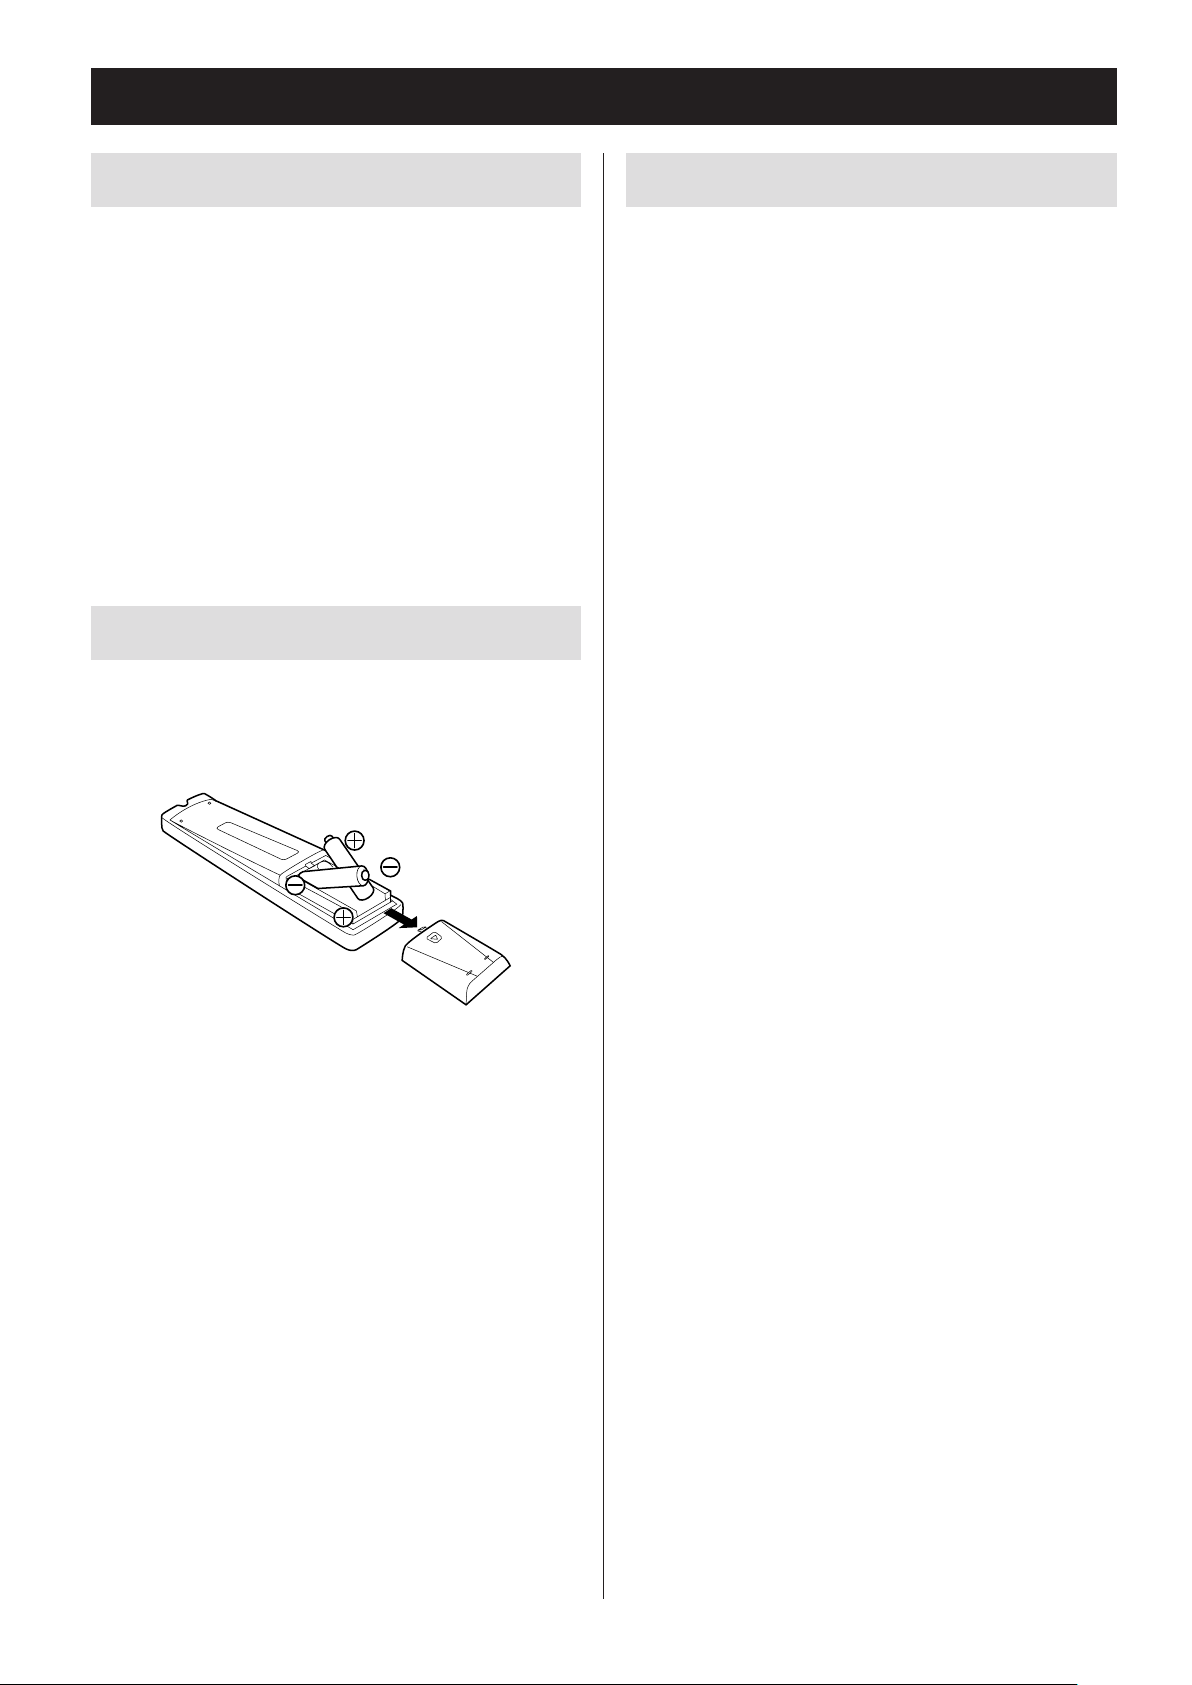
Installing batteries
Remove the cover from the back of the remote control.
Insert two AA batteries into the compartment according to the +/− indications. Then, close the cover.
When to replace batteries
If the distance required between the remote and main
unit decreases or if the unit stops responding to the
remote buttons, replace both batteries with new ones.
Dispose of the used batteries according to the instructions on them or requirements set by your local
municipality.
V
CAUTION
Misuse of batteries could cause them to rupture or
leak, which might result in fire, injury or the staining of nearby materials. Please read and observe
the precautions on page 3 carefully.
22
Page 23
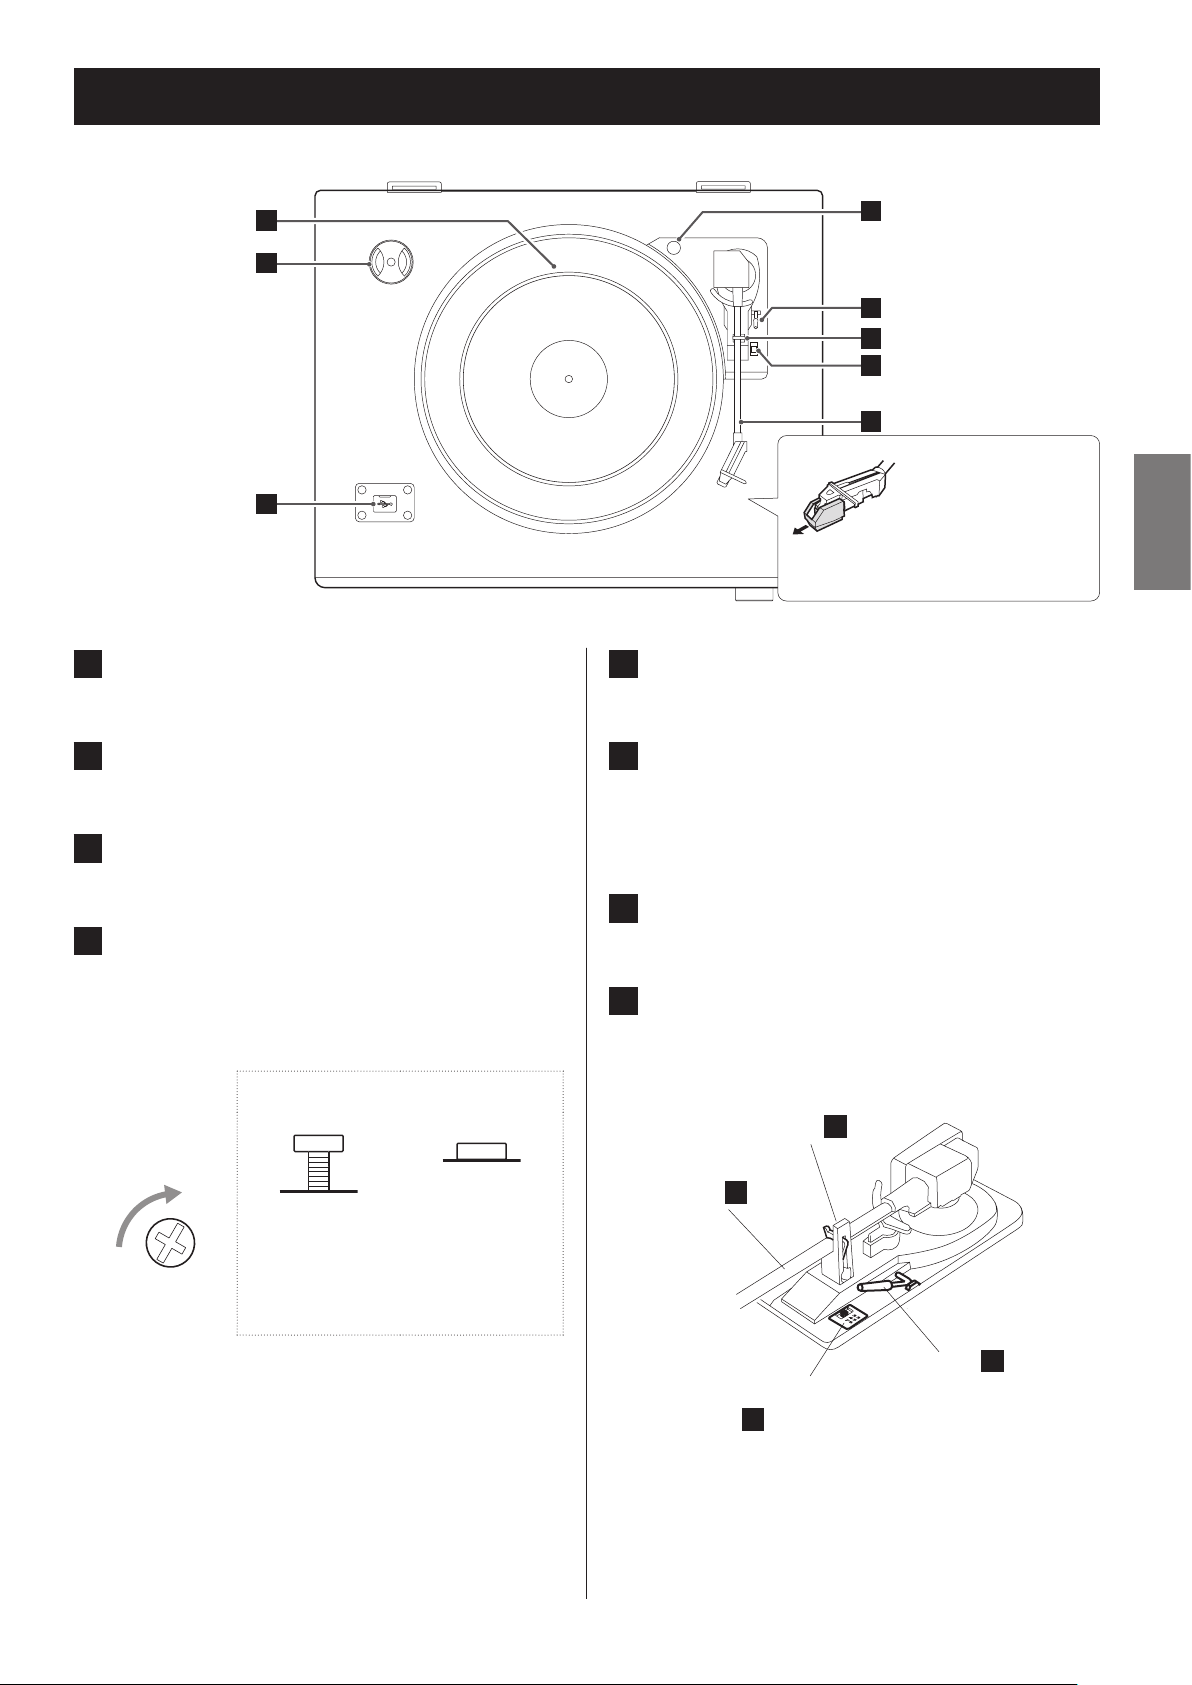
Names and functions of parts (turntable)
a
a
b
c
a
Turntable
Place records centered on the turntable.
b
45 RPM adapter
d
e
f
g
h
Before use, remove the
needle cover (white
plastic part) by pulling
it in the direction of
the arrow.
e
Cue lever
Use this lever to lift the tone arm from the record.
f
Tone arm holder
ENGLISH
Use this when playing back records with large holes.
c
USB
Connect a USB flash drive to the unit.
d
Transport locking screw
Before using the record player, use a coin or other
tool to turn the transport locking screw clockwise
until it stops.
Side view of transport locking screw
Turn this way
Transport
position
(when shipped
from the factory)
Before transporting this unit (to move residences,
for example) turn the screw counterclockwise until
it stops to secure the turntable.
Use position
This is a rest for the tone arm. Gently push the clasp
to the right to release the tone arm before playing a
record.
g
Rotation speed selection switch
Set the rotation speed (RPM) suitable for the record.
h
Tone arm
When you move the tone arm toward the record,
the turntable will begin to turn.
Tone arm holder
Tone arm
h
Rotation speed selection
switch
g
f
Cue lever
e
23
Page 24
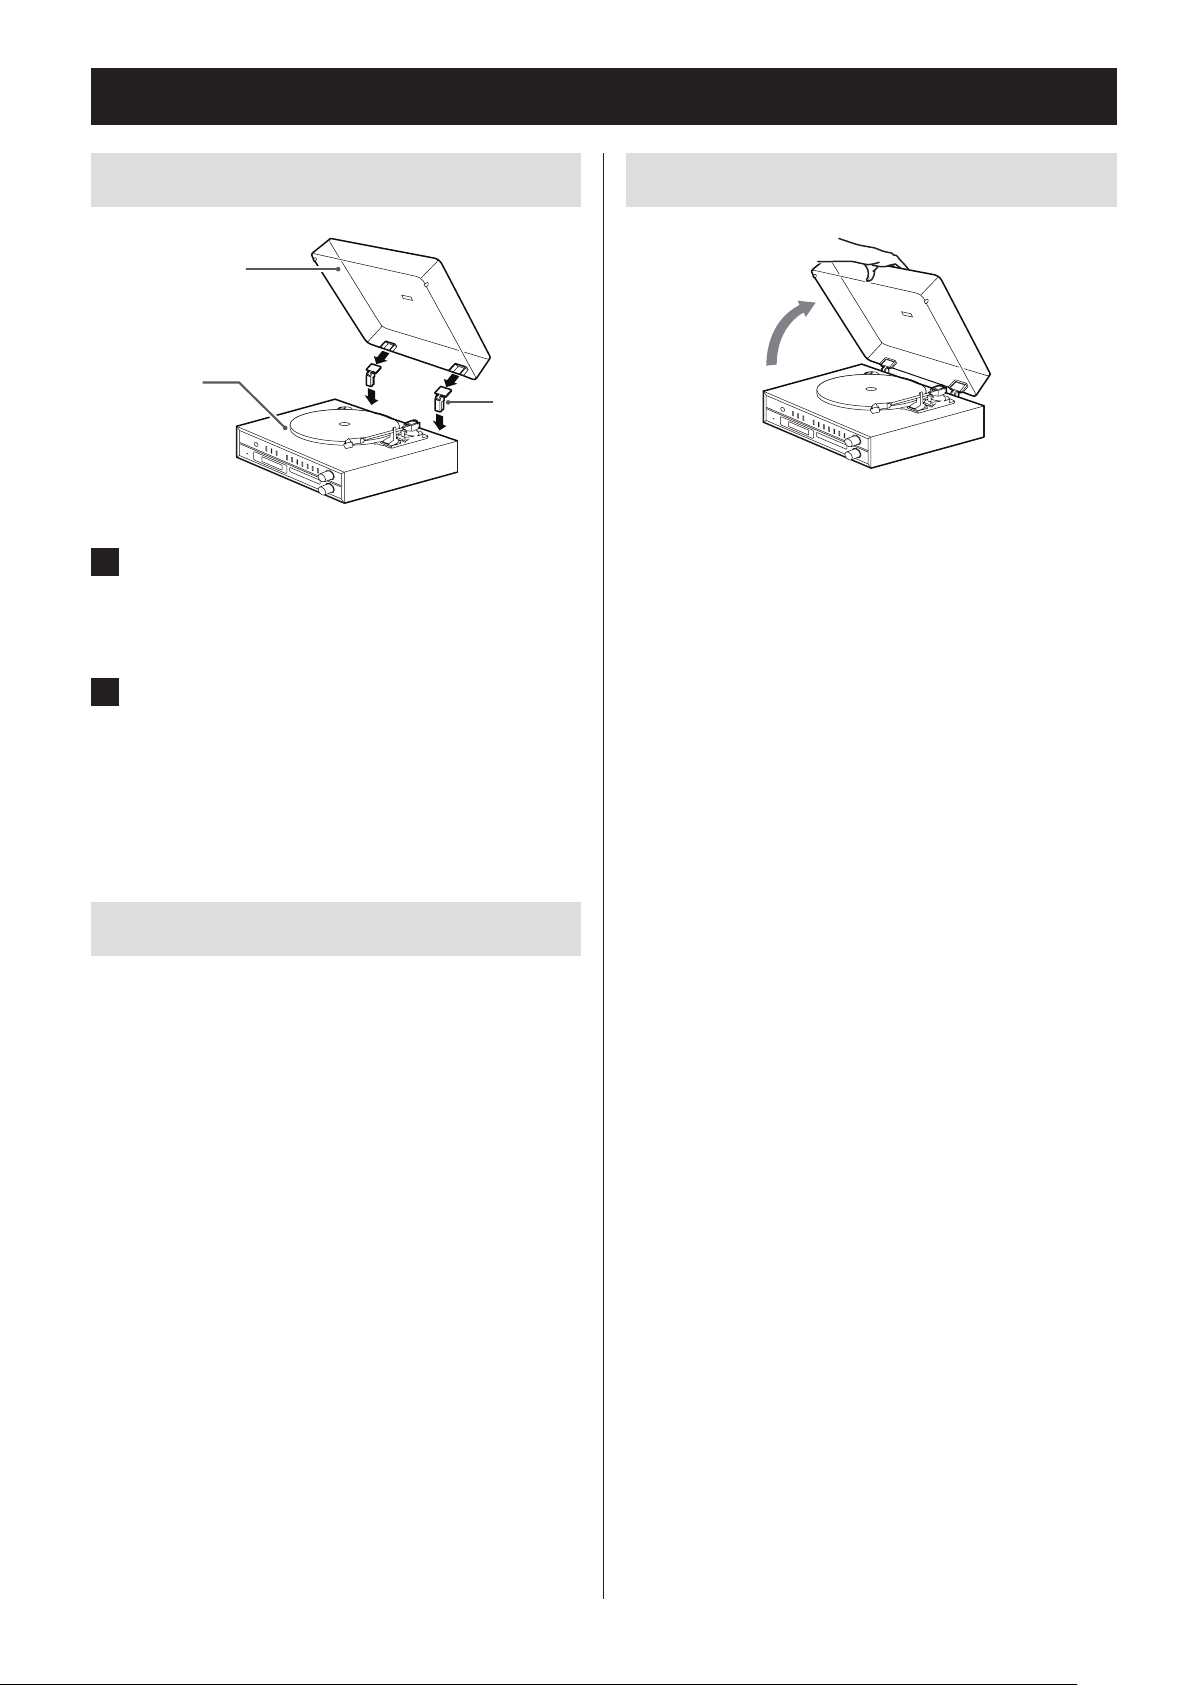
Turntable cover
Attaching the turntable cover
Turntable cover
Main unit
Hinge
1 Insert the hinges completely into the
hinge holders at the left and right ends
of the back of the main unit.
2 Align the tops of the hinges with the
turntable cover hinge holders and
insert them.
Opening and closing the turntable cover
Open
Opening
Hold the front edge of the turntable cover and gently
lift it open completely until it stops.
The turntable cover will stay open in this position.
Closing
Gently lower the turntable cover until it is closed.
V
Be careful not to pinch your hand, for example, when opening and closing the turntable
cover.
Removing the turntable cover
Hold both edges of the turntable cover and lift it slowly
to remove it along with the hinges from the unit. Then,
remove the hinges from the turntable cover.
24
Page 25
Setting the clock
Set the current time before using the unit.
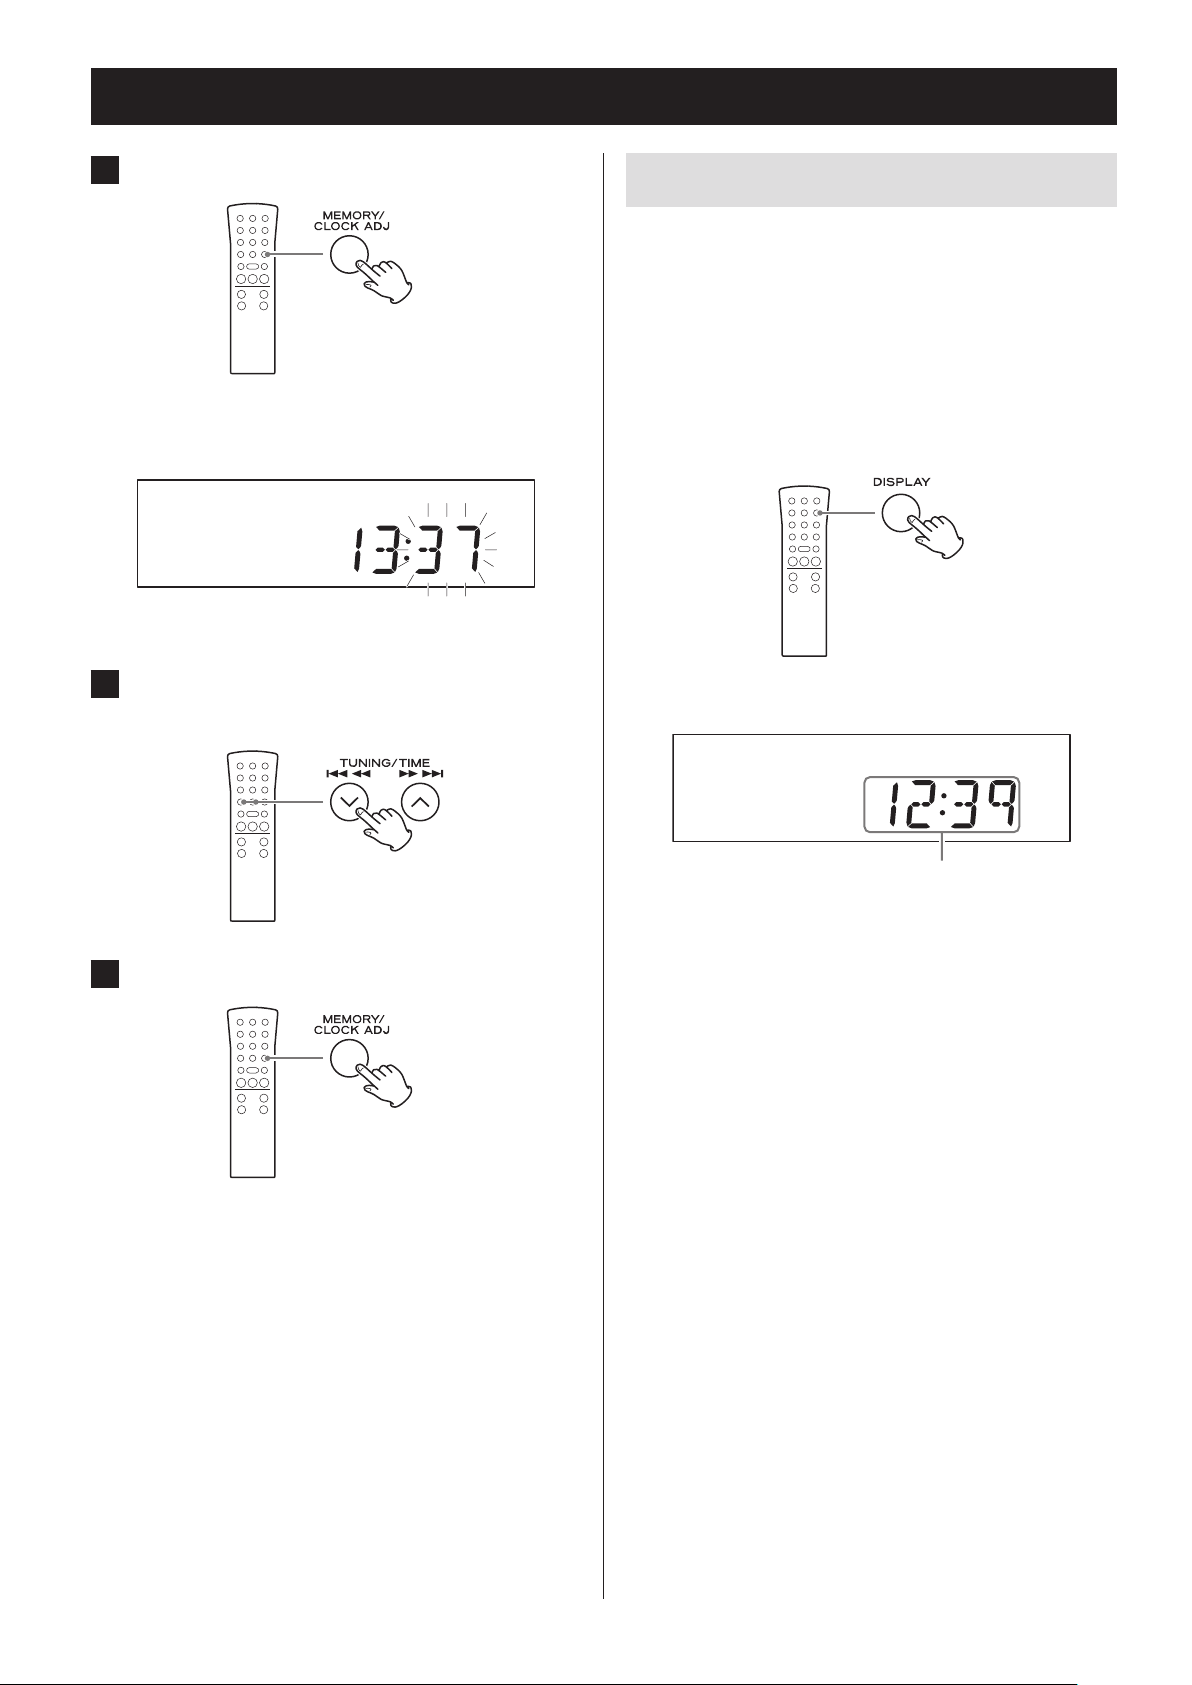
1 Press the STANDBY/ON button to put
the unit into standby.
c3
NOTE
The clock can also be set when the unit is on, but
not when the unit is in radio, CD or USB mode.
2 Press and hold the CLOCK ADJUST but-
ton for at least two seconds.
Press and hold for at
least 2 seconds
“SET CLOCK” scrolls across the display.
o If a setting is left for more than 20 seconds, this
time setting mode will end.
4 Press the CLOCK ADJUST button again.
Display example
The “hour” value blinks.
5 Press the TIME (j/k) buttons to set
the current hour.
ENGLISH
3 Press the TIME (j /k ) buttons to
switch between 24 HOUR and 12 HOUR
(24-hour or 12-hour time display).
Continued on the next page
25
Page 26
Setting the clock (continued)
6 Press the CLOCK ADJUST button.
Display example
The minute value blinks.
7 Press the TIME (j/k) buttons to set
the current minute.
Current time display
The clock is always shown when the unit is in standby
mode (off) and when the function is set to PHONO/
AUX.
Press the remote control's DISPLAY button to show the
clock on the display.
o The current time is shown for three seconds in CD/
USB and FM/AM modes.
Display example
8 Press the CLOCK ADJUST button.
This completes the procedures for setting the time.
The clock will start from the set minute at 0 seconds.
o The unit’s clock and wakeup timer settings will be
erased if a power outage occurs or the power cord is
unplugged from an outlet.
Current time
o The DISPLAY button does not function in AUX/
PHONO and Bluetooth modes.
o In Bluetooth mode, the current time is only shown
when paired.
26
Page 27
Basic operation
1 Press the STANDBY/ON button to turn
the unit on.
Z
o Even when in standby (unit off ), pressing a func-
tion button will turn the unit on.
2 Press a function button to set the play-
back source.
Z
3 Turn the VOLUME knob to adjust the
volume.
Z
ENGLISH
MIN (0): minimum volume
MAX (40): maximum volume
Turn the VOLUME knob right to raise the volume
and left to lower it.
o The default value is 20.
When a playback source is selected, the corresponding indicator appears on the display.
Record
External input
CD
Bluetooth
Radio
USB
o When you turn the VOLUME knob, the volume
will be shown for about three seconds.
o When the volume is at minimum level, “MIN”
appears on the display. At maximum, “MAX”
appears.
V
Sudden loud noises could damage your hearing or cause other harm. Set the volume to
minimum. After sound output begins, adjust
the volume to a suitable level.
o When not using this unit, press the STANDBY/ON
button to put the unit into standby.
27
Page 28
Basic operation (continued)
Adjusting the bass, treble and stereo
balance
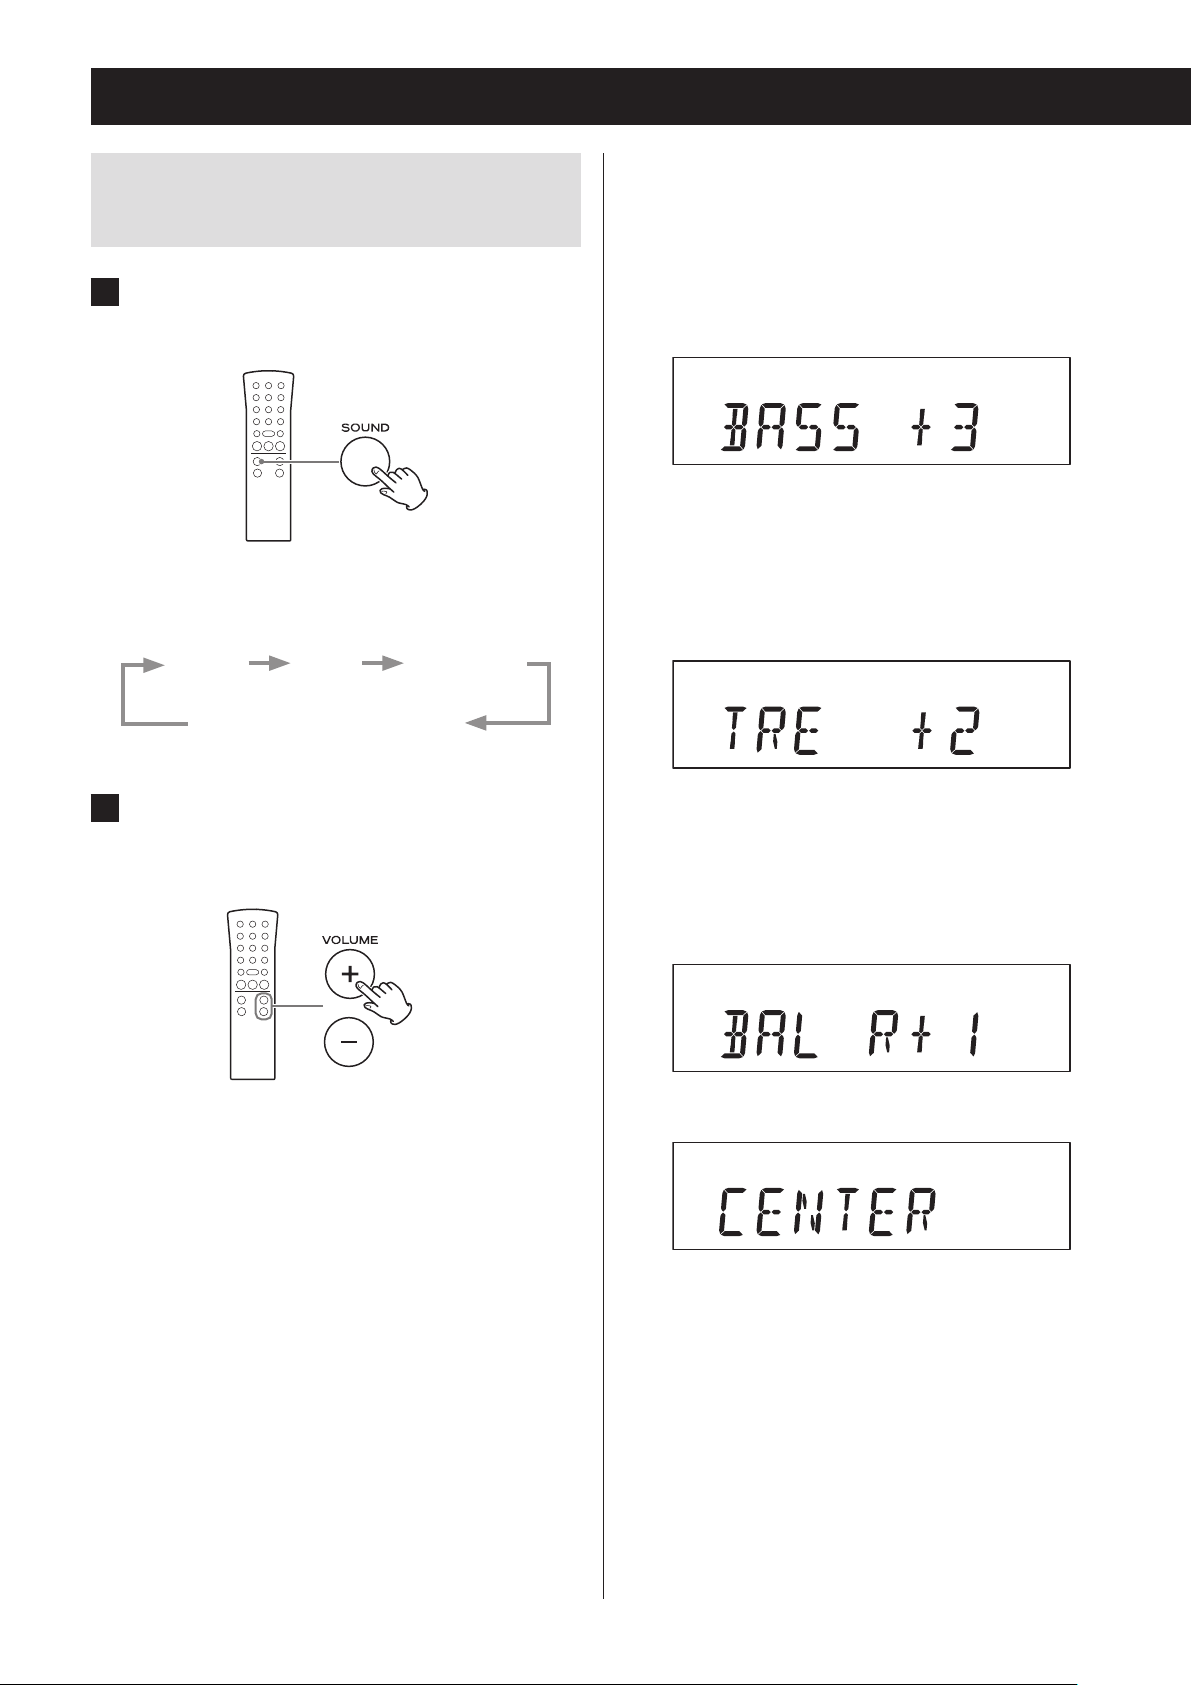
1 Press the SOUND button to select the
item you want to adjust.
Pressing the SOUND button cycles through the
items in the following order.
BASS TREBLE BALANCE
Ordinary display
Setting items and ranges
BASS (low frequencies)
Use to adjust the bass.
Setting range: −5 to +5
Default value: 0
Display example
TREBLE (high frequencies)
Use to adjust the treble.
Setting range: −5 to +5
Default value: 0
Display example
2 Within three seconds, start using the
VOLUME (+/−) buttons to adjust the
setting.
o If three seconds pass without any adjustment,
the setting mode will end.
BALANCE
Use to adjust the left-right stereo balance.
Setting range: L+10 to R+10
Default value: CENTER
Display example
You should usually leave BALANCE set to CENTER.
28
Page 29
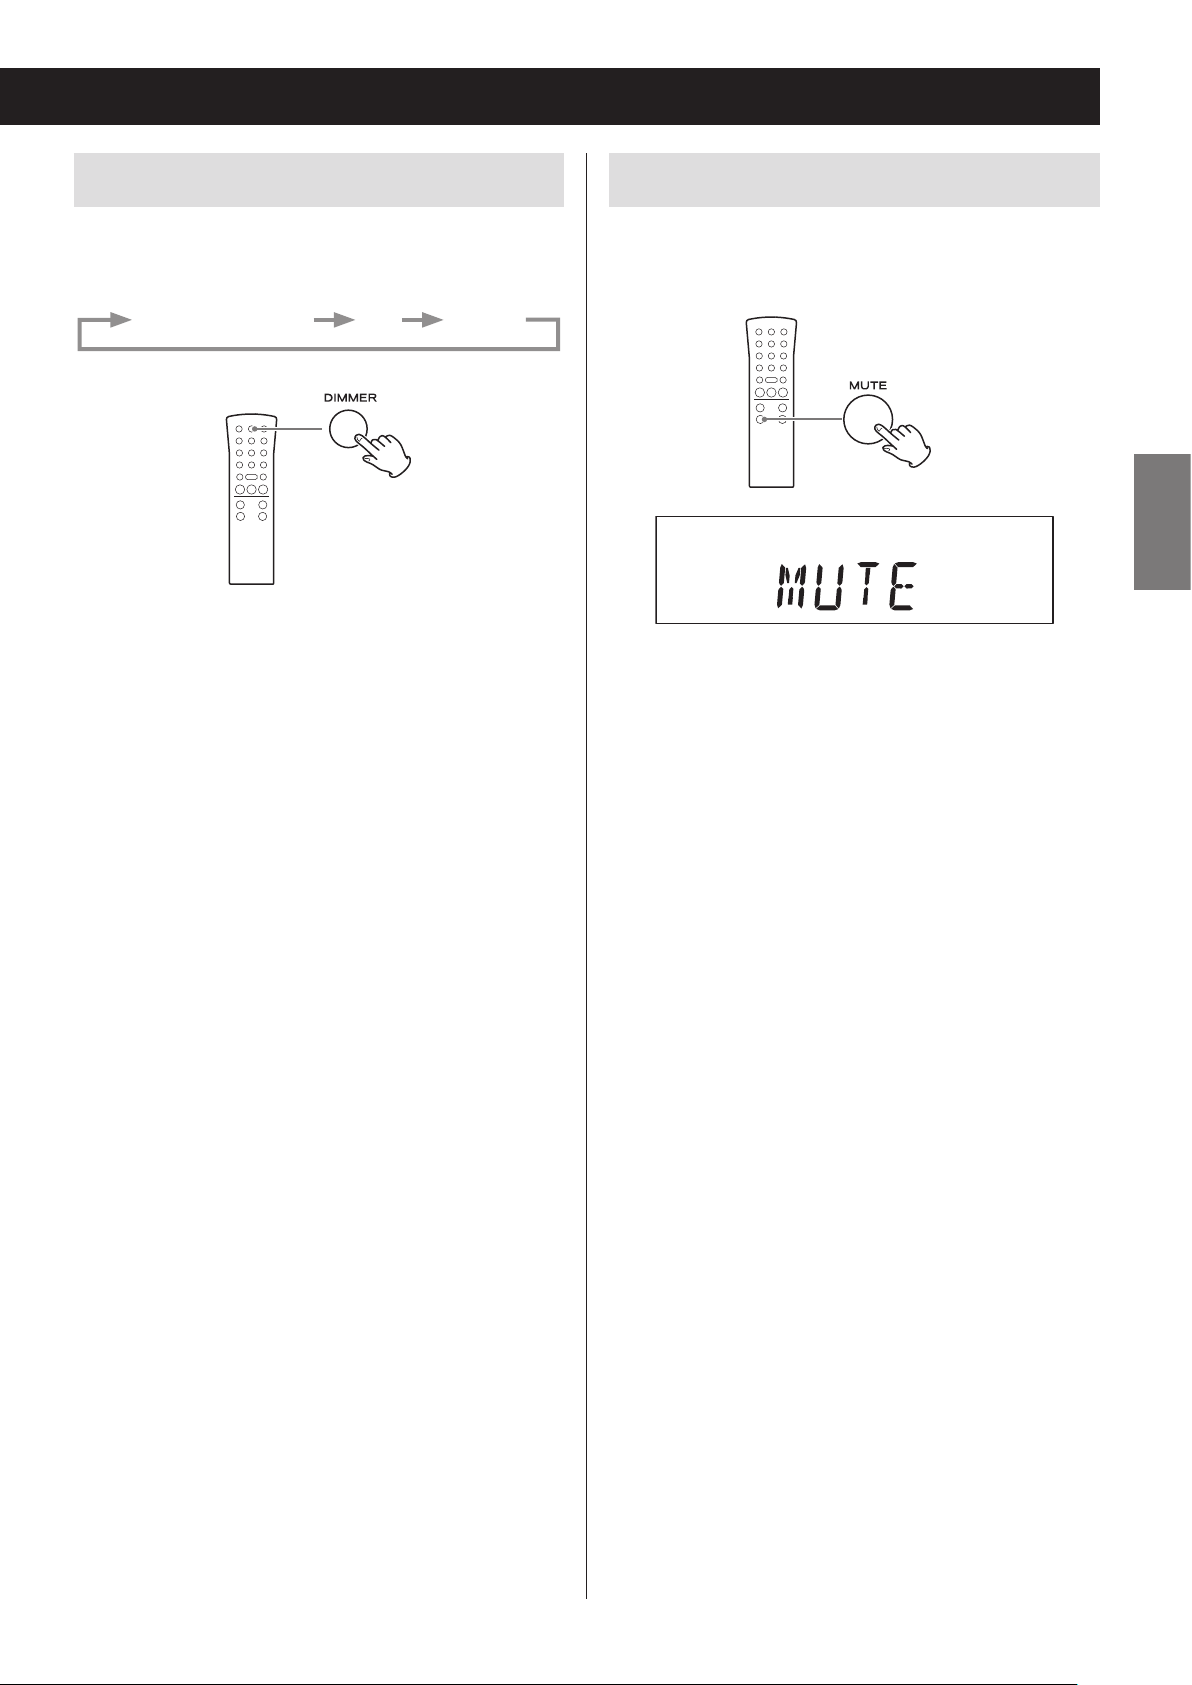
Adjusting the brightness of the display
Muting the output
Press the DIMMER button to cycle through the following brightness settings.
Ordinary brightness Dim Very dim
o When the unit enters standby, the dimmer setting is
reset to ordinary brightness.
Press the MUTE button to temporarily silence the output. Press the MUTE button again to resume output at
the previously set volume level.
ENGLISH
o When the mute function is active, “MUTE” appears on
the display.
o When the mute function is active, adjusting the vol-
ume will unmute the output.
o When the mute function is active, changing the
source will unmute the output.
29
Page 30
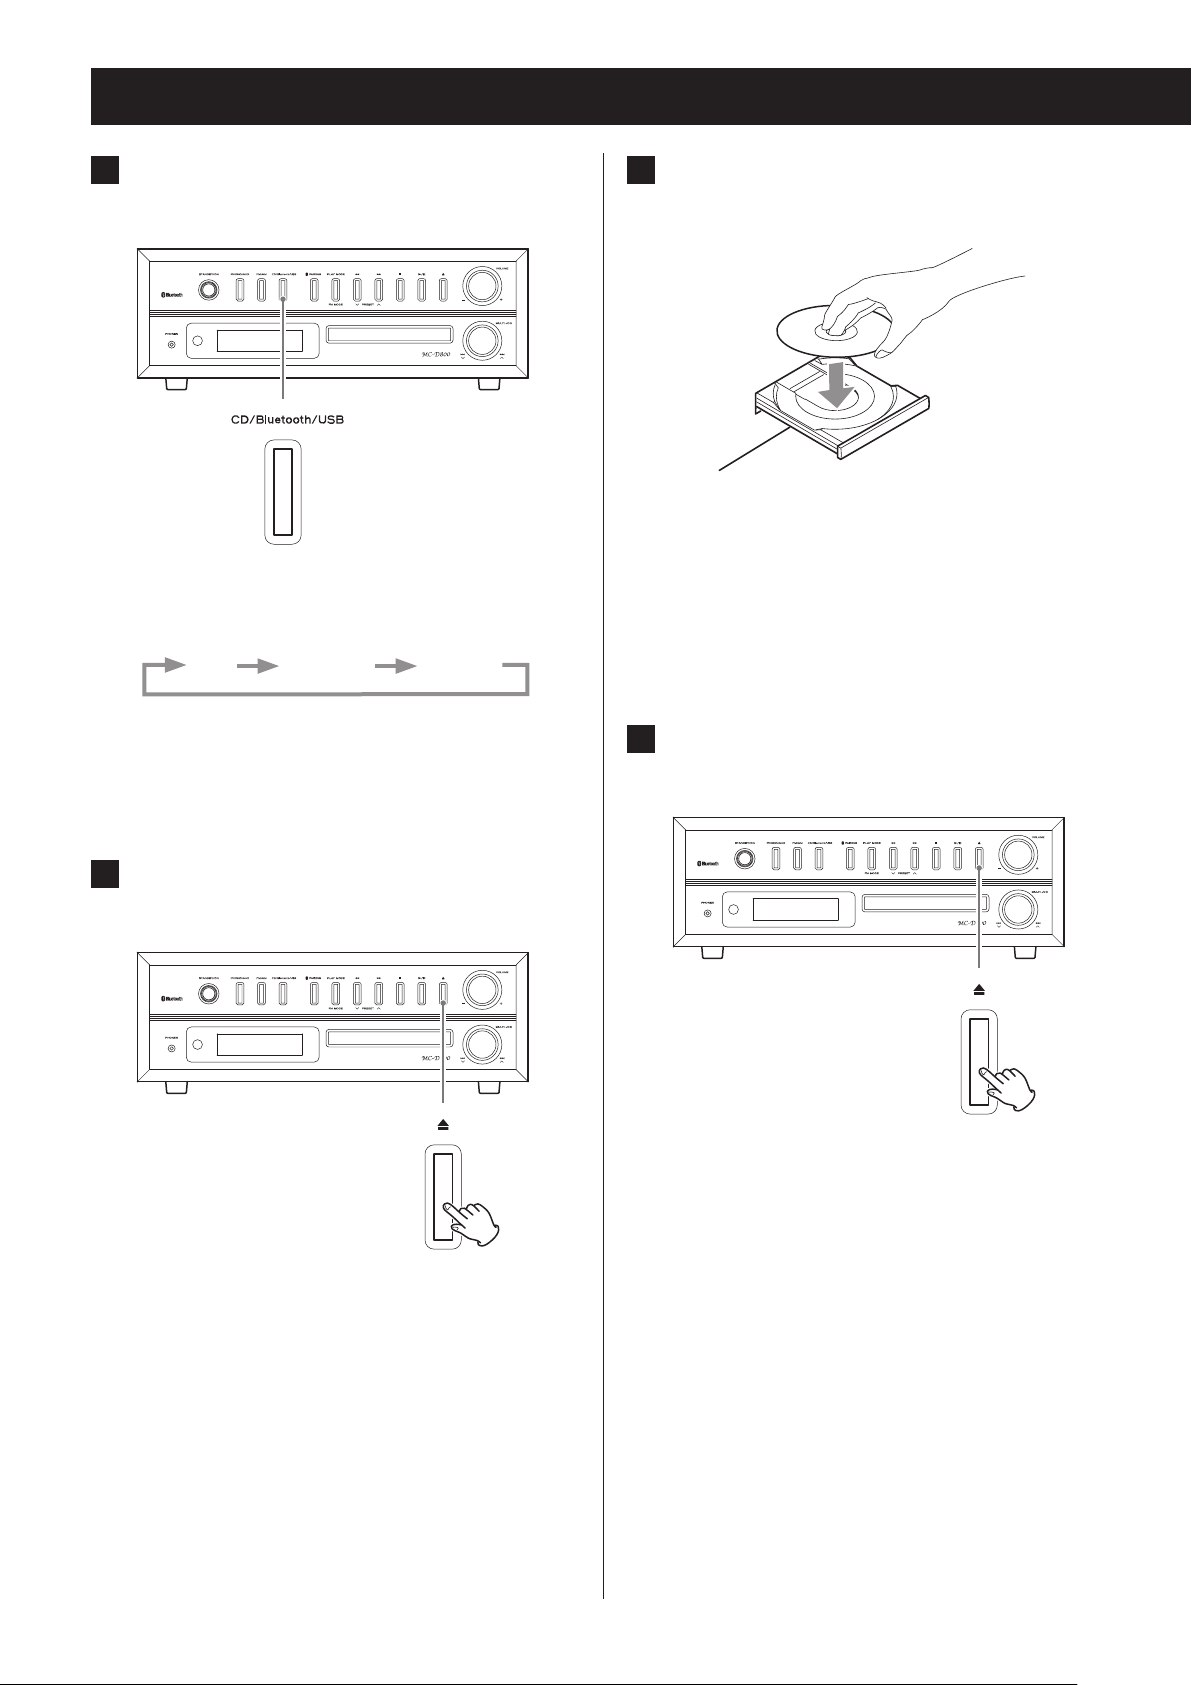
Listening to a CD
1 Press the CD/Bluetooth/USB button to
select “CD”.
Z
Each time you press the CD/Bluetooth/USB button,
the function will change as shown below.
CD Bluetooth USB
After switching to CD, “DISC” will appear, “READING”
will blink for several seconds, and then the CD will
be in a stopped state. If no disc is loaded, “NO DISC”
appears on the display.
3 Place a disc centered on the tray with
the labeled side up.
o Never place more than one disc on the tray.
o If the tray is closed while a disc is outside the center
guides, the disc might become stuck inside and the
tray might not open. Be sure to always place discs
within the guides at the center of the tray.
o Do not force the tray by hand when opening or
closing.
4 Press the open/close (-) button to
close the tray.
Z
2 Press the open/close (-) button to
open the tray.
Z
The disc tray opens forward.
Be careful not to let your fingers be pinched when
the tray closes.
o The unit takes a few seconds to load the disc. No
buttons will work when “READING” is displayed.
Wait until the disc information is displayed.
30
Page 31

Audio CD display example
Total number of tracks Total playback time
MP3/WMA file display example
Folder number File number
5 Press the play/pause (y/9) button.
Z
ENGLISH
Playback will start from the first track and y will
appear on the display.
o A non-audio disc might be “played” in the same
manner as an audio disc, but sound will not be
output.
o When the current file is a WMA file, “WMA” will
appear on the left side of the display.
Audio CD display example
Track number Playback elapsed time
MP3/WMA file display example
File number Playback elapsed time
o If you press the play/pause (y/9 ) button
without closing the disc tray, the tray will close
automatically and playback will start.
o This unit treats MP3/WMA files that are not in fold-
ers as being in the 001 (ROOT) folder. Playback
starts from the first track in the 001 (ROOT) folder.
o For details about the playback order of MP3/
WMA files, see page 39.
o After all tracks have played, playback will auto-
matically stop.
31
Page 32

Listening to files on a USB flash drive
You can play audio files stored on a USB flash drive by
connecting it to this unit.*
For details about the playback order of MP3/WMA files,
see “MP3/WMA files” on page 12.
* The USB port on this unit only support USB flash drives
(also known as “thumb drives” and “jump drives”). It
does not support standard USB hard drives.
1 Press the CD/Bluetooth/USB button to
select “USB”.
Z
3 Press the play/pause (y/9) button.
Z
Playback will start from the first file and y will
appear on the display.
Display example
After switching to USB, “USB” will appear, “READING”
will blink for several seconds, and then the USB flash
drive will be in a stopped state. If no USB flash drive
is connected, “NO USB” will appear on the display.
2 Lift the USB port cover and insert a USB
ash drive.
File number Playback elapsed time
CAUTION
If using the turntable cover, close it slowly to avoid
contacting the USB flash drive.
If the turntable cover would contact the USB flash
drive, do not close the cover.
32
Page 33

Listening to a CD/files on a USB flash drive
Pausing playback
Z
Press the play/pause (y/9) button to pause playback.
When paused, press the play/pause (y/9) button to
resume playback from the paused point.
o When paused, the playback time will blink.
Stopping playback
Z
Skipping tracks/files
Z
ENGLISH
During playback, turn the skip (.//) knob to
skip to the previous or next track/file and start playback. Keep turning until you reach the desired track/file
number.
o When stopped, after selecting a track/file with the
skip (.//) knob, press the play/pause (y/9)
button to start playback.
o During playback, turn slightly toward . to return
to the beginning of the currently playing track/file.
To play an earlier track/file, continue turning toward
..
Press the stop (8) button to stop playback.
Search for a part of a track/file
Z
During playback, press and hold a search (m/,)
button to search forward/backward. When you stop
pressing, ordinary playback will resume.
33
Page 34

Programmed playback (CD/USB)
Up to 32 CD tracks or MP3/WMA files can be programmed
in the desired order.
Program tracks/files when playback is stopped.
Programming tracks/files
1 Press the CD/Bluetooth/USB button to
select “CD” or “USB”.
2 Press the MEMORY button when stopped.
o To stop programming, press the stop (8) button
or wait 20 seconds or more.
o During programming if you do nothing for 20
seconds or more, the program will be confirmed.
Example of display after program confirmation
3 Select a track/le to add to the program.
With an audio CD
Use the skip/search (.m /,/) buttons
to select a track by number.
Display example
Program number
The track number (or folder and file numbers) and
the MEMORY indicator blink.
Display example
Track number
MP3/WMA file example
To select a folder by number, use the MP3 (j/k)
buttons.
34
Page 35

To select a file by number, use the skip/search
(.m/,/) buttons.
Display example
Folder number File number
o This unit treats MP3/WMA files that are not in
folders as being in the 001 (ROOT) folder.
o If you change the folder or file number, only the
MEMORY indicator will blink.
4 Press the MEMORY button.
5 When you have nished adding tracks/
les to a program, press the play/pause
(y/9) button to start programmed
playback.
ENGLISH
o To stop programmed playback, press the stop (8)
button. The contents of the program are retained.
o During programmed playback, use the skip/search
(.m/,/) buttons to select different
tracks/files in the program. You can also use the scroll
(MULTI JOG) knob on the main unit for this operation.
o During programmed playback, shuffle playback
(page 38) is not possible.
o The display will appear as follows when programmed
playback completes.
The selected track/file is added to the program, and
“P02” appears on the display.
o To program multiple tracks/files, repeat steps
to 4.
o To stop programming, press the stop (8) button.
3
Display example
Total number of program tracks
35
Page 36

Programmed playback (CD/USB) (continued)
Checking the program order
When stopped, press the MEMORY button to cycle
through the program numbers and the programmed
track/file numbers in order.
Adding tracks/files to the end of the
program
1 When stopped, press the MEMORY but-
ton repeatedly to show the number
which is one higher than the last program number.
3 Press the MEMORY button.
The track/file is added to the end of the program.
Changing a track/file within the program
1 When programmed playback is stopped,
press the MEMORY button repeatedly
until the program number of the track/
le you want to change appears on the
display.
When using an audio CD, the track number and
MEMORY indicator will blink.
When using MP3/WMA files, the folder number, file
number and MEMORY indicator will blink.
2 Press the skip/search (.m/,/)
button to select a track/le.
2 Use the skip/search (.m/,/)
button to select the track/le that you
want to use as a replacement in the
program.
36
Page 37

3 Press the MEMORY button.
The selected track/file is added at the selected
program number, replacing the track/file that was
there.
Clearing all the program contents
Press and hold the stop (8) button for at least two seconds when stopped.
The contents of the program are cleared.
When the contents of the program are cleared,
“PROGRAM CLEAR” scrolls across the display.
ENGLISH
o The program is also cleared in the following cases.
• The unit enters standby mode
• The PHONO/AUX, FM/AM or CD/Bluetooth/USB
button is pressed, changing the source
• The disc tray is opened
37
Page 38

Repeat and shuffle playback (CD/USB)
Z
e
When the CD/USB function is active, press the PLAY
MODE button to cycle through the following playback
modes.
o You can also change the playback mode by pressing
the PLAY MODE button during playback.
o Any of the following operations will end repeat or
shuffle playback mode.
• The stop (8) button is pressed
• The unit enters standby mode
• The PHONO/AUX, FM/AM or CD/Bluetooth/USB
button is pressed, changing the source
• The disc tray is opened
Repeat playback
Audio CD (CD function)
REPEAT (single track repeat)
REPEAT ALL (all track repeat)
SHUFFLE*
OFF (normal playback)
MP3/WMA files (CD/USB function)
REPEAT (single file repeat)
REPEAT FOLDER
REPEAT ALL (all file repeat)
REPEAT (single track/file repeat)
During playback, press the PLAY MODE button once
to repeat playback of the currently playing track/file.
“REPEAT” appears on the display.
o If you turn the main unit's skip (. // )
knob or press the remote control's skip/search
(.m/, /) buttons and select another
track/file, that track/file will be played repeatedly.
o When stopped, press the PLAY MODE button and
then use the main unit's skip (.//) knob or
remote control's skip/search (.m/,/)
buttons to select a track/file. Press the play/pause
(y/9) button to start single repeat playback.
o During programmed playback, the track/file being
played will be played repeatedly.
REPEAT ALL (all track/file repeat)
Press the PLAY MODE button twice (or three times for
MP3/WMA files).
“REPEAT ALL” appears on the display and repeat playback of all tracks/files starts.
o During programmed playback, the programmed
tracks/files will be played repeatedly.
SHUFFLE*
OFF (normal playback)
Press the play/pause (y/9) button when the mode
you want to select appears to start playback.
*If shuffle is selected, playback starts automatically.
38
Page 39

About MP3/WMA file playback
001ROOT
9
REPEAT FOLDER
(MP3/WMA files only)
Press the PLAY MODE button twice.
“REPEAT FOLDER” appears on the display, and the files in
the selected folder are played back repeatedly.
Shuffle playback
All the tracks/files are played back randomly.
SHUFFLE
Press the PLAY MODE button repeatedly until “SHUFFLE”
appears on the display.
o During shuffle playback, turn the main unit's skip
(/) knob right or press the remote control's skip/
search (,/) button to start playback of the
next random track/file.
Turn the main unit's skip (.) knob left or press the
remote control's skip/search (.m) button to
return to the beginning of the current track/file.
o Shuffle playback is not possible during programmed
playback.
File playback order
A disc or USB flash drive that contains MP3/WMA files
can have files in folders in the same manner that files
are managed on an ordinary computer. One folder can
also contain multiple subfolders.
Example of folder numbers and file playback
order (1 to 9) during normal playback of a disc
that contains MP3/WMA files
001 (ROOT)
1
MP3/WMA file
2
MP3/WMA file
002 folder
3
MP3/WMA file
4
MP3/WMA file
004 folder
6
003 folder
Folder
5
MP3/WMA file
005 folder
MP3/WMA file
MP3/WMA file
7
8
MP3/WMA file
ENGLISH
MP3/WMA file
o Adding, removing or relocating files and folders could
change the order shown in the above illustration.
39
Page 40

About MP3/WMA file playback (continued)
Selecting folders and files
To select a folder by number, use the main unit's search
(m/,) buttons.
Z
When using the remote, use the MP3 (j/k) buttons.
Changing the display
Each time you press the INFO button, the information
on the display changes.
o The first 32 characters of the song/artist/album
names are shown.
o The display of this unit can only show single-byte
alphanumeric characters. If the file information uses
Japanese, Chinese or other double-byte characters,
playback is possible but the name will not be shown
correctly on the display.
o After each item of information scrolls across three
times, the elapsed playback time will appear again.
o If the file is a WMA file, “WMA” will appear on the left
side of the display.
To select a file by number, use the main unit's scroll
(MULTI JOG) knob.
Z
When using the remote, use the skip/search
(.m/,/) buttons.
o After selecting the folder/file number, press the play/
pause (y/9) button to start playback.
If the play button is not pressed within five seconds,
the CD/USB information will appear on the display.
40
Page 41

Example of display when CD function is active
Title name
File number Playback elapsed time
c
File name
c
Folder name
c
c
ENGLISH
Album name
c
Artist name
o If the USB function is active, the USB indicator will
appear.
41
Page 42

Listening to audio from a Bluetooth device
With this unit, you can enjoy listening to music played
back on another Bluetooth device wirelessly.
1 Press the CD/Bluetooth/USB button to
select “Bluetooth”.
Z
“PAIRING” appears on the display, and the unit
searches for paired devices.
When connection with a Bluetooth device succeeds,
the Bluetooth icon ( ) appears and “BLUETOOTH”
scrolls across the display.
Bluetooth figure mark
c
After “BLUETOOTH” scrolls across five times, the current time is shown.
o The unit will automatically try to connect to the
previously connected device.
o Press the CD/Bluetooth/USB button to select
“Bluetooth” (the Bluetooth indicator lights).
o If it cannot connect for two minutes or longer,
“NO DEVICE CONNECTED” will scroll across the
display.
o Pairing is necessary before using the Bluetooth
function of this unit for the first time and when
you want to connect a new Bluetooth device.
o If connection fails, confirm that the other
Bluetooth device is ready to make a Bluetooth
connection.
o If the connection is broken during use, “NO
DEVICE CONNECTED” scrolls across this unit's display. Conduct the connection operations again
on this unit and the other Bluetooth device.
42
Page 43

2 Operate the Bluetooth device to start
playback.
If the connected Bluetooth device supports AVRCP,
you can use this unit or the remote control to play,
pause or stop audio on that device.
Depending on the Bluetooth device being used,
remote control operation might not be supported
or actual operations might differ.
o The volume, however, cannot be adjusted remotely.
Audio/Video Remote Control Profile (AVRCP)
To control playback of a Bluetooth device, the
Bluetooth device must support AVRCP.
Some Bluetooth devices, however, have different functions depending on their specifications.
o Depending on the Bluetooth device, skipping
files might not be possible using this unit’s skip
(.//) knob. In this case, use this unit’s search
(m/,) buttons.
o If you cannot control another Bluetooth device with
this unit, operate the other Bluetooth device directly.
Unpairing a device
To unpair with a connected Bluetooth device, press the
PAIRING button.
o If you later want to use a Bluetooth connection with
that Bluetooth device, you must pair them again.
o This deletes all pairing information. Unpairing with
just one device is not possible.
ENGLISH
43
Page 44
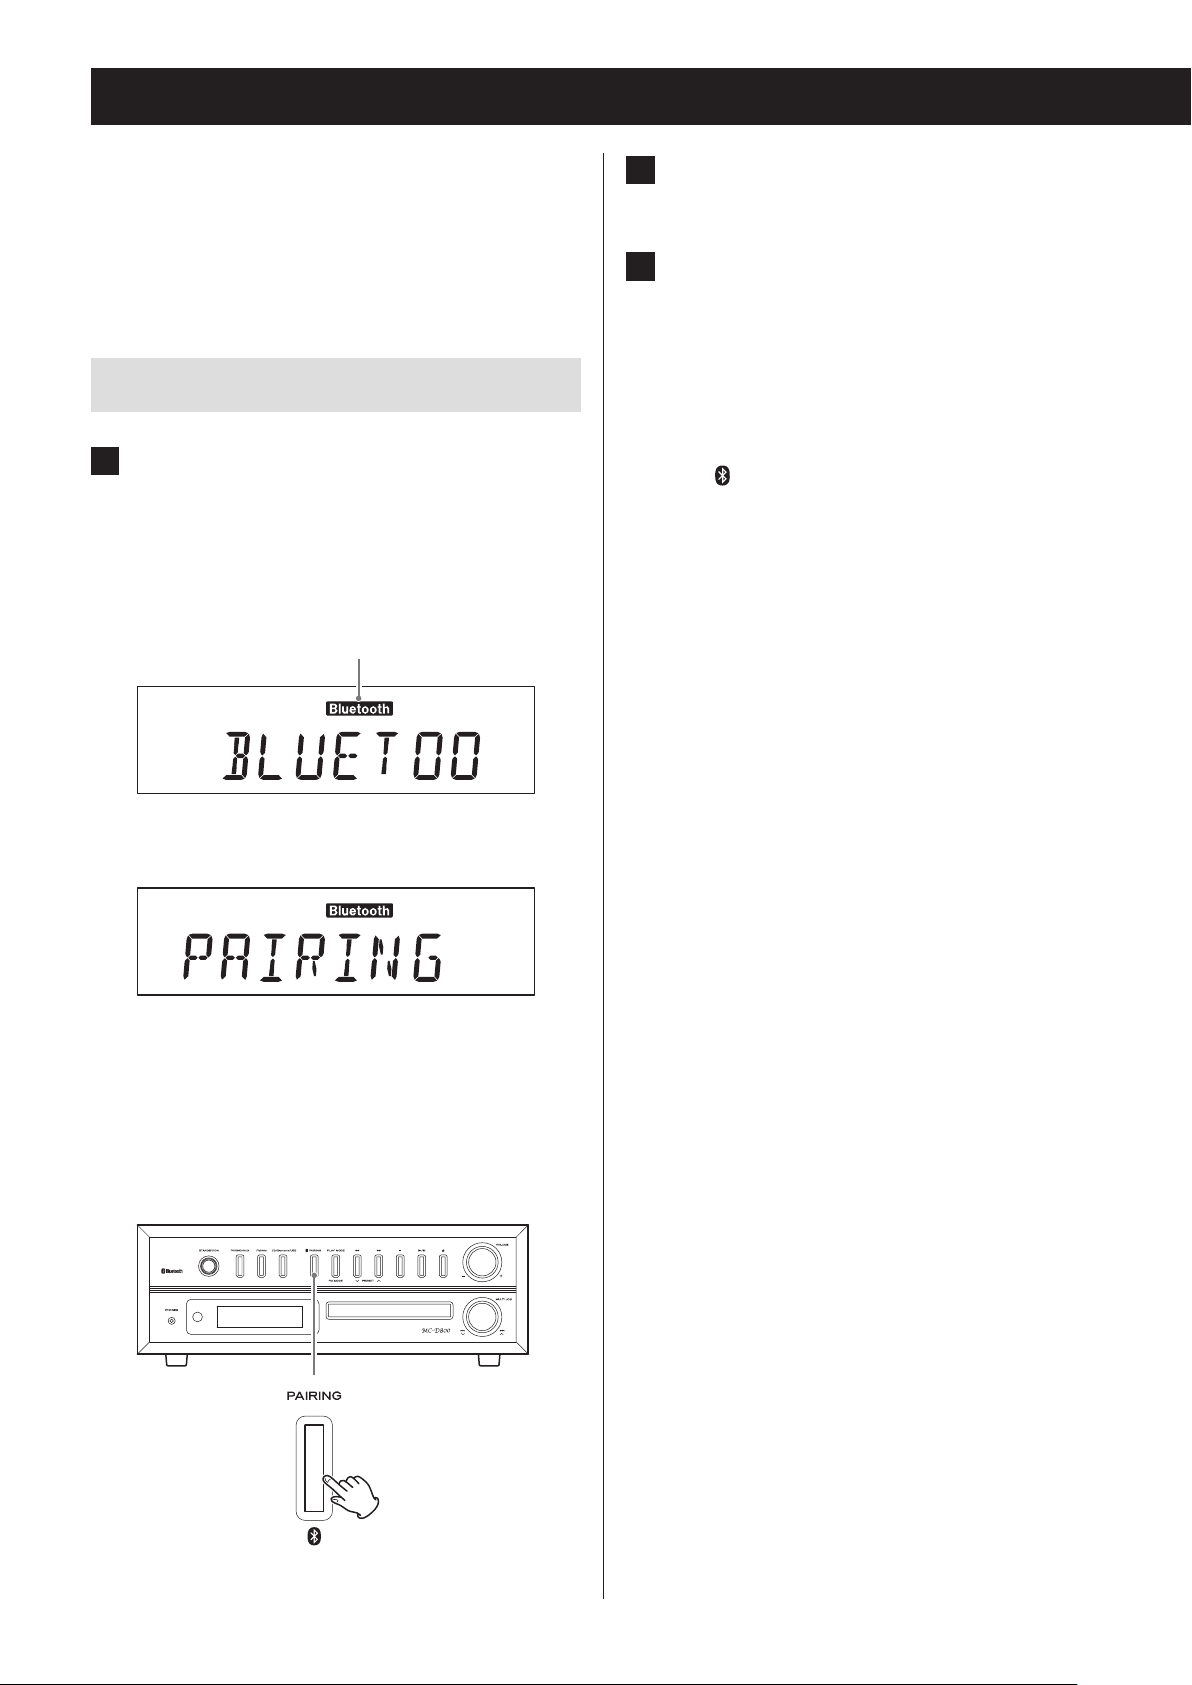
Pairing with another Bluetooth device
Pairing is necessary before using the Bluetooth function
of this unit for the first time and when you want to connect a new Bluetooth device.
Follow these procedures to pair the unit with the other
device.
Pairing
1 Press the CD/Bluetooth/USB button to
select “Bluetooth”.
After “BLUETOOTH” scrolls across the display,
“PAIRING” appears, showing that the unit is ready to
be paired with another device.
Bluetooth indicator
c
If it cannot connect for two minutes or longer, “NO
DEVICE CONNECTED” will scroll across the display.
To begin pairing from this state, press the PAIRING
button to put the unit into pairing mode. “PAIRING”
appears on the display.
2 Enable the Bluetooth communication
function on the other Bluetooth device.
3 From the Bluetooth device select
“MC-D800” (this unit).
o If a passkey is required during pairing, input
“0000”.
When connection succeeds, the unit will make an
electronic beeping sound, and the Bluetooth figure
mark ( ) will appear on the display.
o If it cannot connect for two minutes or longer, “NO
DEVICE CONNECTED” will scroll across the display
and pairing mode will end.
o This unit can retain pairing data for up to five devices.
After five devices have been paired, if a new device is
paired, the oldest pairing will be overwritten.
o When a Bluetooth device is connected, if you
change the input with a function button or press the
STANDBY/ON button to put the unit into standby
mode, the next time the unit is turned on, the last
connected Bluetooth device will automatically
connect again assuming it is in range and has its
Bluetooth function activated.
o If you disconnect from the other Bluetooth device,
“NO DEVICE CONNECTED” will appear.
o If the other Bluetooth device is waiting to pair, pair-
ing will occur automatically when this unit enters
pairing mode.
44
Z
Page 45

Listening to records
Touch pairing
If the other Bluetooth device supports NFC, you can
pair it with this unit using the following procedures.
1 Press the CD/Bluetooth/USB button to
select “Bluetooth”.
o You cannot use touch pairing if another function
is selected.
2 Hold the antenna of the device that
supports NFC toward the touch pairing
reader.
Do this within two seconds of selecting “Bluetooth”.
The touch pairing reader is on top of the unit near
the record needle resting place. When shipped new
from the factory, it is covered with a sticker.
Before using the record player, use a coin or other tool
to turn the transport locking screw clockwise until it
stops. Remove the stylus cover (made of white plastic)
(page 23).
1 Press the PHONO/AUX button to select
“PHONO”.
Z
ENGLISH
Touch pairing reader
Device that supports NFC
(smart phone, etc.)
o Hold the device that supports NFC within 2 cm
of the touch pairing reader.
o Be careful not to bump the record needle when
holding the device that supports NFC.
Each time the PHONO/AUX button is pressed,
PHONO (record) and AUX (external component) are
selected alternatively.
2 Open the turntable cover slowly.
V
Be careful not to pinch your hand, for example, when opening and closing the turntable
cover.
Continued on the next page
45
Page 46

Listening to records (continued)
3 Place a record on the turntable.
When playing a 45 RPM large-hole single record,
use the included adapter.
4 Set according to the rotation speed
(RPM) of the record.
The rotation speed can be set to one of three
options: 33 1/3, 45 or 78.
6 Lift the cue lever to raise the tone arm.
Tone arm
Cue lever
o You can also leave the cue lever down and move
the raised tone arm over the record and then
lower the tone arm slowly to start playback.
7 Move the tone arm to the edge of the
record or the track where you want to
start playback.
When you move the tone arm toward the record,
the turntable will begin to turn.
5 Move the tone arm clasp to the right to
release the tone arm.
Clasp
46
Page 47

8 Slowly lower the cue lever to slowly
lower the tone arm.
Tone arm
When playback finishes
When the end of the record is reached, the tone arm
automatically returns to the tone arm holder and turntable rotation stops (auto return function).
o To stop playback manually, slightly lift the tone arm
using the cue lever or a finger and return the tone
arm to the tone arm holder.
Tone arm
Cue lever
o During record playback, you can close the turn-
table cover to avoid dust.
V
Do not place anything on the turntable cover.
Objects on the cover might cause noise due
to vibrations or fall off, especially during
playback.
During record playback, feedback could occur if
the volume is too loud. If this happens, turn the
VOLUME knob left to lower the volume.
ENGLISH
Cue lever
The auto return function might not work depending on the record. In that case, move the tone arm
back to its original position manually.
47
Page 48

Listening to the radio
Press the FM/AM button to select FM or AM band.
When using the main unit
Z
When using the remote control
Automatic station selection
Press a j/k button repeatedly until the frequency
begins to change. After the frequency starts changing, stop pressing the button to start automatic station
selection.
When using the main unit
Z
Each time you press the FM/AM button, the unit will
switch between FM and AM broadcast reception.
FM radio reception example
c
AM radio reception example
c
When using the remote control
o “SEARCH” appears on the display until the station is
found.
Display example
o When a radio station is received, automatic station
selection ends.
o To cancel automatic station selection, press a j/k
button again.
o If the reception is poor or the antenna is discon-
nected, “PLEASE CHECK ANTENNA” scrolls across on
the display. Check the antenna position and connection and then try the operation again.
48
Page 49

Manual station selection
When using the main unit
Z
Turn the scroll (MULTI JOG) knob to change the reception frequency.
o Turn right to increase the reception frequency and
left to decrease it.
When using the remote control
Stereo mode selection
When an FM stereo broadcast is being received in stereo, the STEREO indicator appears.
o If reception is poor, the STEREO indicator will not
light.
Display example
ENGLISH
c
Stereo indicator
Mono mode selection
When the reception of an FM stereo broadcast is poor,
select this mode.
Use to receive broadcasts in mono to improve the
sound.
Press a TUNING/TIME (j/k) button briefly to change
the frequency by a fixed step.
o Keep pressing the TUNING/TIME (j/k) button until
you find the station that you want.
FM MODE button
Display example
c
When a stereo FM program is tuned in, you can switch
between stereo and mono by pressing the FM MODE
button.
49
Page 50

Preset tuning
You can store FM and AM stations into preset numbers
1 to 20 respectively.
1 Press the FM/AM button to select FM or
AM band.
Each time you press the FM/AM button, the unit will
switch between FM and AM broadcast reception.
2 Use the TUNING (j/k ) buttons to
search for the radio station that you
want to save as a preset.
Display example
Preset number
4 Use the PRESET buttons to select the
preset number that you want to use to
store that radio station.
3 After selecting a radio station, press
the MEMORY button.
The preset number and the MEMORY indicator blink
on the display.
5 Press the MEMORY button.
The radio station will be stored, and the preset
number and the MEMORY indicator will stop blinking and continue to appear on the display.
To save more radio station presets, repeat procedures 1 to 5.
50
Page 51

Automatic presets
The unit can automatically search for and add presets
for the stations that it can receive.
1 Press the FM/AM button to select FM or
AM broadcast reception.
Each time you press the FM/AM button, the unit will
switch between FM and AM broadcast reception.
2 Press and hold the MEMORY button for
at least two seconds.
“AUTO” appears on the display and the unit automatically adds presets for the stations that it can
receive.
Listening to a preset station
1 Press the FM/AM button to choose the
band.
Z
ENGLISH
2 Press a PRESET (j/k) button repeat-
edly until you nd the preset number
of the radio station you want.
Z
o After 20 presets have been added automatically,
“PROG FULL” will appear followed by preset 01
and reception of that station will start.
Continued on the next page
51
Page 52

Preset tuning (continued)
RDS
When using the remote control
The preset number appears on the left side of the
display.
Example when preset 3 is selected
Preset number
The Radio Data System (RDS) is a broadcasting service
which allows stations to send additional information
along with the regular radio program signal.
1 Tune in to an FM RDS station (see page
48).
The RDS indicator lights and the program service
name (station’s name) appears on the display.
2 Press the INFO button.
o When a preset station is selected, the MEMORY
indicator appears.
o After selecting a preset, this number will con-
tinue to be shown unless you select another
station manually.
52
Page 53

Each time the INFO button is pressed, the RDS mode is
changed as follows:
PS (Program service name)
When you select PS, the station’s name will be displayed. If there is no PS data, “NO PS” will be displayed.
PTY (Program type)
When you select PTY, the program type will be displayed.
If there is no PTY data, “NO PTY” will be displayed.
RT (Radio text)
When you select RT, up to 64 characters of information
transmitted by the station will be displayed.
If there is no RT data, “NO TEXT” will be displayed.
RDS Clock Time (CT)
The clock setting will be automatically adjusted
according to the CT data.
If you tune in an RDS station broadcasting incorrect
CT data, the clock could be set incorrectly, and this
could affect timer operation.
No matter which RDS mode is selected, the unit
receives CT data and adjusts the clock.
To turn the CT mode on and off, press and hold
the INFO button for more than two seconds,
then press a TUNING button (j/k) to select on
or off.
ENGLISH
CT (Clock time)
When you select CT, the clock time provided from the
station will be displayed.
If there is no CT data, “NO CT” will be displayed.
o After viewing the CT, press the INFO button again to
show the frequency.
53
Page 54

PTY search
You can search for stations by program type.
1 Press the FM/AM button to select “FM”.
2 Press and hold the remote control's
DISPLAY button for at least two seconds. Then, press a TUNING (j/k )
button repeatedly to select the desired
program type.
3 Press the DISPLAY button.
Searching will start.
o When the program type that you have selected
is found, searching will stop and the programme
type will be displayed.
o If the same program type is not found during PTY
search, it will stop at the beginning frequency.
o If you want to stop searching, press the DISPLAY
button.
Press and hold for at
least 2 seconds
c
54
Page 55

PTY (RDS program type)
NEWS: Brief announcements, events, public
opinion, reports and real situations.
AFFAIRS: Suggestions, including practical
announcements other than news, documents, discussion and analysis.
INFO: Useful and reference information, such
as weather forecasts, consumer guides
and medical advice.
CLASSICS: Orchestral music including great operas
and symphonies, chamber music and
so on.
OTHER M: Other music styles, including rhythm &
blues and reggae.
WEATHER: Weather reports and forecasts.
FINANCE: Financial reports, commerce and
trading.
CHILDREN: Children’s programs.
ENGLISH
SPORT: Sports-related programs.
EDUCATE: Educational and cultural information.
DRAMA: All kinds of radio concerts and serial
dramas.
CULTURE: All aspects of national or local culture,
including religious events, philosophy,
social science, language and theatre.
SCIENCE: Programs on natural science and
technology.
VARIED: Popular programs such as quizzes,
entertainment news, interviews, comedy and satire.
POP M: Programs of commercial and popular
songs, including music sales volumes,
etc.
SOCIAL: Social affairs.
RELIGION: Religious programs.
PHONE IN: Programs in which the public expresses
its views by phone.
TRAVEL: Travel reports.
LEISURE: Programs concerning recreational
activities.
JAZZ: Jazz music.
COUNTRY: Country music.
NATION M: National music.
OLDIES: Music from the so-called golden age of
popular music.
FOLK M: Folk music.
ROCK M: Modern music generally composed
and played by young musicians.
EASY M: Popular music usually lasting for less
than five minutes.
LIGHT M: Classical music, instrumental music,
chorus, and light music favored by
general audiences.
DOCUMENT: Documentaries.
TEST: Broadcast when testing emergency
broadcast equipment or receivers. Not
intended for searching or dynamic
switching for consumer receivers.
ALARM: A program with notifications about
emergencies and natural disasters.
55
Page 56

Wakeup timer
At the set time, sound will be output from the speakers.
o Adjust the clock before setting the timer (page 25).
Setting the timer
1 Put the unit into standby (power o).
The unit must be in standby to set the timer.
Press the STANDBY/ON button to put the unit into
standby.
Display example
c
c
2 Press and hold the TIMER button for at
least two seconds.
Press and hold for at
least 2 seconds
The timer indicator ( ) blinks and “SET TIMER”
scrolls across the display once. “ON TIME” appears
and then the time input mode becomes active.
The “hour” value blinks.
o If no action is taken for 20 seconds, timer setting
will end automatically.
56
Page 57

3 Press the TIME (j/k) buttons to set
the TIMER ON hour and press the TIMER
button.
4 Press the TIME (j/k) buttons to set
the TIMER ON minute and press the
TIMER button.
Display example
Display example
o After setting the hour, the minutes blink.
After making the TIMER ON setting, “OFF TIME”
appears and the hour value blinks.
c
5 Repeat steps 3 and 4 to set the TIMER
OFF time.
Display example
ENGLISH
Continued on the next page
57
Page 58

Wakeup timer (continued)
6 Press the TIME (j/k) buttons to select
the playback source and press the
TIMER button.
Display example
The sources that can be selected are CD, USB, FM
TUNER and AM TUNER.
Press the TIME (j/k) button to cycle through the
following source settings.
7 Press the TIME (j/k) buttons to set
the volume level.
You can set the volume between 5 (minimum) and
32 (maximum).
o When the wakeup timer turns the unit on, the
volume will gradually increase until the set volume is reached.
8 Press the TIMER button.
CD USB FM TUNER
AM TUNER
“BLUETOOTH” and “PHONO” cannot be set.
Timer indicator
The timer indicator appears.
This completes wakeup timer setting.
o The wakeup timer settings will be erased if
a power outage occurs or the power cord is
unplugged from an outlet.
o At the TIMER ON time, operation starts and the
timer indicator blinks.
Prepare the playback source before the
wakeup timer turns the unit on.
If you have selected “CD”, place a disc.
If you have set “USB” as the playback source, connect a
USB flash drive.
o If a disc or USB flash drive is not loaded, the FM tuner
will be used.
58
Page 59

Sleep timer
Turn the wakeup timer on and off when the unit is in
standby mode.
Turning the timer off
When you do not want to use the wakeup timer, press
the TIMER button to turn it off.
“TIMER OFF” scrolls across the display and the timer
indicator disappears from the display.
o You can turn the timer off whether the unit is on or in
standby.
Turning the timer on
The unit can be set to enter standby after a specified
amount of time.
Setting the sleep timer
Press the SLEEP button repeatedly until the desired setting appears on the display.
ENGLISH
The settings for the time until the unit enters standby
change as follows (shown in minutes).
To use the wakeup timer, press the TIMER button again.
“TIMER ON” scrolls across the display followed by the
timer settings in the following order: TIMER ON time,
TIMER OFF time, playback source and volume. The timer
indicator also appears on the display, showing that the
unit is waiting for the TIMER ON time.
o During timer playback, press the TIMER button to
disable the timer. In this case, the unit will not enter
standby mode (turn off) automatically when the
TIMER OFF time is reached.
o The timer cannot be turned on unless the unit is in
standby mode.
90 75 60 45 30 15
Off
When the sleep timer is active, the SLEEP indicator
appears at the bottom right of the display.
o The display is dimmed when the sleep timer is active.
o When the sleep timer is active, press the SLEEP but-
ton once to show for a few seconds the amount of
time until the unit enters standby.
o When the sleep timer is operating, you can press the
SLEEP button twice to turn the sleep timer off.
59
Page 60

Listening to a connected device
You can connect the audio output jack or headphones
jack of a portable audio player or other device to this
unit and listen to its audio playback through this unit.
1 Use a commercially-available audio
cable to connect the headphones jack
(or audio output jack) of a portable
audio player or other device to the analog audio input jacks (AUX IN) on the
back of the unit.
3 Start playback on the playback device.
Then, adjust the volume of both this
unit and the connected device.
o If the volume is not raised on an audio player
when its headphones jack is connected to this
unit, no sound will be output from this unit.
o If you raise the volume level of the connected
device too high, the sound might distort. If this
occurs, lower the volume of the connected
device until distortion stops and then adjust the
volume on this unit.
2 Press the PHONO/AUX button to select
“AUX”.
Z
60
Page 61

Troubleshooting
If you experience a problem with this unit, please
check the following items before requesting service.
Something other than this unit could also be the cause
of the problem. Please also check that the connected
devices are also being used properly.
If it still does not operate correctly, contact the retailer
where you purchased the unit.
The unit will not turn on.
e Confirm that the power plug is plugged into a
working outlet. Then, press the STANDBY/ON button to turn the unit on. Confirm that there is power
to the outlet by plugging in another device such as
a desk lamp or tabletop fan (pages 14 and 27).
There is no sound.
e Turn the VOLUME knob right to raise the volume.
Remote control does not work.
e Press the main unit's STANDBY/ON button to turn it
on.
e If the batteries are dead, replace both batteries with
new ones.
e Clear obstructions that are between the remote
control unit and the main unit. Use the remote control unit within the 5 m (16 ft) range and pointed at
the front panel.
e If a lamp or other strong light source is near the
unit, turn the light source off.
A nearby TV or other device is malfunctioning.
e Some TVs with wireless remote control functions
might malfunction in response to the operation of
this unit’s remote control. In this case, turn the other
device off while using this unit’s remote control.
There is noise.
e Place the unit as far away as possible from TVs,
microwave ovens and other devices that emit electromagnetic waves.
CD player
Playback is not possible.
e If the disc is upside down, reload it with the labeled
side up.
e If the disc is dirty, wipe it clean.
e Discs that do not have any recordings on them or
that have not been finalized cannot be played back.
Make sure that CD-R/CD-RW discs that you want to
play back have recordings on them and have been
finalized.
e Depending on disc quality and recording condi-
tions, playback of some CD-R/CD-RW discs might
not be possible.
e Programmed playback works with finalized discs
only.
The sound skips.
e Vibrations can cause the sound to skip. Place this
unit in a stable location.
e If the disc is dirty, wipe it clean.
e Do not play any disc that is warped, deformed or
damaged.
MP3/WMA files
Playback is not possible.
e Check the file format. MP3 files are recognized by
the “.mp3” file extension and WMA files by the “.wma”
extension.
e The MP3/WMA file might be damaged.
e Confirm that the file format is one that this unit can
play back (page 12).
The song name, artist name and album name do
not appear on the display.
e There is no ID3 tag information for the music
file. Edit the song name, artist name, and album
information of the song on a PC using a suitable
application.
ENGLISH
Some unknown characters are displayed on the
display.
e If the file information uses Japanese, Chinese or
other double-byte characters, playback is possible
but the name will not be shown correctly.
Continued on the next page
61
Page 62

Troubleshooting (continued)
Bluetooth function
Pairing fails.
e Refer to the Bluetooth device’s operation manual.
e Put this unit into standby and turn the other
Bluetooth device off and on once. Then, try pairing
again.
e Turn off all Bluetooth devices other than the one
you are trying to pair the unit with.
e After deleting the “MC-D800” data from the other
Bluetooth device, try pairing again.
Cannot connect.
e Confirm that the other Bluetooth device is on and
its Bluetooth function is enabled.
e Are the unit and the other Bluetooth device too far
apart? Is there a wall or other obstruction between
them?
As much as possible, use them close together in an
environment without obstructions.
e Put the unit into standby and then on again.
e Unpair the “MC-D800” from the Bluetooth device
and follow the instructions in “Pairing with another
Bluetooth device” on page 44.
The touch pairing reader does not work.
e Press the CD/Bluetooth/USB button to select
“Bluetooth”.
e Check the settings of the other device that you are
using.
Radio
A station cannot be received. The reception is
poor.
e Tune in the station properly.
e If FM broadcast reception is poor, try relocating the
FM antenna.
e If AM broadcast reception is poor, try changing the
orientation of the AM antenna.
e Confirm that the FM antenna cable has been con-
nected correctly.
e If a TV is near the unit, turn the TV off.
FM stereo broadcasts become mono.
e Press the FM MODE button to select stereo.
e The signal from the station might be poor. Adjust
the position of the FM antenna and check whether
the FM antenna cable has been connected correctly.
Records
It will not play a record. Playback is noisy.
e Confirm that the stylus cover (made of white plas-
tic) has been removed.
e Clean the stylus (page 17).
e If the stylus is worn-out, replace it.
The pitch is wrong.
e Set the rotation speed (RPM) to match the record
(page 46).
The sound skips or there is noise.
e Is there a wireless LAN, other Bluetooth device,
microwave oven or similar electronic equipment
nearby?
Keep such devices as far away as possible.
e Reduce the distance between the other Bluetooth
device and this unit during use.
e Try moving the other Bluetooth device and this
unit.
62
The sound skips.
e Vibrations will cause skipping. Place this unit in a
stable location.
e If the record is dirty, wipe it clean.
e Do not use scratched records.
e Use a coin or other tool to turn the transport lock-
ing screw clockwise until it stops.
Since this unit uses a microcontroller, external
noise and other interference can cause the unit
to malfunction. If this should occur, unplug the
power cord from the outlet and wait for a minute before plugging the power cord in again and
retrying the operation.
Page 63

Specifications
Amplifier
Output power .......................10 W + 10 W (8 Ω)
Frequency response ....................50 Hz to 20 kHz
Audio input sensitivity/impedance ..AUX: 500 mV/20 kΩ
CD player
Playable disc types ...................CD, CD-R, CD-RW
Frequency response ....................20 Hz to 20 kHz
Signal to noise ratio ......................70 dB or more
Bluetooth function
Bluetooth version ............................V2.1 + EDR
Profiles ................................... A2DP, AVRCP
Codec ..............................................SBC
Class .................................................2
Tuner
Frequency range (FM) ..........87.5 MHz to 108.0 MHz
Frequency range (AM) .............522 kHz to 1629 kHz
General - Main unit
Input jacks ........................Analog (RCA) × 1 pair
Output jacks ......................Analog (RCA) × 1 pair
Headphones output jack .......3.5 mm stereo mini × 1
Power supply ................AC 100 – 240 V, 50 – 60 Hz
Power consumption .............................. 20 W
Dimensions (W × H × D) (including protrusions)
400 × 205.5 × 386 mm (15 3/4" × 8 1/8" × 15 1/4")
Weight (including turn table cover) ....6.6 kg (14 5/8 lb)
Operating temperature range ..............5°C to 35°C
Speakers
Enclosure type ....................Bass reflex (rear port)
Unit .........................89-mm (3.5-inch) (Woofer)
38-mm (1.5-inch) (Tweeter)
Impedance .........................................8 Ω
Dimensions (W × H × D) (including protrusions)
144 × 224 × 154 mm (15 3/4" × 8 1/8" × 6 1/8")
Weight ........................2.8 kg (6 1/4 lb)/speaker
ENGLISH
Record player
Motor ................................. DC servo motor
Drive system ..................................Belt drive
Speed ...............................33-1/3, 45, 78 rpm
Wow and flutter ...........................0.35% or less
Signal to noise ratio ......................50 dB or more
Cartridge type .................Ceramic stereo cartridge
Stylus ....STL-103 (sapphire stylus) for LP and EP records
Replacement stylus (sold separately)
STL-103 ..Sapphire stylus for LP and EP records (3 per set)
SPL-102 ........Diamond stylus for SP records (2 per set)
Included accessories
Speakers × 1 pair
Remote control (RC-1316) × 1
45 RPM adapter × 1
Sapphire stylus for LP and EP records (already installed)
Turntable cover × 1
Hinges × 2
Batteries for remote control (AA) × 2
AM antenna × 1
FM antenna (wire type) × 1
Owner’s manual (this document) × 1
o Specifications and appearance are subject to change
without notice.
o Weight and dimensions are approximate.
o Illustrations in this owner's manual might differ
slightly from production models.
63
Page 64

Précautions pour les équipements sans fil
Conformité de l’émetteur radio et
interférences
Modèle pour l’EEE
(Espace Économique Européen)
Ce produit fait fonction d’émetteur large bande sur la
bande des 2,4GHz.
Plage de fréquences utilisée: 2400MHz – 2480MHz
Puissance maximale de sortie: Bluetooth® classe 2
(moins de 2,5mW)
Par la présente, TEAC Corporation
déclare que cet équipement radio est
en conformité avec la directive 2014/53/
UE ainsi qu’avec les autres directives et
règlements de la Commission.
Le texte intégral de la déclaration de conformité pour
l’UE est disponible à l’adresse internet suivante: veuillez
nous contacter par e-mail.
http://www.teac-audio.eu/en/
Exigences pour l’exposition aux
rayonnements
Cet équipement est conforme à la réglementation
reconnue internationalement en matière d’exposition
humaine aux ondes radio générées par l’émetteur.
Déclaration de conformité
Modèle pour l’EEE
(Espace Économique Européen)
Cet équipement est conforme à la norme EN.62311:
Évaluation des équipements électroniques et électriques en relation avec les restrictions d’exposition
humaine aux champs électromagnétiques; la norme
harmonisée de la Directive 1999/5/CE.
TEAC Corporation
1-47 Ochiai, Tama-shi, Tokyo, 206-8530, Japon
ATTENTION
Les changements ou modifications non expressément
approuvés par la partie responsable de la conformité
peuvent invalider le droit de l’utilisateur à faire fonctionner l’équipement.
ATTENTION
L’autorisation des dispositifs sans fil varie avec les pays
ou régions. Veuillez n’utiliser cet appareil que dans le
pays où il a été acheté.
o Selon le pays, des restrictions d’usage de la techno-
logie sans fil Bluetooth peuvent exister.
64
Page 65

Informations sur le laser
Notes pour la technologie sans fil Bluetooth®
Ce produit contient un système laser à semi-conducteur dans son boîtier et est répertorié comme
«PRODUIT LASER DE CLASSE1».
Pour éviter d’être exposé au faisceau laser, n’essayez
pas d’ouvrir le boîtier.
Laser:
Type: EP-C101
Fabricant: GUANGDONG EVER BRIGHT
GROUP CO.,LTD.
Puissance laser: moins de 0,5 mW
Longueur d’onde: 790 ± 25 nm
Si vous utilisez cette unité avec un téléphone mobile ou
d’autres dispositifs à technologie sans fil Bluetooth, ils
ne doivent pas être éloignés l’un de l’autre de plus de
10m. Toutefois, selon les conditions d’utilisation, la distance effective de transmission peut être réduite.
La communication sans fil ne peut pas être garantie
pour tous les appareils à technologie sans fil Bluetooth.
Pour déterminer la compatibilité entre cette unité
et un autre appareil à technologie sans fil Bluetooth,
reportez-vous au mode d’emploi de cet appareil ou
contactez le magasin dans lequel vous l’avez acheté.
FRANÇAIS
65
Page 66

INSTRUCTIONS DE SÉCURITÉ IMPORTANTES
o N’exposez pas cet appareil aux gouttes ni aux
éclaboussures.
o Ne placez pas d’objet rempli de liquide sur l’appareil,
comme par exemple un vase.
o N’installez pas cet appareil dans un espace confiné
comme une bibliothèque ou un meuble similaire.
o L’appareil tire un courant nominal de veille de la prise
secteur quand son interrupteur POWER ou STANDBY/
ON n’est pas en position ON.
o L’appareil doit être placé suffisamment près de
la prise de courant pour que vous puissiez à tout
moment atteindre facilement la fiche du cordon
d’alimentation.
o La fiche secteur est utilisée comme dispositif de
déconnexion et doit donc toujours rester disponible.
o Les produits de Classe ! sont équipés d’un cordon
d’alimentation ayant une fiche de terre. Le cordon
de ces produits doit être branché dans une prise de
terre.
o Si le produit utilise des batteries (y compris un pack
d’accus ou des piles), elles ne doivent pas être exposées au soleil, au feu ou à une chaleur excessive.
o PRÉCAUTION pour les produits utilisant des batte-
ries au lithium remplaçables: il existe un danger
d’explosion en cas de remplacement par un type de
batterie incorrect. Remplacez-les uniquement par
des modèles identiques ou équivalents.
o Des précautions doivent être prises pour l’emploi
d’écouteurs ou d’un casque avec le produit car une
pression acoustique (volume) excessive dans les
écouteurs ou dans le casque peut provoquer une
perte d’audition.
V
Précautions concernant les piles
Un mauvais emploi des piles peut entraîner leur
rupture ou leur fuite, avec pour conséquence un
incendie, des blessures ou la salissure des objets
proches. Veuillez lire et suivre attentivement les
précautions suivantes.
o Veillez à insérer les piles avec leurs pôles positif
(¥) et négatif (^) correctement orientés.
o Utilisez des piles du même type. N’utilisez jamais
des types de pile différents ensemble.
o Si la télécommande doit rester inutilisée durant
une période prolongée (plus d’un mois), retirez ses
piles pour éviter qu’elles ne coulent.
o Si les piles coulent, essuyez le liquide dans le com-
partiment des piles et remplacez les piles par des
neuves.
o N’utilisez pas de piles d’un type autre que ceux
spécifiés. Ne mélangez pas des piles neuves avec
des anciennes et n’utilisez pas ensemble des types
de pile différents.
o Ne chauffez pas et ne démontez pas les piles. Ne
jetez jamais les piles dans un feu ou dans de l’eau.
o Ne conservez et ne transportez pas les piles avec
d’autres objets métalliques. Les piles pourraient
entrer en court-circuit, couler ou exploser.
o Ne rechargez jamais une batterie sans avoir vérifié
qu’elle peut l’être.
66
Page 67

Pour les consommateurs européens
Pb, Hg, Cd
Mise au rebut des équipements électriques et électroniques
(a) Tout équipement électrique et électronique doit être traité
séparément de la collecte municipale d’ordures ménagères
dans des points de collecte désignés par le gouvernement ou
les autorités locales.
(b) En vous débarrassant correctement des équipements élec-
triques et électroniques, vous contribuerez à la sauvegarde de
précieuses ressources et à la prévention de potentiels effets
négatifs sur la santé humaine et l’environnement.
(c) Le traitement incorrect des déchets d’équipements élec-
triques et électroniques peut avoir des effets graves sur
l’environnement et la santé humaine en raison de la présence
de substances dangereuses dans les équipements.
(d) Le symbole de déchets d’équipements électriques
et électroniques (DEEE), qui représente une poubelle à roulettes barrée d’une croix, indique que les
équipements électriques et électroniques doivent
être collectés et traités séparément des déchets
ménagers.
(e) Des systèmes de retour et de collecte sont disponibles pour
l’utilisateur final. Pour des informations plus détaillées sur la
mise au rebut des vieux équipements électriques et électroniques, veuillez contacter votre mairie, le service d’ordures
ménagères ou le magasin dans lequel vous avez acquis
l’équipement.
FRANÇAIS
Mise au rebut des piles et/ou accumulateurs
(a) Les piles et/ou accumulateurs hors d’usage doivent être
traités séparément de la collecte municipale d’ordures
ménagères dans des points de collecte désignés par le gouvernement ou les autorités locales.
(b) En vous débarrassant correctement des piles et/ou accumu-
lateurs hors d’usage, vous contribuerez à la sauvegarde de
précieuses ressources et à la prévention de potentiels effets
négatifs sur la santé humaine et l’environnement.
(c) Le traitement incorrect des piles et/ou accumulateurs hors
d’usage peut avoir des effets graves sur l’environnement et la
santé humaine car ils contiennent des substances
dangereuses.
(d) Le symbole de déchets d’équipements électriques
et électroniques (DEEE), qui représente une poubelle
à roulettes barrée d’une croix, indique que les piles
et/ou accumulateurs doivent être collectés et traités
séparément des déchets ménagers.
Si une pile ou un accumulateur contient plus que les valeurs
spécifiées de plomb (Pb), mercure (Hg) et/ou cadmium (Cd)
telles que définies dans la directive sur les batteries (2006/66/
EC), alors les symboles chimiques de ces éléments seront
indiqués sous le symbole DEEE.
(e) Des systèmes de retour et de collecte sont disponibles pour
l’utilisateur final. Pour des informations plus détaillées sur la
mise au rebut des piles et/ou accumulateurs, veuillez contacter votre mairie, le service d’ordures ménagères ou le magasin
dans lequel vous les avez achetés.
67
Page 68

Sommaire
Avant l’utilisation
Nous vous remercions d’avoir choisi TEAC. Lisez ce
mode d'emploi avec attention pour tirer les meilleures
performances de cette unité.
Précautions pour les équipements sans fil ............64
Informations sur le laser .............................65
Notes pour la technologie sans fil Bluetooth® ........65
INSTRUCTIONS DE SÉCURITÉ IMPORTANTES ..........66
Avant l’utilisation ....................................68
Fonction d'économie automatique d'énergie ........70
Disques compacts ...................................70
Fichiers MP3/WMA ..................................72
Manipulation des disques vinyle .....................73
Branchements .......................................74
Remplacement de la pointe .........................77
Nomenclature et fonctions des parties (unité principale) ..78
Nomenclature et fonctions des parties (télécommande) ..80
Emploi de la télécommande .........................82
Éléments fournis
Vérifiez que vous disposez bien de tous les accessoires
représentés ci-dessous. Veuillez contacter le magasin
dans lequel vous avez acheté cette unité si l'un de ces
accessoires manque ou a été endommagé durant le
transport.
Enceintes × 1 paire
Télécommande (RC-1316) × 1
Adaptateur 45 tr/min × 1
Pointe saphir pour albums (LP) et maxis (EP) (déjà
montée)
Couvercle de la platine × 1
Charnières × 2
Nomenclature et fonctions des parties (platine tourne-
disque) ..............................................83
Couvercle de la platine ..............................84
Réglage de l'horloge .................................85
Fonctionnement de base ............................87
Écoute d'un CD ......................................90
Écoute des fichiers d'une clé USB ....................92
Écoute d'un CD/des fichiers d'une clé USB ...........93
Lecture programmée (CD/USB) ......................94
Lecture en boucle et lecture aléatoire (CD/USB) ......98
À propos de la lecture des fichiers MP3/WMA ........99
Écoute du son venant d'un appareil Bluetooth ......102
Appairage avec un autre appareil Bluetooth ........104
Écoute de disques vinyle. . . . . . . . . . . . . . . . . . . . . . . . . . . .105
Écoute de la radio ..................................108
Préréglage de syntonisation (preset) ................110
RDS ................................................112
Piles pour télécommande (AA) × 2
Antenne AM × 1
Antenne FM (filaire) × 1
Mode d'emploi (ce document) × 1
o Conservez ce mode d'emploi dans un endroit sûr
pour référence ultérieure.
o Voir au dos de ce document les informations concer-
nant la garantie en Europe et dans d'autres pays ou
régions.
Recherche d'un type de programme (PTY) ..........114
Réveil ...............................................116
Minuterie d'extinction ..............................119
Écoute d'un appareil connecté. . . . . . . . . . . . . . . . . . . . . .120
Guide de dépannage ...............................121
Caractéristiques techniques. . . . . . . . . . . . . . . . . . . . . . . . .123
68
Page 69

Précautions d'emploi
o Ne placez rien sur le couvercle de la platine. Les
objets posés sur le couvercle peuvent provoquer du
bruit dû aux vibrations ou tomber, en particulier lors
de la lecture.
o Évitez d'exposer l'unité directement au soleil, de la
placer près d'une source de chaleur ou dans d'autres
conditions similaires. N’installez pas l’appareil au-dessus d’un amplificateur ou d'un équipement pouvant
dégager une chaleur qui dépasse la température de
fonctionnement de cette unité. Cela pourrait causer
une décoloration, une déformation ou un mauvais
fonctionnement.
o N’ouvrez pas le boîtier car cela peut endomma-
ger le circuit ou causer un choc électrique. Si un
objet étranger pénètre dans l’unité, consultez votre
revendeur.
o Pour débrancher le cordon d'alimentation de la prise
secteur, saisissez toujours la prise, ne tirez jamais sur
le cordon.
o Si on allume un téléviseur alors que cette unité est en
service, des parasites peuvent apparaître sur l'écran
du téléviseur en fonction de la fréquence de la télédiffusion. Si cela se produit, mettez cette unité en
veille (off) lors de l'utilisation du téléviseur.
o Il est possible que l’unité chauffe durant l’utilisation,
laissez donc toujours un espace suffisant autour
d'elle pour sa ventilation. Quand vous installez cette
unité, laissez au moins 20cm entre elle et les murs.
Pour permettre une bonne dissipation de la chaleur, laissez un peu d'espace entre elle et les autres
appareils. Si vous la placez par exemple dans un rack,
laissez au moins 40cm de libre au-dessus de l'unité
et 10cm derrière elle. Ne pas laisser ces espaces
peut entraîner une montée de température ayant
pour résultat un incendie.
o NE DÉPLACEZ PAS L'UNITÉ DURANT LA LECTURE.
Durant la lecture ou l'enregistrement, le disque
tourne. Ne soulevez et ne déplacez pas l'unité durant
la lecture. Vous risqueriez d'endommager le disque,
la pointe, la cellule ou l'unité.
o Retirez toujours le disque avant de déplacer ou
de transporter cette unité. Transporter cette unité
avec un disque à l'intérieur ou sur la platine pourrait
endommager le disque, la pointe, la cellule ou provoquer un dysfonctionnement.
Maintenance
Si la surface de l'unité est sale, essuyez-la avec un chiffon doux ou utilisez un détergent liquide léger dilué.
Laissez la surface de l'unité sécher complètement avant
utilisation.
N’utilisez pas de lingettes de nettoyage imbibées
de produits chimiques, de diluant ou de substances
similaires car cela pourrait endommager la surface de
l’unité.
V
ATTENTION
Par sécurité, débranchez le cordon d'alimentation de la prise secteur avant tout
nettoyage.
FRANÇAIS
o La tension d’alimentation doit correspondre à la ten-
sion imprimée sur le panneau arrière. Si vous avez
des doutes à ce sujet, consultez un électricien.
69
Page 70

Fonction d'économie automatique d'énergie
Disques compacts
Cette unité a une fonction d'économie automatique
d'énergie. La fonction d'économie d'énergie automatique est activée lorsque cette unité quitte l'usine, de
façon à passer automatiquement en veille après 30
minutes dans les conditions indiquées par le tableau
suivant.
État CD/USB Bluetooth PHONO*
Pas de CD/clé USB
Pas d'appareil
connecté
La platine tournedisque ne tourne pas
À l'arrêt/en pause
Fonction d'économie automatique d'énergie activée
— Fonction d'économie automatique d'énergie non
activée
/ Non applicable
* En cas de réglage sur PHONO, cette fonction n'est
activée que si le bras de lecture est ramené sur son
support.
o Si AUX est sélectionné, l’unité passera automatique-
ment en veille après huit heures sans entrée audio.
o Cette fonction est désactivée quand l'unité est réglée
sur FM/AM.
Si vous souhaitez désactiver la fonction d’économie
automatique d’énergie, faites ce qui suit.
1. Branchez le cordon d’alimentation secteur.
2. Appuyez sur la touche STANDBY/ON.
3. Appuyez sur la touche PHONO/AUX pour sélectionner AUX.
—
Disques lisibles par cette unité
CD portant le logo Compact disc Digital Audio
Les CD-R et CD-RW créés au format CD audio et
correctement finalisés.
Les CD-R et CD-RW sur lesquels ont été gravés
des fichiers MP3 ou WMA et qui ont été correctement finalisés.
Cette unité peut lire les types de disque ci-dessus (sans
adaptateur). Cette unité ne peut lire aucun autre type
de disque.
V
ATTENTION
Si vous essayez de lire tout autre type de
disque avec cette unité, des bruits forts risquant d'endommager les haut-parleurs et
d'altérer votre audition peuvent être produits. N'essayez jamais de lire d'autres types
de disque avec cette unité.
o Cette unité peut être dans l'incapacité de correcte-
ment lire des CD à dispositif anti-copie, des disques
doubles (DualDisc) et d'autres CD spéciaux qui ne
se conforment pas à la norme CD Red Book. Le fonctionnement et la qualité sonore ne peuvent pas être
garantis si des disques spéciaux sont utilisés dans
cette unité. Si la lecture d'un disque spécial cause des
problèmes, contactez le vendeur du disque.
4. Maintenez la touche Lecture/Pause (y/9) pressée
durant au moins deux secondes.
5. Quand « ERP-ON » s’affiche, appuyez sur une
touche de saut/recherche (.m/,/) de
la télécommande ou tournez la molette de saut
(.//) de l'unité principale pour sélectionner
«ERP-OFF».
6. Appuyez sur la touche Lecture/Pause (y/9) pour
quitter le mode de réglage.
70
CD-R/CD-RW
Cette unité peut lire les CD-R et CD-RW ayant été enregistrés au format CD audio (CD-DA) et au format MP3
ou WMA.
o Les disques créés par un enregistreur de CD doivent
être finalisés avec celui-ci pour être utilisés dans cette
unité.
o Selon la qualité du disque et les conditions de l'en-
registrement, certains disques risquent de ne pas
Page 71

pouvoir être lus. Veuillez lire le mode d'emploi de
l'appareil ayant servi à créer le disque.
o En cas d'incertitude quant à la gestion d'un CD-R ou
CD-RW, contactez directement son vendeur.
Précautions d'emploi
o N'utilisez pas de disques fendus car ils pourraient
endommager l'unité.
o Pour écrire sur le côté inscriptible du disque,
employez un marqueur permanent à pointe feutre.
L'emploi d'un stylo à bille ou autre à pointe dure peut
endommager le disque, le rendant illisible.
o N'utilisez jamais de stabilisateurs de CD du com-
merce. Cela pourrait rendre le disque illisible ou
endommager l'unité.
o N'employez jamais de CD ayant une forme irrégu-
lière, dont des CD en forme de cœur ou octogonaux,
car ils peuvent endommager l'unité.
Précautions de rangement
o Les disques doivent être rangés dans leurs boîtiers
quand ils ne sont pas utilisés. Ne pas le faire peut
entraîner des déformations et des rayures.
o Ne laissez pas les disques dans des lieux exposés
directement à la lumière du soleil ou qui sont très
humides ou très chauds. Une exposition prolongée à
de telles conditions pourrait déformer ou dégrader les
disques, les rendant illisibles.
o Comme les CD-R/CD-RW sont plus sensibles aux
effets de la chaleur et des rayons ultraviolets que les
CD commerciaux, ne les laissez pas durant de longues périodes dans des lieux qui sont, par exemple,
exposés directement à la lumière du soleil ou à proximité d'équipements qui produisent de la chaleur.
o Des salissures sur le disque peuvent causer des sauts
de son ou dégrader la qualité sonore. Nettoyez toujours les disques avant de les ranger.
FRANÇAIS
Précautions de manipulation
o Placez toujours le disque dans le tiroir, face sérigra-
phiée vers le haut.
o Si la face du disque sur laquelle est enregistré le
signal (face vierge) est rayée, sale, ou porte par
exemple des empreintes de doigt, des erreurs de lecture peuvent survenir. Veuillez manipuler les disques
avec soin.
o Pour sortir un disque de son boîtier, appuyez sur le
centre du boîtier et prenez le disque par sa tranche.
Ne touchez pas la face du disque où sont encodées
les données (côté sans inscription).
Sortie du boîtier Maintien par les bords
Maintenance
o Si la face du disque où sont encodées les données
(face sans inscription) est salie par des empreintes
de doigt ou de la poussière, utilisez un chiffon doux
pour essuyer la surface d'un mouvement allant du
centre vers le bord extérieur.
o N'employez jamais de nettoyants pour disque, traite-
ments antistatiques, diluants ou produits chimiques
similaires pour nettoyer les disques. De tels produits
chimiques pourraient abîmer la surface du disque.
71
Page 72

Fichiers MP3/WMA
Cette unité peut lire les fichiers MP3 et WMA sur CD-R/
CD-RW et supports de stockage USB.
o Formats de fichier audio lisibles
MP3 (extension de fichier: .mp3)
Débit binaire: 8kb/s à 320kb/s
Fréquence d'échantillonnage: 16 kHz à 48 kHz
WMA (extension de fichier: .wma)
Débit binaire: 8kb/s à 320kb/s
Fréquence d'échantillonnage:
32 kHz, 44,1 kHz, 48 kHz
Note: la gestion des droits numériques ou DRM
(Digital Rights Management) n'est pas prise en
charge.
o Huit niveaux de dossiers sont pris en charge.
Informations de fichier affichées
Cette unité ne peut afficher que des caractères alphanumériques à simple octet.
o Si des informations de fichier utilisent des caractères
japonais, chinois ou autres à double octet, la lecture
audio est possible mais le nom ne sera pas affiché
correctement.
Précautions pour créer des fichiers
MP3/WMA sur un ordinateur
o Seuls les disques enregistrés selon la norme ISO 9660
peuvent être lus par cette unité.
o Les fichiers MP3 et WMA sont reconnus par leur
extension de fichier («.mp3 » pour les fichiers MP3
et «.wma » pour les fichiers WMA). Incluez toujours
l'extension dans le nom de fichier.
o Les fichiers sans extension ne peuvent pas être
reconnus. Un fichier ne peut pas être lu, quelle que
soit son extension de nom de fichier, si les données
ne sont pas au format MP3 ou WMA.
o Après enregistrement sur un CD-R/CD-RW, fermez
toujours la session (création complète du disque).
Cette unité ne peut pas lire un disque dont la session
n'a pas été fermée.
o La lecture d'un disque ne peut se faire que sur un
maximum de 999 fichiers et 99 dossiers. Si le support
en contient plus, cette unité peut ne pas parvenir à
lire correctement un fichier au-delà de ces limites (à
partir du 1000e fichier ou du 100e dossier).
o Les disques enregistrés en multi-session ne sont pas
pris en charge. Seule la première session peut être
lue.
o En fonction de l'état du disque, la lecture peut ne pas
être possible ou le son peut sauter.
o Cette unité ne peut pas lire les fichiers audio à pro-
tection de droits d'auteur.
72
Page 73

Manipulation des disques vinyle
Tenue des disques
Lors de la prise en mains d'un disque ou sa sortie de la
pochette, évitez de toucher le sillon en maintenant le
disque d'une main entre son étiquette et son bord, ou
en le tenant avec les deux mains par son bord.
Étiquette Sillon
Bord extérieur
Nettoyage
Précautions
o Ne laissez pas les disques dans des lieux exposés
directement à la lumière du soleil ou qui sont très
humides ou très chauds. Laisser longtemps un
disque dans de telles conditions peut le faire gondoler ou lui causer d'autres dommages.
o N'empilez pas plusieurs disques et ne placez pas
d'objets lourds dessus. Ne laissez pas non plus
les disques de façon prolongée en position inclinée. Cela pourrait les faire gondoler ou leur causer
d'autres dommages.
o Ne laissez pas des objets durs entrer en contact
direct avec le sillon audio. Cela pourrait entraîner des
rayures.
o Une fois que vous avez fini de lire un disque, repla-
cez-le toujours dans sa pochette pour le rangement.
Laisser un disque sans protection pourrait le faire
gondoler ou le rayer.
o N'employez pas de disques fendus.
FRANÇAIS
o Les traces de doigts et la poussière sur un disque
peuvent provoquer du bruit et des sautes de son,
ainsi qu'endommager le disque lui-même et la
pointe. Utilisez un nettoyant pour disque du commerce pour nettoyer les disques. N'utilisez pas de
diluant ni autre chose qu'un nettoyant pour disque.
De tels produits chimiques pourraient abîmer la surface du disque.
o Lors de l'utilisation d'un nettoyant pour disque,
balayez la surface du disque de façon circulaire, en
suivant le sillon.
73
Page 74

Branchements
V
Précautions lors des branchements
o Ne mettez sous tension qu’une fois tous les branchements effectués.
o Lisez attentivement les modes d'emploi des appareils que vous branchez et suivez leurs instructions quand vous
faites les branchements.
A
D
B
Prises de sortie
audio
A
Connecteur d'antenne FM
Déployez l'antenne FM et fixez-la à l'endroit où la
réception est la meilleure (sur un cadre de fenêtre
ou un mur, par exemple).
B
Connecteur d'antenne AM
Montez l'antenne cadre AM fournie et branchez-la à
la prise pour antenne AM à l'arrière de l'unité.
Placez l’antenne dans la position qui donne la meilleure réception AM.
LLR
C
Prise secteur
Appareil d'enregistrement
Prises d'entrée
audio
Montage de l'antenne AM
Pour monter l'antenne AM, tournez le socle dans le sens
de la flèche. Ensuite, insérez la griffe du bas du cadre
dans la fente du socle.
Platine cassette, enregistreur de
CD, etc.
1
Socle de l'antenne Griffe
2
74
Page 75

C
Prises d'entrée et de sortie audio
analogiques (AUX IN/LINE OUT)
Reçoivent et produisent les signaux audio
analogiques.
Utilisez des câbles audio du commerce pour brancher d'autres appareils aux prises d'entrée et de
sortie de cette unité.
Blanc (L)
Rouge (R)
o Pour connecter et utiliser une platine cassette, un
enregistreur de CD ou tout autre appareil d'enregistrement, branchez ses prises de sortie aux
prises AUX IN de cette unité, et ses prises d'entrée aux prises LINE OUT de cette unité.
o Insérez les fiches à fond. Ne regroupez pas ces
câbles avec les cordons d'alimentation ou les
câbles d'enceintes. Cela pourrait réduire la qualité audio ou causer des parasites.
Blanc (L)
Rouge (R)
D
Cordon d’alimentation secteur
Vérifiez que le cordon d'alimentation est branché à
une prise secteur fonctionnelle.
V
Veillez à brancher le cordon d'alimentation
dans une prise secteur fournissant la tension correcte. Le branchement à une prise
fournissant une tension incorrecte pourrait
entraîner un incendie ou une électrocution.
Tenez le cordon d'alimentation par sa fiche
quand vous le branchez ou le débranchez.
Ne tirez jamais sur le cordon lui-même.
Débranchez le cordon d’alimentation de la
prise secteur si vous avez l’intention de laisser l'unité inutilisée de façon prolongée.
FRANÇAIS
75
Page 76

Branchements (suite)
Branchement des enceintes
Branchez les câbles captifs des enceintes fournies aux
borniers pour enceinte de cette unité.
Enceinte droite Enceinte gauche
Tout en appuyant sur le levier, insérez l'extrémité du
câble (où le fil est dénudé). Relâchez le levier pour raccorder le câble d'enceinte.
Branchez l'extrémité ¥ du câble d'enceinte portant le
repère rouge au bornier rouge pour enceinte de l'unité.
Branchez l'extrémité ^ sans repère du câble d'enceinte au bornier noir pour enceinte de l'unité.
o Tirez doucement sur les câbles pour vous assurer
qu'ils sont fermement connectés.
o Vérifiez que seule la partie dénudée du câble est
insérée dans le bornier et que la gaine du câble ne
touche pas le bornier.
o Un court-circuit peut se produire si le conducteur
central dénudé à la pointe d'un câble d'enceinte
touche un autre câble ou bornier.
o Ne laissez jamais les câbles d'enceinte entrer en
court-circuit.
o Pour éviter tout bruit parasite, ne regroupez pas les
câbles d’enceinte avec les cordons d’alimentation ou
d'autres câbles.
Les enceintes fournies ont des évents de basses à l'arrière. Placez les enceintes pour que ces évents ne soient
pas bloqués, par exemple par d'autres objets ou par les
murs.
Évent de basses
Câble d'enceinte
76
Page 77

Remplacement de la pointe
o Les pointes pour disque sont des pièces de précision
à manipuler avec précaution pour éviter de tordre
ou d'endommager leur extrémité. Si une pointe est
tordue ou endommagée, elle pourrait ne plus être
en mesure de suivre précisément le sillon audio et
pourrait endommager les disques ou causer d'autres
dysfonctionnements.
o Si une pointe est sale, utilisez un nettoyant pour
pointe du commerce ou un produit similaire pour la
nettoyer.
o Ne frottez pas fort sur la pointe avec un objet dur.
N'essuyez pas la pointe avec un diluant ou d'autres
produits chimiques. Cela pourrait l'endommager.
Remplacement de la pointe
L'utilisation d'une pointe l'use, ce qui pourrait dégrader la qualité sonore, voire endommager les disques.
Remplacez dès que possible la pointe par un modèle
de rechange spécifié par TEAC.
En général, vous devez remplacer une pointe saphir
pour 33tr après environ 50heures d'utilisation et une
pointe diamant pour 45tr après environ 100heures.
Dépose de la pointe (partie rouge)
1 Appuyez sur la touche STANDBY/ON
pour mettre l’unité en veille.
2 Maintenez la cellule d'une main, et
utilisez un petit tournevis ou un autre
outil pour pousser la partie proéminente à l'avant de la pointe vers le
bas dans la direction «A». Ensuite,
tirez-la vers l'avant et sortez-la.
Tournevis
FRANÇAIS
Montage d'une nouvelle pointe
1 Insérez-la dans la direction «B», de
sorte que l'extrémité de la pointe s'insère dans la cellule.
ATTENTION
o Comme de forts bruits pourraient soudainement se
produire, mettez l'unité en veille avant de changer la
pointe.
o Faites attention de ne pas abîmer vos mains ou
l'équipement.
o Veillez à ne pas permettre à de petits enfants d'avaler
accidentellement les pointes.
Pointes de rechange (vendues séparément)
STL-103: pointe saphir pour albums (LP) et
maxis (EP) (conditionnées par 3)
SPL-102: pointe diamant pour 45tr (SP) (condi-
tionnées par 2)
Pour des pointes de rechange, contactez votre
revendeur.
2 Poussez dans la direction «C » jusqu'à
ce qu'elle s'enclenche en place.
77
Page 78

Nomenclature et fonctions des parties (unité principale)
A B C D HE F G I J
Z
P P
A
Touche STANDBY/ON
Appuyez sur cette touche pour allumer l'unité ou la
mettre en veille (standby).
B
Touches de fonction
K L M N O
(PHONO/AUX, FM/AM, CD/Bluetooth/USB)
Appuyez sur la touche PHONO/AUX pour alterner
entre PHONO et AUX comme indiqué ci-dessous.
PHONO AUX
Pour écouter un disque vinyle, appuyez sur la
touche PHONO/AUX et sélectionnez «PHONO».
Pour écouter un appareil branché aux prises d'entrée auxiliaires (AUX IN), appuyez sur la touche
PHONO/AUX et sélectionnez «AUX».
Chaque fois que vous appuyez sur la touche FM/
AM, la réception de l'unité alterne entre FM et AM
comme indiqué ci-dessous.
FM AM
Chaque fois que vous appuyez sur la touche CD/
Bluetooth/USB, la fonction change comme indiqué
ci-dessous.
CD Bluetooth USB
Pour écouter un CD, appuyez sur la touche CD/
Bluetooth/USB et sélectionnez «CD».
Pour écouter un appareil Bluetooth, appuyez
sur la touche CD/Bluetooth/USB et sélectionnez
«Bluetooth».
Pour écouter une clé USB, appuyez sur la touche
CD/Bluetooth/USB et sélectionnez «USB».
C
Touche PAIRING
Utilisez-la pour l'appairage avec d'autres appareils Bluetooth et pour mettre fin aux connexions
Bluetooth (pages 104 et 103).
D
Touche PLAY MODE
Touche FM MODE
Pour écouter une station FM, appuyez sur la touche
FM/AM et sélectionnez «FM».
Pour écouter une station AM, appuyez sur la touche
FM/AM et sélectionnez «AM».
78
Lors de l'écoute d'un fichier CD/MP3/WMA, sert à
changer de mode de jeu (normal, en boucle, aléatoire) (page 98).
En écoute de la radio FM, sert à alterner entre stéréo
et mono (page 109).
Page 79

E
Touches de recherche (m/,)
L
Récepteur du signal de télécommande
Touches PRESET (j/k)
Maintenez la touche pressée durant la lecture d'un
CD ou d'un fichier MP3/WMA pour une recherche
en arrière/avant (page 93).
En écoute de la radio, servent à sélectionner les stations préréglées (page 111).
F
Touche Stop (8)
Appuyez sur cette touche pour stopper la lecture
de CD/USB/Bluetooth.
G
Touche Lecture/Pause (y/9)
Appuyez sur cette touche pour lancer la lecture
quand le CD, la clé USB ou un appareil Bluetooth
pris en charge est arrêté ou en pause.
Utilisez cette touche pour interrompre la lecture et
la mettre en pause.
H
Touche Ouvrir/Fermer (-)
Les signaux envoyés par la télécommande sont
reçus ici. Quand vous utilisez une télécommande,
pointez-la vers ce capteur.
M
Écran
Affiche le numéro de piste, le temps, la fréquence
FM/AM et d'autres informations.
N
Tiroir de disque
N
Molette de délement/saut
(MULTI JOG/. //j k)
Sert avec la radio à sélectionner les stations (page
109).
Sert également à régler l'heure et le réveil (pages
85 et 116).
Lors de l'écoute d'un CD ou d'une clé USB, sert à sauter au fichier/piste précédent ou suivant (page 93).
FRANÇAIS
Appuyez pour ouvrir et fermer le tiroir de disque.
I
Couvercle de la platine
J
Bouton VOLUME
Sert à régler le volume. Tournez-le vers la droite
pour augmenter le volume ou vers la gauche pour
le réduire.
K
Prise casque (PHONES)
Si vous voulez utiliser un casque, réduisez d'abord le
niveau de volume au minimum. Puis insérez la fiche
de votre casque dans la prise PHONES et montez
progressivement le volume en tournant le bouton
VOLUME.
o Ne mettez pas l'unité sous tension ni en veille et
ne branchez/débranchez pas la fiche du casque
alors que vous portez celui-ci. (cela risquerait de
produire un bruit fort dans le casque).
P
Enceintes gauche/droite
Placez les enceintes comme désiré.
o Quand une fiche est enfoncée dans la prise pour
casque, aucun son ne sort par les enceintes.
79
Page 80

b
d
g
h
Nomenclature et fonctions des parties (télécommande)
a
Touche STANDBY/ON
b
Touche DIMMER
Sert à régler la luminosité de l'écran (page 89).
c
Touche TIMER
m
n
o
p
l
Sert à mettre le réveil en et hors service (pages 116
et 119).
d
Touche SLEEP
Sert à régler la minuterie d'extinction (page 119).
e
Touches PRESET/MP3 (j/k)
En écoute de la radio, servent à sélectionner les stations préréglées (page 111).
Lors de l'écoute d'un fichier MP3/WMA, servent à
sélectionner le numéro de dossier (page 94).
a
c
e
f
i
f
Touches TUNING/TIME (j/k)
Touches de saut/recherche (.m/
j
q
k
,/)
En écoute de la radio, servent à la recherche
manuelle et automatique de stations (pages 109
et 108).
Lors de l'écoute d'un fichier MP3/WMA, servent à
sélectionner le numéro de fichier (page 94).
Lors du réglage de l'horloge et du réveil, servent à
régler l'heure (pages 85 et 116).
Lors de l'écoute d'un CD ou d'une clé USB, servent
à sauter au fichier/piste précédent ou suivant.
Maintenez la touche pressée durant la lecture d'un
CD ou d'un fichier MP3/WMA pour une recherche
en arrière/avant (page 93).
g
Touche Stop (8)
Sert à stopper la lecture.
Quand l'unité principale et la télécommande ont
toutes les deux des touches ayant les mêmes fonctions, les instructions de ce mode d'emploi se
réfèrent à une seule d'entre elles, mais l'autre jeu de
touches peut être utilisé de la même façon.
80
h
Touche Lecture/Pause (y/9)
Appuyez à l'arrêt ou en pause pour lancer la lecture.
Utilisez cette touche pour interrompre la lecture et
la mettre en pause (page 93).
i
Touches de fonction
(PHONO/AUX, FM/AM, CD/Bluetooth/USB)
Appuyez sur la touche PHONO/AUX pour alterner
entre PHONO et AUX.
Page 81

Pour écouter un disque vinyle, appuyez sur la
touche PHONO/AUX et sélectionnez «PHONO».
Pour écouter un appareil branché aux prises d'entrée auxiliaires (AUX IN), appuyez sur la touche
PHONO/AUX et sélectionnez «AUX».
Chaque fois que vous appuyez sur la touche FM/
AM, la réception de l'unité alterne entre FM et AM.
Pour écouter une station FM, appuyez sur la touche
FM/AM et sélectionnez «FM».
Pour écouter une station AM, appuyez sur la touche
FM/AM et sélectionnez «AM».
Chaque fois que vous appuyez sur la touche CD/
Bluetooth/USB, la fonction change comme indiqué
ci-dessous.
CD Bluetooth USB
Pour écouter un CD, appuyez sur la touche CD/
Bluetooth/USB et sélectionnez «CD».
Pour écouter un appareil Bluetooth, appuyez
sur la touche CD/Bluetooth/USB et sélectionnez
«Bluetooth».
Pour écouter une clé USB, appuyez sur la touche
CD/Bluetooth/USB et sélectionnez «USB».
En écoute de la radio FM, utilisez cette touche pour
sélectionner un mode RDS (page 112).
o
Touche MEMORY/CLOCK ADJ
En écoute de la radio, sert au préréglage de stations
de radio (pages 110 et 111).
Utilisez-la pour programmer fichiers et pistes et
pour vérifier les fichiers/pistes programmés (pages
94 à 97).
Sert à régler l'horloge (pages 85 et 86).
p
Touche PLAY MODE/FM MODE
Lors de l'écoute d'un CD ou d'une clé USB, sert à
changer de mode de lecture (normal, en boucle,
aléatoire) (page 98).
En écoute de la radio FM, sert à alterner entre stéréo
et mono (page 109).
q
Touches VOLUME (+/−)
Servent à régler le volume. Appuyez sur la touche +
pour augmenter le volume et sur la touche − pour
le diminuer.
FRANÇAIS
j
Touche SOUND
Sert à régler les graves et les aigus, ainsi que la
balance de volume gauche-droite (page 88).
k
Touche MUTE
Sert à temporairement couper le son de la sortie
(page 89).
l
Touche PAIRING
Utilisez-la pour l'appairage avec d'autres appareils Bluetooth et pour mettre fin aux connexions
Bluetooth (pages 104 et 103).
m
Touche DISPLAY
Appuyez pour afficher l'heure actuelle quand FM/
AM ou CD/Bluetooth/USB est sélectionné.
Utilisez-la pour rechercher des stations par type de
programme (PTY) (page 114).
n
Touche INFO
Lors de l'écoute d'un fichier MP3/WMA, sert à changer d'information affichée à l'écran (page 100).
81
Page 82

Emploi de la télécommande
Précautions d'emploi
o Pour utiliser la télécommande, pointez-la vers le
capteur de télécommande de l’unité principale dans
un rayon maximal de 5m. Ne placez pas d'obstacles
entre l'unité principale et la télécommande.
o La télécommande peut ne pas fonctionner si le
capteur de signal de télécommande de l'unité principale est exposé à la lumière du soleil ou à une forte
source lumineuse. Dans ce cas, essayez de déplacer
l’unité principale.
o Sachez que l'emploi de cette télécommande peut
entraîner le déclenchement involontaire d'opérations
sur d'autres appareils pouvant être contrôlés par
rayons infrarouges.
Installation des piles
Ouvrez le compartiment situé à l'arrière de la télécommande. Insérez deux piles AA dans le compartiment
en respectant les indications +/−. Puis refermez le
compartiment.
Quand faut-il remplacer les piles?
Si la portée d'action de la télécommande diminue ou
si l'unité cesse de répondre aux touches de la télécommande, remplacez les deux piles par des neuves.
Jetez les piles usagées conformément à leurs instructions ou aux directives établies par votre municipalité.
V
ATTENTION
Un mauvais emploi des piles peut entraîner leur
rupture ou leur fuite, avec pour conséquence un
incendie, des blessures ou la salissure des objets
proches. Veuillez attentivement lire et respecter
les précautions en page 66.
82
Page 83

Nomenclature et fonctions des parties (platine tourne-disque)
a
a
b
c
a
Plateau tourne-disque
Placez les disques au centre du plateau.
b
Adaptateur 45 tr/min
Utilisez-le pour lire les disques à grand trou central.
c
USB
Pour brancher une clé USB à l'unité.
d
e
f
g
h
Avant utilisation,
retirez le cache de
la pointe (pièce en
plastique blanc) en le
tirant dans le sens de
la flèche.
e
Lève-bras
Utilisez ce levier pour soulever le bras de lecture du
disque.
f
Support de bras de lecture
C'est un support pour poser le bras de lecture.
Poussez délicatement le loquet vers la droite pour
libérer le bras de lecture avant de lire un disque.
FRANÇAIS
d
Vis de verrouillage de transport
Avant d'utiliser la platine, faites tourner la vis de verrouillage de transport dans le sens horaire jusqu'à
ce qu'elle s'arrête au moyen d'une pièce de monnaie ou d'un autre outil.
Vue latérale de la vis de
Tournez dans ce
sens
Avant de transporter cette unité (pour déménager,
par exemple), tournez la vis dans le sens anti-horaire
jusqu'à ce qu'elle s'arrête pour bloquer la platine
tourne-disque.
verrouillage de transport
Position de
transport
(à la sortie de
l'usine)
Position
d'utilisation
g
Sélecteur de vitesse de rotation
Règle la vitesse de rotation (tr/min) adaptée au
disque.
h
Bras de lecture
Lorsque vous déplacez le bras de lecture vers le
disque, la platine tourne-disque commence à
tourner.
Support de bras de lecture
Bras de lecture
Sélecteur de vitesse de
rotation
h
g
f
Lève-bras
e
83
Page 84

Couvercle de la platine
Fixation du couvercle de la platine
Couvercle de
la platine
Unité
principale
Charnière
1 Insérez les charnières à fond dans
les porte-charnières aux extrémités
gauche et droite de l'arrière de l'unité
principale.
2 Alignez le haut des charnières avec les
porte-charnières du couvercle de la
platine et insérez-les.
Ouverture et fermeture du couvercle de
la platine
Ouvrir
Ouverture
Tenez le bord avant du couvercle de la platine et soulevez-le délicatement pour l'ouvrir complètement jusqu'à
ce qu'il s'arrête.
Le couvercle de la platine restera ouvert dans cette
position.
Fermeture
Abaissez doucement le couvercle de la platine jusqu'à
ce qu'il soit fermé.
V
Veillez à ne pas vous pincer les doigts, par
exemple, lors de l'ouverture et de la fermeture du couvercle de la platine.
Dépose du couvercle de la platine
Maintenez les deux bords du couvercle de la platine
et soulevez-le lentement pour l'extraire, avec les charnières, de l'unité. Ensuite, retirez les charnières du
couvercle de la platine.
84
Page 85

Réglage de l'horloge
Réglez l'heure avant d'utiliser l'unité.
1 Appuyez sur la touche STANDBY/ON
pour mettre l’unité en veille.
NOTE
L'horloge peut également être réglée quand l'unité
est allumée, mais pas quand elle est en mode radio,
CD ou USB.
2 Maintenez pressée la touche CLOCK
ADJUST au moins deuxsecondes.
c3
o Si un réglage reste inchangé pendant plus de 20
secondes, le mode de réglage de l'heure prend fin.
4 Appuyez à nouveau sur la touche CLOCK
ADJUST.
FRANÇAIS
Maintenez-la pressée
au moins 2secondes
«SET CLOCK» (régler l'horloge) défile à l'écran.
3 Appuyez sur une touche TIME (j/k)
pour alterner entre 24 HOUR et
12HOUR (affichage de l'heure au format 24 heures ou 12 heures).
Exemple d'affichage
La valeur des «heures» clignote.
5 Avec les touches TIME (j/k), réglez
les heures.
Suite à la prochaine page
85
Page 86

Réglage de l'horloge (suite)
6 Appuyez sur la touche CLOCK ADJUST.
Exemple d'affichage
La valeur des minutes clignote.
7 Avec les touches TIME (j/k), réglez
les minutes.
Affichage d'horloge actuelle
L'horloge est toujours affichée quand l'unité est en
veille (off) et quand la fonction est réglée sur PHONO/
AUX.
Appuyez sur la touche DISPLAY de la télécommande
pour afficher l'horloge à l'écran.
o L'heure actuelle est affichée durant trois secondes en
mode CD/USB et FM/AM.
Exemple d'affichage
8 Appuyez sur la touche CLOCK ADJUST.
Cela termine la procédure de réglage de l'heure.
L'horloge repartira de la minute ainsi réglée à
0seconde.
o En cas de panne de courant ou si le cordon d'alimen-
tation est débranché, les réglages d'horloge et de
réveil de l'unité s'effacent.
Heure actuelle
o La touche DISPLAY ne fonctionne pas dans les
modes AUX/PHONO et Bluetooth.
o En mode Bluetooth, l'heure actuelle n'est affichée
qu'en cas d'appairage.
86
Page 87

Fonctionnement de base
1 Appuyez sur la touche STANDBY/ON
pour allumer l’unité.
Z
o Même en veille (unité éteinte), appuyer sur une
touche de fonction rallume l'unité.
2 Appuyez sur une touche de fonction
pour changer de source de lecture.
Z
3 Tournez le bouton VOLUME pour régler
le volume.
Z
MIN (0): volume minimal
MAX (40): volume maximal
Tournez le bouton VOLUME vers la droite pour augmenter le volume et vers la gauche pour le réduire.
o La valeur par défaut est 20.
FRANÇAIS
Quand une source de lecture est sélectionnée, l'indicateur correspondant s'affiche à l'écran.
Disque vinyle
Entrée externe
CD
Bluetooth
Radio
USB
o Lorsque vous tournez le bouton VOLUME, le
volume s'affiche durant environ trois secondes.
o Quand le volume est au minimum, «MIN» appa-
raît à l'écran. Au maximum, «MAX» s'affiche.
V
Des bruits forts et soudains peuvent endommager votre audition ou causer d'autres
dommages. Réglez le volume au minimum.
Après le début de production du son, réglez
le volume à un niveau adéquat.
o Quand vous n'utilisez pas l'unité, appuyez sur la
touche STANDBY/ON pour la mettre en veille.
87
Page 88

Fonctionnement de base (suite)
Réglage des graves, des aigus et de la
balance stéréo
1 Appuyez sur la touche SOUND pour
sélectionner le paramètre que vous
voulez régler.
Appuyer sur la touche SOUND fait défiler les paramètres dans l'ordre suivant.
BASS TREBLE BALANCE
Paramètres et plages de réglage
BASS (basses fréquences)
Sert à régler les graves.
Plage de réglage: −5 à +5
Valeur par défaut: 0
Exemple d'affichage
TREBLE (hautes fréquences)
Sert à régler les aigus.
Plage de réglage: −5 à +5
Valeur par défaut: 0
Exemple d'affichage
Affichage ordinaire
2 Dans les trois secondes, utilisez les
touches VOLUME (+/−) pour changer le
réglage.
o Si trois secondes s'écoulent sans aucun réglage,
le mode de réglage prend fin.
BALANCE
Sert à régler la balance stéréo gauche-droite.
Plage de réglage: L+10 (extrême gauche) à R+10
(extrême droite)
Valeur par défaut: CENTER (centre)
Exemple d'affichage
Vous devez normalement laisser BALANCE sur CENTER.
88
Page 89

Réglage de la luminosité de l'écran
Coupure du son en sortie
Appuyez sur la touche DIMMER pour passer en revue
les réglages de luminosité suivants:
Luminosité Atténué Très
ordinaire atténué
o Quand l'unité entre en veille, la luminosité ordinaire
revient.
Appuyez sur la touche MUTE pour temporairement
couper le son de la sortie. Appuyez à nouveau sur la
touche MUTE pour rétablir la sortie avec le niveau de
volume antérieur.
FRANÇAIS
o Quand la fonction de coupure du son est active,
«MUTE» est affiché.
o Quand la fonction de coupure du son est active,
régler le volume rétablit le son de la sortie.
o Quand la fonction de coupure du son est active,
changer de source rétablit le son de la sortie.
89
Page 90

Écoute d'un CD
1 Appuyez sur la touche CD/Bluetooth/
USB pour sélectionner «CD».
Z
Chaque fois que vous appuyez sur la touche CD/
Bluetooth/USB, la fonction change comme indiqué
ci-dessous.
CD Bluetooth USB
3 Placez un disque au centre du tiroir
avec sa face sérigraphiée vers le haut.
o Ne placez jamais plusieurs disques sur le tiroir.
o Si le tiroir est refermé alors qu'un disque est en
dehors des guides de centrage, le disque peut être
coincé à l'intérieur et le tiroir risque de ne plus s'ouvrir. Veillez à toujours placer les disques dans les
guides au centre du tiroir.
o Ne forcez pas sur le tiroir avec la main quand vous
l'ouvrez et le fermez.
Après la commutation sur CD, «DISC» s'affiche,
«READING » clignote pendant quelques secondes,
puis le CD passe à l'arrêt. Si aucun disque n'est
chargé, le message «NO DISC» s'affiche.
2 Appuyez sur la touche Ouvrir/Fermer
(-) pour ouvrir le tiroir.
Z
Le tiroir de disque s'ouvre.
4 Appuyez sur la touche Ouvrir/Fermer
(-) pour fermer le tiroir.
Z
Veillez bien à ne pas vous coincer les doigts quand
le tiroir se ferme.
o L'unité prend quelques secondes pour charger le
disque. Aucune touche ne fonctionne tant que
«READING» est affiché. Patientez jusqu'à ce que
les informations sur le disque s'affichent.
90
Page 91

Exemple d'affichage de CD audio
Nombre total de pistes Durée totale de lecture
Exemple d'affichage de fichier MP3/WMA
5 Appuyez sur la touche Lecture/Pause
(y/9).
Z
Numéro de dossier Numéro de fichier
o Un disque non audio peut être «lu» de la même
manière qu'un disque audio, mais aucun son ne
sortira.
o Quand le fichier actuel est un fichier WMA,
«WMA» apparaît sur le côté gauche de l'écran.
La lecture commencera à la première piste et y
s'affichera.
FRANÇAIS
Exemple d'affichage de CD audio
Numéro de piste Temps de lecture écoulé
Exemple d'affichage de fichier MP3/WMA
Numéro de fichier Temps de lecture écoulé
o Si vous appuyez sur la touche Lecture/Pause
(y/9) sans fermer le tiroir du disque, le tiroir se
ferme automatiquement et la lecture démarre.
o Cette unité traite les fichiers MP3/WMA qui ne
sont pas dans des dossiers comme s'ils appartenaient au dossier 001 (racine ou «ROOT»). La
lecture commence par la première piste du dossier «001 (ROOT)».
o Pour des détails sur l'ordre de lecture des fichiers
MP3/WMA, voir page 99.
o Après lecture de toutes les pistes, la lecture s'ar-
rête automatiquement.
91
Page 92

Écoute des fichiers d'une clé USB
Vous pouvez lire les fichiers audio sauvegardés sur une
clé USB en connectant cette dernière à cette unité.*
Pour des détails sur l'ordre de lecture des fichiers MP3/
WMA, voir page «Fichiers MP3/WMA» en page 72.
* Le port USB de cette unité ne prend en charge que les
mémoires flash USB (aussi appelées «clés USB»). Il ne
prend pas en charge les disques durs USB standards.
1 Appuyez sur la touche CD/Bluetooth/
USB pour sélectionner «USB».
Z
3 Appuyez sur la touche Lecture/Pause
(y/9).
Z
La lecture commencera au premier fichier et y
s'affichera.
Exemple d'affichage
Après la commutation sur USB, «USB» s'affiche,
«READING » clignote pendant quelques secondes,
puis la clé USB passe à l'arrêt. Si aucune clé USB
n'est branchée, «NO USB» s'affiche.
2 Soulevez le volet du port USB et insérez
une clé USB.
Numéro de fichier Temps de lecture écoulé
ATTENTION
Si vous utilisez le couvercle de la platine, fermez-le
lentement pour éviter de toucher la clé USB.
Si le couvercle de la platine entre en contact avec la
clé USB, ne fermez pas le couvercle.
92
Page 93

Écoute d'un CD/des fichiers d'une clé USB
Mise en pause de la lecture
Z
Appuyez sur la touche Lecture/Pause (y/9) pour
mettre la lecture en pause.
En pause, appuyez sur la touche Lecture/Pause (y/9)
pour reprendre la lecture depuis le point de mise en
pause.
o En pause, le temps de lecture clignote.
Arrêt de la lecture
Z
Sauts de fichiers/pistes
Z
Durant la lecture, tournez la molette (.//) pour
sauter au fichier/piste précédent ou suivant et commencer la lecture. Continuez de tourner jusqu'à ce que
vous ayez atteint le numéro de fichier/piste désiré.
o A l'arrêt, après la sélection d'un fichier/piste avec la
molette de saut (.//), appuyez sur la touche
Lecture/Pause (y/9) pour lancer la lecture.
o Durant la lecture, tournez légèrement vers . pour
revenir au début du fichier/piste actuellement lu.
Pour lire un fichier/piste antérieur, continuez à tourner vers ..
FRANÇAIS
Appuyez sur la touche Stop (8) pour arrêter la lecture.
Recherche d'un passage de fichier/piste
Z
Durant la lecture, maintenez pressée une touche de
recherche (m/,) pour une recherche en arrière/
avant. Lorsque vous arrêtez d'appuyer, la lecture ordinaire reprend.
93
Page 94

Lecture programmée (CD/USB)
32 pistes de CD ou fichiers MP3/WMA peuvent être programmés dans l'ordre désiré.
Programmez les pistes/fichiers quand la lecture est
arrêtée.
Programmation de fichiers/pistes
1 Appuyez sur la touche CD/Bluetooth/
USB pour sélectionner « CD » ou
«USB».
2 Appuyez sur la touche MEMORY quand
la lecture est arrêtée.
o Pour arrêter la programmation, appuyez sur la
touche Stop (8) ou attendez 20secondes ou
plus.
o Pendant la programmation, si vous ne faites rien
pendant 20secondes ou plus, le programme sera
confirmé.
Exemple d'affichage après confirmation de
programme
3 Sélectionnez un chier/piste à ajouter
au programme.
Avec un CD audio
Utilisez les touches de saut/recherche (.m/
,/) pour sélectionner une piste par son
numéro.
Exemple d'affichage
Numéro dans le programme
Le numéro de la piste (ou les numéros de dossier et
de fichier) et l'indicateur MEMORY clignotent.
Exemple d'affichage
Numéro de piste
Exemple d'affichage de fichier MP3/WMA
Pour sélectionner un dossier par son numéro, utilisez les touches MP3 (j/k).
94
Page 95

Pour sélectionner un fichier par son numéro, utilisez les touches de saut/recherche (.m/
,/).
Exemple d'affichage
Numéro de dossier Numéro de fichier
o Cette unité traite les fichiers MP3/WMA qui ne
sont pas dans des dossiers comme s'ils appartenaient au dossier 001 (racine ou «ROOT»).
o Si vous changez de numéro de dossier ou de
fichier, seul l'indicateur MEMORY clignote.
4 Appuyez sur la touche MEMORY.
5 Quand vous avez fini d'ajouter des
pistes/chiers au programme, appuyez
sur la touche Lecture/Pause (y/9 )
pour lancer la lecture programmée.
o Pour arrêter la lecture programmée, appuyez sur la
touche Stop (8). Le contenu du programme est
conservé.
o Durant la lecture programmée, utilisez les touches de
saut (.m/,/) pour sélectionner d'autres
pistes/fichiers du programme. Vous pouvez également utiliser la molette de défilement (MULTI JOG)
de l'unité principale pour cette opération.
o Durant la lecture programmée, la lecture aléatoire
(Shuffle, page 98) n'est pas possible.
o L'affichage sera le suivant une fois la lecture program-
mée terminée.
FRANÇAIS
La piste sélectionnée est ajoutée au programme, et
«P02» s'affiche.
o Pour programmer plusieurs pistes/fichiers, répé-
tez les étapes 3 à 4.
o Pour arrêter la programmation, appuyez sur la
touche Stop (8).
Exemple d'affichage
Nombre total de pistes du programme
95
Page 96

Lecture programmée (CD/USB) (suite)
Vérification de l'ordre de
programmation
À l'arrêt, appuyez sur la touche MEMORY pour faire défiler dans l'ordre les positions dans le programme et les
numéros des pistes/fichiers qui leur sont associés.
Ajout de pistes/fichiers à la fin du
programme
1 À l'arrêt, appuyez plusieurs fois sur
la touche MEMORY pour afficher le
numéro juste au-dessus du dernier
numéro dans le programme.
3 Appuyez sur la touche MEMORY.
Le fichier/piste est ajouté à la fin du programme.
Changement d'un fichier/piste dans le
programme
1 Quand la lecture programmée est
arrêtée, appuyez plusieurs fois sur la
touche MEMORY jusqu'à ce qu'apparaisse le numéro dans le programme du
chier/piste que vous voulez changer.
Si vous utilisez un CD audio, le numéro de piste et
l'indicateur MEMORY clignotent.
Si vous utilisez des fichiers MP3/WMA, le numéro de
dossier, le numéro de fichier et l'indicateur MEMORY
clignotent.
2 Avec les touches de saut/recherche
(.m/,/), sélectionnez un
chier/piste.
2 Utilisez les touches de saut/recherche
(.m/,/) pour sélectionner
le chier/piste que vous voulez utiliser
à la place dans le programme.
96
Page 97

3 Appuyez sur la touche MEMORY.
Le fichier/piste sélectionné est ajouté au numéro
sélectionné dans le programme, remplaçant le
fichier/piste qui s'y trouvait.
Effacement de tout le contenu du
programme
Maintenez pressée la touche Stop (8) au moins
deuxsecondes à l'arrêt.
Le contenu du programme est effacé.
Lorsque le contenu du programme est effacé, «PROGRAM
CLEAR» défile à l'écran.
FRANÇAIS
o Le programme est également effacé dans les cas
suivants.
• L'unité passe en mode de veille.
• La source est changée au moyen de la touche
PHONO/AUX, FM/AM ou CD/Bluetooth/USB
• Le tiroir de disque est ouvert
97
Page 98

Lecture en boucle et lecture aléatoire (CD/USB)
Z
e
Quand la fonction CD/USB est activée, appuyez sur la
touche PLAY MODE pour passer en revue les modes de
lecture suivants.
CD audio (fonction CD)
Appuyez sur la touche Lecture/Pause (y/9) quand le
mode que vous voulez sélectionner apparaît pour lancer la lecture.
* Si le mode aléatoire (Shuffle) est sélectionné, la lecture
démarre automatiquement.
o Vous pouvez aussi changer le mode de lecture en
appuyant sur la touche PLAY MODE durant la lecture.
o N'importe laquelle des opérations suivantes mettra
fin au mode de lecture en boucle ou aléatoire.
• La touche Stop (8) est pressée
• L'unité passe en mode de veille.
• La source est changée au moyen de la touche
PHONO/AUX, FM/AM ou CD/Bluetooth/USB
• Le tiroir de disque est ouvert
REPEAT (lecture en boucle
d'une seule piste)
REPEAT ALL (lecture en boucle
de toutes les pistes)
SHUFFLE (lecture aléatoire)*
OFF (lecture normale)
Fichiers MP3/WMA (fonction CD/USB)
REPEAT (lecture en boucle
d'un seul fichier)
REPEAT FOLDER (lecture en
boucle d'un dossier)
Lecture en boucle
REPEAT (lecture en boucle d'un fichier/piste)
Durant la lecture, appuyez une fois sur la touche PLAY
MODE pour faire se répéter (lire en boucle) le fichier/
piste actuellement lu. «REPEAT» (répétition ou «lecture
en boucle») s'affiche.
o Si vous tournez la molette de saut (.//) de
l'unité principale ou appuyez sur les touches de
saut/recherche (.m/,/) de la télécommande et sélectionnez un autre fichier/piste, ce
fichier/piste sera lu en boucle.
o À l'arrêt, appuyez sur la touche PLAY MODE puis
sélectionnez un fichier/piste avec la molette de saut
(.//) de l'unité principale ou les touches
de saut/recherche (.m/,/) de la télécommande. Appuyez sur la touche Lecture/Pause
(y/9) pour lancer la lecture en boucle du même
morceau.
o Durant la lecture programmée, le fichier/piste sera lu
en boucle.
98
REPEAT ALL (lecture en boucle
de tous les fichiers)
SHUFFLE (lecture aléatoire)*
OFF (lecture normale)
REPEAT ALL (lecture en boucle de tous les fichiers/
pistes)
Appuyez deux fois sur la touche PLAY MODE (ou trois
fois pour les fichiers MP3/WMA).
«REPEAT ALL» s'affiche et la lecture en boucle de
tous les fichiers/pistes démarre.
o Durant la lecture programmée, ce sont les fichiers/
pistes programmés qui sont lus en boucle.
Page 99

À propos de la lecture des fichiers MP3/WMA
001ROOT
9
REPEAT FOLDER (lecture en boucle d'un dossier)
(fichiers MP3/WMA uniquement)
Appuyez deux fois sur la touche PLAY MODE.
«REPEAT FOLDER» s'affiche, et les fichiers du dossier
sélectionné sont lus en boucle.
Lecture aléatoire («Shuffle»)
Tous les fichiers/pistes sont lus en ordre aléatoire.
SHUFFLE
Appuyez plusieurs fois sur la touche PLAY MODE jusqu'à
ce que «SHUFFLE» s'affiche.
o Durant la lecture aléatoire, tournez la molette de saut
(/) de l'unité principale vers la droite ou appuyez
sur la touche de saut/recherche (,/) de la
télécommande pour lancer la lecture du prochain
fichier/piste choisi de façon aléatoire.
Tournez la molette de saut (. ) de l'unité principale vers la gauche ou appuyez sur la touche de
saut/recherche (.m) de la télécommande pour
retourner au début du fichier/piste actuel.
o La lecture aléatoire (Shuffle) n'est pas possible durant
la lecture programmée.
Ordre de lecture des fichiers
Un disque ou une clé USB qui contient des fichiers
MP3/WMA peut avoir des fichiers regroupés dans des
dossiers comme sur un ordinateur. Un dossier peut
aussi contenir plusieurs sous-dossiers.
Exemple de numéros de dossiers et d'ordre de lecture des fichiers (1 à 9) durant la lecture normale
d'un disque contenant des fichiers MP3/WMA
001 (ROOT ou «racine»)
1
Fichier MP3/WMA
2
Fichier MP3/WMA
Dossier 002
3
Fichier MP3/WMA
4
Fichier MP3/WMA
Dossier 004
6
Dossier 003
Dossier
5
Fichier MP3/WMA
Dossier 005
Fichier MP3/WMA
Fichier MP3/WMA
7
8
Fichier MP3/WMA
FRANÇAIS
Fichier MP3/WMA
o Ajouter, retirer ou déplacer des fichiers et dossiers
peut changer l'ordre indiqué dans l'illustration
ci-dessus.
99
Page 100

À propos de la lecture des fichiers MP3/WMA (suite)
Sélection de dossiers et de fichiers
Pour sélectionner un dossier par son numéro, utilisez les
touches de recherche (m/,) de l'unité principale.
Z
Si vous utilisez la télécommande, employez les touches
MP3 (j/k).
Changement d'affichage
Chaque fois que vous appuyez sur la touche INFO, les
informations affichées changent.
o Les 32 premiers caractères du nom de morceau/
artiste/album sont affichés.
o Cette unité ne peut afficher que des caractères
alphanumériques à simple octet. Si les informations
de fichier utilisent des caractères japonais, chinois ou
autres à double octet, la lecture audio est possible
mais le nom ne sera pas affiché correctement.
o Quand chaque élément d'information a défilé trois
fois, le temps de lecture écoulé réapparaît.
o Si le fichier est un fichier WMA, «WMA» apparaît sur
le côté gauche de l'écran.
Pour sélectionner un fichier par son numéro, utilisez la
molette de défilement (MULTI JOG) de l'unité principale.
Z
Si vous utilisez la télécommande, utilisez les touches de
saut/recherche (.m/,/).
o Après avoir sélectionné le numéro de dossier/fichier,
appuyez sur la touche Lecture/Pause (y/9) pour
lancer la lecture.
Si la touche Lecture n'est pas pressée dans les 5
secondes, les informations de CD/USB s'affichent à
l'écran.
100
 Loading...