

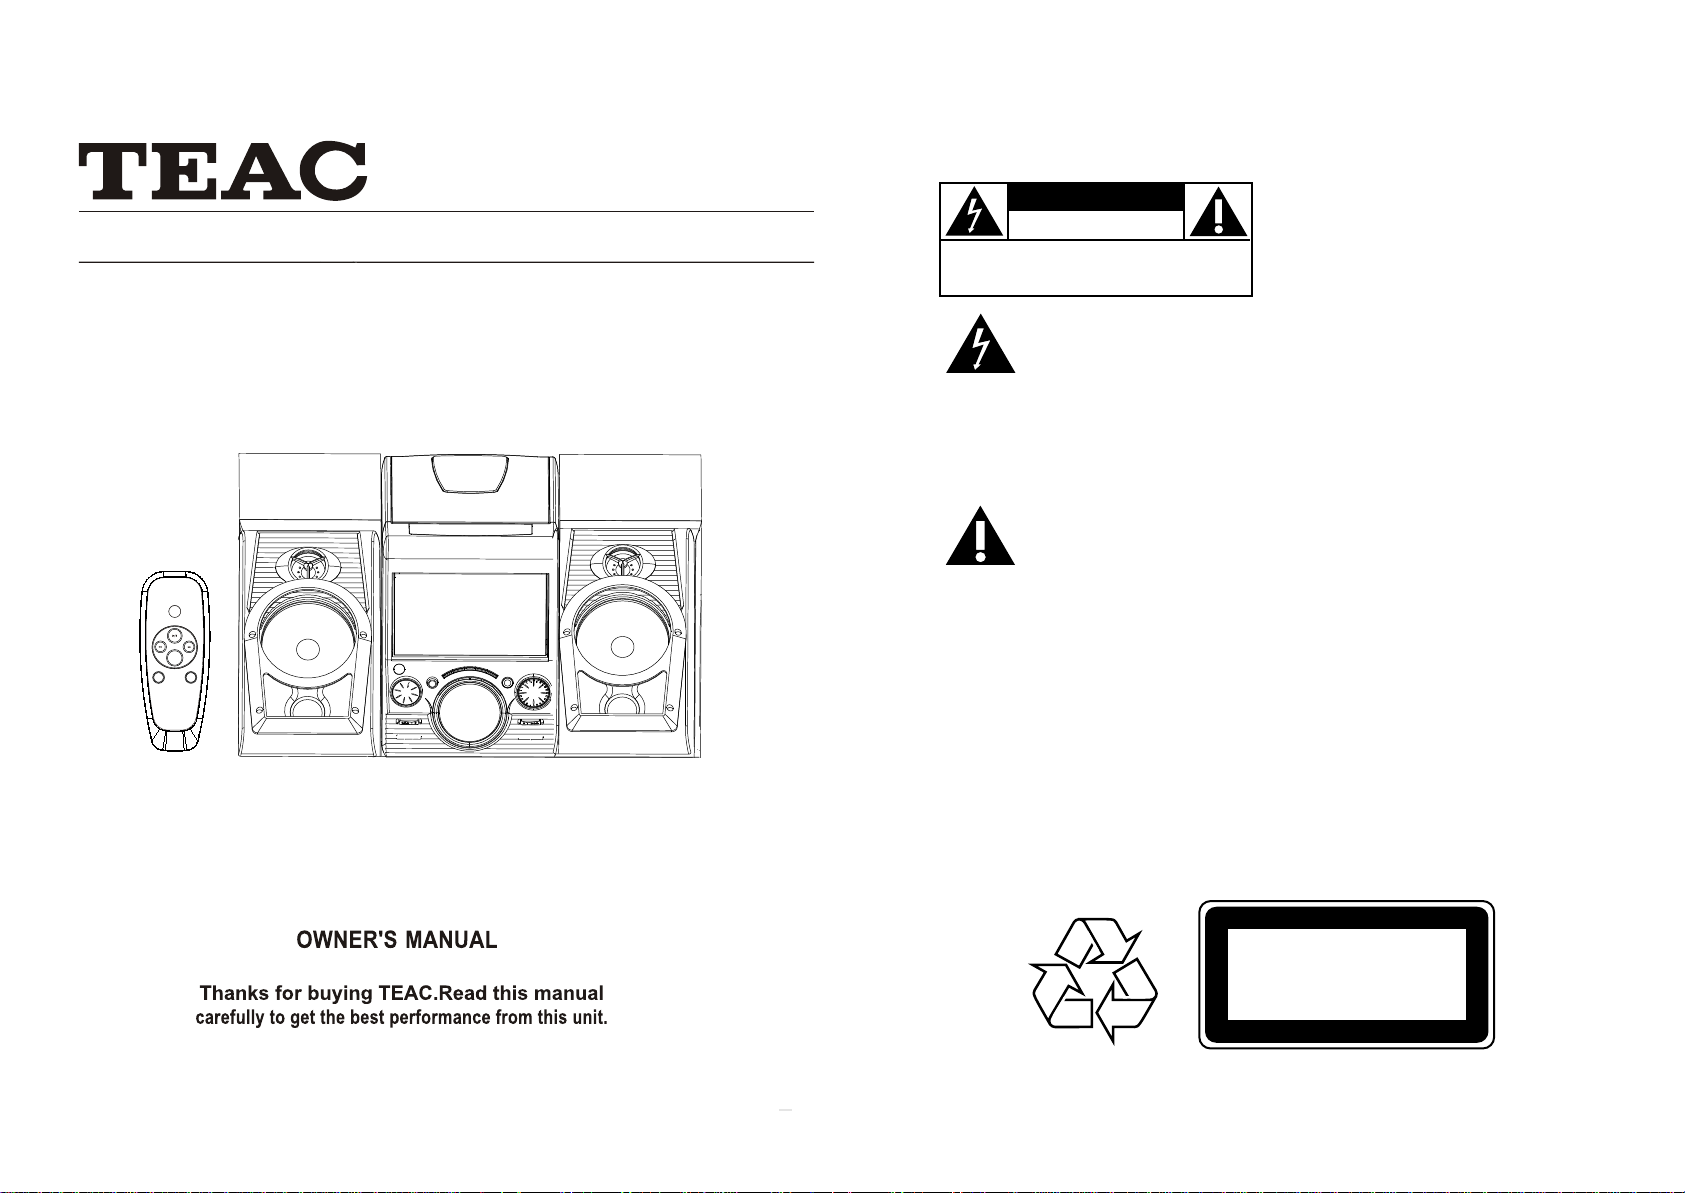
MI CRO CO MPO N ENT S YST E M
PROGRAM
STOP
INTRO
REPEAT
REMOTE CONTROL SYSTEMS
MC-D67MC-D67
Know these
ssasafafefetetytyy symbols
CAUTION
RISK OF ELECTRIC SHOCK
DO NOT OPEN
CAUTION: TO REDUCE THE RISK OF ELECTRIC SHOCK, DO NOT
REMOVE COVER (OR BACK). NO USER-SERVICEABLE PARTS
INSIDE. REFER SERVICING TO QUALIFIED SERVICE PERSONNEL.
This “bolt of lightning”
indicates uninsulated
material within your unit
which may cause an electrical shock.
For the safety of everyone in your
household, please do not remove
product covering.
The “exclamation point”
calls attention to features
for which you should read
the enclosed literature closely to
prevent operating and maintenance
problems.
Dripping warning:
The product shall not be exposed to
dripping or splashing and that no
objects filled with liquids, such as
vases, shall be placed on the product.
WARNING: TO PREVENT
FIRE OR SHOCK HAZARD, DO
NOT EXPOSE THIS EQUIPMENT TO
RAIN OR MOISTURE.
CAUTION: TO PREVENT
ELECTRIC SHOCK, MATCH WIDE
BLADE OF PLUG TO WIDE SLOT,
AND FULLY INSERT.
Ventilation warning:
The normal ventilation of the
product shall not be impeded for
intended use.
CLASS 1
LASER PRODUCT
EN-1

WARRANTY REGISTRATION
R
Keep your purchase receipt to enable you to proceed quickly in the event of a Warranty Service.
Please read this warranty card.
Warranty Terms & Conditions
1. TEAC warrants to the original retail purchaser only, that this product is free from defects in material and
workmanship under normal domestic use and authorises free service during the warranty period at any TEAC
Authorised Centre only. TEAC warranty only applies to products purchased, used and servic ed in Australia .
2. Subject to the terms herein, this warranty effectively covers the equipment as specified in the Warranty Periods
Table from the date of purchase.
3. All parts, except the external cabinet, are warranted as specified in Warranty Periods Table, and will be repaired or
replaced at the sole judgement of TEAC.
4. Normal customer maintenance as described in the owner’s manual is not covered by this warranty (such as cleaning
VCR heads etc.)
5. This warranty does not apply to equipment showing abuse, damage or that it may have been tampered with, altered
or repaired outside any TEAC Authorised Service Centre. If so, the warranty will be void.
*Your nearest Authorised TEAC Service Centre is listed in your Owners Manual
6. In the event that this unit or any defective parts must be returned to TEAC Service Centres, a copy of this warranty
certificate and of your purchase receipt must be enclosed to be a valid warranty. Such equipment or parts must be
sent freight prepaid to the nearest authorised TEAC Service Centre. After the repair, the unit will be available for
collection by the owner or it will be returned to the owner. The warranty does not cover freight or insurance. In all
cases of in-transit damages or loss, a claim must be filed against the carrier by the purchaser.
7. In home service will only be provided as part of this warranty if all the following conditions are met;
a) The product is a Colour Television of 51cm screen size or over.
b) The product is within the warranty period.
c) The product is located within the normal service area of the local TEAC Service Provider.
In any other situation or circumstance, where an in home service call is made, a service fee will be charged by the
Service Provider.
8. TEAC National Service Centre in home service and installation is available at competitive rates.
9. No one is authorised to assume any liability on behalf of TEAC or impose any obligation on it, in connection with
the sale of any equipment other than as stated in this warranty and outlined above.
10. In no event will TEAC be responsible or liable for indirect or consequential damages from interrupted operations or
other causes.
11. Warranty is not transferable to any subsequent purchaser if the product is sold during the warranty period,
TEAC PRODUCT
Televisions / Plasma 106 cm and
above
LCD televisions 56cm and above 1 Year (In-Home Service Included)
Televisions – 51cm and above 1 Year (In-Home Service Included)
Televisions under 51 cm 1 Year (No In-Home Service)
Digital Set Top Boxes 1 Year (No In-Home Service)
VCR 1 Year (No In-Home Service)
DVD 1 Year (No In-Home Service)
DVD Recorder 1 Year (No In-Home Service)
Audio Systems 1 Year (No In-Home Service)
* Extended promotional warranty may apply to certain products (for more info please contact: service@teac.com.au)
In home service administration fee is applied after 1
EN-2
WARRANTY PERIOD
1 Year (In-Home Service Included)
st
year of warranty.

R
WARRANTY PROCEDURES
Please keep this information for your own records.
Please refer to the owner’s manual to ensure that you have followed the correct installation and operating procedures.
1. Read owner’s manual carefully
2. If you require Warranty Service, please contact the TEAC Service Centre
3. Please have your purchase receipt as your proof of purchase and the following details completed for a valid
Warranty.
Owner’s Name
Owner’s Address
Postcode
Model Name/No. Serial No.
Dealer’s Name
Dealer’s Address
Postcode
4. Please ensure that your product is packed appropriately upon return to the service centre.
If you have any other queries regarding service or warranty please contact the TEAC National Service Centre below:
service@teac.com.au
www.teac.com.au
1800 656 700
EN-3
R

FEATURES AND CONTROLS
Main unit (See 1 )
1
VOLUME
- adjusts volume level.
2
CASSETTE RECORDER KEYS
RECORD - starts recording.
PLAY - starts playback.
F.FWD/REW - fast winds / rewinds the tape
STOP/EJECT - stops the tape;
- opens the cassette compartment.
PAUSE - interrupts recording or playback.
3
PROGRAM
CD: - programs and reviews programmed
track numbers.
4
REPEAT
- repeats a track / CD / program.
5
CD DOOR
Remote Control Handset (See )
3
PROGRA MCD:
- programs and reviews p ro gr am med
track numbers.
4
REPEAT
- repeats a track / CD / progr am .
6
SKIP/S EARCH
CD:- skips or searches t ra ck s ba ck wards
or for wards.
7
STOP
- stops CD playback; era se s a CD p ro gr am.
PRESS TO P LAY/ PAUSE
12
- star ts or pa us es C D play
INTRO
18
- provides a 10 second int ro du ct ion to
all tracks on a disc.
1
- Press here to open / close the CD door.
6
SKIP/SEARCH
CD:- skips or searches tracks backwards or forwards.
7
STOP
- stops CD playback; erases a CD program.
8
FM STEREO INDICATOR
- shows the FM stereo indication.
9
FUNCTION SELECTOR
- selects source of sound CD, TAPE(OFF)or RADIO,
10
DBBS (Dynamic Bass Boost)
- enhances bass response.
11
DISPLAY
- shows the CD functions.
12
PROGRAM
6
7
18
STOP
INTRO
REPEAT
REMOTE CONTROL SYSTEMS
3
12
6
4
PRESS TO PLAY/PAUSE
- starts or pauses CD play
13
BAND SELECTOR•
(AM FM FM ST.)
- selects AM / FM / FM ST.
14
TUNING CONTROL
- tunes in desired stations.
15
STEREO HEADPHONE JACK
- 3.5mm stereo headphone jack.
19
REMOTE CONTROL SENSOR
•
Power Supply
Using AC Power
1 Check if the power voltage, as shown on the type
plate located on the back of the set, corresponds
to your local AC power supply. If it does not,
consult your dealer or service centre.
2 Connect the power cord to the AC MAINS inlet and
the wall outlet. The power supply is now
connected and ready for use.
3 To POWER off completely, unplug
from the wall outlet.
- receive the signal from the remote control.
Back Panel (See )
16
FM ANTENNA
1
- to improve FM reception.
17
SPEAKER L/R SOCKET
- output for the left and right speakers.
EN-4
EN-5

BASIC FUNCTIONS RADIO
Headphone Jack
Connect a set of stereo headphones (not included)
to this jack for private listening. When headphones
are in use, the speakers will be automatically disconnected.
IMPORTANT: When using headphones always set
the volume control to a low level before you put the
headphones on, then gradually increase the
volume to a comfortable listening level.
General operation
1 To select your sound source slide the FUNCTION
selector to CD/TAPE (OFF)/RADIO.
2 Adjust the sound with the VOLUME and DBBS
(Dynamic Bass Boost) controls.
3 To switch the set off, slide the FUNCTION
SELECTOR to the TAPE(OFF) position.
RADIO
Radio reception
1. Slide the FUNCTION selector to RADIO.
2. Slide the BAND selector to a desired setting
- FM STEREO, FM, AM.
3. Rotate the TUNING control to find the desired
stations.
NOTE: If the BAND selector is set to the FM
stereo position and you have tuned to an FM
stereo station, the FM stereo LED indicator
will light.
4. When you have finished listening, slide the
FUNCTION selector to the TAPE(OFF) position.
Recept ion
AM
– For AM the set is provided with a built-in anten na
–
so the antenna is n ot n ee de d. D irect the
antenna by turnin g th e wh ol e set.
FM
– For FM, pull out th e an te nn a. Incline and
–
turn the antenna. Reduce its length if the signal is
too strong (very close to a transmitter).
1
RECORDING
GENERAL INFORMATION ON RECORDING
•Recording is permissible in so far as copyright or other rights of
third parties are not infringed.
•This deck is not suitable for recording on CHROME (IEC II) or
METAL (IEC IV) type cassettes. For recording, use NORMAL
type cassettes (IEC I) on which the tabs have not been broken.
The best recording level is set automatically . Altering the VOL
and DBB controls will not affect the recording in progress.
•At the very beginning and end of the tape, no recording will
take place during the 7 seconds, when the leader tape passes
the recorder heads.
•To protect a tape from accidental erasure, have the tape in
front of you and break out the left tab.
Recording on this side is no longer possible. To record over this
side again, cover the tabs with a piece of adhesive tape.
Recording from the radio
1.Tune to the desired r ad io s ta tion (See RADIO).
2.Press STO P EJECT to open the cassette doo r.
).
3.Insert a suitable cassette into the c as se tt e deck and close thecassette door.
4.Press RECORD to start recording.
5.For brief inter ru pt io ns , press PAUSE. To resu me record ing,press PAUSEag ai n.
6.To stop recording, pre ss S TO P EJECT.
Record ing a CD
-Follow the instr uc ti on s on page 8 (CD PLAYER) for CD operation.
1. Insert a CD with the printed side facing u p an d ge nt ly close the door.
2. Press STOP/EJECT to open the cassette door.
3. Insert a suitable cassette and clo se t he d oo r
4.Press RECORD followed by the CD PLAY/PAUSE but to n, t o st ar t play in g an d recording the CD.
5. To stop recording, pres s STOP/EJECT on the cassette deck.
Note: If a tape wit ho ut t he recording tabs is used, the RECORD key will not be able t o be p ressed.
PLAYING A CASSETTE
1. Slide the FUNCTION selector to the TAPE(OFF) position.
2. Press STOP EJECT to open the cassette door.
3. Insert a recorded cassette and close the cassette door.
4. Press PLAY to start playback.
To interrupt playback, press PAUSE To resume, press the key again.
5.
By pressing 6.
or on the set, fast winding of the tape is possible in both directions.
7. To stop the tape, press STOP EJECT .
–After the tape has finished playing the keys are automatically released when the end
of the tape is reached.
EN-6
MAINTENANCE
Tape deck maintenance
To ensure quality recording and playback of the tape deck, clean
A B C
parts , and shown in the diagram below, after approx.
50 hours of operation, or on average once a month. Use a cotton
bud slightly moistened with alcohol or a special head cleaning
fluid to clean the deck.
1. Open the cassette door by pressing STOP EJECT.
2. Press PLAY
3. Press PAUSE
B
Capstan .
and clean the rubber pressure rollers .
and clean the magnetic heads and also the
C
A
4. After cleaning, press STOP EJECT.
Note: Cleaning of the heads can also be done by playing a
cleaning cassette through once.
EN-7
AABC

CD PLAYER
MAINTENANCE & SAFETY
CD Player
Playing a CD
This CD-player can play Audio Discs, ,CD-R, and
CD Rewritables. Do not try to play CD-ROM, CDi, VCD,
DVD or computer CD.
1 Slide the FUNCTION selector to the CD position.
Display: shows Briefly.
2 To open the CD door, push the CD door at the edge
marked
3 Insert a CD, CD-R or CD-RW with the printed side
facing up, gently close the CD door.
4 Press PLAY/PAUSE
5 To pause playback press PLAY/PAUSE
To play your program,press PLAY/PAUSE.
To resume, press PLAY/PAUSE
6 To stop CD playback, press STOP
–
–
–
Selecting a different track
During playback you can use or to select a
particular track.
•If you have selected a track number in the stop or
pause position, press PLAY/PAUSE to start playback.
•Press once briefly for the next track, or press
repeatedly until the desired track number appears
in the display.
•Press once briefly to return to the beginning of
a current track.
•Press more than once briefly for previous
tracks.
Searching a track
During playback you can use the or to search for a particular spot in a track.
Hold the or buttons in and the unit will begin to scan the track, release
–
the buttons when you have reached your desired spot.
Repeat play modes
–
Press the REPEAT button once, REPEAT appears in the display and
the current track is played continuously.
Press the REPEAT button twice, REPEAT ALL appears in the display
and the entire CD is played continuously.
- -
OPEN / .CLO SE
on the set to start playback.
again.
.
Programming track numbers
You may store up to 32 tracks in any desired
sequence. If you like, store any track more than once.
1 In STOP Mode, press the prog. , then
to select your desired track.
2 When your chosen track number appears (the number
will flash), press the PROG button once to store the track.
The display shows a flashing PROG and the program
number that you are up to.
3 Press or to select the next track followed by the PROGRAM
button to store that track. Again the display shows a flashing
PROG icon and the program number you are up to.
4 Repeat step 3 until all desired tracks are stored
Reviewing your set program
•In STOP mode, press the PROGRAM button.
The display shows your stored track numbers
in sequence.
Erasing a program
You can erase the contents of the memory by:
– sliding the FUNCTION selector to the RADIO
– position, after pressing STOP.
–
or buttons
.
Precautions & General Maintenance
•Place the set on a hard and flat surface so that the
system does not tilt.
•Do not expose the set, batteries or CDs to
humidity, rain, sand or excessive heat caused by
heating equipment or direct sunlight.
•Do not cover the set. Adequate ventilation with a
minimum gap of 6 inches between the ventilation
holes and surrounding surfaces is necessary to
prevent heat build-up.
•The mechanical parts of the set contain selflubricating bearings and must not be oiled or
lubricated.
•To clean the set, use a soft dry cloth. Do not use
any cleaning agents containing alcohol, ammonia,
benzene or abrasives as these may harm the
housing.
CD player and CD handling
•The lens of the CD player should never be touched!
•Sudden changes in the surrounding temperature can cause condensation to form and the lens of your CD player to
cloud over. Playing a CD is then not possible. Do not attempt to clean the lens but leave the set in a warm environment
until the moisture evaporates.
•Always close the CD door to keep the CD compartment dust-free. To clean, dust the compartment with a soft dry cloth.
•To clean the CD, wipe in a straight line from the centre towards the edge using a soft, lint-free cloth. Do not use cleaning
agents as they may damage the disc.
•Never write on a CD or attach any stickers to it.
X
EN-8
EN-9

TROUBLESHOOTING
Troubleshooting
If a fault occurs, first check the points listed below before taking the set for repair.
Do not open the set as there is a risk of electric shock.
If you are unable to remedy a problem by following these hints, consult your dealer or service center.
WARNING: Under no circumstances should you try to repair the set yourself, as this will
invalidate the warranty.
–Problem
•Solution
No sound /power
–Volume not adjusted
•Adjust the VOLUME
–power cord not securely connected
•Connect the AC power cord properly
–
•
Display does not function properly /
No reaction to operation of any of
the controls
–Electrostatic discharge
•Switch off and unplug the set. Reconnect after a
few seconds
Poor cassette sound quality
–Dust and dirt on the heads, etc.
•Clean deck parts etc., see Maintenance
–Use of incompatible cassette types (METAL
or CHROME)
I
•Only use NORMAL (IEC
Recording does not work
–Cassette tab(s) may be broken
•Apply a piece of adhesive tape over the
missing tab space
Environmental information
We have done our best to reduce the packaging and make it easy to separate into 3 materials: cardboard,
paper pulp and expandable polyethylene.
Your set consists of materials which can be recycled if disassembled by a specialized company. Please observe
the local regulations regarding the disposal of packaging, dead batteries and old equipment..
) for recording
no disc indication
–No CD inserted
•Insert a CD, CD-R or CD-RW
–CD badly scratched or dirty
•Replace/ clean CD, see Maintenance
–Laser lens steamed up
•Wait until lens has cleared
–CD-R is blank or the disc is not finalized
•Use a finalized CD-R
CD playback does not work
–CD badly scratched/ dirty
•Replace/ clean CD (see maintenance)
–Laser lens steamed up
•Wait until lens has adjusted to room temperature
The CDskips tracks
–CD damaged or dirty
•Replace or clean CD
–Program is active
•Quit Program mode(s)
EN-10
SPECIFICATION
Specifications :
Spec ifica ti ons :
Power supply
Powe r suppl y
Dimensions of unit
Dime nsion s of u nit
Frequency range
Freq uency ran ge
Antenna
Ante nna
CD Section
CD Size
CD Sec tion
Speaker System
CD Siz e
Battery Size
Spea ker Sys te m
Phones Jack
Batt ery Size
Phon es Jack
: AC 230 V, 50 Hz
: 479(W) X 280 (H) X 245 (D) mm.
: AC 240 V, 50 H z
: AM 540 - 1600 KHz.
: FM 88 - 108 MHz.
: 479( W) X 280 (H) X 24 5 (D) mm.
: FM - PIG TAIL ANTENNA.
: AM - FERRITE BAR ANTENNA.
: AM 540 - 16 00 KHz.
: FM 88 - 10 8 Mhz.
: TOP LOADING CD PLAYER.
: FM - PIG TAIL ANT EN NA.
: 5” & 3” COMPATIBLE.
: AM - FERR ITE BAR ANTE NNA.
: 2 WAY 2 SPEAKERS SYSTEM
: TOP LOA DING CD PLAYER .
: “AAA”, UM-4X2 (For Remote)
: 5” & 3” CO MPATIBLE .
: 3.5 mm.
: 2 WAY 2 SPEAKE RS S YSTEM
: “AAA ”, UM-4X2 ( For Rem ot e)
: 3.5 mm .
EN-11

NATIONAL CUSTOMER SERVICE CENTRE (NCSC)
Free call: 1800 656 700
Between Monday to Friday – EST 9AM to 5PM
TEAC CORPORATION
3-7-3, Nakacho, Musashino-shi, Tokyo 180-8550, Japan Phone: (0422) 52-5081
TEAC AUSTRALIA PTY.,LTD.
A.B.N.: 11 113 998 048
HEAD OFFICE 30 Tullamarine Park Road, Tullamarine, VIC 3043 Phone : (03)8336 6500
SERVICE DIVISION
MELBOURNE, VIC 30 Tullamarine Park Road, Tullamarine, VIC 3043
Phone :
(03)8336 6544
SYDNEY, NSW Unit 8, 20-22 Foundry Rd., Seven Hills, NSW 2147. Phone : (02)8811 4000
BRISBANE, QLD 335 Montague Road, West End, QLD 4101.
Phone :
(07)3010 0100
PERTH, WA 273 Great Eastern Highway, Belmont, WA 6104. Phone : (08)9479 6522
E-mail
service@teac.com.au
Website
http://www.teac.com.au
 Loading...