

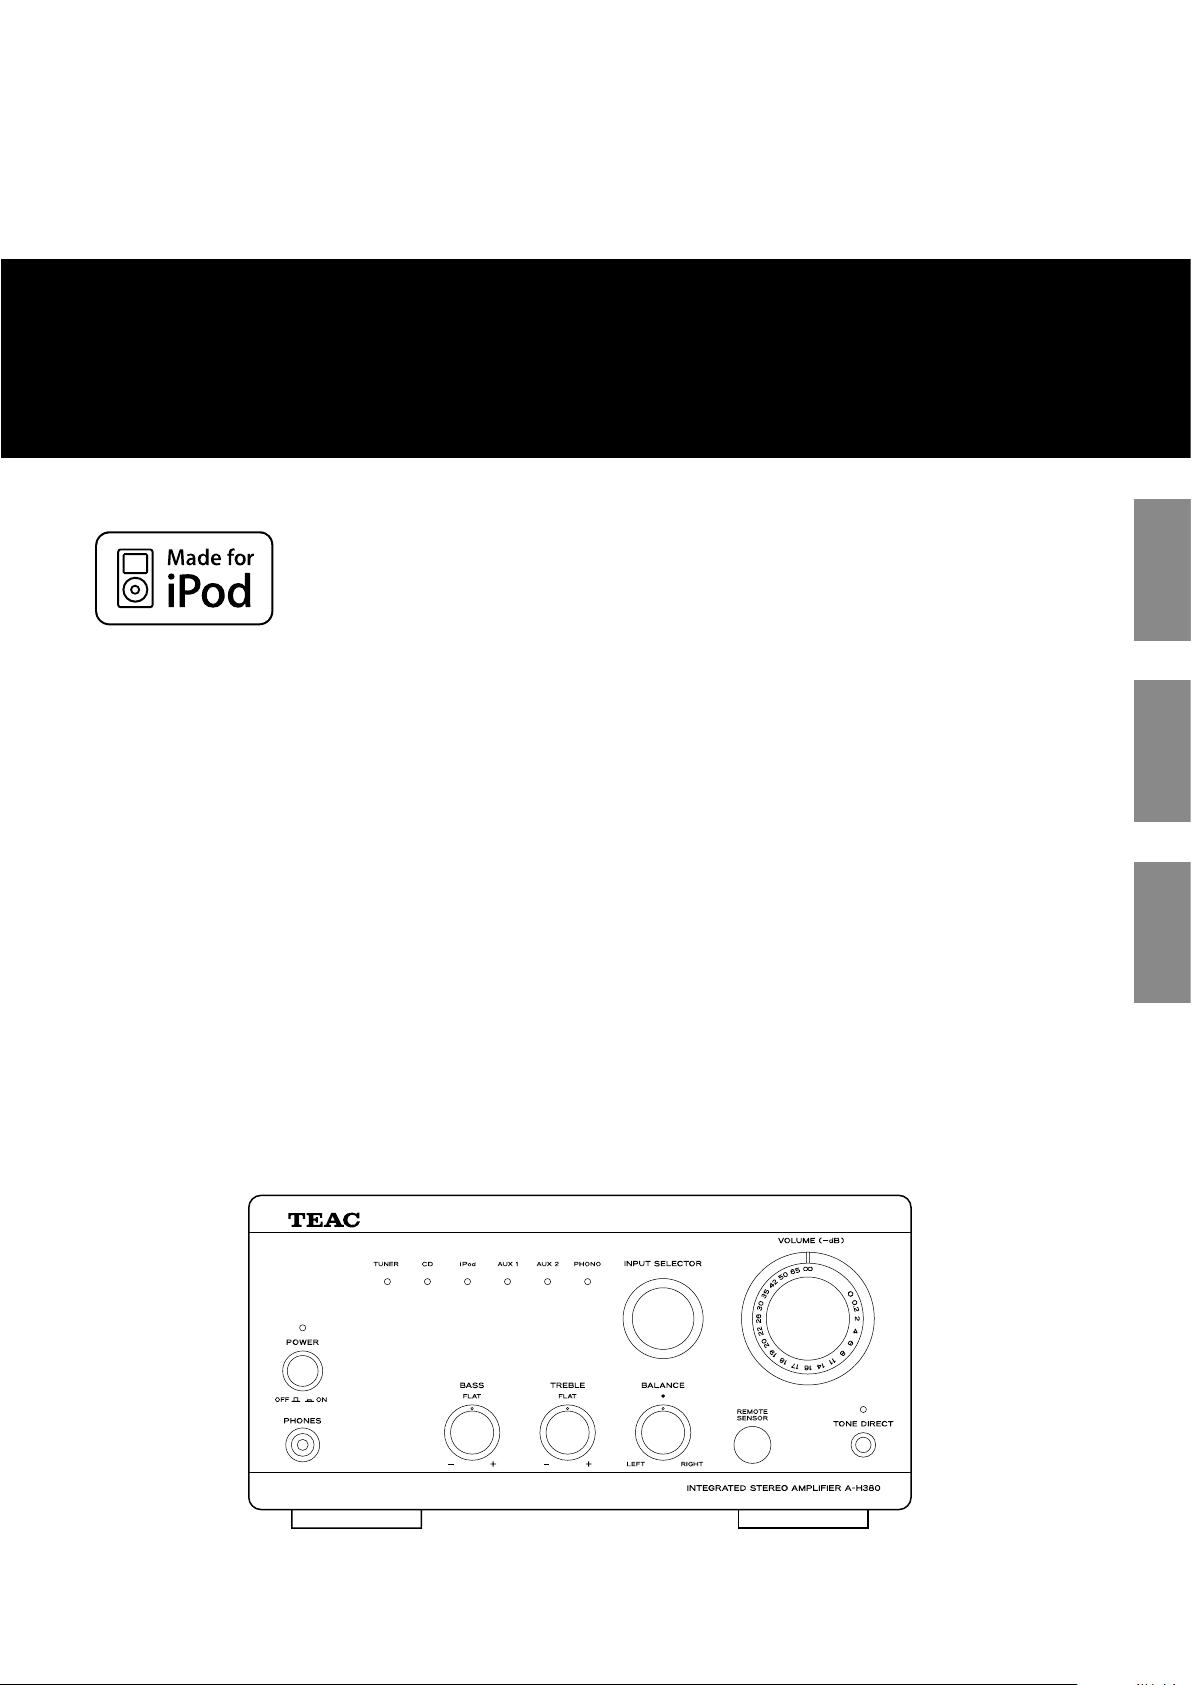
Teac AH-380 Owners Manual
Z
CQX1A1332Z
A
Integrated Stereo Amplifier
-
H380
OWNER’S MANUAL
MANUEL DU PROPRIÉAIRE
MANUAL DEL USUARIO
ENGLISH
ENGLISH
FRANÇAIS
ESPAÑOL
2
< D
o not expose this apparatus to drips or splashes.
o not place any objects filled with liquids, such as vases, on the
< D
apparatus.
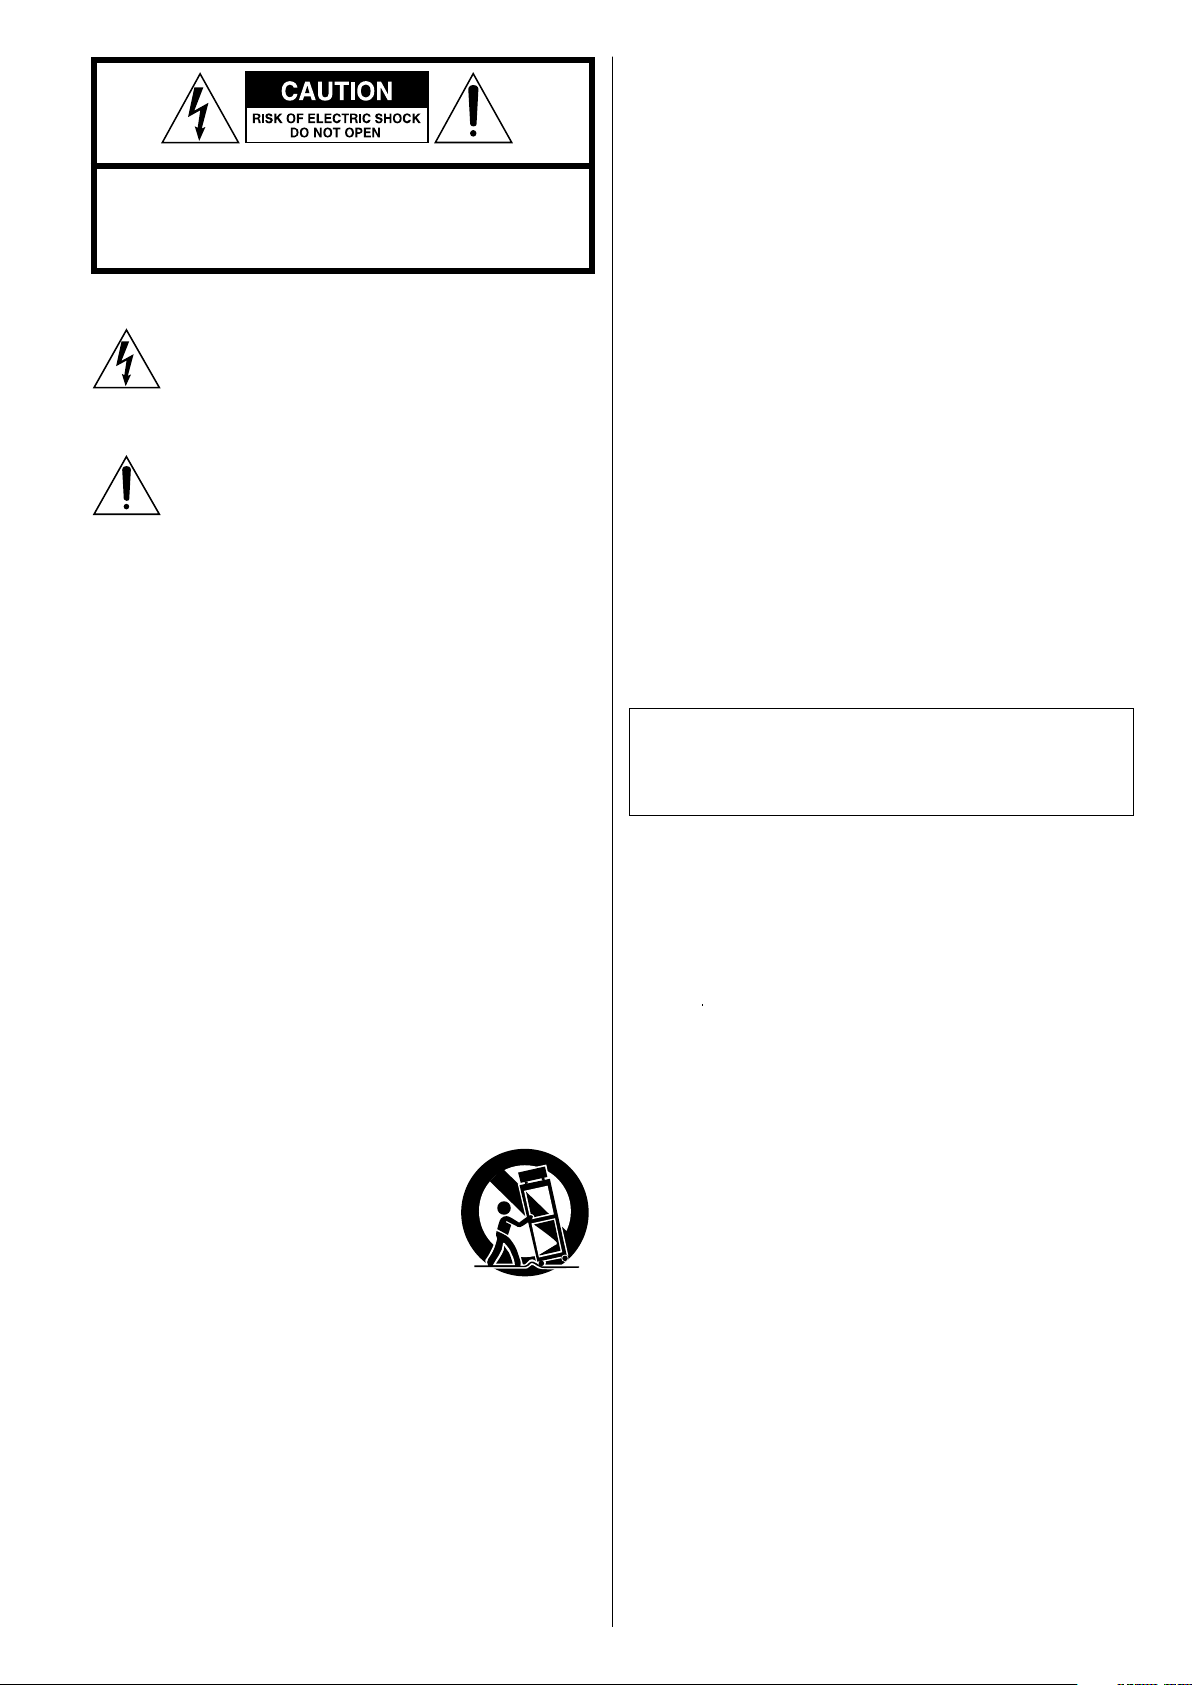
CAUTION: TO REDUCE THE RISK OF ELECTRIC SHOCK, DO NOT
REMOVE COVER (OR BACK). NO USER-SER VICEABLE PARTS
INSIDE. REFER SERVICING TO QUALIFIED SERVICE PERSONNEL.
Th e li ght nin g fl ash wit h ar rowhead symbol, within an
equila teral triangle, is inten ded to alert the user to the
presence of uninsu lated “dangerous voltage” within the
product’s enclosure that may be of sufficient magnitude to
constitute a risk of electric shock to persons.
The exclamation point withi n an equilater al tri angle is
intended to alert the user to the presence of important
operating and maintenance (servicing) instructions in the
literature accompanying the appliance.
IMPORTANT SAFETY INSTRUCTIONS
1) Read these instructions.
2) Keep these instructions.
3) Heed all warnings.
4) Follow all instructions.
5) Do not use this apparatus near water.
6) Clean only with dry cloth.
7) Do not block any ventilation openings. Install in accordance with
the manufacturer’s instructions.
8)
Do not install near any heat sources such as radiators, heat
registers, stoves, or other apparatus (including amplifiers) that
produce heat.
9) Do not defeat the safety purpose of the polarized or groundingtype plug. A polarized plug has two blades with one wider than
the other. A grounding type plug has two blades and a third
grounding prong. The wide blade or the third prong are provided
for your safety. If the provided plug does not fit into your outlet,
consult an electrician for replacement of the obsolete outlet.
10)
Protect the power cord fro m being walk ed on or pinche d
par ticularly at plugs, convenience receptacles, and the point
where they exit from the apparatus.
11) Only use attachments/accessories specified by the manufacturer.
12) Use only with the cart, stand, tripod, bracket,
or table specified by the manufacturer, or
sold with the apparatus. When a cart is used,
use caution when moving the cart/apparatus
combination to avoid injury from tip-over.
13)
Unplug this appara tus dur ing lightning
storms or when unused for long periods of time.
Refer all servicing to qualified service personnel. Servicing is
14)
required when the apparatus has been damaged in any way, such
as power-supply cord or plug is damaged, liquid has been spilled
or objects have fallen into the apparatus, the apparatus has been
exposed to rain or moisture, does not operate normally, or has
been dropped.
< Do not install this apparatus in a confined space such as a book
case or similar unit.
< The apparatus draws nominal non-operating power from the AC
outlet with its POWER switch in the standby position.
< The apparatus should be located close enough to the AC outlet so
that you can easily grasp the power cord plug at any time.
< An apparatus with Class ! construction shall be connected to an
AC outlet with a protective grounding connection.
< Batteries (battery pack or batteries installed) shall not be exposed
to excessive heat such as sunshine, fire or the like.
< Excessive sound pressure from earphones and headphones can
cause hearing loss.
< The main plug is used as the disconnect device, the disconnect
device shall remain readily operable.
WARNING: TO PREVENT FIRE OR SHOCK HAZARD,
DO NOT EXPOSE THIS APPLIANCE TO RAIN OR
MOISTURE.
CAUTION
< DO
NOT REMOVE THE EXTERNAL CASES OR CABINETS TO EXPOSE
THE ELECTRONICS. NO USER SERVICEABLE PARTS ARE WITHIN!
< IF YOU ARE EXPERIENCING PROBLEMS WITH THIS PRODUCT,
CONTAC T TEAC FOR A SERVICE REFERRAL. DO NOT USE THE
PRODUCT UNTIL IT HAS BEEN REPAIRED.
Contents
Before use
Thank you for choosing TEAC. Read this manual carefully to
get the best performance from this unit.
Before Use . . . . . . . . . . . . . . . . . . . . . . . . . . . . . . . . . . . . . . . . . . . . . . . . . . . . . . . 3
Specifications . . . . . . . . . . . . . . . . . . . . . . . . . . . . . . . . . . . . . . . . . . . . . . . . . . . . 4
System Connection . . . . . . . . . . . . . . . . . . . . . . . . . . . . . . . . . . . . . . . . . . . . . . 4
Speaker Connection . . . . . . . . . . . . . . . . . . . . . . . . . . . . . . . . . . . . . . . . . . . . . . 5
Connection . . . . . . . . . . . . . . . . . . . . . . . . . . . . . . . . . . . . . . . . . . . . . . . . . . . . . . 6
Identifying the Parts . . . . . . . . . . . . . . . . . . . . . . . . . . . . . . . . . . . . . . . . . . . . . . 8
Remote Control Unit . . . . . . . . . . . . . . . . . . . . . . . . . . . . . . . . . . . . . . . . . . . . 10
Basic Operation . . . . . . . . . . . . . . . . . . . . . . . . . . . . . . . . . . . . . . . . . . . . . . . . . 10
Listening to iPod . . . . . . . . . . . . . . . . . . . . . . . . . . . . . . . . . . . . . . . . . . . . . . . . 12
Troubleshooting . . . . . . . . . . . . . . . . . . . . . . . . . . . . . . . . . . . . . . . . . . . . . . . . 14
Read this before attempting any operations
< A
s the unit may become warm during operation, always leave
sufficient space around the unit for ventilation.
T
he ventilation holes should not be covered. Make sure there is
at least 20 cm of space above and at least 5 cm of space on each
side of the unit. Do NOT place anything on top of the unit.
he voltage supplied to the unit should match the voltage as
< T
printed on the rear panel. If you are in any doubt regarding this
matter, consult an electrician.
< C
hoose the installation location of your unit carefully. Avoid
placing it in direct sunlight or close to a source of heat. Also
avoid locations subject to vibrations and excessive dust, heat,
cold or moisture.
< D
o not place the unit on the amplifier/receiver.
o not open the cabinet as this might result in damage to the
< D
circuitry or electrical shock. If a foreign object should get into the
unit, contact your dealer or service company.
< W
hen removing the power plug from the wall outlet, always pull
directly on the plug, never yank the cord.
ENGLISH
For European customers Disposal of your
old appliance
1
. When this c rosse d-out wheele d bin
symbol is attached to a product it means
the product is covered by the European
Directive 2002/96/EC.
2
. All electrical and electron ic products
should be disposed of separately from the municipal waste
stream via designated collection facilities appointed by the
government or the local authorities.
3
. The correct disposal of your old appliance will help prevent
potential negative consequences for the environment and
human health.
4
. For more detailed information about disposal of your old
appliance, please contact your city office, waste disposal
service or the shop where you purchased the product.
< Do not attempt to clean the unit with chemical solvents as this
might damage the finish. Use a clean, dry or slightly damp cloth.
< Keep this manual in a safe place for future reference.
3
System ConnectionSpecifications
REMOTE
CONTROL
REMOTE
CONTROL
Amplifier Section
Power output . . . . . . . . . . . . . . . . . . . 45 W + 45 W (6 Ω, 1 kHz, 0.1 %)
Total Harmonic Distortion . . . . . . . . . . . . . . 0.1 % (1 kHz, 6 Ω, 45 W)
S/N Ratio . . . . . . . . . . . . . . . . . . . . . PHONO: 70 dB (IHF-A/input short)
AUX, CD, TAPE, TUNER: 95 dB (IHF-A/input short)
CD direct: 95 dB (IHF-A/input short)
Input Sensitivity/Impedance. . . . . . . . . . . . . . PHONO: 2.5 mV 47 kΩ
AUX, CD, TAPE, TUNER: 180 mV 20 kΩ
Frequency Response . . . . . . . . . . . . . . . . . . . . . . . . . . . . . .10 Hz - 65 kHz
Tone Control . . . . . . . . . . . . . . . . . . . . . . . . . . . . BASS : ±10 dB (100 Hz)
TREBLE : ±10 dB (10 kHz)
General
Power Requirement . . . . . . . . . . . . . . . . . . . . . . . . . . . . . AC 230 V, 50 Hz
Power Consumption . . . . . . . . . . . . . . . . . . . . . . . . . . . . . . . . . . . . . . 85 W
AC Outlet (total 100 W max.). . . . . . . . . . . . . . . . . . . . . . . . switched x 1
Dimensions (W x H x D) . . . . . . . . . . . . . . . . . . . . .215 x 110 x 312 mm
Weight (Net) . . . . . . . . . . . . . . . . . . . . . . . . . . . . . . . . . . . . . . . . . . . . . .5.0 kg
Standard Accessory . . .Remote Control Unit (RC-1179 or RC-1183)
Battery (AAA, R03, UM-4) x 2
AC Power Cord x 1
Owner’s Manual x 1
Warranty Card x 1
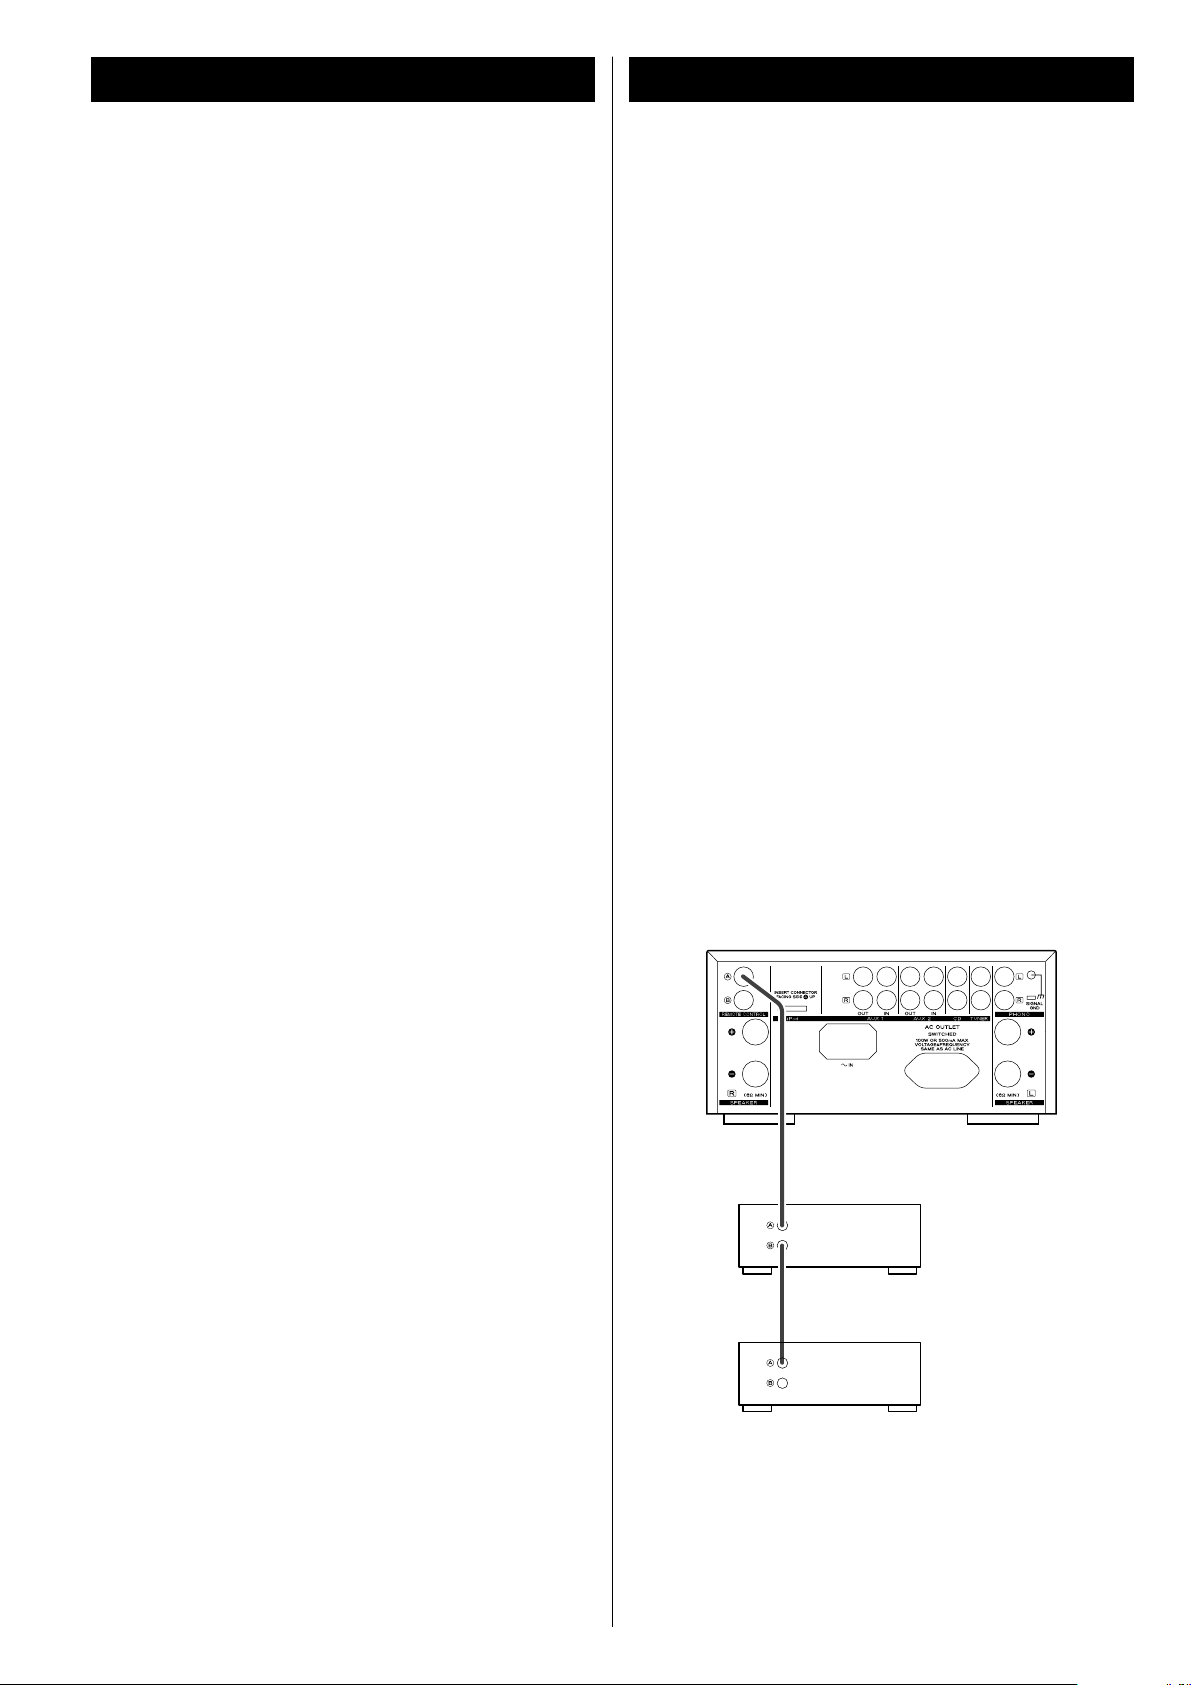
If you have TEAC Reference 380 series, convenient system control
operations and AI direct play functions are possible.
<By pressing the STANDBY/ON button of A-H380, you can switch
ON/standby all the unit connected by remote control cords.
(Set the REMOTE CONTROL SELECTOR on the rear panel of the
PDH380 to ” SYSTEM ” .)
< W
hen you pre ss the PLAY button of a source, the INPUT
SELECTOR of A-H380 is set to the source automatically.
< The source you select by the INPUT SELECTOR of A-H380 will be
played automatically.
< When you turn on the system, the source that was selected last
time will start playback automatically.
< You can use the system remote control unit to operate all the
unit connected by remote control cords.
< You can switch ON/Standby all the unit connected by the remote
control connection cord using the daily timer or sleep timer of
the T-H380.
Connect the REMOTE CONTROL jack (A or B) of each
component by remote control connection cords.
< D
esign and specifications are subject to change without notice.
< W
eight and dimensions are approximate.
< I
llustrations may differ slightly from production models.
A-H380
Reference 380
Reference 380
4

A-H380
Right Speaker Left Speaker
Speaker Connection
Caution:
heck the impedance of your speakers. Connect speaker with an
< C
impedance of more than 6 ohms.
< The red speaker terminals are + (positive) and the black speaker
terminals are _ (negative).
G
enerally, the + side of the speaker cable is marked to make
it distinguishable from the _ side of the cable. Connect the
marked side to the + terminal and the unmarked side to the
black _ terminal.
< T
he metal portions of the two separate wires should not touch
or an electrical short can occur. Shorted wires can create a fire
hazard or induce a failure in your equipment.
< B
e sure to insert each plug securely. To prevent hum and noise,
avoid bundling the signal interconnection cables together with
the AC power cord or speaker cables.
How to connect:
1
. Turn the terminal cap counterclockwise to loosen it. The speaker
terminal caps cannot be fully removed from the base.
ENGLISH
CAUTION:
< S
witch o ff th e pow er t o all equ ipme nt b efor e mak ing
connections.
< Read the instructions of each component you intend to use with
this unit.
. Insert the wire into the terminal fully and turn the terminal cap
2
clockwise to securely connect it:
Make sure none of the wire insulation is under the terminal, only
the bare, stripped wire.
3. Make sure it is fastened firmly by pulling the cable lightly.
5
6
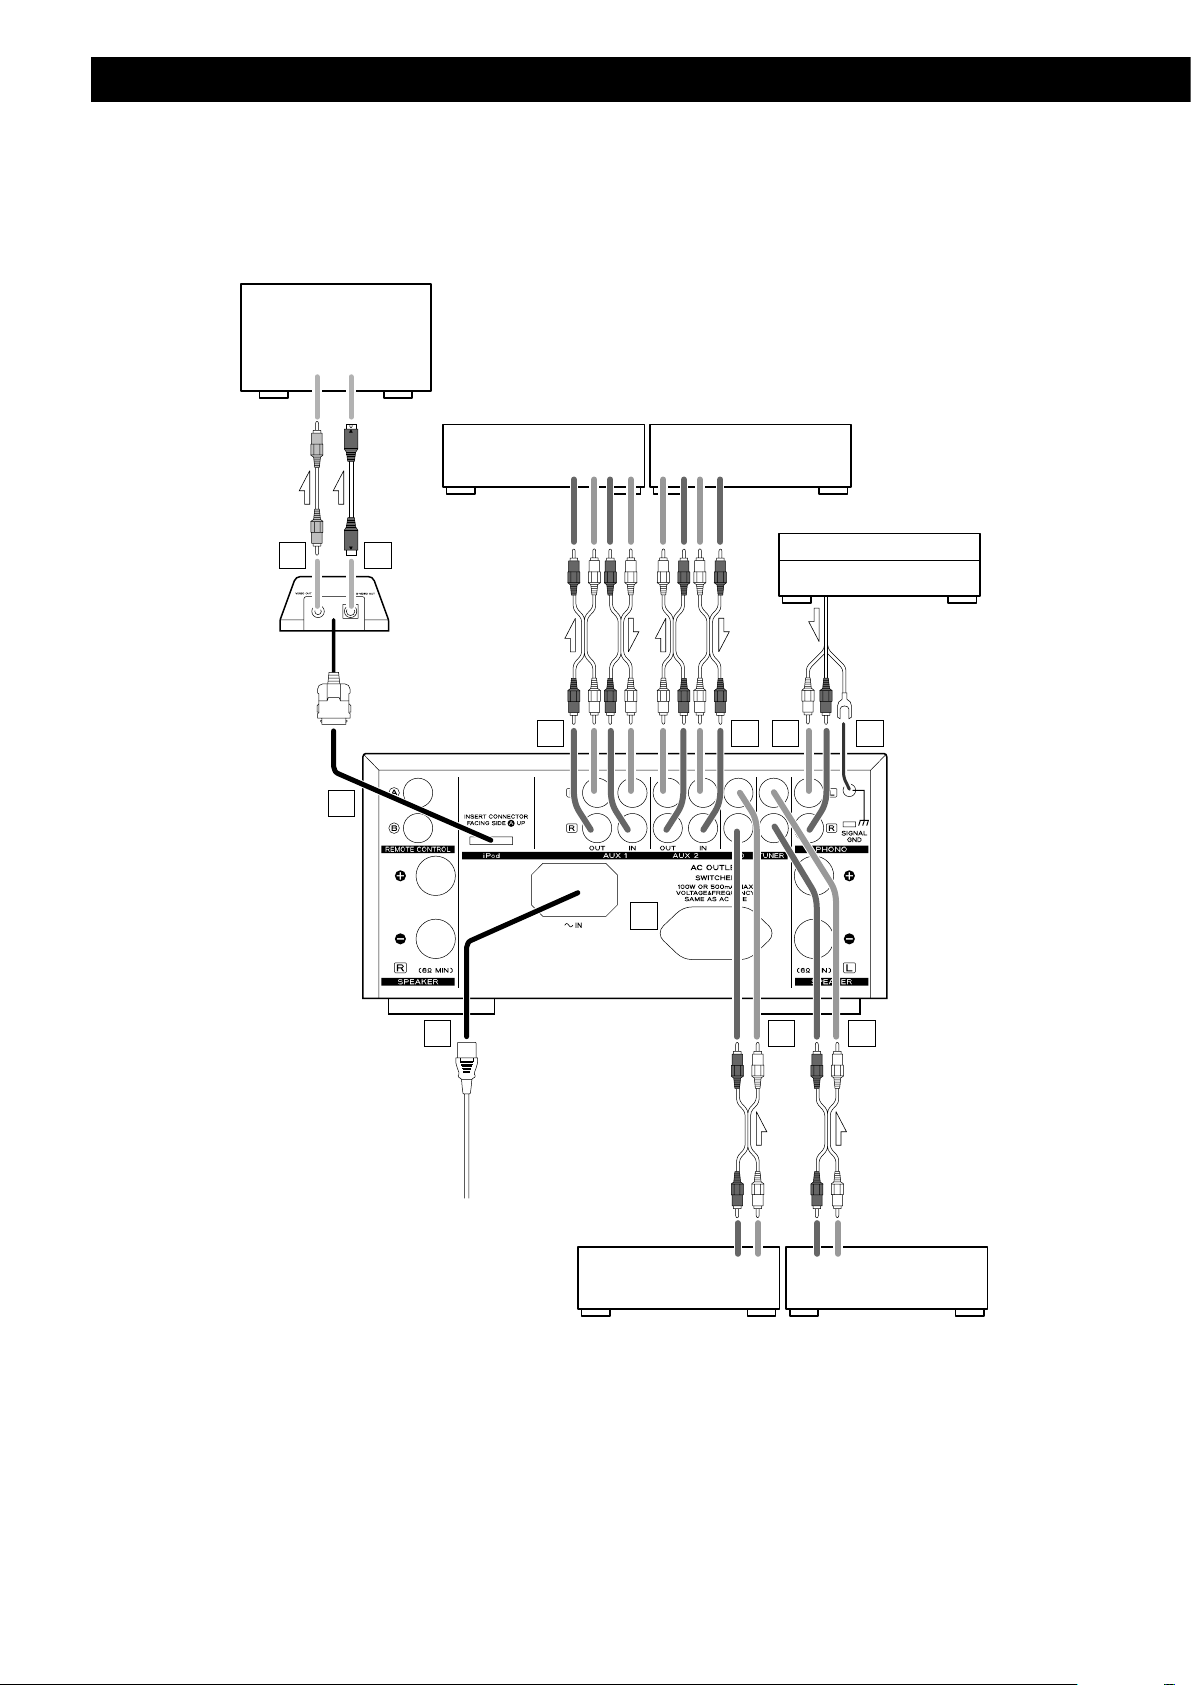
Connection
VIDEO
IN
S-VIDEO
IN
LINE
OUT
LINE
OUT
LINE
IN
LR LR
LINE
OUT
LINE
IN
RL RL
LINE
OUT
R LR L
F
G H
A A
A A
D
E
CB
TV monitor, etc.
Cassette deck,
CD recorder, etc.
Cassette deck,
CD recorder, etc.
Turntable
CAUTION:
<Swit ch of f the powe r to a ll eq uipme nt b efor e mak ing
connections.
<Read the instructions of each component you intend to use with
this unit.
PD-H380 T-H380
White (L)
Red (R)
White (L)
Red (R)
A
LINE IN/OUT jacks
These jacks transmit an analog 2-channel audio signal. Connect
the components using RCA cables.
Make sure to connect the cables as follows:
white plug q white jack (L: left channel)
red plug q red jack (R: right channel)
< Be sure to insert each plug securely. To prevent hum and noise,
avoid bundling the signal interconnection cables together with
the AC power cord or speaker cables.
B
PHONO jacks
Connect the turntable’s RCA pin cord to the PHONO jacks.
Make sure to connect the cables as follows:
white plug q white jack (L: left channel)
red plug q red jack (R: right channel)
F
iPod port
Connect the DS-20 iPod dock (option) to this port.
<Make sure the label A side of the plug is up.
<Securely insert the plug until a slight “click” is heard.
To disconnect the Dock:
Squeeze both sides of the plug and pull.
label side
Compatible iPod Software
In case your iPod will not work with the A-H380 or with the
remote control unit, software update may solve the problem.
Visit the Apple website and download the latest iPod Software.
ENGLISH
< Be sure to insert each plug securely. To prevent hum and noise,
avoid bundling the signal interconnection cables together with
the AC power cord or speaker cables.
C
SIGNAL GND
Connect the ground lead of the turntable to this terminal.
< This is not a safety earth.
D
AC OUTLET
You can connect the AC power cord of your component.
This outlet is active only when the unit is on or standby. When
the unit is off, the outlet is inactive.
Caution:
Make sure that the total power consumption of all equipment
connected to this outlet does not exceed 100 watts (or 500mA).
E
AC Inlet
Use only the supplied power cord.
iPod is a trademark of Apple Inc., registered in the U.S. and other
countries.
G
VIDEO OUT terminal
This terminal outputs video signal from iPod. Use a composite
video cable to connect the Dock to the composite video
connector of a television or monitor.
H
S-VIDEO OUT terminal
This terminal outputs S-video signal from iPod. Use an Svideo cable to connect the Dock to the S-video input of a
suitably equipped television or monitor. Use this connection in
preference to a composite video connection.
< Use of other power cord may result in fire or electric shock.
< Unplug the power cord when you are not going to use the unit
for an extended period of time.
7
8
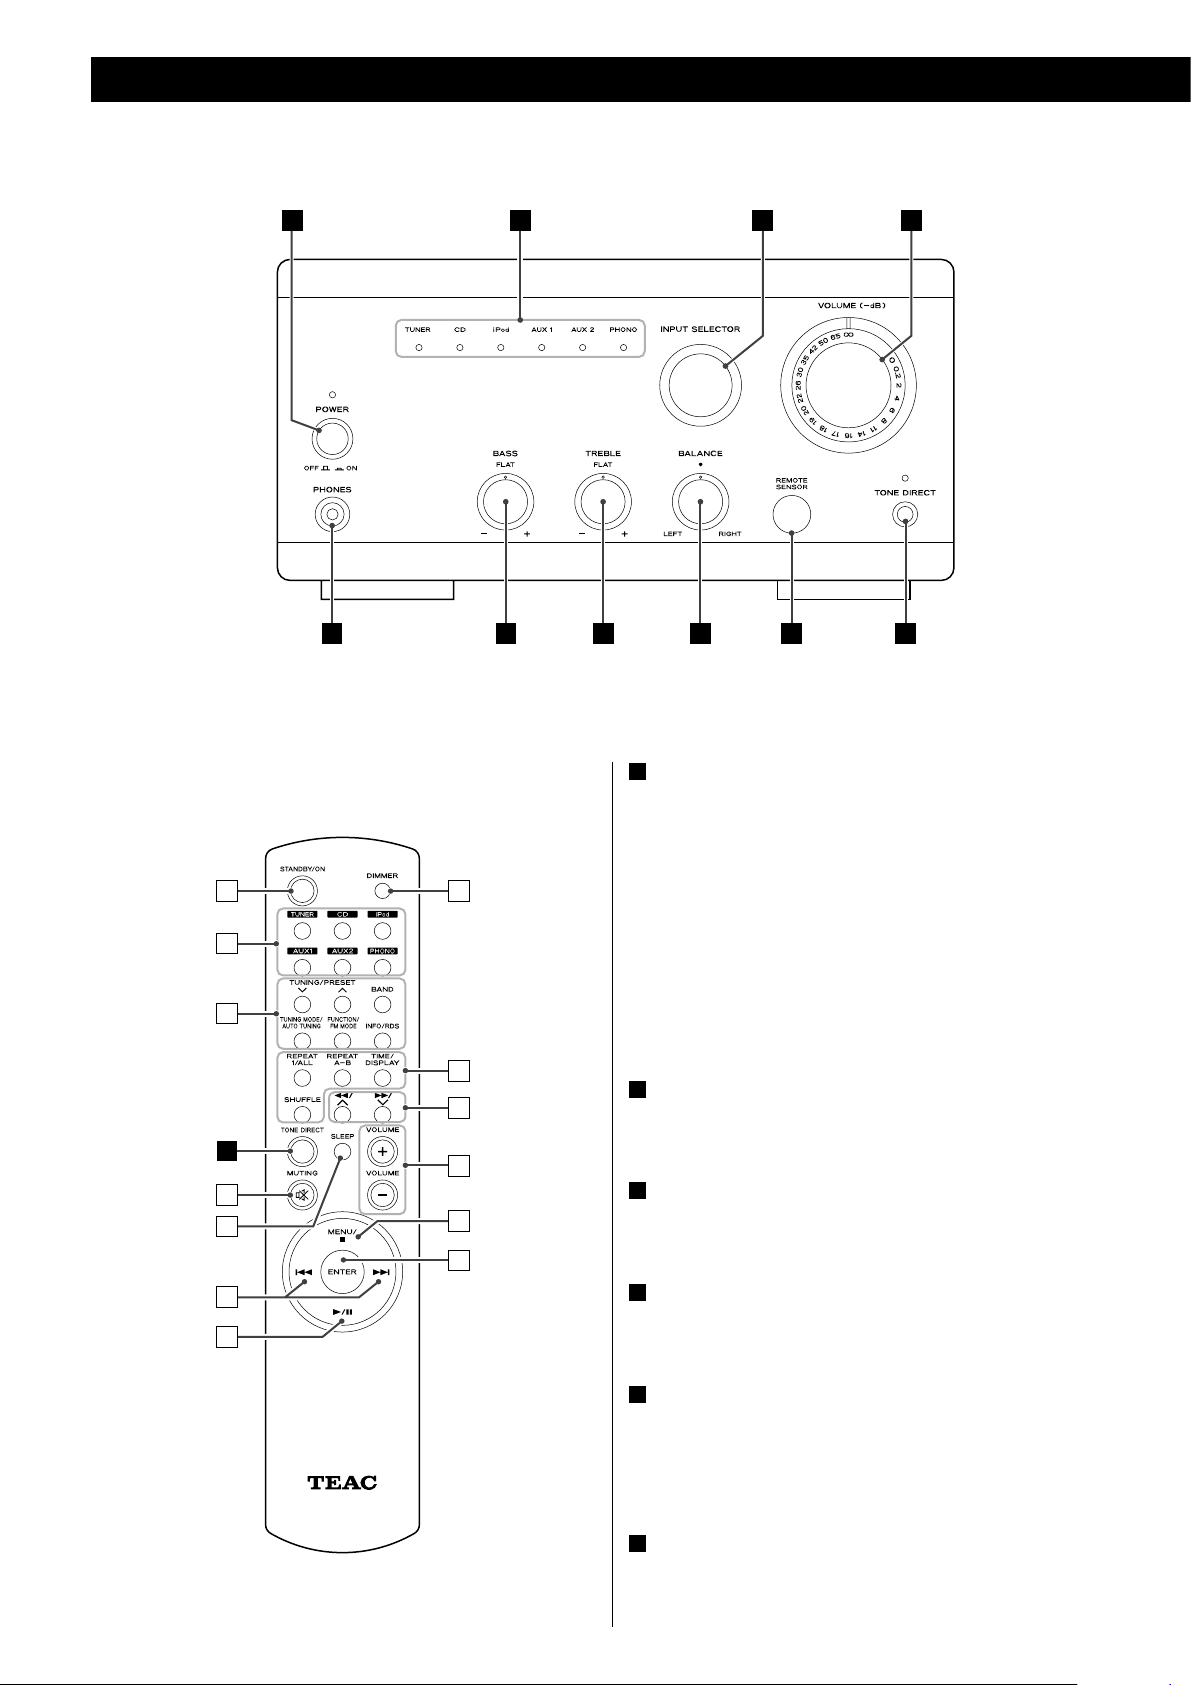
Identifying the Parts
DCA B
J EI H G F
a
j
m
l
k
b
c
d
E
e
f
g
h
i
A
POWER
Press this switch to turn the unit standby or off.
If you use the system control function, set this switch on, and turn
on/standby the system using the remote control unit.
The standby indicator is orange when the unit is in the standby
mode. When the unit is turned on, the indicator is blue.
CAUTION:
< B
efore turning the unit on, set the VOLUME to minimum (∞), and
gradually turn up the volume.
B
Input indicator
This indicates which of the input sources has been selected.
C
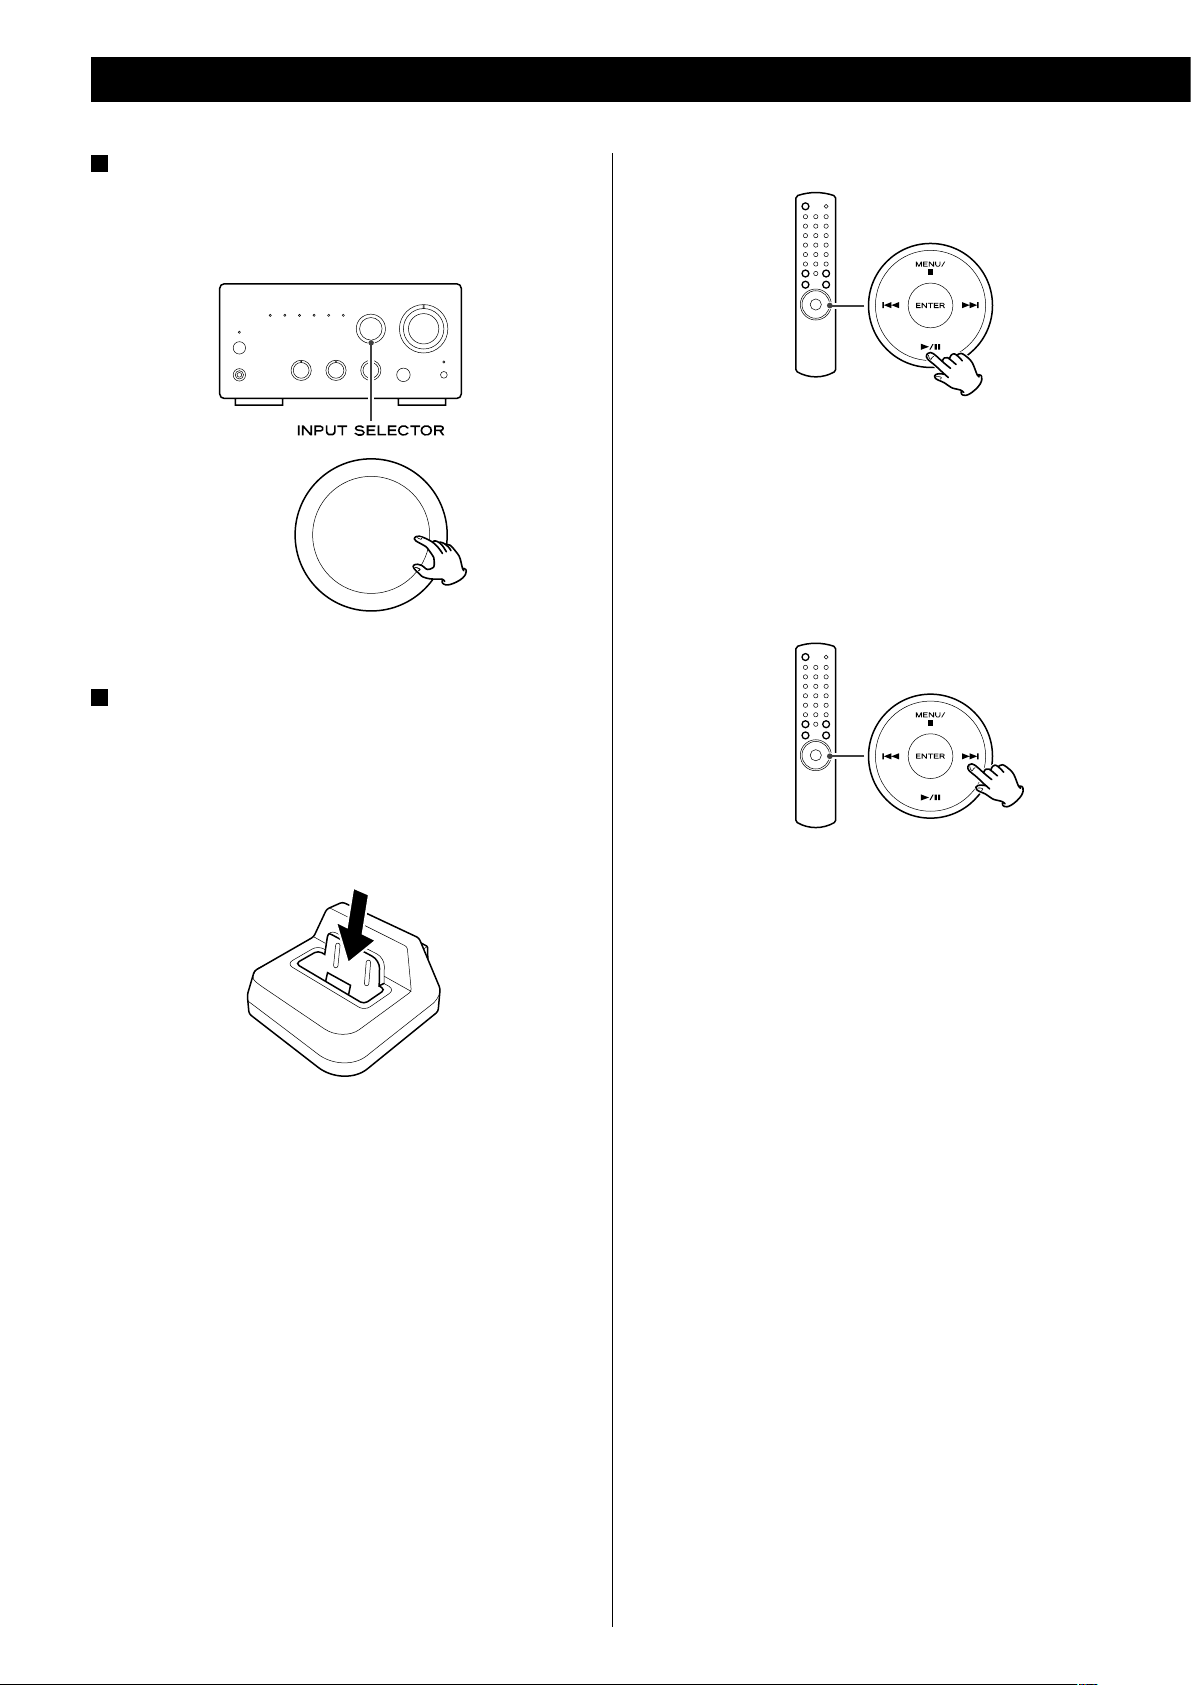
INPUT SELECTOR
Use this knob to select a source.
D
VOLUME
Turn this knob to adjust the volume.
E
TONE DIRECT
When this button is pressed, the tone and balance control is
bypassed. Press it again to turn to normal.
When this functions is active, the indicator lights.
F
Remote Sensor
When using the remote control unit, point it towards the remote
sensor.

G
BALANCE
Use this knob to adjust the balance of the speakers. Normally, set
the knob to the center position.
H
TREBLE
Use this knob to adjust the level of high frequency sound range.
(page 11)
I
BASS
Use this knob to adjust the level of low frequency sound range.
(page 11)
J
PHONES
For private listening, insert the headphones plug into this jack,
and adjust the volume by turning the VOLUME knob.
a
STANDBY/ON
Press this button to turn the unit on or standby.
b
TUNER, CD, iPod, AUX 1, AUX 2, PHONO
Use these buttons to select a source.
h
DIMMER
You can use this button to dim the display among three levels,
when the REMOTE CONTROL jacks of the T-H380 and A-H380 are
connected with the remote control connection cord.
i
Buttons for the operation of TEAC PD-H380 (CD).
You can operate the PD-H380, when the REMOTE CONTROL jacks
of the T-H380 and A-H380 are connected with the remote control
connection cord.
j
Search (m/,) /Scroll (°/‡)
Use these buttons to search for a track/file in CD mode.
Use these buttons to scroll menu of the iPod in iPod mode.
k
VOLUME
Use these buttons to adjust the volume.
l
MENU/stop (H)
Use this button to stop playback of the PD-H380 in CD mode.
Use this button to go back to previous menu in iPod mode. This
button is equivalent to the MENU button on your iPod.
ENGLISH
c
Buttons for the operation of TEAC T-H380 (TUNER).
You can operate the T-H380, when the REMOTE CONTROL jacks
of the t-H380 and A-H380 are connected with the remote control
connection cord.
d
MUTING
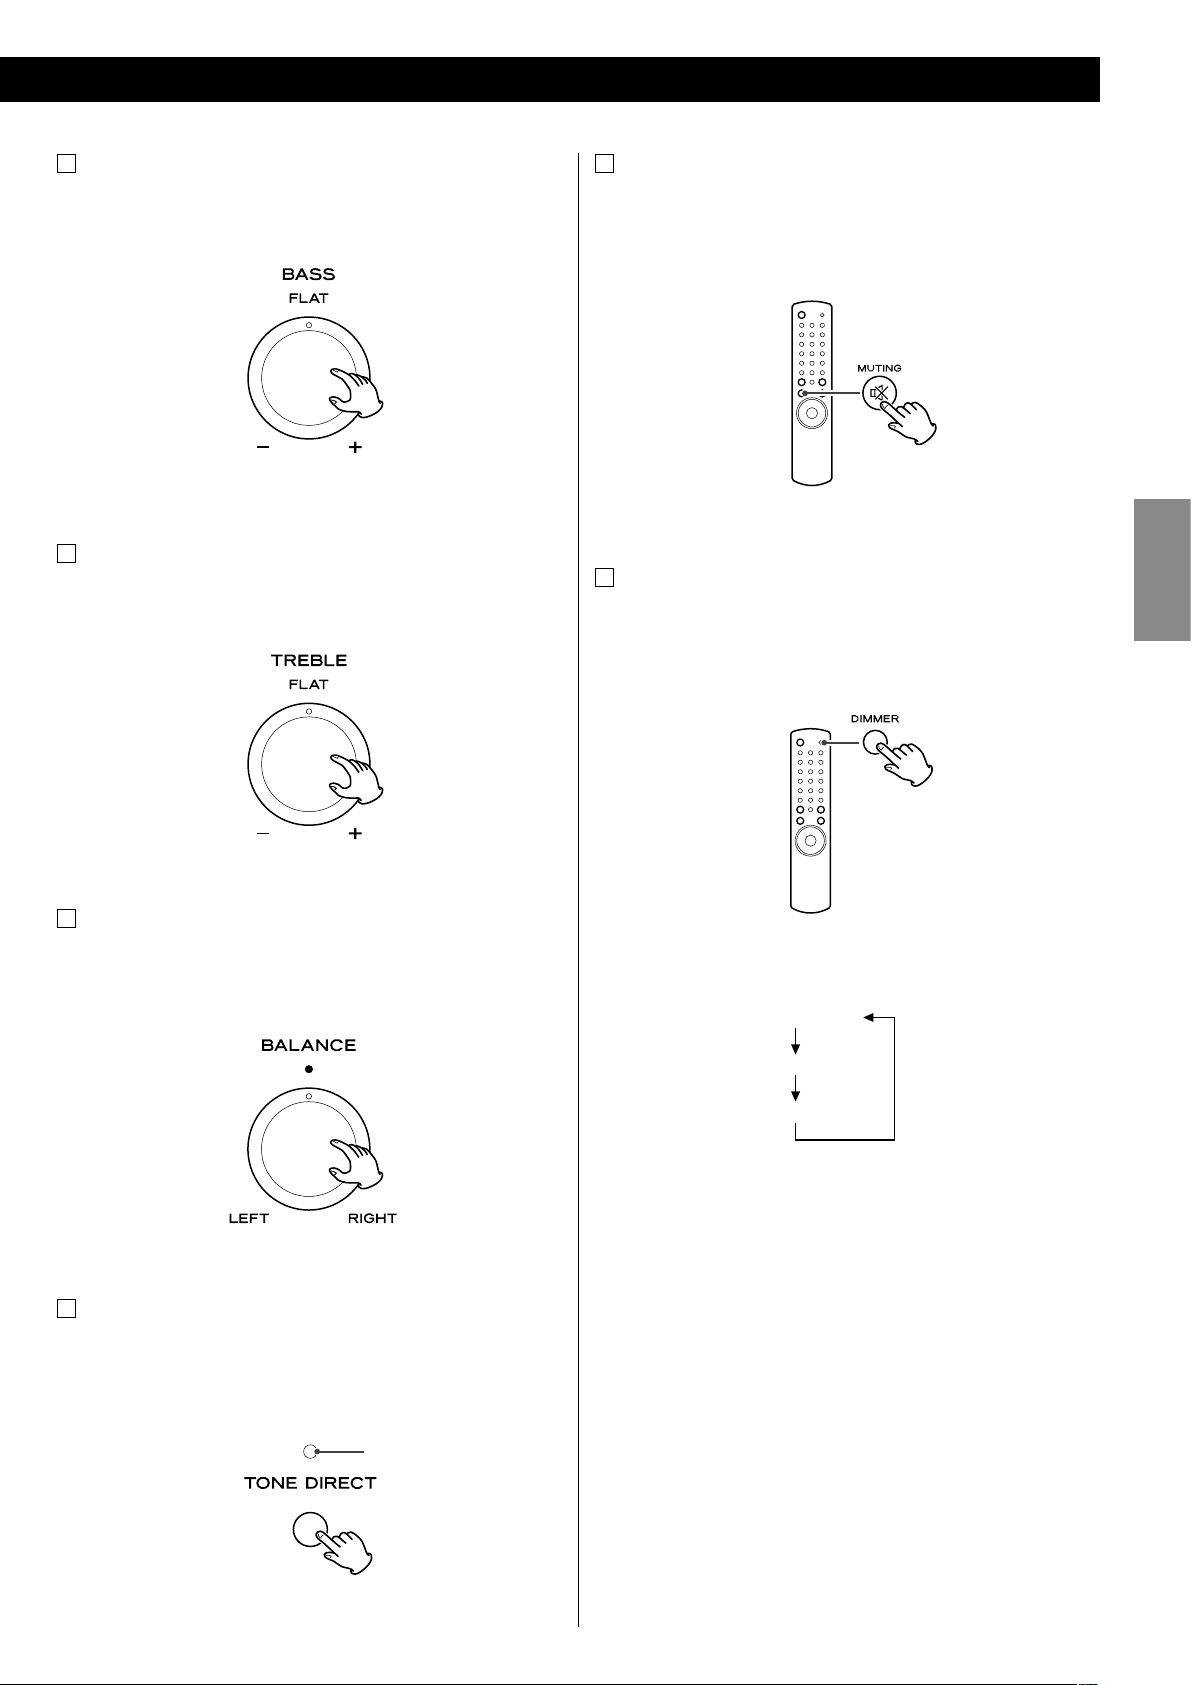
Use this button to mute the sound. (page 11)
e
SLEEP
You can operate the sleep timer function of the T-H380, when the
REMOTE CONTROL jacks of the T-H380 and A-H380 are connected
with the remote control connection cord.
f
skip (.//)
Use these buttons to skip tracks/files during playback of the PDH380 or iPod.
During playback, hold down these buttons to search for a track/
file.
m
ENTER
This button is equivalent to the Center button on your iPod.
In iPod mode, use this button to confirm selection in menus.
g
Play/Pause (y/J)
Use this button to start or pause playback of the PD-H380 or iPod.
9
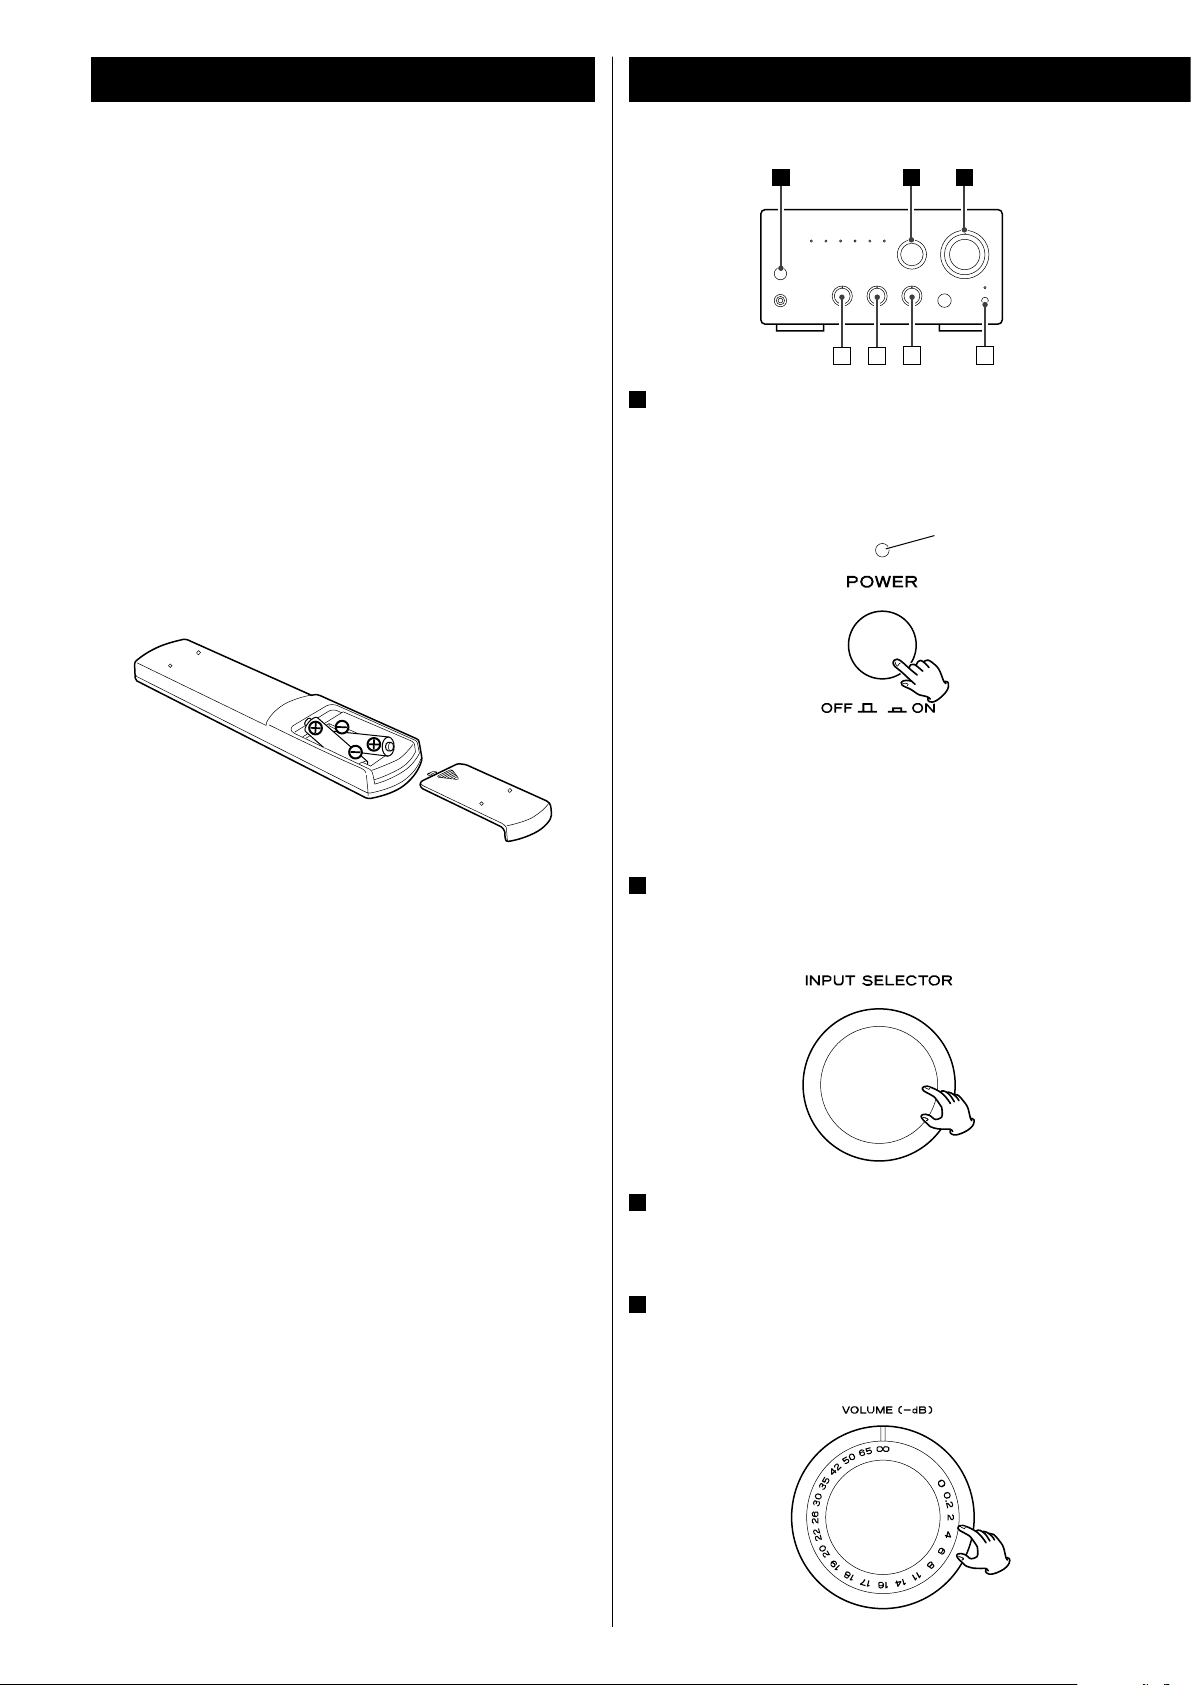
Remote Control Unit Basic Operation
421
A B
DC
The amplifier and Reference 380 series connected by remote
control cords can be operated by the provided remote control
unit.
When operating the remote control unit, point it towards the
REMOTE SENSOR on the front panel of the A-H380.
< E
ven if the remote control unit is operated within the effective
range, remote control operation may be impossible if there are
any obstacles between the unit and the remote control.
< I
f the remote control unit is operated near other appliances which
generate infrared rays, or if other remote control devices using
infrared rays are used near the unit, it may operate incorrectly.
Conversely, the other appliances may operate incorrectly.
Battery Installation
1
Press the power switch to turn the unit on.
When you use the system control function, and when you use
the daily timer or the sleep timer of the T-H380, set this switch on,
and turn the system on/standby using the remote control unit.
Standby/On indicator
Remove the battery compartment cover.
1.
Insert two “AAA” (R03, UM-4) dry batteries. Make sure that the
.
2
batteries are inserted with their positive “+” and negative “_”
poles positioned correctly.
3
. Close the cover.
Battery Replacement
If the distance required between the remote control unit and
main unit decreases, the batteries are exhausted. In this case
replace the batteries with new ones.
Precautions concerning batteries
< B
e sure to insert the batteries with correct positive “+” and
negative “_” polarities.
< U
se batteries of the same type. Never use different types of
batteries together.
< R
echargeable and non-rechargeable batteries can be used. Refer
to the precautions on their labels.
< W
hen the remote control unit is not to be used for a long time
(more than a month), remove the batteries from the remote
control unit to prevent them from leaking. If they leak, wipe
away the liquid inside the battery compartment and replace the
batteries with new ones.
< D
o not heat or disassemble batteries and never dispose of old
batteries by throwing them in a fire.
The Standby/On indicator turns from orange to blue.
< W
hen you turn on the system, the source that was selected last
time will start playback automatically.
2
Select a source
Select a source by turning the INPUT SELECTOR knob (or pressing
one of the INPUT SELECTOR buttons of the remote control unit).
3
Control the units to play
Please read the instructions of each component.
4
Adjust volume
Gradually turn up the volume to the required level by turning the
VOLUME knob.
10
A
Normal
Dimmer
Display o
To adjust bass
Turn this knob to adjust the level of low frequency sound range.
The position of flat is center.
B
To adjust treble
Turn this knob to adjust the level of high frequency sound range.
The position of flat is center.
E
Muting
To mute the sound temporarily, press the MUTING button. Press
the MUTING button again to restore the sound.
While muting is engaged, the pointer of the VOLUME knob
blinks..
F
Dimmer
You can dim the display of the T-H380 and PD-H380, when
the REMOTE CONTROL jacks of these units and the A-H380 are
connected with the remote control connection cord.
ENGLISH
C
To adjust balance
Adjusts the balance of the volume level between left and right
speakers.
Normally, set the knob to the center position.
D
Tone Direct
When this button is pressed, the tone and balance control is
bypassed. Press it again to turn to normal.
When this functions is active, the indicator lights.
indicator
< T
his setting is not memorized when the unit turns standby/on.
The next time the unit turn on, the display is illuminated as
normal.
< W
hen the unit is operated during the setting is “display off“, the
display turns normal for 3 seconds.
11
12
Listening to iPod
1
Select “iPod“ by turing the INPUT SELECTOR knob (or
pressing the iPod button button of the remote control
unit).
2
Insert the iPod into the Dock.
The iPod automatically turns on and starts playback from the
iPod’s music list.
When the iPod is inserted during the INPUT SELECTOR is set to
other source, the iPod will turn on and enter the pause mode.
To pause playback
During playback, press the play/pause button (G/J) to pause
playback. Playback stops at the current position.
To resume playback, press the play/pause button (G/J).
To skip to the next or a previous track/file
< M
ake sure to use an appropriate Dock adapter (see “Getting
started with iPod”).
<The iPod battery will be fully recharged when the iPod is docked
and the A-H380 is on or standby.
<When headphones are plugged into the iPod, sound comes from
both the speakers of the A-H380 and the headphones.
During playback, press the skip button (.//) repeatedly
until the desired track is found.
<When the .button is pressed during playback, the track being
played will be played from the beginning. If you want to play the
previous tracks, press the .button twice or more.
 Loading...