


ENGLISH
9A10272000
AM/FM Stereo Receiver
OWNER’S MANUAL
MANUEL DU PROPRIÉTAIRE
MANUAL DEL USUARIO
BEDIENUNGSANLEITUNG
MANUALE DI ISTRUZIONI
GEBRUIKSAANWIJZING
Z
AG
-
790
FRANÇAIS ESPAÑOL DEUTSCH
ITALIANO NEDERLANDS

3
ENGLISH
Contents Before Use
Thank you for choosing TEAC. Read this manual carefully
to get the best performance from this unit.
Before Use . . . . . . . . . . . . . . . . . . . . . . . . . . . . . . . . . . . . . . . . 3
Remote Control Unit. . . . . . . . . . . . . . . . . . . . . . . . . . . . . . . . . 4
Connecting Antennas . . . . . . . . . . . . . . . . . . . . . . . . . . . . . . . . 4
Connection. . . . . . . . . . . . . . . . . . . . . . . . . . . . . . . . . . . . . . . . 6
Names of Each Control . . . . . . . . . . . . . . . . . . . . . . . . . . . . . . . 8
Basic Operation. . . . . . . . . . . . . . . . . . . . . . . . . . . . . . . . . . . . 10
Radio Reception . . . . . . . . . . . . . . . . . . . . . . . . . . . . . . . . . . . 13
Preset Tuning . . . . . . . . . . . . . . . . . . . . . . . . . . . . . . . . . . . . . 14
RDS . . . . . . . . . . . . . . . . . . . . . . . . . . . . . . . . . . . . . . . . . . . . 15
RDS (PTY) . . . . . . . . . . . . . . . . . . . . . . . . . . . . . . . . . . . . . . . . 15
RDS (PTY Search) . . . . . . . . . . . . . . . . . . . . . . . . . . . . . . . . . . 16
TroubleShooting . . . . . . . . . . . . . . . . . . . . . . . . . . . . . . . . . . . 17
Specifications . . . . . . . . . . . . . . . . . . . . . . . . . . . . . . . . . . . . . 18
CAUTION Regarding Placement
To maintain proper ventilation, be sure to leave a space
around the unit (from the largest outer dimensions including
projections) equal to, or greater than, shown below.
Left and Right Panels : 10 cm
Rear Panel : 10 cm
Top Panel : 50 cm
CAUTION
Ensure this product is not exposed to dripping or splashing
and that no object filled with liquids, such as vases, is placed
on the product.
Do not install this equipment in a confined space such as a
book case or similar unit. Allow adequate air circulation
around this product.
Read this before operation
<
As the unit may become warm during operation, always leave
sufficient space around the unit for ventilation.
The ventilation holes should not be covered. Make sure there
is at least 50 cm (18 inches) of space above and at least 10
cm (4 inches) of space on each side of the unit. Do NOT place
anything on top of the unit.
<
The voltage supplied to the unit should match the voltage as
printed on the rear panel. If you are in any doubt regarding
this matter, consult an electrician.
<
Choose the installation location of your unit carefully. Avoid
placing it in direct sunlight or close to a source of heat. Also
avoid locations subject to vibrations and excessive dust, heat,
cold or moisture.
<
Do not place the unit on the amplifier/receiver.
<
Do not open the cabinet as this might result in damage to the
circuitry or electrical shock. If a foreign object should get into
the unit, contact your dealer or service company.
<
When removing the power plug from the wall outlet, always
pull directly on the plug, never yank the cord.
< Do not attempt to clean the unit with chemical solvents as
this might damage the finish. Use a clean, dry or slightly
damp cloth.
<
Keep this manual in a safe place for future reference.
Disposal of your old appliance
1.When this crossed-out wheeled bin
symbol is attached to a product it means
the product is covered by the European
Directive 2002/96/EC.
2.All electrical and electronic products
should be disposed of separately from
the municipal waste stream via designated collection
facilities appointed by the government or the local
authorities.
3. The correct disposal of your old appliance will help prevent
potential negative consequences for the environment and
human health.
4. For more detailed information about disposal of your old
appliance, please contact your city office, waste disposal
service or the shop where you purchased the product.

4
Connecting Antennas
FM Indoor Antenna
Connect the lead-type FM antenna to the FM 75Ω socket,
extend the lead and tune the tuner to your favorite station
(see page 13). Adjust the antenna in a suitable location like a
window frame or wall until the reception is best and then
affix the antenna in that position using thumb tacks, push
pins or any other suitable means.
FM Outdoor Antenna
In an area where FM signals are weak, it will be necessary to
use an outdoor FM antenna. Generally, a 3-element antenna
will be sufficient; if you live in an area where the FM signals
are particularly weak, it may be necessary to use one with 5
or more elements.
<
Disconnect the FM indoor antenna when using an outdoor
antenna.
Remote Control Unit
The receiver and some other TEAC components which have
mark on the front panel can be operated by the provided “UR”
remote control unit.
When operating the remote control unit, point it towards the
REMOTE SENSOR on the front panel of the receiver (or other
TEAC component).
<
Even if the remote control unit is operated within the effective
range, remote control operation may be impossible if there
are any obstacles between the unit and the remote control.
<
If the remote control unit is operated near other appliances
which generate infrared rays, or if other remote control
devices using infrared rays are used near the unit, it may
operate incorrectly. Conversely, the other appliances may
operate incorrectly.
Battery Installation
1. Remove the battery compartment cover.
2. Insert two “AA” (R6 or SUM-3) dry batteries. Make sure that
the batteries are inserted with their positive “+” and negative
“_
” poles positioned correctly.
3. Close the cover.
Battery Replacement
If the distance required between the remote control unit and
main unit decreases, the batteries are exhausted. In this case
replace the batteries with new ones.
Precautions concerning batteries
<
Be sure to insert the batteries with correct positive “+” and
negative “_
” polarities.
<
Use batteries of the same type. Never use different types of
batteries together.
<
Rechargeable and non-rechargeable batteries can be used.
Refer to the precautions on their labels.
<
When the remote control unit is not to be used for a long
time (more than a month), remove the batteries from the
remote control unit to prevent them from leaking. If they leak,
wipe away the liquid inside the battery compartment and
replace the batteries with new ones.
<
Do not heat or disassemble batteries and never dispose of old
batteries by throwing them in a fire.

5
ENGLISH
AM Indoor Loop Antenna
The high-performance AM loop antenna provided with this
unit is sufficient for good reception in most areas.
To stand the loop antenna on a surface, fix the claw to the
slot in the antenna base.
Connect the loop antenna’s wires to the AM antenna
terminals.
How to connect:
Press the lever, insert the end of the cord,
then release the lever. Make sure it is
fastened securely by pulling the cord lightly.
Make sure only the bare, stripped wire is
inserted in the jack and that no plastic
insulation is preventing contact between the
antenna wire and terminal.
Place the antenna on a shelf or hang it on a window frame,
etc., in the direction which gives the best reception. Keep all
other wires such as power cords, speaker wires or
interconnect wires as far away as possible from the antenna.
AM Outdoor Antenna
If the AM loop antenna provided does not deliver sufficient
reception (often due to being too far from the transmitter or
in a concrete building, etc.), it may be necessary to use an
outdoor AM antenna.
Use either a high quality commercial AM antenna or, if not
available, an insulated wire more than 5 m (15 feet) long,
strip one end, and connect this to the terminal as shown.
The antenna wire should be strung outdoors or indoors near
a window. For better reception, connect the GND terminal to
a reliable ground.
Note:
Even when using an outdoor AM antenna, do not disconnect
the AM loop antenna.
AM Outdoor Antenna
AM Loop Antenna:
Connect the black wire
to the left jack (GND)
and the white wire to
the right jack.
6
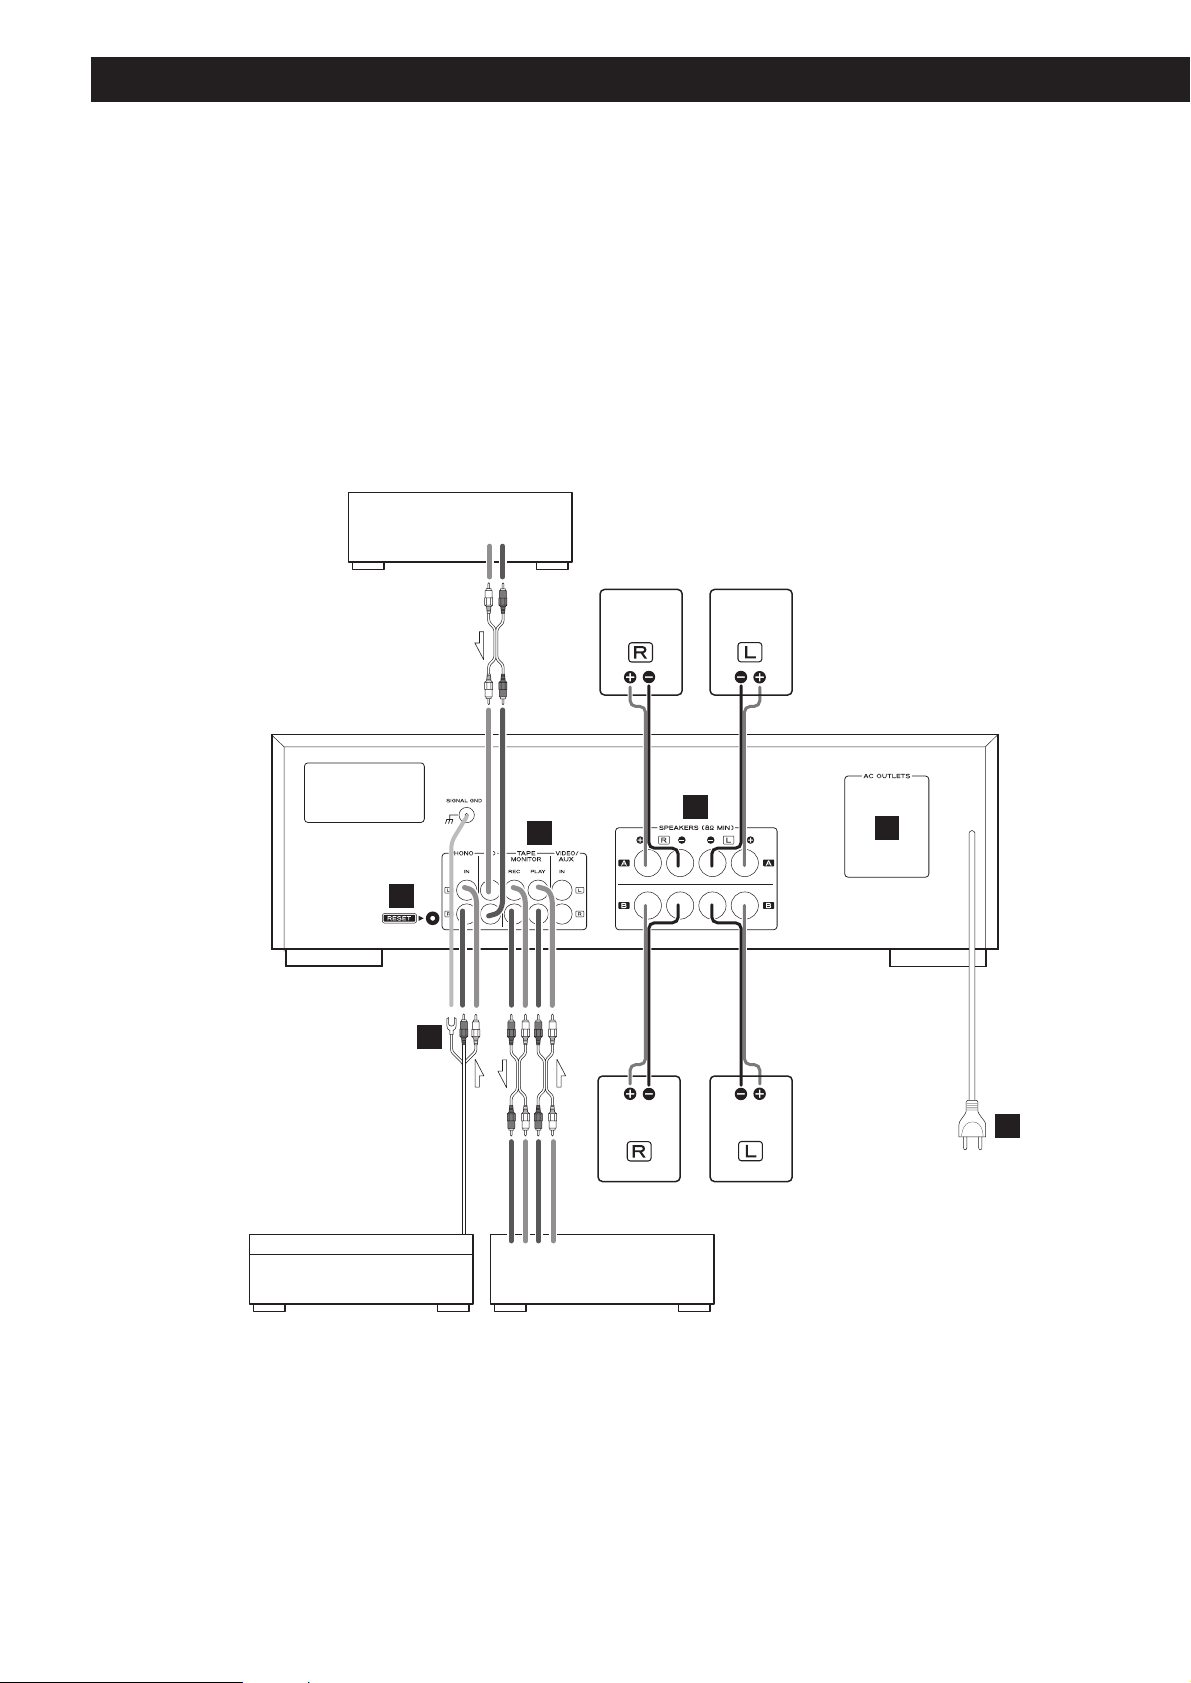
Connection
CAUTION:
< Switch off the power to all equipment before making connections.
<
Read the instructions of each component you intend to use with this unit.
<
Be sure to insert each plug securely. To prevent hum and noise, avoid bundling the signal
interconnection cables together with the AC power cord or speaker cables.
CD PLAYER
TURNTABLE TAPE
Speakers A
Speakers B
LINE OUT
RL
D
C
RL
LINE
IN
B
RL
LINE
OUT
A
E
F

7
ENGLISH
CD, TAPE MONITOR, VIDEO/AUX jacks
Analog 2-channel audio signal is input or output from these
jacks. Connect the component with commercially-available
RCA cables.
Make sure to connect:
white plug q
white jack (L: left channel)
red plug q
red jack (R: right channel)
PHONO jacks/SIGNAL GND terminal
Connect the turntable’s RCA pin cords to PHONO jacks.
Make sure to connect:
white plug q
white jack (L: left channel)
red plug q
red jack (R: right channel)
Connect the turntable’s ground cord to SIGNAL GND
terminal.
RESET switch
In the following cases, function buttons may not work
properly.
• When the system is damaged by electrical shock.
• When the power is irregular or has electrical noises.
In these cases, press the RESET switch once or twice with a
pencil or a ball-point pen lightly.
All the settings kept in memory (such as preset stations) will
be erased.
AC Outlet (Unswitched)
This outlet is active only when the unit is on or standby.
When the power switch of the main unit is off, the outlet is
inactive.
Caution:
Make sure that the total power consumption of all
equipment connected to the outlet does not exceed 100
watts or 1A.
Power cord (AC)
Be sure to connect the power cord to an AC outlet which
supplies the correct voltage.
Hold the power plug when plugging or unplugging the
power cord. Never pull or yank on the power cord.
F
E
D
C
B
Speaker Connections
Caution:
Caution:
The metal portions of the two separate wires should not
touch or an electrical short can occur. Shorted wires can
create a fire hazard or induce a failure in your equipment.
How to connect
1.Turn the terminal cap counterclockwise to loosen it. The
speaker terminal caps cannot be fully removed from the base.
2.Insert the wire into the terminal fully and turn the terminal
cap clockwise to securely connect it .
Make sure none of the wire insulation is under the terminal,
only the bare, stripped wire.
3.Make sure it is fastened firmly by pulling the cable lightly.
A
To avoid damaging the speakers with a sudden high-level
signal, be sure to switch the power off before connecting
the speakers.
<
Check the impedance of your speakers. Connect speaker
with an impedance of 8 ohms or more.
< The black speaker terminals are - (negative).
Generally, the + side of the speaker cable is marked to make
it distinguishable from the - side of the cable. Connect this
marked side to the + terminal and the unmarked side to the
black - terminal.
<
Prepare the speaker cables for connection by stripping off
approximately 10 mm or less of the outer insulation.
(Removing too much insulation may lead to a short circuit if
the bared wires should come in contact with each other.)
Twist the strands of the stripped wires tightly together:

8
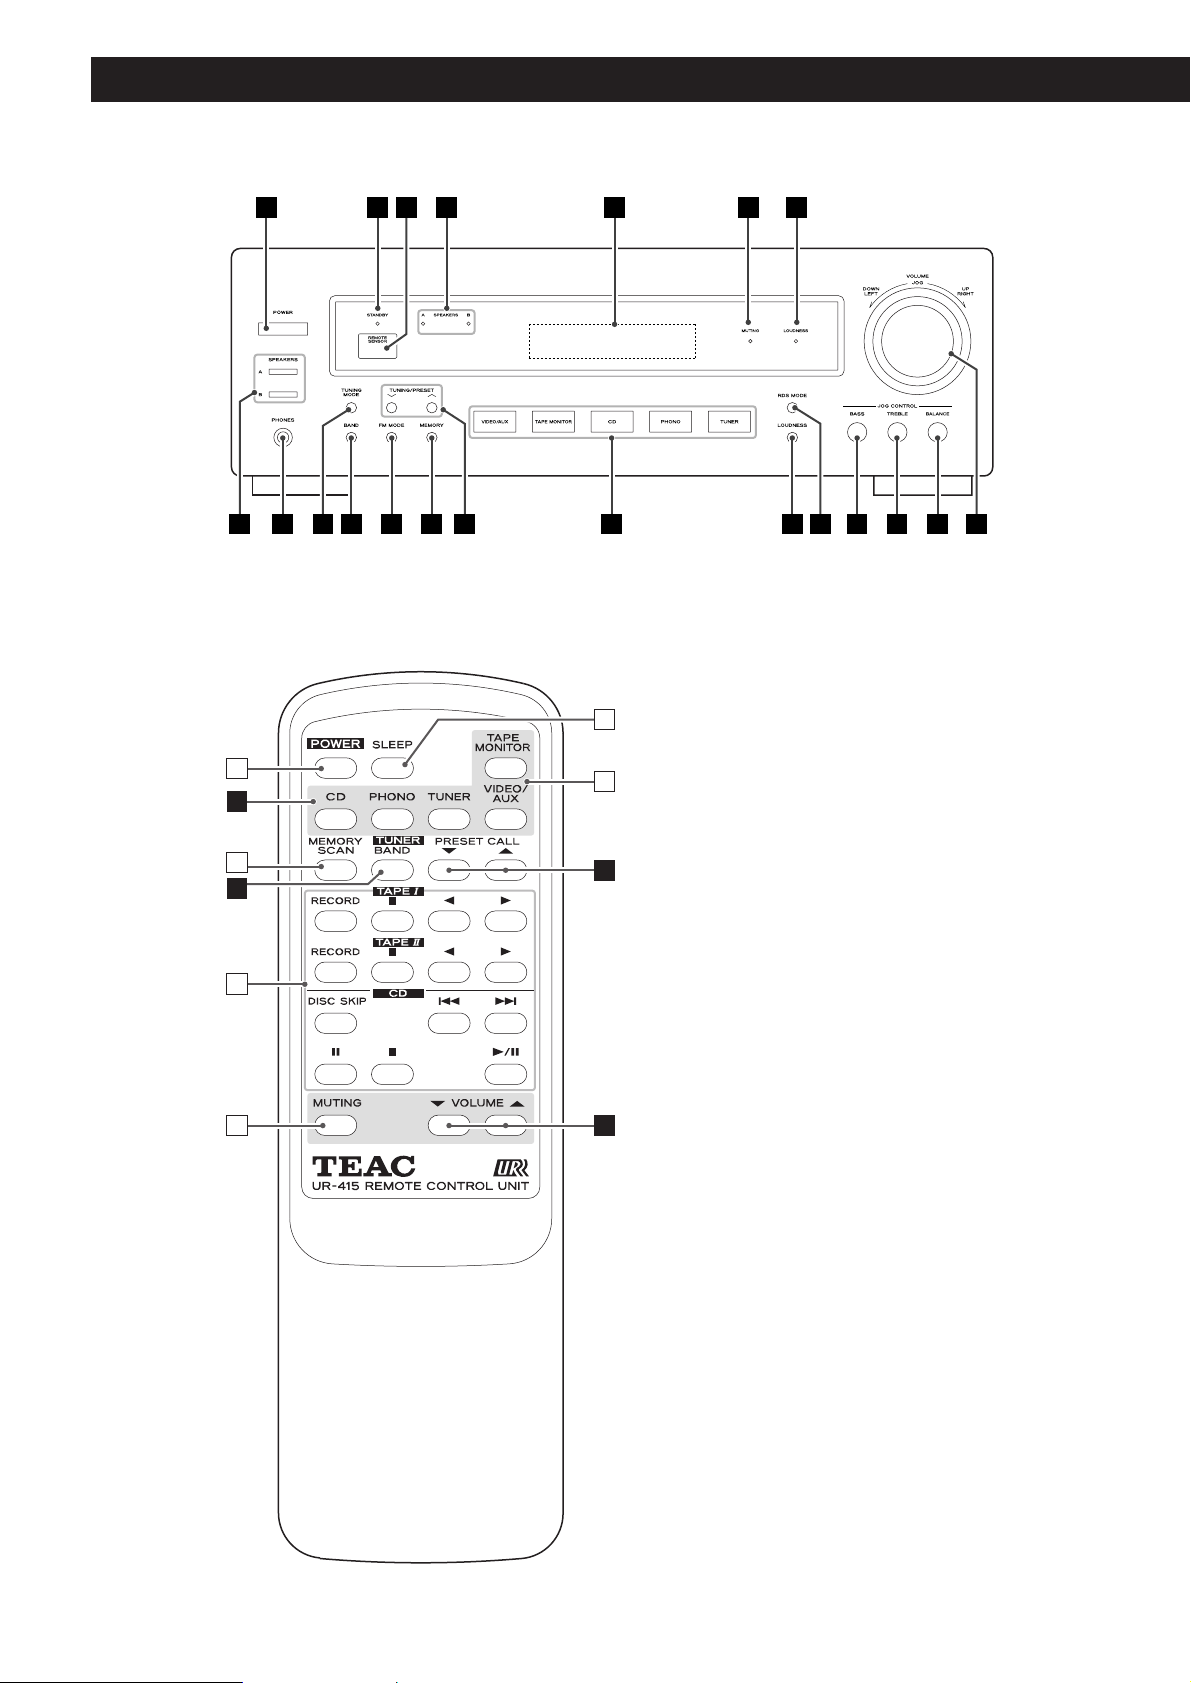
Names of Each Control
A B F GC D E
Q
RT SU O K J I H
a
N
b
R
c
N
M
LP
e
f
O
d
H

9
ENGLISH
POWER (standby/on) button
When the power switch of the main unit is depressed, use
this button to turn the unit on or standby.
MEMORY SCAN button
Use this button to scan preset channels.
Operation buttons for TEAC’s cassette tape deck and CD
player
Use these buttons to operate TEAC components with
mark.
MUTING button
Use this button to mute the sound.
SLEEP button
Use this button to set sleep timer.
INPUT
(CD, PHONO, TUNER, TAPE MONITOR, VIDEO/AUX)
Used to select a function.
Note:
To simplify explanations, instructions in this manual refer to
the names of the buttons on the front panel only. Associated
controls on the remote control will also operate similarly.
f
e
d
c
b
a
POWER switch
Press this switch to turn the unit on or off.
STANDBY indicator
This indicator lights when the unit is in the standby mode.
In the standby mode, press the POWER button of the remote
control unit or the Input buttons of the main unit to turn the
unit on.
When the unit is turned on, the indicator goes off.
REMOTE SENSOR
When operating the remote control unit, point it towards the
REMOTE SENSOR.
SPEAKERS indicator
This indicator lights when the SPEAKERS button (A or B) is set
to on.
Display
When the unit is on, the current status of the unit is
displayed.
MUTING indicator
This indicator blinks during the muting.
LOUDNESS indicator
This indicator lights when the LOUDNESS button is set to on.
VOLUME/JOG
Turn this knob (or press the VOLUME buttons of the remote
control unit) to adjust the volume.
BALANCE button
Press this button and turn the VOLUME/JOG dial to adjust.
TREBLE button
Press this button and turn the VOLUME/JOG dial to adjust.
BASS button
Press this button and turn the VOLUME/JOG dial to adjust.
RDS MODE button
In FM tuner mode, use this button for RDS function.
RDS is available in European countries only.
LOUDNESS button
Use this button to compensate for the loss of bass at low
volumes.
INPUT
(CD, PHONO, TUNER, TAPE MONITOR, VIDEO/AUX)
Used to select a function.
When the unit is in the standby mode, press any one of these
buttons to turn the unit on.
N
M
L
K
J
I
H
G
F
E
D
C
B
The equipment draws nominal non-operating power from
the AC outlet with its POWER switch in the OFF position.
A
TUNING/PRESET buttons
In the manual tuning mode, use these buttons to tune in a
station.
In the preset tuning mode, use these buttons to select a
preset channel.
MEMORY button
Use this button to store preset channels into memory.
FM MODE button
Use this button to select stereo or monaural.
BAND button
Use this button to select FM or AM.
TUNING MODE button
Use this button to select the manual tuning mode or the
preset tuning mode.
PHONES jack
For private listening, insert the headphones plug into this jack,
and adjust the volume by turning the VOLUME knob.
SPEAKERS buttons
Use these buttons to turn on or off the speakers.
on : Sound is output from the speakers.
off : No sound is output from the speakers.
U
T
S
R
Q
P
O

10
Basic Operation 1
2. Start recording.
<
If a 3-head cassette tape deck is connected to TAPE MONITOR
(PLAY and REC) jacks, and if the tape monitor function is set
to on during recording, you can listen to not the source
sound but the sound being recorded. Press the TAPE
MONITOR button to turn on or off the tape monitor function.
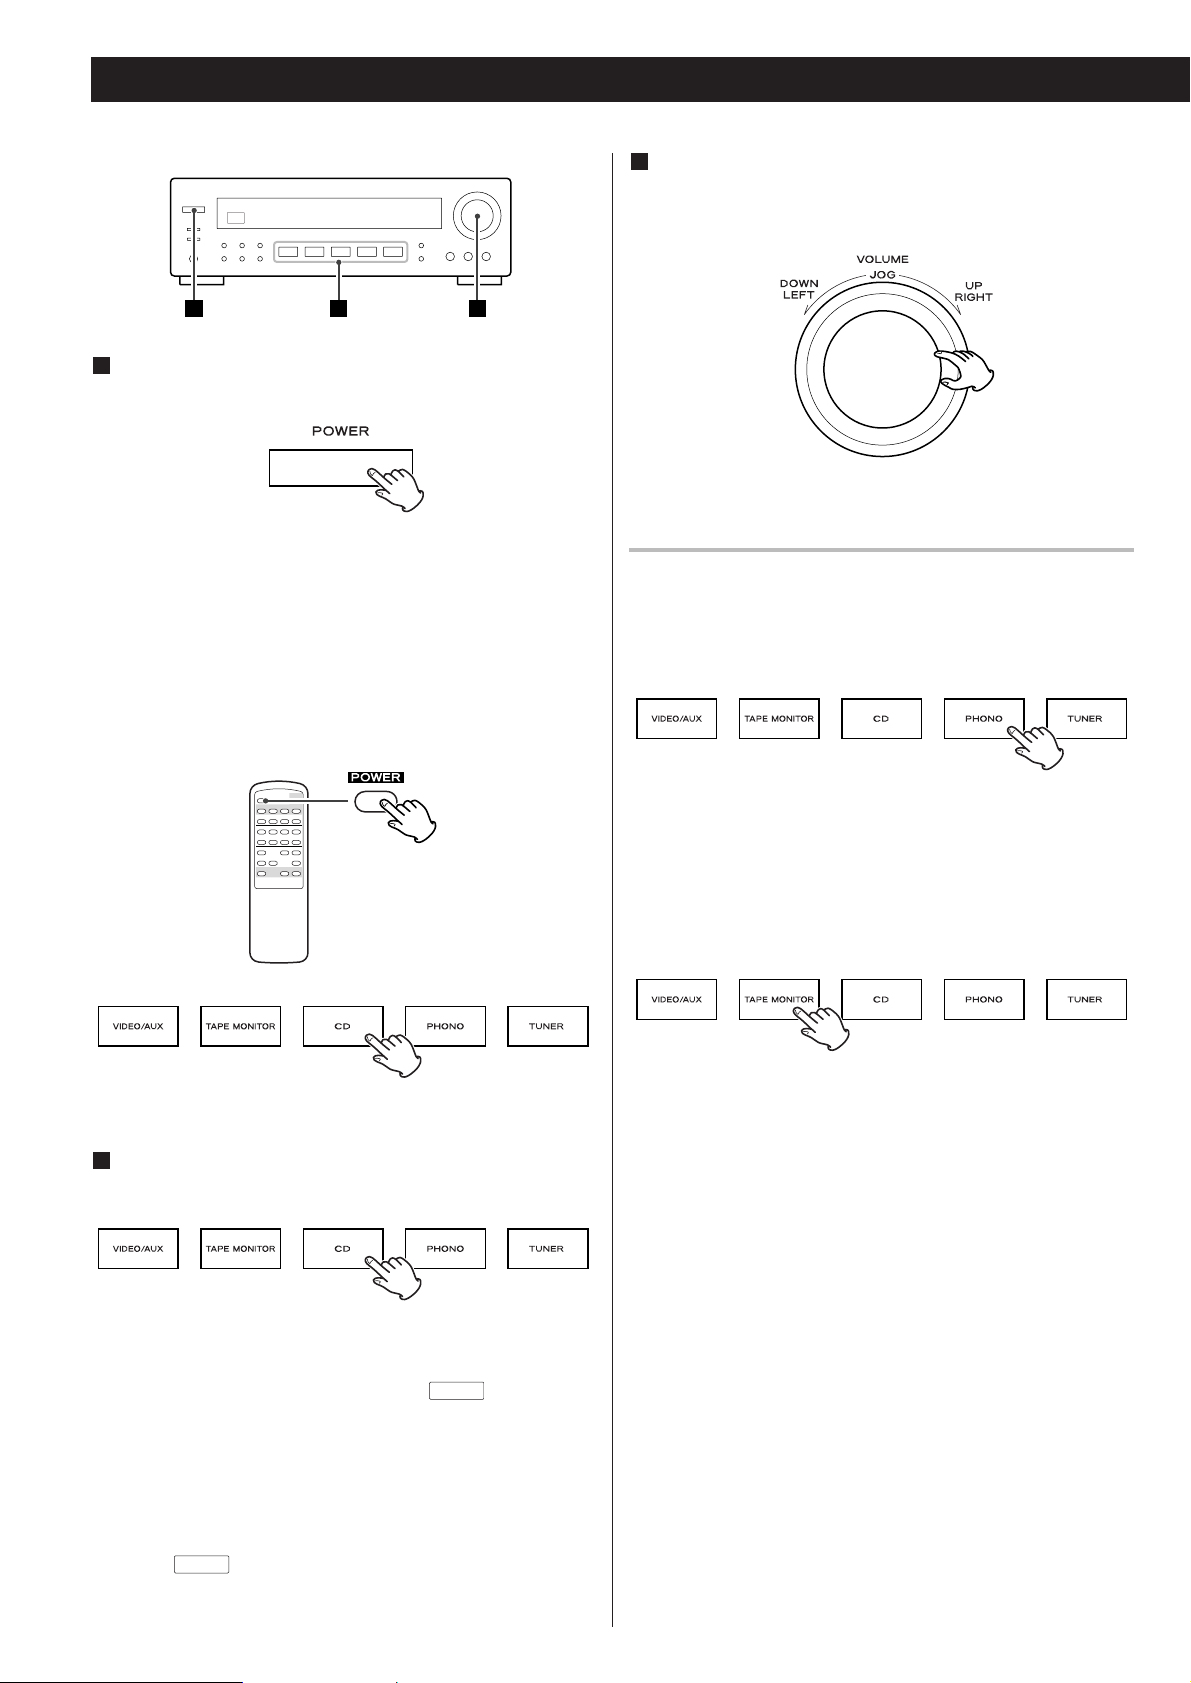
Press the POWER switch.
The unit is turned on.
1
Play the source, and gradually turn up the volume to
the required level by turning the VOLUME knob.
3
Tape Monitor
Press the TAPE MONITOR button to turn on or off the tape
monitor function. When the tape monitor is on, the “
TAPE
” indicator lights on the display.
To listen to the TAPE, turn the tape monitor function ON
using the TAPE MONITOR button.
To listen to a source other than TAPE
If the tape monitor function is ON (“
TAPE
” indicator is
lit), press the TAPE MONITOR button to turn it off.
MON
MON
< When the unit is turned on, the MUTING indicator lights
momentarily. This is not a malfunction.
< When the unit is in the standby mode and the standby
indicator is lit, press the POWER button of the remote control
unit or any of the Input buttons of the main unit (TUNER,
PHONO, CD, TAPE MONITOR or VIDEO/AUX) to turn the unit
on.
Select a source by pressing the corresponding Input
button.
2
Recording
1. Select the source to be recorded using the
corresponding Input button.
2 31

11
ENGLISH
DCB E FA
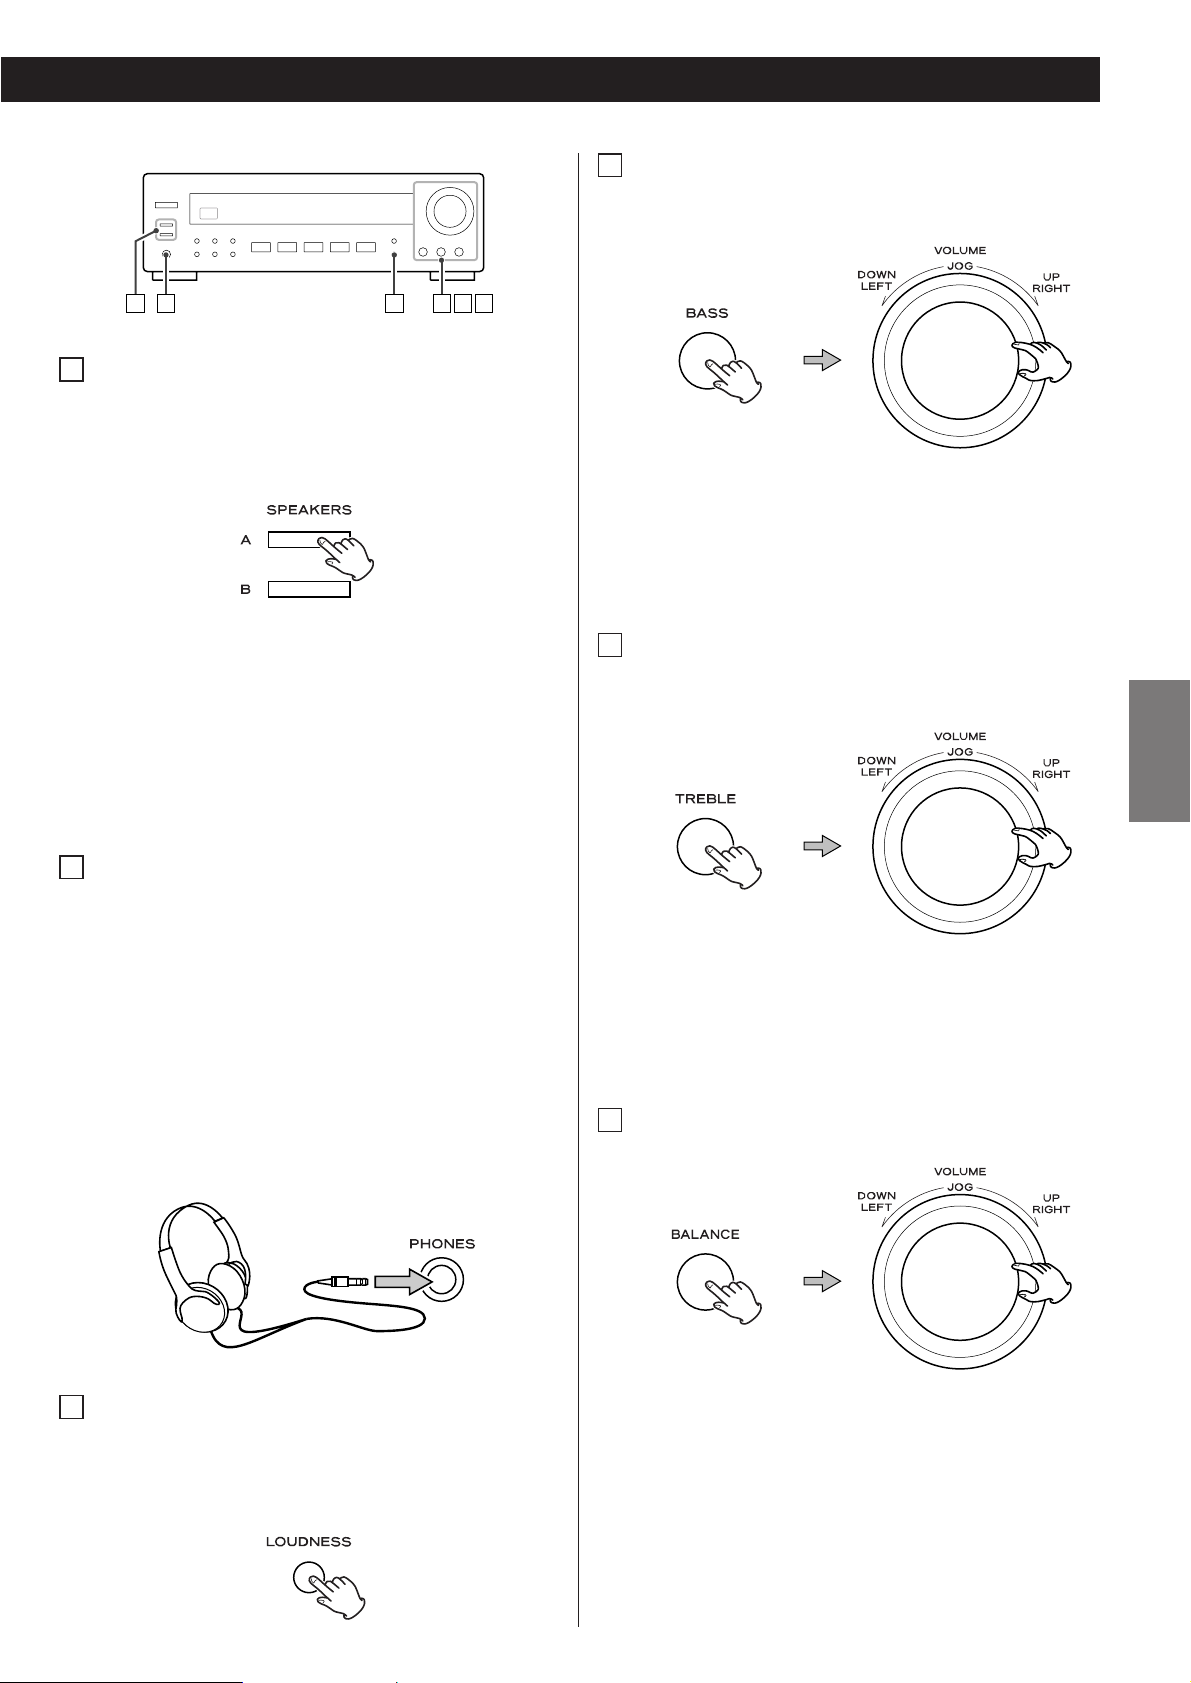
Selecting the speakers
Press the SPEAKERS button (A or B) to turn the speakers on
or off.
When ON is selected, the SPEAKERS indicator lights.
A
Listening through headphones
For private listening, first reduce the volume level on the
receiver to minimum. Then insert the plug from your
headphones into the PHONES jack, and adjust the volume
by turning the VOLUME knob.
If you want to cut off the sound from speakers, press the
SPEAKERS button to turn it off.
CAUTION
Always lower the volume level prior to plugging in your
headphones. TO AVOID DAMAGING YOUR HEARING - Do
not place your headphones on your head until after you
have plugged them in.
B
Caution:
If the speakers are connected to the SPEAKERS A terminals,
turn the SPEAKER A on using the SPEAKERS A button. If no
speakers are connected to the SPEAKER B terminal, be sure
to turn off the SPEAKER B button, or no sound will be
output from SPEAKER A, and vice versa.
LOUDNESS button
This button compensate for the loss of bass at low volumes.
Set this button to the OFF position when listening at normal
levels.
C
1.Press the BASS button. “BAS” appears on the display.
2.Within 3 seconds, turn the JOG dial to adjust the level.
The level can be adjusted in 2 steps from –10 to +10.
Treble Control
This control is used for adjusting the level of the high
frequency sound range.
E
Bass Control
This control is used for adjusting the level of the low
frequency sound range.
D
1.Press the TREBLE button. “TRE” appears on the display.
2.Within 3 seconds, turn the JOG dial to adjust the level.
The level can be adjusted in 2 steps from –10 to +10.
How to adjust the balance between the
left and right speakers
F
1.Press the BALANCE button. “BAL” appears on the display.
2.Within 3 seconds, turn the JOG dial to adjust the level.
The level can be adjusted from L+16 to R+16:
L+16 ... L+1 a
CENT q R+1 ... R+16
Normally, select “CENT (center)”.

12
Basic Operation 2
The power can be switched off after a specified amount of time.
Press the SLEEP button repeatedly until desired time appears on
the display.
The sleep time can be changed in steps of 10 minutes.
SLEEP 90 (80, 70...or 10)
The SLEEP indicator lights, and the power will be switched off
90 (80, 70...or 10) minutes later.
Normal display
Sleep timer is off.
<
When you set the sleep timer, the display is dimmed.
<
If you want to check the remaining time, press the SLEEP
button once. The remaining time will be displayed for about 3
seconds, and return to the normal display.
To mute the sound temporarily, press the MUTING button.
Press the MUTING button again to restore the sound.
<
While muting is engaged, the MUTING indicator blinks.
Sleep Timer Muting
13
ENGLISH
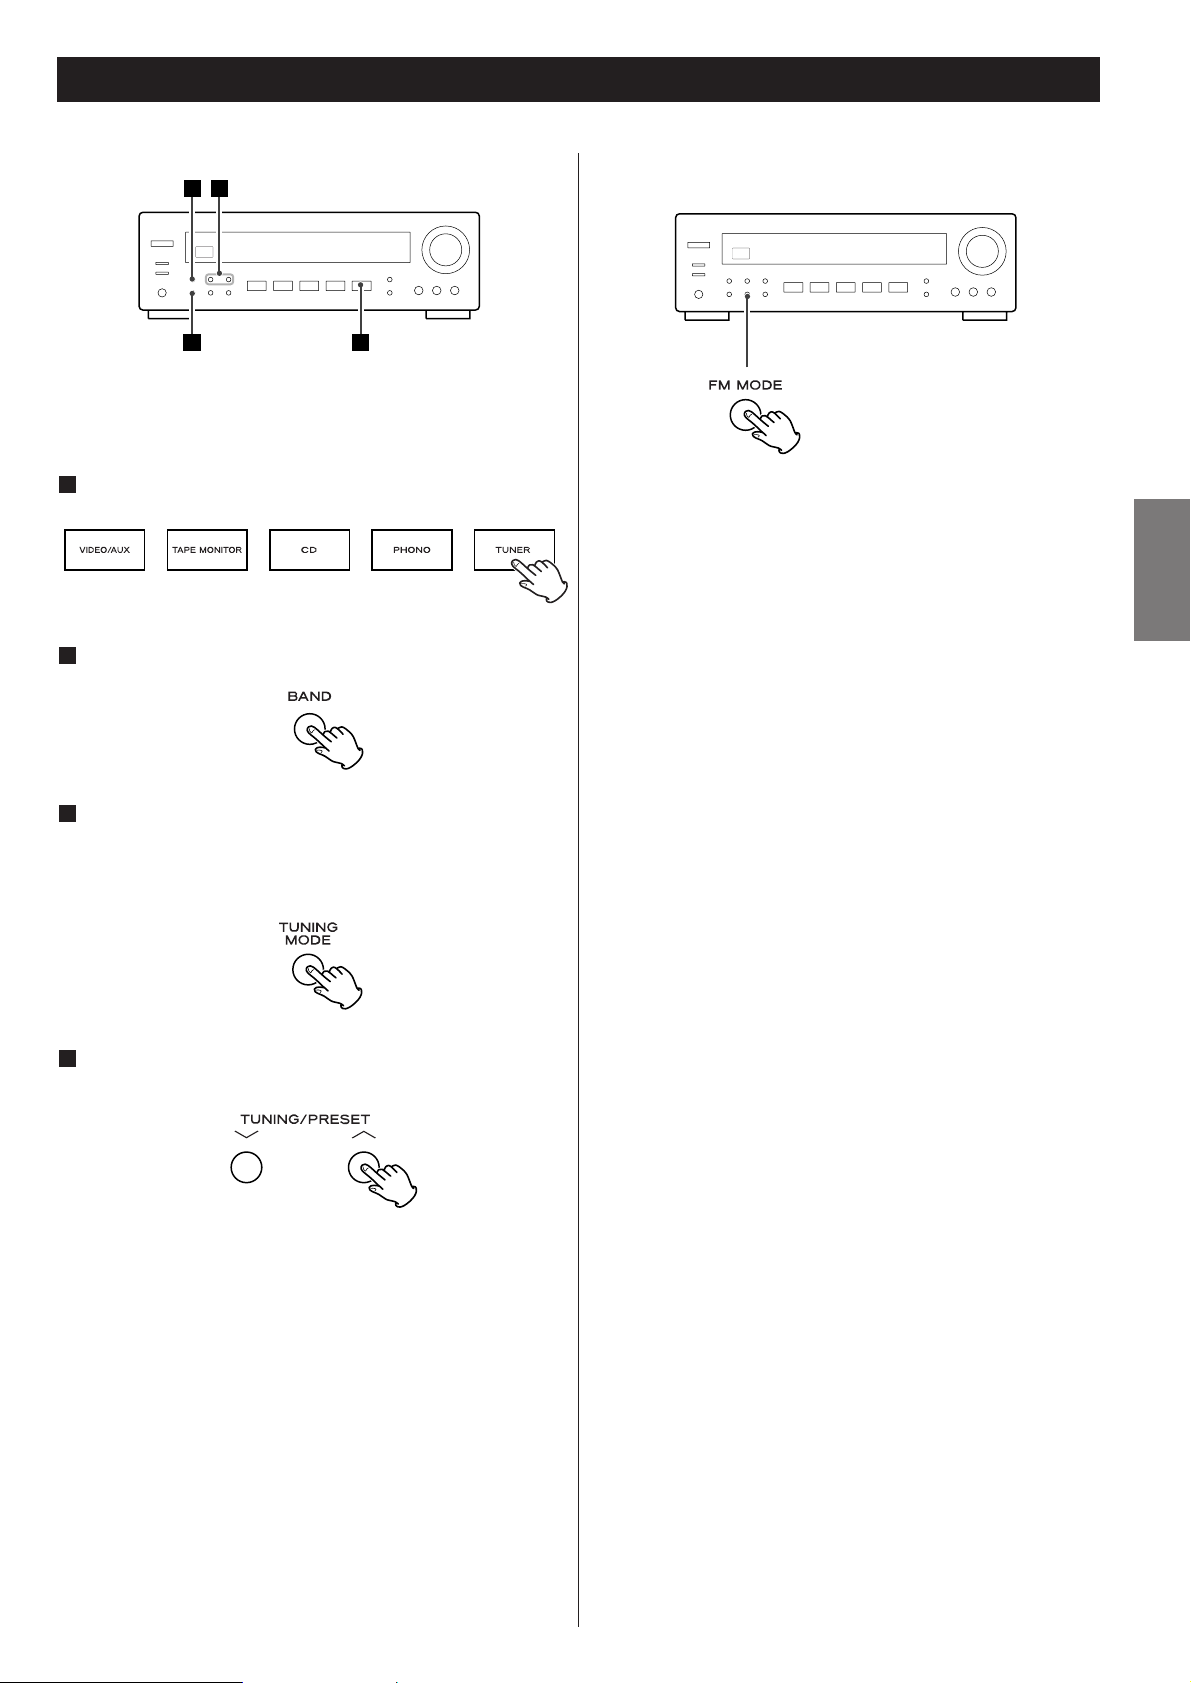
Radio Reception
Hold down the TUNING/PRESET button for 0.5 to 2 seconds.
When a station is found, the tuning process will stop
automatically.
If you want to stop the tuning process, press the
TUNING/PRESET button.
Selecting stations which cannot be tuned automatically
(manual selection)
When the TUNING/PRESET button is pressed momentarily (0.5
second or less), the frequency changes by a fixed step.
Press the TUNING button repeatedly until the station you
want to listen to is found.
< “TUNED” is displayed when a broadcast is correctly tuned in.
3 4
Pressing this button alternates between Stereo mode and Mono
mode.
Stereo
FM stereo broadcasts are received in stereo.
The “STEREO” indicator lights on the display when an FM
stereo broadcast is tuned in.
<
If the sound is distorted and the “STEREO” indicator light
flashes, the signal is not strong enough for good stereo
reception. In this case, change to MONO mode.
Mono
To compensate for weak FM stereo reception, select this
mode. Reception will now be forced monaural, reducing
unwanted noise.
Press the TUNER button.
1
Select AM or FM by pressing the BAND button.
2
If “CH” indicator is lit, press the TUNING MODE button
to select the manual tuning mode.
The “CH” indicator disappears from the display.
This button is used to change the tuning mode.
3
Select the station you want to listen to (auto selection).
4
FM MODE Button
12

14
Preset Tuning
2. Press the MEMORY SCAN button of the remote control
unit.
The preset channels stored in memory are scanned at 5
seconds intervals. When the station you want to listen to is
found, press the MEMORY SCAN button again to stop
scanning.
<
A preset channel with no signal will be skipped.
Manual Memory Presetting
You can store FM and AM stations from Channel 1 to 30
respectively.
Tune in a station you want to listen to (see steps to
of page 13).
Press the MEMORY button.
2
4
11
How to select preset stations
Select AM or FM by pressing the BAND button.
1
Memory Scan
1. Select AM or FM by pressing the BAND button.
To store more stations, repeat steps to .
31
While the “MEMORY” indicator is blinking, select a
preset channel to store the station using the
TUNING/PRESET buttons, and then press the MEMORY
button.
3
If “CH” indicator is not lit, press the TUNING MODE
button to select the preset tuning mode.
2
Select a preset channel using the TUNING/PRESET
buttons.
3
Memory Backup
If the POWER switch of the main unit is turned off or the
power supply is interrupted for 3 days or longer, all the
settings kept in memory (such as preset stations) will be
erased.
To avoid loosing your preset stations, it is advisable to keep
your AG-790 in the STANDBY mode when not in use.
TUNING/PRESETTUNING MODE
BAND
MEMORY

15
ENGLISH
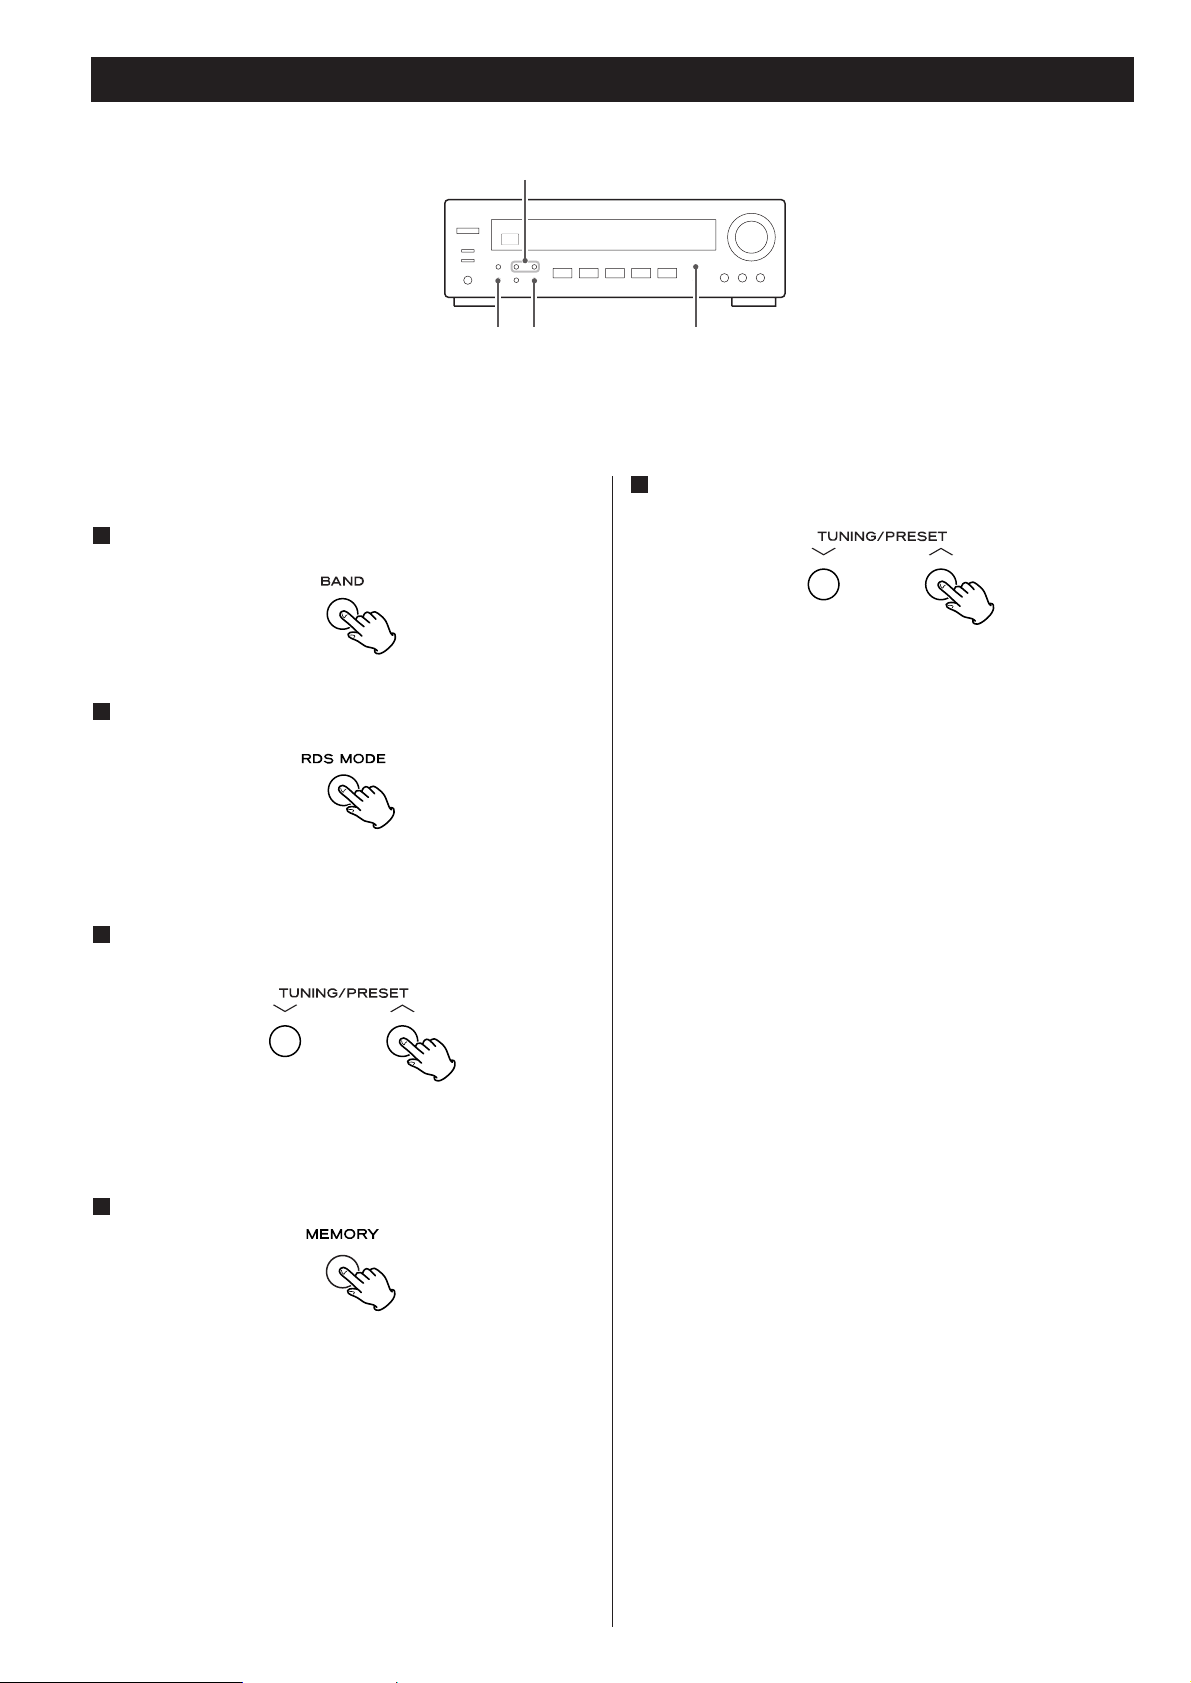
RDS
The Radio Data System(RDS) is a broadcasting service which
allows stations to send additional information along with the
regular radio programme signal.
RDS works on the FM waveband in Europe only.
Tune in an FM station (see steps to of page 13).
Press the RDS MODE button.
2
411
Each time the RDS MODE button is pressed briefly, the RDS
mode is changed as follows:
PS (Programme Service name)
When you select PS, “PS” will blink for about 4 seconds and
then PS or a station’s name will be displayed. If there is no
PS data, the frequency will be displayed.
PTY (Programme Type)
When you select PTY, “PTY” will blink for about 4 seconds
and then the programme type will be displayed. If there is
no PTY data, the frequency will be displayed.
RT (Radio Text)
When you select RT, “RT” will blink for about 4 seconds and
then the news of stations composed of up to 64 symbols
will be displayed.
If there is no RT data, the frequency will be displayed.
TA (Traffic Announcement)
When you select TA, “TA” will blink for 4 seconds and then
the unit searches for a traffic announcement.
< If the station stops broadcasting traffic announcement, the
tuner will find other stations repeatedly.
CT (Clock Time)
displays the information about times provided from the
station.
When you select CT, “CT” will blink for about 4 seconds
and then the clock time will be displayed.
If there is no CT data, RDS mode will be switched to PS
mode automatically.
RDS (PTY)
NEWS : brief announcements, events, public opinion,
reports, actual situations.
AFFAIRS : a kind of suggestion including practical
announcements other than news, documents,
discussion, analysis and so on.
INFO : daily information or reference such as weather
forecast, consumer guide, medical assistance and
so on.
SPORT : sports related programs.
EDUCATE : educational and cultural information.
DRAMA : all kinds of radio concert and serial drama.
CULTURE : all aspects of national or local culture including
religious events, philosophy, social science,
language, theatre, and so on.
SCIENCE : programs on natural science and technology
VARIED : popular programs such as quiz, entertainment,
private interview, comedy, satire and so on.
POP M : program on commercial, practical and popular
songs, and sale volume of discs, etc.
ROCK M : practical modern music generally composed and
played by young musicians.
EASY M : popular music usually lasting for less than 5
minutes.
LIGHT M : classical music, instrumental music, chorus, and
light music favored by non-professionals.
CLASSICS : orchestra including great operas, symphony,
chamber music and so on.
OTHER M : other music styles(Rhythm & Blues, Reggae, etc.)
WEATHER : weather reports, forecast
FINANCE : financial reports, commerce, trading
CHILDREN : children’s programs
SOCIAL : social affairs
RELIGION : religious programs
PHONE IN : program in which the public expresses its view by
phone.
TRAVEL : travel reports
LEISURE : programs concerning recreational activities
JAZZ : jazz music
COUNTRY : country music
NATION M : national music
OLDIES : music from the so-called golden of popular music
FOLK M : folk music
DOCUMENT : documentaries
TEST
ALARM : a program notifying an emergency or a natural
disaster.
16
Searching will start.
< When the programme that you have selected is found,
searching will stop and the programme type will be displayed.
< If the same programme type is not found during PTY Search,
it will stop at the beginning frequency.
< If you want to stop searching, press the RDS MODE button.
RDS (PTY Search)
A station can be searched by this function.
Select FM by pressing the BAND button.
1
Press the RDS MODE button for more than 2 seconds.
2
“SEARCH” blinks on the display.
Select the desired PTY programme using the
TUNING/PRESET buttons.
3
You can select from 31 kinds (see page 15).
The programme blinks in the display.
Press the MEMORY button.
4
Blinking of the programme stops.
Press the TUNING/PRESET button.
5
TUNING/PRESET
BAND
MEMORY RDS MODE

17
ENGLISH
TroubleShooting
If you experience problems with this unit, please take the time to
look through this chart and see if you can solve the problem
yourself before you call your dealer or TEAC service center.
No power
e
Check the connection to the AC power source. Check and
make sure the AC source is not a switched outlet and if it is,
the switch is turned on. Make sure there is power to the AC
outlet by plugging another item such as a lamp or fan.
No sound from speakers.
e
Adjust the volume.
e
Set the BALANCE control to “CENT”.
e
Check the connection to the speakers.
e
If your speakers are connected to the SPEAKER A terminals,
make sure the SPEAKER A button on the front panel is
depressed. If you have no speakers connected to the
SPEAKER B terminals, Make sure the SPEAKER B button on
the front panel is not depressed. Only select the SPEAKER
outputs with speakers connected.
e
If the tape monitor function is ON and the “
TAPE
”
indicator is lit, press the TAPE MONITOR button to turn it
off.
The volume of SPEAKERS A is different from that of B.
e
The volume and sound quality may differ depending on the
speaker’s size, etc. If you want to use SPEAKERS A and B
simultaneously with the same volume, connect exactly the
same type of speakers to the SPEAKERS A and B terminals.
The sound is noisy or humming.
e
The unit is too close to a TV set or similar appliances.
Relocate the units so they no longer interfere with each
other, or turn them off.
e
Connect the turntable’s ground cord to the SIGNAL GND
terminal.
Sound cuts off during listening to the music or no sound
even though power is ON.
e
Speaker impedance is less than prescribed for this unit.
e
Turn the power off and reduce the volume.
Low bass response.
e
Speaker polarity (+/_) is reversed. Check all speakers for
correct polarity.
Cannot listen to any station, or signal is too weak.
e
Make sure the antenna is properly connected.
e
Tune in the station properly.
e
If a TV is near the unit, turn it off.
e
Install the antenna again after relocating it to a better
reception position.
e
An external antenna may be required.
Though the broadcast is stereo, it sounds monaural.
e
Press the FM MODE button.
MON
Remote control doesn’t work.
e
Press the POWER switch of the main unit to turn it on.
e
If the batteries are dead, change the batteries.
e
Use remote control unit within the range (5m /15ft) and
point at the front panel.
e
Clear obstacles between the remote control unit and the
main unit.
e
If a strong light is near the unit, turn it off.
If normal operation is not restored, unplug the power cord
from the outlet and plug it again.
Maintenance
If the surface of the unit gets dirty, wipe with a soft cloth or
use diluted neutral cleaning liquid. Be sure to remove any
fluid completely. Do not use thinner, benzine or alcohol as
they may damage the surface of the unit.

18
Specifications
Amplifier Section
Output Power . . . . . . . . . . . . . . . . . . . . . . . . . . .100 + 100 watts RMS (0.9 % THD, 1 kHz, 8 ohms)
Total Harmonic Distortion. . . . . . . . . . . . . . . . . . . . . . . . . . . . . . . . . . . . 0.05 % (at 80 watts,1 kHz)
Input Sensitivity/Impedance . . . . . . . . . . . . . . . PHONO: 6.5 mV/22 kohms, LINE: 230 mV/22 kohms
Frequency Response. . . . . . . . . . . . . PHONO: 20 Hz to 20 kHz, ±3 dB, LINE: 20 Hz to 35 kHz, –3 dB
Signal-to-Noise Ratio. . . . . . . . . . . . . . . . . . . . . . . . . . . . PHONO: 75 dB (IHF-A), LINE: 90 dB (IHF-A)
Tone Control. . . . . . . . . . . . . . . . . . . . . . . . . . . BASS: ±10 dB at 100 Hz, TREBLE: ±10 dB at 10 kHz
Loudness Control . . . . . . . . . . . . . . . . . . . . . . . . . . . . . . . . . . . . . . . . . . . . . . . . . . +4 dB at 100 Hz
FM Tuner Section
Tuning Range . . . . . . . . . . . . . . . . . . . . . . . . . . . . . . . . . . . . 87.5 MHz to 108.0 MHz, 50 kHz steps
Usable Sensitivity . . . . . . . . . . . . . . . . . . . . . . . . . . . . . . . . . . . . . . . . . . . . . . . . . Mono: 10 dBµV/m
50 dB Quieting Sensitivity . . . . . . . . . . . . . . . . . . . . . . . . . . . Mono: 15 dBµV/m, Stereo: 33 dBµV/m
Image Rejection Ratio . . . . . . . . . . . . . . . . . . . . . . . . . . . . . . . . . . . . . . . . . . . . . . . . . . . . . . . 35 dB
AM Suppresion Ratio. . . . . . . . . . . . . . . . . . . . . . . . . . . . . . . . . . . . . . . . . . . . . . . . . . . . . . . . 50 dB
Harmonic Distortion (1 kHz) . . . . . . . . . . . . . . . . . . . . . . . . . . . . . . . . . Mono: 0.5 %, Stereo: 0.5 %
Frequency Response . . . . . . . . . . . . . . . . . . . . . . . . . . . . . . . . . . . . . . . . . . . 20 Hz to 15 kHz, –3 dB
Stereo Separation (1 kHz) . . . . . . . . . . . . . . . . . . . . . . . . . . . . . . . . . . . . . . . . . . . . . . . . . . . . 35 dB
Signal-to-Noise Ratio . . . . . . . . . . . . . . . . . . . . . . . . . . . . . . . . . Mono: 70 dB, Stereo: 65 dB (IHF-A)
AM Tuner Section
Tuning Range . . . . . . . . . . . . . . . . . . . . . . . . . . . . . . . . . . . . . . . 522 kHz to 1,620 kHz, 9 kHz steps
Usable Sensitivity. . . . . . . . . . . . . . . . . . . . . . . . . . . . . . . . . . . . . . . . . . . . . . . . . . . . . . . . . . . 55 dB
Total Harmonic Distortion . . . . . . . . . . . . . . . . . . . . . . . . . . . . . . . . . . . . . . . . . 1 % at 100 dBµV/m
Signal-to-Noise Ratio. . . . . . . . . . . . . . . . . . . . . . . . . . . . . . . . . . . . . . . . . . . . 40 dB at 100 dBµV/m
General
Power Requirements. . . . . . . . . . . . . . . . . . . . . . . . . . . . . . . . . . . . . . . . . . . . . . . . 230 V AC, 50 Hz
Power Consumption . . . . . . . . . . . . . . . . . . . . . . . . . . . . . . . . . . . . . . . . . . . . . . . . . . . . . . . 280 W
AC Outlet (Total 100 W max) . . . . . . . . . . . . . . . . . . . . . . . . . . . . . . . . . . . . . . . . . . Unswitched x 1
Dimensions (W x H x D) . . . . . . . . . . . . . . . . . . . . . . . . . . . . . . . . . . . . . . . . . . 435 x 144 x 330 mm
Weight (net) . . . . . . . . . . . . . . . . . . . . . . . . . . . . . . . . . . . . . . . . . . . . . . . . . . . . . . . . . . . . . . 7.4 kg
Standard Accessories
AM Loop Antenna x 1
FM Antenna x 1
Remote Control Unit x 1
Battery (AA, R6, SUM-3) x 2
<
Design and specifications are subject to change without notice.
<
Illustrations may differ slightly from production models.

19
FRANÇAIS
Sommaire Avant Utilisation
Nous vous remercions pour l’achat d’un appareil TEAC. Lire
ce manuel avec attention pour obtenir les meilleures
performances possibles de cet appareil.
ATTENTION
Ne pas exposer l’appareil à l’humidité ou aux projections
d’eau; ne pas poser d’objets contenant de l’eau, tels qu’un
vase, ou un liquide quelconque, sur l’appareil.
Ne pas installer l’appareil dans un endroit clos tel qu’une
bibliothèque ou un meuble fermé.
Lire les consignes suivantes avant toute utilisation
<
L’appareil pouvant dégager de la chaleur lorsqu’il fonctionne,
laissez un espace suffisant autour de l’appareil afin de
permettre une ventilation naturelle.
Ne pas obstruer les orifices de ventilation. Laissez au moins 50
cm de libre au-dessus et au moins 10 cm de chaque côté de
l’appareil.
Ne placez RIEN au-dessus de l’appareil.
<
La tension d’alimentation utilisée doit être identique à la
tension indiquée sur la plaque à l’arrière de l’appareil. En cas
de doute, n’hésitez pas à consulter un électricien.
<
Choisissez soigneusement l’endroit où vous installerez
l’appareil. Evitez de le placer dans un endroit exposé
directement aux rayons solaires ou à proximité d’une source
de chaleur. Evitez également les endroits soumis à des
vibrations ou exposés à la poussière, à la chaleur, au froid et à
l’humidité.
<
Ne placez pas l’appareil sur l’amplificateur ou le récepteur.
<
N’ouvrez jamais l’appareil pour ne pas endommager les
circuits ou vous exposer à un risque d’électrocution. Au cas
où un objet tomberait par inadvertance dans l’appareil,
contactez votre revendeur ou la société chargée de la
maintenance.
<
Pour débrancher le cordon d’alimentation de la prise murale,
tirez directement sur la prise, ne tirez jamais sur le cordon.
< N’essayez pas de nettoyer l’appareil avec un détergent
chimique, vous risqueriez d’abîmer la finition du revêtement.
Utilisez toujours un chiffon propre et sec.
<
Conservez soigneusement ce manuel pour pouvoir vous y
référer ultérieurement.
Avant Utilisation . . . . . . . . . . . . . . . . . . . . . . . . . . . . . . . . . . . 19
Boîtier de télécommande . . . . . . . . . . . . . . . . . . . . . . . . . . . . 20
Raccordements d’antenne. . . . . . . . . . . . . . . . . . . . . . . . . . . . 20
Connexions. . . . . . . . . . . . . . . . . . . . . . . . . . . . . . . . . . . . . . . 22
Noms des commandes . . . . . . . . . . . . . . . . . . . . . . . . . . . . . . 24
Fonctionnement de base. . . . . . . . . . . . . . . . . . . . . . . . . . . . . 26
Syntoniseur. . . . . . . . . . . . . . . . . . . . . . . . . . . . . . . . . . . . . . . 29
Syntonisation préréglée. . . . . . . . . . . . . . . . . . . . . . . . . . . . . . 30
RDS . . . . . . . . . . . . . . . . . . . . . . . . . . . . . . . . . . . . . . . . . . . . 31
RDS (Programmes PTY) . . . . . . . . . . . . . . . . . . . . . . . . . . . . . . 31
RDS (Recherche PTY). . . . . . . . . . . . . . . . . . . . . . . . . . . . . . . . 32
Dépannage. . . . . . . . . . . . . . . . . . . . . . . . . . . . . . . . . . . . . . . 33
Caractéristiques techniques. . . . . . . . . . . . . . . . . . . . . . . . . . . 34
Mise au rebut de votre ancien appareil
1. Quand ce symbole de poubelle sur roues
barrée d’une croix est joint à un produit,
cela signifie que ce produit est couvert
par la Directive Européenne 2002/96/EC.
2.Tous les produits électriques et
électroniques doivent être jetés
séparément des ordures ménagères via des collecteurs
désignés agréés par le gouvernement ou les autorités
locales.
3. La gestion correcte de l’élimination de votre ancien appareil
aide à prévenir les conséquences potentiellement négatives
pour l’environnement et la santé humaine.
4. Pour des informations plus détaillées sur la mise au rebut
de votre ancien appareil, veuillez contacter votre mairie, le
service de traitement des ordures ou le magasin dans lequel
vous avez acheté le produit.

20
Antenne FM intérieure
Connectez l’antenne FM filaire à la prise FM 75Ω, déployez la
et accordez vous sur votre station préférée (voir page 29).
Positionnez l’antenne à un endroit approprié tel qu’un
encadrement de fenêtre ou mur afin d’obtenir la meilleure
réception puis fixez la en utilisant des punaises, épingles ou
tout autre fixation approprié.
Antenne FM extérieure
Dans les zones où les signaux FM sont faibles, il sera
nécessaire de faire appel à une antenne extérieure. En général
une antenne 3 éléments suffira ; si vous résidez à un endroit
où les signaux FM sont particulièrement faibles il peut s’avérer
nécessaire d’employer une antenne à 5 éléments ou plus.
<
Débranchez l’antenne intérieure lorsque vous utilisez une
antenne extérieure.
Raccordements d’antenneBoîtier de télécommande
Ce récepteur et autre composants TEAC qui portent la marque
sur le panneau avant peuvent fonctionner utilisant la
télécommande “UR” fournie.
Si vous utilisez la télécommande, pointez là vers le capteur situé
sur le panneau avant du récepteur ( ou autre composant TEAC).
<
Même si le boîtier de télécommande est activé dans la zone de
fonctionnement, la commande à distance peut être impossible
s’il y a des obstacles entre le lecteur et le boîtier de
télécommande.
<
Si le boîtier de télécommande fonctionne dans le voisinage
d’autres appareils générant des rayons infrarouges, ou si
d’autres télécommandes utilisant des rayons infrarouges sont
utilisées près du lecteur, le lecteur peut de ne pas bien
fonctionner. Dans la situation inverse, les autres apaareils
peuvent ne pas bien fonctionner.
Mise en place des piles
Retirer le couvercle du compartiment des piles.
Introduire deux piles “AA“ (R6, SUM-3). S’assurer que les
piles sont correctement mises en respectant les polarités plus
+
et moins _ .
Fermer le couvercle jusqu’au déclic.
Remplacement des piles
Si vous remarquez que la distance entre le boîtier de
télécommande et le lecteur devient plus courte pour un
fonctionnement correct, ceci indique que les piles sont usées.
Dans ce cas, remplacer les piles par des nouvelles.
Précautions à observer concernant les piles
<
Bien placer les piles en respectant les polarités plus + et
moins _
.
<
Utiliser des piles du même type. Ne jamais essayer d’utiliser
des types de pile différents ensemble.
<
Des piles ou des batteries peuvent être utilisées. Se référer à
leurs étiquettes pour les précautions à respecter.
<
Si le boîtier de télécommande n’est pas utilisé pendant une
longue période (pluss d’un mois), retirer les piles du boîtier de
télécommande pour éviter des fuites de pile. Si elles coulent,
essuyer le liquide dans le compartiment des piles et remplacer
les piles par des neuves.
<
Ne pas chauffer, démonter les piles ni les mettre au feu.
3
2
1

21
FRANÇAIS
Antenne AM intérieure à cadre.
L’antenne cadre AM à haute performance fournie avec
l’appareil est suffisante pour une bonne réception dans la
plupart des régions.
Pour faire tenir l’antenne droite, fixez la griffe sur la fente à la
base de l’antenne.
Connectez les extrémités de l’antenne cadre aux bornes
antenne AM.
Branchement des enceintes
Appuyez sur le levier, insérez le bout du fil,
ensuite relâcher le levier.
Assurez-vous que le fil est bien fixé en place
en tirant légèrement sur le cordon. Assurezvous que seulement le bout dénudé du fil est
inséré dans la prise et qu’aucun plastique
prévient un bon contact entre le fil de
l’antenne et son borne.
Placez l’antenne sur une étagère ou suspendez la dans un
encadrement de fenêtre, etc. Orientez la dans la direction qui
donne la meilleure réception. Eloignez autant que possible
tous les fils tels que câbles secteur, haut-parleurs ou
d’interconnexion de l’antenne.
Antenne extérieure AM
Si l’antenne cadre fournie ne fournit pas une réception
satisfaisante (souvent en raison de l’éloignement de
l’émetteur, ou dans un building en béton, etc.), il pourra être
nécessaire de recourir à une antenne AM extérieure.
Utilisez une antenne du commerce haute qualité ou, si non
disponible, un fil isolé de plus de 5m de long dénudé à une
extrémité et raccordé à l’entrée comme indiqué.
L’antenne filaire doit être tendu à l’extérieur ou à l’intérieur
près d’une fenêtre. Pour une meilleure réception, raccordez la
borne GND à une terre fiable.
Remarque:
Même quand vous utilisez une antenne AM extérieure, ne
déconnectez pas l’antenne cadre.
Antenne AM (MW)
extérieure
Antenne cadre AM (MW):
Branchez le conducteur
noir sur la borne gauche
(GND) et le conducteur
blanc sur la borne droite.

22
Connexions
PRÉCAUTION:
<
Coupez l’alimentation de tous les appareils avant d’effectuer les raccordements.
<
Lisez les instructions qui accompagnent chaque appareil que vous avez l’intention d’utiliser en
association avec cet appareil-ci.
<
Veillez à ce que chaque fiche soit soigneusement insérée. Pour éviter les ronflements et les bruits
parasites, évitez d’attacher les câbles d’interconnexion parcourus par les signaux avec le cordon
d’alimentation secteur ou les câbles de liaison aux enceintes.
LECTEUR CD
TABLE TOURNANTE PLATINE CASSETTE
HAUT-PARLEURS A
HAUT-PARLEURS B
LINE OUT
RL
B
D
C
RL
RL
LINE
LINE
OUT
IN
A
E
F

23
FRANÇAIS
Prises PHONO
Borne SIGNAL GND (MASSE DU SIGNAL)
Branchez le cordon RCA de la table tournante aux prises
PHONO.
Veillez à brancher:
la fiche blanche q
la prise blanche (L: voie gauche)
la fiche rouge q
la prise rouge (R: voie droite)
Branchez le fil de masse au borne SIGNAL GND (MASSE DU
SIGNAL).
Réinitialisation [RESET]
Dans les cas suivants, les boutons de fonction peuvent ne
pas marcher correctement.
• Lorsque le système est endommagé par un choc électrique.
• Lorsque le secteur est irrégulier ou est perturbé.
Dans ces cas, pressez légèrement l’interrupteur RESET une
fois ou deux avec un crayon ou stylo bille.
Tous les réglages conservés en mémoire (tels que les stations
préréglées) seront effacés.
Embase Secteur (non commutée)
Ces prises sont actives seulement lorsque l’appareil est en
service ou en veille.
Lorsque l’interrupteur d’alimentation de l’appareil est sur la
position de repos, les prises sont inactives.
Attention:
Assurez-vous que la puissance totale des équipements
raccordés n’excède pas 100 Watts ou 1A.
Cordon d’alimentation (AC)
Bien brancher le cordon d’alimentation sur une prise de
courant qui fournit la tension correcte.
< Tenir la fiche d’alimentation en branchant ou débranchant le
cordon d’alimentation.
<
Pour débrancher le cordon d’alimentation de la prise murale,
tirez directement sur la prise, ne tirez jamais sur le cordon.
F
E
D
C
Branchement des haut-parleurs
Attention :
Pour éviter d’endommager les enceintes avec un signal
brusque de niveau trop élevé, veillez à mettre l’appareil hors
tension avant de raccorder les enceintes.
<
Vérifiez l’impédance de vos enceintes. Raccordez des
enceintes dont l’impédance est d’au moins 8 ohms.
<
Les bornes noires des enceintes correspondent au – (bornes
négatives)
Généralement, le côté + des câbles d’enceinte est indiqué
ou identifié par une couleur, qui le distingue du “–”.
Raccordez le côté ainsi marqué à la borne + et le côté
dépourvu de marque à la borne –.
<
Avant de raccorder les câbles des enceintes, préparez-les en
les dénudant sur environ 10 mm maximum, de la gaine
isolante (pas plus pour éviter tout risque de court-circuit).
Torsadez les brins des extrémités de fils dénudés :
Les parties métalliques de deux fils séparés ne doivent jamais
se toucher pour éviter tout risque de court-circuit. Les fils en
court-circuit peuvent provoquer un incendie ou détériorer
sérieusement votre appareil.
Pour effectuer le raccordement
1.Tournez le capuchon de la borne dans le sens contraire des
aiguilles d’une montre pour le desserrer. Le capuchon ne
peut pas être séparé de la borne.
2.Introduisez le conducteur dans la borne puis tournez le
capuchon dans le sens des aiguilles d’une montre pour
assurer son maintien.
3.Tirez doucement sur le conducteur pour vous assurer qu’il
est solidement maintenu.
Prises CD, TAPE MONITOR, VIDEO/AUX
Un signal audio analogique 2 canaux d’entrée ou de sortie
est disponible sur ces prises. Raccordez l’appareil avec des
câbles standard de type RCA.
Veillez à brancher:
la fiche blanche q
la prise blanche (L: voie gauche)
la fiche rouge q
la prise rouge (R: voie droite)
B
A
24
Noms des commandes
Remarque:
Pour simplifier les explications, les instructions
utilisent les noms des touches et commandes sur
le panneau avant, sans mentionner l’utilisation
de la télécommande.
A B F GC D E
N
b
R
Q
RT SU O K J I H
N
M
LP
e
a
f
O
c
d
H

25
FRANÇAIS
Interrupteur POWER
Appuyez sur cet interrupteur pour mettre l’appareil en service
ou hors service.
Témoin STANDBY
Ce témoin s’éclaire lorsque l’appareil est en veille.
En mode veille, appuyez sur la touche POWER de la
télécommande ou sur une des touches d’entrée de l’appareil
pour mettre celui-ci en service.
Lorsque l’appareil est en service, ce témoin s’éteint.
REMOTE SENSOR (CAPTEUR DE TÉLÉCOMMANDE)
Lorsque vous utilisez le boîtier de télécommande, dirigez-le
vers le capteur de télécommande (REMOTE SENSOR).
Témoin SPEAKERS
Ce témoin s’allume lorsque la touche SPEAKERS (A ou B) est
en position ON.
Afficheur
Lorsque l’appareil est en service, son état est indiqué par cet
afficheur.
Témoin MUTING
clignote pendant la coupure des sons.
Témoin LOUDNESS
Ce témoin s’allume lorsque la touche LOUDNESS est en
position ON.
VOLUME/JOG
Tournez ce bouton (ou appuyez sur les touches VOLUME du
boîtier de télécommande) pour régler le niveau d’écoute
global.
Touche BALANCE
Cette touche est utilisée pour régler la balance des enceintes.
Touche TREBLE
Cette touche est utilisée pour régler les aigus.
Touche BASS
Cette touche est utilisée pour régler les graves.
Touche RDS MODE
En mode tuner FM, utilisez cette touche pour la fonction RDS.
La fonction RDS n’est disponible que dans les pays européens.
Touche LOUDNESS
Cette touche permet de compenser la perte des graves aux
faibles niveaux de volume.
INPUT
(CD, PHONO, TUNER, TAPE MONITOR, VIDEO/AUX)
Ces touches permettent de sélectionner une source.
N
M
L
K
J
I
H
G
F
E
D
C
B
L’appareil tire de la prise secteur une puissance faible mais non
nulle lorsque l’interrupteur POWER est sur la position OFF.
A
Lorsque l’appareil est en mode veille, appuyez sur une de ces
touches pour le mettre en service.
Touche s TUNING/PRESET
En mode de réglage manuel, Utilisez ces touches pour régler
une station. En mode de syntonisation préréglée, Utilisez ces
touches pour sélectionner un canal préréglé.
Touche MEMORY
Appuyez sur cette touche pour mettre en mémoire une
fréquence.
Touche FM MODE
En mode TUNER (FM), appuyez sur cette touche pour
sélectionner la stéréophonie ou la monophonie.
Touche BAND
Appuyez sur cette touche pour sélectionner la gamme, FM ou
AM.
Touche TUNING MODE
Appuyez sur cette touche pour sélectionner le mode de
syntonisation manuelle ou de syntonisation sur les fréquences
en mémoire.
PHONES
Pour l’écoute privée, introduisez la fiche du casque dans cette
prise puis réglez le niveau au moyen du bouton VOLUME.
Touche HAUT-PARLEURS
Utilisez cette touche pour mettre sous tension ou hors tension
les enceintes (A ou B).
ON : Le son est diffusé par les enceintes.
OFF: aucun son ne sort des enceintes.
Touche ALIMENTATION (POWER)
Quand le commutateur d’alimentation de l’unité principale
est appuyé, utilisez cette touche pour allumer ou placez
l’appareil en mode d’attente.
Touche MEMORY SCAN
Utilisez cette touche pour balayer les canaux préréglés.
Touches de commande pour platine cassette et lecteur
CD TEAC
Utilisez ces touches pour commander des éléments TEAC
portant la marque .
Touche MUTING
Appuyez sur cette touche pour couper les sons.
Touche SLEEP
Appuyez sur cette touche pour régler la minuterie de mise
hors service.
INPUT
(CD, PHONO, TUNER, TAPE MONITOR, VIDEO/AUX)
Ces touches permettent de sélectionner une source.
f
e
d
c
b
a
U
T
S
R
Q
P
O
26
Fonctionnement de base 1
2. Démarrer l’enregistrement.
<
Si vous avez raccordé une platine cassette 3 têtes aux prises
TAPE MONITOR (PLAY et REC), et si la fonction Tape Monitor
est activée pendant l’enregistrement vous ne pourrez pas
écouter le son provenant de cette source mais uniquement le
son en cours d’enregistrement.
Appuyez sur l’interrupteur POWER.
L’appareil s’allume.
1
Mettre l’appareil sélectionné en marche et augmentez
progressivement le volume jusqu’au niveau désiré à
l’aide du bouton VOLUME.
3
Ecoute de cassette
Appuyez sur la touche TAPE MONITOR pour mettre la
fonction écoute de cassette en ou hors service. Quand cette
fonction est en service, le témoin “
TAPE
” s’allume sur
l’afficheur.
Pour écouter la source TAPE, mettez la fonction écoute de
cassette en service à l’aide de la touche TAPE MONITOR.
Pour écouter une source autre que TAPE
Si la fonction écoute de cassette est en service et si le témoin
“
TAPE
” est allumé, appuyez sur la touche TAPE
MONITOR pour la mettre hors service.
MON
MON
< Quand l’appareil est allumé, le témoin MUTING (SOURDINE)
s’allume momentanément. Ceci n’est pas un mauvais
fonctionnement.
<
Lorsque l’appareil est en mode veille et que le témoin
STANDBY est allumé, appuyez sur la touche POWER de la
télécommande ou sur une des touches d’entrée (TUNER,
PHONO, CD, TAPE MONITOR ou VIDEO/AUX) de l’appareil
pour mettre celui-ci en service.
Choisir une source en appuyant les touches de sélecteur
d’entrée.
2
Enregistrement
1. Sélectionner la source à partir de laquelle vous
souhaitez réaliser l’enregistrement.
2 31
27
FRANÇAIS
DCB E FA
Allumer/Eteindre les enceintes
Appuyer sur la touche SPEAKERS (A ou B) pour allumer ou
éteindre les enceintes.
Lorsque ON est sélectionné (enceintes allumées), le voyant
SPEAKERS s’allume.
A
Ecoute avec un casque
Pour une écoute privée, commencez par réduire au
minimum le niveau de volume sur le récepteur. Insérez la
prise jack du casque dans la prise PHONES et réglez le
volume à l’aide du bouton VOLUME.
Pour couper le son provenant des enceintes, appuyez sur la
touche SPEAKERS pour les couper (OFF).
Attention:
Baissez toujours le niveau du volume avant de brancher le
casque d’écoute. POUR EVITER DE CAUSER DES TROUBLES
DE L’OUIE – Ne mettez pas votre casque d’écoute sur la tête
tant que vous ne l’avez pas branché.
B
Attention:
Si les haut-parleurs sont connectés aux prises SPEAKERS A,
les mettre en service en appuyant sur la touche SPEAKERS A.
S’il n’y a pas de haut-parleurs connectés aux prises
SPEAKERS B, mettez la touche correspondante sur la
position de repos, sinon aucun son ne sortira des prises
SPEAKERS A, et vice versa.
Touche LOUDNESS
Cette touche permet de compenser la perte des graves aux
faibles niveaux de volume. Régler la touche sur la position
OFF lors d’une écoute à un niveau normal.
C
1.Appuyez sur la touche BASS. L’indication “BAS” s’affiche.
2.Dans les 3 secondes qui suivent, tournez le bouton JOG
pour modifier le réglage.
Le niveau peut être réglé par pas de 2 entre –10 et +10.
Commande des aigus
Cette commande permet de régler le niveau sonore dans la
gamme des fréquences aiguës.
E
Commande des graves
Cette commande sert à eégler le niveau sonore dans la
gamme des fréquences basses.
D
1.Appuyez sur la touche TREBLE. L’indication “TRE” s’affiche.
2.Dans les 3 secondes qui suivent, tournez le bouton JOG
pour modifier le réglage.
Le niveau peut être réglé par pas de 2 entre –10 et +10.
Comment régler l’équilibre des hautparleurs
F
1.Appuyez sur la touche BALANCE. L’indication “BAL”
s’affiche.
2.Dans les 3 secondes qui suivent, tournez le bouton JOG
pour modifier la balance des enceintes.
Le niveau peut être réglé par pas de 1 entre L+16 et R+16:
L+16 ... L+1 a
CENT q R+1 ... R+16
Normalement, régler sur la position “CENT (centre)”.

28
Fonctionnement de base 2
Appuyez de manière répétée sur la touche SLEEP jusqu’à ce
que le temps désiré soit indiqué sur l’afficheur.
Le temps avant la mise hors service peut être réglé par pas de
10 minutes.
SLEEP 90 (80, 70 ... ou 10)
Le témoin SLEEP s’éclaire et l’appareil est mis hors service 90
(80, 70 ... ou 10) minutes plus tard.
Affichage normal
La minuterie est hors service.
< Après avoir réglé la minuterie de mise hors service, la
luminosité de l’afficheur est atténuée.
< Pour connaître le temps restant, appuyez une fois sur la
touche SLEEP. Le temps restant est affiché pendant 3
secondes puis les indications habituelles sont rétablies.
Pour couper momentanément les sons, appuyez sur la touche
MUTING.
Appuyez une nouvelle fois sur la touche MUTING pour rétablir
les sons.
<
Aussi longtemps que les sons sont coupés, le témoin MUTING
clignote.
Minuterie de mise hors service
L’appareil peut être mis hors service au moment désiré.
Silencieux

29
FRANÇAIS
Syntoniseur
Maintenez la pression d’un doigt sur la touche
TUNING/PRESET pendant 0,5 à 2 secondes.
Lorsque la syntonisation sur une station est terminée, cette
opération s’arrête automatiquement.
Pour arrêter manuellement la syntonisation, appuyez sur la
touche TUNING/PRESET.
Appuyez sur cette touche pour passer du mode Stéréo au
mode Mono et inversement.
Stéréo
Les diffusions en FM stéréo sont reçues en stéréo
Le témoin “STEREO” s’allume sur l’afficheur quand une
émission FM stéréo est reçue.
<
Si le son est déformé et si le témoin “STEREO” clignote, le
signal n’est pas suffisamment puissant pour une bonne
réception stéréo. Le cas échéant, passez au mode MONO.
Mono
Pour compenser une réception FM faible, sélectionnez ce
mode. La réception sera alors forcée en mono, réduisant ainsi
les parasites indésirables.
Appuyez sur la touche TUNER.
1
Sélectionnez AM ou FM en appuyant sur la touche
BAND.
2
Sur l’afficheur, le témoin “CH” s’éteint.
Cette touche permet de changer le mode de syntonisation.
Sélectionnez la station que vous désirez écouter
(sélection automatique).
4
Touche FM MODE
Si le témoin “CH” est éclairé, appuyez sur la touche
TUNING MODE pour choisir le mode de syntonisation
manuelle.
3
Sélection de stations pour lesquelles la syntonisation
automatique n’est pas possible (sélection manuelle)
Lorsque vous appuyez brièvement (0,5 seconde ou moins) sur
la touche TUNING/PRESET, la fréquence change d’une
quantité fixe.
Appuyez de manière répétée sur la touche TUNING jusqu’à ce
que la station que vous désirez écouter soit localisée.
<
l’indication “TUNED” s’affiche lorsqu’une station est
correctement réglée.
3 4
12

30
Syntonisation préréglée
2. Appuyez sur la touche MEMORY SCAN de la
télécommande.
Préréglage de mémoire manuel
Vous pouvez mettre en mémoire les fréquences de stations FM
et AM grâce aux canaux 1 à 30 respectivement.
Réglez la station que vous souhaitez écouter (voir
étapes à de la page 29).
Appuyez sur la touche MEMORY.
2
41
1
Comment sélectionner des stations préréglées
Sélectionnez AM ou FM en appuyant sur la touche
BAND.
1
Balayage de stations préréglées
1. Sélectionnez AM ou FM en appuyant sur la touche
BAND.
Pour enregistrer plusieurs stations, répétez les étapes à .
31
Pendant que le voyant “MEMORY” clignote,
sélectionnez un canal préréglé pour enregistrer la
station à l’aide des touches TUNING/PRESET puis
appuyez sur la touche MEMORY.
3
Si le voyant “CH” ne s’allume pas, appuyez sur la touche
TUNING MODE pour sélectionner le préréglage des
stations.
2
Appuyez à plusieurs reprises sur les touches
TUNING/PRESET jusqu’à ce que vous ayez trouvé la
station préréglée.
3
Les stations préréglées stockées en mémoire seront balayées à
intervalles de 5 secondes.
Lorsque vous avez identifiée la station que vous désirez
écouter, appuyez de nouveau sur la touche MEMORY SCAN
pour arrêter le balayage.
<
Toute station préréglée n’émettant pas de signal sera sautée.
Mémoire de secours
Si l’alimentation est interrompue pendant 3 jours ou plus, les
réglages conservés en mémoire (tels que stations préréglées)
seront effacés.
Pour éviter de perdre les stations préréglées, nous vous
recommandons de laisser votre AG-790 en mode STANDBY
quand vous ne l’utilisez pas.
TUNING/PRESETTUNING MODE
BAND
MEMORY

31
FRANÇAIS
RDS
NEWS (nouvelles): communiqués, événements, sondages,
reportages, situations vécues.
AFFAIRS (informations générales) : suggestions diverses, telles
que des annonces pratiques, à l’exception des
nouvelles, documents, débats, analyses, etc.
INFO (informations pratiques) : informations pratiques du jour ou
informations de référence, notamment prévisions
météo, guide du consommateur, informations
médicales utiles, etc.
SPORT : émissions sportives.
EDUCATE (éducatif) : informations culturelles et éducatives.
DRAMA (théâtre) :concerts et séries dramatiques radiodiffusés.
CULTURE : émissions portant sur les cultures locales ou
nationales, y compris les émissions religieuses, la
philosophie, les sciences humaines, les langues, le
théâtre, etc.
SCIENCE : émissions sur les sciences de la nature et les
techniques
VARIED (variétés) : émissions grand public telles que jeux,
variétés, interviews,
émissions comiques ou satiriques,
etc.
POP M (musique de variétés) : émissions de musique, de variété,
ou indication du volume de vente des disques
ROCK M : musique moderne, composée et interprétée
généralement par des jeunes
EASY M : morceaux grand public, d’une durée généralement
inférieure à 5 minutes
LIGHT M (musique légère) :
musique classique, orchestrale ou chorale, qui
s’adresse à un public de non spécialistes
CLASSICS (musique classique) :
musique d’orchestre, notamment opéra, musique
symphonique ou musique de chambre, etc.
OTHER M (autres styles musicaux) :
autres styles, tels que reggae, rythm’n blues, etc.
WEATHER (météo) : informations et prévisions météorologiques
FINANCE : informations financières, commerciales, boursières
CHILDREN (enfants) : émissions pour enfants
SOCIAL (société) : vie collective et sociale
RELIGION : émissions à caractère religieux
PHONE IN : émissions au cours desquelles les auditeurs
s’expriment en direct
TRAVEL (voyages) : émissions à caractère touristique
LEISURE : émissions sur les activités de loisirs (bricolage,
couture, etc.)
JAZZ : musique de jazz
COUNTRY : musique country
NATION M : musique militaire et patriotique
OLDIES : Tubes de l’âge d’or de la musique
FOLK M : musique folk
DOCUMENT : émissions documentaires
TEST (tonalité d’essai)
ALARM : avis d’alerte ou de catastrophe naturelle
NONE : Aucun type de programme ou indéfini
RDS (Programmes PTY)
Le système RDS (Radio Data System) est un service de diffusion
qui permet aux stations d’envoyer des informations
supplémentaires en même temps que le programme radio
normal.
Le mode RDS fonctionne sur la bande FM en Europe
uniquement.
Réglez-vous sur une station FM (voir étapes à page
29).
Appuyez sur le bouton RDS MODE.
2
411
Chaque fois que le bouton RDS MODE est appuyé
brièvement, le mode RDS change comme suit:
PS (Programme Service name/affichage du nom de la
station)
Lorsque vous sélectionnez PS, “PS” clignote pendant à peu
près 4 secondes, puis PS ou le nom de la station s’affiche.
S’il n’existe pas de donnée PS, la fréquence s’affichera.
PTY (Programme Type/Type de programme)
Lorsque vous sélectionnez PTY, “PTY” clignote pendant à
peu près 4 secondes puis le type de programme s’affiche.
S’il n’existe pas de donnée PTY, la fréquence s’affichera.
RT (Radio Text/Texte Radio)
Lorsque vous sélectionnez RT, “RT” clignote pendant à peu
près 4 secondes, puis les informations des stations
composées au maximum de 64 symboles s’affichent.
S’il n’existe pas de donnée RT, la fréquence s’affichera.
TA (Traffic Announcement/
Infos Trafic)
Lorsque vous sélectionnez TA, “TA” clignote pendant à peu
près 4 secondes, puis l’appareil recherche les informations
sur l’état du trafic.
<
Si la station interrompt sa diffusion d’informations sur le
trafic, le tuner trouvera d’autres stations jusqu’à satisfaction.
CT (Clock Time/Horloge)
Affiche l’heure émise par la station.
Lorsque vous sélectionnez CT, “CT” clignote pendant à peu
près 4 secondes, puis l’heure s’affiche.
S’il n’existe pas de données CT, le mode RDS se paramètrera
automatiquement en mode PS.

32
RDS (Recherche PTY)
La recherche commence.
< Lorsque le programme que vous avez choisi est trouvé, la
recherché s’arrête et le type de programme s’affiche.
< Si le même type de programme n’est pas trouvé lors de la
recherche PTY, la fréquence de départ est retrouvée.
< Si vous souhaitez interrompre la recherche, appuyez sur le
bouton RDS MODE.
Appuyez sur la touche RDS MODE pendant plus de 2
secondes.
2
“SEARCH” clignote sur l’affichage.
Sélectionnez le programme PTY souhaité en utilisant les
touches TUNING/PRESET.
3
Vous pouvez choisir parmi 31 catégories.
Le type d’émission clignote.
Appuyez sur la touche MEMORY.
4
Le type d’émission devient fixe.
Appuyez sur la touche TUNING/PRESET.
5
Il est possible de rechercher une station grâce à cette fonction.
Sélectionnez le mode FM en appuyant sur la touche
BAND.
1
TUNING/PRESET
BAND
MEMORY RDS MODE

33
Dépannage
En cas de problème avec l’appareil, prenez le temps de lire ce
tableau et de voir si vous pouvez résoudre le problème tout seul
avant de faire appel à votre revendeur ou au centre d’assistance
TEAC.
L’appareil ne s’allume pas
e
Vérifier que l’appareil est bien branché sur la prise secteur.
Vérifiez que la source d’alimentation CA n’est pas une prise
équipée d’un interrupteur et si tel et le cas vérifiez que
l’interrupteur est bien sur ON. Vérifiez que la prise délivre
bien du courant en branchant un autre appareil électrique,
une lampe ou un ventilateur par exemple.
Aucun son ne sort des enceintes.
e
Régler le volume.
e
Régler la commande BALANCE en position “CENT”.
e
Vérifier que les enceintes sont bien connectées.
e
Si les enceintes sont connectées aux prises SPEAKERS A,
veillez à ce que la touche SPEAKERS A de la façade soit
enfoncée. S’il n’y a pas d’enceintes connectées aux prises
SPEAKERS B, veillez à ce que la touche SPEAKERS B de la
façade ne soit pas enfoncée. Sélectionnez seulement les
prises auxquelles des enceintes sont connectées.
e
Si la fonction écoute de cassette est en service et si le
témoin “
TAPE
” est allumé, appuyez sur la touche
TAPE MONITOR pour la mettre hors service.
Le volume des haut-parleurs A est différent de celui des
haut-parleurs B.
e
Le volume et la qualité sonore peuvent différer suivant les
dimensions, et autres, des haut-parleurs. Si vous voulez
utiliser les haut-parleurs A et B simultanément au même
volume, connectez exactement le même type de hautparleurs aux prises SPEAKERS A et B.
Le son est déformé.
e
L’appareil est placé trop près d’un poste de télévision ou
d’un appareil du même type. Eloignez l’amplificateur ou
éteignez ces deux appareils.
e
Branchez le fil de masse de la table tournante au borne
SIGNAL GND (MASSE DU SIGNAL).
Le son est interrompu en cours d’écoute ou aucun son ne
sort alors que l’appareil est sous tension.
e
L’impédance des enceintes est inférieure à celle spécifiée
pour cet appareil.
e
Mettre l’appareil hors tension et baisser le volume.
Réponse des basses faible.
e
La polarité (+/_) des enceintes est inversée. Vérifier la
polarité de chacune des enceintes.
Aucune station ne peut être captée, ou niveau sonore trop
faible.
e
Se régler précisément sur la station désirée.
e
Si l’appareil se trouve à proximité d’un poste de télévision,
éteindre ce dernier.
e
Installez de nouveau l’antenne après avoir repéré la meileure
position de réception.
e
Il est recommandé d’utiliser une antenne externe.
MON
Bien que l’émission soit en stéréo, le son est en mono.
e
Actionnez la touche FM MODE.
Le boîtier de télécommande ne fonctionne pas.
e
Appuyez sur le commutateur d’alimentation (POWER) de
l’unité principale pour allumer l’appareil.
e
Si les piles sont usagées, changez les piles.
e
Utilisez le boîtier de télécommande dans les limites de sa
portée (5 m) et dirigez-le vers la face avant de l’appareil.
e
Retirez les obstacles qui peuvent se trouver entre le boîtier
de télécommande et l’appareil.
e
Si une lumière violente éclaire l’appareil, éteignez-la.
Si malgré ces indications, vous ne parvenez pas à faire
fonctionner normalement l’appareil, débranchez le cordon
d’alimentation du secteur et rebranchez-le.
Entretien
Si la surface de l’appareil est sale, nettoyez-la avec un chiffon
doux ou utilisez une solution diluée de savon doux. Veillez à
ce qu’il ne reste pas de produit sur l’appareil. N’utilisez jamais
de diluant, de benzène ou d’alcool, ceux-ci risquant
d’endommager la surface de l’appareil.
FRANÇAIS

34
Caractéristiques techniques
Section amplificateur
Puissance de sortie. . . . . . . . . . . . . . . . . . . . . . . . . . 100 + 100 watts RMS (0,9 % THD, 1 kHz, 8 Ω)
Distortion harmonique totale . . . . . . . . . . . . . . . . . . . . . . . . . . . . . . . . . 0,05 % (à 80 watts, 1 kHz)
Sensibilité d’entrée/impedance . . . . . . . . . . . . . . . . . PHONO: 6,5 mV/22 kΩ, LIGNE: 230 mV/22 kΩ
Réponse de réquence. . . . . . . . . . . . PHONO: 20 Hz à 20 kHz, ±3 dB, LIGNE: 20 Hz à 35 kHz, –3 dB
Rapport signal/bruit . . . . . . . . . . . . . . . . . . . . . . . . . . . PHONO: 75 dB (IHF-A), LIGNE: 90 dB (IHF-A)
Controle de tonalité. . . . . . . . . . . . . . . . . . . . GRAVES: ±10 dB à 100 Hz, AIGUES: ±10 dB à 10 kHz
Controle du contour . . . . . . . . . . . . . . . . . . . . . . . . . . . . . . . . . . . . . . . . . . . . . . . . +4 dB à 100 Hz
Section syntonisateur FM
Gamme de syntonisation . . . . . . . . . . . . . . . . . . . . . . . . . 87,5 MHz à 108,0 MHz,
étapes de 50 kHz
Sensibilité utilisable . . . . . . . . . . . . . . . . . . . . . . . . . . . . . . . . . . . . . . . . . . . . . . . Mono: 10 dBµV/m
Sensibilité amortissement 50 dB . . . . . . . . . . . . . . . . . . . . . . Mono: 15 dBµV/m, Stéréo: 33 dBµV/m
Rapport réjection d’image . . . . . . . . . . . . . . . . . . . . . . . . . . . . . . . . . . . . . . . . . . . . . . . . . . . . 35 dB
Rapport suppression AM . . . . . . . . . . . . . . . . . . . . . . . . . . . . . . . . . . . . . . . . . . . . . . . . . . . . . 50 dB
Distortion harmonique (1 kHz) . . . . . . . . . . . . . . . . . . . . . . . . . . . . . . . Mono: 0,5 %, stéréo: 0,5 %
Réponse de fréquence . . . . . . . . . . . . . . . . . . . . . . . . . . . . . . . . . . . . . . . . . . 20 Hz à 15 kHz, –3dB
Séparation stéréo (1 kHz). . . . . . . . . . . . . . . . . . . . . . . . . . . . . . . . . . . . . . . . . . . . . . . . . . . . . 35 dB
Rapport signal/bruit . . . . . . . . . . . . . . . . . . . . . . . . . . . . . . . . . . Mono: 70 dB, stéréo: 65 dB (IHF-A)
Section syntonisateur AM
Gamme de syntonisation. . . . . . . . . . . . . . . . . . . . . . . . . . . . 522 kHz à 1.620 kHz, étapes de 9 kHz
Sensibilité utilisable . . . . . . . . . . . . . . . . . . . . . . . . . . . . . . . . . . . . . . . . . . . . . . . . . . . . . . . . . 55 dB
Distortion harmonique totale . . . . . . . . . . . . . . . . . . . . . . . . . . . . . . . . . . . . . . . 1 % à 100 dBµV/m
Rapport signal/bruit . . . . . . . . . . . . . . . . . . . . . . . . . . . . . . . . . . . . . . . . . . . . . 40 dB à 100 dBµV/m
Généralités
Alimentation. . . . . . . . . . . . . . . . . . . . . . . . . . . . . . . . . . . . . . . . . . . . . . . . . . . . . . . 230 Vca, 50 Hz
Consommation . . . . . . . . . . . . . . . . . . . . . . . . . . . . . . . . . . . . . . . . . . . . . . . . . . . . . . . . . . . 280 W
Prise de courant (totale 100 W max) . . . . . . . . . . . . . . . . . . . . UNSWITCHED (Non-commutable) x 1
Dimensions (L x H x P) . . . . . . . . . . . . . . . . . . . . . . . . . . . . . . . . . . . . . . . . . . . 435 x 144 x 330 mm
Poids (net) . . . . . . . . . . . . . . . . . . . . . . . . . . . . . . . . . . . . . . . . . . . . . . . . . . . . . . . . . . . . . . . 7,4 kg
Accessoires standard
Antenna de boucle AM x 1
Antenne FM x 1
Boîtiier de télécommande x 1
Pile (AA, R6, SUM-3) x 2
• Les caractéristiques et la présentation peuvent être modifiées sans avis préalable.
• Les illustrations peuvent légèrement différer des modèles de production.

35
ESPAÑOL
Antes de comenzarIndice
PRECAUCIÓN
El producto no deberá quedar expuesto a goteos o
salpicaduras, ni servir de base para objetos que contengan
líquido (jarrones, etc.).
No instale este equipo en espacios cerrados tales como
estantes de libros o similares.
Enhorabuena por la adquisición de un TEAC. Lea
detenidamente este manual a fin de obtener el mejor
rendimiento de esta unidad.
Antes de comenzar. . . . . . . . . . . . . . . . . . . . . . . . . . . . . . . . . 35
Mando a distancia . . . . . . . . . . . . . . . . . . . . . . . . . . . . . . . . . 36
Conexión (Antena) . . . . . . . . . . . . . . . . . . . . . . . . . . . . . . . . . 36
Conexión . . . . . . . . . . . . . . . . . . . . . . . . . . . . . . . . . . . . . . . . 38
Nombres de los controles . . . . . . . . . . . . . . . . . . . . . . . . . . . . 40
Operación básica . . . . . . . . . . . . . . . . . . . . . . . . . . . . . . . . . . 42
Sintonizador . . . . . . . . . . . . . . . . . . . . . . . . . . . . . . . . . . . . . . 45
Presintonías . . . . . . . . . . . . . . . . . . . . . . . . . . . . . . . . . . . . . . 46
RDS . . . . . . . . . . . . . . . . . . . . . . . . . . . . . . . . . . . . . . . . . . . . 47
RDS (Programas PTY) . . . . . . . . . . . . . . . . . . . . . . . . . . . . . . . 47
RDS (Búsqueda PTY) . . . . . . . . . . . . . . . . . . . . . . . . . . . . . . . . 48
Solución de problemas . . . . . . . . . . . . . . . . . . . . . . . . . . . . . . 49
Especificaciones . . . . . . . . . . . . . . . . . . . . . . . . . . . . . . . . . . . 50
Léase antes de continuar
<
La unidad puede calentarse durante su funcionamiento, por
lo que habrá que dejar espacio suficiente alrededor para su
ventilación.
Los orificios de ventilación no deberán obstruirse. Deje al
menos 50 cm de espacio libre encima de cada unidad y 10 cm
en los laterales.
NO coloque ningún objeto encima de la unidad.
<
La tensión suministrada a la unidad deberá coincidir con el
valor indicado en el panel posterior. En caso de duda,
consulte a un electricista.
<
Elija cuidadosamente el emplazamiento de la unidad. No
coloque la unidad a la luz solar directa ni cerca de fuentes de
calor. Evite también los lugares expuestos a vibraciones o a un
exceso de suciedad, frío, calor o humedad.
<
No coloque la unidad encima del amplificador/receptor.
<
No abra la carcasa de la unidad, ya que podrían dañarse los
circuitos o producirse descargas eléctricas. Si entra algún
cuerpo extraño en la unidad, póngase en contacto con su
distribuidor o empresa de servicios.
<
Cuando desconecte el cable de la toma mural, sostenga
únicamente el conector y nunca el propio cable.
< No intente limpiar la unidad con disolventes químicos, ya que
podrían dañar el acabado. Utilice un paño limpio y seco.
< Conserve el manual en un lugar seguro para futuras
consultas.
Reciclaje de su producto viejo
1. Cuando se adjunta a un producto este
símbolo tachado de un contenedor con
ruedas, significa que el producto está
cubierto por la Directiva Europea
2002/96/EC.
2.Todos los productos eléctricos y electrónicos se deben
reciclar de un modo separado del sistema municipal de
basura, a través de las instalaciones de recogida señaladas
por el gobierno o las autoridades locales
3. El reciclaje correcto de su producto viejo ayudará a prevenir
las consecuencias negativas potenciales para el ambiente y
la salud humana.
4. Para una información más detallada sobre el reciclaje de su
producto viejo, contacte por favor con su ayuntamiento,
servicio de basuras o la tienda en donde usted compró el
producto.

36
Conexión (Antena)Mando a distancia
1. Abra la tapa del compartimento de las pilas.
2. Inserte dos pilas “AA“ (R6, SUM-3).
Asegúrese de que las pilas queden ubicadas con sus polos
positivo +
y negativo _ correctamente posicionados.
3. Cierre la tapa hasta que quede perfectamente encajada.
Cambio de pilas
Si nota que ha disminuido la distancia necesaria para un
control correcto entre el mando y el reproductor, significa que
las pilas están agotadas. En tal caso, reemplácelas por unas
nuevas.
Precauciones con las pilas
<
Asegúrese de insertar las pilas con sus polaridades positiva + y
negativa _
correctas.
<
Utilice el mismo tipo de pilas. Nunca utilice diferentes tipos de
pilas juntas.
<
Pueden utilizarse pilas recargables y no recargables. Lea las
precauciones indicadas en las pilas.
<
Si no va a utilizar el mando a distancia durante un periodo
prolongado (más de un mes), retire las pilas para evitar fugas.
Si se producen pérdidas, limpie el líquido del interior del
compartimento y cambie las pilas por unas nuevas.
<
No caliente ni desmonte las pilas, y no arroje nunca las pilas
usadas
al fuego.
Antena de FM interior
Conecte la antena de FM monofilar a la toma FM 75Ω,
despliegue el cable y sintonice su emisora favorita (véase
página 45). Ajuste la antena en una posición apropiada, como
el marco de una ventana o una pared, hasta conseguir la
recepción óptima, y después asegure la antena en esa
posición con chinchetas, alfileres o fijaciones adecuadas.
Antena de FM exterior
Si las señales de FM son débiles en la zona, será necesario
usar una antena exterior de FM. Por lo general valdrá con una
de 3 elementos. Si la recepción de FM es especialmente débil,
quizá sea preciso utilizar una antena de 5 o más elementos.
<
Desconecte la antena de FM interior cuando utilice una
exterior.
El receptor y otros componentes TEAC con la marca en el
panel frontal pueden ser controlados desde el control remoto
universal “UR” suministrado con el equipo.
Cuando use el control remoto apunte hacia el SENSOR REMOTO
en el panel frontal del receptor (o de otro componente TEAC)
<
Aunque se utilice la unidad dentro del margen de
funcionamiento efectivo, es imposible el control a distancia si
hay obstáculos entre el reproductor y el control remoto.
<
Si se utiliza la unidad cerca de otros aparatos que generen
rayos infrarrojos o si se emplean otros aparatos de control
remoto por rayos infrarrojos cerca del reproductor, es posible
que éste no funcione correctamente. Del mismo modo, es
posible que los otros aparatos tampoco funcionen
correctamente.
Instalación de las pilas

37
ESPAÑOL
Antena de cuadro de AM interior
En la mayoría de las zonas será suficiente con la antena de
cuadro de AM facilitada con la unidad.
Para instalar la antena de cuadro en una superficie, asegure la
horquilla a la ranura de la antena de la base.
Conecte los hilos de la antena a los terminales de AM.
Conexiones:
Presione la palanca, inserte el extremo del
cable y libere la palanca. Compruebe que
queda bien conectado tirando ligeramente
del cable. Asegúrese de insertar únicamente
el extremo desprovisto de aislante, y
compruebe que la funda de plástico no
impide el contacto entre el cable de la
antena y el terminal.
Coloque la antena sobre un estante o suspendida del marco
de una ventana, etc., en la dirección que ofrezca la mejor
calidad de recepción. Mantenga lo más lejos posible de la
antena el resto de cables (alimentación, altavoz,
interconexión).
Antena exterior AM
<
Si la antena de cuadro de AM suministrada no ofrece una
recepción correcta (suele deberse a una distancia excesiva al
transmisor, edificios de hormigón, etc.), quizá sea preciso
usar una antena de AM de exterior.
Consiga una antena de AM de buena calidad o, en su
defecto, un cable con aislante de más de 5 m de longitud,
uno de cuyos extremos deberá pelar y conectar al terminal
como se ilustra en la figura.
El cable de antena se deberá tender hasta las proximidades
de una ventana (interior o exterior). Para mejorar la
recepción, conecte el terminal GND a un punto de toma a
tierra adecuado.
Observación:
Aunque utilice una antena de AM exterior, no desconecte la
antena de AM de cuadro.
Antena exterior AM
Antena de cuadro de AM
interior:
Conecte el hilo negro al
terminal derecho (GND), y el
hilo blanco al terminal
izquierdo.

38
Conexión
Reproductor de CD
Tornamesa Deck de cassette
Bocinas A
Bocinas B
PRECAUCIÓN:
< Apague todos los equipos antes de realizar las conexiones.
<
Lea las instrucciones de cada equipo que intenta utilizar con esta unidad.
<
Asegúrese de insertar firmemente cada enchufe. Para evitar zumbidos y ruidos, evite poner los
cables de conexión de señal en haz con el cable de alimentación de CA o cables de altavoz.
LINE OUT
RL
B
D
C
RL
RL
LINE
LINE
OUT
IN
A
E
F

39
ESPAÑOL
Conectores PHONO
Terminal SIGNAL GND (TIERRA DE SEÑAL)
Conecte los cables de clavija RCA del tornamesa a los
conectores PHONO. Asegúrese de conectar:
Enchufe blanco q
Enchufe blanco (L: canal izquierdo)
Enchufe rojo q
Enchufe rojo (R: canal derecho)
Conecte el cable de tierra del tornamesa a la terminal
SIGNAL GND.
RESET (reinicio)
En los siguientes casos, es posible que los botones
operativos no funcionen correctamente:
• Si el sistema ha resultado dañado por alguna descarga
eléctrica.
• Si la alimentación es irregular o tiene interferencias
eléctricas.
En tales circunstancias, pulse levemente RESET una o dos
veces con un lapicero o bolígrafo.
Se borrarán todos los ajustes guardados en la memoria
(presintonías).
Toma de alimentación (no conmutada)
Esta toma sólo estará activa cuando la unidad esté
encendida o en modo de espera.
Cuando esté apagado el interruptor de la unidad principal,
la toma permanecerá inactiva.
Precaución:
Compruebe que el consumo total de los equipos conectados
a la toma de red no sobrepasa los 100 vatios.
Cable de alimentación (c.a.)
Una vez realizadas todas las conexiones restantes, conecte el
cable de alimentación a la toma mural.
Asegúrese de conectar el cable de alimentación a una toma
de red que suministre la tensión adecuada.
Sostenga siempre el cable de alimentación por el conector.
<
Cuando desconecte el cable de la toma mural, sostenga
únicamente el conector y nunca el propio cable.
F
E
D
C
Conexiones de altavoz
Precaución:
Para evitar posibles daños en los altavoces por una señal
repentina de alto nivel, apague la unidad antes de
conectarlos.
<
Compruebe la impedancia de los altavoces. Los altavoces
deberán tener una impedancia mínima de 8 ohmios.
< Los terminales de altavoz negros son el negativo _.
Por lo general, la parte positiva +
del cable de altavoz está
identificada (franja, color...) para distinguirla de la parte
negativa. Conecte el extremo positivo al terminal +
, y el
negativo al terminal negro _
.
<
Prepare los cables de altavoz para la conexión, pelando
como máximo 10 mm de aislante (no más, para evitar
cortocircuitos). Trence los hilos con firmeza:
Las porciones metálicas de los dos cables no deberán
tocarse, ya que se podría producir un cortocircuito. Los hilos
cortocircuitados pueden ocasionar riesgo de incendio o
fallos en el equipo.
Conexiones:
1.Gire el casquillo del terminal hacia la izquierda para aflojarlo.
Los casquillos de los terminales de altavoz no se pueden
desprender por completo de la base.
2.Inserte el hilo a fondo en el terminal y gire el casquillo hacia
la derecha para dejarlo debidamente conectado:
Compruebe que no queda nada de aislante debajo del
terminal, únicamente el hilo desnudo.
3.Compruebe que queda bien conectado tirando ligeramente
del cable.
Conectores CD, TAPE MONITOR, VIDEO/AUX
La señal de audio analógico de 2 canales se envía y recibe a
través de estos terminales. Utilice cable RCA (de venta en
comercios) para conectar el componente.
Asegúrese de conectar:
Enchufe blanco q
Enchufe blanco (L: canal izquierdo)
Enchufe rojo q
Enchufe rojo (R: canal derecho)
B
A

40
Nombres de los controles
Nota:
Para simplificar, las instrucciones se
refieren a los nombres de botones y
controles del panel frontal, y no se
mencionan los del mando a distancia.
A B F GC D E
Q
RT SU O K J I H
N
M
LP
e
a
f
N
b
O
R
c
d
H

41
ESPAÑOL
Botón POWER (STANDBY/ON)
Cuando el interruptor “POWER” de la unidad principal esté
oprimido, use este botón para encender y apagar la unidad.
Botón MEMORY SCAN
Use este botón para explorar los canales presintonizados.
Botones de control de platina de casete o reproductor
de CD TEAC
Use estos botones para controlar los componentes TEAC que
lleven el distintivo .
Botón MUTING
Utilice este botón para silenciar el sonido.
Botón SLEEP
Utilice este botón para configurar el temporizador de
apagado (sleep).
INPUT
(CD, PHONO, TUNER, TAPE MONITOR, VIDEO/AUX)
Se utilizan estos botones para seleccionar una función.
f
e
d
c
b
a
Interruptor principal POWER
Pulse este interruptor para encender o apagar la unidad.
Indicador STANDBY
Este indicador se ilumina cuando se pone la unidad en el
modo de espera.
En el modo de espera, pulse el botón POWER del mando a
distancia o los botones Input de la unidad principal para
encenderla.
Cuando se apaga la unidad, este indicador se apaga.
SENSOR REMOTO
Cuando opere el control remoto, apúntelo hacia el SENSOR
REMOTO.
Indicador SPEAKER
Este indicador se ilumina cuando está activado el botón
SPEAKERS (A o B).
Visualizador
Cuando se enciende la unidad, se visualiza el estado actual de
la unidad.
Indicador MUTING
Parpadea durante el silenciamiento.
Indicador LOUDNESS
Este indicador se ilumina cuando está activado el botón
LOUDNESS.
Control VOLUME/JOG
Gire este control (o pulse los botones VOLUME del control
remoto) para ajustar el volumen general.
Botón BALANCE
Se utiliza este botón para ajustar el equilibrio entre los canales
izquierdo y derecho.
Botón TREBLE
Se utiliza este botón para ajustar los graves y agudos.
Botón BASS
Se utiliza este botón para ajustar los graves.
Botón RDS MODE (sólo modelos europeos)
En elmodo de sintonizador FM, use este botón para controlar
las funciones RDS.
El sistema RDS sólo está disponible en Europa.
Botón LOUDNESS
Este botón compensa la pérdida de graves a volúmenes bajos.
M
L
K
J
I
H
G
F
E
D
C
B
El equipo suministra una energía no operativa nominal
desde la toma de CA con su interruptor POWER en la
posición OFF.
A
INPUT
(CD, PHONO, TUNER, TAPE MONITOR, VIDEO/AUX)
Se utilizan estos botones para seleccionar una función.
Si la unidad está en el modo de espera, utilice estos botones
para encenderla.
Botones TUNING/PRESET
En el modo de sintonización manual, utilice estos botones
para sintonizar una emisora.
En el modo de presintonía, utilice estos botones para
seleccionar un canal predeterminado.
Botón MEMORY
Utilice este botón para memorizar los canales preajustados.
Botón FM MODE
Utilice este botón para seleccionar estéreo o monofónico.
Botón BAND
Utilice este botón para seleccionar FM o AM.
Botón TUNING MODE
Utilice este botón para seleccionar el modo de sintonización
manual o el modo de sintonización preajustada.
PHONES
Para una escucha privada, inserte el enchufe de los auriculares
a esta toma, y ajuste el volumen girando el control VOLUME.
Botones SPEAKERS
Use estos botones para activar o desactivar los altavoces.
on: El sonido sale por los altavoces
off: Se corta el sonido de los altavoces
U
T
S
R
Q
P
O
N

42
Operación básica 1
2. Inicie la grabación.
<
Si hay una platina de cinta de 3 cabezales conectada a los
terminales TAPE MONITOR (PLAY y REC) y activa la función de
monitorización durante la reproducción, no podrá oír el
sonido procedente de la fuente, sino el sonido que está
grabando.
Oprima el interruptor POWER (ENERGÍA).
La unidad se enciende.
1
Reproduzca la fuente y suba gradualmente el volumen
hasta el nivel requerido girando el mando VOLUME.
3
Función de monitorización de cinta (Tape Monitor)
Si desea seleccionar la fuente conectada a los terminales TAPE
MONITOR, pulse el botón TAPE MONITOR para activar la
función de monitorización de cinta. El indicador “
TAPE
” se iluminará.
Pulse el botón TAPE MONITOR para cancelar esta función.
< Si la función de monitorización está activada, no podrá oír
otras fuentes que no sean TAPE MONITOR. Para oír otras
fuentes, asegúrese de que esta función esté desactivada.
MON
< Cuando se enciende la unidad, se encenderá
momentáneamente el indicador MUTING (SILENCIAR). No se
trata de un mal funcionamiento.
<
Si la unidad se encuentra en el modo de espera (indicador de
espera iluminado), pulse el botón POWER del mando a
distancia o uno de los botones Input de la unidad principal
(TUNER, PHONO, CD, TAPE MONITOR o VIDEO/AUX) para
encenderla.
Seleccione una fuente oprimiendo los botones
selectores de entrada.
2
Grabación
1. Seleccione la fuente que se va a grabar.
2 31

43
ESPAÑOL
DCB E FA
Activación/desactivación de altavoces
Pulse el botón SPEAKERS (A o B) para activar o desactivar los
altavoces.
Con ellos activados (“on”), el indicador SPEAKERS se
ilumina.
A
Escucha a través de auriculares
Para audiciones privadas, reduzca primero el nivel del
volumen del receptor al mínimo. A continuación inserte el
conector de los auriculares en la toma PHONES y ajuste el
volumen con el mando VOLUME.
Si desea interrumpir el sonido de los altavoces, pulse el
botón SPEAKER para desactivarlos.
PRECAUCIÓN
Reduzca previamente el volumen siempre que conecte los
auriculares. PARA NO DAÑAR LOS OÍDOS - Póngase los
auriculares después de conectarlos.
B
Precaución:
Si los altavoces están conectados a los terminales SPEAKERS
A, active dichos terminales con el botón SPEAKERS A. En
caso de que no haya ningún altavoz conectado a SPEAKER
B, asegúrese de desactivar el botón SPEAKER B, pues de lo
contrario no saldrá sonido por SPEAKER A (y viceversa).
Botón LOUDNESS
Este botón compensa la pérdida de graves a volúmenes
bajos. Ajuste este botón en la posición OFF (apagado)
cuando se escuche a niveles normales.
C
1.Pulse el botón BASS. La indicación “BAS” aparecerá en la
pantalla.
2.Para cambiar la configuración., gire el control JOG antes de
3 segundos.
Se puede ajustar el nivel en pasos de 2 , de –10 a +10.
Control de agudos
Este control se emplea para ajustar el nivel de altas
frecuencias del sonido.
E
Control de graves
Este control se emplea para ajustar el nivel de bajas
frecuencias del sonido.
D
1.Pulse el botón TREBLE. La indicación “TRE” aparecerá en la
pantalla.
2.Para cambiar la configuración., gire el control JOG antes de
3 segundos.
Se puede ajustar el nivel en pasos de 2 , de –10 a +10.
Cómo ajustar el balance de los altavoces
frontales
F
1.Pulse el botón BALANCE. La indicación “BAL” aparecerá en
la pantalla.
2.Para cambiar la configuración., gire el control JOG antes de
3 segundos.
Se puede ajustar el nivel en paso de 1, de L+16 a R+16:
L+16 ... L+1 a
CENT q R+1 ... R+16
Normalmente situará el mando en la posición “CENT
(central)”.

44
Operación básica 2
Pulse repetidamente el botón SLEEP hasta que el tiempo
deseado aparezca en el visualizador.
Se puede cambiar el tiempo de apagado en pasos de 10
minutos.
SLEEP 90 (80, 70...ó 10)
El indicador SLEEP se ilumina, y la alimentación se apaga 90
(80, 70...ó 10) minutos más tarde.
Visualizador normal
El temporizador sleep está desactivado.
< Al configurar el temporizador sleep, el visualizador se
atenúa.
< Si desea comprobar el tiempo restante, pulse una vez el
botón SLEEP. Se visualiza el tiempo restante por 3 segundos,
y la unidad vuelve al visualizador normal.
Para silenciar temporalmente el sonido, pulse el botón
MUTING.
Pulse nuevamente el botón MUTING para restaurar el sonido.
<
Mientras el silenciamiento está activado, el indicador MUTING
parpadea.
Temporizador sleep
Se puede apagar la unidad después de un tiempo deseado.
Silenciamiento

45
ESPAÑOL
Sintonizador
Mantenga pulsado el botón TUNING/PRESET por 0,5 a 2
segundos.
Cuando se sintoniza una emisora, el proceso de sintonización
se detiene automáticamente.
Si desea interrumpir el proceso de sintonización, pulse el
botón TUNING/PRESET.
Selección de emisoras que no pueden sintonizarse
automáticamente (selección manual)
Cuando se pulsa momentáneamente el botón
TUNING/PRESET (0,5 segundos o menos), la frecuencia
cambia por un paso fijo.
Pulse repetidamente el botón TUNING hasta que encuentre la
emisora que desea escuchar.
<
Cuando se sintonice correctamente una emisión, se
visualizará “TUNED”.
3 4
Cuando pulse este botón, alternará entre el modo estéreo y el
modo mono.
Stereo:
Las emisiones de FM se recibirán en estéreo y en la pantalla se
iluminará el indicador “STEREO”.
< Si el sonido distorsiona y el indicador “STEREO” parpadea,
significa que la señal no tiene suficiente intensidad para una
buena recepción estéreo. En tal caso, seleccione el modo
MONO.
Mono:
Seleccione este modo cuando la señal FM estéreo recibida sea
débil. La recepción será monofónica y se reducirá el nivel de
ruido.
PPulse el botón TUNER.
1
Seleccione AM o FM con el botón BAND.
2
Seleccione la emisora que desea escuchar (selección
automática).
4
Botón FM MODE
Si el indicador “CH” está iluminado, pulse el botón
TUNING MODE para seleccionar el modo de
sintonización manual.
El indicador “CH” desaparece del visualizador.
Este botón se utiliza para cambiar el modo de sintonización.
3
12

46
Presintonías
2. Pulse el botón MEMORY SCAN del mando a distancia.
Las presintonías almacenadas en la memoria se sucederán a
intervalos de 5 segundos.
Cuando encuentre la emisora deseada, pulse el botón
MEMORY SCAN otra vez para detener la exploración.
<
Se omitirán los canales presintonizados que no reciban
ninguna señal.
Presintonización manual
Se pueden almacenar las emisoras FM y AM en los canales de 1
a 30, respectivamente.
Sintonice una emisora que desee oír (véanse los pasos
a de la página 45).
Pulse el botón MEMORY.
2
41
1
Selección de presintonías
Seleccione AM o FM con el botón BAND.
1
Exploración de presintonías
1. Seleccione AM o FM con el botón BAND.
Para guardar otras emisoras, repita los pasos a .
31
Mientras parpadea el indicador “MEMORY”, seleccione
un canal predefinido para guardar la emisora con los
botones TUNING/PRESET y luego pulse el botón
MEMORY.
3
Si el indicador “CH” no está iluminado, pulse el botón
TUNING MODE para seleccionar el modo de
presintonías.
2
Pulse los botones TUNING/PRESET repetidamente hasta
encontrar la presintonía deseada.
3
Memoria de seguridad
Si el interruptor POWER de la unidad principal se apaga o el
suministro eléctrico se interrumpe durante tres días o más, se
borrarán todos los ajustes guardados en la memoria
(presintonías, etc.).
Para no perder las presintonías, se recomienda mantener el
AG-790 en el modo de espera (STANDBY) cuando no se esté
utilizando.
TUNING/PRESETTUNING MODE
BAND
MEMORY

47
ESPAÑOL
RDS
El sistema de datos de radio (RDS) es un servicio de radiodifusión
que permite a las emisoras enviar información adicional junto
con la señal de radio normal.
Este sistema funciona únicamente con la banda de FM
europea.
Sintonice una emisora de FM (véanse pasos a en
página 45).
Pulse el botón RDS MODE.
2
411
Cada vez que pulse el botón RDS MODE, el modo cambiará
en el siguiente orden:
PS (nombre del servicio de programación)
Cuando seleccione PS, la indicación “PS” parpadeará unos 4
segundos y aparecerá PS o el nombre de una emisora. Si no
hay datos PS, se visualizará la frecuencia.
PTY (tipo de programa)
Cuando seleccione PTY, la indicación “PTY” parpadeará
unos 4 segundos y aparecerá el tipo de programa. Si no hay
datos PTY, se visualizará la frecuencia.
RT (texto de radio)
Cuando seleccione RT, la indicación “RT” parpadeará unos 4
segundos y aparecerá la información de las emisoras en un
máximo de 64 símbolos. Si no hay datos RT, se visualizará la
frecuencia.
TA (mensajes de tráfico)
Cuando seleccione TA, la indicación “TA” parpadeará 4
segundos y la unidad buscará un mensaje de tráfico.
< Si la emisora deja de emitir mensajes de tráfico, el
sintonizador seguirá buscando otras emisoras.
CT (información horaria)
ofrece la información horaria facilitada por la emisora.
Cuando seleccione CT, la indicación “CT” parpadeará unos
4 segundos y aparecerá la lectura de la hora.
Si no hay datos CT, el modo RDS cambiará
automáticamente a PS.
RDS (Programas PTY)
NEWS : mensajes, convocatorias, opinión pública, informes.
AFFAIRS : temas de actualidad, documentos, debates, análisis,
etc.
INFO : información cotidiana, previsión meteorológica,
consumo, asistencia médica, etc.
SPORT : programas relacionados con el mundo del deporte.
EDUCATE : educación y cultura.
DRAMA : conciertos de radio, series dramáticas.
CULTURE : todos los aspectos culturales de ámbito nacional o
local, celebraciones religiosas, filosofía, ciencias
sociales, lenguaje, teatro, etc.
SCIENCE : programas sobre ciencias naturales y tecnología.
VARIED : programas populares, concursos, variedades,
entrevistas, comedia, humor, etc.
POP M : música comercial, popular, discos vendidos, etc.
ROCK M : música actual, principalmente compuesta e
interpretada por jóvenes artistas.
EASY M : temas de música populares, por lo general de
menos de 5 minutos.
LIGHT M : música clásica, instrumental, coral y ligera
interpretada por artistas no profesionales.
CLASSICS: música clásica, grandes óperas, sinfónica, de cámara,
etc.
OTHER M : otros estilos musicales (Rhythm & Blues, Reggae,
etc.).
WEATHER : informes meteorológicos, previsiones.
FINANCE : información económica, comercial, etc.
CHILDREN : programación infantil.
SOCIAL : asuntos sociales.
RELIGION : programas religiosos.
PHONE IN : programas con participación del público por
teléfono.
TRAVEL : información sobre viajes.
LEISURE : programas relacionados con las actividades
recreativas.
JAZZ : música de jazz.
COUNTRY : música country.
NATION M : música del país.
OLDIES : música de la llamada época dorada del pop.
FOLK M : música folk.
DOCUMENT: documentales.
TEST
ALARM : mensajes urgentes, información sobre desastres
naturales, etc.
NONE : ningún tipo de programa o sin definir

48
Se inicia la búsqueda.
< Cuando se localiza el programa seleccionado, la búsqueda se
interrumpe y el tipo de programa se visualiza en la pantalla.
< Si no se encuentra el mismo tipo de programa durante la
búsqueda PTY, se detendrá en la frecuencia inicial.
< Si quiere detener la búsqueda, pulse el botón RDS.
RDS (Búsqueda PTY)
Esta función permite buscar emisoras por tipo de programa.
Seleccione FM con el botón BAND.
1
Pulse el botón RDS MODE durante más de 2 segundos.
2
“SEARCH” parpadeará en la pantalla.
Seleccione el tipo de programa con los botones
TUNING/PRESET.
3
Se pueden seleccionar 31 tipos de programa. El tipo de
programa parpadea en la pantalla.
Pulse el botón MEMORY.
4
El indicador de programa se iluminará.
Pulse el botón TUNING/PRESET.
5
TUNING/PRESET
BAND
MEMORY RDS MODE

49
ESPAÑOL
Solución de problemas
Si surge algún problema con la unidad, dedique unos instantes a
revisar los siguientes puntos por si puede solucionar el problema
sin necesidad de acudir al distribuidor o centro de servicio
técnico TEAC.
No hay corriente.
e
Compruebe la conexión a la red. Compruebe que la fuente
de c.a. no es una toma conmutada y que, si lo es, el
interruptor no está activado. Compruebe que hay corriente
en la toma de c.a. conectando otro aparato como una
lámpara o un ventilador.
No sound from speakers.
e
Ajuste el volumen con el mando VOLUME.
e
Ajuste el control de BALANCE en la posición “CENT”.
e
Verifique la conexión a las bocinas.
e
Si los altavoces están conectados a los terminales SPEAKER
A, compruebe que está presionado el botón SPEAKER A del
panel frontal. Si no hay altavoces conectados a los
terminales SPEAKER B, asegúrese de que el botón SPEAKER
B del panel frontal no está pulsado. Seleccione únicamente
las salidas SPEAKER que tienen altavoces conectados.
e
Si está activada la función de monitorización de cinta e
iluminado el indicador “TAPE ”, pulse el botón TAPE
MONITOR para desactivarla.
El volumen de SPEAKERS A no es el mismo que el de
SPEAKERS B.
e
El volumen y la calidad de sonido puede diferir en función
del tamaño del altavoz y de otros factores. Si desea usar
SPEAKERS A y B simultáneamente y al mismo volumen,
conecte exactamente el mismo tipo de altavoces a los
terminales SPEAKERS A y B.
El sonido es ruidoso.
e
La unidad está demasiado cerca de la TV o aparatos
similares. Instale la unidad lejos de ellas o apáguelas.
e
Conecte el cable de tierra del tornamesa la terminal SIGNAL
GND (TIERRA DE SEÑAL).
El sonido se corta durante el tiempo que se escucha o
incluso no hay sonido aunque la energía esté ENCENDIDA.
e
La impedancia de las bocinas es menor a la prescrita para
esta unidad.
e
Apague la energía y baje el volumen.
Respuesta de graves bajos.
e
La polaridad de las bocinas (+/_) está invertida. Verifique la
polaridad correcta en todas las bocinas.
No puede recibirse ninguna emisora, o la señal es
demasiado débil.
e
Compruebe que la antena está conectada correctamente.
e
Sintonice bien la emisora.
e
Si hay un televisor cerca de la unidad, apáguelo.
e
Instale de nuevo la antena, colocándola en una mejor
posición de recepción.
e
Puede que sea necesaria una antena externa.
MON
Aunque la emisión es en estéreo, se recibe en mono.
e
Pulse el botón FM MODE.
El mando a distancia no funciona.
e
Pulse el interruptor POWER de la unidad principal para
dejarla en modo de espera.
e
Si las pilas están agotadas, cámbielas por otras nuevas.
e
Utilice el mando a distancia dentro del radio de acción (5 m)
y apunte hacia el panel frontal.
e
Retire cualquier obstáculo que haya entre el mando a
distancia y la unidad principal.
e
Si hay un luz intensa cerca de la unidad, apáguela.
Si no se restablece el funcionamiento normal, desconecte
el cable de alimentación de la toma y vuélvalo a conectar.
Mantenimiento
Si se ensucia la superficie del equipo, pase un paño suave o
utilice jabón líquido normal diluido. Limpie cualquier resto
que pueda quedar en la unidad. No utilice aguarrás, bencina
ni alcohol, ya que podría dañar el acabado de la unidad.

50
Especificaciones
Sección del amplificador
Energía de salida . . . . . . . . . . . . . . . . . . . . . . . . 100+100 watts RMS (0,9 % THD, 1 kHz, 8 ohmios)
Distorsión armónica total. . . . . . . . . . . . . . . . . . . . . . . . . . . . . . . . . . . . 0,05 % (at 80 watts, 1 kHz)
Sensibilidad/Impedancia de entrada . . . . . . PHONO: 6,5 mV/22 kohmios, LINE: 230 mV/22 kohmios
Respuesta en frecuencia. . . . . . . . . . . . . . PHONO: 20 Hz-20 kHz, ±3 dB, LINE: 20 Hz-35 kHz, –3 dB
Relación señal/ruido . . . . . . . . . . . . . . . . . . . . . . . . . . . . PHONO: 75 dB (IHF-A), LINE: 90 dB (IHF-A)
Control de tonos: . . . . . . . . . . . . . . . . . . . . GRAVES: ±10 dB a 100 Hz, AGUDOS: ±10 dB a 10 kHz
Control de sonido. . . . . . . . . . . . . . . . . . . . . . . . . . . . . . . . . . . . . . . . . . . . . . . . . . . +4 dB a 100 Hz
Sección del sintonizador FM
Límites de sintonización . . . . . . . . . . . . . . . . . . . . . . . . . . . 87,5 MHz-108,0 MHz (pasos de 50 kHz)
Sensibilidad utilizable . . . . . . . . . . . . . . . . . . . . . . . . . . . . . . . . . . . . . . . . . . Monoaural: 10 dBµV/m
Sensibilidad en silencio de 50 dB . . . . . . . . . . . . . . . . . Monoaural: 15 dBµV/m, Estéreo: 33 dBµV/m
Proporción de rechazo de imagen . . . . . . . . . . . . . . . . . . . . . . . . . . . . . . . . . . . . . . . . . . . . . . 35 dB
Proporción de supresión AM . . . . . . . . . . . . . . . . . . . . . . . . . . . . . . . . . . . . . . . . . . . . . . . . . . 50 dB
Distorsión armónica (1 kHz). . . . . . . . . . . . . . . . . . . . . . . . . . . . . Monoaural: 0,5 %, Estéreo: 0,5 %
Respuesta en frecuencia . . . . . . . . . . . . . . . . . . . . . . . . . . . . . . . . . . . . . . . . . . 30 Hz-15 kHz, –3 dB
Separación estéreo (1 kHz) . . . . . . . . . . . . . . . . . . . . . . . . . . . . . . . . . . . . . . . . . . . . . . . . . . . 35 dB
Relación señal/ruido . . . . . . . . . . . . . . . . . . . . . . . . . . . . . Monoaural: 70 dB, Estéreo: 65 dB (IHF-A)
Sección del sintonizador AM
Límites de sintonización . . . . . . . . . . . . . . . . . . . . . . . . . . . . . . 522 kHz-1.620 kHz (pasos de 9 kHz)
Sensibilidad utilizable. . . . . . . . . . . . . . . . . . . . . . . . . . . . . . . . . . . . . . . . . . . . . . . . . . . . . . 55 dB/m
Distorsión armónica total . . . . . . . . . . . . . . . . . . . . . . . . . . . . . . . . . . . . . . . . . . 1 % a 100 dBµV/m
Relación señal/ruido . . . . . . . . . . . . . . . . . . . . . . . . . . . . . . . . . . . . . . . . . . . . . 40 dB a 100 dBµV/m
Generalidades
Requerimientos de energía. . . . . . . . . . . . . . . . . . . . . . . . . . . . . . . . . . . . . . . . . . . 230 V c.a., 50 Hz
Consumo de energía . . . . . . . . . . . . . . . . . . . . . . . . . . . . . . . . . . . . . . . . . . . . . . . . . . . . . . . 280 W
Salida CA . . . . . . . . . . . . . . . . . . . . . . . . . . . . UNSWITCHED (no commutada) x 1, total 100 W máx
Dimensiones (An x Al x P). . . . . . . . . . . . . . . . . . . . . . . . . . . . . . . . . . . . . . . . . 435 x 144 x 330 mm
Peso (neto) . . . . . . . . . . . . . . . . . . . . . . . . . . . . . . . . . . . . . . . . . . . . . . . . . . . . . . . . . . . . . . . 7,4 kg
Accesorios estándar
Antena AM de bucle x 1
Antena FM x 1
Control remoto x 1
Pila (AA, R6, SUM-3) x 2
• El diseño y las especificaciones están sujetos a cambios sin previo aviso.
• Las ilustraciones pueden diferir de los modelos de producción.

51
DEUTSCH
Inhalt
ACHTUNG
Vermeiden Sie Aufstellungsorte, an denen der AG-790
Spritzwasser ausgesetzt wäre. Plazieren Sie keine mit
Flüssigkeiten gefüllten Objekte - wie etwa Vasen - auf dem
Gerät.
Installieren Sie den AG-790 nicht in einem geschlossenen
Schrank, Regal oder ähnlichen Möbeln.
Vielen Dank für den Kauf dieses TEAC-Geräts. Bitte lesen
Sie diese Anleitung sorgfältig durch, um die Leistungsfähigkeit dieses Geräts optimal nutzen zu können.
Vor der ersten Inbetriebnahme . . . . . . . . . . . . . . . . . . . . . . . . 51
Betrieb mit der Fernbedienung . . . . . . . . . . . . . . . . . . . . . . . . 52
Anschluss von Antennen. . . . . . . . . . . . . . . . . . . . . . . . . . . . . 52
Anschlüsse . . . . . . . . . . . . . . . . . . . . . . . . . . . . . . . . . . . . . . . 54
Namen der einzelnen Bedienungselemente. . . . . . . . . . . . . . . 56
Grundlegende Bedienung . . . . . . . . . . . . . . . . . . . . . . . . . . . . 58
Tuner . . . . . . . . . . . . . . . . . . . . . . . . . . . . . . . . . . . . . . . . . . . 61
Sender-Presets . . . . . . . . . . . . . . . . . . . . . . . . . . . . . . . . . . . . 62
RDS . . . . . . . . . . . . . . . . . . . . . . . . . . . . . . . . . . . . . . . . . . . . 63
RDS (PTY-Spartenprogramme). . . . . . . . . . . . . . . . . . . . . . . . . 63
RDS (PTY-Suchfunktion) . . . . . . . . . . . . . . . . . . . . . . . . . . . . . 64
Hilfe bei der Fehlerbeseitigung . . . . . . . . . . . . . . . . . . . . . . . . 65
Technische Daten . . . . . . . . . . . . . . . . . . . . . . . . . . . . . . . . . . 66
Vor der ersten Inbetriebnahme
Lesen Sie die folgenden Hinweise bitte aufmerksam durch
und beachten Sie diese, bevor Sie den AG-790 in Betrieb
nehmen.
<
Da sich der Receiver während des Betriebs erwärmt, achten
Sie bitte stets auf ausreichenden Freiraum zur Belüftung rund
um den AG-790.
Verdecken Sie die Lüftungsöffnungen nicht. Stellen Sie sicher,
dass stets ein Freiraum von mindestens 50 cm oberhalb und
von mindestens 10 cm seitlich des Receivers vorhanden ist.
Legen oder stellen Sie keine Gegenstände auf den Receiver.
<
Achten Sie bitte darauf, dass die Netzspannung, mit der Sie
den AG-790 betreiben möchten, den Angaben auf der
Rückseite des Receivers entspricht. Im Zweifelsfall fragen Sie
bitte einen örtlichen Elektriker.
<
Gehen Sie bei der Wahl eines geeigneten Standorts
gewissenhaft vor. Vermeiden Sie hierbei die Einwirkung
direkten Sonnenlichts oder anderer Hitzequellen sowie Orte,
die vermehrt Erschütterungen oder Vibrationen, Staub,
Wärme, Kälte oder Feuchtigkeit ausgesetzt sind.
<
Plazieren Sie den AG-790 niemals auf einem anderen
Verstärker/Receiver.
< Öffnen Sie nicht das Gehäuse, da dies zu Schäden im
Geräteinnern oder zu einem Stromschlag führen kann. Falls
ein Fremdkörper ins Geräteinnere eingedrungen sein sollte,
wenden Sie sich bitte an Ihren Händler oder eine autorisierte
Servicestelle.
<
Ziehen Sie beim Entfernen des Anschlusskabels niemals am
Kabel, sondern stets am daran befindlichen Stecker.
<
Verwenden Sie zur Reinigung des Gehäuses ausschließlich ein
sauberes, weiches und trockenes Tuch, da die Verwendung
chemischer Reinigungsmittel zu Beschädigungen führen kann.
<
Bewahren Sie diese Bedienungsanleitung an einem sicheren
Ort auf, so dass Sie diese bei eventuellen Fragen oder
Problemen zur Hand haben.
Entsorgung ihrer alten elektrischen oder elektronischen
Geräte
1.Sofern ein Gerät mit dem Symbol
einer durchkreuzten Abfalltonne
gekennzeichnet ist, bedeutet dies,
dass dessen Entsorgung gemäß der
„RICHTLINIE 2002/96/EG DES
EUROPÄISCHEN PARLAMENTS UND
DES RATES vom 27. Januar2003 über
Elektro- und Elektronik-Altgeräte“
geregelt ist.
2. Sämtliche elektrischen und elektronischen Geräte müssen
dementsprechend, getrennt vom Restmüll, den von der
jeweils zuständigen städtischen oder Bundesbehörde dazu
bestimmten, gesonderten Wertstoffsammlungen zugeführt
werden.
3.Eine korrekte Entsorgung ihrer alten elektrischen oder
elektronischen Geräte trägt in hohem Maße der
Vermeidung möglicher negativer Konsequenzen für die
Umwelt und damit auch für ihre eigene sowie die
Gesundheit Anderer bei.
4. Weiterführende Informationen bezüglich der Entsorgung
ihrer alten elektrischen oder elektronischen Geräte erhalten
Sie auf Anfrage bei ihrem zuständigen Stadtbüro,
Abfallentsorgungsgesellschaft oder dem Händler, bei dem
Sie das Gerät ursprünglich erworben haben.

52
Anschluss von AntennenBetrieb mit der Fernbedienung
Der Receiver sowie andere TEAC-Komponenten, die mittels
UR-Logo ( ) auf der Gerätevorderseite gekennzeichnet
sind, können über die im Lieferumfang befindliche „UR“Fernbedienung gesteuert werden.
Richten Sie die Fernbedienung bei deren Verwendung stets
auf den auf der Frontseite des Receivers (oder einer anderen
TEAC-Komponente) befindlichen REMOTE SENSOR aus.
<
Innerhalb des zulässigen Entfernungsbereichs können
Gegenstände, die sich zwischen Fernbedienung und
Empfangssensor befinden, den Signalempfang behindern.
<
Bei Verwendung der Fernbedienung können am Receiver
Fehlfunktionen auftreten, wenn er in der Nähe eines Geräts
betrieben wird, das Infrarotstrahlen aussendet oder wenn
Infrarot-Fernbedienungen anderer Geräte im gleichen Raum
verwendet werden.
Ebenso kann die Fernbedienung des AG-790 die Funktion
anderer mittels Infrarotsignalen gesteuerter Geräte
beeinflussen.
Einlegen der Batterien
1. Entfernen Sie die Batteriefach-Abdeckung.
2. Setzen Sie zwei Batterien des Typs „AA“ (R6, SUM-3), unter
Beachtung der korrekten Polarität (+
/_) ein.
3. Bringen Sie die Abdeckung wieder an.
Batteriewechsel
Sollte die Funktionsauslösung nur nach Verringern des
Abstands zwischen Gerät und Fernbedienung möglich sein, ist
ein Wechsel der Batterien empfehlenswert. Verwenden Sie
hierbei stets zwei neue Batterien.
Batterie-Vorsichtsmaßnahmen
<
Achten Sie beim Einsetzen der Batterien auf deren korrekte
Polarität (+
und _).
<
Verwenden Sie stets zwei Batterien des gleichen Typs und
niemals gleichzeitig gebrauchte und frische Batterien.
<
Sowohl Einweg- als auch wieder aufladbare Batterien können
verwendet werden.
Beachten Sie die Sicherheitshinweise auf den Batterien.
<
Bei längerem Nichtgebrauch (länger als ein Monat) sollten die
Batterien entnommen werden, um ein Auslaufen im
Batteriefach zu verhindern. Entnehmen Sie bereits
ausgelaufene Batterien, reinigen Sie das Batteriefach und
setzen Sie frische Batterien ein.
<
Batterien dürfen nicht erhitzt, zerlegt oder in offenes Feuer
geworfen werden.
UKW-Zimmerantenne
Schließen Sie die UKW-Zimmerantenne am 75Ω-
Antennenanschluss an. Spannen Sie das Antennenkabel und
stellen Sie am Tuner den gewünschten Sender ein (siehe Seite
61). Befestigen Sie die Antenne mittels Reißzwecken,
Stecknadeln oder Klebeband an einem Fenster oder der
Wand, und richten Sie sie auf beste Empfangsqualität aus.
UKW-Außenantenne
In Gebieten mit verminderter UKW-Empfangsqualität kann
die Verwendung einer Außenantenne erforderlich sein.
Normalerweise verbessert eine Dreielementantenne die
Empfangsqualität ausreichend. Sehr ungünstige
Empfangsbedingungen können allerdings die Verwendung
von Fünf-, Sieben- oder Antennen mit mehr Elementen
erforderlich machen.
<
Trennen Sie bei Verwendung einer UKW-Außenantenne die
Zimmerantenne vom Tuner.

53
DEUTSCH
MW-Zimmer-Rahmenantenne
Die mitgelieferte Hochleistungs-MW-Rahmenantenne
gewährleistet in den meisten Gebieten einen guten Empfang.
Zur Aufstellung der MW-Antenne rasten Sie die
Halterklammer im Standfuß ein.
Schließen Sie die Kabel der Rahmenantenne an die AMKlemmen an.
Anschließen der Antenne:
Betätigen Sie den Hebel, führen Sie das
Kabelende ein, und lösen Sie den Hebel.
Prüfen Sie den ordnungsgemäßen Sitz,
indem Sie leicht am Kabel ziehen.
Vergewissern Sie sich nochmals, dass sich
lediglich das jeweils abisolierte Kabelende in
den Klemmanschlüssen befindet. Falls Sie die
Kunststoff-Kabelummantelung festgeklemmt haben, drücken
Sie nochmals leicht auf die Lasche des entsprechenden
Klemmanschlusses und ziehen Sie die Litze ein wenig heraus,
da ansonsten kein korrekter Antennenanschluss gewährleistet
ist.
Positionieren Sie die Antenne auf einem Schrank oder hängen
Sie sie beispielsweise im Fenster auf, usw. Richten Sie die
Antenne auf besten Empfang aus. Zur Vermeidung von
Rauschen und Interferenzen achten Sie dabei darauf, dass
sich die Antenne soweit wie möglich von Ihrem HiFi-System,
den Lautsprecher- und Netzzuleitungen entfernt befindet.
MW-Außenantenne
Sollte die mitgelieferte Mittelwellenantenne nicht die
gewünschte Empfangsqualität bieten, weil Sie zu weit
entfernt vom Sender oder in einem sehr dicht bebauten
Wohngebiet leben, verwenden Sie zusätzlich eine MWAußenantenne.
Verwenden Sie hierzu ein isoliertes Kabel, das länger als 5 m
ist. Isolieren Sie das eine Ende ab, und schließen Sie es, wie in
der Abbildung dargestellt, an.
Das Antennenkabel sollte außerhalb oder innerhalb der
Wohnung, in der Nähe eines Fensters, gespannt werden. Zur
weiteren Empfangsverbesserung verbinden Sie die GNDKlemme mit einer „guten“ Erdleitung (Hausmasse).
Hinweis:
Lassen Sie die MW-Rahmenantenne auch bei Verwendung
einer MW-Außenantenne angeschlossen.
MW-Außenantenne
MW-Rahmenantenne:
Schließen Sie das schwarze
Kabel an der linken (GND)
und das weiße Kabel an der
rechten Buchse an.

54
Anschlüsse
CD-Player
Plattenteller Cassetten Deck
Lautsprecherboxen A
Lautsprecheranschlüsse
ACHTUNG:
Achten Sie bitte darauf, dass der AG-790 ausgeschaltet ist,
bevor Sie die Lautsprecherkabel anschließen. Andernfalls
können die Lautsprecher durch Kontaktgeräusche etc.
beschädigt werden.
<
Überprüfen Sie bitte die Anschlussimpedanz der zu
verwendenden Lautsprecherboxen. Betreiben Sie am AG790 ausschließlich Lautsprecherboxen mit einer
Anschlussimpedanz von 8Ω oder höher.
<
Die schwarzen Lautsprecheranschlussklemmen
repräsentieren den Minuspol (–).
Üblicherweise sind Lautsprecherboxen-Anschlusskabel
gekennzeichnet. Der (farbig) markierte Leiter entspricht
hierbei dem Pluspol. Verbinden Sie daher den (farbig)
markierten Leiter mit dem (+)-Anschluss und den
unmarkierten Leiter mit dem (–)-Anschluss.
A
Lautsprecherboxen B
VORSICHT:
<
Schalten Sie alle Geräte aus, bevor Sie Anschlüsse vornehmen.
<
Lesen Sie bitte die Bedienungsanleitungen aller
Komponenten, die Sie an diesem Receiver betreiben möchten.
< Achten Sie bitte auf korrekten Anschluss aller
Steckverbindungen.
Audiosignalkabel sollten nicht mit Netz- oder
Lautsprecherkabeln gebündelt verlegt werden, da
anderenfalls Interferenzen auftreten können.
D
LINE OUT
RL
B
A
E
C
RL
RL
LINE
LINE
OUT
IN
F

55
DEUTSCH
PHONO-Buchsen und SIGNAL GNDAnschluss
Verbinden Sie die Ausgänge eines Plattenspielers mittels
Cinchkabel mit den PHONO-Eingangsbuchsen. Anschluss:
weißer Stecker q
weiße Buchse (L: linker Kanal)
roter Stecker q
rote Buchse (R: rechter Kanal)
Verbinden Sie das Massekabel eines Plattenspielers mit dem
SIGNAL GND-Anschluss.
RESET
In den nachfolgend beschriebenen Fällen kann es bei
Verwendung der Funktionstasten zu Fehlfunktionen
kommen:
• Sofern das System durch Überspannung beschädigt wurde.
• Sofern starke Spannungs- und/oder Frequenzschwankungen
in der Netzversorgung auftreten.
Betätigen Sie in solch einem Fall ein- oder zweimal den
RESET-Schalter. Verwenden Sie hierzu die Spitze eines
Bleistifts oder eines Kugelschreibers.
Alle gespeicherten Einstellungen (wie Sender-Presets) gehen
hierbei allerdings verloren.
AC OUTLET Netzausgang (geschaltet)
Der Netzausgang führt lediglich bei eingeschaltetem oder im
Bereitschaftsmodus befindlichem Receiver Spannung.
Bei ausgeschaltetem Receiver ist der Netzausgang
spannungsfrei.
Achtung:
Stellen Sie sicher, dass die Gesamtleistungsaufnahme aller
an diesem Anschluss betriebenen Komponenten den Wert
von 100 Watt nicht übersteigt.
Netzkabel
Nachdem Sie sämtliche Kabelverbindungen zwischen den
Komponenten Ihres Systems hergestellt haben, verbinden
Sie das Netzkabel mit einer Wandsteckdose.
Vergewissern Sie sich bitte, dass die Wandsteckdose, an der
Sie das Audiosystem anschließen möchten, die korrekte
Netzversorgung zur Verfügung stellt.
Ziehen Sie bitte nicht am Netzkabel. Verbinden oder ziehen
Sie stets den Stecker des Netzkabels.
<
Ziehen Sie beim Entfernen des Anschlusskabels niemals am
Kabel, sondern stets am daran befindlichen Stecker.
F
E
D
C
< Isolieren Sie maximal 10 mm der Boxenkabel ab. Längere,
unisolierte Enden können sehr leicht zu Kurzschlüssen
führen. Verdrillen Sie die abisolierten Enden der Kabel so
fest, dass keine einzelnen Drähte herausragen können:
ACHTUNG:
Achten Sie bitte darauf, dass sich die beiden abisolierten
Enden der Kabel nicht berühren, da dies andernfalls zu
Kurzschlüssen führen kann, die möglicherweise einen Kabeloder Gerätebrand sowie irreparable Schäden an Ihrem HiFiSystem bedingen könnten.
Anschließen der Lautsprecherboxen:
1.Drehen Sie die Klemmschrauben der Anschlussklemmen
gegen den Uhrzeigersinn, um die Kabel anschließen zu
können. Die Klemmschrauben lassen sich nicht komplett aus
ihren Gewinden herausschrauben.
2.Stecken Sie die abisolierten Kabelenden in die
Anschlussöffnungen, und ziehen Sie die Klemmschrauben
fest an (im Uhrzeigersinn drehen):
Achten Sie darauf, dass Sie nicht anstelle der abisolierten
Kabelenden die Kabelummantelung festgeklemmt haben.
3.Vergewissern Sie sich durch leichtes, vorsichtiges Ziehen,
dass die Kabel richtig festgeklemmt sind.
CD, TAPE MONITOR, VIDEO/AUXAnschlüsse
Das analoge Stereo (2-Kanal) Audiosignal wird über diese
Anschlüsse ein- bzw. ausgegeben. Verwenden Sie zum
Anschließen der entsprechenden Komponente ein
handelsübliches Cinchkabel.
Anschluss:
weißer Stecker q
weiße Buchse (L: linker Kanal)
roter Stecker q
rote Buchse (R: rechter Kanal)
B

56
Namen der einzelnen Bedienungselemente
POWER
Betätigen Sie bitte diese Taste, um den AG-790 ein- oder in
den Bereitschaftsmodus zu schalten.
Bereitschaftsmodus-Anzeige (Standby)
Diese Anzeige leuchtet, wenn sich der AG-790 im
Bereitschaftsmodus befindet.
Wenn sich der AG-790 im Bereitschaftsmodus befindet,
betätigen Sie zum Einschalten die POWER-Taste auf der
Fernbedienung oder eine der Signalquellentasten am
Receiver.
Sobald der Receiver eingeschaltet wird, erlischt die Anzeige.
Fernbedienungs-Empfangssensor
Bei Verwendung der Fernbedienung richten Sie diese bitte
stets auf den Fernbedienungs-Empfangssensor am AG-790
aus.
Lautsprecheranzeige
Diese Anzeige leuchtet, sobald die SPEAKERS-Taste (A oder B)
aktiviert wurde.
Display
Bei eingeschaltetem AG-790 wird der jeweilige
Betriebszustand im Display angezeigt.
MUTING-Anzeige
Diese Anzeige blinkt bei aktivierter Stummschaltungsfunktion.
LOUDNESS-Anzeige
Diese Anzeige leuchtet, sobald die LOUDNESS-Taste aktiviert
wurde.
G
F
E
D
C
B
Auch im ausgeschalteten Zustand (POWER-Schalter in
Stellung OFF) bezieht der Receiver eine geringe Leistung
aus dem Stromnetz.
A
A B F GC D E
N
b
R
d
Q
RT SU O K J I H
e
a
f
O
c
H
N
M
LP

57
DEUTSCH
POWER (STANDBY/ON)
Sofern der Netzschalter POWER der Systemhauptkomponente
eingeschaltet ist, können Sie mit dieser Taste den AG-790 einoder in den Bereitschaftsmodus (Standby) schalten.
MEMORY SCAN
Mittels dieser Taste können Sie die Presetspeicher
nacheinander aufrufen.
Tasten zur Laufwerksteuerung von angeschlossenen
TEAC Kassettendecks sowie CD-Playern
Diese Tasten dienen zur Steuerung der Laufwerksfunktionen
von TEAC-Komponenten, die mittels „UR“-Logo
gekennzeichnet sind.
MUTING
Mittels dieser Taste können Sie die Wiedergabe kurzzeitig
stumm schalten.
SLEEP
Diese Taste dient zum Einstellen der Sleep Timer-Funktion.
INPUT
(CD, PHONO, TUNER, TAPE MONITOR, VIDEO/AUX)
Diese Tasten dienen zur Auswahl der jeweils gewünschten
Signalquelle.
Hinweis:
Zur Vereinfachung wird in dieser Bedienungsanleitung
hauptsächlich Bezug auf die Bedienelemente auf der
Vorderseite des AG-790 genommen.
f
e
d
c
b
a
VOLUME/JOG
Mittels dieses Drehreglers (oder der entsprechenden
VOLUME-Tasten auf der Fernbedienung) können Sie die
Gesamtlautstärke einstellen.
BALANCE
Betätigen Sie diese Taste und drehen Sie gleichzeitig am
VOLUME/JOG-Rad, um die Balance zwischen linkem und
rechtem Kanal einzustellen.
TREBLE
Betätigen Sie diese Taste und drehen Sie gleichzeitig am
VOLUME/JOG-Rad, um die Wiedergabelautstärke des
Hochtonbereichs einzustellen.
BASS
Betätigen Sie diese Taste und drehen Sie gleichzeitig am
VOLUME/JOG-Rad, um den Bassanteil des Wiedergabesignals
zu regulieren.
RDS MODE
Sofern UKW-Tunerbetrieb aktiv ist, können Sie mittels dieser
Taste die RDS-Funktion bedienen.
Das RDS-Signal wird lediglich von europäischen Radiosendern
ausgestrahlt.
LOUDNESS
Die LOUDNESS-Taste dient zum gehörrichtigen Ausgleich des
Bassbereichs bei geringen Wiedergabelautstärken.
INPUT
(CD, PHONO, TUNER, TAPE MONITOR, VIDEO/AUX)
Diese Tasten dienen zur Auswahl der jeweils gewünschten
Signalquelle.
Falls sich der AG-790 im Bereitschaftsmodus befindet, können
Sie ihn mittels einer dieser Tasten einschalten.
TUNING/PRESET
Sofern manuelle Senderabstimmung ausgewählt wurde,
können Sie mittels dieser Tasten eine Senderempfangsfrequenz
einstellen.
In der Sender-Preset-Betriebsart dienen diese Tasten zur
Auswahl eines Sender-Presets.
MEMORY
Mittels dieser Taste können Sie Senderempfangsfrequenzen in
einem Preset abspeichern.
FM MODE
In der UKW-Betriebsart dienen diese Tasten zur Umschaltung
zwischen Mono- und Stereoempfang.
BAND
Mittels dieser Taste können Sie zwischen UKW- und MWEmpfang umschalten.
R
Q
P
O
N
M
L
K
J
I
H
TUNING MODE
Diese Taste dient zur Änderung des Abstimmodus.
PHONES
An diesem Anschluss können Sie einen Stereokopfhörer
anschließen, dessen Wiedergabelautstärke Sie mit dem
MASTER VOLUME-Drehregler einstellen können.
SPEAKERS
Mittels dieser Taste können Sie die Lautsprecherwiedergabe
ein- oder ausschalten.
ON: das Audiosignal wird über die angeschlossenen
Lautsprecherboxen wiedergegeben.
OFF: über die angeschlossenen Lautsprecherboxen wird kein
Audiosignal wiedergegeben.
U
T
S

58
Grundlegende Bedienung 1
2. Starten Sie die Aufnahme.
<
Sofern Sie ein Dreikopf-Cassetten Deck mit den TAPE
MONITOR (PLAY und REC)-Anschlüssen verbunden haben und
während des Aufnehmens die Hinterbandkontrollfunktion
aktivieren, wird nicht das Eingangssignal sondern das soeben
aufgezeichnete Audiosignal wiedergegeben.
Betätigen Sie zum Einschalten der Komponente die
POWER-Taste.
1
Sofern dies erforderlich ist, starten Sie die Wiedergabe
der externen Signalquelle, und stellen Sie durch
langsames Drehen des VOLUME-Reglers die gewünschte
Wiedergabelautstärke ein.
3
Tape Monitor-Funktion (Hinterbandkontrolle)
Betätigen Sie zur Wiedergabe der mit dem TAPE MONITORAnschluss verbundenen Programmquelle bitte die TAPE
MONITOR-Taste. Hierdurch aktivieren Sie die
Hinterbandkontrollfunktion und die „
TAPE
“-Anzeige
leuchtet.
Erneutes Betätigen der TAPE MONITOR-Taste schaltet die
Tape Monitor-Funktion wieder aus.
<
Bei aktiver Tape Monitor-Funktion kann das Audiosignal einer
anderen, als der an TAPE MONITOR angeschlossenen
Programmquelle, nicht wiedergegeben werden. Schalten Sie
zur Wiedergabe anderer Programmquellen die
Hinterbandkontrollfunktion aus.
MON
< Beim Einschalten des Receivers leuchtet die MUTING-Anzeige
kurzzeitig auf. Hierbei handelt es sich nicht um eine
Fehlfunktion.
<
Wenn sich der AG-790 im Bereitschaftsmodus befindet,
leuchtet die Standby-Anzeige. Betätigen Sie zum Einschalten
die POWER-Taste auf der Fernbedienung oder eine der
Signalquellentasten - TUNER, PHONO, CD, TAPE MONITOR
oder VIDEO/AUX - am Receiver.
Wählen Sie durch Betätigen der zugehörigen Taste die
gewünschte Signalquelle aus.
2
Aufnahme
1. Wählen Sie mittels der entsprechenden Taste die
Signalquelle aus, deren Audiosignal Sie aufzeichnen
möchten.
2 31

59
DEUTSCH
DCB E FA
Kopfhörer
Stellen Sie den VOLUME-Regler auf dessen Minimalwert
(linker Anschlag) ein, und schließen Sie Ihren
Stereokopfhörer an der PHONES-Buchse an. Stellen Sie nun
mittels VOLUME-Regler eine gehörrichtige
Wiedergabelautstärke ein.
Sofern Sie die Wiedergabe über die angeschlossenen
Lautsprecherboxen stumm schalten möchten, betätigen Sie
die SPEAKERS-Taste.
ACHTUNG
Regulieren Sie die Wiedergabelautstärke stets auf den
Minimalwert zurück, bevor Sie die Kopfhörer anschließen.
ZUR VERMEIDUNG VON HÖRSCHÄDEN sollten Sie die
Kopfhörer stets erst dann aufsetzen, wenn Sie diese am
PHONES-Ausgang angeschlossen haben.
B
Achtung:
Sofern die Lautsprecherboxen an den mit SPEAKERS A
bezeichneten Lautsprecherausgängen angeschlossen sind,
können Sie diese mittels SPEAKERS A-Taste aktivieren. Falls
an den mit SPEAKER B bezeichneten Lautsprecherausgängen
keine Boxen angeschlossen sind, deaktivieren Sie diese bitte
mittels SPEAKER B-Taste. Andernfalls wird kein Audiosignal
über die SPEAKER A-Ausgänge ausgegeben. Im
umgekehrten Fall, wenn Sie Ihre Boxen an den mit SPEAKER
B bezeichneten Leistungsausgängen angeschlossen haben,
deaktivieren Sie bitte die SPEAKERS A-Ausgänge.
LOUDNESS-Taste
Diese Taste dient der gehörrichtigen Anpassung des
Bassfrequenzbereichs bei leisen Wiedergabepegeln.
Achten Sie bitte darauf, dass bei normaler
Wiedergabelautstärke hier die OFF-Stellung gewählt ist.
C
Höhenregler
Mit diesem Regler beeinflussen Sie den Anteil hoher
Frequenzen des, über die Lautsprecherboxen
wiedergegebenen, Audiosignals.
E
Baßregler
Mit diesem Regler beeinflussen Sie den Anteil tiefer
Frequenzen des, über die Lautsprecherboxen
wiedergegebenen, Audiosignals.
D
Einstellen der Balance zwischen den
einzelnen Lautsprechersystemen
F
1.Betätigen Sie die BALANCE-Taste. Die Meldung „BAL“ wird
im Display angezeigt.
2.Stellen Sie innerhalb von drei Sekunden mittels JOG-Dial den
gewünschten Balancewert zwischen linkem und rechtem
Kanal ein.
Der Einstellbereich für die Stereobalance erstreckt sich von
L+16 bis R+16:
L+16 ... L+1 a
CENT q R+1 ... R+16
Normalerweise können Sie den Drehregler in seiner
Mittelstellung (CENT) belassen.
Lautsprecherwiedergabe Ein-/Ausschalten
Betätigen Sie zum Ein-/Ausschalten der Wiedergabe über die
angeschlossenen Lautsprecherboxen die SPEAKER-Taste (A
oder B). Bei eingeschaltetem Boxenbetrieb leuchtet die
SPEAKERS-Anzeige.
A
1.Betätigen Sie die BASS-Taste. Die Meldung „BAS“ wird im
Display angezeigt.
2.Stellen Sie nun innerhalb von drei Sekunden mittels JOG-Dial
den gewünschten Pegel ein.
Der Bassanteil kann in zwei Stufen im Bereich zwischen –10
bis +10 eingestellt werden.
1.Betätigen Sie die TREBLE-Taste. Die Meldung „TRE“ wird im
Display angezeigt.
2.Stellen Sie nun innerhalb von drei Sekunden mittels JOG-Dial
den gewünschten Pegel ein.
Der Hochtonanteil kann in zwei Stufen im Bereich zwischen
–10 bis +10 eingestellt werden.

60
Grundlegende Bedienung 2
Betätigen Sie wiederholt die SLEEP-Taste, bis die gewünschte
Ausschaltzeit im Display angezeigt wird.
SLEEP 90 (80, 70 ... bzw. 10)
Der AG-790 wird nach 90 (80 ... bzw. 10) Minuten
ausgeschaltet.
Die normale Displayanzeige
Die normale Displayanzeige signalisiert, dass die Sleep TimerFunktion nicht aktiv ist.
< Nach dem Einstellen der Einschlaftimerfunktion wird die
Hintergrundbeleuchtung des Displays abgedunkelt.
< Zum Überprüfen der noch verbleibenden Zeitspanne
betätigen Sie bitte die SLEEP-Taste. Die noch verbleibende
Zeitspanne wird 3 Sekunden lang im Display angezeigt.
Danach erscheint im Display automatisch wieder die vorherige
Anzeige.
Betätigen Sie zur zeitweisen Stummschaltung der Wiedergabe
bitte die MUTING-Taste.
Durch erneutes Betätigen der MUTING-Taste wird die
Wiedergabe mit der zuvor eingestellten Lautstärke
fortgesetzt. Falls Sie während aktivierter Muting-Funktion den
Wiedergabepegel verändern (VOLUME-Regler oder VOLUMETasten auf der Fernbedienung), wird die Muting-Funktion
automatisch beendet.
<
Bei aktivierter Stummschaltung blinkt die MUTING-Anzeige.
Sleep Timer-Funktion
Der AG-790 kann nach einer bestimmten, zuvor
programmierten Zeit automatisch abgeschaltet werden.
Stummschaltung

61
DEUTSCH
Tuner
Halten Sie die TUNING/PRESET-Taste 0,5 bis 2 Sekunden lang
gedrückt.
Sobald eine Station abgestimmt worden ist, stoppt der
Suchlauf automatisch.
Wenn Sie den Suchlauf stoppen möchten, drücken Sie die
TUNING/PRESET-Taste.
Wahl von Stationen, die nicht automatisch abgestimmt
werden können (manuelle Wahl)
Durch kurzes Drücken der TUNING/PRESET-Taste (0,5
Sekunden oder kürzer) wird die Frequenz um einen
festgelegten Schrittwert geändert.
Drücken Sie die TUNING-Taste wiederholt, bis Sie die
gewünschte Station gefunden haben.
<
„TUNED“ erscheint bei korrekter Abstimmung einer Station.
Durch Betätigen dieser Taste können Sie zwischen Stereound Mono-Wiedergabequalität umschalten.
Stereo:
UKW-Stereosendungen werden in Stereoqualität empfangen
und wiedergegeben. Die „STEREO“-Anzeige leuchtet.
< Falls die Wiedergabe verzerrt ist, und die „STEREO“-Anzeige
blinkt, ist das empfangene Signal nicht stark genug zur
Erzielung der vollen Stereoqualität. Wechseln Sie in diesem
Fall zum MONO-Wiedergabemodus.
Mono:
Wählen Sie diese Einstellung, wenn die Stereoqualität beim
UKW-Empfang durch Rauschen beeinträchtigt wird. Das
Signal wird nun in Monoqualität wiedergegeben, wodurch
störende Nebengeräusche wirkungsvoll unterdrückt werden.
Betätigen Sie die TUNER-Taste.
1
Wählen Sie mittels BAND-Taste den gewünschten
Empfangsbereich – UKW oder MW.
2
Drücken Sie die TUNING MODE-Taste bei leuchtender
„CH“-Anzeige, um die manuelle Abstimmbetriebsart zu
wählen.
Die „CH“-Anzeige erlischt.
Diese Taste dient zur Änderung des Abstimmodus.
3
Wählen Sie die Station, die Sie hören möchten
(Wahlautomatik).
4
FM MODE-Taste
3 4
12

62
Sender-Presets
2. Betätigen Sie die MEMORY SCAN-Taste auf der
Fernbedienung.
Die Empfangssignale der gespeicherten Radiostationen
werden in Intervallen von jeweils fünf Sekunden
wiedergegeben.
Sobald das Signal des gewünschten Senders wiedergegeben
wird, betätigen Sie zum Beenden des Preset-Scans bitte
nochmals die MEMORY SCAN-Taste.
<
Falls ein unter einem Preset abgelegter Sender momentan
kein Signal aussendet oder der Sender nicht empfangen
werden kann, wird diese Station während des MEMORY
SCANS übersprungen.
Sender-Presets manuell programmieren
Die Empfangsfrequenzen von UKW- und MW-Radiosendern
können jeweils in den Presets 1 bis 30 gespeichert werden.
Stellen Sie die Empfangsfrequenz des gewünschten
Senders ein (siehe Bedienschritte bis auf Seite 61).
Betätigen Sie die MEMORY-Taste.
2
41
1
Preset-Scan-Funktion
1. Wählen Sie mittels BAND-Taste den gewünschten
Empfangsbereich – UKW oder MW.
Zum Speichern weiterer Sender-Presets wiederholen Sie bitte
die Bedienschritte bis .
31
Wählen Sie mittels TUNING/PRESET-Tasten das SenderPreset, unter dem Sie die eingestellte Empfangsfrequenz
abspeichern möchten, während die MEMORY-Anzeige
blinkt. Betätigen Sie anschließend bitte nochmals die
MEMORY-Taste.
3
Sofern die CH-Anzeige nicht leuchtet, betätigen Sie zum
Aufruf der Preset-Senderwahl bitte die TUNING MODETaste.
2
Betätigen Sie wiederholt die TUNING/PRESET-Tasten, bis
die gewünschte Empfangsfrequenz angezeigt wird.
3
Aufrufen von Sender-Presets
Wählen Sie mittels BAND-Taste den gewünschten
Empfangsbereich – UKW oder MW.
1
Speicherinhalt
Falls Sie den AG-790 mittels Netzschalter (POWER) ausschalten
oder die Stromzufuhr zum Gerät drei Tage oder länger
unterbrochen ist, geht der Speicherinhalt (unter anderem auch
die Preset-Programmierung) verloren.
Um den Verlust aller gespeicherten Daten zu vermeiden, wird
daher empfohlen, den AG-790 bei Nichtgebrauch lediglich in
den Bereitschaftsbetrieb (STANDBY) zu versetzen.
TUNING/PRESETTUNING MODE
BAND
MEMORY

63
DEUTSCH
RDS
RDS (Radio Data System) ist ein Service der Rundfunkanstalten,
der neben dem normalen Radioprogramm die Ausstrahlung
zusätzlicher Textinformationen ermöglicht.
Der RDS-Dienst steht ausschließlich bei UKW-Empfang in
Europa zur Verfügung.
Stellen Sie die Empfangsfrequenz eines UKW-Senders
ein (siehe Bedienschritte bis auf Seite 62).
Betätigen Sie die RDS-Taste.
2
41
1
Bei jedem Betätigen der RDS MODE-Taste ändert sich der
RDS-Modus, wie folgt:
PS (Programm-Service Name)
Nach Auswahl von PS blinkt die Meldung „PS“ zuerst ungefähr
vier Sekunden lang im Display. Danach erscheint PS oder der
Name des ausgewählten Radiosenders. Falls der eingestellte
Sender keine PS-Daten übermittelt, wird dessen
Empfangsfrequenz angezeigt.
PTY (Programm-Typ)
Nach Auswahl von PTY blinkt die Meldung „PTY“ zuerst
ungefähr vier Sekunden lang im Display. Danach erscheint der
ausgestrahlte Programmtyp. Falls der eingestellte Sender
keine
PTY-Daten übermittelt, wird dessen Empfangsfrequenz
angezeigt.
RT (Radio-Text)
Nach Auswahl von RT blinkt die Meldung „RT“ zuerst ungefähr
vier Sekunden lang im Display. Danach erscheinen Nachrichten
des Senders, die sich aus bis zu 64 Zeichen zusammensetzen
können. Falls der eingestellte Sender keine RT-Daten
übermittelt, wird dessen Empfangsfrequenz angezeigt.
TA (Traffic Announcement – Verkehrsmeldungen)
Nach Auswahl von TA blinkt die Meldung „TA“ zuerst ungefähr
vier Sekunden lang im Display. Danach sucht der Tuner nach
aktuellen Verkehrsmeldungen.
<
Falls der eingestellte Sender keine Verkehrsmeldungen
ausstrahlt, stellt der Tuner automatisch andere Sender ein, die
diesen Dienst unterstützen.
CT (Clock Time – Uhrzeit)
Die vom jeweiligen Sender ausgestrahlte aktuelle Uhrzeit wird
im Display angezeigt.
Nach Auswahl von CT blinkt die Meldung „CT“ zuerst ungefähr
vier Sekunden lang im Display. Danach erscheint die aktuelle
Uhrzeit. Falls der eingestellte Sender keine CT-Daten überträgt,
wird automatisch vom RDS- zum PS-Modus gewechselt.
RDS (PTY-Spartenprogramme)
NEWS : kurze Ansagen, Ereignisse, öffentliche Meinungen,
Reportagen, aktuelle Situationen.
AFFAIRS : Stellungnahmen, Nachrichten, die nicht nicht unter
NEWS fallen, Anregungen, Dokumentationen,
Diskussionen, Analysen, usw.
INFO : tägliche Informationen oder Berichte, wie etwa
Wetterbericht, Verbraucher-Empfehlungen,
medizinische Hinweise, usw.
SPORT : Sport-Programme.
EDUCATE : Bildungs- und Informationsprogramme.
DRAMA : alle Arten von Hörspiel, Konzert, Kinderfunk oder
Comedy-Serien.
CULTURE :
alle Arten von nationalen oder regionalen kulturellen
Belangen, inklusive religiöser Themen, Philosophie,
Sozialwissenschaften, fremdsprachliche Programme,
Theater, usw.
SCIENCE : Naturwissenschaften und Technologie.
VARIED : Unterhaltungsprogramme, Quiz, Interviews,
Comedy, Satire, usw.
POP M : Pop Musik, Kommerzielle Programme,
Werbesendungen, usw.
ROCK M : Rock Musik.
EASY M : Pop Musik, normalerweise Titel mit Laufzeiten von
weniger als 5 Minuten.
LIGHT M : klassische Musik, instrumentale Stücke, Chor sowie
leichte Unterhaltungsmusik.
CLASSICS : klassische Werke, Orchester, Oper, Symphonien,
Kammermusik, usw.
OTHER M : Stilrichtungen der Musik, die nicht bereits
kategorisiert wurden, Folk, Schlager, Jazz, Rhythm
& Blues, Country, usw.
WEATHER : Wettervorhersagen.
FINANCE : Nachrichten aus der Finanz- und Wirtschaftswelt ,
Börsenmeldungen.
CHILDREN : Kinder- und Jugendprogramm.
SOCIAL : Soziale Belange.
RELIGION : Programme mit religiösen Inhalten.
PHONE IN : sogenannte Call-In-Shows, telefonische
Meinungsumfragen und -äußerungen.
TRAVEL : Reiseberichte.
LEISURE : Programme, die sich mit verschiedenen Hobbies
befassen.
JAZZ : Jazz Musik.
COUNTRY : Country Musik.
NATION M : jeweils nationale Musik (Schlager, Chansons, usw.)
OLDIES : Musik aus der sogenannten „Guten Alten Zeit“.
FOLK M : Folk Musik.
DOCUMENT: Dokumentationen.
TEST
ALARM : Eine Sendung, die über einen Notzustand oder eine
Naturkatastrophe informiert.

64
Die Suchfunktion beginnt.
< Sobald ein Sender, der den ausgewählten Programmtyp
ausstrahlt, gefunden wurde, endet der Suchlauf, und der
Programmtyp wird im Display angezeigt.
<
Falls der gesuchte Programmtyp von der PTY-Suchfunktion
nicht gefunden wird, stoppt die Suchfunktion, und die zuvor
eingestellte Frequenz wird erneut eingestellt und angezeigt.
<
Betätigen Sie die RDS MODE-Taste, um die Suchfunktion
vorzeitig abzubrechen.
RDS (PTY-Suchfunktion)
Diese Funktion ermöglicht die direkte Suche nach einem Sender,
der diesen RDS-Dienst unterstützt.
Wählen Sie mittels BAND-Taste den UKWFrequenzbereich aus.
1
Betätigen Sie die RDS MODE-Taste und halten Sie diese
länger als 2 Sekunden nieder gedrückt.
2
Die Meldung „SEARCH“ blinkt im Display.
Wählen Sie mittels TUNING/PRESET-Tasten das
gewünschte PTY-Programm aus.
3
Sie können zwischen 31 verschiedenen Programmtypen
wählen. Der ausgewählte Programmtyp blinkt im Display.
Betätigen Sie die MEMORY-Taste.
4
Der ausgewählte Programmtyp wird nun konstant angezeigt.
Betätigen Sie die TUNING/PRESET-Tasten.
5
TUNING/PRESET
BAND
MEMORY RDS MODE

65
DEUTSCH
Hilfe bei der Fehlerbeseitigung
Die folgende Tabelle dient als Hilfe bei der Fehlerbeseitigung,
falls während des Betriebes des AG-790 Störungen oder
Fehlfunktionen auftreten sollten. Anhand der hier beschriebenen
Problemlösungen lassen sich viele Fehlfunktionen beseitigen,
ohne dass Sie Ihren HiFi-Händler oder ein TEAC-Servicecenter
aufsuchen müssen.
Keine Strom-/Spannungsversorgung
e
Überprüfen Sie bitte die korrekte Netzverbindung zwischen
dem AG-790 und der Wandsteckdose. Vergewissern Sie sich
bitte, dass der Steckkontakt, an dem Sie den AG-790
angeschlossen haben, nicht über einen Schalter
ausgeschaltet ist. Falls dies der Fall ist, schalten Sie den
Schalter ein. Überprüfen Sie die einwandfreie Funktion der
Wandsteckdose, indem Sie ein anderes elektrisches Gerät,
von dem Sie wissen, dass es einwandfrei funktioniert, wie
beispielsweise einen Fön oder eine Lampe, an der
betreffenden Steckdose anschließen.
Die Wiedergabe ist nicht oder lediglich sehr leise zu hören
e
Stellen Sie eine gehörrichtige Lautstärke durch Drehen des
VOLUME-Reglers ein.
e
Positionieren Sie den BALANCE-Regler in Mittenstellung
(„CENT“).
e
Vergewissern Sie sich, dass sämtliche Lautsprecherboxen
und Quellkomponenten korrekt angeschlossen sind.
e
Vergewissern Sie sich, dass die SPEAKER A-Taste auf der
Vorderseite des AG-790 nieder gedrückt ist, sofern Sie Ihre
Lautsprecherboxen an den mit SPEAKER A bezeichneten
Lautsprecherausgängen angeschlossen haben. Falls Sie an
den SPEAKER B-Leistungsausgängen keine Boxen
angeschlossen haben, darf die SPEAKER B-Taste auf der
Vorderseite des AG-790 nicht nieder gedrückt sein.
Aktivieren Sie grundsätzlich nur die SPEAKER-Ausgänge, an
denen auch Boxen angeschlossen sind.
e
Wenn die Hinterbandkontrollfunktion aktiviert (ON) ist, und
die „TAPE “-Anzeige leuchtet, betätigen Sie bitte die
TAPE MONITOR-Taste, um die Funktion abzuschalten.
Die Wiedergabelautstärke der jeweils an SPEAKERS A und
SPEAKERS B angeschlossenen Lautsprecherboxen ist
unterschiedlich
e
Wiedergabelautstärke und Klangqualität sind abhängig vom
jeweils eingesetzten Boxentyp (Volumen, Wandlersysteme,
usw.). Wenn die jeweils an den SPEAKER-Ausgängen A und
B zusammen betrieben und dabei auch homogen klingen
sollen, müssen Sie identische Boxenmodelle verwenden.
Die Wiedergabe ist verrauscht
e
Der AG-790 befindet sich in unmittelbarer Nähe eines
Fernsehgeräts/Monitors oder einer anderen Quelle, die
Interferenzen erzeugt. Wählen Sie für den AG-790 einen
anderen Aufstellungsort oder schalten Sie die Geräte, die die
Störungen verursachen, aus.
e
Verbinden Sie die Masse des Plattenspielers mit dem SIGNAL
GND-Anschluss am AG-790.
MON
Die Wiedergabe wird plötzlich unterbrochen oder ist
überhaupt nicht möglich, obwohl der AG-790
eingeschaltet ist.
e
Die Lautsprecherimpedanz der angeschlossenen
Lautsprechersysteme ist niedriger als der vorgeschriebene
Mindestwert. Verwenden Sie andere Lautsprechersysteme.
e
Schalten Sie den AG-790 aus und reduzieren Sie die
Lautstärke.
Tiefe Frequenzen werden lediglich sehr leise
wiedergegeben.
e
Die Polarität (+/-) der angeschlossenen Lautsprechersysteme
wurde vertauscht. Überprüfen Sie sämtliche
Lautsprecherboxen auf korrekte Anschlusspolarität.
Radioempfang ist nicht möglich oder das Signal ist nur
sehr schwach zu empfangen
e
Vergewissern Sie sich, dass die jeweilige Antenne korrekt
angeschlossen ist.
e
Stellen Sie die Empfangsfrequenz des gewünschten Senders
optimal ein.
e
Falls Sie den Receiver in unmittelbarer Näher eines
Fernsehgeräts aufgestellt haben, schalten Sie diesen aus.
e
Positionieren Sie die jeweilige Antenne an einem Ort, der
bessere Empfangseigenschaften bietet.
e
Möglicherweise ist die Verwendung einer Außenantenne
unabdingbar.
Obwohl die empfange Sendung in Stereoqualität
ausgestrahlt wird, klingt die Wiedergabe monaural.
e
Betätigen Sie die FM MODE-Taste.
Die Fernbedienung funktioniert nicht
e
Aktivieren Sie den Bereitschaftsmodus durch Betätigen des
POWER-Schalters des AG-790.
e
Überprüfen Sie die Batterien der Fernbedienung. Ersetzen Sie
verbrauchte Batterien durch neue.
e
Verwenden Sie die Fernbedienung in einem Wirkungsbereich
von 5m, und richten Sie sie auf den Remote Sensor auf der
Frontseite des Receivers aus.
e
Falls sich Hindernisse, wie beispielsweise Möbel, usw.,
zwischen der Fernbedienung und dem Receiver befinden,
wechseln Sie Ihren oder deren Standort.
e
Falls sich eine sehr helle Lichtquelle in unmittelbarer Nähe
der Fernbedienung befindet, schalten Sie die Lampe aus.
In einigen Fällen können Fehlfunktionen, die sich
anderweitig nicht beseitigen lassen, durch Ziehen des
Netzsteckers behoben werden. Hierdurch führen Sie einen
Reset des internen Mikroprozessors durch. Warten Sie
ungefähr zwanzig Sekunden, bevor Sie den Netzstecker
wieder anschließen.
Pflege und Wartung
Wenn die Geräteoberfläche verschmutzt sein sollte, wischen
Sie diese mit einem weichen Tuch ab oder verwenden Sie eine
verdünnte, neutrale Reinigungsflüssigkeit. Reinigen Sie sie
gründlich. Verwenden Sie keinen Verdünner, Benzin oder
Alkohol, da dies die Geräteoberfläche beschädigen kann.

66
Technische Daten
Verstärkerteil
Ausgangsleistung . . . . . . . . . . . . . . . . . . . . . . . . . . .100 + 100 watts RMS (0,9 % THD, 1 kHz, 8 Ω)
Klirrfactor. . . . . . . . . . . . . . . . . . . . . . . . . . . . . . . . . . . . . . . . . . . . . . . . . . 0,05 % (80 Watts,1 kHz)
Audio-Eingangsempfindlichkeit/-impedanz . . . . . . . . . PHONO: 6,5 mV/22 kΩ, LINE: 230 mV/22 kΩ
Frequenzgang . . . . . . . . . . . . . . . . PHONO: 20 Hz bis 20 kHz, ±3 dB, LINE: 20 Hz bis 35 kHz, –3 dB
Signal/Rausch-Abstand . . . . . . . . . . . . . . . . . . . . . . . . . . PHONO: 75 dB (IHF-A), LINE: 90 dB (IHF-A)
Klangregelung. . . . . . . . . . . . . . . . . . . . . . . . Tiefen: ±10 dB bei 100 Hz, Höhen: ±10 dB bei 10 kHz
Loudness-Anhebung . . . . . . . . . . . . . . . . . . . . . . . . . . . . . . . . . . . . . . . . . . . . . . . +4 dB bei 100 Hz
UKW-Empfangsteil
Empfangsbereich . . . . . . . . . . . . . . . . . . . . . . . . . . . . . . . . 87,5 MHz - 108,0 MHz (50 kHz-Schritte)
Nutzbare Empfindlichkeit . . . . . . . . . . . . . . . . . . . . . . . . . . . . . . . . . . . . . . . . . . . Mono: 10 dBµV/m
50 dB Dämpfungsempfindlichkeit . . . . . . . . . . . . . . . . . . . . . Mono: 15 dBµV/m, Stereo: 33 dBµV/m
Spiegelungsverhältnis . . . . . . . . . . . . . . . . . . . . . . . . . . . . . . . . . . . . . . . . . . . . . . . . . . . . . . . 35 dB
MW Signalunterdrückung . . . . . . . . . . . . . . . . . . . . . . . . . . . . . . . . . . . . . . . . . . . . . . . . . . . . 50 dB
Klirrfaktor. . . . . . . . . . . . . . . . . . . . . . . . . . . . . . . . . . . . . . . . . . . . . . . Mono: 0,5 %, Stereo: 0,5 %
Frequenzgang . . . . . . . . . . . . . . . . . . . . . . . . . . . . . . . . . . . . . . . . . . . . . . . 20 Hz bis 15 kHz, –3 dB
Stereolanaltrennung (1 kHz) . . . . . . . . . . . . . . . . . . . . . . . . . . . . . . . . . . . . . . . . . . . . . . . . . . 35 dB
Signal/Rausch-Abstand. . . . . . . . . . . . . . . . . . . . . . . . . . . . . . . . Mono: 70 dB, Stereo: 65 dB (IHF-A)
MW-Empfangsteil
Empfangsbereich . . . . . . . . . . . . . . . . . . . . . . . . . . . . . . . . . . . . 522 Hz - 1.620 kHz (9 kHz-Schritte)
Nutzbare Empfindlichkeit. . . . . . . . . . . . . . . . . . . . . . . . . . . . . . . . . . . . . . . . . . . . . . . . . . . . . 55 dB
Klirrfaktor . . . . . . . . . . . . . . . . . . . . . . . . . . . . . . . . . . . . . . . . . . . . . . . . . . . . . 1 % an 100 dBµV/m
Signal/Rausch-Abstand . . . . . . . . . . . . . . . . . . . . . . . . . . . . . . . . . . . . . . . . . . 40 dB an 100 dBµV/m
Allgemein
Spannungsversorgung. . . . . . . . . . . . . . . . . . . . . . . . . . . . . . . . . . . 230 V Wechselspannung, 50 Hz
Leistungsaufnahme . . . . . . . . . . . . . . . . . . . . . . . . . . . . . . . . . . . . . . . . . . . . . . . . . . . . . . . . 280 W
Netzausgang (außer GB-Modell, max. 100 W) . . . . . . . . . . . . . . . . . . . . . . . . . . nicht geschaltet x 1
Abmessungen (BxHxT) . . . . . . . . . . . . . . . . . . . . . . . . . . . . . . . . . . . . . . . . . . . 435 x 144 x 330 mm
Gewicht (netto) . . . . . . . . . . . . . . . . . . . . . . . . . . . . . . . . . . . . . . . . . . . . . . . . . . . . . . . . . . . 7,4 kg
Mitgeliefertes Zubehör
MW-Rahmenantenne x 1
UKW-Antenne x 1
Fernbedienung x 1
AA (R6, SUM-3) Batterie x 2
• Änderungen des Designs und der technischen Daten bleiben jederzeit vorbehalten.
• Die Abbildungen stellen die Produktionsmodelle nicht unbedingt in jedem Detail genau dar.

67
ITALIANO
Istruzioni preliminari
Prima di mettere in funzione l’apparecchio, si prega di
leggere attentamente queste istruzioni.
< Dato che l’apparecchio può scaldarsi durante il
funzionamento, è opportuno lasciare attorno ad esso lo
spazio sufficiente alla dovuta ventilazione.
Pertanto, non ostruire le aperture di ventilazione ed accertarsi
che rimangano almeno 20 cm di spazio libero sopra
l’apparecchio ed almeno 5 cm su entrambi i lati.
NON appoggiare sopra l’apparecchio oggetti di nessun tipo.
<
La tensione di rete da applicare deve corrispondere al valore
stampato sul pannello posteriore dell’apparecchio. Per
qualsiasi dubbio riguardante la tensione di funzionamento,
consultare un elettricista di fiducia.
<
Scegliere con cura il luogo dove installare l’apparecchio,
evitando che sia esposto alla luce solare diretta o troppo
vicino ad una sorgente di calore. Evitare anche luoghi soggetti
a vibrazioni, sbalzi di temperatura o condizioni eccessive di
polvere od umidità.
<
Se possibile, non collocare l’apparecchio sopra il
sintoamplificatore, ma di fianco.
< Non togliere il coperchio, per non correre il rischio di
danneggiare i circuiti interni o provocare fenomeni di
folgorazione. Se un oggetto estraneo dovesse penetrare
nell’apparecchio, rivolgersi al rivenditore o al Servizio
assistenza.
<
Dovendo staccare il cavo d’alimentazione dalla presa di rete,
non tirarlo direttamente, ma afferrarlo per la spina.
< Per la pulizia dell’apparecchio non usare solventi chimici, che
potrebbero danneggiare la finitura esterna. Basta passare un
panno morbido, asciutto.
<
Conservare questo manuale in un luogo sicuro, dove sia facile
consultarlo in caso di necessità.
ATTENZIONE
Non esporre quest’apparecchio al rischio di ricevere spruzzi
d’acqua, e non appoggiarvi sopra oggetti contenenti acqua o
liquidi d’altro genere.
Non installare l’apparecchio in uno spazio ristretto, come il
vano di una libreria o un ripiano analogo.
Grazie per aver acquistato un prodotto TEAC. Leggere
attentamente questo manuale per ottenere le migliori
prestazioni da questo apparecchio.
Indice
Istruzioni preliminari . . . . . . . . . . . . . . . . . . . . . . . . . . . . . . . . 67
Funzionamento col telecomando . . . . . . . . . . . . . . . . . . . . . . 68
Collegamento delle antenne . . . . . . . . . . . . . . . . . . . . . . . . . . 68
Collegamenti . . . . . . . . . . . . . . . . . . . . . . . . . . . . . . . . . . . . . 70
Descrizione dei singoli controlli . . . . . . . . . . . . . . . . . . . . . . . . 72
Operazioni di base . . . . . . . . . . . . . . . . . . . . . . . . . . . . . . . . . 74
Sintonizzatore. . . . . . . . . . . . . . . . . . . . . . . . . . . . . . . . . . . . . 77
Sintonia preset . . . . . . . . . . . . . . . . . . . . . . . . . . . . . . . . . . . . 78
RDS (Radio Data System). . . . . . . . . . . . . . . . . . . . . . . . . . . . . 79
RDS (Programmi PTY) . . . . . . . . . . . . . . . . . . . . . . . . . . . . . . . 79
RDS (Ricerca PTY) . . . . . . . . . . . . . . . . . . . . . . . . . . . . . . . . . . 80
Ricerca guasti . . . . . . . . . . . . . . . . . . . . . . . . . . . . . . . . . . . . . 81
Caratteristiche tecniche. . . . . . . . . . . . . . . . . . . . . . . . . . . . . . 82
Smaltimento di apparecchi usati
1. Quando questo simbolo con il bidone
della spazzatura attraversato da una
croce viene apposto su un prodotto
significa che questo è conforme alle
direttive Europe 2002/96/EC.
2. Tutti i prodotti elettrici ed elettronici devono essere smaltiti
separatamente dagli altri tramite canali specifici indicati
dalle autorità Comunali locali.
3.Per ottenere le necessarie informazioni relative allo
smaltimento dei Vostri apparecchi elettrici usati Vi invitiamo
a contattare gli uffici Comunali a ciò preposti od il
Rivenditore ove avete appena acquistato questo prodotto.

68
Collegamento delle antenneFunzionamento col telecomando
Il sintoamplificatore e anche altri componenti Teac che hanno
serigrafato il marchio (UR) sul pannello frontale possono
essere comandati tramite il telecomando del tipo UR in dotazione
ai medesimi.
Quando si desidera utilizzare il telecomando ricordarsi di puntarlo
verso il sensore (Remote Sensor) situato sul pannello frontale
dell’apparecchio.
<
Anche se l’unità di telecomando viene utilizzata entro il campo
efficace, il comando a distanza potrebbe essere impossibile se
vi sono degli ostacoli tra il telecomando ed il lettore.
<
Se l’unità di telecomando viene utilizzata in prossimità di altri
apparecchi che generano raggi infrarossi oppure se altri
dispositivi di comando a distanza utilizzanti raggi infrarossi
vengono utilizzati in prossimità del lettore, esso potrebbe
funzionare in modo scorretto. Dal punto di vista opposto
anche gli altri apparecchi potrebbero funzionare in modo
scorretto.
Installazione batterie
1. Rimuovere il coperchio del vano batterie.
2.Inserire due batterie “AA“ (R6, SUM-3). Accertarsi che le
batterie siano inserite con i poli positivo +
e negativo _ nelle
posizioni corrette.
3. Chiudere il coperchio fino a sentire uno scatto.
Sostituzione batterie
Se si notasse che la distanza di funzionamento diminuisce, ciò
indica che le batterie sono scariche. In tale caso sostituire le
batterie con altre di nuove.
Precauzioni riguardanti le batterie
<
Accertarsi di inserire le batterie con le polarità + e _ nella
posizione corretta.
<
Usare batterie dello stesso tipo. Non usare mai tipi diversi di
batterie assieme.
<
Possono essere usate sia batterie ricaricabili che batterie non
ricaricabili.
Fare riferimento alle indicazioni sull’etichetta.
<
Quanddo si prevede di non utilizzare il telecomando per un
lungo periodo (più di un mese), rimuovere le batterie per
prevenire perdite. Se si verificassero delle perdite, pulire il vano
batterie e sostituire le batterie con altre di nuove.
<
Non riscaldare o disassemblare le batterie e non gettarle nel
fuoco.
Antenna FM interna
Collegare l’antenna FM a filo alla presa FM 75Ω, stendere il
filo e sintonizzare l’apparecchio sulla propria emittente
preferita (vedi pagina 77). Installare l’antenna a parete o sul
telaio di una finestra e spostarla fino a trovare la posizione
che consente la migliore ricezione: fissare allora l’antenna in
quel punto con puntine da disegno, chiodini o qualcosa di
simile.
Antenna FM esterna
Nelle zone in cui i segnali FM arrivano deboli, sarà necessario
installare un’antenna FM esterna. Di solito, dovrebbe essere
sufficiente un’antenna a 3 elementi; quando però si vive un
una località nella quale i segnali FM sono particolarmente
deboli, sarà opportuno scegliere un’antenna a 5 o più
elementi.
<
Quando si utilizza un’antenna esterna, ricordarsi di staccare
l’antenna FM interna.

69
ITALIANO
Antenna AM a telaio interna
L’antenna a telaio AM di elevate prestazioni, compresa nella
fornitura di quest’apparecchio, garantisce un’ottima ricezione
in quasi tutte le località.
Affinché l’antenna a telaio possa rimanere diritta, inserire la
parte sporgente nell’incavo praticato nella base.
Collegare i cavi dell’antenna a telaio agli appositi terminali
AM del sintonizzatore.
Aansluitingen
Druk de knop in, steek het uiteinde van de
snoer in de opening en laat de knop los.
Controleer of het snoer inderdaad goed vast
zit, door er even voorzichtig aan te trekken.
Trek voorzichtig aan de kabel om te
controleren of deze stevig genoeg in de
aansluiting zit. Let erop dat de isolatie aan
het uiteinde van de luidsprekerkabel volledig is verwijderd en
dat er geen plasticresten aanwezig zijn die het contact tussen
de antennekabel en de uitgang hinderen.
Appoggiare l’antenna su uno scaffale oppure fissarla al telaio
di una finestra, od altro, scegliendo la direzione che
garantisce la migliore ricezione. Installare l’antenna lontano
quanto possibile da altri conduttori d’elettricità (cavi
d’alimentazione, cavetti dei diffusori, cavi di collegamento, e
simili).
Antenna AM esterna
Se l’antenna AM fornita non garantisce una buona ricezione
(spesso perché si trova troppo lontano dal trasmettitore,
oppure in un edifico di cemento, od altro), potrebbe essere
necessario installare un’antenna AM esterna.
Si può acquistare un’antenna AM di buona qualità oppure, se
non fosse disponibile, si può usare un filo isolato lungo più di
5 metri e collegarne un’estremità, dopo averla privata del
rivestimento, all’apposito terminale, come qui illustrato.
Il filo dell’antenna dovrà essere steso all’esterno, oppure
all’interno vicino a una finestra. Per migliorare la qualità della
ricezione, collegare il terminale GND ad una presa di terra
affidabile.
Nota:
Anche quando si usa un’antenna AM esterna, non è
consigliabile scollegare l’antenna AM interna a telaio.
Antenna AM esterna
Antenna AM a telaio interna:
Collegate il cavetto nero al
terminale sinistro (GND) ed il
cavetto bianco a quello
destro.

70
Collegamenti
ATTENZIONE:
< Prima di eseguire i collegamenti, spegnete tutti gli apparecchi.
<
Leggete le istruzioni relative a ciascun componente che intendete utilizzare con questa unità.
<
Accertatevi quindi di inserire saldamente nella presa di rete le relative spine. Al fine di prevenire
ronzii e rumore, evitate di raggruppare i cavi dei segnali di interconnessione con quello di
alimentazione CA ovvero con i cavi degli altoparlanti.
Lettore di CD
Giradischi Registratore a Cassette
Diffusori A
Diffusori B
LINE OUT
RL
B
D
C
RL
RL
LINE
LINE
OUT
IN
A
E
F

71
ITALIANO
Connettori phono e presa di terra
Collegare i connettori tipo RCA del giradischi agli ingressi
phono. Eseguite i collegamenti nel seguente modo:
spinotto bianco q
presa bianca (L: canale sinistro)
spinotto rosso q
presa rossa (R: canale destro)
Collegare il cavetto di messa a terra del giradischi con il
connettore sul pannello posteriore (SIGNAL GROUND).
RESET
Nei seguenti casi, i tasti potrebbero funzionare in modo
improprio:
• quando il sistema ha subito danni dovuti a sovratensioni.
• quando l’alimentazione è instabile o disturbata.
In tali condizioni, premere leggermente l’interruttore RESET
una o due volte con una matita o una penna a sfera.
Tutte le regolazioni memorizzate (emittenti preselezionate,
eccetera) verranno così cancellate.
Presa di corrente (Non commutata)
Questa presa è utilizzabile solo quando l’apparecchio è
acceso o in stand-by.
Quando è spento questa presa è inutilizzabile.
Avvertenza:
Accertarsi che il consumo totale di tutti gli apparecchi
collegati a questa presa non superi il valore di 100 watt.
Cavo d’alimentazione
Dopo aver eseguito tutti i collegamenti necessari, inserire la
spina del cavo d’alimentazione in una presa di corrente.
Accertarsi che il cavo d’alimentazione venga inserito in una
presa che eroghi la corretta tensione.
Per inserire od estrarre il cavo d’alimentazione afferrarlo
sempre per la spina.
<
Dovendo staccare il cavo d’alimentazione dalla presa di rete,
non tirarlo direttamente, ma afferrarlo per la spina.
F
E
D
C
Collegamento dei diffusori
Attenzione:
Per evitare che l’uscita improvvisa di un segnale ad altissimo
livello danneggi i diffusori, ricordarsi sempre di togliere
l’alimentazione prima di effettuare questo collegamento.
<
Verificare l’impedenza dei diffusori utilizzati: deve essere di 8
Ω o più
< I terminali neri, contrassegnati –, hanno polarità negativa
Di solito, l’estremità positiva del cavo di un diffusore è
appositamente contrassegnata, o di colore diverso, per
poterla distinguere dall’estremità negativa. Inserire perciò
l’estremità contrassegnata nel terminale + e quella senza
contrassegno nel terminale nero –.
<
Preparare i cavi di collegamento dei diffusori spellando le
loro estremità per una lunghezza massima di 10 mm (non di
più, per non provocare un cortocircuito) e attorcigliarle poi
strettamente in modo che non si abbiano a formare parte di
cavo “libere”:
ATTENZIONE:
Le parti metalliche dei due fili non devono toccarsi, per non
provocare un cortocircuito, con relativo danneggiamento
degli stadi finali di amplificazione.
Per effettuare il collegamento:
1.Ruotare in senso antiorario il cappellotto del connettore per
allentarlo.
2.Inserire a fondo il filo nel connettore e ruotare in senso
orario il cappellotto per rendere ben saldo il collegamento:
Accertarsi che nel connettore entri soltanto la parte
metallica del filo, senza nessun residuo del rivestimento in
plastica.
3.Per accertarsi che il collegamento sia stato ben effettuato,
provare a tirare leggermente il filo.
Prese CD, TAPE MONITOR, VIDEO/AUX
Servono per l’ingresso/uscita del segnale audio analogico a 2
canali. Per il collegamento usare cavi RCA disponibili in
commercio.
Eseguite i collegamenti nel seguente modo:
spinotto bianco q
presa bianca (L: canale sinistro)
spinotto rosso q
presa rossa (R: canale destro)
B
A

72
Descrizione dei singoli controlli
Nota:
Per semplificare la spiegazione, queste
descrizioni riportano i nomi di tasti e
controlli situati sul pannello frontale
dell’apparecchio, senza nessun
riferimento all’uso del telecomando.
A B F GC D E
Q
RT SU O K J I H
N
M
LP
e
a
f
N
b
O
R
c
d
H

73
ITALIANO
POWER (standby/on)
Quando il tasto di accensione è stato premuto, tramite questo
tasto potrete accendere l’apparecchio o lasciarlo in stand-by.
MEMORY SCAN
Effettua la scansione dei canali preselezionati.
Tasti dedicati all’operatività di un registratore a cassette
e di un lettore di CD TEAC.
Per comandare le funzioni di componenti TEAC dotati del
logo UR potete utilizzare questi tasti.
MUTING
Esclude temporaneamente il segnale audio.
SLEEP
Predispone lo spegnimento ritardato dell’apparecchio.
INPUT
(CD, PHONO, TUNER, TAPE MONITOR, VIDEO/AUX)
Usare questi tasti per selezionare una sorgente d’ingresso.
f
e
d
c
b
a
POWER
Questo interruttore commuta l’apparecchio dalla condizione
di standby a quella di spegnimento.
Indicatore di standby.
Si accende quando l’apparecchio si trova in condizione di
standby e si spegne quando l’apparecchio viene acceso.
Quando l’apparecchio è in stand-by, per accenderlo premere
il tasto POWER del telecomando o uno dei tasti (TUNER,
PHONO, CD, TAPE MONITOR o VIDEO/AUX) sul pannello
frontale.
Sensore
Quando si utilizza il telecomando, dirigere il suo segnale verso
questo sensore.
Indicatore SPEAKERS (diffusori)
Si accende quando il tasto SPEAKERS (A o B) è attivo.
Finestra di visualizzazione (display)
Quando l’apparecchio è acceso, mostra lo stato operativo
corrente.
Indicatore MUTING
Lampeggia durante il silenziamento.
Indicatore LOUDNESS
Si accende quando il tasto LOUDNESS è attivo.
VOLUME/JOG
Ruotare questa manopola (o premere i tasti VOLUME del
telecomando) per regolare il volume principale.
BALANCE
Per regolare il bilanciamento dei canali premere questo tasto
e poi ruotare la manopola VOLUME/JOG per poter effettuare
l’operazione.
TREBLE
Per aumentare o diminuire la resa dei toni acuti premere
questo tasto e poi ruotare la manopola VOLUME/JOG per
poter effettuare la regolazione.
BASS
Per aumentare o diminuire la resa dei toni bassi premere
questo tasto e poi ruotare la manopola VOLUME/JOG.
RDS MODE
Quando il sintonizzatore è commutato nella gamma FM,
questo tasto servono per la funzione RDS.
LOUDNESS
Premere questo tasto per aumentare la resa dei toni bassi
durante l’ascolto a bassi volumi.
M
L
K
J
I
H
G
F
E
D
C
B
Quando l’interruttore POWER si trova in posizione OFF,
l’apparecchio assorbe dalla presa CA potenza nominale di
non utilizzo.
A
INPUT
(CD, PHONO, TUNER, TAPE MONITOR, VIDEO/AUX)
Usare questi tasti per selezionare una sorgente d’ingresso.
Quando l’apparecchio è in stand-by se premerete uno
qualsiasi di questi tasti si accenderà automaticamente.
TUNING/PRESET
Nel modo di sintonia manuale, questi tasti sintonizzano le
emittenti; nel modo di sintonia “preset”, selezionano le
emittenti memorizzate.
MEMORY
Inserisce in memoria le emittenti preselezionate.
FM MODE
Quando nel sintonizzatore è attiva la gamma FM, questo
tasto seleziona l’ascolto stereofonico o monofonico.
BAND
Permette di commutare tra le gamme radio FM oppure AM.
TUNING MODE
Usare questo tasto per selezionare un modo di sintonia
PHONES
Quando si desidera un ascolto “privato”, inserire qui la spina
della cuffia; regolare poi il volume con la manopola VOLUME.
SPEAKERS
Questo tasto attiva od esclude il funzionamento dei diffusori.
ON : il suono esce dai diffusori.
OFF : nessun suono viene emesso dai diffusori.
U
T
S
R
Q
P
O
N

74
Operazioni di base 1
2. Iniziare la registrazione.
<
Quando ai connettori TAPE MONITOR (PLAY e REC) è
collegato un registratore a cassetta a 3 testine, attivando la
funzione Tape Monitor durante la registrazione, si potrà
ascoltare quello che state registrando e non il segnale
proveniente dalla sorgente.
Premere il tasto POWER per accendere l’apparecchio.
1
Attivare in riproduzione la sorgente, poi aumentare
gradualmente il volume, ruotando la manopola
VOLUME, fino a raggiungere il livello richiesto.
3
Funzione Tape Monitor
Volendo selezionare la sorgente collegata agli ingressi TAPE
MONITOR, premere il tasto TAPE MONITOR: diventa così
attiva la funzione d’ascolto del nastro. L’indicatore “
TAPE
” si accende.
Per disattivare questa funzione, premere ancora il tasto TAPE
MONITOR.
<
Quando è attiva la funzione Tape Monitor, si può ascoltare
esclusivamente il segnale proveniente dalla sorgente TAPE.
Per ascoltare il segnale di altre sorgenti, bisogna perciò
verificare che la funzione Tape Monitor sia disattivata.
MON
< Subito dopo aver acceso l’apparecchio l’indicatore di MUTING
lampeggia per pochi attimi. Ciò è normale.
< Quando l’apparecchio è in stand-by e la luce che indica
questo stato è accesa, premendo sul telecomando il tasto
POWER o uno dei tasti (TUNER, PHONO, CD, TAPE MONITOR
o VIDEO/AUX) sul pannello frontale questo si accenderà.
Selezionare la sorgente che si desidera ascoltare
premendo uno dei tasti di selezione degli ingressi.
2
Registrazione di una sorgente
1. Scegliere la sorgente da registrare premendo uno dei
tasti di selezione degli ingressi.
2 31

75
ITALIANO
DCB E FA
Uso della cuffia
Volendo ascoltare senza disturbare il prossimo, ridurre
dapprima al minimo il livello audio dell’apparecchio. Inserire
la spina della cuffia nella presa PHONES, e poi regolare il
volume ruotando la manopola VOLUME.
Per escludere il suono che esce diffusori, premere
nuovamente il tasto SPEAKERS.
ATTENZIONE
Abbassate sempre il volume prima di collegare le vostre
cuffie. PER EVITARE DANNI ALL’UDITO - Non indossate le
cuffie prima di averle collegate.
B
ATTENZIONE:
Se avete collegato i diffusori alle uscite SPEAKER A, per
attivare l’ascolto premete il tasto SPEAKER A.
Se alle uscite SPEAKER B non avete collegato diffusori
ricordateVi di non premere il tasto SPEAKER B altrimenti non
arriverà segnale ai diffusori collegati alle uscite SPEAKER A e
viceversa.
Tasto LOUDNESS
Premendo questo tasto aumenterà la resa dei toni bassi
durante l’ascolto ai bassi volumi.
Escludete questa funzione quando ascoltate a volume
normale.
C
Attivazione/disattivazione dei diffusori
Per attivare o disattivare i diffusori premere il tasto
SPEAKERS (A o B).
L’accensione dell’indicatore SPEAKERS segnala che i diffusori
sono attivi.
A
Controllo dei toni alti
Serve per regolare il livello delle alte frequenze.
E
Controllo dei toni bassi
Serve per regolare il livello delle basse frequenze.
D
Regolazione del bilanciamento dei
diffusori anteriori
F
1.Premete il tasto BALANCE. Sul display apparirà “BAL”.
2.Entro max.3 secondi ruotate la manopola per regolarne il
livello.
Questo potrà essere scelto tra L+16 fino a R+16:
L+16 ... L+1 a
CENT q R+1 ... R+16
Di norma, lasciare la manopola in posizione centrale (CENT).
1.Premete il tasto BASS. Sul display apparirà “BAS”.
2.Entro max. 3 secondi ruotate la manopola per regolarne il
livello.
Questo può essere scelto tra diversi livelli da –10 a +10.
1.Premete il tasto TREBLE. Sul display apparirà “TRE”.
2.Entro max. 3 secondi ruotate la manopola per regolarne il
livello.
Questo potrà essere scelto tra diversi livelli da –10 a +10.

76
Operazioni di base 2
Premete ripetutamente il tasto SLEEP sino a fare apparire sul
display l’ora desiderata.
L’ora di spegnimento può essere modificata a passi di 10
minuti.
SLEEP 90 (80, 70 ... 10)
L’indicatore SLEPP si illumina e l’apparecchio si spegne 90
(oppure 80, 70,... 10) minuti più tardi.
Visualizzazione normale
Il temporizzatore di spegnimento non è attivo.
< Quando si imposta il temporizzatore di spegnimento, la
luminosità del display viene attenuata.
< Se desiderate verificare il tempo residuo, premete una volta il
tasto SLEEP. Per 3 secondi viene visualizzato il tempo residuo
e quindi l’apparecchio ritorna alla normale visualizzazione.
Per silenziare temporaneamente l’audio, premete il tasto
MUTING.
Per ripristinare l’audio, premete nuovamente il tasto MUTING.
Regolando il volume durante lo stato di silenziamento, la
relativa funzione si cancella.
<
Durante il silenziamento l’indicatore MUTING lampeggia.
Temporizzatore di spegnimento
Si può stabilire di spegnere il sistema ad un’ora desiderata.
Silenziamento

77
ITALIANO
Sintonizzatore
Mantenete premuto il tasto TUNING/PRESET da 0,5 a 2
secondi.
Una volta sintonizzata la stazione, il processo di
sintonizzazione si arresta automaticamente.
Se desiderate interrompere il processo di sintonizzazione,
premete nuovamente il tasto TUNING/PRESET.
Selezione di stazioni non automaticamente
sintonizzabili (selezione manuale)
Premendo brevemente il tasto TUNING/PRESET (0,5 secondi o
meno), la frequenza varia di un valore o passo fisso.
Premete ripetutamente il tasto TUNING sino a quando
individuate la stazione che desiderate ascoltare.
< Alla corretta sintonizzazione di una trasmissione, sul display
appare l’indicazione "TUNED".
3 4
La pressione di questo tasto determina l’alternanza tra il
modo stereofonico ed il modo monofonico.
Stereo
Le stazioni FM stereofoniche vengono ricevute in modo
stereofonico, mentre sul display si illumina l’indicazione
STEREO.
<
Se il suono è distorto e l’indicatore “STEREO” lampeggia, ciò
significa che il segnale non è sufficiente per una corretta
ricezione in stereo. In questo caso, commutare in modo
MONO.
Mono
Selezionate questo modo per compensare la ricezione di
stazioni FM stereofoniche deboli. In questo modo la ricezione
diviene forzatamente monofonica, riducendo il rumore
indesiderato.
Per selezionare TUNER, premere il tasto TUNER.
1
Scegliere la gamma AM o FM con il tasto BAND.
2
Se l’indicatore “CH” è illuminato, premete il tasto
TUNING MODE in modo da selezionare il modo di
sintonizzazione manuale.
L’indicatore “CH” quindi scompare dal display.
Questo tasto viene pertanto utilizzato per modificare il
metodo di sintonizzazione dell’apparecchio.
3
Selezionate la stazione che desiderate ascoltare
(selezione automatica).
4
Tasto FM MODE
12

78
Sintonia preset
2. Premere il tasto MEMORY SCAN del telecomando.
La scansione delle emittenti memorizzate avviene ad intervalli
di 5 secondi.
Quando viene individuata l’emittente che si desidera
ascoltare, premere ancora MEMORY SCAN per interrompere
l’operazione.
<
Un’emittente memorizzata ma priva di segnale verrà
automaticamente saltata.
Memorizzazione manuale delle emittenti
È possibile memorizzare, rispettivamente nei canali da 1 a 30, le
stazioni FM ed AM desiderate.
Sintonizzare un’emittente che si desidera ascoltare
(seguendo i passi - della pagina 77).
Premere il tasto MEMORY.
2
41
1
Scelta delle emittenti preselezionate
Scegliere la gamma AM o FM con il tasto BAND.
1
Scansione delle emittenti memorizzate
1. Scegliere la gamma AM o FM con il tasto BAND.
Per memorizzare altre emittenti, ripetere i passi - .
31
Mentre l’indicatore “MEMORY” lampeggia, selezionare
un canale in cui memorizzare l’emittente con i tasti
TUNING/PRESET, e poi premere il tasto MEMORY.
3
Se l’indicatore “CH” non è acceso, premere il tasto
TUNING MODE per attivare il modo di sintonia preset.
2
Continuare a premere i tasti TUNING/PRESET fino a
trovare l’emittente preselezionata che si desidera.
3
Memoria tampone
Se l’interruttore di accensione Power viene posizionato su OFF
(spento) o viene a mancare la corrente di alimentazione per
oltre 3 giorni, tutte le regolazioni memorizzate compreso le
emittenti si cancelleranno.
Per evitare che ciò avvenga si consiglia di tenere l’AG-790 in
stand-by quando non lo si usa.
TUNING/PRESETTUNING MODE
BAND
MEMORY

79
ITALIANO
RDS (Radio Data System) RDS (Programmi PTY)
Radio Data System (RDS) è un servizio radiofonico che permette
alle emittenti di trasmettere informazioni supplementari insieme
alla normale programmazione.
I segnali RDS si possono ricevere solo in Europa, nella
gamma FM.
Sintonizzare un’emittente FM (come descritto nei passi
- a pagina 77).
Premere il tasto RDS MODE.
2
41
1
Ogni volta che si preme brevemente il tasto RDS MODE,
vengono visualizzate le varie opzioni del sistema, nel seguente
ordine:
PS (Programme Service name)
Quando si seleziona PS, lampeggia per 4 secondi l’indicatore
“PS”, poi vengono visualizzati i dati PS o il nome
dell’emittente. In assenza di dati PS, sul display comparirà la
frequenza.
PTY (Programme Type)
Quando si seleziona PTY, lampeggia per 4 secondi
l’indicatore “PTY”, poi viene visualizzato il tipo del
programma.
In assenza di dati PTY, sul display comparirà la frequenza.
RT (Radio Text)
Quando si seleziona RT, lampeggia per 4 secondi l’indicatore
“RT”, poi vengono visualizzate le ultime notizie
dell’emittente sintonizzata (64 simboli al massimo).
In assenza di dati RT, sul display comparirà la frequenza.
TA (Traffic Announcement)
Quando si seleziona TA, lampeggia per 4 secondi
l’indicatore “TA”, poi il sistema cerca un’emittente che
trasmetta informazioni sul traffico.
<
Quando l’emittente trovata smette di trasmettere
informazioni sul traffico, il sistema ne cerca subito un’altra, e
così via.
CT (Clock Time)
Quando si seleziona CT, lampeggia per 4 secondi
l’indicatore “CT”, poi viene visualizzata l’ora esatta fornita
dall’emittente.
In assenza di dati CT, il sistema commuta automaticamente
sull’opzione PS.
NEWS : annunci brevi, eventi, interviste, resoconti, cronache
dal vivo.
AFFAIRS : proposte che comprendono annunci diversi dalle
notizie, documenti, discussioni, analisi e così via
INFO : informazioni giornaliere o di utilità quali previsioni
meteo, consigli ai consumatori, assistenza medica,
eccetera
SPORT : servizi dedicati a tutti gli sport
EDUCATE : informazioni didattiche e culturali
DRAMA : concerti di ogni tipo e adattamenti teatrali a
puntate
CULTURE : tutti gli aspetti della cultura nazionale o locale,
comprese funzioni religiose, filosofia, sociologia,
teatro, eccetera
SCIENCE : programmi sulle scienze naturali e sulla tecnologia
VARIED : programmi per il grande pubblico, come quiz,
intrattenimento, interviste, commedie, satira,
eccetera.
POP M : programmi di musica commerciale e popolare, hit
parade di dischi, eccetera
ROCK M. : musica moderna, di solito composta ed eseguita da
giovani musicisti
EASY M : musica pop, con brani che durano in genere meno
di 5 minuti
LIGHT M : musica classica, strumentale, corale, e musica
leggera preferita dai non professionisti
CLASSICS : orchestre che eseguono opere liriche, musica
sinfonica, da camera, eccetera
OTHER M : generi musicali diversi (Rhythm & Blues, Reggae,
eccetera)
WEATHER : condizioni e previsioni del tempo
FINANCE : resoconti finanziari, commerciali, quotazioni dei
cambi
CHILDREN : programmi per i bambini
SOCIAL : programmi di argomento sociologico
RELIGION : programmi di argomento religioso
PHONE IN : programmi nei quali il pubblico può intervenire
telefonicamente
TRAVEL : resoconti di viaggio
LEISURE : programmi sulle attività ricreative
JAZZ : musica jazz
COUNTRY : musica country
NATION M : musica caratteristica delle varie nazioni
OLDIES : canzoni dei cosiddetti “tempi d’oro” della musica
pop
FOLK M : musica folcloristica
DOCUMENT: documentari
TEST
ALARM : programma riservato alle comunicazioni riguardanti
situazioni d’emergenza o disastri naturali

80
Inizia l’operazione di ricerca.
< Quando il programma scelto è stato trovato, la ricerca si
ferma e viene visualizzato il tipo del programma.
< Se la ricerca PTY non riesce a trovare il tipo di programma
scelto, l’operazione si interrompe, e viene ripristinata la
frequenza iniziale.
<
Per fermare l’operazione di ricerca, premere il tasto RDS
MODE.
RDS (Ricerca PTY)
Questa funzione permette di ricercare una data emittente.
Selezionare la gamma FM premendo il tasto BAND.
1
Premere il tasto RDS MODE per più di 2 secondi.
2
Sul display lampeggia l’indicatore “SEARCH”.
Per selezionare il desiderato tipo di programma (PTY)
utilizzare i tasti TUNING/PRESET.
3
Sono disponibili 31 categorie di dati PTY.
L’indicazione del programma prescelto lampeggerà sul
display.
Premere il tasto MEMORY.
4
Il lampeggiare si interrompe.
Premere il tasto TUNING/PRESET.
5
TUNING/PRESET
BAND
MEMORY RDS MODE

81
ITALIANO
Ricerca guasti
Nell’eventualità di un comportamento difettoso di
quest’apparecchio, prima di rivolgersi al rivenditore dove è stato
acquistato oppure a un Centro assistenza TEAC, verificare se il
difetto compare nell’elenco che segue e provare a risolverlo
come consigliato.
Non arriva la corrente
e
Verificare che la spina del cavo d’alimentazione sia inserita a
fondo nella presa di rete. Per verificare se c’è corrente nella
presa di rete, provare ad inserirvi un altro apparecchio, come
un ventilatore o un phon.
Non esce suono dai diffusori
e
Regolare il volume ruotando la manopola VOLUME.
e
Posizionare al centro (CENT) il controllo di bilanciamento
e
Controllare che il collegamento dei diffusori e dei
componenti sia ben fatto.
e
Se avete collegato i diffusori alle uscite SPEAKER A, per
attivare l’ascolto premete il tasto SPEAKER A. Se alle uscite
SPEAKER B non avete collegato diffusori ricordateVi di non
premere il tasto SPEAKER B altrimenti non arriverà segnale ai
diffusori collegati alle uscite SPEAKER A e viceversa. Detto in
altre parole, selezionate soltanto l’uscita alla quale sono
collegati i diffusori.
e
Se la funzione “
TAPE
” è attiva e la relativa
indicazione luminosa è accesa, premete il tasto TAPE
MONITOR per disattivarla.
Il volume dei diffusori A è diverso da quello dei diffusori B.
e
Il volume e la qualità del suono possono differire a seconda
del tipo e delle caratteristiche dei diffusori impiegati.
Se decidete di ascoltare contemporaneamente due coppie di
diffusori assicurateVi che siano dello stesso modello.
L’audio è disturbato
e
L’amplificatore si trova troppo vicino a un televisore od altro
elettrodomestico. Allontanarlo, oppure spegnere l’altro
apparecchio.
e
Verificare che il cavo della messa a terra del giradischi sia
ben fissato al connettore SIGNAL GND sul pannello
posteriore dell’AG-790.
Il suono s’interrompe durante l’ascolto, oppure manca del
tutto anche se l’amplificatore è regolarmente alimentato
e
L’impedenza dei diffusori è minore di quanto prescritto.
e
Togliere l’alimentazione e riducendo il volume.
Risposta scarsa dei toni bassi
e
La polarità (+/_) del diffusore è invertita. Verificare che i
cavi di collegamento di tutti i diffusori siano stati collegati
con la corretta polarità.
Impossibile ascoltare un’emittente radio, oppure il segnale
è troppo debole.
e
Verificare che l’antenna sia correttamente collegata.
e
Sintonizzare l’emittente in modo corretto.
e
Se il televisore è troppo vicino all’apparecchio, spegnerlo.
e
Spostare l’antenna in una nuova posizione che garantisca
una migliore ricezione.
e
Può darsi che sia necessaria un’antenna esterna.
MON
Si riceve un segnale mono anche se la trasmissione è
stereofonica.
e
Premere il tasto FM MODE.
Non funziona il telecomando
e
Premere l’interruttore POWER dell’apparecchio, per
accenderlo.
e
Può darsi che le pile siano scariche: sostituirle con pile
nuove.
e
Usare il telecomando entro il suo raggio d’azione (5 metri) e
puntarlo verso il pannello frontale dell’apparecchio.
e
Eliminare qualsiasi ostacolo che impedisca il percorso del
segnale dal telecomando all’apparecchio.
e
Se fosse accesa una forte lampada vicino all’apparecchio,
spegnerla.
Se non si riuscisse a ripristinare il normale funzionamento,
provare a staccare il cavo d’alimentazione dalla presa di
rete, e poi inserirlo di nuovo.
Manutenzione
Per pulire quest’apparecchio utilizzare un panno inumidito
con una soluzione d’acqua e sapone neutro oppure con un
panno inumidito con lo stesso tipo di soluzione utilizzata per
pulire la tastiera del computer. Poi rimuovere completamente
ogni residuo.
Non usare mai prodotti a base di alcol o benzina che
potrebbero danneggiarlo irreparabilmente.

82
Caratteristiche tecniche
Amplificatore
Potenza max . . . . . . . . . . . . . . . . . . . . . . . . . . . . . . . . . . . . . . . . 100+100 watt RMS, 8 ohm, 1 KHz
Distorsione armonica totale . . . . . . . . . . . . . . . . . . . . . . . . . . . . . . . . . . . 0,05 % @ 80 watt, 1 KHz
0,9 % @ 100 watt, 1 KHz
Sensitività ed impedenza ingresso audio . . . . . . PHONO: 6,5 mV/ 22 Kohm, LINE: 230 mV/ 22 Kohm
Risposta in frequenza. . . . . . . . PHONO: da 20Hz a 20 KHz, +/–3 dB, LINE: da 20 Hz a 35 KHz, –3dB
Rapporto segnale/rumore . . . . . . . . . . . . . . . . . . . . . . . . PHONO: 75 dB (IHF-A), LINE: 90 dB (IHF-A)
Comandi dei toni. . . . . . . . . . . . . . . . . . . . . . BASS: +/–10 dB a 100 Hz, TREBLE: +/–10 dB a 10 KHz
Controllo “loudness” . . . . . . . . . . . . . . . . . . . . . . . . . . . . . . . . . . . . . . . . . . . . . . . . +4 dB a 100 Hz
Sintonizzatore FM
Gamma di sintonizzazione . . . . . . . . . . . . . . . . . . . . . . da 87,5MHz a 108,0MHz, a scatti di 50 KHz
Sensibilità utile. . . . . . . . . . . . . . . . . . . . . . . . . . . . . . . . . . . . . . . . . . . . . . . . . . . Mono: 10 dBµV/m
Sensitività di silenziamento (50dB). . . . . . . . . . . . . . . . . . . . . Mono: 15 dBµV/m, Stereo: 33 dBµV/m
Rapporto di ricezione d’immagine . . . . . . . . . . . . . . . . . . . . . . . . . . . . . . . . . . . . . . . . . . . . . . 35 dB
Rapporto di soppressione AM . . . . . . . . . . . . . . . . . . . . . . . . . . . . . . . . . . . . . . . . . . . . . . . . . 50 dB
Distorsione armonica (1KHz). . . . . . . . . . . . . . . . . . . . . . . . . . . . . . . . . Mono: 0,5 %, Stereo: 0,5 %
Risposta in frequenza . . . . . . . . . . . . . . . . . . . . . . . . . . . . . . . . . . . . . . . . da 20 Hz a 15 KHz, –3 dB
Separazione stereo (1KHz). . . . . . . . . . . . . . . . . . . . . . . . . . . . . . . . . . . . . . . . . . . . . . . . . . . . 35 dB
Rapporto segnale/rumore. . . . . . . . . . . . . . . . . . . . . . . . . . . . . . Mono: 70 dB, Stereo: 65 dB (IHF-A)
Sintonizzatore AM
Gamma di sintonizzazione . . . . . . . . . . . . . . . . . . . . . . . . da 522 Hz a 1.620 KHz (a scatti di 9 KHz)
Sensibilità utile . . . . . . . . . . . . . . . . . . . . . . . . . . . . . . . . . . . . . . . . . . . . . . . . . . . . . . . . . . . . 55 dB
Distorsione armonica totale. . . . . . . . . . . . . . . . . . . . . . . . . . . . . . . . . . . . . . . . . 1 % a 100 dBµV/m
Rapporte segnale/rumore . . . . . . . . . . . . . . . . . . . . . . . . . . . . . . . . . . . . . . . . . 40 dB a 100 dBµV/m
Generali
Alimentazione. . . . . . . . . . . . . . . . . . . . . . . . . . . . . . . . . . . . . . . . corrente alternata a 230 V, 50 Hz
Consumo. . . . . . . . . . . . . . . . . . . . . . . . . . . . . . . . . . . . . . . . . . . . . . . . . . . . . . . . . . . . . . . . 280 W
Presa ausiliaria di corrente . . . . . . . . . . . . . . . . . . . . . . . . . . . . . . . . . . . . . . . . . Non commutata x 1
(Accertarsi che la corrente totale assorbita da tutti gli apparecchi collegati a questa presa non superi
100 watt.)
Dimensioni (L x A x P). . . . . . . . . . . . . . . . . . . . . . . . . . . . . . . . . . . . . . . . . . . . 435 x 144 x 330 mm
Peso (netto). . . . . . . . . . . . . . . . . . . . . . . . . . . . . . . . . . . . . . . . . . . . . . . . . . . . . . . . . . . . . . 7,4 Kg.
Accessori in dotazione :
Antenna circolare AM x 1
Antenna FM x 1
Telecomando (UR-415) x 1
Batterie (AA, R6, SUM-3) x 2
• L’aspetto e le caratteristiche sono soggetti a modifiche senza preavviso.
• Le illustrazioni possono lievemente differire dai modelli di produzione.

83
NEDERLANDS
Voor gebruikInhoud
Hartelijk dank dat u voor een TEAC product heeft gekozen.
Lees deze gebruiksaanwijzing zorgvuldig door om
optimaal te kunnen profiteren van de mogelijkheden en
prestaties van dit apparaat.
Voor gebruik. . . . . . . . . . . . . . . . . . . . . . . . . . . . . . . . . . . . . . 83
Afstandsbediening . . . . . . . . . . . . . . . . . . . . . . . . . . . . . . . . . 84
Antennes aansluiten . . . . . . . . . . . . . . . . . . . . . . . . . . . . . . . . 84
Aansluitingen . . . . . . . . . . . . . . . . . . . . . . . . . . . . . . . . . . . . . 86
Beschrijving van de bedieningselementen . . . . . . . . . . . . . . . . 88
Basis bediening. . . . . . . . . . . . . . . . . . . . . . . . . . . . . . . . . . . . 90
Tuner . . . . . . . . . . . . . . . . . . . . . . . . . . . . . . . . . . . . . . . . . . . 93
Geprogrammeerde afstemfunctie . . . . . . . . . . . . . . . . . . . . . . 94
RDS (Radio Data Systeem). . . . . . . . . . . . . . . . . . . . . . . . . . . . 95
RDS (PTY Programma’s) . . . . . . . . . . . . . . . . . . . . . . . . . . . . . 95
RDS (PTY zoekfunctie). . . . . . . . . . . . . . . . . . . . . . . . . . . . . . . 96
Foutmeldingen . . . . . . . . . . . . . . . . . . . . . . . . . . . . . . . . . . . . 97
Technische gegevens . . . . . . . . . . . . . . . . . . . . . . . . . . . . . . . 98
Waarschuwing
Stel dit apparaat niet bloot aan water of vocht en zet nooit
vazen of andere zaken die vloeistof bevatten bovenop het
apparaat.
Plaats de apparatuur nooit in een afgesloten kast zonder
adequate ventilatie.
Lees dit gedeelte aandachtig door voordat u uw AG-790 in
gebruik neemt
< Het apparaat kan warm worden tijdens normaal functioneren.
Zorg altijd voor voldoende ventilatie aan de bovenzijde.
De ventilatie-openingen mogen niet worden afgedekt of
geblokkeerd. Let er op dat er tenminste 50 cm ruimte is
boven en tenminste 10 cm ruimte aan de zijkanten van de
versterker. Plaats niets boven op de AG-790.
<
De gebruikte netspanning moet overeenkomen met de
netspanning zoals die op de achterzijde van het apparaat
staat aangegeven. Raadpleeg bij twijfel altijd uw dealer.
<
Kies de best mogelijke plaats voor de AG-790, echter niet in
direct zonlicht of in de buurt van een warmtebron. Stel het
apparaat niet bloot aan trillingen, stof, extreme hitte, koude
of vochtigheid.
<
Plaats het apparaat niet op of tussen een versterker en/of een
receiver.
< Open nooit de behuizing. Dit kan leiden tot schade aan de
elektronica of een elektrische schok veroorzaken. Wanneer
een voorwerp in het apparaat terecht komt raadpleeg dan uw
dealer.
<
Wanneer u de stekker uit het stopcontact verwijdert trek dan
altijd aan de stekker en nooit aan de kabel.
< Maak het apparaat niet schoon met chemische middelen, dit
kan de laklaag beschadigen. Gebruik een schone, droge
doek.
<
Bewaar deze handleiding zorgvuldig om eventueel later te
kunnen raadplegen.
Verwijdering van uw oude elektrische of elektronische
apparaten
1.Als op een apparaat een symbool
staat met een kruis door een afvalton
dan betekent dit dat de verwijdering
ervan volgens de „RICHTLIJN
2002/96/EG VAN HET EUROPESCHE
PARLEMENT EN DE RAAD van 27
januari 2003 met betrekking tot
elektrische en elektronische
apparaten“ geregeld is.
2. Al dit soort elektrische en elektronische apparaten moeten
dientengevolge, gescheiden van ander restafval, op een
door de staatsoverheid of de betreffende locale autoriteiten
te bepalen inzamelplaats ingeleverd worden.
3. Een correcte verwijdering/afvoer van uw oude elektrische of
elektronische apparaten draagt in hoge mate bij tot het
voorkomen van een negatieve invloed op het milieu en
levert daarmee ook een positieve bijdrage aan uw eigen
gezondheid en die van anderen.
4. Verdere informatie over de afvoer van uw oude elektrische
of elektronische apparaten kunt u op aanvraag verkrijgen
bij het betreffende gemeentehuis, de
afvalverwerkingorganisatie of bij de handelaar/winkel waar
u het apparaat oorspronkelijk gekocht heeft.

84
Antennes aansluitenAfstandsbediening
De AG-790 en verschillende andere TEAC componenten die
voorzien zijn van het UR logo in het voorpaneel kunnen
bediend worden met de meegeleverde “UR“ afstandsbediening.
Richt bij gebruik de afstandsbediening op de REMOTE SENSOR in
het voorpaneel van de AG-790 (of een andere TEAC component).
<
Ondanks het feit dat de afstandsbediening binnen het
effectieve bereik wordt gebruikt, kan de aanwezigheid van
obstakels ertoe leiden dat deze niet werkt.
<
Wanneer de afstandsbediening wordt gebruikt in de nabijheid
van apparaten die infrarood signalen afgeven, of in
combinatie met andere afstandsbedieningen, dan kan deze
onjuist werken. Ook kunnen dan die andere apparaten onjuist
reageren.
Batterijen inzetten
1. Verwijder het deksel van het batterijvak.
2. Leg twee “AA“ (R6, SUM-3) droge batterijen in. Let bij het
inzetten vooral op de juiste positie van positief +
en negatief
_
.
3. Breng het deksel weer aan.
Batterijen vervangen
Als u voor correct functioneren de afstandsbedienig steeds
dichter bij de ontvangstsensor moet houden dan is het aan te
raden om de batterijen te vervangen. Vervang steeds beide
batterijen tegelijk door nieuwe.
Voorzorgsmaatregelen bij batterijen
<
Let bij het plaatsen van de batterijen op de correcte polariteit
(+
/_).
<
Gebruik altijd twee batterijen van hetzelfde type en nooit een
oude en een nieuwe batterij tegelijk.
<
Zowel gewone als oplaadbare batterijen kunnen gebruikt
worden, let op de aanwijzingen op de verpakking van
batterijen.
<
Verwijder de batterijen als u de afstandsbediening voor
langere tijd (langer dan een maand) niet gebruikt om lekken
te voorkomen. Als batterijen toch gelekt hebben verwijder ze
dan, maak het batterijvak schoon en plaats nieuwe batterijen.
<
Verhit batterijen nooit, maak ze niet open en gooi ze niet in
open vuur. Lever oude batterijen op een daarvoor bestemd
punt in.
FM binnenantenne
Sluit de draadvormige FM antenne direct aan op de FM 75 Ω
aansluiting, rol de kabel uit en selecteer uw favoriete zender
(zie pagina 93). Bevestig de antenne met bijvoorbeeld
punaises of iets dergelijks op een muur of raamkozijn waar de
ontvangst optimaal is.
FM buitenantenne
Als u in een gebied woont waar de FM-signalen bijzonder
zwak zijn kan het nodig zijn een FM buitenantenne aan te
sluiten. Over het algemeen is een 3-elements antenne
voldoende maar als de FM signalen erg zwak zijn dan kan het
nodig zijn om een antenne met 5 of meer elementen te
gebruiken.
<
Maak de FM binnenantenne los als u een buitenantenne
gebruikt.

85
NEDERLANDS
AM raamantenne
De meegeleverde hoogwaardige AM raamantenne is
voldoende voor een goede ontvangst in vrijwel iedere
omgeving.
Bevestig om de antenne neer te kunnen zetten het voetje aan
de aansluiting in de onderkant.
Sluit de kabel van de raamantenne aan op de AM antenneaansluitingen.
Aansluitingen
Druk de knop in, steek het uiteinde van de
snoer in de opening en laat de knop los.
Controleer of het snoer inderdaad goed vast
zit, door er even voorzichtig aan te trekken.
Trek voorzichtig aan de kabel om te
controleren of deze stevig genoeg in de
aansluiting zit. Let erop dat de isolatie aan
het uiteinde van de luidsprekerkabel volledig is verwijderd en
dat er geen plasticresten aanwezig zijn die het contact tussen
de antennekabel en de uitgang hinderen.
Plaats de antenne bijvoorbeeld op een boekenkast of hang
deze aan een raam of dergelijke in de richting van waar u de
beste ontvangst krijgt, maar let er op dat de antenne zo ver
mogelijk van het gehele systeem en van de luidspreker- en
netstroomkabels verwijderd is om mogelijke storingen te
vermijden.
AM buitenantenne
Als de meegeleverde AM raamantenne niet genoeg ontvangst
biedt (omdat u bijvoorbeeld te ver van een zender verwijdert
bent of omdat u zich in een betonnen gebouw bevindt, enz.)
kan het voorkomen dat u een AM buitenantenne dient te
gebruiken. Gebruik hiervoor een geïsoleerde kabel van
minstens vijf meter lang, verwijder de isolatie aan het einde
en sluit de kabel zoals op de afbeelding aangegeven aan. De
antenne dient u buiten op te hangen of binnen in de buurt
van een raam te bevestigen. Voor een betere ontvangst sluit u
de GND aansluiting op een goed geaarde ondergrond aan.
Opmerking:
Zelfs als de AM buitenantenne wordt gebruikt dient de AM
raamantenne aangesloten te blijven.
AM buitenantenne
AM raamantenne:
Verbind de zwarte kabel met
de linker aansluiting (GND)
en de witte kabel met de
rechter aansluiting.

86
Aansluitingen
CD speler
Draaitafel Cassettedeck
Luidspreker A
Luidspreker B
LET OP:
< Raadpleeg van te voren de gebruiksaanwijzingen van de
componenten die u op de AG-790 aan wilt sluiten.
<
Zorg voor een correcte aansluiting van alle
verbindingskabels.
<
Bundel audiosignaalkabels niet met netstroom- of
luidsprekerkabels om ongewenste interferentie te
voorkomen.
Luidsprekeraansluitingen
Waarschuwing:
Om beschadiging aan het apparaat te voorkomen doordat
een te hoog volumeniveau wordt weergegeven dient de
AG-790 uitgeschakeld te zijn voordat de luidsprekers
worden aangesloten.
<
Controleer de impedantie van uw luidsprekers. Sluit
luidsprekers aan met een impedantie van 8 ohm of meer.
A
Wandstopcontact
netstroomaansluiting
< De zwarte luidsprekeraansluitingen van de versterker zijn de
negatieve (–) aansluitingen.
Bij de meeste luidsprekerkabels is de (+) draad van de
luidsprekerkabel gemerkt of gekleurd om onderscheid
mogelijk te maken met de (–) draad van de kabel. Verbind
de gemerkte/gekleurde draad met de (+) aansluiting en de
ongemerkte kant met de zwarte (–) aansluiting.
<
Bereid de luidsprekerkabels voor aansluiting door ca. 10 mm
of iets minder van de isolatie te verwijderen (niet meer
omdat dit kortsluiting kan veroorzaken). Draai de uiteinden
van de kabels stevig in elkaar om loshangende draden en
een mogelijk daaruit voortkomende kortsluiting te
voorkomen:
D
LINE OUT
RL
A
B
E
C
RL
RL
LINE
LINE
OUT
IN
F

87
NEDERLANDS
RESET
In de volgende gevallen kan het voorkomen dat de
functietoetsen niet goed werken:
• Als het systeem door een elektrische schok beschadigd is.
• Als de stroomvoorziening hapert of als er elektrische
storingen plaatsvinden.
Druk in dit geval een of twee keer zachtjes met een potlood
of met de punt van een balpen op de RESET schakelaar.
Alle instellingen opgeslagen in het geheugen (zoals
voorgeprogrammeerde stations en timerinstellingen) worden
gewist.
AC OUTLET netstroomuitgang
(geschakeld)
De netstroomspanning is alleen geactiveerd als de AG-790
aan staat of naar standby geschakeld is.
Als de AG-790 uit staat dan is de netstroomuitgang niet
actief.
Voorzichtig:
Let er op dat het totale stroomverbruik van alle aangesloten
apparaten niet meer dan 100 watt bedraagt.
AC Netsnoer
Als alle andere aansluitingen gemaakt zijn sluit dan pas de
netstroomkabel aan op de wandcontactdoos.
Let er op dat het netsnoer op een stopcontact met de juiste
spanning, die overeenkomt met de spanning van het
apparaat, wordt aangesloten.
Gebruik altijd de stekker om het netsnoer in het stopcontact
te doen of om het netsnoer uit het stopcontact te halen.
Trek nooit aan de netstroomkabel.
F
E
D
WAARSCHUWING:
Let er op dat de metalen einden van de twee draden niet
met elkaar in aanraking komen omdat dit kortsluiting tot
gevolg kan hebben. Dit kan mogelijk brand veroorzaken
en/of uw HiFi systeem ernstig beschadigen.
Aansluiten van de luidsprekers:
1.Draai het aansluitdopje tegen de wijzers van de klok in los.
Het aansluitdopje kan niet van de basis verwijderd worden.
2.Steek de draad volledig in de aansluiting en draai het dopje
met de wijzers van de klok mee stevig vast.
Let er op dat geen isolatiemateriaal van de draad in de
aansluiting komt, steek alleen het metalen gedeelte van de
kabel in de aansluiting.
3.Controleer of de luidsprekerkabels stevig vast zitten door er
licht aan te trekken.
CD, TAPE MONITOR, VIDEO/AUX
aansluitingen
Een analoog 2-kanaals audiosignaal wordt via deze
aansluitingen ontvangen of verzonden. Sluit de component
aan met in de handel verkrijgbare RCA kabels.
Let op, aansluiten als volgt:
witte stekker q
witte aansluiting (L: linkerkanaal)
rode stekker q
rode aansluiting (R: rechterkanaal)
PHONO en SIGNAL GND aansluitingen
Verbind de RCA pinkabels van een platenspeler (pick-up)
met de PHONO aansluitingen.
Let op, aansluiten als volgt:
witte stekker q
witte aansluiting (L: linkerkanaal)
rode stekker q
rode aansluiting (R: rechterkanaal)
Verbind de randaardedraad van de platenspeler met de
SIGNAL GND aansluiting.
C
B

88
Beschrijving van de bedieningselementen
POWER switch
Gebruik deze toets om het apparaat aan of uit te zetten.
Standby indicatielampje
Dit indicatielampje brandt als de AG-790 in de standby stand
staat.
Druk in de standby-stand op de POWER toets van de
afstandsbediening of op een van de signaalbronselectietoetsen om de AG-790 in te schakelen.
Als het systeem ingeschakeld wordt gaat het indicatielamp
automatisch uit.
Sensor
Als u de afstandsbediening gebruikt richt deze dan op de
Sensor in de voorzijde van de AG-790.
Luidspreker indicatielampje
Dit indicatielampje brandt als de luidspreker toets (A of B)
geactiveerd is.
Display
Als de AG-790 ingeschakeld is wordt in het display de actuele
status van het systeem aangegeven.
MUTING indicatielampje
De MUTING indicatie knippert als de MUTING functie
(weergave tijdelijk onderbreken) geactiveerd is.
F
E
D
C
B
De apparatuur verbruikt nominale non-actieve stroom via de
stroomkabel als de POWER-toets in de positie OFF staat.
A
A B F GC D E
N
b
R
d
Q
RT SU O K J I H
e
a
f
O
c
H
N
M
LP

89
NEDERLANDS
POWER (standby/aan)
Als de POWER knop van de AG-790 ingedrukt is kunt u met
deze toets het systeem aan of in de standby stand zetten.
MEMORY SCAN
Gebruik deze toets om naar voor-geprogrammeerde zenders
te zoeken.
Bedieningstoetsen voor een aangesloten TEAC
cassettedeck of TEAC CD speler.
Gebruik deze toetsen voor de bediening van TEAC
componenten die voorzien zijn van het “UR“ logo.
MUTING
Druk op deze knop om het geluid tijdelijk uit te schakelen.
SLEEP
Met deze toets kunt u de sleep timer instellen.
INPUT
(CD, PHONO, TUNER, TAPE MONITOR, VIDEO/AUX)
Met deze toetsen kunt u een gewenste signaalbron
selecteren.
Opmerking:
Om de volgende instructies eenvoudiger te maken worden de
namen van de toetsen op de voorzijde van de AG-790
gebruikt en niet de namen van de bedieningstoetsen van de
afstandsbediening.
f
e
d
c
b
a
LOUDNESS indicatielampje
Dit indicatielampje brandt als de LOUDNESS toets geactiveerd
is.
VOLUME/JOG
Draai aan deze knop (of druk op de VOLUME toetsen van de
afstandsbediening) totdat de gewenste geluidssterkte bereikt
is.
BALANCE
Druk op deze toets en draai gelijktijdig aan de VOLUME/JOG
knop om de balans tussen het linker en rechter kanaal te
regelen.
TREBLE
Druk op deze toets en draai gelijktijdig aan de VOLUME/JOG
knop om de weergavegeluidssterkte van het hogetonenbereik
in te stellen.
BASS
Druk op deze toets en draai tegelijk aan de VOLUME/JOG
knop om het bereik van de lage tonen in te stellen.
RDS MODE
Druk op deze toets als de AG-790 in de FM tuner stand staat.
De RDS functie is alleen beschikbaar in Europese landen.
LOUDNESS
Gebruik deze toets om het verlies aan lage tonen bij een
zacht geluidsweergaveniveau te compenseren.
INPUT
(CD, PHONO, TUNER, TAPE MONITOR, VIDEO/AUX)
Met deze toetsen kunt u een gewenste signaalbron
selecteren.
Als de AG-790 in de standby-stand staat druk dan op een van
deze toetsen om het apparaat aan te zetten.
TUNING/PRESET
Gebruik deze toetsen voor het handmatig selecteren van
zenders.
Gebruik deze toetsen voor het selecteren van een voorgeprogrammeerde zender.
MEMORY
Gebruik deze toets om voor-geprogrammeerde zenders in het
geheugen op te slaan.
FM MODE
Gebruik deze toetsen als de AG-790 in de FM tuner stand
staat om stereo of mono te selecteren.
Q
P
O
N
M
L
K
J
I
H
G
BAND
Gebruik deze toetsen om FM of AM te selecteren.
TUNING MODE
Gebruik deze toets om de tuning mode te veranderen.
PHONES
Weergave via een hoofdtelefoon. Sluit een hoofdtelefoon op
deze ingang aan en pas daarna het volume aan door aan de
VOLUME knop te draaien.
SPEAKERS
Gebruik deze toetsen om de luidsprekers (A of B) in of uit te
schakelen.
ON: Er wordt geluid via de luidsprekers weergegeven.
OFF: Er wordt geen geluid via de luidsprekers weergegeven.
U
T
S
R

90
Basis bediening 1
2. Start het opnemen.
<
Als een cassette-recorder met 3 koppen op de TAPE
MONITOR (PLAY en REC) aansluitingen aangesloten is en u
schakelt tijdens het opnemen de tape-monitorfunctie in dan
wordt het zojuist opgenomen signaal weergegeven in plaats
van het signaal van de opname-bron.
Druk op de POWER knop.
Het apparaat staat aan.
1
Start, voor zover nodig, de weergave van de externe
signaalbron en stel langzaam met de VOLUME knop de
gewenste weergavegeluidssterkte in.
3
Tape Monitor functie
Als u de programmabron wilt selecteren die op de TAPE
MONITOR aansluitingen aangesloten is, druk dan op de TAPE
MONITOR toets om de tape-monitorfunctie in te schakelen.
Het
TAPE
indicatielampje brandt.
Druk nogmaals op de TAPE MONITOR toets om de tapemonitorfunctie weer uit te schakelen.
<
Als de tape-monitorfunctie geactiveerd is kan geen andere
programmabron dan TAPE MONITOR via de luidsprekers
weergegeven worden. Denk er aan dat u de tape-monitor
functie uitzet als u naar andere programmabronnen wilt
luisteren.
MON
< Als de AG-790 ingeschakeld wordt dan licht de MUTING
indicator kort op, dit is geen storing.
< Als de AG-790 in de standby-stand staat en de standby-
indicator brandt druk dan op de POWER toets van de
afstandsbediening of op een van de signaalbrontoetsen
(TUNER, PHONO, CD, TAPE MONITOR of VIDEO/AUX) om de
receiver in te schakelen.
Druk op de overeenkomstige toets om de gewenste
signaalbron te selecteren.
2
Opnemen van een externe bron
1. Druk op de overeenkomstige toets om de gewenste
signaalbron te selecteren.
2 31

91
NEDERLANDS
DCB E FA
Luidsprekers selecteren
Druk op de SPEAKERS toets (A of B) om de luidsprekers in of
uit te schakelen.
Als ON geselecteerd is zal het SPEAKERS indicatielampje
branden.
A
Hoofdtelefoon
Reduceer eerst het volume van de AG-790 tot minimum,
steek dan de plug van uw hoofdtelefoon in de PHONES
aansluiting en regel het volumeniveau door aan de VOLUME
knop te draaien.
Als u het geluid van de luidsprekers uit wilt zetten druk dan
op de SPEAKERS toets om de luidsprekers uit te schakelen.
Waarschuwing
Zet altijd de geluidssterkteweergave naar minimum terug
voordat u uw hoofdtelefoon aansluit om een mogelijke
beschadiging van uw gehoor te voorkomen. Gebruik de
hoofdtelefoon pas als u deze aangesloten heeft.
B
Waarschuwing
Als de luidsprekers aangesloten zijn op de SPEAKERS A
aansluitingen selecteer dan de SPEAKER A instelling met de
SPEAKERS A toets. Als er geen luidsprekers aangesloten zijn
op de SPEAKER B aansluitingen zorg er dan voor dat de
SPEAKER B toets niet geactiveerd is anders wordt er geen
geluid via de SPEAKER A uitgang weergegeven en zo ook in
omgekeerde richting.
LOUDNESS toets
Met deze toets compenseert u het verlies aan lage tonen bij
een zacht geluidsweergaveniveau.
Schakel deze functie tijdens het luisteren op een normaal
geluidsweergaveniveau uit.
C
1.Druk op de BASS toets. ”BAS” verschijnt in het display.
2.Draai binnen 3 seconden de JOG-knop om de instelling te
veranderen.
Het niveau kan in stappen van 2 worden aangepast van –10
tot +10.
Regeling van de hoge tonen
Deze knop wordt gebruikt om het niveau van de hoge
tonen in te stellen.
E
Regeling van de lage tonen
Deze knop wordt gebruikt om het niveau van de lage tonen
in te stellen.
D
1.Druk op de TREBLE toets. ”TRE” verschijnt in het display.
2.Draai binnen 3 seconden de JOG-knop om de instelling te
veranderen.
Het niveau kan in stappen van 2 worden aangepast van –10
tot +10.
Balansregelaar
F
1.Druk op de BALANCE toets. ”BAL” verschijnt in het display.
2.Draai binnen 3 seconden de JOG-knop om de instelling te
veranderen.
Het niveau kan van L+16 tot R+16 ingesteld worden.
L+16 ... L+1 a
CENT q R+1 ... R+16
Normaliter selecteert u “CENT (center)“.

92
Basis bediening 2
Druk herhaaldelijk op de SLEEP-toets tot de gewenste tijd op
de display verschijnt.
U kunt de sleep timer in stappen van 10 minuten wijzigen.
SLEEP 90 (80, 70...of 10)
De SLEEP indicator gaat aan en het apparaat wordt 90 (80,
70, of 10) minuten later uitgeschakeld.
Normaal display:
De sleep timer staat uit.
<
Als u de sleep timer instelt zal de verlichting in het display
automatisch gedimd worden.
<
Als u wilt controleren hoeveel tijd er nog over is, drukt u
eenmaal op de SLEEP-toets. De resterende tijd wordt
gedurende 3 seconden weergegeven, waarna de normale
display weer verschijnt.
Om de geluidsweergave tijdelijk te onderbreken drukt u op de
MUTING toets. Druk opnieuw op de MUTING toets om de
geluidsweergave te herstellen. Als u tijdens onderbreking van
de geluidsweergave het volume verandert dan wordt deze
functie opgeheven.
<
Als Muting geactiveerd is zal het MUTING indicatielampje
knipperen.
Sleep Timer
Het apparaat kan worden uitgezet op het gewenste tijdstip.
Demping van het geluid

93
NEDERLANDS
Tuner
Houd de TUNING/PRESET-toets gedurende 0,5 tot 2 seconden
ingedrukt. Als een zender wordt gevonden, stopt het
instelproces automatisch.
Als u het instelproces wilt stoppen, drukt u op de
TUNING/PRESET-toets.
Zenders selecteren die niet automatisch kunnen worden
ingesteld (handmatige selectie)
Wanneer u kort op de TUNING/PRESET-toets drukt (een halve
seconde of korter), verandert de frequentie in vaste stappen.
Druk herhaaldelijk op de TUNING/PRESET-toets tot u de
zender waarnaar u wilt luisteren heeft gevonden.
< “TUNED” verschijnt in het display als de zender goed en
duidelijk wordt ontvangen.
3 4
Deze toets wordt gebruikt voor het omschakelen tussen
mono- of stereo-ontvangst.
Stereo
FM stereo-uitzendingen worden ontvangen en het ”STEREO”
stereo-indicatielampje verschijnt in het display.
< Als het geluid vervormd is en de “STEREO” indicator knippert
dan is het signaal niet sterk genoeg voor een goede stereoontvangst. Verander in zo’n geval de instelling naar MONO.
Mono
Om een zwakke stereo FM ontvangst te compenseren wordt
deze instelling geselecteerd. De signalen wordt nu in mono
weergegeven waarmee een betere klank bereikt wordt.
Druk op de TUNER toets.
1
Selecteer AM of FM met de BAND toets.
2
Druk op de TUNING MODE toets als het “CH”
indicatielampje brandt om de handmatige zenderselectiefunctie te selecteren.
Het “CH” indicatielampje in het display gaat uit.
Deze toets wordt gebruikt om de tuning mode te veranderen.
3
Selecteer de gewenste zender (autoselectie).
4
FM MODE Toets
12

94
Geprogrammeerde afstemfunctie
2. Druk op de MEMORY SCAN toets van de
afstandsbediening.
Voor-geprogrammeerde zenders, opgeslagen in het
geheugen, worden met een interval van 5 seconden
gescanned. Druk nogmaals op de MEMORY SCAN toets als u
de gewenste zender heeft gevonden en het scannen wilt
stoppen.
<
Een ingestelde voorkeurzender die geen signaal doorgeeft
wordt overgeslagen.
Handmatige geheugenafstemming
U kunt FM- en AM-zenders opslaan op kanaal 1 tot 30.
Selecteer de gewenste zender (radiostation) (zie stap
tot en met op pagina 93).
Druk op de MEMORY toets.
2
4
11
Selecteren van voor-geprogrameerde zenders
Selecteer AM of FM met de BAND toets.
1
Scannen van voor-geprogrammeerde zenders
1. Selecteer AM of FM met de BAND toets.
Om meer zenders in het geheugen op te slaan herhaald u
stap tot en met .
31
Druk terwijl ”MEMORY” in het display knippert op de
TUNING/PRESET toets om het gewenste voorkeurkanaal
te selecteren waarin u de geselecteerde zender op wilt
slaan. Druk daarna nogmaals op de MEMORY toets.
3
Als het “CH” indicatielampje niet brandt drukt u op de
TUNING MODE toets om de geprogrammeerde
afstemfunctie te selecteren.
2
Druk herhaald op de TUNING/PRESET toetsen om het
gewenste zendernummer te selecteren.
3
Opgeslagen gegevens in het geheugen
Alle opgelagen gegevens in het geheugen (zoals bijvoorbeeld
voorkeurzenders) worden gewist als de POWER schakelaar van
de AG-790 uitgezet wordt of als de netstroomtoevoer drie
dagen of langer uitgeschakeld is.
Om te voorkomen dat uw ingestelde voorkeurzenders verloren
gaan is het aan te raden om uw AG-790 in de STANDBY stand
te laten staan als u deze niet gebruikt.
TUNING/PRESETTUNING MODE
BAND
MEMORY

95
NEDERLANDS
RDS (Radio Data Systeem) RDS (PTY Programma’s)
RDS (Radio Data Systeem) is een zenderservice die ervoor zorgt
dat u naast een normaal radiosignaal ook nog extra informatie
kunt ontvangen.
De RDS zenderservice kan alleen op FM en alleen in
Europa worden ontvangen.
Selecteer een FM zender (zie stap t/m op pagina
93).
Druk op de RDS MODE-toets.
2
411
Elke keer als u kort op de RDS MODE-toets drukt verandert de
RDS mode als volgt:
PS (Naam programma service)
Als u PS selecteert knippert ongeveer 4 seconden “PS”,
daarna verschijnt PS of de zendernaam in het display. Als er
geen PS informatie is verschijnt de zenderfrequentie in het
display.
PTY (Programma type)
Als u PTY selecteert knippert ongeveer 4 seconden “PTY” in
het display. Als er geen PTY informatie is verschijnt de
zenderfrequentie in het display.
RT (Radio tekst)
Als u RT selecteert knippert ongeveer 4 seconden “RT” in
het display. De RT mode geeft zendernieuws weer
samengesteld uit maximaal 64 symbolen. Als er geen RT
informatie is verschijnt de zenderfrequentie in het display.
TA (Verkeersinformatie)
Als u TA selecteert knippert ongeveer 4 seconden “TA” in
het display, het systeem zoekt nu een zender die
verkeersinformatie doorgeeft.
<
Als de gevonden zender geen TA meldingen
(vekeersinformatie) meer doorgeeft dan zoekt het systeem
herhaald naar andere zenders.
CT (Tijdinformatie over zenders)
Geeft informatie over de tijden dat de zender weergegeven
wordt.
Als u CT selecteert knippert ongeveer 4 seconden “CT” in
het display, daarna verschijnt de tijd in het display.
Als er geen CT data beschikbaar is schakelt het systeem
automatisch van RDS naar PS.
NEWS : korte berichten, evenementen, publieke opinie,
verslagen, actualiteiten.
AFFAIRS : algemene informatie, o.a. praktische mededelingen
anders dan nieuws, documentaires, discussies,
analyses, enzovoorts.
INFO : alledaagse informatie of referentiemateriaal zoals
weerberichten, consumenten informatie, medische
assistentie, enzovoorts.
SPORT : programma’s over sport.
EDUCATE : educatieve en culturele informatie.
DRAMA : allerlei radioconcerten en radioseries.
CULTURE : alle aspecten van de nationale of locale cultuur,
inclusief religieuze evenementen, filosofie, sociale
wetenschappen, taal, theater, enzovoorts.
SCIENCE : programma’s over natuurwetenschappen en
technologie.
VARIED : populaire programma’s zoals kwissen, amusement,
persoonlijke vraaggesprekken, komedie, satire,
enzovoorts.
POP M : programma’s over commerciële en populaire
muziek, het aantal verkochte discs, enzovoorts.
ROCK M : moderne muziek, doorgaans gecomponeerd en
uitgevoerd door jonge muzikanten.
EASY M : populaire muziek, gewoonlijk korter dan 5
minuten.
LIGHT M : klassieke muziek, instrumentale muziek, koorzang
en lichte muziek voor liefhebbers.
CLASSICS : orkestmuziek, inclusief opera’s, symphonieën,
kamermuziek, enzovoorts.
OTHER M : andere stijlen muziek (Rhythm & Blues, Reggae,
enzovoorts).
WEATHER : weerberichten, vooruitzichten.
FINANCE : financiële berichten, commercie, handel.
CHILDREN : kinderprogramma’s
SOCIAL : sociale aangelegenheden.
RELIGION : religieuze programma’s.
PHONEIN : programma waarin de luisteraars hun mening via
de telefoon kenbaar kunnen maken.
TRAVEL : reisverslagen.
LEISURE : programma over recreatieve activiteiten.
JAZZ : jazz muziek.
COUNTRY : country muziek.
NATION M : volksmuziek.
OLDIES : muziek uit de zogenaamde goeie ouwe tijd.
FOLK M : folk muziek.
DOCUMENT: documentaires.
TEST
ALARM : programma dat voor een noodtoestand of een
natuurramp waarschuwt.

96
Het zoeken start.
< Als het door u geselecteerde PTY programma gevonden is
stopt het zoeken en het programma-type wordt in het display
weergegeven.
<
Als hetzelfde programma tijdens het PTY zoeken niet wordt
gevonden dan stopt de zoekfunctie automatisch bij de eerste
frequentie.
<
Als u het zoeken wilt stoppen drukt u op de RDS MODEtoets.
RDS (PTY zoekfunctie)
U kunt met deze functie een zender zoeken.
Selecteer FM met de BAND-toets.
1
Druk de RDS MODE toets langer dan 2 seconde in.
2
“SEARCH” knippert in het display.
Selecteer het gewenste PTY programma met de
TUNING/PRESET-toetsen.
3
U kunt 31 soorten selecteren.
Het programma knippert in het display.
Druk op de MEMORY-toets.
4
Het knipperen van de programma-indicatie stopt.
Druk op de TUNING/PRESET toetsen.
5
TUNING/PRESET
BAND
MEMORY RDS MODE

97
NEDERLANDS
Foutmeldingen
Neem bij problemen met de AG-790 alstublieft de moeite aan de
hand van de onderstaande lijst te kijken of u het probleem
wellicht zelf op kunt lossen. Als het probleem blijft bestaan
neem dan contact op met een HiFi vakman of het TEACServicecenter.
Geen netspanning
e
Controleer het stopcontact waarop u het apparaat heeft
aangesloten.
Controleer of het stopcontact schakelbaar is, zoja zorg er
dan voor dat deze schakelaar aan staat. Controleer met een
lamp, een ventilator of dergelijke of er netstroom op het
stopcontact staat.
Geen geluidsweergave hoorbaar of slechts een zeer zacht
geluid.
e
Pas het geluid aan met de VOLUME knop.
e
Stel de BALANCE controlefunctie in op “CENT“.
e
Controleer de aansluitingen van de luidsprekers en van de
versterker. Overtuig u ervan dat de aansluitingen correct en
secuur gemaakt zijn.
e
Als uw luidsprekers aangesloten zijn op de SPEAKER A
aansluitingen controleer dan of de SPEAKER A toets op het
voorpaneel ingedrukt is. Als u geen luidsprekers aangesloten
heeft op de SPEAKER B uitgangen overtuig u er dan van dat
de SPEAKER B toets niet ingedrukt is. Selecteer alleen de
SPEAKER uitgangen waarop u uw luidsprekers aangesloten
heeft.
e
Als de tape/monitorfunctie geactiveerd is en de “TAPE
“ indicatie brandt druk dan op de TAPE MONITOR
toets om deze functie uit te schakelen.
Het geluidsweergaveniveau van SPEAKERS A verschilt van
dat van SPEAKERS B.
e
Het geluidsniveau en de kwaliteit van het geluid kunnen,
afhankelijk van het luidsprekervermogen enz., verschillend
zijn. Als u de SPEAKERS A en SPEAKERS B uitgangen tegelijk
wilt gebruiken met een overeenkomstig geluidsweergaveniveau dan dient u luidsprekers van exact hetzelfde
type op de SPEAKERS A en B uitgangen aan te sluiten.
Het weergavegeluid is niet zuiver of klinkt vervormd
e
De AG-790 staat te dicht bij een TV toestel/monitor of een
soortgelijk apparaat.
Verplaats de apparaten om interferentie te voorkomen of zet
ze uit.
e
Verbind de aardedraad van de platenspeler met de SIGNAL
GND uitgang.
Het geluid stopt tijdens weergave van de muziek of er is
geen geluid hoorbaar na inschakeling van het apparaat.
e
De luidspreker-impedantie is minder dan voor het apparaat
is voorgeschreven.
e
Schakel het apparaat uit en stel het volume lager in.
MON
De lage tonen zijn niet of niet goed hoorbaar
e
De luidspreker-aansluitingen zijn niet correct (+ en –
verkeerd) aangesloten. Controleer de polariteit van de
luidspreker-aansluitingen.
Geen zender kan ontvangen worden of het signaal is te
zwak.
e
Controleer of de antenne(s) correct aangesloten zijn.
e
Stel het radiostation correct in.
e
Als er naast de AG-790 een TV toestel aanstaat zet dit dan
uit.
e
Installeer de antenne opnieuw nadat u mogelijk een plaats
met een betere ontvangst gevonden heeft.
e
Het aansluiten van een externe antenne kan noodzakelijk
zijn.
De ontvangst is stereo, het geluid is mono.
e
Druk op de FM MODE toets.
De afstandsbediening functioneert niet.
e
Druk op de POWER toets om de AG-790 in te schakelen.
e
Vervang alle batterijen in de afstandsbediening door
nieuwe. Mogelijk zijn deze te zwak.
e
Gebruik de afstandsbediening dicht(er) bij het apparaat
(minder dan 5m) en richt de afstandsbediening op de sensor
in het voorpaneel van de AG-790.
e
Verwijder eventuele obstakels die zich tussen de
afstandsbediening en de AG-790 bevinden.
e
Als er een fluorescerende lamp of een ander soort felle lamp
in de omgeving van de AG-790 staat verwijder deze dan of
zet hem uit.
Als normale bediening niet meer mogelijk is trek dan de
stekker uit het stopcontact en steek hem vervolgens na 20
seconden weer terug in het stopcontact.
Onderhoud
Als het apparaat vuil wordt, gebruik dan voor het
schoonmaken een zachte, schone, droge doek of een milde
zeep. Zorg ervoor dat al het vuil wordt verwijderd. Gebruik
nooit chemische reinigingsmiddelen zoals spuitbussen,
antistatische spray’s of vloeistof, benzine of verdunner. De
chemicaliën beschadigen het oppervlak van het apparaat.

98
Technische gegevens
Versterker gedeelte
Uitgangsvermogen . . . . . . . . . . . . . . . . . . . . . . . . . .100 W + 100 W RMS (0,9 % THD, 1 kHz, 8 Ω)
Totale Harmonische Vervorming . . . . . . . . . . . . . . . . . . . . . . . . . . . . . . . . . 0,05 % (bij 80 W,1 kHz)
Audio gevoeligheid/impedantie . . . . . . . . . . . . PHONO: 6,5 mV/22 kohms, LINE: 230 mV/22 kohms
Frequentiebereik . . . . . . . . . . . . . . . . . PHONO: 20 Hz - 20 kHz, ±3 dB, LINE: 20 Hz - 35 kHz, –3 dB
Signaal/ruisverhouding . . . . . . . . . . . . . . . . . . . . . . . . . . PHONO: 75 dB (IHF-A), LINE: 90 dB (IHF-A)
Klankcontrole. . . . . . . . . . . . . . . . . . . . . . . . . . BASS: ±10 dB bij 100 Hz, TREBLE: ±10 dB bij 10 kHz
Loudness controle. . . . . . . . . . . . . . . . . . . . . . . . . . . . . . . . . . . . . . . . . . . . . . . . . . +4 dB bij 100 Hz
FM Tuner gedeelte
Ontvangstbereik . . . . . . . . . . . . . . . . . . . . . . . . . . . . . . . . . 87,5 MHz-108,0 MHz (50 kHz stappen)
Bruikbare gevoeligheid. . . . . . . . . . . . . . . . . . . . . . . . . . . . . . . . . . . . . . . . . . . . . Mono: 10 dBµV/m
50 dB Eindgevoeligheid. . . . . . . . . . . . . . . . . . . . . . . . . . . . . Mono: 15 dBµV/m, Stereo: 33 dBµV/m
Spiegelfrequentie-onderdrukking. . . . . . . . . . . . . . . . . . . . . . . . . . . . . . . . . . . . . . . . . . . . . . . 35 dB
AM-signaalonderdrukking . . . . . . . . . . . . . . . . . . . . . . . . . . . . . . . . . . . . . . . . . . . . . . . . . . . . 50 dB
Harmonische Vervorming (1 kHz) . . . . . . . . . . . . . . . . . . . . . . . . . . . . . Mono: 0,5 %, Stereo: 0,5 %
Frequentiebereik. . . . . . . . . . . . . . . . . . . . . . . . . . . . . . . . . . . . . . . . . . . . . . . 20 Hz - 15 kHz, –3 dB
Stereokanaal-begrenzing (1 kHz) . . . . . . . . . . . . . . . . . . . . . . . . . . . . . . . . . . . . . . . . . . . . . . . 35 dB
Signaal/ruisverhouding. . . . . . . . . . . . . . . . . . . . . . . . . . . . . . . . Mono: 70 dB, Stereo: 65 dB (IHF-A)
AM Tuner gedeelte
Ontvangstbereik . . . . . . . . . . . . . . . . . . . . . . . . . . . . . . . . . . . . 522 kHz-1,620 kHz (9 kHz stappen)
Bruikbare gevoeligheid . . . . . . . . . . . . . . . . . . . . . . . . . . . . . . . . . . . . . . . . . . . . . . . . . . . . . . 55 dB
Totale Harmonische Vervorming . . . . . . . . . . . . . . . . . . . . . . . . . . . . . . . . . . . . 1 % bij 100 dBµV/m
Signaal/ruisverhouding . . . . . . . . . . . . . . . . . . . . . . . . . . . . . . . . . . . . . . . . . . 40 dB bij 100 dBµV/m
Algemene informatie
Stroomtoevoer . . . . . . . . . . . . . . . . . . . . . . . . . . . . . . . . . . . . . . . . . . . . . . . . . . . . . AC 230V, 50Hz
Stroomverbruik . . . . . . . . . . . . . . . . . . . . . . . . . . . . . . . . . . . . . . . . . . . . . . . . . . . . . . . . . . . 280 W
AC netstroom aansluiting (max. 100 W) . . . . . . . . . . . . . . . . . . . . . . . . . . . . . . . niet geschakeld x 1
Afmetingen (B x H x D). . . . . . . . . . . . . . . . . . . . . . . . . . . . . . . . . . . . . . . . . . . 435 x 144 x 330 mm
Gewicht (netto) . . . . . . . . . . . . . . . . . . . . . . . . . . . . . . . . . . . . . . . . . . . . . . . . . . . . . . . . . . . 7,4 kg
Standaard accessoires
AM Raamantenne x 1
FM-antenne x 1
Afstandsbediening (UR-415) x 1
Batterij (AA, R6, SUM-3) x 2
• Het ontwerp en de specificaties kunnen worden gewijzigd zonder aankondiging vooraf.
• De illustraties kunnen licht afwijken van de productiemodellen.

0705.MA-0980A
Z
This appliance has a serial number located on the rear panel. Please record
the model number and serial number and retain them for your records.
Model number Serial number
TEAC CORPORATION
3-7-3, Nakacho, Musashino-shi, Tokyo 180-8550, Japan Phone: (0422) 52-5081
TEAC AMERICA, INC. 7733 Telegraph Road, Montebello, California 90640 Phone: (323) 726-0303
TEAC CANADA LTD. 5939 Wallace Street, Mississauga, Ontario L4Z 1Z8, Canada Phone: (905) 890-8008
TEAC MEXICO, S.A. De C.V Campesinos N°184, Colonia Granjas Esmeralda, Delegacion Iztapalapa, CP 09810, México DF Phone: (525) 581-5500
TEAC UK LIMITED Unit 19 & 20, The Courtyards, Hatters Lane, Watford, Hertfordshire, WD18 8TE, U.K. Phone: (0845) 130-2511
TEAC EUROPE GmbH Bahnstrasse 12, 65205 Wiesbaden-Erbenheim, Germany Phone: 0611-71580
TEAC ITALIANA S.p.A. Via C. Cantù 9/A, 20092 Cinisello Balsamo, Milano, Italy Phone: 02-66010500
TEAC AUSTRALIA PTY., LTD. 280 William Street, Melbourne VIC 3000, Australia Phone: (03) 9672-2400
A.B.N. 80 005 408 462
 Loading...