

Teac AG-980 Owners Manual

5707-04735-053-0S
DUAL ZONE AM/FM STEREO RECEIVER
OWNER’S MANUAL
MANUEL DU PROPRIÉTAIRE
MANUAL DEL USUARIO
BEDIENUNGSANLEITUNG
MANUALE DI ISTRUZIONI
GEBRUIKSAANWIJZING
Z
AG
-
980
ENGLISH
FRANÇAIS NEDERLANDSITALIANODEUTSCH
ESPAÑOL
Disposal of your old appliance
1. When this crossed-out wheeled bin symbol
is attached to a product it means the product is covered by the European Directive
2002/96/EC.
2. All electrical and electronic products should
be disposed of separately from the municipal waste stream via designated collection facilities
appointed by the government or the local authorities.
3. The correct disposal of your old appliance will help prevent potential negative consequences for the environment
and human health.
4. For more detailed information about disposal of your old
appliance, please contact your city office, waste disposal
service or the shop where you purchased the product.
2
The lightning flash with arrowhead symbol, within
an equilateral triangle, is intended to alert the user
to the presence of uninsulated “dangerous voltage”
within the product’s enclosure that may be of sufficient magnitude to constitute a risk of electric shock
to persons.
The exclamation point within an equilateral triangle
is intended to alert the user to the presence of
important operating and maintenance (servicing)
instructions in the literature accompanying the
appliance.
IMPORTANT SAFETY
INSTRUCTIONS
1) Read these instructions.
2) Keep these instructions.
3) Heed all warnings.
4) Follow all instructions.
5) Do not use this apparatus near water.
6) Clean only with dry cloth.
7) Do not block any ventilation openings. Install in accordance
with the manufacturer’s instructions.
8) Do not install near any heat sources such as radiators, heat
registers, stoves, or other apparatus (including amplifiers)
that produce heat.
9) Do not defeat the safety purpose of the polarized or
grounding-type plug. A polarized plug has two blades with
one wider than the other. A grounding type plug has two
blades and a third grounding prong. The wide blade or the
third prong are provided for your safety. If the provided
plug does not fit into your outlet, consult an electrician for
replacement of the obsolete outlet.
10) Protect the power cord from being walked on or pinched
particularly at plugs, convenience receptacles, and the point
where they exit from the apparatus.
11) Only use attachments/accessories specified by the manufacturer.
12) Use only with the cart, stand, tripod,
bracket, or table specified by the manufacturer, or sold with the apparatus.
When a cart is used, use caution when
moving the cart/apparatus combination
to avoid injury from tip-over.
13) Unplug this apparatus during lightning storms or when
unused for long periods of time.
CAUTION: TO REDUCE THE RISK OF ELECTRIC SHOCK, DO
NOT REMOVE COVER (OR BACK). NO USER-SERVICEABLE
PARTS INSIDE. REFER SERVICING TO QUALIFIED SERVICE
PERSONNEL.
WARNING: TO PREVENT FIRE OR SHOCK
HAZARD, DO NOT EXPOSE THIS APPLIANCE
TO RAIN OR MOISTURE.
14) Refer all servicing to qualified service personnel. Servicing is
required when the apparatus has been damaged in any
way, such as power-supply cord or plug is damaged, liquid
has been spilled or objects have fallen into the apparatus,
the apparatus has been exposed to rain or moisture, does
not operate normally, or has been dropped.
< Do not expose this apparatus to drips or splashes.
< Do not place any objects filled with liquids, such as vases, on
the apparatus.
< Do not install this apparatus in a confined space such as a
book case or similar unit.
< The apparatus draws nominal non-operating power from
the AC outlet with its STANDBY/ON switch in the standby
position.
< The apparatus should be located close enough to the AC
outlet so that you can easily grasp the power cord plug at
any time.
< An apparatus with Class
!
construction shall be connected to
an AC outlet with a protective grounding connection.
< Batteries (battery pack or batteries installed) shall not be
exposed to excessive heat such as sunshine, fire or the like.
< Excessive sound pressure from earphones and headphones
can cause hearing loss.

3
ENGLISH
CONTENTS
CONTENTS.................................................................................................................................................................
3
System Connections .................................................................................................................................................. 4
Front Panel & Remote Controls ................................................................................................................................. 7
• REMOTE CONTROL OPERATION RANGE ............................................................................................................................ 9
• LOADING BATTERIES ............................................................................................................................................................. 9
Operations ................................................................................................................................................................ 10
• LISTENING TO A PROGRAM SOURCE ............................................................................................................................... 10
• LISTENING TO RADIO BROADCASTS ................................................................................................................................. 14
• LISTENING TO RDS BROADCASTS (FM ONLY) ................................................................................................................. 17
(RDS Tuner (Regional Option for some countries in Europe, etc))
• RECORDING .......................................................................................................................................................................... 20
• OTHER FUNCTIONS ............................................................................................................................................................. 20
• SUB ZONE PLAYBACK ......................................................................................................................................................... 21
Troubleshooting Guide ............................................................................................................................................. 23
Specifications ........................................................................................................................................................... 24
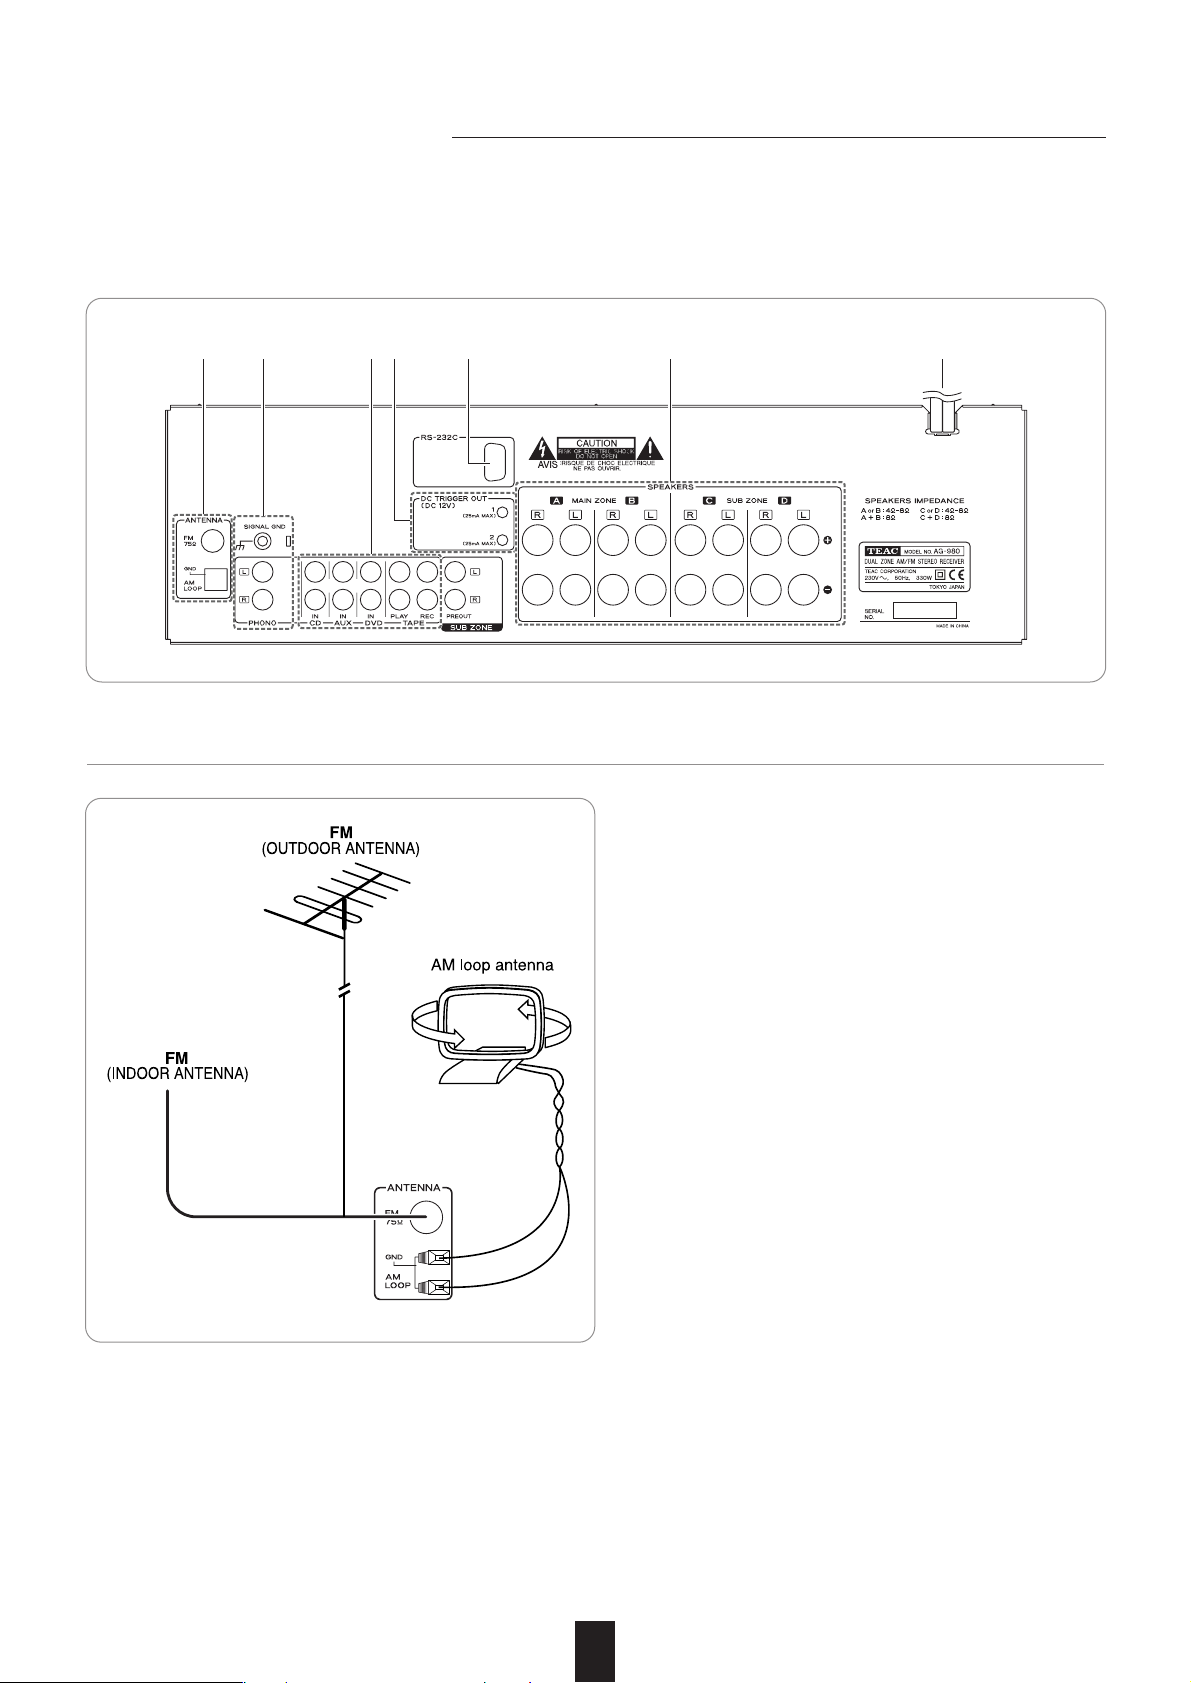
4
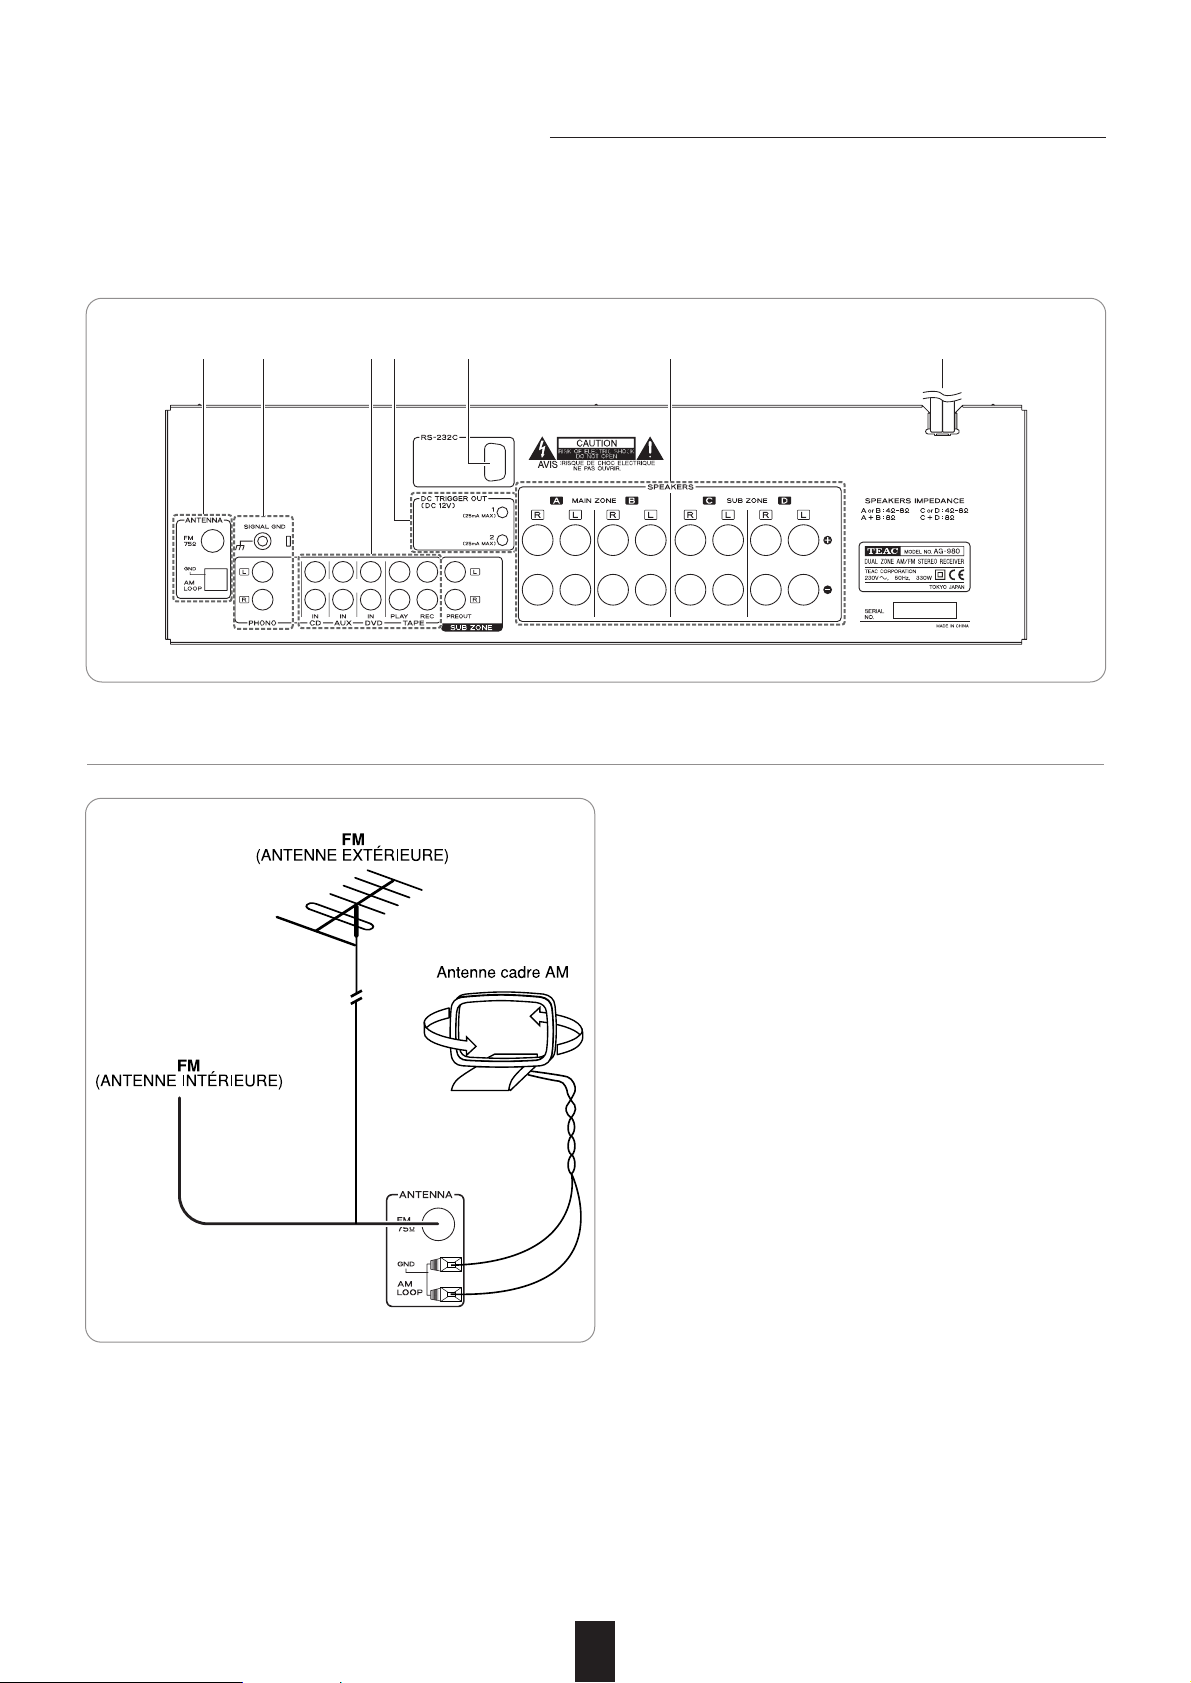
System Connections
• Do not plug the AC input cord into the wall AC outlet until all connections are completed.
• Be sure to connect the white RCA pin cords to the L (left) and the red RCA pin cords to the R (right) jacks when making audio
connections.
• Make connections firmly and correctly. If not, it can cause loss of sound, noise or damage to the receiver.
1 2 4 53 6 7
• Change the position of the FM indoor antenna until you
get the best reception of your favorite FM stations.
• A 75Ω outdoor FM antenna may be used to further
improve the reception. Disconnect the indoor antenna
before replacing it with the outdoor one.
• Place the AM loop antenna as far as possible from the
receiver, TV set, speaker cords and the AC input cord and
set it to a direction for the best reception.
• If the reception is poor with the AM loop antenna, an AM
outdoor antenna can be used in place of the AM loop
antenna.
1. CONNECTING ANTENNAs
5
ENGLISH
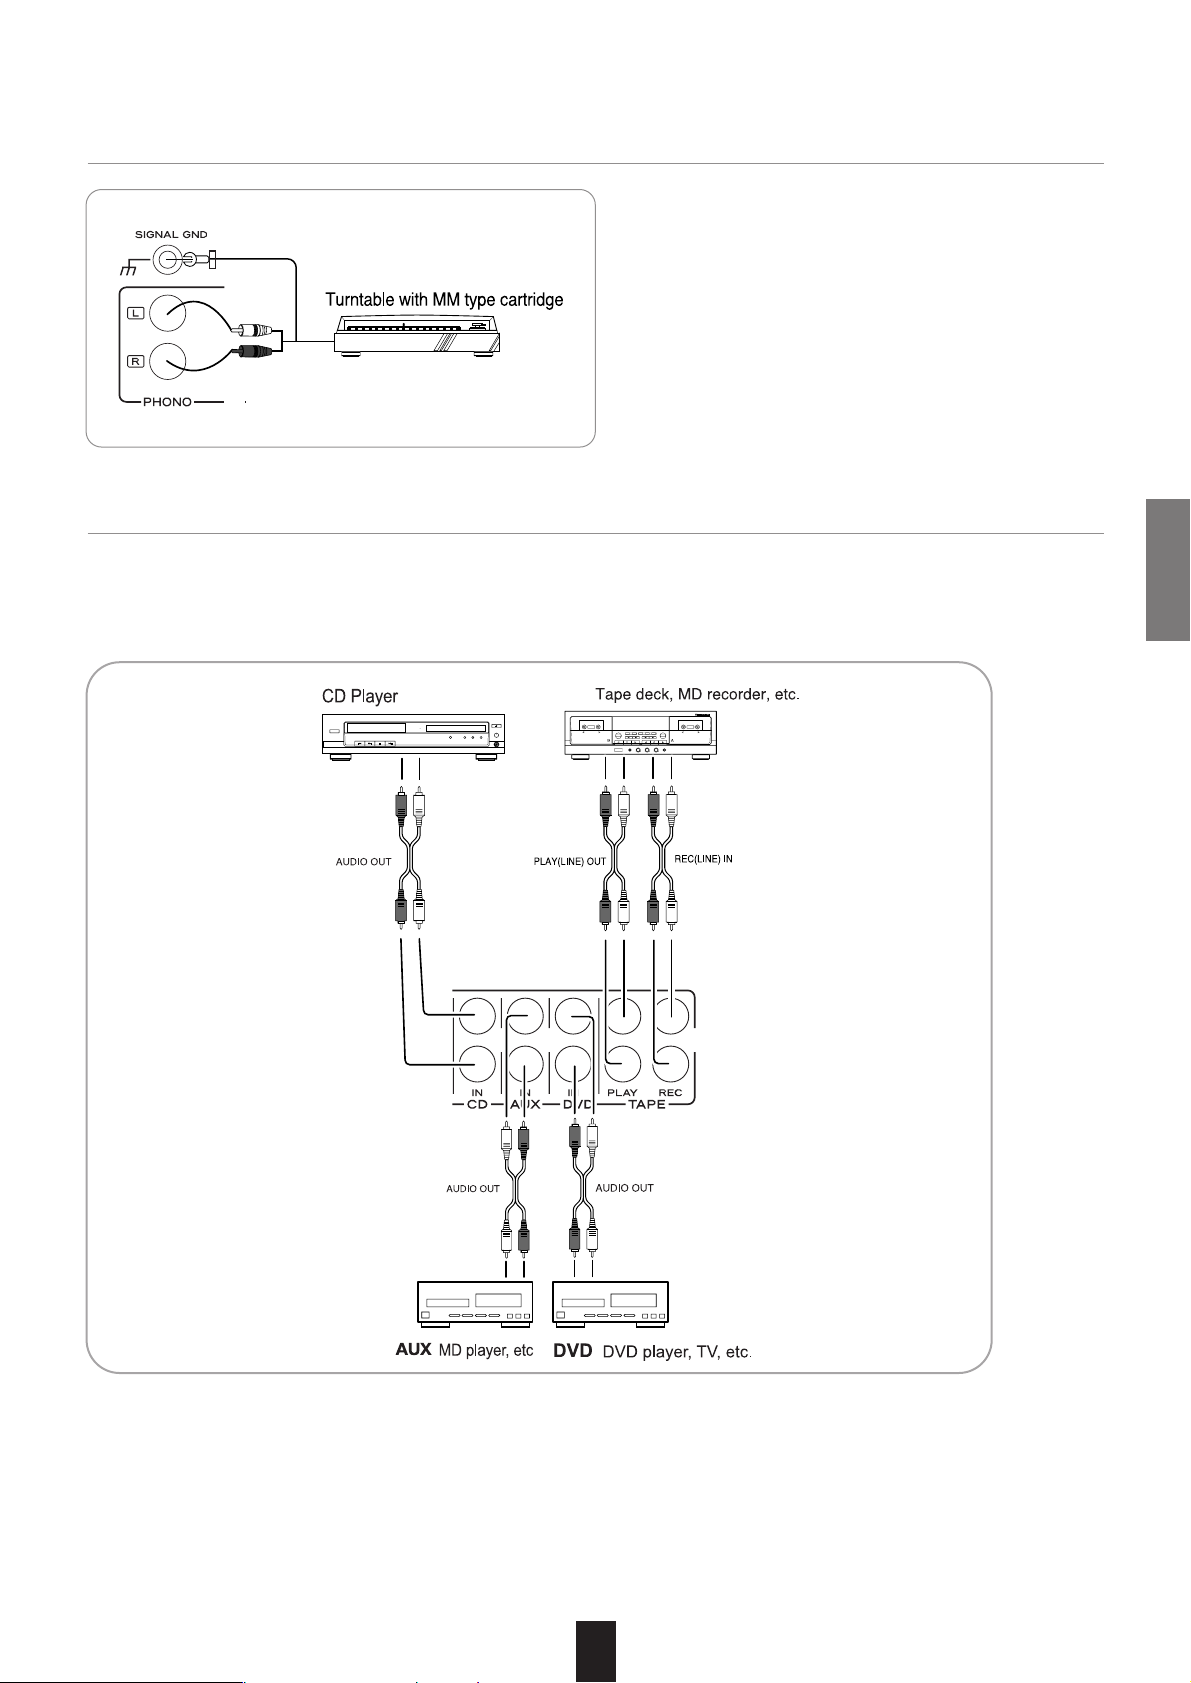
TAPE
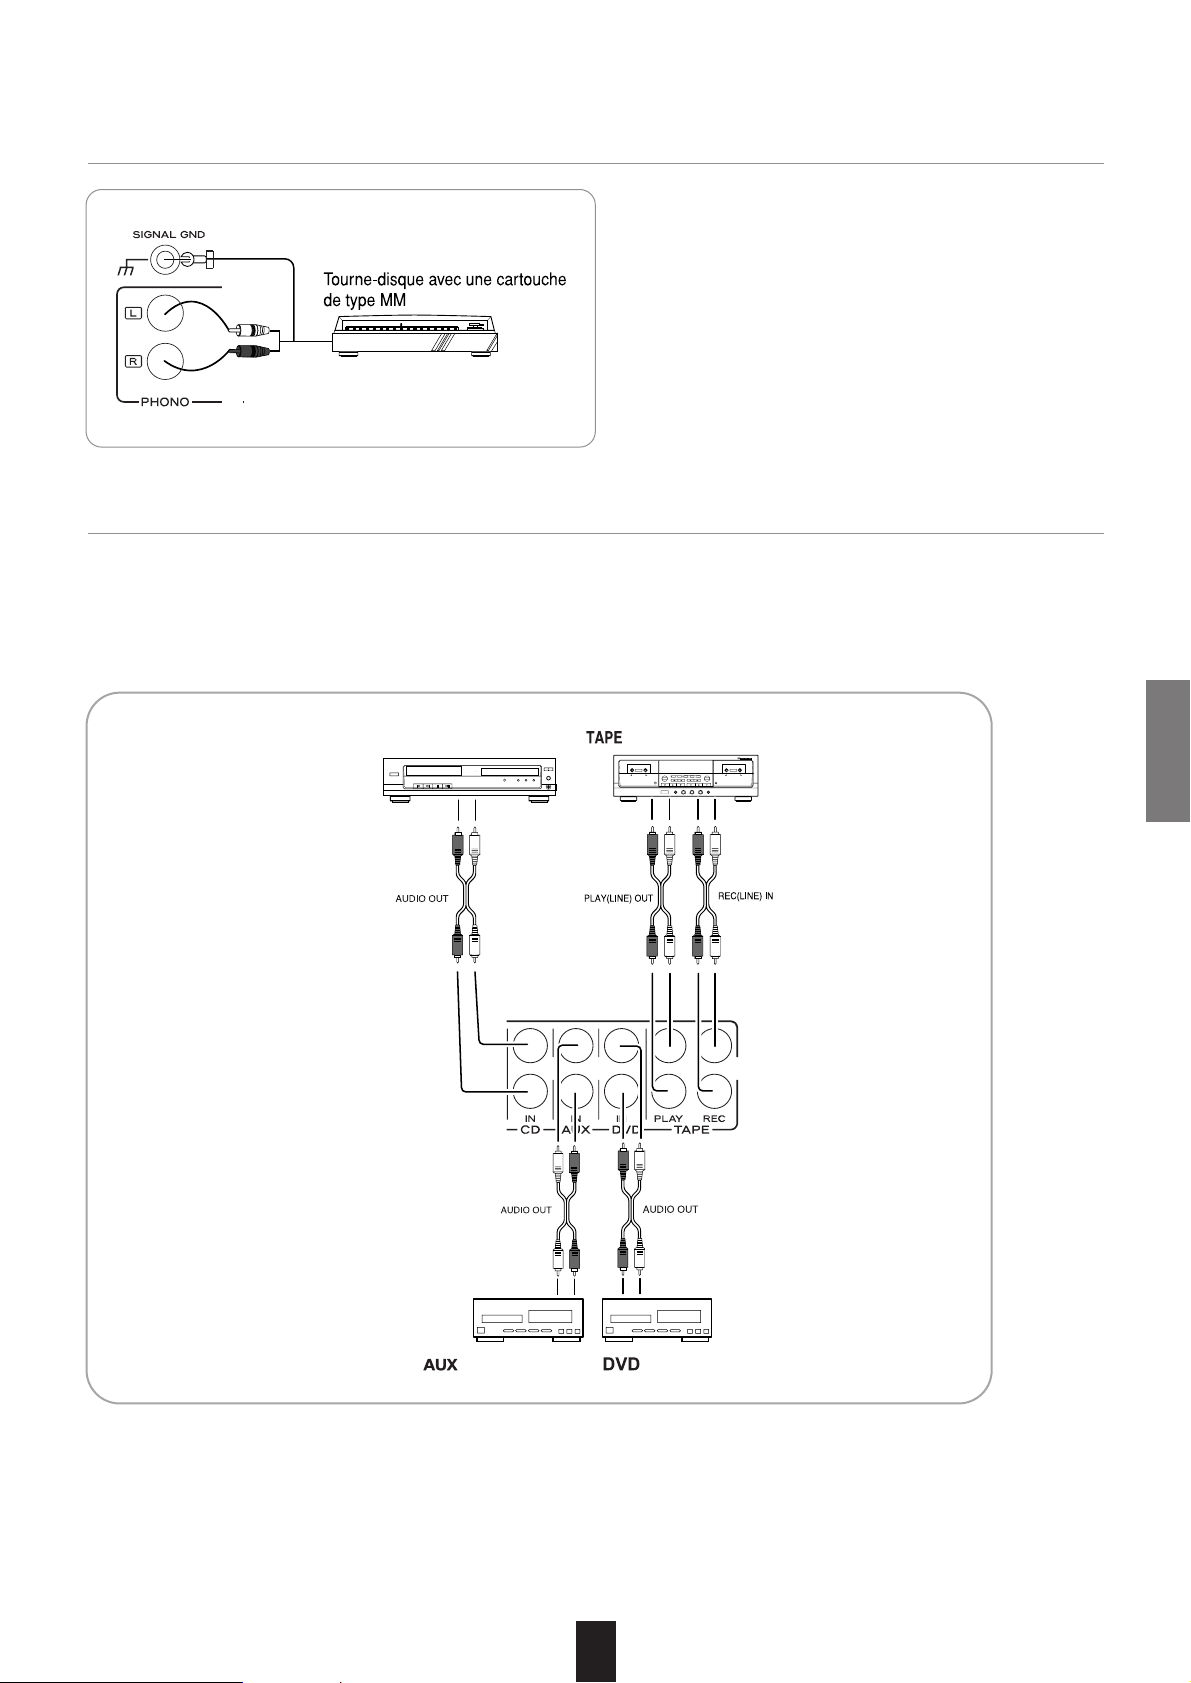
3. CONNECTING AUDIO COMPONENTS
• The AUX jacks may also be connected to an additional component.
• The DVD jacks may be connected to AUDIO OUT jacks of video components such as DVD player, TV, etc.
• The TAPE PLAY/REC jacks can be connected to audio recording equipment such as a tape deck, an MD recorder, etc.
2. CONNECTING PHONO
∑Note
• Do not connect the turntable with MC type cartridge directly.
If so, use a separate head amplifier or step-up transformer.
6
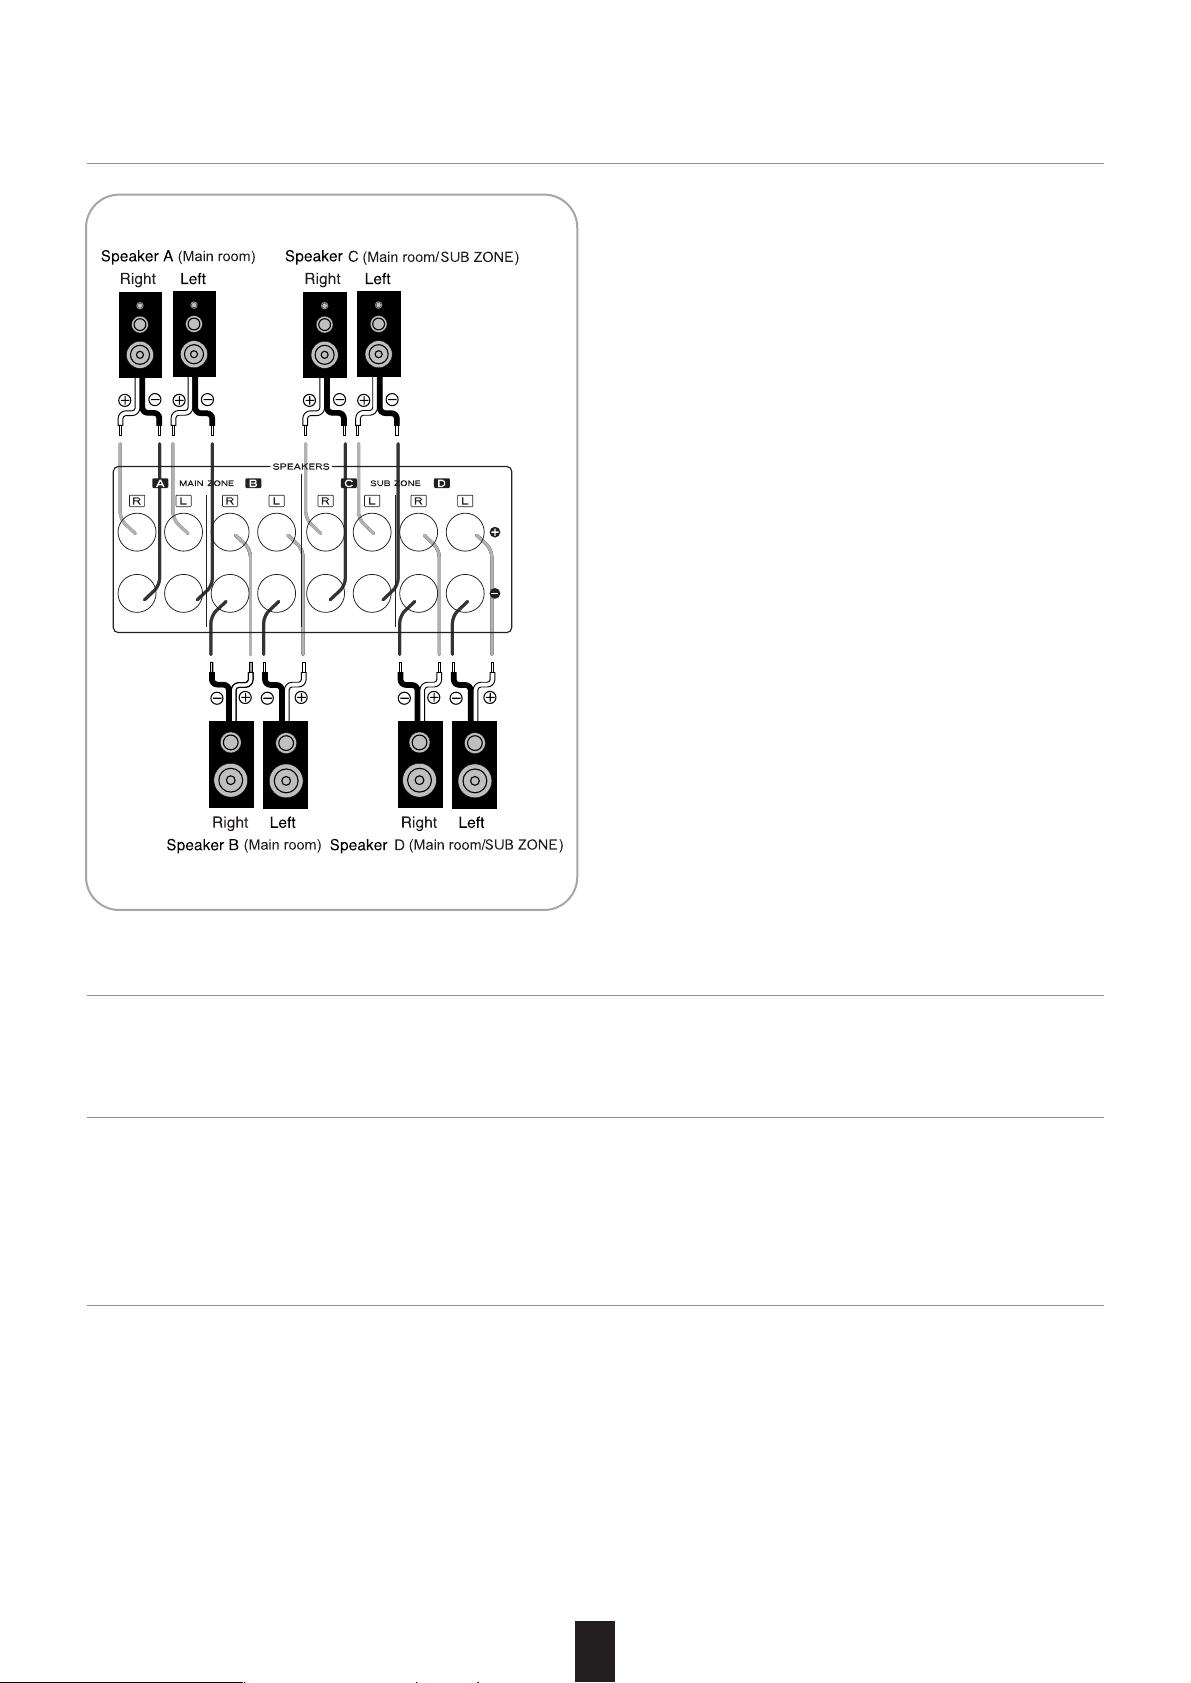
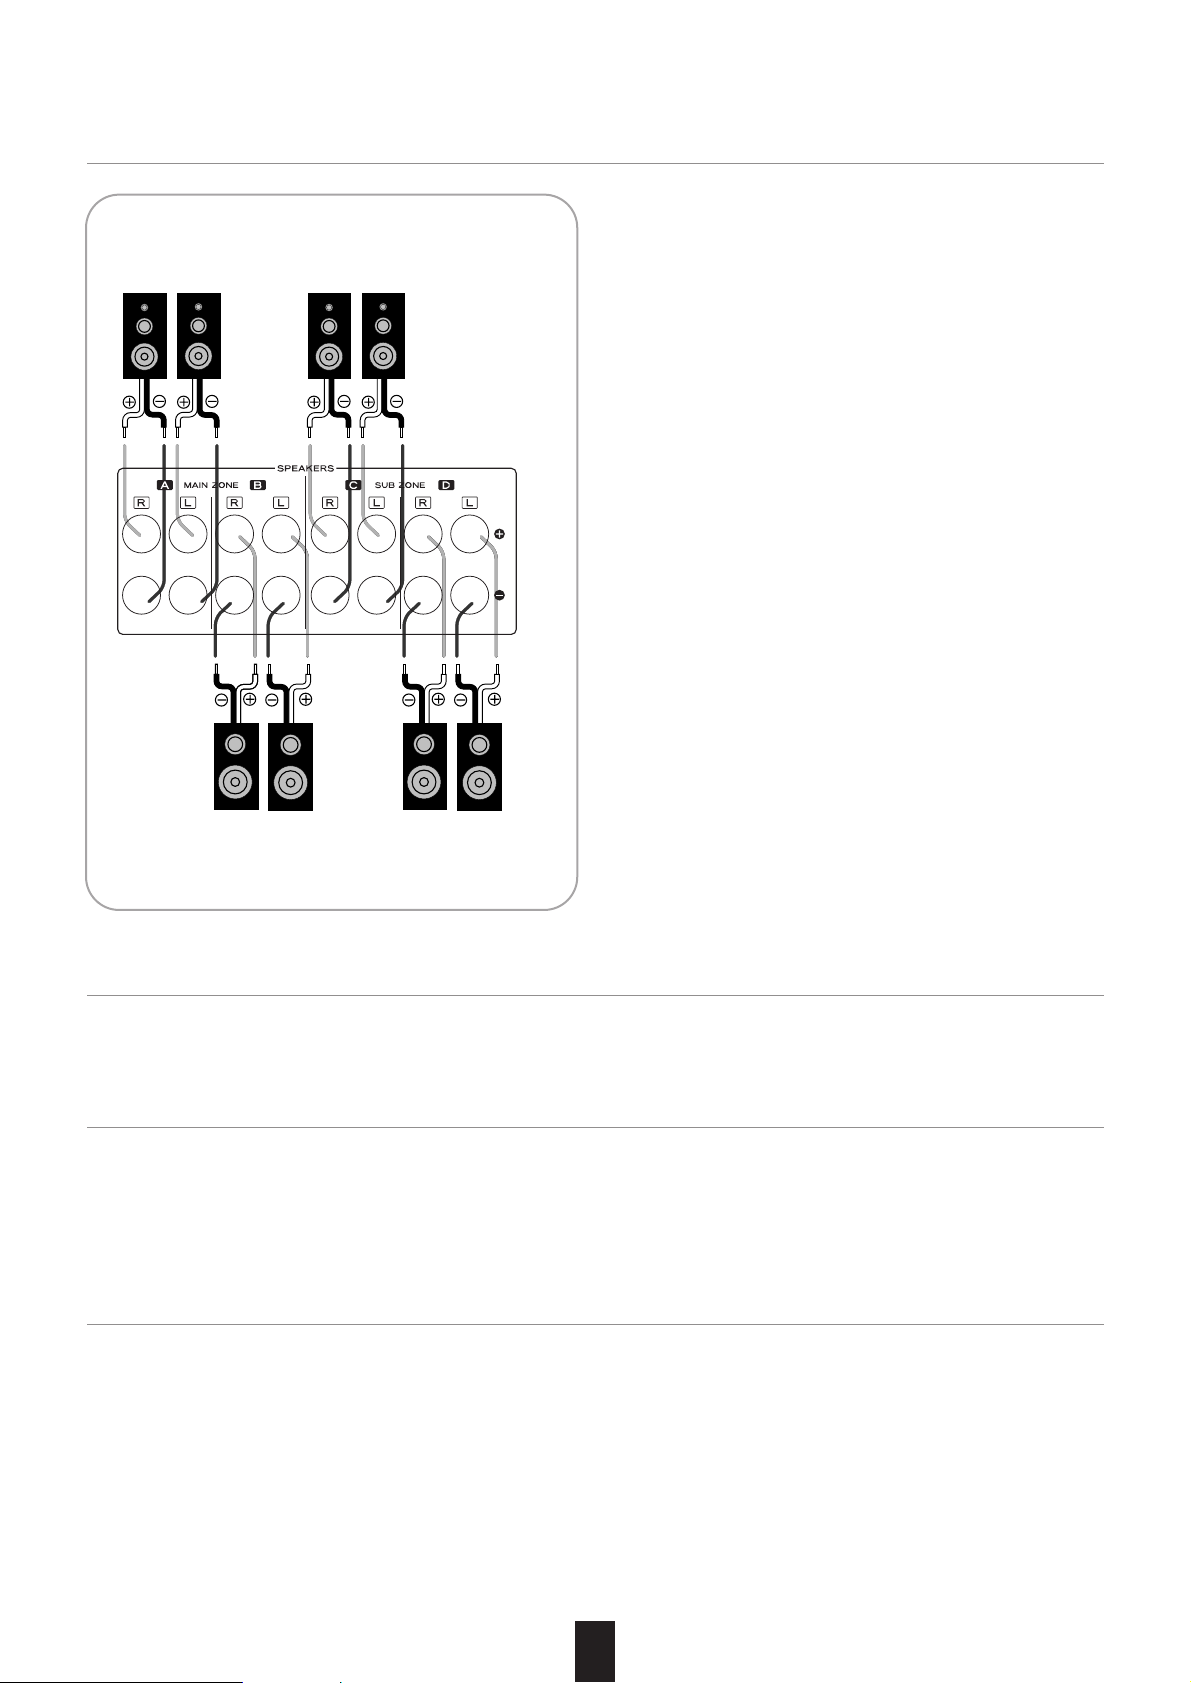
• You can connect up to four pairs of speakers to this receiver and select the various combinations of speakers according to your tastes.
• The speakers C and D can be installed in the main room as
the speakers A and B can or in the another room (SUB
ZONE) for SUB ZONE playback. (For details, refer to "SUB
ZONE PLAYBACK" on page 21.)
• Be sure to connect speakers firmly and correctly according
to the channel (left and right) and the polarity (+ and -).
• If the connections are faulty, no sound will be heard from
the speakers, and if the polarity of the speaker connection
is incorrect, the sound will be unnatural and lack bass.
∑Notes :
• For safe amplifier operation, use the speakers with impedance of over 4Ω when you connect a pair terminals of
SPEAKER A or B terminals and a pair terminals of SPEAKER C or D terminals and use the speakers with impedance
of over 8Ω when you connect both SPEAKER A and B terminals or/and both SPEAKER C and D terminals.
• Do not let the bare speaker wires touch each other or any
metal part of this receiver. This could damage this receiver
and/or the speakers.
4. CONNECTING SPEAKERS
5. AC INPUT CORD
• Plug the cord into an wall AC outlet.
6. DC TRIGGER OUT
• When the DC TRIGGER OUT button is pressed, “INPUT”-TRIG ON is displayed for a few minutes, and then 12 V (25mA max)
is output.
• Press the DC TRIGGER OUT button again, “INPUT”-TRIG OFF is displayed for a few minutes, and then output will be disabled.
7. RS-232C
• Used for a wired RS-232C standard remote control unit (optional).
7
ENGLISH
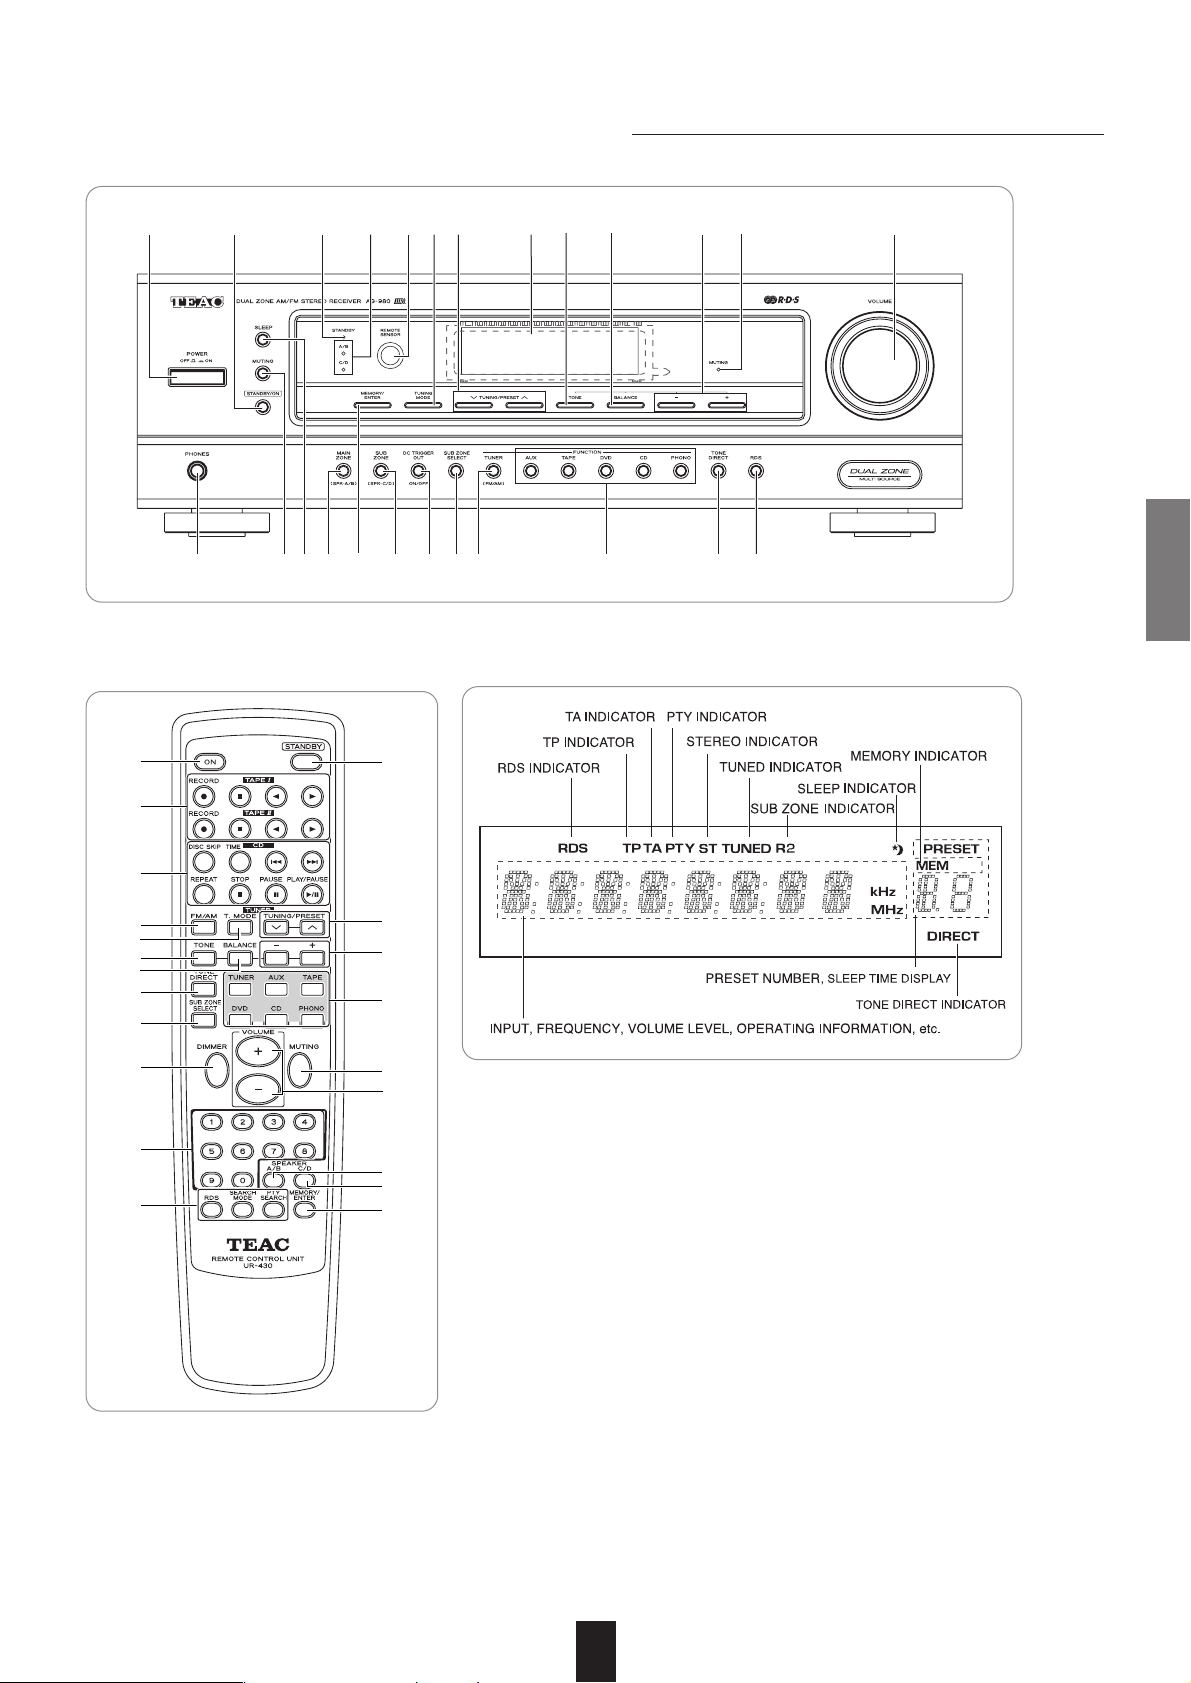
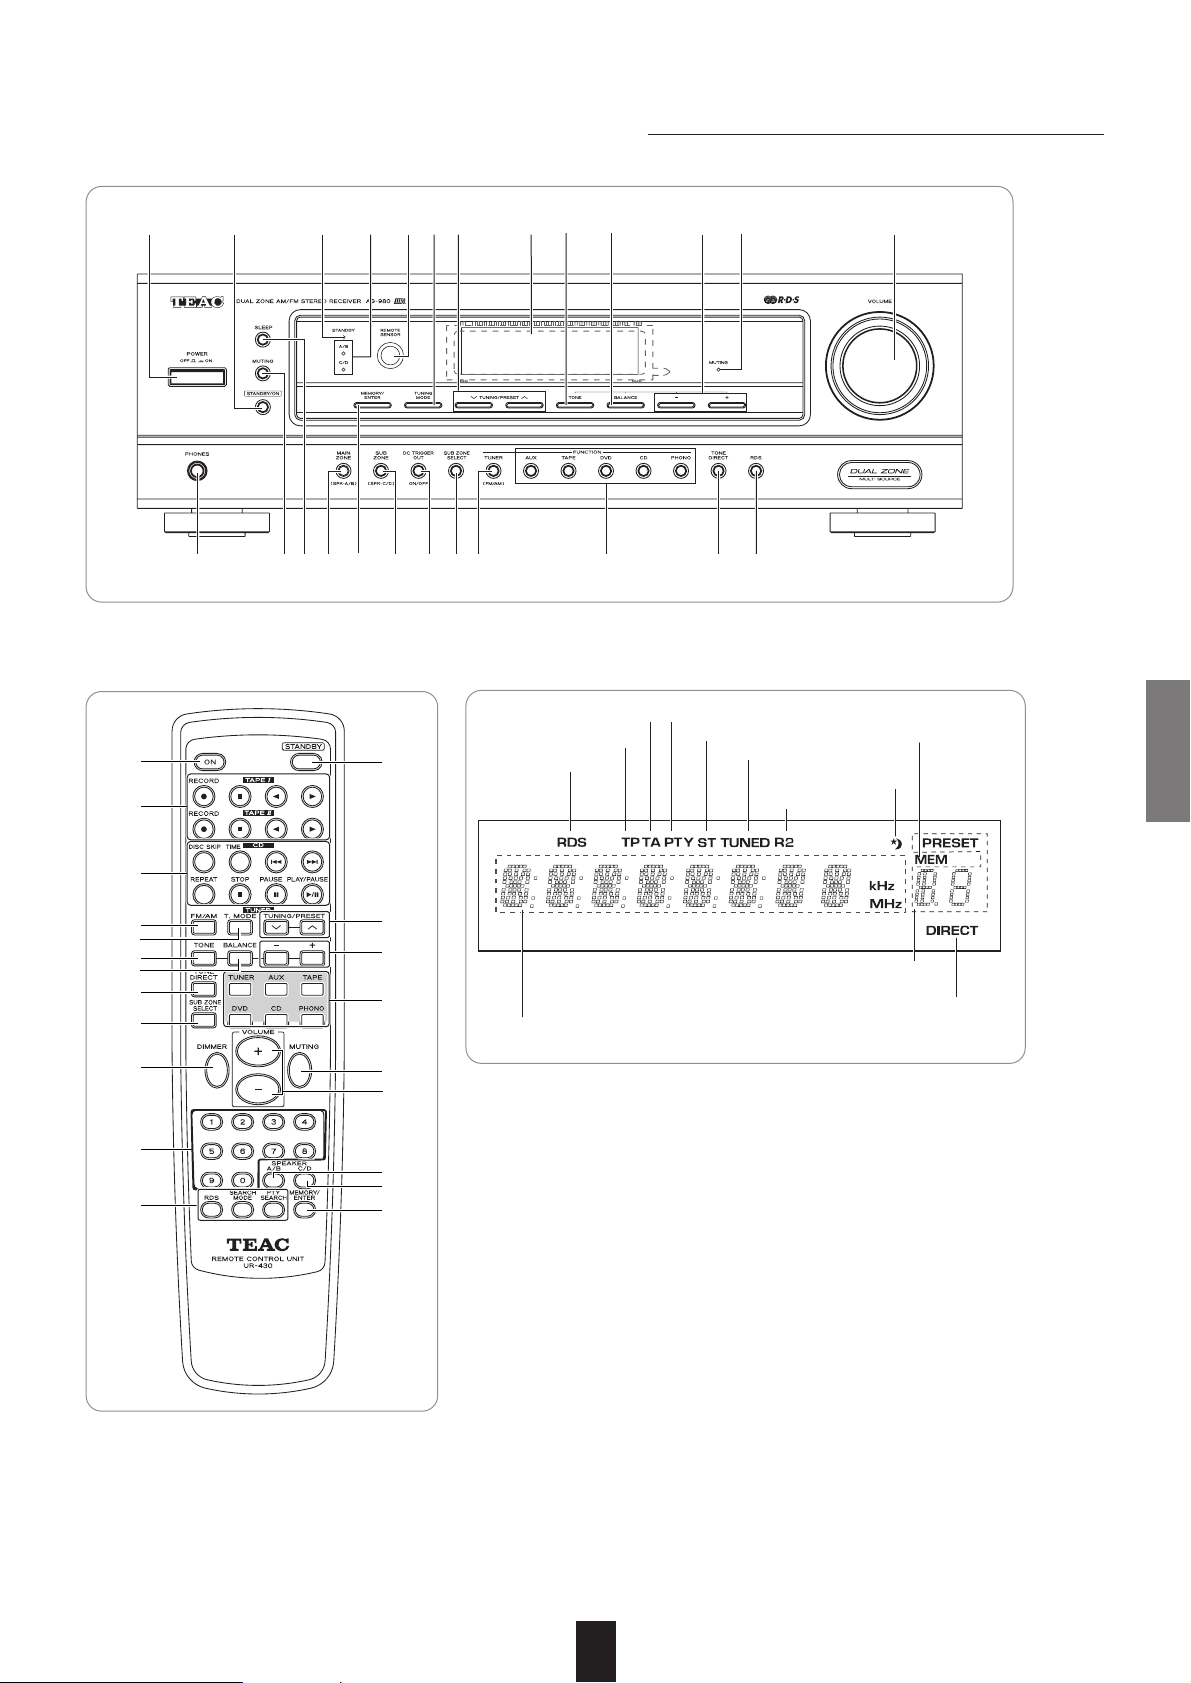
Front Panel & Remote Controls
∑REMOTE CONTROLS
13 42822 1617 23 12 13 14 18
24
119810
29
3015 765 1920
2
26
3
17
27
8
16
13
12
11
10
21
24
14
9
19
7
15
6
18
25
∑FLUORESCENT DISPLAY
∑FRONT PANEL
8
1. POWER SWITCH
Push this switch to enter the standby mode.
To switch the power off, push again this switch.
2. POWER ON BUTTON
In the standby mode, when this button is pressed, the unit
is turned on to enter the operating mode.
3. STANDBY BUTTON
In the operating mode, when this button is pressed, the unit
is turned off to enter the stnadby mode.
4. STANDBY INDICATOR
5. HEADPHONE JACK
Stereo headphones with a standard 1/4 inch plug can be
plugged into this jack for private listening.
6. MAIN ZONE SPEAKER (A/B) SELECTOR BUTTON
Each time this button is pressed, the speakers are switched
on or off as follows :
( ) : When the SUB ZONE mode is set to on.
7. SUB ZONE SPEAKER (C/D) SELECTOR BUTTON
Each time this button is pressed, the speakers are switched
on or off as follows :
( ) : When the SUB ZONE mode is set to on.
8. FM/AM SELECTOR BUTTON
Each time the FM/AM button is pressed, the band changes
as follows:
9. INPUT SELECTOR BUTTONS (AUX, TAPE, DVD, CD, PHONO)
Press the button to select the desired input source.
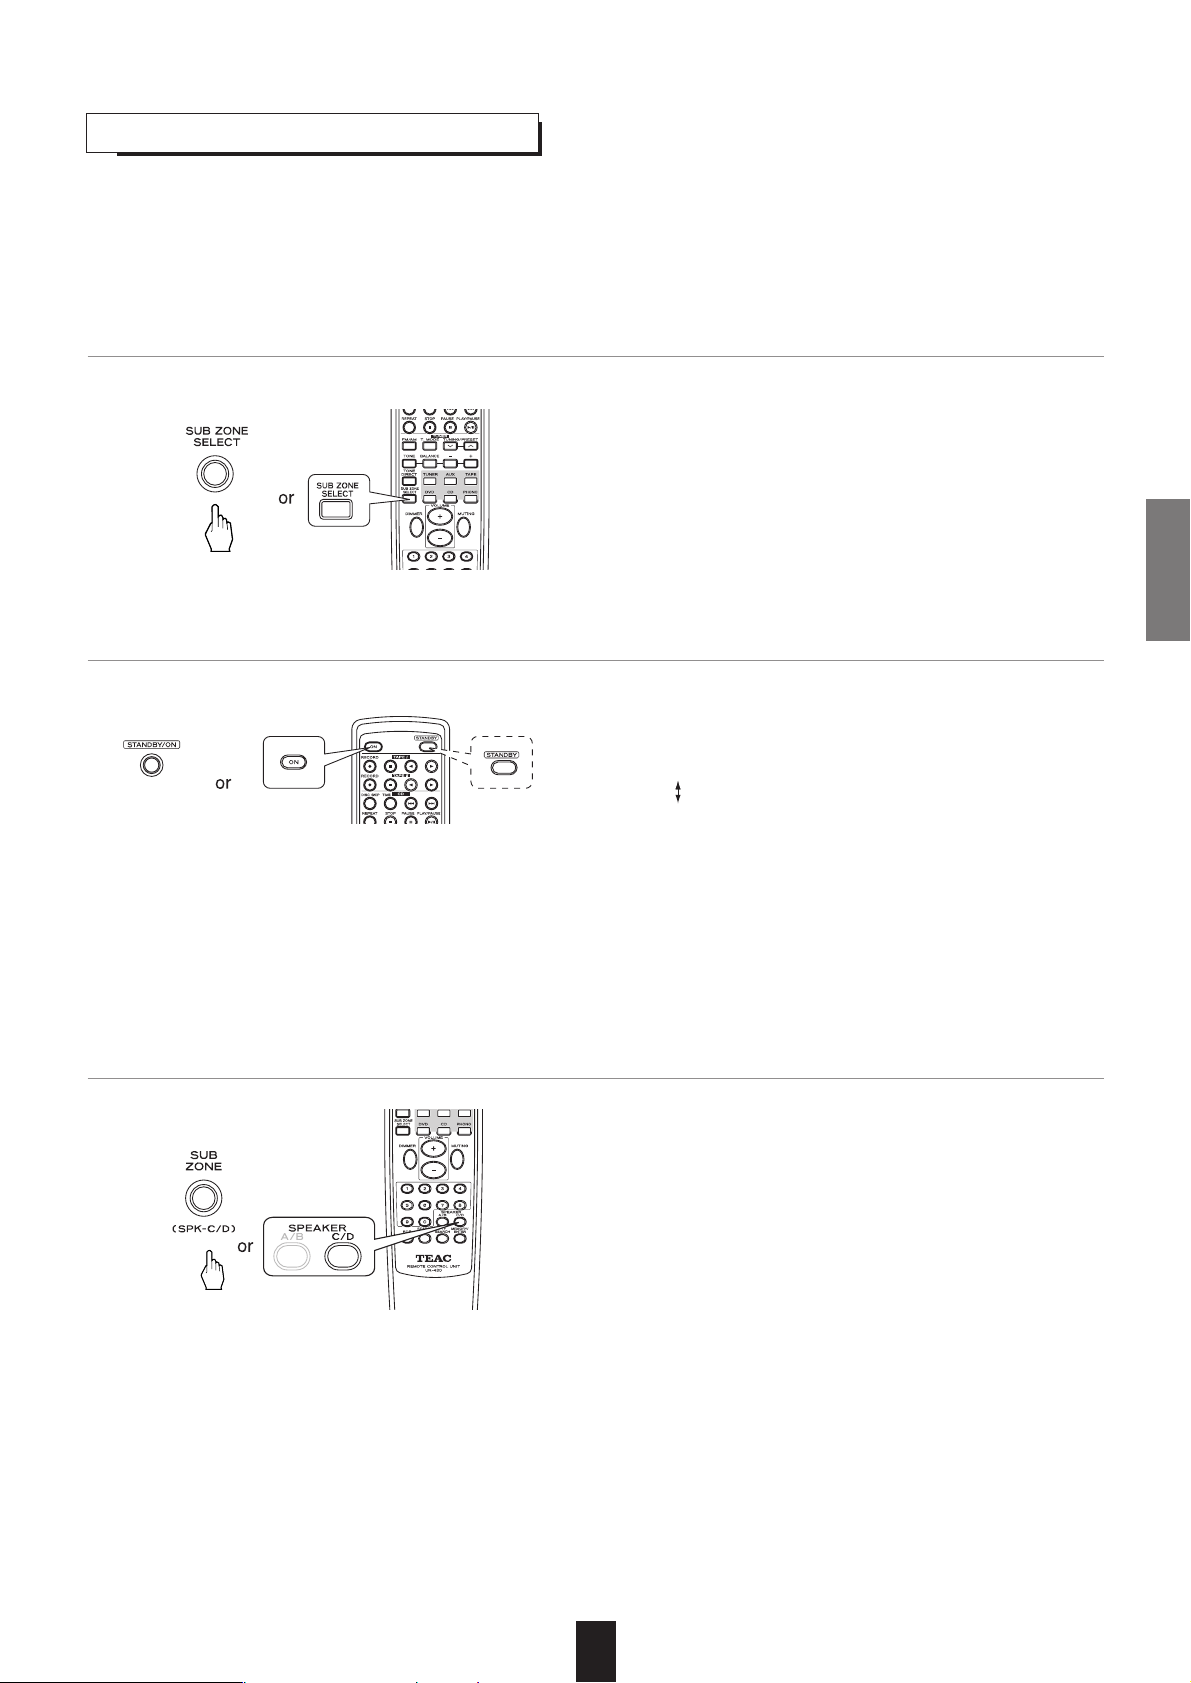
10. SUB ZONE SELECT BUTTON
Press this button to enter the SUB ZONE mode.
11. TONE DIRECT BUTTON
Press this button to listen to a program source without the
tone effect.
12. TONE BUTTON
When adjusting the tone (bass and treble), press this button to select the desired tone mode.
• Each time this button is pressed, the tone mode is
changed to bass or treble.
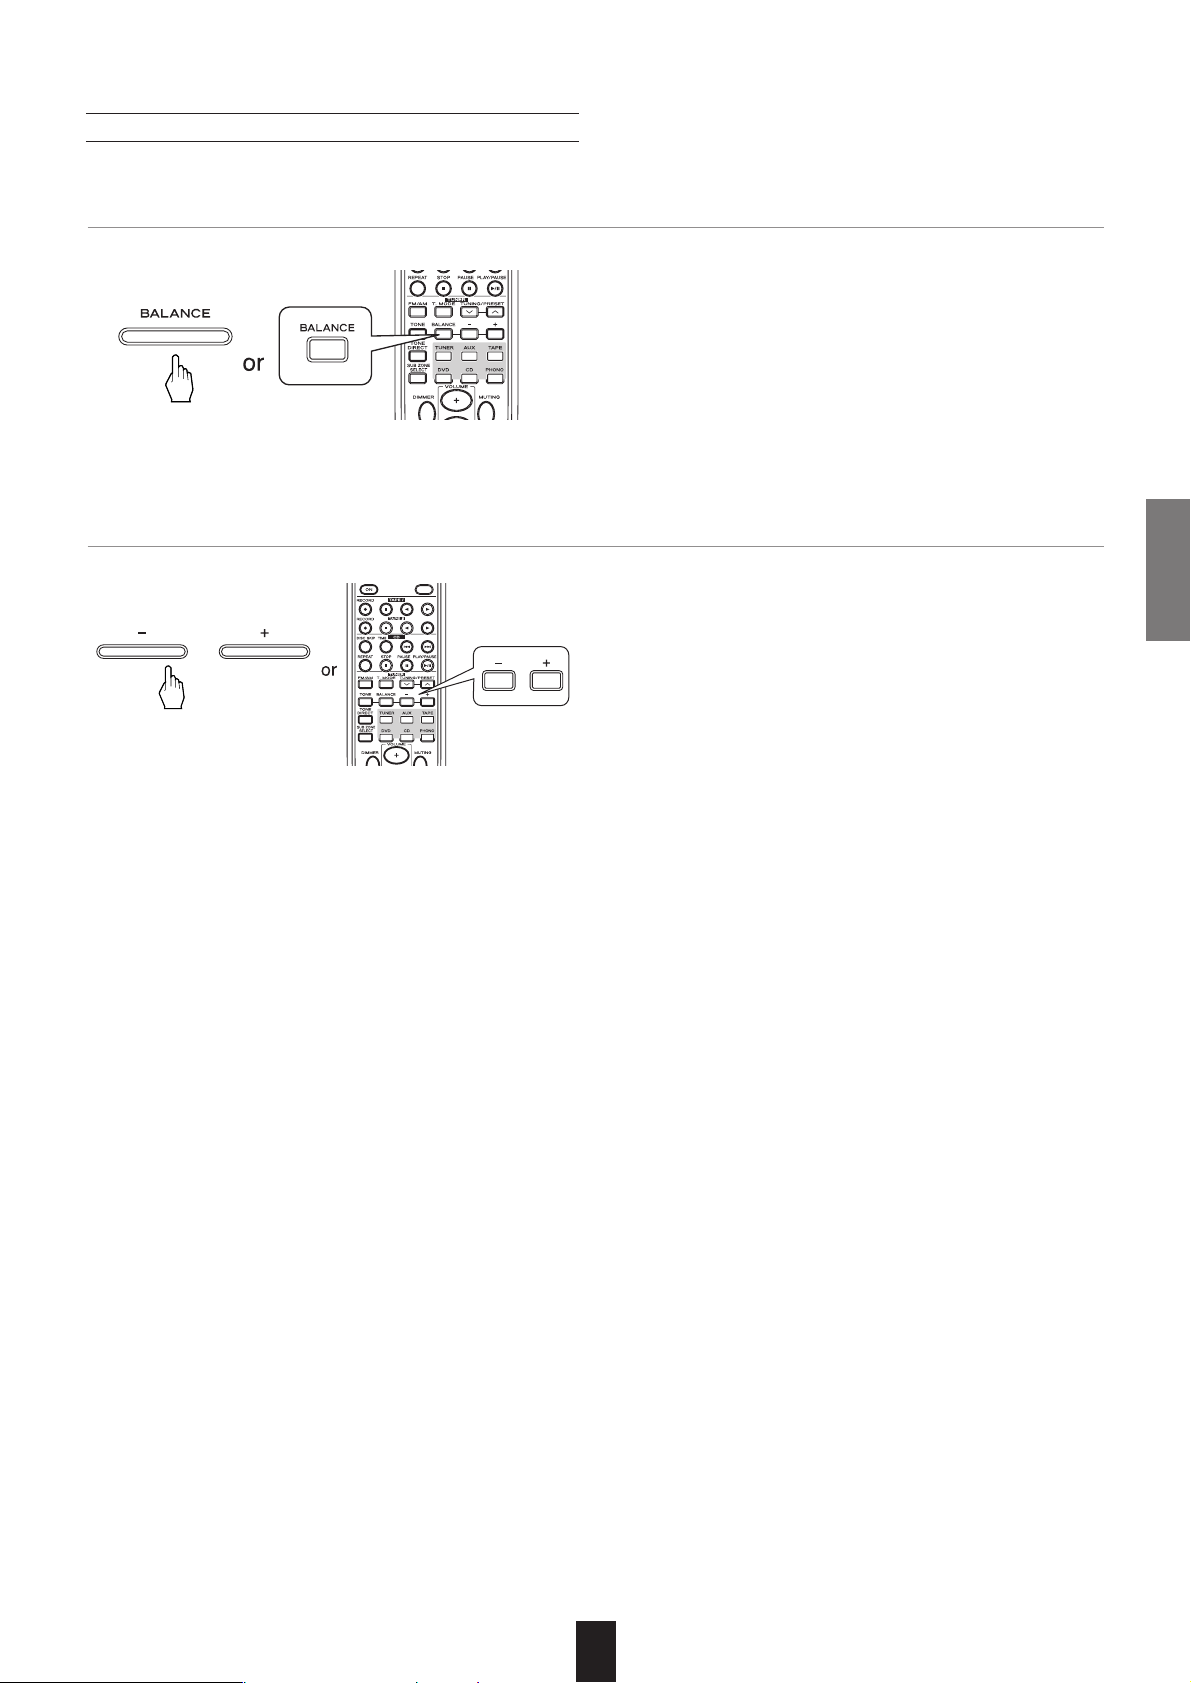
13. BALANCE BUTTON
When adjusting the sound volume balance, press this button to enter the balance mode.
FM ST FM MONO AM
~ C/D
or (R2 C/D)
~ - / -
or (R2 -/-)
~ C/ -
or (R2 C/-)
~ - /D
or (R2 -/D)
A/B ~
or (MAIN A/B)
- / - ~
or (MAIN -/-)
A/ - ~
or (MAIN A/-)
- /B ~
or (MAIN -/B)
14. BALANCE, TREBLE/BASS UP/DOWN (°/‡) BUTTONS
At the balance mode, adjust the sound volume balance
between left and right speakers with these buttons.
At the desired tone mode, adjust the tone as desired with
these buttons.
15. MEMORY/ENTER BUTTON
Press this button to store preset stations.
16. TUNING MODE BUTTON
Press this button to select the tuning mode or the preset
mode.
17. TUNING/PRESET UP/DOWN (°/‡) BUTTONS
Press these buttons to tune in the desired stations.
18. VOLUME CONTROL KNOB, UP/DOWN (°/‡) BUTTONS
Adjust the volume to a comfortable listening level with this
knob or these buttons.
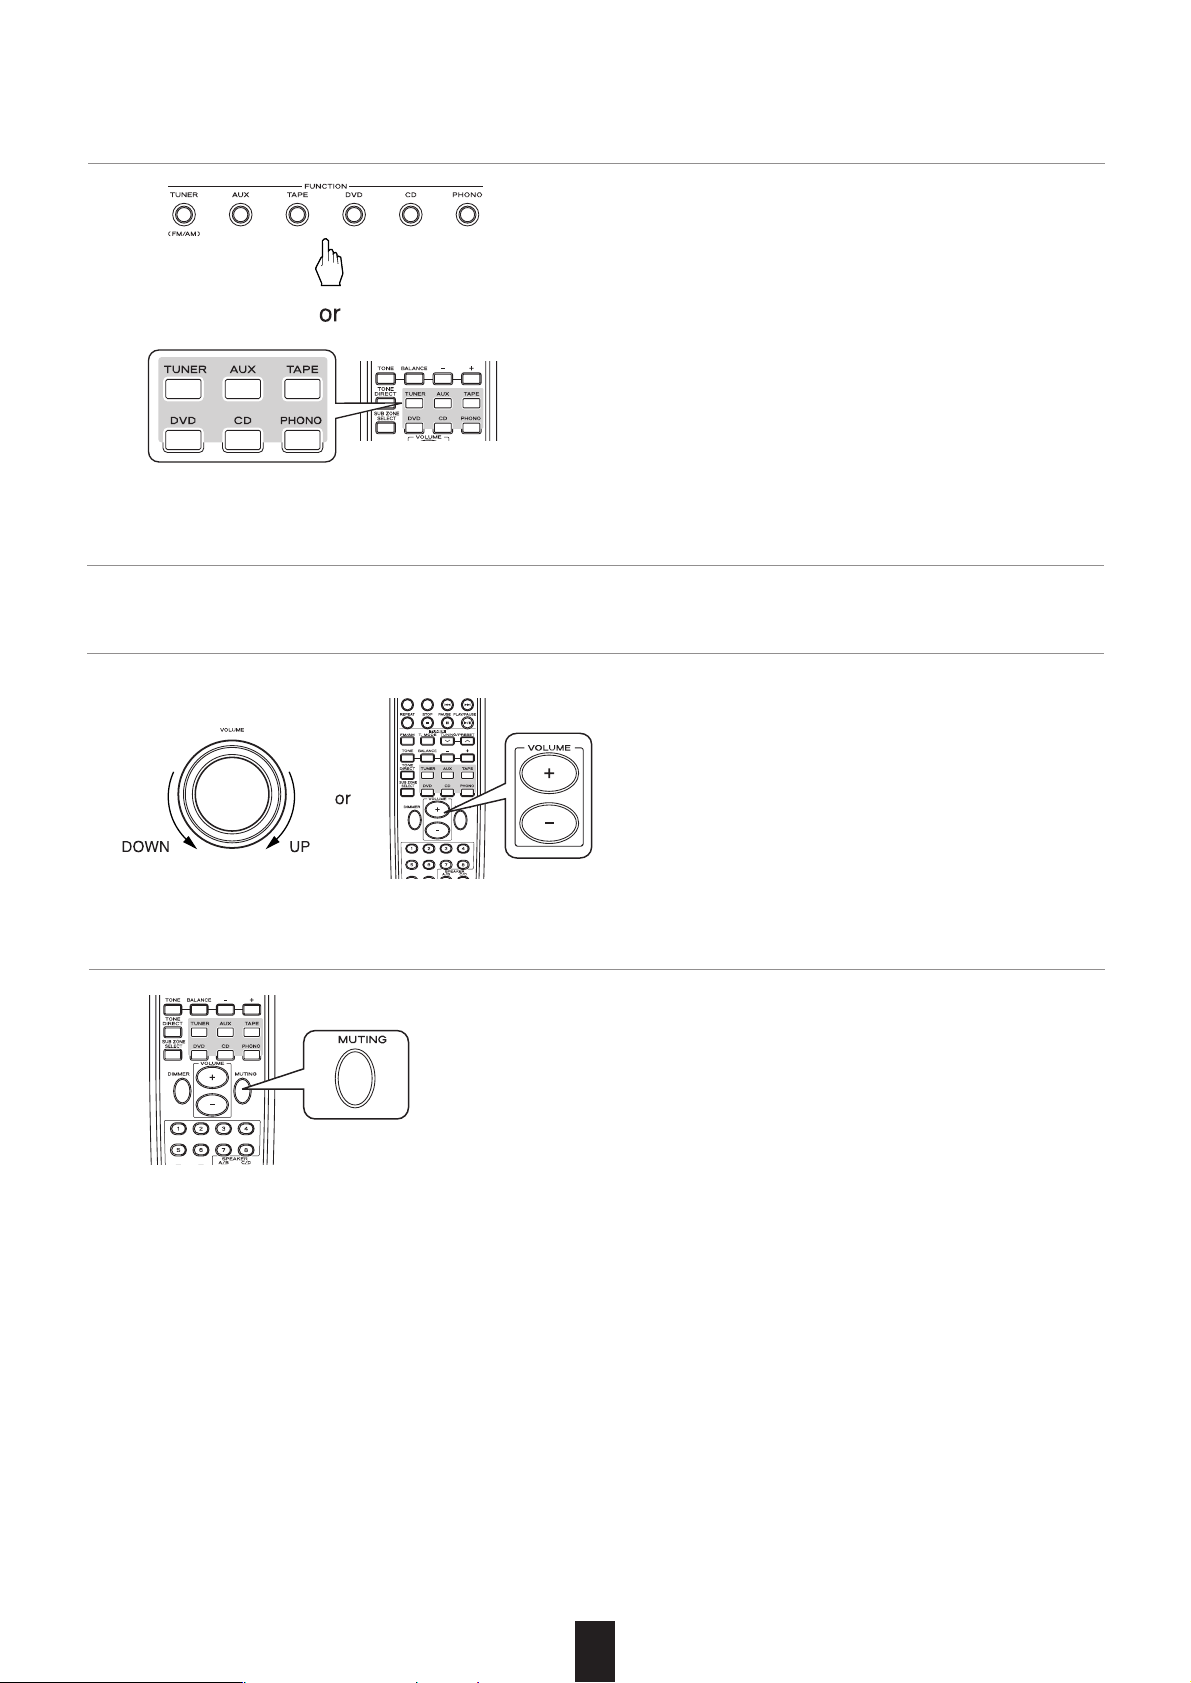
19. MUTING BUTTON
Press this button to temporarily mute the sound.
Press it again to resume the previous sound level.
20. SLEEP BUTTON
Press this button to activate the sleep timer for a specified
period of time.
• Each time this button is pressed, the sleep time changes
as follows:
21. DIMMER BUTTON (Remote Control)
Press this button to select the brightness of the fluorescent display as desired.
• Each time this button is pressed, the brightness of the
fluorescent display changes as follows:
22. REMOTE SENSOR
This receives the signals from the remote control unit.
23. FLUORESCENT DISPLAY
For details, see the previous page.
24. RDS BUTTONS (Regional option for Europe, etc.)
Use these buttons when listening to RDS broadcast.
For more information, refer to pages 17~19.
25. 10 KEY BUTTONS/TUNER PRESET CALL)
In tuner mode, use these buttons to select a preset channel.
26. TEAC TAPE DECK (I / II) OPERATION BUTTONS
27. TEAC CD PLAYER OPERATION BUTTONS
28. SPEAKER (A/B, C/D) INDICATOR
29. MAIN ZONE MUTING INDICATOR
30. DC TRIGGER OUT BUTTON
ON dimmer OFF
10 20 30
…
90 OFF
Unit : minutes
9
ENGLISH
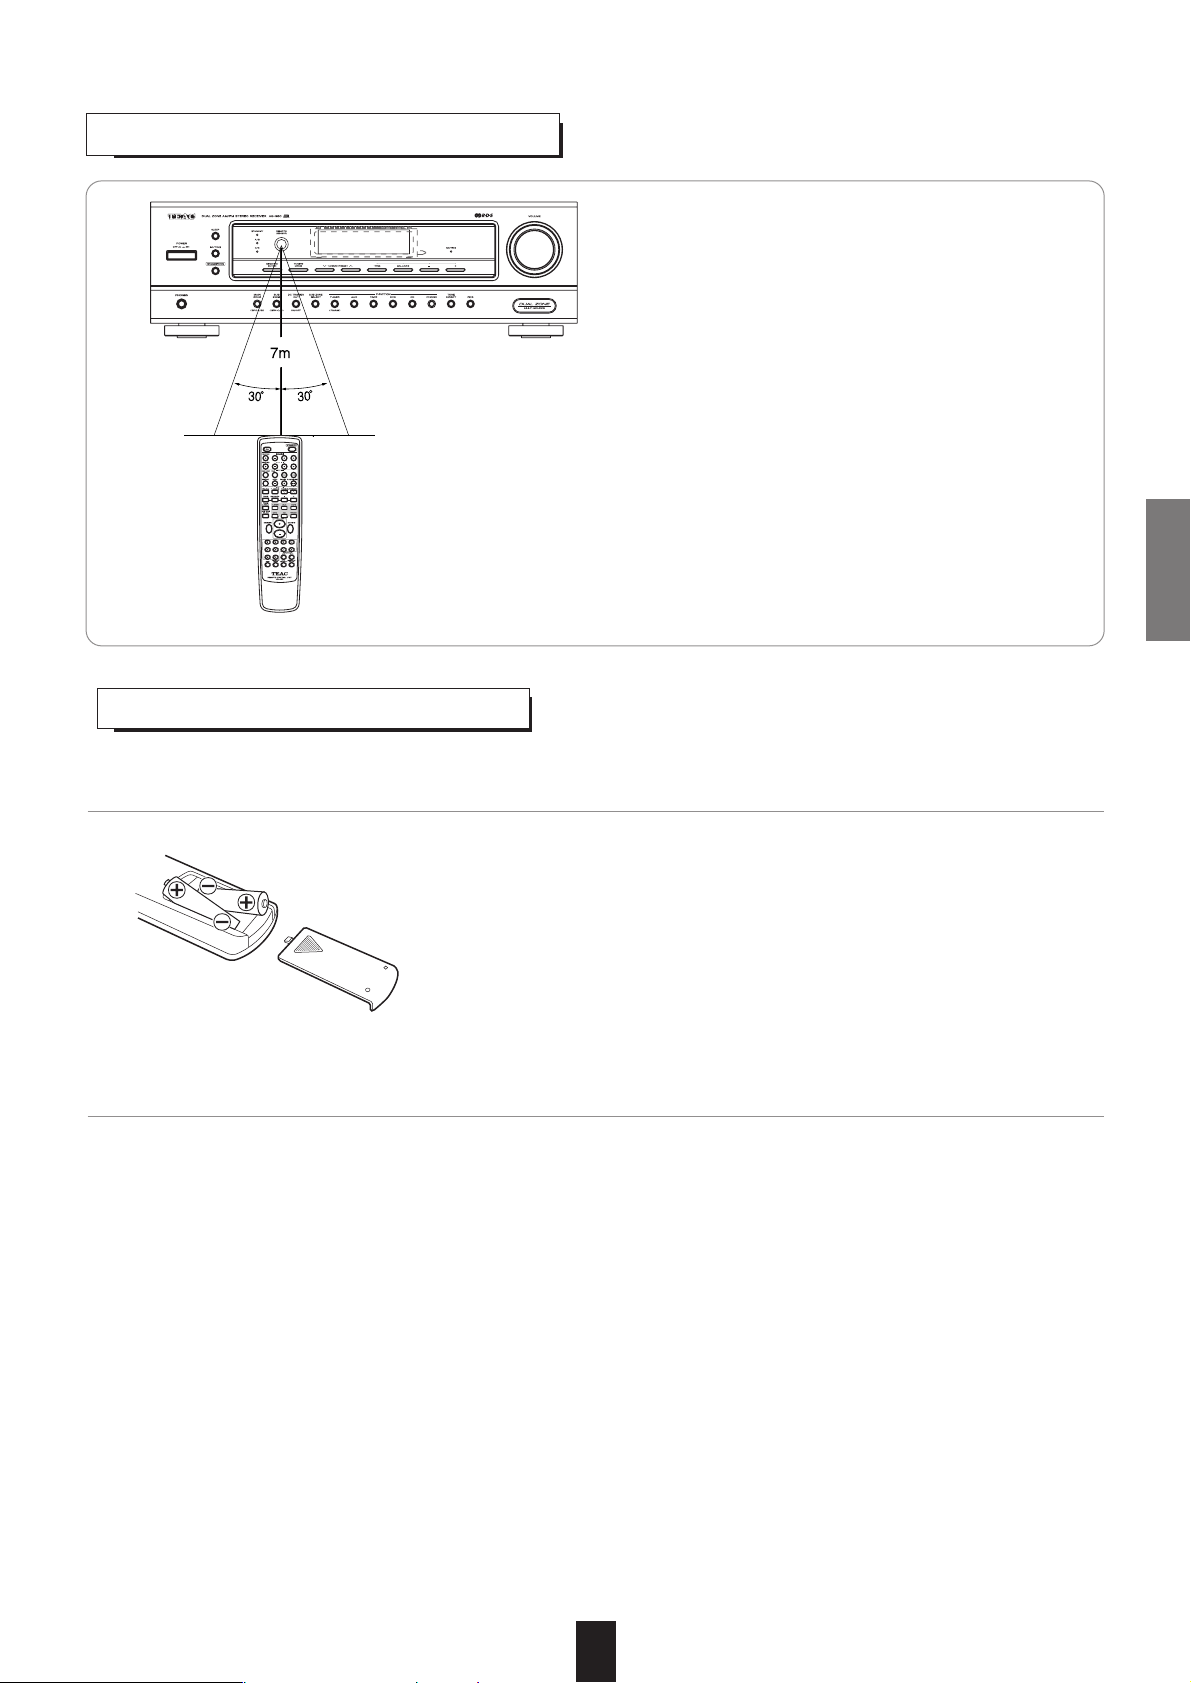
LOADING BATTERIES
REMOTE CONTROL OPERATION RANGE
• Use the remote control unit within a range of about
7 meters (23 feet) and angles of up to 30 degrees aiming
at the remote sensor.
• Remove the batteries when they are not used for a long
time.
• Do not use the rechargeable batteries (Ni-Cd type).
1. Remove the cover.
2. Load two batteries matching the polarity.

10
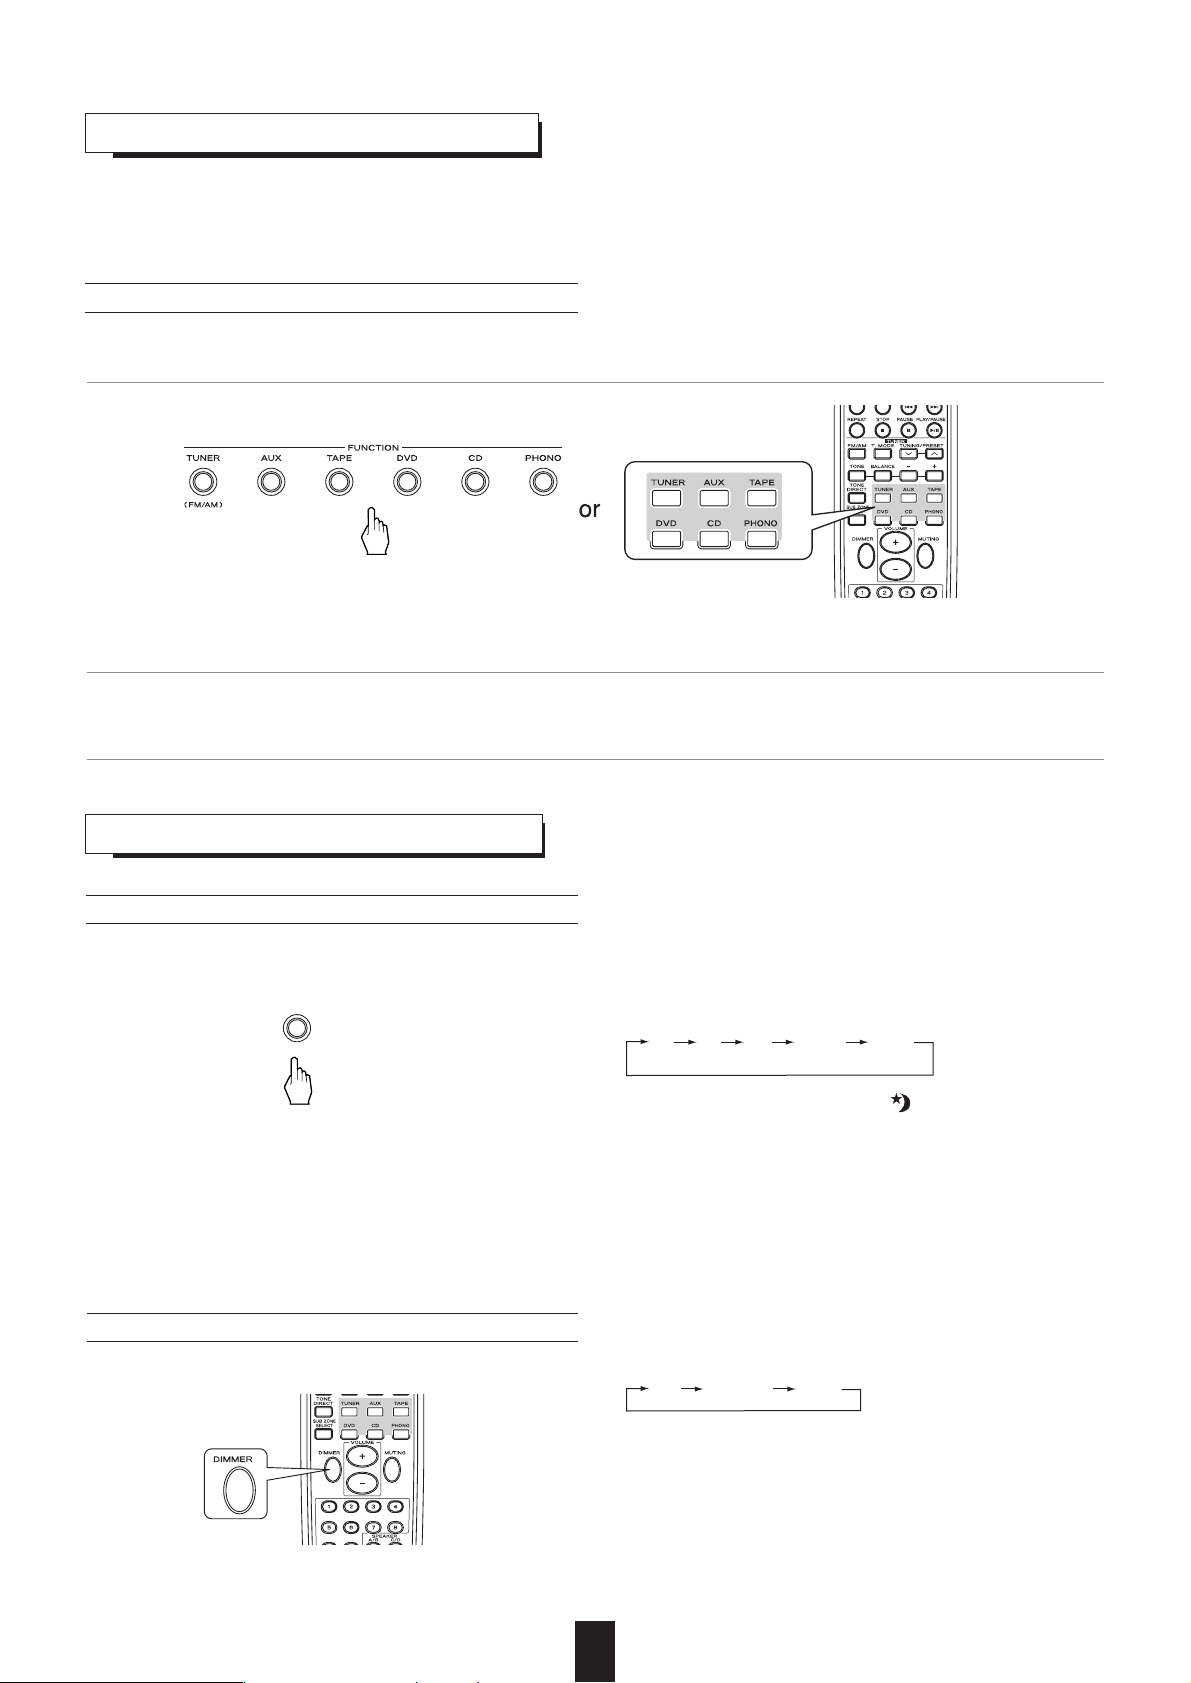
LISTENING TO A PROGRAM SOURCE
Operations
• Each time the STANDBY/ON button on the front panel, the
receiver is turned on to enter the operating mode or off to
enter the standby mode.
• On the remote control, press the ON button to enter the
operating mode or press the STANDBY button to enter the
standby mode.
1. In the standby mode, turn the power on.
• This unit enters the standby mode and the STANDBY indicator lights up.
This means that the receiver is not disconnected from the
AC mains and a small amount of current is retained to support the operation readiness.
• To switch the power off, push the POWER switch again. Then
the power is cut off and the STANDBY indicator turns off.
Before operation
• Push the POWER switch.
2
. Switch the desired speakers on.
• You can select the various combinations of speakers
depending on where the speakers C or/ and D are installed.
• Each time the MAIN ZONE SPEAKER (A/B) SELECTOR
button is pressed, the speakers are switched on or off as follows :
( ) : When the SUB ZONE mode is set to on.
• Each time the SUB ZONE SPEAKER (C/D) SELECTOR
button is pressed, the speakers are switched on or off as follows :
( ) : When the SUB ZONE mode is set to on.
• When using the headphones for private listening, switch off
all the speakers installed in the main room.
∑Note :
• To use SUB ZONE function, you should install speakers C
or/and D in another room (SUB ZONE) and set the SUB
ZONE mode to on. (For details, refer to "CONNECTING
SPEAKERS" on page 6 and "SUB ZONE PLAYBACK" on
page 21.)
~ C/D
or (R2 C/D)
~ - / -
or (R2 -/-)
~ C/ -
or (R2 C/-)
~ - /D
or (R2 -/D)
A/B ~
or (MAIN A/B)
- / - ~
or (MAIN -/-)
A/ - ~
or (MAIN A/-)
- /B ~
or (MAIN -/B)

11
ENGLISH
4. Operate the selected component for playback.
• Press the button to select the desired input source.
3. Select the desired input source.
• "MUTE" flickers. (Muting the MAIN ZONE)
• To resume the previous sound level, press this button again.
• When adjusting the volume, the mutting effect is turned off.
• Push the SUB ZONE SELECT button, then push the MUTING button.
• While the mute function for SUB ZONE is operating, "R2" is
flickering.
• To resume the previous sound level, press this button again.
6. To mute the sound.
5. Adjust the volume to a comfortable listening level.
• Be sure to switch off all the speakers installed in the main
room.
7. To listen with the headphones.
12
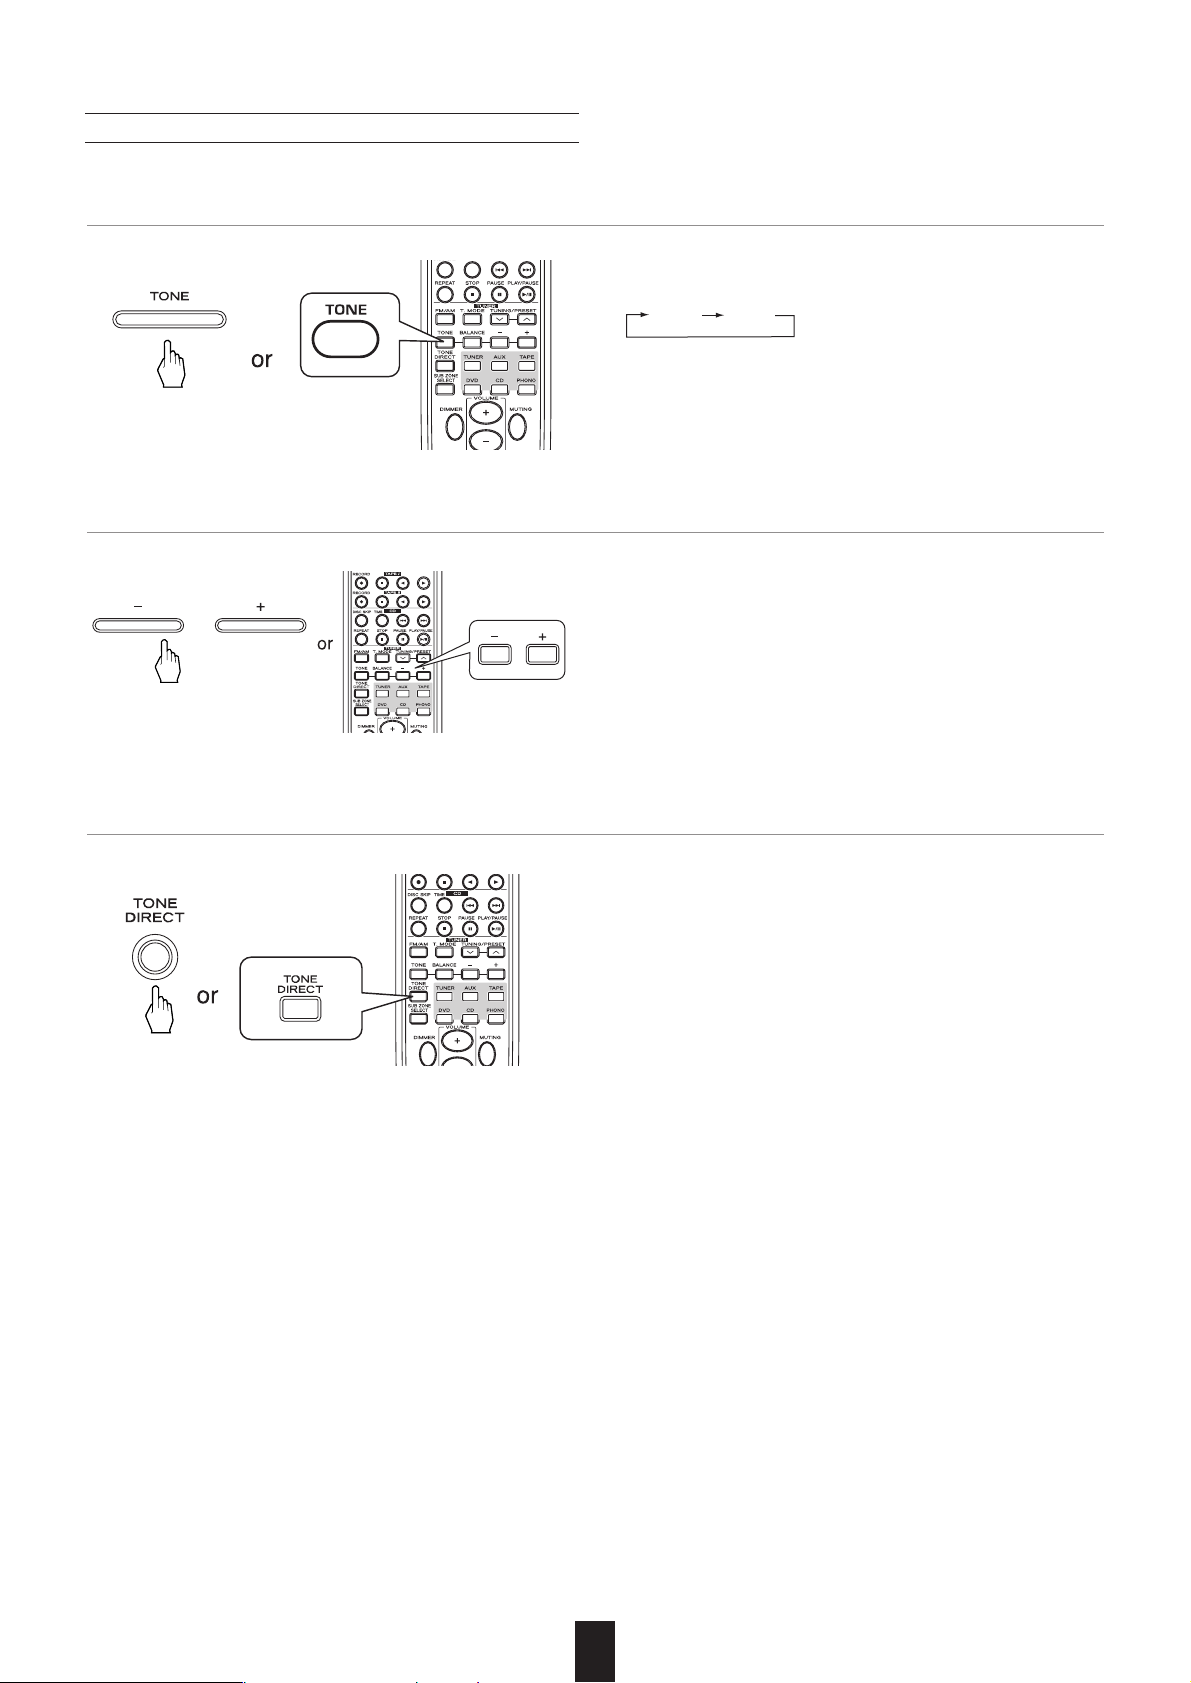
• Each time this button is pressed, the corresponding tone
mode is selected and shown for 5 seconds as follows:
∑Note:
• When the tone direct function is activated, the tone mode
cannot be entered and “TON DIR” flickers for 3 seconds.
BASS TRBL
Adjusting the tone
(bass and treble)
8. Enter the tone mode.
• "TON DIR" is displayed, "DIRECT" lights up and the sound
that bypasses the tone circuitry will be heard.
• To cancel the tone direct function, press this button again to
display "TON CTRL", and then "DIRECT" turns off.
10
. To listen to a program source without the tone effect.
• If the tone display disappears, start from the step 8 again.
• The tone (BASS and TRBL) can be adjusted within the range
of -10 ~ +10 dB.
∑Note:
• Extreme settings at high volume may damage your speakers.
• In general, the bass and treble levels are adjusted to 0.
9. At the desired tone mode, adjust the tone as desired.
13
ENGLISH
• "BAL" and the balance level are displayed for 5 seconds.
• If the balance display disappears, start from the step 11
again.
• The balance level can be adjusted within the range of L10 ~
R10.
∑Note:
• In general, the balance level is adjusted to 0.
Adjusting the sound volume balance
11. Enter the balance mode.
12. Adjust the sound volume balance between the left and right speakers.
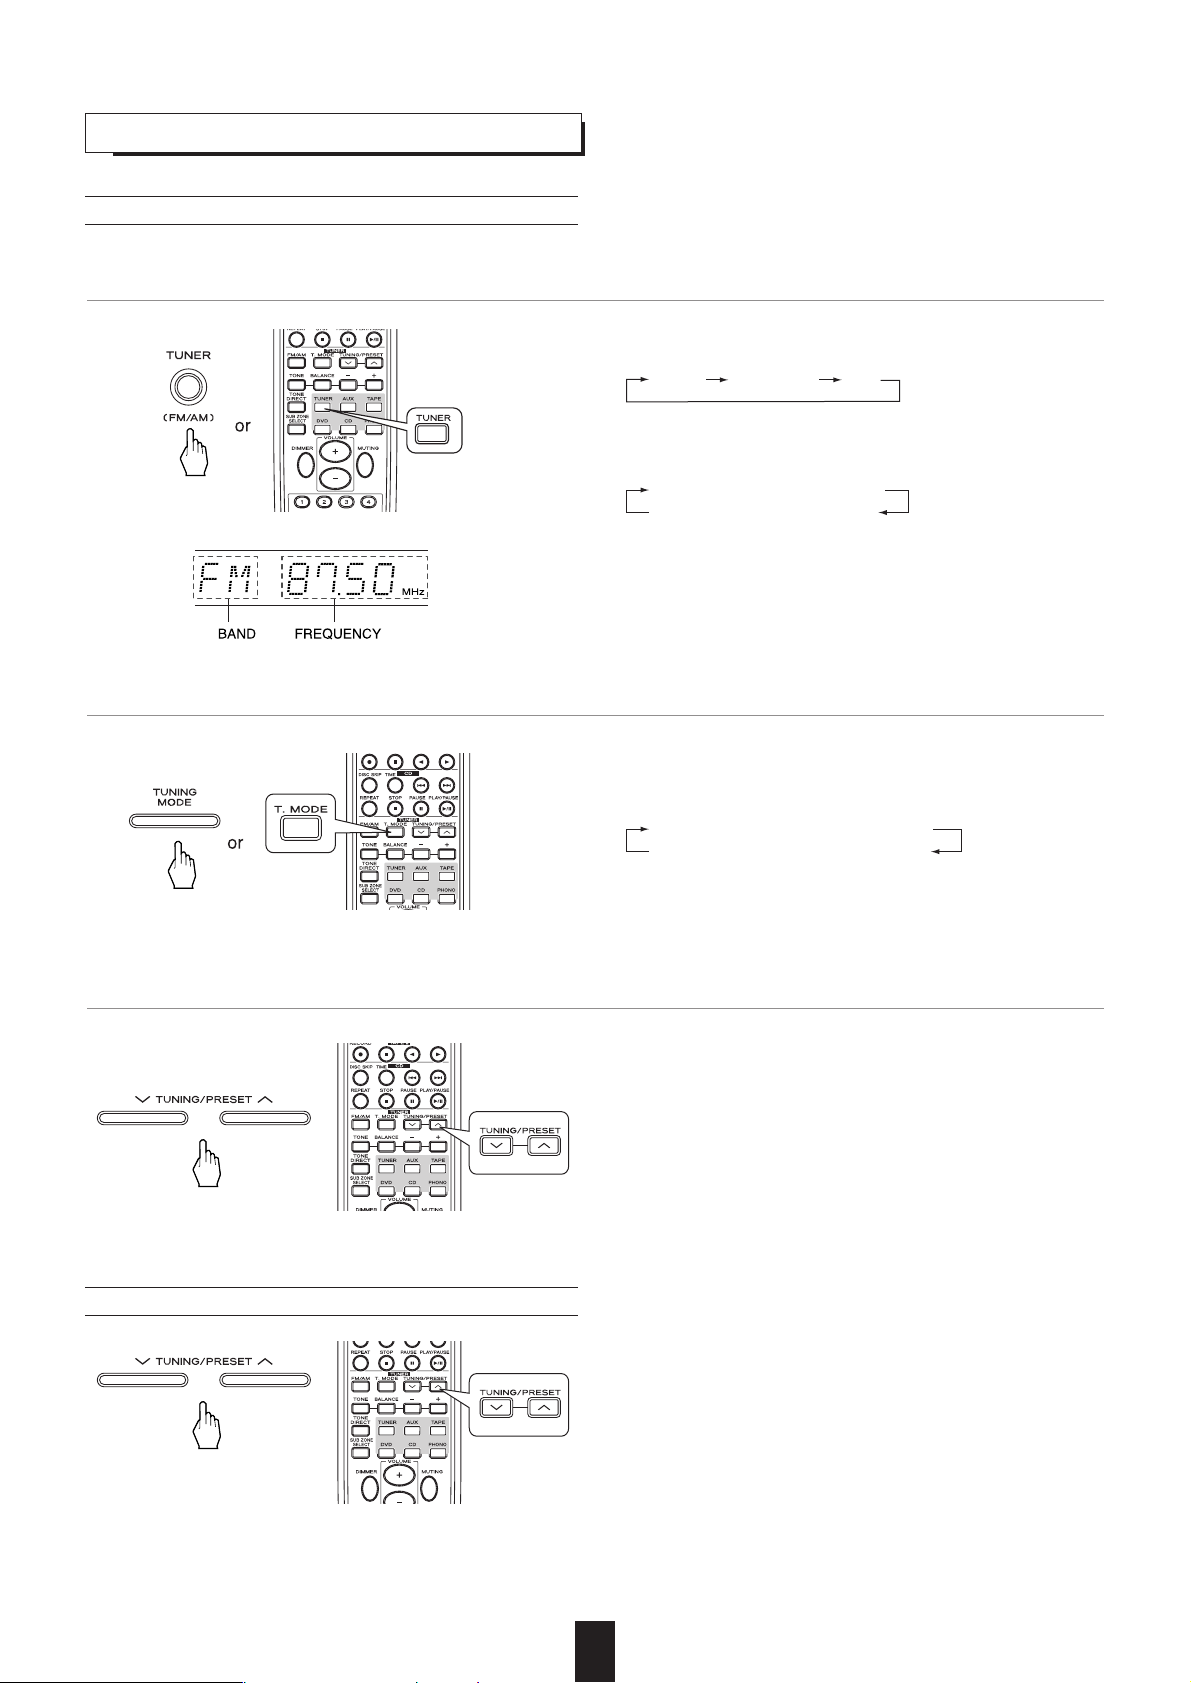
LISTENING TO RADIO BROADCASTS
Auto tuning
• Each time this button is pressed, the mode changes as follows:
Tuning mode : "PRESET" turns off.
Preset mode : "PRESET" lights up.
14
1
. Select the tuner and then the desired band.
2. Select the tuning mode.
• Each time this button is pressed, the tuner is automatically
selected and the band is changed as follows :
• When the FM stereo broadcast is tuned, the FM mode
changes as follows:
• When FM stereo broadcasts are poor because of weak
broadcast signals, select the FM mono mode ("ST" turns off)
to reduce the noise, then FM broadcasts are reproduced in
monaural sound.
Stereo mode : "ST" lights up.
Mono mode : "ST" turns off.
FM ST FM MONO AM
• The tuner will now search until a station of sufficient strength
has been found. The display shows the tuned frequency and
"TUNED".
• If the station found is not the desired one, simply repeat this
operation.
• Weak stations are skipped during auto tuning.
or
3. Press the TUNING/PRESET UP (°) or DOWN (‡) button for more than 0.5 second.
• Manual tuning is useful when you already know the frequency of the desired station.
• Perform the steps 1 and 2 in "Auto tuning" procedure on
page 14 and press the TUNING/PRESET UP (°) DOWN
(‡) button repeatedly until the right frequency has been
reached.
Manual tuning
or
15
ENGLISH
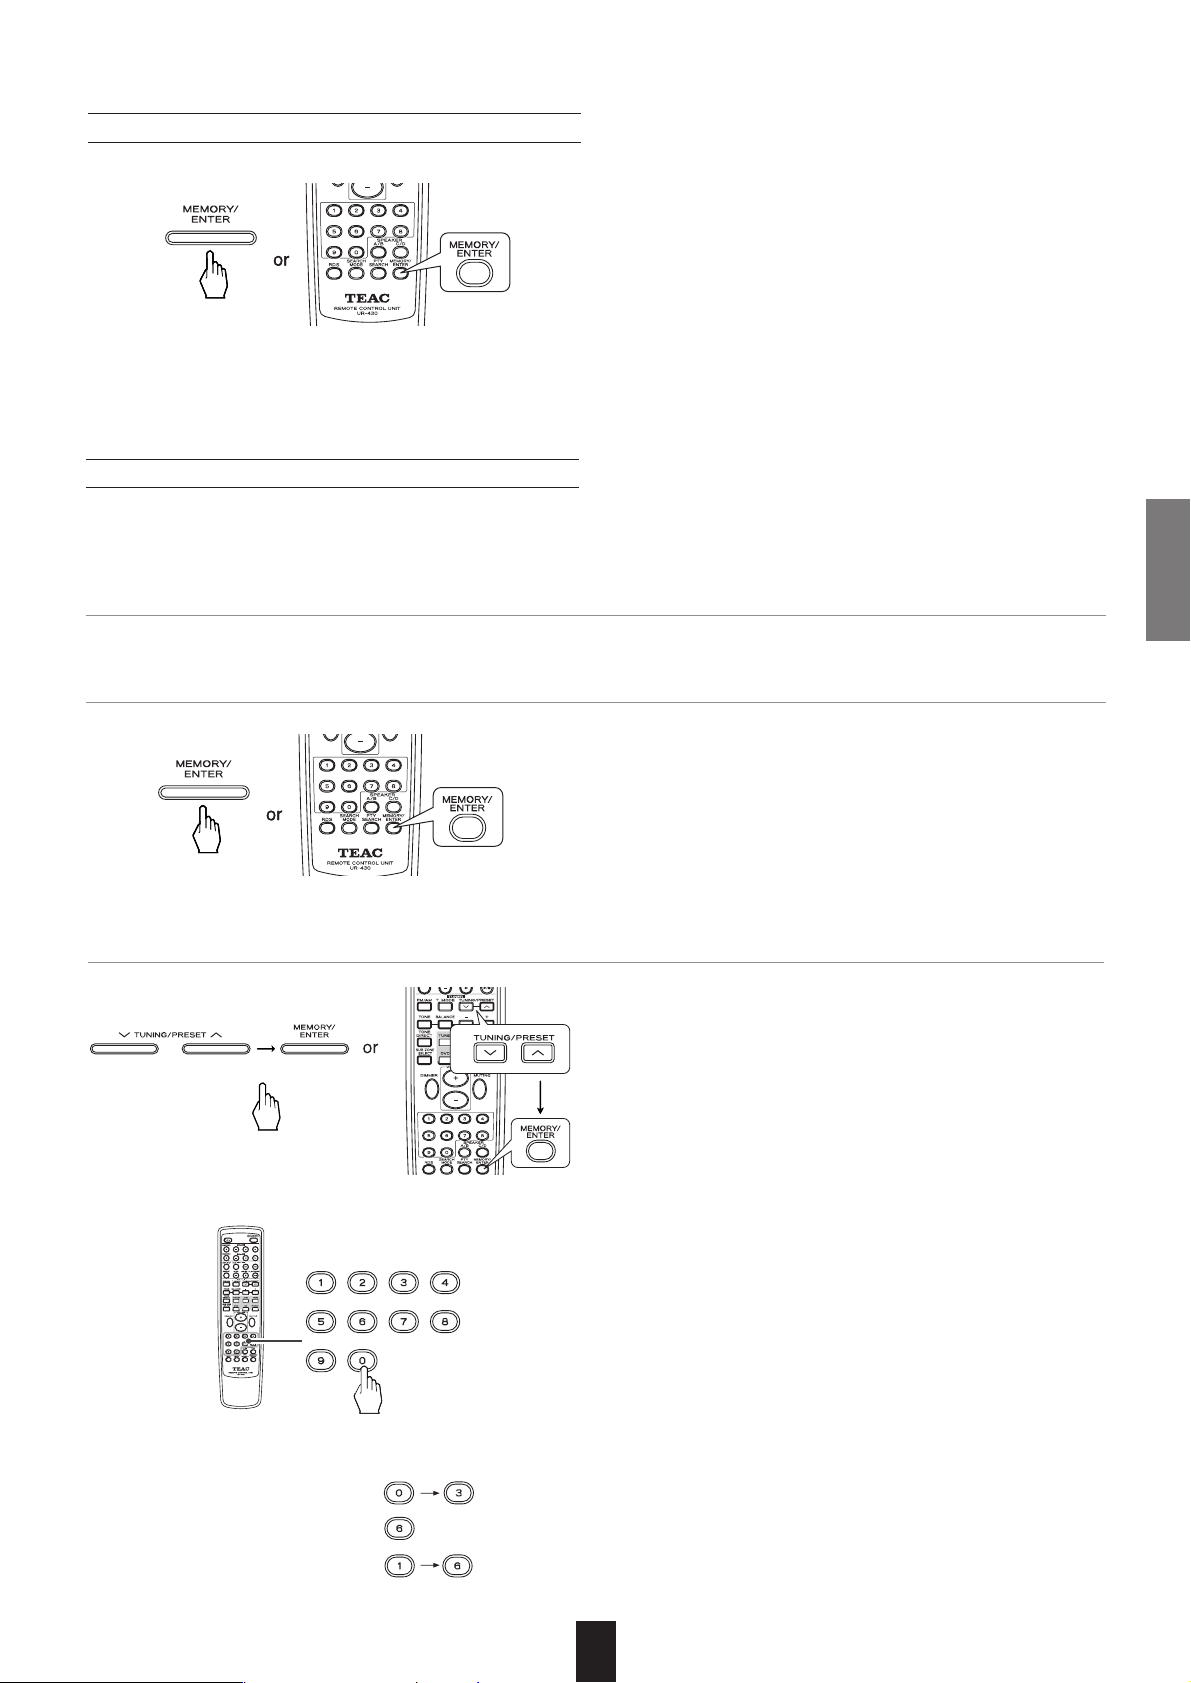
Manual presetting
• You can store up to 30 preferred stations in the memory.
1. Tune in the desired station with auto or manual tuning.
2. Press the MEMORY/ENTER button.
• "MEM" is flickering for 5 seconds.
• Auto presetting function automatically searches for FM stations only and store them in the memory.
• While listening to radio broadcasts, press and hold down the
MEMORY/ENTER button for more than 2 seconds.
• Then "AUTO MEM" is displayed and this receiver starts auto
presetting.
• Up to 30 FM stations can be stored.
∑Notes:
• FM stations of weak strength cannot be memorized.
• To memorize AM stations or weak stations, preform "Manual
presetting" procedure with using "Manual tuning" operation.
Auto presetting
3. Press the TUNING/PRESET UP (°) or DOWN (‡) button to select the desired preset number and press
the MEMORY button.
• The station has now been stored in the memory.
•A stored frequency is erased from the memory by storing
another frequency in its place.
• If "MEM" turns off, start again from the above step 2.
You can also use the numeric buttons of the remote control
unit to select a preset channel.
To select channel No.16 for example, press “1”, and within 2
seconds press “6”.
To select channel No.1, 2 or 3, press “0” and then the number (1, 2 or 3). As an example, to select number 3, press “0”
and “3”. (Optionally, you may press just the number “3” and
then wait a few seconds.)
To select channel No.4 through 9, simply press the appropriate button (4 through 9).
When using the numeric buttons, the station is stored automatically without pressing the MEMORY/ENTER button.
Example:
To select channel No. 3:
To select channel No. 6:
To select channel No. 16:

16
• Then "PRESET" lights up.
Tuning to preset stations
or
1. After selecting the tuner as an input source, select the preset mode.
2.
Select the desired preset number.
4.Repeat the above steps 1 to 3 to memorize other stations.
∑MEMORY BACKUP FUNCTION
The following items, set before the receiver is turned off, are memorized.
• FUNCTION settings
• Preset stations, etc.
• The SUB ZONE settings.
• If the power supply is interrupted for 3 days or longer, all the settings kept in memory (such as preset stations and timer settings) will be erased.
• You can also use the numeric buttons to select a preset
channel.

17
ENGLISH
listening to rds broadcasts (fm only)
RDS Tuner (Regional Option for some countries in Europe, etc.)
RDS (Radio Data System) is a method for sending information signals together with the transmitter signals. Your tuner is
capable of translating these signals and putting the information on the display.
These codes contain the following informations. Program Service name(PS), A list of Program Types(PTY), Traffic
Announcement(TA), Clock Time(CT), Radio Text(RT).
∑Note :
• In the other countries, RDS tuner function can not be available.
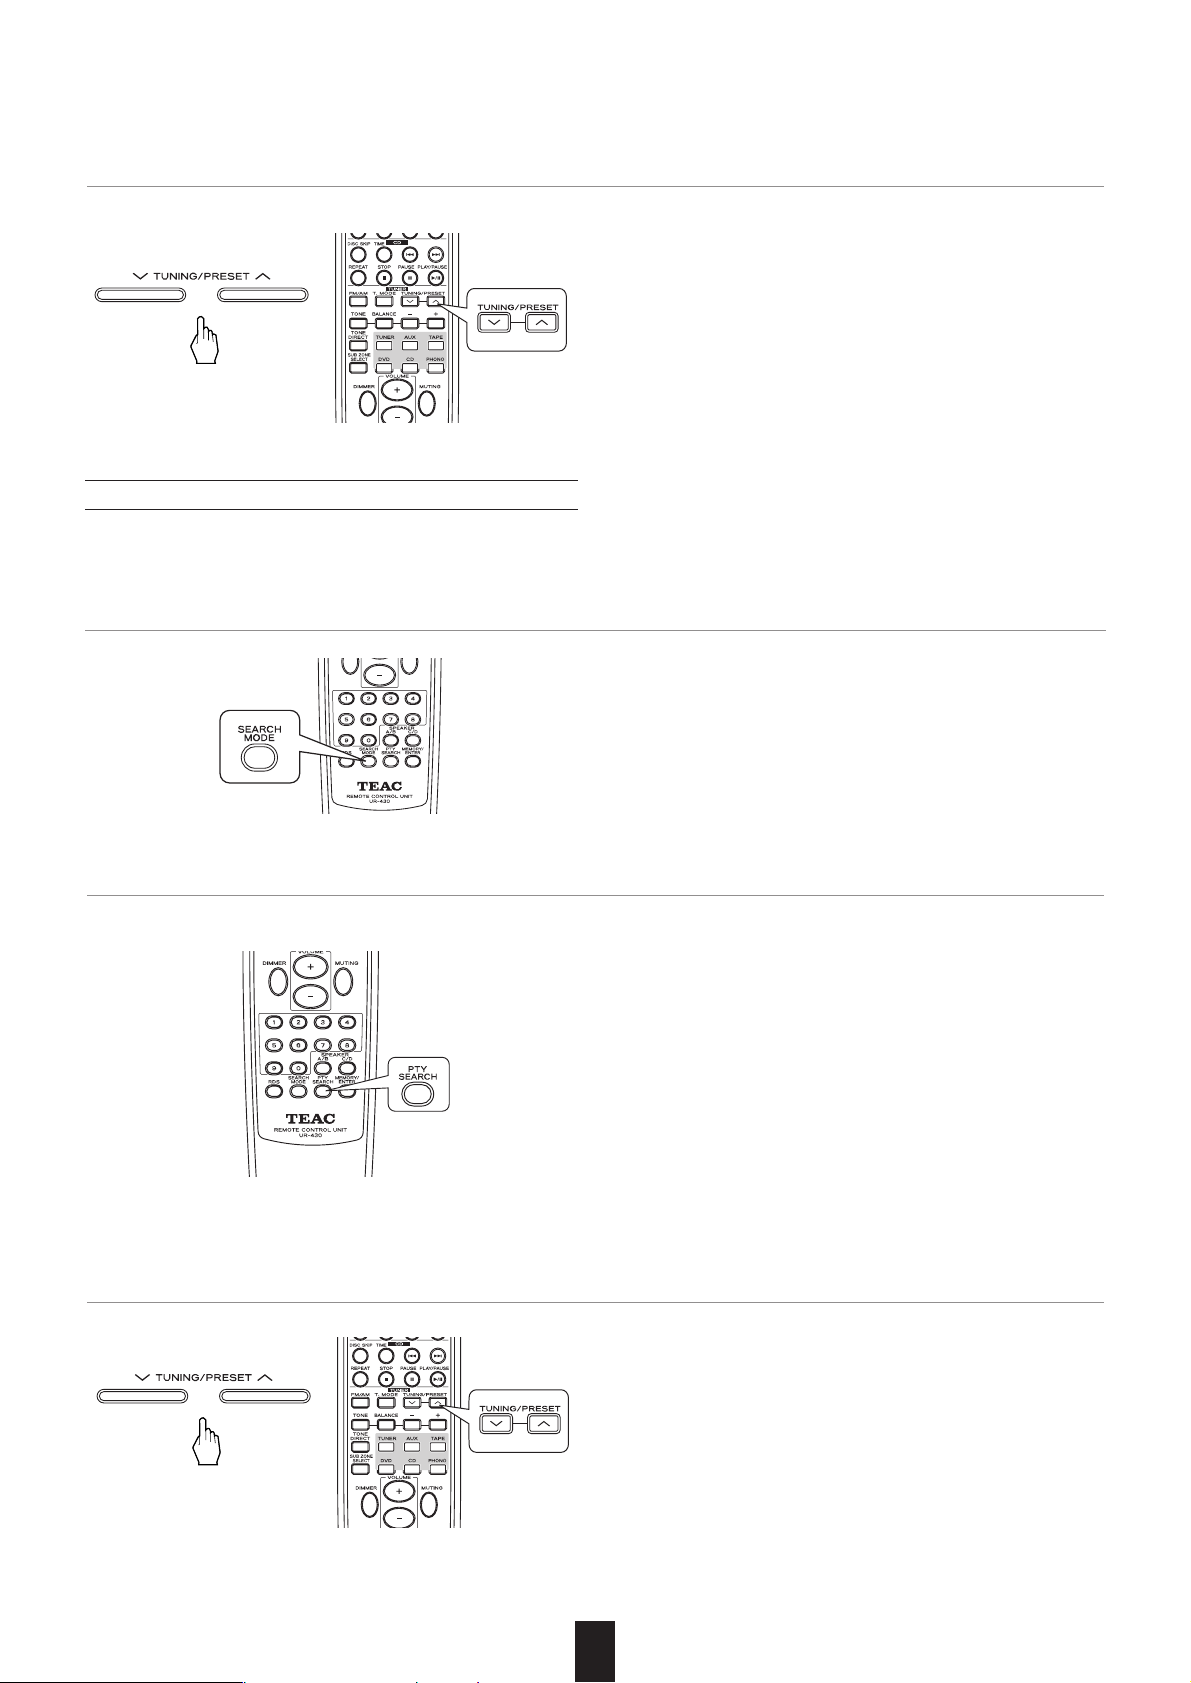
• Use this function to automatically search and receive the stations offering RDS services.
• Each time this button is pressed, the search mode changes
as follows :
RDS SRCH TP SRCH PTY SRCH off
RDS Search
1.
In the FM mode, select the RDS search mode.
• "RDS" flickers and the tuner automatically searches stations
offering RDS services and the station name is displayed.
• If no other RDS station is found, "NO RDS" is displayed.
• When "RDS SRCH" is not displayed, repeat again from the
above step 1.
2. When "RDS SRCH" is displayed, press the TUNING/PRESET UP (°) or DOWN (‡) button.
or
• Use this function to automatically search and receive the stations broadcasting the traffic program.
1
.
In the FM mode, press the SEARCH MODE button twice.
• "TP SRCH" is displayed.
TP Search
18
PTY Search
• Use this function to automatically search and receive the stations broadcasting the desired program type.
1.
In the FM mode, press the SEARCH MODE button three times.
• "PTY SRCH" is displayed.
• "TP" flickers and the tuner automatically searches for stations broadcasting the traffic program.
• "NO TRAFF"is displayed if the signal is too weak or there
are no other stations broadcasting the traffic program.
• When "TP SRCH" is not displayed, repeat again from the
above step 1.
2. When "TP SRCH" is displayed, press the TUNING/PRESET UP (°) or DOWN (‡) button to search the sta-
tion.
or
• Each time this button is pressed, one of 29 different types of
programs is selected.
(NEWS, AFFAIRS, INFO, SPORT, EDUCATE, DRAMA, CULTURE, SCIENCE, VARIED, POP M, ROCK M, EASY M, LIGHT
M, CLASSICS, OTHER M, WEATHER, FINANCE, CHILDREN,
SOCIAL, RELIGION, PHONE IN, TRAVEL, LEISURE, JAZZ,
COUNTRY, NATION M, OLDIES, FOLK M, DOCUMENT)
• When "PTY SRCH" is not displayed, repeat again from the
above step 1.
2. When "PTY SRCH" is displayed, press the PTY SEARCH button to select the desired program type.
• "PTY" flickers and the tuner automatically searches stations
offering PTY services.
• If no other station is found, "NO PROG" is displayed.
3. When the selected program type is displayed, press the TUNING/PRESET UP (°) or DOWN (‡) button to
search the station.
or

19
ENGLISH
• Each time this button is pressed, the display mode changes
as follows :
• If the signals are too weak or no RDS service is available,
"NO NAME", "NO PTY", "NO TIME" or "NO TEXT" will be
displayed.
Frequency
Program
Service name
(PS)
Program
Type
(PTY)
Clock
Time
(CT)
Radio
Te xt
(RT)
DISPLAY
In the FM mode,
20
RECORDING
Recording with TAPE
• The volume, tone(bass, treble) and balance settings have no effect on the recording signals.
• When you select tuner, CD, DVD, AUX or PHONO as a recording source, recording can be made on the TAPE.
• The SUB ZONE input source cannot be recorded onto the TAPE.
1. Select the desired input as a recording source except for TAPE.
2. Start recording on the TAPE.
3. Start play on the desired input.
Operating the sleep timer
• The sleep timer allows the system to continue to operate for
a specified period of time before automatically shutting off.
• Each time this button is pressed, the sleep time changes as
follows:
• While operating the sleep timer, " " lights up.
• When the sleep time is selected,
the fluorescent display is dimly lit.
• When the SUB ZONE function is operating, it will not be
turned off by the sleep timer.
10 20 30
…
90 OFF
Unit : minutes
OTHER FUNCTIONS
• Each time this button is pressed, the brightness of the fluorescent display changes as follows:
• In the display OFF mode, pressing any button will restore
the display ON mode.
ON dimmer OFF
Adjusting the brightness of the fluorescent display
SLEEP
21
ENGLISH
• Each time the "ON/STANDBY" button on the front panel is
pressed, the SUB ZONE mode changes as follows :
R2 > OFF : SUB ZONE off mode ("R2" turns off)
R2 > input display : SUB ZONE on mode ("R2" lights up)
• On the remote control, press the ON button to turn on the
SUB ZONE mode or press the STANDBY button to turn it
off.
∑Note :
• Only while displaying the SUB ZONE on mode, you can
adjust the SUB ZONE settings.
SUB ZONE PLAYBACK
• This function allows enjoying one source in the main room and playing another in a different room at the same time.
• Even when this receiver enters the standby mode, in such a case that "R2" is dimly lit, meaning only the SUB ZONE circuitry
operates, the SUB ZONE source can be played independently. Therefore, when you do not use the SUB ZONE function, turn
off the SUB ZONE function to save electricity.
• To enjoy SUB ZONE source, turn on the SUB ZONE function and adjust the SUB ZONE settings as below.
1. Enter the SUB ZONE mode.
• "R2 > ~ " is displayed for several seconds.
• Each time this button is pressed, the mode is changed to
the SUB ZONE mode ("R2 > ~") or the main mode (main
input display).
• When "R2 > ~" is not displayed, press this button again.
∑Note :
• Only while displaying the SUB ZONE mode, you can set the
SUB ZONE mode.
2.
Turn on the SUB ZONE mode.
3. Select the desired SUB ZONE speakers.
• Press the button to select the desired input source.
∑Note :
• Only when the SUB ZONE mode is set to on, the speakers
C or/and D can be used as SUB ZONE speakers.
• Press this button to enter the SUB ZONE mode.
22
4. Select the desired SUB ZONE input.
5. Start play on the component related to the SUB ZONE source.
6.
Adjust the SUB ZONE volume to a comfortable listening level.
• While the mute function for SUB ZONE is operating, "R2" is
flickering.
• To resume the previous sound level, press this button again.
7. To mute the sound.

23
ENGLISH
Troubleshooting Guide
If a fault occurs, run through the table below before taking your receiver for repair.
If the fault persists, attempt to solve it by switching the receiver off and on again. If this fails to resolve the situation, consult with
your dealer. Under no circumstances should you repair the receiver yourself as this could invalidate the warranty.
PROBLEME CAUSE POSSIBLE REMEDE
No power
No sound
Stations cannot be received
Preset stations cannot be received
Poor FM reception
Continuous hissing noise during FM
reception, especially when a stereo
broadcast is received.
Continuous or intermittent hissing
noise during AM reception, especially at night.
No recording
Remote control unit does not operate.
• The AC input cord is disconnected.
• Poor connection at AC wall outlet or the outlet
is inactive.
• The speaker cords are disconnected.
• The volume is adjusted too low.
• The MUTING button on the remote control is
pressed to ON.
• Speakers are not switched on.
• Incorrect selection of the input source.
• Incorrect connections between the components.
• No antenna is connected.
• The desired station frequency is not tuned in.
• The antenna is in wrong position.
• An incorrect station frequency has been memorized.
• The memorized stations are cleared.
• No antenna is connected.
• The antenna is not positioned for the best
reception.
• Weak signals.
• Noise is caused by motors, fluorescent lamps
or lightning, etc.
• Incorrect selection between the components.
• Incorrect operation of each component for playback and recording.
• Batteries are not loaded or exhausted.
• The remote sensor is obstructed.
• Connect the cord securely.
• Check the outlet using a lamp or another appliance.
• Check the speaker connections.
• Adjust the volume.
• Press the MUTING button to cancel the muting
effect.
• Switch on the desired speakers.
• Select the desired input source correctly.
• Make connections correctly.
• Connect an antenna.
• Tune in the desired station frequency.
• Move the antenna and retry tuning.
• Memorize the correct station frequency.
• Memorize the stations again.
• Connect an antenna.
• Change the position of the antenna.
•
Change the position of the antenna.
•
Install an outdoor antenna.
• Keep the receiver away from noise sources.
• Install an outdoor AM antenna.
• Make connections correctly.
• Operate each component correctly.
• Replace the batteries.
• Remove the obstacle.
Restoring factory settings
If you have made a lot of changes in the setup, and want to
restart from a known set of options, restore the unit to the
factory default settings as follows:
1. Turn the unit standby using the STANDBY/ON button.
2. While holding down the MAIN ZONE button, press the
STANDBY/ON button of the main unit.
All memories are erased, and the unit returns to the factory
settings.

24
∑ AMPLIFIER SECTION
• Power output, 4Ω, THD 0.1 %, only a pair of speakers driven ........................................................................................ 2 × 65 W
• Total harmonic distortion, 8Ω, @ -3dB, 20 Hz~20 kHz ........................................................................................................ 0.05%
• Input sensitivity, 47 kΩ
Phono(MM) ......................................................................................................................................................................... 2.5 mV
Line(CD,DVD,TAPE,AUX) ................................................................................................................................................. 220 mV
• Signal to noise ratio, IHF "A" weighted
Phono(MM) ........................................................................................................................................................................... 75 dB
Line(CD,DVD,TAPE,AUX) .................................................................................................................................................... 98 dB
• Frequency response
Phono(MM), RIAA, 20 Hz~20 kHz .................................................................................................................................... ±0.3 dB
Line(CD,DVD,TAPE,AUX), 10 Hz~100 kHz ......................................................................................................................... ±3 dB
• Output level
TAPE OUT, 2.2 kΩ ............................................................................................................................................................ 200 mV
• Bass/Treble control, 100 Hz/10 kHz ................................................................................................................................... ±10 dB
∑
FM TUNER SECTION
• Tuning frequency range .......................................................................................................................................... 87.5~108 MHz
• Usable sensitivity, THD 3%, S/N 26 dB ............................................................................................................................... 15 dBf
• 46 dB quieting sensitivity, mono/stereo .................................................................................................................... 25.2/45.2 dBf
• Signal to noise ratio, 65 dBf, mono/stereo ....................................................................................................................... 68/65 dB
• Total harmonic distortion, 65 dBf, 1 kHz, mono/stereo .................................................................................................... 0.5/0.8%
• Frequency response, 20 Hz~14 kHz .................................................................................................................................... ±3 dB
• Stereo separation, 1 kHz ...................................................................................................................................................... 30 dB
• Capture ratio ........................................................................................................................................................................... 4 dB
• IF rejection ratio .................................................................................................................................................................... 75 dB
∑
AM TUNER SECTION
• Tuning frequency range .......................................................................................................................................... 522~1611 kHz
• Usable sensitivity , S/N 20 dB.......................................................................................................................................... 55 dBµ/m
• Signal to noise ratio .............................................................................................................................................................. 50 dB
• Selectivity .............................................................................................................................................................................. 30 dB
∑
GENERAL
• Power supply ........................................................................................................................................................... 230 V~ 50 Hz
• Power consumption ..................................................................................................................... 330 W (STANDBY: 3 W or less)
• Dimensions (W × H × D, including protruding parts) ....................................... 440 × 141 × 330mm (17-3/8 × 5-9/16 × 13 inches)
•Weight (Net) ......................................................................................................................................................... 8.4 kg (18.5 lbs)
Note: Design and specifications are subject to change without notice for improvements.
Specifications
25
FRANÇAIS
SOMMAIRE
SOMMAIRE...............................................................................................................................................................
25
Raccordement du système ....................................................................................................................................... 26
Panneau avant et télécommande ............................................................................................................................. 29
• PLAGE DE FONCTIONNEMENT DE LA TÉLÉCOMMANDE ................................................................................................ 31
• MISE EN PLACE DES PILES ................................................................................................................................................. 31
Fonctionnement ....................................................................................................................................................... 32
• ÉCOUTE
D’UN PROGRAMME
.................................................................................................................................................. 32
• ÉCOUTE
D’ÉMISSIONS DE RADIO
........................................................................................................................................... 36
• ÉCOUTE
D’ÉMISSIONS RDS (FM UNIQUEMENT)
..................................................................................................................... 39
Syntoniseur RDS (option régionale pour certains pays d
’Europe, etc.)
• ENREGISTREMENT .............................................................................................................................................................. 42
• AUTRES FONCTIONS ........................................................................................................................................................... 42
• LECTURE SUB ZONE ............................................................................................................................................................ 43
Guide de dépannage ................................................................................................................................................ 45
Spécifications ........................................................................................................................................................... 46
ATTENTION
• N’exposez pas cet appareil au ruissellement ni aux
éclaboussures.
• Ne placez aucun objet contenant du liquide, tel qu’un
vase, sur l’appareil.
•N’installez pas cet appareil dans un espace confiné
comme une bibliothèque ou similaire.
•L’appareil tire un courant de veille nominal de la prise
secteur quand son interrupteur STANDBY/ON est en position d’arrêt.
• L’appareil doit être placé assez près de la prise de courant
pour que vous puissiez à tout moment attraper facilement
la fiche du cordon d’alimentation.
• Un appareil de Classe I doit être branché à une prise de
terre.
• Les batteries (ou le pack de batteries ou les batteries
chargées) ne devront pas être exposées à la chaleur excessive telle que le soleil, le feu ou analogues.
• Une pression acoustique excessive d’écouteurs ou d’un
casque peut provoquer une perte d’audition.
Mise au rebut de votre ancien appareil
1. Quand ce symbole de poubelle sur roues
barrée d’une croix est joint à un produit,
cela signifie que ce produit est couvert par
la Directive Européenne 2002/96/EC.
2. Tous les produits électriques et électroniques doivent être jetés séparément des
ordures ménagères via des collecteurs
désignés agréés par le gouvernement ou les autorités
locales.
3. La gestion correcte de l’élimination de votre ancien
appareil aide à prévenir les conséquences potentiellement
négatives pour l’environnement et la santé humaine.
4. Pour des informations plus détaillées sur la mise au rebut
de votre ancien appareil, veuillez contacter votre mairie, le
service de traitement des ordures ou le magasin dans
lequel vous avez acheté le produit.
26
Raccordement du système
• Ne branchez pas le cordon d’alimentation sur une prise secteur murale avant que tous les branchements soient terminés.
• Assurez-vous de raccorder les cordons à fiche RCA blanche aux prises L (gauche) et les cordons à fiche RCA rouge aux prises R (droite) lors des branchements audio.
• Branchez les prises solidement et correctement. Sinon, cela pourrait entraîner des pertes de son, du bruit ou endommager le
récepteur.
1 2 4 53 6 7
• Changez la position de l’antenne FM intérieure jusqu’à ce
que vous obteniez la meilleure réception possible pour
vos stations FM préférées.
• Une antenne FM extérieure de 75Ω peut être utilisée pour
améliorer encore plus la réception. Débranchez l’antenne
intérieure avant de la remplacer par l’antenne extérieure.
• Placez l’antenne cadre aussi loin que possible du
réception, du téléviseur, des cordons d’enceinte et du cordon d’alimentation et tournez-la dans la direction qui offre
la meilleure réception.
• Si la réception est mauvaise avec l’antenne cadre AM,
vous pouvez utiliser une antenne AM extérieure à la place
de l’antenne cadre AM.
1. BRANCHEMENT DES ANTENNES
27
FRANÇAIS
Lecteur de CD
Platine cassette, Enregistreur de MD, etc.
Lecteur de MD, etc.
Lecteur de DVD, téléviseur, etc.
3. BRANCHEMENT D’AUTRES APPAREILS AUDIO
• Les prises AUX peuvent aussi être raccordées à un appareil extérieur.
• Les prises DVD peuvent être raccordées aux prises AUDIO OUT d’un appareil vidéo tel qu’un lecteur de DVD, un téléviseur,
etc.
• Les prises TAPE PLAY/REC peuvent être raccordées à un appareil d’enregistrement tel qu’une platine cassette, un enregistreur de MD, etc.
2. BRANCHEMENT D’UN TOURNE-DISQUES
∑Note
• Ne branchez pas directement un tourne-disques avec une
cartouche de type MC. Pour le faire, utilisez un amplificateur
de tête séparé ou un transformateur élévateur.
28
• Vous pouvez brancher un maximum de quatre paires d’enceintes à ce récepteur et sélectionner diverses combinaisons d’enceintes en fonction de vos préférences.
• Les enceintes C et D peuvent êtres installées dans la pièce
principale de même que les enceintes A et B, ou bien dans
une autre (SUB ZONE) pour la lecture SUB ZONE. (Pour
plus de détails, reportez-vous à "LECTURE SUB ZONE" à
la page 43.)
• Assurez-vous de branchez les enceintes solidement et correctement en fonction du canal (gauche et droit) et de la
polarité (+ et -).
• Si les branchements ne sont pas corrects, aucun son ne
sort des enceintes, et si la polarité du branchement des
enceintes est incorrecte, le son ne sera pas naturel et manquera de graves.
∑Notes :
• Pour utiliser l’amplificateur en toute sécurité, utilisez des
enceintes avec une impédance de plus de 4Ω quand vous
branchez uniquement une paire d’enceintes aux prises
SPEAKER A ou B et une paire d’enceintes aux prises
SPEAKER C ou D et utilisez des enceintes avec une
impédance de plus de 8Ω quand vous branchez des
enceintes aux deux prises SPEAKER A et B et/ou au deux
prises SPEAKER C et D.
• Ne laissez pas les fils d’enceintes dénudés entrer en contact les uns avec les autres ou toucher une partie
métallique de ce récepteur. Cela pourrait endommager ce
récepteur et/ou les enceintes.
Enceintes D
(pièce principale/SUB ZONE)
Enceintes A
(pièce principale)
Droite Gauche
Droite Gauche Droite Gauche
Droite Gauche
Enceintes C
(pièce principale/SUB ZONE)
Enceintes B
(pièce principale)
4. BRANCHEMENT DES ENCEINTES
5. CORDON D’ALIMENTATION SECTEUR
• Branchez le cordon sur une prise secteur murale.
6. DC TRIGGER OUT
• Quand vous appuyez sur la touche DC TRIGGER OUT, “INPUT”-TRIG ON est affiché pendant quelques minutes, puis une
tension de 12 V (25mA max) est sortie.
• Appuyez de nouveau sur la touche DC TRIGGER OUT, “INPUT”-TRIG OFF est affiché pendant plusieurs minutes, puis la sortie est coupée.
7. RS-232C
• Utilisez cette prise pour raccorder une télécommande à fil RS-232C standard (en option).
29
FRANÇAIS
Panneau avant et télécommande
∑TÉLÉCOMMANDE
13 42822 1617 23 12 13 14 18
24
119810
29
3015 765 1920
2
26
3
17
27
8
16
13
12
11
10
21
24
14
9
19
7
15
6
18
25
∑AFFICHAGE FLUORESCENT
∑PANNEAU AVANT
Eingang, Frequenz, Lautstärkepegel, Betriebsinformationen, usw.
TA-Anzeige PTY-Anzeige
TP-Anzeige
Stereoanzeige
Speicheranzeige
RDS-Anzeige
TUNED-Anzeige
SUB ZONE-Anzeige
Schlaf-Anzeige
Speichernummer-/Schlafzeit-Anzeige
DIRECT-Anzeige
30
1. INTERRUPTEUR POWER
Appuyez sur cet interrupteur pour entrer en mode de veille.
Pour mettre l’appareil hors tension, appuyez de nouveau
sur cet interrupteur.
2. TOUCHE DE POWER ON
Quand l’appareil est en veille, appuyez sur cette touche
pour mettre l’appareil sous tension.
3. TOUCHE DE STANDBY
Quand l’appareil est sous tension, appuyez sur cette touche
pour mettre l’appareil en mode de veille.
4. INDICATEUR DE STANDBY
5. PRISE DE HEADPHONE
Pour une écoute privée, vous pouvez brancher un casque
d’écoute stéréo muni d’une fiche standard 1/4 pouce sur
cette prise.
6. TOUCHE DE SÉLECTION DES ENCEINTES DE MAIN ZONE
(Zone principale) (A/B)
Chaque fois que vous appuyez sur cette touche les
enceintes sont mise en ou hors service de la façon suivante:
( ) : Quand le mode SUB ZONE est en service.
7. TOUCHE DE SÉLECTION DES ENCEINTES DE SUB ZONE
(Zone secondaire) (C/D)
Chaque fois que vous appuyez sur cette touche les
enceintes sont mise en ou hors service de la façon suivante:
( ) : Quand le mode SUB ZONE est en service.
8. TOUCHE FM/AM (SYNTONISEUR)
Chaque fois que vous appuyez sur la touche FM/AM (SYNTONISEUR), la bande change comme suit:
9. TOUCHES DE SÉLECTION D’ENTRÉE (AUX, TAPE, DVD, CD, PHONO)
Appuyez sur ces touches pour sélectionner la source d’entrée souhaitée.
10. TOUCHE SUB ZONE (PIÈCE 2)
Appuyez sur cette touche pour entrer en mode SUB
ZONE.
11. TOUCHE TONE DIRECT (TONALITÉ DIRECTE)
Appuyez sur cette touche pour écouter un programme
sans effet de tonalité.
12. TOUCHE TONE (TONALITÉ)
Pour ajuster la tonalité (graves et aigus), appuyez sur
cette touche pour sélectionner le mode de tonalité
souhaité.
• Chaque fois que vous appuyez sur cette touche, le
mode de tonalité change entre les graves et les aigus.
13. TOUCHE BALANCE
Pour ajuster la balance du volume sonore, appuyez sur
cette touche pour entrer en mode de balance.
FM ST FM MONO AM
~ C/D
ou (R2 C/D)
~ - / -
ou (R2 -/-)
~ C/ -
ou (R2 C/-)
~ - /D
ou (R2 -/D)
A/B ~
ou (MAIN A/B)
- / - ~
ou (MAIN -/-)
A/ - ~
ou (MAIN A/-)
- /B ~
ou (MAIN -/B)
14. TOUCHE BALANCE, AIGUS/GRAVE/HAUT/BAS (°/‡)
En mode de balance, ces touches permettent d’ajuster la
balance du son entre les enceintes gauche et droite.
En mode de tonalité souhaité, ajustez la tonalité à votre
goût en utilisant ces touches.
15. TOUCHE MEMORY/ENTER
Appuyez sur cette touche pour mémoriser les stations
préréglées.
16. TOUCHE DE TUNING MODE (SYNTONISATION/PRÉRÉGLAGE)
Appuyez sur cette touche pour sélectionner le mode de
syntonisation ou le mode de préréglage.
17. TOUCHES TUNING/PRESET HAUT/BAS (°/‡)
Appuyez sur ces touches pour syntoniser les stations
souhaitées.
18. TOUCHES/BOUTON DE COMMANDE DU VOLUME
HAUT/BAS (°/‡)
Utilisez ce bouton ou ces touches pour ajuster le volume
sur un niveau d’écoute confortable.
19. TOUCHE MUTING (SOURDINE)
Appuyez sur cette touche pour couper le son temporairement. Appuyez de nouveau sur la touche pour rétablir le
niveau sonore précédent.
20. TOUCHE SLEEP (TEMPORISATION DE VEILLE)
Appuyez sur cette touche pour mettre en service la temporisation de veille pendant une période de temps
donnée.
• Chaque fois que vous appuyez sur la touche, la durée
de la temporisation change comme suit:
21. TOUCHE DIMMER (GRADATEUR)
Appuyez sur cette touche pour sélectionner la luminosité
de l’affichage fluorescent au niveau que vous souhaitez.
• Chaque fois que vous appuyez sur la touche, la lumi-
nosité de l’affichage fluorescent change comme suit:
22. CAPTEUR DE TÉLÉCOMMANDE
Il reçoit les signaux de la télécommande.
23. AFFICHAGE FLUORESCENT
Pour les détails, reportez-vous à la page précédente.
24. TOUCHES RDS (option régionale pour l’Europe, etc.)
Utilisez ces touches lors de l’écoute d’une émission RDS.
Pour en savoir plus, reportez-vous aux pages 39 à 41.
25. TOUCHES NUMÉRIQUES (10 KEY)
En mode tuner, utilisez ces touches pour sélectionner un
canal préréglé.
26. TOUCHES DE FONCTIONNEMENT TAPE (I/II) (platine cassette)
27. TOUCHES DE FONCTIONNEMENT DU LECTEUR CD
28. INDICATEUR SPEAKER (A/B, C/D)
29. INDICATEUR MUTING (ZONE PRINCIPALE)
30. TOUCHE DC TRIGGER OUT
ON dimmer OFF
10 20 30
…
90 OFF
Unité: minutes
 Loading...