


ad-500
`
Compact Disc Player/Reverse Cassette Deck
3D0007500A
D
Thanks for buying a TEAC. Read this manual carefully to get the best
performance from this unit.
Nous vous remercions pour l’achat d’un appareil TEAC.
Lire ce manuel avec attention pour obtenir les meilleures performances
possibles de cet appareil.
Vielen Dank für den Kauf dieses TEAC-Geräts.
Bitte lesen Sie diese Anleitung sorgfältig durch, um die Leistungsfähigkeit dieses Geräts optimal nutzen zu können.
Grazie per aver acquistato un prodotto TEAC.
Leggere attentamente questo manuale per ottenere le migliori
prestazioni da questo apparecchio.
Enhorabuena por la adquisición de un TEAC.
Lea detenidamente este manual a fin de obtener el mejor rendimiento de
esta unidad.
Dank u voor de aanschaf van een TEAC.
Lees deze gebruiksaanwijzing aandachtig door teneinde de beste
prestaties van dit toestel te verkrijgen.
OWNER’S MANUAL ......................... 4
MANUEL DU PROPRIETAIRE...........17
BEDIENUNGSANLEITUNG................30
MANUALE DI ISTRUZIONI ...............44
MANUAL DEL USUARIO ..................57
GEBRUIKSAANWIJZING ..................70
NEDERLANDS ESPAÑOL
ITALIANO DEUTSCH
FRANÇAIS
ENGLISH
This appliance has a serial number located
on the rear panel. Please record the model
number and serial number and retain them
for your records.
Model number
Serial number
WARNING: TO PREVENT FIRE OR SHOCK
HAZARD, DO NOT EXPOSE THIS
APPLIANCE TO RAIN OR MOISTURE.
The exclamation point within an equilateral triangle is intended to alert the user to the
presence of important operating and maintenance (servicing) instructions in the literature
accompanying the appliance.
The lightning flash with arrowhead symbol, within an equilateral triangle, is intended to alert
the user to the presence of uninsulated “dangerous voltage” within the product’s enclosure
that may be of sufficient magnitude to constitute a risk of electric shock to persons.
CAUTION: TO REDUCE THE RISK OF ELECTRIC SHOCK, DO NOT
REMOVE COVER (OR BACK). NO USER-SERVICEABLE PARTS INSIDE.
REFER SERVICING TO QUALIFIED SERVICE PERSONNEL.
Ü
ÿ
Ÿ

_ 2_
IMPORTANT SAFETY INSTRUCTIONS
CAUTION:
OO
Read all of these Instructions.
OO
Save these Instructions for later use.
OO
Follow all Warnings and Instructions marked on the audio
equipment.
1) Read Instructions — All the safety and operating instructions
should be read before the product is operated.
2) Retain Instructions — The safety and operating instructions should
be retained for future reference.
3) Heed Warnings — All warnings on the product and in the operating
instructions should be adhered to.
4) Follow Instructions — All operating and use instructions should be
followed.
5) Cleaning — Unplug this product from the wall outlet before
cleaning. Do not use liquid cleaners or aerosol cleaners. Use a damp
cloth for cleaning.
6) Attachments — Do not use attachments not recommended by the
product manufacturer as they may cause hazards.
7) Water and Moisture — Do not use this product near water _for
example, near a bath tub, wash bowl, kitchen sink, or laundry tub; in a
wet basement; or near a swimming pool; and the like.
8) Accessories — Do not place this product on an unstable cart,
stand, tripod, bracket, or table. The product may fall, causing serious
injury to a child or adult, and serious damage to the product. Use only
with a cart, stand, tripod, bracket, or table recommended by the
manufacturer, or sold with the product. Any mounting of the product
should follow the manufacturer’s instructions, and should use a
mounting accessory recommended by the manufacturer.
9) A product and cart combination should be moved with care. Quick
stops, excessive force, and uneven surfaces may cause the product
and cart combination to overturn.
10) Ventilation — Slots and openings in the cabinet are provided for
ventilation and to ensure reliable operation of the product and to protect
it from overheating, and these openings must not be blocked or
covered. The openings should never be blocked by placing the product
on a bed, sofa, rug, or other similar surface. This product should not be
placed in a built-in installation such as a bookcase or rack unless proper
ventilation is provided or the manufacturer’s instructions have been
adhered to.
11) Power Sources — This product should be operated only from the
type of power source indicated on the marking label. If you are not sure
of the type of power supply to your home, consult your product dealer or
local power company. For products intended to operate from battery
power, or other sources, refer to the operating instructions.
12) Grounding or Polarization — This product may be equipped with a
polarized alternating-current line plug (a plug having one blade wider
than the other). This plug will fit into the power outlet only one way. This
is a safety feature. If you are unable to insert the plug fully into the
outlet, try reversing the plug. If the plug should still fail to fit, contact your
electrician to replace your obsolete outlet. Do not defeat the safety
purpose of the polarized plug.
13) Power-Cord Protection — Power-supply cords should be routed
so that they are not likely to be walked on or pinched by items placed
upon or against them, paying particular attention to cords at plugs,
convenience receptacles, and the point where they exit from the
product.
14) Outdoor Antenna Grounding — If an outside antenna or cable
system is connected to the product, be sure the antenna or cable
system is grounded so as to provide some protection against voltage
surges and built-up static charges. Article 810 of the National Electrical
Code, ANSI/NFPA 70, provides information with regard to proper
grounding of the mast and supporting structure, grounding of the lead-in
wire to an antenna discharge unit, size of grounding conductors,
location of antenna-discharge unit, connection to grounding electrodes,
and requirements for the grounding electrode.
"Note to CATV system installer:
This reminder is provided to call the CATV system installer’s attention to
Section 820-40 of the NEC which provides guidelines for proper
grounding and, in particular, specifies that the cable ground shall be
connected to the grounding system of the building, as close to the point
of cable entry as practical.
15) Lightning — For added protection for this product during a lightning
storm, or when it is left unattended and unused for long periods of time,
unplug it from the wall outlet and disconnect the antenna or cable
system. This will prevent damage to the product due to lightning and
power-line surges.
16) Power Lines — An outside antenna system should not be located
in the vicinity of overhead power lines or other electric light or power
circuits, or where it can fall into such power lines or circuits. When
installing an outside antenna system, extreme care should be taken to
keep from touching such power lines or circuits as contact with them
might be fatal.
17) Overloading — Do not overload wall outlets, extension cords, or
integral convenience receptacles as this can result in risk of fire or
electric shock.
18) Object and Liquid Entry — Never push objects of any kind into
this product through openings as they may touch dangerous voltage
points or short-out parts that could result in a fire or electric shock.
Never spill liquid of any kind on the product.
19) Servicing — Do not attempt to service this product yourself as
opening or removing covers may expose you to dangerous voltage or
other hazards. Refer all servicing to qualified service personnel.
20) Damage Requiring Service — Unplug this product from the wall
outlet and refer servicing to qualified service personnel under the
following conditions:
a) when the power-supply cord or plug is damaged.
b) if liquid has been spilled, or objects have fallen into the product.
c) if the product has been exposed to rain or water.
d) if the product does not operate normally by following the operating
instructions. Adjust only those controls that are covered by the
operating instructions as an improper adjustment of other controls may
result in damage and will often require extensive work by a qualified
technician to restore the product to its normal operation.
e) if the product has been dropped or damaged in any way.
f ) when the product exhibits a distinct change in performance _ this
indicates a need for service.
21) Replacement Parts — When replacement parts are required, be
sure the service technician has used replacement parts specified by the
manufacturer or have the same characteristics as the original part.
Unauthorized substitutions may result in fire, electric shock, or other
hazards.
22) Safety Check — Upon completion of any service or repairs to this
product, ask the service technician to perform safety checks to
determine that the product is in proper operating condition.
23) Wall or Ceiling Mounting — The product should be mounted to a
wall or ceiling only as recommended by the manufacturer.
24) Heat — The product should be situated away from heat sources
such as radiators, heat registers, stoves, or other products (including
amplifiers) that produce heat.
Example of Antenna Grounding as per
National Electrical Code, ANSI/NFPA 70
ANTENNA
LEAD IN
WIRE
GROUND
CLAMP
ANTENNA
DISCHARGE UNIT
(NEC SECTION 810-20)
ELECTRIC
SERVICE
EQUIPMENT
NEC - NATIONAL ELECTRICAL CODE
GROUNDING CONDUCTORS
(NEC SECTION 810-21)
GROUND CLAMPS
POWER SERVICE GROUNDING
ELECTRODE SYSTEM
(NEC ART 250. PART H)

_ 3_
SAFETY INFORMATION
OCAUTION OACHYUNG OOBSERVERA OADVARSEL
This product has been designed and manufactured according to FDA regulations "title 21, CFR, chapter 1, subchapter J, based on the Radiation
Control for Health and Safety Act of 1968", and is classified as a class 1 laser product. There is no hazardous invisible laser radiation during
operation because invisible laser radiation emitted inside of this product is completely confined in the protective housings.
The label required in this regulation is shown
1.
OCAUTION
- DO NOT REMOVE THE PROTECTIVE HOUSING USING A SCREWDRIVER.
- USE OF CONTROLS OR ADJUSTMENTS OR PERFORMANCE OF PROCEDURES OTHER THAN THOSE SPECIFIED HEREIN MAY RESULT IN
HAZARDOUS RADIATION EXPOSURE.
- IF THIS PRODUCT DEVELOPS TROUBLE, CONTACT YOUR NEAREST QUALIFIED SERVICE PERSONNEL, AND DO NOT USE THE PRODUCT IN ITS
DAMAGED STATE.
Optical pickup: Type : KSS-212B
Manufacturer : SONY Corporation
Laser output : Less than 0.4 mW on the objective lens
Wavelength : 760_800nm
1 THIS LABEL IS ATTACHED TO THE PLACE AS ILLUSTRATED TO
INFORM THAT THE APPARATUS CONTAINS A LASER
COMPONENT.
1 DIESE AUFKLEBEMARKE IST AN DEM IN DER ABBILDUNG
GEZEIGTEN ORT ANGEBRACHT UM DARAUF HINZUWEISEN,
DASS IM INNERN DES GERÄTS EINE LASER-KOMPONENTE
BEFINDET.
1 PÅSKRIFTEN SITTER PÅ APPARATEN SOM VISAS SOM
UPPMANING OM ATT APPARATEN OMFATTAR EN INBYGGD
LASERKOMPONENT.
1 DETTE MÆRKAT ER ANBRAGT SOM VIST I ILLUSTRATIONEN FOR
AT ADVARE BRUGEREN OM AT APPARATET INDEHOLDER EN
LASERKOMPONENT.
2 DETTE MÆRKAT ER SOM VIST PÅ ILLUSTRATIONEN ANBRAGT
PÅ INDERSIDEN AF TOPDÆKSLET FOR AT ADVARE BRUGEREN
OM AT YDERLIGERE FREMTRÆNGEN VIL VÆRE FORBUNDET
MED FARE FOR AT UDSÆTTE SIG FOR LASERSTRÅLING.
ADVARSEL — BETJENING AF ANDRE KONTROLLER OG
REGULATORER ELLER BENYTTELES AF ANDRE
FREMGANGSMÅDER END BESKREVET HERI ER FORBUNDET
MED FARE FOR UDSÆTTELSE FOR LASERSTRÅLING.
VARING: APPARATEN INNEHÅLLER LASER LOMPONENT MED
STRÅLNING ÖVERSTIGANDE KLASS 1.
"ADVARSEL: USYNLIG LASERSTRÅLING VED ÅBNING NAR
SIKKERHEDSAFBRYDERE ER UDE AF FUNKTION. UNDGÅ
UDSAETTELSE FOR STRÅLING"
"VAROITUS! SUOJAKOTELOA EI SAA AVATA. LAITE SISÄLTÄÄ
LASERDIODIN. JOKA LÄHETTÄ (NÄKYMÄTÖNTÄ) SILMILLE
VAARALLISTA LASERSÄTEILYÄ".
ADVARSEL: USYNLIG LASERBESTRÅLING NÅR DENNE
DELEN ER ÅPEN OG SIKKERHETSSPERREN ER UTKOBLET
UNNGÅ UTSETTELSE FOR STRÅLING.
CLASS 1 LASER PRODUCT
LUOKAN 1 LASERLAITE
KLASS 1 LASERAPPARAT
CERTIFICATION
THIS PRODUCT COMPLIES WITH DHHS
RULES 21 CFR SUBCHAPTER J APPLICABLE AT DATE OF MANUFACTURE
TEAC CORPORATION
3-7-3 NAKA-CHO, MUSASHINO-SHI, TOKYO, JAPAN
MANUFACTURED TIF
For U.S.A.
1
2
CAUTION - INVISIBLE LASER RADIATION WHEN OPEN AND
INTERLOCKS DEFEATED. AVOID EXPOSURE TO BEAM.
VORSICHT! UNSICHTBARE LASERSTRAHLUNGTRITT AUS.
WENN DECKEL GEÖFFNET UND WENN
SICHERHEITSVERRIEGELUNG ÜBERBRÜCKT IST.
NICHT DEM STRAHL AUSSETZEN !
VARNING - OSYNLIG LASERSTRÅLNING NÄR DENNA DEL
ÄR ÖPPNAD OCH SPÄRR ÄR URKOPPLAD.
STRÄLEN ÄR FARLIG.
ADVARSEL -USYNLIG LASERSTRÅLING VED ÅBNING, NÅR
SIKKERHEDSAFBRYDERE ER UDE AF FUNKTION.
UNDGÅ UDSÆTTELSE FOR STRÅLING.
VAROITUS! SUOJAKOTELOA EI SAA AVATA. LAITE SISÄLTÄÄ
LASERDIODIN, JOKA LÄHETTÄÄ (NÄKYMÄTÖNTÄ)
SILMILLE VAARALLISTA LASERSÄTEILYÄ.
ADVARSEL -USYNLIG LASERBESTRÅLING NÅR DENNE DELEN ER
ÅPEN OG SIKKERHETSSPERREN ER UTKOBLET.
UNNGÅ UTSETTELSE FOR STRÅLING.
1

_ 4_
Before Use
O Choose the installation location of your
unit carefully. Avoid placing it in direct
sunlight or close to a source of heat.
Also avoid locations subject to
vibrations and excessive dust, heat,
cold or moisture. Keep away from such
sources that hum, such as transformers
or motors.
O Do not open the cabinet as this might
result in damage to the circuitry or
electrical shock. If a foreign object
should get into the set, contact your
dealer.
O When removing the power plug from
the wall outlet, always pull directly on
the plug, never yank the cord.
O Be sure not to handle discs with dirty
fingers. Never insert a disc which has a
crack on the surface.
O Do not attempt to clean the unit with
chemical solvents as this might damage
the finish. Use a clean, dry cloth.
O Keep this manual in a safe place for
future reference.
This unit has been designed specifically for
reproduction of compact discs bearing the
"˛ " mark. No other discs can be
reproduced.
O Always place the compact disc in the
disc tray with the label facing upward.
(Compact discs can be played only on
one side.)
O To remove a disc from its storage case,
press down on the center of the case
and lift the disc out, holding it carefully
by the edges.
How to remove the disc
How to hold the disc
O Fingerprints and dust should be
carefully wiped off the disc's recorded
surface with a soft cloth.
Wipe radially
O Do not use thinner, benzine or alcohol
as they damage the surface of the
disc's plastic surface.
O Discs should be returned to their cases
after use to avoid serious scratches
that could cause the laser pickup to
"skip."
O Do not expose discs to direct sunlight or
high humidity and temperature for
extended periods.
Long exposure to high temperatures
can warp the disc.
O Do not stick paper or write anything
with a ballpoint pen on the surface of
the label side.
Read This Before Operating
Handling the Tapes
Cassette Tape
Handling the Discs
Remote control unit
Do not store tapes in the following places:
‚ On top of heaters, exposed to direct
sunlight or in any other places with high
temperatures.
O Near speakers, on TV sets or amplifiers
or where they would be exposed to
strong magnetic fields.
O Where humidity is high and in dirty,
dusty places.
O Avoid dropping or subjecting cassettes
to excessive shocks.
O As C-120 tapes are physically weak and
could become entangled in the
transport mechanism, do not use them.
Tape Selection:
For the automatic tape select function to
work properly, metal and chrome (cobalt)
tapes must have identification holes.
*Dolby noise reduction manufactered under
license from Dolby Laboratories Licensing
Corporation.
“DOLBY” and the double-D symbol
∂
are trademarks of Dolby Laboratories
Licensing Corporation.
When operating the remote control unit,
point it towards the remote sensor on the
front panel of the unit.
ª Battery Installation
1. Remove the battery compartment
cover.
2. Insert two “AA” (R6, SUM-3) dry
batteries.
Make sure that the batteries are
inserted with their positive
≠ and
negative
– poles positioned correctly.
3. Close the cover until it clicks.
Battery Replacement.
If you notice that the distance between
the remote control unit and the unit for
correct operation becomes shorter, it
indicates that the batteries are exhausted. In this case replace the batteries with
new ones.
Precautions concerning batteries
O Be sure to insert the batteries with
correct positive
≠ and negative –
polarities.
O Use batteries of the same type. Never
use different types of batteries
together.
O Rechargeable and non-rechargeable
batteries can be used. Refer to the
precautions on their labels.
O When the remote control unit is not to
be used for a long time (more than a
month), remove the batteries from the
remote control unit to prevent them
from leaking. If they leak, wipe away
the liquid inside the battery
compartment and replace the batteries
with new ones.
O Do not heat or disassemble batteries
and never dispose of old batteries by
throwing them in fire.

O Before connection, turn off all
components and pay special attention
to left (L) and right (R) channel
indications.
O Read the owner's manual of each
component you intend to use with this
unit.
∑ Signal cords
LINE IN / OUT terminals
Connect the LINE IN terminals to the TAPE
REC terminals and connect the LINE OUT
terminals to the TAPE PLAY terminals of the
stereo amplifier using RCA pin plug cords.
O LINE OUT terminals output the compact
disc or cassette deck tape signal. When
both compact disc and tape are played
back, the tape sound has priority.
CD LINE OUT terminals
Connect the CD LINE OUT terminals to the
CD, DAT or AUX terminals of the stereo
amplifier using RCA pin plug cords.
O CD LINE OUT terminals always output
the disc signal.
Caution:
If the CD player interferes with the tuner,
TV reciever, etc., allow a reasonable
distance between them.
∑ Power cord
Be sure to connect the power cord to an
AC outlet which supplies the correct
voltage.
∑ Headphones
When using headphones, connect the
headphone plug into the PHONES jack.
O Adjust the level of the signals output
from the phones jack.
_ 5_
Connections
ENGLISH
ENGLISH
IMPORTANT (for U.K. Customers)
DO NOT cut off the mains plug from this
equipment.
If the plug fitted is not
suitable for the power points in your
home or the cable is too short to reach
a power point, then obtain an
appropriate safety approved extension
lead or consult your dealer.
If nonetheless the mains plug is cut off,
remove the fuse and dispose of the plug
immediately, to avoid a possible shock
hazard by inadvertent connection to the
mains supply.
If this product is not provided with a
mains plug, or one has to be fitted,
then
follow the instructions given below:
IMPORTANT. DO NOT make any
connection to the larger terminal which
is marked with the letter E or by the
safety earth symbol
ç or coloured
GREEN or GREEN-and-YELLOW.
The wires in the mains lead on this
product are coloured in accordance
with the following code:
BLUE: NEUTRAL
BROWN: LIVE
As these colours may not correspond
with the coloured markings identifying
the terminals in your plug proceed as
follows:
The wire which is coloured BLUE must
be connected to the terminal which is
marked with the letter N or coloured
BLACK.
The wire which is coloured BROWN
must be connected to the terminal
which is marked with the letter L or
coloured RED.
When replacing the fuse only a
correctly rated approved type should
be used and be sure to re-fit the fuse
cover.
IF IN DOUBT — CONSULT A
COMPETENT ELECTRICIAN.
Be sure to remove the power cord from the
AC outlet before repositioning the voltage
converter switch.
1. Locate the voltage selector on the rear
panel.
2. Using a flat-bladed screwdriver, set to
the appropriate 230 V or 120 V position
according to your area.
Voltage Conversion
(For general export models)
Stereo Amplifier
AD-500

_ 6_
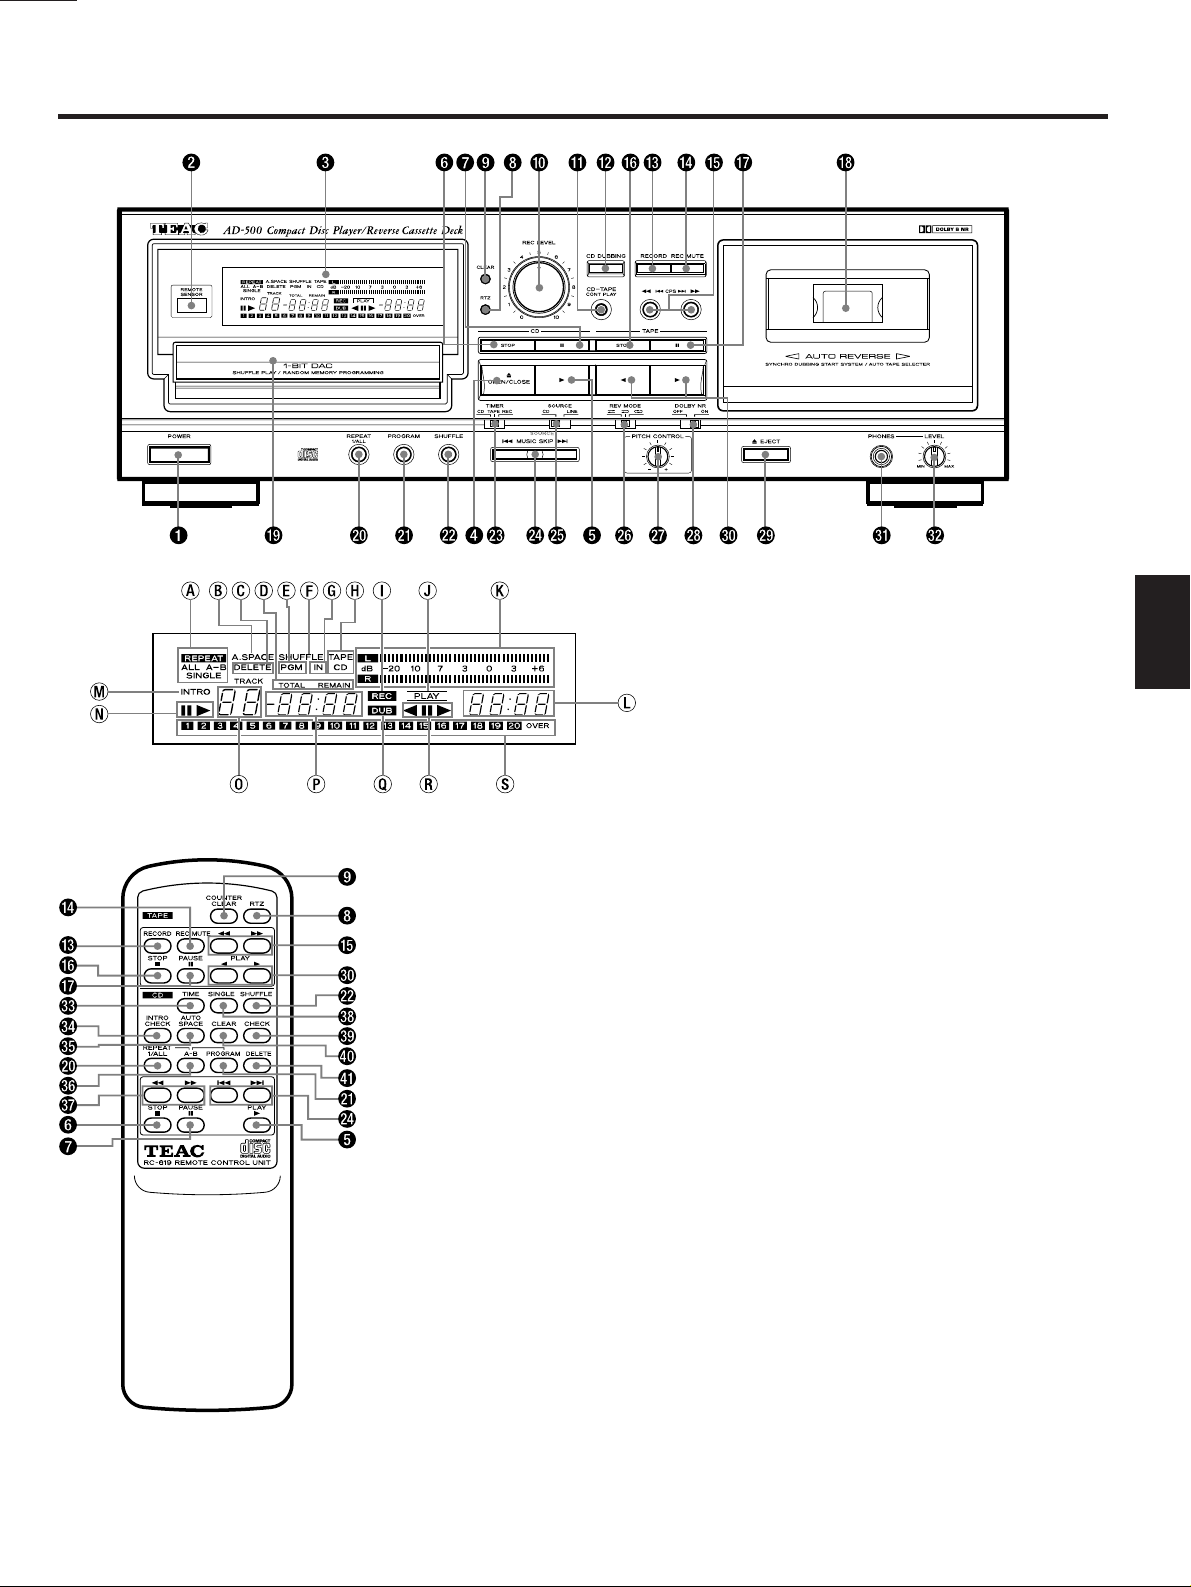
Name of Each Control
1 POWER switch
2 REMOTE SENSOR
3 Multi-function display window
a REPEAT indicator
b Auto space indicator (A. SPACE)
c DELETE indicator
d Time mode indicator
e Program indicator (PGM)
f SHUFFLE indicator
g CD input indicator (IN)
h TAPE/CD indicator
i REC indicator
j Tape PLAY indicator
k Level meter
l Tape counter
m INTRO play indicator
n CD pause/play indicator (ƒ/∏)
o Track indicator
p Time counter
q DUB indicator
r Tape reverse/pause/forward
indicator (”ƒ∏)
s Music calendar
4 OPEN/CLOSE button
5 CD play button (å)
6 CD STOP button
7 CD pause button (ƒ)
8 Return-To-Zero button (RTZ)
9 Counter clear button (CLEAR)
0 REC LEVEL control
q Continuous play button (CD-TAPE
CONT PLAY)
w CD DUBBING button
e RECORD button
r REC MUTE button
t Rewind and fast forward/CPS buttons
(Ú CPS ÆÒ)
y Tape STOP button
u Ta pe pause button (ƒ)
i Cassette holder
o Disc tray
p REPEAT 1/ALL button
a PROGRAM button
s SHUFFLE button
d TIMER switch
f MUSIC SKIP buttons (Ú/Æ)
g SOURCE switch
h Reverse mode switch (REV MODE)
j PITCH CONTROL knob
k DOLBY NR switch
l EJECT button
; Tape play buttons (”/∏)
z PHONES jack
x Headphones LEVEL knob
c TIME button
v INTRO CHECK button
b AUTO SPACE button
n A-B button
m CD SEARCH buttons (/Ò)
, SINGLE button
. CHECK button
/ CLEAR button
! DELETE button
∑ Even if the disc tray is open ...
When the å button is pressed:
The disc tray will close and playback starts
from the first track.
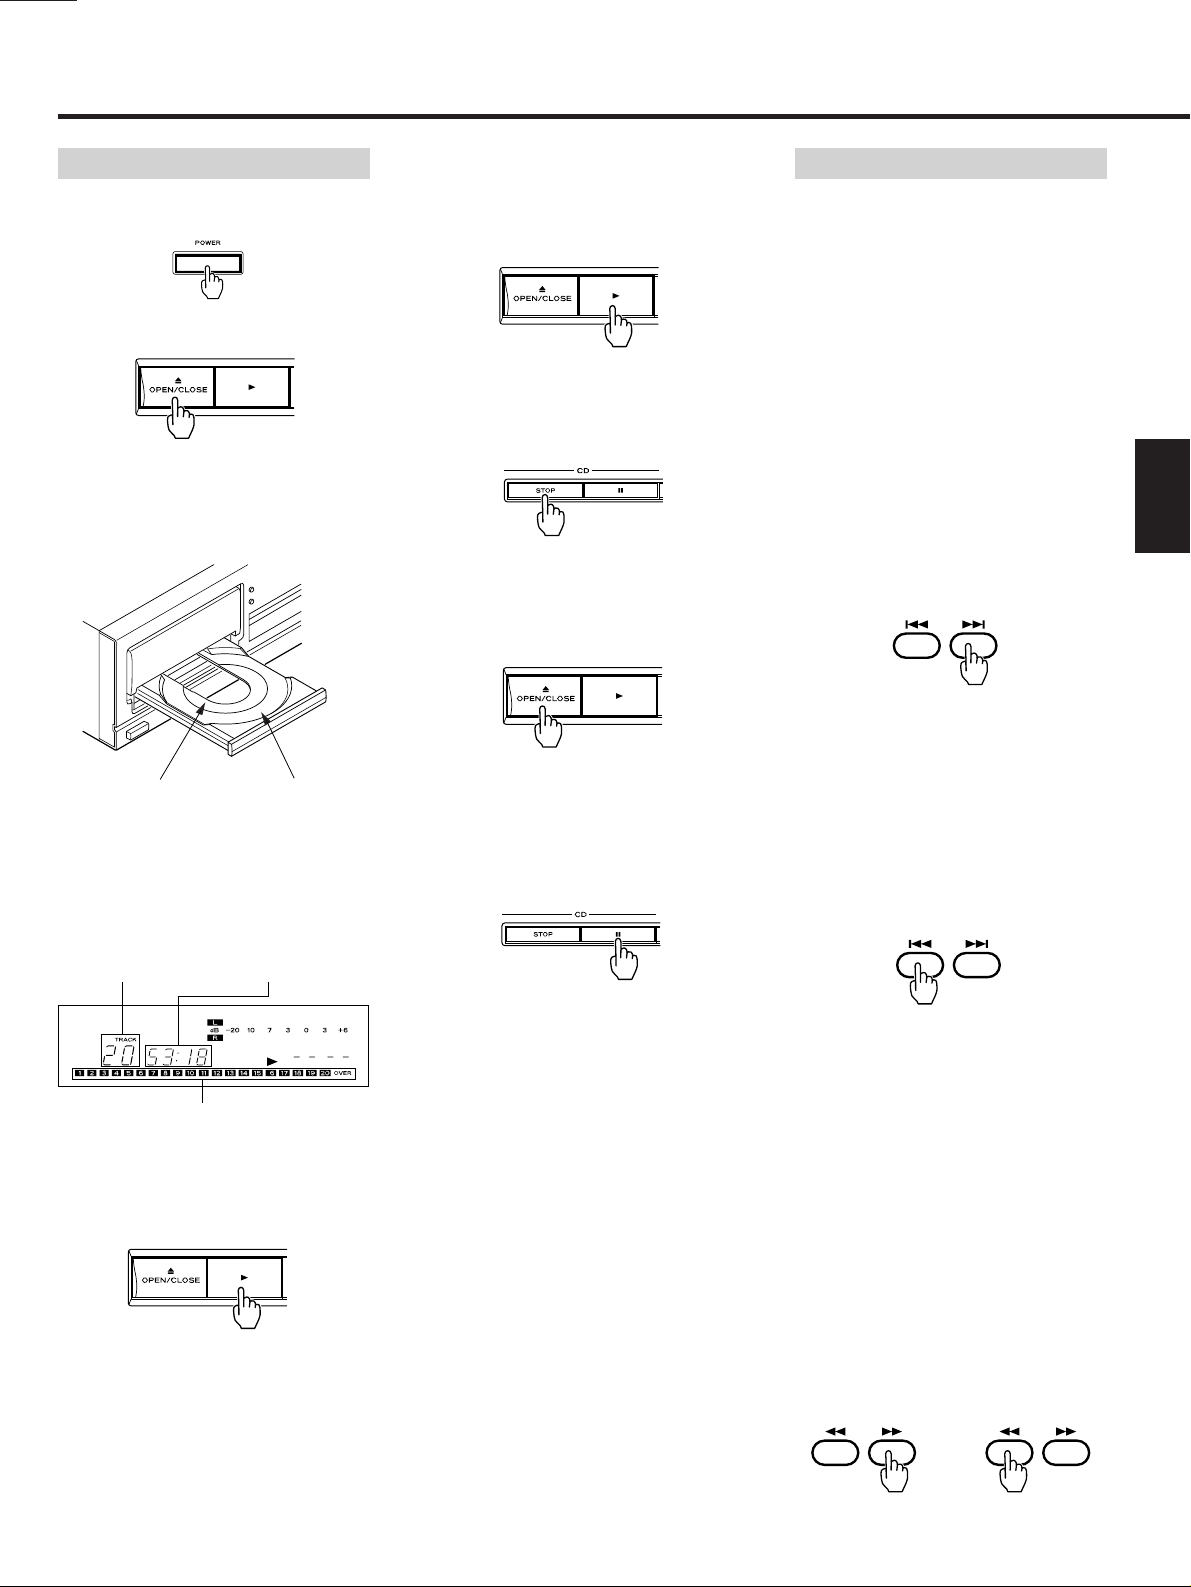
∑ To stop playback
Press the STOP button. The player enters
the Stop mode.
To unload the disc:
Press the OPEN/CLOSE button; playback
stops and the disc tray will slide out, and
all functions are reset to their initial
settings.
To temporarily suspend playback (Pause
mode):
Press the ƒ button. Playback stops at the
current position and the
ƒ indicator lights
steadily. To resume playback from the
same position, press the
∏ or ƒ button.
CAUTION :
O Do not force the tray by hand during
opening and closing operations.
_ 7_
ENGLISH
1. Press the POWER switch.
2. Press the OPEN/CLOSE button.
The disc tray will slide out. Place the
disc gently on the tray with its label side
facing upward. The disc is set within
the disc guides at the center of the tray.
3. Press the OPEN/CLOSE button again.
The disc tray will close.
Several seconds later, the following
information is displayed.
4. Press the CD PLAY (∏) button.
Disc playback starts from the first track,
and the
∏ (play) indicator will light.
O During playback, the number of the
currently played tune blinks on the
music calendar.
O When tunes have been played, their
numbers will disappear from the Music
Calendar display.
CD Player
Basic Operation
For 8 cm (3-inch)
CD singles
For 12 cm (5-inch)
Compact Discs
Tune numbers on disc up to 20
Total number of
tunes on the disc
Total playback
time of disc
∑ Music search using MUSIC
SKIP buttons (Ú/Æ)
The beginning of any tune can be easily
located using the
Ú/Æ MUSIC SKIP
buttons. This operation is indicated clearly
in the TRACK display.
O This operation is possible even in the
Program Playback mode. However,
only programmed tunes will be
detected.
∑ To skip to the next tune
Press the
Æ button.
The player will skip ahead to the next tune
each time the
Æ button is pressed. The
player can be advanced to the last tune
this way, but once the beginning of the last
tune is reached, the player will not
advance even if the
Æ button is pressed.
∑ To skip back to the previous tune
Press the
Ú button.
The player will skip back one tune each
time the
Ú button is pressed. If this
button is pressed in the middle of a tune,
the player will skip back to the beginning of
the current tune. To make it skip back to
the previous tune, the button must be
pressed twice.
In this way, the player can be returned to
the beginning of the first tune on the disc.
∑ Music search using SEARCH
buttons (/Ò)
During playback or in the Pause mode,
hold down the
Ò button of the remote
control or the
Æ button of the main unit
to move the playing position quickly in the
forward direction, and hold down the
button of the remote control or the Ú
button of the main unit to move quickly in
the reverse direction.
During the manual search operation, sound
will be audible but the output level will be
lowered. This lets you search for any
required portion while checking the sound.
When the desired position is reached,
release the button to reenter the previous
mode.
Music Search Operation
or

_ 8_
∑ To display the total program
time
In the Program mode, press the TIME
button to display the total program time.
Pressing the TIME button again will return
the CD player to the Program mode.
∑ To review the program contents
1. Press the CHECK button in the Program
mode.
The first programmed track number will
light and "P-01" will blink in the display.
2. Each time the CHECK button is pressed,
the next programmed track number will
light.
"P-XX (Program number)" will blink in
the display.
O When the last programmed track
number is displayed, pressing the
CHECK button will return the CD player
to the Program mode, allowing you to
add tracks to the program.
O The track numbers stored in the
program memory will be displayed on
the Music Calendar. However, please
note that the Calendar can handle only
up to track 20. If higher track numbers
are entered in the Program memory, the
OVER indicator will light.
∑ To cancel a programmed track
Pressing the CLEAR button will cancel the
last programmed track.
∑ Delete programming
This is the opposite to normal programming, and is used to program tunes
which are not to be played. Use it when
there are tunes on the disc you don't want
to listen to.
1. Press the STOP button.
2. Press the DELETE button.
The CD player enters the Delete
Program mode.
The "DELETE" and "PGM" indicators light
in the display.
3. Alternately press the Ú MUSIC Æ
button(s) and the PROGRAM button in
any desired order.
4. Press the PLAY button.
Delete-programmed playback starts.
O In the Delete-Program mode, pressing
the TIME button will display the total
time of the non-deleted tracks. Pressing
the TIME button again will return the
player to the Delete-Program mode.
O Pressing the CHECK button in the
Delete-Program mode will display the
first deleted track number.
Each time the CHECK button is pressed,
the next deleted track number will be
displayed. When the last deleted track
number is displayed, pressing the
CHECK button will return the player to
the Delete-Program mode, allowing you
to delete other tracks.
O Pressing the CLEAR button will cancel
the last delete-programmed track.
O Pressing the STOP button when the
player is stopped will clear the deleteprogram memory.
The program playback function allows you
to program up to 20 tunes (tracks) for
playback in any desired order.
∑ Programming required tunes
1. Press the STOP button.
2. Press the PROGRAM button.
The player enters the Program mode.
The PGM indicator lights in the display.
3. Alternately press the Ú MUSIC SKIP
Æ button(s) and the PROGRAM
button in the following order.
4. Press the
∏ button.
Programmed playback starts from the
first programmed tune.
O Programming tunes is possible only
when the player is in the Stop mode.
O The programmed contents will be held
in memory even after programmed
playback has been completed or when
programmed playback is stopped by
pressing the STOP button.
O When the STOP button is pressed in the
stop mode, the contents of the program
are erased.
O To release the program mode, press the
program button again.
O During program playback, the TOTAL
REMAIN time display shows the total
remaining time of the programmed
tunes, from the current position.
O If tunes with numbers higher than 32
are programmed, TOTAL time may not
appear in the display. ("nn:nn" appears
in the display)
Program Playback
Example
To program tunes in the order 5 @ 2 @
8 in the Stop mode.
(select 5) (select 2)(enter)
(select 8) (enter)(enter)
_ 9_
ENGLISH
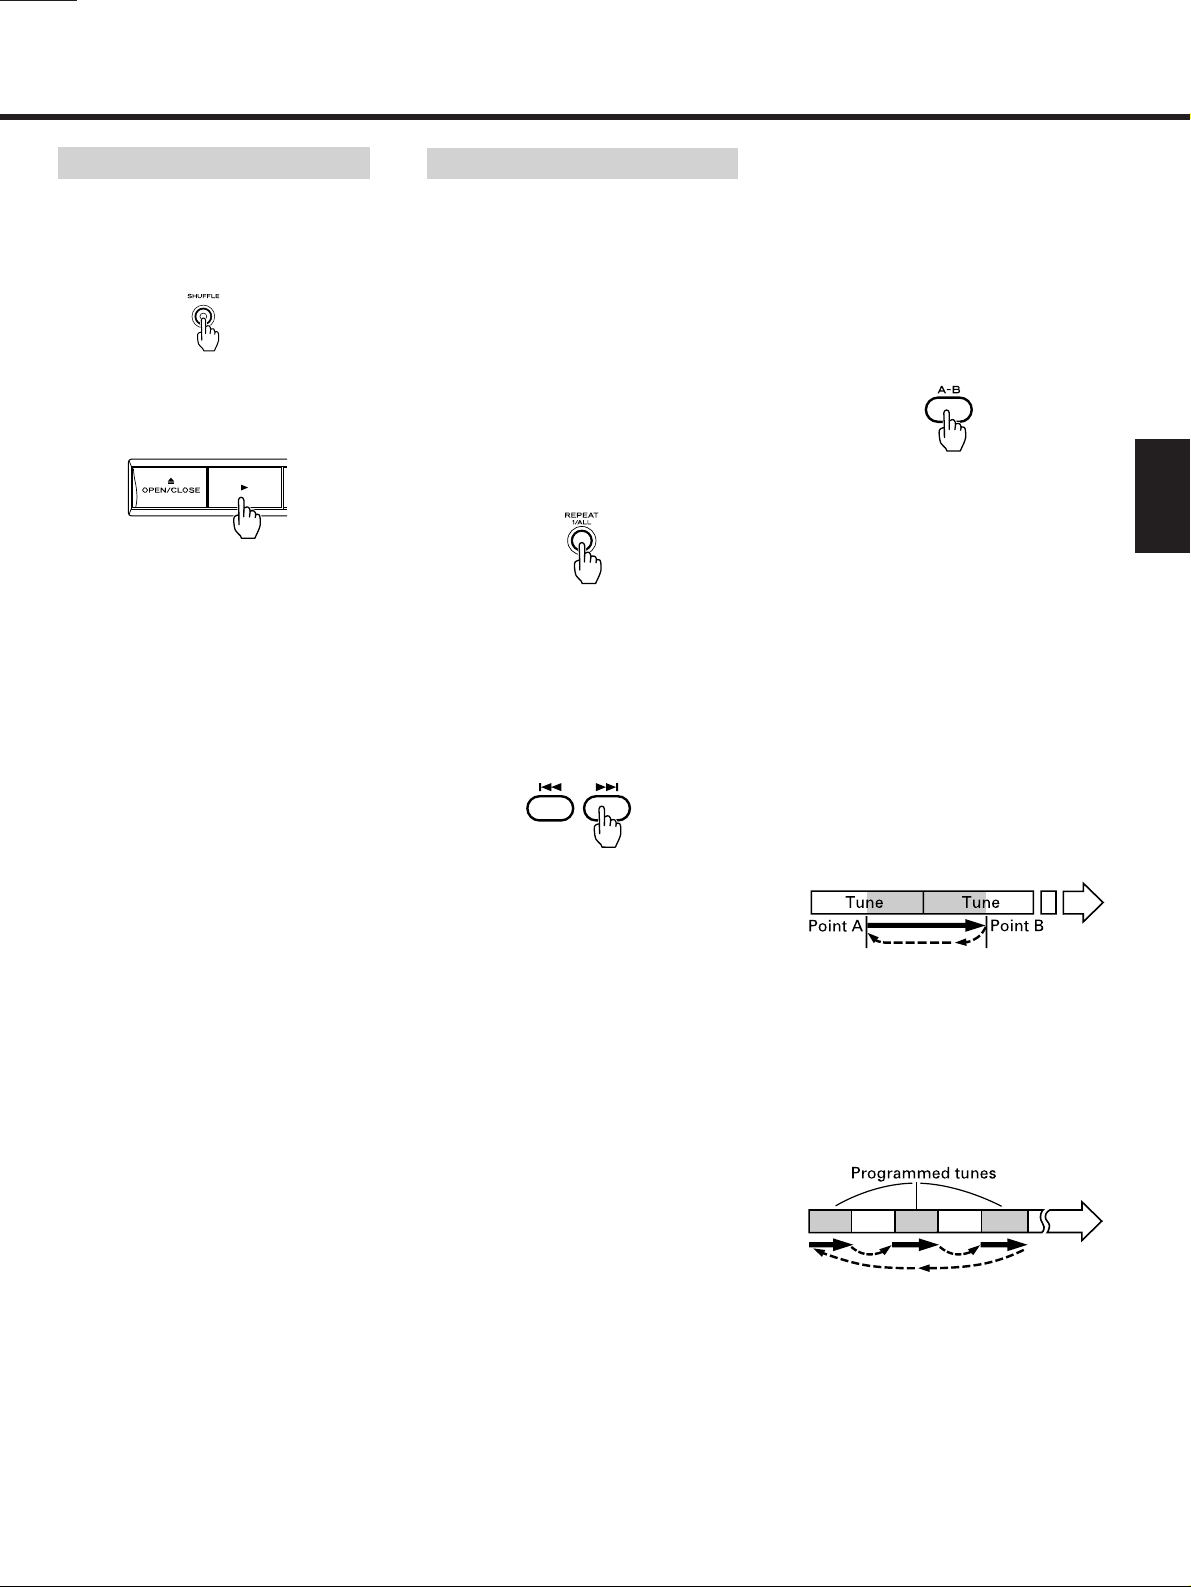
The repeat function allows repeat
playback of any single tune, the entire disc,
or any desired portion on the disc
designated by two (start and end) points.
O The repeat functions can be released
by pressing the repeat button again.
∑ To repeat one tune
(Single Repeat mode)
1. Press the REPEAT 1/ALL button.
The REPEAT and SINGLE indicators
light.
2. Select the required tune by pressing
the
ÚÆ button.
The selected tune is played, then when
the end of the tune is reached, the
player will return to the beginning of the
tune and playback starts again. In this
way, the selected tune will be played
back repeatedly.
∑ To repeat an entire disc
(All Repeat mode)
1. Press the REPEAT 1/ALL button twice.
The REPEAT and ALL indicators light.
2. Press the PLAY button.
Playback starts and, when the end of
the disc is reached, the player will
return to the beginning of the first tune,
and then playback continues
repeatedly.
∑ To repeat a designated section
(A-B Repeat mode)
1. Start playback from any point before
the section to be designated.
2. Designate the point at which repeat
playback should start (point A) by
pressing the A-B button.
The REPEAT and A - indicators light and
the B indicator blinks to show that point
A has been entered.
3. When the portion at which repeat
playback should end is reached, press
the A-B button again to designate point
B.
The B indicator is changed to light
steadily to show that the A-B repeat
function has been activated.
The player automatically returns to
point A and restarts playback.
When play reaches point B, the player
returns to point A and starts playback
again, repeatedly.
O After designating point A, when quick
searching point B, use the
Ò or Æ
button instead of playing back normally.
O When the A-B button is pressed again
during block repeat play, block repeat
playback will be released.
∑ Programmed repeat playback
The repeat function can be activated even
in the Programmed Playback mode.
To repeat all the programmed tunes, press
the 1/ALL button twice. (At this time, check
that the REPEAT and ALL indicators light.)
Repeat Function
1. Press the SHUFFLE button in the Stop
mode.
The SHUFFLE indicator lights in the
display.
2. Press the CD PLAY button.
Tracks will be randomly selected and
played back.
O Press the Æ button with the random
play function engaged to select a tune
at random. Press the
Ú button to
replay the currently played tune from its
beginning.
O A tune cannot be replayed after it has
been played in this mode.
O To release the random play function
while it is engaged, press the SHUFFLE
button again. Tunes will play back in
their normal designated order, starting
from the currently played tune.
RANDOM Playback

_ 10_
The time counter shows various time
readouts, as follows.
1 Total disc playback time
After the disc tray is closed with a disc
loaded, the total disc playback time and
total number of tunes on the disc are
displayed.
2 Elapsed time display
When playback begins, the elapsed time
of the tune being played is displayed in
minutes and seconds.
3 Remaining time display (REMAIN)
Displayed when the TIME button is
pressed once. This provides an easy
check of the remaining time of the tune
being played.
4 Total remaining time display
(TOTAL REMAIN)
Displayed when the TIME button is
pressed twice. The time displayed is
the total remaining playback time from
the position being played, to the end of
the disc; the counter counts down to
"00:00" during playback.
O Displayed after the TIME button is
pressed three times. The time displayed
is the elapsed playback time
2.
O In Normal Playback mode, if a tune with
a number higher than 32 is being
played, the remaining time will not be
displayed in the time counter even
when the TIME button is pressed.
Instead, "nn:nn" will be indicated on the
time indicator.
The intro check function allows only the
beginning of each track to be played for 10
seconds.
1. Press the INTRO CHECK button.
The INTRO and
∏ indicators will be
indicated.
2. Press the INTRO CHECK button again to
clear the intro check function.
O The intro check function also works
together with SHUFFLE, PROGRAM and
REPEAT ALL functions.
Time Counter Display Auto Spacing
Intro Check Function
1. Press the single button. The SINGLE
indicator will light in the display.
2. Press the
Ú/Æ MUSIC SKIP
buttons corresponding to the required
tune.
3. A single tune will be played back, after
which the player will enter the stop
mode.
O To release the Single mode, press the
SINGLE button again.
Single Playback
When this function is activated, an interval
of approx. 4 seconds will be inserted
between tunes automatically, so they are
played back with a fixed spacing.
To activate this, press the AUTO SPACE
button so that the A.SPACE indicator lights
in the display.
When the auto space button is pressed
again, the indicator goes off and the auto
spacing function is released.

_ 11_
ENGLISH
1. Press the POWER switch ON.
2. Set the REV MODE switch to the
required tape travel mode.
3. Load a pre-recorded cassette with its
open edge facing down and side A
facing toward you.
4. Select ON/OFF of the DOLBY NR system.
5. Press the
” or ∏ button to start
playback.
6. Adjust the volume with the amplifier's
volume control.
O To stop playback, press the STOP
button.
Playback
The tape counter counts up when the tape
is moving forward and down when the tape
is being rewound. The display can be
cleared by pressing the COUNTER CLEAR
button, which resets the counter index to
"0000".
Tape Counter
Cassette Deck Operation
COUNTER CLEAR
REC REVEL
STOP
RECORD
SOURCE
REV MODE
POWER
EJECT
DOLBY NR
1. Press the POWER switch ON.
2. Set the REV MODE switch.
O If you want to make a bi-directional
recording, set the REV MODE switch to
the
π or ø position.
O When starting to record with ”ú, one
side recording is performed.
O Set to the “ position if recording is to
be made on a single side of the tape.
3. Load a recordable cassette.
O Check that the safety tabs on the spine
of the cassette are in place. If they
have been broken off, block the holes
with adhesive tape.
4. Select the SOURCE switch.
O When selecting "CD", the built-in CD
player's output is selected as a source.
O When selecting "LINE", the external
signal from "LINE IN" is selected as a
source.
5. Select ON/OFF of the DOLBY NR system.
6. Press the RECORD button and the deck
enters the Record-Pause mode (REC
and
ƒ indicators light).
7. Adjust the recording level with the REC
LEVEL control so that the loudest sound
to be recorded just makes the meters
briefly reach around the "0 dB" point (for
Normal or Chrome tapes) or the "+3 dB"
point (for Metal tapes).
Recording
Metal
Normal or chrome
Loading a Cassette Tape
1. Use your finger or a pencil to turn the
cassette's hub and take up any slack
tape.
Note: Avoid touching the tape.
Fingerprints attract dust and dirt.
2. Press the eject button (
∫)* to open
the cassette compartment door.
3. Load the cassette tape with its open
edge facing down.
4. Gently close the compartment door.
*Notes:
OThe cassette holder cannot be
opened during recording or playback.
OIf the power has been switched off
during play or recording, ejecting the
cassette may be impossible. In such
a case, switch the power on and
press the eject button again.
8. Press the ƒPAUSE button again to start
recording.
O To stop recording temporarily, press the
ƒ PAUSE button. To restart the tape,
press the
ƒPAUSE button or ”∏play
button. During the Record-Pause mode,
if the button whose
”, ∏ indicator is
lit is pressed, recording will start;
however, if the button whose
”, ∏
indicator is not lit is pressed, only the
tape direction will change; to restart the
tape, press the button again.
O To stop recording, press the STOP
button.
Anything previously recorded on the tape
will automatically be erased when you
make a new recording on it. It can also be
erased by "recording" on it with the REC
LEVEL control set to "0".
CAUTION
Recording pre-recorded tapes, records, or
other published or broadcast material may
infringe copyright laws. Check before
recording.
Erasing

_ 12_
You can change the tape speed during
playback, allowing to change the pitch of
the reproduced sound.
By turning the PITCH CONTROL to the right,
the tape speed becomes faster, resulting in
higher pitch. By turning it to the left, the
tape speed becomes slower, resulting in
lower pitch.
O At the fully clockwise position, the tape
speed is approx. 12% faster .
O At the fully counter-clockwise position,
the tape speed is approx. 12% slower.
Pitch Control
O If, by using the Ò , the required CPS
number setting is exceeded, use the
button to count down the CPS
number until the required CPS number
is displayed.
O When the Ò button is pressed, the
next tune is counted as "1" and when
the
button is pressed, the current
tune is counted as "1".
2. The tape is fast-wound to detect blanks
between tunes until the required tune is
reached. Then playback starts from the
beginning of the designated tune.
Notes on CPS
CPS operates by detecting and counting
blanks of about 4 seconds, the standard
interval between tunes. Therefore, with
the following types of tapes, search
functions may not work correctly.
O When the intervals between tunes
cannot be detected.
– Intervals of less than 4 seconds.
– High levels of noise in intervals.
– Long low level sections (in classical
music, etc.)
CPS allows the selection and playback of
any tune up to 15 tunes ahead or before
the one being played. This function
operates by detecting blank spaces of at
least 4 seconds between tunes. These
blanks can be created using the REC MUTE
function.
Notes:
O In the following steps 1 and 2, to
simplify the description, the explanation
is given for "forward playback" (
∏
direction). A similar procedure should
be used for "reverse playback".
O The Ò (Fast Forward) and
(Rewind) buttons act as CPS buttons
during playback. This is why the main
unit indicates "
Ú CPS ÆÒ"
for these buttons, while the remote
control unit shows just "
Ò". In
the following explanation, these buttons
are described as just "
" and "Ò".
1. During forward playback, press the
or Ò button repeatedly until the
number of tunes to be skipped appears
in the counter display. Use the
Ò
button for searching a tune following
the current tune and
button for a
tune before the current tune. Refer to
the chart "How to Select any Required
Tune Using CPS".
CPS (Computomatic Program Search)
’
’
’
’
’
’
(1) (2)
(4)(3)
How to Select Any Required Tune Using CPS
Ex: See (1). To select the 3rd tune past the current tape position, select "CP03".
Current tape position
Direction of
tape travel
Following Before
In example (1), if "t" is less than
4 seconds, it will not be counted
as a blank. Designate "CP-02"
instead of "CP-03" to select the
3rd tune in this case.
’
Current tape position
BeforeFollowing
Direction
of tape
travel
In the Stop mode, the Òbuttons act
as fast forward and rewind buttons.
O In the Playback mode, these buttons act
as CPS buttons.
Fast Wind
By pressing the RTZ (Return To Zero)
button, the tape will locate the "0000" point
and stop.
O The RTZ function does not work when
the tape counter indicates a number
between "9996" and "0004".
RTZ (Return To Zero) Function
or

Using the CD DUBBING function, a CD-totape copy can be done easily and simply.
1. Load a compact disc.
2. Load a recordable cassette.
3. Select ON/OFF of the DOLBY NR system.
O In the CD DUBBING mode, the REC
LEVEL control has no effect, as the
recording level is automatically
adjusted internally.
∑ To record from the beginning of
the tape
Press the CD DUBBING button in the Stop
mode.
The tape is rewound to the beginning of
Side A and the counter is reset to "0000",
while the CD player is in the Pause mode at
the beginning of the first CD track.
After mute-recording for approx. 10
seconds (to avoid the leader tape), the
cassette deck drops into the Recording
mode while the CD player starts playback.
∑ To record from any desired
position of the tape
1. Move the tape to the desired position
and press the STOP button.
2. Press the RECORD button.
The deck enters the Record-Pause
mode.
3. Press the CD DUBBING button.
CD-to-tape copying starts from the
current tape position.
O While CD DUBBING is engaged, only
the STOP (CD), STOP (TAPE),
OPEN/CLOSE and TIME buttons are
operational.
∑ Designating CD tracks to be
recorded on Side A or Side B
(A-B Program Dubbing)
By using the A-B Program Dubbing
function, you can designate CD tracks to
be recorded on Side A or Side B.
1. Press the PROGRAM button.
2. Press the A-B button.
"A-" blinks and "B" lights in the display,
indicating that the CD player is now in
the "Side A program" mode.
3. Program tracks to be recorded on Side
A of the tape.
Perform the procedures described in
step 3 in the "Program Playback" section
on page 8.
O To display the total program time, press
the TIME button in the Program mode. It
will help you to fit the total recording
time to the tape length. Pressing the
TIME button again will return the CD
player to the Program mode.
4. Press the A-B button.
"A-" lights and "B" blinks in the display,
indicating that the CD player is now in
the "Side B program" mode.
5. Program tracks to be recorded on Side
B of the tape.
O Pressing the A-B button in the Side B
Program mode will return the CD player
to the Side A Program mode.
6. Press the CD DUBBING button.
The tape is rewound to the beginning of
side A and the counter is reset to "0000",
while the CD player is in the Pause
mode at the first track of the Side A
program.
After mute-recording for approx. 10
seconds (to avoid the leader tape), the
cassette deck drops into the Recording
mode while the CD player starts the
program playback.
O If you press the RECORD button before
pressing the CD DUBBING button, the
recording will start from the current
tape position (without rewinding the
tape to the beginning).
O If the tape on Side A ends before 01:30
(1 minute 30 seconds) of the current CD
track has been played, the recording of
Side B will start with that track. (except
with A-B Program Dubbing)
O When the CD player finishes playback,
the CD DUBBING mode is released.
O If the tape comes to the end of Side B
before the CD player finishes playback,
the CD DUBBING mode is canceled.
_ 13_
ENGLISH
∑ Automatic spacing operation for
4-second blanks (during recording)
Press the REC MUTE button during
recording. The tape movement
continues and a blank space of about 4
seconds is recorded (the RECORD
indicator blinks). The deck then enters
the Record-Pause mode automatically
(both the RECORD and PAUSE
indicators light).
To restart recording, press the PAUSE
button (the PAUSE indicator goes off).
∑ Automatic spacing operation for 4-
second blanks (during record-pause)
In the Record-Pause mode, pressing the
REC MUTE button will initiate the above
record-muting operation automatically.
The deck then returns to the RecordPause mode.
∑ For a blank of more than 4 seconds
During recording, hold the REC MUTE
button depressed for longer than 4
seconds. A blank space will be left as
long as the button is pressed. Release
the button to enter the Record-Pause
mode. To restart recording, press the
PAUSE button.
O During record muting operation (while
the RECORD indicator is blinking),
pressing the REC MUTE button again
will release the record muting operation
and recording will restart without
stopping the tape.
Record Muting Operation
Copying from CD to Tape
or

The unit has a timer controlled function.
This lets you start playback or recording
operations at any desired time when an
optional audio timer is used.
∑ Timer Playback of CD or Cassette
1. Connect the unit and your stereo
system to an audio timer as shown in
the diagram.
2. Set the power switches of all
components to ON.
3. Load a disc or a prerecorded cassette.
4. Set the timer switch to the CD or TAPE
position.
5. Set the audio timer to the required start
(power on) and stop (power off) times.
When this setting is completed, the
power to all components will be
switched off.
6. When the preset start time is reached,
power will be supplied and playback
will start automatically.
∑ Timer Recording
1. Select the amplifier's input which this
deck is capable of recording.
2. Select the source to be recorded (FM,
AM, etc.).
3. Load a recordable cassette and set the
[TIMER] switch to [REC].
4. Set the audio timer to the required start
(power on) and stop (power off) times.
When this setting is completed, the
power to all components will be
switched off.
5. When the preset start time is reached,
power will be supplied and recording
will start automatically.
In the Continuous Playback mode, once
either the CD player or cassette deck
finishes (or stops) playback, the other
starts playback automatically.
1. Press CD-TAPE CONT PLAY button.
"TAPE" and "CD" blink in the display.
2. (For example) Press the CD Play button.
The CD player starts playback.
"CD" blinks in the display.
3. When the CD player stops, the cassette
deck automatically starts playback.
"TAPE" blinks in the display.
Afterward, when one stops, the other
starts.
O Regardless of whether one machine
(CD player or cassette deck) is stopped
forcibly by pressing the STOP button or
automatically at the end of playback,
the other machine starts playback.
O You may change the CD or tape while it
is in Stop mode.
O To release the Continuous Playback
mode, press the CD-TAPE CONT PLAY
button again.
_ 14_
Timer-controlled operation
Continuous Playback
between CD and Tape
Audio timer
Tuner
To AC outlet of
the timer
To AC outlet of
the tuner
To amplifier's
AC outlet
Amplifier
AD-500
Timer Connection

_ 15_
ENGLISH
Basic troubleshooting of this unit is similar to troubleshooting of any other electrical or electronic equipment. Always check the most obvious
possible causes first. To give you a few ideas of what to look for, check the following:
Troubleshooting
Problem Probable cause Remedy
General
No power when POWER is pressed. Power plug not inserted securely. Plug in securely.
Hum Pin-cord plug not connected securely. Re-connect plug securely.
Noise in tuner. Too close to tuner. Keep a reasonable distance between
them or switch off the power of
this unit.
No audio output. Connection to stereo system is incorrect. Check connections.
Remote control unit operation is POWER switch set to OFF. Set switch to ON.
impossible.
Batteries not inserted in remote control. Insert batteries.
CD player
No playback when disc is loaded. Disc loaded with label side down. Load with label side up.
Disc dirty. Clean disc surface.
No audio output. Connection to stereo system is incorrect. Check connections.
No CD output The cassette deck is in Playback mode. Stop the deck. Or connect the
CD output with the amplifier.
A single tune can only be played. SINGLE button engaged. Press button to disengage it.
No program playback. PROGRAM button not pressed. Press button to display PGM.
Mistracking (sound jumping). Player receiving vibration or shock. Change the installation position
of this unit.
Disc dirty. Clean disc surface.
Cassette deck
Low sound quality The heads are dirty. Clean the heads.
The heads are magnetized. Demagnetize the heads using
the TEAC E-3.
The position of the Dolby NR switch is Change the position.
not correct.
Strange sound The pitch control has been changed. Set the pitch control pot to the
center position.
Impossible to record The record protection tabs of the Put adhesive tape on the tab hole.
cassette are broken off.
The heads are dirty. Clean the heads.
Recording level is too low. Turn the REC LEVEL pot to the right.

_ 16_
General
Power requirements:
120/230 V AC, 50–60 Hz
(U.S.A./Canada/general export model)
230 V AC, 50 Hz (Europe/U.K. model)
240 V AC, 50 Hz (Australia model)
Power consumption: 14 W
Dimensions (W x H x D):
435 x 145 x 290 mm (17-1/8" x 5-3/4" x
11-7/16")
Weight: 5.3 kg (11.7 lbs.)
Standard Accessories
Wireless remote control RC-619,
Pin plug cord x 2,
Battery (SUM-3, "AA", "R6" type) x 2
O Improvements may result in specifi-
cation or feature changes without
notice.
O Photos and illustrations may differ
slightly from production models.
CD player section
(Audio)
Number of channels:
2
Frequency response: 10 - 20,000 Hz ± 0.5 dB
Signal-to-noise ratio: 90 dB
Dynamic range: 90 dB
Total harmonic distortion: 0.02% (1 kHz)
Wow and flutter:
Unmeasurable (quartz accuracy)
Channel separation: 75 dB
Output: 2 Vrms
Digital filter: 4-times oversampling
Analog filter: 3rd order
(Signal format)
Sampling frequency:
44.1 kHz
D/A converter: 16-bit linear/channel
Channel bit rate: 4.3218 Mb/sec.
Channel modulation code: EFM
Error correction: CIRC
(Pickup)
Type:
Objective lens drive, optical 3-beam
laser pickup.
Objective Lens:
2-dimensional parallel drive
Laser Type:
GaAIAs type semiconductor laser
Wave length: 780 nm
Cassette section
Track system: 4-track 2-channel stereo
Heads: Record/playback x 1 (rotary
reverse), erase x 1
Type of tape: Cassette tape C-60, C-90
Tape speed:4.76 cm/sec.
Motor: DC servo motor x 1
Wow and flutter: 0.08% (W. RMS)
Frequency response (overall):
50 – 15,000 Hz ± 3 dB, metal
50 – 15,000 Hz ± 3 dB, chrome
50 – 14,000 Hz ± 3 dB, normal
Signal-to-noise ratio (overall):
59 dB (Dolby NR off, 3% THD level,
weighted),
69 dB (DOLBY NR on, over 5 kHz)
Fast winding time: Approx. 120 sec. (with
C-60)
Input: Line; 87 mV (input impedance of 50
kohms or more)
Output: Line; 0.46 V (load impedance of 50
kohms or more)
Headphones; 1 mV/8 ohms
Specifications
The heads and tape path should be
cleaned and demagnetized periodically.
Cleaning tape path
O Apply head cleaning fluid* to a cotton
bud or soft cloth, and lightly rub the
heads, capstan and all metal parts in
the tape path.
O Also clean the pinch roller using rubber
cleaning fluid*.
* Both are available in TEAC Tape
Cleaning Kits HC-2 and RC-2 in the
U.S.A. or TZ-261 in other areas.
Maintenance
Demagnetizing heads
Be sure that the power is off, then
demagnetize the heads using a TEAC E-3
demagnetizer. For details of its use, read
its instructions.
Pinch Roller
Capstan
Erase Head
Record/Play Head

_ 17_
FRANÇAIS
Avant utilisation
O Eviter de placer l'appareil en plein soleil
ou près d'une source de chaleur. Eviter
également les endroits sujets aux
vibrations et à la poussière excessive,
la chaleur, le froid ou l'humidité.
L'éloigner de sources de bruit, comme
les transformateurs ou les moteurs.
‚ Ne pas ouvrir le coffret, pour ne pas
endommager circuits ou provoquer des
chocs électriques. Si un objet étranger
pénètre dans l'appareil, contacter le
revendeur.
‚ Ne pas manipuler les disques avec les
doigts sales. Ne jamais introduire un
disque qui a une fêlure en surface.
‚ Pour retirer la fiche d'alimentation de la
prise de courant, toujours tirer
directement sur la fiche, ne jamais tirer
sur le cordon.
‚ Ne pas tenter de nettoyer l'appareil
avec des solvants chimiques qui
pourraient endommager la finition.
Utiliser un chiffon sec et propre.
‚ Conserver ce manuel dans un lieu sûr
pour toute référence ultérieure.
Cet appareil a été spécialement conçu
pour la reproduction de disques
audionumériques portant la marque "
˛".
D'autres disques ne peuvent pas être
reproduits.
‚ Toujours placer le disque audio-
numérique sur le tiroir de disque avec
son étiquette tournée vers le haut. (Les
disques audionumériques ne peuvent
être lus que sur une seule face.)
‚ Pour retirer un disque de sa boîte de
rangement, appuyer sur le centre de la
boîte et lever le disque, en le tenant
soigneusement par les bords.
Comment retirer le disque
Comment tenir le disque
O Les empreintes digitales et la poussière
doivent être soigneusement essuyées
de la surface enregistrée du disque
avec un chiffon doux.
Essuyer du centre vers l'extérieur
O Ne pas utiliser de diluant, de benzine ou
d'alcool qui endommageraient la
surface de plastique du disque.
‚ Les disques doivent être remis dans
leur boîte après utilisation pour éviter
des rayures qui pourraient faire "sauter"
le capteur laser.
‚ Ne pas exposer les disques en plein
soleil ou à une humidité et une
température élevées pendant de
longtemps. Une longue exposition à des
températures élevées peut gauchir le
disque.
A lire ceci avant utilisation
Manipulation des cassettes
Cassette
Manipulation des disques
Ne pas ranger les cassettes dans les
endroits suivants :
‚ Au-dessus d'appareils de chauffage, en
plein soleil ou des températures
élevées.
‚ Près de haut-parleurs, sur un téléviseur
ou un amplificateur ou des endroits où
elles pourraient être exposées à des
champs magnétiques puissants.
‚ Dans des endroits sales et poussiéreux
ou exposés à l'humidité.
‚ Eviter de faire tomber des cassettes ou
de leur faire subir des chocs excessifs.
‚ Comme les bandes des cassettes C120
sont peu résistantes et peuvent
facilement se coincer dans le
mécanisme de transport, ne pas les
utiliser.
Sélection de bande:
Pour que la fonctionne sélection
automatique de bande fonctionne
correctement, les cassettes à bande métal
et chrome (cobalt) doivent avoir des trous
d'identification.
*Réduction de bruit Dolby fabriqué sous
license de Dolby Laboratories Licensing
Corporation.
DOLBY et le symbole double-D
∂ sont
des marques de Dolby Laboratories
Licensing Corporation.
‚ Ne pas coller de papier ni écrire avec
un stylo à bille sur la surface du côté de
l'étiquette.
Pour utiliser la télécommande, la pointer
vers le capteur de télécommande du
panneau avant de l'appareil.
ª Mise en place des piles
Télécommande
1. Retirer le couvercle du compartiment
des piles.
2. Introduire deux piles "AA" (R6, SUM-3)
S'assurer que les piles sont installées
correctement en respectant la polarité
plus
± et moins —.
3. Fermer le couvercle jusqu'à son déclic.
Remplacement des piles
Si vous remarquez que la distance entre la
télécommande et l'appareil devient plus
courte pour assurer un fonctionnement
correct, c'est que les piles sont usées.
Dans ce cas, remplacer les piles par des
neuves.
Précautions à observer concernant les
piles
O Bien placer les piles en respectant la
polarité plus (+) et moins (–).
O Utiliser des piles du même type. Ne
jamais utiliser ensemble différents
types de piles.
O Des piles ou des batteries peuvent être
utilisées. Se référer aux précautions à
observer sur leurs étiquettes.
O Si la télécommande n'est pas utilisée
pendant une longue période (plus d'un
mois), retirer les piles de la
télécommande pour éviter des fuites
des piles. Si elles coulent, bien essuyer
le liquide dans le compartiment des
piles et remplacer les piles par des
neuves.
O Ne pas chauffer, ni démonter les piles
et ne jamais les mettre au feu.

_ 18_
O Avant de raccorder le combiné lecteur
CD-cassette, éteindre tous les appareils
et bien repérer les canaux gauche (L) et
droit (R).
O Lire le mode d'emploi de chaque
appareil utilisé avec le combiné lecteur
CD-cassette.
∑ Cordons de liaison
Prises d'entrée/sortie de ligne (LINE
IN/OUT)
Raccorder les prises LINE IN aux prises
TAPE REC et les prises LINE OUT aux
prises TAPE PLAY de l'amplificateur stéréo
à l'aide des cordons de liaison à fiches
RCA.
O Les prises LINE OUT fournissent le
signal du lecteur CD ou de la platine à
cassette. Quand ces deux appareils
sont en mode de lecture, le son fourni
par la platine à cassette a priorité.
Prises CD LINE OUT
Raccorder les prises CD LINE OUT aux
prises CD, DAT ou AUX de l'amplificateur
stéréo à l'aide des cordons de liaison à
fiches RCA.
O Les prises CD LINE OUT fournissent
toujours le signal du lecteur de disque
compact.
Attention:
Si le lecteur CD produit des interférences
sur le syntoniseur, le téléviseur, etc.,
laisser une distance raisonnable entre ces
appareils.
∑ Cordon d'alimentation
Bien raccorder le cordon d'alimentation à
une prise secteur CA sous tension.
∑ Casque d'écoute
Pour utiliser un casque d'écoute, brancher
la fiche du casque à la prise PHONES.
O Régler le niveau de sortie de la prise
casque.
Raccordements
Bien débrancher le cordon d'alimentation
de la prise secteur avant de repositionner
le sélecteur de tension.
1. Localiser le sélecteur de tension sur le
panneau arrière.
2. En utilisant un tournevis à lame plate,
régler sur la position appropriée 230 V
ou 120 V en fonction de la tension
locale.
Changement de tension
(Pour les modèles universel)
AD-500
Prise secteur CA
Cordon de liaison
à fiches RCA
Cordon de liaison
à fiches RCA
Cordon de liaison
à fiches RCA
Amplificateur stéréo
A CD, DAT
ou AUX
A
TAPE PLAY
A
TAPE REC
_ 19_
FRANÇAIS
Nomenclature
1 Interrupteur d'alimentation (POWER)
2 Récepteur du signal de télécommande
3 Afficheur à fonctions multiples
a Indicateur de répétition (REPEAT)
b Indicateur d'espacement
automatique (A.SPACE)
c Indicateur d'effacement (DELETE)
d Indicateur de mode d'affichage du
temps
e Indicateur de mode de
programmation (PGM)
f Indicateur de lecture aléatoire
(SHUFFLE)
g Indicateur d'entrée CD (IN)
h Indicateur de cassette/CD (TAPE/CD)
i Indicateur d'enregistrement (REC)
j Indicateur de lecture de cassette
(PLAY)
k Décibelmètres
l Compteur de bande
m Indicateur de lecture des
introductions (INTRO)
n Indicateur de pause/lecture de CD
(
ƒ/∏)
o Indicateur de plage
p Compteur temporel
q Indicateur de copie (DUB)
r Indicateur de lecture de face arrière/
pause/lecture de face avant (
”ƒ∏)
s Calendrier musical
4 Touche d'ouverture/fermeture
(OPEN/CLOSE)
5 Touche de lecture de CD (å)
6 Touche d'arrêt de CD (CD STOP)
7 Touche de pause de CD (ƒ)
8 Touche de retour au point zéro (RTZ)
9 Touche de remise à zéro du compteur
(COUNTER CLEAR)
0 Commande de réglage du niveau
d'enregistrement (REC LEVEL)
q Touche de lecture continue (CD-TAPE CONT PLAY)
w Touche de copie de CD (CD DUBBING)
e Touche d'enregistrement (RECORD)
r Touche d'enregistrement silencieux (REC MUTE)
t Touches de rembobinage et d'avance rapide/
Recherche automatique(
Ú CPS ÆÒ)
y Touche d'arrêt de cassette (STOP)
u Touche de pause de cassette (ƒ)
i Porte-cassette
o Tiroir de disque
p Touche de lecture répétée plage/disque
(REPEAT 1/ALL)
a Touche de programmation de plages (PROGRAM)
s Touche de lecture aléatoire (SHUFFLE)
d Sélecteur de minuterie (TIMER)
f Touches de saut de plage (MUSIC SKIP (Ú/Æ))
g Sélecteur de source (SOURCE)
h Sélecteur de sens de défilement (REV MODE)
j Bouton de réglage de l'acuité du son
(PITCH CONTROL)
k Commutateur de réducteur de bruit (DOLBY NR)
l Touche d'éjection (EJECT)
; Touches de lecture de cassette (”/∏)
z Prise de casque (PHONES)
x Bouton de réglage de niveau au casque (LEVEL)
c Touche d'affichage du temps (TIME)
v Touche de contrôle des introductions (INTRO
CHECK)
b Touche d'espacement automatique (AUTO SPACE)
n Touche A-B
m Touches de recherche de plage de CD SEARCH
(
/Ò)
, Touche de lecture de plage unique (SINGLE)
. Touche de contrôle de plages programmées
(CHECK)
/ Touche d'annulation de plages programmées
(CLEAR)
! Touche d'effacement (DELETE)

∑ Si le tiroir du disque est ouvert...
Lorsque la touche ∏ est pressée:
Le tiroir se fermera et la lecture
commencera à de la première plage.
∑ Pour arrêter la lecture
Appuyer sur la touche STOP. Le lecteur
entre en mode d'arret.
Pour retirer le disque:
Appuyer sur la touche OPEN/CLOSE; La
lecture s'arrête et le tiroir ressort, et toutes
les fonctions reviennent à leur réglage
initial.
Pour arrêter momentanément la lecture
(mode de pause):
Appuyer sur la touche ƒ. La lecture
s'arrête à la position du capteur.
L'indicateur
ƒ s'allume. Pour reprendre la
lecture à partir de la même position,
appuyer sur la touche
∏ ou ƒ.
PRECAUTION:
O Ne pas forcer le tiroir lors de
l'ouverture et de la fermeture.
1. Appuyer sur l'interrupteur d'alimentation POWER.
2. Appuyer sur la touche OPEN/CLOSE.
Le tiroir du disque s'ouvre. Placer avec
précaution le disque sur le tiroir avec la
surface imprimée dirigée vers le haut.
Le disque doit être positionné dans les
guides de disque au centre du tiroir.
3. Appuyer à nouveau sur la touche
OPEN/CLOSE.
Le tiroir du disque se referme.
Quelques secondes plus tard,
l'information suivante est affichée.
4. Appuyer sur la touche CD PLAY (∏).
La lecture du disque commence à
partir de la première plage, et
l'indicateur
∏ (lecture) s'allume.
O Pendant la lecture, le numéro de la
plage en cours de lecture clignote sur
le calendrier musical.
O Après la lecture d'une plage, son
numéro disparaît de l'affichage du
calendrier musical.
_ 20_
Lecteur CD
Fonctionnement de base
For 8 cm (3-inch)
CD singles
For 12 cm (5-inch)
Compact Discs
Tune numbers on disc up to 20
Total number of
tunes on the disc
Total playback
time of disc
∑ Pour passer à la plage suivante
Appuyer sur la touche
Æ.
Le lecteur passera au début de la plage
suivante à chaque pression sur la touche
Æ. Le lecteur peut ainsi être avancé
jusqu à la dernière plage, mais une fois
que le début de la dernière plage est
atteint, le lecteur n'avance plus même si la
touche
Æ est pressée.
∑ Pour revenir à la plage précédente
Appuyer sur la touche
Ú.
Le lecteur reviendra en arrière d'une plage
à chaque pression sur la touche
Ú. Si
cette touche est pressée au milieu d'une
plage, le lecteur revient au début de la
plage actuelle. Pour revenir à la plage
précédente, la touche doit être pressée
deux fois.
Il est ainsi possible de revenir au début de
la première plage du disque.
∑ Recherche de plage avec les
touches (
/Ò)
Pendant la lecture ou la pause de lecture,
appuyer en continu sur la touche
Ò de
la télécommande, ou
Æ de l'appareil,
pour rechercher plus rapidement une
plage vers l'avant, et appuyer en continu
sur
de la télécommande, ou Ú de
l'appareil, pour rechercher plus rapidement une plage vers l'arrière.
Pendant la recherche manuelle, le son est
audible mais le niveau sonore est réduit.
N'importe quelle position sur le disque
peut ainsi être localisée. Quand la position
souhaitée est atteinte, relâcher la touche
pour revenir au mode normal.
Fonctionnement de la recherche
musicale
or
Nombre total de plages
sur le disque
Disques simples
de 8 cm
Disques
audionumériques
de 12 cm
Numéros de plage sur le disque jusqu'à 20
Temps total de
lecture du disque
∑ Recherche musicale en utili-
sant les touches MUSIC SKIP
(
Ú/Æ)
Le début d'une plage peut facilement être
localisé en utilisant les touches MUSIC
SKIP
Ú et Æ. Ce fonctionnement est
clairement indiqué sur l'affichage TRACK.
O Cette opération est possible même en
mode de lecture programmée; dans ce
cas, cependant, seules les plages
programmées seront détectées.
ou

O Si plus de 32 plages sont programmées,
le temps total n'apparaîtra pas dans
l'afficheur. ("nn:nn" apparaîtra à la
place.)
∑ Pour afficher le temps total des
plages programmées
En mode de programmation, appuyer sur la
touche TIME pour afficher le temps total
des plages programmées.
Pour revenir au mode de programmation,
appuyer une nouvelle fois sur la touche
TIME.
∑ Pour contrôler les plages
programmées
1. Appuyer sur la touche CHECK en mode
de programmation.
Le numéro de la première plage
programmée s'allume et "P-01" clignote
dans l'afficheur.
2. A chaque pression sur la touche
CHECK, le numéro de plage
programmée suivant s'allume.
"P-XX (numéro de programme)" clignote
dans l'afficheur.
O Quand le numéro de la dernière plage
programmée est affiché, une pression
sur la touche CHECK permet de revenir
au mode de programmation et d'ajouter
des plages au programme.
O Les numéros des plages programmées
apparaissent dans le calendrier
musical, mais comme celui-ci ne peut
contenir que 20 plages, l'indicateur
OVER s'allume quand d'autres plages
sont ajoutées à un programme
contenant déjà 20 plages.
∑ Pour annuler une plage pro-
grammée
Il suffit d'appuyer sur la touche CLEAR
pour annuler la dernière plage
programmée.
_ 21_
FRANÇAIS
∑ Programmation des plages à
effacer
C'est l'inverse de la programmation
normale, c'est-à-dire que les plages qui ne
doivent pas être reproduites sont exclues
de la programmation. Ce type de programmation est pratique quand on ne veut pas
écouter certaines plages d'un disque.
1. Appuyer sur la touche STOP.
2. Appuyer sur la touche DELETE.
Le lecteur CD entre dans le mode de
programmation.
Les indicateurs "DELETE" et "PGM"
s'allument dans l'afficheur.
3. Appuyer alternativement sur les
touches
Ú MUSIC Æ et la touche
PROGRAM dans l'ordre souhaité.
4. Appuyer sur la touche PLAY.
La lecture sans les plages effacées
commence.
O En mode de programmation avec
effacement de plages, une pression sur
la touche TIME permet d'afficher le
temps de lecture de toutes les plages
non effacées.
Pour revenir au mode de programmation, appuyer une nouvelle fois sur
TIME.
O Le numéro de la première plage effacée
s'allume, quand on appuie sur la touche
CHECK dans ce mode de programmation.
A chaque pression sur la touche
CHECK, le numéro de la plage effacée
suivante apparaît. Quand la dernière
plage effacée apparaît, appuyer sur la
touche CHECK pour revenir au mode de
programmation et éventuellement
effacer d'autres plages.
O Il suffit d'appuyer sur la touche CLEAR
pour annuler la dernière plage effacée.
O Quand le lecteur est à l'arrêt, une
pression sur la touche STOP permet
d'annuler toute la programmation.
La fonction de lecture programmée vous
permet de programmer jusqu'à 20 plages
dans n'importe quel ordre pour la lecture.
∑ Programmation de certaines
plages
1. Appuyer sur la touche STOP.
2. Appuyer sur la touche PROGRAM.
Le lecteur entre en mode de programmation.
L'indicateeur PGM s'allume sur l'affichage.
3. Appuyer alternativement sur les
touches
Ú MUSIC SKIP Æ et
PROGRAM dans l'ordre suivant:
4. Appuyer sur la touche de lecture PLAY
(
∏).
La lecture programmée commence à
partir de la première plage programmée.
O La programmation des plage n'est
possible que quand le lecteur est dans
le mode d'arrêt.
O La programmation n'est pas annulée
lorsque la lecture d'un programmée est
terminée ou interrompue par une
pression sur la touche d'arrêt.
O Par contre, si l'on appuie sur la touche
STOP en mode d'arrêt, la programmation sera annulée.
O Pour sortir du mode de programmation,
appuyer une nouvelle fois sur la touche
PROGRAM.
O Pendant la lecture d'un programmée, le
temps de lecture total des plages
programmées restantes, à partir de la
position actuelle, est affiché avec
TOTAL REMAIN.
Lecture programmée
Exemple:
Pour programmer les plages dans
l'ordre 5
@ 2 @ 8 en mode d'arrêt.
(sélectionnez 5) (sélectionnez 2)(validez)
(sélectionnez 8) (validez)(validez)

_ 22_
Avec cette fonction, il est possible de
répéter la lecture d'une seule plage, de
tout un disque ou d'un passage d'un
disque défini par deux points (début et fin).
O Il suffit d'appuyer une nouvelle fois sur
la touche de répétition pour annuler la
lecture répétée.
∑ Pour répéter une plage
(Lecture répétée d'une plage)
1. Appuyer sur la touche REPEAT 1/ALL.
Les indicateurs REPEAT et SINGLE
s'allument.
2. Sélectionner la plage souhaitée en
appuyant sur la touche
ÚÆ.
La plage sélectionnée est reproduite et
lorsqu'elle est terminée, le lecteur
revient au début de cette plage pour la
reproduire une nouvelle fois. De cette
façon, la plage sélectionnée est
reproduite continuellement.
∑ Pour répéter tout un disque
(Lecture répétée de toutes les
plages)
1. Appuyer deux fois sur la touche
REPEAT 1/ALL.
Les indicateurs REPEAT et ALL s'allument.
2. Appuyer sur la touche PLAY.
La lecture commence et quand la fin du
disque est atteinte, le lecteur revient au
début de la première plage du disque et
le disque est reproduit une nouvelle
fois.
∑ Pour répéter un passage donné
(Lecture répétée d'un passage
A-B)
1. Commencer la lecture un peu avant le
passage qui doit être répété.
2. Désigner le point où la lecture répétée
doit commencer (point A) en appuyant
sur la touche A-B.
Les indicateurs REPEAT et A- s'allument
et l'indicateur B clignote pour indiquer
que le point A a été enregistré.
3. Quand le point où la lecture répétée
doit s'arrêter est atteint, appuyer à
nouveau sur la touche A-B pour
désigner le point B.
L'indicateur B reste maintenant allumé
pour indiquer que la lecture répétée du
passage A-B est en service.
Le lecteur revient automatiquement au
point A et la lecture commence.
Quand le point B est atteint, le lecteur
revient au point A et le passage est
répété continuellement.
O Après la désignation du point A,
appuyer sur la touche
Ò ou Æ
pour trouver plus rapidement le point B.
O Une nouvelle pression sur la touche
A-B pendant la répétition d'un passage
annule la lecture répétée de ce
passage.
∑ Lecture répétée d'un program-
me
La fonction de répétition peut aussi être
utilisée pendant la lecture programmée.
Pour répéter toutes les plages programmées, appuyer deux fois sur la touche
1/ALL. (A ce moment, vérifier que les
indicateurs REPEAT et ALL s'allument.)
Fonction de répétition
1. Appuyer sur la touche SHUFFLE en
mode d'arrêt.
L'indicateur SHUFFLE s'allume dans
l'afficheur.
2. Appuyer sur la touche CD PLAY.
Les plages sont sélectionnées au
hasard et reproduites.
O Appuyer sur la touche Æ quand la
lecture aléatoire est en service pour
choisir une plage au hasard. Appuyer
sur la touche
Ú pour reprendre la
lecture depuis le début de la plage en
cours de lecture.
O Une plage ne peut pas être répétée
dans ce mode.
O Pour libérer la fonction aléatoire,
appuyer à nouveau sur la touche
SHUFFLE. Les plages seront lues dans
l'ordre normal à partir de la plage en
cours de lecture.
Lecture aléatoire
Point BPoint A
Plage Plage
Plages programmées

_ 23_
FRANÇAIS
Le compteur temporel indique divers types
de temps, comme mentionné ci-dessous.
1 Temps de lecture total du disque
Après la fermeture du tiroir contenant
un disque, le temps de lecture total du
disque et le nombre de plages sur le
disque sont affichés.
2 Temps écoulé
Quand la lecture commence, le temps
écoulé de la plage actuelle est indiqué
en minutes et secondes.
3 Temps restant (REMAIN)
Ce temps apparaît après une pression
sur la touche TIME. Il indique le temps
restant sur la plage en cours de lecture.
4 Temps total restant (TOTAL REMAIN)
Ce temps apparaît après une double
pression sur la touche TIME. Le temps
affiché correspond au temps restant sur
le disque à partir de la position actuelle
jusqu'à la fin du disque. Le compteur
tourne jusqu'à "00:00" pendant la
lecture.
O Apparaît après une triple pression sur la
touche TIME. Le temps affiché est le
temps de lecture écoulé
2.
O En mode de lecture normale, le temps
restant n'est pas affiché dans le
compteur après une pression sur la
touche TIME, si le numéro de la plage
reproduite est supérieur à 32. Au lieu du
numéro de plage, "nn:nn" apparaît dans
l'indicateur de temps.
La fonction de contrôle des introductions
permet d'écouter seulement le début de
chaque plage pendant 10 secondes.
1. Appuyer sur la touche INTRO CHECK.
Les indicateurs INTRO et
∏ apparais-
sent.
2. Appuyer à nouveau sur la touche INTRO
CHECK pour annuler cette fonction.
O La fonction de contrôle d'introductions
est également possible avec les
fonctions SHUFFLE, PROGRAM et
REPEAT ALL.
Affichage du compteur temporel Espacement automatique
Fonction de contrôle des
introductions
1. Appuyer sur la touche SINGLE.
L'indicateur SINGLE s'allume dans
l'afficheur.
2. Appuyer sur les touches
Ú/Æ
MUSIC SKIP pour rechercher la plage
souhaitée.
3. Cette plage seulement est reproduite,
puis le lecteur s'arrête.
O Pour annuler le mode Single, appuyer
une nouvelle fois sur la touche SINGLE.
Lecture d'une seule plage
Lorsque cette fonction est activée, un
intervalle de 4 secondes environ sera
introduit automatiquement entre les plages
pour qu'elles soient lues avec un
espacement fixe.
Pour activer cette fonction, appuyer sur la
touche AUTO SPACE pour que l'indicateur
A.SPACE s'allume dans l'afficheur.
Quand la touche d'espacement automatique est à nouveau pressée,
l'indicateur s'éteint et la fonction d'espacement automatique est mise hors service.

_ 24_
1. Appuyer sur l'interrupteur POWER.
2. Régler le sélecteur REV MODE sur le
mode de défilement souhaité.
3. Insérer une cassette enregistrée avec
le bord ouvert dirigé vers le bas et la
face A dirigée vers l'extérieur.
4. Sélectionner DOLBY NR ON ou OFF.
5. Appuyer sur la touche
” ou ∏ pour
commencer la lecture.
6. Ajuster le volume sur l'amplificateur.
O Pour arrêter la lecture, appuyer sur la
touche STOP.
Lecture
L'indication du compteur augmente quand
la bande défile vers l'avant et elle diminue
quand la bande est rembobinée. La touche
COUNTER CLEAR permet de ramener
l'affichage à "0000".
Compteur de bande
Fonctionnement de la platine à cassette
COUNTER CLEAR
REC REVEL
STOP
RECORD
SOURCE
REV MODE
POWER
EJECT
DOLBY NR
La cassette s'arrête après 5 cycles.
Réglage Mode de défilement
Lecture d'une face
Face A
Face A
Face B
Face B
Arrêt
1. Appuyer sur l'interrupteur POWER.
2. Régler le sélecteur REV MODE.
O Pour un enregistrement bidirectionnel,
régler le sélecteur REV MODE sur la
position
π ou ø.
O Quand la touche ”úest utilisée pour
mettre l'enregistrement en service, une
seule face est enregistrée.
O Régler le sélecteur sur la position “ si
une seule face de la cassette doit être
enregistrée.
3. Insérer la cassette à enregistrer.
O S'assurer que les languettes de
sécurité de la cassette sont en place. Si
elles sont été brisées, fermer les
ouvertures avec du ruban adhésif.
4. Sélectionner la source avec SOURCE.
O Quand "CD" est sélectionné, le lecteur
CD intégré est sélectionné comme
source.
O Quand "LINE" est sélectionné, le signal
externe de "LINE IN" est sélectionné
comme source.
5. Sélectionner DOLBY NR ON ou OFF pour
mettre le réducteur de bruit en ou hors
service.
6. Appuyer sur la touche RECORD pour
mettre la platine en mode de pause
d'enregistrement (les indicateurs REC
et
ƒ s'allument).
7. Régler le niveau d'enregistrement avec
la commande REC LEVEL pour que les
décibelmètres atteignent juste "0 dB"
(cassette normale ou au chrome) ou le
point "+3 dB" (cassette métal) au niveau
de crête.
Enregistrement
Métal
Normal ou
au chrome
Chargement d'une cassette
1. Utiliser le doigt ou un crayon pour
tourner le moyeu de la cassette et
tendre la bande.
Remarque: Eviter de toucher la bande.
Les empreintes digitales attirent la
poussière et les saletés.
2. Appuyer sur la touche d'éjection
(
∫)*pour ouvrir le volet du porte-
cassette.
3. Charger une bande avec le bord
ouvert en bas.
4. Fermer avec précaution le volet du
porte-cassette.
*Remarques:
OLe porte-cassette ne peut pas être
ouvert pendant l'enregistrement ou la
lecture.
OSi l'alimentation a été coupée
pendant la lecture ou l'enregistrement, l'éjection de la cassette
peut être impossible. Dans ce cas,
remettre sous tension et appuyer à
nouveau sur la touche d'éjection.
8. Appuyer à nouveau sur la touche
ƒ PAUSE pour commencer l'enregistrement.
O Pour interrompre l'enregistrement,
appuyer sur la touche
ƒPAUSE. Pour
continuer l'enregistrement, appuyer sur
la touche
ƒPAUSE ou sur une touche
de lecture
”∏. Pendant la pause
d'enregistrement, l'enregistrement
commence si la touche dont l'indicateur
”, ∏ est allumé est actionnée, mais
seul le sens de défilement change si la
touche dont l'indicateur
”, ∏ est
éteint est actionnée. Pour poursuivre
l'enregistrement, appuyer une nouvelle
fois sur la touche.
O Pour arrêter l'enregistrement, appuyer
sur la touche STOP.
Tous les effectués enregistrements sur une
bande sont effacés par un nouvel
enregistrement. Il est également possible
d'effacer une bande en "enregistrant" avec
la commande de réglage du niveau REC
LEVEL sur "0".
ATTENTION:
L'enregistrement de bandes préenregistrées, de disques, ou de tout autre
matériau enregistré ou diffusé peut
contrevenir à la réglementation sur les
droits d'auteur. Se renseigner avant
d'enregistrer.
Effacement

_ 25_
FRANÇAIS
La vitesse de la bande pendant la lecture
peut être changée, ce qui permet de
modifier l'acuité du son.
En tournant le bouton PITCH CONTROL
vers la droite, la vitesse de la bande
augmente et le son devient plus aigu. En le
tournant vers la gauche, la vitesse diminue
et le son devient plus grave.
O A l'extrême droite, la vitesse de la
bande augmente de 12% environ.
O A l'extrême gauche, la vitesse de la
bande augmente de 12% environ.
Réglage de l'acuité du son
O Si, en utilisant sur Ò, le nombre CPS
voulu est dépassé, utiliser la touche
pour revenir en arrière jusqu'à
l'affichage du nombre CPS voulu.
O Quand la touche Ò est pressée, la
plage suivante est indiqué par "1" et
quand la touche
est pressée, le
plage courant est indique par "1".
2. La bande défile rapidement pour
détecter les espaces entre les plages
jusqu'à atteindre le plage voulue. Puis
la lecture commence au début de la
plage désignée.
Remarques sur la fonction CPS
La fonction CPS fonctionne par détection
et comptage de espaces d'environ 4
secondes, comme des intervalles standard
entre les plages. Toutefois, avec les types
suivants de bandes, les fonctions de
recherche peuvent ne pas fonctionner
correctement.
O Les intervalles entre les plages ne
peuvent pas être détectés;
– Pour des intervalles de moins de 4
secondes.
–Avec des niveaux de bruit élevés
dans les intervalles.
– Pour de longues sections à faible
niveau (en musique classique, etc.)
La fonction CPS permet de sélectionner et
de reproduire une des 15 plages avant ou
après la plage en cours de lecture. La
recherche s'effectue par détection des
espaces vierges d'au moins 4 secondes
entre les plages. Les espaces peuvent être
créés au préalable à l'aide de la fonction
REC MUTE.
Remarques:
O Pour simplifier la description des
opérations, les étapes 1 et 2 suivantes
indiquent comment rechercher une
plage vers l'avant (sens
∏) seulement.
La marche à suivre est similaire pour la
recherche en sens inverse.
O Les touches Ò (avance rapide) et
(rembobinage) servent de touches
CPS pendant la lecture. C'est pourquoi
"
Ú CPS ÆÒ" est inscrit sur
l'appareil au-dessus de ces touches,
tandis que la télécommande n'indique
que "
Ò". Dans les explications
suivantes, ces touches seront indiquées
par "
" et "Ò".
1. Pendant la lecture avant, appuyer
plusieurs fois sur la touche
ou
Ò jusqu'à ce que le nombre de
plages à sauter apparaisse dans
l'affichage du compteur. Utiliser la
touche
Ò pour chercher une plage
suivante la plage actuelle et la touche
pour une plage avant la plage
actuelle. Se reporter à l'encadré
"comment sélectionner une plage en
utilisant la fonction CPS".
CPS (Recherche automatique de
programme)
t
’
’
1
2
3
3
2
1
’
’
’
’
1
2
3
3
2
1
(1) (2)
(4)(3)
Comment sélectionner une plage en utilisant la fonction CPS
Ex: Voir (1). Pour sélectionner la 3ème plage après la position courante, sélectionner
"CP03".
Position actuelle sur de la bande
Après
Avant
Sens de
défilement
de la bande
Position actuelle sur de la bande
AvantAprès
Dans l'exemple (1), si "t" est inférieur à
4 secondes, il ne sera pas compté comme
espace vierge. Dans ce cas, sélectionner
"CP-02" au lieu de "CP-03" pour sélectionner
la 3ème plage.
’
Sens de
défilement
de la bande
En mode d'arrêt, les touches et Ò
servent de touches d'avance rapide ou de
rembobinage.
O En mode de lecture, ces touches
servent de touches CPS.
Rembobinage rapide
En appuyant sur la touche RTZ (retour au
point zéro), le lecteur localise le point
"0000" sur la bande.
O La fonction RTZ n'agit pas quand le
compteur indique un nombre entre
"9996" et "0004".
Retour au point zéro (RTZ)
or
ou

1. Appuyer sur la touche PROGRAM.
2. Appuyer sur la touche A-B.
"A-" clignote et "B" s'allume dans
l'afficheur pour indiquer que le lecteur
CD est en mode de programmation de la
face A de la cassette.
3. Programmer les plages à enregistrer
sur la face A.
Effectuer les opérations décrites dans
l'étape 3 de la section "Lecture
programmée", à la page 21.
O Pour afficher le temps total de la
programmation, appuyer sur la touche
TIME en mode de programmation. Le
temps total d'enregistrement peut ainsi
être adapté à la durée de la face A de la
cassette. Appuyer une nouvelle fois sur
la touche TIME pour ramener le lecteur
au mode de programmation.
4. Appuyer sur la touche A-B.
"A-" s'allume et "B-" clignote dans
l'afficheur pour indiquer que le lecteur
CD est maintenant en mode de
programmation de la face B.
5. Programmer les plages devant être
enregistrées sur la face B de la
cassette.
O Une pression sur la touche A-B en
mode de programmation de la face B
ramène le lecteur CD au mode de
programmation de la face A.
6. Appuyer sur la touche CD DUBBING.
La bande est rembobinée jusqu'au
début de la face A et le compteur
revient à "0000", tandis que le lecteur CD
est en mode de pause au début de la
première plage programmée pour la
face A de la cassette.
Après le défilement des 10 premières
secondes de la cassette (pour éviter
d'enregistrer sur l'amorce de la bande),
la platine se met en mode d'enregistrer
et la lecture du CD commence.
O Si l'on appuie sur la touche RECORD
avant d'appuyer sur la touche CD
DUBBING, l'enregistrement commencera à partir de la position actuelle
de la cassette, sans que la bande soit
rembobinée.
_ 26_
Avec la fonction CD DUBBING, rien n'est
plus simple que d'enregistrer un CD sur
une cassette.
1. Insérer un disque compact.
2. Insérer une cassette pouvant être
enregistrée.
3. Sélectionner DOLBY NR ON ou OFF pour
mettre en ou hors service le réducteur
de bruit.
O En mode de copie CD, la commande
REC LEVEL n'agit pas sur le niveau
d'enregistrement puisque celui-ci est
automatiquement ajusté par l'appareil.
∑ Pour enregistrer dès le début de
la cassette
Appuyer sur la touche CD DUBBING en
mode d'arrêt.
La bande est rembobinée jusqu'au début
de la face A et le compteur revient à "0000",
tandis que le lecteur CD est en mode de
pause, au début de la première plage du
CD.
Après le défilement des 10 premières
secondes de la bande (pour éviter
d'enregistrer sur l'amorce de la bande), la
platine se met en mode d'enregistrement
et la lecture du CD commence.
∑ Pour enregistrer à partir d'un
point donné de la cassette
1. Faire défiler la bande jusqu'au point
souhaité et appuyer sur la touche STOP.
2. Appuyer sur la touche RECORD.
La platine se met en pause
d'enregistrement.
3. Appuyer sur la touche CD DUBBING.
La copie CD-cassette commence à
partir de la position actuelle.
O Pendant la copie du CD, seules les
touches STOP(CD), STOP(TAPE),
OPEN/CLOSE et TIME sont opérationnelles.
∑ Désignation des plages à
enregistrer sur les faces A et B
(Enregistrement programmé A-B)
Avec l'enregistrement programmé A-B, les
plages devant être enregistrées sur les
faces A et B peuvent être désignées au
préalable.
∑ Insertion automatique d'espaces
vierges de 4 secondes (pendant
l'enregistrement)
Appuyer sur la touche REC MUTE
pendant l'enregistrement. La bande
continue de défiler et un espace
d'environ 4 secondes est enregistré
(l'indicateur REC clignote). L'appareil se
met ensuite automatiquement en mode
de pause d'enregistrement (les
indicateurs REC et
ƒ restent tous deux
allumés).
Pour poursuivre l'enregistrement,
appuyer sur la touche PAUSE (l'indicateur
ƒ s'éteint).
∑ Insertion automatique d'espaces de 4
secondes (pendant la pause
d'enregistrement)
En mode de pause d'enregistrement, le
fait d'appuyer sur la touche REC MUTE
lance automatiquement l'opération
d'enregistrement silencieux décrite cidessus. L'appareil revient ensuite au
mode de pause à d'enregistrement.
∑ Insertion d'un espace de plus de 4
secondes
Pendant l'enregistrement, maintenir
enfoncée la touche REC MUTE plus
longtemps. Un espace est enregistré
aussi longtemps que la touche REC
MUTE est maintenue enfoncée.
Relâcher la touche pour passer au
mode de pause d'enregistrement. Pour
poursuivre l'enregistrement, appuyer
sur la touche PAUSE.
O Pendant d'enregistrement silencieux
(pendant que l'indicateur REC clignote),
le fait d'appuyer une deuxième fois sur
la touche REC MUTE désactive ce mode
et l'enregistrement reprend sans que la
bande s'arrête.
Fonctionnement de
l'enregistrement silencieux
Copie d'un CD sur une cassette
or
ou

_ 27_
FRANÇAIS
Cet appareil est doté d'une fonction
minuterie qui permet de fixer l'heure à
laquelle la lecture ou l'enregistrement
doivent commencer quand une minuterie
en option est raccordée.
∑ Lecture préréglée d'un CD ou
d'une cassette
1. Raccorder l'appareil et la chaîne stéréo
à une minuterie audio, comme indiqué
sur le schéma.
2. Mettre tous les appareils sous tension.
3. Insérer un disque ou une cassette
enregistré.
4. Régler la minuterie sur la position CD ou
TAPE.
5. Désigner les heures de début (mise
sous tension) et de fin (mise hors
tension) sur la minuterie. Quand le
réglage est terminé, tous les appareils
sont mis hors tension.
6. A l'heure préréglée, l'alimentation est
fournie et la lecture commence
automatiquement.
∑ Enregistrement préréglé
1. Sélectionner l'entrée amplificateur à
partir de laquelle la platine peut
enregistrer.
2. Sélectionner la source à enregistrer
(FM, AM, etc.)
3. Insérer une cassette pouvant être
enregistrée et régler le sélecteur TIMER
sur REC.
4. Désigner les heures de début (mise
sous tension) et de fin (mise hors
tension) sur la minuterie. Quand le
réglage est terminé, tous les appareils
sont mis hors tension.
5. A l'heure préréglée, l'alimentation est
fournie et l'enregistrement commence
automatiquement.
En mode de lecture continue, lorsque la
lecture du CD ou de la cassette s'arrête,
elle se poursuit automatiquement sur la
cassette ou le CD.
1. Appuyer sur la touche CD-TAPE CONT
PLAY.
"TAPE" et "CD" clignotent dans
l'afficheur.
2. (Par exemple) Appuyer sur la touche de
lecture de CD.
La lecture du CD commence.
"CD" clignote dans l'afficheur.
3. Quand le lecteur CD s'arrête, la platine
se met automatiquement en marche.
"TAPE" clignote dans l'afficheur.
Quand la lecture s'arrête sur une
machine, elle se poursuit sur l'autre.
O Même si l'on essaie d'arrêter une
machine (lecteur CD ou platine à
cassette) en appuyant sur la touche
STOP, ou à la fin de la lecture, l'autre
machine se remet automatiquement en
marche.
O Le CD ou la cassette peuvent être
changés en mode d'arrêt.
O Pour annuler la lecture continue,
appuyer à nouveau sur la touche CDTAPE CONT PLAY.
Utilisation d'une minuterie
Lecture continue d'un CD
et d'une cassette
Minuterie audio
Tuner
A la prise secteur
de la minuterie
A la prise secteur
du tuner
A la prise secteur
de l'amplificateur
Amplificateur
AD-500
Raccordement de la minuterie
O Si la face A de la cassette se termine
alors qu'il reste encore 1 minute 30
secondes de lecture sur le CD,
l'enregistrement sur la face B
commencera par cette plage (sauf avec
la copie A-B).
O Quand la lecture du CD est terminée, le
mode de copie CD est annulé.
O Si la face B de la cassette se termine
avant la fin de la lecture du CD, le mode
de copie CD est annulé.

_ 28_
La résolution des problèmes de base est similaire pour la plupart des appareils électriques ou électroniques. Toujours rechercher d'abord la
cause la plus probable. Vérifier les points suivants pour avoir une idée des points à contrôler.
En cas de panne
Problème Cause probable Solution
Généralités
Mise sous tension impossible La fiche n'est pas bien insérée. Enfoncer la fiche à fond.
avec POWER.
Bourdonnement. Une fiche d'un cordon de liaison La réinsérer correctement.
est mal insérée.
Parasites lors de la réception radio. Le tuner est trop rapproché de Eloigner le tuner et l'appareil,
l'appareil. ou éteindre cet appareil.
Aucun son. Les raccordements à la chaîne stéréo Les vérifier.
ne sont pas corrects.
Fonctionnement avec la L'appareil a été mis hors tension Le remettre sous tension.
télécommande impossible. avec POWER.
La télécommande ne contient pas Insérer des piles.
de piles.
Lecteur CD
Lecture impossible bien qu'un Le disque est à l'envers Diriger la face avec l'étiquette
disque soit en place. (étiquette vers le bas). vers le haut.
Disque sale. Nettoyer la surface du disque.
Aucun son. Les raccordements à la chaîne stéréo Les vérifier.
ne sont pas corrects.
Aucun son fourni par le lecteur CD. La platine à cassette est en mode Arrêter la platine, ou raccorder la
de lecture. sortie CD à l'amplificateur.
Une seule plage est reproduite. La touche SINGLE a été enfoncée. Appuyer dessus pour la faire
ressortir.
Lecture programmée impossible La touche PROGRAM n'a pas été Appuyer sur la touche pour faire
enfoncée. apparaître PGM.
Mauvais alignement Vibration ou choc. Changer la position de l'appareil.
(coupure du son). Disque sale. Nettoyer la surface du disque.
Platine à cassette
Mauvaise qualité du son. Les têtes sont sales. Les nettoyer.
Les têtes sont magnétisées. Les démagnétiser avec le TEAC E-3.
La position du commutateur Le changer de position.
DOLBY NR n'est pas correct.
Son étrange. Le réglage du bouton PITCH CONTROL Le régler sur la position centrale.
a été changé.
Enregistrement impossible. Les languettes de protection Recouvrir les ouvertures de
d'enregistrement ont été brisées. ruban adhésif.
Les têtes sont sales. Nettoyer les têtes.
Le niveau d'enregistrement est Tourner la commande REC LEVEL
trop bas. vers la droite.

_ 29_
FRANÇAIS
Section Lecteur CD
(Audio)
Nombre de canaux:
2
Réponse en fréquence: 10 à 20.000 Hz
±0,5 dB
Rapport signal sur bruit: 90 dB
Plage dynamique: 90 dB
Distorsion harmonique totale: 0,02%
(1 kHz)
Pleurage et scintillement: Non mesurable
(précision quartz)
Séparation des canaux: 75 dB
Sortie: 2 Vrms
Filtre numérique: Quadruple suréchantil-
lonnage
Filtre analogique: 3ème ordre
(Format du signal)
Fréquence d'échantillonnage:
44,1 kHz
Convertisseur N/A: linéairo 16 bits/canal
Débit par canal: 4,3218 Mb/sec.
Code de modulation de canal: EFM
Correction d'erreur: CIRC
(Capteur)
Type:
Capteur à laser optique à 3 rayons, à
déplacement de la lentille
Lentille: Pilotage parallèle 2 dimensions
Type de laser: Laser à semi-conducteurs
de type GaAlAs
Longueur d'ondes: 780 nm
Section Platine à cassette
Système d'enregistrement: 4 pistes,
2 canaux stéréo
Têtes: Enregistrement/Lecture x 1
(rotatives à inversion), effacement x 1
Type de cassette: Cassette C-60, C-90
Vitesse de défilement: 4,76 cm/sec.
Moteur: Servomoteur CC x 1
Pleurage et scintillement: 0,08% (W. RMS)
Réponse en fréquence (d'ensemble):
50 - 15.000 Hz ±3 dB, métal
50 - 15.000 Hz ±3 dB, chrome
50 - 14.000 Hz ±3 dB, normal
Rapport signal sur bruit (d'ensemble):
59 dB (Dolby hors service, niveau DHT
3%, pondéré), 69 dB (Dolby en service,
plus de 5 kHz)
Temps de rembobinage rapide: Env. 120
sec. (avec une C-60)
Entrée Ligne: 87 mV (impédance d'entrée
de 50 kohms ou plus)
Sortie Ligne: 0,46 V (impédance de charge
de 50 kohms ou plus)
Casque: 1 mV/8 ohms
Spécifications
Généralités
Alimentation:
Secteur 120/230 V, 50-60 Hz
(Modèle Etats-Unis/Canada/Modèle
universel)
Secteur 230 V, 50 Hz (Modèle Europe/
Royaume-Uni)
Secteur 240 V, 50 Hz (Modèle Australie)
Consommation: 14 W
Dimensions (L/H/P): 435 x 145 x 290 mm
(17-1/8" x 5-3/4" x 11-7/16")
Poids: 5,3 kg (11,7 li.)
Accessoires fournis
Télécommande sans fil RC-619
Cordons de liaison à fiches RCA x 2
Piles (SUM-3, "AA", type "R6") x 2
O En vue de l'amélioration du produit, les
spécifications ou la conception peuvent
être modifiées sans préavis.
O Les photos et illustrations peuvent être
légèrement différentes du modèle réel.
Les têtes et le chemin de la bande doivent
être nettoyés et démagnétisés périodiquement.
Nettoyage du chemin de bande
O Appliquer un liquide* de nettoyage de
tête sur le coton-tige spécial ou sur un
chiffon doux et frotter légèrement les
têtes, cabestans et toutes les pièces de
métal du chemin de bande.
O Nettoyer aussi les galets presseurs
avec un liquide de nettoyage pour
caoutchouc*.
*Tous deux disponibles dans les trousses
de nettoyage pour magnétophones
TEAC HC-2 et RC-2 aux Etats-Unis ou
TEAC TZ-261 dans les autres pays.
Entretien
Démagnétisation des têtes
S'assurer que l'alimentation est coupée,
puis démagnétiser les têtes avec le
démagnétiseur TEAC E-3 ou équivalent.
Pour plus de détails, consulter le manuel
d'instructions.
Galets presseurs
Cabestans
Tête d'effacement
Tête de lecture/enregistrement

Dieses Gerät spielt ausschließlich CDs ab,
die mit dem Zeichen "
˛" gekennzeichnet
sind. Andere CDs sind nicht verwendbar.
O Eine CD stets mit nach oben weisendem
Etikett einlegen. (CDs enthalten Signale
nur auf einer Seite).
O Zur CD-Entnahme aus der Schutzhülle
den mittleren Nabenkranz andrücken
und die CD beim Entnehmen vorsichtig
am Rand fassen.
Entnehmen der CD
Die CD am Rand Halten
O Fingerabdrücke, Staub etc. vorsichtig
mit einem weichen fusselfreien Tuch
entfernen.
Gerade nach außen wischen
O Zur Reinigung niemals Farbverdünner,
Benzin oder Alkohol verwenden, da
diese und sonstige Lösungsmittel die
CD-Oberfläche irreparabel beschädigen.
Bandsorte
Handhabung von CDs
Bandsortenwahl:
Die automatische Bandsortenwahl (Metallund Chromband (Kobaltband)) arbeitet nur
einwandfrei, wenn Cassetten entsprechende Identifikationsöffnungen vorweisen.
*Dolby Rauschunterdrückung hergestellt
unter Lizenz von Dolby Laboratories
Licensing Corporation.
DOLBY und das Doppel-D-Symbol ∂
sind Warenzeichen der Dolby Laboratories
Licensing Corporation.
_ 30_
Vor Inbetriebname
Fernbedieneinheit
Die Fernbedieneinheit bei Gebrauch auf
den Fernbediensensor am Deck
ausrichten.
ª Einlegen der Batterien
1. Die Batteriefach-Abdeckung entfernen.
2. Zwei Batterien "AA" (R6, SUM-3)
polrichtig (
±/—) einlegen.
3. Die Abdeckung wieder einwandfrei
anbringen.
Batteriewechsel
Muß der Abstand zwischen Gerät und
Fernbedieneinheit zur Funktionsauslösung
verringert werden, wird ein Batteriewechsel notwendig. Stets zwei neue
Batterien einlegen.
Batterie-Vorsichtsmaßregeln
O Die Batterien stets polrichtig (±/—)
einlegen.
O Stets zwei Batterien der gleichen
Ausführung verwenden. Niemals
gleichzeitig eine gebrauchte und eine
neue Batterie verwenden.
O Sowohl Einweg- als auch
wiederaufladbare Batterien sind
verwendbar. Die Sicherheitshinweise
auf den Batterien beachten.
‚ Einen geeigneten Aufstellungsort
wählen, der vor direkter Sonneneinstrahlung und/oder hohen Temperaturen geschützt ist. Das Gerät sollte
weder Vibrationen, starker Staub-,
Hitze-, Kälte- oder Feuchtigkeitseinwirkung noch elektromagnetischen
Einflüssen einschließlich Brummeinstreuungen (Transformator, Generator
etc.) ausgesetzt werden.
‚ Niemals die Geräteverkleidung
abnehmen, da andernfalls die
elektrischen Schaltkreise beschädigt
werden können und Stromschlaggefahr
besteht. Falls ein Fremdkörper oder
Flüssigkeit in das Geräteinnere
eingedrungen ist, wenden Sie sich bitte
an Ihren Fachhändler.
‚ CDs niemals mit schmutzigen Fingern
handhaben. Niemals eine stark verkratzte oder verworfene CD einlegen.
‚ Bei Abziehen das Netzkabel stets am
Steckerende fassen. Niemals am Kabel
zerren.
‚ Niemals das Gehäuse mit chemischen
Lösungsmitteln reinigen. Andernfalls
können Verfärbungen und Verformungen auftreten. Verwenden Sie zur
Reinigung ein sauberes, trockenes,
fusselfreies Tuch.
‚ Bitte bewahren Sie diese Anleitung zur
späteren Bezugnahme sorgfältig auf.
Bitte vor der Ingebrauchnahme
durchlesen
Handhabung von Audiocassetten
Cassetten niemals an Orten aufbewahren,
die folgenden Umgebungseinflüssen
ausgesetzt sind:
‚ Direkte Sonneneinstrahlung (z.B. auf
Fenstersims), hohe Temperaturen (z.B.
neben Heizkörper).
‚ Starke elektromagnetische Felder (z.B.
neben Lautsprechern, auf einem TVGerät, neben einem Netzteil etc.).
‚ Hohe Luftfeuchtigkeit, starke Staubein-
wirkung oder sonstige start verschmutzte Umgebungen.
‚ Cassetten niemals heftigen Stößen oder
Erschütterungen aussetzen.
‚ Wie empfehlen, C-120-Kassetten nicht
zu verwenden, da es zu Bandverschlingungen und schweren Betriebsstörungen kommen kann.
O CDs nach dem Abspielen stets in ihrer
Schutzhülle aufbewahren, um Kratzer
etc. zu vermeiden. Kratzer können bei
der CD-Wiedergabe Laser-Fehlabtastungen verursachen.
O CDs niemals langdauernd direkter
Sonneneinstrahlung, hohen Temperaturen oder hoher Luftfeuchtigkeit
aussetzen.
Bei Einwirkung extrem hoher
Temperaturen kann es zu CDVerwerfungen kommen.
O Niemals die CD-Etikettseite bekleben
oder mit einem Kugelschreiber
beschriften!

O Vor der Anschlußherstellung alle
einbezogenen Geräte ausschalten. Auf
einwandfreie Kanalzuweisung
((Kennzeichen L) links/(Kennzeichen R)
rechts) achten.
O Für alle eingesetzten Geräte die
zugehörige Bedienungsanleitung durchlesen.
∑ Signalkabel
Line-Eingang/Ausgang (LINE IN/OUT)
Die Buchsen LINE IN mit den Buchsen
TAPE REC des Stereo-Verstärkers, die
Buchsen LINE OUT mit den Buchsen TAPE
PLAY des Stereo-Verstärkers verbinden.
Hierzu Cinchstecker-Kabel verwenden.
O Die Buchsen LINE OUT liefern das CD-
oder Cassettenbandsignal. Wird
gleichzeitig von CD und Cassette
wiedergegeben, hat das Cassettenbandsignal Vorrang.
CD-Line-Ausgang (CD LINE OUT)
Die Buchsen CD LINE OUT mit den
Buchsen CD, DAT oder AUX des StereoVerstärkers verbinden. Hierzu
Cinchstecker-Kabel verwenden.
O Die Buchsen CD LINE OUT liefern
ausschließlich das CD-Ausgangssignal.
Achtung:
Falls dieser CD-Spieler Interferenzen beim
UKW-Tuner, TV-Empfänger etc. verursacht,
auf ausreichenden Abstand achten.
∑ Netzkabel
Bei Netzanschluß sichergehen, daß die
vorgeschriebene Netzspannung vorliegt.
∑ Kopfhörerbuchse
Für den Anschluß eines StereoKopfhörers.
O Die Kopfhörerlautstärke einstellen.
_ 31_
Anschlüsse
Vor der Umstellung des Netzspannungswählers unbedingt das Netzkabel
abziehen!
1. Der Spannungswähler befindet sich an
der Geräterückseite.
2. Mit einem Flachklingen-Schraubendreher wie erforderlich auf Position 230
V oder 120 V stellen.
Netzspannungsumstellung
(Nur für allgemeine Exportmodelle)
AD-500
Netzsteckdose
CinchsteckerKabel
CinchsteckerKabel
CinchsteckerKabel
Stereo-Verstärker
An CD, DAT
oder AUX
An TAPE
PLAY
An TAPE
REC
O Bei längerem Nichtgebrauch (über
einen Monat) sollten die Batterien
entnommen werden, um dem Auslaufen
der Batterien vorzubeugen. Ausgelaufene Batterien entnehmen und
nach Säubern des Batteriefachs gegen
frische auswechseln.
O Batterien niemals erhitzen, zerlegen
oder zur Entsorgung verbrennen.
DEUTSCH

_ 32_
Bezeichnung der Bedienelemente
1 Netzschalter (POWER)
2 Fernbediensensor (REMOTE SENSOR)
3 Mehrfachanzeige-Displayfeld
a Wiederholanzeige (REPEAT)
b Auto-Einfüganzeige (A.SPACE)
c Löschanzeige (DELETE)
d Zeitmodusanzeige
e Programmieranzeige (PGM)
f Zufallswiedergabe-Anzeige
(SHUFFLE)
g CD-Eingangsanzeige (IN)
h Band/CD-Anzeige (TAPE/CD)
i Aufnahmeanzeige (REC)
j Bandwiedergabeanzeige (PLAY)
k Pegelmeter
l Bandzähler
m Anspielsuchlaufanzeige (INTRO)
n CD-Pausen-/Wiedergabeanzeige
(ƒ/∏)
o Titelanzeige
p Zeitzähleranzeige
q Kopieranzeige (DUB)
r Bandlaufrichtungs-/
Pausenanzeige (”ƒ∏)
s Musikkalender
4 Öffnen-/Schließen-Taste
5 CD-Wiedergabetaste (å)
6 CD-Stopptaste (CD STOP)
7 CD-Pausentaste (ƒ)
8 Nullrücklauftaste (RTZ)
9 Zählerlöschtaste (CLEAR)
0 Aufnahmepegelregler (REC LEVEL)
q Taste für kontinuierliche Wiedergabe
(CD-TAPE CONT PLAY)
w CD-Kopiertaste (CD DUBBING)
e Aufnahmetaste (RECORD)
r Stummaufnahmetaste (REC MUTE)
t Umspul-CPS-Tasten
(Ú CPS ÆÒ)
y Bandstopptaste (STOP)
u Bandpausentaste (ƒ)
i Cassettenhalter
o CD-Halter
p Wiederholtaste (REPEAT 1/ALL)
a Programmiermodustaste (PROGRAM)
s Zufallswiedergabetaste (SHUFFLE)
d Timer-Schalter (TIMER)
f Titelsprungtasten (Ú/Æ)
g Signalquellenwähler (SOURCE)
h Umkehrmodusschalter (REV MODE)
j Geschwindigkeitsfeinregler (PITCH
CONTROL)
k Dolby-Rauschunterdrückungsschalter
(DOLBY NR)
l Auswurftaste (EJECT)
; Bandwiedergabetasten (”/∏)
z Kopfhörerbuchse (PHONES)
x Kopfhörer-Lautstärkeregler (LEVEL)
c Zeittaste (TIME)
v Anspielsuchlauftaste (INTRO CHECK)
b Taste für automatische Leerabschnitte-
einfügung (AUTO SPACE)
n Abschnittstaste (A-B)
m CD-Suchlauftaste
(CD SEARCH /Ò)
, Einzeltiteltaste (SINGLE)
. Prüftaste (CHECK)
/ Löschtaste (CLEAR)
! Löschprogrammiertaste (DELETE)

∑ Bei ausgefahrenem CD-Halter
Wenn die Taste å betätigt wird:
Der CD-Halter wird eingefahren und die
Wiedergabe startet mit dem ersten Titel.
∑ Wiedergabestopp
Die Taste STOP betätigen. Das Laufwerk
wird gestoppt.
Entnehmen der CD:
Die Taste OPEN/CLOSE betätigen. Die
Wiedergabe stoppt und der CD-Halter wird
ausgefahren. Das Gerät schaltet auf den
Anfangsstatus.
Kurzzeitige Wiedergabeunterbrechung
(Wiedergabepause):
Die Taste ƒ betätigen. Die Wiedergabe
wird bei der vorliegenden Laserabnehmerposition unterbrochen. Die Pausenanzeige
ƒ leuchtet. Zur Wiedergabe-
fortsetzung die Taste
∏ oder ƒ betätigen.
VORSICHT:
O Den CD-Halter-Einschub oder
-Ausschub niemals behindern und
keinerlei Druck auf den CD-Halter
ausüben.
_ 33_
1. Den Schalter POWER drücken.
2. Die Taste OPEN/CLOSE drücken.
Der CD-Halter wird ausgefahren. Eine
CD vorsichtig mit nach oben weisendem
Etikett einlegen. Die CD muß in der
Mitte des CD-Halters, innerhalb der CDVertiefung, eingesetzt werden.
3. Die Taste OPEN/CLOSE erneut betäti-
gen.
Der CD-Halter wird eingefahren.
Nach wenigen Sekunde erscheint die
folgende Anzeige.
4. Die Taste CD PLAY (∏) betätigen.
Die Wiedergabe startet beim ersten
Titel, die Wiedergabeanzeige
∏
leuchtet.
O Bei Wiedergabe blinkt im
Musikkalender jeweils die Nummer des
Abspiel-Titels.
O Nach vollständiger Wiedergabe erlischt
die zugehörige Titelnummer des
Musikkalenders.
CD-Spieler
Grundsätzliche Bedienschritte
For 8 cm (3-inch)
CD singles
For 12 cm (5-inch)
Compact Discs
Tune numbers on disc up to 20
Total number of
tunes on the disc
Total playback
time of disc
∑ Titelsuchlauf mit den Tasten
(Ú/Æ MUSIC SKIP)
Titelanfänge können mit Hilfe der Tasten
Ú/Æ auf einfache Weise angewählt
werden. Dieser Modus wird im Displayfenster TRACK angezeigt.
O Diese Funktion arbeitet auch bei der
programmierten Wiedergabe, allerdings
nur für die programmierten Titel.
∑ Versetzen zum nächten Titel
Die Taste
Æ betätigen.
Bei jedem Druck auf die Taste Æ wird
der Laserabnehmer zum Anfang des
jeweils nachfolgenden Titels weitergesetzt.
Diese Funktion ist bis zum letzten CD-Titel
verfügbar. Wird diese Taste nach Erreichen
des letzten Titels betätigt, unterbleibt die
Weitersetzung des Laserabnehmers.
∑ Versetzen zum vorhergehenden Titel.
Die Taste
Ú betätigen
Bei Betätigen der Taste Ú wird der
Laserabnehmer zum Anfang des
vorliegenden Titels versetzt. Soll der
Anfang des vorhergehenden Titels
angewählt werden, muß diese Taste
zweimal betätigt werden.
Auf diese Weise kann der Laserabnehmer
bis zum Anfang des ersten Titels
rückgesetzt werden.
∑ Musik-Suchlauftasten
(SEARCH /Ò)
Die Abspielposition kann unterbrechungsfrei beschleunigt in beiden
Richtungen versetzt werden. Zum
Vorwärtssuchlauf die Taste
Ò auf der
Fernbedienung oder die Taste
Æ am
Gerät gedrückt halten. Zum Rückwärtssuchlauf die Taste
auf der Fernbe-
dienung oder die Taste
Ú am Gerät
gedrückt halten.
Da bei diesem Suchlauf das zeitgeraffte
Tonsignal bei verringerter Lautstärke
mitgehört werden kann, ist so die Anwahl
einer neuen CD-Abspielposition möglich.
An der gewünschten CD-Abspielposition
einfach die Taste freigeben. Der CD-Spieler
schaltet wieder auf den ursprünglichen
Modus.
Titelsuchlauf
or
DEUTSCH
Für CD-Singles
(8 cm)
Für normale CDs
(12 cm)
Gesamt-Titelzahl
der CD
CD mit bis zu 20 Titeln
Gesamtspielzeit
der CD
oder

_ 34_
∑ Anzeige der Gesamtspielzeit
aller programmierten Titel
Hierzu im Programmiermodus die Taste
TIME drücken.
Durch nochmaliges Betätigen der Taste
TIME schaltet der CD-Spieler erneut auf
den Programmiermodus.
∑ Überprüfung der Programmie-
rung
1. Im Programmiermodus die Taste CHECK
drücken.
Die Nummer des ersten programmierten Titels wird zusammen mit der
blinkenden Programmfolgenummer
"P-01" angezeigt.
2. Jeder weitere Druck auf die Taste
CHECK ruft die Anzeige für den jeweils
nächsten programmierten Titel auf.
Die zugehörige Programmfolgenummer
"P-xx" blinkt.
O Nach Anzeige der letzten program-
mierten Titelnummer schaltet der CDSpieler bei Betätigen der Taste CHECK
erneut auf den Programmiermodus
zurück, so daß weitere Titel programmiert werden können.
O Die Nummern der abgespeicherten
programmierten Titel werden im
Musikkalender angezeigt. Da die
Musikkalenderanzeige auf 20 Titel
begrenzt ist, werden darüberliegende
Titelnummern durch die Leuchtanzeige
"OVER" bestätigt.
∑ Löschung programmierter Titel
Mit Taste CLEAR kann die jeweils zuletzt
abgespeicherte Titelnummer gelöscht
werden.
∑ Löschprogrammierung
Bei diesem Programmierverfahren werden
ausschließlich die Titel programmiert, die
nicht wiedergegeben werden sollen. Dies
ist vorteilhaft, wenn eine CD Titel enthält,
die Sie nicht hören möchten.
1. Die Taste STOP betätigen.
2. Die Taste DELETE betätigen.
Der CD-Spieler schaltet auf den
Löschprogrammiermodus.
Die Displayfeldanzeigen "DELETE" und
"PGM" leuchten.
3. Abwechselnd die Taste(n) Ú MUSIC
Æ und die Taste PROGRAM in der
gewünschten Reihenfolge betätigen.
4. Die Taste PLAY betätigen.
Die Wiedergabe startet für die nicht
gelöschten Titelnummern.
O Zur Überprüfung der Gesamtspielzeit
der nicht gelöschten Titelnummern im
Löschprogrammiermodus die Taste
TIME drücken.
Durch nochmaliges Betätigen der Taste
TIME schaltet der CD-Spieler erneut auf
den Löschprogrammiermodus.
O Im Löschprogrammiermodus die Taste
CHECK drücken, um die Nummer des
ersten gelöschten Titels anzuzeigen.
Jeder weitere Druck auf die Taste
CHECK ruft die Anzeige für die jeweils
nächste gelöschten Titelnummer auf.
Nach Anzeige der letzten gelöschten
Titelnummer schaltet der CD-Spieler bei
Betätigen der Taste CHECK erneut auf
den Löschprogrammiermodus zurück,
so daß weitere Titelnummern gelöscht
werden können.
O Mit Taste CLEAR kann die jeweils zuletzt
durchgeführte Titelnummerlöschung
rückgängig gemacht werden.
O Zum Verlassen des Löschprogram-
miermodus im Stoppmodus die Taste
STOP betätigen.
Diese Funktion ermöglicht die Wiedergabe
von in beliebiger Reihenfolge programmierten Titeln (max. 20).
∑ Programmierung von CD-Titeln
1. Die Taste STOP betätigen.
2. Die Taste PROGRAM betätigen.
Das Gerät schaltet auf den Programmiermodus. Die Anzeige PGM leuchtet.
3. Abwechselnd die Taste(n) Ú MUSIC
SKIP
Æ und die Taste PROGRAM in
der gezeigten Reihenfolge betätigen.
4. Die Taste
∏ drücken.
Die programmierte Wiedergabe startet
beim ersten Programmtitel.
O Titel können nur programmiert werden,
wenn der CD-Spieler auf Stopp
geschaltet ist.
O Die programmierte Titelfolge wird nach
vollständiger programmierter
Wiedergabe oder bei Abbruch der
programmierten Wiedergabe mit der
Stopptaste im Speicher beibehalten.
O Die programmierte Titelfolge wird
gelöscht, wenn die Stopptaste im
Stoppmodus gedrückt wird.
O Zum Verlassen des programmierten
Wiedergabemodus nochmals die
Programmiertaste betätigen.
O Bei der programmierten Wiedergabe
bezieht sich die Restzeitanzeige TOTAL
REMAIN auf die Restzeit der
verbleibenden programmierten Titel ab
der vorliegenden Abspielposition.
O Werden Titel mit Titelnummern über 32
programmiert, kann die Anzeige TOTAL
entfallen (die Anzeige "nn:nn" erscheint
stattdessen).
Programmierte Wiedergabe
Beispiel:
Im Stoppmodus die Titelfolge 5 @ 2 @
8 programmieren.
(5 anwählen) (2 anwählen)(abspeichern)
(8 anwählen) (abspeichern)(abspeichern)

∑ Wiedergabe eines CD-
Abschnittes
(A-B-Abschnittswiederholung)
1. Die Wiedergabe beliebig vor dem
Abschnittsstartpunkt auslösen.
2. Den Abschnittsstartpunkt (A) durch
Drücken der Taste A-B markieren.
Die Anzeigen REPEAT und A- leuchten,
die Anzeige B blinkt. Dies bestätigt, daß
A abgespeichert wurde.
3. Im nachfolgenden Abspielbereich der
CD den Abschnittsendpunkt (B) durch
Drücken der Taste A-B markieren.
Hierauf leuchtet Anzeige B konstant zur
Bestätigung, daß B abgespeichert
wurde. Hierauf wird die Abschnittswiederholung ausgelöst.
Der CD-Spieler wechselt auf Punkt A
und setzt die Wiedergabe hier fort.
Wird Punkt B erreicht, erfolgt erneuter
Wechsel auf Punkt A und Wiedergabe
bis Punkt B. Dieser Vorgang wird
beliebig oft wiederholt.
O Nach der Abspeicherung von Punkt A
kann Punkt B schneller mit den Tasten
Ò oder Æ angewählt werden.
O Zum Verlassen des Abschnittswieder-
holungsmodus nochmals die Taste A-B
betätigen.
∑ Wiederholung programmierter
Titel
Die Wiederholfunktion ist auch bei
programmierter Wiedergabe einsetzbar.
Zur Wiederholung aller programmierten
Titel die Taste 1/ALL zweimal drücken.
(Sicherstellen, daß hierauf die Anzeigen
REPEAT und ALL leuchten.)
_ 35_
Die Wiedergabewiederholung kann für
einen Titel, die gesamte CD oder einen
vorbestimmten CD-Abschnitt (A-B)
durchgeführt werden.
O Zum Verlassen des Wiedergabewieder-
holmodus nochmals die Taste REPEAT
betätigen.
∑ Wiederholung eines Titels
(Einzeltitelwiederholung)
1. Die Taste REPEAT 1/ALL betätigen.
Die Anzeigen REPEAT und SINGLE
leuchten.
2. Den gewünschten Titel mit Taste Ú
und/oder Æ aufrufen.
Jeweils nach der vollständigen
Wiedergabe wird der gleiche Titel
nochmals aufgerufen und erneut
abgespielt. Diese Wiederholung kann
beliebig oft erfolgen.
∑ Wiederholung aller CD-Titel
(Gesamtwiederholung)
1. Die Taste REPEAT 1/ALL zweimal
betätigen.
Die Anzeigen REPEAT und ALL leuchten.
2. Die Taste PLAY betätigen.
Die Wiedergabe startet. Jeweils nach
der vollständigen Wiedergabe aller Titel
wird erneut der erste Titel angewählt
und die CD wird nochmals abgespielt.
Diese Wiederholung kann beliebig oft
erfolgen.
Wiedergabewiederholung
1. Im Stoppmodus die Taste SHUFFLE
betätigen.
Die Displayfeldanzeige SHUFFLE
leuchtet.
2. Die Taste CD PLAY betätigen.
Die Wiedergabe erfolgt bei zufällig
bestimmter Titelreihenfolge.
O Bei ausgelöster Zufallswiedergabe
kann mit Taste
Æ ein neuer ZufallsTitel angewählt werden. Mit der Taste
Ú kann der vorliegende Titel von
Anfang an erneut abgespielt werden.
O Ein bereits einmal abgespielter Titel
wird nicht mehr aufgerufen.
O Zum Verlassen des Zufallswieder-
gabemodus nochmals die Taste
SHUFFLE betätigen. Hierauf werden alle
verbleibenden Titel ab dem vorliegenden Titel in normaler Reihenfolge
abgespielt.
Zufallswiedergabe
Punkt BPunkt A
Titel Titel
Programmierte Titel
DEUTSCH

_ 36_
Der Zähler kann auf die folgenden
Zeitanzeigefunktionen geschaltet werden:
1 CD-Gesamtzeit
Nach Einfahren des belegten CDHalters werden CD-Gesamtspielzeit und
CD-Gesamttitelzahl angezeigt.
2 Laufzeitanzeige
Ab Wiedergabestart wird die Titellaufzeit in Minuten und Sekunden
angezeigt.
3 Restzeitanzeige (REMAIN)
Erfolgt, wenn Taste TIME einmal
gedrückt wird. So kann die Titelrestzeit
schnell überprüft werden.
4 Gesamtrestzeitanzeige
(TOTAL REMAIN)
Erfolgt, wenn Taste TIME zweimal
gedrückt wird. Die Restzeitanzeige
bezieht sich auf die gesamte
verbleibende Spielzeit ab der
vorliegenden Abspielposition. Die
Anzeige erfolgt während der
Wiedergabe bei Abwärtszählung bis
"00:00".
O Wird angezeigt, wenn Taste TIME
dreimal gedrückt wird. Die gezeigte Zeit
ist die Laufzeit
2.
O Wird bei herkömmlicher Wiedergabe
ein Titel mit einer Titelnummer über 32
abgespielt, unterbleibt die Restzeitanzeige, auch wenn die Taste TIME
betätigt wird. Im Zeitanzeigebereich
erscheint stattdessen die Meldung
"nn:nn".
Für einen schnellen CD-Inhaltsüberblick
werden jeweils die ersten 10 Sekunden
von jedem Titel angespielt.
1. Die Taste INTRO CHECK drücken.
Die Anzeigen INTRO und
∏ leuchten.
2. Zum Verlassen des Anspielmodus
nochmals die Taste INTRO CHECK
drücken.
O Die Anspielfunktion ist auch in
Verbindung mit der Zufallswiedergabe,
programmierten Wiedergabe und
Gesamtwiederholfunktion einsetzbar.
Zähleranzeige
Automatische
Leerabschnitteeinfügung
Anspielsuchlauf
1. Die Taste SINGLE drücken. Die
Displayfeld-Anzeige SINGLE leuchtet.
2. Den gewünschten Titel mit den Tasten
Ú MUSIC SKIP Æ wie erforderlich
aufrufen.
3. Der aufgerufenen Titel wird einmal
abgespielt. Am Titelende schaltet der
CD-Spieler auf Stopp.
O Zum Verlassen des Einzelwiedergabe-
modus nochmals die Taste SINGLE
drücken.
Einzelwiedergabe
GESAMTRESTZEIT
TITELRESTZEIT
TITELZEIT
GESAMTZEIT
Diese Funktion fügt automatisch zwischen
den einzelnen Titeln eine 4 Sekunden
dauernde Pause ein, so daß zwischen
allen Titeln gleicher Abstand gegeben ist.
Hierzu die Taste AUTO SPACE drücken, so
daß die Anzeige A.SPACE leuchtet.
Zum Verlassen des Einfügmodus nochmals
die Taste AUTO SPACE drücken, so daß die
Anzeige erlischt.

_ 37_
1. Mit Taste POWER einschalten.
2. Mit Schalter REV MODE den Bandlaufmodus bestimmen.
3. Eine bespielte Cassett einlegen. Die
Bandöffnung muß nach unten, Seite A
muß nach außen weisen.
4. Mit Schalter DOLBY NR die Rauschunterdrückung aktivieren (ON) oder
deaktivieren (OFF).
5. Zum Wiedergabestart die Taste
” oder
∏ drücken.
6. Die Lautstärke am Verstärker einstellen.
O Zum Wiedergabestopp die Taste STOP
drücken.
Wiedergabe
Der Bandzähler zählt aufwärts bei
Vorwärtsrichtung und abwärts bei
Rückwärtsrichtung. Die Anzeige kann mit
Taste COUNTER CLEAR auf "0000"
rückgestellt werden.
Bandzähler
Cassettenbetrieb
Zählerrückstellung
Aufnahmepegel
Stopp
Aufnahme
Signalquelle
Bandlaufmodus
Netz
Auswurf
Dolby
Das Band wird nach 5 Abläufen gestoppt.
Einstellung
Bandlauf
Wiedergabe einer Seite
Seite A
Seite A
Seite B
Seite B
Stopp
1. Mit dem Schalter POWER einschalten.
2. Den Bandlaufmodus mit Schalter REV
MODE bestimmen.
O Sollen beide Seiten bespielt werden,
den Schalter REV MODE auf
π oder
ø stellen.
O Wird die Aufnahme mit Taste ”ú,
ausgelöst, erfolgt die Aufnahme nur für
eine Bandseite.
O Soll nur eine Seite bespielt werden, den
Schalter REV MODE auf
“ stellen.
3. Eine bespielbare Cassette einlegen.
O Sicherstellen, daß die Aufnahmezungen
am Cassettenrücken vorhanden sind.
Falls nicht, die Löschschutzöffnungen
mit Klebeband abdecken.
4. Mit Schalter SOURCE die Signalquelle
bestimmen.
O Bei Vorwahl "CD" gilt der eingebaute
CD-Spieler als Signalquelle.
O Bei Vorwahl "LINE" wird die an den
Buchsen LINE IN anliegende Signalquelle vorgewählt.
5. Mit Schalter DOLBY NR die Rauschunterdrückung aktivieren (ON) oder
deaktivieren (OFF).
6. Mit Taste RECORD das Deck auf
Aufnahmebereitschaft schalten (die
Anzeigen REC und
ƒ leuchten).
7. Den Aufnahmepegel so aussteuern, daß
Pegelspitzen kurz im Bereich "0 dB"
(Normal- oder Chromband) bzw. im
Bereich "+3 dB" (Metallband) angezeigt
werden.
Aufnahme
Metallband
Normal- oder
Chromband
Einlegen einer Cassette
1. Das Band straffen. Hierzu die Nabe
mit einem Finger oder Bleistift etc.
drehen.
Hinweis: Nicht das Band berühren!
Fingerabdrücke verursachen Staubund Schmutzablagerungen.
2. Zum Öffnen des Cassettenhalters die
Auswurftaste (
∫)* drücken.
3. Eine Cassette mit nach unten
weisender Bandöffnung einlegen.
4. Den Cassettenhalter vorsichtig
andrücken.
*Hinweise:
ODer Cassettenhalter kann bei
Aufnahme oder Wiedergabe nicht
geöffnet werden.
OWurde das Gerät bei Aufnahme oder
Wiedergabe ausgeschaltet, ist der
Cassettenauswurf ggf. nicht möglich.
In diesem Fall das Gerät einschalten
und hierauf die Auswurftaste
drücken.
8. Zum Aufnahmestart nochmals die Taste
ƒ PAUSE drücken.
O Zur kurzzeitigen Aufnahmeunter-
brechung die Taste
ƒ PAUSE drücken.
Zur Aufnahmefortsetzung die Taste
ƒ
PAUSE oder die Wiedergabetaste ”∏
drücken. Wird bei Aufnahmepause die
Taste gedrückt, deren Anzeige (
” oder
∏) leuchtet, erfolgt der Aufnahmestart.
Wird die Taste gedrückt, deren Anzeige
nicht leuchtet, wird nur die Bandlaufrichtung gewechselt. Zum Aufnahmestart die gleiche Taste nochmals
drücken.
O Zum Aufnahmestopp die Taste STOP
drücken.
Bereits auf dem Band aufgezeichnete
Signale werden bei der Neuaufnahme
automatisch gelöscht und durch die
Neuaufnahme ersetzt. Um ein Band ohne
Neuaufnahme zu löschen, den Regler REC
LEVEL auf "0" stellen und die Aufnahme
starten.
VORSICHT
Das Aufzeichnen von kommerziell
bespielten Cassetten, Schallplatten,
Sendeprogrammen und anderen Medien
kann gegen das Urheberrecht verstoßen.
Die gesetzlichen Bestimmungen vor der
Aufnahme überprüfen.
Löschen
DEUTSCH

_ 38_
Bei Wiedergabe kann die Bandgeschwindigkeit feineingestellt werden, um
Klangabweichungen zu kompensieren oder
bewußt einzusetzen.
Den Regler PITCH CONTROL nach rechts
drehen, um die Bandgeschwindigkeit zu
erhöhen (höhere Tonlage). Den Regler
nach links drehen, um die Bandgeschwindigkeit zu verringern (tiefere Tonlage).
O Bei Anschlag im Uhrzeigersinn ist die
Bandgeschwindigkeit um ca. 12 %
erhöht.
O Bei Anschlag gegen den Uhrzeigersinn
ist die Bandgeschwindigkeit um ca. 12
% verringert.
Geschwindigkeitsfeineinstellun
g
O Wenn die Taste Ò zu oft betätigt
wurde, kann die Zahl der angezeigte
Sprungtitel mit Taste
verringert
und damit berichtigt werden.
O Bei Verwendung der Taste Ò wird
der nächste Titel als Sprungtitel 1
gezählt, während mit Taste
der
vorliegende Titel als Sprungtitel 1 gilt.
2. Das Band wird vorgespult, bis die
eingegebene Anzahl von Leerabschnitten erfaßt wurde. Die Wiedergabe setzt dann am Anfang des
gesuchten Titels wieder ein.
Hinweise zur CPS-Funktion
Der CPS-Suchlauf bezieht sich auf die 4
Sekunden langen Leerabschnitte zwischen
den einzelnen Titeln. In den folgenden
Fällen arbeitet diese Funktion ggf. nicht
ordnungsgemäß.
O Der Abstand zwischen einzelnen Titeln
wird nicht als Leerabschnitt erkannt,
wenn
– der Leerabschnitt kürzer als 4
Sekunden Sekunden ist,
– der Leerabschnitt einen hohen
Störpegel aufweist,
– längere Passagen einen geringen
Signalpegel (klassische Musik etc.)
aufweisen.
Die CPS-Funktion ermöglicht den Zugriff
auf einen beliebigen Titel zur Wiedergabe,
wobei bis zu 15 Titel vor oder nach dem
vorliegenden Titel übersprungen werden
können. Der Suchlauf orientiert sich an
den 4 Sekunden dauernden Leerabschnitten zwischen den einzelnen Titeln. Diese
Leerabschnitte können mit der Stummaufnahmefunktion hergestellt werden.
Hinweise:
O Die folgenden Anleitungsschritte 1 und
2 behandeln zur Vereinfachung nur die
Vorwärtsrichtung (
∏).
Die Bedienschritte gelten entsprechend
für die Rückwärtsrichtung (
”).
O Bei Wiedergabe arbeiten die
Umspultasten (
Ò und ) als CPSTasten. Am Gerät finden Sie die
Tastenbeschriftung "
Ú CPS
ÆÒ" und auf der Fernbedienung
die Tastenbeschriftung "
Ò" vor.
In der folgenden Beschreibung werden
diese Tasten als
und Ò
angegeführt.
1. Bei Vorwärts-Wiedergabe die Taste
oder Ò (wiederholt) drücken, bis
die Anzahl der gewünschten Sprungtitel
angezeigt wird. Taste
Ò dient zur
Anwahl von nachfolgenden Titeln, Taste
arbeitet entsprechend für
vorhergehende Titel. Siehe auch die
Tafel "Anwahl eines Titels mit der CPSFunktion".
CPS (Computomatic-ProgrammSuchlauf)
t
’
’
1
2
3
3
2
1
’
’
’
’
1
2
3
3
2
1
(1) (2)
(4)(3)
’
Anwahl eines Titels mit der CPS-Funktion
Beispiel: Siehe (1). Für Suchlauf zum 3. Titelanfang nach der vorliegenden
Bandposition "CP03" wählen.
Vorliegende Bandposition
Bandlaufrichtung
Nachfolgend Vorangehend
Vorliegende Bandposition
Nachfolgend Vorangehend
Wenn "t" in Beispiel (1) kürzer ist als 4
Sekunden, wird das Intervall nicht als
Leerstelle gezählt. In diesem Fall
muß zur Wahl des 3. Titels "CP-02" anstelle
von "CP-03" eingegeben werden.
Bandlaufrichtung
Im Stoppmodus dienen die Tasten
und Ò als Umspultasten (vorwärts/
rückwärts).
O Im Wiedergabemodus dienen diese
Tasten als CPS-Tasten.
Umspulen
Durch Drücken der Taste RTZ (Return To
Zero) wird das Band bis zum Erreichen der
Zählernullanzeige "0000" umgespult.
Hierauf wechselt das Deck auf Stopp.
O Die Nullrücklauf-Funktion arbeitet nicht,
wenn die Zähleranzeige im Bereich
zwischen "99996" und "0004" liegt.
Bandversetzung bis zur Zählernullanzeige (Nullrücklauf)
or
oder

Mit der CD-Kopierfunktion ist die
Überspielung von CD auf Band besonders
einfach.
1. Eine CD einlegen.
2. Einen bespielbare Cassette einlegen.
3. Mit Schalter DOLBY NR die Rauschunterdrückung aktivieren (ON) oder
deaktivieren (OFF).
O Beim CD-Kopiermodus arbeitet der
Regler REC LEVEL nicht, da der
Aufnahmepegel hierbei automatisch
ausgesteuert wird.
∑ Aufnahme ab Bandanfang
Im Stoppmodus die Taste CD DUBBING
drücken.
Das Band wird bis zum Anfang
zurückgespult und der Zähler wird auf
"0000" rückgestellt. Der CD-Spieler schaltet
am Anfang des ersten Titels auf Pause.
Nach einer Stummaufnahme von ca. 10
Sekunden (um den Bandvorspann zu
vermeiden) wird die Bandaufnahme
zeitgleich mit der CD-Wiedergabe
ausgelöst.
∑ Aufnahme ab einer beliebigen
Bandposition
1. Das Band bis zur gewünschten Stelle
umspulen. Dann die Taste STOP
drücken.
2. Die Taste RECORD drücken.
Das Deck schaltet auf Aufnahmepause.
3. Die Taste CD DUBBING drücken.
Die CD-Kopieraufnahme wird an der
vorgesehenen Bandstelle ausgelöst.
O Während der CD-Kopieraufnahme
arbeiten nur die Tasten STOP (CD),
STOP (Band), OPEN/CLOSE und TIME.
∑ Zuweisung der CD-Aufnahme-
titel für Bandseite A und B
(Programmierte A-B-Kopieraufnahme)
Mit dieser Funktion können CD-Titel zur
Aufnahme auf Bandseite A oder B
vorgemerkt werden.
1. Die Taste PROGRAM drücken.
2. Die Taste A-B drücken.
Anzeige A blinkt, Anzeige B leuchtet.
Dies bedeutet, daß der CD-Spieler auf
Titel-Programmierung für Bandseite A
geschaltet ist.
3. Die für Bandseite A vorgesehenen Titel
programmieren.
Wie in Schritt 3 des Kapitels "Programmierte Wiedergabe" auf Seite 34
beschrieben vorgehen.
O Zur Anzeige der Gesamtzeit aller
programmierten Titel im Programmiermodus die Taste TIME drücken. So
kann überprüft werden, ob die
Aufnahmedauer für die Bandlänge
geeignet ist. Durch nochmaliges
Betätigen der Taste TIME schaltet der
CD-Spieler erneut auf den Programmiermodus.
4. Die Taste A-B drücken.
Anzeige A leuchtet, Anzeige B blinkt.
Dies bedeutet, daß der CD-Spieler auf
Titel-Programmierung für Bandseite B
geschaltet ist.
5. Die für Bandseite B vorgesehenen Titel
programmieren.
O Wird die Taste A-B im Program-
miermodus für Seite B gedrückt,
wechselt der CD-Spieler auf Programmierung für Seite A.
_ 39_
∑ Automatische 4-Sekunden-
Leerabschnitteeinfügung bei
Aufnahme
Bei Aufnahme die Taste REC MUTE
drücken. Ohne Bandlaufunterbrechung
wird ein Leerabschnitt von ca. 4
Sekunden Dauer aufgezeichnet (die
Anzeige RECORD blinkt). Hierauf
schaltet das Deck auf Aufnahmepause
(die Anzeigen RECORD und PAUSE
leuchten). Zur Aufnahmefortsetzung
erneut die Taste PAUSE drücken (die
Anzeige PAUSE erlischt).
∑ Automatische 4-Sekunden-Leerab-
schnitteanfügung bei Aufnahmepause
Bei Aufnahmepause die Taste REC
MUTE drücken. Der Bandlauf wird
ausgelöst, wobei ein Leerabschnitt wie
oben beschrieben aufgezeichnet wird.
Hierauf schaltet das Deck erneut auf
Aufnahmepause.
∑ Herstellen eines Leerabschnittes von
mehr als 4 Sekunden Dauer
Bei Aufnahme die Taste REC MUTE
gedrückt halten. Solange diese Taste
gedrückt gehalten wird, erfolgt eine
Leerabschnitteaufzeichnung. Bei
Freigabe der Taste REC MUTE wechselt
das Deck auf Aufnahmepause. Zur
Aufnahmefortsetzung die Taste PAUSE
drücken.
O Eine bereits aktivierter Stummaufnahme
(blinkende Anzeige RECORD) kann
durch nochmaliges Drücken der Taste
REC MUTE aufgehoben werden, wobei
die Aufnahme direkt fortgesetzt wird.
Stummaufnahme
Kopieraufnahme von CD auf Band
or
DEUTSCH
oder

Diese Funktion sorgt dafür, daß bei
Wiedergabeende oder -stopp des CDSpielers oder Cassettendecks die jeweils
andere Signalquelle die Wiedergabe
fortsetzt.
1. Die Taste CD-TAPE CONT PLAY drücken.
Die Displayfeldanzeigen TAPE und
CD blinken.
2. (Beispiel) Die CD-Wiedergabetaste
drücken.
Der CD-Spieler startet die Wiedergabe.
Die Displayfeldanzeige CD blinkt.
3. Wenn die CD-Wiedergabe stoppt, löst
das Cassettendeck automatisch die
Bandwiedergabe aus. Die Displayfeldanzeige TAPE blinkt.
Hierauf gilt: Sobald eine Wiedergabe
endet, wird die andere Wiedergabe
ausgelöst.
_ 40_
Kontinuierlicher Wiedergabewechsel zwischen
CD und Band
6. Die Taste CD DUBBING drücken.
Das Band wird bis zum Anfang von
Seite A zurückgespult und der Zähler
wird auf "0000" rückgestellt. Der CDSpieler schaltet am Anfang des ersten
Titels von Seite A auf Pause.
Nach einer Stummaufnahme von ca. 10
Sekunden (um den Bandvorspann zu
vermeiden) wird die Bandaufnahme
zeitgleich mit der programmierten CDWiedergabe ausgelöst.
O Wird vor der Taste CD DUBBING die
Taste RECORD gedrückt,wird die
Aufnahme an der vorliegenden
Bandstelle ausgelöst (ohne Rückspulen
bis zum Bandanfang).
O Wird das Ende von Bandseite A erreicht
und wurde der vorliegende CD-Titel zu
diesem Zeitpunkt für weniger als 1
Minute und 30 Sekunden abgespielt,
wird die Aufnahme auf Seite B mit
diesem abgebrochenen Titel gestartet
(dies gilt nicht für die programmierte AB-Kopieraufnahme).
O Wenn der CD-Spieler die Wiedergabe
beendet, wird der CD-Kopieraufnahmemodus verlassen.
O Wird das Ende von Bandseite B
erreicht, noch ehe der CD-Spieler die
Wiedergabe beendet, wird der CDKopieraufnahmemodus beendet.
O Ungeachtet ob die Wiedergabe des CD-
Spielers oder Cassettendecks mit Taste
STOP beendet wird oder am letzten Titel
endet, die Wiedergabe wird jeweils mit
dem anderen Laufwerk fortgesetzt.
O Für das auf Stopp geschaltete Laufwerk
kann jeweils der Signalträger (CD oder
Cassette) ausgetauscht werden.
O Zum Verlassen des kontinuierlichen
Wiedergabemodus nochmals die Taste
CD-TAPE CONT PLAY betätigen.

_ 41_
DEUTSCH
Dieses Gerät ist zum Timer-gesteuerten
Betrieb geeignet. Dementsprechend
können Wiedergabe oder Aufnahme zu
einem am externen Timer (nicht
mitgeliefert) vorbestimmten Zeitpunkt
ausgelöst werden.
∑ Timer-gesteuerte CD- oder
Cassettenwiedergabe
1. Dieses Gerät und das Stereo-System
wie gezeigt an einen Timer anschließen.
2. Alle zu benutzenden Geräte
einschalten.
3. Eine CD oder bespielte Cassette
einlegen.
4. Den Schalter TIMER in Stellung CD oder
TAPE bringen.
5. Am Timer die gewünschte Startzeit
(Einschaltzeit) und Stoppzeit
(Ausschaltzeit) eingeben. Nach dieser
Einstellung werden alle Geräte
ausgeschaltet.
6. Zum voreingestellten Zeitpunkt werden
die Geräte mit Spannung versorgt und
die Wiedergabe startet automatisch.
∑ Timer-gesteuerte Aufnahme
1. Den Verstärker-Eingang wählen, der die
Aufnahme mit diesem Deck ermöglicht.
2. Die aufzunehmende Signalquelle (UKW,
MW etc.) bestimmen.
3. Eine bespielbare Cassette einlegen und
den Schalter TIMER in Stellung REC
bringen.
4. Am Timer die gewünschte Startzeit
(Einschaltzeit) und Stoppzeit
(Ausschaltzeit) eingeben. Nach dieser
Einstellung werden alle Geräte
ausgeschaltet.
5. Zum voreingestellten Zeitpunkt werden
die Geräte mit Spannung versorgt und
die Aufnahme startet automatisch.
Timer-gesteuerter Betrieb
Timer
Tuner
An Netzausgang
des Timers
An Netzausgang
des Tuners
An Netzausgang
des Verstärkers
Verstärker
AD-500
Timer-Anschlüsse
Köpfe und Bandpfad sollten in
regelmäßigen Abständen gereinigt und
entmagnetisiert werden.
Reinigung des Bandpfades
O Auf ein Wattestäbchen oder weiches
Tuch Kopfreinigungsflüssigkeit*
auftragen und Köpfe, Capstan und alle
Metallteile des Bandpfades leicht
abreiben.
O Die Andruckrolle mit Gummireini-
gungsflüssigkeit* reinigen.
* Beide sind in den Bandgeräte-
Reinigungssets TEAC HC-2 und RC-2 (in
den U.S.A.) oder TEAC TZ-261 (in
anderen Ländern) enthalten.
Pflege und Wartung
Entmagentisieren der Köpfe
Sicherstellen, daß die Spannungsversorgung ausgeschaltet ist. Dann die
Köpfe mit dem Entmagnetisierer TEAC E-3
oder einem gleichwertigen Gerät
entmagnetisieren. Ausführliche Angabe
zur Handhabung finden sich in der
Bedienungsanleitung der Entmagnetisiergeräte.
Andruckrolle
Capstan
Löschkopf
Aufnahme-/Wiedergabekopf

_ 42_
Die grundsätzliche Störungssuche sollte wie bei sonstigen elektrischen oder elektronischen Geräten üblich vorgenommen werden. Zunächst
naheliegende mögliche Störungsursachen überprüfen. Hier sind einige Beispiele aufgeführt:
Störungssuche
Störung Mögliche Ursache Abhilfe
Allgemein
Keine Einschaltung nach Drücken Keine einwandfreie Netzkabel einwandfrei anschließen.
von Schalter POWER. Netzkabelverbindung.
Brummstörung. Keine einwandfreie Die Kabel einwandfrei anschließen..
Cinchsteckerkabelverbindung.
Störeinstreuung bei Tuner ist zu nahe aufgestellt. Abstand zwischen Tuner und
nahestehendem Tuner. diesem Gerät erweitern oder
dieses Gerät ausschalten.
Keine Tonwiedergabe. Unsachgemäßer Anschluß am Die Anschlüsse überprüfen.
Stereo-System.
Fernbedienung ist nicht möglich. Gerät ist ausgeschaltet. Gerät einschalten.
Keine Batterien in der Batterien einlegen.
Fernbedieneinheit.
CD-Spieler
Keine Wiedergabe von der CD ist mit Etikettseite nach unten Mit Etikettseite nach oben weisend
eingelegten CD. weisend eingelegt. einlegen.
Verschmutzte CD. Die CD-Oberfläche säubern.
Keine Tonwiedergabe. Unsachgemäßer Anschluß am Die Anschlüsse überprüfen.
Stereo-System.
Keine CD-Signalwiedergabe. Das Cassettendeck ist auf Wiedergabe Die Cassettenwiedergabe stoppen.
geschaltet. Oder den CD-Ausgang mit dem
Verstärker verbinden.
Es wird nur ein Titel abgespielt. Es ist auf Einzeltitel-Wiedergabe Mit Taste SINGLE deaktivieren.
geschaltet.
Keine programmierte Wiedergabe. Es wurde nicht auf den Die Taste PROGRAM drücken, so
Programmiermodus geschaltet. daß Anzeige PGM leuchtet.
Tonaussetzer. Vibrations- oder Stoßeinwirkung Dieses Gerät an einem anderen Ort
auf den CD-Spieler. aufstellen.
Verschmutzte CD. Die CD-Oberfläche reinigen.
Cassettendeck
Dumpfes Klangbild. Verschmutzte Köpfe. Die Köpfe reinigen.
Magnetisierte Köpfe. Die Köpfe entmagnetisieren
(mit TEAC E-3).
Ungeeignete Stellung des Den Schalter in die geeignete
DOLBY NR-Schalters. Stellung bringen.
Ungewohntes Klangbild. Die Geschwindigkeitsfeineinstellung Den Geschwindigkeitsfeinregler in
wurde verstellt. die mittlere Stellung bringen.
Aufnahme ist nicht möglich. Die Aufnahmezungen der Cassette Die Löschschutzöffnungen mit
sind entfernt. Klebeband abdecken.
Verschmutzte Köpfe. Die Köpfe reinigen.
Zu niedriger Aufnahmepegel. Den Regler REC LEVEL nach
rechts drehen.

_ 43_
DEUTSCH
Allgemein
Spannungsversorgung:
120/230 V Wechselspannung, 50/60 Hz
(USA/Kanada/Allgemeines Exportmodell)
230 V Wechselspannung, 50 Hz (Europa/
Großbritannien)
240 V Wechselspannung, 50 Hz
(Australien)
Leistungsaufnahme: 14 W
Abmessungen (BxHxT): 435 x 145 x 290 mm
Gewicht: 5,3 kg
Mitgeliefertes Zubehör
Drahtlose Fernbedieneinheit RC-619
Cinchstecker-Kabel x 2
Batterie (SUM-3, AA, R6) x 2
O Änderungen der technischen Daten und
Konstruktion jederzeit ohne Vorankündigung vorbehalten.
O Die Abbildungen in dieser Anleitung
können leicht von der Geräteausführung abweichen.
CD-Spieler
(Audio)
Zahl der Kanäle:
2
Frequenzgang: 10 -20.000 Hz ±0,5 dB
Signal/Rausch-Abstand: 90 dB
Dynamikbereich: 90 dB
Klirrfaktor: 0,02 % (1 kHz)
Gleichlaufschwankungen: Nicht meßbar
(quarzgenau)
Kanaltrennung: 75 dB
Ausgang: 2 Veff.
Digitalfilter: 4fach-Oversampling
Analogfilter: 3. Ordnung
(Signalformat)
Samplingrate:
44,1 kHz
D/A-Wandler: 16 Bit linear/Kanal
Kanal-Bit-Rate: 4,3218 Mb/Sek
Kanal-Modulationscode: EFM
Fehlerkorrektur: CIRC
(Abnehmer)
Typ:
Gesteuerter optischer Dreistrahl-
Laser-Tonabnehmer
Linse: Zweidimensionaler Parallelantrieb
Laser: GaAlAs-Halbleiter-Laser
Wellenlänge: 780 nm
Cassettendeck
Spursystem: 4-Spur/2-Kanal-Stereo
Köpfe: Aufnahme/Wiedergabe x 1
(Umkehrkopf), Löschen x 1
Cassetten: C-60, C-90
Bandgeschwindigkeit: 4,76 cm/Sek.
Motor: Gleichstrom-Servo-Motor x 1
Gleichlaufschwankungen: 0,08 (W. RMS)
Frequenzgang (gesamt):
50 - 15.000 HZ ±3 dB, Metall
50 - 15.000 HZ ±3 dB, Chrom
50 - 14.000 HZ ±3 dB, Normal
Signal/Rausch-Abstand (gesamt):
59 dB (Dolby-Rauschunter. aus, 3%
Klirrfaktor, gewichtet), 69 dB (Dolby
Rauschunter. ein, größer 5 kHz)
Umspuldauer: Ca. 120 Sek. (mit C-60-
Cassette)
Eingang: Line, 87 mV
(Mind. 50 kohm Eingangsimpedanz)
Ausgang:
Line;
0,46 V
(Mind. 50 kohm Lastimpedanz)
Kopfhörer; 1 mV/8 ohm
Technische Daten

Quest'unità è stata disegnata
specificamente per la riproduzione di CD
che portino il marchio "
˛". I CD di altro
tipo non possono venire riprodotti.
O Caricare sempre i CD con il lato che
porta l'etichetta rivolto in alto. Esso è
l'unico riproducibile.
O Per togliere un CD dalla sua custodia,
premere verso il basso il centro della
custodia stessa e sollevare il CD
prendendolo delicatamente per i bordi.
Modo corretto di togliere il CD
Modo corretto di tenere il CD
O Le impronte e la polvere devono venire
tolti dalla superficie del CD con un
panno morbido ed asciutto.
Pulire in senso radiale
O Non usare mai benzina, diluenti o alcool
per pulire il disco. Essi ne possono
rovinare la superficie.
O Per evitare che si graffino, i CD devono
venire rimessi il più presto possibile
nella loro custodia. I graffi possono far
saltare la testina a laser durante la
riproduzione.
O Non esporre i dischi a luce solare
diretta, umidità o calore intenso.
L'esposizione a calore intenso può
deformare il disco.
O Non incollare adesivi e non scrivere
con penne a sfere sull'etichetta del CD.
_ 44_
Prima dell’uso
O Proteggere l'apparecchio da luce
solare diretta o fonti di calore intenso.
Evitare di installarlo in posizioni esposte
a vibrazioni o polvere, calore, freddo ed
umidità eccessivi.
O Non aprire l'unità, dato che così
facendo si possono causare guasti o
folgorazioni. Se in essa dovesse
penetrare un oggetto, entrare in
contatto con personale tecnico
autorizzato.
O Non toccare la superficie dei CD con le
mani. Non utilizzare dischi incrinati.
O Nel rimuovere la spina di alimentazione
dalla presa, agire sempre sulla spina
stessa e mai sul cavo.
O Non tewntare di ripulire l'unità con
sostanze chimiche, dato che esse ne
danneggiano le finiture. Usare solo un
panno morbido e pulito.
O Conservare questo manuale in un luogo
sicuro per poterlo consultare in caso di
necessità.
Leggere prima dell'uso
Uso delle audiocassette
Audiocassette
Uso dei CD
Uso del telecomando
Non conservare audiocassette in luoghi
come i seguenti:
O Su caloriferi e in luoghi esposti a luce
solare diretta o temperature elevate.
O Vicino a diffusori, televisori o
amplificatori o comunque a campi
magnetici intensi.
O In luoghi umidi e polverosi.
O In luoghi che espongano l'unità a
cadute ed urti.
O I nastri C-120 sono troppo sottili e
tendono a impigliarsi nei meccanismi di
lettura del nastro, e se ne sconsiglia
quindi l’uso.
Scelta dei nastri:
Perché il dispositivo di rilevamento
automatico del tipo di nastro possa
funzionare normalmente, l'audiocassetta
deve possedere fori di identificazione dei
tipi metal o al cromo (cobalto).
*Dispositivo Dolby di riduzione del rumore
è fabbricato su licenza della Dolby
Laboratories Licensing Corporation.
DOLBY ed il simbolo della doppia D
∂
sono marchi di fabbrica della Dolby
Laboratories Licensing Corporation.
Il telecomando deve essere usato
puntandolo verso il sensore del pannello
anteriore dell'apparecchio.
ª Installazione delle batterie
1. Togliere il coperchio del vano delle
batterie.
2. Inserire due batterie "AA" (o R6, o SUM-
3).
Verificare che le batterie siano
inserite con i poli positivo
± e negativo
— nelle posizioni corrette.
3. Richiudere il coperchio sino a quando
si ode un leggero scatto.
Sostituzione delle batterie
Se la distanza utile di funzionamento del
telecomando risulta diminuire le batterie
sono probabilmente vicine all'esaurimento.
Provvedere alla loro sostituzione.
Precauzioni riguardanti le batterie
O Verificare che le batterie siano inserite
con le polarità
± e — nella posizione
corretta.
O Usare batterie dello stesso tipo. Non
usare mai assieme tipi diversi di
batterie.
O Possono essere usate sia batterie
ricaricabili che batterie non ricaricabili.
Vedere le indicazioni dell'etichetta.
O Se si prevede di non utilizzare il
telecomando per un lungo periodo (oltre
un mese), togliere le batterie per
prevenire possibili perdite. In caso di
perdite, pulire il vano batterie e
sostituire le batterie con altre nuove.
O Non riscaldare le batterie, non
smontarle e non gettarle nel fuoco.

O Prima di procedere ai collegamenti
spegnere tutti i componenti. Fare
particolarmente attenzione alle
indicazioni relative ai canali sinistro (L)
e destro (R).
O Leggere attentamente i manuali di
istruzioni di ciascuno dei componenti
che si intendono usare insieme a
questo apparecchio.
∑ Cavo del segnale
Terminali di ingresso e uscita di linea
(LINE IN/OUT)
Facendo uso degli appositi cavi a spina del
tipo RCA, collegare i terminali di ingresso
LINE IN e di uscita LINE OUT ai terminali,
rispettivamente, TAPE REC e TAPE PLAY
dell'amplificatore stereo.
O I terminali LINE OUT emettono il
segnale proveniente dal lettore di
compact disc o dal deck a cassette. Se
si utilizzano contemporaneamente il
lettore CD e il deck a cassette, il suono
del deck ha la precedenza.
Terminali di uscita di linea del compact
disc (CD LINE OUT)
Collegare i terminali CD LINE OUT ai
terminali CD, DAT o AUX dell'amplificatore
stereo, per mezzo degli appositi cavi a
spina del tipo RCA.
O I terminali CD LINE OUT emettono
sempre il segnale del disco.
Precauzioni:
Se il lettore per CD interferisce con la
radio, il televisore, o altri apparecchi
elettrici, porre i rispettivi apparecchi ad
una distanza sufficiente ad evitare le
interferenze.
∑ Cavo di alimentazione
Il cavo di alimentazione deve essere
collegato ad una presa di corrente
alternata di rete la cui tensione sia del
livello corretto per questo apparecchio.
∑ Cuffie
Per l'uso della cuffia, collegare la spina
alla presa PHONES.
O Regolare il livello del segnale emesso
dalla presa della cuffia.
_ 45_
Collegamenti
Ricordarsi di staccare il cavo di
alimentazione dalla presa alla parete prima
di procedere a modificare la posizione del
commutatore di voltaggio del convertitore.
1. Individuare il selettore di voltaggio sul
pannello posteriore.
2. Usando un cacciavite a lama piatta,
selezionare la posizione (230 V o 120 V)
appropriata, relativa alla zona di
utilizzazione.
Conversione del voltaggio
(per i modelli per l'esportazione)
AD-500
Ad una presa di
corrente alternata
di rete
Cavo a spina
RCA
Cavo a spina
RCA
Cavo a spina
RCA
Amplificatore stereo
Ai terminali CD,
o DAT, o AUX
Ai terminali
TAPE PLAY
Ai terminali
TAPE REC
ITALIANO

_ 46_
Ubicazione e denominazione dei comandi
1 Interruttore di attivazione (POWER)
2 Sensore del telecomando (REMOTE SENSOR)
3 Quadrante di visualizzazione, polivalente
a Indicazione di ripetizione (REPEAT)
b
Indicazione di spaziatura automatica
(A. SPACE)
c Indicazione di cancellazione (DELETE)
d Indicazione della modalità del tempo
e Indicazione di programmazione (PGM)
f Indicazione di riproduzione casuale
(SHUFFLE)
g Indicazione di ingresso dal CD (IN)
h
Indicazione del componente in uso (TAPE o CD)
i Indicazione di registrazione (REC)
j Indicazione di riproduzione del nastro
(PLAY)
k Misuratore di livello
l Contanastro
m Indicazione di riproduzione degli inizi
(INTRO)
n Indicazione di CD in pausa o riproduzione
(
ƒ/∏)
o Indicazione del numero del brano
p Indicazione del tempo
q Indicazione di riversamento (DUB)
r Indicazione di movimento del nastro
all'indietro, in pausa, o in avanti (
”ƒ∏)
s Lista dei numeri dei brani
4 Tasto di apertura e chiusura del vano
portacassette (OPEN/CLOSE)
5
Tasto di riproduzione del compact disc (CD å)
6 Tasto di arresto del compact disc (CD STOP)
7 Tasto di pausa del compact disc (CD ƒ)
8 Tasto di ritorno al punto zero (RTZ)
9 Tasto di azzeramento del contanastro (CLEAR)
0
Comando del livello di registrazione (REC LEVEL)
q Tasto di riproduzione continua
(CD-TAPE CONT PLAY)
w
Tasto per il riversamento del compact disc
(CD DUBBING)
e Tasto per la registrazione (RECORD)
r Tasto di silenziamento della registrazione
(REC MUTE)
t Tasti di riavvolgimento e avanzamento veloce,
e di ricerca computerizzata del
programma(
Ú CPS ÆÒ)
y Tasto di arresto del nastro (TAPE STOP)
u Tasto di pausa del nastro (TAPE ƒ)
i Vano portacassette
o Vano del piatto portadischi
p Tasto di ripetizione di uno o di tutti i brani
(REPEAT 1/ALL)
a Tasto per la programmazione (PROGRAM)
s Tasto di riproduzione casuale (SHUFFLE)
d Interruttore del timer (TIMER)
f Tasti di salto dei brani all'indietro o in avanti
(MUSIC SKIP
Ú/Æ)
g Interruttore della sorgente (SOURCE)
h
Interruttore della modalità di inversione
(REV MODE)
j
Manopola di comando dell'altezza
(PITCH CONTROL)
k Interruttore del sistema Dolby (DOLBY NR)
l Tasto di espulsione (EJECT)
; Tasti per la riproduzione del nastro (”/∏)
z Presa per la cuffia (PHONES)
x
Manopola di comando del livello della cuffia
(LEVEL)
c Tasto di indicazione del tempo (TIME)
v
Tasto di controllo degli inizi dei brani
(INTRO CHECK)
b Tasto di spaziatura automatica (AUTO SPACE)
n
Tasto di designazione di una porzione di brano (A-B)
m Tasti di ricerca sul compact disc (CD SEARCH
/Ò)
,
Tasto per riproduzione di un solo brano (SINGLE)
. Tasto di verifica (CHECK)
/ Tasto di cancellazione (CLEAR)
! Tasto di cancellazione (DELETE)

∑ Se il piatto del CD è aperto...
Premendo il tasto å :
Il piatto del CD si chiude e la riproduzione
inizia dal primo brano.
∑ Arresto della riproduzione
Premere il tasto STOP. Il lettore entra in
modalità di arresto.
Estrazione del disco:
Premere il tasto OPEN/CLOSE. La
riproduzione si interrompe, il piatto del
disco fuoriesce e tutte le funzioni ritornano
alle condizioni iniziali.
Interruzione temporanea della
riproduzione (modalità di pausa):
Premere il tasto ƒ. La riproduzione si
interrompe sulla posizione in cui il pickup
si trova in quel momento. L'indicazione
ƒ
rimane illuminata. Per riprendere la
riproduzione dalla stessa posizione
premere il tasto
∏ o ƒ.
AVVERTENZA:
O Non forzare il piatto con le mani durante
le operazioni di apertura e chiusura.
_ 47_
1. Portare l'interruttore POWER su ON.
2. Premere il tasto OPEN/CLOSE.
Il piatto del CD fuoriesce. Appoggiare
gentilmente il disco sul piatto col lato
etichettato rivolto verso l'alto. Il disco
va inserito nelle guide al centro del
piatto.
3. Premere nuovamente il tasto
OPEN/CLOSE.
Il piatto del CD si chiude.
Alcuni secondi più tardi, le informazioni
seguenti vengono visualizzate.
4. Premere il tasto CD PLAY (∏).
La riproduzione del CD inizia dal primo
brano e l'indicatozione di riproduzione
(
∏) si illumina.
O Durante la riproduzione, il numero del
brano riprodotto al momento lampeggia
sulla lista dei brani.
O Al termine della riproduzione di un
brano il numero corrispondente
scompare dalla lista dei brani.
Lettore CD
Operazioni principali
For 8 cm (3-inch)
CD singles
For 12 cm (5-inch)
Compact Discs
Tune numbers on disc up to 20
Total number of
tunes on the disc
Total playback
time of disc
∑ Ricerca dei brani per mezzo dei
tasti MUSIC SKIP (Ú/Æ)
L'inizio di un qualsiasi brano può essere
localizzato facilmente utilizzando i tasti
MUSIC SKIP
Ú/Æ. Questa operazione
viene indicata chiaramente nel riquadro
TRACK.
O Questa operazione è possibile anche in
modelità di riproduzione programmata.
In questo caso solo i brani programmati
vengono localizzati.
∑ Salto al brano successivo
Premere il tasto
Æ.
Il lettore salta al brano successivo ogni
volta che viene premuto il tasto
Æ. Il
lettore può arrivare fino all'ultimo brano in
questo modo ma, una volta che l'inizio
dell'ultimo brano è stato raggiunto, esso
non avanza più anche premendo di nuovo il
tasto
Æ.
∑ Salto al brano precedente
Premere il tasto
Ú.
Il lettore salta al brano precedente ogni
volta che viene premuto il tasto
Ú. Se
questo tasto viene premuto nel corso di un
brano, il lettore salta all'inizio del brano
stesso. Per saltare al brano precedente è
necessario premere il tasto due volte.
In questo modo è possibile ritornare fino
all'inizio del primo brano del disco.
∑ Ricerca dei brani per mezzo dei
tasti SEARCH ( o Ò)
Nel corso della riproduzione, o durante la
pausa, tenere premuto i tasti
Ò del
telecomando o
Æ dell'apparecchio per
spostare rapidamente in avanti la
posizione di riproduzione, e i tasti
del
telecomando o
Ú dell'apparecchio per
spostare la posizione di riproduzione
rapidamente all'indietro.
Nel corso della ricerca manuale il suono
rimane udibile, sia pure ad un livello
alquanto diminuito. In questo modo è
possibile procedere alla ricerca del punto
desiderato. Una volta raggiuntolo,
lasciando andare il tasto si ritorna alla
modalità in essere prima della ricerca.
Ricerca dei brani
or
ITALIANO
Numero totale di
brani sul disco
Per dischi singoli
da 8 cm
Per dischi da 12 cm
Sino a 20 numeri di brani sul disco
Tempo di riproduzione
totale del disco
o

O Nel corso della riproduzione
programmata, la voce TOTAL REMAIN
dell'indicazione dei tempi, visualizza il
tempo totale rimanente per la
riproduzione dei brani programmati, a
partire dalla posizione in cui ci si trova
al momento.
O Se si programmano dei brani il cui
numero d'ordine sul disco è di 32 o
superiore, l'indicazione del tempo totale
potrebbe non venire visualizzata (in tal
caso sul quadrante compare
l'indicazione "nn:nn").
∑ Visualizzazione del tempo totale
del programma
In modalità di programmazione, per
visualizzare la durata totale del programma
agire sul tasto TIME.
Premendo di nuovo il tasto TIME si riporta
il lettore CD alla precedente modalità di
programmazione.
∑ Verifica del contenuto del
programma
1. Premere il tasto CHECK in modalità di
programmazione.
Il numero di posizione sul disco del
primo brano del programma si illumina,
e sul quadrante si mette a lampeggiare
l'indicazione "P-01".
2. Ad ogni successiva pressione del tasto
CHECK si illumina il numero di
posizione sul disco del successivo
brano programmato.
Contemporaneamente, sul quadrante si
mette a lampeggiare l'indicazione "P-xx
(numero progressivo del brano nel
programma)".
O Una volta visualizzato il numero di
posizione sul disco dell'ultimo brano del
programma, premendo di nuovo il tasto
CHECK si riporta il lettore CD alla
modalità di programmazione, per una
eventuale ulteriore aggiunta di altri
brani al programma.
O I numeri dei brani presenti nella
memoria del programma vengono
visualizzati sulla lista dei brani. Questa
lista può indicare però solo i primi 20
brani presenti sul disco. Pertanto, se nel
programma è stato inserito un brano la
cui posizione sul disco è superiore a 20,
si illumina la voce OVER ("eccesso").
_ 48_
∑ Cancellazione di un brano
programmato
Premendo il tasto CLEAR si cancella
l'ultimo brano del programma.
∑ Programmazione a cancella-
zione
Si tratta di una operazione esattamente
opposta alla normale programmazione e
consiste nel designare i brani di cui non si
vuole effettuare la riproduzione.
1. Premere il tasto STOP.
2. Premere il tasto DELETE.
Il lettore CD entra in modalità di
programmazione a cancellazione.
Sul quadrante si illuminano le
indicazioni "DELETE" e "PGM".
3. Agire alternativamente sui tasti Ú
MUSIC Æ e sul tasto PROGRAM, in
un qualsiasi ordine desiderato.
4. Premere il tasto PLAY.
La riproduzione programmata a
cancellazione ha inizio.
O In modalità di programmazione a
cancellazione, premendo il tasto TIME,
si visualizza il tempo totale dei brani non
cancellati. Premendo di nuovo il tasto
TIME si ritorna alla modalità di
programmazione a cancellazione.
O Premendo il tasto CHECK in modalità di
programmazione a cancellazione si
visualizza il numero di posizione sul
disco del primo brano cancellato. Una
volta visualizzato il numero di posizione
sul disco dell'ultimo brano di cui si è
programmata la cancellazione,
premendo di nuovo il tasto CHECK si
riporta il lettore CD alla modalità di
programmazione a cancellazione, per
una eventuale ulteriore programmazione della cancellazione di altri brani.
O Premendo il tasto CLEAR si cancella
l'ultimo brano programmato per la
cancellazione.
O Premendo il tasto STOP con il lettore
già in modalità di arresto, si cancella la
programmazione a cancellazione.
La funzione di riproduzione programmata
permette di programmare fino a 20 brani
per la riproduzione nell'ordine desiderato.
∑ Programmazione dei brani
desiderati
1. Premere il tasto STOP.
2. Premere il tasto PROGRAM.
Il lettore entra in modalità di
programmazione.
L'indicazione PGM si illumina sul
quadrante.
3. Premere alternativamente i tasti Ú
MUSIC SKIP Æ e quello PROGRAM
nell'ordine seguente.
4. Premere il tasto PLAY (
∏).
La riproduzione inizia dal primo brano
programmato.
O La programmazione di brani è possibile
solo con il lettore in modalità di arresto.
O Il contenuto della programmazione
viene conservato in memoria anche
dopo il termine della riproduzione
programmata, e anche nel caso in cui la
riproduzione del programma venga
interrotta agendo sul tasto di arresto.
O Premendo invece il tasto di arresto con
l'apparecchio già in modalità di arresto,
il contenuto del programma viene
cancellato.
O Per disattivare la modalità di
programmazione, premere di nuovo il
tasto PROGRAM.
Riproduzione programmata
Esempio:
Per programmare i brani nell'ordine 5
@ 2 @ 8, in modalità di arresto.
scegliere 5 scegliere 2memorizzare
scegliere 8 memorizzarememorizzare

_ 49_
La funzione di ripetizione consente di
ripetere la riproduzione di un qualsiasi
brano singolo, o di tutti i brani del disco, o
di una certa porzione del disco designata
fra due punti (di inizio e di fine).
O Le funzioni di ripetizione attivate
possono essere disattivate premendo di
nuovo il tasto di ripetizione.
∑ Ripetizione di un solo brano
(modalità di riproduzione
ripetuta di un solo brano)
1. Premere il tasto REPEAT 1/ALL.
Le indicazioni REPEAT e SINGLE si
illuminano.
2. Selezionare il brano desiderato agendo
opportunamente sui tasti
Ú e Æ.
Il brano prescelto viene riprodotto.
Raggiunta la fine del brano,
l'apparecchio provvede automaticamente a ritornare all'inizio del brano
stesso e a riprodurlo di nuovo, e così di
seguito indefinitamente, sino a quando
non si disattiva la funzione di
ripetizione.
∑ Ripetizione di tutto il disco
(modalità di riproduzione
ripetuta di tutti i brani del disco)
1. Premere due volte il tasto REPEAT
1/ALL.
Le indicazioni REPEAT e ALL si
illuminano.
2. Premere il tasto PLAY.
La riproduzione ha inizio. Raggiunta la
fine del disco, l'apparecchio ritorna
automaticamente all'inizio del primo
brano e riprende la riproduzione
dall'inizio, e così di seguito, sino a
quando la funzione di ripetizione non
viene disattivata.
∑ Ripetizione di una sezione
designata (modalità di
riproduzione ripetuta di una
certa porzione A-B)
1. Avviare la riproduzione da un punto
qualunque, purché precedente la
sezione che si vuole designare.
2. Agire sul tasto A-B per designare il
punto di inizio (punto A) della sezione
che si vorrà poi riprodurre
ripetutamente.
Le indicazioni REPEAT e A- si
illuminano, mentre l'indicazione B si
mette a lampeggiare, a significare che il
punto A è stato fissato.
3. Raggiunto il punto di fine (punto B)
della sezione che si vuole riprodurre
ripetutamente, designarlo premendo di
nuovo il tasto A-B.
L'indicazione B si illumina in modo
continuo, a significare che la funzione
di riproduzione ripetuta della sezione
A-B è stata attivata.
L'apparecchio ritorna poi
automaticamente al punto A e inizia la
riproduzione della sezione così
designata. Quando la riproduzione
raggiunge il punto B, l'apparecchio si
arresta, ritorna in corrispondenza del
punto A, e da qui riprende di nuovo la
riproduzione, ripetendo il ciclo sino a
quando non si provvede a disattivare la
funzione di ripetizione.
O Dopo aver designato il punto A, per
ricercare rapidamente il punto B,
invece di proseguire con la normale
riproduzione si può far uso dei tasti
Ò
o Æ.
O Se si preme di nuovo il tasto A-B
durante la riproduzione ripetuta della
sezione, questa funzione di ripetizione
viene disattivata.
∑ Ripetizione della riproduzione
programmata
La funzione di ripetizione può essere
attivata anche in modalità di riproduzione
programmata.
Per ripetere la riproduzione di tutti i brani
programmati, premere due volte il tasto
REPEAT 1/ALL, controllando che sul
quadrante risultino illuminate le indicazioni
REPEAT e ALL.
Funzione di ripetizione
1. In modalità di arresto premere il tasto
SHUFFLE.
Sul quadrante si illumina l'indicazione
SHUFFLE.
2. Premere il tasto CD PLAY.
I brani vengono scelti dall'apparecchio
in un ordine del tutto casuale, e
riprodotti.
O Per scegliere un brano a caso, premere
il tasto
Æ durante la riproduzione
casuale. Per riprodurre dall'inizio il
brano in corsodi riproduzione, premere
il tasto
Ú.
O Un brano riprodotto in questo modo
non può venire riprodotto nuovamente.
O Per abbandonare la funzione di
riproduzione casuale in corso, premere
di nuovo il tasto SHUFFLE. I brani
vengono riprodotti nel loro ordine
normale a partire da quello in corso.
Riproduzione in ordine casuale
Punto BPunto A
Brano Brano
Brani programmati
ITALIANO

_ 50_
1. Accendere l'apparecchio portando
l'interruttore POWER su ON.
2. Disporre la modalità di inversione di
marcia nella posizione desiderata.
3. Inserire il nastro che si vuole ascoltare,
con il bordo aperto rivolto verso il
basso, ed il lato A rivolto verso se
stessi.
Riproduzione
Funzionamento del deck a
cassette
Il contatempo visualizza i seguenti vari tipi
di indicazioni di tempo.
1 Durata totale di riproduzione del disco
Richiudendo il vano portadischi dopo
avervi inserito un disco, sul quadrante
compare l'indicazione del tempo
necessario alla riproduzione di tutto il
disco e del numero totale di brani
presenti sul disco stesso.
2 Tempo trascorso
Viene visualizzato, in minuti e secondi, il
tempo progressivamente trascorso
dall'inizio della riproduzione.
3 Tempo rimanente (REMAIN)
Premendo una volta il tasto TIME si
visualizza l'indicazione del tempo
rimanente, cioè del tempo, in
progressiva diminuzione, necessario
per giungere alla fine del brano in corso
di riproduzione.
4 Tempo totale rimanente (TOTAL
REMAIN)
Si ottiene premendo due volte il tasto
TIME. Il tempo visualizzato è il periodo
di tempo necessario a riprodurre la
parte di disco che va dalla posizione
presente sino alla fine. Il contatempo
visualizza questo tempo in progressiva
diminuzione, sino alla lettura "00:00".
O Premendo tre volte il tasto TIME si
ritorna alla visualizzazione del tempo
trascorso per il brano in corso di
riproduzione di cui al precedente punto
2.
O In modalità di riproduzione normale, se
si sta riproducendo un brano la cui
posizione sul disco è di numero
superiore a 32, il tempo rimanente del
brano non viene visualizzato sul
quadrante, anche se si preme il tasto
TIME. Nel riquadro del tempo compare
invece l'indicazione "nn:nn".
La funzione di riproduzione del solo inizio
dei brani permette appunto la riproduzione
dei soli primi 10 secondi di ciascun brano.
1. Premere il tasto INTRO CHECK.
Vengono visualizzate le indicazioni
INTRO e
∏.
2. Premere il tasto INTRO CHECK una
seconda volta per disattivore la
funzione.
O Questa funzione può venire usata
anche insieme a quelle di riproduzione
casuale, programmata e ripetuta per
tutti i brani.
Visualizzazione del contatempo Creazione automatica di spazi
Riproduzione del solo inizio dei
brani
1. Premere il tasto SINGLE. Sul quadrante
si illumina l'indicazione SINGLE.
2. Agire opportunamente sui tasti
ÚMUSIC SKIPÆ per raggiungere il
punto di inizio del brano desiderato.
3. Solamente quel brano viene riprodotto,
e l'apparecchio passa poi alla modalità
di arresto.
O Per disattivare la modalità di
riproduzione di un brano solo, premere
di nuovo il tasto SINGLE.
Riproduzione di un solo brano
Durata totale
del disco
Tempo trascorso
di un brano
Tempo rimanente
di quel brano
Tempo rimanente
del disco
Quando questa funzione viene attivata, uno
spazio di circa 4 secondi viene inserito
automaticamente tra i brani in modo che
essi siano riprodotti con un intervallo fisso.
Per attivare questa funzione, premere il
tasto AUTO SPACE. Sul quadrante si
illumina l'indicazione SPACE.
Premendo di nuovo il tasto A. SPACE ,
l'indicazione si spegne e la funzione viene
disattivata.
Il nastro si arresta dopo 5 cicli.
Posizione
Movimento del nastro
Riproduzione di un solo lato
Lato A
Lato A
Lato B
Lato B
Arresto
Caricamento di una cassetta
1. Usate un dito o una matita per far
girare il mozzo della cassetta e
stringere il nastro attorno al suo
rocchetto.
Nota: Evitate in modo rigoroso di
toccare il nastro vero e proprio. Le
impronte digitali trattengono la
polvere e lo sporco.
2. Premere il tasto di espulsione (
∫)*
per far aprire il vano portacassette.
3. Caricare il nastro con il lato aperto
rivolto verso il basso.
4. Chiudere con delicatezza lo sportello
del vano portacassette.
*Note:
OLo sportello del vano portacassette
non può essere aperto durante la
riproduzione o la registrazione.
OSe l'apparecchio è stato spento
durante la riproduzione o la
registrazione, l'espulsione della
cassetta potrebbe non essere
possibile. In tal caso, accendere
l'apparecchio e premere il tasto di
espulsione un'altra volta.

_ 51_
Le cifre del contanastro aumentano se il
nastro si sta spostando in avanti, e
diminuiscono se il nastro si sta spostando
in direzione inversa. Agendo sul tasto
COUNTER CLEAR, l'indicazione del
contanastro viene riazzerata, ritornando
alla posizione "0000".
Contanastro
Azzeramento del contanastro
(COUNTER CLEAR)
Livello di registrazione (REC LEVEL)
Arresto (STOP)
Registrazione (RECORD)
Sorgente (SOURCE)
Modalità di inversione
(REV MODE)
Attivazione
(POWER)
Espulsione (EJECT)
Sistema di riduzione del rumore (DOLBY NR)
1. Accendere l'apparecchio portando
l'interruttore POWER su ON.
2. Disporre come desiderato l'interruttore
della modalità di inversione (REV
MODE).
O Per una registrazione bidirezionale,
posizionare l'interruttore REV MODE su
una delle due posizioni
π o ø.
O Se la registrazione viene avviata per
mezzo del tasto
”
ú
, la registrazione
stessa viene effettuata solo su un lato
del nastro.
O Se si vuole effettuare la registrazione su
un solo lato, disporre l'interruttore REV
MODE sulla posizione
“.
3. Inserire la cassetta sulla quale si vuole
registrare.
O Verificare che le linguette di sicurezza
presenti sul bordo della cassetta siano
debitamente in posizione. Se risultano
spezzate, per poter di nuovo registrare
sulla stessa cassetta è necessario
ricoprire i fori lasciati dalle linguette
con del nastro adesivo un po' spesso.
4. Agire sull'interruttore SOURCE per
selezionare la sorgente desiderata.
O Designando come sorgente la posizione
"CD", viene automaticamente
selezionata l'uscita del lettore CD
incorporato nell'apparecchio.
Registrazione
Nastri di metallo
Nastri normali o
al cromo
fermo. Per riavviare il movimento del
nastro è necessario premere lo stesso
tasto una seconda volta.
O Per arrestare la registrazione premere il
tasto STOP.
8. Per avviare la registrazione premere di
nuovo il tasto ƒ PAUSE.
O Per arrestare temporaneamente la
registrazione agire sul tasto
ƒ PAUSE.
Per riavviare poi il nastro agire di nuovo
sullo stesso tasto
ƒ PAUSE, o sui tasti
di riproduzione
” o ∏. Se in modalità
di pausa della registrazione, premendo
il tasto di riproduzione la cui relativa
indicazione
” o ∏ si trova illuminata,
la registrazione viene avviata. Se
invece si preme il tasto di riproduzione
la cui relativa indicazione
” o ∏ non
si trova illuminata, si ottiene solamente
il cambiamento di direzione del
movimento del nastro, che però rimane
Qualsiasi registrazione precedentemente
effettuata si cancella automaticamente
quando se ne effettua una nuova sullo
stesso nastro. In alternativa, il nastro può
anche essere cancellato "registradolo" con
il comando del livello REC LEVEL posto a
"0".
AVVERTENZA
La duplicazione di nastri già registrati, di
dischi, o di altro materiale pubblicato o
trasmesso via radio può costituire una
violazione delle leggi sui diritti d'autore.
Verificare attentamente le leggi relative
prima della registrazione.
Cancellazione del nastro
ITALIANO
4. Selezionare la posizione desiderata per
il sistema di riduzione del rumore
DOLBY NR.
5. Agire sui tasti
” o ∏ per avviare la
riproduzione.
6. Regolare il volume per mezzo
dell'apposito comando dell'amplificatore.
O Per arrestare la riproduzione, premere il
tasto STOP.
O Designando come sorgente la posizione
"LINE", viene selezionato come sorgente
il segnale che giunge ai terminali di
ingresso 'LINE IN".
5. Selezionare la posizione desiderata per
il sistema di riduzione del rumore
DOLBY NR.
6. Premere il tasto RECORD. Il deck passa
alla modalità di pausa della
registrazione (con le indicazioni REC e
ƒ illuminate).
7. Regolare il livello di registrazione per
mezzo del comando REC LEVEL, ed in
modo che il più forte suono da
registrare faccia raggiungere al
misuratore di livello appena brevemente
la zona intorno al punto "0 dB" (per i
nastri normali o al cromo) o intorno al
punto "3 dB" (per i nastri di metallo).

_ 52_
Nel corso della riproduzione si può
modificare la velocità del nastro, con la
conseguenza che anche l'altezza del
suono riprodotto risulta modificata.
Ruotando la manopola PITCH CONTROL
verso destra la velocità del nastro
aumenta, risultando in un'altezza del suono
più elevata. Ruotando la manopola in
senso antiorario, la velocità del nastro
diminuisce e l'altezza del suono anche.
O In posizione completamente ruotata in
senso orario, la velocità del nastro
risulta aumentata di circa il 12% rispetto
alla velocità media normale.
O In posizione completamente ruotata in
senso antiorario, la velocità del nastro
risulta diminuita di circa il 12% rispetto
alla velocità media normale.
Comando dell'altezza del suono
1. Durante la riproduzione in direzione
normale, agire sui tasti
o Ò più
volte sino a far apparire sul
contanastro il numero del brano che si
vuole evitare. Usare il tasto
Ò per
raggiungere brani successivi a quello in
corso e quello
per raggiungere
brani precedente. Vedere il diagramma
"Selezione di un particolare brano con
la funzione CPS".
O Se premendo il tasto Ò si supera il
numero CPS richiesto, usare il tasto
per tornare indietro al numero CPS
richiesto.
O Quando il tasto Ò viene premuto, il
brano sucessivo viene conteggiato
come primo brano, mentre se viene
premuto quello
, viene conteggiato
come primo brano il brano in corso.
2. Il nastro viene fatto avanzare
rapidamente in modo da rilevare gli
spazi non registrati fra i brani sino a che
il brano richiesto non viene raggiunto.
La riproduzione inizia poi dall'inizio del
brano designato.
Note sulla funzione CPS
La funzione CPS opera rilevando e
contando gli spazi di 4 secondi circa che
precedono clascun brano. Con nastri dei
tipi seguenti, essa potrebbe non funzionare
normalmente.
O Se gli intervalli fra i brani non possono
essere rilevati.
– Gli intervalli durano meno di 4
secondi.
– Gli intervalli fra brani contengono alti
livelli di rumore.
– Il brano contiene dei pianissimo
molto lunghi (musica classica, ecc.).
Questa funzione consente di selezionare
un qualunque brano la cui posizione sia, al
massimo, di 15 brani prima o dopo quello in
corso di riproduzione, avviandone la
riproduzione non appena individuato. La
funzione opera individuando gli spazi non
registrati di almeno 4 secondi presenti fra
un brano e l'altro. Questi intervalli di
nastro non registrato possono essere
creati, al momento della realizzazione del
nastro stesso, usando la funzione del tasto
REC MUTE.
Note:
O Nei seguenti punti 1 e 2, per
semplificare la descrizione, si
esemplifica il caso della "riproduzione in
avanti (direzione
∏). Per la
riproduzione all'indietro (direzione
”)
si fa uso della stessa procedura,
specularmente.
O I tasti Ò (avanzamento veloce) e
(riavvolgimento veloce) fungono da tasti
della funzione CPS nel corso della
riproduzione. Questa è la ragione per
cui, sul pannello dei comandi
dell'apparecchio, questi tasti sono
indicati con "
Ú CPS ÆÒ",
mentre sul telecomando compaiono
solamente come "
Ò". Nella
spiegazione seguente tutti questi tasti
sono indicati semplicemente come
"
" e "Ò".
Funzione di ricerca
programmata automatica (CPS)
t
’
’
1
2
3
3
2
1
’
’
’
’
1
2
3
3
2
1
(1) (2)
(4)(3)
’
Selezione di un particolare brano con la funzione CPS
Es.: Vedere (1). Per raggiungere il terzo brano dopo quello in corso, scegliere "CP03".
Posizione attuale del nastro
Seguente
Precedente
Direzione
di scorrimento del
nastro
Posizione attuale del nastro
Seguente Precedente
Nell'esempio (1), se "t" dura meno di
4 secondi, non viene contato come
uno spazio in bianco. In questo caso,
impostare "CP-02" invece di "CP-03" per
selezionare il terzo brano.
Direzione
di scorrimento del
nastro
In modalità di arresto, agendo sui tasti
o Ò si può far, rispettivamente,
retrocedere o avanzare il nastro ad alta
velocità.
O In modalità di riproduzione, questi tasti
attivano la funzione CPS (vedi).
Avvolgimento veloce
Premendo il tasto di ritorno al punto zero
(RTZ), l'apparecchio provvede ad
individuare il punto "0000", dopodiché si
arresta.
O La funzione di ritorno al punto zero non
può operare se il tasto viene premuto
con il contanastro in una posizione
qualunque compresa fra "9996" e "0004".
Funzione di ritorno al punto zero
(RTZ)
or
o

Facendo uso della funzione di
riversamento, il contenuto di un compact
disc può essere molto facilmente copiato
su nastro.
1. Inserire il compact disc che si vuole
copiare.
2. Caricare la cassetta sulla quale si vuole
registrare.
3. Selezionare la posizione desiderata per
il sistema di riduzione del rumore
DOLBY NR.
O In modalità di riversamento del CD, il
comando REC LEVEL non ha alcun
effetto, perché il livello della
registrazione viene regolato
automaticamente.
∑ Registrazione dall'inizio del
nastro
In modalità di arresto premere il tasto CD
DUBBING.
Il nastro viene riavvolto sino all'inizio del
lato A ed il contanastro viene riportato alla
lettura "0000", mentre il lettore CD si
dispone in posizione di pausa in
corrispondenza dell'inizio del primo brano
presente sul disco stesso.
Dopo una registrazione "in bianco" di circa
10 secondi (per saltare la parte guida
iniziale del nastro), il deck a cassette
passa alla modalità di registrazione mentre
il lettore CD inizia la riproduzione.
∑ Registrazione da un punto
qualunque del nastro
1. Portare il nastro sulla posizione dalla
quale si vuole iniziare la registrazione e
premere il tasto STOP.
2. Premere il tasto RECORD.
Il deck passa alla modalità di pausa
della registrazione.
3. Premere il tasto CD DUBBING.
La copia dal disco al nastro inizia dalla
posizione nella quale il nastro si trova al
momento.
O Nel corso delle operazioni di riversa-
mento dal disco al nastro, solamente i
tasti STOP (CD), STOP (TAPE),
OPEN/CLOSE e TIME sono operativi.
∑ Designazione dei brani del
disco per la registrazione sul
lato A o sul lato B (riversamento
programmato A-B)
Usando la funzione di riversamento
programmato A-B, si possono designare i
brani del compact disc che si vogliono
registrare sul lato A o sul lato B del nastro.
1. Premere il tasto PROGRAM.
2. Premere il tasto A-B.
L'indicazione "A-" si mette a
lampeggiare, mentre quella "B" si
illumina, a informare che il lettore CD si
trova attualmente in modalità di
programmazione dei brani da riversare
sul "lato A".
3. Programmare i brani che si vogliono
registrare sul lato A del nastro.
Per la programmazione seguire la
procedura descritta al punto 3 del
paragrafo "Riproduzione programmata",
a pag. 48.
O Per visualizzare il tempo totale di durata
del programma, premere il tasto TIME
mentre si è in modalità di programmazione. Questa informazione può
servire per poter programmare una
serie di brani in grado di "entrare" senza
problemi nella lunghezza del nastro
previsto. Ripremendo poi lo stesso
tasto TIME si riporta il lettore CD in
modalità di programmazione.
4. Premere il tasto A-B.
L'indicazione "A-" si illumina mentre
quella "B" si mette a lampeggiare, ad
informare che il lettore CD si trova ora
in modalità di programmazione per i
brani da riversare sul lato "B".
5. Procedere alla programmazione dei
brani da riversare sul lato B del nastro.
O Premendo il tasto A-B mentre si è in
modalità di programmazione dei brani
per il lato B, si riporta il lettore alla
modalità di programmazione dei brani
per il lato A, e così di seguito.
6. Premere il tasto CD DUBBING.
Il nastro viene riavvolto sino all'inizio
del lato "A" ed il contanastro viene
riazzerato alla lettura "0000", mentre il
lettore CD viene a mettersi in posizione
di pausa in corrispondenza del primo
brano programmato, destinato ad
essere registrato sul lato A.
Dopo una registrazione "in bianco" di
circa 10 secondi (per saltare la parte
guida iniziale del nastro), il deck a
cassette passa alla modalità di
registrazione mentre il lettore CD inizia
la riproduzione programmata.
_ 53_
∑ Funzionamento per spaziatura
automatica per spazi non
registrati di circa 4 secondi
(durante la registrazione)
Nel corso della registrazione premere il
tasto REC MUTE. Il movimento del
nastro continua e viene registrato uno
spazio in bianco di circa 4 secondi
(mentre l'indicazione RECORD
lampeggia). Il deck passa poi
automaticamente alla posizione di
pausa della registrazione (entrambe le
indicazioni RECORD e PAUSE si
illuminano).
Per riprendere la registrazione premere
di nuovo il tasto PAUSE (la relativa
indicazione si spegne).
∑ Funzionamento per spaziatura
automatica per spazi non registrati di
circa 4 secondi (durante la pausa della
registrazione)
Nella modalità di pausa della
registrazione, premendo il tasto REC
MUTE si avvia automaticamente la
suddetta operazione di spaziatura, al
termine della quale il deck ritorna alla
posizione di pausa della registrazione.
∑ Per uno spazio non registrato superiore
a 4 secondi
Nel corso della registrazione tenere
premuto il tasto REC MUTE per un
periodo più lungo. La registrazione
viene silenziata sin tanto che si tiene
premuto il tasto. Disinserendo il tasto si
passa alla modalità di pausa della
registrazione. Per riprendere la
registrazione premere il tasto PAUSE.
O Nel corso delle operazioni di
silenziamento (e cioè mentre
l'indicazione RECORD lampeggia),
premendo di nuovo il tasto REC MUTE si
disattiva la funzione stessa, e la
registrazione riprende senza che il
nastro si fermi.
Funzionamento del silenziamento
della registrazione
Riversamento da un compact disc su nastro
or
ITALIANO
o

∑ Registrazione a mezzo timer
1. Selezionare l'ingresso dell'amplificatore
che il deck è in grado di registrare.
2. Selezionare la sorgente che si intende
registrare (trasmissioni radio FM, o AM,
o altro).
3. Caricare nel deck la cassetta sulla
quale si vuole effettuare la registrazione
e portare l'interruttore [TIMER] sulla
posizione [REC].
4. Predisporre il timer sulle desiderate ore
di inizio (accensione) e fine
(spegnimento). Al termine di queste
operazioni l'alimentazione a tutti i
componenti viene spenta.
5. Quando giunge l'ora designata per
l'inizio della registrazione,
l'alimentazione si attiva e la
registrazione si avvia automaticamente.
Timer ad uso audio
Sintonizzatore
Alla presa di corrente
di rete presente sul
timer
Alla presa di corrente
di rete presente sul
sintonizzatore
Alla presa di corrente
di rete presente
sull'amplificatore
Amplificatore
AD-500
L'apparecchio può essere fatto funzionare
a mezzo timer. Questa funzione consente
di far partire la riproduzione o la
registrazione in un qualunque momento
desiderato, nel caso in cui si utilizzi
l'apparecchio in combinazione con un
dispositivo timer.
∑ Riproduzione a mezzo timer di un
disco o di una cassetta
1. Collegare l'apparecchio, ed il sistema
stereo utilizzato, ad un timer, nel modo
indicato nel diagramma a lato.
2. Portare gli interruttori di attivazione di
tutti gli apparecchi su ON.
3. Inserire il disco o la cassetta che si
vogliono riprodurre.
4. Portare l'interruttore del timer sulla
posizione CD o TAPE.
5. Predisporre il timer sulle desiderate ore
di inizio (accensione) e fine
(spegnimento). Al termine di queste
operazioni l'alimentazione a tutti i
componenti viene spenta.
6. Quando giunge l'ora designata per
l'inizio della riproduzione,
l'alimentazione si attiva e la
riproduzione si avvia automaticamente.
In modalità di riproduzione continua, non
appena il lettore CD o il deck a cassette
termina la riproduzione (o viene arrestato
di proposito), l'altro apparecchio inizia
automaticamente a riprodurre.
1. Premere il tasto CD-TAPE CONT PLAY.
Sul quadrante si mettono a
lampeggiare le due indicazioni
"TAPE" e "CD".
2. Premere (ad esempio) il tasto di
riproduzione del lettore CD.
Il lettore CD inizia la riproduzione.
Sul quadrante lampeggia
l'indicazione "CD".
_ 54_
Funzionamento a mezzo timer
Riproduzione continua fra il compact disc e il nastro
Collegamenti del timer
O Se si preme il tasto RECORD prima di
premere il tasto CD DUBBING, la
registrazione ha inizio dalla posizione
del nastro in cui il nastro si trova al
momento (senza il suo preventivo
riavvolgimento all'inizio del lato
interessato).
O Se il lato A del nastro termina prima che
siano stati riprodotti 1 minuto e 30
secondi (posizione 01:30 del
contatempo) del brano del disco in
corso di riproduzione al momento, la
registrazione dal lato B del nastro
riparte con quel brano, riprodotto
dall'inizio (ad eccezione del caso in cui
si stia effettuando il riversamento
programmato A-B).
O La modalità di riversamento del disco
viene automaticamente disattivata
quando il lettore CD giunge al termine
della riproduzione.
O Se il nastro giunge al termine del lato B
prima che il lettore CD abbia terminato
la riproduzione, la modalità di
riversamento viene cancellata.
3. Quando il lettore CD si arresta, il deck a
cassette avvia automaticamente la
riproduzione.
Sul quadrante lampeggia l'indicazione
"TAPE".
E così di seguito, non appena uno dei
due apparecchi si arresta, l'altro entra
immediatamente in funzione.
O Non appena uno dei due apparecchi, il
lettore CD o il deck a cassette, si
arresta, l'altro entra subito in funzione
automaticamente, indipendentemente
dal fatto che l'arresto avvenga
naturalmente alla fine della
riproduzione, o che venga invece
provocato dall'azione sul tasto di
arresto dell'apparecchio in funzione al
momento.
O Mentre il lettore CD, o il deck a
cassette, si trova in modalità di arresto,
si può procedere alla sostituzione del
disco o, rispettivamente, della cassetta.
O Premendo di nuovo il tasto CD-TAPE
CONT PLAY si disattiva la modalità di
riproduzione continua.

_ 55_
Le operazioni per la diagnostica di eventuali problemi insorti nel funzionamento di questo apparecchio sono simili a quelle che si effettuano per
qualsiasi altra apparecchiatura elettrica o elettronica. Controllare per prime sempre le cause più probabili ed ovvie. Qui di seguito si indicano
alcuni dei principali problemi e la loro possibile soluzione.
Diagnostica
ITALIANO
Problema Probabile causa Rimedio
Generalità
L'apparecchio non si La spina del cavo di alimentazione non Provvedere.
accende, anche premendo è inserita ben a fondo nella presa di
il tasto POWER. corrente di rete.
Ronzii. Le spine dei cavi di collegamento non sono Controllare o rifare i collegamenti.
collegate ben a fondo nelle rispettive prese.
Disturbi nel sintonizzatore. Apparecchio troppo vicino al Tenere l'apparecchio ed il sintonizzatore
sintonizzatore. ad una distanza ragionevole, o spegnere
questo apparecchio quando si ascolta
la radio.
Nessun suono. I collegamenti al sistema stereo Controllare e provvedere.
non sono corretti.
Non si riesce a utilizzare il L'interruttore POWER si trova su OFF. Portarlo su ON.
telecomando.
Telecomando senza batterie, o con batterie Inserire le batterie, o sostituirle,
esaurite. secondo il caso.
Lettore CD
Non si riesce a riprodurre Disco inserito con l'etichetta rivolta Inserirlo con l'etichetta rivolta
il disco inserito. verso il basso. verso l'alto.
Disco sporco. Ripulirne la superficie.
Nessun suono. I collegamenti al sistema stereo Controllare e provvedere.
non sono corretti.
Nessuna uscita dal CD. Il deck a cassette si trova in modalità Fermare il deck, o collegare l'uscita
di riproduzione. del CD all'amplificatore.
Si riesce a riprodurre solo Il tasto SINGLE si trova inserito. Premerlo per disattivarlo.
un brano.
Riproduzione programmata Non è stato premuto il tasto PROGRAM. Premere il tasto. L'indicazione PGM
impossibile. deve comparire sul quadrante.
Salti nel suono Il lettore si trova soggetto a urti o Posizionare il lettore in un luogo non
(allineamento non preciso). vibrazioni. soggetto a urti o vibrazioni.
Disco sporco. Ripulirne la superficie.
Deck a cassette
Suono di qualità scadente. Le testine sono sporche. Ripulirle.
Le testine sono magnetizzate. Smagnetizzarle con il dispositivo
TEAC E-3.
La posizione dell'interruttore di riduzione Modificarla in modo appropriato.
del rumore DOLBY NR non è quella corretta.
Suoni strani. Il comando dell'altezza è stato modificato. Riportare il punto del comando
dell'altezza sulla posizione centrale.
Registrazione impossibile. Le linguette della cassetta per la protezione Ricoprirne i fori con del nastro
dalle cancellazioni accidentali sono spezzate. adesivo un po' spesso.
Le testine sono sporche. Ripulirle.
Il livello di registrazione è troppo basso. Alzarlo, ruotando la manopola
verso destra.

_ 56_
Generalità:
Alimentazione: A corrente alternata da 120
a 230 V, 50/60 Hz (modello per gli U.S.A.
e il Canada, e modello generale per
esportazione)
A corrente alternata a 230 V, 50 Hz
(modello per l'Europa e la Gran
Bretagna)
A corrente alternata a 240 V, 50 Hz
(modello per l'Australia)
Consumo: 14 W
Dimensioni (largh. x alt. x prof.):
435 x 145 x 290 mm
Peso: 5,3 kg
Accessori in dotazione:
Telecomando, modello RC-619
2 cavi a spina
2 batterie (tipo "SUM-3", o "AA", o "R6")
O Eventuali ulteriori miglioramenti
possono risultare in modifiche senza
preavviso ai dati tecnici o all'aspetto
dell'apparecchio.
O Le fotografie e le illustrazioni possono
differire leggermente dai modelli
effettivamente in produzione.
Sezione del lettore CD
[Audio]
Numero di canali:
2
Risposta in frequenza: da 10 a 20.000 Hz
± 0,5 dB
Rapporto segnale/rumore: 90 dB
Gamma dinamica: 90 dB
Distorsione armonica totale:
0,02% (a 1 kHz)
Fluttuazioni e fruscii: Inferiori ai limiti
misurabili (precisione del quarzo)
Separazione dei canali: 75 dB
Uscita: 2 Vrms
Filtro digitale:
sovracampionamento quadruplo
Filtro analogico: del terzo ordine
[Formato del segnale]
Frequenza di campionamento:
44,1 kHz
Convertitore D/A (da digitale ad
analogico):
lineare, a 16 bit per canale
Rapporto bit per canale:
4,3218 Mb al secondo
Codice di modulazione del canale: EFM
Correzione dell'errore: sistema CIRC
[Pickup]
Tipo:
Pickup laser ottico a tre raggi con
guida ad objettivo
Objettivo:
Guida parallela a due dimen-sioni
Tipo laser:
Laser a semiconduttore tipo GaAlAs
Lunghezza d'onda: 780 nm
Sezione del deck a cassette
Sistema delle piste: 4 piste, 2 canali stereo
Testine: 1 per registrazione e riproduzione
(rotante, ad inversione);
1 per cancellazione
Tipo di nastro utilizzabile: Nastrocassette
tipo C-60 e C-90
Velocità del nastro: 4,76 cm/sec
Motore: 1 servo motore a corrente
continua
Fluttuazioni e fruscii: 0,08% (W. RMS)
Risposta in frequenza (media):
da 50 a 15.000 Hz ±3 dB, per nastri di
metallo
da 50 a 15.000 Hz ±3 dB, per nastri al
cromo
da 50 a 14.000 Hz ±3 dB, per nastri
normali
Rapporto segnale/rumore (medio):
59 dB (con sistema DOLBY NR
disattivato, livello di distorsione
armonica totale del 3%, compensato),
69 dB (con sistema DOLBY NR attivato,
ad oltre 5 kHz)
Tempo di avvolgimento veloce: Circa 120
secondi (con nastri tipo C-60)
Ingresso di linea: 87 mV (con impedenza di
ingresso di 50 kohm o più).
Uscita di linea: 0,46 V (con impedenza di
carico di 50 kohm o più)
Uscita per la cuffia: 1 mV, a 8 ohm
Dati tecnici
Le tastine e il percorso del nastro devono
essere puliti regolarmente.
Pulizia del percorso del nastro
O Versare un po'di liquido per pulizia* su
un apposito bastoncino di ovatta o su
un panno morbido e pulire quindi le
testine, i cabestani e tutte le parti
metalliche sul percorso del nastro.
O Pulire anche i rulli pressori, usando un
apposito liquido per parti di gomma*.
* Entrambi sono parte dei prodotti di
pulizia TEAC HC-2 e RC-2 per gli Stati
Uniti, e TEAC TZ-261 nelle altre aree.
Manutenzione
Smagnetizzazione delle testine
Prima di procedere alla smagnetizzazione
delle testine usando lo smagnetizzatore
TEAC E-3 o equivalente, verificare che
l'apparecchio sia spento. Per l'uso dello
smagnetizzatore vedere le istruzioni che lo
accompagnano.
Rullo pressore
Cabestano
Testina di
cancellazione
Testina di registrazione
e riproduzione

Lea antes de la operación
Manipulación de discos
_ 57_
ESPAÑOL
Previo al empleo
O Evite colocar la unidad a la luz directa
del sol o cerca de una fuente de calor.
También evite lugares sujetos a
vibraciones, polvo, calor, frío o
humedad excesivos. Manténgala lejos
de fuentes de zumbido, tales como
transformadores y motores.
O No abra el gabinete ya que puede dañar
los circuitos o recibir un choque
eléctrico. Si entra un objeto extraño
dentro de la unidad, póngase en
contacto con su agente.
O Asegúrese de manipular los discos con
las manos limpias. Nunca inserte un
disco que tiene una grieta en la
superficie.
O Para desenchufar el enchufe de
alimentación del tomacorriente, tire
directamente del enchufe, nunca del
cordón.
O No intente limpiar la unidad con
solventes químicos ya que el hacerlo
puede dañar la terminación. Use un
paño limpio y seco.
O Conserve este manual en un lugar
seguro para referencia futura.
Esta unidad ha sido específicamente
diseñada para reproducir discos
compactos con la marca "
˛". Ningún
otro disco puede ser reproducido.
O Coloque siempre el disco compacto en
el portadisco con la etiqueta apuntado
hacia arriba. (Los discos compactos
sólo pueden ser reproducidos de un
sólo lado).
O Para extraer un disco de la caja,
presione el centro de la caja y levante
el disco, sosteniéndolo con precaución
por el borde.
Modo correcto de sacar el disc
Modo correcto de sujetar el disc
O Las huellas digitales y el polvo deben
ser limpiados de la superficie grabada
del disco empleando un paño suave.
Limpiar radialmente
O No utilice solvente, bencina o alcohol
ya que puede dañar la superficie de
plástico del disco.
‚ Los discos deben ser guardados en sus
cajas después de usarlos para evitar
los arañados que pueden hacer que el
captor láser "salte".
‚ No exponga los discos a la luz directa
del sol, a alta humedad y temperatura
durante largo tiempo.
La exposición prolongada a altas
temperaturas puede deformar el disco.
‚ No adhiera papel ni escriba sobre el
lado de la etiqueta del disco usando un
bolígrafo.
Manipulación de cintas
Cinta de cassette
No almacene las cintas en los siguientes
lugares:
‚ En la parte superior de calentadores,
expuestas a la luz directa del sol o en
cualquier otro lugar con alta
temperatura.
‚ Cerca de altavoces, receptores de TV o
amplificadores o dónde puedan ser
sujetas a fuertes campos magnéticos.
‚ Dónde la humedad sea elevada y en
lugares sucios o polvorientos.
‚ Evite dejar caer o someter a los
cassettes a choques fuertes.
‚ Como las cintas C-120 son débiles y
pueden atascarse en el mecanismo de
transporte, no las use.
Selección de cinta:
Para que la función de selección
automática de cinta funcione
correctamente, las cintas de metal y de
cromo (cobalto), deben tener orificios de
identificación.
*Reduccion de ruido Dollby fabricado bajo
licencia de Dolby Laboratories Licensing
Corporation.
DOLBY y el símbolo de la D doble
∂ son
marcas de Dolby Laboratories Licensing
Corporation.
1. Abra la tapa del compartimiento de las
pilas.
2. Coloque dos pilas "AA" (R6, SUM-3).
Asegúrese de que las pilas queden
ubicadas con sus polos positivo
± y
negativo
— correctamente
posicionados.
3. Cierre la tapa hasta que se trabe.
Cambio de pilas
Si nota que ha disminuido la distancia
necesaria para un control correcto entre el
control remoto y el aparato, ello significa
que las pilas están gastadas. En este caso,
reemplácelas por nuevas.
Precauciones con las pilas
O Asegúrese de insertar las pilas con sus
polaridades positiva
± y negativa —
correctas.
O Utilice el mismo tipo de pilas. Nunca
utilice diferentes tipos de pilas juntas.
O Pueden utilizarse pilas recargables y no
recargables. Refiérase a las
precauciones en sus rótulos.
O Si no va a utilizar el control remoto por
mucho tiempo (más de un mes), retire
las pilas para evitar pérdidas. Si se
producen pérdidas, limpie el líquido en
el interior del compartimiento y cambie
las pilas por nuevas.
O No caliente ni desarme las pilas y
nunca arroje pilas agotadas al fuego.
Cuando opere con el control remoto,
apúntelo hacia REMOTE SENSOR en el
panel frontal del aparato.
ª Colocación de las pilas
Control remoto

_ 58_
O Antes de conectar, desconecte la
alimentación de todos los componentes
y preste especial atención a las
indicaciones de canal izquierdo (L) y
derecho (R).
O Lea el manual del propietario de cada
componente que va a emplear con esta
unidad.
∑ Cordones de señales
Terminales LINE IN/OUT
Conecte los terminales LINE IN a los
terminales TAPE REC y conecte los
terminales LINE OUT a los terminales del
amplificador estereofónico empleando los
cordones con enchufe de clavijas RCA.
O Los terminales LINE OUT son la salida
de las señales del disco compacto o de
la cinta de la platina de cassette.
Cuando se reproducen al mismo tiempo
un disco compacto o cinta, el sonido de
la cinta tiene prioridad.
Terminales CD LINE OUT
Conecte los terminales CD-LINE OUT a los
terminales CD, DAT o AUX del amplificador
estereofónico empleando los cordones
con enchufe de clavijas RCA.
O Por los terminales CD LINE OUT
siempre sale la señal del disco.
Atención
Si el reproductor de discos compactos
interfiere con el sintonizador, el televisor,
etc., deje una distancia razonable entre
ellos.
∑ Cordón de alimentación
Conecte el cordón en un tomacorriente de
corriente alterna que suministre la tension
correcta.
∑ Auriculares
Cuando emplee los auriculares, conecte el
enchufe de los mismos al jack PHONES.
O Ajuste el nivel de la salida de señales
del jack phones.
Conexiones
Desenchufe el cable de alimentación del
tomacorriente de corriente alterna antes
de reposicionar el convertidor de tensión.
1. Ubique el selector de tensión en el
panel posterior.
2. Utilizando un destornillador de extremo
plano, ajuste en la posición adecuada
230 V o 120 V de acuerdo con su zona.
Conversión de tensión
(Unicamente modelos de exportación
general)
AD-500
Tomacorriente de CA
Cordón de
clavijas RCA
Cordón de
clavijas RCA
Cordón de
clavijas RCA
Amplificador estereofónico
A CD, DAT
o AUX
A TAPE
PLAY
A TAPE
REC

_ 59_
ESPAÑOL
Nombre de los controles
1 Conmutador POWER
2 SENSOR REMOTO
3 Indicación de múltiples funciones
a Indicador REPEAT
b Indicador de espaciamiento
automático (A. SPACE)
c Indicador DELETE
d Indicador de modo de tiempo
e Indicador de programa (PGM)
f Indicador SHUFFLE
g Indicador de entrada de CD (IN)
h Indicador TAPE/CD
i Indicador REC
j Indicador PLAY de cinta
k Indicador de nivel
l Contador de cinta
m Indicador de reproducción INTRO
n Indicador (ƒ/∏) de
pausa/reproducción del CD
o Indicador de pista
p Contador de tiempo
q Indicador DUB
r Indicador (”ƒ∏) de inversión/
pausa/hacia adelante de la cinta
s Calendario musical
4 Botón OPEN/CLOSE
5 Botón (å) de reproducción de CD
6 Botón CD STOP
7 Botón (ƒ) de pausa del CD
8 Botón (RTZ) de reposición a cero
9 Botón (CLEAR) de borrado del contador
0 Control REC LEVEL
q Botón de reproducción continuada
(CD-TAPE CONT PLAY)
w Botón CD DUBBING
e Botón RECORD
r Botón REC MUTE
t Botones de rebobinado y avance
rápido/botones CPS
(Ú CPS ÆÒ)
y Botón STOP de la cinta
u Botón (ƒ)de pausa de la cinta
i Portacassette
o Portadisco
p Botón REPEAT 1/ALL
a Botón PROGRAM
s Botón SHUFFLE
d Interruptor TIMER
f Botones (Ú/Æ) MUSIC SKIP
g Conmutador SOURCE
h Conmutador de modo de inversión
(REV MODE)
j Mando PITCH CONTROL
k Conmutador DOLBY NR
l Botón EJECT
; Botones (”/∏) de reproducción de
cinta
z Jack PHONES
x Mando LEVEL de los auriculares
c Botón TIME
v Botón INTRO CHECK
b Botón AUTO SPACE
n Botón A-B
m Botones (/Ò)de CD SEARCH
, Botón SINGLE
. Botón CHECK
/ Botón CLEAR
! Botón DELETE

1. Encienda el aparato con el interruptor
POWER.
2. Presione la tecla OPEN/CLOSE; saldrá
la bandeja portadisco.
La bandeja portadisco se deslizará
hacia afuera. Coloque el disco
gentilmente en la bandeja con la
etiqueta hacia arriba. El disco debe ser
colocado dentro de las guías para el
mismo en el centro de la bandeja.
3. Presione nuevamente la tecla
OPEN/CLOSE.
La bandeja portadisco se cerrará.
Varios segundos más tarde aparece la
siguiente información.
4. Presione la tecla CD PLAY (∏).
La reproducción del disco se inicia
desde la primera pista y se enciende el
indicador
∏ (reproducción).
O Durante la reproducción, el número de
la música que está siendo reproducida
parpadea en el calendario musical.
O Después de la reproducción de cada
música, el número desaparece de la
indicación del calendario musical.
∑ Aunque la bandeja portadisco
esté abierta...
Cuando se presional la tecla ∏ :
Se cierra la bandeja portadisco y se inicia
la reproducción desde la primera pista.
∑ Para detener la reproducción
Para detener la reproducción:
Presione la tecla
STOP. El reproductor se
establece en el modo de parada.
Para sacar el disco:
Presione la tecla OPEN/CLOSE; se detiene
la reproducción y sale la bandeja
portadisco, y se reponen todas las
funciones a sus ajustes inicialess.
Para suspender provisoriamente la
reproducción (modo de pausa):
Presione la tecla ƒ. Se detiene la
reproducción en la posición actual del
fonocaptor. Se enciende el indicador
ƒ.
Para reanudar la reproducción desde la
misma posición, presione la tecla
∏ o ƒ.
ATENCION:
O No fuerce la bandeja con la mano
durante su apertura y cierre.
_ 60_
Reproductor de CD
Operación básica
For 8 cm (3-inch)
CD singles
For 12 cm (5-inch)
Compact Discs
Tune numbers on disc up to 20
Total number of
tunes on the disc
Total playback
time of disc
∑ Para saltar a la próxima música
Presione la tecla
Æ.
El reproductor avanzará a la próxima
música cada vez que se presione la tecla
Æ. De este modo, el reproductor puede
avazar hasta la última música pero una vez
que llegue al principio de la última música,
no avanzará aunque se presione la tecla
Æ.
∑ Para retroceder a la música previa
Presione la tecla
Ú.
El reproductor retrocederá una música
cada vez que se presione la tecla
Ú. Si
se presiona esta tecla durante una música,
el reproductor retrocederá al comienzo de
la misma. Para que retroceda a la música
anterior, debe presionarse dos veces la
tecla.
De este modo, el reproductor puede
retornar hasta el comienzo de la primera
música del disco.
∑ Búsqueda de música
empleando los botones
(
/Ò) SEARCH
Durante la reproducción o con el modo de
pausa activado, mantenga presionado el
botón
Ò del control remoto o el botón
Æ de la unidad principal para mover
hacia adelante rápidamente la
reproducción y mantenga presionado el
botón
del control remoto o el botón
Ú de la unidad principal para mover la
reproducción hacia atrás rápidamente.
Durante la operación de búsqueda manual,
el sonido será audible pero el nivel del
volumen se reducirá. Esto le permite
buscar cualquier porción deseada al
mismo tiempo que verifica el sonido.
Cuando encuentre la porción deseada,
suelte el botón para reactivar el modo
anterior.
Búsqueda musical
or
Para discos compactos
simple de 8 cm
(3 pulgadas)
Para compact
deje 12 cm
(5 pulgadas)
∑ Búsqueda musical utilizando las
teclas MUSIC SKIP (
Ú/Æ)
El comienzo de cualquier canción puede
localizarse fácilmente utilizando las teclas
MUSIC SKIP
Ú y Æ. Esta operación
es claramente indicada en el indicador
TRACK.
O Esta operación es posible aún cuando
la modalidad de repetición de programa
está activada, sin embargo, sólo las
canciones programadas serán
detectadas.
o
Número total de
canciones del disco
Número de canciones en el disco hasta 20
Tiempo total de
reproducción del disco

O Durante la reproducción programada
TOTAL REMAIN indica el tiempo
restante total de las músicas
programadas desde la posición actual.
O Si se programan más de 32 músicas, el
tiempo TOTAL puede no aparecer en la
indicación. (En la indicación aparece
"nn:nn").
∑ Llamado de la indicación del
tiempo total del programa
En el modo de programa, presione el botón
TIME para llamar la indicación del tiempo
total del programa.
Al presionar el botón TIME otra vez
devolverá el reproductor de CD al modo de
programa.
∑ Revisión del contenido del
programa
1. Presione el botón CHECK con el modo
de programa activado.
Se encenderá el número de la primera
pista programada y "P-01" parpadeará
en la indicación.
2. Cada vez que presiona el botón CHECK,
se encenderá el próximo número de
pista programada.
"P-XX (Program number)" parpadeará
en la indicación.
O Cuando aparezca indicado el último
número de pista programada, el
presionar el botón CHECK reactivará el
modo de programa en el reproductor de
CD permitiéndole que agregue pistas al
programa.
O Los números de pista almacenados en
la memoria de programa serán
indicados en el calendario musical. Sin
embargo, note que el calendario sólo
puede indicar un máximo de 20 pistas.
Si se ingresa un número mayor de
pistas en la memoria de programa, se
encenderá el indicador OVER.
∑ Cancelación de una pista
programada
El presionar el botón CLEAR cancelará la
última pista programada.
_ 61_
ESPAÑOL
∑ Borrado de la programación
Esta es la acción opuesta a la
programación, y es usada para programar
músicas que no serán reproducidas.
Emplee esta función cuando haya músicas
en el disco que usted no desee escuchar.
1. Presione el botón STOP.
2. Presione el botón DELETE.
El reproductor de CD ingresará en el
modo de borrado de programa.
En la indicación se encenderán los
indicadores "DELETE" y "PGM".
3. Presione alternadamente los botones
Ú MUSIC Æ y el botón PROGRAM
en el orden deseado.
4. Presione el botón PLAY.
Se inicia la reproducción con borrado
de programación.
O Con el modo de borrado de programa el
presionar el botón TIME llamará la
indicación del tiempo total de las pistas
que no fueron omitidas. El presionar el
botón TIME otra vez activará el modo
de borrado de programación en el
reproductor.
O El presionar el botón CHECK con el
modo de borrado de programación
mostrará el primer número de pista
omitida.
Cada vez que presiona el botón CHECK,
aparecerá indicado el próximo número
de pista omitido. Cuando el último
número de pista omitido haya
aparecido, el presionar el botón CHECK
activará el modo de borrado de
programación en el reproductor,
permitiéndole omitir otras pistas.
O El presionar el botón CLEAR cancelará
la última pista programada para
omisión.
O El presionar el botón STOP cuando el
reproductor no está reproduciendo
borrará la memoria del programa de
borrado.
Esta función le permite programar la
reproducción de hasta 20 música (pistas)
en el orden que desee.
∑ Programación de las música
deseadas
1. Presione la tecla STOP.
2. Presione la tecla PROGRAM.
El reproductor ingresa en el modo de
programa.
Se enciende el indicador PGM.
3. Presione alternadamente el botón/es
Ú MUSIC SKIP Æ y el botón
PROGRAM en el siguiente orden:
4. Presione la tecla PLAY (
∏).
Se inicia la reproducción de la primera
pista programada.
O Sólo es posible programar las músicas
cuando el reproductor está en el modo
de pausa.
O El contenido programado será retenido
en memoria aun después de que se
haya terminado la reproducción
programada o después que la
reproducción programada sea detenida
presionando el botón de parada.
O Cuando presiona el botón de parada en
el modo de parada, se borra la
programación.
O Para desactivar el modo de programa,
presione otra vez el botón programa.
Reproducción programada
Ejempio:
Para programar música en el orden de
5
@ 2 @ 8 en la modalidad de parada.
(select 5) (select 2)(enter)
(select 8) (enter)(enter)

_ 62_
La función de repetición permite la
reproducción repetida de una sóla música,
todo el disco o cualquier porción deseada
del mismo, designada por dos puntos
(punto de inicio y fin).
O Las funciones de repetición pueden ser
desactivadas presionando otra ves el
botón de repetición.
∑ Repetición de una sóla música
(Modo de repetición de una sóla
música)
1. Presione el botón REPEAT 1/ALL.
Se encenderán los indicadores REPEAT
y SINGLE.
2. Seleccione la música deseada
presionando el botón (
ÚÆ).
Aparecerá indicada la música
seleccionada, luego cuando la unidad
llegue al fin de la misma, el reproductor
volverá al principio de la música e
iniciará la reproducción otra vez. De
esta manera, la música seleccionada
será reproducida repetidamente.
∑ Repetición de todo un disco
(Modo de repetición completa)
1. Presione dos veces el botón REPEAT
1/ALL.
Se encenderán los indicadores REPEAT
y ALL.
2. Presione el botón PLAY.
Se iniciará la reproducción y cuando la
unidad llegue al fin del disco, el
reproductor volverá al principio de la
primera música y la reproducción
continuará repetidamente.
∑ Repetición de la sección
seleccionada
(Modo de repetición A-B)
1. Inicie la reproducción desde cualquier
punto antes de la sección que desea
reproducir.
2. Establezca el punto en el cual desee
iniciar la reproducción (punto A) y
presione el botón A-B.
Se encenderán los indicadores REPEAT
y A y el indicador B parpadeará
indicando que el punto A ha sido
ingresado.
3. Cuando el reproductor llega al fin de la
porción que desea repetir, presione el
botón A-B otra vez para establecer el
punto B.
El indicador B se enciende
constantemente indicando que ha
quedado activada la función de
repetición A-B.
El reproductor vuelve automáticamente
al punto A y reinicia la reproducción.
Cuando la reproducción llega al punto
B, el reproductor vuelve al punto A y
reinicia la reproducción otra vez,
repetidamente.
O Después de establecer el punto A, y
desee buscar rápidamente el punto B,
emplee el botón
Ò o Æ en lugar de
efectuar la reproducción normal.
O Para desactivar este modo presione el
botón A-B otra vez, durante la
reproducción repetida de la sección
programada.
∑ Reproducción repetida pro-
gramada
La función de repetición puede ser
activada aunque la unidad esté en el modo
de reproducción programada.
Para repetir todas las músicas
programadas, presione dos veces el botón
1/ALL. (En este momento, compruebe que
se enciendan los indicadores REPEAT y
ALL).
Función de repetición
1. Presione el botón SHUFFLE con el
modo de parada activado.
Presione el botón SHUFFLE con el modo
de parada activado.
2. Presione el botón CD PLAY.
La unidad seleccionará las pistas
aleatoriamente y las reproducirá.
O Presione la tecla Æ con la función de
reproducción aleatoria activada para
seleccionar una música aleatoriamente.
Presione la tecla
Ú para reproducir
la música actual desde el principio.
O La música no puede ser reproducida
otra ves después que haya sido
reproducida en este modo.
O Para desactivar la función aleatoria
mientras está activada, presione otra
vez la tecla SHUFFLE. Las músicas
serán reproducidas en el orden normal
designado, comenzando desde la
música que está siendo reproducida.
Reproducción RANDOM
Punto BPunto A
Música Música
Músicas programadas

_ 63_
ESPAÑOL
El contador de tiempo muestra varias
lecturas de tiempo que son las siguientes.
1 Tiempo total de reproducción del disco
Después de cerrar el portadisco con un
disco colocado, el contador indica el
tiempo total de reproducción del disco y
el número total de músicas en el mismo.
2 Indicación del tiempo transcurrido
Cuando se inicia la reproducción, la
indicación muestra el tiempo
transcurrido de la música que está
siendo reproducida en minutos y
segundos.
3 Indicación de tiempo restante
(REMAIN)
El tiempo restante es indicado al
presionar una vez el botón TIME. Esto
sirve para verificar fácilmente el tiempo
restante de la música que está siendo
reproducida.
4 Indicación de tiempo total restante
(TOTAL REMAIN)
Indicado al presionar dos veces el
botón TIME. El tiempo indicado es el
tiempo total restante de reproducción
desde el lugar que está siendo
reproducido, hasta el fin del disco; el
contador muestra la cuenta regresiva a
"00:00" durante la reproducción
O Indicado después de presionar tres
veces el botón TIME. El tiempo indicado
es el tiempo de reproducción
transcurrido
2.
O En el modo de reproducción normal, si
se está reproduciendo una música con
un número mayor a 32, el tiempo
restante no será indicado en el
contador aunque presione el botón
TIME. En lugar de ello aparecerá
indicado "nn:nn" en la indicación de
tiempo.
La función de comprobación de
introducción permite que sólo el comienzo
de cada pista sea reproducida durante 10
segundos.
1. Presione la tecla INTRO CHECK.
Aparecerán los indicadores INTRO y
∏.
2. Presione otra vez la tecla INTRO CHECK
para cancelar la función de
comprobación de introducción.
O La función de comprobación de
introducción también funciona
conjuntamente con las funciones de
SHUFFLE PROGRAM y REPEAT ALL.
Indicación del contador de
tiempo
Espaciamiento automático
Función de comprobación de
introducción
1. Presione el botón SINGLE. En la
indicación se encenderá el indicador
SINGLE.
2. Presione los botones (
Ú/Æ) MUSIC
SKIP correspondientes a la música
deseada.
3. Se reproducirá una sóla música,
después de lo cual el reproductor
ingresará en el modo de pausa.
O Para desactivar el modo SINGLE,
presione el botón SINGLE otra vez.
Reproducción única
TOTAL
RESTANTE
CADA
RESTANTE
CADA
TOTAL
Con esta función activada, quedará
automáticamente un intervalo de unos 4
segundos entre música de tal manera que
se reproduzcan con un espacio fijo.
Para activarla, presione la tecla AUTO
SPACE, se encenderá el indicador
A.SPACE.
Al presionar nuevamente esta tecla, se
apaga el indicador y se cancela la función
de espaciamiento automático.

_ 64_
1. Coloque el conmutador POWER en ON.
2. Ajuste el conmutador REV MODE en el
modo de transporte de cinta deseado.
3. Coloque un cassette grabado con el
extremo abierto apuntando hacia abajo
y el lado A apuntando hacia usted.
4. Ajuste ON/OFF en el sistema DOLBY NR.
5. Presione el botón
” o el botón ∏ para
iniciar la reproducción.
6. Ajuste el volumen con el control de
volumen del amplificador.
O Para parar la reproducción presione el
botón STOP.
Reproducción
El contador de cinta se incrementa cuando
la cinta se está moviendo hacia adelante y
se reduce cuando la cinta está siendo
rebobinada. La indicación puede ser
borrada presionando el botón COUNTER
CLEAR que reposiciona la lectura del
contador a "0000".
Contador de cinta
Operación de la platina de cassette
BORRADO DEL CONTADOR
NIVEL DE GRABACION
PARADA
GRABACION
FUENTE
MODO INVERSION
ALIMENTACION
EYECCION
DOLBY NR
La cinta parará después de 5 ciclos.
Ajuste Transporte de cinta
Reproducción de un sólo lado
LADO A
LADO A
LADO B
LADO B
PARADA
1. Coloque el conmutador POWER en ON.
2. Ajuste el conmutador REV MODE.
O Si desea efectuar una grabación
bidireccional, ajuste el conmutador REV
MODE en la posición
π o en ø.
O Para grabar de un sólo lado inicie la
grabación con el botón
”
ú
.
O Ajuste la posición de “ si va a grabar
un sólo lado de la cinta.
3. Coloque un cassette sin grabar.
O Verifique que las lengüetas de
protección contra borrado del cassette
estén intactas. Si están rotas, cubra los
orificios con cinta adhesiva.
4. Seleccione el conmutador SOURCE.
O Cuando selecciona "CD" la salida
incorporada del reproductor de CD
queda seleccionada como fuente.
O Al seleccionar "LINE", la señal externa
proveniente de "LINE IN" es
seleccionada como fuente.
5. Ajuste ON/OFF del sistema DOLBY NR.
6. Presione el botón RECORD para activar
el modo de pausa de grabación de la
platina (se encenderán los indicadores
REC y
ƒ).
7. Ajuste el nivel de grabación con el
control REC LEVEL de tal manera que el
sonido con más volumen haga que el
medidor de nivel llegue brevemente al
punto "0 dB) (para cintas normales o de
cromo), o al punto "+3 dB" (para cintas
de metal).
Grabación
Metal
Normal or chrome
Colocación de un cassette
1. Utilice el dedo o un lápiz para girar el
carrete del cassette si la cinta está
floja.
Nota: Trate de no tocar la cinta. Las
huellas digitales atraen polvo y
suciedad.
2. Presione el botón de eyección (
∫)*
3. Coloque el cassette con la parte
abierta hacia abajo.
4. Cierre suavemente el portacassette.
*Notas:
OEl portacassette no puede abrirse
durante una grabación o
reproducción.
OSi se apaga la platina durante una
grabación o reproducción, será
imposible sacar el cassette. En tal
caso, conecte la alimentación de la
platina y presione nuevamente el
botón de eyección.
8. Presione otra vez el botón ƒ PAUSE
para iniciar la grabación.
O Para parar la grabación
temporariamente, presione el botón
ƒ PAUSE. Para reiniciar el transporte
de cinta, presione el botón
ƒ PAUSE o
el botón
”∏ de reproducción. Con el
modo de pausa de grabación activada y
si presiona el botón cuyo indicador
”,
∏ está encendido, se iniciará la
grabación; sin embargo si presiona el
botón cuyo indicador
”, ∏ no está
encendido, sólo cambiará el sentido de
transporte de la cinta. Para reiniciar el
transporte de cinta, presione el botón
otra vez.
O Para parar la grabación, presione el
botón STOP.
Cualquier material previamente grabado
en la cinta será automáticamente borrado
al efectuar una nueva grabación en la
misma. También puede borrarse una cinta
"grabando" sobre ella con el control de
nivel REC LEVEL ubicado en la posición "0".
ATENCION:
La grabación de cintas grabadas, discos o
cualquier otro material publicado o de
radiodifusión puede violar leyes de
derechos de autor. Examine estas leyes
antes de grabar.
Borrado

_ 65_
ESPAÑOL
Usted puede modificar la velocidad de la
cinta durante la reproducción, cambiando
de esta manera el tono del sonido
reproducido.
Al girar el mando PITCH CONTROL hacia la
derecha, aumenta la velocidad de la cinta,
resultando en tonos más altos, girando el
mando hacia la izquierda se reduce la
velocidad de la cinta resultando en tonos
más bajos.
O La velocidad de la cinta es 12% más
rápida aproximadamente con el mando
girado completamente hacia la
derecha.
O La velocidad de la cinta es 12% más
lenta aproximadamente con el mando
girado completamente hacia la
izquierda.
Control de tono
el contador. Utilice el botón Ò para
ubicar la siguiente música y el botón
para la música anterior. Refiérase
al cuadro "Cómo seleccionar la música
deseada utilizando CPS".
O Si se pasa el número CPS deseado
mediante el botón
Ò, utilice el botón
para retroceder hasta el número
CPS requerido.
O Cuando se presiona el botón Ò, la
próxima música es contada como "1" y
cuando se presiona el botón
, la
música actual es contada como "1".
2. La cinta avanza rápidamente y se van
detectando los espacios sin grabar
entre canciones hasta que se ubica la
música deseada. Entonces se inicia la
reproducción desde el principio de la
música seleccionada.
Notas sobre CPS
La función CPS detecta y cuenta los
espacios de aproximadamente 4 segundos
que corresponden normalmente a los
intervalos entre música. Por lo tanto, con
los siguientes tipos de cintas, es posible
que la búsqueda no funcione
correctamente.
O Cuando no pueden detectarse los
intervalos entre música.
– Intervalos de menos de 4 segundos.
– Alto nivel de ruido en los intervaloss.
– Largas secciones con bajo nivel (en
música clásica, etc.)
La CPS permite la selección y
reproducción de cualquier música hasta
un máximo de 15 músicas hacia adelante o
hacia atrás de la que está siendo
reproducida. Esta función detecta los
espacios sin grabar de 4 segundos como
mínimo entre músicas. Estos espacios sin
grabar pueden ser creados empleando la
función REC MUTE.
Notas:
O En los siguientes pasos 1 y 2, para
simplificar la descripción, la explicación
está dada en términos de "reproducción
hacia adelante" (en sentido
∏). Un
procedimiento similar debe ser
empleado para la "reproducción hacia
atrás".
O Los botones Ò (avance rápido) y
(rebobinado) actúan como botones
CPS durante la reproducción. Este es el
motivo por el cual la unidad indica
"
Ú CPS ÆÒ" en relación a
estos botones, mientras que el control
remoto muestra "
Ò" solamente.
En la siguiente explicación estos
botones son descritos como "
" y
"
Ò" solamente.
1. Durante la reproducción hacia
adelante, presione repetidamente el
botón
o Ò hasta que aparezca
el número de canciones a omitir en
CPS (Búsqueda programada automática computadorizada)
t
’
’
1
2
3
3
2
1
’
’
’
’
1
2
3
3
2
1
(1) (2)
(4)(3)
’
Cómo seleccionar la música deseada utilizando CPS
Ej : Véase (1). Para seleccionar la 3° música posterior a la posición actual de la cinta,
seleccione "CP03".
Posición actual de la cinta
Sentido
de la cinta
Siguiente
Anterior
Posición actual de la cinta
Siguiente Anterior
En el ejemplo (1), si "t" es de menos de 4
segundos, no será contado como espacio sin
grabar. En este caso, designe "CP-02" en lugar
de "CP-03" para seleccionar la 3° música.
Sentido
de la cinta
ICon el modo de parada activado los
botones
Òfuncionan como
botones de avance rápido y rebobinado.
O En el modo de reproducción, estos
botones actúan como botones CPS.
Bobinado rápido
Al presionar el botón RTZ (reposición a
cero), la cinta vuelve al punto "0000" y para.
O La función RTZ no funciona cuando el
contador de cinta indica un número
entre "9996" y "0004".
Función RTZ (reposición a cero)
or
o

Empleando la función de copia de CD, es
fácil y sencillo copiar una CD en una cinta.
1. Coloque un disco compacto.
2. Coloque un cassette en el que se pueda
grabar.
3. Ajuste ON/OFF del sistema DOLBY NR.
O En el modo de copia de CD, el mando
REC LEVEl no tiene efecto, ya que el
nivel de grabación es ajustado
automáticamente por la unidad.
∑ Grabación desde el principio de
la cinta
Presione el botón CD DUBBING con el
modo de parada activado.
La cinta es rebobinada hasta el principio
del lado A y el contador se reposiciona a
"0000", mientras que el reproductor de CD
está en el modo de pausa al principio de la
primera pista del CD.
Después de un espacio sin grabar de
aprox. 10 segundos (para pasar la parte sin
grabar al principio de la cinta), la platina de
cassette entra en el modo de grabación y el
reproductor de CD inicia la reproducción.
∑ Grabación desde cualquier
punto deseado en la cinta
1. Mueva la cinta hasta la posición
deseada y presione el botón STOP.
2. Presione el botón RECORD.
La platina entra en el modo de pausa de
grabación.
3. Presione el botón CD DUBBING.
Se inicia la copia de CD a cinta desde el
punto actual de la cinta.
O Mientras la copia de CD DUBBING está
activada, sólo los botones STOP (CD),
STOP (TAPE), OPEN/CLOSE y TIME
están habilitados.
∑ Selección de pistas del CD a ser
grabadas en el lado A o B de la
cinta (copia programada A-B)
Empleando las función de copia
programada A-B, usted puede seleccionar
las pistas del CD que desea grabar en el
lado A o B de la cinta.
1. Presione el botón PROGRAM.
2. Presione el botón A-B.
"A-" parpadeará y "B" se encenderá en la
indicación, indicando que el reproductor
de CD está en el modo "Programación del
lado A".
3. Programe las pistas a ser grabadas en el
lado A de la cinta.
Efectúe los procedimientos descritos en
el paso 3 de la sección "Reproducción
programada" en la página 61.
O Para llamar la indicación del tiempo total
del programa, presione el botón TIME
con el modo de programación activado.
Esto le ayudará a adecuar el tiempo total
de grabación a la longitud de la cinta. Al
presionar el botón TIME otra vez el
reproductor de CD vuelve al modo de
programación.
4. Presione el botón A-B.
"B" parpadeará y "A" se encenderá en la
indicación, indicando que el reproductor
de CD está en el modo "Programación del
lado B".
5. Las pistas programadas serán grabadas
en el lado B de la cinta.
O Al presionar el botón A-B en la
programación del lado B, devolverá el
reproductor de CD al modo de
programación del lado A.
6. Presione el botón CD DUBBING.
La cinta es rebobinada hasta el principio
del lado A y el contador se reposiciona a
"0000" mientras que el reproductor de CD
está en el modo de pausa en la primera
pista del programa del lado A.
Después de un espacio sin grabar de
aprox. 10 segundos (para pasar la parte
sin grabar al principio de la cinta), la
platina de cassette entra en el modo de
grabación y el reproductor de CD inicia la
reproducción.
O Si usted presiona el botón RECORD antes
de presionar el botón CD DUBBING, la
grabación se iniciará desde la posición
actual de la cinta (sin que la misma sea
rebobinada hasta el principio).
O Si la cinta del lado A termina antes de
01:30 (1 minuto 30 segundos) que la pista
actual del CD haya terminado de ser
reproducida, la grabación del lado B se
iniciará en esa pista, (exceptuando el
caso de la copia programada A-B).
O Cuando el reproductor de CD termina la
reproducción, se desactiva el modo de
copia de CD.
O Si la cinta llega al fin del lado B antes de
que el reproductor de CD termine la
reproducción, se cancelará el modo de
copia de CD.
_ 66_
∑ Espaciamiento automático para
secciones sin grabar de 4
segundos (durante la grabación)
Presione el botón REC MUTE durante
una grabación. El movimiento de la
cinta continúa y queda una sección sin
grabar de unos 4 segundos (destella el
indicador REC). El reproductor ingresa
se establece automáticamente en el
modo de pausa de grabación (se
encienden los indicatores REC y
ƒ).
Para reanudar la grabación, presione el
botón PAUSE (se apaga el indicador
ƒ).
∑ Espaciamiento automático para
secciones sin grabar de 4 segundos
(durante el modo de pausa de
grabación)
En el modo de pausa de grabación, la
pulsación del botón REC MUTE iniciará
automáticamente el silenciamiento de
la grabación mencionado. El
reproductor retornará después al modo
de pausa de grabación.
∑ Para una sección sin grabar de más de
4 segundos
Durante la grabación, mantenga
presionado el botón REC MUTE por más
tiempo. Quedará una sección sin grabar
mientras se mantenga presionado el
botón. Suelte el botón para establecer
el modo de pausa de grabación. Para
reanudar la grabación, presione el
botón PAUSE.
O Durante el silenciamiento de grabación
(mientras está parpadeando el
indicador REC), el presionar otra vezel
botón REC MUTE desactivará el
silenciamiento y se reanudará al
grabación sin detener la cinta.
Silenciamiento de grabación
Copia de CD a cinta
or
o

La unidad posee una función de control
por temporizador.
Esto le permite iniciar la reproducción o la
grabación en cualquier momento cuando
se emplea el temporizador de audio
opcional.
∑ Reproducción de CD o cassette
por temporizador
1. Conecte la unidad y su sistema
estereofónico a un temporizador de
audio como se muestra en el diagrama.
2. Ajuste en ON los conmutadores de
alimentación de todos los
componentes.
3. Coloque un disco o un cassette
grabado.
4. Coloque el conmutador del
temporizador en la posición CD o TAPE.
5. Ajuste el temporizador de audio a la
hora deseada de (conexión de
alimentación) y parada (desconexión de
alimentación).
Al terminar el ajuste, se desconectará
la alimentación de todos los
componentes.
6. Cuando el temporizador llega a la hora
ajustada, se conectará la alimentación
y se iniciará automáticamente la
reproducción.
∑ Grabación por temporizador
1. Seleccione la entrada del amplificador
que esta platina es capaz de grabar.
2. Seleccione la fuente a ser grabada (FM,
AM, etc.).
3. Coloque un cassette grabable y coloque
el conmutador [TIMER] en [REC].
4. Ajuste el temporizador de audio a la
hora de inicio (activación de
alimentación) y parada (desconexión de
alimentación).
Cuando termine este ajuste, se
desconectará la alimentación de todos
los componentes.
5. Cuando el temporizador llega al tiempo
ajustado se conectará la alimentación y
se iniciará la grabación
automáticamente.
Reproducción continuada
entre CD y cinta
_ 67_
ESPAÑOL
Conexión del temporizador
En el modo de reproducción continuada,
una vez que el reproductor de CD o la
platina de cassette termina (o para) la
reproducción, el otro comienza la misma
automáticamente.
1. Presione el botón CD-TAPE CONT PLAY.
"TAPE" y "CD" parpadearán en la
indicación.
2. (Por ejemplo) Presione el botón de
reproducción de CD.
El reproductor de CD iniciará la
reproducción
"CD" parpadea en la indicación.
3. Cuando el reproductor de CD para, la
platina de cassette inicia
automáticamente la reproducción.
"TAPE" parpadea en la indicación.
Después de ello, cuando uno de ellos
para, el otro inicia la reproducción.
O La otra unidad inicia la reproducción
independientemente de que una de
ellas (reproductor de CD o platina de
cassette), haya sido parada
presionando el botón STOP, o parada
automáticamente al fin de la
reproducción.
O Usted puede cambiar el CD o la cinta
mientras están en el modo de parada.
O Para desactivar el modo de
reproducción continua, presione otra
vez el botón CD-TAPE CONT PLAY.
Operación controlada por temporizador
Temporizador de audio
Sintonizador
A la salida de CA
del temporizador
A la salida de CA
del sintonizador
A la salida de CA
del amplificador
Amplificador
AD-500

_ 68_
La localización y reparación de averías de esta unidad es similar a la de cualquier otro equipo eléctrico o electrónico. No se olvide de
inspeccionar las causas más probables primero. Para ofrecerle algunas ideas de dónde buscar, vea lo siguiente.
Localización y reparación de averías
Problema Causa probable Remedio
Generalidades
Al presionar POWER no se conecta El enchufe de alimentación no está Enchúfelo firmemente.
la alimentación. firmemente conectado.
Se escucha un zumbido. El enchufe del cordón de clavija no está Conecte firmemente el enchufe.
firmemente conectado.
Interferencia en el sintonizador. Demasiado cerca del sintonizador. Mantenga una distancia razonable
entre ellos o desconecte la
alimentación de esta unidad.
No hay salida de audio. La conexión al sistema estereofónico Verifique las conexiones.
es incorrecta.
El control remoto no funciona. El conmutador POWER está en OFF. Colóquelo en ON.
No hay pilas colocadas en el control Coloque pilas.
remoto.
Reproductor de CD
La reproducción no funciona con El disco está colocado con la etiqueta Coloque el disco con la etiqueta
un disco colocado. hacia abajo. hacia arriba.
El disco está sucio. Limpie la superficie del disco.
No hay salida de audio. La conexión con el sistema Inspeccione las conexiones.
estereofónico es incorrecta.
No hay salida de CD. La platina de cassette está en el modo Pare la platina. O conecte la salida
de reproducción. de CD a un amplificador.
Sólo se puede reproducir una música. El botón SINGLE está presionado. Presione el botón para desactivarlo.
La reproducción programada No ha presionado el botón PROGRAM. Presione el botón para llamar
no funciona. la indicación PGM.
Falla de seguimiento El reproductor está sujeto a Cambie de lugar esta unidad.
(interrupción repetida del sonido). vibraciones o choques.
El disco está sucio. Limpie la superficie del disco.
Platina de cassette
Baja calidad de sonido. Las cabezas están sucias. Limpie las cabezas.
Las cabezas están magnetizadas. Desmagnetice las cabezas
empleando el TEAC E-3.
El conmutador Dolby NR está Cambie la posición.
incorrectamente ajustado.
Sonidos extraños. Se ha modificado el control de tono. Ajuste el mando de control de tono
en la posición central.
La grabación no funciona. Las lengüetas de protección contra Coloque cinta adhesiva para
borrado del cassette están rotas. cubrir el orificio.
Las cabezas están sucias. Limpie las cabezas.
El nivel de grabación es demasiado Gire el mando REC LEVEL hacia
bajo. la derecha.

_ 69_
ESPAÑOL
Sección del reproductor de CD
(Audio)
Número de canales:
2
Respuesta de frecuencia: 10 - 20.000 Hz
±0,5 dB
Relación señal a ruido: 90 dB
Gama dinámica: 90 dB
Distorsión armónica total: 0,02% (1 kHz)
Lloro y trémolo: Imposible medirlo
(precisión de cuarzo)
Separación entre canales: 75 dB
Salida: 2 Vrms
Filtro digital: 4 sobremuestreos
Filtro analógico: 3er. orden
(Formato de señal)
Frecuencia de muestreo:
44,1 kHz
Convertidor D/A: Lineal 16 bit/canal
Velocidad de bit de canal: 4,3218 Mb/seg.
Código de modulación de canal: EFM
Corrección de error: CIRC
(Fonocaptor)
Tipo:
Impulsor de objetivo, fonocaptor
óptico laser de 3 haces
Objetivo: Impulsor paralelo bidimensional
Tipo de laser: Laser de semiconductor tipo
GaAlAs
Longitud de onda: 780 nm
Sección del cassette
Sistema de pistas: 4 pistas 2 canales
estereofónicos
Cabezas: Grabación/reproducción x 1
(inversión giratoria), borrado x 1
Tipo de cinta: Cinta de cassette C-60 y C-90
Velocidad de la cinta: 4,76 cm/seg.
Motor: Servo motor de CC x 1
Lloro y trémolo: 0,08% (W. RMS)
Respuesta de frecuencia (general):
50 – 15.000 Hz ±3 dB, metal
50 – 15.000 Hz ±3 dB, cromo
50 – 14.000 Hz ±3 dB, normal
Relación señal a ruido (general):
59 dB (Dolby NR desconectado, 3%
nivel THD, ponderado), 69 dB (DOLBY
NR conectado, más de 5 kHz)
Tiempo de bobinado rápido: 120 seg.
aprox. (con C-60)
Entrada: Línea: 87 mV (impedancia de
entrada de 50 K ohmios o mayor)
Salida:
Línea;
0,46 (impedancia de carga de 50
K ohmios o mayor)
Auriculares: 1 mV/8 ohmios
Especificaciones
Generalidades
Requisitos de alimentación:
120/230 V CA, 50-60 Hz (EE.UU/Canadá/
modelo de exportación general)
230 V CA, 50 Hz (Modelo Europa/G.B.)
240 V CA, 50 Hz (Modelo para Austria)
Consumo de energía: 14 W
Dimensiones (A x Alt. x P):
435 x 145 x 290 mm
Peso: 5,3 kg
Accesorios estándar
Control remoto inalámbrico RC-619
Cordón con enchufe de clavija x 2
Pila (tipo SUM 3, "AA", "R6") x 2
O Las mejoras pueden resultar en
cambios de especificaciones o de
funciones sin aviso.
O Las fotografías e ilustraciones pueden
ser levemente diferentes a los modelos
de producción.
Las cabezas y la ruta de la cinta deben
limpiarse y desmagnetizarse periódicamente.
Limpieza de la ruta de la cinta
O Aplique el líquido de limpieza de
cabezas* a un hisopo especial o paño
suave y frote ligeramente las cabezas,
cabrestantes y todas las partes
metálicas de la ruta de la cinta.
O Limpie también los rodillos presores
usando el líquido de limpieza para
goma*.
* Ambos se hallan disponibles en los
juegos de limpieza para reproductores
TEAC, HC-2 y RC-2 en EE.UU. o TZ-261
en otros países.
Mantenimiento
Desmagnetización de las cabezas
Asegúrese que la alimentación esté
desconectada, luego desmagnetice las
cabezas usando el desmagnetizador E-3 de
TEAC o similar. Para mayores detalles
sobre su uso, lea las instrucciones.
Rodillo presor
Cabrestante
Cabeza de borrado
Cabeza de grabación/reproducción

_ 70_
Voor ingebruikneming
O Kies zorgvuldig een geschikte plaats
voor het apparaat. Zet het niet in de
volle zon en niet te dicht bij een
warmtebron. Vermijd tevens plaatsen
met trillingen, veel stof, hitte, koude of
vocht. Houd afstand van apparatuur die
brom of elektrische storing kan
veroorzaken, zoals transformators of
motoren.
O Open in geen geval de ombouw van het
apparaat, om schade aan de circuits en
gevaar voor een elektrische schok te
vermijden. Mocht er vloeistof of een
voorwerp in het apparaat
terechtkomen, neem dan kontakt op met
uw audiohandelaar.
O Voor het verwijderen van de stekker uit
het stopkontakt mag u alleen de stekker
vastpakken; trek nooit aan het snoer.
O Zorg dat uw handen schoon zijn voor u
een compact disc pakt. Plaats nooit een
gebarsten disc in het apparaat.
O Gebruik voor het reinigen van het
apparaat geen chemische
oplosmiddelen, aangezien deze de
afwerking kunnen aantasten. Veeg het
apparaat schoon met een zacht, droog
doekje.
O Bewaar deze gebruiksaanwijzing op
een veilige plaats waar u hem voor
naslag gemakkelijk kunt terugvinden.
Dit apparaat is ontworpen voor het
afspelen van compact discs met het "
˛"
beeldmerk. Het is niet geschikt voor
andere soorten discs.
O Plaats een compact disc altijd met de
label-kant boven in de disc-lade.
(Compact discs zijn maar aan één kant
afspeelbaar.)
O Om een compact disc uit het doosje te
nemen, drukt u met een vinger de
middenklemmetjes in en tilt u de disc
aan de randen omhoog, zonder het
glimmende oppervlak aan te raken.
Uitnemen van een compact disc
Vasthouden van een compact disc
O Vingerafdrukken en stof kunt u van de
bespeelde onderkant van de disc
verwijderen met een zacht doekje.
Schoonvegen van het midden
naar de rand
Lees dit voor het gebruik
Behandelen van cassettes
Soorten cassetteband
Behandelen van compact discs
Afstandsbediening
Vermijd voor het bewaren van uw
cassettes de volgende plaatsen:
‚ Vlakbij of bovenop een verwarming, in
de volle zon of op andere plaatsen met
hoge temperaturen.
‚ Dichtbij luidsprekers, op een TV-toestel
of een versterker, waar de cassettes
kunnen worden blootgesteld aan
krachtige magnetische velden.
‚ Vemijd plaatsen met veel vocht, stof of
vuil.
‚ Zorg dat uw cassettes niet kunnen
vallen en niet worden blootgesteld aan
heftige schokken.
‚ Gebruik liever geen C-120 cassettes,
aangezien de uiterst dunne band
hiervan gemakkelijk kan uitrekken en
verstrikt kan raken in het bandloopwerk.
Keuze van de bandsoort:
De automatische bandsoort-instelling van
dit apparaat kan slechts naar behoren
werken als cassettes met chroom- (kobalt) of metaalband zijn voorzien van hun eigen
karakteristieke bandsoort-openingen.
*De Dolby ruisonderdrukking is vervaardigd
onder licentie van de Dolby Laboratories
Licensing Corporation.
De naam "DOLBY" en het dubbele-D
symbool
∂ zijn handelsmerken van de
Dolby Laboratories Licensing Corporation.
Richt de afstandsbediening voor gebruik
naar de afstandssensor op het voorpaneel
van het toestel.
ª Plaatsen van batterijen
1. Verwijder het deksel van het
batterijvak.
2. Plaats twee "AA" (R6, SUM-3) droge cel
batterijen.
Plaats de batterijen met de positieve ≠
en negatieve – polen in de juiste
richting.
3. Sluit het deksel zodat het vastklikt.
Vervangen van batterijen
De batterijen zijn bijna uitgeput wanneer
het bereik van de afstandsbediening
aanzienlijk kleiner wordt en het toestel niet
meer juist op de signalen reageert. U moet
nu de batterijen door nieuwe vervangen.
Voorzorgen aangaande de batterijen
O Plaats de batterijen beslist met de
positieve
≠ en negatieve – polen in de
juiste richting.
O Gebruik geen benzine, tri of spiritus
voor het reinigen van compact discs,
aangezien vluchtige stoffen het plastic
oppervlak van de disc kunnen
aantasten.
O Berg elke compact disc na het afspelen
weer in het bijbehorende doosje op, om
te voorkomen dat er krassen op komen
waardoor de laser-weergavekop zou
kunnen "overspringen".
O Zorg dat compact discs niet te lang
worden blootgesteld aan direkte
zonnestraling, veel vocht of hoge
temperaturen.
Door langdurige verwarming kunnen de
discs kromtrekken.
O Plak geen etiketten op de label-kant van
een compact disc en schrijf er niet met
een balpen op.

O Schakel alle apparatuur uit voordat u
deze gaat aansluiten en zorg dat u bij
het aansluiten de linker (L) en rechter
(R) aansluitingen niet verwisselt.
O Lees voor het aansluiten van andere
apparatuur de daarbij behorende
gebruiksaanwijzingen door.
∑ Signaalsnoeren
LINE IN/OUT aansluitingen
Verbind de LINE IN stekkerbussen met de
TAPE REC uitgangen van uw stereo
versterker en de LINE OUT stekkerbussen
met de TAPE PLAY ingangen van de
versterker, met behulp van audioaansluitsnoeren met tulpstekkers.
O Via de LINE OUT aansluitingen worden
de muzieksignalen van de compact disc
speler en het cassettedeck uitgestuurd.
Bij tegelijk afspelen van een compact
disc en een cassette krijgt het
cassettegeluid voorrang en zal dat
worden weergegeven.
CD LINE OUT aansluitingen
Verbind de CD LINE OUT stekkerbussen
met de CD, DAT of AUX ingangen van uw
stereo versterker, met behulp van audioaansluitsnoeren met tulpstekkers.
O Via de CD LINE OUT aansluitingen
worden altijd alleen de muzieksignalen
van de compact disc speler uitgestuurd.
Opmerking:
Mocht de compact disc speler storing
veroorzaken bij de tuner of de televisie,
laat dan een ruime afstand tussen deze
toestellen onderling.
∑ Netsnoer
Steek de stekker van het netsnoer in een
stopkontakt dat het juiste voltage levert.
∑ Hoofdtelefoon
Voor gebruik van een hoofdtelefoon steekt
u de stekker van de hoofdtelefoon in de
PHONES aansluiting.
O Stel de geluidssterkte van de
hoofdtelefoon naar wens in met de
LEVEL regelaar.
_ 71_
Aansluitingen
Vergeet niet de stekker uit het stopkontakt
te trekken alvorens de spanningskiezer in
een andere stand te zetten.
1. Lokaliseer de spanningskiezer op het
achterpaneel.
2. Zet de spanningskiezer, afhankelijk van
het land, m.b.v. een platte
schroevedraaier in de 230 V of 120 V
stand.
Spanningsomzetting
(Enkel voor algemene exportmodellen)
AD-500
naar een stopkontakt
TulpstekkersnoerTulpstekkersnoerTulpstekkersnoer
Stereo versterker
naar CD, DAT
of AUX
naar
TAPE PLAY
naar
TAPE REC
O Gebruik batterijen van hetzelfde type.
Gebruik niet tegelijkertijd batterijen van
verschillend type of merk.
O U kunt zowel oplaadbare als niet-
oplaadbare batterijen gebruiken. Zie de
voorzorgen die op de batterijen zijn
gedrukt.
O Verwijder de batterijen uit de
afstandsbediening indien u deze voor
langere tijd niet gaat gebruiken (langer
dan een maand), zodat er geen
batterijvloeistof kan gaan lekken. Indien
de batterijen toch hebben gelekt, veeg
de vloeistof dan goed uit het batterijvak
en vervang de batterijen door nieuwe.
O Verwarm en demonteer batterijen niet.
Gooi gebruikte batterijen nooit in een
vuur.
NEDERLANDS

_ 72_
Benaming van de bedieningsorganen
1 Aan/uit-schakelaar (POWER)
2 Afstandsbedieningssensor
(REMOTE SENSOR)
3 Multifunktioneel uitleesvenster
a Herhaal-indikator (REPEAT)
b Tussenruimte-indikator (A.SPACE)
c Weglaat-indikator (DELETE)
d Tijdfunktie-indikator
e Programmeer-indikator (PGM)
f Willekeurige weergave-indikator
(SHUFFLE)
g CD-ingangsindikator (IN)
h Cassette/CD-indikator (TAPE/CD)
i Opname-indikator (REC)
j Cassetteweergave-indikator (PLAY)
k Geluidssterktemeters
l Bandteller
m Introweergave-indikator (INTRO)
n CD pauze/weergave-indikator (ƒ/∏)
o Muziekstuknummer (TRACK)
p Tijdteller
q Kopieer-indikator (DUB)
r Cassette achteruit/pauze/vooruit-
indikator (
”ƒ∏)
s Muziekkalender
4 Open/sluit-toets (OPEN/CLOSE)
5 CD-weergavetoets (å)
6 CD-stoptoets (STOP)
7 CD-pauzetoets (ƒ)
8 Nulpunt-terugkeertoets (RTZ)
9 Tellernulsteltoets (CLEAR)
0 Opnameniveauregelaar (REC LEVEL)
q Doorlopende-weergavetoets
(CD-TAPE CONT PLAY)
w CD-opnametoets (CD DUBBING)
e Opnametoets (RECORD)
r Opnamedempingtoets (REC MUTE)
t Terug/vooruitspoel/zoektoetsen
(
Ú CPS ÆÒ)
y Cassette-stoptoets (STOP)
u Cassette-pauzetoets (ƒ)
i Cassettehouder
o Disc-lade
p Herhaaltoets (REPEAT 1/ALL)
a Programmeertoets (PROGRAM)
s Willekeurige-weergavetoets (SHUFFLE)
d Schakelklok-schakelaar (TIMER)
f Terug/vooruitspring/zoektoetsen
(
Ú MUSIC SKIP Æ)
g Geluidsbron-keuzeschakelaar (SOURCE)
h Omkeerfunktieschakelaar (REV MODE)
j Snelheidsregelaar (PITCH CONTROL)
k Dolby ruisonderdrukkingsschakelaar
(DOLBY NR)
l Cassette-uitwerptoets (EJECT)
; Cassette-weergavetoetsen (”/∏)
z Hoofdtelefoon-aansluiting (PHONES)
x Hoofdtelefoon-volumeregelaar (LEVEL)
c Tijdtoets (TIME)
v Intro-weergavetoets (INTRO CHECK)
b Tussenruimtetoets (AUTO SPACE)
n A-B cassettekant-programmeertoets
(A-B)
m CD zoektoetsen (/Ò)
, Enkel-nummer weergavetoets (SINGLE)
. Kontroletoets (CHECK)
/ Enkel-nummer wistoets (CLEAR)
! Weglaat-programmeertoets (DELETE)

∑ Zelfs als de disc-lade open is...
Wanneer de å toets ingedrukt wordt:
De disc-lade wordt gesloten en weergave
begint vanaf het eerste muziekstuk.
∑ Stoppen van de weergave
Stoppen van de weergave:
Druk op de STOP toets. De stopfunktie
wordt ingeschakeld.
Uitnemen van een disc:
Druk op de OPEN/CLOSE toets. De
weergave stopt, de disc-lade komt naar
buiten en alle funkties worden op hun
oorspronkelijke instelling teruggesteld.
Tijdelijk onderbreken van de weergave
(pauzefunktie):
Druk op de ƒ toets. Weergave stopt bij de
huidige positie. De
ƒ indikator licht op.
Druk op de
∏ of ƒ toets om de weergave
vanaf dezelfde positie te hervatten.
WAARSCHUWING:
O Forceer de disc-lade tijdens het
openen en sluiten niet met de hand.
_ 73_
1. Druk de POWER schakelaar in.
2. Druk op de OPEN/CLOSE toets.
De disc-lade komt naar buiten. Plaats
de disc met het label omhoog wijzend
voorzichtig op de schuif. De disc dient
binnen de uitsparingen te liggen.
3. Druk nogmaals op de OPEN/CLOSE
toets.
De disc-lade sluit.
Enkele sekonden later verschijnt de
volgende informatie in het uitleesvenster.
4. Druk op de CD PLAY (∏) toets.
Weergave start vanaf het begin van het
eerste muziekstuk en de ∏ (weergave)
indikator licht op.
O Tijdens weergave knippert het nummer
van het spelende muziekstuk in de
muziekkalender.
O Na weergave van het muziekstuk dooft
het overeenkomende nummer in de
muziekkalender.
Compact Disc Speler
Basisbediening
For 8 cm (3-inch)
CD singles
For 12 cm (5-inch)
Compact Discs
Tune numbers on disc up to 20
Total number of
tunes on the disc
Total playback
time of disc
∑ Om naar het volgende nummer te gaan:
Druk op de
Æ toets.
Telkens bij indrukken van de Æ toets
gaat de afspeelkop naar het volgende
muziekstuk.
De afspeelkop kan op deze manier naar het
laatste muziekstuk gestuurd worden, maar
als de
Æ toets daarna ingedrukt wordt,
gebeurt er niets.
∑ Teruggaan naar het vorige muziekstuk:
Druk op de
Ú toets.
Telkens bij indrukken van de Ú toets
gaat de afspeelkop een muziekstuk terug.
Als de toets in het midden van een
muziekstuk ingedrukt wordt, gaat de
afspeelkop terug naar het begin van het
huidige muziekstuk. De toets dient
tweemaal ingedrukt te worden om de
afspeelkop terug te laten gaan naar het
vorige muziekstuk.
Op deze manier kan de afspeelkop terug
naar het begin van het eerste muziekstuk
op de disc worden gestuurd
∑ Muziekzoekfunktie met de
(/Ò) zoektoetsen
Houd tijdens weergave of in de pauzestand
de
Ò toets op de afstandsbediening of
de
Æ vooruitspringtoets op het
voorpaneel wat langer ingedrukt om de
muziek snel voorwaarts te doorzoeken en
houd de
toets op de
afstandsbediening of de
Ú
terugspringtoets op het voorpaneel
ingedrukt om de muziek snel terugwaarts
te doorzoeken.
Tijdens het handmatig zoeken zal het
geluid wel hoorbaar zijn, maar het klinkt
minder luid. Zo kunt u aan de hand van het
versneld weergegeven geluid precies de
gewenste muziekpassage op de disc
opzoeken. Wanneer u de gewenste
passage hoort, laat u de toets los om terug
te keren naar de eerdere stand, weergave
of pauze.
Muziekzoekfunktie
or
Totale aantal muziekstukken op de disc
Voor 8 cm "single"
discs
Voor 12 cm discs
Maximaal 20 muzieknummers op de disc
Totale weergavetijd
van de disc
∑ Muziekzoeken met de MUSIC
SKIP toetsen (Ú/Æ)
Het begin van elk nummer kan makkelijk
gelokaliseerd worden m.b.v. de
Ú/Æ
MUSIC SKIP toetsen. Deze bedieningswijze wordt duidelijk in de TRACK display
aangegeven.
O Verspringen is tevens mogelijk tijdens
geprogrammeerde weergave. Er wordt
in dit geval echter alleen naar de
geprogrammeerde nummers versprongen.
NEDERLANDS
of

_ 74_
O Als er muziekstuknummers boven de 32
zijn geprogrammeerd, kan de totale
speelduur niet in het uitleesvenster
worden aangegeven. (In plaats hiervan
verschijnt er dan slechts "nn:nn" in het
tijdvenster.)
∑ Aangeven van de totale
programma-speelduur
Tijdens het programmeren kunt u door
indrukken van de TIME toets de totale
programma-speelduur zien.
Druk nogmaals op de TIME toets om de
compact disc speler terug te zetten in de
programmeerstand.
∑ Kontroleren van de nummers in
uw muziekprogramma
1. Druk tijdens het programmeren op de
CHECK kontroletoets.
Het eerste geprogrammeerde
muziekstuknummer verschijnt en het
volgnummer "P-01" knippert in het
uitleesvenster.
2. Telkens wanneer u op de CHECK toets
drukt, licht het volgende geprogrammeerde muziekstuknummer op.
Hierbij knippert steeds het "P-XX"
volgnummer in het uitleesvenster.
O Wanneer het laatste geprogrammeerde
nummer is aangegeven, zal de volgende
druk op de CHECK toets de compact
disc speler terugzetten in de
programmeerstand, zodat u nog meer
nummers aan uw programma kunt
toevoegen.
O De muziekstuknummers die u in het
geheugen hebt geprogrammeerd zullen
worden aangegeven in de
muziekkalender. De muziekkalender kan
echter geen nummers boven de 20
aangeven. Als u hogere nummers
programmeert, zal de "OVER" indikator
oplichten.
∑ Wissen van een gepro-
grammeerd nummer
Druk op de CLEAR toets om het laatste
geprogrammeerde nummer uit het
geheugen te wissen.
∑ Programmeren door weglaten
van nummers
Deze methode werkt precies andersom als
het normale programmeren, door het
weglaten van de muziekstuknummers die u
bij het afspelen wilt overslaan. Gebruik
deze weglaat-programmeerfunktie als u
slechts enkele muziekstukken op een disc
niet wilt horen.
1. Druk op de STOP toets.
2. Druk op de DELETE toets.
De CD-speler komt nu in de weglaatprogrammeerstand. In het uitleesvenster lichten de "DELETE" en "PGM"
indikators op.
3. Druk nu beurtelings op de Ú MUSIC
Æ toets(en) en de PROGRAM toets,
in elke gewenste volgorde.
4. Druk op de PLAY weergavetoets.
Nu begint de geprogrammeerde
weergave, waarbij de ongewenste
nummers worden overgeslagen.
O In de weglaat-programmeerstand kunt
u met een druk op de TIME toets de
totale speelduur van de overgebleven
muziekstukken zien. Druk nogmaals op
de TIME toets om de CD-speler terug te
zetten in de weglaat-programmeerstand.
O Bij indrukken van de CHECK
kontroletoets wordt het eerste
overgeslagen nummer aangegeven.
Telkens wanneer u op de CHECK toets
drukt, licht het volgende overgeslagen
muziekstuknummer op. Wanneer het
laatste overgeslagen nummer is
aangegeven, zal de volgende druk op de
CHECK toets de CD-speler terugzetten
in de programmeerstand, zodat u nog
meer nummers kunt weglaten.
O Druk op de CLEAR toets om het laatste
weggelaten nummer uit het geheugen
te wissen en het muziekstuk weer voor
weergave beschikbaar te maken.
O Wanneer u in de stopstand op de STOP
toets drukt, worden de nummers van uw
weglaat-programma uit het geheugen
gewist.
Middels geprogrammeerde weergave
kunnen maximaal 20 muziekstukken
(nummers) voor weergave in elke
gewenste volgorde worden geprogrammeerd.
∑ Programmeren van gewenste
muziekstukken
1. Druk op de STOP toets.
2. Druk op de de PROGRAM toets.
De CD-speler schakelt in de
programmeerfunktie.
De PGM indikator in het uitleesvenster
licht op.
3. Druk afwisselend op de Ú MUSIC
SKIP
Æ toets(en) en de PROGRAM
toets in de volgende volgorde:
4. Druk op de PLAY (
∏) toets.
Het eerst geprogrammeerde muziekstuk
begint te spelen.
O Programmeren van nummers is alleen
mogelijk als de speler op stop staat.
O De nummers van uw muziekprogramma
blijven in het geheugen bewaard, ook
na afloop van de programma-weergave
en nadat u de weergave onderbreekt
met de stoptoets.
O Wanneer u in de stopstand op de STOP
toets drukt, worden de nummers van uw
muziekprogramma uit het geheugen
gewist.
O Om de programmeerfunktie uit te
schakelen, drukt u nogmaals op de
programmeertoets.
O Tijdens programma-weergave wordt er
onder TOTAL REMAIN in het uitleesvenster de totale resterende speelduur
van de geprogrammeerde muziekstukken aangegeven, vanaf het huidige
punt in de weergave.
Geprogrammeerde weergave
Voorbeeld:
In de stop muziekstukken 5 @ 2 @ 8 in
deze volgorde programmeren.
(kies 5) (kies 2)(invoeren)
(kies 8) (invoeren)(invoeren)

_ 75_
De herhaalfunktie dient voor het herhalen
van een enkel muziekstuk, de gehele
compact disc of een gedeelte van de disc
tussen twee door u gekozen punten
(beginpunt en eindpunt).
O Voor het uitschakelen van de
herhaalfunktie drukt u nogmaals op de
REPEAT 1/ALL toets.
∑ Herhalen van een enkel
muziekstuk (REPEAT 1 - enkele
herhaalfunktie)
1. Druk op de REPEAT 1/ALL toets.
In het uitleesvenster lichten de
"REPEAT" en "SINGLE" indikators op.
2. Kies met de Ú of Æ toets het
muziekstuk dat u wilt herhalen.
Het gekozen muziekstuk wordt
weergegeven, aan het eind ervan gaat
de CD-speler terug naar het begin van
het muziekstuk en dan begint de
weergave opnieuw. Zo zal het gekozen
muziekstuk meermalen achtereen
worden afgespeeld.
∑ Herhalen van een gehele
compact disc (REPEAT ALL volledige herhaalfunktie)
1. Druk tweemaal op de REPEAT 1/ALL
toets.
In het uitleesvenster lichten de
"REPEAT" en "ALL" indikators op.
2. Druk op de PLAY weergavetoets.
De compact disc wordt nu in zijn geheel
weergegeven, aan het eind ervan gaat
de CD-speler helemaal terug naar het
begin van het eerste muziekstuk om
daar opnieuw te beginnen en zo wordt
de gehele CD herhaaldelijk weergegeven.
∑ Herhalen van een door u
gekozen gedeelte
(REPEAT A-B herhaalfunktie)
1. Start de weergave vanaf elk gewenst
punt vóór het te herhalen gedeelte.
2. Kies het punt van waaraf u de
weergave wilt herhalen (beginpunt A)
en druk daar op de A-B toets.
In het uitleesvenster lichten de
"REPEAT" en "A-" indikators op en gaat
de "B" indikator knipperen om aan te
geven dat punt A in het geheugen is
vastgelegd.
3. Wanneer het eindpunt van het te
herhalen gedeelte wordt bereikt, drukt
u nogmaals op de A-B toets om punt B
vast te leggen.
Nu stopt de "B" indikator met knipperen
en blijft branden om aan te geven dat de
A-B herhaalfunktie is ingeschakeld.
De CD-speler keert nu automatisch naar
punt A terug en begint daar weer met
weergave.
Bij het opnieuw bereiken van punt B
keert de CD-speler weer terug naar
punt A en zo blijft dit zich herhalen.
O Na het vastleggen van beginpunt A kunt
u het eindpunt B ook sneller opzoeken
met de
Ò of Æ toets, in plaats van
te wachten tot het punt met de normale
weergave wordt bereikt.
O Druk tijdens de A-B weergave
nogmaals op de A-B toets om deze
herhaalfunktie uit te schakelen.
∑ Herhalen van de gepro-
grammeerde weergave
U kunt de herhaalfunktie ook inschakelen
tijdens geprogrammeerde weergave.
Om alle geprogrammeerde muziekstukken
te herhalen, drukt u tweemaal op de
REPEAT 1/ALL toets. (Kontroleer of hierbij
de "REPEAT" en "ALL" indikators oplichten
in het uitleesvenster.)
Herhaalfunktie
1. Druk in de stopstand op de SHUFFLE
toets.
In het uitleesvenster licht de SHUFFLE
indikator op.
2. Druk op de CD PLAY weergavetoets.
Alle muziekstukken op de compact disc
worden nu in willekeurige volgorde
weergegeven.
O Druk tijdens de willekeurige
weergavefunktie op de
Æ toets om
willekeurig een ander muziekstuk in te
stellen. Druk op de
Ú toets om het
spelende muziekstuk weer vanaf het
begin weer te geven.
O Een muziekstuk kan na weergave niet
met deze funktie worden herhaald.
O Druk tijdens willekeurige weergave
nogmaals op de SHUFFLE toets om de
willekeurige weergavefunktie te
annuleren. De muziekstukken worden
vanaf het spelende muziekstuk in hun
normale volgorde weergegeven.
Afspelen in willekeurige
volgorde
Eindpunt
B
Beginpunt
A
Muziekstuk Muziekstuk
Geprogrammeerde muziekstukken
NEDERLANDS

_ 76_
In het tijdvenster kunnen verschillende
tijdsaanduidingen worden aangegeven, als
volgt.
1 Totale speelduur van de compact disc
Na het sluiten van de disc-lade met
daarin een compact disc wordt de
totale speelduur van de disc en het
totale aantal muziekstukken
aangegeven.
2 Verstreken speelduur
Zodra de weergave begint wordt de
verstreken speelduur van het
weergegeven muziekstuk in minuten en
seconden aangegeven.
3 Resterende speelduur (REMAIN)
Bij eenmaal indrukken van de TIME
toets verschijnt de resterende
speelduur van het weergegeven
muziekstuk. Zo kunt u gemakkelijk
kontroleren hoe lang het muziekstuk
nog duurt.
4 Totale resterende speelduur (TOTAL
REMAIN)
Bij tweemaal indrukken van de TIME
toets verschijnt de totale resterende
speelduur op de gehele compact disc.
De aangegeven tijd is het totaal vanaf
het punt van weergave tot het eind van
de disc; tijdens de weergave blijft de
tijdteller terugtellen naar "00:00".
O Na driemaal indrukken van de TIME
toets verschijnt weer een optellende
tijd. Dit is weer de verstreken speelduur,
zoals aangegeven bij
2.
O Als tijdens het normale afspelen een
muziekstuk met een nummer hoger dan
32 wordt weergegeven, dan kan de
tijdteller niet de resterende speelduur
aangeven, ook al drukt u op de TIME
toets. In plaats van de tijd zal er dan
"nn:nn" in het tijdvenster verschijnen.
De intro-weergave speelt
achtereenvolgens van ieder muziekstuk
alleen de eerste 10 sekonden.
1. Druk op de INTRO CHECK toets.
De INTRO en
∏ indikators verschijnen.
2. Druk nogmaals op de INTRO CHECK
toets om de intro-weergave te
annuleren.
O De intro-weergave is tevens bruikbaar
in kombinatie met de SHFFLE,
PROGRAM en REPEAT ALL funkties.
Aanduiding van de tijdteller Automatische intervalfunktie
Intro-weergave
1. Druk op de SINGLE toets. In het
uitleesvenster licht de "SINGLE"
indikator op.
2. Zoek het gewenste muziekstuk op met
de
Ú MUSIC SKIP Æ verspring/
zoektoetsen.
3. Nu wordt alleen het gekozen
muziekstuk weergegeven en dan keert
de CD-speler terug in de stopstand.
O Om de SINGLE enkel-nummer weergave
uit te schakelen, drukt u nogmaals op
de SINGLE toets.
Enkel-nummer weergave
TOTAAL
RESTEREND
ENKEL
RESTEREND
VERSTREKEN
TOTAAL
Als deze fuktie is bijgeschakeld, zal
automatisch tussen de afzonderlijke
muziekstukken een interval van 4 sekonden
worden aangebracht.
De funktie wordt geaktiveerd door op de
AUTO SPACE toets te drukken zodat de
SPACE indikator in het uitleesvenster
oplicht.
Als de A.SPACE toets hierna opnieuw
wordt ingedrukt, zal de funktie worden
uitgeschakeld en de bijbehorende indikator
doven.

7. Stel het opnameniveau zodanig in met
de REC LEVEL regelaar dat de
niveaumeters bij de luidste op te nemen
geluiden net tot aan de "0 dB" uitslaan
(voor normaalband- of chroombandcassettes) of net tot aan het "+3 dB"
punt (voor metaalband-cassettes).
8. Druk op de
ƒ pauzetoets wanneer u
met opnemen wilt beginnen.
O Om het opnemen tijdelijk te
onderbreken, drukt u op de
ƒ
pauzetoets. Om het opnemen daarna te
hervatten, drukt u nogmaals op de
ƒ
pauzetoets of op de ” of ∏
weergavetoets. Als u tijdens de
opnamepauzestand op de weergavetoets drukt waarvan het
” of ∏
lampje brandt, begint het opnemen
onmiddellijk; drukt u echter op de
weergavetoets waarvan het
” of ∏
lampje niet brandt, dan verandert alleen
de bandlooprichting; om te beginnen
met opnemen drukt u dan nogmaals op
dezelfde toets.
O Om te stoppen met opnemen drukt u op
de STOP toets.
_ 77_
1. Druk de POWER schakelaar in.
2. Stel met de REV MODE schakelaar in op
de gewenste omkeerfunktie.
3. Plaats een bespeelde cassette in de
houder met de open bandzijde omlaag
en de af te spelen kant A naar u toe
gericht.
4. Zet de DOLBY NR schakelaar naar
keuze op ON/OFF voor ruisonderdrukking of niet.
5. Druk op de
” of ∏ toets om te
beginnen met afspelen.
6. Stel de geluidssterkte naar wens in met
de volumeregelaar van de versterker.
O Om te stoppen met afspelen drukt u op
de STOP toets.
Afspelen
Bediening van het cassettedeck
Tellernulsteltoets (CLEAR)
Opnameniveauregelaar (REC LEVEL)
Stoptoets (STOP)
Opnametoets (RECORD)
Geluidsbron-keuzeschakelaar
(SOURCE)
Omkeerfunktieschakelaar
(REV MODE)
Aan/uitschakelaar
(POWER)
Cassette-uitwerptoets
(EJECT)
Dolby ruisonderdrukkingsschakelaar (DOLBY NR)
Na vijfmaal volledig afspelen stopt de bandloop.
Stand
schakelaar
Bandloop
Afspelen van een enkele cassettekant
KANT A
KANT A
KANT B
KANT B
STOP
1. Druk de POWER schakelaar in de AAN
stand.
2. Stel met de REV MODE schakelaar in op
de gewenste omkeerfunktie.
O Als u op beide kanten van de cassette
wilt opnemen, zet u de REV MODE
schakelaar in de
π of ø stand.
O Als u aan de achterkant met opnemen
begint door indrukken van de
”
ú
, toets,
dan zal het opnemen altijd stoppen aan
het einde van de achterkant.
O Zet de omkeerfunktieschakelaar in de
“ stand als u slechts op een enkele
kant van de cassette wilt opnemen.
3. Plaats een voor opnemen geschikte
cassette in de houder.
O Kontroleer eerst even of de
wispreventienokjes van de cassette in
orde zijn. Ontbreekt er een nokje, plak
de ontstane uitsparing dan af met een
stukje plakband.
4. Kies met de SOURCE schakelaar de
geluidsbron die u wilt opnemen.
O Bij instellen op "CD" zal er worden
opgenomen vanaf de ingebouwde
compact disc speler.
O Bij instellen op "LINE" zal het
geluidssignaal dat binnenkomt via de
"LINE IN" aansluitingen worden
opgenomen.
5. Zet de DOLBY NR schakelaar naar
keuze op ON/OFF voor ruisonderdrukking of niet.
6. Druk op de RECORD opnametoets en
het cassettedeck komt in de
opnamepauzestand (waarbij de REC en
ƒ indikators oplichten).
Opnemen
Metaalband
Normaalof chroomband
Plaatsen van een cassette
1. Trek eventuele lussen in de band
strak met uw vinger of een potlood
zoals afgebeeld.
Opmerking: Raak de band zelf niet
aan. Vingerafdrukken trekken
namelijk stof en vuil aan.
2. Druk op de uitwerptoets (
∫)* om de
cassettehouder te openen.
3. Plaats een cassette met de kant
waar de band bloot ligt naar beneden
gericht.
4. Sluit de cassettehouder voorzichtig.
*Opmerkingen:
ODe cassettehouder kan tijdens
opname of weergave niet worden
geopend.
ODe cassette kan mogelijk niet worden
uitgenomen indien het apparaat
tijdens weergave of opname werd
uitgeschakeld. U dient in zo'n geval
eerst het apparaat weer aan te
schakelen en vervolgens nogmaals
op de uitwerptoets te drukken.
NEDERLANDS

_ 78_
Tijdens afspelen kunt u de snelheid van de
bandloop bijregelen en daarmee de
toonhoogte van het opgenomen of
weergegeven geluid.
Door de PITCH CONTROL regelaar
rechtsom te draaien verhoogt u de
bandsnelheid en dus de toonhoogte. Door
de regelaar linksom te draaien verlaagt u
de bandsnelheid en dus de toonhoogte.
O Met de regelaar geheel naar rechts
gedraaid loopt de band ongeveer 12%
sneller dan normaal.
O Met de regelaar geheel naar links
gedraaid loopt de band ongeveer 12%
langzamer dan normaal.
Snelheidsfijnregeling
1. Druk tijdens voorwaartse weergave net
zo vaak op de
of Ò toets totdat
het aantal muziekstukken dat u wenst
over te slaan in het uitleesvenster wordt
getoond. Gebruik de
toets voor
doorspoelen naar een verder gelegen
muziekstuk, en de
Ò toets voor
terugspoelen naar een eerder gelegen
muziekstuk. Zie tevens het overzicht
"Kiezen van het gewenste muziekstuk
met het CPS muziek-zoeksysteem".
O Indien u per ongeluk te vaak op
bijvoorbeeld de
Ò toets heeft
gedrukt, dan kunt u het aantal
muziekstukken dat in het uitleesvenster
wordt getoond verminderen door net zo
vaak als vereist op de
toets te
drukken.
O Bij het drukken op de Ò toets zal het
volgende muziekstuk als nummer "1"
worden geteld. Bij het drukken op de
toets is het spelende muziekstuk
echter nummer "1".
2. De band spoelt nu door naar het begin
van het muziekstuk dat het gekozen
aantal muziekstukken verder ligt,
waarna automatisch op weergave
wordt overgeschakeld.
Met de CPS zoekfunktie kunt u snel en
gemakkelijk een ander muziekstuk
opzoeken en afspelen, tot 15 nummers
verder of eerder op de band dan het
weergegeven muziekstuk. Deze funktie
werkt door het herkennen van
onbespeelde bandgedeelten van minstens
4 seconden lang tussen de muziekstukken.
Dergelijke tussenruimtes kunt u tijdens
opnemen zelf invoegen met behulp van de
REC MUTE opnamedemping.
Opmerkingen:
O In de volgende aanwijzingen 1 en 2
wordt voor het gemak alleen de uitleg
gegeven voor voorwaartse weergave
(in de
∏ richting). U kunt de funktie
echter net zo gebruiken tijdens
"terugwaartse" weergave.
O De Ò vooruitspoeltoets en de
terugspoeltoets werken tijdens
weergave als "CPS" muziekzoektoetsen.
Daarom staat er op het voorpaneel
boven deze toetsen "
Ú CPS
ÆÒ" aangegeven, terwijl er op de
afstandsbediening slechts "
" en
"
Ò" staat. In de volgende uitleg
gebruiken we voor de duidelijkheid
alleen de aanduidingen "
" en "Ò".
Muziekzoekfunktie
(CPS = Computomatic Program Search)
In de stopstand kunt u de en Ò
toetsen gebruiken om de band snel terug
of vooruit te spoelen.
O Tijdens het afspelen van een cassette
werken deze toetsen als "CPS"
muziekzoektoetsen.
Snelspoelen
Met een druk op de RTZ (Return To Zero)
nulpunt-terugkeertoets kunt u een eerder
vastgelegd nulpunt op de band opzoeken,
zodat de bandloop automatisch stopt bij
"0000".
O De nulpunt-terugkeerfunktie zal niet
werken wanneer de bandteller een
waarde tussen "9996" en "0004"
aangeeft.
Nulpunt-terugkeerfunktie (RTZ)
or
De bandteller telt op wanneer de band in
voorwaartse richting loopt en telt terug
tijdens het terugspoelen van de band. Om
een punt op de band terug te vinden kunt u
de bandteller op nul zetten met een druk op
de CLEAR nulsteltoets, zodat het
tellervenster "0000" aangeeft.
Bandteller
Een eerder gemaakte opname zal
automatisch worden gewist door er een
nieuwe opname overheen aan te brengen.
Verder kan opgenomen materiaal ook
worden gewist door een opname te maken
met de REC LEVEL regelaar op "0".
LET OP:
Het opnemen van voorbespeelde
cassettes, grammofoonplaten of ander
geluidsmateriaal kan een inbreuk op de
auteursrechtwetgeving inhouden. Stel u
daarom op de hoogte van deze wetten
alvorens op te nemen.
Uitwissen
of

_ 79_
∑ Automatische intervalfunktie
voor blanco intervallen van 4
seconden (tijdens opname)
Druk tijdens opname op de REC MUTE
toets. De band blijft lopen en een blanco
interval van 4 seconden wordt
opgenomen (de REC indikator knippert).
Hierna schakelt het deck automatisch
in opnamepauze (zowel de REC als de
ƒ indikators lichten op). Druk op de
PAUSE toets om de opname vervolgens
te hervatten (de
ƒ indikator dooft).
∑ Automatische intervalfunktie voor
blanco intervallen van 4 sekonden
(tijdens opnamepauze)
Door tijdens de opnamepauzefunktie op
de REC MUTE toets de drukken zal de
bovenstaande interval-opnamefunktie
automatisch in werking worden gesteld.
Het deck zal vervolgens terugschakelen
in opnamepauze, klaar voor verdere
opnamen.
∑ Opnemen van een blanco interval van
meer dan 4 seconden
Houd de REC MUTE toets tijdens
opname voor een langere periode
ingedrukt. Een blanco passage van
gelijke lengte zal op band worden
aangebracht. Laat de toets los om in de
opnamepauzefunktie over te schakelen.
Druk op de PAUSE toets om hierna de
opname te hervatten.
O Indien u tijdens het opnemen van een
blanco interval (terwijl de REC indikator
knippert) opnieuw op de REC MUTE
toets drukt, zal de blanco-opname
stoppen en de opname direkt worden
voortgezet.
Opnamedemping
Opmerkingen aangaande het CPS
muziekzoeksysteem
Het CPS systeem werkt door het tellen van
blanco passages van meer dan 4 sekonden
en neemt daarbij aan dat deze tussen
muziekstukken in liggen. Hierdoor zal in de
volgende gevallen het CPS systeem
mogelijk niet naar behoren funktioneren.
O Als de intervallen tussen muziekstukken
niet waarneembaar zijn:
– Intervallen van minder dan 4
sekonden lengte.
–Veel ruis in het interval.
– Zeer lange rustige passages (zoals
b.v. in klassieke muziek)
t
’
’
1
2
3
3
2
1
’
’
’
’
1
2
3
3
2
1
(1) (2)
(4)(3)
’
Kiezen van het gewenste muziekstuk met het CPS muziekzoeksysteem
Voorbeeld: Zie (1). Kies "CP03" voor het 3de muziekstuk na de huidige positie van de band.
Huidige positie van de band
Volgend Voorgaand
Bandlooprichting
Bandlooprichting
Voorgaand
Volgend
Huidige positie van de band
In voorbeeld (1) zal onderbreking "t"
niet worden meegeteld indien deze korter
dan 4 sekonden is. Stel in dat geval "CP-02"
in plaats van "CP-03" in om door te spoelen
naar het 3e muziekstuk.
NEDERLANDS

∑ Kiezen van muziekstukken op
CD voor opname op cassettekant A of B
(A-B cassettekant-opname)
Met de A-B cassettekant-opname kunt u
muziekstukken van een CD kiezen voor
opname op cassettekant A of B.
1. Druk op de PROGRAM toets.
2. Druk op de A-B toets.
De "A-" indikator gaat knipperen en de
"B" indikator licht op in het
uitleesvenster, om aan te geven dat de
CD-speler nu in de "cassettekant-A
programmeerstand" staat.
3. Programmeer de gewenste muziekstukken voor opname op cassettekant
A.
Volg de aanwijzingen vanaf stap 3
onder "Programma-weergave" op blz.
74.
O Voor het aangeven van de totale
programma-speelduur drukt u in de
programmeerstand op de TIME toets.
Dit maakt het u gemakkelijk om de
totale programma-speelduur aan te
passen aan de beschikbare bandlengte.
Druk nogmaals op de TIME toets om de
CD-speler terug te zetten in de
programmeerstand.
4. Druk nogmaals op de A-B toets.
Nu blijft de "A-" indikator branden en
gaat de "B" indikator knipperen in het
uitleesvenster, om aan te geven dat de
CD-speler nu in de "cassettekant-B
programmeerstand" staat.
5. Programmeer de gewenste muziekstukken voor opname op cassettekant
B.
O Door in de cassettekant-B program-
meerstand nogmaals op de A-B toets te
drukken, kunt u de CD-speler
terugzetten in de cassettekant-A
programmeerstand.
6. Druk op de CD DUBBING toets.
De cassetteband wordt dan
teruggespoeld naar het begin van kant
A, de bandteller komt op "0000" te staan
en de CD-speler komt in de weergavepauzestand, aan het begin van het
eerste muziekstuk van uw cassettekantA programma.
_ 80_
Met de CD-opnamefunktie kunt u op
eenvoudige wijze muziek van compact
discs op cassette opnemen.
1. Leg een CD in de disc-lade.
2. Plaats een voor opnemen geschikte
cassette in de houder.
3. Zet de DOLBY NR schakelaar naar
keuze op ON/OFF voor ruisonderdrukking of niet.
O Bij de CD-opnamefunktie is de stand
van de REC LEVEL niveauregelaar niet
van invloed op het opgenomen geluid,
aangezien het opnameniveau hierbij
automatisch wordt ingesteld.
∑ Opnemen vanaf het begin van
de cassette
Druk in de stopstand op de CD DUBBING
toets.
De cassetteband wordt dan teruggespoeld
naar het begin van kant A, de bandteller
komt op "0000" te staan en de CD-speler
wacht aan het begin van het eerste
muziekstuk in de weergave-pauzestand.
Nu gaat eerst de band ongeveer 10
seconden lang lopen zonder opname (om
de aanloopband door te draaien) en dan
begint het cassettedeck met opnemen
terwijl de CD-speler de weergave van de
CD start.
∑ Opnemen vanaf een ander
gewenst punt op de band
1. Spoel de band door tot het punt waar u
de nieuwe bandopname wilt laten
beginnen en druk daar op de STOP
toets.
2. Druk op de RECORD opnametoets.
Het cassettedeck komt in de opnamepauzestand.
3. Druk op de CD DUBBING opnametoets.
Het opnemen van de CD muziek op de
cassette begint dan vanaf het gekozen
punt op de band.
O Tijdens het CD DUBBING opnemen
werken alleen nog de CD STOP toets,
de TAPE STOP toets, de OPEN/CLOSE
toets en de TIME toets.
Vervolgens gaat eerst de band
ongeveer 10 seconden lang lopen
zonder opname (om de aanloopband
door te draaien) en dan begint het
cassettedeck met opnemen terwijl de
CD-speler de weergave van uw CDmuziekprogramma start.
O Door op de RECORD opnametoets te
drukken voor u op de CD DUBBING
toets drukt, kunt u het opnemen laten
beginnen vanaf het huidige punt op de
band (dus zonder de band naar het
begin terug te spoelen).
O Als er voor het laatste muziekstuk aan
cassettekant A te weinig ruimte is en de
band eindigt voordat er 01:30
(anderhalve minuut) van het CDmuziekstuk is afgespeeld, dan wordt
hetzelfde muziekstuk als eerste op
cassettekant B opgenomen (behalve bij
de A-B cassettekant-opname).
O Wanneer het afspelen van de CD-speler
stopt, wordt ook de CD DUBBING
opnamefunktie uitgeschakeld.
O Als het einde van cassettekant B wordt
bereikt vóór de de CD-speler klaar is
met afspelen, dan wordt de CD
DUBBING opnamefunktie uitgeschakeld.
Opnemen van compact discs op cassette
or
of

_ 81_
NEDERLANDS
Dit apparaat is geschikt voor opnemen en
afspelen met een schakelklok. Door het
aansluiten van een los verkrijgbare audioschakelklok kunt u het opnemen en
afspelen automatisch laten beginnen op
een van tevoren ingesteld tijdstip.
∑ Schakelklok-weergave van een
compact disc of cassette
1. Sluit dit apparaat en uw stereoinstallatie aan op een audioschakelklok, zoals aangegeven in de
volgende afbeeldingen.
2. Schakel alle betrokken apparatuur in,
met de aan/uit-schakelaars (POWER) in
de AAN stand.
3. Plaats een bespeelde cassette of de af
te spelen compact disc.
4. Zet de TIMER schakelklok-schakelaar
naar keuze in de "CD" of "TAPE" stand.
5. Stel op de aangesloten audioschakelklok de gewenste inschakeltijd
en uitschakeltijd in.
Wanneer u deze instellingen naar
behoren hebt gemaakt, wordt de
stroomvoorziening van alle betrokken
apparatuur automatisch uitgeschakeld.
6. Bij het bereiken van de ingestelde
inschakeltijd wordt de stroom weer
ingeschakeld en begint automatisch het
afspelen van de gekozen geluidsbron.
∑ Schakelklok-opname
1. Stel uw versterker in op weergave van
een geluidsbron die u op dit
cassettedeck kunt opnemen.
2. Kies de op te nemen geluidsbron (FMradio, AM-radio enz.).
3. Plaats een voor opnemen geschikte
cassette en zet de "TIMER" schakelaar
in de "REC" stand.
4. Stel op de aangesloten audioschakelklok de gewenste inschakeltijd
en uitschakeltijd in.
Wanneer u deze instellingen naar
behoren hebt gemaakt, wordt de
stroomvoorziening van alle betrokken
apparatuur automatisch uitgeschakeld.
5. Bij het bereiken van de ingestelde
inschakeltijd wordt de stroom weer
ingeschakeld en begint automatisch het
opnemen van de gekozen geluidsbron.
De doorlopende afspeelfunktie zorgt dat er,
zodra het afspelen van de CD-speler of het
cassettedeck stopt (of wordt onderbroken),
onmiddellijk wordt doorgegaan met
weergave van de andere geluidsbron
(cassette of compact disc).
1. Druk op de CD-TAPE CONT PLAY
doorlopende-weergavetoets.
In het uitleesvenster gaan de "TAPE"
en "CD" indikators knipperen.
2. Druk (bijvoorbeeld) op de CDweergavetoets.
Het afspelen van de compact disc
begint.
De aanduiding "CD" blijft in het
uitleesvenster knipperen.
3. Zodra nu de weergave van de CD
eindigt, gaat automatisch het
cassettedeck door met afspelen.
Nu gaat in het uitleesvenster de
aanduiding "TAPE" knipperen.
Vervolgens zal na afloop van de
weergave de andere geluidsbron het
afspelen weer overnemen.
O Het maakt niet uit of de ene geluidsbron
(compact disc of cassette) geheel is
afgespeeld of wordt onderbroken door
indrukken van de STOP toets, de andere
geluidsbron zal automatisch het
afspelen vervolgen.
O In de stopstand kunt u zonder bezwaar
een andere cassette of een andere
compact disc plaatsen.
O Om de doorlopende afspeelfunktie uit te
schakelen, drukt u nogmaals op de CDTAPE CONT PLAY toets.
Schakelklok-funkties
Doorlopende weergave van
compact disc en cassette
Audio-schakelklok
Tuner
naar de netuitgang
van de schakelklok
naar de netuitgang
van de tuner
naar de netuitgang
van de versterker
Versterker
AD-500
Aansluiten van de schakelklok

_ 82_
Mocht er zich met dit apparaat een probleem voordoen, dan kunt u dezelfde werkwijze volgen als voor andere elektrische of elektronische
apparatuur. Kontroleer altijd eerst de mogelijke oorzaken die het meest voor de hand liggen. Als leidraad kunt u bijvoorbeeld de volgende
kontrolepunten doornemen:
Verhelpen van storingen
Probleem Mogelijke oorzaak Oplossing
Algemeen
Bij indrukken van de POWER De netsnoerstekker zit niet goed Steek de stekker stevig in een
schakelaar wordt het apparaat in het stopkontakt. werkend stopkontakt.
niet ingeschakeld.
Een storende bromtoon. Een van de tulpstekkers is niet Steek alle tulpstekkers stevig
stevig aangesloten. in de aansluitbussen.
Storing in de radio-ontvangst. Het apparaat staat te dicht bij Zet dit apparaat en de tuner iets
de tuner. verder uit elkaar of schakel dit
apparaat uit.
Er wordt geen geluid weergegeven. Er is iets mis met de aansluitingen Kontroleer de aansluitingen.
van de stereo-installatie.
De afstandsbediening werkt niet. De POWER schakelaar staat nog Druk de schakelaar in de AAN
in de UIT stand stand.
Er zitten geen batterijen in de Plaats een stel nieuwe batterijen
afstandsbediening of ze zijn leeg. in de afstandsbediening.
Compact disc speler
De geplaatste CD wordt niet De disc ligt ondersteboven in Leg de compact disc met de
afgespeeld. de disc-lade. label-kant boven.
De compact disc is vuil. Maak de compact disc schoon.
Er wordt geen geluid weergegeven. Er is iets mis met de aansluitingen Kontroleer de aansluitingen.
van de stereo-installatie.
Geen compact disc weergave. Het cassettedeck staat in de Stop het afspelen van het
weergavestand. cassettedeck, of verbind de CD LINE
OUT stekkerbussen met de ingangen
van de versterker.
Er wordt maar een enkel De SINGLE toets is ingedrukt. Druk nogmaals op de toets om de
muziekstuk weergegeven. enkel-nummer weergave uit te
schakelen.
Het muziekprogramma wordt niet De PROGRAM toets is niet ingedrukt. Druk op de toets zodat het
weergegeven. uitleesvenster "PGM" aangeeft.
De weergave stottert of springt over. De CD-speler staat bloot aan trillingen Zet het apparaat op een stevige,
of schokken. trillingsbestendige ondergrond.
De compact disc is vuil. Maak de compact disc schoon.
Cassettedeck
De geluidskwaliteit is beneden peil. De bandkoppen zijn vuil. Maak de bandkoppen schoon.
De bandkoppen zijn gemagnetiseerd. Demagnetiseer de koppen met de
TEAC E-3.
De DOLBY NR schakelaar staat in Zet de schakelaar om.
de verkeerde stand.
De weergave klinkt vreemd. De snelheidsregelaar is verdraaid. Zet de snelheidsregelaar terug in
de middenpositie.
Het opnemen werkt niet. Een of beide wispreventienokjes van de Plak de ontstane uitsparing(en)
geplaatste cassette zijn uitgebroken. af met plakband.
De bandkoppen zijn vuil. Maak de bandkoppen schoon.
Het opnameniveau staat te laag Draai de REC LEVEL regelaar wat
ingesteld. verder naar rechts.

_ 83_
NEDERLANDS
Algemeen
Stroomvoorziening: 120/230 V
wisselstroom, 50/60 Hz (model voor de
V.S./Canada/algemeen exportmodel)
230 V wisselstroom, 50 Hz (model voor
Europa/Groot-Brittannië)
240 V wisselstroom, 50 Hz (model voor
Australië)
Stroomverbruik: 14 watt
Afmetingen (b/h/d): 435 x 145 x 290 mm
Gewicht: 5,3 kg
Bijgeleverd toebehoren
Infrarood-afstandsbediening RC-619,
tulpstekkersnoeren x 2
batterijen (SUM-3, R6, AA-formaat) x 2
O Wijzigingen door verbetering in ontwerp
en technische gegevens voorbehouden,
zonder kennisgeving.
O De foto's en afbeeldingen kunnen licht
afwijken van de uiteindelijke
productiemodellen.
Compact disc speler
(Audio)
Aantal kanalen:
2
Frekwentiebereik: 10 - 20.000 Hz ± 0,5 dB
Signaal/ruisverhouding: 90 dB
Dynamisch bereik: 90 dB
Totale harmonische vervorming: 0,02%
(1 kHz)
Snelheidsfluktuaties: Onmeetbaar gering
(door kwartskoppeling)
Kanaalscheiding: 75 dB
Uitgangsspanning: 2 V rms
Digitaal filter: 4-voudige overbemonstering
Analoog filter: 3de orde
(Signaalverwerking)
Bemonsteringsfrekwentie:
44,1 kHz
Digitaal-analoog omzetter: 16-bit
lineair/kanaal
Kanaal-bitverwerking: 4,3218 Mb/sec.
Kanaal-modulatiecode: EFM
Foutcorrectie: CIRC
(Aftastkop)
Type:
Objektieflensaandrijving, optische 3-
stralen laser pick-up
Objektiefelens: 2-dimensionale
parallelaandrijving
Lasertype: Halfgeleider laser van het
GaAlAs type
Golflengte: 780 nm
Cassettedeck
Spoorsysteem: 4 sporen, 2 kanalen stereo
Bandkoppen: Opname/weergavekop x 1
(roterend voor omkering), wiskop x 1
Geschikt voor cassettes: C-60, C-90
compact cassettes
Bandsnelheid: 4,76 cm/sec.
Motor: Gelijkstroom-servomotor x 1
Snelheidsfluktuaties: 0,08% (W. RMS)
Frekwentiebereik (totaal):
50 – 15.000 Hz ± 3 dB, metaalband
50 – 15.000 Hz ± 3 dB, chroomband
50 – 14.000 Hz ± 3 dB, normaalband
Signaal/ruisverhouding (totaal):
59 dB (Zonder Dolby ruisonderdrukking,
bij 3% THV, gewogen), 69 dB (met Dolby
ruisonderdrukking, boven 5 kHz)
Snelspoeltijd: Ca. 120 sec. (met C-60
cassette)
Ingangsspanning:
Lijningangen:
87 mV
(ingangsimpedantie 50 kohm of meer)
Uitgangsspanning:
Lijnuitgangen:
0,46 V
(belastingsimpedantie 50 kohm of meer)
Hoofdtelefoon: 1 mV/8 ohm
Technische gegevens
De koppen en de onderdelen waarlangs de
band loopt dienen geregeld schoongemaakt en gedemagnetiseerd te worden.
Reinigen van de onderdelen
waarlangs de band loopt
O Breng koppenreinigingsvloeistof* aan
op een wattenstaafje of een zachte
doek en wrijf voorzichtig over de
koppen, windassen en alle metalen
onderdelen waarlangs de band loopt.
O Reinig tevens de aandrukrollen m.b.v.
rubberreinigingsvloeistof*.
* Beide zijn verkrijgbaar als TEAC HC-2
en RC-2 in de V.S. en als TEAC TZ-261
cassetterecorder-reinigingsset in
andere landen.
Onderhoud
Demagnetiseren van de koppen
Zorg er allereerst voor dat de spanning
uitgeschakeld is.
Demagnetiseer vervolgens de koppen
m.b.v. de TEAC E-3 demagnetiseerder of
een gelijkwaardig apparaat. Lees de
bijbehorende aanwijzingen voor details.
Aandrukrollen
Windassen
Wiskop
Opname/weergavekop

PRINTED IN JAPAN 0197U1.3 MA-0047A
TEAC CORPORATION
3-7-3, Nakacho, Musashino-shi, Tokyo 180, Japan Phone: (0422) 52-5082
TEAC AMERICA, INC. 7733 Telegraph Road, Montebello, California 90640 Phone: (213) 726-0303
TEAC CANADA LTD. 340 Brunel Road, Mississauga, Ontario L4Z 2C2, Canada Phone: 905-890-8008
TEAC MEXICO, S.A. De C.V Privada De Corina, No.18, Colonia Del Carmen Coyoacon, Mexico DF 04100 Phone: 5-658-1943
TEAC UK LIMITED 5 Marlin House, Marlins Meadow, The Croxley Centre, Watford, Herts. WD1 8YA, U.K. Phone: 01923-819699
TEAC DEUTSCHLAND GmbH Bahnstrasse 12, 65205 Wiesbaden-Erbenheim, Germany Phone: 0611-71580
TEAC FRANCE S. A. 17 Rue Alexis-de-Tocqueville, CE 005 92182 Antony Cedex, France Phone: (01) 42.37.01.02
TEAC BELGIUM NV/SA P.A. TEAC Nederland BV, Perkinsbaan 11a, 3439 ND Nieuwegein, Netherlands Phone: 0031-30-6048115
TEAC NEDERLAND BV Perkinsbaan 11a, 3439 ND Nieuwegein, Netherlands Phone: 030-6030229
TEAC AUSTRALIA PTY., LTD.
106 Bay Street, Port Melbourne, Victoria 3207, Australia Phone: (03) 9644-2442
A.C.N. 005 408 462
TEAC ITALIANA S.p.A. Via C. Cantù 5, 20092 Cinisello Balsamo, Milano, Italy Phone: 02-66010500
AC POWER CORD CONNECTION
CAUTION:
TO PREVENT ELECTRIC SHOCK, MATCH WIDE
BLADE OF PLUG TO WIDE SLOT, FULLY INSERT.
CORDE DE CONNEXION CA
ATTENTION:
POUR ÉVITER LES CHOCS ÉLECTRIQUES,
INTRODUIRE LA LAME LA PLUS LARGE DE LA
FICHE DANS LA BORNE CORRESPONDANTE DE
LA PRISE ET POUSSER JUSQU’AU FOND.
For CANADA
TO THE USER
This equipment has been tested and found to comply with the limits for a Class B digital device, pursuant to Part 15
of the FCC Rules. These limits are designed to provide reasonable protection against interference in a residential
area. This device generates and uses radio frequency energy and if not installed and used in accordance with the
instructions, it may cause interference to radio or TV reception. If this unit does cause interference with TV or radio
reception you can try to correct the interference by one or more of the following measures:
a) Reorient or relocate the receiving antenna.
b) Increase the separation between the equipment and the receiver.
c) Plug the equipment into a different outlet so that it is not on the same circuit as the receiver.
If necessary, consult the dealer or an experienced radio/TV technician for additional suggestions.
CAUTION:
Changes or modifications to this equipment not expressly approved by TEAC CORPORATION for compliance could
void the user's authority to operate this equipment.
For U.S.A.
 Loading...