

Page 1
VoiceOne
Voice Pitch and Modeling Tool
Quick Start Guide
Page 2

Page 3

1
BEFORE YOU BEGIN
Thank you for purchasing the TC-Helicon VoiceOne Vocal Pitch and Modeling Tool.We know
you want to get started right away. By reading this Quick Start manual you will be up and
running in a matter of minutes. Please use this to get into the main functions of VoiceOne,
but do refer to the main manual for more detailed features and descriptions.
The TC-Helicon Team
www.tc-helicon.com
BEFORE YOU BEGIN
1) Check the contents of your VoiceOne carton. You should have received:
* VoiceOne unit
* Power cable appropriate to the power receptacles for you region
* VoiceOne User Manual
* This VoiceOne Quickstart Manual
* VoiceOne Preset, Style and Application Pamphlet
* TC-Electronic Catalog
* Warranty Card
2) Observe basic safety precautions:
* Operate from a regulated power receptacle.
* Do not open the unit! There are no user serviceable parts inside.
* Turn amplifiers and speakers down or off when patching in this equipment.
WHAT DOES VOICEONE DO?
VoiceOne is a special product for the human voice. With this tool you now have the power to
do:
• Voice Modeling
(TM) Effects -
•Inflection including FlexTime(TM)
•Vibrato
•Resonance (Warp)
•Growl
•Breath
•Spectral (Voice Optimized Equalizer)
• Pitch Shifting and Correction to +/- 2 octaves, by reference to
scales, note mapping, fine tuned cent unit shifts, MIDI notes and
Pitch Bend
• PureShift(TM) Full DSP Mode for Pitch Effects.
• Foot switch control of select parameters.
• Extensive MIDI control of effect parameters.
Let’s get started!
Rev 1.0 – SW – V 1.00
Page 4

2
SETUP - AUDIO AND MIDI
SETTING UP VOICEONE
Note: Do not turn the unit on until you make all of your setup connections.
1) Connect the power cable to the back of VoiceOne and plug it in to the power receptacle.
2) Connect your audio source - a) Connect the output from your mixer, preamp or other balanced
equipment to VoiceOne, using XLR analog cable to Channel 1, or b) an S/PDIF digital cable to
the DI jack. See the main manual for Digital I/O information. VoiceOne defaults to analog
settings.
3) Connect your Audio Output - a) Connect the Balanced Analog Output from Channel 1 to your
mixer, recorder or monitor system using balanced XLR cable. b) You may also connect the
S/PDIF Out ‘DO’ to your S/PDIF digital equipment.
4) Connect your MIDI devices - a) Connect the MIDI Out from your controller or sequencer to the
MIDI In in VoiceOne. b) Connect the MIDI Thru to your other MIDI devices if you choose.
c) Connect the MIDI Out to your MIDI recorder or sound module.
5) Footswitch - You may connect a footswitch to control the bypass features. See the main manual
for details.
6) Set the Input and Output Knobs to full counter-clockwise as a precaution for power-up.
7) Power up VoiceOne using the POWER key.
Rear Panel Diagram
2a 3a 2b 3b 4a 4b 4c 5
7 6 6
You’re now connected and powered up! You can now set the input gain of your signal to a
strong level without clipping (The leftmost meter labelled IN will light up red if there is an
overload). Use the Input knob to adjust this.
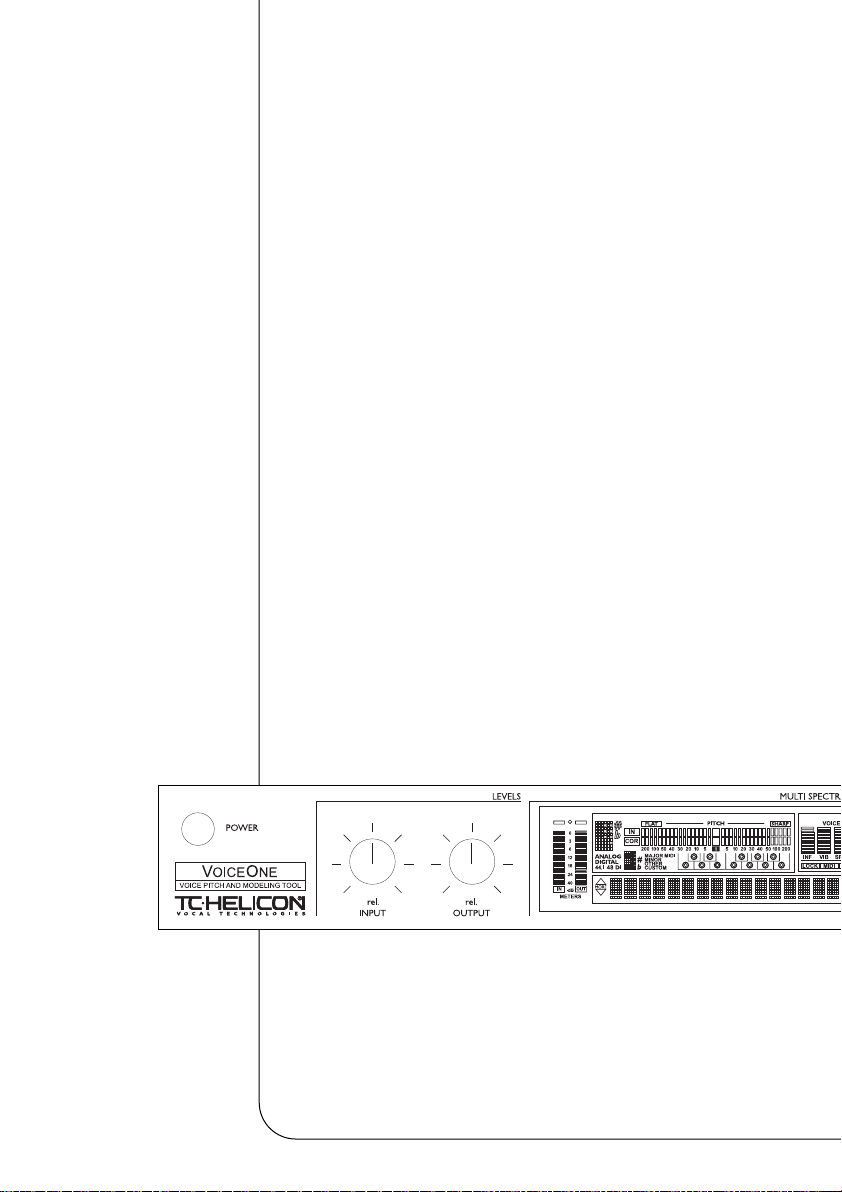
Now let’s take a look at the front panel controls...
Front Panel Diagram - Left
Page 5

35
Now that you know how the buttons are set up, you can experiment with browsing the presets. Use the DATA wheel to do this. Press the Voice Modeling and Pitch keys to toggle the
effects on and off. Turn the wheel to preset 99. This is the preset we will use to explore the
individual effects.
Let’s look at the effects and what they do...
FRONT PANEL NAVIGATION
PITCH and VOICE MODELING KEYS
A single click will activate/deactivate the effect. Double clicking on
the key will enter the edit menu of
the effect algorithm. A lit key LED
indicates that the effect block is
active.
FUNCTION KEYS: I/O and MIDI/UTIL
A single click will enter the parameters for editing.
RECALL KEY
Use the DATA wheel to scroll
through the presets, then pres
RECALL to load the preset.
STORE
Press STORE once to save a preset.
Select a location using the DATA
wheel. Press ENTER to confirm this
operation. To edit the name, use the
ARROW keys to scroll through the
letter positions, and the DATA wheel
to select a character. Press ENTER
or STORE to finish.
DATA WHEEL
ARROW KEYS
ENTER KEY
BYPASS KEY
Bypasses all
functions, allowing the original
input audio to
pass.
FRONT PANEL CONTROLS
Page 6

4
VOICEMODELING EDIT PARAMETERS
VOICE MODELING (VM) STYLES AND
AMOUNTS
Here’s a good way to get started hearing all of
the Voice Modeling effects with your vocal.
• Go to factory preset 99 - we’ll use this preset
to do our experiments.
• Press the VM effect key so that it lights - the
effect is now active. Choose between
Inflection, Vibrato, Spectra, Breath, Growl
and Resonance.
• Double click that same key to enter the edit
parameters.
• Set the Amount to 50% - a midrange value.
• Use the ARROW DOWN key to scroll to the
next parameter - the styles. Styles are like
miniature factory presets for the VM
categories. Refer to the Preset, Style and
Application pamphlet for descriptions on the
effects applications, and the style functions.
INFLECTION EFFECTS
The inflection effect can alter the inflection of
your vocals in different ways. You can add
various types of "scooping" effects to the
onsets of a lead vocal for instance, but
inflection is also the place where you can find
the humanization tools that will help you give a
harmony line its own identity or create
extremely natural doubling effect. Inflection
provides tools such as portamento, pitch and
timing randomization (using our FlexTime
(TM)
algorithm) as well as up/down scoop models.
VIBRATO KEY EFFECTS
Vibrato is a pitch and amplitude effect that
singers often use in their delivery of a piece of
music. It is a combination of various
characteristics of the voice being repeatedly
altered in a oscillating fashion. Every singer's
vibrato is unique. The Vibrato Styles are based
on real vocalist's vibratos. We have analyzed a
large set of parameters from a voice database
and created various vibrato models. The
Vibrato setting names reflect the style of the
vocals from which they were extracted.
Experimentation is the key to finding a style
setting that best suits your application. You
might begin incorporating Vibrato into your
sound by setting the VIB Amt control to 50%.
This setting matches the depth level that we
analyzed in our modeling subjects. You can
then vary the effect from this middle range up or
down to suit your taste.
SPECTRAL KEY EFFECTS
The Spectral styles reflect the natural
equalization equivalent to the native control a
singer has over his or her own voice, and apply
this equalization to the VM voice. These styles
may be used in conjunction with the
resonances, or purely as additional tonal control
over the VM voice.
BREATH KEY EFFECTS
The Breath styles add breathiness to the vocal.
This varies from a whisper, all the way to a
rough, raspy sound, such as is found in hard
rock and ‘alternative’ rock music.
Some styles are sensitive to the dynamics of
the incoming vocal, meaning that they can be
‘played’ by varying the level of what is sung into
Voice One. This is also known as ‘self control’.
GROWL KEY EFFECTS
Growl in VoiceModeling mimics friction activity
between the larynx and epiglottis regions of the
vocal tract. This is a ‘character’ phenomenon
used in high energy rock, blues or old soul
music for example.
The Growl effect also models the changes in
the vocal tract shape that growling requires,
altering the vocal resonance characteristics.
Some styles are sensitive to the dynamics of
the incoming vocal, meaning that the effect can
be controlled by the volume of what is sung into
Voice One. This is also know as self-control.
RESONANCE KEY EFFECTS
Resonance styles allow you to take the
harmonic content that forms the identity of the
incoming voice and change the content’s
positioning to yield a new character to the
sound. Some styles change the voice to a
heavier, darker chest resonance, while others
lighten the sound to more of a head and throat
resonance. Some styles also change the voice
in a more complex way that depends on the
input voice.
Page 7

5
PITCH EFFECTS EDIT PARAMETERS
PITCH CORRECTION
Again, we will use Factory preset #99 for our
experiments. Turn all of the VM effects off for
now by pressing their keys on the front panel.
Press the CORRECT key in preset #99 to turn
on the effect. We have set this up to correct to
a chromatic scale, with a default root of C.
Double Click the CORRECT key and use the
ARROW keys to find the COR Window or
correction window. Sing or play a vocal into
VoiceOne, and adjust this window with the
DATA wheel. You should also work with the
COR Attack and COR Amount parameters to
change the strictness and amount of correction.
Refer to the main User’s Manual to investigate
the other correction scales, entering a custom
scale, and correction via MIDI control.
PITCH SHIFTING
Shift Amount/Mode
To understand how the shift amount is applied
in the various modes, it is a good idea to be
familiar with how VoiceOne shows the shift
offsets in the various modes. Please refer to
the main manual for details.
In our Quickstart test preset (Factory #99) the
setting is for SHI Mode Chromatic. You can
then apply a static shift to the vocal by
changing the SHI Amount. This value is in
cents. 100 cents = one semitone. Experiment
with upshifts and downshifts. When finished,
Press the SHIFT key to return to the top level
screen. Press the CORRECT button to disable
the Pitch Correction.
Now, let’s do an intelligent shift. We’re going to
use a major scale as our basis.
Remember, to hear the effect, the SHIFT key
must be pressed so that the LED lights.
Double-click the SHIFT key, and use the
ARROW keys to find the SHI Mode parameter.
Select Major 1 with the DATA wheel. With the
Arrow keys, scroll to the SHI Amount
parameter, and select the interval you want to
shift to. Try ‘3rd’ as an experiment. The scale is
in C major, since you haven’t changed the root
note in the Correction section. You should now
hear your input shifted to a diatonic 3rd above
C, depending on the notes you send in. If you
sing C, you should hear E.
There you have a basic hands on
demonstration on how some of the many
functions of VoiceOne are accessed. We
invite you to explore these features in depth
in the main User’s Manual.
Have fun with VoiceOne!
Visit our website for technical support,
literature, information, presets, FAQs,
promotions and many other items related to
TC-Helicon Vocal Products.
www.tc-helicon.com
Thank You
The TC-Helicon Team
 Loading...