


 Loading...
English Reference Manual
<![if ! IE]><![endif]>VL3X

Safety information |
1 |
Using the HIT footswitch |
52 |
Synth effect block / tab |
102 |
||
Important safety instructions |
2 |
Using individual effects |
53 |
Transducer effect block / tab |
103 |
||
EMC / EMI |
4 |
Change a button from Latched to |
|
Vocal µMod effect block / tab |
104 |
||
Explanation of graphic symbols |
5 |
Momentary mode |
54 |
Choir effect block / tab |
105 |
||
|
|
Remapping a footswitch |
55 |
Vocal Rhythmic effect block / tab |
106 |
||
Before you begin |
6 |
Talk/Tuner Mode |
57 |
Stutter effect block / tab |
107 |
||
About this manual |
7 |
Guitar Effects |
58 |
Vocal Buttonmap tab |
|
108 |
|
Getting support |
8 |
Editing HIT |
59 |
|
|
|
|
VoiceSupport |
9 |
Using ALL HIT |
60 |
Editing the Guitar Layer |
110 |
||
Please register your VL3X |
10 |
HIT – Dynamic vs. Snapshot |
61 |
Introduction |
|
111 |
|
|
|
Storing Presets |
63 |
Amp effect block / tab |
|
112 |
|
Introduction |
11 |
Tapping tempo |
65 |
Drive effect block / tab |
|
114 |
|
Welcome! |
12 |
Using Global Tempo |
66 |
Guitar Delay effect block / tab |
115 |
||
Concepts |
13 |
Editing an Effect |
67 |
Guitar Reverb effect block / tab |
116 |
||
Top panel overview |
18 |
Defining and using Global Effects |
69 |
Comp(ression) effect block / tab |
117 |
||
Footswitches overview |
21 |
MIDI Sync |
72 |
Wah (Wah-Wah) effect block / tab |
118 |
||
Back panel inputs and outputs |
27 |
Backing Track Import |
73 |
µMod effect block / tab |
119 |
||
|
|
Backing Tracks |
76 |
Octaver effect block / tab |
120 |
||
VL3X overview |
30 |
Backing Track Sequence Recording |
|
Guitar Rhythmic effect block / tab |
121 |
||
Setting up |
31 |
(Automation) |
80 |
Guitar Buttonmap block / tab |
122 |
||
Diagram legend |
32 |
Importing and Exporting Performances |
83 |
|
|
|
|
Diagrams |
33 |
Direct to USB Recording |
84 |
The Looper |
|
123 |
|
Quick troubleshooting tips |
38 |
Using the Mix Controls |
85 |
Introduction |
|
124 |
|
|
|
Tips and tricks for working with layers |
|
Loop button parameters |
125 |
||
Getting to know VL3X |
39 |
and effects |
87 |
Basic loop concepts and terms |
128 |
||
Amazing Grace |
40 |
Mic Control and Footswitch tabs: |
|
Entering and exiting Loop mode |
129 |
||
A guided tour |
41 |
Remapping footswitches |
88 |
Your first loop |
|
130 |
|
There’s no place like Home |
42 |
Exp. Pedal tab: Getting the most out |
|
The Utility menu |
|
134 |
|
Using the Control knob |
43 |
of your expression pedal |
89 |
Loop limits |
|
139 |
|
Using the Arrow buttons |
44 |
|
|
Loop Management |
|
140 |
|
What is a Preset? |
45 |
Editing the Vocal Layer |
91 |
Loop Triggers |
|
142 |
|
Using Steps |
46 |
Introduction |
92 |
Looping and MIDI Sync |
144 |
||
Using Preset Genres and Favorites |
47 |
Harmony effect block / tab |
93 |
|
|
|
|
What is NaturalPlay? |
48 |
Double effect block / tab |
95 |
Product |
|
VL3X |
|
Using Global Key/Scale |
49 |
Vocal Delay effect block / tab |
96 |
|
|
||
Product (firmware) version |
|
2.0.00 Build 311 |
|
||||
Setting Key/Scale manually |
50 |
Vocal Reverb effect block / tab |
98 |
|
|
||
Document |
|
Reference manual |
|
||||
Let’s try Harmony! |
51 |
HardTune effect block / tab |
100 |
|
|
||
Document version / date |
|
2015-05-12 |
|
||||
|
|
|
|
|
|
||
VL3X – Reference manual (updated 2015-05-12) |
|
|
|
|
|
|
a |

Setup |
145 |
Introduction |
146 |
Input tab |
147 |
Output tab |
151 |
Guitar tab |
153 |
MIDI tab |
155 |
Tone tab |
159 |
System tab |
165 |
Mic Control and Footswitch tabs |
169 |
Mic Control tab |
170 |
Footswitch tab |
172 |
Pedal Calibration tab |
177 |
Product info tab |
178 |
Appendix |
179 |
MIDI CC List |
180 |
System Maintenance/Factory Reset |
181 |
Technical Specifications |
182 |
VL3X – Reference manual (updated 2015-05-12) |
b |

Safety information
Safety information
VL3X – Reference manual (updated 2015-05-12) |
1 |

Safety information
Important safety instructions
1.Read these instructions.
2.Keep these instructions.
3.Heed all warnings.
4.Follow all instructions.
5.Do not use this apparatus near water.
6.Clean only with a dry cloth.
7.Do not block any ventilation openings. Install in accordance with the manufacturer’s instructions.
8.Do not install near any heat sources such as radiators, heat registers, stoves, or other apparatus (including amplifiers) that produce heat.
9.Do not defeat the safety purpose of the polarized or grounding-type plug. A polarized plug has two blades with one wider than the other. A grounding-type plug has two blades and a third grounding prong. The wide blade or the third prong is provided for your safety. If the provided plug does not fit into your outlet, consult an electrician for replacement of the obsolete outlet.
10.Protect the power cord from being walked on or pinched, particularly at plugs, convenience receptacles, and the point where they exit from the apparatus.
11.Only use attachments/accessories specified by the manufacturer.
12.Use only with a cart, stand, tripod,
bracket, or table specified by the manufacturer, or sold with the apparatus. When a cart is used, use
caution when moving the cart/apparatus combination to avoid injury from tip-over.
13.Unplug this apparatus during lightning storms or when unused for long periods of time.
14.Refer all servicing to qualified service personnel. Servicing is required when the apparatus has been damaged in any way, such as power-supply cord or plug is damaged, liquid has been spilled or objects have fallen into the apparatus, the apparatus has been exposed to rain or moisture, does not operate normally, or has been dropped.
VL3X – Reference manual (updated 2015-05-12)
Caution
You are cautioned that any change or modifications not expressly approved in this manual could void your authority to operate this equipment.
2

Service
►► All service must be performed by qualified personnel.
►► There are no user-serviceable parts inside.
VL3X – Reference manual (updated 2015-05-12)
Warning
►► To reduce the risk of fire or electric shock, do not expose this apparatus to rain or moisture and objects filled with liquids, such as vases, should not be placed on this apparatus.
►► This apparatus must be earthed.
►► Use a three wire grounding type line cord like the one supplied with the product.
►► Be advised that different operating voltages require the use of different types of line cord and attachment plugs.
►► Check the voltage in your area and use the correct type.
Voltage |
Line plug according to standard |
|
|
110 to 125 V |
UL817 and CSA C22.2 no 42. |
220 to 230 V |
CEE 7 page VII, SR section 107- |
|
2-D1 / IEC 83 page C4. |
►► This equipment should be installed near the socket outlet and disconnection of the device should be easily accessible.
►► To completely disconnect from AC mains, disconnect the power supply cord from the AC receptacle.
►► The mains plug of the power supply shall remain readily operable.
►► Do not install this device in a confined space. ►► For use at an altitude of 2000 m or lower.
►► Do not open the unit – risk of electric shock inside.
Safety information
3

EMC / EMI
Electromagnetic compatibility /
Electromagnetic interference
This equipment has been tested and found to comply with the limits for a Class B digital device, pursuant to part 15 of the FCC rules.
These limits are designed to provide reasonable protection against harmful interference in residential installations. This equipment generates, uses and can radiate radio frequency energy and, if not installed and used in accordance with the instructions, may cause harmful interference to radio communications. However, there is no guarantee that interference will not occur in a particular installation.
If this equipment does cause harmful interference to radio or television reception, which can be determined by turning the equipment off and on, the user is encouraged to try to correct the interference by one or more of the following measures:
►► Reorient or relocate the receiving antenna. ►► Increase the separation between the equip-
ment and receiver.
►► Connect the equipment into an outlet on a circuit different from that to which the receiver is connected.
►► Consult the dealer or an experienced radio / TV technician for help.
VL3X – Reference manual (updated 2015-05-12)
For customers in Canada
This Class B digital apparatus complies with Canadian ICES-003.
Cet appareil numérique de la classe B est conforme à la norme NMB-003 du Canada.
Safety information
4

Explanation of graphic symbols
The lightning bolt triangle is used to alert the user to the presence of uninsulated “dangerous voltages” within the unit’s chassis that may be of sufficient magnitude to constitute a risk of electric shock to humans.
The exclamation point triangle is used to alert the user to presence of important operating and service instructions in the literature accompanying the product.
VL3X – Reference manual (updated 2015-05-12)
Safety information
5

Before you begin
Before you begin
VL3X – Reference manual (updated 2015-05-12) |
6 |

About this manual
This reference manual will help you learn understanding and operating your VL3X.
You can download the most current version of this reference manual from:
tc-helicon.com/support/manuals/
To get the most from this reference manual, please read it from start to finish, or you may miss important information.
VL3X – Reference manual (updated 2015-05-12)
Before you begin
7
Getting support
If you still have questions about the product after reading this reference manual, please get in touch with TC-Helicon Support:
tc-helicon.com/support/product/
VL3X – Reference manual (updated 2015-05-12)
Before you begin
8

VoiceSupport
VoiceSupport is the application that allows you to fully unlock the potential of your TC-Helicon product and stay in touch with the latest news, tips and tricks.
VoiceSupport key features include:
►► Professionally authored preset libraries ►► Direct access to product manuals
►► Drag & drop Preset management
►► Customizable content about your products ►► Firmware upgrades
►► Account management
►► Access to TC-Helicon support
You can download VoiceSupport for Microsoft Windows and Mac OS X from:
tc-helicon.com/products/voicesupport/
VL3X – Reference manual (updated 2015-05-12)
Before you begin
9

Please register your VL3X
To register your VL3X using the VoiceSupport software, launch VoiceSupport and click on the ACCOUNT button.
You can also go to
account.tc-helicon.com
Registration of your product is NOT required to use VoiceSupport, download presets, update firmware or contact support.
VL3X – Reference manual (updated 2015-05-12)
Before you begin
10

Introduction
Introduction
VL3X – Reference manual (updated 2015-05-12) |
11 |

Introduction
Welcome!
Thank you for purchasing VoiceLive 3 Extreme – or as we affectionately call it: VL3X.
Like the original VoiceLive 3, VL3X brings you a wide array of vocal and guitar effects, plus a great multi-track looper.
But, you bought the Extreme – so what’s NEW?
In a word… well, four words: Backing Tracks and
Automation.
See “Backing Tracks” and “Backing Track Sequence Recording (Automation)”.
As you discovered in the Quick Start Guide (the short manual that came in the box), VL3X is easy to use at the top level but offers unprecedented depth in both control and editing. We recommend you treat your VL3X like any other new instrument and dedicate some time to learning how to use it.
Yes, that means RTFM!
Read the… full manual.
VL3X – Reference manual (updated 2015-05-12) |
12 |

Introduction
Concepts
Before we dive into the countless features of VL3X, let’s establish some basic terms and concepts.
VL3X – Reference manual (updated 2015-05-12)
Layers & footswitch mapping
VL3X is built on the fundamental concept of “layers”. From a design perspective, there are thee Layers to work with:
►► Vocal ►► Guitar
►► Looping / Backing Track
You may switch between Layers using the Layer footswitch, which we will discuss in more detail later in the manual.
Essentially, when you tap the Layer footswitch, the effects associated with the six effect footswitches (labeled µMod, Delay, Reverb, HIT, Double/Comp, Harmony/Drive) will change from vocal effects to guitar effects or looping/backing track controls.
You can even remap footswitches within a Layer or from one Layer to another. This approach solves one of the most common requests from
our massively popular VoiceLive 2 unit: “I love it – but I want the ‘X’ footswitch to be where the ‘Y’ footswitch is”.
We also recognize that Layers and remappable footswitches can be a bit daunting to learn. This is why we have designed the system to be consistent and straightforward. Once you have learned how to remap one footswitch, you know how to remap them all.
13
Introduction
Global Effects
Another common request from TC-Helicon users has been for “global effects”. VL3X allows you to define a specific Preset as the “Global” Preset. This defines all of the effects and parameters within that Preset and allows them to be easily applied to other Presets.
What does that mean for you? Easier, quicker Preset creation and access to consistent sounds!
Here is an example:
“I want to use this great reverb on a whole bunch of Presets. How do I do that?”
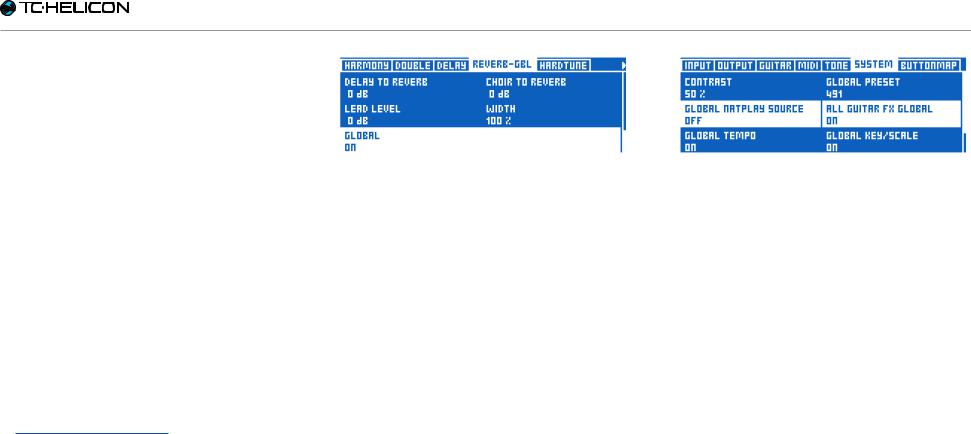
►► First, edit the guitar reverb on your Global Preset (by default, this is Preset no. 491). Editing guitar settings is explained in greater detail in “Editing the Guitar Layer”.
►► Then go to each Preset where you would like to use the same Reverb, go to the Reverb settings and change the Global parameter to “On”.
Done! This Preset will now use the Reverb settings from the Global Preset.
VL3X – Reference manual (updated 2015-05-12)
Setting Global to on links an effect to the settings defined in the Global Preset
Global effects are available for each and every effect in the Vocal and Guitar Layers. There are endless possibilities for Global effects handling, but here are a couple we think you might like:
Use the same guitar effects across all Presets
This essentially turns VL3X’s Guitar Layer into a series of stomp-boxes that you only need to set up once.
“How do I do that?”
►► Simply edit ANY Preset until all of the guitar effects and footswitch assignments are how you like them.
►► Enter the Setup menu and navigate to the System tab using the horizontal Arrow buttons.
►► Dial the Control knob until the line saying “All Guitar FX Global: Off” is highlighted.
►► Turn Mix knob 3 or Mix knob 4 under the display until “Off” changes to “On”.
Done! Every Preset will now have the same guitar sounds.
Set All Guitar FX Global to “On” to use the same guitar effect in all Presets
Make sure a particular effect always sounds the same
Want a certain Delay available in every Preset? No problem.
►► Just edit the Global Preset’s Delay setting. ►► Go to each Preset where you would like to use
the same Delay, go to the Delay settings and change the Global parameter to “On”.
Always use the same guitar amp model, but have everything else change
►► Easy! Adjust the Global Preset’s Amp setting the way you want it.
►► Go to each Preset where you would like to use the same Amp, go to the Amp settings and change the Global parameter to “On”.
Updating Global settings
The Global system is “opt in”. This means each Preset carries its own individual settings until you change an effect to Global. Once that happens, the current Preset and Global Preset settings become shared.
Once you have changed an effect to Global ON, any edits you make within that Pre-
14
Introduction
set affect the Global settings as well. This means you don’t have to bounce back and forth between the Global and current Preset to make changes to Global effects.
It also means that you need to be aware of the above, so you don’t accidentally edit a Global setting, thinking you are only editing the current Preset. With great power comes great responsibility!
For more information, see “Defining and using Global Effects”.
VL3X – Reference manual (updated 2015-05-12)
Multi-track looper
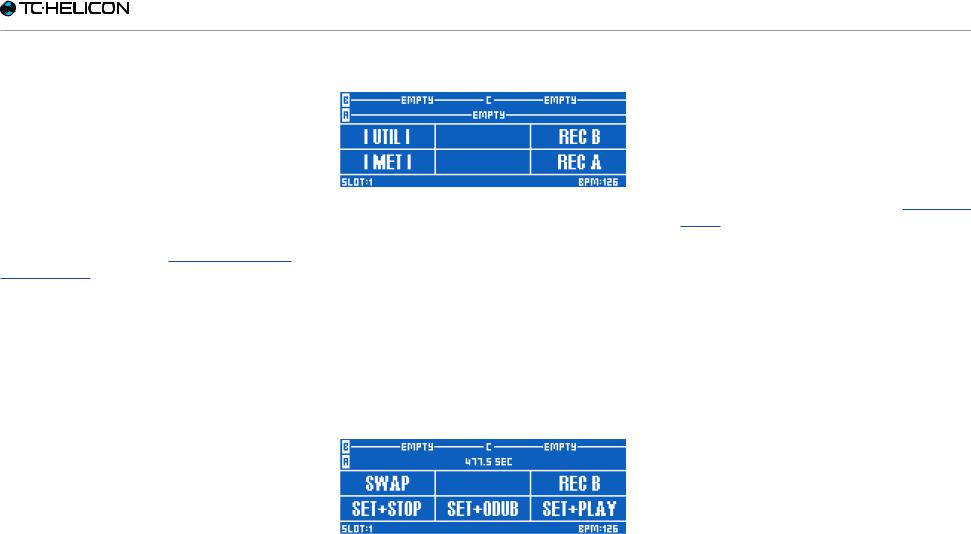
Looper – Main view
Having access to multiple, independent loops allows for a lot of flexibility and functionality when looping. Our multi-track looper has some really amazing performance features that will help you to make great loops.
The Swap feature allows you to record two loops and alternate between them with the push of a footswitch. This is particularly useful for recording different “sections” of a song, (like a verse and chorus) and quickly moving between them.
Looper – Swap feature
Loop length no longer matters. In some loopers, your longest loop track will dictate the length of all others, which can be a big hassle. Imagine a “beat box” style rhythm that is 1 bar long and a guitar progression that is 8 bars long. In the past, you would have to record 8 bars of the “beat
box” segment in order for there to be “enough” to play your guitar part over. Now, you can record unequal length phrases!
Record your 1 bar “beat box” on one loop Track, then record your 8 bar guitar section on another.
There are a few different Sync modes in the Looper – so be sure to read the “The Utility menu” to familiarize yourself with the way they affect your loops.
15
Introduction
Store loops
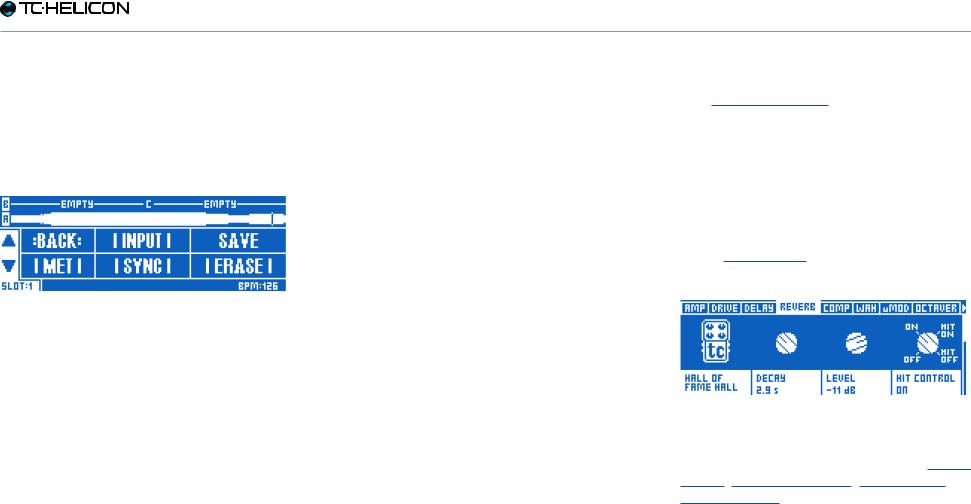
Those of you who have jumped on board with looping have likely made a really, really good loop in the past – only to see it vanish into thin air when you power off the device. VL3X allows you to store your creations right in the box!
Loop Utility menu with Save function
Not only can you store your loops – you can assign a stored loop to a Preset. This, in our opinion, is a game changer.
Imagine recording a really cool ambient loop, synced to the tempo of your song, while you are at home – and then fire it off at your gig. If the band is using a click track, everything will line up perfectly with what you are playing, including all of your time-based vocal and guitar effects!
This storage ability removes a lot of the repetitive nature of building loops live in front of an audience. Sure, it’s neat the first time you see someone build a loop live, but then it gets a bit boring. It often takes a while to get all of the “bits” of the loop recorded. You can do that work in advance and then add to things in real-time during performance.
VL3X – Reference manual (updated 2015-05-12)
Backing Tracks and Automation
VL3X’s killer new feature is its ability to import Backing Tracks, assign them to a Preset and then record your effect changes throughout the song. When you hit the stage, your carefully designed performance can be presented to your audience, keeping your eyes up and feet free to better deliver a compelling performance.
No more “tap dancing” on the effects buttons. No more external track player. Just a great performance where you can concentrate on what you do best, playing music.
Complete guitar effects
With VoiceLive Play GTX, we introduced our first “complete” guitar effects suite. Previously, we had provided Chorus, Reverb, EQ and Compression blocks. VoiceLive Play GTX added Amp/ Distortion and Delay to the options, greatly expanding the sound possibilities for guitar players.
VL3X takes that ball and runs with it. In fact, it pulls a Forrest Gump and runs straight out of the stadium and across the country!
Guitar effects in VL3X
The guitar effects in VL3X come from some of TC Electronic’s most successful effects, like Corona Chorus, Hall of Fame Reverb, Vortex Flanger and Flashback Delay!
When you couple those beautiful effects with great amp modeling, Drive/Boost, Compression, Rhythm/Tremolo, Wah-wah and Octave Down, you can truly manipulate your guitar and vocal sounds as a cohesive unit.
Imagine your time-based vocal and guitar effects being perfectly in sync, without having to set up complex timing systems or tapping tempo on multiple devices. Everything just lines up!
16

Advanced monitoring
More and more people are jumping into the In Ear Monitor (IEM) pool. It’s a great thing to do – but it can often require a fairly complex setup. VL3X offers two features that make custom monitor mixing really easy for you.
Monitor IN
Using the Monitor IN XLR connection, you can bring a “monitor or cue” mix into your VL3X, blending it with your own vocal, guitar and loop sounds. The incoming monitor IN does not get passed back out of the unit – so you can rest assured that it won’t cause feedback.
Headphone Mix
VL3X’s headphone mix is independent of the output mix – allowing you to hear “what you want” in your headphones or IEMs, without affecting what comes from the main outputs.
Headphone Mix
This monitoring capability can literally eliminate the need for expensive belt packs, transmitters, secondary mixers and other gear required for a custom IEM solution. Using our included Guitar/ Headphone cable, you only use one cable to connect your guitar and headphones/IEM’s to the unit!
VL3X – Reference manual (updated 2015-05-12)
Introduction
17
Introduction
Top panel overview
Click or tap on an interface element to jump directly to its description.
 Record Audio
Record Sequence |
Push for Favorite |
VL3X – Reference manual (updated 2015-05-12) |
18 |

Introduction
Below is a brief description of the top panel controls and buttons. Full functionality for each will be described in more detail later.
Genre button
Use the Genre button to find
Presets based on their musical genre or featured effects.
For example, you may want to
restrict the Presets “visible” to you in VL3X to those that are defined as “Rock” or “Country” in nature.
Use the knob right under the genre indicator to select the desired Genre (e.g. “Rock”), and press the Genre button again. When browsing Presets, you will only see Presets assigned to this Genre, and the name of the selected Genre will be shown in the lower left corner of the display.
To remove the filter, tap the Genre button, set Genre to “All” and tap the Genre button again
Setup button
Press the Setup button to access all system setup settings, including Input, Output, MIDI, Tone, Guitar and more.
For more information, see “Setup”.
VL3X – Reference manual (updated 2015-05-12)
Press and hold the Setup button to enter the automated microphone and guitar gain setting mode.
Store button
Use the Store button to store Presets. Tap once to activate the store procedure. Tap again to confirm. For more information, see “Storing Presets”.
Home button
Use the Home button to return
to the “top level” interface. The screen will show the number of
the current Preset and any ef-
fects associated with the current Layer.
Control knob
Use the Control knob to move through Presets and scrolls up/ down when in an edit screen.
When the “Home” screen is
shown, you can press the Control knob to add or remove the current Preset from the Favorite genre. For more information, see “Using Favorites”.
Vocal button
Use the Vocal button to enter the Vocal edit screens. This is where you can make changes to the vocal effects for the current Preset.
For more information, see “Editing the Vocal Layer”.
Guitar button
Use the Guitar button to enter the Guitar edit screens. This is where you can make changes to any of the guitar effects for the current Preset.
For more information, see “Editing the Guitar Layer”.
Looper button
Use the Looper button to enter the Loop and Backing Tracks options screen. Here you can control several general Loop options.
When you’re in the Vocal or Guitar layer and have a Loop playing, the small red LED next to the Looper button will flash. This gives a visual indication that a loop is running.
19
For more information, see “Loop button parameters”.
Mix knobs
From the Home screen, turning any mix knob enters the Mix screens (Main, Headphones and Effects).
For more information on the Mix screens, see “Using the Mix Controls”.
Within an Edit page, the mix knobs adjust parameter settings. Each mix knob controls the parameter shown right above it in the display.
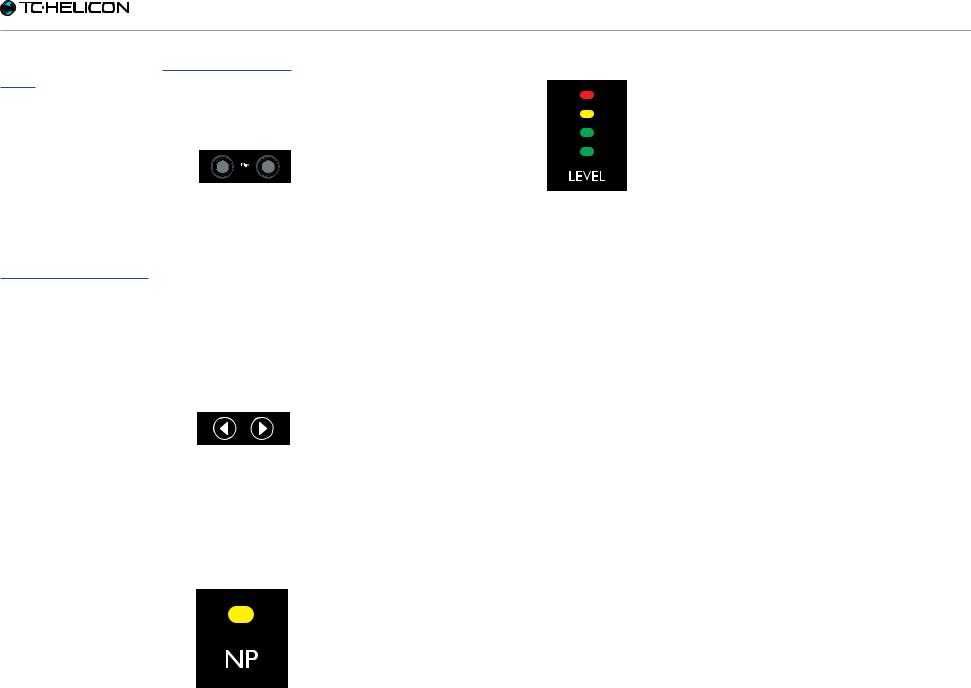
Arrow buttons
When you are on the Home screen, you can use the Arrow buttons to move through Presets.
When you are on an Edit screen, use the Arrow buttons to move between tabs.
NP LED
The NP LED lights when NaturalPlay (chord) information is received via Guitar, MIDI, Aux, Looper or RoomSense.
VL3X – Reference manual (updated 2015-05-12)
Level LEDs
Read the level LEDs as follows:
►► If you play your guitar without singing, the LEDs show your guitar level.
►► If you sing and don’t play guitar, the LEDs show your
vocal level.
►► If you play and sing, the LEDs show a combined level.
Introduction
20

Introduction
Footswitches overview
Click or tap on an interface element to jump directly to its description.
VL3X – Reference manual (updated 2015-05-12) |
21 |
Introduction
Below is a description of the footswitches on VL3X. Some switches will be discussed in more detail later in the manual.
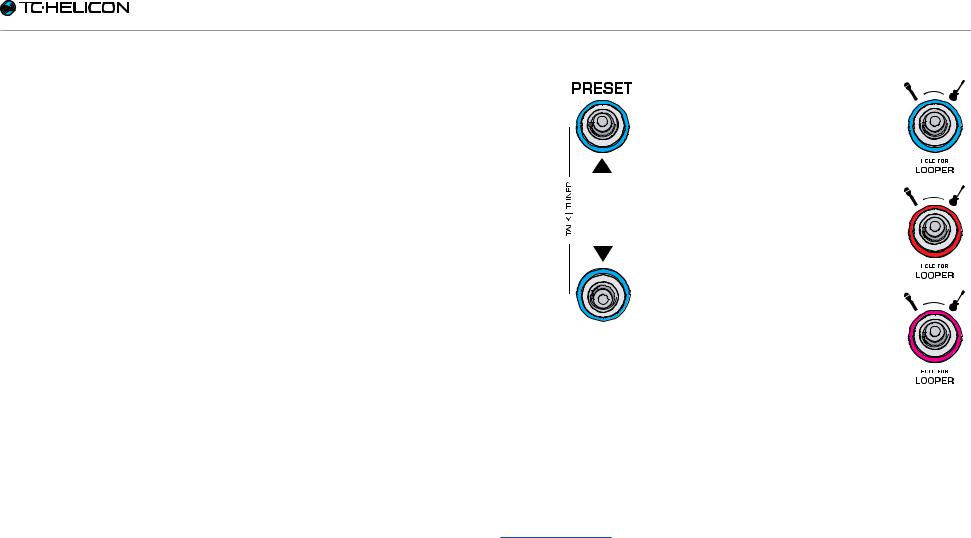
Preset up / Preset down footswitches
►► Tap the Preset Up/Preset Down footswitches to move through Presets.
►► Hold the Preset Up/Preset Down footswitches to quickly scroll through Presets.
►► Tap both footswitches simultaneously to enter Talk/Tuner mode.
About Talk/Tuner mode
Talk/Tuner mode mutes guitar output, activates the guitar tuner and bypasses all vocal effects so you can speak to your audience.
You can still tap the Preset Up and Down Preset buttons while in Talk/Tuner mode to change presets. This is great for changing presets while addressing the audience to queue sounds for your next song.
To exit Talk/Tuner, press any button other than Preset Up or Preset Down.
For more information, see “Talk/Tuner Mode”.
Layer footswitch
To switch between the Vocal and Guitar effects layers, tap the Layer footswitch.
►► Vocal Layer active: Layer footswitch LED lights blue.
►► Guitar Layer active: Layer footswitch LED lights red.
To access the Loop Layer, hold the Layer footswitch.
►► Loop/Backing Track Layer active: Layer footswitch LED lights purple.
To return from the Loop or Backing Track Layer to the previously active Layer (Vocal or Guitar), hold the Layer footswitch.
VL3X – Reference manual (updated 2015-05-12) |
22 |
Introduction
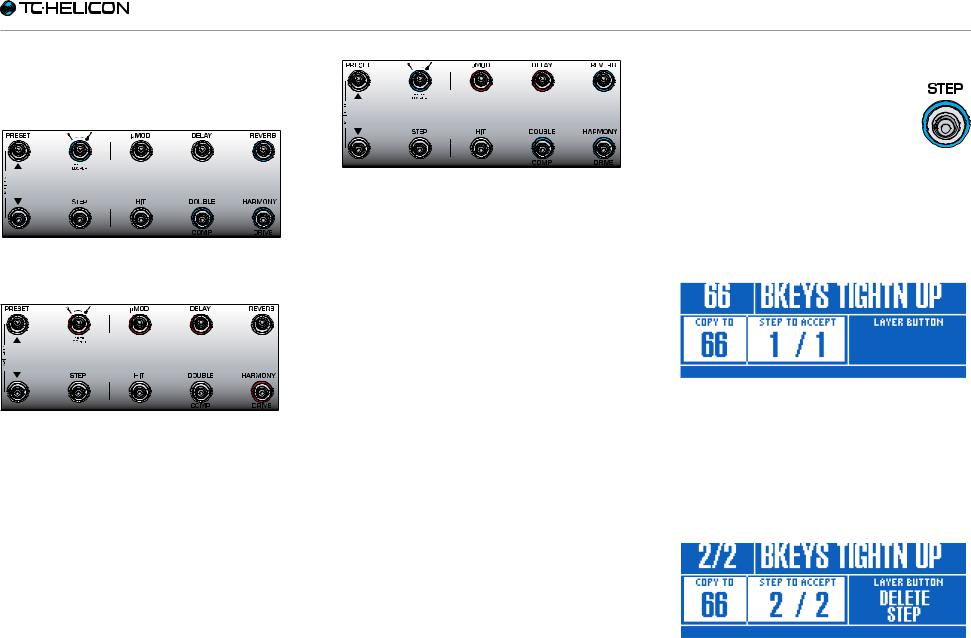
Here are a couple of examples showing how the effects footswitches might look when each Layer is active:
Vocal Layer with Reverb, Double and Harmony activated.
Guitar Layer with µMod (let’s say it’s Flanger for this example), Delay and Drive activated. If you were previously on the Vocal Layer, you would tap the Layer footswitch to move to the Guitar Layer, changing the footswitch LED color from blue to red.
Vocal Layer with some guitar effects remapped to vocal effect footswitches. You may find that you would like to “hang out” on a particular Layer (Vocal or Guitar) and have access to a key effect or effects from another Layer. Remapping footswitches allows you do to just that. This is best referred to as a “mixed Layer”. This is a more advanced operational mode that we will cover later.
VL3X – Reference manual (updated 2015-05-12)
Step footswitch
►► To move to the next Step within the current Preset (e.g. from 1 to 2), tap the Step footswitch. Not all Presets have Steps.
►► To move to the previous Step in the current Preset (e.g. from 2 to 1), tap the Preset Down footswitch.
►► To enter the Step management screen, hold the Step footswitch.
Step management
Step management
You can use the current Preset or a different Preset as a Step.
If you are using the current Preset, make sure that it sounds the way you want it to before you enter Step management.
Adding a Step to a Preset
23
Introduction
If it is a different Preset, enter Step management and then use the Preset Up and Preset Down footswitches to locate the Preset you would like to add as a Step.
Adding a different Preset as a Step
►► To accept changes, tap the Step footswitch. ►► To delete the current step, tap the Layer
footswitch.
►► To cancel, press the Home button.
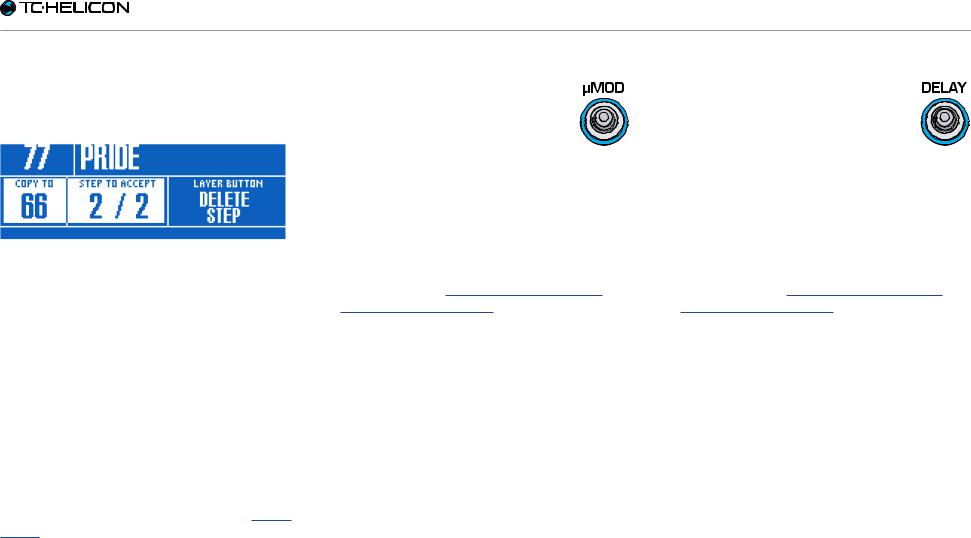
The Step footswitch can be globally reassigned to several different functions – such as Tap Tempo, HIT, Set Key, any Vocal or Guitar effect and more. We have found that remapping Step to enter/leave the Looper can be incredibly useful in performance, when you need quick access in and out.
For more information about Steps, see “Using Steps”.
µMod footswitch
Tap the µMod footswitch to turn the micro-modulation (µMod) effect on or off.
The µMod block encompasses effects such as Chorus, Flange, Detune and Rotor.
This effect can be configured and used separately for the Vocal and Guitar layer. For more information, see “Editing the Vocal Layer” and “Editing the Guitar Layer”.
Delay footswitch
Tap the Delay footswitch to turn the Delay effect (also known as echo) on or off.
The Delay block encompasses effects such as ¼ Note, Multi-Tap and Ping Pong.
This effect can be configured and used separately for the Vocal and Guitar layer. For more information, see “Editing the Vocal Layer” and “Editing the Guitar Layer”.
Tempo tapping
►► To access tempo tapping, hold the Delay footswitch.
►► Tap the footswitch in time with your song. A few taps are enough.
►► When you are happy with the tempo, stop tapping.
VL3X – Reference manual (updated 2015-05-12) |
24 |

Introduction
Reverb footswitch |
HIT footswitch |
Double/Comp footswitch |
Tap the Reverb footswitch to turn the Reverb effect on or off.
Tap the HIT footswitch to activate or deactivate HIT. HIT can control:
On the Vocal Layer, tap the Double/ Comp footswitch to turn the Double effect on or off.
The Reverb block encompasses ef- |
►► Vocal HIT (blue) |
|
|
|
|
||||||
fects such as Hall, Club, Room and Plate. |
►► Guitar HIT (red) |
Double encompasses effects such |
|||||||||
|
|
|
|
►► All HIT (purple) |
as 1 Voice Tight, 2 Voices Wide and 4 Voices |
||||||
This effect can be configured and used sepa- |
|
|
|
|
Wide. |
||||||
rately for the Vocal and Guitar layer. For more |
HIT is covered in greater detail in “Using the HIT |
|
|
|
|
||||||
information, see “Editing the Vocal Layer” and |
footswitch”. |
|
|
For more information, see “Double effect |
|||||||
|
|
|
|
|
|
|
|
|
|
|
|
“Editing the Guitar Layer”. |
|
|
|
|
block/tab”. |
||||||
|
|
|
|
|
|
|
|
|
|
|
|
|
|
|
|
|
|
|
|
On the Guitar Layer, tap the Double/Comp |
|||
|
|
|
|
|
|
|
|
footswitch to turn the Compressor on or off. |
|||
|
|
|
|
|
|
|
|
For more information, see “Comp(ression) effect |
|||
|
|
|
|
|
|
|
|
block/tab”. |
|
||
|
|
|
|
|
|
|
|
|
|
|
|
VL3X – Reference manual (updated 2015-05-12) |
25 |

Introduction
Harmony/Drive footswitch
On the Vocal Layer, tap the Harmony/Drive footswitch to turn the Harmony effect on or off.
Harmony encompasses effects
such as High (3rd up), Low (4th below) and Low & Lower (4th below and 6th below).
For more information, see “Harmony effect block/tab”.
On the Guitar Layer, tap the Harmony/Drive footswitch to turn the Drive effect on or off.
Drive encompasses effects such as Boost, Boost & Drive and Drive.
For more information, see “Drive effect block/tab”.
VL3X – Reference manual (updated 2015-05-12) |
26 |

Introduction
Back panel inputs and outputs
VL3X offers extremely robust input and output routing. Using the Monitor IN/THRU and dedicated Guitar outputs effectively, you can greatly reduce the amount of gear you need to take to a performance.
VL3X – Reference manual (updated 2015-05-12) |
27 |
Loading...