


USER’S MANUAL
Ver. 1.5

WARNING
To reduce the risk of fire or electric shock, do not expose this appliance to rain or moisture.
CAUTION
This equipment has been tested and found to comply with the limits for a Class B digital device pursuant to Part 15 of FCC Rules. Operation is subject to the following two conditions: (1) This device may not cause harmful interference, and (2) this device must accept any interference received, including interference that may cause undesired operation.
The lightning symbol within a triangle means, “Electrical caution!” It indicates the presence of information about operating voltage and potential risks of electrical shock.
The exclamation point within a triangle means, “Caution!” Please read the information next to all caution signs.

Table of Contents: Basics Section
Introduction . . . . . . . . . . . . . . . . . . . . . . . . . . . . . . . 7
Front Panel . . . . . . . . . . . . . . . . . . . . . . . . . . . . . . . .9
Back Panel . . . . . . . . . . . . . . . . . . . . . . . . . . . . . . .12
Quick Start . . . . . . . . . . . . . . . . . . . . . . . . . . . . . . .14
Overview . . . . . . . . . . . . . . . . . . . . . . . . . . . . . . . . .14
Step 1: Pre-Flight Check . . . . . . . . . . . . . . . . . . . . .14
Step 2: Inputs . . . . . . . . . . . . . . . . . . . . . . . . . . . . . .15
Step 3: Outputs . . . . . . . . . . . . . . . . . . . . . . . . . . . .16
Step 4: Set Mic Level . . . . . . . . . . . . . . . . . . . . . . . .17
Step 5: Quick Start Settings . . . . . . . . . . . . . . . . . . .17
First Impressions . . . . . . . . . . . . . . . . . . . . . . . . . .18
How To Audition Presets . . . . . . . . . . . . . . . . . . . . .18
Finding Presets With The Wizard . . . . . . . . . . . . . .18
Using Harmony Presets . . . . . . . . . . . . . . . . . . . . . .18
Using The Effect On/Off Switches . . . . . . . . . . . . . .19
The SHORTCUT Footswitch . . . . . . . . . . . . . . . . . .19
The STEP Footswitch . . . . . . . . . . . . . . . . . . . . . . .20
Programming Your Own Steps . . . . . . . . . . . . . . . . .20
Tone, Pitch And Guitar FX Buttons . . . . . . . . . . . . .21
Activating Bypass + Tuner Mode . . . . . . . . . . . . . . .22
Changing The Mix . . . . . . . . . . . . . . . . . . . . . . . . . .22
Basic Editing Concepts . . . . . . . . . . . . . . . . . . . . . .23
VoiceLive 2 for the Guitarist/Singer . . . . . . . . . . |
24 |
Overview . . . . . . . . . . . . . . . . . . . . . . . . . . . . . . . . .24
Acoustic Guitar . . . . . . . . . . . . . . . . . . . . . . . . . . . . .24
Electric Guitar . . . . . . . . . . . . . . . . . . . . . . . . . . . . . .25
Tuning Your Guitar . . . . . . . . . . . . . . . . . . . . . . . . . .25
Guitar Performance Tips . . . . . . . . . . . . . . . . . . . . .25
TC Helicon Vocal Technologies Ltd. |
Manual revision: 1.5 |
Prod. No: E60509411 |
support@tc-helicon.com |
|
English Version |

Table of Contents: Basics Section
VoiceLive 2 for the MIDI keyboardist/Singer . . . .26
Overview . . . . . . . . . . . . . . . . . . . . . . . . . . . . . . . . .26 MIDI Hookup And Channel Selection . . . . . . . . . . .26
MIDI IN And USB . . . . . . . . . . . . . . . . . . . . . . . . . . .26
MIDI Controlled Harmony . . . . . . . . . . . . . . . . . . . .26
MIDI Performance Tips . . . . . . . . . . . . . . . . . . . . . .27
Alternate Harmony Method . . . . . . . . . . . . . . . . . . .27
VoiceLive 2 for the Lead Singer . . . . . . . . . . . . . .28
Overview . . . . . . . . . . . . . . . . . . . . . . . . . . . . . . . . .28
Using A Fixed Key (aka “Scale”) . . . . . . . . . . . . . . .28
Singing To Music Playback . . . . . . . . . . . . . . . . . . .29
“Borrowing” From Another Player . . . . . . . . . . . . . .30
General Usage Tips . . . . . . . . . . . . . . . . . . . . . . . .31
Connecting VoiceLive 2 To A Computer . . . . . . .32
The USB Connection . . . . . . . . . . . . . . . . . . . . . . . .32
The VoiceSupport Application . . . . . . . . . . . . . . . . .32
VoiceLive 2 And Digital Audio . . . . . . . . . . . . . . . . .33
USB Audio And ASIO Applications . . . . . . . . . . . . .35
Selecting The Audio Device . . . . . . . . . . . . . . . . . . .35
USB and MIDI Control . . . . . . . . . . . . . . . . . . . . . . .35
4

Table of Contents: Details Section
The Tone Button . . . . . . . . . . . . . . . . . . . . . . . . . . .38
The Tone Tab . . . . . . . . . . . . . . . . . . . . . . . . . . . . . .38
The Adaptive Check Boxes . . . . . . . . . . . . . . . . . . .39
The Shape Control . . . . . . . . . . . . . . . . . . . . . . . . . .39
The Compress Control . . . . . . . . . . . . . . . . . . . . . . .40
The De-Ess Control . . . . . . . . . . . . . . . . . . . . . . . . .41
The Gate Control . . . . . . . . . . . . . . . . . . . . . . . . . . .42
The EQ Tab With Adaptive On . . . . . . . . . . . . . . . . .42
The EQ Tab With Adaptive Off . . . . . . . . . . . . . . . . .43
The Compress Tab With Adaptive On . . . . . . . . . . .45
The Compress Tab With Adaptive Off . . . . . . . . . . .45
The Gate Tab . . . . . . . . . . . . . . . . . . . . . . . . . . . . . .46
The Pitch Button . . . . . . . . . . . . . . . . . . . . . . . . . .48
The Guitar FX Button . . . . . . . . . . . . . . . . . . . . . . .49
The Guitar FX Tab . . . . . . . . . . . . . . . . . . . . . . . . . .49
The EQ Tab . . . . . . . . . . . . . . . . . . . . . . . . . . . . . . .51
The Compress Tab . . . . . . . . . . . . . . . . . . . . . . . . . .52
The Edit Menu Overview . . . . . . . . . . . . . . . . . . . .53
The μMod Tab . . . . . . . . . . . . . . . . . . . . . . . . . . . . .54
The Delay Tab . . . . . . . . . . . . . . . . . . . . . . . . . . . . .57
The Reverb Tab . . . . . . . . . . . . . . . . . . . . . . . . . . . .60
The Harmony Tab . . . . . . . . . . . . . . . . . . . . . . . . . .63
The Double Tab . . . . . . . . . . . . . . . . . . . . . . . . . . . .72
The FX Tab . . . . . . . . . . . . . . . . . . . . . . . . . . . . . . .74
The Rhythmic Tab . . . . . . . . . . . . . . . . . . . . . . . . . .79
The Preset Tab . . . . . . . . . . . . . . . . . . . . . . . . . . . . .82
The Setup Menu . . . . . . . . . . . . . . . . . . . . . . . . . . |
83 |
I/O Tab . . . . . . . . . . . . . . . . . . . . . . . . . . . . . . . . . . .83
The MIDI Tab . . . . . . . . . . . . . . . . . . . . . . . . . . . . . .86
5

Table of Contents: Details Section
The System Tab . . . . . . . . . . . . . . . . . . . . . . . . . . . .88
The Expression Tab . . . . . . . . . . . . . . . . . . . . . . . . .89
The VLoop Tab . . . . . . . . . . . . . . . . . . . . . . . . . . . . .91
The Store Menu . . . . . . . . . . . . . . . . . . . . . . . . . . .93
FAQ and Troubleshooting . . . . . . . . . . . . . . . . . . .94
MIDI Implementation . . . . . . . . . . . . . . . . . . . . . . .98
Factory Preset List . . . . . . . . . . . . . . . . . . . . . . . .101
Effects Path Diagram . . . . . . . . . . . . . . . . . . . . . .103
Warranty . . . . . . . . . . . . . . . . . . . . . . . . . . . . . . . .104
Specifications . . . . . . . . . . . . . . . . . . . . . . . . . . . .105
6

Introduction
Welcome to VoiceLive 2
Thank you for stepping into the evolution of what it means to be a singer. VoiceLive 2 was conceived and engineered during a time in history when singers took control of their vocal sound with the advent of vocal effects pedals and rack mount units. The significance for you, the singer using VoiceLive 2, is being able to benefit from a wave of innovation that makes production of your vocal sound effortless and creative.
We encourage you to give a quick scan of the Quick Start and First Impressions section.You likely don't need much help getting started with VoiceLive 2, but these sections can help you get the most from VoiceLive 2 and your voice.
Features:
o Stompbox access to six effect blocks o Easy editing of all parameters
o Simple effect chaining with Step feature
o Control harmonies with guitar, MIDI or MP3 input o Up to 8 voices of new NaturalPlay harmonies
o New reverb, delay, μMod, and double
o FX block for HardTune, megaphone, distortion o Global tone, correction, and guitar effects
o Digital mic-gain control is engaged by your feet o USB for updates, back-ups and audio streaming
7

Introduction
About TC-Helicon
At TC-Helicon we truly believe that the voice is the world's most beautiful instrument. We don't mean to degrade other beautiful instruments, but the singing voice is the anthropological source for all things melodic.
You should know there is a dedicated group of engineers, researchers and product specialists based in Victoria BC, Canada, who spend every waking moment of their working lives listening, talking, singing, and interacting with singers and those who have passion for the singing voice.
All this knowledge and experience is used to design products respecting and empowering the modern vocalist. Our products focus on removing barriers and inspiring creativity in performance. That's why our products range from near-field personal vocal monitors to floor-based vocal multi-effects pedals.
Enjoy!
The TC-Helicon Team
About This Manual
You’ve no doubt noticed that the Table of Contents has two sections: the Basics section and the Details section. This manual is divided into sections so that users who prefer to get right into using the product can do so quickly with a minimum of detailed text. Users who want to learn the detailed operation of every parameter can use the Details section.
Product Firmware Version
Feature descriptions in this manual represent VoiceLive 2 firmware version 1.2 and newer. Product version is temporarily visible when the product is powered on.You can check for the latest firmware version by running the VoiceSupport application and checking the items in its HOME tab.
8

Front Panel
|
1 |
|
2 |
|
|
|
|
|
|
3 |
|
4 |
5 |
6 |
7 |
8 |
9 |
11 |
12 |
13 |
14 |
10
15 |
16 |
17 |
18 |
9

Front Panel
1.GLOBAL GROUP - When activated, these three effects stay on independent of preset changes. Press any to activate or hold to enter a specific edit menu. TONE applies EQ, compression and more to improve the core sound of your voice. PITCH adds subtle, chromatic pitch correction to help you sing more in tune. Press GUITAR FX to add modulation and reverb effects to the guitar connected to the GUITAR IN jack. The GUITAR THRU jack must be empty for GUITAR FX to be heard.
2.HOME - Press this to return to the main performing mode from SETUP, WIZARD, STORE or EDIT modes.
3.MAIN DISPLAY - All text and graphics feedback is shown here.The Contrast adjustment is in the SYSTEM tab of the SETUP menu.
4.SETUP - Press this to access the I/O, MIDI, SYSTEM and EXPRESSION pedal edit tabs.
5.WIZARD - This helps you find presets on the basis of factory-assigned tags or to sort alphabetically by name.
6.STORE - Press to enter a menu to name, assign a
destination and commit edited presets to memory. To cancel and exit, press HOME.
7.EDIT - Press to enter EDIT menu and make changes to the μMOD, DELAY etc effects parameters via their tabbed menus. HOME exits EDIT mode.
8.MIX / EDIT - When HOME is lit, turning any of these will temporarily present the MIX screen allowing control of the relative levels of the VOICES (harmony and doubling), DELAY/REVERB, GUITAR and OUTPUT level. In EDIT mode, these controls adjust the highlighted parameters immediately above them.
9.NAVIGATE CONTROLS - The Data Wheel scrolls through presets when HOME is lit or through editing rows when EDIT is lit. The left and right arrow buttons increment presets up and down respectively when HOME is lit or through edit tabs when EDIT is lit.
10.PRESET UP/DOWN - The UP arrow advances through presets and the DOWN arrow reverses. Holding either will accelerate in its direction.
10
Front Panel
11.SHORTCUT - Press to access the effect extension that is listed in the MAIN DISPLAY under SHORTCUT. This can include TEMPO,HARMONY HOLD and more.
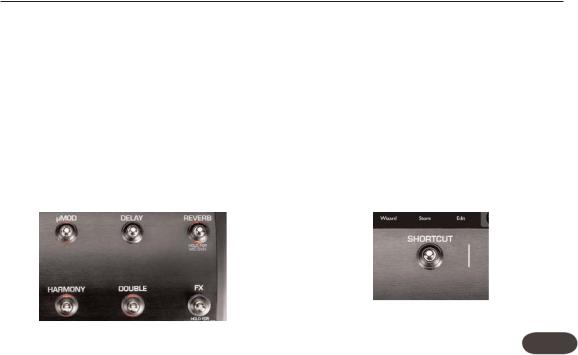
12.μMOD ON/OFF - Press to enable or disable modulation effects including chorus, flange, detune, tube resonance and more.
13.DELAY ON/OFF - Press to enable or disable timed echo, tempo-based echo, slapback effects and more. Hold to enter a temporary tap tempo setting mode then tap at the tempo of your song.
14.REVERB ON/OFF - Press to enable or disable reverberation effects such as Hall, Room, Plate and Ambience. Hold to access MIC GAIN setting.
15.STEP - When the COUNT legend in the MAIN DISPLAY shows a number greater than one, tapping this will advance to the next step in the chain. Holding STEP enters the STEP programming menu.
16.HARMONY ON/OFF - Tap to add or mute the Harmony voices created by your voice and VoiceLive 2.
Hold this footswitch to enter a temporary key setting mode then tap the Preset Up/Down, Shortcut and Step footswitches to set a fixed key and scale. See Using A Fixed Key in VoiceLive 2 for the Lead Singer section for more detail on using fixed key to guide harmonies.
17.DOUBLE ON/OFF - Adds or mutes the Doubling voices assigned to the current preset. The Doubling voices are constrained to unison intervals only.
18.FX ON/OFFPress to add the serial effects of Transducer (megaphones, distortion, hi-pass etc.) and /or Hard Tune including scale-based Pitch Correction. Each preset may be set to enable either or both effects. Holding the FX footswitch enters BYPASS + TUNER mode which mutes all effects except TONE and allows silent guitar tuning.
11

Back Panel
2 |
|
|
1 |
4 |
5 |
3 |
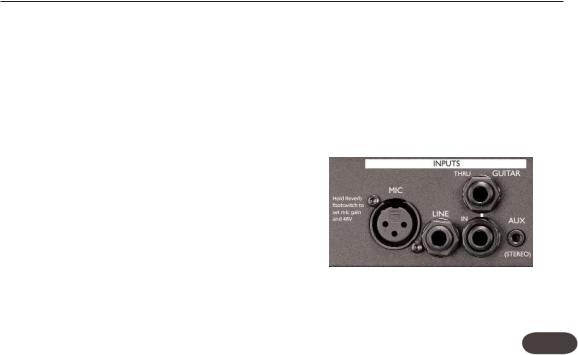
1.MIC and LINE inputs - Connect your microphone or line level audio device’s output here. Only one should be connected at a time. Hold the REVERB footswitch to set gain when changing back and forth between MIC and LINE ins.
2.GUITAR IN and THRU - Connect a guitar to the GUITAR IN to guide harmony and mix the guitar signal into the main output. Connect the THRU to your guitar amp and remove the guitar from the main mix output.
3.AUX In - An audio signal received here can be mixed into the main output or used to control harmony.
6 |
7 |
8 |
9 |
10 |
11 |
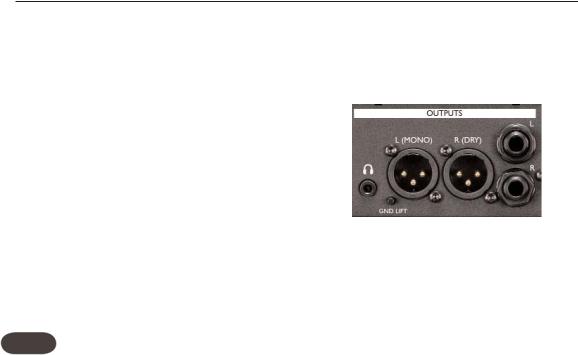
4.HEADPHONE Out - The main output is mirrored here to drive headphones. Adjust the headphone and main output volume with the OUTPUT setting controlled by turning the MIX knobs.
5.OUTPUTS - The XLR and TRS (1/4”) produce the same balanced audio output. Both can be used simultaneously if required. Mono/Stereo configuration is found in the I/O tab of the SETUP menu.
6.DIGITAL IN/OUT - The S/PDIF-formatted DIGITAL OUT is always active. Selecting this DIGITAL IN instead
12

Back Panel
of the USB digital input is done in the I/O tab of the SETUP menu.
7.PEDAL Input - A standard expression pedal can be connected here to control the level of the Harmony and Doubling voices. Calibration is done in the EXPRESSION tab of the SETUP menu.
8.MIDI Connectors - A computer or controller keyboard connected to the MIDI IN offers preset control, realtime parameter control, and guidance of the harmony voices. MIDI IN and OUT can also be used as an alternative to the USB connection for backup and restore operations.
9.USB I/O - USB is a standard computer connection allowing transfer of digital audio to and from VoiceLive 2 as well as for MIDI control and MIDI preset backup. Configuration of the digital audio and MIDI settings is done in the SETUP menu.
10.POWER In - Connect only the supplied adaptor or one with the exact specifications shown on the back of VoiceLive 2.
11.POWER Switch - Press to turn VoiceLive 2 on and
off.
13

Quick Start
Overview:
This chapter will help you get set up in the typical live performance setting with a microphone. You will learn how to connect external devices and how to set the microphone gain properly. At the end you will be ready to move on to experimenting with the vocal effects in the First Impressions chapter.
In this section we cover:
1.Initial connections
2.Setting microphone gain
See the section on Basic Editing Concepts for more information on VoiceLive 2’s tabbed, style-based edit menus.
Step 1: Pre-Flight Check
Assemble the gear you need to get started. For now, leave your VoiceLive 2 and PA system turned off.
1.Vocal microphone
2.PA system or headphones
3.Harmony control instrument.This can be a Guitar, MIDI keyboard, external audio source such as an MP3 player or none if you plan to enter Key and Scale with the footswitches.
4.You will need a selection of cables listed below depending on your harmony control instrument and monitoring.
o XLR cable for your microphone o 1/4” cable from your guitar
o MIDI cable from your keyboard o 1/8” mini from an MP3 player
o XLR or 1/4” cables to feed your PA system
14
Quick Start
Step 2: Inputs
First, connect the XLR cable from your microphone to the MIC input jack on VoiceLive 2.
Next, connect the instrument or device you will use to control harmony. On power-up, VoiceLive 2 will automatically configure all harmony presets to recognize which instrument is connected. Only one of the following should be connected for this Quick Start.
oGuitar. Connect the 1/4” cable directly from your guitar (no pedals between the guitar and VoiceLive 2) to the input jack labelled GUITAR IN. If you want your guitar to go through pedals and an amp, connect another 1/4” cable from the GUITAR THRU to either your first effect pedal or your amplifier.
oMIDI keyboard. Connect a MIDI cable to VoiceLive 2’s MIDI IN from your keyboard’s MIDI OUT. Set your keyboard’s MIDI OUT channel to channel #1 if it is not already.
oMP3 player (AUX Input). Connect the output of an MP3 player or another music source to the AUX input using a stereo 1/8” connector.
If you do not connect an instrument to the GUITAR IN, MIDI IN or AUX input, most of the harmony presets in VoiceLive 2 will default to global Scale mode in the Key of A Major (for this, see the section entitled VoiceLive 2 for the Lead Singer)
15
Quick Start
Step 3: Outputs
The typical setup for monitoring the output of VoiceLive 2 is to connect two 1/4” cables to a stereo channel in a PA mixer. VoiceLive 2 can be set to output in mono if preferred in the I/O tab of the SETUP menu.
If you are using a snake to connect to an offstage mixer, then the XLR outputs can be connected without the need for DI boxes. The output of the XLR jacks is the same as the 1/4” jacks: line level (maximum +16 dBu). Both the XLR and TRS output jacks can be used at the same time when required.
If you prefer to monitor with headphones, the output labelled with the headphones graphic will drive most headphone types that are equipped with an 1/8” jack.
Now you can connect the power adaptor and press the POWER switch to turn on the unit. NOTE: keep your PA level off until you set the mic gain level in Step 4.
16

Quick Start
Step 4: Set Mic Level
This step informs VoiceLive 2 how loud you plan to sing with your particular mic. We’ll use VoiceLive 2’s automatic MIC GAIN feature to quickly set the optimum level.
1.Press and hold the REVERB footswitch
2.If you need to activate phantom power for your condenser mic, adjust the onscreen PHANTOM parameter which will restart the level test
2.Sing for five seconds with peaks that are as loud as you plan to sing
3.Follow the prompts in the display to finalize mic level setting, cancel or redo the procedure
During performance, if you see the CLIP indicator light in the HOME screen, you can return to the automatic MIC GAIN feature to adjust the input level.
Step 5: Quick Start Settings
Ensure that the HOME and TONE buttons on the front panel are lit. Load preset #1 with the PRESET up or down footswitches. Ensure that the FX footswitch is not flashing. Tap it once if it is flashing to exit Bypass/Tuner mode.
Sing as you carefully raise your PA level or put on your headphones. You should now hear your voice clearly with Preset #1’s effects added. If you would like to adjust the headphones level, turn the furthest right Mix/Edit knob to adjust the OUTPUT level.
Now you’re ready for the next chapter: First Impressions. There you’ll learn how to explore the presets in VoiceLive 2.
17

First Impressions
How To Audition Presets
The best way to sample VoiceLive 2’s effects is to start with preset #1, sing, and then tap the PRESET up footswitch to audition the next preset. These factory presets contain collections of settings that affect your voice in different ways.
Holding PRESET up or down will automatically cycle in that direction. When working close to the unit, you can also use the DATA WHEEL to cycle through presets.
Finding Presets With The Wizard
Press the WIZARD button to search for presets by “Tags” which are preset attributes. Choosing a single tag will result in a broad search; adding successive tags (up to 3 total) will narrow your search. When you edit and store presets, you can assign tags yourself to assist in searching later.
The Wizard can also list the presets in alphabetical order when you change the Sort setting.
Using Harmony Presets
Most presets that have the HARMONY footswitch lit require that you play your guitar, keyboard or music source (AUX input) to arrange the harmony intervals musically around your voice.There are, however, presets where the HARMONY footswitch can be lit but that do not require musical input from you such as when the harmony intervals are unisons, octaves or fixed shifts used to create doubling and special effects.
If you want to audition presets without a music source, simply press the HARMONY footswitch to mute this effect each time you load a new preset.
You can read more about using harmony in the following sections:
o VoiceLive 2 for the Guitarist/Singer
o VoiceLive 2 for the MIDI Keyboardist/Singer o VoiceLive 2 for the Lead Singer
18
First Impressions
Using The Effect On/Off Switches
The Effect On/Off footswitches give you the option to modify the sound without changing to another preset. You can do so by tapping any of the 6 effects footswitches which include μMOD (pronounced “micromod”), DELAY, REVERB, HARMONY, DOUBLE AND FX.
Tapping an effect that’s off will add it to the effects mix and vice versa. All effects have default settings so you can merely press their associated footswitches to add them to your preset without editing.When you advance to the next preset, your on/off settings will be lost unless stored.
The SHORTCUT Footswitch
This footswitch extends the capabilities of the current preset. Depending on the preset, it could allow you to engage Harmony Hold, set the tempo for the Delay or turn on the Choir effect.The shortcut assignment for the current preset is clearly shown in the HOME screen.
Some shortcuts require holding the footswitch (e.g. Harmony Hold) and some require tapping it (e.g. Delay tempo). Every preset has a shortcut, so be sure to familiarize yourself with them all while exploring the product.
19

First Impressions
The STEP Footswitch
The Step feature allows you to create a series of up to 10 linked effect changes associated with a preset. In a preset that has steps, for example, tapping STEP could toggle to another preset’s effects, turn on all of the effects at once, increase the Delay level by 6 dB or all of the above.
Some factory presets have been programmed with examples of steps. You can see that a preset has steps when the COUNT (graphic) item in the HOME screen is a number greater than 1. When you see this, you can press the STEP footswitch to cycle through the preprogrammed effect changes.
The STEP footswitch cycles forward through any steps present. The PRESET (down arrow) cycles backwards towards step 1 after which it will cycle backwards through presets again. When the Step count is 2, the STEP footswitch can be used toggle between the two settings.
Programming Your Own Steps
1.Select a preset as the starting effect in your chain.
2.Hold STEP for a moment to enter Step programming mode. Segments of the main display will change color.
3.To insert another preset’s effect as the next step, use the PRESET footswitches to locate the desired preset.
4.If you want to change which effect blocks are on press the desired effect footswitches.
5.If you want to make an edit, press the EDIT button and make your changes. Edits made in Step insert mode before accepting are stored automatically to the new step.
6.Tap STEP to accept your new step and exit Step programming mode.The COUNT legend in the main display will increment by one and the STEP footswitch will light.
To cancel and exit Step programming mode, hold STEP.
20
First Impressions
To delete any single step, locate the step you want to remove then enter Step programming mode. Tap SHORTCUT to delete the current step.
To speed Step programming, all insertions and deletions are automatically stored when you exit Step mode. If you want to experiment without affecting an important Step chain, you can either store the preset to another location first (Steps are stored with presets) and work there or perform a backup before experimenting and restore when done.
The Tone, Pitch and Guitar FX Buttons
These three buttons apply live engineer features that are “global” in that they affect all presets.
The TONE button makes your voice sound smoother and brighter by applying studio-grade adaptive compression, EQ, de-ess and gating.We recommend that the TONE button be turned on and left active to improve your overall vocal tone.
Press the PITCH button to add subtle Auto Chromatic pitch correction which helps you sing more in tune.
If you have a guitar connected to the GUITAR IN jack, pressing the GUITAR FX button will apply effects to your guitar sound that will be heard through VoiceLive 2’s main outputs. The guitar effects and dry signal will be muted if a jack is connected to the GUITAR THRU jack.
Press and hold any of these buttons to access their menus and make global changes.
21
First Impressions
Activating BYPASS + TUNER Mode
Press and hold the FX footswitch to remove all effects from your voice except TONE (when active). The Tone feature remains active in BYPASS + TUNER (Bypass) so your voice does not sound darker when switching to Bypass for speaking or singing with no effects.
If you have a guitar connected to the GUITAR IN, its output will be muted in Bypass and the Tuner display will become active so you can tune silently.
Tap the FX or any other footswitch to exit Bypass mode and return to the previous display screen.
Changing The Mix
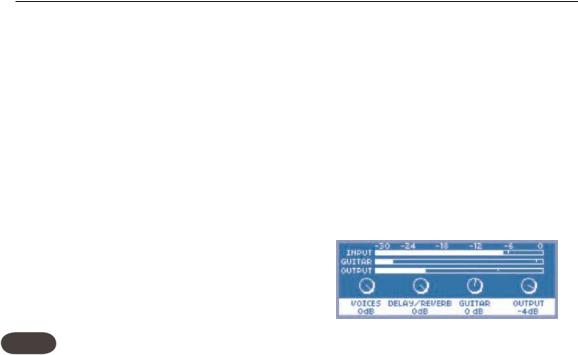
The effects balance in VoiceLive 2 is adjusted at the factory to suit many situations. The Mix/Edit knobs change the levels of :
o the combined Harmony and Doubling voices, o the combined Delay and Reverb effects
oyour guitar and its Guitar FX (as long as GUITAR THRU jack is unused)
o the overall output level
NOTE: These adjustments are “global” meaning they affect all presets by the same amount.
With the HOME button lit, turn any of the 4 MIX knobs. This will present the MIX screen where you can see and adjust these levels. After approximately 3 seconds the display will revert back to the HOME screen. Your new balance will remain in effect each time you power up the unit until they are changed again.
If you want to adjust the level of a music source connected to the AUX IN, you can do so with the AUX LEVEL setting in the SETUP menu under the I/O tab.
22

First Impressions
Basic Editing Concepts
When you want to go beyond turning effects on and off to make changes in your preset, press the Edit button to explore VoiceLive 2’s editing tabs. Each of the effect footswitches has a related tab you can access with the NAVIGATE left and right arrow buttons. Holding the left or right NAVIGATE buttons will jump between the uMOD and PRESET tabs.
If you make changes you want to keep, presets can be edited and stored in place or to another location. Individual factory presets can be restored at any time from the STORE menu.
Once in the Edit screens, you can cycle up and down to browse the rows of parameters by turning the DATA WHEEL. The settings are arranged left to right so that they can be accessed by the Mix/Edit knob immediately below each parameter.Turn the knobs to make changes.
The first row of each tab contains the Style for that effect. Styles speed editing by collecting a group of parameter values together. If you like the sound of a
particular preset but you want a shorter reverb, for example, changing the Reverb style is the quickest way to accomplish this.
You can also vary the level of each effect in the edit tabs. All effect blocks except for FX (Transducer and Hard Correct are always100% wet) and Rhthmic can be adjusted.
To store your edits press the STORE button. This will show the preset naming and destination preset number display. Press STORE again to save. If you want to cancel, press the HOME button and then load any other preset.
To store from a standing position, hold PRESET down arrow and STEP together. The LCD will show “STORING” briefly and your edit is stored.
23

VoiceLive 2 for the Guitarist/Singer
Overview
Guitarists have bonus features in VoiceLive 2. In addition to sensing the guitar chords to guide harmony,VoiceLive 2 offers the guitarist:
oEffects, including compression, EQ, modulation and reverb dedicated to the guitar
o Guitar mix to main outputs o Chromatic Tuner
By this section we assume you have completed the Quick Start and have your voice set to a comfortable level in your PA or headphones.
Acoustic Guitar
If you haven’t by now, connect a cable from your pickupequipped acoustic guitar to the GUITAR IN as described in the Quick Start. You should now hear your guitar sound mixed with your voice.
To adjust the balance of guitar and voice, ensure the HOME button is lit then turn the third Mix/Edit knob.
This will present the MIX screen so you can adjust the level of your guitar.
Press the GUITAR FX button if it is not already lit. This will add the default effects to your guitar.The Guitar FX on/off status and style is static through preset changes.
Now you can sample the harmony-based presets with harmonies closely related to your guitar playing. You should now hear nicely produced lead vocal, harmony vocals and guitar from your PA system or headphones.
Electric Guitar
Connect a cable from your electric guitar to the GUITAR IN. Connect another cable from the GUITAR THRU to your first guitar effects pedal or to your amp. Set your guitar amp volume to a level compatible with your vocals.
By connecting a jack to the GUITAR THRU, the guitar signal is removed from the internal mixer and effects paths in VoiceLive 2.
24

VoiceLive 2 for the Guitarist/Singer
If you hear a buzz from either your guitar amplifier or the PA VoiceLive 2 is connected to, press the GND LIFT (ground lift) button to silence it.
Now you can sample the harmony-based presets with the harmonies musically related to your guitar playing.
Tuning Your Guitar
The Bypass + Tuner function works for both acoustic and electric guitars.The tuner is a chromatic type so you can use alternate tunings as well as standard tuning.
To activate the tuner, hold the FX button.This will:
o Change the main display to show the tuning meter o Mute the guitar in both the OUTPUTs and THRU o Remove all effects on the voice except TONE.
Tap the FX footswitch to exit Bypass + Tuner mode.
Guitar Performance Tips
To ensure that the harmony voices follow your guitar closely, it’s best to play cleanly with chords containing at
least two notes. If you want to sing right at the start of a song, it’s important to briefly play a chord first. A recognized chord will show “NP” in the LCD display.
Your guitar should be well-tuned to the onboard tuner.
If the song section you want vocal harmony on has fast chord changes, single note runs or very slow arpeggios, you can use presets based on a fixed Key to produce harmony.To find out more about this see Using A Fixed Key (aka “Scale”) section in the chapter entitled VoiceLive 2 for the Lead Singer.
Setting Fixed Key and Scale With Guitar
If you wish to try using this type of harmony it’s easy. Find a preset with the SHORTCUT set to SET KEY. Tap the SHORTCUT button when the root of the chord you’re playing is the Key you want. You can change the Scale type with the STEP footswitch if you like. To accept this Key and Scale, just keep playing - the menu will time out automatically. If the preset SHORTCUT is not assigned to SET KEY, you can hold the HARMONY footswitch in any preset to enter the same menu.
25

VoiceLive 2 for the MIDI Keyboardist/Singer
Overview
Using MIDI opens up a wide range of harmony and parameter control options. This section will discuss the basics of setting MIDI channel and performing with a MIDI keyboard/synth to control harmony.
By this section we assume you have completed the Quick Start and have your voice set to a comfortable level in your PA or headphones.
MIDI Hookup and Channel Selection
If you haven’t already, connect a MIDI cable between your keyboard’s MIDI out and VoiceLive 2’s MIDI IN. Play a note on your keyboard and check VoiceLive 2’s display to see if the MIDI indicator lights. If it doesn’t, set the MIDI transmit channel of your keyboard to 1 (VoiceLive 2’s default) or perform the following quick MIDI receive channel procedure.
Hold the PRESET up and SHORTCUT footswitches briefly to enter MIDI Setup. Press any note on your keyboard. This will automatically configure VoiceLive 2’s
MIDI receive channel to match your keyboard’s.Tap the SHORTCUT footswitch to exit.You should now see the word MIDI flash in the main display when you play your keyboard.You can also set MIDI channel manually in the MIDI tab of the SETUP menu.
MIDI IN and USB
To use the MIDI IN while you have a USB cable connected, press the SETUP button, locate the SYSTEM tab and turn the USB CONTROL setting to OFF. This will enable the MIDI IN. Alternatively, you may also remove the USB cable to access MIDI IN.
When you want to restore computer control of VoiceLive 2 over USB, or you want to access the VoiceSupport application’s features, you can turn the USB CONTROL parameter back to On.
MIDI Controlled Harmony
Now that you’ve followed the preceding section, you can sample the many presets that feature the harmony effect. Load a preset with the HARMONY footswitch lit
26

VoiceLive 2 for the MIDI Keyboardist/Singer
or tap it to engage harmony in any preset. Now you can play a song on your keyboard while singing and hear how the harmony voices adjust musically as you play the different chords in your song. As each chord is recognized, the LCD display will briefly show “NP” meaning NaturalPlay.
The factory presets that have the word “Notes” in their names use another form of harmony control called “MIDI Notes”.These presets allow you to tie the pitch of the harmony voices to the exact notes you play. The maximum number of notes can be 4 or 8 depending on whether Harmony Doubling is activated in the HARMONY tab of the EDIT menu.
MIDI Performance Tips
In chords without a clear third,VoiceLive 2 will assume a major chord, so when you play in a minor key, and as a general rule, you should always include a third when changing chords.
If you want to sing right at the beginning of your song, it’s important to play a chord just before you sing
If you sing while playing a chord and then press the sustain pedal, you’re able to add a keyboard embellishment that doesn’t affect the harmony.
By default, program change messages from your keyboard are ignored so you can change your keyboard sound without changing VoiceLive 2’s preset.
Your mod wheel can be used to add or remove vibrato in harmony presets.
Alternate Harmony Method
For some songs, fixed scale harmony (not controlled by an instrument) works well. To find out more about this see Using A Fixed Key (aka “Scale”) section in the chapter entitled VoiceLive 2 for the Lead Singer.
27

VoiceLive 2 for the Lead Singer
Overview
This section is for those who do not play an instrument such as a MIDI keyboard or guitar. You are still able to experience VoiceLive 2’s vocal harmony effects with these methods:
o Using fixed Key and Scale
o Singing to music-only playback
o “Borrowing” from another player’s instrument
By this section we assume you have completed the Quick Start and have your voice set to a comfortable level in your PA or headphones.
Using A Fixed Key (aka “Scale”)
This is the main method for creating harmony used successfully in the original VoiceLive processor. Briefly, all of the chords in an entire song and your melody can belong to a single “Key”. You can input this key in any harmony preset by holding the HARMONY footswitch or using the SET KEY shortcut if it’s assigned in the current harmony preset.
When the match of Key and song is correct, a fixed Key is nearly indistinguishable from recorded harmony.There are limitations however:
o Fixed Key works for many, but not all songs.
oFixed Key works best with 3rd harmony intervals; adding the 5th (interval: Higher) reduces the number of compatible songs.
You should be singing with musical backing and stay true to a A=440Hz reference. This could be a CD or other musicians. Choose a simple song to start with. Determine the Key of your song; this is often the first or
28

VoiceLive 2 for the Lead Singer
last chord in a song without extensions. For example G Major is a valid Key, Gm7b5 is not.
Hold the HARMONY footswitch to enter Key Set mode then use the PRESET up and down footswitches to enter the Key.The STEP footswitch will cycle through the 3 Major and 3 Minor alternate scales that can be chosen if your harmony intervals sound incorrect at certain chord/melody combinations.
Note that the Key you set is global so you can try other presets with your song without entering Key again.
If you’re lucky the first time, you’ll be rewarded with soaring harmony over your whole chorus or song. If not, you can try the following:
oTry a different Key, perhaps a 5th away from your first choice.
o Choose a different Major or Minor alternate Scale. o Choose a preset with only the 3rd (High) interval. o Create a Step to change Key at the right moments. o Move on to the next options listed.
Singing To Music Playback
VoiceLive 2 can derive musical information from fully mixed music tracks. For this alternative you’ll need:
oMusic source device.This could be an MP3 player, computer, CD player etc.
oRecorded music without vocals.This could be your latest CD tracks minus your vocals or Karaoke tracks available on the web
Connect as described for MP3 Player (AUX input) in the Quick Start section. When you power up VoiceLive 2, it will auto-recognize the AUX input as the harmony music source. Choose a harmony preset and play your music source. You should hear your music, voice and the harmonies in your PA system or headphones.
Use the volume control on your music source device to adjust the balance of music to vocals.You can also adjust the AUX level in the SETUP menu, in the I/O tab.
29

VoiceLive 2 for the Lead Singer
“Borrowing” From Another Player
If you play with a guitarist or MIDI keyboard player, you can use their playing to guide the harmony voices in your VoiceLive 2.
Your guitarist can connect to the GUITAR IN and THRU then to their pedalboard or amp.Their guitar sound will remain the same and you can turn the harmonies on and off when you need them.The only limitation is the length of cable because high impedance signals lose signal over long cable runs. If this is an issue, you could use a preamp out or effects loop output from the amp.
Alternatively, you can run a MIDI cable from your keyboardist’s controller to your VoiceLive 2. This has no effect on the keyboard sound and cable runs are not a problem.
With either solution, you can co-ordinate with the player to make sure they are playing complete chords where you plan to use harmony.
30
 Loading...