


 Loading...
PERFORM-VE
Revolutionary Vocal Manipulator with MIDI-Pitch-Controlled Sampling, Vocal Synth and One-Button Drum Looper
User Manual
Rev. 1.2
A50-XXXXX-XXXXX

2 PERFORM-VE User Manual
Table of Contents
Important Safety Instructions....................................... |
3 |
||
Legal Disclaimer.............................................................. |
3 |
||
Limited warranty............................................................ |
3 |
||
1. Introduction................................................................ |
4 |
||
2. |
Update your Device!.................................................. |
4 |
|
3. |
Connection Diagram.................................................. |
5 |
|
4. |
Front Panel.................................................................. |
6 |
|
|
4.1 The Set Button...................................................................... |
6 |
|
|
4.2 The Headphone Button.................................................... |
8 |
|
5. |
Effects.......................................................................... |
9 |
|
|
5.1 Double .................................................................................... |
9 |
|
|
5.2 |
Morph...................................................................................... |
9 |
|
5.3 |
HardTune ............................................................................. |
12 |
|
5.4 |
XFX.......................................................................................... |
13 |
|
5.5 |
Echo ...................................................................................... |
16 |
|
5.6 |
Filter....................................................................................... |
17 |
|
5.7 |
Tap (Tempo)......................................................................... |
18 |
6. |
Looper....................................................................... |
19 |
|
7. Sample....................................................................... |
22 |
||
8. |
Presets....................................................................... |
23 |
|
9. I/O Section................................................................. |
24 |
||
|
9.1 AUX Input............................................................................. |
24 |
|
|
9.2 |
Switch3/Switch6 (Pedal) In............................................. |
24 |
|
9.3 |
USB Audio............................................................................ |
24 |
|
9.4 |
RoomSense.......................................................................... |
25 |
Appendix A: Effect Quick Reference Chart................. |
26 |
||
Appendix B: MIDI Implementation............................. |
27 |
||
Appendix C: General..................................................... |
28 |
||
3 PERFORM-VE User Manual
Important Safety
Instructions
Terminals marked with this symbol carry electrical current of sufficient magnitude to constitute risk of electric shock.
Use only high-quality professional speaker cables with ¼" TS or twist-locking plugs pre-installed. All other installation or modification should be performed only by qualified personnel.
This symbol, wherever it appears,
alerts you to the presence of uninsulated dangerous voltage inside the
enclosure - voltage that may be sufficient to constitute a risk of shock.
This symbol, wherever it appears, alerts you to important operating and maintenance instructions in the
accompanying literature. Please read the manual.
Caution
To reduce the risk of electric shock, do not remove the top cover (or the rear section).
No user serviceable parts inside. Refer servicing to qualified personnel.
Caution
To reduce the risk of fire or electric shock, do not expose this appliance to rain and moisture. The apparatus shall not be exposed to dripping
or splashing liquids and no objects filled with liquids, such as vases, shall be placed on the apparatus.
Caution
These service instructions are for use by qualified service personnel only.
To reduce the risk of electric shock do not perform any servicing other than that contained in the operation instructions. Repairs have to be performed by qualified service personnel.
1.Read these instructions.
2.Keep these instructions.
3.Heed all warnings.
4.Follow all instructions.
5.Do not use this apparatus near water.
6.Clean only with dry cloth.
7.Do not block any ventilation openings. Install in accordance with the manufacturer’s instructions.
8.Do not install near any heat sources such as radiators, heat registers, stoves, or other apparatus (including amplifiers) that produce heat.
9.Do not defeat the safety purpose of the polarized or grounding-type plug. A polarized plug has two blades with one wider than the other. A grounding-type plug has two blades and a third grounding prong. The wide
blade or the third prong are provided for your safety. If the provided plug does not fit into your outlet, consult an electrician for replacement of the obsolete outlet.
10.Protect the power cord from being walked on or pinched particularly at plugs, convenience receptacles, and the point where they exit from the apparatus.
11.Use only attachments/accessories specified by
the manufacturer.
12. Use only with the cart, stand, tripod, bracket,
or table specified by the
manufacturer, or sold with the apparatus. When a cart is used, use caution when
moving the cart/apparatus combination to avoid
injury from tip-over.
13.Unplug this apparatus during lightning storms or when unused for long periods of time.
14.Refer all servicing to qualified service personnel. Servicing is required when the apparatus has been damaged in any way, such as power supply cord or plug is damaged, liquid has been spilled or objects have fallen into the apparatus, the apparatus has been exposed
to rain or moisture, does not operate normally, or has been dropped.
15.The apparatus shall be connected to a MAINS socket outlet with a protective earthing connection.
16.Where the MAINS plug or an appliance coupler is used as the disconnect device, the disconnect device shall remain readily operable.
17.Correct disposal of this product: This symbol indicates that this product must not be disposed of with household waste, according to the WEEE
Directive (2012/19/EU) and your national law. This product
should be taken to a collection center licensed for the recycling of waste electrical and electronic equipment (EEE). The mishandling of this type of waste could have a possible negative impact on the environment and human health due to potentially hazardous substances that are generally associated with EEE. At the same time, your cooperation in the correct disposal of this product will contribute to the efficient use of natural resources. For more information about where you can take your waste equipment for recycling, please contact your local city office, or your household waste collection service.
18.Do not install in a confined space, such as a book case or similar unit.
19.Do not place naked flame sources, such as lighted candles, on the apparatus.
20.Please keep the environmental aspects of battery disposal in mind. Batteries must be disposed-of at a battery collection point.
21.Use this apparatus in tropical and/or
moderate climates.
LEGAL DISCLAIMER
MUSIC Group accepts no liability for any loss which may be suffered by any person who relies either wholly or in part upon any description, photograph,
or statement contained herein. Technical specifications, appearances and other information are subject to change without notice. All trademarks are the property of their respective owners. MIDAS, KLARK TEKNIK, LAB GRUPPEN, LAKE, TANNOY, TURBOSOUND,
TC ELECTRONIC, TC HELICON, BEHRINGER and BUGERA are trademarks or registered trademarks of MUSIC Group IP Ltd. © MUSIC Group IP Ltd. 2017 All rights reserved.
LIMITED WARRANTY
For the applicable warranty terms and conditions and additional information regarding MUSIC Group’s
Limited Warranty, please see complete details online at music-group.com/warranty.

4PERFORM-VE User Manual
1.Introduction
Thank you for purchasing Perform-VE!
Your new mic stand-mounted vocal processor opens up a world of sound creation and performance opportunities.
Starting with our Adaptive Tone (automatic EQ, De-Essing, Gating and Compression), your voice will punch through the mix and sound great in any environment.
Next up, an impressive assortment of transformations await your voice: HardTune Pitch Correction, Doubling, Shift and Gender Morphing all work together to create whatever modern lead vocal sound you can dream up.
Perform-VE also generates MIDI Voices to accompany your Lead. MIDI Voices can be pitch-perfect vocal harmonies, virtual analog vocoder voices, or VS Synthesis samples that you record on the fly. Simply play notes on a connected MIDI controller keyboard and you can have up to eight of these MIDI voices singing along with your Lead.
You also get XFX for stutter, rhythmic, ring modulation and flanger effects, Echo for spacious reverbs + beat-synced delays, and Filter for a selection of transducer and sweepable filters. With all this at your command, you’ll quickly generate striking vocal effects and exciting, fresh sounds that will take your music to new levels.
But wait, there’s more!
Perform-VE also includes a Drum and Audio Looper. With several different kick, snare and hi-hat sounds available, you can easily build a beat and then record a synchronized audio loop from Perform-VE’s internal signal path. Just tap and vocalize.
Read the Quick Start!
If you’ve read the Quick Start Guide that came in the box, hooked up a microphone, and can hear your music and vocals coming through the outputs, you are already skimming the top features of Perform-VE. If you want to get into Perform-VE’s deeper capabilities with this reference manual, we’ll need to do a little more set up. Don’t worry – it won’t take long!
2. Update your Device!
It is HIGHLY recommended that you update the firmware on your Perform-VE before first use.
To update your firmware, you'll need both a USB driver
(PC only) and our VoiceSupport 2 program. Both can be found at tc-helicon.com/products/ perform-ve/support/
PC Users
1.Download both the USB driver and VoiceSupport 2
2.Install the USB driver (restart if prompted)
3.Install VoiceSupport 2 (restart if prompted)
4.Connect your Perform-VE to your computer with the supplied USB cable
5.Power up Perform-VE
6.Start VoiceSupport 2
7.Follow the prompts to update your firmware
Mac Users
You will not need the USB driver. Download VoiceSupport 2 and follow steps 3-7 above.
5PERFORM-VE User Manual
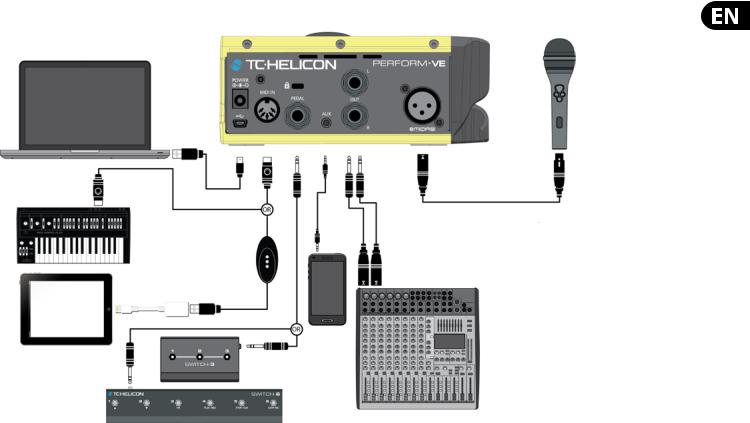
3.Connection Diagram
Perform-VE has a lot of connectivity:
• MIDI data is received via the mini-USB port or the 5-Pin MIDI socket.
• MIDI data is transmitted via the mini-USB port.
• The PEDAL input allows you to connect a Switch-3 or Switch-6 (sold separately) to change presets, toggle effects and control the LOOPER and SAMPLE features.
• The AUX input lets you mix stereo audio tracks with Perform-VE’s output.
• The balanced stereo outputs allow connection to any ¼" input equipped mixer or powered speaker system.
• The XLR input is MIDAS microphone preamplifier equipped, providing the much-loved MIDAS soft-clipping characteristic sound when pushed hard.
For learning purposes, we recommend that you connect a MIDI keyboard to your Perform-VE while you track along with this reference manual. Your MIDI keyboard will ideally be connected directly to Perform-VE’s 5-Pin MIDI port as shown above.
Alternatively, your MIDI keyboard can be connected via USB cable to a laptop running music software that features a MIDI soft THRU capability. You would then connect Perform-VE to the laptop via a second USB cable and configure your DAW to take incoming MIDI from the USB MIDI keyboard and pass it on to Perform-VE’s USB port. See your respective software manual for details on how to set up your particular system.
6PERFORM-VE User Manual
4.Front Panel
Now that your Perform-VE is set up and connected to the devices of your choosing, we’re going to take a quick tour of the front panel, explaining what each of the buttons do without getting too deep in any details just yet. Don’t worry – we’ll go feature diving soon enough!
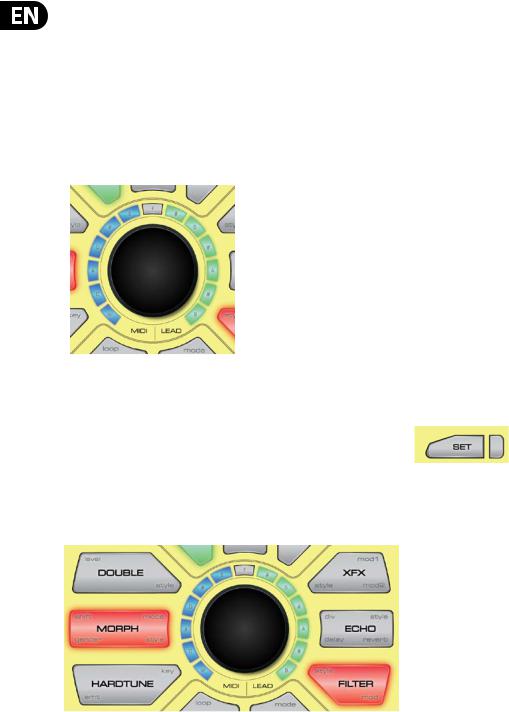
One Knob To Rule Them All
By default, Perform-VE’s Control Knob edits the mix between the MIDI Voices and your Lead Voice. It applies to all three presets and is not stored when Perform-VE is turned off.
LEAD Voice: Your voice. Enhanced and extremely altered, just how you want it!
MIDI Voices: Up to 8 MIDI Note controlled voices
generated by Perform-VE to accompany your LEAD Voice.
MIDI Voices are Harmony, Vocoder or
VS Synthesis Voices.
The graphic above shows equal levels of MIDI and LEAD as displayed on the LED Ring. From here you can dial down the blue MIDI level by turning the knob counter-clockwise, or dial down the green LEAD level by turning the knob
clockwise. Whichever level you turn down, the other one will stay at max volume.
Effects
Perform-VE makes some of the wildest and most complex sounds that TC-Helicon has ever made possible. There’s a lot to discover by simply pushing buttons and combining sounds, but we’ll give you an overview of the basics here, starting with the six effects buttons, as shown below:
Toggling the Effects
Quickly pressing and releasing any one of the FX buttons will toggle the associated effect on and off. The LED ring will switch to an alternate display mode while the button is down. There’s a reason for this momentary flash, and we’ll explain it now.
Real-time Control of Effect Parameters
Perform-VE was designed to allow instant access to 21 different effect parameters without navigating through menus.
Each effect button is labeled with light gray text in one or more corners of the button. For example, if you press “Level” in the top left corner of the Double button, and turn the Control Knob while it’s pressed, you’ll adjust the amount of
doubling. Alternatively, if you hold Style in the bottom right corner of the Double button, once that button pulses, you’ll be able to change the doubling style when you turn the Control Knob.
When a parameter edit is underway…
• The LED ring will display the currently selected parameter value,
• The Control Knob will edit this parameter, ranging (clockwise) from min to max, and
• The pressed FX button will pulse on and off. At this point you won’t need to keep holding it down to continue editing.
Pressing any button (including the button that is pulsing) will quit the edit mode.
Styles and Mods
In addition to parameters like Level, Shift, Gender, Mode, Key, Div, Delay and Reverb, you’ll see that four of the effects have a Style parameter. Styles are essentially mini-presets for the effect in question. Changing any style will instantly update a number of deeper effect parameters that are not available for direct Control Knob editing. Style selections appear on the LED Ring as single color-coded LEDs.
Mods are related to the currently selected Style. They appear as levels on the LED Ring, colored to match the Style. You can think of each mod as custom ‘Tweak’ parameter matched to the Style in question.
4.1 The Set Button
Configures: Microphone Input Level,
MIDI Channel Select,
MIDI Split Point Select,
& More…
Once a microphone and a MIDI keyboard are connected to your Perform-VE, it’s time to ensure that the audio and MIDI settings are correct. You achieve this with the SET button.
The SET button performs many functions in your Perform-VE. By itself, the SET button configures the mic input level and sets the MIDI channel and split-point used to control the notes, vocoder and sample features of your unit.
Mic Gain Setting
The actual signal level coming from your microphone can vary depending on what type of microphone you have connected and how loudly you vocalize (speak/sing/shout/shriek) into it. The Auto-Gain procedure is the easiest way to ensure the microphone preamplifier level set within your Perform-VE is calibrated to match your mic and vocal technique, but you have the freedom to set the Mic Gain level manually if you prefer.
Auto-Gain
Press and Hold the SET button to activate the Auto-Gain procedure and vocalize into the microphone at your typical loudest volume. After several seconds the SET button will flash red, indicating that the procedure is complete.
You will see that the LED to the right of the SET button changes color when you vocalize into the microphone.
7 PERFORM-VE User Manual
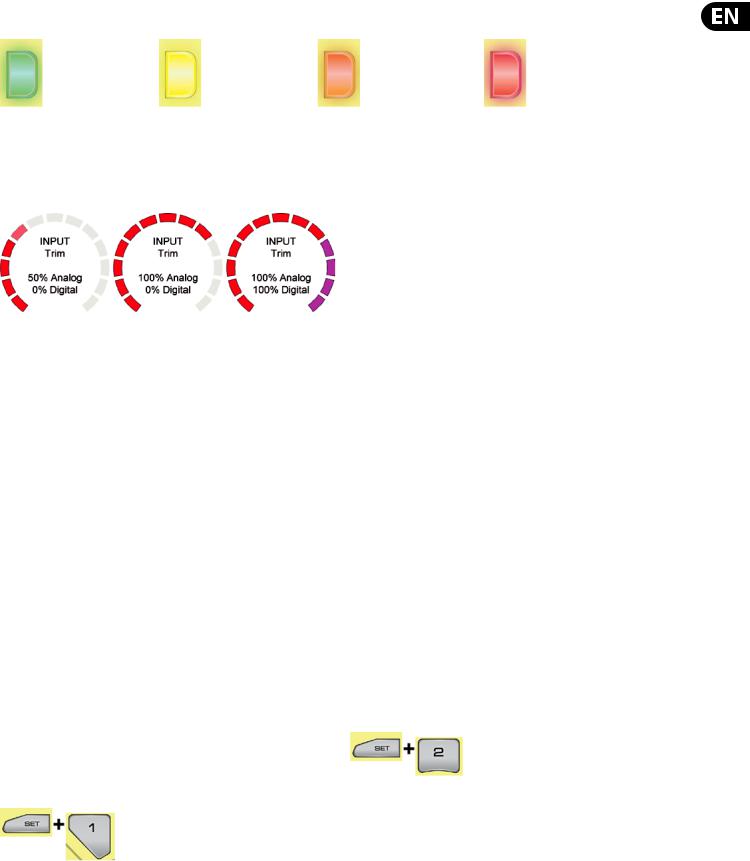
This LED is a VU Meter, with the following color codes:
Green |
Yellow |
Orange |
Red |
|
-4 dB … 0 dB |
||||
-23 dB … -13.5 dB |
-13.5 dB…-7.5 dB |
0 dB |
||
|
||||
Good Level |
Hot level, but still okay. |
Soft-clipping: |
Hard-clipping! |
|
Midas Tone. |
||||
|
|
|
If you find the Auto-Gain procedure set the input trim too low or high for your liking, you can always run Auto-Gain again or you can set the gain manually.
Manual Gain
Press and Release the SET button to edit the Manual Gain with the Control Knob.
The red LED segments indicate gain provided by Perform-VE’s analog microphone preamplifier circuit. When the mic pre is at maximum gain, further gain is possible via digital amplification (the remaining 4 magenta LED segments).
Once you stop editing with the Control Knob, the LED ring will return to the MIDI/ LEAD mix display after two seconds. You can then vocalize into your microphone and confirm the gain settings are correct for your application.
HINT: Red in VU meter LED is not a good thing as it means hard clipping and digital distortion! Reduce the microphone gain and try again if you see the VU LED turning red when you are vocalizing.
MIDI Channel
The MIDI channel that Perform-VE responds to is set if a MIDI note event is received while the SET button is held down.
To set the MIDI Channel (without a split point):
• Press and Hold the SET button,
• Play a single MIDI note on your controller,
• Release the SET button.
Don’t worry about having to repeat the Auto-Gain on the microphone – these steps will not overwrite your previous microphone level settings while the SET button is down, provided you a MIDI note is received while SET is held down.
When complete, you can verify Perform-VE is set to receive on the correct MIDI channel for your keyboard by playing notes and monitoring the SET button; the SET button will flash red whenever MIDI note events are received on the configured MIDI channel.
SET + Preset 1: Adaptive Tone
Holding down the SET button and pressing Preset 1 will toggle Adaptive Tone, with the VU meter LED as an indicator.
RED: Off GREEN: On
Tone automatically adds EQ (equalization), Compression, De-Ess and Gate to your overall vocal sound. Tone is enabled by default and we highly recommend leaving it on.
EQ helps to shape the tone of your voice to fit into a musical mix. We remove some of the low “mud” frequencies and boost the highs for “sparkle” or “air”. Every recording you hear has some manner of EQ on the lead vocal (and pretty much everything else too).
Compression reduces the difference in volume between the loudest and quietest notes. This gives you a more even sound that helps your vocal sit better in the local mix. It’s almost unheard of for vocals to go uncompressed in modern music, both recorded and live.
De-Ess gets rid of harsh “S” sounds and makes them sound more pleasing. De-Ess goes hand in hand with Compression, since Compression can make “S” sounds a bit more pronounced in the mix.
Gate “shuts off” an audio input when it falls below a certain volume. This works great on things like drums where you want the drum hit to come through, but then have the mic silent in between hits.
For vocals, we don’t want to go as far as shutting your mic off but we do want to reduce the volume (gain) of the mic when you’re not singing so that feedback becomes less likely.
Since Perform-VE replaces EQ and effects that are often added by a live sound technician, you’ll want to make sure that the mixer channel you plug Perform-VE into has a flat EQ (not altering any frequencies) and that any effects are
turned off.
SET + Preset 2: +48 V (Phantom Power)
Holding down the SET button and pressing Preset 2 will toggle phantom power (+48 V), with the VU meter LED as an indicator.
RED: Off GREEN: On
If you have a condenser mic, it’ll need power to function. Enable +48 V to use it with your Perform-VE.
If you’re not sure what kind of mic you have, but you don’t hear any sound, it’s ok to try +48 V - it won’t damage a dynamic microphone.
8 PERFORM-VE User Manual
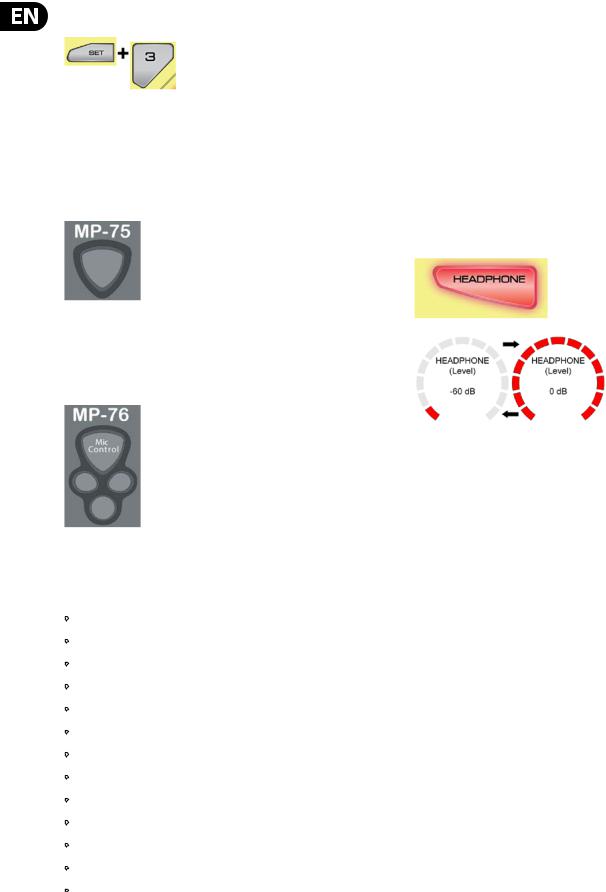
SET + Preset 3: Mic Control
Holding down the SET button and pressing Preset 3 repeatedly will cycle through Mic Control settings, with the VU meter LED showing which mode you’re in.
RED: Mic Control Off
Use this when you have a condenser microphone. If you have another Mic Control mode set, you may inadvertently activate buttons on the box as you sing.
GREEN: MP-75 Mode
On your TC-Helicon MP-75 Microphone, the single Mic Control button cycles the preset selection. You can reassign the Mic Control button by holding the
button and then pressing the corresponding button on Perform-VE that you’d like to control.
For example, if you hold the Mic Control then press the Reverb button, the MP-75 will now toggle Reverb on and off.
YELLOW: MP-76 Mode
In MP-76 mode, the Mic Control button cycles the preset selection as it does in MP-75 mode. The remaining three buttons default to toggle the following effects on your Perform-VE:
• Left toggles ECHO.
• Right toggles FILTER.
• Bottom toggles XFX.
NOTE: If you have a TC-Helicon MP-76 connected but choose MP-75 mode instead, the lower three buttons will not operate.
The MP-75 and MP-76 buttons can be reassigned to control the following:
• |
DOUBLE |
• |
MORPH |
• |
HARDTUNE |
• |
XFX |
• |
ECHO |
• |
FILTER |
• |
LOOPER Record/Play/Erase |
• |
SAMPLE record |
• |
SAMPLE play |
• |
Preset 1 |
• |
Preset 2 |
• |
Preset 3 |
• |
Tap Tempo |
SET + Double: MIDI SYSEX Dump Current Preset
Holding down the SET button and pressing the DOUBLE button outputs the sysex of the current active preset parameters.
SET + Tap
Holding down the SET button and pressing the Tap button toggles drum quantizing on and off.
SET + Kick: Erase Kick loop component SET + Snare: Erase Snare loop component
SET + Headphone: Erase Hi-hat loop component SET + Loop: Erase Audio loop component
4.2 The Headphone Button
When held down,
HEADPHONE Level adjusts the volume of the headphone jack.
Range: -60 to 0 dB
When the looper button is lit or pulsing, the headphone button plays the hi-hat. The loop needs to be erased to be able to adjust the headphone level.
Now that the basics are out of the way, let’s check out Perform-VE’s effects!
9 PERFORM-VE User Manual
5. Effects
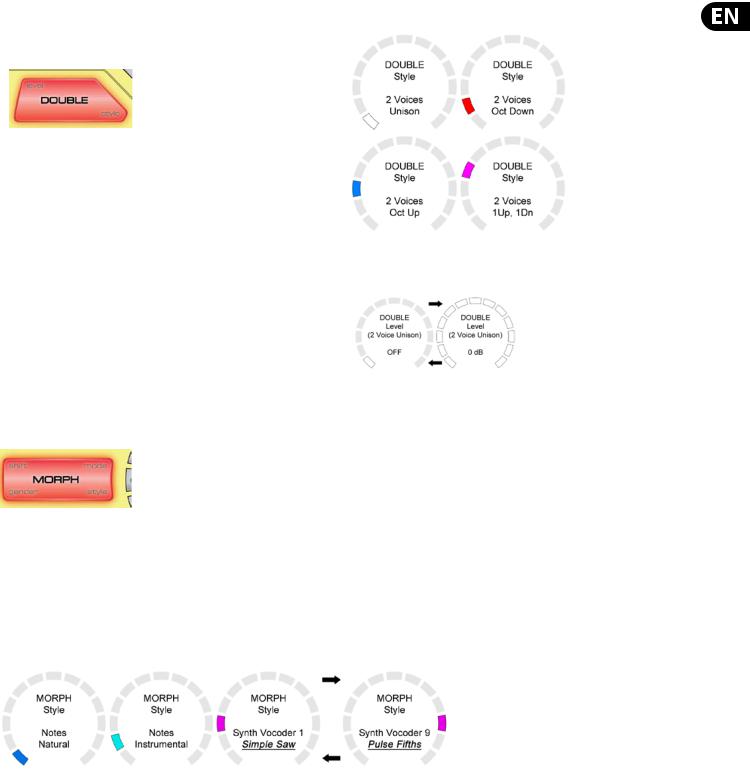
5.1 Double
Double Style
Applies to: LEAD Voice
Double simulates the classic “double tracked” studio sound that’s common on recordings of all genres. Double Style selections can include Octave Up and Octave Down voices, for an even thicker effect. Hold style to edit.
Double Level
Double Level changes the amount of doubled voice, relative to your lead vocal. Hold level to edit.
On the ring, Level is indicated by one up to all LEDs lit, in the color of the current style.
Range: Off, -10 to 0 dB
5.2 Morph
Applies to: LEAD Voice (Shift & Gender),
MIDI Voice (Mode & Style)
“Morphing is a special effect in motion pictures and animations that changes (or morphs) one image or shape into another through a seamless transition. Most often it is used to depict one person turning into another through technological means or as part of a fantasy or surreal sequence.” (Wikipedia)
Perform-VE’s Morph effect does exactly this to your voice: you can morph your lead voice into a giant, a mouse, or a spaced out alien (and beyond) using the Shift and Gender parameters, while also morphing your MIDI voices into choirs of angels, robots, zombies or whatever you dream up using the Mode and Style parameters.
Morph Style
Morph Style sets the MIDI Voices to be either Notes harmony voices or Synth Vocoder voices. There are two styles of Notes harmony (natural or warp), and eight different Synth Vocoder styles to choose from.
Notes
Notes harmony voices are created from either your own voice, or a VS Synthesis sample (vocal sample synthesis) that you create with Perform-VE’s innovative new VS Synthesis sampler technology (covered later in this manual).
Formants are the unique resonant frequencies that give your voice its characteristic sound. When set to Natural operation, the Notes Harmony voices will retain the formant characteristics of your lead vocal. When set to Warp, the voices will have their formant characteristics expanded or compressed depending on the actual MIDI notes you play, making for tonal transformations that are striking, unexpected and possibly unreal sounding when compared to the original. Try it and hear for yourself!
Notes Natural is the default mode for Perform-VE’s MIDI Voices. As long as MORPH and SAMPLE are turned off, you will hear natural shifted harmony voices whenever you vocalize and send MIDI Notes to Perform-VE.
When MORPH is turned on, the MIDI Voice mode changes to reflect the MORPH Style – you can keep the MIDI Voices Natural, make them Warped, or replace them with Synth Vocoder voices as you see fit.

10 PERFORM-VE User Manual
Synth Vocoder
Perform-VE has a dual oscillator synth vocoder hidden inside. When Synth Vocoder styles are chosen, the synthesizer will generate up to eight articulated synth voices to render the MIDI notes you play, and will also generate a ninth Lead synth voice that follows the pitch of your voice.
The graphic above assumes a sample hasn’t been recorded. In this case, your Lead vocal gets a dedicated synth voice and also acts as the modulator (shaping signal) for the vocoder.
Enabling the SAMPLE button changes the way the vocoder operates:
We’ll cover the SAMPLE features in detail later on. For now, it’s enough to know that when the SAMPLE button is green, the recorded sample acts as the modulator of up to 8 synthesizer voices, and your lead Vocal passes through to the rest of the effects aboard Perform-VE.
Synth Vocoder
Each one of the Synth Vocoder styles is actually a synthesizer preset (or patch), named accordingly:
Loading...