


USER’S MANUAL
v2.1

Table of Contents
HOW DO I USE THIS THING? . . . |
. |
. . . |
. |
3 |
CONNECTION GUIDE . . . . |
. . |
. . |
|
.6 . . |
BASICS . . . . . . . . . . . . . . . |
. |
. . . |
. |
7 |
SOFT BUTTONS . . . . . . . . . . |
. |
. . . |
.11 |
|
GENRE . . . . . . . . . . . . . . . . . . . .11 FAVORITE . . . . . . . . . . . . . 11. . . . .
SETUP - INPUT . . . . . . . . . . . 12. . . .
SETUP - OUTPUT . . . . . . . . . . 15. . . .
SEUP - GLOBAL . . . . . . . . . . . 16. . . .
SETUP - LOOP . . . . . . . . . . . . . . . .17 SETUP - SYSTEM . . . . . . . . . . . . . . .18
EFFECTS . . . . . . . . . . . |
. |
. |
. 19. . . . . |
EFFECTS - UMOD (MICRO MOD) . |
|
. . .20. |
|
EFFECTS - DELAY . . . . . . . . . . 21. . . . |
|||
EFFECTS - DELAY CONT.. . . . . |
. |
. |
. 22. . . |
EFFECTS - REVERB . . . . . . . . . . . . . .23 EFFECTS - HARMONY. . . . . . . . . . . .24 EFFECTS - HARMONY CONT.. . . . . . 25. .
EFFECTS - DOUBLE . . . . . . . . . .26. . .
EFFECTS - HARDTUNE . . . . . . . . 27. . .
EFFECTS - TRANSDUCER . . . . . . . 28. . .
MIX . . . . . . . . . . . . . . . . . . . . . .29 PRACTICE . . . . . . . . . . . . . 30. . . . .
TROUBLESHOOTING . . . . . . . . . . . .31

How Do I Use This Thing?
The following section gives some examples of how you might use the VoiceLive Play.. Of course, every setup is different and you may find another way of doing things that works better for you!
I’ve got nothing… just a VoiceLive Play and some headphones!
1.Press Setup and navigate to the INPUT page..
2.Choose VOICE from the ROOMSENSE menu..
3.Press BACK..
4.Plug in your headphones..
5.While singing, press MIX and adjust the HEADPHONE LEVEL until it’s as loud or soft as you like it.
6.Press BACK..
7.Use the Control Knob to navigate through presets.Try HIT!
I’ve got a microphone, headphones and an acoustic guitar, electric guitar with an amplifier, acoustic piano or electric piano with speakers…
1.Press SETUP and navigate to the INPUT screen..
2.Choose your mic type from the INPUT menu..
3.Select AMBIENT/AUTO from the ROOMSENSE menu..
4.Press BACK..
5.Plug in your Mic
6.While singing,adjust the Mic Knob until the input LED lights GREEN (yellow is ok,but don’t let it get red and angry)
7.Plug in your headphones..
8.Sing into your mic and play your guitar/piano..
9.Press MIX and adjust the ROOMSENSE and HEADPHONE level to get a nice blend between your voice and instrument..
10.Press BACK..
11.Use the Control Knob to navigate through presets.Try some presets with harmony.The Room Sense mics will pick up your instrument sounds and figure out which key the song is in!
3

How Do I Use This Thing?
I’ve got a mic, PA system and play with a band. I’d like the harmonies to be in key automatically…
1.Follow steps 1-6 above.
2.With your PA output levels turned off or waaaay down, connect XLR cables from the OUT-
PUT of the VoiceLive Play to input(s) on your mixer..
3.Press MIX and turn the ROOMSENSE level all the way OFF..
4.Press BACK..
5.While singing, slowly raise the level of the PA system until it’s at a level that works well with the rest of the band.
6.Use either the Control Knob or Up and Down footswitches to select presets.Try HardTune or Harmony presets and the Play will figure out the key the band is playing in. If it’s having trouble, try placing the Play closer to a chord based instrument or its’ amp, like guitar or keyboard… or keytar…epic!
I want to sing along, Karaoke style, with my mp3 player or through my computer..
For an mp3 player, connect your device to the AUX input with a 1/8th inch cable.
For computer output, connect theVoiceLive Play to your computer with the supplied USB cable.
a.Locate your Audio Control Panel..
b. SetVoiceLive Play as the default output device. c Hit Apply.
d.Since computer systems vary wildly from user to user, we suggest looking up information on your particular operating system or computer manufacturer to get further assistance directly..
Forums are a good place to check, along with manufacturer knowledgebase systems.
1. If you want to use the Vocal Cancel feature to remove the lead vocal:
2.Press Setup
3.Navigate to Page 2 (OUTPUT)
4.Press the blue “soft button” next toVOCAL CANCEL
5.Use the Control Knob to change the setting to ON
4

How Do I Use This Thing?
6.Press Back to exit.
7.Pick a preset you like.
8.Press play on your mp3 player or computer..
9.Sing your heart out!
Looping Tips
When it comes to looping, practice is the key.You might notice that your loops have a small gap between the end of the phrase and when the loop restarts..This happens when you mis-time pressing the
PLAY/REC/O-DUB button. Pay careful attention to co-ordinating your button press to the down beat, so that the loop beginning and end is seamless.
Experiment with exiting LOOP MODE and picking a different vocal sound for the next O-DUB layer. You can get some great results by simply varying the sounds that are part of the loop.
When adding an O-DUB layer, you can record multiple passes of O-DUB parts without starting and stopping the looper.This allows you to add numerous parts, which can all be removed with a single UNDO action. (they can also be brought back by repeating the UNDO action)
Using a Switch3 will give you permanent access to looping without pressing the Up and Down footswitches. It frees up those switches to be assigned for Key/Scale selection, plus you don’t have to go in and out of loop mode to change presets.. It times out automatically, so you can choose a new sound..
The Switch3 buttons are mapped as follows: 1. Rec/Play/O-Dub
2..Stop/Clear (Hold)
3..Undo
The benefit of having undo on a separate button is the ability to perfectly time your undo, rather than waiting a moment for a Hold to be registered.
Note:When a Switch3 is plugged in, Key/Scale selection is automatically assigned to UP/DN..When the
Switch3 is unplugged, UP/DN remains Key/Scale and will need to be changed in the setup menu if you wish to assign UP/DN back to Looping.
For more info on Switch 3, check out:
www..tc-helicon..com/products/switch-3
5
Connection Guide
|
|
|
|
|
|
|
|
|
|
|
|
|
|
|
|
|
|
|
|
|
|
|
|
|
|
|
|
|
|
|
|
|
|
|
|
|
|
|
|
|
|
|
|
|
|
|
|
|
|
|
|
|
|
|
|
|
|
|
|
|
|
|
|
|
|
|
|
|
|
|
|
|
|
|
|
|
|
|
|
|
|
|
|
|
|
|
|
|
|
|
|
|
|
|
|
|
|
|
|
|
|
|
|
|
|
USB |
|
|
|
|
|
|
|
|
|
|
|
|
|
||||||
|
|
|
|
|
|
|
|
|
|
|
|
|
|
|
|
|
|
|||
|
|
|
|
|
|
|
|
|
|
|
|
|
|
|
|
|
|
|
|
|
|
|
Phones |
|
|
Switch3 In |
|
|
|
|
|||||||||||
|
|
|
|
|
|
|
|
|
|
|
|
|
|
|
|
|
|
|
|
|
|
|
|
|
|
|
|
|
|
|
|
|
|
|
|
|
|
|
|
|
|
Power In Out to P..A.. |
|
Aux In |
Mic In |
|||||||||||||||||
|
|
|
|
|
|
|
|
or DAW |
|
|
|
|
|
|
|
|
|
|
||
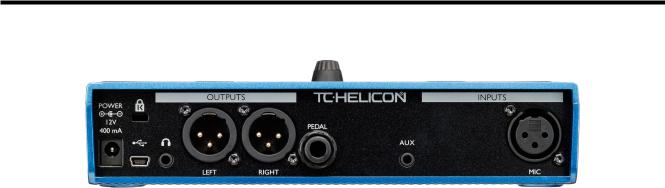
Power In - Connect the included power supply
USB - Connect to your computer with the included cable. Use VoiceSupport to manage presets and update Firmware. www.tc-helicon.com/products/voicesupport
Phones - Headphone output.
Left+Right - Main XLR outputs connect to your P.A. system or audio interface. Always use balanced cables to avoid HUMMMMMMM.
Switch3 In - Use a TRS cable to connect a Switch 3, which can control looping. If you use the S3, you have access to looping without pressing the Up and Down footswitches.
Aux In - Use a 1/8” cable to connect any music source you like, espcially the 8-Track from your 1974 Comet. When an input is detected here, Play will use the music to figure out Key/Scale info.
Mic In - This is where the magic happens. Plug your dynamic, condenser or MP-75 Mic in here. Remember to set the mic type and level, as described in the QuickStart Guide.
*WARNING: ALWAYS USE A TC-HELICON POWER SUPPLY. THE USE OF ANY OTHER POWER SUPPLY MAY CAUSE DAMAGE TO THE UNIT AND WILL NOT BE COVERED BY WARRANTY.
6
Basics
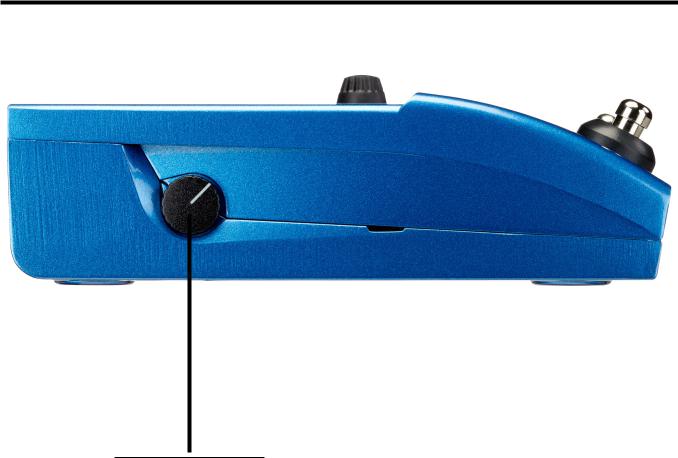
Mic Gain Knob
Once you’ve connected your microphone and selected the Mic Type (pg.. 12, Dynamic, Condenser,
MP-75), use the Mic Gain Knob to set the input level for your microphone.
As you increase the level, pay close attention to the LED on the top of the VoiceLive Play..You want the input to light Green. It’s OK if the LED sometimes lightsYellow, but it should never turn Red. If it does turn Red, reduce the level. Red means the input is overloading.You’ve got powerful lungs!
7
Basics
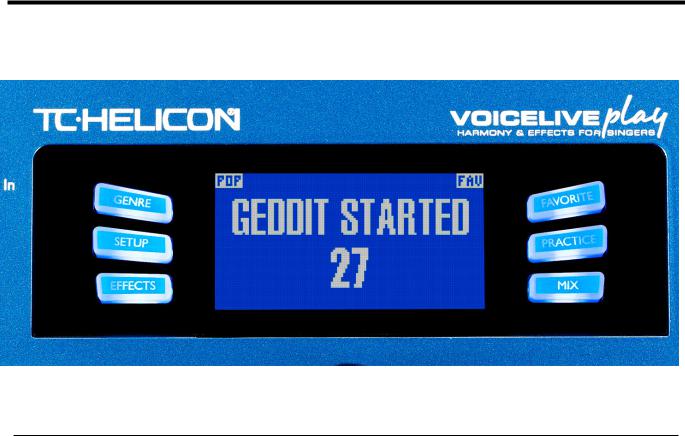
LCD Display
1.Patch Name (Geddit Started)
2.Patch Number (27)
3.FAV – Shown if the current preset is tagged as a Favorite
4.NP – Shown when NaturalPlay key/scale information is being processed by the system
5.LOOP – Shown when a loop is playing in the background
6.GENRE – Displays the name of the genre selected in the genre screen.. Not shown when the genre is set to ALL..
8
Basics
Switches and Operation
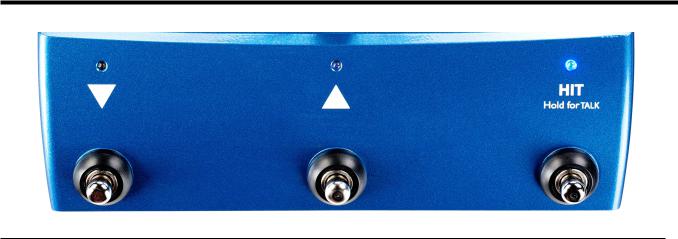
1.The UP and DOWN switches allow you to navigate through presets.. Press once for a single preset change. Press and HOLD to quickly move through presets.
2.HIT/TALK – In normal operation, this button acts as a HIT button.When activated, a new effect or effects will be added to the current patch.This feature is perfect for adding effects like
Harmony to a chorus section of a song, or even to a single line or word..
3.When you press and HOLD the HIT/TALK button, theVoiceLive Play entersTALK mode.
All effect output is muted and the mic input is passed directly to the output..This is especially
effective when a singer may want to speak to the crowd without any effects present on their voice. .
4.To enter LOOP mode, press and hold the UP and DOWN switches simultaneously.. Once in LOOP mode, the DOWN footswitch controls REC/PLAY/OVERDUB functions, the UP footswitch controls the STOP/CLEAR functions and the HIT button exits LOOP mode.You may exit loop mode while a loop is still playing..That means you can choose a new vocal sound and then re-enter LOOP mode to add a new overdub to the loop. Press and hold the DOWN footswitch after performing an OVERDUB to UNDO..
*LOOP mode is the default action when pressing the UP and DOWN buttons simultaneously.The alternative mode, set on SYSTEM page 5 under UP/DN Function is KEY/SCALE mode, described below.
5..To access TAP TEMPO, press and hold the UP and HIT switches simultaneously.. Once you see the tempo on the LCD screen, tap the HIT button in time with your music.When you’re finished, stop tapping and the screen will “time out” back to the preset screen.Voila!
6.To enter KEY/SCALE mode and select the KEY/SCALE to be used with Harmony and Hard tune effects, press and hold the UP and DOWN switches simultaneously..To save your selected KEY/SCALE, press EXIT..
*If you don’t know the KEY/SCALE that a particular song is in, try using the last chord of the song for the KEY and Major 2 for the SCALE.. It’s often correct, especially in popular music..
9
Basics
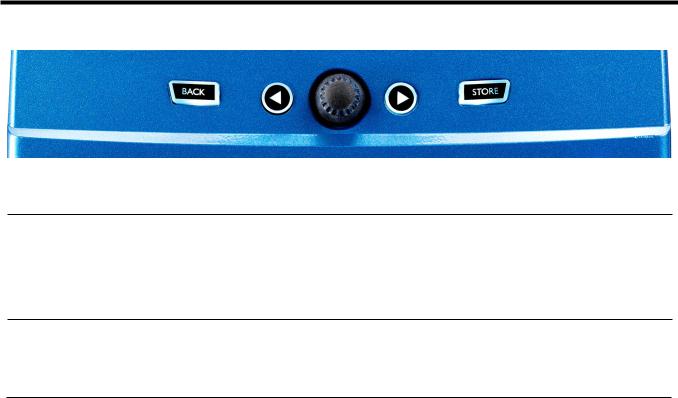
Control Knob and Arrow Buttons
The control knob is used to move through presets and to move through various settings when in Edit,
System or other menu areas..The Arrow Buttons act similarly, moving through presets, styles, Genres etc...
Back
Exits the current screen or mode..
Store
When you have made a change to a preset, simply press STORE.The first press will bring up the name/ location window, allowing you to re-name and/or relocate the preset.. Pressing STORE again will save the preset, along with its new name or location..
To change the NAME of a preset, press the STORE button once, then press the Left Blue Soft Button to modify the letters/numbers. Press STORE again to complete the process.
To save the current preset in a different LOCATION press the STORE button once, then press the Right Blue Soft Button and use the control knob to select the destination number for the preset. Press
STORE again to complete the process..
If you change your mind and don’t want to save the changes, simply press BACK..
Soft Buttons and their operation are described in more detail on the next page.
10
 Loading...