


 Loading...
USER’S MANUAL
v1.0

Safety
Safety Instructions
1Read these instructions.
2Keep these instructions.
3Heed all warnings.
4Follow all instructions.
5Do not use this apparatus near water.
6Clean only with dry cloth.
7Do not block any ventilation openings.
8Install in accordance with the manufacturer’s instructions.
9Do not install near heat sources such as radiators, heat registers, stoves, or other apparatus
(including amplifiers) that produce heat.
10Only use attachments/accessories specified by the manufacturer.
11Refer all servicing to qualified service personnel. Servicing is required when the apparatus has been damaged in any way, such as powersupply cord or plug is damaged, liquid has been spilled or objects have fallen into the apparatus, the apparatus has been exposed to rain or moisture, does not operate normally, or has been dropped.
Warning!
•To reduce the risk of fire or electrical shock, do not expose this equipment to dripping or splashing and ensure that no objects filled with liquids, such as vases, are placed on the equipment.
•Do not install in a confined space.
Service
All service must be performed by qualified personnel.
Caution
You are cautioned that any change or modifications not expressly approved in this manual could void your warranty.
EMC/EMI
This equipment has been tested and found to comply with the limits for a Class B Digital device, pursuant to part 15 of the FCC rules.
These limits are designed to provide reasonable protection against harmful interference in residential installations.This equipment generates, uses and can radiate radio frequency energy and – if not installed and used in accordance with the instructions – may cause harmful interference
to radio communications. However, there is no guarantee that interference will not occur in a particular installation. If this equipment does cause harmful interference to radio or television reception – which can be determined by turning the equipment off and on –, the user is encouraged to try correcting the interference by one or more of the following measures:
•Reorient or relocate the receiving antenna.
•Increase the separation between the equipment and the receiver.
•Connect the equipment to an outlet on a circuit different from the one to which the receiver is connected.
•Consult the dealer or an experienced radio/ TV technician for help.
For Customers in Canada:
This Class B digital apparatus complies with Canadian ICES-003. Cet appareil numérique de la classe B est conforme à la norme NMB-003 du Canada.
1

Introduction
Before You Get Started
1.Check to see if this manual has been updated click the following link:
www.tc-helicon.com/products/voicelive-rack/support/
2. DownloadVoiceSupport.
Get the latest firmware for your product, tips and tricks, and videos. Click the following link to download and installVoiceSupport
www.tc-helicon.com/voicesupport.
3. RegisterYour Product inVoiceSupport.
Click on the ACCOUNT button within theVoiceSupport application.
Thank You
Thank you for purchasingVoiceLive Rack, a complete, programmable mic channel and vocal effects processor.This product is the result of input from customers like you who requested the premium features ofVoiceLive 2 in a 19” rack chassis.We hope you enjoy making your music sound even better withVoiceLive Rack.
About TC-Helicon
TC-Helicon is the only pro audio company 100% dedicated to providing creativity and control to singers.We are a dedicated group of engineers, researchers and product specialists based in
Victoria BC, Canada, who spend every waking moment of their working lives listening, talking, singing, and interacting with singers and those who have passion for the singing voice.
VoiceLive Rack Features
•High quality, dedicated vocal channel and effects processor
•8 fully editable effect blocks
•Total recall of mic preamp and Setup menu parameters in up to 10 user profiles
•Unique touch interface on front panel
•Large, bright LCD screen
•Wizard feature to help users find presets
•Up to 4 intervals of NaturalPlay harmony available
•Harmony reference can be guitar, MIDI or
MP3 input
•Global adaptive tone and auto-chromatic pitch correction effects
•Mic Control feature allows remote effects control with included MP-75 mic
•400 user presets
•USB for audio streaming, updates, and backup to computer
•Discrete guitar mixing and effects to main output
MP-75 Mic
Warranty
To view the general warranty forTC-Helicon products click below or visit:
www.tc-helicon.com/support/warranty/
2

Table of Contents
SAFETY . . . . . . . . . . . . . . . . . . . . 1
INTRODUCTION . . . . . . . . . . . 2 .
Warranty . . . . . . . . . . . . . . . . . . . . .2
FRONT PANEL . . . . . . . . . . . . . . . . 7 BACK PANEL . . . . . . . . . . . . 9. QUICK START . . . . . . . . . . . . 10.
.
.
|
GATE Tab Overview. . . . . . . . . . . . . . . . . . . . |
21 |
|
|
GATE . . . . . . . . . . . . . . . . . . . . . |
21 |
|
. |
. LEAD ATTEN . . . . . . . . . . . . . . . . . |
. 21 |
|
|
HARM ATTEN . . . . . . . . . . . . . . . . . |
21 |
|
|
THRESHOLD (MANUAL Gate Only) . . . . . . . |
. 21 |
|
|
THE PITCH BUTTON . . . . . . . . . . . |
.22 |
|
. . |
|
22 |
|
|
Pitch Button Overview . . . . . . . . . . . . . . |
||
. |
AUTO. |
-CHROMATIC AMOUNT . . . . . . . . . |
. 22 |
BASIC OPERATION . . . . . . . . . |
.11. |
. |
|
. THE TAP BUTTON . . . . . . . . . . . . . |
.23 |
Selecting presets . . . . . . . . . . . . . . . . |
. 11 |
|
|
Tap Button Overview . . . . . . . . . . . . . . |
. 23 |
Searching for presets using tags . . . . . . . . . . |
. 11 |
|
|
THE BYPASS BUTTON . . . . . . . . |
24. . . |
Modifying presets . . . . . . . . . . . . . . . . |
12 |
|
|
||
|
|
Bypass Button Overview . . . . . . . . . . . . . |
24 |
||
Changing the global mix . . . . . . . . . . . . . |
. 12 |
|
|
||
|
|
|
|
||
Adjusting the Guitar features . . . . . . . . . . . |
. 12 |
|
|
DETAILED OPERATION . . . . . . . . . . |
.25 |
Phantom, Mono, MIDI etc. - the Setup menu . . . . |
. 13 |
|
|
Overview . . . . . . . . . . . . . . . . . . . |
. 25 |
Adjusting theTone settings . . . . . . . . . . . . |
. 13 |
|
|
||
|
|
Harmony and Hardtune Guided by a Guitar . . . . . |
25 |
||
Preset chaining with the Step feature . . . . . . . . |
13 |
|
|
||
|
|
Acoustic guitar . . . . . . . . . . . . . . . . . |
. 25 |
||
Performing a global reset . . . . . . . . . . . . . |
13 |
|
|
||
|
|
Electric guitar . . . . . . . . . . . . . . . . . . |
25 |
||
Restoring individual presets to factory settings . . . . |
14 |
|
|
||
|
|
Guitar performance tips . . . . . . . . . . . . . |
. 25 |
||
Mic-Control and Footswitch assignments . . . . . . |
14 |
|
|
||
|
|
Harmony and Hardtune Guided by a MIDI Keyboard . 25 |
|||
|
|
|
|
||
THE TONE BUTTON . . . . . . . . |
. 15. |
. |
. |
MIDI hookup and channel selection . . . . . . . . |
. 26 |
Tone Overview . . . . . . . . . . . . . . . . . |
15 |
|
|
MIDI IN and USB . . . . . . . . . . . . . . . . |
26 |
|
|
MIDI-controlled Harmony and Hardtune . . . . . . |
26 |
||
TheTONETab . . . . . . . . . . . . . . . . . |
. 15 |
|
|
||
|
|
MIDI performance tips . . . . . . . . . . . . . . |
26 |
||
The ADAPTIVE Check Boxes . . . . . . . . . . . |
15 |
|
|
||
|
|
Alternate Harmony and Hardtune Methods . . . . . |
26 |
||
SHAPE . . . . . . . . . . . . . . . . . . . . |
. 15 |
|
|
||
|
|
Using a fixed key (aka“Scale”) . . . . . . . . . . |
. 26 |
||
COMPRESS . . . . . . . . . . . . . . . . . . |
. 16 |
|
|
||
|
|
Singing to Music Playback . . . . . . . . . . . . . |
28 |
||
DE-ESS . . . . . . . . . . . . . . . . . . . . |
. 16 |
|
|
||
|
|
“Borrowing” from Another Player . . . . . . . . . |
. 28 |
||
GATE . . . . . . . . . . . . . . . . . . . . . |
17 |
|
|
||
|
|
Steps Overview . . . . . . . . . . . . . . . . . . . . . .29. |
|||
EQ Tab Overview . . . . . . . . . . . . . . . . . . . . . . |
18 |
|
|
||
|
|
External Control Overview . . . . . . . . . . . . . . |
30 |
||
EQTabWith ADAPTIVE On . . . . . . . . . . . |
. 18 |
|
|
||
SHAPE . . . . . . . . . . . . . . . . . . . . |
. 18 |
|
|
The MP-75 Mic Switch . . . . . . . . . . . . . . |
30 |
WARMTH . . . . . . . . . . . . . . . . . . . |
18 |
|
|
The Switch3 Footswitch . . . . . . . . . . . . . |
. 30 |
EQTabWith ADAPTIVE Off . . . . . . . . . . . |
. 18 |
|
|
MIDI Remote Control . . . . . . . . . . . . . . |
31 |
LOW GAIN . . . . . . . . . . . . . . . . . . |
18 |
|
|
The USB Computer Connection . . . . . . . . . . |
32 |
LOW FREQ . . . . . . . . . . . . . . . . . . |
18 |
|
|
TheVoiceSupport Application . . . . . . . . . . |
. 32 |
HIGH GAIN . . . . . . . . . . . . . . . . . . . . . . . . . . . . . . . . . . . . . 18 |
|
|
VoiceLive Rack and Digital Audio . . . . . . . . . |
. 32 |
|
HIGH FREQ . . . . . . . . . . . . . . . . . . |
. 19 |
|
|
Digital Input Notes: . . . . . . . . . . . . . . . |
. 33 |
PARA GAIN . . . . . . . . . . . . . . . . . . |
. 19 |
|
|
Digital Output Notes: . . . . . . . . . . . . . . |
33 |
PARA FREQ . . . . . . . . . . . . . . . . . . |
. 19 |
|
|
Audio Device Name . . . . . . . . . . . . . . . |
34 |
PARAWIDTH . . . . . . . . . . . . . . . . . |
. 19 |
|
|
USB and MIDI Control . . . . . . . . . . . . . . |
34 |
COMPRESS Tab Overview . . . . . . . . . . . . . . . 20
COMPRESSTabWith ADAPTIVE ON . . . . . . . . 20 COMPRESS . . . . . . . . . . . . . . . . . . . 20
COMPRESSTabWith ADAPTIVE OFF . . . . . . . 20
THRESHOLD . . . . . . . . . . . . . . . . . . 20 RATIO . . . . . . . . . . . . . . . . . . . . . 20
THE INPUT GAIN BUTTON . . . . . . 35. .
Overview . . . . . . . . . . . . . . . . . . . . 35 Manual Gain Adjustment . . . . . . . . . . . . . 35 Automatic Gain Adjustment . . . . . . . . . . . . 35
TC HeliconVocalTechnologies Ltd. |
3 |
User’s Manual revision 1.0 |
VoiceLive Rack |
www.tc-helicon.com |
|
EnglishVersion |

Table of Contents
THE WIZARD BUTTON . . . . . . . . . . |
.36 |
|
REVERB Tab Overview . . . . . . . . . . . . . . . . . . |
45 |
|
Overview . . . . . . . . . . . . . . . . . . . |
. 36 |
|
GLOBAL REVERB ENABLE . . . . . . . . . . . |
. 45 |
|
The FIND tab . . . . . . . . . . . . . . . . . . 36 |
|
STYLE . . . . . . . . . . . . . . . . . . . . |
. 45 |
||
TheTAG tab . . . . . . . . . . . . . . . . . . . . . . . . . . . . . . . . . . . . . 37 |
|
LEVEL . . . . . . . . . . . . . . . . . . . . . |
45 |
||
THE SETUP BUTTON . . . . . . . . |
. 38. . |
. |
WIDTH . . . . . . . . . . . . . . . . . . . . |
45 |
|
DECAY . . . . . . . . . . . . . . . . . . . . |
45 |
||||
Overview . . . . . . . . . . . . . . . . . . . |
. 38 |
|
LO COLOR / HI COLOR . . . . . . . . . . . . |
. 45 |
|
Resetting Setup (Initializing) . . . . . . . . . . . . |
38 |
|
|||
|
HI FACTOR . . . . . . . . . . . . . . . . . . |
. 45 |
|||
The I/O Tab . . . . . . . . . . . . . . . . . . |
. 39. . . |
. |
. EARLY. . |
REFLECTIONS /TAIL LEVEL . . . . . . . . |
45 |
IN GAIN . . . . . . . . . . . . . . . . . . . . |
39 |
|
DUCKING . . . . . . . . . . . . . . . . . . . |
45 |
|
PHANTOM . . . . . . . . . . . . . . . . . . . 39 |
|
DIFFUSE . . . . . . . . . . . . . . . . . . . . |
45 |
||
AUX LEVEL . . . . . . . . . . . . . . . . . . . 39 |
|
PRE DLY . . . . . . . . . . . . . . . . . . . . |
46 |
||
OUTPUT . . . . . . . . . . . . . . . . . . . . 39 |
|
SPEED . . . . . . . . . . . . . . . . . . . . . |
46 |
||
DIGITAL IN . . . . . . . . . . . . . . . . . . . 39 |
|
DEPTH . . . . . . . . . . . . . . . . . . . . |
. 46 |
||
DIGITAL OUT . . . . . . . . . . . . . . . . . . 39 |
|
DUCKING AMOUNT . . . . . . . . . . . . . |
. 46 |
||
LEAD MUTE . . . . . . . . . . . . . . . . . . |
39 |
|
DUCKINGTIME . . . . . . . . . . . . . . . . |
. 46 |
|
LEAD DLY . . . . . . . . . . . . . . . . . . . |
40 |
|
LEAD to REV . . . . . . . . . . . . . . . . . . |
46 |
|
OUTPUT LEVEL RANGE . . . . . . . . . . . . . 40 |
|
HARM to REV . . . . . . . . . . . . . . . . . |
. 46 |
||
GUITAR MUTE . . . . . . . . . . . . . . . . . |
40 |
|
DEL to REV . . . . . . . . . . . . . . . . . . |
. 46 |
|
PAN . . . . . . . . . . . . . . . . . . . . . . 40 |
|
LEAD LEVEL . . . . . . . . . . . . . . . . . . |
46 |
||
MIC/LINE PHASE . . . . . . . . . . . . . . . . |
40 |
|
MIC-CONTROL Tab Overview . . . . . . . . . . . |
47 |
|
The MIDI Tab . . . . . . . . . . . . . . . . . . . . . . . . |
.41 |
|
CONTROL . . . . . . . . . . . . . . . . . . |
. 47 |
|
|
|
|
GLOBAL MIC-CONTROL . . . . . . . . . . . . |
47 |
|
|
|
|
MIC-CONTROL button . . . . . . . . . . . . . |
47 |
|
|
|
|
SWITCH3 Tab Overview . . . . . . . . . . . . . . . . |
48 |
|
|
|
|
SWITCH 1 FUNCTION . . . . . . . . . . . . . |
48 |
|
|
|
|
SWITCH 2 FUNCTION . . . . . . . . . . . . . |
48 |
|
|
|
|
SWITCH 3 FUNCTION . . . . . . . . . . . . . |
48 |
|
|
|
|
GLOBAL . . . . . . . . . . . . . . . . . . . |
. 48 |
|
The SYSTEM Tab . . . . . . . . . . . . . . . . . 42. . . . .
LCD CONTRAST . . . . . . . . . . . . . . . . 42 USB CONTROL . . . . . . . . . . . . . . . . . 42
GLOBAL NATURALPLAY . . . . . . . . . . . . . 42
GLOBAL KEY/SCALE . . . . . . . . . . . . . . |
42 |
GLOBALTAPTEMPO . . . . . . . . . . . . . . |
42 |
TUNEREF . . . . . . . . . . . . . . . . . . . |
. 42 |
GUITAR Tab Overview . . . . . . . . . . . . . |
.43. . . |
REVERB STYLE . . . . . . . . . . . . . . . . . |
43 |
REVERB LEVEL . . . . . . . . . . . . . . . . . |
43 |
UMOD STYLE . . . . . . . . . . . . . . . . . . 43 |
|
UMOD LEVEL . . . . . . . . . . . . . . . . . |
. 43 |
EQ LOW GAIN . . . . . . . . . . . . . . . . |
. 44 |
EQ LOW FREQ(uency) . . . . . . . . . . . . . |
44 |
EQ HIGH GAIN . . . . . . . . . . . . . . . . |
. 44 |
EQ HIGH FREQ . . . . . . . . . . . . . . . . |
. 44 |
EQ PARA GAIN . . . . . . . . . . . . . . . . |
. 44 |
EQ PARA FREQ . . . . . . . . . . . . . . . . |
. 44 |
EQ PARAWIDTH . . . . . . . . . . . . . . . |
. 44 |
COMPRESSIONTHRESH(old) . . . . . . . . . . |
. 44 |
COMPRESSION RATIO . . . . . . . . . . . . . |
44 |
THE STORE BUTTON . . . . . . . . . . . .49
STORETab Overview . . . . . . . . . . . . . . |
. 49 |
CURSOR . . . . . . . . . . . . . . . . . . . . 49 |
|
LETTER . . . . . . . . . . . . . . . . . . . . |
. 49 |
INS > < DEL . . . . . . . . . . . . . . . . . . |
49 |
STORETO . . . . . . . . . . . . . . . . . . . |
49 |
MANAGE PRESETTab . . . . . . . . . . . . . . |
50 |
SEND PRESETTO MIDI SYSEX . . . . . . . . . . |
50 |
ERASE USER PRESET . . . . . . . . . . . . . . . 50 |
|
CLEAN PRESET BANK . . . . . . . . . . . . . |
. 50 |
STORE SETUP Overview . . . . . . . . . . . . |
. 51 |
CURSOR . . . . . . . . . . . . . . . . . . . . 51 |
|
LETTER . . . . . . . . . . . . . . . . . . . . |
. 51 |
INS > < DEL . . . . . . . . . . . . . . . . . . |
51 |
STORETO . . . . . . . . . . . . . . . . . . . |
51 |
LOAD SETUPTab Overview . . . . . . . . . . . |
52 |
MANAGE SETUPTab Overview . . . . . . . . . |
. 53 |
4

EDITING .. .. .. .. .. .. .. .. .. .. .. .. .. .. .. .. .. .. ..54 |
|
SPEED . . . . . . . . . . . . . . . . . . . . . |
60 |
|
Editing Overview . . . . . . . . . . . . . . . . . 54 |
|
DEPTH . . . . . . . . . . . . . . . . . . . . |
. 60 |
|
Navigation . . . . . . . . . . . . . . . . . . . |
54 |
|
DUCKING AMOUNT . . . . . . . . . . . . . |
. 60 |
Saving Changes . . . . . . . . . . . . . . . . . |
54 |
|
DUCKINGTIME . . . . . . . . . . . . . . . . |
. 60 |
THE EDIT BUTTON . . . . . . . . . |
.55. |
. . |
LEAD to REV . . . . . . . . . . . . . . . . . . |
60 |
HARM to REV . . . . . . . . . . . . . . . . . |
. 60 |
|||
µMOD Tab Overview . . . . . . . . . . . . . . . . . . |
55 |
|
DEL to REV . . . . . . . . . . . . . . . . . . |
. 60 |
STYLE . . . . . . . . . . . . . . . . . . . . . |
55 |
|
LEAD LEVEL . . . . . . . . . . . . . . . . . . |
60 |
LEVEL . . . . . . . . . . . . . . . . . . . . . |
55 |
|
HARDTUNE Tab . . . . . . . . . . . . . . . . . . . |
. 61. . |
WIDTH . . . . . . . . . . . . . . . . . . . . |
55 |
|
HARDTUNE KEY . . . . . . . . . . . . . . . . |
61 |
DETUNE LEFT / DETUNE RIGHT . . . . . . . . |
. 55 |
|
HARDTUNE RATE . . . . . . . . . . . . . . . |
. 61 |
SPEED . . . . . . . . . . . . . . . . . . . . . 55 |
|
HARDTUNE AMOUNT . . . . . . . . . . . . . |
61 |
|
DEPTH-L / DEPTH-R . . . . . . . . . . . . . . |
55 |
|
HARDTUNE SHIFT . . . . . . . . . . . . . . . |
61 |
OUT PHASE . . . . . . . . . . . . . . . . . . |
55 |
|
HARDTUNE WINDOW . . . . . . . . . . . . . |
61 |
DLY L / DLY R . . . . . . . . . . . . . . . . . |
. 55 |
|
KEY & SCALE . . . . . . . . . . . . . . . . . |
. 61 |
FEEDBACK L / FEEDBACK R . . . . . . . . . . . |
55 |
|
NOTE & ENABLED . . . . . . . . . . . . . . . |
62 |
PHASE . . . . . . . . . . . . . . . . . . . . . 55 |
|
DOUBLETab Overview . . . . . . . . . . . . . |
. 63 |
|
WAVE . . . . . . . . . . . . . . . . . . . . |
. 56 |
|
STYLE . . . . . . . . . . . . . . . . . . . . |
. 63 |
XFB L / XFB R . . . . . . . . . . . . . . . . . |
. 56 |
|
LEVEL . . . . . . . . . . . . . . . . . . . . . |
63 |
LOWCUT L / LOWCUT R & HICUT L / HICUT R . |
. 56 |
|
HUMANIZE STYLE . . . . . . . . . . . . . . . |
63 |
LEADTo UMOD . . . . . . . . . . . . . . . . |
. 56 |
|
HUMANIZE AMOUNT . . . . . . . . . . . . . |
. 63 |
HARMTo UMOD . . . . . . . . . . . . . . . . |
56 |
|
V1 toV4 PAN . . . . . . . . . . . . . . . . . |
. 63 |
LEAD LEVEL . . . . . . . . . . . . . . . . . . |
56 |
|
V1 toV4 LEVEL . . . . . . . . . . . . . . . . . |
63 |
DELAY Tab Overview . . . . . . . . . . . . . . . . . . . |
57 |
|
V1 toV4 PORTA . . . . . . . . . . . . . . . . |
. 63 |
STYLE . . . . . . . . . . . . . . . . . . . . . |
57 |
|
V1 toV4 SMOOTHING . . . . . . . . . . . . . |
. 63 |
LEVEL . . . . . . . . . . . . . . . . . . . . . |
57 |
|
V1 toV4 GENDER . . . . . . . . . . . . . . . |
. 63 |
WIDTH . . . . . . . . . . . . . . . . . . . . |
57 |
|
LEAD LEVEL . . . . . . . . . . . . . . . . . . |
64 |
SOURCE . . . . . . . . . . . . . . . . . . . . 57 |
|
CHOIR . . . . . . . . . . . . . . . . . . . . |
. 64 |
|
TEMPO . . . . . . . . . . . . . . . . . . . . . 57 |
|
HARMONY Tab Overview . . . . . . . . . . . |
.65. . |
|
DUCKING . . . . . . . . . . . . . . . . . . . |
57 |
|
STYLE . . . . . . . . . . . . . . . . . . . . |
. 65 |
DIV L / DIV R . . . . . . . . . . . . . . . . . |
. 57 |
|
LEVEL . . . . . . . . . . . . . . . . . . . . . |
65 |
TIME L /TIME R . . . . . . . . . . . . . . . . |
. 57 |
|
V1 toV4VOICING . . . . . . . . . . . . . . . |
. 65 |
FEEDBACK L / FEEDBACK R . . . . . . . . . . . |
58 |
|
V1 toV4 LEVEL . . . . . . . . . . . . . . . . . |
65 |
XFB RTO L / XFB LTO R . . . . . . . . . . . . |
58 |
|
V1 toV4 GENDER . . . . . . . . . . . . . . . |
. 65 |
LOCUT L / LOCUT R & HICUT L / HICUT R . . . |
. 58 |
|
V1 toV4 PAN . . . . . . . . . . . . . . . . . |
. 65 |
DUCKING AMOUNT . . . . . . . . . . . . . |
. 58 |
|
DOUBLING and DOUBLE LEVEL . . . . . . . . . |
65 |
DUCKINGTIME . . . . . . . . . . . . . . . . |
. 58 |
|
CHOIR, CHOIR LEV and CHOIR STYLE . . . . . . |
65 |
LEADTO DELAY . . . . . . . . . . . . . . . . |
58 |
|
HUMANIZE STYLE . . . . . . . . . . . . . . . |
66 |
HARMTO DELAY . . . . . . . . . . . . . . . |
. 58 |
|
HUMANIZE AMOUNT . . . . . . . . . . . . . |
. 66 |
UMODTO DELAY . . . . . . . . . . . . . . . |
. 58 |
|
VIBRATO STYLE . . . . . . . . . . . . . . . . |
. 66 |
LEAD LEVEL . . . . . . . . . . . . . . . . . . |
58 |
|
VIBRATO AMOUNT . . . . . . . . . . . . . . |
. 66 |
REVERB Tab Overview . . . . . . . . . . . . . . . . . . |
59 |
|
V1 toV4 PORTA . . . . . . . . . . . . . . . . |
. 66 |
STYLE . . . . . . . . . . . . . . . . . . . . |
. 59 |
|
V1 toV5 SMOOTHING . . . . . . . . . . . . . |
. 66 |
LEVEL . . . . . . . . . . . . . . . . . . . . . |
59 |
|
GUITAR CHORDS . . . . . . . . . . . . . . . |
. 67 |
WIDTH . . . . . . . . . . . . . . . . . . . . |
59 |
|
HOLD RELEASE . . . . . . . . . . . . . . . . |
. 67 |
DECAY . . . . . . . . . . . . . . . . . . . . |
59 |
|
TUNING . . . . . . . . . . . . . . . . . . . |
. 67 |
LO COLOR / HI COLOR . . . . . . . . . . . . |
. 59 |
|
HARMONY EQ . . . . . . . . . . . . . . . . |
. 67 |
HI FACTOR . . . . . . . . . . . . . . . . . . . 59 |
|
LEAD LEVEL . . . . . . . . . . . . . . . . . . |
67 |
|
EARLY REFLECTIONS /TAIL LEVEL . . . . . . . . |
59 |
|
NATURALPLAY . . . . . . . . . . . . . . . . |
. 68 |
DUCKING . . . . . . . . . . . . . . . . . . . |
59 |
|
NATURALPLAY Settings and Parameter Changes . . |
. 69 |
DIFFUSE . . . . . . . . . . . . . . . . . . . . |
59 |
|
NATURALPLAY = SCALE Mode . . . . . . . . . |
. 69 |
PRE DLY . . . . . . . . . . . . . . . . . . . . |
60 |
|
KEY & SCALE . . . . . . . . . . . . . . . . . |
. 69 |
5

Table of Contents
V1 toV4VOICING . . . . . . . . . . . . . . . . |
69 |
MAP IN SOURCE / MAP IN NOTE . . . . . . . . |
69 |
V1 toV4 MAP OUT . . . . . . . . . . . . . . . |
69 |
NATURALPLAY = SHIFT Mode . . . . . . . . . . |
69 |
V1 toV4VOICING . . . . . . . . . . . . . . . . |
69 |
NATURALPLAY = MIDI NOTES, MIDI NOTES 4 CHAN |
|
Modes . . . . . . . . . . . . . . . . . . . . . |
70 |
DOUBLING . . . . . . . . . . . . . . . . . . . 70 |
|
ATTACK & RELEASE . . . . . . . . . . . . . . . 70 |
|
NOTES EXTENSION . . . . . . . . . . . . . . . 70 |
|
NATURALPLAY = MIDI NOTES Mode Only . . . . . |
70 |
PAN, GENDER, PORTA, SMOOTH, and IndividualVoice |
|
LEVEL . . . . . . . . . . . . . . . . . . . . . |
70 |
TRANSDUCERTab Overview . . . . . . . . . . . |
71 |
TRANSDUCER STYLE . . . . . . . . . . . . . . 71 |
|
ROUTING: . . . . . . . . . . . . . . . . . . . |
71 |
LOW CUT and HIGH CUT . . . . . . . . . . . . |
71 |
GATETHRESHOLD . . . . . . . . . . . . . . . |
71 |
DISTORTIONTYPE and DISTORTION AMOUNT . . |
71 |
TRANSDUCER IN and OUT GAIN . . . . . . . . |
72 |
PRESENCE GAIN, PRES FREQ and PRESWIDTH . . |
72 |
RHYTHMICTab Overview . . . . . . . . . . . . |
73 |
Using the Rhythmic Features . . . . . . . . . . . . |
73 |
STYLE . . . . . . . . . . . . . . . . . . . . . |
73 |
MODE . . . . . . . . . . . . . . . . . . . . . 73 |
|
MODE = RHYTHM . . . . . . . . . . . . . . . |
73 |
DEPTH . . . . . . . . . . . . . . . . . . . . . 73 |
|
TARGET . . . . . . . . . . . . . . . . . . . . |
73 |
DIVISION . . . . . . . . . . . . . . . . . . . . 73 |
|
TYPE . . . . . . . . . . . . . . . . . . . . . . |
73 |
MIDI IMPLEMENTATION . . . . . . . 78. . .
PRESET LIST . . . . . . . . . . . . .81. . . .
SCALES DIAGRAM . . . . . . . . . . . . . .84 FREQUENTLY ASKED QUESTIONS (FAQ) . 85 SPECIFICATIONS . . . . . . . . . . 86. . . .
MODE = SAMPLE . . . . . . . . . . . . . . . . . . . 74. .
SAMPLE LOOP DIVISION . . . . . . . . . . . . 74 SAMPLE LOOP CAPTURE . . . . . . . . . . . . 74
SAMPLE DIRECTION . . . . . . . . . . . . . . 74 PATH . . . . . . . . . . . . . . . . . . . . . . . . . . . . . . . . . . . . . . . . . . . 74
MIC-CONTROL Tab Overview . . . . . . . . . . . 75
CONTROL . . . . . . . . . . . . . . . . . . . 75 FUNCTION . . . . . . . . . . . . . . . . . . . 75
MIC-CONTROL BUTTON . . . . . . . . . . . . 75
SWITCH3 Tab Overview . . . . . . . . . . . . . . . . 76
SWITCH 1 FUNCTION . . . . . . . . . . . . . 76 SWITCH 2 FUNCTION . . . . . . . . . . . . . 76 SWITCH 3 FUNCTION . . . . . . . . . . . . . 76
PRESET Tab . . . . . . . . . . . . . . . . . . . . . . . . . . . 77
LEAD LEVEL . . . . . . . . . . . . . . . . . . 77 LEAD PAN . . . . . . . . . . . . . . . . . . . 77 LEAD EFFECT SENDS . . . . . . . . . . . . . . 77
6
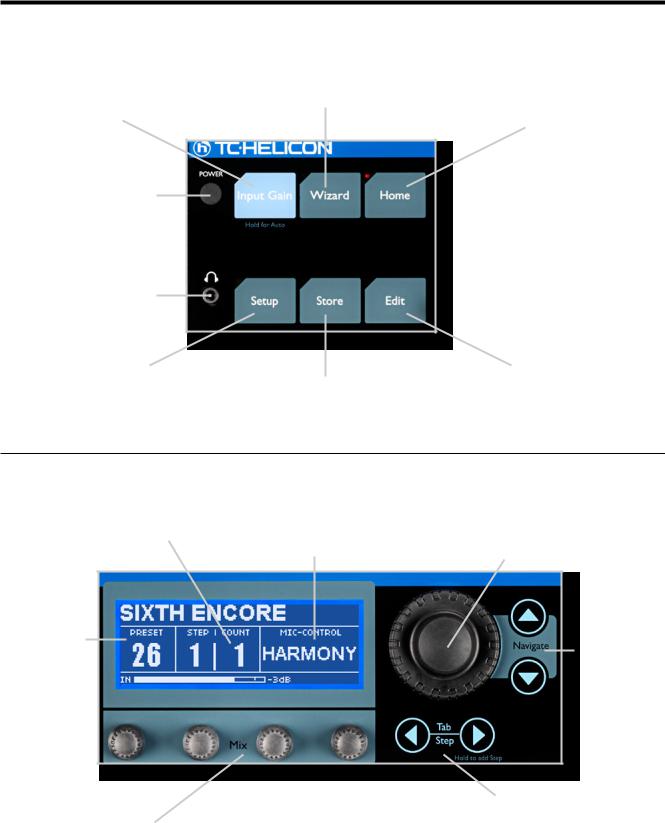
Front Panel
Touch to access input gain adjustment screen or hold to enter auto input gain feature.
Push in to apply power.
Connect headphones to monitor main output mix.
Touch to access Setup menu and parameters.
Touch Home to exit.
Touch to browse presets based on tags or to load presets on demand.
Touch to access Store menu for presets and setups as well as management features.
Touch Home to exit any menu and set screen to show main preset display.
Touch to access Edit menu and parameters or touch Home to exit.
Displays preset steps |
Displays parameter |
if any (Count) and |
remote controlled by |
current step in Home |
Mic-control feature us- |
mode. |
ing optional MP-75 mic. |
Displays preset name and number in Home mode or all edit parameters in edit modes.
Main wheel locates presets in Home mode and selects rows in edit modes.
Navigate arrows will increment/decrement presets by 1 in Home mode or select rows in edit modes.
In Home screen, turning Mix knobs 1 detent will temporarily display 4 global mix values then allow adjustment.
In all edit modes Mix knobs are used to adjust parameter values.
Tab/Step arrows cycle |
Tab/Step arrows cycle |
through preset step |
through tabs in edit |
chain (if any) and allow |
modes. |
management of step |
|
chains in Home mode. |
|
7
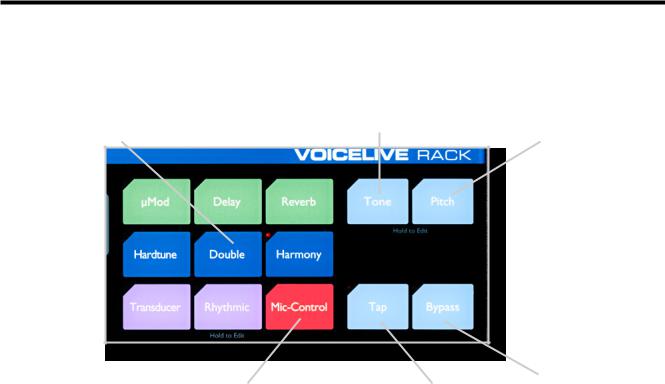
Front Panel
Touch any to engage effects or hold to jump directly to the effect’s edit menu.
Touch to activate adaptive EQ, compression, de-ess and gate or hold to edit.
Touch to activate autochromatic pitch correction or hold to edit correction settings.
Duplicates the switch on an MP-75 mic to activate switched parameters.
Tap at song tempo to set delay time in Home mode.
Mutes all processing exceptTone when Tone is active.
8

Back Panel
Connect dynamic or |
Passes dry guitar signal |
condenser mic here. |
to an amplifier or PA. |
Input gain and phantom |
Connection here will |
power on/off located in |
remove guitar from the |
Setup menu. |
main mix. |
Attachment port for Kensington®
lock
ConnectTRS balanced |
A guitar connected here can |
or unbalanced cable |
guide Harmony and Hardtune |
from mixer here. |
effects. IfThru is not connected, |
|
guitar is mixed to main outputs |
|
with dedicated effects. |
Auxiliary input from |
Main outputs are balanced and |
mp3 player can be |
default output is stereo. Mono and |
mixed to outputs and |
dual mono modes are configured in |
be used to guide Har- |
Setup menu. |
mony and Hardtune. |
|
If ground buzz is heard in your PA, push the Ground
Lift in. Otherwise leave it out.
S/PDIF output always available. Full Mix orVocal & Guitar (LR) configured in Setup menu.
Hardware MIDI ports allow remote harmony and preset control from MIDI keyboards etc. Ensure USB Control is set to Off in Setup menu to use this input.
USB I/O connects to a computer for audio I/O and system functions such as preset backup and version updates.
AC cable strain relief minimizes shutdowns due to cable pulling.
S/PDIF digital input can |
Connect optionalTC-Helicon |
|
Connect supplied AC |
|
|||
be fed dry to analog mix |
Switch 3 footswitch here for |
|
adaptor here. |
outs or used as vocal and |
additional control per preset |
|
|
instrument (LR) inputs for |
or globally. |
|
|
effect processing. |
|
|
|
|
|
|
|
9
Quick Start
ff a.. Connections
1.Turn down your mixer channel or main PA volume.
2.Connect a Mic or Line level input from the mixer to the respective input jack onVoiceLive
Rack.
3.Connect the XLR orTRS stereo outputs to your mixer/PA.
4.Connect the supplied AC adaptor to the unit and press the POWER button in.
ff b.. Set input level
1.Touch the Bypass button so it flashes.
2.Touch the Input Gain button.
3.Sing or start playback while watching the IN meter in the display
4.Adjust the IN GAIN setting with the knob below the onscreen parameter until no CLIP message occurs.
5.Touch Home to exit Input Gain setup.
ff c.. First audio
1.Select preset 6: BRIGHT DOUBLE with the large wheel or the Navigate up/down arrows.
2.Sing or start dry vocal playback then raise your monitors/PA level until you hear theVoiceLive
Rack output at a comfortable volume.
3.Touch the Bypass button to hear the effect programmed into the current preset.
4.Now you can select different presets and/or touch the effect blocks (µMod, Delay, Reverb etc) to turn them on and off within the current preset.
10

Basic Operation
ff Selecting presets
There are over 200 factory programmed presets inVoiceLive Rack. Presets are loaded as soon as the name appears in the LCD window.
To select presets:
1.Ensure the Home button LED is lit.
2.Turn the large encoder wheel. Detents in this wheel allow increment and decrement by 1 or;
3.Touch the Navigate up or down arrows to browse by single presets.
ff Searching for presets using tags
TheWizard function organizes the presets by user-selected tag filters and alphabetically so you can search more effectively for them.TheWizard also allows you to locate but not automatically load a new preset while another is currently active.
To search for presets using the Wizard:
1.Touch theWizard button
2.Use the Mix knobs to select the Sort function and/or to choose up to 3 tag criteria.
3.Turn the large encoder to view the filtered results.
4.Press theWizard button to load the highlighted preset.
ff Using Harmony or Hardtune presets with a connected instrument or music track
Presets that have the Harmony or Hardtune buttons lit require a musical reference in order to sound musically correct.VoiceLive Rack automatically senses which input is connected (see following) in order to use it as a reference.
1.Connect an accompaniment instrument or music player toVoiceLive Rack.This can be either:
•A guitar connected to the GUITAR IN
•A MIDI keyboard (channel=1) connected to the MIDI IN
•An MP3 player connected to the AUX IN
2.Select a harmony-based preset such as 1: Sixth Encore.
3.Play the accompaniment instrument or track while singing intoVoiceLive Rack.The harmony intervals will follow the changing chords of the music.
By default, the GUITAR and AUX inputs are routed to the main mix output.Their levels can be muted or adjusted in the GUITAR and I/O tabs of the Setup menu respectively.
ff Using Harmony or Hardtune presets without a connected instrument or track
This method, which uses a single key and scale generally throughout an entire song, will produce useful musical results for many songs but not all. Experimentation in a rehearsal setting is essential before using this method before an audience.
1.An accompaniment is required so the singer can sing relative to a key and scale.This can be a piano, acoustic guitar, playback etc.
2.Touch the Setup button and navigate to the SYSTEM tab using theTAB/STEP arrows.
3.Set GLOBAL NATURALPLAY to SCALE and GLOBAL KEY/SCALE to ON.
4.Touch the Edit button and navigate to the
HARMONY tab.
5.Set the KEY and SCALE* parameters to match the song accompaniment.This is often the first or last chord in the song.
11

Basic Operation
6. Sing while the accompaniment plays.
*There are 3 major scales and 3 minor scales; generally Major 2 and Minor 2 will work for more songs. See the Scales Diagram at the end of this manual for details.
Touch Home to exit and try different presets, all of which are set to the same key by the Setup parameters changed in step 3.
ff Modifying presets
The effect block buttons, the arrow buttons and tabbed menus allow you to make changes to the current preset quickly.
To modify a preset by enabling and disabling effect blocks:
1.Touch any one or a group of effect blocks to reverse their on or off state.The buttons’ LEDs will show their status.
To edit effect block parameters including preset mix:
1.There are two ways to enter the effects editing menu -
a.Hold any effect block button for 1 second.This will present its editing menu.The on/off status of the effect will not change however.
b.Touch the Edit button and use theTab/Step arrow buttons to locate the tab of effect you want to edit.
2.Adjust parameter values on the highlighted row with the Mix knobs.
3.Select another row with the wheel or the Navigate up/down arrows.
4.To finish, either touch Store twice to save your changes or touch the Home button to allow further preset navigation without saving.
ff Changing the global mix
There are 4 global mix levels adjustable with the front panel Mix knobs.When you adjust these controls at the Home level, the mix screen will show values for the controls as well as Mic/Line input, Guitar input and main output levels.
•Voices - Combined level of the Harmony and
Doubling voices.
•Delay/Reverb - Combined level of the Delay and Reverb effects.
•Guitar - If a guitar is connected to the Guitar input and no GuitarThru connection is made, this control varies the level of the guitar in the main output mix.
•Output - Adjusts the overall output level to the main outputs and the Headphone output.
ff Adjusting the Guitar features
The Guitar input has its own Reverb and µMod processors, 3 band EQ and compressor. As long as the GuitarThru has no jack inserted, the guitar will be routed to the main output mix with these effects added.
To adjust the Guitar effects:
1.Touch the Setup button.
2.Use theTab/Step arrow buttons to navigate to the GUITAR tab.
3.Select and adjust parameters within the GUI-
TAR tab using the Navigate arrows and the
Mix knobs.
All changes are recalled automatically the next time the unit is powered.
12

Basic Operation
ff Phantom, Mono, MIDI etc.. - the Setup menu
Global parameters are adjusted in the Setup menu. Changes made in this menu are automatically stored as they are made. Note that some settings of parameters such as DIGITAL IN and LEAD MUTE can result in unexpected sound (or lack thereof) from the unit.
To adjust global setup parameters:
1.Touch the Setup button to enter the Setup menu.
2.Use theTab/Step and Navigate arrow buttons to locate parameters then make changes with the Mix knobs.
3.Touch Home to exit.
ff Adjusting the Tone settings
The goal of the singleTone button, with its adapting Shape EQ, compression, de-essing and gate is that adjustment is done automatically. If, however, you want to make manual adjustments, they are easy to perform.
To change the Tone settings:
1.Hold theTone button to reveal its menu in the display.
2.In the firstTONE tab, sing while you make general adjustments such as adjusting brightness and bass rolloff via the SHAPE control or increasing or reducing compression amount with the COMPRESS control.
3.Use theTab/Step arrows to tab over to the individual effects and disable the ADAPTIVE parameter if desired.This will reveal additional manual adjustment settings.
ff Preset chaining with the Step feature
Each preset can consist of up to 10 steps that you can step through using theTab/Step arrow buttons or a footswitch. Steps can be edits of the starting preset or other presets copied into the slots.
To add a step to a preset:
1.Locate the desired starting preset and hold the right Step arrow button.
2.Follow the onscreen prompts to insert and delete steps in your chain.
Note that inserted steps are automatically stored.
See“Restoring...” below to return the preset to its original state.
ff Performing a global reset
This can be performed to initialize all presets and system parameters back to their factory defaults.
To perform a global reset:
1.Power up the unit.
2.When the first text is displayed in the LCD window, hold the 4 buttons listed below and continue to hold until the reset prompt is displayed:
•µMod
•Delay
•Reverb
•Tone
This procedure can take up to 2 minutes.
13

Basic Operation
ff Restoring individual presets to factory settings
To reset a preset to its original settings:
1.Locate the Manage Preset tab in the Store menu.
2.Use Erase User Preset to select the preset to restore and set Confirm toYes.
3.Touch the Store button.
ff Mic-Control and Footswitch assignments
External control of parameters via the MP-75 microphone and Switch 3 footswitch can be assigned uniquely per preset or globally.
To set Mic-control and Footswitch assignments:
1.Locate the Mic-Control and/or Switch3 tabs in either the Setup menu (for global assignment) or in the Edit menu (unique per preset).
2.Make the changes required.
3.If you have made a preset assignment it will need to be stored with the preset. Global assignment does not require storing.
14

TheTone Button
Tone Overview
TheTone button activates what we call the“Live Engineer Effects”.These are different from standard vocal processing effects in that they adjust their settings to your particular voice and the way you sing at different times of your performance just like a professional audio engineer will. All EQ and compression enhancements applied here will affect the overall sound ofVoiceLive Rack including Harmony, Doubling, Reverb etc.
The suite of effects that make upTone are:
•Adaptive Shape EQ
•Adaptive Compression
•De-Ess
•Adaptive Gate
The TONE Tab
Press and hold theTone button to enter this screen and make adjustments or view settings.
This will present theTONE tab allowing convenient control of these four processors in one screen. At any time you can exit the tab menus by pressing the Home button.
The factory settings for theTone button are:
•SHAPE
ADAPTIVE=X(On), SHAPE=50%
•COMPRESS
ADAPTIVE=X(On), COMPRESS=50%
•DE-ESS DE-ESS=50%
•GATE
ADAPTIVE
These settings are intended to apply to a broad range of singers’ tastes and PA equipment. Making adjustments consists of turning the Mix/Edit
knobs below the LCD and listening to the results. You can also cycle theTone button on and off while editing to hear the difference between your effected and non-effected voice.
Note that there is a slight lag between adjusting the Adaptive effects and hearing the effect as the algorithm re-assesses your voice input.
ff The ADAPTIVE Check Boxes
These show whether the automatically-adjusting
Adaptive feature is enabled for the SHAPE or COMPRESS controls.
NOTE: If either or both ADAPTIVE check boxes is unchecked, the associated control is set to
MANUAL. Manual adjustment is possible by using the Navigate buttons to go to the edit tab associated with it and changing the controls on that tab.
ff SHAPE
“Shape” is the name given to the automatically adjusting EQ that is activated by the ADAPTIVE check box.When the Adaptive feature is activated, Shape processing offers an EQ curve that adds an airy brightness, or“sizzle” to your voice while reducing“mud” due to the proximity effect from singing closely into a cardioid microphone.
Adjusting the control from 0% to 50% reduces mud while increasing brightness to a useful range for your voice.Turning from 50% up to 100% adds more brightness.
Reducing Mud:
For singers who have a voice with less bass frequencies, the“mud” reduction may be less and perhaps not noticeable at all.This is a good thing - your voice is nicely balanced regarding bass frequencies. For the average male singer or women who sing closely on their mic, the reduction in bass will be noticeable and beneficial.
When voices have too much bass, they tend to become lost in the other instruments that occupy
15

TheTone Button
those frequencies resulting in sonic clutter. Reducing bass has the natural effect of emphasizing mid and upper frequencies which allow the voice to cut through dense instrumentation.
Lastly, the term“proximity effect” and“cardioid” need to be clarified as they can cause bass build up.The typical microphone used by singers has a pickup pattern called“cardioid” or heart-like, because it picks up less sound at the rear than at the front.This intends to reduce other instruments or sounds from getting into the front of the mic. A side effect of this that singing closely on a cardioid mic adds more bass frequencies
than your voice actually has.This is called“proximity effect” because it is caused by closeness to the mic.The adaptive Shape feature ofVoiceLive Rack listens continually to your voice through your mic and adjusts to make your voice sound like it is professionally produced and balanced.
Adding Highs
The other facet of the Shape feature is that it adds high frequencies, also known as“air” or “presence” without making your voice sound “tinny”.The vocal sounds we hear on CDs and the radio are not typically what you hear when you listen to a singer acoustically. Commercial vocal sounds are more of a hyper-reality designed to flatter the voice or voices and make them cut through a group of instruments and thus make
a larger impression on the listener.The Shape feature, used at moderate settings, emulates this sound through the average microphone and PA system.
When making Shape adjustments, it’s important to sing while listening to the PA system your audience will hear rather than only judging by your monitor sound.
ff COMPRESS
With the ADAPTIVE control activated, the
COMPRESS control reduces the amount of range between louder and softer singing to produce more even-sounding vocals. It does so by listening to your singing over time (less than 30 seconds) and adjusting accordingly.
Typical compressors require multiple controls, knowledge and experience, and time spent testing and refining over a performance.WithTC-
Helicon’s Adaptive Compress feature, these are not required.
The factory setting of 50% strikes a good balance between moderating dynamics in your singing without incurring feedback, a side effect of compression used in a live mic setting. If you have a high quality monitoring/PA setup with a flat frequency response and you want more compression, by all means add more with the COMPRESS control. Be aware though, that average quality systems have frequency peaks that may cause feedback with lots of compression combined with Adaptive Shape EQ.
•Note that, in order for the Adaptive Compression feature to work properly, you must have your mic gain set properly either with by using auto MIC GAIN or by setting it manually.
ff DE-ESS
There is a side effect that comes from adding high frequencies and compression to your voice, and that’s excessive sibilance. Sibilance can be described as the brief whistle that accompanies“S”, “T” and“D” syllables in your vocal performance.
Again, when singing acoustically, there is no issue with these sounds. It’s when you amplify and combine with boosted highs and compression that they can become piercing.
VoiceLive Rack’s DE-ESS control monitors the level of sibilance and, when it is detected, will quickly and transparently reduce it.Typically, it’s
16

TheTone Button
only briefly required and it then gets out of the way allowing the silky brightness to remain on the voiced portion of your singing.
There is only the single DE-ESS control; no other manual adjustment settings are required.The factory setting of 50% gently reduces sibilance without becoming obvious. Higher settings of compression and Shape or a bright, sibilant voice may require a higher setting.
ff GATE
When set to the factory default of ADAPTIVE, the GATE control on theTone Edit screen helps in two very important ways by:
1.Minimizing feedback
2.Reducing the amount of audible effects processing on sounds entering the mic other than your voice.
A typical, fixed gate works by shutting off, or reducing the level of any signal below a threshold that you set.When you sing louder than that threshold, the gate will open and your vocal will come through the PA.When you aren’t singing, the gate will close and block sounds around you.
The Adaptive Gate inVoiceLive Rack works automatically with your singing style to provide the optimum balance between how loud you have to sing to open the gate and how much other noises are reduced.
For troublesome audio environments, or for those who are familiar with setting manual gate parameters, there is also a MANUAL setting on this page.
17

TheTone Button
EQ Tab Overview
The EQ tab is where you control the tone shaping of your voice. It is where you can turn the
ADAPTIVE feature on and off for the SHAPE EQ.
EQ Tab With ADAPTIVE On
When the ADAPTIVE control is set to ON (the factory default), most of the adjustment is done automatically so fewer controls are required.
These are:
•ADAPTIVE ON/OFF
•SHAPE AMOUNT
•WARMTH ON/OFF
•ADAPTIVE ON/OFF
This activates the automatic EQ algorithm and changes the control set for the EQ tab.When set to ON, this places an X in the ADAPTIVE check box in theTONE tab and allows editing of the
SHAPE control in that tab.When set to OFF, this presents the manual parametric EQ controls, and removes the check in the ADAPTIVE box on the TONE tab.
ff SHAPE
This is a duplicate of the SHAPE control found on theTONE tab discussed previously.
ff WARMTH
This control returns a narrow band of low frequencies for singers who prefer this sound.The majority of the“mud“ frequencies are still reduced automatically when using this control.
EQ Tab With ADAPTIVE Off
Turning ADAPTIVE off presents manual parametric EQ controls for users who understand this type of equalization.There are 3 bands of control:
•Low band shelving
•All band fully parametric peak/dip control
•High band shelving
The two“Shelving” EQs boost or cut all frequencies below or above the frequencies set by the
LOW FREQ and HIGH FREQ controls respectively.These are most like the common Bass and Treble controls on a stereo system.
The“Parametric” EQ boosts or cuts the frequencies within a selected band that is defined by
a center frequency (PARA FREQ) and a width control (PARAWIDTH). For vocals, the gain of a narrow parametric band is typically reduced to overcome room or voice resonances and smooth the sound although experienced users may boost a band felt to be missing in a particular voice as well.
The three GAIN controls allow +/- 12 dB of adjustment.The 3 FREQ controls range from 20 Hz to 20 kHz.
ff LOW GAIN
Boosts or cuts the range of frequencies below the frequency set by the LOW FREQ control.
ff LOW FREQ
Allows you to define the frequency range for the low shelf by choosing the highest frequency below which boosting or cutting is possible.
ff HIGH GAIN
Boosts or cuts the range of frequencies above the frequency set by the LOW FREQ control.
18

TheTone Button
ff HIGH FREQ
Defines the frequency range for the high shelf with the selection of the lowest frequency above which boosting or cutting is possible.
ff PARA GAIN
Boosts or cuts the band of frequencies centered at the setting of the PARA FREQ control and its associatedWIDTH.
ff PARA FREQ
Defines the center of the parametric band.
ff PARA WIDTH
Defines how narrow or wide the parametric band is to be.The ends of the control range are labelled“NARROW” and“WIDE” to add meaning to the numbers in the middle of the control range.
19
TheTone Button
COMPRESS Tab Overview
This tab offers further control of the compression effect.The controls on this tab change depending on the status of the ADAPTIVE setting in the same way as the EQ tab.
COMPRESS Tab With ADAPTIVE
ON
The ADAPTIVE Compression algorithm performs automatic processing which reduces the number of adjustable parameters. As such, once ADAP-
TIVE is enabled, the only control is COMPRESS.
ff COMPRESS
This allows you to vary the amount of peak reduction by the ADAPTIVE compression algorithm.The factory value is 50% but you can increase or decrease as you require.
COMPRESS Tab With ADAPTIVE
OFF
Turning off ADAPTIVE compression switches compression to manual control. Be sure to reduce the level of your PA or switch to headphones when adjusting the manual compressor because high settings can cause more gain and thus feedback.
ff THRESHOLD
This sets the singing level at and above which the amount of gain reduction (compression) specified by the RATIO control will occur.The range is 0 dB to -30 dB: 0 dB being the loudest input signal
VoiceLive Rack can accept without distortion and
-30 dB being a very quiet signal. If you sing consistently more quietly than theTHRESHOLD, you will not hear any compression.You can see your
input level on the IN meter on the Home screen. A good setting for experimentation is -10 dB.
ff RATIO
This sets how much gain reduction you prefer when your voice level goes above the threshold.
The range is from 1:1 (no gain reduction) to 4:1 (maximum vocal gain reduction ).The default setting for RATIO is 4:1.
The number on the left side of the : (colon) symbol is how loud the peaks in your singing have to be in order to achieve a 1 dB gain increase. A brief example of how adjusting the ratio of compressor works is this: say a word you sang went 4 dB over the threshold when the Ratio was set to
4:1.The compressor would only allow it to go 1 dB louder.
Note that the RATIO control has to be set above 1.0 (1.0:1) to apply any compression regardless of the setting of theTHRESHOLD.
Also note that automatic makeup gain occurs depending on your combination ofTHRESHOLD and RATIO.A side effect of compression is that it can reduce apparent level until makeup gain is applied to raise the overall level.
20

TheTone Button
GATE Tab Overview
The Gate feature can assist in:
1.Minimizing feedback.
2.Reducing the amount of audible effects processing on sounds entering the mic other than your voice.
ff GATE
This sets the Gate type.The factory default is ADAPTIVE, which performs automatic level assessment for the average musical setting.You can also turn the gate to OFF with good results if you are in a quiet, low volume musical environment.
This can be set to MANUAL if you have more challenging requirements.When the GATE is set to MANUAL, an additional parameter,THRESHOLD, is displayed.
ff LEAD ATTEN
This controls how much your lead voice level is reduced (attenuated) when your voice falls below the Gate threshold and the Gate closes.This setting applies whether the GATE is set to ADAPTIVE or MANUAL.The factory default setting of -3 dB (a reduction of 3 dB) is gentle enough that if your voice strays below the threshold, it is not cut off completely. If you are in a feedback-prone environment (loud monitors plus Shape and
Compress on) you can increase this to reduce more. A setting of 0 dB offers no gain reduction on your lead voice at all. Settings of -30 to OFF effectively mute your voice when the Gate is on.
ff HARM ATTEN
This sets the amount of attenuation for the
Harmony and Doubling voices when the Gate closes.They have a separate attenuation setting to reduce chatter caused by instrument sounds entering the mic and being harmonized when
you aren’t singing .The factory default attenuation amount of -10 dB should work well in many situations, but you can further reduce the level if you still hear harmonized instrumental chattering when you stop singing.
ff THRESHOLD (MANUAL Gate Only)
This parameter becomes visible when the GATE has been switched to MANUAL.TheTHRESHOLD defines the minimum singing level you need to reach in order for the Gate to open and let your voice sound.The factory default setting of
-40 dB is very sensitive to allow a wide range of singing levels but it may also allow more nearby instrumental sounds through when you are not singing. In this case, further adjustment from -39 dB and upward may be needed.
21

The Pitch Button
Pitch Button Overview
Pressing the Pitch button activates Auto Chromatic pitch correction. For most applications, this is all that is required to set this feature.There is no need to set Key or Scale; all notes that you sing in the 12 tone western chromatic scale are corrected to the nearest scale tone.
This type of vocal pitch correction is quite subtle at its factory setting of 50% but even the most highly skilled and on-pitch singers will hear a slight chorusing from the PA or monitors with it engaged.
Press and hold the Pitch button to access the
PITCH tab and adjust the single parameter for this feature. Once you see this tab, the Pitch button can be cycled on and off to allow you to hear the difference. Press the Home button to exit the Pitch edit tab.
ff AUTO-CHROMATIC AMOUNT
The factory default value of 50% is active when you enter the PITCH edit tab.Turning the control towards 0% reduces the correction effect and turning towards 100% increases it.Above 50% the effect becomes more noticeable when you slide from note to note.This is the effect of faster transition speed between your input note and the closest scale tone as well as the fact that the algorithm is trying to pull you closer to the target.
For those singers who want to use or experiment with scale-based pitch correction and perhaps even the jagged, modern HardTune effects, there are presets set up specifically for this that can be found by pressing theWizard button and choosing CORRECT or HARDTUNE as theTag.
22

TheTap Button
Tap Button Overview
This button provides convenient access to tempo setting for the Delay and Rhythmic effects.You can tap it at any time to synchronize these effect blocks to the beats of a song.
The display will temporarily show the BPM (Beats Per Minute) derived from your most recent two taps.
To enter an exact BPM, you can use the up or down Navigate buttons while theTEMPO display is shown on the display for fine tuning.
The Delay or Rhythmic effect buttons must be active forTap tempo to have an audible effect.
Upon loading a new preset, the LED in theTap button will flash indicating the Delay SOURCE in the preset is set toTAP. If theTap LED does not flash upon loading a preset, the Delay SOURCE is set toTIME or MIDI. Regardless of the initial setting, tapping theTap button will temporarily modify the current preset so that its SOURCE becomesTAP.
To prevent the tempo from changing as you load different presets, set GLOBALTAPTEMPO in the SYSTEM tab of the Setup menu to ON.
23

The Bypass Button
Bypass Button Overview
Pressing the Bypass button will mute all active effects blocks from the vocal audio path except Tone if it’s active. This is done so that your basic tone remains the same as you address the audience during Bypass.To removeTone from Bypass, press theTone button.
The Bypass button will flash and the display will show BYPASS as long as the unit is bypassed.
Bypass has no effect on the Guitar or Aux inputs.
24

Detailed Operation
Overview
Much of the operation ofVoiceLive Rack is covered in the Quick Start and Basic Operation chapters.This Detailed Operation chapter offers additional procedural detail where it’s needed. For button menus and parameter descriptions see the Setup, Edit etc. menu chapters.
Harmony and Hardtune Guided by a Guitar
TC-Helicon’s NaturalPlay algorithm can listen to chords played on an electric guitar or electrified acoustic guitar to guide the Harmony and the
Hardtune effects. Both need to stay“in key” or musically relevant to accompanying instruments.
ff Acoustic guitar
If you haven’t by now, connect a cable from your pickup-equipped acoustic guitar to the GUITAR
IN as described in the Quick Start.You should now hear your guitar sound mixed with your voice.
To adjust the balance of guitar and voice, ensure the HOME button is lit then turn the third Mix/
Edit knob.This will present the MIX screen so you can adjust the level of your guitar.
Now, sing while you sample the harmonyand Hardtune-based presets with effects closely related to your guitar playing.You should now hear nicely produced lead vocal, harmony and/or Hardtuned vocals and guitar from your PA system or headphones.
The recommended pickup is the typical undersaddle type because potential mistracking can result from resonances generated by soundboardmounted pickups.
ff Electric guitar
Connect a cable from your electric guitar to the
GUITAR IN. Connect another cable from the GUITARTHRU to your first guitar effects pedal or to your amp. Set your guitar amp volume to a level compatible with your vocals.
By connecting a jack to the GUITARTHRU, the guitar signal is removed from the internal mixer and effects paths inVoiceLive Rack.
If you hear a buzz from either your guitar amplifier or the PAVoiceLive Rack is connected to, press the GND LIFT (ground lift) button to silence it.
Now you can sample the harmonyand Hard- tune-based presets with the effects musically related to your guitar playing.
ff Guitar performance tips
To ensure that the harmony voices follow your guitar closely, it’s best to play cleanly with chords containing at least two notes. If you want to sing right at the start of a song, it’s important to briefly play a chord first.A recognized chord will show“NP” in the LCD display.
Your guitar should be well-tuned.TC Electronic’s PolyTune is perfect for this.
If the song section you want vocal harmony or Hardtune effects on has fast chord changes, single note runs or very slow arpeggios, it may be better to use presets based on a fixed Key.To find out more about this see Harmony and Hardtune guided by a fixed key.
Harmony and Hardtune Guided by a MIDI Keyboard
Using MIDI opens up a range of harmony options.
This section will discuss the basics of setting MIDI channel and performing with a MIDI keyboard/ synth to control Harmony and Hardtune.
25

Detailed Operation
ff MIDI hookup and channel selection
If you haven’t already, connect a MIDI cable between your keyboard’s MIDI out andVoiceLive
Rack’s MIDI IN. Play a note on your keyboard and checkVoiceLive Rack’s display to see if the MIDI indicator lights. If it doesn’t, set the MIDI transmit channel of your keyboard to 1 (VoiceLive Rack’s default). If you wantVoiceLive Rack to receive on another MIDI channel, locate the MIDI tab in the
Setup menu and set CHANNEL to the same as your keyboard transmits on. Check the display as you play your keyboard to confirm reception.
ff MIDI IN and USB
To use the MIDI IN jack while you have a USB cable connected, locate the SYSTEM tab in the Setup menu and turn the USB CONTROL setting to OFF.This will enable the MIDI IN jack.
Alternatively, you may also remove the USB cable to access MIDI IN.
When you want to restore computer control of
VoiceLive Rack over USB, or you want to access theVoiceSupport application’s features, you can turn the USB CONTROL parameter back to On.
ff MIDI-controlled Harmony and Hardtune
Now that you’ve followed the preceding section, you can sample the many presets that feature the
Harmony and Hardtune effects. Load a preset with one or both of these effect buttons lit. Now you can play a song on your keyboard while singing and hear how the effects adjust musically as you play the different chords in your song. As each chord is recognized, the LCD display will briefly show“NP” meaning NaturalPlay.
The factory presets that have the word“Notes” in their names (presets #217-238) operate differently for both Harmony and Hardtune.These presets allow you to determine the pitch of the Harmony or Hardtune effects to the exact notes
you play.The harmony notes will adapt to the octave of your playing where the Hardtune effect ignores it.
The maximum number of harmony notes that will sound can be 4 or 8 depending on which preset you load.This in turn is due to whether
Harmony Doubling is activated in the HARMO-
NY tab of the EDIT menu.
ff MIDI performance tips
In chords without a clear third,VoiceLive Rack will assume a major chord, so when you play in a minor key, and as a general rule, you should always include a third when changing chords.
If you want to sing right at the beginning of your song, it’s important to play a chord just before you sing
If you sing while playing a chord and then press the sustain pedal, you’re able to add a keyboard embellishment that doesn’t affect the harmony.
Your mod wheel can be used to add or remove vibrato in harmony presets.
Alternate Harmony and
Hardtune Methods
This section is for those who do not play an instrument such as a MIDI keyboard or guitar.You are still able to experienceVoiceLive Rack’s Harmony and Hardtune effects with these methods:
•Using fixed Key and Scale
•Singing to music-only playback
•“Borrowing” from another player’s instrument
ff Using a fixed key (aka “Scale”)
This is the main method for creating harmony used successfully in the originalVoiceLive processor. It is also the main method for other Hard-
26
Loading...