

Page 1
USER
MANUAL
Page 2

IMPORTANT SAFETY INSTRUCTIONS
1 Read these instructions.
2 Keep these instructions.
3 Heed all warnings.
4 Follow all instructions.
5 Do not use this apparatus near water.
6 Clean only with dry cloth.
7 Do not block any ventilation openings.
8 Install in accordance with the manufacturer’s instructions.
9 Do not install near heat sources such as radiators, heat registers,
stoves, or other apparatus (including amplifiers) that produce heat.
10 Only use attachments/accessories specified by the manufacturer.
11 Refer all servicing to qualified service personnel. Servicing is
required when the apparatus has been damaged in any way, such
as power-supply cord or plug is damaged, liquid has been spilled
or objects have fallen into the apparatus, the apparatus has been
exposed to rain or moisture, does not operate normally, or has
been dropped.
WARNING!
• To reduce the risk of fire or electrical shock, do not expose this
equipment to dripping or splashing and ensure that no objects
filled with liquids, such as vases, are placed on the equipment.
• Do not install in a confined space.
SERVICE
• All service must be performed by qualified personnel.
CAUTION:
You are cautioned that any change or modifications not expressly
approved in this manual could void your warranty.
EMC/EMI
This equipment has been tested and found to comply with the limits for
a Class B Digital device, pursuant to part 15 of the FCC rules.
These limits are designed to provide reasonable protection against
harmful interference in residential installations.This equipment generates,
uses and can radiate radio frequency energy and – if not installed and
used in accordance with the instructions – may cause harmful
interference to radio communications. However, there is no guarantee
that interference will not occur in a particular installation. If this
equipment does cause harmful interference to radio or television
reception – which can be determined by turning the equipment off and
on –, the user is encouraged to try correcting the interference by one or
more of the following measures:
• Reorient or relocate the receiving antenna.
• Increase the separation between the equipment and the receiver.
• Connect the equipment to an outlet on a circuit different from
the one to which the receiver is connected.
• Consult the dealer or an experienced radio/TV technician for help.
FOR THE CUSTOMERS IN CANADA:
This Class B digital apparatus complies with Canadian ICES-003. Cet appareil
numérique de la classe B est conforme à la norme NMB-003 du Canada.
Page 3

BEFORE YOU GET STARTED
1. Download the Latest User’s Manual. To get the latest and
most comprehensive information and to view the product warranty
visit:
www.tc-helicon.com/support
and select your specific product.
2. Download VoiceSupport – Get the latest firmware for your
product, tips and tricks, and videos. Download and install
VoiceSupport from www.tc-helicon.com/voicesupport.
3. Register Your Product in VoiceSupport – Click on the
ACCOUNT button.
TC Helicon Vocal Technologies Ltd.
www.tc-helicon.com
User Manual 1.2 VoiceLive Touch
English Version
Page 4

Table of Contents
5
Advanced Looping: Shots Mode . . . . . . . . . . . . .23
Advanced Looping: Shots Mode . . . . . . . . . . . . . . .23
USB and Digital Audio . . . . . . . . . . . . . . . . . . . . . .25
VoiceLive Touch and Digital Audio . . . . . . . . . . . . . .25
MIDI Implementation . . . . . . . . . . . . . . . . . . . . . . .27
Factory Preset List . . . . . . . . . . . . . . . . . . . . . . . . .30
FAQ and Troubleshooting . . . . . . . . . . . . . . . . . . .33
Appendix: Looping Tutorial . . . . . . . . . . . . . . . . .34
Introduction . . . . . . . . . . . . . . . . . . . . . . . . . . . . . . .34
Glossary . . . . . . . . . . . . . . . . . . . . . . . . . . . . . . . . . .34
How to Get Started with Vocal Looping . . . . . . . . . .35
How to Expand Your Vocal Looping Horizons . . . . .37
Tips and Tricks . . . . . . . . . . . . . . . . . . . . . . . . . . . . .41
Specifications . . . . . . . . . . . . . . . . . . . . . . . . . . . . .42
Mounting to a Mic Stand . . . . . . . . . . . . . . . . . . . . .6
The VoiceSupport Application . . . . . . . . . . . . . . . .7
Connections . . . . . . . . . . . . . . . . . . . . . . . . . . . . . . .8
Front Panel . . . . . . . . . . . . . . . . . . . . . . . . . . . . . . . .9
Basic Operations . . . . . . . . . . . . . . . . . . . . . . . . . .10
Using the Slider . . . . . . . . . . . . . . . . . . . . . . . . . . . .10
Using the Vocal Effects . . . . . . . . . . . . . . . . . . . . . .10
Musical Control of Harmony & HardTune . . . . . . . .11
Basic Looping . . . . . . . . . . . . . . . . . . . . . . . . . . . . . .11
Editing Procedure . . . . . . . . . . . . . . . . . . . . . . . . . . .12
Effect Editing Parameters . . . . . . . . . . . . . . . . . . . .12
Using the Guitar Features . . . . . . . . . . . . . . . . . . . .14
Finding Presets with the Preset Wizard . . . . . . . . . .15
Setup: Phantom Power, Mono Output, MIDI Channel
and more . . . . . . . . . . . . . . . . . . . . . . . . . . . . . . . . .15
Performing a Reset . . . . . . . . . . . . . . . . . . . . . . . . .17
Using the Lockout Modes . . . . . . . . . . . . . . . . . . . .17
MIDI Setup Menu . . . . . . . . . . . . . . . . . . . . . . . . . .18
Additional Setup Menus . . . . . . . . . . . . . . . . . . . . . .18
The MIDI Setup Menu . . . . . . . . . . . . . . . . . . . . . . .18
The Advanced Setup Menu . . . . . . . . . . . . . . . . . . .19
Advanced Looping: Loops Mode . . . . . . . . . . . . .21
Advanced Looping: Loops Mode . . . . . . . . . . . . . . .21
Page 5
6
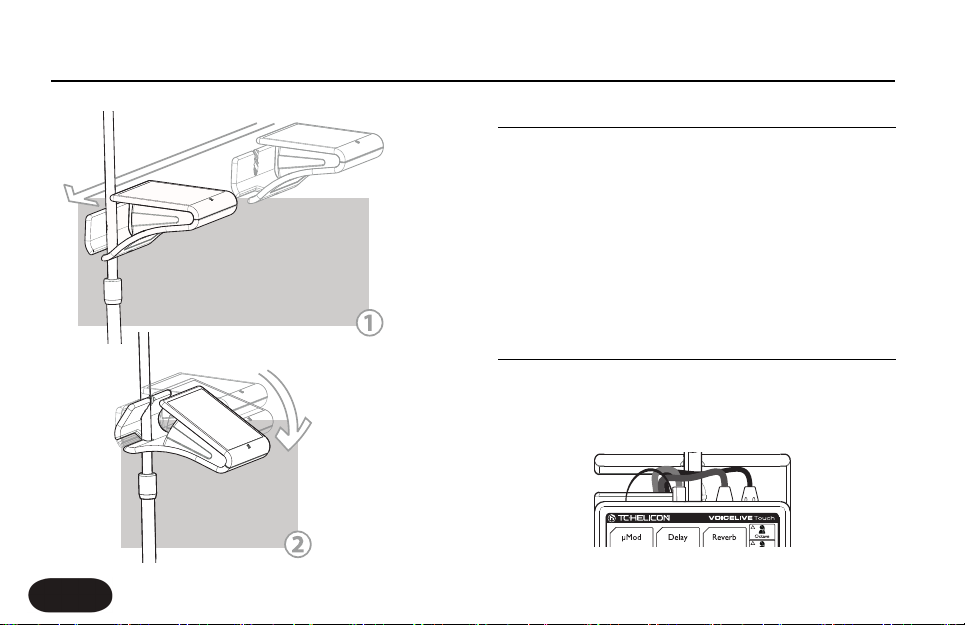
Mounting to a Mic Stand
MIC STAND SETUP
1. With no cables attached to the product, grasp it on both sides so
the printed top faces you and is approximately level.
2. Slide VoiceLive Touch to the left so that the upper shaft of your
mic stand is captured by the lower slot on the product. (Figure 1)
3. Slowly but firmly lower the front of the product so the serrated
slot fully captures the micstand shaft. (Figure 2) You’ll feel initial
resistance then the shaft should snap in and seat tightly.
Removal is the reverse: lift the front of the product so it snaps free of the
micstand shaft then slide right to remove.
Note that micstand diameter should not exceed 16.5 mm.
CABLING
The horizontal mounting slot on VoiceLive Touch is also used to collect
your cables. As shown in the graphic below, cables can be threaded
through the slot. Use the provided cable wrap to tie your cables neatly
to your micstand.
Page 6
7
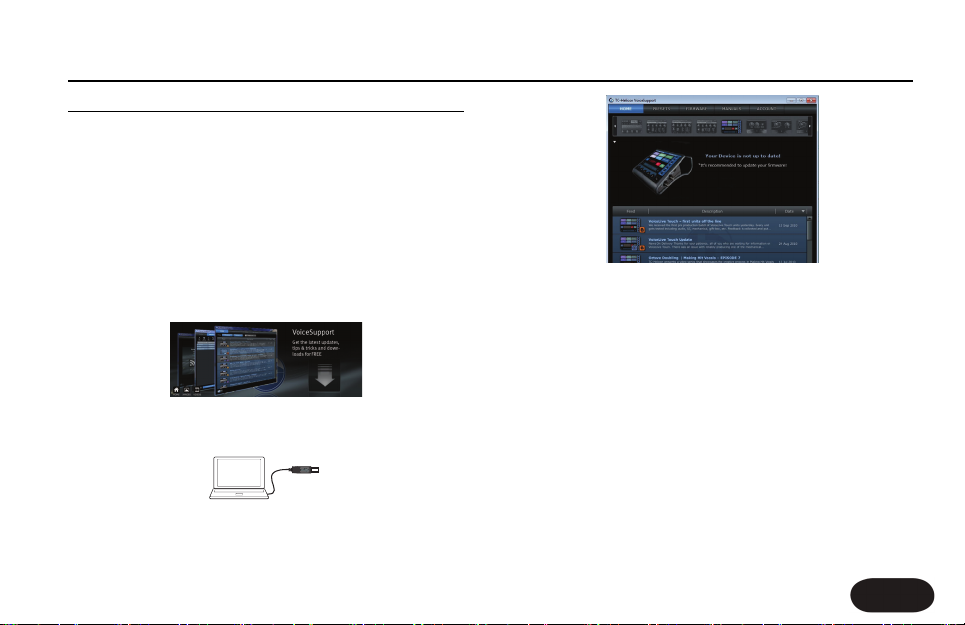
The VoiceSupport Application
4. Read the news, click on tabs and browse the features of the
application. A manual for VoiceSupport is located here:
http://www.tc-helicon.com/voicessupport-support.asp
Notes on using VoiceSupport with VoiceLive Touch
The Presets tab of VoiceSupport allows you to re-arrange and rename
presets and Favorites in VoiceLive Touch.
Note: In the Presets window, the Favorites are located in preset slots
numbered 276 to 300.
Individual edited presets and Favorites may be returned to factory
settings in VoiceSupport.This is done by deleting them in the Presets tab
and then pressing the Apply Changes button.
USING VOICESUPPORT
VoiceSupport is your way of getting the most from your TC-Helicon
product, as well as letting your product grow with firmware updates that
include new features.VoiceSupport includes:
••
Drag & drop preset management and backup
••
Access to firmware updates and new features
••
Videos, artist profiles, tips & tricks
••
Registration of your product
To access the VoiceSupport application
1. Download VoiceSupport from www.tc-helicon.com/voicesuppor t.
2. Install VoiceSupport on your computer.
3. Connect your product via USB to your computer.
3. Run VoiceSupport.
Page 7
8
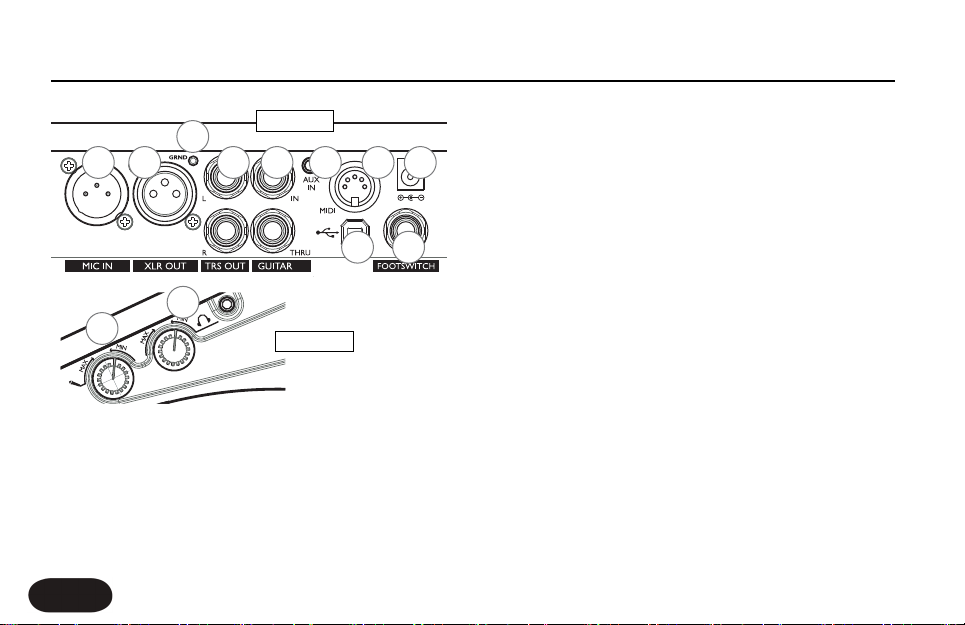
Connections
55.. GGuuiittaarr IInn aanndd TThhrruu -
Plug a 1/4” cable directly from your guitar into
the high Z (impedance) In jack. If you use effect pedals, they should be
connected after VoiceLive Touch. Plug a 1/4” cable from the Thru jack to
your first effect pedal or to your amplifier/PA. If you leave the Thru
unconnected, the guitar sound will be mixed into the main output of
VoiceLive Touch.
66.. AAuuxx IInn JJaacckk -
Mixes audio from an external stereo device such as an
MP3 player into the main mix. No effects are applied to this input.
77.. MMIIDDII IInnppuutt -
Connect the MIDI Out from a keyboard, audio
workstation or MIDI sequencer to control harmony and select presets.
88.. PPoowweerr A
Addaappttoorr IInnppuutt -
Connect the factory-supplied adaptor here.
Applying power automatically turns on VoiceLive Touch as there is no
power switch.
99.. UUSSBB CCoonnnneeccttoorr -
Used for connecting VoiceLive Touch to a computer
for version updates and MIDI communication. Note that the USB
connection does not provide power for the unit.
1100.. FFoooottsswwiittcchh IInnppuutt -
Allows connection of a TC-Helicon Switch 3
footswitch.This footswitch can be set to control several useful functions
in the Setup menu. Requires a 3 conductor (TRS) cable.
1111.. HHeeaaddpphhoonnee OOuut
tppuutt aanndd LLeevveell CCoonnttrrooll -
Connects to standard 1/8”
stereo headphones.
1122.. IInnppuutt LLeevveell CCoonnttrrooll -
Turn clockwise while singing to set input level.
The green LED on the front panel should flash but the Clip LED should
not light on your loudest singing.
11.. MMiicc IInnppuutt -
Balanced, low impedance XLR input for your mic.
22.. XXLLRR OOuuttppuutt -
Can produce a mono output when Output is
configured for mono in the Setup menu.
33.. GGuuiittaarr GGrroouunndd LLiifftt -
Press this to assist with hum reduction.
44.. 11//44”” TTRRSS OOuut
tppuuttss -
These produce the main output. They can be
configured for Mono, Dual Mono or Stereo output in the Setup menu.
Side View
Rear View
1 2
3
4 5 6 7 8
9
10
11
12
Page 8
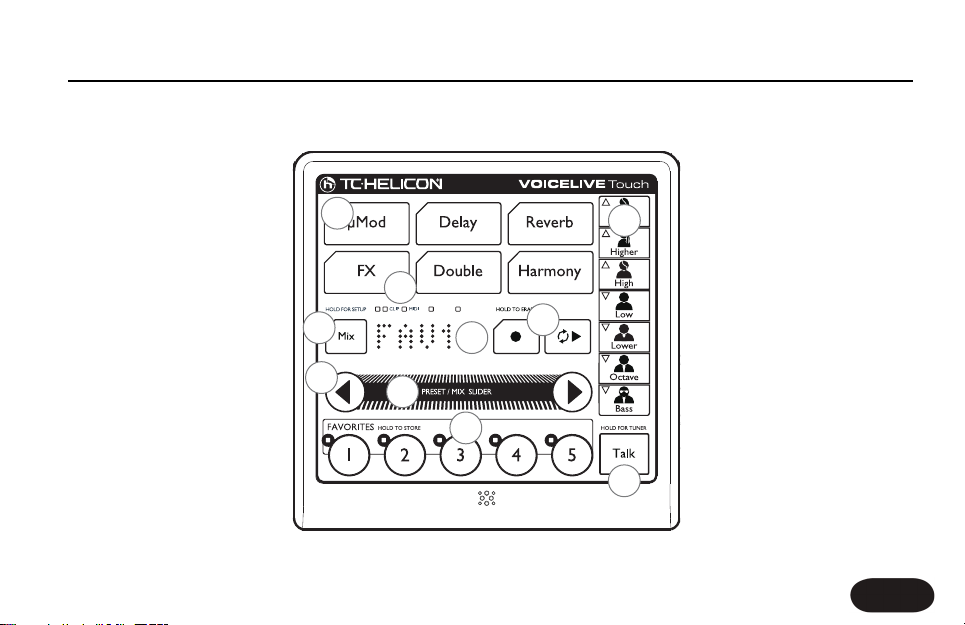
1100.. TTAALLKK BBUUTTTTOONN -
Tap to mute all
effects except Tone. Hold to access
guitar Tuner.
33.. LLEEDDss -
Input and Clip show signal
present(green) and input too high
(red). MIDI indicates MIDI input. An
unlabeled flashing LED shows the tap
tempo of the current preset.
88.. TTHHEE SSLLIIDDEERR -
Swipe, drag or tap the
Slider to load presets or change values in
edit modes. Tap to display preset name
or parameter and value in edit modes.
Hold to enter Wizard that assists in
browsing presets according to category.
Double tap anytime to exit to Home.
77.. AARRRROOWW BBUUTTTTOONNSS -
Tap either
arrow to increment presets in Home
mode. Tap either to browse menus in
edit modes. Hold Left arrow to undo last
loop overdub. Hold right to extend loop
length 2x.
22.. HHAARRMMOONNYY VVOOIICCIINNGG -
Tap any
four to choose harmony voice
arrangements. Hold any lit Voicing
button to edit.
55.. DDIISSPPLLAAYY -
Shows current Favorite
bank and number (FAV1-5, B1-5, C1-5
etc.) or preset (e.g. 105). Also shows
edit parameters and values.
44.. MMIIXX BBUUTTTTOONN -
Tap to enter mix
menu then use arrows to select and
Slider to adjust. Tap Mix again to exit.
Hold Mix to enter
SSeettuupp mmeennuu
and set
phantom power, Tone, MIDI channel
and more.
99.. FFAAVVOORRIITTE
E BBUUTTTTOONNSS -
Tap a
Favorite button to jump to presets you
use most often. Hold to store preset and
any edits as a Favorite. To select
FFaavvoorriittee
bbaannkkss AA ttoo EE
, briefly hold the Slider while
tapping a Favorite and then release.
Front Panel
9
66.. LLOOOOPP CCOONNTTRROOLLSS -
Tap red button to record and again to loop.
Tap green to stop and play. Hold red to Erase loop.
11.. EEFFFFEECCTT BBLLOOCCKKSS -
Tap any effect block to turn it on or off. Hold to edit,
then tap to exit. Holding the Delay button is used to set
ttaapp tteemmppoo
.
1
2
3
4
5
6
7
8
9
10
Page 9
Basic Operations
10
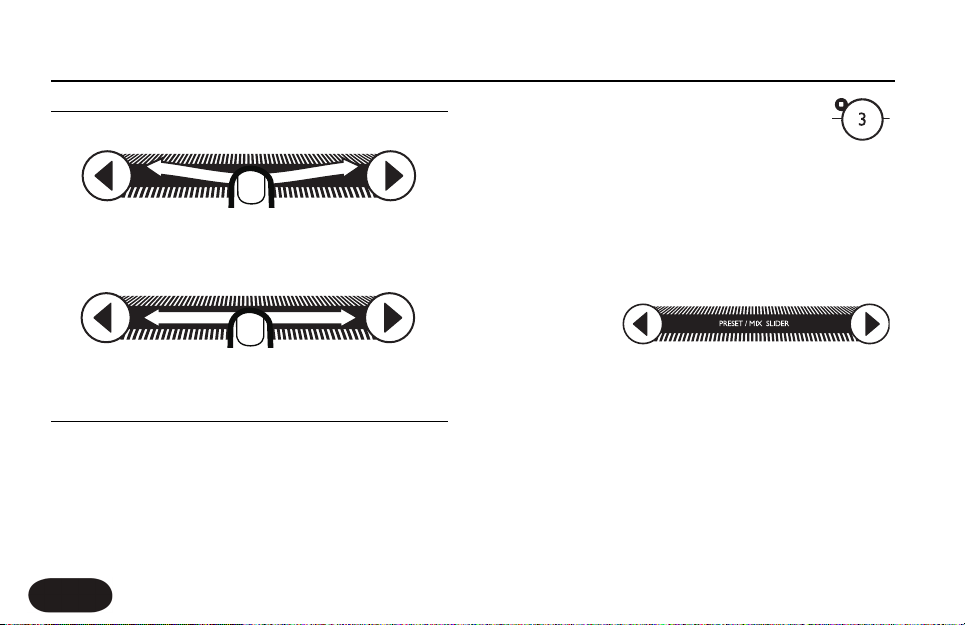
THE SLIDER
Using the Slider: Swipe
A quick flick along a portion or the entire Slider will star t it freewheeling
through the parameter values or presets. Repeated swipes will continue.
A single tap during freewheeling will stop scrolling.
Using the Slider: Drag
Moving your finger along the Slider slowly without releasing is best for a
small range of values.
USING THE VOCAL EFFECTS
First, ensure no edit modes are active by double tapping the Slider. The
display should briefly show “HOME”.
Presets and Favorites
VoiceLive Touch contains over 200 factory presets.You can store any of
these presets to a Favorite including any edits you've done on that
preset.
Loading a Favorite
Tap any Favorite button to load the effect assigned to it.
There are 25 Favorites contained in banks labeled A
through E. To access the banks, hold the Slider and
immediately tap one of the 5 Favorites buttons.
The factory-programmed Favorite banks are organized as follows:
Bank A - Showcase/variety
Bank B - Harmony and Doubling effects
Bank C - Effects useful for making interesting loops
Bank D - Transducer effects
Bank E - Extreme sounds
Loading a Preset
There are over 200
presets to sing
through. Slide along
the Slider or use the Arrow buttons to scroll up or down presets by
ones. Swipe the Slider to scroll through a large range of presets quickly
and tap to stop.
Flashing Favorite LED
This lets you know something about that Favorite has changed. Either it
has been edited or the preset has been changed. If you don’t want to
store the changes, choose any other preset or Favorite.
To save a preset to a Favorite:
1. Load a preset you want to store as a Favorite.
2. (Optional) Choose the desired Favorite bank by holding the Slider and
immediately tapping one of the five Favorite buttons.
Page 10
2. Press and hold the desired Favorite location to store.
Displaying preset names
As long as you are not in an editing menu, you can scroll the current
preset or Favorite’s name by tapping the Slider once.
MUSICAL CONTROL OF HARMONY AND HARDTUNE
The harmony and HardTune effects require musical information to
sound correct with your accompaniment. VoiceLive Touch dynamically
detects whether a single device (guitar,MIDI or MP3 player) is connected
and temporarily assigns it as the musical control device.
Using Guitar, MIDI or Aux In to control harmony
Connect one device to the respective input jack on the rear panel. Select
any preset that has the Harmony and/or FX button LED lit such as
preset #3. Sing while you play guitar, MIDI keyboard or MP3 player.
These inputs are interpreted to produce moving harmony intervals that
correlate to the changing chords in your music. In presets with
““NNootteess””
in the title, the Harmony voices are controllable only by MIDI; your exact
keyboard notes determine the harmony pitches.
Using key and scale to control Harmony and HardTune without an
instrument
You can enter a key and scale when you a) know the key of the song
you are singing and b) have a pitch reference to sing along with such as
an instrument or mixed music. Choose a preset such as #3: Tuned
Up+Down to hear the effects.
To enter the Harmony key and scale of your song:
1. Hold the Harmony button to enter its edit menu.
2. Press the arrow buttons until you locate the Key: menu.
3. Slide along the Slider to choose the key.
4. Tap the right arrow to enter the Scale: menu.
5. Slide to choose a M
ajor scale e.g. M1, M2, M3 or a minor scale
e.g. m1, m2, m3.Tr y each scale for best fit with your music.
Now, sing the song with your accompaniment. By default, the key and
scale you set will remain in effect for all harmony presets. If you prefer
to save different keys for presets, turn the Key/Scale Gbl parameter in
the Setup menu to Off.
Note regarding Custom scales: Scale customization is not possible in
Touch. Some presets ported from VoiceLive 2, e.g. those with “Drone” in
the name, will show Cu for scale. This indicates the scale is custom,
though it cannot be edited further in VoiceLive Touch.
BASIC
LOOPING
To make a basic loop:
1. Load or edit a preset you want as your first layer effect.
2. Press the red Record button where you want your loop
to start from and sing a shor t phrase.
3. Press the Record button again to end recording and begin loop
playback.
You should now hear your repeating phrase.You can press the green Play
button to stop playback.
Basic Operations
11
Page 11
To overdub the next layer:
1. Load a different Favorite or preset if desired, then start
playback and press Record when ready to add your layer.
2. Press Record again to continue playback without recording or
continue recording layers.
Holding the left arrow will undo the previously
recorded layer. Holding it again will undo the
previous undo (or redo).
Holding the right arrow copies and doubles the length of the loop so
you can record a longer phrase over a shorter repeating loop beneath
it.This can be repeated until the memor y fills.
Holding the Record button will erase the entire loop including loop
points and is not undo-able.
More detailed information on basic looping as well as the
LLooooppss
and
SShhoottss
modes can be found in the Looping Tutorial section of this manual.
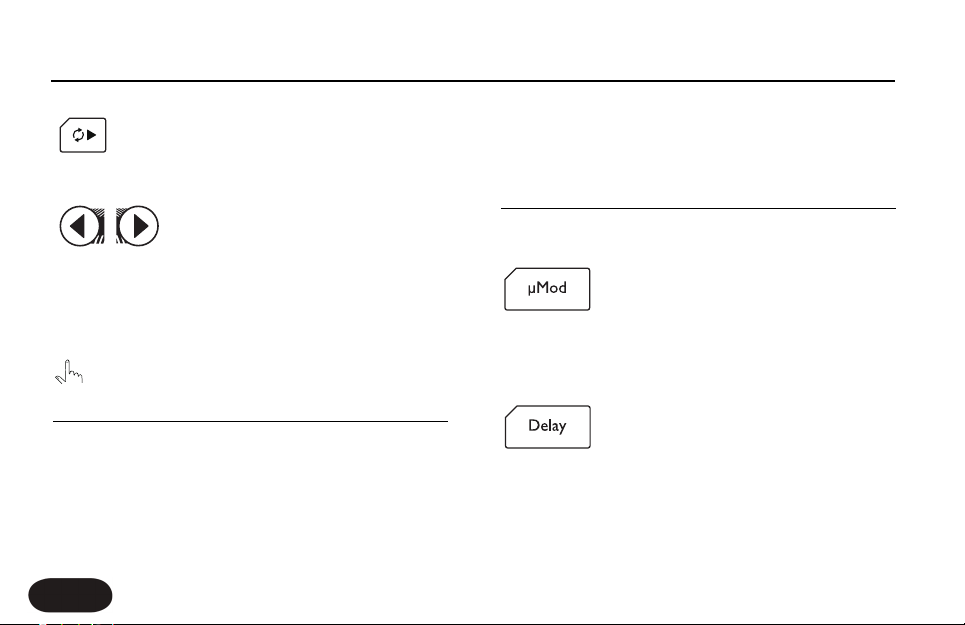
EDITING PROCEDURE
To make changes in an edit menu
1. Hold an Effect block button,Voicing button or the Mix button to
enter its edit menu.
2. Tap an Arrow button to browse up or down through the
parameters in the menu. The parameter name and value will
scroll across the display.This prompt can be recalled by tapping
the Slider.
&
3. When you have found the parameter you want to change, swipe
quickly or drag along the Slider.
To store edits to a Favorite, hold any Favorite button.
To finish editing and return to performance mode, double tap the Slider.
EFFECT EDIT PARAMETERS
The following lists the editable parameters by effect. Hold any effect
button to enter its edit menu.
1 Level - Sets amount of effect in the mix.
2 Style - Selection of 24 factory-configured effect types.
3 Lead Level - Lowers lead (dry voice) when the effect is the only one
active. Useful for 100% wet effects when needed.
1 Level - Sets amount of effect in the mix.
2 Style - Selection of 18 factory-configured effect types.
3 Lead Level - Lowers lead when only the Delay is active.
4 Width - Some styles have stereo panning. This sets how wide they
sound from 0% (mono) to 100% (stereo).
Basic Operations
12
Page 12

5 Tempo - Parameter appear s when delay style is set for tap tempo
(styles 1-16 only). Used to set delay time via beats per minute (BPM).
1 Level - Sets amount of effect in the mix.
2 Style - Selection of 30 factory-configured effect types.
3 Lead Level - Lowers lead when only Reverb is active.
1 HardTune Style - Ranges from Off through 12 styles blending gender,
octave shifting and HardTune amount.
2 Transducer Style - Ranges from Off through 16 styles including Beatbox
which can be used for a bass-heavy sound in a preset when Tone is on
globally.
3 Low Cut - Allows tailoring of megaphone effects by rolling off low
frequencies as the number (in Hertz) increases.
4 Trans Level - Compensates for lost level when frequency bands have
been attenuated to make megaphone/radio effects. Caution: can cause
feedback at high settings.
5 Routing - Controls where the Transducer is placed in the vocal path:
Lead: Transducer is inserted on the Lead voice only. Harmonies,
Doubling and effect sends are unaffected.
Harm+Dbl: Transducer is inserted on the Harmony and Doubling
paths only.
Voices: Transducer is inserted on the Lead, Harmony and Doubling
voices and their effect sends.
Lead FX: Transducer is inser ted on the Lead send to the μMod, Delay
and Reverb effect sends.The Lead voice will be clean and the effects
will be affected by the Transducer style.
Harm FX: Transducer is inserted on the HARMONY send to the
effects. Lead and Harmony voices will be clean but the effects driven
by only the Harmonies will be affected by the Transducer style.
1 Level - Sets amount of effect in the mix
2 Style - Selection of 6 factory-configured effect types
3 Lead Level - Lowers lead when the Doubling effect only is active.
1 Level - Sets amount of effect in the mix
2 Style - Selection of 15 factory-configured effect types
3 Double - Used to thicken the Harmony voices. On engages an extra
voice for every active Voicing button, Choir engages the Choir effect.
Both is a combination of the Double and Choir effects.
Basic Operations
13
Page 13

4 Lead Level - Lowers lead when only the Harmony effect is active.
5 Naturalplay - Determines whether Harmony in the current preset is
controlled by the automatic input sensing feature (Auto) or by one of
the specific inputs: Guitar, MIDI,Aux Input, Scale, Shift, Notes or Notes 4
Channel.The Nat Play Gbl parameter in the setup menu must be set to
Off in order to allow editing this setting.
The Guitar, MIDI and Aux Input settings configure the harmony
algorithm to produce interpreted dynamic harmony intervals that change
with the ongoing chords of the device. Scale produces fixed scale
harmony (see below). Shift produces fixed intervals also but requires no
key or scale to be set. Notes harmony intervals are determined by the
exact notes played on a MIDI keyboard. Notes 4Channel mode is the
same but each of four voices are controlled on a separate MIDI channel
counted up from the main MIDI channel set in the Setup menu.
6 Key and 7 Scale - Sets Harmony control to a fixed key and one of the
3 Major and 3 m
inor scales when the Naturalplay setting is configured
for Scale. Scale harmony can work well with many songs but not all.To
use, find a preset with Harmony enabled and test which scale works best
for your music. If the Scale shows “Cu”, this means that it has been
customized at the factory to produce unusual intervals,generally a drone
note. Scale customization is not possible in VoiceLive Touch.
Harmony Voicing Buttons
These each have the same editable parameters. Note that the voicing
must be on before it can be edited.
1 Level - Reduces the volume of the current voice relative to the others.
2 Pan - Sets where the voice sits in the stereo field.Note this only applies
when the output is configured for stereo and you are using a stereo PA
or headphones.
3 Gender - Sets the timbre of the Harmony voice from very deep (-50)
to very thin (50).
USING THE GUITAR FEATURES
When you connect a guitar to the Guitar In jack and connect nothing to
the Guitar Thru jack, you have the option to mix the guitar sound and
effects with your voice and its effects and send all of this to your PA.This
is in addition to the guitar being useful for guiding harmonies.
VoiceLive Touch allows adjustment of the global guitar level (Guitar) and
effects level (Gtr Fx) selection parameters when you press the Mix
button. Use the arrow buttons to find the parameters and the Slider to
adjust if necessary.
The default guitar effects configuration offers reverb and chorus/detune
but if you want to change it, hold Mix to enter the Setup menu then find
the Gtr Fx Style parameter with the arrow buttons. Use the Slider to
select a style you like.The guitar level and effects are global and stay the
same over preset changes.
Hold the Talk button to access the guitar tuner.The tuner works whether
the Guitar Thru jack is used or not.
Basic Operations
14
Page 14

FINDING PRESETS WITH THE PRESET WIZARD
1. In Home mode, press and hold the Slider
2. Drag the slider to choose a preset category
3. Tap the Slider
4. Swipe the slider to listen to presets within the choosen category
5. Double tap the slider to select the preset and return Home.
The Wizard categories are listed below:
Harmony HardTune Megaphone Character Extreme
Modulation Tap Double Choir Simple
Notes No Harmony
SETUP:P
HANTOM POWER,MONO OUTPUT,
MIDI CHANNEL AND MORE
Standard settings are located in the Setup menu.The Setup
parameters make global changes (ones that don’t change when you
change presets). Edits made in the Setup menu are retained over
subsequent powered-on sessions.
1. To enter the Setup Menu, hold the Mix button.
2. To find Setup parameters, tap the arrow buttons.
3. To make changes to a parameter value, swipe the Slider. Changes
are active immediately and stored until changed again.
4. To view the name of a selected parameter and value while in
Setup menu, tap the Slider.
5. To exit the Setup menu, double tap the Slider.
The Setup parameters are listed below:
1 Phantom - Turn this on to provide 48V phantom power if you are using
a condenser microphone.
2 Tone - Applies adaptive Shape EQ, compression, de-ess and gate functions.
Off 5 Normal No Gate
1 Normal 6 Less Bright NG
2 Less Bright 7 Warmth NG
3 Norm + Warmth 8 More Comp NG
4 More Comp
3 Pitch Cor Amt - Controls auto chromatic pitch correction. 50% is a
good starting setting.
4 Gtr FX Style - Combines guitar-dedicated reverb and μMod effects
into styles.
Off - No guitar effects
1 Thk+Hall - Thicken (detune) and medium hall reverb
2 Hall - Hall reverb only, no thicken
3 Thk + Room - thicken plus small room reverb
4 Room - Small room reverb only
5 Thk + Arena - Thicken plus long arena reverb
6 Arena - Arena reverb only
5 Output - Configures the outputs for stereo or mono.
Stereo - (default) Set when using the Left and Right 1/4”TRS jacks into
a stereo PA.
Basic Operations
15
Page 15

Mono - Set when using the single XLR output jack only.
Dual Mono - Allows independent external mix control of mono wet
guitar and mono wet vocals. Mono vocals with effects are produced
from the Left TRS output and mono guitar plus effects are produced
from the Right TRS output.
6 USB - Configures USB input and output.
Stereo - (default) USB input audio from a computer is mixed directly
to the main outputs of Touch. USB output of Touch is stereo mix of all
effects and guitar plus its effects.
Track - USB input is same as Stereo above. USB output configured to
send dry voice (left) and guitar (right) while analog outs produce
normal stereo output for monitoring while performing par ts.
Insert - USB audio input is optimized for processing external vocal and
guitar tracks. USB left input expects dry voice for harmony and effects
processing. USB right input expects dry guitar or chordal instrument
audio for harmony control. USB output is same as Stereo.
7 Tap Gbl - Tap Tempo Global control. Determines whether a tempo you
have tapped-in via the Delay button sets all presets to the same tempo
(On) or each preset or favorite uses its own stored tempo (Off).
8 Key/Scale Gbl - This parameter determines whether a key and scale
you have entered in the Harmony edit menu will apply to all presets
(On) or each preset may have a different key and scale (Off).
9 Nat Play Gbl - (Naturalplay Global Control) Determines global device
for harmony control.
Off - Favorites can be stored with a unique Naturalplay control device
setting in their Harmony edit menu. Thus, one Favorite could be
controlled by a guitar and another could be controlled by MIDI.
Auto - Harmony control device is determined dynamically depending
on which device is connected.
Guitar - Global harmony control device is from Guitar input jack only.
MIDI - Device connected to MIDI In jack or via USB controls harmony.
Aux - Input from Aux In jack or via USB controls harmony only.
Scale - A fixed key and scale controls harmony in all presets and Favorites.
Shift - Sets global harmony to Shift mode.
Notes - Global harmony controlled by MIDI Notes on 1 channel.
4 Chan Notes - Global Notes mode harmony controlled by MIDI
Notes on 4 separate MIDI channels.
See also the Naturalplay parameter in the Harmony edit menu.
10 Pedal - Configures the optional Switch 3 footswitch using styles.
1 Harmony/Favorite/Loop
2 Loop/Stop/Undo+Redo
3 Loop/Left button/Right button
4 Talk/Banks/Favorite
5 Harmony/Banks/Fav
6 Harmony/10s/1s
7 Talk/10s/1s
8 Harmony/Stop/Loop
Basic Operations
16
Page 16

Basic Operations
17
Pedal Legend:
Harm - Harmony effect on/off
Fav - Cycle Favorites
Banks - Cycle Favorite banks
10s - Increment preset by 10. Hold to reverse
1s - Increment preset. Hold to reverse
Loop - Single button loop control: first tap=Record, 2nd tap=Play,
subsequent tap/release=Record on/off during playback,
tap/hold=undo /redo previous, double tap=Stop.
MIDI Chan - Choose a channel from 1 to 16 to match the MIDI output
channel of your controller keyboard. Choose Off to ignore incoming
MIDI.
PERFORMING A
RESET
You can return all setup, preset and Favorite values to factory values in
one reset operation.This cannot be undone.
To reset all:
1. Power up
2. When the version number is shown in the display hold the Bass, Low
and the top Octave harmony voicing buttons until you see “Factor y Init”.
Release.
Individual edited presets and Favorites may be returned to factory
settings by deleting them in the Presets window of VoiceSupport and
then pressing the Apply Changes button.
USING THE LOCKOUT MODES
VoiceLive Touch has three special modes where the functionality of the
product is limited for specific situations.These modes are accessible from
the Home screen.
Sleep Mode
In this mode all features and audio from the product are turned off.This
is very similar to turning off the power.
To enter the mode: press and hold Favorite 1 and 5
To exit the mode: double click the slider
Break Mode
Use this mode when your between sets. Audio is muted at the outputs
except for USB and Aux.This way you can keep background music going.
In addition, the user interface is locked out so no one can change your
settings.
To enter the mode: press and hold Favorite 2 and 5
To exit the mode: double click the slider
Lock Mode
The Lock mode is especially useful on worship teams or situations where
there is more than one singer,each using VoiceLive Touch. In Lock mode,
the user interface features are locked out except for accessing the
Favorites and Talk.This way a leader can program the units in advance and
focus other singers on simple changes.
To enter the mode: press and hold Favorite 3 and 5
To exit the mode: press and hold Favorite 3 and 5
Page 17

ADDITIONAL SETUP MENUS
In addition to the Setup menu described previously are the MIDI and
Advanced menus. Hold the Mix button to enter the most recently used
of these menus. Hold the right arrow button to cycle to the next menu
or hold the left arrow to cycle to the previous menu.The current menu
name will show for a moment before changing to a parameter in that
menu and showing it’s value. The MIDI and Advanced menus are
discussed below.
THE MIDI SETUP MENU
The MIDI setup menu allows you to adjust settings relating to control of
VoiceLive Touch from a MIDI keyboard or a sequencer. See above for
instructions on accessing the MIDI setup menu.
1 MIDI Chan - Sets the MIDI channel on which Touch will receive the
MIDI notes for harmony control in Notes presets and program change
messages that call up presets or Favorites. A setting of Off will prevent
these messages from being received on any channel.
2 Filter - Blocks program change (PrgChange), system exclusive (Sysex)
or both (PC+Sysex) messages. It can be convenient to block program
change messages if your keyboard controller is sending notes and
program changes to a sound module on the same channel and you want
VoiceLive Touch to receive only notes. Sysex can be filtered to prevent
presets being overwritten by an external program such as VoiceSupport.
3 CC Chan - Sets the MIDI channel on which Touch can receive
continuous controller (CC) messages such as volume (CC7). By default,
this is set to channel 1 but it can be changed to other values including
0ff which will ignore all CC messages on all channels.
4 Transpose - This transposes the harmony voices in MIDI Notes presets
to allow it to be controlled by upper or lower sections of a MIDI
keyboard if required.The value corresponds to octaves.
5 SplitDir - (Split Direction) Sets whether MIDI notes ABOVE or
BELOW the split point are used to control MIDI Notes presets only.
6 SplitNote - Sets the MIDI note above or below which the keyboard
split will be active.
7 SysexID - (MIDI System Exclusive ID number) Used when addressing
multiple VoiceLive Touch units with a MIDI editing program. If multiple
units are on the same MIDI In/Thru chain, each one should have its own
ID or they all will be edited in the same way.
8 VibBoost - Specifies how the Mod Wheel message affects vibrato if it
is enabled in a preset.The Boost setting (default) will add more vibrato
once the part of the wheel movement reaches the corresponding
amount of vibrato and then returns to the original amount at rest
position.The Manual setting allows full range control of vibrato once the
wheel is moved.To restore the factory vibrato amount, recall the preset.
9 PBRange - (Pitchbend Range) Sets the range in semitones that MIDI
pitch bend information will alter harmony voice pitch shifts.
10 MIDI Ctrl - Specifies through which input MIDI notes and sysex data
are received: the physical MIDI input or the USB input:
MIDI Setup Menu
18
Page 18

MERGE (default) - Keyboard controller data (MIDI notes and CCs)
are received via the MIDI In jack. USB sysex data (presets, updates) are
received via the USB jack. This allows you to load presets from
VoiceSupport and then immediately test them with a keyboard
controller if you like.
MIDI - Keyboard controller data and sysex are received via the MIDI
In jack only.The USB jack is ignored. Note that VoiceSupport updates
will not work because USB is required for this. Updates are possible
via the MIDI In jack but a sysex application is required as well as a
sysex header.Contact TC-Helicon support if you need to update your
product without USB.
USB - Keyboard controller data and sysex are received via the USB
input only. This is useful when you are using a DAW/MIDI sequencer
application to send keyboard notes to VoiceLive Touch and you want
the preset loading and version update features of VoiceSupport.
THE ADVANCED SETUP MENU
The Advanced menu contains less often used system-level parameters.
See previous to see how to access this menu.
1. Scroll Speed - Text scrolling speed in VoiceLive Touch can be increased
or decreased from the default value of 25. Numbers between 24 and 10
are faster and numbers between 26 and 50 are slower.
2. Lead Mute - Turns your dry lead voice off in all presets when set to
ON. This is useful when Touch is being fed via an auxilliary send on an
external mixer and there is already a dry lead path in the mixer. Note
that HardTune and Megaphone effects will be layered onto the dry
external voice where normally dry lead is muted in the preset.
Lead Delay - Can be used to compensate for the slight processing
latency of the harmony and doubling voices by delaying the dry lead
voice. When set to NONE (default), the lead voice is sent through
VoiceLive Touch with the shortest possible latency inherent to the
system. When set to VOICE SYNC, the lead voice is delayed.
Guitar Mute - Mutes the guitar signal in the main outputs when no jack
is connected to the GUITAR THRU jack.This allows the guitar dry signal
to be mixed externally.The guitar signal still feeds the NATURALPLAY
harmonies and tuner.
Undo - Setting this to OFF doubles looping time available at the expense
of the ability to undo the previous loop overdub.
Loop Feedback - Used to make each loop playback during overdubbing
fade in level if desired.The default is 98%. This will allow you to make a
loop that fades out gradually instead of stopping abruptly if you enter the
menu and set a lower value when you want to start fading out.
Output - This can decrease the overall output level of VoiceLive Touch in
the situation where the mixer you are connecting to is not capable of
accepting Touch’s full output without distorting.
TuneRef - This sets the overall tuning reference of the harmony voices
and HardTune with respect to A-440.This may become necessary when
performing with an instrument such as a piano where it’s overall tuning
has dropped. Note that dropped tuning on a guitar used to control
harmony does not require this parameter to be adjusted unless the
guitar is less than 100 cents detuned which is rare.
Advanced Setup Menu
19
Page 19

Demo - There is a looped vocal recording in VoiceLive Touch that can be
used to facilitate self demonstration. Turning this parameter to On will
change the user interface prompt to offer this feature.
When Demo mode is selected, the demo will take 10-15 seconds to
load. Once the demo is loaded a repeating prompt invites you to hold
the Play button and play the demo vocal.While the demo vocal plays it
is possible to audition the different Favorites, presets and features.
Holding play will stop the demo vocal. Note that this mode consumes
looping memory so looping time is shor tened.
VoiceLive Touch will remain in Demo mode over power cycles until this
parameter is turned Off.
Advanced Setup Menu
20
Page 20

ADVANCED LOOPING: LOOPS MODE
Loops mode allows you to create a set of loops of the same length that
can be played back in any order. As one loop plays, you can cue up the
next so that it starts at the exact end point of the previous. This keeps
your rhythm going continuously as you vary the musical intensity.
To enter Loops mode
1. Double tap the Slider to go Home if you are not in Home mode
already.
2. While holding your finger on the Slider, tap the red Record
button.The display will briefly show >LOOPS to indicate Loops
mode.
Note: If you hold the Slider too long in Home mode before tapping
Record or Play, the Wizard will star t. If this happens double tap the Slider
to go back Home then repeat the action described above.
Understanding the
LLooooppss
mode display and controls:
11.. LLOOOOPP NNUUMMBBEERR DDIISSPPLLAAYY -
The number on the left is the current
loop.The number on the right shows the number of available loops given
the length of your starting loop.
22.. LLOOOOPP BBEEAATT CCOOUUNNTTEERR -
Shows the length of your loop divided by
four. If your loop is one bar long, this can be used as a beat reference
when adding overdubs. With loops longer than one bar, it is used as a
progress reference showing a multiplier of your beat length. Flashing
indicates current loop number displayed is cued for next playback.
33.. RREECCOORRDD && PPLLAAYY
-
Same operation as in Basic looping mode.
44.. CCUUEE PPRREEVVIIOOUUSS && UUNNDDOO -
Tap the left arrow to cue previous loop
when current loop number is greater than 1. Cueing can be done during
playback or stopped.
Hold to undo an overdub, copy or clear operation.
Advanced Looping: Loops Mode
21
1
2
3
6
4
5
Page 21

55.. SSLLIIDDEERR LLOOOOPP FFUUNNCCTTIIOONNSS -
Swipe right to clear the current loop.
Swipe left for undo.
Holding the Slider anywhere left of its center will copy the current loop
into a temporary buffer for pasting into multiple loop slots.
Hold the Slider anywhere to the right of center to paste into the current
slot.
66.. CCUUEE NNEEXXTT && AAUUTTOO CCOOPPYY -
When the next loop slot is empty,
tapping the right arrow will automatically copy the current loop to the
next slot and cue it for playback.Automatic copying will continue until all
loop slots are full. An apostrophe will show beside the loop number
during copy actions.
If the next slot already contains a loop, tapping the right arrow will cue
the loop for playback.
Holding the right arrow will copy the current loop into a temporar y
holding slot.This allows you to paste over another non-consecutive loop
selected with the left or right arrow buttons. Note that the paste isn’t
completed until the current playback ends so you have a moment to
choose the destination slot. The display will show ACOPY meaning
Auto-Copy.
Holding the right arrow again will cancel the copy action.This is to allow
you to cue another loop without overwriting it with the current loop’s
contents if you change your mind.
Advanced Looping: Loops Mode
22
Page 22

ADVANCED LOOPING: SHOTS MODE
Shots mode offers you random-access loop playback. Where Loops
mode allows you to cue loops so that they play one after the other,
Shots mode changes the Favorite buttons into trigger buttons for you
to play loops in any order at any time.
To enter Shots mode
1. Double tap the Slider to go Home if you’re not there already.
2. While holding your finger on the Slider, tap the green Play button.
The display will briefly show >SHOTS. From then on, all of the
Favorite buttons will flash to indicate Shots mode.
Understanding the
SShhoottss
mode display and controls:
11.. LLOOOOPP NNUUMMBBEERR && BBAANNKK DDIISSPPLLAAYY
- Displays the same information
as in Loops mode except briefly after either of the arrows is pressed.
Pressing either of the arrow buttons will temporarily show the next
available bank of loops shown as 1-5, 6-10, ... 20-25.
22.. LLOOOOPP BBEEAATT CCOOUUNNTTEERR -
Same as in Loops mode.
33.. RREECCOORRDD && P
PLLAAYY -
Same operation as in Basic looping mode.
44.. LLOOOOPP BBAANNKK DDOOWWNN && UUNNDDOO -
Tap the left arrow to navigate to
lower loop banks when current bank is 6-10 or higher.
Hold to undo an overdub, copy or clear operation as in Loops mode.
Advanced Looping: Shots Mode
23
1
2
3
6
4
5
7
Page 23

55.. SSLLIIDDEERR LLOOOOPP FFUUNNCCTTIIOONNSS -
Same as in Loops mode.
66.. LLOOOOPP BBAANNKK UUPP && AAUUTTOO CCOOPPYY -
Tap the right arrow to navigate
to higher loop banks.When the number of slots in upper banks exceed
the maximum number of loops at your loop length, upper banks will not
be shown.
Holding the right arrow activates the automatic copy feature with the
difference that you can jump directly to the target destination instead of
cycling forward sequentially as in Loops mode.
77.. FFAAVVOORRIITTEESS
BBUUTTTTOONNSS -
In Shots mode, these become playback
triggers for the individual loops. Tapping them will immediately play back
the loop. When you lift your finger off the button, playback will stop
unless the Play button is lit.The number of buttons flashing corresponds
to the number of loop slots available at your loop length.
See the Appendix: Looping Tutorial for more information on
looping.
&
Advanced Looping: Shots Mode
24
Page 24

VOICELIVE TOUCH AND DIGITAL AUDIO
Here are a few common methods of using VoiceLive Touch with a USBconnected computer and an audio application (DAW):
1. Capturing a full mix of your performance
2. Processing vocals from your DAW
3. Recording dry vocal and guitar tracks
We assume you are familiar with configuring your audio application for
input and output and that you understand connection of VoiceLive
Touch’s inputs and outputs.
Method 1 - Capturing a full mix of your performance:
Set VoiceLive Touch’s Setup menu parameters
as such:
6 USB: STEREO
Connect your mic, headphones and optionally an instrument to
VoiceLive Touch and pick a preset you like.VoiceLive Touch will send the
fully processed sound to your DAW and you’ll be able to monitor
through your headphones. Set the input and output devices of your
destination DAW track to VoiceLive Touch. If you are singing along with
pre-recorded tracks, set those track outputs Touch as well so you can
monitor through your headphones.
Method #2 - Processing vocals from your DAW:
You’ll need a fully dry mono vocal track and optionally, a dry instrument
track (guitar or keyboard) or midi performance track if you plan to use
harmony.To use VoiceLive Touch as an effects insert, set the Setup menu
parameter as such:
6 USB: INSERT
Configure an aux send in your DAW to send the vocal track via USB to
VoiceLive Touch’s left input and the guitar track to the right.
To record a 100% wet track that will be mixed with the dry lead vocal
track, set the LEAD MUTE parameter to ON in the Advanced Setup
menu. If a guitar track is used to control harmony, the GUITAR MUTE
parameter in the same menu should also be set to ON.
To record an output track that will replace the original vocal track such
as when you use HardTune or Transducer presets, ensure that LEAD
MUTE is set OFF.
You can monitor through VoiceLive’s headphone or main outputs as you
record but when playing back using VoiceLive Touch as the output audio
device, set 6 USB: INSERT to USB: STEREO.
Method #3 - Recording dry vocal and guitar tracks:
This method allows you to hear a fully produced sound while recording
but send only your dry guitar and dry voice to the DAW.
Set the Setup menu parameters as such:
6 USB:TRACK
Connect your mic and a guitar to VoiceLive Touch and your headphones
to the headphone out. Even though you’ll hear fully processed vocals and
guitar (with Guitar FX) in the headphones, the output feeding your
DAW will be separate dry vocal and guitar that you can process later
with Method #2.
USB & Digital Audio
25
Page 25

USB audio sample rate:
VoiceLive Touch requires no Sample Rate parameter (e.g. 44.1 kHz/48
kHz) setting to correctly receive from or send digital audio to a
computer.The synchronization process is done automatically.
Maximum sample rate VoiceLive Touch can accept is 48 kHz. Working
within an 88.2 or 96 kHz DAW session may be possible but this is
dependent on whether the DAW application or the computer OS
automatically downsamples to VoiceLive Touch’s USB audio requirement.
USB Audio And ASIO Applications
PC-based ASIO apps such as Cubase may require you to install a WDM
to ASIO “wrapper” such as ASIO4ALL which is available at
www.asio4all.com in order for VoiceLive Touch to be recognized as an
audio device.
Selecting The Audio Device
In the Mac and Windows operating systems, you can select VoiceLive
Touch’s audio device in your workstation program by name. In some
Windows XP DAW apps, however, the name of the audio device may
be “USB Audio Device”.
USB & Digital Audio
26
Page 26

MIDI Implementation
EEffffeecctt BBlloocckk OOnn//OOffff
Harmony 110 0-63 off 64-127 on
Double 111 “ “
Reverb 112 “ “
μMod 116 0-63 off 64-127 on
Delay 117 “ “
FX 104 “ “ On sets HardTune and Transducer to individual on/off status
BBlloocckk EEddiittss
μMod Style 50 0-24
Level 90 0-127
Delay Style 51 0-12
Level 62 0-127
Reverb Style 52 0-30
Level 91 0-127
Double Style 53 0-5
Level 15 0-127
Transducer Style 55 0-16
Out Gain 105 0-127
Harmony Style 56 0-14 Only for NaturalPlay, Scale and Shift modes. N/A for Notes, Notes 4Chan.
Level 12 0-127
Harmony Key 30 0-11 0=C, 1=C#, 2=D, 3=Eb, 4=E, 5=F, 6=F#, 7=G, 8=G#, 9=A, 10=Bb, 11=B
Harmony Scale 31 0-6 0=Maj1, 1=Maj2, 2=Maj3, 3=Min1, 4=Min2, 5=Min3, 6=Custom Scale
Note 1: Harmony Key & Scale also controls HardTune Key & Scale
Note 2: NaturalPlay must be set to Scale in preset or globally
Voicing Voice1 89 0 to the # of voicings in mode Only for Scale and Shift modes. N/A for Notes and Notes 4 Chan modes
Voicing Voice2 61 “ “ “ “
Voicing Voice3 88 “ “ “ “
Voicing Voice4 3 “ “ “ “
Level Voice1 46 maps to 127 values
Level Voice2 17 “ “
Level Voice3 21 “ “
PPaarraammeetteerr CCCC## RRaannggee CCoommmmeennttss
27
Page 27

Level Voice4 25 maps to 127
Gender Voice1 29 “ “
Gender Voice2 19 “ “
Gender Voice3 23 “ “
Gender Voice4 27 “ “
GGlloobbaallss
Voices Level 85 maps to 127
Delay/Reverb Lvl 86 “ “
Guitar Level 109 maps to 127
Guitar FX Lvl 22 maps to 127
Guitar FX Style 9 0-7
Aux Level 58 Maps to 127
Output Level 7 “ “ Caution: value 0 can mute all output audio over power up sessions!
Tone Style 106 0-3
Pitch Correct Amt 107 maps to 127 0=off
SSyysstteemm
Lead Mute 13 0-63 off 64-127 on
Talk 114 0-1 1=on. No tuner mode available
Sustain 64 “ “ Active in MIDI Naturalplay and MIDI Notes, MIDI Notes 4 Chan modes
All Notes Off 123 “ “
NNoonn-CCCC mmeessssaaggeess
Pitch Bend
Bank select 0-2 0=presets 1-127, 1=presets 128-256, 2=Favorites
Preset select 0-127 0=preset #1, 1=preset #2 etc.
MIDI Note on/off
LLooooppiinngg
All Loop Actions 44 0-26 See table following for CC44 values. Note: Release will stop Shots playback.
MIDI Implementation
28
PPaarraammeetteerr CCCC## RRaannggee CCoommmmeennttss
Page 28

0 PLAY 6 2X 12 BANK 2 18 SHOTS TRIGGER 3 24 SHOTS 4 RELEASE
1 REC 7 COPY 13 BANK 3 19 SHOTS TRIGGER 4 25 SHOTS 5 RELEASE
2 STOP 8 PASTE 14 BANK 4 20 SHOTS TRIGGER 5 26 ERASE
3 NEXT 9 AUTO COPY 15 BANK 5 21 SHOTS 1 RELEASE
4 PREV 10 CLEAR 16 SHOTS TRIGGER 1 22 SHOTS 2 RELEASE
5 UNDO 11 BANK 1 17 SHOTS TRIGGER 2 23 SHOTS 3 RELEASE
MIDI Implementation
29
LLooooppiinngg CCCC4444 ccoonnttrrooll vvaalluuee ttaabbllee
Page 29
Factory Preset List
30
1 SIXTH ENCORE 26 SIMPLE SLAP 51 JAZZ CLOSEUP 2 76 SING WITH RADIO
2 CLOSE UP 3RD 27 LONGVERB DUCKED 52 JAZZ CLOSEUP 3 77 THICK 2 ABOVE
3 TUNED UP+DOWN 28 ARENA CHANT 53 LIGHT FLANGE 78 BEACH BOY RADIO
4 KANYE LOCKDOWN 29 AMATEUR KIDS 54 LOWER DUO 79 TOE PLASTIC
5 ANOTHER BRICK 30 PRO KIDS 55 LOWER & DOUBLE 80 3RDS & 5THS BIG
6 BRIGHT DOUBLE 31 CLOSE 1UP+1DOWN 56 DARK SWIRL 81 HIGHERCHOIR WET
7 TWO HIGH 32 CLOSE BELOW 57 TWO LOW 82 BASSY CHOIR
8 CHORALE THREE 33 3RD OCT BELOW 58 CHORALE ONE 83 CHANGE THE WORL
9 UNISON CHOIR 34 3RDS & 5THS L-R 59 CHORALE TWO 84 BIG BOTTM CHOIR
10 AUTOTUNE RADIO 35 FAR 1UP+1DOWN 60 3RD UP GROUP 85 3RD UP CHOIR
11 DEEPER YOU 36 FAR GENDERS 61 3RD UP LADIES 86 4TH DOWN CHOIR
12 POWER CHORDS 2 37 2UP+1DOWN 62 LOWER GUYS 87 6TH DOWN CHOIR
13 HIGHER CHOIR 38 1UP+2DOWN 63 FAR GENDRGROUP 88 YOU'RE NOT ALON
14 HARMONY CHOIR 39 2UP+1DOWN+OCT 64 1UP+2DOWN+OCT 89 U R ALTO
15 RADIOHARMNY DLY 40 SHIFT -4 SEMI 65 DOMINUS REQUIEM 90 U R SOPRANO
16 BASS & 3RD UP 41 SHIFT +5 SEMI 66 FADEOUT 3RD UP 91 TUNED HARMONY
17 ELVIS RADIO 42 ONE UP ROOM 67 STEVE MCQUEEN 92 TUNED 2UP
18 DOUBLE REFLECT 43 CHOIR ONE 68 UP TWO ROOM 93 TUNED 1 BELOW
19 ANGELS RADIO 44 LOWER TRIO 69 SLAP ABOVE 94 LOWER ROBOTS
20 DIGERI-VOICES 45 BASSMAN 70 SLAP TRIO 95 UPPER ROBOTS
21 DISTORTO 46 COUNTRY GIRLS 71 BASS & LOW 96 RADIO GOSPEL
22 POP DUO 47 POP TRIO 72 3UP FLANG DELAY 97 JAZZ RADIO
23 LOWER BACKUP 48 STEREO PAIR 3+5 73 RUNNING ON MT 98 FLANGEY 3RD
24 THE MASSES 49 6TH BELOW 74 FLANGE TWO HIGH 99 POWER CORDS
25 DEEP DOWN 50 JAZZ CLOSEUP 75 FLANGE UP & DN 100 HARD TUNE DELAY
Page 30

Factory Preset List
31
101 DELAYED UPPERS 128 LOOSE DOUBLE 155 BANDPASS VERB 182 BOLLYWOOD
102 DELAYED HARMONY 129 OCTAVE CHILD 156 DEEP DUCKED FX 183 NOW HEAR THIS!
103 LIFE IN THE F L 130 BON J-U GIVE LV 157 T- ROOM 184 BASIC NOTES 8V
104 TONE DRONE UNI 131 OCT DOWN DOUBLE 158 ALTERNATIVE 185 NOTES 1V FEMALE
105 UNI+5TH DRONES 132 OCT DOWN GROUP 159 THICK OVERDRIVE 186 EASY NOTES 8V
106 OCTAVE DRONE 133 HARDTUNE OCTAVS 160 MEDIUM CORR 20% 187 NATURAL NOTES
107 TONE DRONE DOWN 134 GREGORIAN 161 GENTLE CORR 10% 188 NOTES 1V MELODY
108 TONE DRONE UP 135 SILKY DOUBLES 162 EASYTUNE 189 NOTES 1V MALE
109 DIGERI-DISTORT 136 CRUNCH DETUNE 163 T-PAINFUL 190 NOTES UNI STACK
110 MICROPITCH 137 OCTAVE FLANGE 164 STAGE AMP 191 NOTES UNI + YOU
111 DOUBLE CHORUS 138 VALKYRIE DUO 165 ECHO DOWN 192 THICK NOTES 4V
112 CHORUS PLATE 139 METAL DEMONS 166 IN THE SEWERS 193 NOTES 8V WIDE
113 DOUBLE BALLAD 140 SPACE CHOIR 167 POLTERGEIST 194 NOTES 8V MALES
114 OVERDUB SLAP 141 MONO SPRING 168 CHURCH TUNE 195 NOTES 8V FEMALE
115 100% WET UNISON 142 SMOOTHED VERB 169 AUTO PANNER 196 NOTES SLOW ATK
116 LAGER & ALE 143 GORGEOUS HALL 170 I AM A WALRUS 197 NOTES HEAVEN
117 MIXED OCTAVES 144 PRACTICE ROOM 171 POWER CORD ECHO 198 NOTES HEAVEN 2
118 OCT UP DOUBLE 145 JUST AMBIENCE 172 FLUTTER 199 NOTES 1V VOCODR
119 OCT UP GROUP 146 SLAP DUCK 173 CYLON DRONE 200 VOCODER SHIMMER
120 THINNER YOU 147 HOT SLAP 174 CLOCK RADIO 201 VOCO PORTA DIST
121 POPEYE + OLIVE 148 FREE FALLING 175 DISTORTED RADIO 202 NOTES WET CHOIR
122 OCTAVE POP 149 SIMPLE CHORUS 176 DIRTY SCREAM 203 NOTES CHOIR MEN
123 FIFTH DIVA 150 IF I WERE ABOY 177 TRASH-IT 204 NOTES CHOIR FEM
124 UNISON F&M 151 DUCKING TAPS 178 OCTAVE TRASH 205 NOTES CHOIR+UNI
125 UNISON M&F 152 MOD DELAY 179 FAST ROTOR 206 OPERA DIVAAAA!
126 PANNED DOUBLES 153 DIST DELAY 180 CHAOS 207 OCT DOWN MALE
127 MASSIVE STACK 154 TUNE TRANS ECHO 181 SPIRAL DOWN 208 POPEYE LIVES
Page 31

Factory Preset List
32
209 DEEPEST YOU Favorites: Bank A/Fav1 HARMONY CHOIR
210 THINNEST YOU Bank A/Fav2 CLOSE 1UP+1DOWN
211 OCT UP FEMALE Bank A/Fav3 KANYE LOCKDOWN
212 CROONER Bank A/Fav4 ANOTHER BRICK
213 PING PONG VERB Bank A/Fav5 CHORUS PLATE
214 BOP-A-LULA B1 CLOSE UP 3RD
215 MULTITAP ECHO B2 TUNED UP+DOWN
216 TAP TEMPO 1/4 B3 CHORALE THREE
217 1/2N TUNED ECHO B4 MAMBAZO!
218 SLAP ‘N’ ECHO B5 LOOSE DOUBLE
219 TRIPLET PONG C1 1/8N FILTERED
220 DRONE & ECHO C2 DRONE & ECHO
221 1/8N FILTERED C3 BASSDRUM FUZZ
222 BASSDRUM FUZZ C4 ANGELS LEFT
223 ANGELS LEFT C5 SOLOIST RIGHT
224 SOLOIST RIGHT D1 ELVIS RADIO
225 MAMBAZO! D2 NOW HEAR THIS!
D3 ANGELS RADIO
D4 SING WITH RADIO
D5 BANDPASS VERB
E1 OCT DOWN MALE
E2 OCT UP FEMALE
E3 ARENA CHANT
E4 BOP-A-LULA
E5 1/2N TUNED ECHO
Page 32

FAQs and Troubleshooting
33
Where can I find support for this product?
Point your browser to www.tc-helicon.com/support.
How do I change Favorite banks?
Hold the Slider while tapping a Favorite: 1=bank A, 2=bank B etc.
I can’t get the buttons to work.What’s wrong?
Double tap the Slider to exit Sleep or Break mode. If this doesn’t work
you may be in Lock mode - hold Favorites 3 and 5 to exit.
Why am I hearing feedback?
Move your vocal monitor so it faces the jack end of your mic.Turn Tone
to the Off or Less Bright style in the Setup menu.
Why do the Favorite buttons flash?
They show that you have made an edit. Either store the edit or reload
the Favorite.
Why can’t I tap a tempo for the Delay effect?
The Delay effect in the current preset/Favorite is not set to tempo.
Choose a Delay style from 1 to 16 and then tap your tempo.
The Harmony button is on in some presets, but there’s no Harmony.
These are likely the Notes mode presets. Connect a MIDI keyboard or
choose another preset.
Why doesn’t my guitar change the harmonies correctly?
Check that the volume control on your guitar is up.
Confirm your guitar cable is good by connecting your guitar directly to
your amp.
Remove any guitar effect pedals between your guitar and VoiceLive
Touch’s input.
Ensure that you are playing guitar chords made up of at least a root note
and a major or minor third.
Check that the Naturalplay Global parameter in the Setup menu is off
or the Naturalplay setting in the Harmony edit menu is set to either
Auto or Guitar.
My guitar is connected to my amp but I can’t hear it.What’s wrong?
Tap the Talk button to exit Tuner mode.
Can I Use Alternate Tunings On My Guitar?
Alternate tunings e.g. drop D, DADGAD, etc. are okay. The most
important notes of your chord, as far as VoiceLive Touch is concerned,
are the chord root and the third, so make sure these notes are clearly
voiced.Your guitar can be tuned to alternate tunings as long as you are
in tune with the onboard tuner.
Guitar Performance Tips
To ensure that the harmony voices follow your guitar playing closely, it’s
best to play as cleanly as you can.Also, at the beginning of your song,it’s
important to play a chord if you want to sing right on the downbeat.
Your guitar should be well-tuned to the onboard tuner or an external
one set to A=440 Hz. If the song section you want vocal harmony on
has fast chord changes, single note runs or very slow arpeggios, you can
use Scale mode to produce harmony.
Singing Performance Tips
The more in-tune you sing, the better the harmonies will sound.There is
a slight amount of pitch correction on the harmony voices but it’s mostly
up to you! Try to ensure that your amp or monitor is not facing directly
into your mic as this can confuse VoiceLive Touch.
Page 33

Appendix: Looping Tutorial
34
INTRODUCTION
VoiceLive touch is the ultimate vocal performance tool. Everything about
it has been designed to allow you to deliver unique and creative
performances to your audiences. Everything is instant-action, quickaccess, and do-it-now oriented. Looping is no different. Looping in
VoiceLive Touch is meant to be done from scratch in the heat of
performance. Don't think of it as a "voice recorder" to be used in
conjunction with software recording studios. Think of Vocal Looping as
the act of jamming with yourself in a live setting. Looping is an art, not
a gimmick. Your creative opportunities are about to increase
dramatically!
GLOSSARY
Loop Memory
VoiceLive Touch has a finite amount of memory to record your loops.
The maximum loop size depends on whether you are operating in mono
or stereo. In full stereo, you get 30 seconds of uncompressed hi-fidelity
loop time. In mono, you get double that at 60 seconds. If you are brave,
you can also disable the undo feature from the system menu (see the
manual) to double the available memory (up to 120 seconds in mono
mode). Note, making any changes to these modes will erase the current
loop because the system needs to reconfigure the way it uses internal
memory.
Beatboxing
Using your voice-box, lips, tongue and other parts of your body in
creative ways for the purpose of mimicking rhythmic instruments
(drums, cymbals, shakers, etc.)
Bar of Music
Western music usually relies on a repeating 4 beat rhythm. For example:
| Kick | Snare | Kick-Kick | Snare |. A bar in this type of music is always
4 beats. Some western music is based on a 3 beat repeating rhythm.
For example the "waltz": | Kick | Snare | Snare |. A bar in a waltz would
have 3 beats. Most western songs are made of several (hundreds of)
bars, each with the same number of beats.
Additive Recording
The act of recording over an existing recording, but instead of replacing
the old material, mixing the old and new together. Also called "overdubbing". The old audio is normally mixed at a slightly lower level so
that over time the oldest loop audio will gradually fade away. You can
adjust this fade out factor from the setup menus (see the manual for
details).
Loop Point
The moment in time a recording jumps back to the beginning and
seamlessly starts again. The time from the beginning of the recording to
the loop point defines the length of the loop.
Page 34

HOW TO GET STARTED WITH VOCAL LOOPING
Never looped before? Don't worry, it's amazingly simple. Looping is
about capturing an idea and then repeating it seamlessly in a loop over
and over again. That's not all however. The real magic of a looper is
that you're able to continue to record over the loop while it plays back,
building it up in wonderful ways on every pass. With a little skill and a
lot of creativity you can base an entire performance around a single loop
being built from absolutely nothing, to a fully grooved out, ear candy
masterpiece. And that's just the beginning. But for star ters, let's look at
the simplest way to get your feet wet.
Recording a loop
Step 1: Find a great sounding preset. Although sometimes you may want
to sing through no effect, relying on your voice alone for the sound you
are looking for, most times, the presets in VoiceLive Touch will give you a
huge creative range.
Step 2:Visualize - How long will my loop be? For example, maybe you
want to beatbox a simple 4 beat rhythmic bar. Or you may want a 4 bar
melody. Generally it's best to keep the initial loop small (later you'll learn
how to extend small loops into bigger ones). Let's assume a single 4
beat bar. Count in your mind: One Two Three Four.. at the tempo you
desire. It's important to feel comfor table before proceeding, because
once you set the length of your loop, it stays that way forever (until you
delete it and start again). On the other hand, right now you're just
having fun (hopefully) so who cares if you don't get it right the first time.
Move on to step 3!
Step 3: When you're ready, you're going to hit the record button and
start singing your vocal loop at exactly the same time. For your first
experiment, the moment you hit the record button start chanting
something like "one two three four". Now this is the tricky par t: After
you chant "four" keep a very even rhythm and pretend you're going to
keep repeating "one two three four" but press the record button at the
exact same time you say "one" for the second time. After that you can
stop chanting. This will establish the loop. Try it now!
Step 4: If you're lucky, you should be hearing a recording of yourself
chanting "one two three four" over and over again in a very steady loop.
Congratulations!
Step 5: Clean up -- Hold the Rec button to erase everything. Start again
from Step 1 and have some fun chanting or singing something else. Try
varying the length of the loop each time. See if you can get some
seamless beatboxing happening!
Layer Cake
Getting bored? I bet you've already figured out the next part before
getting here. Once a loop is created and playing back, you can punch in
and out with the record button at will, allowing you to "overdub" new
bits of vocally mimicked instrumentation, and of course, singing! Give it
a shot now (do this after Step 4 of Getting Started).
Hints: Going back to step 3 of Getting Started, instead of pressing the
record button to mark the end of your loop, you can also press the play
button which will do the same thing but will leave you in recording mode
allowing you to immediately build your loop without punching in first.
Appendix: Looping Tutorial
35
Page 35

Mistakes are Opportunities
We reveal the undo feature at this time with this advice: If you're going
to use undo, use it in a way that enhances your creativity. Making
mistakes is natural and often leads to great places, so don't overuse it or
become too much of a perfectionist. That being said, here's how the
feature works:
At any time, you can hold the left arrow for about a second to "Undo"
the last action, for example the last audio you recorded using punch in
and punch out. Here's the fun part: Holding the arrow again will "Redo"
the undo operation. With a little practice, you can actually maintain and
flip between two loops simultaneously. Note: You can keep swapping
between what you "did" and what you "undid" with this function, but at
some point you may want to forget what you "undid". The "Redo" buffer
will be reset if you initiate a new undoable action (like starting a new
additive recording punch in).
Stop, Start, and Arm
Of course, once you've got a loop recorded, you can stop it and start it
again using the play button. You may be surprised at first if you ever hit
the record button while your loop is stopped. Instead of recording a
new loop, you'll find that "ARM" engages. This means simply that the
next time you press play, you'll start playback of your stored loop and
additive recording at the same time. If you really want to create new
loop points, you'll have to hold the erase button to erase everything and
start fresh.
Going Big
Often you'll find yourself with a great sounding loop, but one that's too
short to record a melody on top of. Solution: Expansion. We've added
a very simple feature that can go a long way. It's called 2X meaning "2
times" or "multiply". Holding the right arrow at any time will take your
loop and double it onto itself. This is great for example, when you record
a short 1 bar drum beat, but you want to expand it into 2 bars and
record a bass part over top, and then say 4 bars to record a 4 bar vocal
phrase. Just activate the 2x, record your bass line, then activate 2x again,
and finish off with your vocal.
Warning: 2x effectively doubles the loop, meaning eventually you'll run
out of memory, especially if your original loop was lengthy to begin with.
Tip: the great thing about VoiceLive Touch is you can keep the action
going at all times. Undo, 2x, and all the great features we'll get to later
can be done in real time without disturbing your creative flow and the
ear candy you are delivering to your audience.
Clean Slate
Holding record at anytime will leave you with a clean slate.
Appendix: Looping Tutorial
36
Page 36

HOW TO EXPAND YOUR VOCAL LOOPING
HORIZONS
If not already, you will most certainly one day ask yourself "I've built up
this great loop, but now what?" We call this lonely-loop-syndrome. All
traditional loopers on the market suffer from it.
Loops Mode
Loops Mode is an exciting way to self-medicate lonely-loop-syndrome ,
and it's dead easy to use. Loops Mode allows you to start with a basic
loop and use it as the foundation for several more that you can flip
between at will. For example, let's say you record a drum beat. Next
you want to add a bass line, and then a guitar part. So far so good. But
at a critical moment in your performance you want to pull it all back to
the original drum par t. Loops Mode makes this easy.
In and Out of Loops Mode
Step 1: Start with a clean slate. Hold erase before continuing (note, once
you learn how to use Loops Mode, you'll be able to switch seamlessly
between the modes even when playing or overdubbing.)
Step 2: Getting into Loops Mode - This requires a multi-touch action.
You'll need to press and hold the touch slider and then the REC button
immediately after. Don't hold the slider too long before pressing the
record button as doing so will activate the preset search mode (consult
the manual for more information on searching).
Hint: double click the slider at any time to leave special modes like Loops
Mode and to return home.
Step 3:You should see "LOOPS" on the display. Next, record a loop in
exactly the same way as you did in step 3 of Getting Started.
Step 4: You should see "1:N" with an animated progress bar at the far
right of the display. The "N" will be the number of available loops based
on the size of the recorded loop. The shorter the original loop, the
larger "N" will be (up to a maximum of 25). The progress bar indicates
the progress through the playing loop (for very short loops,the progress
bar will be rapidly pulsating, for long loops, it will give you a visual
indication of when the loop is about to loop to the beginning).
Step 5: Try stopping the loop. The display should switch to show
"LOOPS". Hitting play again will bring back the "1:N" display. Try double
clicking the slider to go back to Presets Mode (home). You should
momentarily see "HOME" then the display will let you chose a preset
with the slider. Now get back into Loops Mode with the multi touch
action (S lider first then quickly the Record button).
The Multipurpose Touch Slider
In Loops Mode, the slider acts differently. You can always jump back
home (double click) to use it for selecting presets, but when in Loops
Mode, here's what it does:
Left Arrow: Jumps to the previous loop at the next bar transition.
Right Arrow: Jumps to the next loop at the next bar transition.
Swipe slider Left: Shortcut to the "undo" feature, saving you from the
time it takes to hold the left arrow.
Swipe slider Right: Clear. Clear silences the current loop but does not
stop or change the loop length. Picture in your performance where
Appendix: Looping Tutorial
37
Page 37

you've got a thick loop going and you're vamping/overdubbing a new
layer and you suddenly want to create a huge dramatic moment. You
can instantly clear the loop, but since you're still recording, the next time
around the vamping will be all that remains. Of course you can be even
more dramatic and swipe left a few moments later which will undo the
clear and your thick loop will instantly return.
Next Loop - Automatic Loop Copying
Here is the magic of Loops Mode. From your single loop "1:N", pressing
the right arrow will move you to a new loop (in this case 2:N), and if
nothing was there (if it had never been touched), it will automatically
copy from the loop you were on. Try this:
Step 1: Start from a clean slate and enter Loops Mode. Record a short
and minimal rhythmic vocal loop. When you're done, start it playing back.
Hint: while recording a new loop from Loops Mode, you'll see a
countdown of the remaining loop memory.
Step 2: Press the right arrow. The display will switch to "2:N". Nothing
should have changed audibly. This is because whatever you recorded in
loop 1 was automatically copied into loop 2. Note, all loops share the
same loop length.
Step 3: Press the left arrow to move back to loop 1. The display should
change appropriately. Now try overdubbing onto loop 1. Then switch
back to loop 2. Because loop 2 had already been created, moving to
loop 2 again did not automatically copy from the contents of loop 1.
Loop 2 will still sound like the original loop, while loop 1 will have the
newly recorded overdub.
Step 4: Try additively recording to loop 2 and then pressing the right
arrow to move to loop 3. Notice whatever you had in loop 2 will now
also be in loop 3. Got the idea? Try switching back to loop 1, and swipe
right to clear it. Clearing loop 1 will leave the other loops unaffected.
Step 5: One last trick - go to loop 1 and make sure something is
recorded there. Now,at the beginning of a pass around the loop, quickly
tap the right arrow until you get to the first untouched loop (loop 4 if
you're following these steps). Because you came from loop 1, the
contents of loop 1 will be automatically copied to loop 4, not the
contents of loop 3 as you might have thought.
Hint: If you want to jump between loops that are not sequential (i.e.
from loop 1 to 4, you can tap the arrows multiple times before the end
of the playing bar, as the loop won't actually change until bar transition
Changing presets in Loops Mode
Since the touch slider in Loops Mode is used for the special features
described above, the only way to change presets while staying in this
mode is to use the 5 favorites (you actually have access to 25 favorites
if you use the favorites bank switching feature described in the manual).
Don't forget you can also instantly go home by double clicking the slider
without stopping your loop, switch presets,and then get back into Loops
Mode with the multi touch action.
No 2x in Loops Mode?
That's correct. Once you star t using Loops Mode, you can no longer
use the 2x feature. The suggested workflow is to start in Preset Mode
with a short rhythm, use 2x as needed to create your basic starting loop,
and then switch to Loops Mode to grow a simple loop into an epic
performance.
Appendix: Looping Tutorial
38
Page 38

Shots Mode
Shots Mode gives you instant access to your loops through the 5 favorite
buttons. Instead of switching loops on bar transitions like Loops Mode,
Shots Mode plays your loops instantly, as if you were triggering your
loops from the keys on a synthesizer, or sampler. You can rapidly fire off
your loops at will, creating drum & bass like effects, or vocal mash-ups.
Or using it more like a sampler, you can have up to 25 vocal samples
ready and waiting to be triggered at any time during your performance.
In and Out of Shots Mode
Step 1: Start with a clean slate. Hold erase before continuing (note, once
you learn how to use Shots Mode, you'll be able to switch seamlessly
between Home, Shots, or Loops Modes even while playing or
overdubbing.
Step 2: Getting into Shots Mode - This requires a multi-touch action.
You'll need to press and hold the touch slider and then the Play button
immediately after. Don't hold the slider too long before pressing the
Play button as doing so will activate the preset search mode (consult the
manual for more information on searching).
Hint: double click the slider at any time to leave special modes like Shots
Mode and to return home.
Step 3:You should see "SHOTS" on the display. Next, record a loop in
exactly the same way as you did in step 3 of Getting Started.
Step 4: Like Loops Mode, you should see "1:N" with an animated
progress bar at the far right of the display. You should also see the
favorite lights blinking. Favorites 1 through 5 correspond to loops 1
through 5 from Loops Mode.
Step 5: Try stopping the loop. The display should switch to show
"SHOTS". Hitting play again will bring back the "1:N" display. Try double
clicking the slider to go back to Presets Mode (home). You should
momentarily see "HOME" then the display will let you chose a preset
with the slider. Now get back into Shots Mode with the multi touch
action (Slider first then quickly the Play button).
Shot Banks
Since you're allowed to have more than 5 loops, you'll need a way to
access them from the 5 favorite buttons. Do this by using the left and
right arrows. Tapping right, the display will show "1-5", then "6-10", then
"11-15" etc.. If on bank "6-10", favorites 1 to 5 will correspond to loops
6 to 10. Tap left to go back to access loops "1-5". Hint: If your original
loop was long, at some point the favorites will stop blinking and pressing
them will do nothing. For example if your original loop took up a third
of the available loop memory, only favorites 1 through 3 would be
blinking and available for recording / triggering.
The Multipurpose Touch Slider
In Shots Mode, the slider acts differently. You can always jump back
home (double click) to use it for selecting presets, but when in Loops
Mode, here's what it does:
Left Arrow: Jumps to the previous bank of loops.
Right Arrow: Jumps to the next bank of loops.
Swipe slider Left: Shortcut to the "undo" feature, saving you from the
time it takes to hold the left arrow.
Swipe slider Right: Clear. Clear silences the current loop but does not
stop or change the loop length. Picture in your performance where
Appendix: Looping Tutorial
39
Page 39

you've got a thick loop going and you're vamping/overdubbing a new
layer and you suddenly want to create a huge dramatic moment. You
can instantly clear the loop, but since you're still recording, the next time
around the vamping will be all that remains. Of course you can be even
more dramatic and swipe right a few moments later which will undo the
clear and your thick loop will instantly return.
Momentary Vs. Continuous
Shots Mode can be used in two ways. Either you trigger your recorded
loops from full stop, or you trigger them while they are playing.
Momentary: Make sure the looper is stopped. Now, press and hold
favorite 1, corresponding to loop 1 which you recorded in step 3. You
should hear your loop paying back again and again until you release
favorite 1. It will only play while held down. Try tapping favorite one
slowly, then faster. Try var ying how long you hold it down. Hint: Notice
that every time you press the favorite button, the corresponding loop
plays back from the begging.
Continuous: From full stop, press the play button. Loop 1 should be
playing. Now, pressing favorite 1 will merely reset loop 1 to the
beginning and it will continue to play even when you let go. This lets you
act almost like a DJ, choosing loops at will, or firing them off in rapid
succession when you want a special effect. Of course you can keep
record enabled if you wish even while switching between loops. The
additive recording will be applied to whichever loop you have selected.
How to Easily Record Vocal Samples in Momentary Shots Mode
Using Momentary Shots Mode is a bit like using a vocal sampler. Here's
a walk-through of how you might choose to record a set of samples to
trigger at will:
Step 1: Start from a clean slate, and double click the slider to return
home. Record your first vocal sample like you did in step 3 of getting
started. Make sure it's longer than any other samples you plan to record
(leave empty space at end if necessary). This is because all loops in both
Loops and Shots Mode must share the same loop length.
Step 2: Stop playback and switch to Shots Mode.
Step 3:Arm recording by pressing record button (the recording LED will
flash).
Step 4: Get ready to sing your next vocal sample. When ready, hold
Favorite 2 and sing while pressed. Release when done. Notice that the
record LED is still flashing. This means recording is still armed, and so the
next time playback is enabled (while momentarily holding a favorite),
additive recording will also be active.
Step 5: Get ready to sing next vocal sample, repeat step 4 for favorites
3, 4, and 5.
Step 6: If desired, switch to next bank by pressing right arrow.
Step 7: If desired, layer on top of previously recorded vocal samples by
pressing their favorites again. What you sing will be overdubbed onto
the corresponding loops.
Step 8: Disable armed recording.
Step 9: As long as you leave the looper stopped, you can momentarily
trigger your vocal samples just like a traditional sampler.
Appendix: Looping Tutorial
40
Page 40

Auto Copy
In Loops Mode we saw that moving to a new loop would automatically
copy the audio from the previous loop. It's a great feature, but what if
you want to copy and paste to and from arbitrary loops? With
AutoCopy, you can copy from any loop to any other loop in both Shots
and Loops mode without skipping a beat. Follow these steps:
Step 1: Start from a clean slate in Shots Mode. Record a minimal
rhythmic vocal loop into loop 1.
Step 2: To initiate an AutoCopy, hold the right arrow until you see
"ACOPY" on the screen. After that, the next loop you jump to will
become an exact copy of the loop that's currently playing. (Note it's the
same button we used for 2x, but that's fine since 2x can't be used in
Shots/Loops mode).
Step 3: Press the loop 2 button and you should immediately notice the
loop was copied across. Repeat from step 1 at will.
Note that this will also work in Loops mode, it's just that instead of
jumping directly to a loop like you can in Shots mode, you'll have to
navigate to the destination loop quickly before the bar changes. Once
the bar changes, wherever you end up will be the destination for the
copy, so be careful! (Of course, you can always undo.) One great thing
about this feature is that if you want to copy to a blank loop or a loop
that you don't like, you can do so without having to first switch and listen
to the offending loop, which would interrupt your flow.
Copy / Paste
Another way to copy from one loop to another is by holding the left
portion of the touch slider to copy (the display will flash "COPY"), then
moving to another loop, then holding the right portion of the touch
slider to paste (the display will flash "PASTE"). This is different from
AutoCopy in that you have to move to the destination loop to manually
paste. The advantage however,is that you can paste one loop to several,
as the copy origin is remembered after the initial paste.
TIPS AND TRICKS
Keep it Armed
You may have noticed that you can keep record on when switching
between loops. In momentary shots mode, you can also accomplish this
by arming recording. Recording will stay armed after you trigger and
release each shot. This can be very cool, as you can build up several
shots in succession by jumping back and forth between them.
Performance Booster
If you're using armed recording a lot, or you end up going in and out of
additive recording quickly for whatever reason, you might notice a lot of
"BUSY" messages. This is because on each new recording pass, the
system has to prepare for the possibility that you'll want to undo later.
If you want the ultimate performance, and you're capable of turning
mistakes into masterpieces, then go to the system menu and turn off
undo (refer to the manual). Not only will responsiveness of the system
increase dramatically, you'll also have double the loop time!
Appendix: Looping Tutorial
41
Page 41

Specifications
42
AAnnaalloogg IInnppuuttss
Connectors: Mic: Balanced XLR, Guitar: 1/4" phone jack, Aux: 1/8" stereo mini jack
Input Impedance: Balanced/Unbalanced Mic.: 2.14/1.07 kOhm
Mic Input Level @ 0 dBFS: -42dBu to +1dBu
EIN @ Max Mic Gain Rg = 150 Ohm: -127 dBu
Mic SNR: > 107 dB
Guitar Input impedance: 1 MOhm
Guitar Input Level @ 0 dBFS: -7 dBU to 17 dBu
Guitar Input SNR: >115dB
Aux Input Level @ 0dBu: +2dBu
A to D Conversion: 24 bit, 128 x oversampling bitstream, 110dB SNR A-weighted
AAnnaalloogg OOuuttppuuttss
Connectors, balanced: XLR (for mono) and 1/4" TRS phone jack
Output Impedance: Balanced/Unbalanced: 80/40 Ohm
Output Range: Line: 14.5 dBu
Dynamic Range: >109 dB, 20 Hz to 20 kHz
Frequency Response: +0/-0.3 dB, 20 Hz to 20 kHz
Headphone Out: 1/8" Mini stereo jack, 32 Ohm, +17 dBu max (180mW max)
D to A Conversion: 24 bit, 128 x oversampling bitstream, 115dB SNR A-weighted
CCoonnttrrooll
USB: USB-B (control, MIDI and audio I/O)
MIDI: In 5 Pin DIN
Pedal: 1/4" TRS phone jack
PPoowweerr
External Power Supply Mains Voltage: 100 to 240 VAC, 50 to 60 Hz
(auto-select)
Power Consumption: <14 W
SSaaffeettyy
EMC: Complies with EN 55103-1 and EN 55103-2 FCC part 15,
Class B, CISPR 22, Class B
Safety: Certified to IEC 65, EN 60065, UL6500 and CSA IEC 65,
EN 60065, UL6500 and CSA
OOppeerraattiinngg RReeqquuiirreemmeennttss
Operating Temperature: 32° F to 122° F (0° C to 50° C)
Storage Temperature: -22° F to 167° F (-30° C to 70° C)
Humidity Max.: 90 % non-condensing
SSiizzee && WWeeiigghhtt
Dimensions: 9" x 4" x 7" (230 x 100 x 180)
Weight: 5 lb. (2.3 kg)
WWaarrrraannttyy
See www.tc-helicon.com\support for warranty information
Page 42

 Loading...