


Quick Start Guide
Voicelive 3 Extreme
Unrivaled Vocal and Guitar Eects Performance Floor Pedal with
Backing Tracks, Looping, Automation and Audio Recording
V 1.0

2 Voicelive 3 Extreme Quick Start Guide 3
8. No instale este equipo cerca de fuentes de calor
los recursos naturales. Para más información acerca del
deben ser siempre eliminadas en un punto limpio y nunca
este documento. Las especicaciones técnicas, imágenes
están sujetas a modicaciones sin previo aviso. Todas las
9. Do not defeat the safety purpose of the polarized
20. Please keep the environmental aspects of battery
This apparatus may be used in tropical and moderate
Important Safety
Instructions
Terminals marked with this symbol carry
electrical current of sucient magnitude
to constitute risk of electric shock.
Use only high-quality professional speaker cables with
¼" TS or twist-locking plugs pre-installed. Allother
installation or modication should be performed only
by qualiedpersonnel.
This symbol, wherever it appears,
alertsyou to the presence of uninsulated
dangerous voltage inside the
enclosure-voltage that may be sucient to constitute a
risk ofshock.
This symbol, wherever it appears,
alertsyou to important operating and
maintenance instructions in the
accompanying literature. Please read the manual.
Caution
To reduce the risk of electric shock, donot
remove the top cover (or the rear section).
No user serviceable parts inside. Refer servicing to
qualied personnel.
Caution
To reduce the risk of re or electric shock,
do not expose this appliance to rain and
moisture. The apparatus shall not be exposed to dripping
or splashing liquids and no objects lled with liquids,
suchas vases, shall be placed on the apparatus.
Caution
These service instructions are for use
by qualied service personnel only.
Toreduce the risk of electric shock do not perform any
servicing other than that contained in the operation
instructions. Repairs have to be performed by qualied
servicepersonnel.
1. Read these instructions.
2. Keep these instructions.
3. Heed all warnings.
4. Follow all instructions.
5. Do not use this apparatus near water.
6. Clean only with dry cloth.
7. Do not block any ventilation openings. Install in
accordance with the manufacturer’s instructions.
8. Do not install near any heat sources such as
radiators, heat registers, stoves, or other apparatus
(including ampliers) that produce heat.
or grounding-type plug. A polarized plug has two blades
with one wider than the other. A grounding-type plug
has two blades and a third grounding prong. The wide
blade or the third prong are provided for your safety. Ifthe
provided plug does not t into your outlet, consult an
electrician for replacement of the obsolete outlet.
10. Protect the power cord from being walked on or
pinched particularly at plugs, convenience receptacles,
and the point where they exit from the apparatus.
11. Use only attachments/accessories specied by
themanufacturer.
12. Use only with the
cart, stand, tripod, bracket,
or table specied by the
manufacturer, orsold with
the apparatus. When a cart
is used, use caution when
moving the cart/apparatus
combination to avoid
injury from tip-over.
13. Unplug this apparatus during lightning storms or
when unused for long periods of time.
14. Refer all servicing to qualied service personnel.
Servicing is required when the apparatus has been
damaged in any way, such as power supply cord or plug
is damaged, liquid has been spilled or objects have fallen
into the apparatus, the apparatus has been exposed
to rain or moisture, does not operate normally, or has
beendropped.
15. The apparatus shall be connected to a MAINS socket
outlet with a protective earthing connection.
16. Where the MAINS plug or an appliance coupler is
used as the disconnect device, the disconnect device shall
remain readily operable.
17. Correct disposal of this
product: This symbol indicates
that this product must not be
disposed of with household
waste, according to the WEEE
Directive (2012/19/EU) and
your national law. This product
should be taken to a collection center licensed for the
recycling of waste electrical and electronic equipment
(EEE). The mishandling of this type of waste could have
a possible negative impact on the environment and
human health due to potentially hazardous substances
that are generally associated with EEE. At the same time,
your cooperation in the correct disposal of this product
will contribute to the ecient use of natural resources.
For more information about where you can take your
waste equipment for recycling, please contact your local
city oce, or your household waste collection service.
18. Do not install in a conned space, such as a book
case or similar unit.
19. Do not place naked ame sources, such as lighted
candles, on the apparatus.
disposal in mind. Batteries must be disposed-of at a
battery collection point.
21.
climates up to 45°C.
LEGAL DISCLAIMER
Music Tribe accepts no liability for any loss which may
be suered by any person who relies either wholly or in
part upon any description, photograph, or statement
contained herein. Technical specications, appearances
and other information are subject to change without
notice. All trademarks are the property of their
respective owners. Midas, Klark Teknik, Lab Gruppen,
Lake, Tannoy, Turbosound, TC Electronic, TC Helicon,
Behringer, Bugera, Oberheim, Auratone and Coolaudio
are trademarks or registered trademarks of Music
Tribe Global Brands Ltd. © Music Tribe Global Brands
Ltd. 2021 All rights reserved.
LIMITED WARRANTY
For the applicable warranty terms and conditions
and additional information regarding Music Tribe’s
Limited Warranty, please see complete details online at
musictribe.com/warranty.
Instrucciones de
seguridad
Las terminales marcadas con este símbolo
transportan corriente eléctrica de
magnitud suciente como para constituir
un riesgo de descarga eléctrica. Utilice solo cables de
altavoz profesionales y de alta calidad con conectores
TS de 6,3 mm o de bayoneta prejados. Cualquier otra
instalación o modicación debe ser realizada únicamente
por un técnico cualicado.
Este símbolo, siempre que aparece,
leadvierte de la presencia de voltaje
peligroso sin aislar dentro de la caja;
estevoltaje puede ser suciente para constituir un riesgo
dedescarga.
Este símbolo, siempre que aparece,
leadvierte sobre instrucciones operativas
y de mantenimiento que aparecen en la
documentación adjunta. Por favor, lea el manual.
Atención
Para reducir el riesgo de descarga
eléctrica, no quite la tapa (o la parte
posterior). No hay piezas en el interior del equipo que
puedan ser reparadas por el usuario. Si es necesario,
póngase en contacto con personal cualicado.
Atención
Para reducir el riesgo de incendio o
descarga eléctrica, no exponga este
aparato a la lluvia, humedad o alguna otra fuente que
pueda salpicar o derramar algún líquido sobre el aparato.
Nocoloque ningún tipo de recipiente para líquidos sobre
el aparato.
Atención
Las instrucciones de servicio deben
llevarlas a cabo exclusivamente personal
cualicado. Para evitar el riesgo de una descarga eléctrica,
no realice reparaciones que no se encuentren descritas
en el manual de operaciones. Lasreparaciones deben ser
realizadas exclusivamente por personalcualicado.
1. Lea las instrucciones.
2. Conserve estas instrucciones.
3. Preste atención a todas las advertencias.
4. Siga todas las instrucciones.
5. No use este aparato cerca del agua.
6. Limpie este aparato con un paño seco.
7. No bloquee las aberturas de ventilación. Instale el
equipo de acuerdo con las instrucciones del fabricante.
tales como radiadores, acumuladores de calor, estufas u
otros aparatos (incluyendo amplicadores) que puedan
producir calor.
9. No elimine o deshabilite nunca la conexión a tierra
del aparato o del cable de alimentación de corriente.
Unenchufe polarizado tiene dos polos, uno de los cuales
tiene un contacto más ancho que el otro. Una clavija con
puesta a tierra dispone de tres contactos: dos polos y la
puesta a tierra. El contacto ancho y el tercer contacto,
respectivamente, son los que garantizan una mayor
seguridad. Si el enchufe suministrado con el equipo no
concuerda con la toma de corriente, consulte con un
electricista para cambiar la toma de corriente obsoleta.
10. Coloque el cable de suministro de energía de manera
que no pueda ser pisado y que esté protegido de objetos
alados. Asegúrese de que el cable de suministro de
energía esté protegido, especialmente en la zona de la
clavija y en el punto donde sale del aparato.
11. Use únicamente los dispositivos o accesorios
especicados por el fabricante.
12. Use únicamente la
carretilla, plataforma,
trípode, soporte o mesa
especicados por el
fabricante o suministrados
junto con el equipo.
Altransportar el equipo,
tenga cuidado para evitar
daños y caídas al tropezar con algún obstáculo.
13. Desenchufe el equipo durante tormentas o si no va a
utilizarlo durante un periodo largo.
14. Confíe las reparaciones únicamente a servicios
técnicos cualicados. La unidad requiere mantenimiento
siempre que haya sufrido algún daño, si el cable de
suministro de energía o el enchufe presentaran daños,
sehubiera derramado un líquido o hubieran caído objetos
dentro del equipo, si el aparato hubiera estado expuesto
a la humedad o la lluvia, si ha dejado de funcionar de
manera normal o si ha sufrido algún golpe o caída.
15. Al conectar la unidad a la toma de corriente eléctrica
asegúrese de que la conexión disponga de una unión
atierra.
16. Si el enchufe o conector de red sirve como único
medio de desconexión, éste debe ser accesiblefácilmente.
17. Cómo debe deshacerse de
este aparato: Este símbolo indica
que este aparato no debe ser
tratado como basura orgánica,
según lo indicado en la Directiva
WEEE (2012/19/EU) y a las
normativas aplicables en su país.
En lugar de ello deberá llevarlo al punto limpio más
cercano para el reciclaje de sus elementos eléctricos/
electrónicos (EEE). Al hacer esto estará ayudando a
prevenir las posibles consecuencias negativas para el
medio ambiente y la salud que podrían ser provocadas
por una gestión inadecuada de este tipo de aparatos.
Además, el reciclaje de materiales ayudará a conservar
reciclaje de este aparato, póngase en contacto con el
Ayuntamiento de su ciudad o con el punto limpio local.
18. No instale esta unidad en un espacio muy reducido,
tal como encastrada en una librería o similar.
19. No coloque objetos con llama, como una vela
encendida, sobre este aparato.
20. Tenga presentes todas las advertencias relativas
al reciclaje y correcta eliminación de las pilas. Las pilas
con el resto de la basura orgánica.
21. Puede usar este aparato en lugares con climas
tropicales y moderados que soporten temperaturas de
hasta 45°C.
NEGACIÓN LEGAL
Music Tribe no admite ningún tipo de responsabilidad
por cualquier daño o pérdida que pudiera sufrir
cualquier persona por conar total o parcialmente en la
descripciones, fotografías o armaciones contenidas en
y otras informaciones contenidas en este documento
marcas comerciales que aparecen aquí son propiedad
de sus respectivos dueños. Midas, Klark Teknik,
Lab Gruppen, Lake, Tannoy, Turbosound, TC Electronic,
TC Helicon, Behringer, Bugera, Oberheim, Auratone y
Coolaudio son marcas comerciales o marcas registradas
de Music Tribe Global Brands Ltd. © Music Tribe Global
Brands Ltd. 2021 Reservados todos los derechos.
GARANTÍA LIMITADA
Si quiere conocer los detalles y condiciones aplicables
de la garantía así como información adicional sobre la
Garantía limitada de Music Tribe, consulte online toda la
información en la web musictribe.com/warranty.

4 Voicelive 3 Extreme Quick Start Guide 5
Erdungskontakt dient Ihrer Sicherheit. Falls das
19. Stellen Sie keine Gegenstände mit oenen
Fotos oder Aussagen verlassen haben. Technische Daten,
Turbosound, TC Electronic, TC Helicon, Behringer, Bugera,
oder eingetragene Warenzeichen der Music Tribe Global
8. Ne placez pas l’appareil à proximité d’une source
dangereuses généralement associées à ces équipements.
Consignes de sécurité
Les points repérés par ce symbole portent
une tension électrique susante pour
constituer un risque d’électrocution.
Utilisez uniquement des câbles d’enceintes professionnels
de haute qualité avec ches Jack mono 6,35 mm ou ches
à verrouillages déjà installées. Touteautre installation ou
modication doit être eectuée uniquement par un
personnel qualié.
Ce symbole avertit de la présence d’une
tension dangereuse et non isolée à
l’intérieur de l’appareil - elle peut
provoquer des chocs électriques.
Attention
Ce symbol signale les consignes
d’utilisation et d’entre ! Tien importantes
dans la documentation fournie. Lisez les consignes de
sécurité du manuel d’utilisation de l’appareil.
Attention
Pour éviter tout risque de choc électrique,
ne pas ouvrir le capot de l’appareil ni
démonter le panneau arrière. L’intérieur de l’appareil
ne possède aucun élément réparable par l’utilisateur.
Laissertoute réparation à un professionnel qualié.
Attention
Pour réduire les risques de feu et de choc
électrique, n’exposez pas cet appareil à la
pluie, à la moisissure, aux gouttes ou aux éclaboussures.
Ne posez pas de récipient contenant un liquide sur
l’appareil (un vase par exemple).
Attention
Ces consignes de sécurité et d’entretien
sont destinées à un personnel qualié.
Pouréviter tout risque de choc électrique, n’eectuez
aucune réparation sur l’appareil qui ne soit décrite par le
manuel d’utilisation. Les éventuelles réparations doivent
être eectuées uniquement par un technicien spécialisé.
1. Lisez ces consignes.
2. Conservez ces consignes.
3. Respectez tous les avertissements.
4. Respectez toutes les consignes d’utilisation.
5. N’utilisez jamais l’appareil à proximité d’un liquide.
6. Nettoyez l’appareil avec un chion sec.
7. Veillez à ne pas empêcher la bonne ventilation
de l’appareil via ses ouïes de ventilation. Respectezles
consignes du fabricant concernant l’installation
del’appareil.
de chaleur telle qu’un chauage, une cuisinière ou tout
appareil dégageant de la chaleur (y compris un ampli
depuissance).
9. Ne supprimez jamais la sécurité des prises bipolaires
ou des prises terre. Les prises bipolaires possèdent deux
contacts de largeur diérente. Leplus large est le contact
de sécurité. Les prises terre possèdent deux contacts plus
une mise à la terre servant de sécurité. Si la prise du bloc
d’alimentation ou du cordon d’ali-mentation fourni ne
correspond pas à celles de votre installation électrique,
faites appel à un électricien pour eectuer le changement
de prise.
10. Installez le cordon d’alimentation de telle façon
que personne ne puisse marcher dessus et qu’il soit
protégé d’arêtes coupantes. Assurez-vous que le cordon
d’alimentation est sufsamment protégé, notamment au
niveau de sa prise électrique et de l’endroit où il est relié à
l’appareil; cela est également valable pour une éventuelle
rallonge électrique.
11. Utilisez exclusivement des accessoires et des
appareils supplémentaires recommandés par lefabricant.
12. Utilisez
exclusivement des
chariots, des diables,
desprésentoirs, despieds
et des surfaces de
travail recommandés
par le fabricant ou
livrés avec le produit.
Déplacezprécautionneusement tout chariot ou diable
chargé pour éviter d’éventuelles blessures en cas dechute.
13. Débranchez l’appareil de la tension secteur en cas
d’orage ou si l’appareil reste inutilisé pendant une longue
période de temps.
14. Les travaux d’entretien de l’appareil doivent
être eectués uniquement par du personnel qualié.
Aucunentretien n’est nécessaire sauf si l’appareil est
endommagé de quelque façon que ce soit (dommagessur
le cordon d’alimentation ou la prise par exemple), siun
liquide ou un objet a pénétré à l’intérieur du châssis, si
l’appareil a été exposé à la pluie ou à l’humidité, s’il ne
fonctionne pas correctement ou à la suite d’une chute.
15. L’appareil doit être connecté à une prise secteur
dotée d’une protection par mise à la terre.
16. La prise électrique ou la prise IEC de tout appareil
dénué de bouton marche/arrêt doit rester accessible
enpermanence.
17. Mise au rebut appropriée de
ce produit: Ce symbole indique
qu’en accord avec la directive DEEE
(2012/19/EU) et les lois en vigueur
dans votre pays, ce produit ne
doit pas être jeté avec les déchets
ménagers. Ce produit doit être
déposé dans un point de collecte agréé pour le recyclage
des déchets d’équipements électriques et électroniques
(EEE). Une mauvaise manipulation de ce type de déchets
pourrait avoir un impact négatif sur l’environnement
et la santé à cause des substances potentiellement
En même temps, votre coopération dans la mise au
rebut de ce produit contribuera à l’utilisation ecace
des ressources naturelles. Pour plus d’informations
sur l’endroit où vous pouvez déposer vos déchets
d’équipements pour le recyclage, veuillez contacter votre
mairie ou votre centre local de collecte des déchets.
18. N’installez pas l’appareil dans un espace conné tel
qu’une bibliothèque ou meuble similaire.
19. Ne placez jamais d’objets enammés, tels que des
bougies allumées, sur l’appareil.
20. Gardez à l’esprit l’impact environnemental lorsque
vous mettez des piles au rebus. Les piles usées doivent
être déposées dans un point de collecte adapté.
21. Cet appareil peut être utilisé sous un climat tropical
ou modéré avec des températures de 45°C maximum.
DÉNI LÉGAL
Music Tribe ne peut être tenu pour responsable pour
toute perte pouvant être subie par toute personne
se ant en partie ou en totalité à toute description,
photographie ou armation contenue dans ce
document. Les caractéristiques, l’apparence et d’autres
informations peuvent faire l’objet de modications
sans notication. Toutes les marques appartiennent
à leurs propriétaires respectifs. Midas, Klark Teknik,
Lab Gruppen, Lake, Tannoy, Turbosound, TC Electronic,
TC Helicon, Behringer, Bugera, Oberheim, Auratone et
Coolaudio sont des marques ou marques déposées de
Music Tribe Global Brands Ltd. © Music Tribe Global
Brands Ltd. 2021 Tous droits réservés.
GARANTIE LIMITÉE
Pour connaître les termes et conditions de garantie
applicables, ainsi que les informations supplémentaires
et détaillées sur la Garantie Limitée de Music Tribe,
consultez le site Internet musictribe.com/warranty.
Wichtige
Sicherheitshinweise
Vorsicht
Die mit dem Symbol markierten
Anschlüsse führen so viel Spannung,
dassdie Gefahr eines Stromschlags besteht.
Verwenden Sie nur hochwertige, professionelle
Lautsprecherkabel mit vorinstallierten 6,35 mm
MONO-Klinkensteckern oder Lautsprecherstecker
mit Drehverriegelung. Alle anderen Installationen
oder Modikationen sollten nur von qualiziertem
Fachpersonal ausgeführt werden.
Achtung
Um eine Gefährdung durch Stromschlag
auszuschließen, darf die Geräteabdeckung
bzw. Geräterückwand nicht abgenommen werden.
ImInnern des Geräts benden sich keine vom Benutzer
reparierbaren Teile. Reparaturarbeiten dürfen nur von
qualiziertem Personal ausgeführt werden.
Achtung
Um eine Gefährdung durch Feuer bzw.
Stromschlag auszuschließen, darf dieses
Gerät weder Regen oder Feuchtigkeit ausgesetzt werden
noch sollten Spritzwasser oder tropfende Flüssigkeiten
in das Gerät gelangen können. Stellen Sie keine mit
Flüssigkeit gefüllten Gegenstände, wie z. B. Vasen,
aufdasGerät.
Achtung
Die Service-Hinweise sind nur durch
qualiziertes Personal zu befolgen.
Umeine Gefährdung durch Stromschlag zu vermeiden,
führen Sie bitte keinerlei Reparaturen an dem Gerät
durch, die nicht in der Bedienungsanleitung beschrieben
sind. Reparaturen sind nur von qualiziertem
Fachpersonaldurchzuführen.
1. Lesen Sie diese Hinweise.
2. Bewahren Sie diese Hinweise auf.
3. Beachten Sie alle Warnhinweise.
4. Befolgen Sie alle Bedienungshinweise.
5. Betreiben Sie das Gerät nicht in der Nähe vonWasser.
6. Reinigen Sie das Gerät mit einem trockenen Tuch.
7. Blockieren Sie nicht die Belüftungsschlitze. Beachten
Sie beim Einbau des Gerätes die Herstellerhinweise.
8. Stellen Sie das Gerät nicht in der Nähe von
Wärmequellen auf. Solche Wärmequellen sind z. B.
Heizkörper, Herde oder andere Wärme erzeugende Geräte
(auch Verstärker).
9. Entfernen Sie in keinem Fall die
Sicherheitsvorrichtung von Zweipol- oder geerdeten
Steckern. Ein Zweipolstecker hat zwei unterschiedlich
breite Steckkontakte. Ein geerdeter Stecker hat zwei
Steckkontakte und einen dritten Erdungskontakt.
Derbreitere Steckkontakt oder der zusätzliche
mitgelieferte Steckerformat nicht zu Ihrer Steckdose
passt, wenden Sie sich bitte an einen Elektriker, damit die
Steckdose entsprechend ausgetauscht wird.
10. Verlegen Sie das Netzkabel so, dass es vor
Tritten und scharfen Kanten geschützt ist und nicht
beschädigt werden kann. Achten Sie bitte insbesondere
im Bereich der Stecker, Verlängerungskabel und an
der Stelle, an der das Netzkabel das Gerät verlässt,
aufausreichendenSchutz.
11. Das Gerät muss jederzeit mit intaktem Schutzleiter
an das Stromnetz angeschlossen sein.
12. Sollte der Hauptnetzstecker oder eine
Gerätesteckdose die Funktionseinheit zum Abschalten
sein, muss diese immer zugänglich sein.
13. Verwenden Sie nur Zusatzgeräte/Zubehörteile,
dielaut Hersteller geeignet sind.
14. Verwenden
Sie nur Wagen,
Standvorrichtungen,
Stative, Halter oder Tische,
die vom Hersteller benannt
oder im Lieferumfang
des Geräts enthalten
sind. Falls Sie einen
Wagen benutzen, seien Sie vorsichtig beim Bewegen
der Wagen- Gerätkombination, umVerletzungen durch
Stolpern zuvermeiden.
15. Ziehen Sie den Netzstecker bei Gewitter oder wenn
Sie das Gerät längere Zeit nicht benutzen.
16. Lassen Sie alle Wartungsarbeiten nur von
qualiziertem Service-Personal ausführen. EineWartung
ist notwendig, wenn das Gerät in irgendeiner Weise
beschädigt wurde (z. B. Beschädigung des Netzkabels oder
Steckers), Gegenstände oder Flüssigkeit in das Geräteinnere
gelangt sind, das Gerät Regen oder Feuchtigkeit ausgesetzt
wurde, das Gerät nicht ordnungsgemäß funktioniert oder
auf den Boden gefallen ist.
17. Korrekte Entsorgung
dieses Produkts: Dieses
Symbol weist darauf hin, das
Produkt entsprechend der
WEEE Direktive (2012/19/EU)
und der jeweiligen nationalen
Gesetze nicht zusammen mit
Ihren Haushaltsabfällen zu entsorgen. DiesesProdukt
sollte bei einer autorisierten Sammelstelle für
Recycling elektrischer und elektronischer Geräte (EEE)
abgegeben werden. Wegen bedenklicher Substanzen,
diegenerell mit elektrischen und elektronischen Geräten
in Verbindung stehen, könnte eine unsachgemäße
Behandlung dieser Abfallart eine negative Auswirkung
auf Umwelt und Gesundheit haben. Gleichzeitig
gewährleistet Ihr Beitrag zur richtigen Entsorgung dieses
Produkts die eektive Nutzung natürlicher Ressourcen.
Fürweitere Informationen zur Entsorgung Ihrer Geräte
bei einer Recycling-Stelle nehmen Sie bitte Kontakt zum
zuständigen städtischen Büro, Entsorgungsamt oder zu
Ihrem Haushaltsabfallentsorgerauf.
18. Installieren Sie das Gerät nicht in einer beengten
Umgebung, zum Beispiel Bücherregal oder ähnliches.
Flammen, etwa brennende Kerzen, auf das Gerät.
20. Beachten Sie bei der Entsorgung von Batterien
den Umweltschutz-Aspekt. Batterien müssen bei einer
Batterie-Sammelstelle entsorgt werden.
21. Dieses Gerät ist in tropischen und gemäßigten
Klimazonen bis 45° C einsetzbar.
HAFTUNGSAUSSCHLUSS
Music Tribe übernimmt keine Haftung für Verluste,
die Personen entstanden sind, die sich ganz oder
teilweise auf hier enthaltene Beschreibungen,
Erscheinungsbild und andere Informationen können
ohne vorherige Ankündigung geändert werden. Alle
Warenzeichen sind Eigentum der jeweiligen Inhaber.
Midas, Klark Teknik, Lab Gruppen, Lake, Tannoy,
Oberheim, Auratone und Coolaudio sind Warenzeichen
Brands Ltd. © Music Tribe Global Brands Ltd. 2021 Alle
Rechte vorbehalten.
BESCHRÄNKTE GARANTIE
Die geltenden Garantiebedingungen und zusätzliche
Informationen bezüglich der von Music Tribe gewährten
beschränkten Garantie nden Sie online unter
musictribe.com/warranty.

6 Voicelive 3 Extreme Quick Start Guide 7
9. Non escludere la sicurezza fornita dalla spina
20. Per lo smaltimento delle batterie, tenere in
Coolaudio sono marchi o marchi registrati di Music Tribe
de duas palhetas e um terceiro dente de ligação à terra.
19. Não coloque fontes de chama, tais como velas
Instruções de Segurança
Importantes
Aviso!
Terminais marcados com o símbolo
carregam corrente elétrica de magnitude
suciente para constituir um risco de choque elétrico.
Use apenas cabos de alto-falantes de alta qualidade
com plugues TS de ¼" ou plugues com trava de torção
pré-instalados. Todas as outras instalações e modicações
devem ser efetuadas por pessoasqualicadas.
Este símbolo, onde quer que o encontre,
alerta-o para a leitura das instruções de
manuseamento que acompanham o
equipamento. Por favor leia o manual de instruções.
Atenção
De forma a diminuir o risco de choque
eléctrico, não remover a cobertura
(ouasecção de trás). Não existem peças substituíveis por
parte do utilizador no seu interior. Para esse efeito recorrer
a um técnico qualicado.
Atenção
Para reduzir o risco de incêndios ou
choques eléctricos o aparelho não deve ser
exposto à chuva nem à humidade. Além disso, não deve
ser sujeito a salpicos, nem devem ser colocados em cima
do aparelho objectos contendo líquidos, tais como jarras.
Atenção
Estas instruções de operação devem ser
utilizadas, em exclusivo, por técnicos de
assistência qualicados. Para evitar choques eléctricos
não proceda a reparações ou intervenções, que não as
indicadas nas instruções de operação, salvo se possuir as
quali-cações necessárias. Para evitar choques eléctricos
não proceda a reparações ou intervenções, que não as
indicadas nas instruções de operação. Só o deverá fazer se
possuir as qualicações necessárias.
1. Leia estas instruções.
2. Guarde estas instruções.
3. Preste atenção a todos os avisos.
4. Siga todas as instruções.
5. Não utilize este dispositivo perto de água.
6. Limpe apenas com um pano seco.
7. Não obstrua as entradas de ventilação. Instale de
acordo com as instruções do fabricante.
8. Não instale perto de quaisquer fontes de calor tais
como radiadores, bocas de ar quente, fogões de sala
ou outros aparelhos (incluindo amplicadores) que
produzam calor.
9. Não anule o objectivo de segurança das chas
polarizadas ou do tipo de ligação à terra. Uma cha
polarizada dispõe de duas palhetas sendo uma mais larga
do que a outra. Uma cha do tipo ligação à terra dispõe
A palheta larga ou o terceiro dente são fornecidos para
sua segurança. Se a cha fornecida não encaixar na sua
tomada, consulte um electricista para a substituição da
tomada obsoleta.
10. Proteja o cabo de alimentação de pisadelas ou
apertos, especialmente nas chas, extensões, e no local
de saída da unidade. Certique-se de que o cabo eléctrico
está protegido. Verique particularmente nas chas, nos
receptáculos e no ponto em que o cabo sai doaparelho.
11. O aparelho tem de estar sempre conectado à rede
eléctrica com o condutor de protecção intacto.
12. Se utilizar uma cha de rede principal ou uma
tomada de aparelhos para desligar a unidade de
funcionamento, esta deve estar sempre acessível.
13. Utilize apenas ligações/acessórios especicados
pelofabricante.
14. Utilize apenas com
o carrinho, estrutura,
tripé, suporte, ou mesa
especicados pelo
fabricante ou vendidos
com o dispositivo.
Quandoutilizar um
carrinho, tenha cuidado ao
mover o conjunto carrinho/dispositivo para evitar danos
provocados pela terpidação.
15. Desligue este dispositivo durante as trovoadas
ou quando não for utilizado durante longos períodos
detempo.
16. Qualquer tipo de reparação deve ser sempre
efectuado por pessoal qualicado. É necessária uma
reparação sempre que a unidade tiver sido de alguma
forma danicada, como por exemplo: no caso do cabo
de alimentação ou cha se encontrarem danicados;
naeventualidade de líquido ter sido derramado ou
objectos terem caído para dentro do dispositivo; no caso
da unidade ter estado exposta à chuva ou à humidade;
seesta não funcionar normalmente, ou se tiver caído.
17. Correcta eliminação deste
produto: este símbolo indica que
o produto não deve ser eliminado
juntamente com os resíduos
domésticos, segundo a Directiva
REEE (2012/19/EU) e a legislação
nacional. Este produto deverá
ser levado para um centro de recolha licenciado para a
reciclagem de resíduos de equipamentos eléctricos e
electrónicos (EEE). O tratamento incorrecto deste tipo
de resíduos pode ter um eventual impacto negativo
no ambiente e na saúde humana devido a substâncias
potencialmente perigosas que estão geralmente
associadas aos EEE. Ao mesmo tempo, a sua colaboração
para a eliminação correcta deste produto irá contribuir
para a utilização eciente dos recursos naturais. Paramais
informação acerca dos locais onde poderá deixar o seu
equipamento usado para reciclagem, é favor contactar
os serviços municipais locais, a entidade de gestão de
resíduos ou os serviços de recolha de resíduosdomésticos.
18. Não instale em lugares connados, tais como
estantes ou unidades similares.
acesas, sobre o aparelho.
20. Favor, obedecer os aspectos ambientais de descarte
de bateria. Baterias devem ser descartadas em um ponto
de coletas de baterias.
21. Esse aparelho pode ser usado em climas tropicais e
moderados até 45°C.
LEGAL RENUNCIANTE
O Music Tribe não se responsabiliza por perda
alguma que possa ser sofrida por qualquer pessoa
que dependa, seja de maneira completa ou parcial,
de qualquer descrição, fotograa, ou declaração
aqui contidas. Dados técnicos, aparências e outras
informações estão sujeitas a modicações sem aviso
prévio. Todas as marcas são propriedade de seus
respectivos donos. Midas, Klark Teknik, Lab Gruppen,
Lake, Tannoy, Turbosound, TC Electronic, TC Helicon,
Behringer, Bugera, Oberheim, Auratone e Coolaudio
são marcas ou marcas registradas do Music Tribe
Global Brands Ltd. © Music Tribe Global Brands Ltd.
2021 Todos direitos reservados.
GARANTIA LIMITADA
Para obter os termos de garantia aplicáveis e condições e
informações adicionais a respeito da garantia limitada do
Music Tribe, favor vericar detalhes na íntegra através do
website musictribe.com/warranty.
Informazioni importanti
Attenzione
I terminali contrassegnati da questo
simbolo conducono una corrente elettrica
di magnitudine suciente a costituire un rischio di scossa
elettrica. Utilizzare solo cavi per altoparlanti professionali
di alta qualità con jack sbilanciati da 6,35mm. o connettori
con blocco a rotazione. Tutte le altre installazioni o
modiche devono essere eseguite esclusivamente da
personale qualicato.
Attenzione
Questo simbolo, ovunque appaia, avverte
della presenza di una tensione pericolosa
non isolata all'interno dello chassis, tensione che può
essere suciente per costituire un rischio di scossa
elettrica.
Attenzione
Questo simbolo, ovunque appaia, segnala
importanti istruzioni operative e di
manutenzione nella documentazione allegata. Si invita a
leggere il manuale.
Attenzione
Per ridurre il rischio di scosse elettriche,
non rimuovere il coperchio superiore
(o la sezione posteriore). All'interno non ci sono parti
riparabili dall'utente. Per la manutenzione rivolgersi a
personale qualicato.
Attenzione
Per ridurre il rischio di incendi o scosse
elettriche, non esporre questo apparecchio
a pioggia e umidità. L'apparecchio non deve essere
esposto a gocciolio o schizzi di liquidi e nessun oggetto
contenente liquidi, come vasi, deve essere collocato
sull'apparecchio.
Attenzione
Queste istruzioni di servizio sono destinate
esclusivamente a personale qualicato.
Per ridurre il rischio di scosse elettriche non eseguire
interventi di manutenzione diversi da quelli contenuti
nel manuale di istruzioni. Le riparazioni devono essere
eseguite da personale di assistenza qualicato.
1. Leggere queste istruzioni.
2. Conservare queste istruzioni.
3. Prestare attenzione a tutti gli avvisi.
4. Applicare tutte le istruzioni.
5. Non utilizzare questo dispositivo vicino l'acqua.
6. Pulire esclusivamente con un panno asciutto.
7. Non bloccare le aperture di ventilazione. Installare in
conformità con le istruzioni del produttore.
8. Non installare vicino a fonti di calore come
radiatori, termoregolatori, stufe o altri apparecchi
(inclusi amplicatori) che producono calore.
polarizzata o con messa a terra. Una spina polarizzata ha
due lame, una più larga dell'altra. Una spina con messa a
terra ha due lame e un terzo polo di messa a terra. La lama
larga o il terzo polo sono forniti per la vostra sicurezza.
Se la spina fornita non si adatta alla presa, consultare un
elettricista per la sostituzione della presa obsoleta.
10. Proteggere il cavo di alimentazione dal calpestio
o essere schiacciato in particolare alle spine, prese di
corrente e il punto in cui esce dall'apparecchio.
11. Utilizzare esclusivamente dispositivi/accessori
specicati dal produttore.
12. Utilizzare solo
carrelli, supporti, treppiedi,
stae o tavoli indicati dal
produttore o venduti con
l'apparecchio. Utilizzando
un carrello, prestare
attenzione quando si
sposta la combinazione
carrello/apparecchio per evitare lesioni dovute al
ribaltamento.
13. Scollegare questo apparecchio durante i temporali o
se non è utilizzato per lunghi periodi di tempo.
14. Per tutte le riparazioni rivolgersi a personale
qualicato. La manutenzione è necessaria quando
l'apparecchio è danneggiato in qualsiasi modo, come
danneggiamento del cavo di alimentazione o della spina,
versamento di liquido o oggetti caduti nell'apparecchio,
se l'apparecchio è stato esposto a pioggia o umidità, se
non funziona normalmente o è caduto.
15. L'apparecchio deve essere collegato a una presa di
corrente elettrica con messa a terra di protezione.
16. Se la spina o una presa del dispositivo è utilizzata
come dispositivo di disconnessione, deve essere
facilmente utilizzabile.
17. Smaltimento corretto di
questo prodotto: questo simbolo
indica che questo dispositivo non
deve essere smaltito insieme
ai riuti domestici, secondo
la Direttiva RAEE (2012/19 /
UE) e la vostra legislazione
nazionale. Questo prodotto deve essere portato in un
centro di raccolta autorizzato per il riciclaggio di riuti
di apparecchiature elettriche ed elettroniche (RAEE).
La cattiva gestione di questo tipo di riuti potrebbe avere
un possibile impatto negativo sull'ambiente e sulla salute
umana a causa di sostanze potenzialmente pericolose
che sono generalmente associate alle apparecchiature
elettriche ed elettroniche. Nello stesso tempo la vostra
collaborazione al corretto smaltimento di questo prodotto
contribuirà all'utilizzo eciente delle risorse naturali. Per
ulteriori informazioni su dove è possibile trasportare le
apparecchiature per il riciclaggio vi invitiamo a contattare
l'ucio comunale locale o il servizio di raccolta dei
riuti domestici.
18. Non installare in uno spazio ristretto, come in una
libreria o in una struttura simile.
19. Non collocare sul dispositivo fonti di amme libere,
come candele accese.
considerazione gli aspetti ambientali. Le batterie devono
essere smaltite in un punto di raccolta delle batterie
esauste.
21. Questo apparecchio può essere usato in climi
tropicali e temperati no a 45°C.
DISCLAIMER LEGALE
Music Tribe non si assume alcuna responsabilità per
eventuali danni che possono essere subiti da chiunque
si adi in tutto o in parte a qualsiasi descrizione,
fotograa o dichiarazione contenuta qui. Speciche
tecniche, aspetti e altre informazioni sono soggette
a modiche senza preavviso. Tutti i marchi sono di
proprietà dei rispettivi titolari. Midas, Klark Teknik,
Lab Gruppen, Lake, Tannoy, Turbosound, TC Electronic,
TC Helicon, Behringer, Bugera, Oberheim, Auratone e
Global Brands Ltd. © Music Tribe Global Brands Ltd.
2021 Tutti i diritti riservati .
GARANZIA LIMITATA
Per i termini e le condizioni di garanzia applicabili e le
informazioni aggiuntive relative alla garanzia limitata
di Music Tribe, consultare online i dettagli completi su
musictribe.com/warranty.

8 Voicelive 3 Extreme Quick Start Guide 9
9. Maak de veiligheid waarin door de polarisatie-
van de natuurlijke hulpbronnen. Voormeer informatie
10. Förlägg elkabeln så, att det inte är möjligt att
nns här. Tekniska specikationer, utseenden och annan
Auratone och Coolaudio är varumärken eller registrerade
För tillämpliga garantivillkor och ytterligare information
Belangrijke
veiligheidsvoorschriften
Waarschuwing
Aansluitingen die gemerkt zijn met
het symbool voeren een zodanig hoge
spanning dat ze een risico vormen voor elektrische
schokken. Gebruik uitsluitend kwalitatief hoogwaardige,
in de handel verkrijgbare luidsprekerkabels die
voorzien zijn van ¼"TS stekkers. Laat uitsluitend
gekwaliceerd personeel alle overige installatie- of
modicatiehandelingen uitvoeren.
Dit symbool wijst u altijd op belangrijke
bedienings - en onderhoudsvoorschriften
in de bijbehorende documenten.
Wijvragen u dringend de handleiding te lezen.
Attentie
Verwijder in geen geval de bovenste
afdekking (van het achterste gedeelte)
anders bestaat er gevaar voor een elektrische schok.
Het apparaat bevat geen te onderhouden onderdelen.
Reparatiewerkzaamheden mogen uitsluitend door
gekwaliceerd personeel uitgevoerd worden.
Attentie
Om het risico op brand of elektrische
schokken te beperken, dient u te
voorkomen dat dit apparaat wordt blootgesteld aan regen
en vocht. Het apparaat mag niet worden blootgesteld aan
neerdruppelend of opspattend water en er mogen geen
met water gevulde voorwerpen – zoals een vaas – op het
apparaat worden gezet.
Attentie
Deze onderhoudsinstructies zijn
uitsluitend bedoeld voor gekwaliceerd
onderhoudspersoneel. Omelektrische schokken te
voorkomen, mag u geen andere onderhoudshandelingen
verrichten dan in de bedieningsinstructies vermeld staan.
Reparatiewerkzaamheden mogen alleen uitgevoerd
worden door gekwaliceerd onderhoudspersoneel.
1. Lees deze voorschriften.
2. Bewaar deze voorschriften.
3. Neem alle waarschuwingen in acht.
4. Volg alle voorschriften op.
5. Gebruik dit apparaat niet in de buurt van water.
6. Reinig het uitsluitend met een droge doek.
7. Let erop geen van de ventilatie-openingen
te bedekken. Plaats en installeer het volgens de
voor- schriften van de fabrikant.
8. Het apparaat mag niet worden geplaatst in de buurt
van radiatoren, warmte-uitlaten, kachels of andere zaken
(ook versterkers) die warmte afgeven.
of aardingsstekker wordt voorzien, niet ongedaan.
Eenpolarisatiestekker heeft twee bladen, waarvaner
een breder is dan het andere. Een aardingsstekker heeft
twee bladen en een derde uitsteeksel voor de aarding.
Het bredere blad of het derde uitsteeksel zijn er voor
uw veiligheid. Mocht de geleverde stekker niet in uw
stopcontact passen, laat het contact dan door een
elektricien vervangen.
10. Om beschadiging te voorkomen, moet de
stroomleiding zo gelegd worden dat er niet kan worden
over gelopen en dat ze beschermd is tegen scherpe
kanten. Zorg zeker voor voldoende bescherming aan de
stekkers, de verlengkabels en het punt waar het netsnoer
het apparaat verlaat.
11. Het toestel met altijd met een intacte aarddraad aan
het stroomnet aangesloten zijn.
12. Wanneer de stekker van het hoofdnetwerk of een
apparaatstopcontact de functionele eenheid voor het
uitschakelen is, dient deze altijd toegankelijk te zijn.
13. Gebruik uitsluitend door de producent
gespeci- ceerd toebehoren c.q. onderdelen.
14. Gebruik het apparaat
uitsluitend in combinatie
met de wagen, hetstatief,
de driepoot, de beugel of
tafel die door de producent
is aangegeven, of die
in combinatie met het
apparaat wordt verkocht.
Bij gebruik van een wagen dient men voorzichtig te zijn bij
het verrijden van de combinatie wagen/apparaat en letsel
door vallen te voorkomen.
15. Bij onweer en als u het apparaat langere tijd niet
gebruikt, haalt u de stekker uit het stopcontact.
16. Laat alle voorkomende reparaties door vakkundig en
bevoegd personeel uitvoeren. Reparatiewerk-zaamheden
zijn nodig als het toestel op enige wijze beschadigd is
geraakt, bijvoorbeeld als de hoofd-stroomkabel of -stekker
is beschadigd, als er vloeistof of voorwerpen in terecht
zijn gekomen, als het aan regen of vochtigheid heeft
bloot-gestaan, niet normaal functioneert of wanneer het
is gevallen.
17. Correcte afvoer van dit
product: dit symbool geeft aan
dat u dit product op grond van
de AEEA-richtlijn (2012/19/EU)
en de nationale wetgeving van
uw land niet met het gewone
huishoudelijke afval mag
weggooien. Dit product moet na aoop van de nuttige
levensduur naar een ociële inzamelpost voor afgedankte
elektrische en elektronische apparatuur (AEEA) worden
gebracht, zodat het kan worden gerecycleerd. Vanwege
de potentieel gevaarlijke stoen die in elektrische en
elektronische apparatuur kunnen voorkomen, kan een
onjuiste afvoer van afval van het onderhavige type
een negatieve invloed op het milieu en de menselijke
gezondheid hebben. Eenjuiste afvoer van dit product is
echter niet alleen beter voor het milieu en de gezondheid,
maar draagt tevens bij aan een doelmatiger gebruik
over de plaatsen waar u uw afgedankte apparatuur kunt
inleveren, kunt u contact opnemen met uw gemeente of
de plaatselijkereinigingsdienst.
18. Installeer niet in een kleine ruimte, zoals een
boekenkast of iets dergelijks.
19. Plaats geen open vlammen, zoals brandende
kaarsen, op het apparaat.
20. Houd rekening met de milieuaspecten van het
afvoeren van batterijen. Batterijen moeten bij een
inzamelpunt voor batterijen worden ingeleverd.
21. Dit apparaat kan worden gebruikt in tropische en
gematigde klimaten tot 45 ° C.
WETTELIJKE ONTKENNING
Music Tribe aanvaardt geen aansprakelijkheid voor enig
verlies dat kan worden geleden door een persoon die
geheel of gedeeltelijk vertrouwt op enige beschrijving,
foto of verklaring hierin. Technische specicaties,
verschijningen en andere informatie kunnen zonder
voorafgaande kennisgeving worden gewijzigd. Alle
handelsmerken zijn eigendom van hun respectievelijke
eigenaren. Midas, Klark Teknik, Lab Gruppen, Lake,
Tannoy, Turbosound, TC Electronic, TC Helicon, Behringer,
Bugera, Oberheim, Auratone en Coolaudio zijn
handelsmerken of gedeponeerde handelsmerken van
Music Tribe Global Brands Ltd. © Music Tribe Global
Brands Ltd. 2021 Alle rechten voorbehouden.
BEPERKTE GARANTIE
Voor de toepasselijke garantievoorwaarden en
aanvullende informatie met betrekking tot de beperkte
garantie van Music Tribe, zie de volledige details online
op musictribe.com/warranty.
Viktiga
säkerhetsanvisningar
Varning
Uttag markerade med symbolen leder
elektrisk strömstyrka som är tillräckligt
stark för att utgöra en risk för elchock. Använd endast
högkvalitativa, kommersiellt tillgängliga högtalarkablar
med förhandsinstallerade ¼"TS-kontakter. All annan
installering eller modikation bör endast utföras av
kompetent personal.
Den här symbolen hänvisar till viktiga
punkter om användning och underhåll i
den medfölljande dokumentationen.
Varvänlig och läs bruksanvisningen.
Försiktighet
Minska risken för elektriska stötar genom
att aldrig ta av höljet upptill på apparaten
(eller ta av baksidan). Inuti apparaten nns det inga delar
som kan repareras av användaren. Endastkvalicerad
personal får genomföra reparationer.
Försiktighet
För att minska risken för brand och
elektriska stötar ska apparaten skyddas
mot regn och fukt. Apparaten går inte utsättas för
dropp eller spill och inga vattenbehållare som vaser etc.
fårplaceras på den.
Försiktighet
Serviceinstruktionen är enbart avsedd
för kvalicerad servicepersonal. Föratt
undvika risker genom elektriska stötar, genomför inga
reparationer på apparaten, vilka inte är beskrivna i
bruksanvisningen. Endast kvalicerad fackpersonal får
genomföra reparationerna.
1. Läs dessa anvisningar.
2. Spara dessa anvisningar.
3. Beakta alla varningar.
4. Följ alla anvisningar.
5. Använd inte apparaten i närheten av vatten.
6. Rengör endast med torr trasa.
7. Blockera inte ventilationsöppningarna.
Installeraenligt tillverkarens anvisningar.
8. Installera aldrig intill värmekällor som
värme- element, varmluftsintag, spisar eller annan
utrustning som avger värme (inklusive förstärkare).
9. Ändra aldrig en polariserad eller jordad kontakt.
Enpolariserad kontakt har två blad – det ena bredare än
det andra. En jordad kontakt har två blad och ett tredje
jordstift. Det breda bladet eller jordstiftet är till för din
säkerhet. Omden medföljande kontakten inte passar i ditt
uttag, skadu kontakta en elektriker för att få uttaget bytt.
trampa på den och att den är skyddad mot skarpa kanter
och inte kan skadas. Ge i synnerhet akt på områdena
omkring stickkontakterna, förlängningskablarna
och på det ställe, där elkabeln lämnar apparaten,
ärtillräckligtskyddade.
11. Apparaten måste alltid vara ansluten till elnätet
med intakt skyddsledare.
12. Om huvudkontakten, eller ett apparatuttag,
fungerar som avstängningsenhet måste denna alltid
varatillgänglig.
13. Använd endast tillkopplingar och tillbehör som
angetts av tillverkaren.
14. Använd endast
med vagn, stativ, trefot,
hållareeller bord som
angetts av tillverkaren,
ellersom sålts tillsammans med apparaten.
Om du använder en
vagn, var försiktig, när du
föryttar kombinationen vagn-apparat, för att förhindra
olycksfall genom snubbling.
15. Dra ur anslutningskontakten und åskväder eller när
apparaten inte ska användas under någon längre tid.
16. Låt kvalicerad personal utföra all service. Serviceär
nödvändig när apparaten har skadats, t.ex.när en elkabel
eller kontakt är skadad, vätska eller främmande föremål
har kommit in i apparaten, eller när den har fallit i golvet.
17. Kassera produkten på rätt
sätt: den här symbolen indikerar
att produkten inte ska kastas i
hushållssoporna, enligt WEEE
direktivet (2012/19/EU) och
gällande, nationell lagstiftning.
Produkten ska lämnas till ett
auktoriserat återvinningsställe för elektronisk och
elektrisk utrustning (EEE). Om den här sortens avfall
hanteras på fel sätt kan miljön, och människors hälsa,
påverkas negativt på grund av potentiella risksubstanser
som ofta associeras med EEE. Avfallshanteras produkten
däremot på rätt sätt bidrar detta till att naturens
resurser används på ett bra sätt. Kontakta kommun,
ansvarig förvaltning eller avfallshanteringsföretag för
mer information om återvinningscentral där produkten
kanlämnas
18. Installera inte i ett trångt utrymme,
t.ex. i en bokhylsa eller liknande enhet.
19. Placera inte källor med öppen eld, t.ex. tända ljus,
på apparaten.
20. Tänk på miljöaspekterna vid kassering av batterier.
Batterier måste kasseras på ett batteriuppsamlingsställe.
21. Denna apparat kan användas i tropiska och måttliga
klimat upp till 45 ° C.
FRISKRIVNINGSKLAUSUL
Music Tribe tar inget ansvar för någon förlust som kan
drabbas av någon person som helt eller delvis förlitar
sig på någon beskrivning, fotogra eller uttalande som
information kan ändras utan föregående meddelande.
Alla varumärken tillhör respektive ägare. Midas,
Klark Teknik, Lab Gruppen, Lake, Tannoy, Turbosound,
TC Electronic, TC Helicon, Behringer, Bugera, Oberheim,
varumärken som tillhör Music Tribe Global Brands Ltd.
© Music Tribe Global Brands Ltd. 2021 Alla Rättigheter
reserverade.
BEGRÄNSAD GARANTI
om Music Tribes begränsade garanti, se fullständig
information online på musictribe.com/warranty.

10 Voicelive 3 Extreme Quick Start Guide 11
8. Nie stawiać urządzenia w pobliżu źródeł ciepła
zdrowie człowieka z powodu potencjalnych substancji
prawidłową utylizację niniejszego produktu przyczynia się
Ważne informacje o
bezpieczeństwie
Uwaga
Terminale oznaczone symbolem
przenoszą wystarczająco wysokie
napięcie elektryczne, aby stworzyć ryzyko porażenia
prądem. Używaj wyłącznie wysokiej jakości fabrycznie
przygotowanych kabli z zainstalowanymi wtyczkami
¼"TS. Wszystkie inne instalacje lub modykacje powinny
być wykonywane wyłącznie przez wykwalikowany
personel techniczny.
Ten symbol informuje o ważnych
wskazówkach dotyczących obsługi i
konserwacji urządzenia w dołączonej
dokumentacji. Proszę przeczytać stosowne informacje w
instrukcji obsługi.
Uwaga
W celu wyeliminowania zagrożenia
porażenia prądem zabrania się
zdejmowania obudowy lub tylnej ścianki urządzenia.
Elementy znajdujące się we wnętrzu urządzenia nie mogą
być naprawiane przez użytkownika. Naprawy mogą być
wykonywane jedynie przez wykwalikowanypersonel.
Uwaga
W celu wyeliminowania zagrożenia
porażenia prądem lub zapalenia się
urządzenia nie wolno wystawiać go na działanie deszczu
i wilgotności oraz dopuszczać do tego, aby do wnętrza
dostała się woda lub inna ciecz. Nie należy stawiać na
urządzeniu napełnionych cieczą przedmiotów takich jak
np. wazony lub szklanki.
Uwaga
Prace serwisowe mogą być wykonywane
jedynie przez wykwalikowany personel.
W celu uniknięcia zagrożenia porażenia prądem nie należy
wykonywać żadnych manipulacji, które nie są opisane
w instrukcji obsługi. Naprawywykonywane mogą być
jedynie przez wykwalikowany personeltechniczny.
1. Proszę przeczytać poniższe wskazówki.
2. Proszę przechowywać niniejszą instrukcję.
3. Należy przestrzegać wszystkich wskazówek
ostrzegawczych.
4. Należy postępować zgodnie z instrukcją obsługi.
5. Urządzenia nie wolno używać w pobliżu wody.
6. Urządzenie można czyścić wyłącznie suchąszmatką.
7. Nie zasłaniać otworów wentylacyjnych.
Wczasie podłączania urządzenia należy przestrzegać
zaleceńproducenta.
takich, jak grzejniki, piece lub urządzenia produkujące
ciepło (np. wzmacniacze).
9. W żadnym wypadku nie należy usuwać
zabezpieczeń z wtyczek dwubiegunowych oraz wtyczek
z uziemieniem. Wtyczka dwubiegunowa posiada
dwa wtyki kontaktowe o różnej szerokości. Wtyczka z
uziemieniem ma dwa wtyki kontaktowe i trzeci wtyk
uziemienia. Szerszy wtyk kontaktowy lub dodatkowy
wtyk uziemienia służą do zapewnienia bezpieczeństwa
użytkownikowi. Jeśli format wtyczki urządzenia nie
odpowiada standardowi gniazdka, proszę zwrócić się do
elektryka z prośbą o wymienienie gniazda.
10. Kabel sieciowy należy ułożyć tak, aby nie był
narażony na deptanie i działanie ostrych krawędzi, co
mogłoby doprowadzić do jego uszkodzenia. Szczególną
uwagę zwrócić należy na odpowiednią ochronę miejsc w
pobliżu wtyczek i przedłużaczy oraz miejsce, w którym
kabel sieciowy przymocowany jest do urządzenia.
11. Urządzenie musi być zawsze podłączone do sieci
sprawnym przewodem z uziemieniem.
12. Jeżeli wtyk sieciowy lub gniazdo sieciowe w
urządzeniu pełnią funkcję wyłącznika, to muszą one być
zawsze łatwo dostępne.
13. Używać wyłącznie sprzętu dodatkowego i
akcesoriów zgodnie z zaleceniami producenta.
14. Używać
jedynie zalecanych
przez producenta
lub znajdujących
się w zestawie
wózków, stojaków,
statywów, uchwytów
i stołów. Wprzypadku
posługiwania się wózkiem należy zachować szczególną
ostrożność w trakcie przewożenia zestawu, aby uniknąć
niebezpieczeństwa potknięcia się i zranienia.
15. W trakcie burzy oraz na czas dłuższego nieużywania
urządzenia należy wyjąć wtyczkę z gniazdka sieciowego.
16. Wykonywanie wszelkich napraw należy zlecać
jedynie wykwalikowanym pracownikom serwisu.
Przeprowadzenie przeglądu technicznego staje się
konieczne, jeśli urządzenie zostało uszkodzone w
jakikolwiek sposób (dotyczy to także kabla sieciowego
lub wtyczki), jeśli do wnętrza urządzenia dostały się
przedmioty lub ciecz, jeśli urządzenie wystawione było
na działanie deszczu lub wilgoci, jeśli urządzenie nie
funkcjonuje poprawnie oraz kiedy spadło na podłogę.
17. Prawidłowa utylizacja
produktu: Ten symbol wskazuje,
że tego produktu nie należy
wyrzucać razem ze zwykłymi
odpadami domowymi,
tylko zgodnie z dyrektywą
w sprawie zużytego sprzętu
elektrycznego i elektronicznego (WEEE) (2012/19/EU)
oraz przepisami krajowymi. Niniejszy produkt należy
przekazać do autoryzowanego punktu zbiórki zużytego
sprzętu elektrycznego i elektronicznego. Niewłaściwe
postępowanie z tego typu odpadami może wywołać
szkodliwe działanie na środowisko naturalnej i
niebezpiecznych zaliczanych jako zużyty sprzęt
elektryczny i elektroniczny. Jednocześnie, Twój wkład w
do oszczędnego wykorzystywania zasobów naturalnych.
Szczegółowych informacji o miejscach, w których można
oddawać zużyty sprzęt do recyklingu, udzielają urzędy
miejskie, przedsiębiorstwa utylizacji odpadów lub
najbliższy zakład utylizacji odpadów.
18. Nie instaluj w ograniczonej przestrzeni, takiej jak
półka na książki lub podobny zestaw.
19. Nie stawiaj na urządzeniu źródeł otwartego ognia,
takich jak zapalone świece.
20. Należy pamiętać o środowiskowych aspektach
utylizacji baterii. Baterie należy utylizować w punkcie
zbiórki baterii.
21. To urządzenie może być używane w klimacie
tropikalnym i umiarkowanym do 45 ° C.
ZASTRZEŻENIA PRAWNE
Music Tribe nie ponosi odpowiedzialności za
jakiekolwiek straty, które mogą ponieść osoby, które
polegają w całości lub w części na jakimkolwiek opisie,
fotograi lub oświadczeniu zawartym w niniejszym
dokumencie. Specykacje techniczne, wygląd i inne
informacje mogą ulec zmianie bez powiadomienia.
Wszystkie znaki towarowe są własnością ich
odpowiednich właścicieli. Midas, Klark Teknik,
Lab Gruppen, Lake, Tannoy, Turbosound, TC Electronic,
TC Helicon, Behringer, Bugera, Oberheim, Auratone i
Coolaudio są znakami towarowymi lub zastrzeżonymi
znakami towarowymi rmy Music Tribe Global Brands
Ltd. © Music Tribe Global Brands Ltd. 2021 Wszystkie
prawa zastrzeżone.
OGRANICZONA GWARANCJA
Aby zapoznać się z obowiązującymi warunkami
gwarancji i dodatkowymi informacjami dotyczącymi
ograniczonej gwarancji Music Tribe, zapoznaj się ze
wszystkimi szczegółami w trybie online pod adresem
musictribe.com/warranty.
Before you begin
About the VoiceLive 3 quick guide
This quick guide will help you learn understand ing and operating your VoiceLive 3.
You can download the most current version of this quick guide from:
tc-helicon.com/products/voicelive-3/support/
To get the most from this quick guide, please read it from start to nish, or you may miss im portant information.
Be sure to download the VoiceLive 3 reference manual!
Please note that this document is just a quick guide – not the full manual! It is intended to get you up and running with
your VoiceLive 3, but we really just skim the surface here.
For information on all of the functions and fea tures in your new VoiceLive 3, make sure you download the complete reference manual from:
tc-helicon.com/products/voicelive-3/support/.
Getting support
If you still have questions about the product af ter reading this quick guide and the reference manual, please get in touch with TC-Helicon Support:
tc-helicon.com/support/
VoiceSupport
VoiceSupport is the application that allows you to fully unlock the potential of your TC-Helicon product and stay in touch with the latest news, tips and tricks.
VoiceSupport key features include:
• Professionally authored preset libraries
• Direct access to product manuals
• Update messaging – helping you stay up to date with the latest software
• Drag & drop preset management
• Customizable content about your products
• Firmware upgrading
• Access to support.
You can download VoiceSupport for Microsoft Windows and Mac OS X from:
tc-helicon.com/products/voicesupport/
Please register your VoiceLive 3
To register your product, please visit: https://www.tc-helicon.com/brand/tchelicon/product-registration
Please note that registration of your product is NOT required to use
VoiceSupport, download presets, update rmware or contact support.

12 Voicelive 3 Extreme Quick Start Guide 13
Diagrams Introduction
Thank you for purchasing
VoiceLive 3!
Your new Vocal, Guitar and Loop processor is quite an amazing piece of
technology. With liter ally thousands of eect combinations and many
versatile controls, you can completely customize your sound.
VoiceLive 3 replaces stand-alone vocal pro cessors, guitar multi effects units
(1)
VOICELIVE 3 P. A
(5)
To give you clear and concise representations of what goes where,
we have provided several connection diagrams in the “Making connections”
(page 10) section. There are a few things we would like you to keep in mind
as you follow these diagrams:
• Signal sources that go into your VoiceLive 3 (e.g. microphone or guitar) will
always be shown to the left of the back panel image (1).
• “Downstream” devices (mixers, speakers) will always be shown to the right of
the back panel image (2).
• The box in the lower left corner shows what signals you will hear from the
VoiceLive 3 headphone output.
• The box in the lower right corner shows what you will hear from your mixer /
PA speakers. This could be anything from a “stick system” or a portable/all-inone loudspeaker system to powered studio monitors or even a DAW
recording interface.
In many cases, what you hear from the Voice Live 3 headphone output and your
PA will be the same (5) – but it can also be dierent.
Please note that we do not account for other in puts or instruments in these
diagrams – so you won’t see pictures of drums (4) etc. When a set up example
includes a connection to your guitar amp, we do not show that amp being miked
and sent through the PA (which often is the case) – we are just showing you
how to connect Voice Live 3 in a particular setup. This means the “what you hear”
section in the lower right corner does not show guitar sounds coming from the
PA – even though they might at a gig.
(2)
(3)
(5) (4)
Legend
The following symbols are used in the setup ex amples section of this quick guide:
Microphone
Acoustic Guitar
Electric Guitar
Keyboard or
other instrument
Mixing Desk
P.A.
Guitar or
keyboard amp
Monitor Mix
Important
and phrase loopers – reducing your “gig weight” to what you can throw
in a backpack.
We’re really excited to get you up and running quickly, so let’s get started!
In the box
The VoiceLive 3 box should contain the follow ing items:
• 1 VoiceLive 3 vocal processor
• 1 power adaptor
• 1 USB cable
• 1 guitar/headphone cable
• this manual.
If you are missing an item, please contac t your retailer immediately.
Inspect all items for signs of transit damage. In the unlikely event of
transit damage, inform the carrier and supplier.
If damage has occurred, keep all packaging as it can be used as
evidence of excessive handling force.
VoiceLive 3 key features
Just to whet your appetite, here is a basic over view of
VoiceLive 3’s many exciting features!
• Vocal Eects Suite
• Adaptive Tone
• EQ
• Compression
• De-ess
• Reverb
• Delay (Echo)
• Double
• Harmony
• Choir
• Vocoder / Talk Box / Vocal Synth
Guitar Eects Suite
• Amp Simulation
• Reverb
• Delay
• Mod: Flanger / Chorus / Detune
• Drive
• Compressor
• Rhythm / Tremolo
• Wah Wah
• Octave Down
Multi-Phrase Looper
• Loop Assist quantization
• Swap Mode – For easy verse / chorus / bridge style looping
• Onboard loop storage
• Customizable button layout – Completely remappable footswitches
• Easy Top-Level Editing – Deep controls when you’re ready
• HIT function – Add multiple eects to Vocals, Guitar or both with
one button press
• Direct guitar out – go straight to your amp
• Independent headphone mix – Perfect for in-ear monitoring without
an ex pensive transmitter/receiver system
XLR cable
TRS cable
TS (guitar) cable
1
/8" cable
• Rhythmic
• Mod (pronounced “micro mod”): Flanger / Chorus / Detune
• Transducer
• HardTune
• Whammy

14 Voicelive 3 Extreme Quick Start Guide 15
Making connections
(4)
OR
(2) (3) (6) (7) (5)
(1)
1. Vocals and guitar using guitar/headphone cable
OR
VOICELIVE 3 P. A
Inputs
(1) Connect the supplied power adapter to the 12 V DC jack of your
VoiceLive 3 and plug the adapter into a wall outlet.
Do not power up your VoiceLive 3 yet.
(2) Plug your microphone into the MIC / LINE jack using an XLR cable.
(3) Connect your guitar to the GUITAR IN jack us ing a ¼" Tip Sleeve (TS) cable
(i.e., a regular guitar cable).
(4) Connect your MP3 player or smartphone to the AUX jack using a ⁄" cable.
(5) Connect your MIDI master keyboard or syn thesizer to the MIDI IN jack using
a MIDI cable.
(6) Plug your Switch-3 into the FOOTSWITCH jack using a ¼" Tip Ring Sleeve
(TRS) cable (the cable that came with the Switch-3).
(7) Plug your Expression pedal into the EXPRES SION jack.
Do you have a condenser, MP-75 or e835FX microphone? When the
unit is powered up (there’s a few more steps before that hap pens),
you’ll need to enable Phantom Power. To enable Phantom Power, press SETUP
and navigate to the INPUT tab using the < and > buttons below the large
control knob. Find the Mic Type parameter and change it to Con denser.
Press SETUP to exit. These instruc tions are also printed on the bottom of your
VoiceLive 3.
Outputs
Depending on what kind of amplication system you are using,
there are lots of options. We cover a few common setups on the following pages.
In the reference manual, we’ll show many more connec tion options,
including incoming monitor mixes.
This setup utilizes the included guitar/headphone cable, which is perfect for personal monitoring in any setup. You will see that the two smaller ends of the cable are
dierent. One end has a male headphone jack beside the guitar jack. Connect these to the GUITAR IN and HEADPHONE jacks. The other end plugs into your guitar and
has a fe male jack for your headphones/in-ear monitors.
2. Stereo vocal and stereo guitar (2 channels)
OR
VOICELIVE 3 P. A
This is a very common setup for both live per formances with a stereo PA (double-check that the venue PA system is actually in stereo!) or for basic 2 channel recording.

16 Voicelive 3 Extreme Quick Start Guide 17
3. Stereo vocals and stereo guitar (4 channels)
OR
VOICELIVE 3 P. A
5. Stereo vocals and guitar amplier
L
R
OR
VOICELIVE 3 P. A
VoiceLive 3 features “jack sensing” on several inputs and outputs. With this connection setup, all guitar signals are removed from the XLR sig nal path when ¼" Guitar
OUT connections are made. This gives you separate stereo channels for your vocals and guitar. This is a great setup for connecting to a 4 channel
audio interface.
4. Mono vocals and mono guitar (dual mono mode)
OR
VOICELIVE 3 P. A
Keep in mind that your guitar amp may be miked and come out through the PA. That part of the signal ow isn’t shown in this setup example.
Guitar output is automatically muted in the XLR signal path when a ¼" guitar out connection is made.
6. Mono vocals and guitar amplier
OR
VOICELIVE 3 P. A
If you are not using a guitar amplier, this is a common connection setup for most live venues, since the PA is typically in mono. It also allows a sound tech to control
the overall balance be tween your vocals and guitar. Output modes can be changed in the Setup/Out put menu.
Keep in mind that your guitar amp may be miked and come out through the PA. That part of the signal ow isn’t shown in this setup example.
Guitar output is automatically muted in the XLR signal path when a ¼" guitar out connection is made.

18 Voicelive 3 Extreme Quick Start Guide 19
Sing and play!
7. Stereo vocals and MIDI keyboard
Let’s get going!
Make all connections as seen in “Making connections” (page 10).
Before you power up VoiceLive 3, make sure that the amplier or PA it is
connected to is muted or turned all the way down!
Press the POWER switch on the back of the unit.
Booting will take a few seconds – so it is nor mal if you see a
blank screen for a shor t while.
For additional information on input trim, please refer to your PA or mixer’s
instruction manual. If you need a bit more guidance, check out this “Craig’s
Corner” video explaining mixer setup:
youtube.com/watch?v=qq0AOtafIjs
Time to have some fun!
It’s time to hear what your VoiceLive 3 really can do! Set the VoiceLive 3 channel
faders on your mixer to 0 or “Unity”, whichever applies.
Slowly turn up the master/main volume on your PA/Mixer (and on your guitar
amp if you are hooked up to one).
If you encounter feedback, turn the master vol ume down until it goes away.
For more informa tion on feedback and how to overcome it, check out this
“Craig’s Corner” video:
youtube.com/watch?v=VlN1RJ4gcAo
VOICELIVE 3 P. A
VoiceLive 3 is not a synthesizer and cannot con vert MIDI note messages to audio. The MIDI con nection is only used for NaturalPlay chord detec tion and other control
data. You will still need to connect your keyboard to the PA or an amplier for it to be heard!
Auto Gain
The easiest way to set the input levels for your microphone and guitar is to press
and hold the Setup button.
You will see a series of on-screen instructions. When you are done, gain settings
will be opti mized for your microphone and guitar.
You should only have to use Auto Gain once. There is no need to go through this
procedure each time you power on the unit.
If you have a condenser, MP-75, or e835FX mic, this is a good time to enable it.
Follow the in structions printed on the bottom of your Voice Live 3.
Setting input gain on your mixer
While singing and playing at your loudest vol ume, slowly turn up the input gain/
trim knobs of the mixer channels your VoiceLive 3 is con nected to. When the clip
indicator on your mixer lights up, reduce input gain/trim slightly.
Explore the sounds
The best way to get an idea of your VoiceLive 3’s potential is to browse the
presets. The factory presets have tons of great sounds, so we sug gest you carve
out a little time to go through and listen to them.
To browse presets, press the footswitches with the up and down arrows
on the far left.
Note which presets you enjoy the most – you can use them as a starting point for
creating your own presets later.
VoiceLive 3 for acoustic guitar players
VoiceLive 3 comes with pristine reverbs, mod ulation eects, EQs and delays to
make your acoustic guitar sound better than it ever has. However, you may not
want heavy overdrive or radical anging applied to the output of your
handmade masterpiece…
If you have a nice eects setup for your acous tic guitar that you want to use for
all your songs, press SETUP, go to the SYSTEM tab and set ALL GUITAR FX GLOBAL
to ON. This will “lock” the guitar eec ts so they won’t change when you
switch presets.

20 Voicelive 3 Extreme Quick Start Guide 21
Let’s make it a HIT!
When you are checking out presets, be sure to press the HIT button.
HIT allows you to add (or remove) multiple e ects for both your vocals and/
or guitar with a single button press. It can be used as a ex ible “A/B” feature
for two variations of a preset, or as a “turbo”. E.g., HIT allows you to bring in
Harmony at just the right time, or you can use it to turn o the Delay and activate
the Vocoder in the bridge of a song. Be adventurous – HIT re ally brings out new
and interesting facets of the presets.
Editing HIT settings is covered in the reference manual.
Are we there yet?
Frankly, we haven’t even started…
By now, you have probably realized that we have merely scratched the surface of
what you can do with your VoiceLive 3 – there is a lot to learn and do!
If you really want to know how deep the rabbit hole goes, download the full
reference manual for your VoiceLive 3. It will show you how to…
• use vocal, guitar and loop “layers”
• edit presets
• turn individual eects on and o
• remap eect buttons
• use Harmony modes eectively
• tweak all eect parameters
• create and edit loops
• Global eects assignments
• browse presets by genre
• adapt audio signal routings to your needs
• mix audio signals
• set up MIDI controls
• … and much more!
Antes de que empieces
Acerca de la guía rápida VoiceLive 3
Esta guía rápida le ayudará a comprender y utilizar su VoiceLive 3.
Puede descargar la versión más actualizada de esta guía rápida desde:
tc-helicon.com/products/voicelive-3/support/
Para aprovechar al máximo esta guía rápida, léala de principio a n, o puede perder información importante.
¡Asegúrese de descargar el manual de referencia de VoiceLive 3!
Tenga en cuenta que este documento es solo una guía rápida, ¡no el manual completo! Tiene la intención de ponerlo en funcionamiento con su VoiceLive 3, pero en
realidad solo vamos a echar un vistazo a la supercie aquí.
Para obtener información sobre todas las funciones y características de su nuevo VoiceLive 3, asegúrese de descargar el manual de referencia completo desde:
tc-helicon.com/products/voicelive-3/support/.
Conseguir apoyo
Si aún tiene preguntas sobre el producto después de leer esta guía rápida y el manual de referencia, comuníquese con el soporte de TC-Helicon:
tc-helicon.com/support/
Soporte de voz
VoiceSupport es la aplicación que le permite aprovechar completamente el potencial de su producto TC-Helicon y mantenerse en contacto con las últimas noticias,
consejos y trucos.
Las características clave de VoiceSupport incluyen:
• Bibliotecas preestablecidas creadas profesionalmente
• Acceso directo a manuales de productos
• Actualice la mensajería, lo que le ayudará a mantenerse actualizado con el sof tware más reciente.
• Gestión de presets de arrastrar y soltar
• Contenido personalizable sobre sus productos
• Actualización de rmware
• Acceso a soporte.
Puede descargar VoiceSupport para Microsoft Windows y Mac OS X desde:
tc-helicon.com/products/voicesupport/
Registre su VoiceLive 3
Para registrar su producto, visite: https://www.tc-helicon.com/brand/tchelicon/product-registration
Tenga en cuenta que NO es necesario registrar su producto para utilizar
VoiceSupport, descargue ajustes preestablecidos, actualice el rmware o comuníquese con el soporte.
You can download the VoiceLive 3 reference manual from:
tc-helicon.com/products/voicelive-3/support/

22 Voicelive 3 Extreme Quick Start Guide 23
Diagramas Introducción
Gracias por comprar VoiceLive 3!
Su nuevo procesador Vocal, Guitar y Loop es una pieza de tecnología asombrosa.
Con literalmente miles de combinaciones de efectos y muchos controles
versátiles, puede personalizar completamente su sonido.
VoiceLive 3 reemplaza los procesadores vocales independientes, las
unidades multiefectos de guitarra y los loopers de frases, lo que reduce el
(1)
VOICELIVE 3 P. A
(5)
Para brindarle representaciones claras y concisas de lo que va a dónde, le
proporcionamos varios diagramas de conexión en la sección "Cómo hacer
conexiones" (página 10). Hay algunas cosas que nos gustaría que tuviera en
cuenta al seguir estos diagramas:
• Las fuentes de señal que ingresan a su VoiceLive 3 (por ejemplo, micrófono
o guitarra) siempre se mostrarán a la izquierda de la imagen del panel
posterior (1).
• Los dispositivos “descendentes” (mezcladores, altavoces) siempre se
mostrarán a la derecha de la imagen del panel posterior (2).
• El cuadro de la esquina inferior izquierda muestra las señales que escuchará
desde la salida de auriculares VoiceLive 3.
• El cuadro en la esquina inferior derecha muestra lo que escuchará de su
mezclador / altavoces PA. Esto podría ser cualquier cosa, desde un "sistema
stick" o un sistema de altavoces portátil / todo en uno hasta monitores de
estudio con alimentación o incluso una interfaz de grabación DAW.
(2)
(3)
(5) (4)
Leyenda
Los siguientes símbolos se utilizan en la sección de ejemplos de conguración de
esta guía rápida:
Microphone
Acoustic Guitar
Electric Guitar
Keyboard or
other instrument
Mixing Desk
"peso del concierto" a lo que puede llevar en una mochila.
Estamos muy emocionados de poder ponerlo en funcionamiento rápidamente,
¡así que comencemos!
En el cuadro
La caja del VoiceLive 3 debe contener los siguientes elementos:
• 1 procesador vocal VoiceLive 3
• 1 adaptador de corriente
• 1 cable USB
• 1 cable de guitarra / auriculares
• este manual.
Si le falta un artículo, comuníquese con su distribuidor de inmediato.
Inspeccione todos los artículos en busca de señales de daños durante el
transporte. En el caso poco probable de daños durante el transporte, informe al
transportista y al proveedor.
Si se ha producido algún daño, conserve todo el embalaje, ya que puede utilizarse
como evidencia de una fuerza de manipulación excesiva.
Funciones clave de VoiceLive 3
Solo para abrir el apetito, aquí hay una descripción básica de
¡Las muchas funciones interesantes de VoiceLive 3!
• Suite de efectos vocales
• Tono adaptable
• Ecualizador
• Compresión
Suite de efectos de guitarra
• Simulación de amplicador
• Reverberación
• Retrasar
• Mod: Flanger / Chorus / Detune
• Manejar
• Compresor
• Ritmo / Tremolo
• Wah Wah
• Octava abajo
Looper de múltiples frases
• Cuantización asistida por bucle
• Modo de intercambio: para un bucle de estilo de verso / coro / puente fácil
• Almacenamiento de bucle a bordo
• Disposición de botones personalizable: conmutadores de pedal
completamente reasignables
• Edición fácil de nivel superior: controles profundos cuando esté listo
• Función HIT: agregue múltiples efectos a voces, guitarra o ambos con solo
presionar un botón
• Salida directa de guitarra: vaya directamente a su amplicador
• Mezcla de auriculares independiente: perfecta para la monitorización en el
oído sin un costoso sistema de transmisor / receptor
En muchos casos, lo que escuche de la salida de auriculares VoiceLive 3 y su
PA será el mismo (5), pero también puede ser diferente.
Tenga en cuenta que no tenemos en cuenta otras entradas o instrumentos en
estos diagramas, por lo que no verá imágenes de baterías (4), etc. Cuando un
ejemplo de conguración incluye una conexión a su amplicador de guitarra, no
mostramos que el amplicador se esté micro y enviado a través del PA (que suele
ser el caso); solo le mostramos cómo conectar el VoiceLive 3 en una conguración
particular. Esto signica que la sección "lo que escuchas" en la esquina inferior
derecha no muestra los sonidos de guitarra provenientes del PA, aunque podrían
hacerlo en un concierto.
P.A.
Guitar or
keyboard amp
Monitor Mix
Important
XLR cable
TRS cable
TS (guitar) cable
1
/8" cable
• De-ess
• Reverberación
• Retraso (eco)
• Doble
• Armonía
• Coro
• Vocoder / Talk Box / Sintetizador vocal
• Rítmico
• Mod (pronunciado "micro mod"): Flanger / Chorus / Detune
• Transductor
• HardTune
• Golpe

24 Voicelive 3 Extreme Quick Start Guide 25
Hacer conexiones
(2) (3) (6) (7) (5)
OR
(4)
(1)
1. Voz y guitarra con cable de guitarra / auriculares
OR
VOICELIVE 3 P. A
Entradas
(1) Conecte el adaptador de corriente suministrado a la toma de 12 V CC de su
VoiceLive 3 y conecte el adaptador a una toma de corriente. No encienda
todavía su VoiceLive 3.
(2) Conecte su micrófono a la toma MIC / LINE usando un cable XLR.
(3) Conecte su guitarra a la toma GUITAR IN utilizando un cable de manga de
punta (TS) de ¼"(es decir, un cable de guitarra normal).
(4) Conecte su reproduc tor MP3 o teléfono inteligente a la toma AUX con un
cable de ⁄".
(5) Conecte su teclado o sintetizador MIDI maestro a la toma MIDI IN mediante
un cable MIDI.
(6) Enchufe su Switch-3 en el enchufe FOOTSWITCH usando un cable de ¼"Tip
Ring Sleeve (TRS) (el cable que vino con el Switch-3).
(7) Conecte su pedal de expresión en el conector EXPRESSION.
Tiene un micrófono de condensador, MP-75 o e835FX? Cuando la
unidad está encendida (hay algunos pasos más antes de que eso
suceda), deberá habilitar Phantom Power. Para habilitar Phantom Power,
presione SETUP y navegue hasta la pestaña INPUT usando los botones <y>
debajo de la perilla de control grande. Busque el parámetro Tipo de micrófono y
cámbielo a Condensador. Presione SETUP para salir. Estas instrucciones también
están impresas en la parte inferior de su VoiceLive 3.
Salidas
Dependiendo del tipo de sistema de amplicación que esté utilizando,
hay muchas opciones. Cubrimos algunas conguraciones comunes en las
siguientes páginas.
En el manual de referencia, mostraremos muchas más opciones de conexión,
incluidas las mezclas de monitores entrantes.
Esta conguración utiliza el cable de guitarra / auriculares incluido, que es perfecto para el monitoreo personal en cualquier conguración. Verá que los dos extremos
más pequeños del cable son diferentes. Un ex tremo tiene un conector para auriculares macho al lado del conector para guitarra. Conéctelos a las tomas GUITAR IN y
HEADPHONE. El otro extremo se conecta a su guitarra y tiene un conector hembra para sus audífonos / monitores internos.
2. Guitarra estéreo y vocal estéreo (2 canales)
OR
VOICELIVE 3 P. A
Esta es una conguración muy común tanto para presentaciones en vivo con un PA estéreo (¡verique que el sistema PA del lugar esté realmente en estéreo!)
O para la grabación básica de 2 canales.

26 Voicelive 3 Extreme Quick Start Guide 27
3. Voz estéreo y guitarra estéreo (4 canales)
OR
VOICELIVE 3 P. A
5. Voz estéreo y amplicador de guitarra
L
R
OR
VOICELIVE 3 P. A
VoiceLive 3 cuenta con "detección de jack" en varias entradas y salidas. Con esta conguración de conexión, todas las señales de guitarra se eliminan de la ruta de
señal XLR cuando se realizan las conexiones Guitar OUT de ¼". Esto le brinda canales estéreo separados para su voz y guitarra. Es una excelente conguración para
conectarse a una interfaz de audio de 4 canales.
4. Voz mono y guitarra mono (modo mono dual)
OR
VOICELIVE 3 P. A
Tenga en cuenta que su amplicador de guitarra puede tener micrófono y salir a través del PA. Esa parte del ujo de señal no se muestra en este
ejemplo de conguración.
La salida de guitarra se silencia automáticamente en la ruta de la señal XLR cuando se realiza una conexión de salida de guitarra de ¼".
6. Amplicador de guitarra y voz mono
OR
VOICELIVE 3 P. A
Si no está utilizando un amplicador de guitarra, esta es una conguración de conexión común para la mayoría de los lugares en vivo, ya que el PA suele ser
mono. También permite que un técnico de sonido controle el equilibrio general entre su voz y su guitarra. Los modos de salida se pueden cambiar en el menú
Conguración / Salida.
Tenga en cuenta que su amplicador de guitarra puede tener micrófono y salir a través del PA. Esa parte del ujo de señal no se muestra en este ejemplo de
conguración.
La salida de guitarra se silencia automáticamente en la ruta de la señal XLR cuando se realiza una conexión de salida de guitarra de ¼".

28 Voicelive 3 Extreme Quick Start Guide 29
Sing and play!
7. Voces estéreo y teclado MIDI
¡Vámonos!
Realice todas las conexiones como se muestra en “Realizar conexiones”
(página 10).
Antes de encender VoiceLive 3, asegúrese de que el amplicador o PA al que está
conectado esté silenciado o bajado completamente.
Presione el interruptor POWER en la parte posterior de la unidad.
El inicio tardará unos segundos, por lo que es normal que vea una
pantalla en blanco durante un tiempo.
Ganancia automática
La forma más fácil de congurar los niveles de entrada para su micrófono y
guitarra es presionar y mantener presionado el botón Conguración.
¡Hora de divertirse!
¡Es hora de escuchar lo que realmente puede hacer su VoiceLive 3! Ajuste los
faders de canal VoiceLive 3 en su mezclador a 0 o "Unity", lo que corresponda.
Suba lentamente el volumen principal / maestro en su PA / Mixer (y en su
amplicador de guitarra si está conectado a uno).
VOICELIVE 3 P. A
VoiceLive 3 no es un sintetizador y no puede convertir mensajes de notas MIDI en audio. La conexión MIDI solo se utiliza para la detección de acordes NaturalPlay y
otros datos de control. ¡Aún necesitará conectar su teclado al PA o un amplicador para que se escuche!
Verá una serie de instrucciones en pantalla. Cuando haya terminado, la
conguración de ganancia se optimizará para su micrófono y guitarra.
Solo debería tener que usar Auto Gain una vez. No es necesario realizar este
procedimiento cada vez que enciende la unidad.
Si tiene un micrófono de condensador, MP-75 o e835FX, este es un buen
momento para habilitarlo. Siga las instrucciones impresas en la parte inferior
de su VoiceLive 3.
C
ongurar la ganancia de entrada
en su mezclador
Mientras canta y toca a su volumen más alto, suba lentamente las perillas
de ganancia / recorte de entrada de los canales del mezclador a los que está
conectado su VoiceLive 3. Cuando se enciende el indicador de clip de su
mezclador, reduzca ligeramente la ganancia / recorte de entrada.
Si encuentra comentarios, baje el volumen principal hasta que desaparezca. Para
obtener más información sobre la retroalimentación y cómo superarla, vea este
video de “Craig's Corner”:
youtube.com/watch?v=VlN1RJ4gcAo
Explora los sonidos
La mejor manera de tener una idea del potencial de su VoiceLive 3 es explorar los
ajustes preestablecidos. Los ajustes preestablecidos de fábrica tienen toneladas
de sonidos geniales, por lo que le sugerimos que se tome un poco de tiempo para
revisarlos y escucharlos.
Para buscar presets, presione los pedales con las echas hacia arriba y hacia abajo
en el extremo izquierdo.
Tenga en cuenta qué ajustes preestablecidos disfruta más; puede usarlos como
punto de partida para crear sus propios ajustes preestablecidos más adelante.
Para obtener información adicional sobre el ajuste de entrada, consulte el
manual de instrucciones de su PA o mezclador. Si necesita un poco más de
orientación, consulte este video de "Craig's Corner" que explica la conguración
del mezclador:
youtube.com/watch?v=qq0AOtafIjs
VoiceLive 3 para guitarristas acústicos
VoiceLive 3 viene con reverberaciones impecables, efectos de modulación,
ecualizadores y retardos para que su guitarra acústica suene mejor que nunca.
Sin embargo, es posible que no desee aplicar un overdrive pesado o un anger
radical a la salida de su obra maestra hecha a mano ...
Si tiene una buena conguración de efectos para su guitarra acústica que desea
usar para todas sus canciones, presione SETUP, vaya a la pestaña SYSTEM y
congure ALL GUITAR FX GLOBAL en ON. Esto “bloqueará” los efectos de guitarra
para que no cambien cuando cambie los preajustes.

30 Voicelive 3 Extreme Quick Start Guide 31
¡Hagámoslo un HIT!
Cuando esté revisando los presets, asegúrese de presionar el botón HIT.
HIT le permite agregar (o eliminar) múltiples efectos tanto para su voz como
para su guitarra con solo presionar un botón. Se puede utilizar como una función
exible "A / B" para dos variaciones de un preajuste, o como un "turbo". Por
ejemplo, HIT le permite traer armonía en el momento justo, o puede usarlo
para apagar el retardo y activar el vocoder en el puente de una canción. Sea
aventurero: HIT realmente saca nuevas e interesantes facetas de los ajustes
preestablecidos.
La edición de la conguración de HIT se trata en el manual de referencia.
¿Ya llegamos?
Francamente, ni siquiera hemos empezado ...
A estas alturas, probablemente se habrá dado cuenta de que simplemente hemos
arañado la supercie de lo que puede hacer con su VoiceLive 3: ¡hay mucho que
aprender y hacer!
Si realmente desea saber qué tan profundo es el agujero del conejo, descargue el
manual de referencia completo para su VoiceLive 3. Le mostrará cómo ...
Avant que tu commences
À propos du guide rapide VoiceLive 3
Ce guide rapide vous aidera à comprendre et à utiliser votre VoiceLive 3.
Vous pouvez télécharger la version la plus récente de ce guide rapide sur:
tc-helicon.com/products/voicelive-3/support/
Pour tirer le meilleur parti de ce guide rapide, veuillez le lire du début à la n, sinon vous risquez de manquer des informations importantes.
Assurez-vous de télécharger le manuel de référence VoiceLive 3!
Veuillez noter que ce document n'est qu'un guide rapide - pas le manuel complet! Il est destiné à vous permettre de démarrer avec votre VoiceLive 3, mais nous ne
faisons que survoler la surface ici.
Pour plus d'informations sur toutes les fonctions et fonctionnalités de votre nouveau VoiceLive 3, assurez-vous de télécharger le manuel de référence complet à partir de:
tc-helicon.com/products/voicelive-3/support/.
Obtenir de l'aide
Si vous avez encore des questions sur le produit après avoir lu ce guide rapide et le manuel de référence, veuillez contacter l'assistance TC-Helicon:
tc-helicon.com/support/
VoiceSupport
VoiceSupport est l'application qui vous permet de libérer pleinement le potentiel de votre produit TC-Helicon et de rester en contact avec les dernières nouvelles,
conseils et astuces.
Les principales fonctionnalités de VoiceSupport incluent:
• Bibliothèques de préréglages créées par des professionnels
• Accès direct aux manuels des produits
• utilizar "capas" de voz, guitarra y bucle
• editar presets
• activar y desactivar efectos individuales
• botones de efectos de reasignación
• utilizar los modos de armonía de forma ecaz
• modicar todos los parámetros de efectos
• crear y editar bucles
• Asignaciones de efectos globales
• buscar presets por género
• Adapte las rutas de las señales de audio a sus necesidades.
• mezclar señales de audio
• congurar controles MIDI
• … ¡y mucho más!
Puede descargar el manual de referencia de VoiceLive 3 desde:
tc-helicon.com/products/voicelive-3/support/
• Mettre à jour la messagerie - vous permettant de rester à jour avec les derniers logiciels
• Gestion des préréglages par glisser-déposer
• Contenu personnalisable sur vos produits
• Mise à jour du micrologiciel
• Accès au support.
Vous pouvez télécharger VoiceSupport pour Microsof t Windows et Mac OS X à partir de:
tc-helicon.com/products/voicesupport/
Veuillez enregistrer votre VoiceLive 3
Pour enregistrer votre produit, veuillez visiter: https://www.tc-helicon.com/brand/tchelicon/product-registration
Veuillez noter que l'enregistrement de votre produit n'est PAS nécessaire pour utiliser
VoiceSupport, téléchargez les préréglages, mettez à jour le micrologiciel ou contactez l'assistance.

32 Voicelive 3 Extreme Quick Start Guide 33
Diagrammes Introduction
Merci d'avoir eectué un achat
VoiceLive 3!
Votre nouveau processeur Vocal, Guitar and Loop est une technologie tout à
fait incroyable. Avec des milliers de combinaisons d'eets et de nombreuses
commandes polyvalentes, vous pouvez personnaliser complètement votre son.
VoiceLive 3 remplace les processeurs vocaux autonomes, les multi-eets de
(1)
VOICELIVE 3 P. A
(5)
Pour vous donner des représentations claires et concises de ce qui va où,
nous avons fourni plusieurs schémas de connexion dans la section «Établir les
connexions» (page 10). Nous aimerions que vous gardiez à l'esprit certaines
choses lorsque vous suivez ces schémas:
• Les sources de signal qui vont dans votre VoiceLive 3 (par exemple microphone
ou guitare) seront toujours achées à gauche de l'image du panneau arrière (1).
• Les appareils «en aval» (mélangeurs, haut-parleurs) seront toujours achés à
droite de l'image du panneau arrière (2).
• La boîte dans le coin inférieur gauche indique les signaux que vous entendrez
de la sortie casque du VoiceLive 3.
• La boîte dans le coin inférieur droit montre ce que vous entendrez de vos haut-
parleurs de mixage / PA. Cela peut être n'importe quoi, depuis un «système
bâton» ou un système d'enceintes portable / tout-en-un jusqu'aux moniteurs
de studio alimentés ou même une interface d'enregistrement DAW.
Dans de nombreux cas, ce que vous entendez de la sortie casque du VoiceLive 3 et
de votre sono sera le même (5) - mais cela peut aussi être diérent.
Veuillez noter que nous ne tenons pas compte des autres entrées ou instruments
dans ces schémas - vous ne verrez donc pas d'images de batterie (4) etc.
Lorsqu'un exemple de conguration inclut une connexion à votre ampli de
guitare, nous ne montrons pas cet ampli en cours de micro et envoyé via le PA
(ce qui est souvent le cas) - nous vous montrons simplement comment connecter
VoiceLive 3 dans une conguration particulière. Cela signie que la sec tion «ce
que vous entendez» dans le coin inférieur droit ne montre pas les sons de guitare
provenant de l'AP - même s'ils le pourraient lors d'un concert.
(2)
(3)
(5) (4)
Légende
Les symboles suivants sont utilisés dans la section des exemples de conguration
de ce guide rapide:
Microphone
Acoustic Guitar
Electric Guitar
Keyboard or
other instrument
Mixing Desk
P.A.
Guitar or
keyboard amp
Monitor Mix
Important
XLR cable
guitare et les boucleurs de phrases - réduisant votre «poids de concert» à ce que
vous pouvez jeter dans un sac à dos.
Nous sommes vraiment ravis de vous permettre de démarrer rapidement, alors
commençons!
Dans la boite
La boîte VoiceLive 3 doit contenir les éléments suivants:
• 1 processeur vocal VoiceLive 3
• 1 adaptateur secteur
• 1 câble USB
• 1 câble guitare / casque
• ce manuel.
S'il vous manque un article, veuillez contacter immédiatement votre revendeur.
Inspectez tous les articles à la recherche de signes de dommages pendant le
transport. Dans le cas improbable de dommages pendant le transport, informez
le transporteur et le fournisseur.
En cas de dommage, conservez tous les emballages car ils peuvent être utilisés
comme preuve d'une force de manipulation excessive.
Fonctionnalités clés de VoiceLive 3
Juste pour vous mettre en appétit, voici un aperçu de base de Les nombreuses
fonctionnalités intéressantes de VoiceLive 3!
• Suite d'eets vocaux
• Tonalité adaptative
• EQ
• Compression
• De-ess
• Réverbération
• Retard (écho)
• Double
• Harmonie
• Chorale
• Vocoder / Talk Box / Synthétiseur vocal
• Rythmique
Suite d'eets pour guitare
• Simulation d'ampli
• Réverbération
• Retard
• Mod: Flanger / Chorus / Detune
• Conduire
• Compresseur
• Rythme / Tremolo
• Wah Wah
• Octave vers le bas
Looper multi-phrases
• Quantication Loop Assist
• Mode Swap - Pour une boucle de style couplet / refrain / pont facile
• Stockage en boucle à bord
• Disposition des boutons personnalisable - Commutateurs au pied
entièrement remappables
• Édition facile de haut niveau - Contrôles profonds lorsque vous êtes prêt
• Fonction HIT - Ajoutez plusieurs eets aux voix, à la guitare ou aux deux en
appuyant sur un bouton
• Sortie directe de la guitare - accédez directement à votre ampli
• Mélange de casque indépendant - Parfait pour la surveillance intra-auriculaire
sans système émetteur / récepteur coûteux
TRS cable
TS (guitar) cable
1
/8" cable
• Mod (prononcé «micro mod»): Flanger / Chorus / Detune
• Transducteur
• HardTune
• Whammy

34 Voicelive 3 Extreme Quick Start Guide 35
Établir des connexions
(4)
OR
(2) (3) (6) (7) (5)
(1)
1. Voix et guitare à l'aide d'un câble guitare / casque
OR
VOICELIVE 3 P. A
Contributions
(1) Connectez l'adaptateur secteur fourni à la prise 12 V CC de votre VoiceLive
3 et branchez l'adaptateur dans une prise murale. N'allumez pas encore
votre VoiceLive 3.
(2) Branchez votre microphone dans la prise MIC / LINE à l'aide d'un câble XLR.
(3) Connectez votre guitare à la prise GUITAR IN à l'aide d'un câble à pointe ¼"
(TS) (c'est-à-dire un câble de guitare ordinaire).
(4) Connectez votre lec teur MP3 ou smartphone à la prise AUX à l'aide d'un
câble ⁄".
(5) Connectez votre clavier maître ou synthétiseur MIDI à la prise MIDI IN à
l'aide d'un câble MIDI.
(6) Branchez votre Switch-3 dans la prise FOOTSWITCH à l'aide d'un câble TRS
(Tip Ring Sleeve) ¼"(le câble fourni avec le Switch-3).
(7) Branchez votre pédale d'expression dans la prise EXPRESSION.
Avez-vous un microphone à condensateur, MP-75 ou e835FX? Lorsque
l'unité est mise sous tension (il y a encore quelques étapes avant que
cela ne se produise), vous devrez activer l'alimentation fantôme. Pour activer
l'alimentation fantôme, appuyez sur SETUP et accédez à l'onglet INPUT à l'aide
des boutons <et> sous le grand bouton de commande. Trouvez le paramètre Mic
Type et changez-le en Condenser. Appuyez sur SETUP pour quitter.
Ces instructions sont également imprimées sous votre VoiceLive 3.
Les sorties
Selon le type de système d'amplication que vous utilisez, il existe de
nombreuses options. Nous couvrons quelques congurations courantes dans
les pages suivantes.
Dans le manuel de référence, nous montrerons de nombreuses autres options de
connexion, y compris les mixages de retour entrants.
Cette conguration utilise le câble guitare / casque inclus, ce qui est parfait pour une surveillance personnelle dans n'importe quelle conguration. Vous verrez que
les deux plus petites extrémités du câble sont diérentes. Une extrémité a une prise casque mâle à côté de la prise guitare. Connectez-les aux prises GUITAR IN et
HEADPHONE. L'autre extrémité se branche sur votre guitare et dispose d'une prise femelle pour vos écouteurs / moniteurs intra-auriculaires.
2. Voix stéréo et guitare stéréo (2 canaux)
OR
VOICELIVE 3 P. A
Il s'agit d'une conguration très courante pour les performances live avec une sonorisation stéréo (vériez que le système de sonorisation de la salle est bien en
stéréo!) Ou pour l'enregistrement de base à 2 canaux.

36 Voicelive 3 Extreme Quick Start Guide 37
3. Voix stéréo et guitare stéréo (4 canaux)
OR
VOICELIVE 3 P. A
5. Voix stéréo et amplicateur de guitare
L
R
OR
VOICELIVE 3 P. A
VoiceLive 3 dispose d'une «détection de prise» sur plusieurs entrées et sorties. Avec cette conguration de connexion, tous les signaux de guitare sont supprimés
du chemin du signal XLR lorsque des connexions Guitar OUT ¼"sont établies. Cela vous donne des canaux stéréo séparés pour votre voix et votre guitare. C'est une
excellente conguration pour la connexion à une interface audio à 4 canaux.
4. Voix mono et guitare mono (mode double mono)
OR
Gardez à l'esprit que votre ampli de guitare peut être capté par micro et sortir par le PA. Cette partie du ux de signal n'est pas achée dans cet
exemple de conguration.
La sortie guitare est automatiquement coupée dans le chemin du signal XLR lorsqu'une connexion de sortie guitare ¼"est établie.
6. Voix mono et amplicateur de guitare
OR
VOICELIVE 3 P. A
Si vous n'utilisez pas d'amplicateur de guitare, il s'agit d'une conguration de connexion courante pour la plupart des salles de concert, car la sonorisation est
généralement en mono. Il permet également à une technologie du son de contrôler l'équilibre général entre votre voix et votre guitare. Les modes de sortie peuvent
être modiés dans le menu Conguration / Sortie.
VOICELIVE 3 P. A
Gardez à l'esprit que votre ampli de guitare peut être capté par micro et sortir par le PA. Cette partie du ux de signal n'est pas achée dans cet
exemple de conguration.
La sortie guitare est automatiquement coupée dans le chemin du signal XLR lorsqu'une connexion de sortie guitare ¼"est établie.

38 Voicelive 3 Extreme Quick Start Guide 39
Sing and play!
7. Voix stéréo et clavier MIDI
Allons-y!
Eectuez toutes les connexions comme indiqué dans «Établissement des
connexions» (page 10).
Avant de mettre le VoiceLive 3 sous tension, assurez-vous que l'amplicateur ou
la sono auquel il est connecté est coupé ou complètement éteint!
Appuyez sur l'interrupteur POWER à l'arrière de l'appareil.
Le démarrage prendra quelques secondes - il est donc normal que
vous voyiez un écran vide pendant un court instant.
Gain automatique
Le moyen le plus simple de régler les niveaux d'entrée de votre microphone et de
votre guitare est d'appuyer sur le bouton Setup et de le maintenir enfoncé.
C'est l'heure de s'amuser!
Il est temps d'entendre ce que votre VoiceLive 3 peut vraiment faire! Réglez les
faders de canaux VoiceLive 3 de votre table de mixage sur 0 ou «Unit y», selon le cas.
Montez lentement le volume principal / principal sur votre sono / mixeur (et sur
votre ampli de guitare si vous en êtes connecté à un).
VOICELIVE 3 P. A
VoiceLive 3 n'est pas un synthétiseur et ne peut pas convertir les messages de note MIDI en audio. La connexion MIDI n'est utilisée que pour la détection d'accords
NaturalPlay et d'autres données de contrôle. Vous devrez toujours connec ter votre clavier à la sono ou à un amplicateur pour qu'il soit entendu!
Vous verrez une série d'instructions à l'écran. Lorsque vous avez terminé, les
réglages de gain seront optimisés pour votre microphone et votre guitare.
Vous ne devriez avoir à utiliser le gain automatique qu'une seule fois. Il n'est pas
nécessaire de suivre cette procédure à chaque fois que vous mettez l'appareil
sous tension.
Si vous avez un micro à condensateur, MP-75 ou e835FX, c'est le bon moment
pour l'activer. Suivez les instructions imprimées au bas de votre VoiceLive 3.
Réglage du gain d'entrée sur votre table
de mixage
Tout en chantant et en jouant au volume le plus élevé, augmentez lentement les
boutons de gain / trim d'entrée des canaux de mixage auxquels votre VoiceLive 3
est connecté. Lorsque l'indicateur d'écrêtage de votre table de mixage s'allume,
réduisez légèrement le gain d'entrée / le trim.
Si vous rencontrez des commentaires, baissez le volume principal jusqu'à ce
qu'il disparaisse. Pour plus d'informations sur les commentaires et comment les
surmonter, regardez cette vidéo «Craig's Corner»:
youtube.com/watch?v=VlN1RJ4gcAo
Explorez les sons
La meilleure façon de se faire une idée du potentiel de votre VoiceLive 3 est
de parcourir les préréglages. Les préréglages d'usine ont des tonnes de sons
géniaux, nous vous suggérons donc de prévoir un peu de temps pour les écouter
et les écouter.
Pour parcourir les préréglages, appuyez sur les commutateurs au pied avec les
èches haut et bas à l'extrême gauche.
Notez les préréglages que vous appréciez le plus - vous pouvez les utiliser comme
point de départ pour créer vos propres préréglages plus tard.
Pour plus d'informations sur le trim d'entrée, veuillez vous référer au manuel
d'instructions de votre sono ou de votre mixeur. Si vous avez besoin d'un peu plus
de conseils, regardez cette vidéo «Craig's Corner» expliquant la conguration du
mélangeur:
youtube.com/watch?v=qq0AOtafIjs
VoiceLive 3 pour les guitaristes acoustiques
VoiceLive 3 est livré avec des réverbérations, des eets de modulation, des
égaliseurs et des retards immaculés pour rendre le son de votre guitare acoustique
meilleur que jamais. Cependant, vous ne voudrez peut-être pas un overdrive lourd
ou un anger radical appliqué à la sortie de votre chef-d'œuvre fait à la main ...
Si vous avez une belle conguration d'eets pour votre guitare acoustique que vous
souhaitez utiliser pour toutes vos chansons, appuyez sur SETUP, allez dans l'onglet
SYSTEM et réglez ALL GUITAR FX GLOBAL sur ON. Cela «verrouille» les eets de
guitare an qu'ils ne changent pas lorsque vous changez de préréglages.

40 Voicelive 3 Extreme Quick Start Guide 41
Faisons un HIT!
Lorsque vous vériez les préréglages, assurez-vous d'appuyer sur le bouton HIT.
HIT vous permet d'ajouter (ou de supprimer) plusieurs eets pour votre voix et
/ ou votre guitare en appuyant sur un seul bouton. Il peut être utilisé comme
fonction «A / B» exible pour deux variations d'un préréglage, ou comme
«turbo». Par exemple, HIT vous permet d'apporter l'harmonie au bon moment,
ou vous pouvez l'utiliser pour désactiver le délai et activer le vocodeur dans le
pont d'un morceau. Soyez aventureux - HIT fait vraiment ressortir de nouvelles
facettes intéressantes des préréglages.
La modication des paramètres HIT est traitée dans le manuel de référence.
Sommes-nous déjà là?
Franchement, nous n'avons même pas commencé ...
À présent, vous avez probablement réalisé que nous n'avons fait qu'eeurer
la surface de ce que vous pouvez faire avec votre VoiceLive 3 - il y a beaucoup à
apprendre et à faire!
Si vous voulez vraiment savoir à quelle profondeur le terrier du lapin va,
téléchargez le manuel de référence complet de votre VoiceLive 3. Il vous
montrera comment…
• utiliser des «couches» de voix, de guitare et de boucle
• modier les préréglages
• activer et désactiver des eets individuels
• boutons d'eet de remappage
• utiliser ecacement les modes Harmony
• modier tous les paramètres d'eet
• créer et modier des boucles
• Assignations d'eets globales
• parcourir les préréglages par genre
• adaptez le routage des signaux audio à vos besoins
• mélanger les signaux audio
Bevor Sie beginnen
Informationen zur VoiceLive 3-Kurzanleitung
Diese Kurzanleitung hilft Ihnen dabei, das Verständnis und die Bedienung Ihres VoiceLive 3 zu erlernen.
Sie können die aktuellste Version dieser Kurzanleitung herunterladen von:
tc-helicon.com/products/voicelive-3/support/
Um diese Kurzanleitung optimal nutzen zu können, lesen Sie sie bitte von Anfang bis Ende durch. Andernfalls fehlen möglicherweise wichtige Informationen.
Laden Sie unbedingt das VoiceLive 3-Referenzhandbuch herunter!
Bitte beachten Sie, dass dieses Dokument nur eine Kurzanleitung ist - nicht das vollständige Handbuch! Es ist beabsichtigt, Sie mit Ihrem VoiceLive 3 zum Laufen zu
bringen, aber wir überiegen hier wirklich nur die Oberäche.
Informationen zu allen Funktionen und Merkmalen Ihres neuen VoiceLive 3 nden Sie im vollständigen Referenzhandbuch unter:
tc-helicon.com/products/voicelive-3/support/.
Unterstützung bekommen
Wenn Sie nach dem Lesen dieser Kurzanleitung und des Referenzhandbuchs noch Fragen zum Produkt haben, wenden Sie sich bitte an den TC-Helicon-Support:
tc-helicon.com/support/
VoiceSupport
VoiceSupport ist die Anwendung, mit der Sie das Potenzial Ihres TC-Helicon-Produkts voll ausschöpfen und mit den neuesten Nachrichten, Tipps und Tricks in Kontakt
bleiben können.
Zu den wichtigsten Funktionen von VoiceSupport gehören:
• Professionell erstellte voreingestellte Bibliotheken
• Direkter Zugri auf Produkthandbücher
• Aktualisieren Sie Messaging, damit Sie mit der neuesten Software auf dem Laufenden bleiben
• Voreinstellungsverwaltung per Drag & Drop
• Anpassbare Inhalte zu Ihren Produkten
• Firmware-Aktualisierung
• Zugang zum Support.
Sie können VoiceSupport für Microsoft Windows und Mac OS X herunterladen von:
tc-helicon.com/products/voicesupport/
Bitte registrieren Sie Ihr VoiceLive 3
Um Ihr Produkt zu registrieren, besuchen Sie bitte: https://www.tc-helicon.com/brand/tchelicon/product-registration
Bitte beachten Sie, dass für die Verwendung KEINE Registrierung Ihres Produkts erforderlich ist
VoiceSupport, Voreinstellungen herunterladen, Firmware aktualisieren oder Support kontaktieren.
• congurer les commandes MIDI
• … et beaucoup plus!
Vous pouvez télécharger le manuel de référence VoiceLive 3 à partir de:
tc-helicon.com/products/voicelive-3/support/

42 Voicelive 3 Extreme Quick Start Guide 43
Diagramme Einführung
Danke für Ihren Einkauf VoiceLive 3!
Ihr neuer Vocal-, Gitarren- und Loop-Prozessor ist ein erstaunliches Stück
Technologie. Mit buchstäblich Tausenden von Eektkombinationen und vielen
vielseitigen Steuerelementen können Sie Ihren Sound vollständig anpassen.
VoiceLive 3 ersetzt eigenständige Vokalprozessoren, Gitarren-Multi-EffektEinheiten und Phrasen-Loopers und reduziert so Ihr „Gig-Gewicht“ auf das,
(1)
VOICELIVE 3 P. A
(5)
Um Ihnen eine klare und präzise Darstellung dessen zu geben, was wohin geht,
haben wir im Abschnitt „Herstellen von Verbindungen“ (Seite 10) verschiedene
Verbindungsdiagramme bereitgestellt. Wir möchten, dass Sie einige Dinge
beachten, wenn Sie diesen Diagrammen folgen:
• Signalquellen, die in Ihr VoiceLive 3 eingehen (z. B. Mikrofon oder Gitarre),
werden immer links neben dem Bild auf der Rückseite angezeigt (1).
• "Downstream" -Geräte (Mixer, Lautsprecher) werden immer rechts neben dem
Bild auf der Rückseite angezeigt (2).
• Das Feld in der unteren linken Ecke zeigt an, welche Signale Sie vom VoiceLive
3-Kopfhörerausgang hören.
(2)
(3)
(5) (4)
Legende
Die folgenden Symbole werden im Abschnitt mit den Setup-Beispielen dieser
Kurzanleitung verwendet:
Microphone
Acoustic Guitar
Electric Guitar
was Sie in einen Rucksack werfen können.
Wir freuen uns sehr, Sie schnell zum Laufen zu bringen, also fangen wir an!
In der Box
Die VoiceLive 3-Box sollte die folgenden Elemente enthalten:
• 1 VoiceLive 3-Sprachprozessor
• 1 Netzteil
• 1 USB-Kabel
• 1 Gitarren- / Kopfhörerkabel
• dieses Handbuch.
Wenn Sie einen Artikel vermissen, wenden Sie sich bitte sofort an Ihren Händler.
Untersuchen Sie alle Gegenstände auf Anzeichen von Transportschäden. Im
unwahrscheinlichen Fall eines Transportschadens informieren Sie den Spediteur
und den Lieferanten.
Wenn Schäden aufgetreten sind, bewahren Sie alle Verpackungen auf, da diese
als Beweis für übermäßige Handhabungskraft verwendet werden können.
VoiceLive 3 Hauptfunktionen
Um Ihren Appetit anzuregen, nden Sie hier eine grundlegende Übersicht über
Die vielen aufregenden Funktionen von VoiceLive 3!
• Vocal Eects Suite
Guitar Eects Suite
• Amp Simulation
• Reverb
• Verzögern
• Mod: Flanger / Chorus / Detune
• Fahr t
• Kompressor
• Rhythmus / Tremolo
• Wah Wah
• Oktave runter
Multi-Phrase Looper
• Loop Assist Quantisierung
• Swap-Modus - Für einfaches Vers- / Chorus- / Bridge-Looping
• Onboard-Loop-Speicher
• Anpassbares Tastenlayout - Vollständig neu zuordenbare Fußschalter
• Einfache Bearbeitung auf oberster Ebene - Tiefe Steuerung,
wenn Sie bereit sind
• HIT-Funktion - Fügen Sie Vocals, Guitar oder beiden mit einem Tastendruck
mehrere Eekte hinzu
• Direkter Gitarrenausgang - gehen Sie direkt zu Ihrem Verstärker
• Unabhängiger Kopfhörermix - Perfekt für die In-Ear-Überwachung ohne
teures Sende- / Empfängersystem
• Das Feld in der unteren rechten Ecke zeigt an, was Sie von Ihren Mischpult- /
PA-Lautsprechern hören. Dies kann alles sein, von einem „Stick-System“
oder einem tragbaren / All-in-One-Lautsprechersystem bis hin zu aktiven
Studiomonitoren oder sogar einer DAW-Aufnahmeschnittstelle.
In vielen Fällen ist das, was Sie über den VoiceLive 3-Kopf hörerausgang und Ihre
PA hören, dasselbe (5) - es kann jedoch auch unterschiedlich sein.
Bitte beachten Sie, dass wir in diesen Diagrammen keine anderen Eingänge
oder Instrumente berücksichtigen. Sie sehen also keine Bilder von Drums (4)
usw. Wenn ein Setup-Beispiel eine Verbindung zu Ihrem Gitarrenverstärker
enthält, wird dieser Verstärker nicht mikrofoniert und über die PA gesendet
(was häug der Fall ist) - wir zeigen Ihnen nur, wie Sie VoiceLive 3 in einem
bestimmten Setup verbinden. Dies bedeutet, dass im Abschnitt „Was Sie hören“
in der unteren rechten Ecke keine Gitarrensounds von der PA angezeigt werden auch wenn dies bei einem Auftritt der Fall sein könnte.
Keyboard or
other instrument
Mixing Desk
P.A.
Guitar or
keyboard amp
Monitor Mix
Important
XLR cable
TRS cable
TS (guitar) cable
1
/8" cable
• Adaptiver Ton
• EQ
• Kompression
• De-ess
• Reverb
• Verzögerung (Echo)
• Doppelt
• Harmonie
• Chor
• Vocoder / Talk Box / Vocal Synth
• Rhythmisch
• Mod (ausgesprochen „Micro Mod“): Flanger / Chorus / Detune
• Wandler
• HardTune
• Whammy

44 Voicelive 3 Extreme Quick Start Guide 45
Verbindungen herstellen
(4)
OR
(2) (3) (6) (7) (5)
(1)
1. Gesang und Gitarre mit Gitarre / Kopfhörerkabel
OR
VOICELIVE 3 P. A
Eingänge
(1) Schließen Sie das mitgelieferte Netzteil an die 12-V-DC-Buchse Ihres Geräts
an VoiceLive 3 und stecken Sie den Adapter in eine Steckdose. Schalten Sie
Ihr VoiceLive 3 noch nicht ein.
(2) Schließen Sie Ihr Mikrofon mit einem XLR-Kabel an die
MIC / LINE-Buchse an.
(3) Schließen Sie Ihre Gitarre mit einem TS-Kabel (¼"Tip Sleeve) (dh einem
normalen Gitarrenkabel) an die GUITAR IN-Buchse an.
(4) Schließen Sie Ihren MP3-Player oder Ihr Smartphone mit einem ⁄"-Kabel
an die AUX-Buchse an.
(5) Verbinden Sie Ihr MIDI-Master-Keyboard oder Ihren Synthesizer über ein
MIDI-Kabel mit der MIDI IN-Buchse.
(6) Stecken Sie Ihren Switch-3 mit einem TRS-Kabel (¼"Tip Ring Sleeve) (dem
mit dem Switch-3 gelieferten Kabel) in die FOOTSWITCH-Buchse.
(7) Stecken Sie Ihr Expression-Pedal in die EXPRESSION-Buchse.
Haben Sie einen Kondensator, ein MP-75- oder ein e835FX-Mikrofon?
Wenn das Gerät eingeschaltet ist (bevor dies geschieht, müssen noch
einige Schritte ausgeführt werden), müssen Sie Phantomspeisung aktivieren. Um
Phantomspeisung zu aktivieren, drücken Sie SETUP und navigieren Sie mit den
Tasten <und> unter dem großen Bedienknopf zur Registerkarte EINGABE.
Suchen Sie den Parameter Mic Type und ändern Sie ihn in Condenser. Drücken Sie
SETUP, um den Vorgang zu beenden. Diese Anweisungen nden Sie auch auf der
Unterseite Ihres VoiceLive 3.
Ausgänge
Je nachdem, welche Art von Verstärkungssystem Sie verwenden, gibt
es viele Optionen. Auf den folgenden Seiten werden einige gängige
Einstellungen behandelt.
Im Referenzhandbuch werden viele weitere Verbindungsoptionen angezeigt,
einschließlich eingehender Monitormischungen.
Dieses Setup verwendet das mitgelieferte Gitarren- / Kopfhörerkabel, das sich perfekt für die persönliche Überwachung in jedem Setup eignet. Sie werden sehen,
dass die beiden kleineren Enden des Kabels unterschiedlich sind. Ein Ende hat eine männliche Kopfhörerbuchse neben der Gitarrenbuchse. Schließen Sie diese an die
Buchsen GUITAR IN und HEADPHONE an. Das andere Ende wird an Ihre Gitarre angeschlossen und verfügt über eine Buchse für Ihre Kopfhörer / In-Ear-Monitore.
2. Stereo-Gesang und Stereo-Gitarre (2 Kanäle)
OR
VOICELIVE 3 P. A
Dies ist ein sehr häuges Setup für Live-Auftritte mit einer Stereo-PA (überprüfen Sie noch einmal, ob das Veranstaltungsort-PA-System tatsächlich in Stereo ist!)
Oder für einfache 2-Kanal-Aufnahmen.

46 Voicelive 3 Extreme Quick Start Guide 47
3. Stereo-Gesang und Stereo-Gitarre (4 Kanäle)
L
OR
VOICELIVE 3 P. A
5. Stereo-Gesang und Gitarrenverstärker
R
OR
VOICELIVE 3 P. A
VoiceLive 3 bietet „Jack Sensing“ an mehreren Ein- und Ausgängen. Mit diesem Verbindungsauf bau werden alle Gitarrensignale aus dem XLR-Signalpfad entfernt,
wenn ¼"Guitar OUT-Verbindungen hergestellt werden. Dadurch erhalten Sie separate Stereokanäle für Ihren Gesang und Ihre Gitarre. Dies ist ein großartiger
Aufbau für den Anschluss an ein 4-Kanal-Audio-Interface.
4. Mono-Gesang und Mono-Gitarre (Dual-Mono-Modus)
OR
Denken Sie daran, dass Ihr Gitarrenverstärker möglicherweise mikrofoniert ist und über die PA ausgegeben wird. Dieser Teil des Signalusses wird in diesem SetupBeispiel nicht angezeigt.
Der Gitarrenausgang wird im XLR-Signalpfad automatisch stummgeschaltet, wenn eine 1/4 "-Gitarrenausgangsverbindung hergestellt wird.
6. Mono-Gesang und Gitarrenverstärker
OR
VOICELIVE 3 P. A
Wenn Sie keinen Gitarrenverstärker verwenden, ist dies ein üblicher Verbindungsaufbau für die meisten Live-Veranstaltungsorte, da die PA normalerweise in Mono ist.
Außerdem kann ein Tontechniker die Gesamtbalance zwischen Gesang und Gitarre steuern. Die Ausgabemodi können im Setup / Output-Menü geändert werden.
VOICELIVE 3 P. A
Denken Sie daran, dass Ihr Gitarrenverstärker möglicherweise mikrofoniert ist und über die PA ausgegeben wird. Dieser Teil des Signalusses wird in diesem
Setup-Beispiel nicht angezeigt.
Der Gitarrenausgang wird im XLR-Signalpfad automatisch stummgeschaltet, wenn eine 1/4 "-Gitarrenausgangsverbindung hergestellt wird.

48 Voicelive 3 Extreme Quick Start Guide 49
Sing and play!
7. Stereo-Gesang und MIDI-Keyboard
Lasst uns anfangen!
Stellen Sie alle Verbindungen her, wie unter „Herstellen von Verbindungen“
(Seite 10) beschrieben.
Stellen Sie vor dem Einschalten von VoiceLive 3 sicher, dass der Verstärker oder die
PA, an die es angeschlossen ist, stummgeschaltet oder ganz heruntergedreht ist!
Drücken Sie den POWER-Schalter auf der Rückseite des Geräts.
Das Booten dauert einige Sekunden. Daher ist es normal, wenn Sie für
kurze Zeit einen leeren Bildschirm sehen.
Auto Gain
Der einfachste Weg, die Eingangspegel für Ihr Mikrofon und Ihre Gitarre
einzustellen, besteht darin, die Setup-Taste gedrückt zu halten.
Zeit, Spaß zu haben!
Es ist Zeit zu hören, was Ihr VoiceLive 3 wirklich kann! Stellen Sie die VoiceLive
3-Kanal-Fader Ihres Mischpults auf 0 oder „Unity“, je nachdem, was gilt.
Erhöhen Sie langsam die Master- / Hauptlautstärke Ihres PA / Mixers (und Ihres
Gitarrenverstärkers, wenn Sie an einen angeschlossen sind).
VOICELIVE 3 P. A
VoiceLive 3 ist kein Synthesizer und kann keine MIDI-Noten in Audio konvertieren. Die MIDI-Verbindung wird nur für die NaturalPlay-Akkorderkennung und andere
Steuerdaten verwendet. Sie müssen Ihre Tastatur noch an die PA oder einen Verstärker anschließen, damit sie gehört werden kann!
Sie sehen eine Reihe von Anweisungen auf dem Bildschirm. Wenn Sie fertig sind,
werden die Verstärkungseinstellungen für Ihr Mikrofon und Ihre Gitarre optimiert.
Sie sollten Auto Gain nur einmal verwenden müssen. Sie müssen diesen Vorgang
nicht jedes Mal ausführen, wenn Sie das Gerät einschalten.
Wenn Sie ein Kondensator-, MP-75- oder e835FX-Mikrofon haben, ist dies ein guter
Zeitpunkt, um es zu aktivieren. Befolgen Sie die Anweisungen auf der Unterseite
Ihres VoiceLive 3.
Einstellen der Eingangsverstärkung
an Ihrem Mixer
Drehen Sie beim Singen und Spielen mit der lautesten Lautstärke langsam die
Eingangsverstärkungs- / Trimmregler der Mischerkanäle, an die Ihr VoiceLive 3
angeschlossen ist. Wenn die Clip-Anzeige Ihres Mischpults aueuchtet, verringern
Sie die Eingangsverstärkung / -trimmung geringfügig.
Wenn Sie auf Feedback stoßen, drehen Sie die Master-Lautstärke herunter, bis
sie verschwindet. Weitere Informationen zu Feedback und wie Sie es überwinden
können, nden Sie in diesem Video zu „Craig's Corner“:
youtube.com/watch?v=VlN1RJ4gcAo
Erkunde die Geräusche
Der beste Weg, um sich ein Bild vom Potenzial Ihres VoiceLive 3 zu machen, ist
das Durchsuchen der Voreinstellungen. Die Werksvoreinstellungen enthalten
unzählige großartige Sounds. Wir empfehlen Ihnen daher, sich etwas Zeit zu
nehmen, um sie anzuhören.
Drücken Sie zum Durchsuchen von Voreinstellungen die Fußschalter mit den
Aufwärts- und Abwärtspfeilen ganz links.
Notieren Sie sich, welche Voreinstellungen Ihnen am besten gefallen - Sie
können sie später als Ausgangspunkt für die Erstellung eigener Voreinstellungen
verwenden.
Weitere Informationen zum Trimmen des Eingangs nden Sie in der
Bedienungsanleitung Ihrer PA oder Ihres Mischpults. Wenn Sie weitere
Informationen benötigen, sehen Sie sich dieses Video „Craig's Corner“ an, in dem
die Einrichtung des Mischpults erläutert wird:
youtube.com/watch?v=qq0AOtafIjs
VoiceLive 3 für Akustikgitarristen
VoiceLive 3 verfügt über makellose Reverbs, Modulationseekte, EQs und Delays,
damit Ihre Akustikgitarre besser klingt als je zuvor. Möglicherweise möchten
Sie jedoch nicht, dass die Ausgabe Ihres handgefer tigten Meisterwerks stark
übersteuert oder radikal angeanscht wird.
Wenn Sie ein schönes Eekt-Setup für Ihre Akustikgitarre haben, das Sie für alle Ihre
Songs verwenden möchten, drücken Sie SETUP, gehen Sie zur Registerkar te SYSTEM
und setzen Sie ALL GUITAR FX GLOBAL auf ON. Dadurch werden die Gitarreneekte
„gesperrt“, sodass sie sich beim Wechseln der Voreinstellungen nicht ändern.

50 Voicelive 3 Extreme Quick Start Guide 51
Machen wir es zu einem HIT!
Drücken Sie beim Auschecken von Voreinstellungen unbedingt die Taste HIT.
Mit HIT können Sie mit einem einzigen Tastendruck mehrere Eekte für Ihren
Gesang und / oder Ihre Gitarre hinzufügen (oder entfernen). Es kann als exible
„A / B“ -Funktion für zwei Variationen eines Presets oder als „Turbo“ verwendet
werden. Mit HIT können Sie beispielsweise Harmony genau zum richtigen
Zeitpunkt einspielen oder die Verzögerung deaktivieren und den Vocoder auf
der Brücke eines Songs aktivieren. Seien Sie abenteuerlustig - HIT bringt wirklich
neue und interessante Facetten der Presets zum Vorschein.
Das Bearbeiten der HIT-Einstellungen wird im Referenzhandbuch behandelt.
Sind wir schon da?
Ehrlich gesagt haben wir noch nicht einmal angefangen ...
Inzwischen haben Sie wahrscheinlich festgestellt, dass wir nur die Oberäche
dessen zerkratzt haben, was Sie mit Ihrem VoiceLive 3 tun können - es gibt viel
zu lernen und zu tun!
Wenn Sie wirklich wissen möchten, wie tief das Kaninchenloch ist, laden Sie
das vollständige Referenzhandbuch für Ihr VoiceLive 3 herunter. Es zeigt Ihnen,
wieSie…
• Verwenden Sie Vokal-, Gitarren- und Loop-Ebenen.
• Voreinstellungen bearbeiten
• Schalten Sie einzelne Eekte ein und aus
• Eektschaltächen neu zuordnen
• Verwenden Sie die Harmony-Modi eektiv
• Optimieren Sie alle Eektparameter
• Schleifen erstellen und bearbeiten
• Globale Eektzuweisungen
Antes de você começar
Sobre o guia rápido do VoiceLive 3
Este guia rápido irá ajudá-lo a aprender a entender e operar seu VoiceLive 3.
Você pode baixar a versão mais atual deste guia rápido em:
tc-helicon.com/products/voicelive-3/support/
Para obter o máximo deste guia rápido, leia-o do início ao m, ou você pode perder informações importantes.
Be sure to download the VoiceLive 3 reference manual!
Observe que este documento é apenas um guia rápido - não o manual completo! Destina-se a colocá-lo em funcionamento com o VoiceLive 3, mas na verdade nós
apenas folheamos a superfície aqui.
Para obter informações sobre todas as funções e recursos em seu novo VoiceLive 3, certique-se de baixar o manual de referência completo em:
tc-helicon.com/products/voicelive-3/support/.
Obtendo suporte
Se você ainda tiver dúvidas sobre o produto depois de ler este guia rápido e o manual de referência, entre em contato com o Suporte TC-Helicon:
tc-helicon.com/support/
VoiceSupport
VoiceSupport é o aplicativo que permite que você desbloqueie totalmente o potencial do seu produto TC-Helicon e que por dentro das últimas notícias, dicas e truques.
Os principais recursos do VoiceSupport incluem:
• Bibliotecas predenidas de autoria prossional
• Acesso direto aos manuais do produto
• Mensagens de atualização - ajudando você a se manter atualizado com o software mais recente
• Arrastar e soltar gerenciamento predenido
• Conteúdo personalizável sobre seus produtos
• Atualização de rmware
• Acesso ao suporte.
Você pode baixar o VoiceSupport para Microsoft Windows e Mac OS X em:
tc-helicon.com/products/voicesupport/
Por favor, registre o seu VoiceLive 3
Para registrar seu produto, visite: https://www.tc-helicon.com/brand/tchelicon/product-registration
• Durchsuchen Sie Presets nach Genre
• Passen Sie die Audiosignal-Routings an Ihre Bedürfnisse an
• Audiosignale mischen
• MIDI-Regler einrichten
• … und vieles mehr!
Sie können das VoiceLive 3-Referenzhandbuch herunterladen von:
tc-helicon.com/products/voicelive-3/support/
Observe que o registro do seu produto NÃO é necessário para usar
VoiceSupport, baixe predenições, atualize o rmware ou entre em contato com o suporte.

52 Voicelive 3 Extreme Quick Start Guide 53
Diagrams Introdução
Obrigado por adquirir VoiceLive 3!
Seu novo processador Vocal, Guitar and Loop é uma incrível peça de tecnologia.
Com literalmente milhares de combinações de efeitos e muitos controles
versáteis, você pode personalizar completamente o seu som.
VoiceLive 3 substitui processadores vocais autônomos, unidades de
múltiplos efeitos de guitarra e loopers de frase - reduzindo seu “peso de
(1)
VOICELIVE 3 P. A
(5)
Para fornecer representações claras e concisas do que acontece, fornecemos
vários diagramas de conexão na seção “Fazendo conexões” (página 10).
Existem algumas coisas que gostaríamos que você tivesse em mente ao seguir
estes diagramas:
• As fontes de sinal que vão para seu VoiceLive 3 (por exemplo, microfone ou
guitarra) serão sempre mostradas à esquerda da imagem do painel traseiro (1).
• Dispositivos “downstream” (mixers, alto-falantes) sempre serão mostrados à
direita da imagem do painel traseiro (2).
• A caixa no canto esquerdo inferior mostra quais sinais você ouvirá da saída de
fone de ouvido do VoiceLive 3.
• A caixa no canto inferior direito mostra o que você ouvirá dos alto-falantes do
mixer / PA. Pode ser qualquer coisa, desde um “sistema stick” ou um sistema
de alto-falantes portátil / tudo-em-um até monitores de estúdio alimentados
ou até mesmo uma interface de gravação DAW.
Em muitos casos, o que você ouve da saída de fone de ouvido do VoiceLive 3 e do
seu PA será o mesmo (5) - mas também pode ser diferente.
Observe que não levamos em consideração outras entradas ou instrumentos
nesses diagramas - então você não verá imagens de bateria (4) etc. Quando um
exemplo de conguração inclui uma conexão para seu amplicador de guitarra,
não mostramos esse amplicador sendo microfonado e enviado através do PA
(o que geralmente é o caso) - estamos apenas mostrando a você como conectar
o VoiceLive 3 em uma conguração especíca. Isso signica que a seção "o que
você ouve" no canto inferior direito não mostra os sons da guitarra vindos do PA mesmo que possam ser em um show.
(2)
(3)
(5) (4)
Lenda
Os seguintes símbolos são usados na seção de exemplos de conguração deste
guia rápido:
Microphone
Acoustic Guitar
Electric Guitar
Keyboard or
other instrument
Mixing Desk
P.A.
Guitar or
keyboard amp
Monitor Mix
Important
show” para o que você pode jogar em uma mochila.
Estamos muito animados para colocá-lo em funcionamento rapidamente, então
vamos começar!
Na caixa
A caixa VoiceLive 3 deve conter os seguintes itens:
• 1 processador vocal VoiceLive 3
• 1 adaptador de energia
• 1 cabo USB
• 1 cabo de guitarra / fone de ouvido
• este manual.
Se estiver faltando um item, entre em contato com seu revendedor
imediatamente.
Inspecione todos os itens em busca de sinais de danos durante o transporte.
No caso improvável de danos durante o transporte, informe a transportadora e o
fornecedor.
Se ocorrer algum dano, guarde todas as embalagens, pois podem ser usadas
como prova de força excessiva de manuseio.
Principais recursos do VoiceLive 3
Apenas para abrir seu apetite, aqui está uma visão geral básica de
Muitos recursos interessantes do VoiceLive 3!
• Vocal Eects Suite
• Adaptive Tone
• EQ
• Compression
• De-ess
• Reverb
• Delay (Echo)
• Double
• Harmony
• Choir
• Vocoder / Talk Box / Vocal Synth
Suíte Guitar Eects
• Simulação de Amp
• Ressonância
• Demora
• Mod: Flanger / Chorus / Detune
• Dirigir
• Compressor
• Ritmo / Tremolo
• Wah Wah
• Octave Down
Multi-Phrase Looper
• Quantização do Loop Assist
• Modo de troca - Para um loop de estilo verso / refrão / ponte fácil
• Armazenamento de loop integrado
• Layout de botão personalizável - Footswitches totalmente recarregáveis
• Edição fácil de nível superior - controles profundos quando estiver pronto
• Função HIT - Adicione vários efeitos a vocais, guitarra ou ambos com um
toque de botão
• Saída de guitarra direta - vá direto para o seu amplicador
• Mixagem independente de fone de ouvido - Perfeito para monitoramento
intra-auricular sem um sistema transmissor / receptor caro
XLR cable
TRS cable
TS (guitar) cable
1
/8" cable
• Rhythmic
• Mod (pronounced “micro mod”): Flanger / Chorus / Detune
• Transducer
• HardTune
• Whammy

54 Voicelive 3 Extreme Quick Start Guide 55
Fazendo conexões
(2) (3) (6) (7) (5)
OR
(4)
(1)
1. Vocais e guitarra usando cabo de guitarra / fone de ouvido
OR
VOICELIVE 3 P. A
Entradas
(1) Conecte o adaptador de alimentação fornecido à tomada de 12 V DC do seu
VoiceLive 3 e conecte o adaptador a uma tomada de parede. Não ligue seu
VoiceLive 3 ainda.
(2) Conecte seu microfone na tomada MIC / LINE usando um cabo XLR.
(3) Conecte sua guitarra à entrada GUITAR IN usando um cabo de manga de
ponta (TS) de ¼" (ou seja, um cabo de guitarra comum).
(4) Conecte seu MP3 player ou smartphone ao conector AUX usando um cabo
de ⁄".
(5) Conecte seu teclado mestre MIDI ou sintetizador ao conector MIDI IN
usando um cabo MIDI.
(6) Conecte seu Switch-3 à tomada FOOTSWITCH usando um cabo de ¼" Tip
Ring Sleeve (TRS) (o cabo que acompanha o Switch-3).
(7) Conecte seu pedal Expression no conector EXPRESSION.
Você tem um condensador, microfone MP-75 ou e835FX? Quando a
unidade for ligada (há mais algumas etapas antes que isso aconteça),
você precisará habilitar o Phantom Power. Para habilitar Phantom Power,
pressione SETUP e navegue até a guia INPUT usando os botões <e> abaixo do
botão de controle grande. Encontre o parâmetro Mic Type e altere-o para
Condenser. Pressione SETUP para sair. Essas instruções também estão impressas
na parte inferior do VoiceLive 3.
Saídas
Dependendo do tipo de sistema de amplicação que você está usando, existem
muitas opções. Cobrimos algumas congurações comuns nas páginas a seguir.
No manual de referência, mostraremos muito mais opções de conexão, incluindo
mixagens de monitor de entrada.
Esta conguração utiliza o cabo de guitarra / fone de ouvido incluso, que é perfeito para monitoramento pessoal em qualquer conguração. Você verá que as duas
pontas menores do cabo são diferentes. Uma extremidade possui um fone de ouvido macho ao lado do conector da guitarra. Conec te-os aos conectores GUITAR IN e
HEADPHONE. A outra extremidade se conecta à sua guitarra e possui um conec tor fêmea para fones de ouvido / monitores intra-auriculares.
2. Vocal estéreo e guitarra estéreo (2 canais)
OR
VOICELIVE 3 P. A
Esta é uma conguração muito comum para ambas as apresentações ao vivo com um PA estéreo (verique se o sistema de PA do local está realmente em estéreo!)
Ou para gravação básica de 2 canais.

56 Voicelive 3 Extreme Quick Start Guide 57
3. Voz estéreo e guitarra estéreo (4 canais)
OR
VOICELIVE 3 P. A
5. Vocais estéreo e amplicador de guitarra
L
R
OR
VOICELIVE 3 P. A
VoiceLive 3 apresenta “detecção de jack” em várias entradas e saídas. Com esta conguração de conexão, todos os sinais de guitarra são removidos do caminho do sinal
XLR quando as conexões Guitar OUT de ¼"são feitas. Isso fornece canais estéreo separados para seus vocais e guitarra. Esta é uma ótima conguração para conectar a
uma interface de áudio de 4 canais.
4. Mono vocal e guitarra mono (modo dual mono)
OR
VOICELIVE 3 P. A
Lembre-se de que seu amplicador de guitarra pode ser microfonado e sair pelo PA. Essa parte do uxo do sinal não é mostrada neste exemplo de conguração.
A saída da guitarra é silenciada automaticamente no caminho do sinal XLR quando uma conexão de saída de guitarra de ¼"é feita.
6. Mono vocais e amplicador de guitarra
OR
VOICELIVE 3 P. A
Se você não estiver usando um amplicador de guitarra, esta é uma conguração de conexão comum para a maioria dos locais ao vivo, uma vez que o PA é
normalmente em mono. Também permite que um técnico de som controle o equilíbrio geral entre sua voz e a guitarra. Os modos de saída podem ser alterados no
menu Conguração / Saída.
Lembre-se de que seu amplicador de guitarra pode ser microfonado e sair pelo PA. Essa parte do uxo do sinal não é mostrada neste exemplo de conguração.
A saída da guitarra é silenciada automaticamente no caminho do sinal XLR quando uma conexão de saída de guitarra de ¼"é feita.

58 Voicelive 3 Extreme Quick Start Guide 59
Sing and play!
7. Vocais estéreo e teclado MIDI
Vamos indo!
Faça todas as conexões conforme visto em “Fazendo as conexões” (página 10).
Antes de ligar o VoiceLive 3, certique-se de que o amplicador ou PA ao qual ele
está conectado está mudo ou no mínimo!
Pressione o botão POWER na parte traseira da unidade.
A inicialização levará alguns segundos - por isso, é normal ver uma tela
em branco por um curto período.
Ganho Automático
A maneira mais fácil de denir os níveis de entrada do microfone e da guitarra é
manter pressionado o botão Congurar.
Hora de ter alguma diversão!
É hora de ouvir o que seu VoiceLive 3 realmente pode fazer! Dena os faders do
canal VoiceLive 3 em seu mixer para 0 ou “Unity”, o que for aplicável.
Aumente lentamente o volume master / principal em seu PA / Mixer (e em seu
amplicador de guitarra, se você estiver conectado a um).
VOICELIVE 3 P. A
O VoiceLive 3 não é um sintetizador e não pode converter mensagens de notas MIDI em áudio. A conexão MIDI é usada apenas para detecção de acordes NaturalPlay e
outros dados de controle. Você ainda precisará conectar seu teclado ao PA ou um amplicador para que seja ouvido!
Você verá uma série de instruções na tela. Quando terminar, as congurações de
ganho serão otimizadas para seu microfone e guitarra.
Você deve usar o ganho automático apenas uma vez. Não há necessidade de
seguir este procedimento sempre que ligar a unidade.
Se você tiver um condensador, microfone MP-75 ou e835FX, este é um bom
momento para ativá-lo. Siga as instruções impressas na parte inferior do seu
VoiceLive 3.
Congurando o ganho de entrada
em seu mixer
Enquanto canta e toca no volume mais alto, aumente lentamente os botões
de ganho / compensação de entrada dos canais do mixer aos quais o VoiceLive
3 está conectado. Quando o indicador de clipe no seu mixer acender, reduza
ligeiramente o ganho / corte de entrada.
Se você encontrar feedback, abaixe o volume principal até que ele desapareça.
Para obter mais informações sobre feedback e como superá-lo, assista a este
vídeo “Craig's Corner”:
youtube.com/watch?v=VlN1RJ4gcAo
Explore os sons
A melhor maneira de ter uma ideia do potencial do seu VoiceLive 3 é navegar
pelos presets. As predenições de fábrica têm toneladas de sons excelentes,
então sugerimos que você reserve um tempo para examiná-los e ouvi-los.
Para navegar pelos presets, pressione os pedais com as setas para cima e para
baixo na extrema esquerda.
Observe quais predenições você mais gosta - você pode usá-las como ponto de
partida para criar suas próprias predenições posteriormente.
Para obter informações adicionais sobre o ajuste de entrada, consulte o
manual de instruções do PA ou do mixer. Se você precisar de um pouco mais
de orientação, conra este vídeo “Craig's Corner” explicando a conguração
domixer:
youtube.com/watch?v=qq0AOtafIjs
VoiceLive 3 para guitarristas acústicos
VoiceLive 3 vem com reverbs, efeitos de modulação, EQs e atrasos puros para
fazer seu violão soar melhor do que nunca. No entanto, você pode não querer
overdrive pesado ou anging radical aplicado à produção de sua obra-prima
feita à mão ...
Se você tiver uma boa conguração de efeitos para seu violão que deseja usar
em todas as suas músicas, pressione SETUP, vá para a guia SYSTEM e dena ALL
GUITAR FX GLOBAL para ON. Isso irá “travar” os efeitos da guitarra para que eles
não mudem quando você mudar os presets.

60 Voicelive 3 Extreme Quick Start Guide 61
Vamos fazer um HIT!
Ao vericar os presets, certique-se de pressionar o botão HIT.
O HIT permite que você adicione (ou remova) vários efeitos para seus vocais
e / ou guitarra com um único toque de botão. Ele pode ser usado como um
recurso “A / B” exível para duas variações de uma predenição ou como um
“turbo”. Por exemplo, o HIT permite que você introduza o Harmony no momento
certo ou pode usá-lo para desligar o Delay e ativar o Vocoder na ponte de uma
música. Aventure-se - o HIT realmente traz novas e interessantes facetas das
predenições.
A edição das congurações do HIT é abordada no manual de referência.
Já estamos lá?
Francamente, ainda nem começamos ...
A esta altura, você provavelmente já deve ter percebido que apenas arranhamos
a superfície do que você pode fazer com o VoiceLive 3 - há muito o que aprender
e fazer!
Se você realmente deseja saber a profundidade da toca do coelho, baixe o manual
de referência completo do seu VoiceLive 3. Ele mostrará como ...
• usar "camadas" de vocal, guitarra e loop
• editar predenições
• liga e desliga os efeitos individuais
• remapear botões de efeito
• usar os modos Harmony de maneira ecaz
• ajustar todos os parâmetros de efeito
• criar e editar loops
Prima di iniziare
Informazioni sulla guida rapida di VoiceLive 3
Questa guida rapida ti aiuterà a comprendere e utilizzare VoiceLive 3.
È possibile scaricare la versione più recente di questa guida rapida da:
tc-helicon.com/products/voicelive-3/support/
Per ottenere il massimo da questa guida rapida, leggila dall'inizio alla ne, altrimenti potresti perdere informazioni importanti.
Assicurati di scaricare il manuale di riferimento di VoiceLive 3!
Si prega di notare che questo documento è solo una guida rapida, non il manuale completo! Ha lo scopo di farti iniziare a usare VoiceLive 3, ma qui ci limitiamo a
sfogliare la supercie.
Per informazioni su tutte le funzioni e caratteristiche del tuo nuovo VoiceLive 3, assicurati di scaricare il manuale di riferimento completo da:
tc-helicon.com/products/voicelive-3/support/.
Ottenere supporto
Se dopo aver letto questa guida rapida e il manuale di riferimento hai ancora domande sul prodotto, contatta l'assistenza TC-Helicon:
tc-helicon.com/support/
VoiceSupport
VoiceSupport è l'applicazione che ti consente di sfruttare appieno il potenziale del tuo prodotto TC-Helicon e di rimanere in contatto con le ultime notizie, suggerimenti e
trucchi.
Le caratteristiche principali di VoiceSupport includono:
• Librerie predenite create professionalmente
• Accesso diretto ai manuali dei prodotti
• Aggiorna i messaggi: ti aiuta a rimanere aggiornato con il software più recente
• Gestione dei preset drag & drop
• Contenuti personalizzabili sui tuoi prodotti
• Aggiornamento del rmware
• Accesso al supporto.
Puoi scaricare VoiceSupport per Microsoft Windows e Mac OS X da:
tc-helicon.com/products/voicesupport/
• Atribuições de efeitos globais
• procurar predenições por gênero
• adapte roteamentos de sinal de áudio às suas necessidades
• misturar sinais de áudio
• congurar controles MIDI
• … e muito mais!
Você pode baixar o manual de referência do VoiceLive 3 em:
tc-helicon.com/products/voicelive-3/support/
Registra il tuo VoiceLive 3
Per registrare il prodotto, visitare: https://www.tc-helicon.com/brand/tchelicon/product-registration
Si prega di notare che la registrazione del prodotto NON è richiesta per l'uso
VoiceSupport, scarica i preset, aggiorna il rmware o contatta l'assistenza.

62 Voicelive 3 Extreme Quick Start Guide 63
Diagrammi Introduzione
Grazie per l'acquisto
VoiceLive 3!
Il tuo nuovo processore Vocal, Guitar e Loop è un pezzo di tecnologia davvero
sorprendente. Con letteralmente migliaia di combinazioni di eetti e molti
controlli versatili, puoi personalizzare completamente il tuo suono.
VoiceLive 3 sostituisce processori vocali autonomi, unità multieetto per chitarra
(1)
VOICELIVE 3 P. A
(5)
Per fornire rappresentazioni chiare e concise di ciò che va dove, abbiamo fornito
diversi schemi di collegamento nella sezione "Esecuzione dei collegamenti"
(pagina 10). Ci sono alcune cose che vorremmo che tenessi a mente mentre segui
questi diagrammi:
• Le sorgenti di segnale che entrano in VoiceLive 3 (ad es. Microfono o
chitarra) verranno sempre visualizzate a sinistra dell'immagine del pannello
posteriore(1).
(2)
(3)
(5) (4)
Leggenda
I seguenti simboli vengono utilizzati nella sezione degli esempi di congurazione
di questa guida rapida:
Microphone
e phrase looper, riducendo il "peso del concerto" a quello che puoi buttare in
unozaino.
Siamo davvero entusiasti di metterti subito in funzione, quindi iniziamo!
Nella scatola
La confezione di VoiceLive 3 dovrebbe contenere i seguenti elementi:
• 1 processore vocale VoiceLive 3
• 1 alimentatore
• 1 cavo USB
• 1 cavo per chitarra / cua
• questo manuale.
Se ti manca un articolo, contatta immediatamente il tuo rivenditore.
Ispezionare tutti gli articoli per rilevare segni di danni dovuti al trasporto.
Nell'improbabile caso di danni dovuti al trasporto, informare il vettore e
ilfornitore.
Se si sono vericati danni, conservare tutti gli imballaggi in quanto possono
essere utilizzati come prova di un'eccessiva forza di manipolazione.
Guitar Eects Suite
• Amp Simulation
• Riverbero
• Ritardo
• Mod: Flanger / Chorus / Detune
• Guidare
• Compressore
• Ritmo / Tremolo
• Wah Wah
• Octave Down
Looper multi-frase
• Quantizzazione Loop Assist
• Modalità Swap - Per un facile looping in stile strofa / ritornello / ponte
• Stoccaggio loop a bordo
• Layout dei pulsanti personalizzabile - Interruttori a pedale
completamenterimappabili
• Facile modica di primo livello: controlli approfonditi quando sei pronto
• Funzione HIT - Aggiungi più eetti a Vocals, Guitar o entrambi premendo
unpulsante
• Uscita diretta della chitarra: vai direttamente al tuo amplicatore
• Mix di cue indipendente: perfetto per il monitoraggio in-ear senza un
costoso sistema di trasmissione / ricezione
• I dispositivi "downstream" (mixer, altoparlanti) verranno sempre visualizzati a
destra dell'immagine del pannello posteriore (2).
• Il riquadro nell'angolo in basso a sinistra mostra quali segnali sentirai
dall'uscita delle cue di VoiceLive 3.
• Il riquadro nell'angolo in basso a destra mostra ciò che sentirai dal tuo mixer /
altoparlanti PA. Potrebbe trattarsi di qualsiasi cosa, da un "sistema stick" o un
sistema di altoparlanti por tatile / all-in-one a monitor da studio alimentati o
persino un'interfaccia di registrazione DAW.
In molti casi, ciò che senti dall'uscita delle cue di VoiceLive 3 e dal tuo PA sarà lo
stesso (5), ma può anche essere diverso.
Si prega di notare che non teniamo conto di altri ingressi o strumenti in questi
diagrammi, quindi non vedrete immagini di batteria (4) ecc. Quando un esempio
di congurazione include una connessione all'amplicatore per chitarra, non
mostriamo che l'amplicatore sia microfonato e inviato tramite la PA (cosa
che spesso accade): ti stiamo solo mostrando come collegare VoiceLive 3 in
una congurazione particolare. Ciò signica che la sezione "quello che senti"
nell'angolo in basso a destra non mostra i suoni di chitarra provenienti dal PA,
anche se potrebbero essere a un concerto.
Acoustic Guitar
Electric Guitar
Keyboard or
other instrument
Mixing Desk
P.A.
Guitar or
keyboard amp
Monitor Mix
Important
XLR cable
TRS cable
TS (guitar) cable
1
/8" cable
VoiceLive 3 caratteristiche principali
Solo per stuzzicare l'appetito, ecco una panoramica di base di
Le tante eccitanti funzioni di VoiceLive 3!
• Suite di eetti vocali
• Tono adattivo
• EQ
• Compressione
• De-ess
• Riverbero
• Ritardo (eco)
• Doppio
• Armonia
• Coro
• Vocoder / Talk Box / Sintetizzatore vocale
• Ritmico
• Mod (pronunciato "micro mod"): Flanger / Chorus / Detune
• Trasduttore
• HardTune
• Whammy

64 Voicelive 3 Extreme Quick Start Guide 65
Fare collegamenti
(2) (3) (6) (7) (5)
OR
(4)
(1)
1. Voce e chitarra tramite cavo per chitarra / cua
OR
VOICELIVE 3 P. A
Ingressi
(1) Collega l'adattatore di alimentazione in dotazione alla presa da 12 V CC del
tuo VoiceLive 3 e collega l'adattatore a una presa a muro. Non accendere
ancora VoiceLive 3.
(2) Collega il microfono alla presa MIC / LINE utilizzando un cavo XLR.
(3) Collega la chitarra alla presa GUITAR IN utilizzando un cavo TS (Tip Sleeve)
da ¼" (cioè un normale cavo per chitarra).
(4) Collega il tuo lettore MP3 o smartphone alla presa AUX utilizzando un cavo
da ⁄".
(5) Collega la tua tastiera o sintetizzatore MIDI al jack MIDI IN utilizzando un
cavo MIDI.
(6) Collega lo Switch-3 alla presa FOOTSWITCH usando un cavo TRS (Tip Ring
Sleeve) da ¼" (ilcavo fornito con lo Switch-3).
(7) Collega il pedale d'espressione alla presa EXPRESSION.
Hai un microfono a condensatore, MP-75 o e835FX? Quando l'unità è
accesa (ci sono ancora alcuni passaggi prima che ciò accada), dovrai
abilitare l'alimentazione phantom. Per abilitare l'alimentazione
phantom, premere SETUP e accedere alla scheda INPUT utilizzando i pulsanti <e>
sotto la grande manopola di controllo. Trova il parametro Mic Type e modicalo in
Condenser. Premere SETUP per uscire. Queste istruzioni sono stampate anche nella
parte inferiore di VoiceLive 3.
Uscite
A seconda del tipo di sistema di amplicazione che stai utilizzando, ci sono molte
opzioni. Tratteremo alcune congurazioni comuni nelle pagine seguenti.
Nel manuale di riferimento, mostreremo molte altre opzioni di connessione,
inclusi i mix di monitor in entrata.
Questa congurazione utilizza il cavo per chitarra / cua incluso, che è perfetto per il monitoraggio personale in qualsiasi congurazione. Vedrai che le due estremità
più piccole del cavo sono diverse. Un'estremità ha un jack per cue maschio accanto al jack per chitarra. Collegateli alle prese GUITAR IN e HEADPHONE. L'altra
estremità si collega alla chitarra e dispone di una presa femmina per le cue / i monitor in-ear.
2. Voce stereo e chitarra stereo (2 canali)
OR
VOICELIVE 3 P. A
Questa è una congurazione molto comune sia per le esibizioni dal vivo con un PA stereo (ricontrolla che il sistema PA della sede sia eettivamente in stereo!) O per la
registrazione di base a 2 canali.

66 Voicelive 3 Extreme Quick Start Guide 67
3. Voce stereo e chitarra stereo (4 canali)
VoiceLive 3 dispone di "rilevamento jack" su diversi ingressi e uscite. Con questa congurazione di collegamento, tutti i segnali della chitarra vengono rimossi dal
L
R
OR
VOICELIVE 3 P. A
5. Voce stereo e amplicatore per chitarra
OR
VOICELIVE 3 P. A
percorso del segnale XLR quando vengono eettuate connessioni Guitar OUT da ¼". Ciò fornisce canali stereo separati per la voce e la chitarra. Questa è un'ottima
congurazione per il collegamento a un'interfaccia audio a 4 canali.
4. Voce mono e chitarra mono (modalità dual mono)
OR
VOICELIVE 3 P. A
Tieni presente che il tuo amplicatore per chitarra potrebbe essere microfonato ed uscire attraverso il PA. Quella parte del usso del segnale non è mostrata in questo
esempio di congurazione.
L'uscita della chitarra viene automaticamente silenziata nel percorso del segnale XLR quando viene eettuata una connessione di uscita della chitarra da ¼".
6. Voce mono e amplicatore per chitarra
OR
VOICELIVE 3 P. A
Se non si utilizza un amplicatore per chitarra, questa è una congurazione di collegamento comune per la maggior par te dei luoghi dal vivo, poiché il PA è
tipicamente in mono. Consente inoltre a un tecnico del suono di controllare l'equilibrio generale tra la voce e la chitarra. Le modalità di uscita possono essere
modicate nel menu Congurazione / Uscita.
Tieni presente che il tuo amplicatore per chitarra potrebbe essere microfonato ed uscire attraverso il PA. Quella parte del usso del segnale non è mostrata in questo
esempio di congurazione.
L'uscita della chitarra viene automaticamente silenziata nel percorso del segnale XLR quando viene eettuata una connessione di uscita della chitarra da ¼".

68 Voicelive 3 Extreme Quick Start Guide 69
Sing and play!
7. Voce stereo e tastiera MIDI
Muoviamoci!
Eettuare tutti i collegamenti come illustrato in "Esecuzione dei collegamenti"
(pagina 10).
Prima di accendere VoiceLive 3, assicurati che l'amplicatore o il PA a cui è
collegato sia disattivato o disattivato completamente!
Premere l'interruttore POWER sul retro dell'unità.
L'avvio richiederà alcuni secondi, quindi è normale se vedi una
schermata vuota per un breve periodo.
Guadagno automatico
Il modo più semplice per impostare i livelli di ingresso del microfono e della
chitarra è tenere premuto il pulsante Setup.
È ora di divertirsi!
È ora di sentire cosa può fare davvero VoiceLive 3! Imposta i fader dei canali di
VoiceLive 3 sul mixer su 0 o su "Unity", a seconda di quale si applica.
Alza lentamente il volume principale / principale del tuo PA / mixer (e
dell'amplicatore per chitarra se ne sei collegato a uno).
Se riscontri feedback, abbassa il volume principale nché non scompare. Per
ulteriori informazioni sul feedback e su come superarlo, guarda questo video
"Craig's Corner":
VOICELIVE 3 P. A
VoiceLive 3 non è un sintetizzatore e non può convertire i messaggi di note MIDI in audio. La connessione MIDI viene utilizzata solo per il rilevamento degli accordi
NaturalPlay e altri dati di controllo. Sarà comunque necessario collegare la tastiera al PA o a un amplicatore per poterlo ascoltare!
Vedrai una serie di istruzioni sullo schermo. Al termine, le impostazioni del
guadagno verranno ottimizzate per il microfono e la chitarra.
Dovresti utilizzare il guadagno automatico solo una volta. Non è necessario
eseguire questa procedura ogni volta che si accende l'unità.
Se hai un microfono a condensatore, MP-75 o e835FX, questo è un buon
momento per abilitarlo. Segui le istruzioni stampate nella parte inferiore di
VoiceLive 3.
Impostazione del guadagno in ingresso
sul mixer
Mentre canti e suoni al volume più alto, alza lentamente le manopole di
guadagno / trim in ingresso dei canali del mixer a cui è collegato VoiceLive 3.
Quando l'indicatore di clip sul mixer si accende, ridurre leggermente il guadagno
/ trim in ingresso.
youtube.com/watch?v=VlN1RJ4gcAo
Esplora i suoni
Il modo migliore per avere un'idea del potenziale di VoiceLive 3 è sfogliare
i preset. I preset di fabbrica hanno tonnellate di suoni fantastici, quindi ti
suggeriamo di ritagliar ti un po 'di tempo per esaminarli e ascoltarli.
Per sfogliare i preset, premere i pulsanti a pedale con le frecce su e giù all'estrema
sinistra.
Nota quali preset ti piacciono di più: puoi usarli come punto di partenza per
creare i tuoi preset in un secondo momento.
Per ulteriori informazioni sul trim dell'ingresso, fare riferimento al manuale di
istruzioni del PA o del mixer. Se hai bisogno di un po 'più di guida, guarda questo
video di "Craig's Corner" che spiega la congurazione del mixer:
youtube.com/watch?v=qq0AOtafIjs
VoiceLive 3 per chitarristi acustici
VoiceLive 3 è dotato di riverberi, eetti di modulazione, EQ e delay incontaminati
per rendere il suono della tua chitarra acustica migliore di quanto abbia mai
fatto. Tuttavia, potresti non volere un overdrive pesante o un anging radicale
applicato all'output del tuo capolavoro fatto a mano ...
Se hai una bella congurazione degli eetti per la tua chitarra acustica che
desideri utilizzare per tutte le tue canzoni, premi SETUP, vai alla scheda SYSTEM e
imposta ALL GUITAR FX GLOBAL su ON. Questo "bloccherà" gli eetti per chitarra
in modo che non cambino quando cambi i preset.

70 Voicelive 3 Extreme Quick Start Guide 71
Facciamolo un successo!
Quando stai controllando i preset, assicurati di premere il pulsante HIT.
HIT ti consente di aggiungere (o rimuovere) più eetti sia per la voce che per
la chitarra premendo un solo pulsante. Può essere utilizzato come funzione
essibile "A / B" per due variazioni di un preset o come "turbo". Ad esempio,
HIT ti consente di inserire Harmony al momento giusto, oppure puoi usarlo
per disattivare il Delay e attivare il Vocoder nel bridge di una canzone. Sii
avventuroso: HIT mette davvero in risalto aspetti nuovi e interessanti dei preset.
La modica delle impostazioni HIT è trattata nel manuale di riferimento.
Siamo arrivati?
Francamente, non abbiamo nemmeno iniziato ...
A questo punto, probabilmente ti sarai reso conto che abbiamo solo scalto la
supercie di ciò che puoi fare con VoiceLive 3: c'è molto da imparare e da fare!
Se vuoi davvero sapere quanto è profonda la tana del coniglio, scarica il manuale
di riferimento completo per VoiceLive 3. Ti mostrerà come ...
• usa "strati" di voce, chitarra e loop
• modicare i preset
• attivare e disattivare i singoli eetti
• rimappa i pulsanti degli eetti
• utilizzare le modalità Harmony in modo ecace
• modicare tutti i parametri degli eetti
• creare e modicare i loop
• Assegnazioni di eetti globali
• sfoglia i preset per genere
• adattare i percorsi del segnale audio alle proprie esigenze
• mixare segnali audio
• impostare i controlli MIDI
• … e altro ancora!
Voordat je begint
Over de VoiceLive 3 beknopte handleiding
Deze korte handleiding helpt u uw VoiceLive 3 te begrijpen en te gebruiken.
U kunt de meest recente versie van deze beknopte handleiding downloaden van:
tc-helicon.com/products/voicelive-3/support/
Om het meeste uit deze beknopte handleiding te halen, leest u deze van begin tot eind, anders mist u mogelijk belangrijke informatie.
Zorg ervoor dat u de VoiceLive 3-referentiehandleiding downloadt!
Let op: dit document is slechts een korte handleiding - niet de volledige handleiding! Het is bedoeld om u op weg te helpen met uw VoiceLive 3, maar we schijnen hier
echt de oppervlakte af.
Voor informatie over alle functies en mogelijkheden van uw nieuwe VoiceLive 3, moet u de volledige referentiehandleiding downloaden van:
tc-helicon.com/products/voicelive-3/support/.
Ondersteuning krijgen
Mocht u na het lezen van deze beknopte handleiding en de referentiehandleiding nog vragen hebben over het product, neem dan contact op met TC-Helicon Support:
tc-helicon.com/support/
VoiceSupport
VoiceSupport is de applicatie waarmee u het potentieel van uw TC-Helicon-product volledig kunt benutten en op de hoogte kunt blijven van het laatste nieuws, tips en trucs.
De belangrijkste functies van VoiceSupport zijn onder meer:
• Professioneel geschreven vooraf ingestelde bibliotheken
• Directe toegang tot producthandleidingen
• Update berichten - zodat u op de hoogte blijft van de nieuwste software
• Vooraf ingesteld beheer slepen en neerzetten
• Aanpasbare inhoud over uw producten
• Firmware-upgrade
• Toegang tot ondersteuning.
U kunt VoiceSupport voor Microsoft Windows en Mac OS X downloaden van:
tc-helicon.com/products/voicesupport/
Registreer uw VoiceLive 3
Om uw product te registreren, gaat u naar: https://www.tc-helicon.com/brand/tchelicon/product-registration
Houd er rekening mee dat registratie van uw product NIET vereist is om te gebruiken
VoiceSupport, download presets, update rmware of neem contact op met support.
Puoi scaricare il manuale di riferimento di VoiceLive 3 da:
tc-helicon.com/products/voicelive-3/support/

72 Voicelive 3 Extreme Quick Start Guide 73
Diagrammen Invoering
Bedankt voor uw aankoop
VoiceLive 3!
Je nieuwe vocale, gitaar- en loop-processor is een behoorlijk verbazingwekkend
stukje technologie. Met letterlijk duizenden eectcombinaties en vele veelzijdige
bedieningselementen, kunt u uw geluid volledig aanpassen.
VoiceLive 3 vervangt stand-alone vocale processors, gitaar multi-effect units en
(1)
VOICELIVE 3 P. A
(5)
Om u een duidelijke en beknopte weergave te geven van wat waar naartoe
gaat, hebben we verschillende aansluitschema's verstrekt in het gedeelte
"Verbindingen maken" (pagina 10). Er zijn een paar dingen die we willen dat u in
gedachten houdt wanneer u deze diagrammen volgt:
• Signaalbronnen die naar uw VoiceLive 3 gaan (bijv. Microfoon of gitaar)
worden altijd links van de af beelding op het achterpaneel (1) weergegeven.
(2)
(3)
(5) (4)
Legende
De volgende symbolen worden gebruikt in het gedeelte met
installatievoorbeelden van deze beknopte handleiding:
Microphone
Phrase Loopers - waardoor je "gig gewicht" wordt gereduceerd tot wat je in een rugzak
kunt gooien.
We zijn erg verheugd om u snel aan de slag te kunnen, dus laten we aan de
slaggaan!
In de doos
De VoiceLive 3-box moet de volgende items bevatten:
• 1 VoiceLive 3 vocale processor
• 1 voedingsadapter
• 1 USB-kabel
• 1 gitaar- / koptelefoonkabel
• deze handleiding.
Als u een artikel mist, neem dan onmiddellijk contact op met uw winkelier.
Inspecteer alle items op tekenen van transportschade. Informeer de vervoerder en
leverancier in het onwaarschijnlijke geval van transportschade.
Als er schade is opgetreden, bewaar dan al het verpakkingsmateriaal, aangezien
dit kan worden gebruikt als bewijs van overmatige hanteringskracht.
Gitaareecten Suite
• Amp Simulatie
• Reverb
• Vertraging
• Mod: Flanger / Chorus / Detune
• Rijden
• Compressor
• Ritme / Tremolo
• Wah Wah
• Octaaf omlaag
Multi-Phrase Looper
• Loop Assist-kwantisering
• Swap Mode - Voor eenvoudig loopen in couplet / refrein / brugstijl
• Lusopslag aan boord
• Aanpasbare knopindeling - Volledig opnieuw toe te passen voetschakelaars
• Eenvoudige bewerking op het hoogste niveau - Diepe controle wanneer u
klaar bent
• HIT-functie - Voeg meerdere eecten toe aan zang, gitaar of beide met één
druk op de knop
• Directe gitaaruitgang - ga rechtstreeks naar je versterker
• Onafhankelijke koptelefoonmix - Perfect voor in-ear monitoring zonder een
duur zender / ontvangersysteem
• 'Downstream'-apparaten (mixers, luidsprekers) worden altijd rechts van de
afbeelding op het achterpaneel (2) weergegeven.
• Het vak in de linker benedenhoek laat zien welke signalen je hoort van de
VoiceLive 3 koptelefoonuitgang.
• Het vakje in de rechter benedenhoek laat zien wat je uit je mixer / PA speakers
hoort. Dit kan van alles zijn, van een "stick-systeem" of een draagbaar /
alles-in-één luidsprekersysteem tot actieve studiomonitors of zelfs een DAWopname-interface.
In veel gevallen is wat u hoort via de VoiceLive 3-hoofdtelefoonuitgang en uw PA
hetzelfde (5) - maar het kan ook anders zijn.
Houd er rekening mee dat we in deze diagrammen geen rekening houden met
andere ingangen of instrumenten - u ziet dus geen afbeeldingen van drums (4)
enz. Als een installatievoorbeeld een aansluiting op uw gitaarversterker bevat,
laten we niet zien dat de versterker wordt gemiked. en verzonden via de PA (wat
vaak het geval is) - we laten u alleen zien hoe u VoiceLive 3 in een bepaalde
opstelling kunt verbinden. Dit betekent dat het gedeelte "wat je hoort" in de
rechter benedenhoek geen gitaargeluiden laat zien die uit de PA komen - ook al
zouden ze dat wel kunnen tijdens een optreden.
Acoustic Guitar
Electric Guitar
Keyboard or
other instrument
Mixing Desk
P.A.
Guitar or
keyboard amp
Monitor Mix
Important
XLR cable
TRS cable
TS (guitar) cable
1
/8" cable
VoiceLive 3 belangrijkste kenmerken
Om uw eetlust op te wekken, volgt hier een basisoverzicht van
De vele opwindende functies van VoiceLive 3!
• Vocal Eects Suite
• Adaptieve toon
• EQ
• Compressie
• De-ess
• Reverb
• Vertraging (echo)
• Dubbele
• Harmonie
• Koor
• Vocoder / Talk Box / Vocal Synth
• Ritmisch
• Mod (uitgesproken als "micro mod"): Flanger / Chorus / Detune
• Transducer
• HardTune
• Whammy

74 Voicelive 3 Extreme Quick Start Guide 75
Connecties maken
(2) (3) (6) (7) (5)
OR
(4)
(1)
1. Zang en gitaar met gitaar- / hoofdtelefoonkabel
OR
VOICELIVE 3 P. A
Ingangen
(1) Sluit de meegeleverde voedingsadapter aan op de 12 V DC-aansluiting
van uw VoiceLive 3 en steek de adapter in een stopcontact. Schakel uw
VoiceLive 3 nog niet in.
(2) Sluit uw microfoon aan op de MIC / LINE-aansluiting met een XLR-kabel.
(3) Sluit je gitaar aan op de GUITAR IN-aansluiting met een ¼" Tip Sleeve (TS)
-kabel (dwz een gewone gitaarkabel).
(4) Sluit uw mp3-speler of smartphone aan op de AUX-aansluiting met een
⁄" kabel.
(5) Verbind uw MIDI-mastertoetsenbord of synthesizer met de MIDI
IN-aansluiting met behulp van een MIDI-kabel.
(6) Sluit uw Switch-3 aan op de FOOTSWITCH-aansluiting met een ¼" Tip Ring
Sleeve (TRS) -kabel (de kabel die bij de Switch-3 is geleverd).
(7) Steek uw expressiepedaal in de EXPRESSION-aansluiting.
Heb je een condensator, MP-75 of e835FX microfoon? Als het apparaat
is ingeschakeld (er zijn nog een paar stappen voordat dat gebeurt),
moet u fantoomvoeding inschakelen. Om fantoomvoeding in te
schakelen, drukt u op SETUP en navigeert u naar het tabblad INPUT met de <en>
knoppen onder de grote bedieningsknop. Zoek de parameter Mic Type en verander
deze in Condenser. Druk op SETUP om af te sluiten. Deze instructies staan ook op
de onderkant van uw VoiceLive 3.
Uitgangen
Afhankelijk van het soort versterkingssysteem dat u gebruikt, zijn er veel opties.
Op de volgende pagina's behandelen we enkele veelvoorkomende opstellingen.
In de naslaggids zullen we veel meer verbindingsopties laten zien, inclusief
inkomende monitormixen.
Deze opstelling maakt gebruik van de meegeleverde gitaar- / hoofdtelefoonkabel, die perfect is voor persoonlijke monitoring in elke opstelling. U zult zien dat de
twee kleinere uiteinden van de kabel verschillend zijn. Het ene uiteinde heeft een mannelijke koptelefoonaansluiting naast de gitaaraansluiting. Verbind deze met de
GUITAR IN en HEADPHONE jacks. Het andere uiteinde wordt op je gitaar aangesloten en heeft een vrouwelijke aansluiting voor je koptelefoon / in-ear monitors.
2. Stereo zang en stereo gitaar (2 kanalen)
OR
VOICELIVE 3 P. A
Dit is een veel voorkomende opstelling voor zowel live optredens met een stereo PA (controleer nogmaals of het PA-systeem van de locatie daadwerkelijk in stereo is!)
Of voor standaard 2-kanaals opname.

76 Voicelive 3 Extreme Quick Start Guide 77
3. Stereo zang en stereo gitaar (4 kanalen)
OR
VOICELIVE 3 P. A
5. Stereo zang en gitaarversterker
L
R
OR
VOICELIVE 3 P. A
VoiceLive 3 beschikt over "jack sensing" op verschillende inputs en outputs. Met deze verbindingsopstelling worden alle gitaarsignalen verwijderd uit het XLRsignaalpad wanneer ¼" Guitar OUT-aansluitingen worden gemaakt. Dit geeft je aparte stereokanalen voor je zang en gitaar. Dit is een geweldige opstelling voor
aansluiting op een 4-kanaals audio-interface.
4. Mono zang en mono gitaar (dual mono mode)
OR
VOICELIVE 3 P. A
Houd er rekening mee dat uw gitaarversterker mogelijk van een microfoon is voorzien en via de PA naar buiten komt. Dat deel van de signaalstroom wordt in dit
installatievoorbeeld niet getoond.
De gitaaruitgang wordt automatisch gedempt in het XLR-signaalpad wanneer een ¼" gitaaruitgang wordt gemaakt.
6. Mono zang en gitaarversterker
OR
VOICELIVE 3 P. A
Als u geen gitaarversterker gebruikt, is dit een gebruikelijke verbindingsopstelling voor de meeste live-locaties, aangezien de PA meestal in mono is. Het stelt een
geluidstechnicus ook in staat om de algehele balans tussen je zang en gitaar te regelen. Uitvoermodi kunnen worden gewijzigd in het menu Instellingen / Uitvoer.
Houd er rekening mee dat uw gitaarversterker mogelijk van een microfoon is voorzien en via de PA naar buiten komt. Dat deel van de signaalstroom wordt in dit
installatievoorbeeld niet getoond.
De gitaaruitgang wordt automatisch gedempt in het XLR-signaalpad wanneer een ¼" gitaaruitgang wordt gemaakt.

78 Voicelive 3 Extreme Quick Start Guide 79
Sing and play!
7. Stereozang en MIDI-toetsenbord
Laten we gaan!
Maak alle aansluitingen zoals beschreven in "Aansluitingen maken" (pagina 10).
Voordat u VoiceLive 3 inschakelt, moet u ervoor zorgen dat de versterker of PA
waarop deze is aangesloten, is gedempt of helemaal is uitgeschakeld!
Druk op de POWER-schakelaar aan de achterkant van het apparaat.
Opstarten duurt een paar seconden, dus het is normaal als u korte tijd
een leeg scherm ziet.
Automatische versterking
De eenvoudigste manier om de ingangsniveaus voor uw microfoon en gitaar in te
stellen, is door de knop Setup ingedrukt te houden.
Tijd om plezier te maken!
Het is tijd om te horen wat uw VoiceLive 3 echt kan! Zet de VoiceLive 3
kanaalfaders op uw mixer op 0 of "Unity", afhankelijk van wat van toepassing is.
Verhoog langzaam het master- / hoofdvolume op uw PA / Mixer (en op uw
gitaarversterker als u er een hebt aangesloten).
Als u feedback krijgt, draait u het hoofdvolume omlaag totdat het verdwijnt.
Bekijk deze video van "Craig's Corner" voor meer informatie over feedback en hoe
u deze kunt overwinnen:
VOICELIVE 3 P. A
VoiceLive 3 is geen synthesizer en kan geen MIDI-nootberichten naar audio converteren. De MIDI-aansluiting wordt alleen gebruikt voor NaturalPlay-akkoorddetectie
en andere besturingsgegevens. U moet nog steeds uw toetsenbord op de PA of een versterker aansluiten om het te laten horen!
U ziet een reeks instructies op het scherm. Als je klaar bent, worden de gaininstellingen geoptimaliseerd voor je microfoon en gitaar.
U hoeft Auto Gain maar één keer te gebruiken. Het is niet nodig om deze
procedure elke keer dat u het apparaat inschakelt, te doorlopen.
Als je een condensator, MP-75 of e835FX microfoon hebt, is dit een goed moment
om deze in te schakelen. Volg de instructies op de onderkant van uw VoiceLive 3.
Input gain instellen op uw mixer
Draai terwijl je zingt en speelt op je hardste volume de input gain / trim knoppen
van de mixerkanalen waarmee je VoiceLive 3 is verbonden langzaam omhoog.
Wanneer de clip-indicator op uw mixer oplicht, verlaagt u de input gain / trim
een beetje.
youtube.com/watch?v=VlN1RJ4gcAo
Ontdek de geluiden
De beste manier om een idee te krijgen van het potentieel van uw VoiceLive 3, is
door de presets te bladeren. De fabrieksinstellingen hebben tonnen geweldige
geluiden, dus we raden je aan wat tijd vrij te maken om ze door te nemen en
ernaar te luisteren.
Om door de presets te bladeren, drukt u op de voetschakelaars met de pijlen
omhoog en omlaag helemaal links.
Noteer welke presets u het leukst vindt - u kunt ze gebruiken als uitgangspunt
om later uw eigen presets te maken.
Raadpleeg de instructiehandleiding van uw PA of mixer voor meer informatie
over ingangstrim. Als je wat meer begeleiding nodig hebt, bekijk dan deze
"Craig's Corner" -video waarin de mixeropstelling wordt uitgelegd:
youtube.com/watch?v=qq0AOtafIjs

80 Voicelive 3 Extreme Quick Start Guide 81
VoiceLive 3 voor akoestische gitaristen
VoiceLive 3 wordt geleverd met ongerepte reverbs, modulatie-eecten, EQ's en
vertragingen om uw akoestische gitaar beter te laten klinken dan ooit tevoren.
Maar misschien wil je geen zware overdrive of radicale anging toepassen op de
output van je handgemaakte meesterwerk ...
Als je een mooie eectenopstelling voor je akoestische gitaar hebt die je voor al
je liedjes wilt gebruiken, druk dan op SETUP, ga naar de SYSTEM-tab en zet ALL
GUITAR FX GLOBAL op ON. Hierdoor worden de gitaareecten 'vergrendeld', zodat
ze niet veranderen als u van presets verandert.
Laten we er een HIT van maken!
Zorg ervoor dat u op de HIT-knop drukt wanneer u presets uitcheckt.
Met HIT kun je meerdere eecten toevoegen (of verwijderen) voor zowel je zang
als / of gitaar met een enkele druk op de knop. Het kan worden gebruikt als een
exibele "A / B" -functie voor twee variaties van een preset, of als een "turbo".
Met HIT kun je bijvoorbeeld op het juiste moment Harmony binnenhalen, of
je kunt het gebruiken om de Delay uit te schakelen en de Vocoder in de bridge
van een nummer te activeren. Wees avontuurlijk - HIT brengt echt nieuwe en
interessante facetten van de presets naar voren.
Het bewerken van HIT-instellingen wordt behandeld in de referentiehandleiding.
Zijn we er al?
Eerlijk gezegd zijn we nog niet eens begonnen ...
Inmiddels heb je je waarschijnlijk gerealiseerd dat we slechts de opper vlakte hebben
bekrast van wat je kunt doen met je VoiceLive 3 - er is veel te leren en te doen!
Als je echt wilt weten hoe diep het konijnenhol gaat, download dan de volledige
handleiding voor je VoiceLive 3. Hierin zie je hoe je ...
• gebruik zang, gitaar en loop "lagen"
• voorinstellingen bewerken
• schakel individuele eecten in en uit
• remap eect knoppen
• gebruik Harmony-modi eectief
• tweak alle eectparameters
• loops maken en bewerken
• Toewijzingen van globale eecten
• door presets bladeren op genre
• pas de routings van audiosignalen aan uw behoeften aan
• mix audiosignalen
• MIDI-bedieningselementen instellen
• … en nog veel meer!
Innan du börjar
Om VoiceLive 3 snabbguide
Den här snabbguiden hjälper dig att lära dig förstå och använda din VoiceLive 3.
Du kan ladda ner den senaste versionen av den här snabbguiden från:
tc-helicon.com/products/voicelive-3/support/
För att få ut det mesta av denna snabbguide, läs den från början till slut, annars kanske du saknar viktig information.
Var noga med att ladda ner referenshandboken för VoiceLive 3!
Observera att detta dokument bara är en snabbguide - inte hela manualen! Det är tänkt att få dig igång med din VoiceLive 3, men vi skummar bara ytan här.
För information om alla funktioner och funktioner i din nya VoiceLive 3, se till att du laddar ner hela referenshandboken från:
tc-helicon.com/products/voicelive-3/support/.
Få support
Om du fortfarande har frågor om produkten efter att ha läst den här snabbguiden och referenshandboken, kontakta TC-Helicon Support:
tc-helicon.com/support/
VoiceSupport
VoiceSupport är applikationen som låter dig helt frigöra potentialen i din TC-Helicon-produkt och hålla kontakten med de senaste nyheterna, tipsen och tricksna.
VoiceSupport nyckelfunktioner inkluderar:
• Professionellt författade förinställda bibliotek
• Direkt åtkomst till produkthandböcker
• Uppdatera meddelanden - hjälper dig att hålla dig uppdaterad med den senaste programvaran
• Dra och släpp förinställd hantering
• Anpassningsbart innehåll om dina produkter
• Uppgradering av fast programvara
• Tillgång till support.
Du kan ladda ner VoiceSupport för Microsoft Windows och Mac OS X från:
tc-helicon.com/products/voicesupport/
Registrera din VoiceLive 3
För att registrera din produkt, besök: https://www.tc-helicon.com/brand/tchelicon/product-registration
Observera att registrering av din produkt INTE krävs för att använda
VoiceSupport, ladda ner förinställningar, uppdatera rmware eller kontakta support.
U kunt de VoiceLive 3-referentiehandleiding downloaden van:
tc-helicon.com/products/voicelive-3/support/
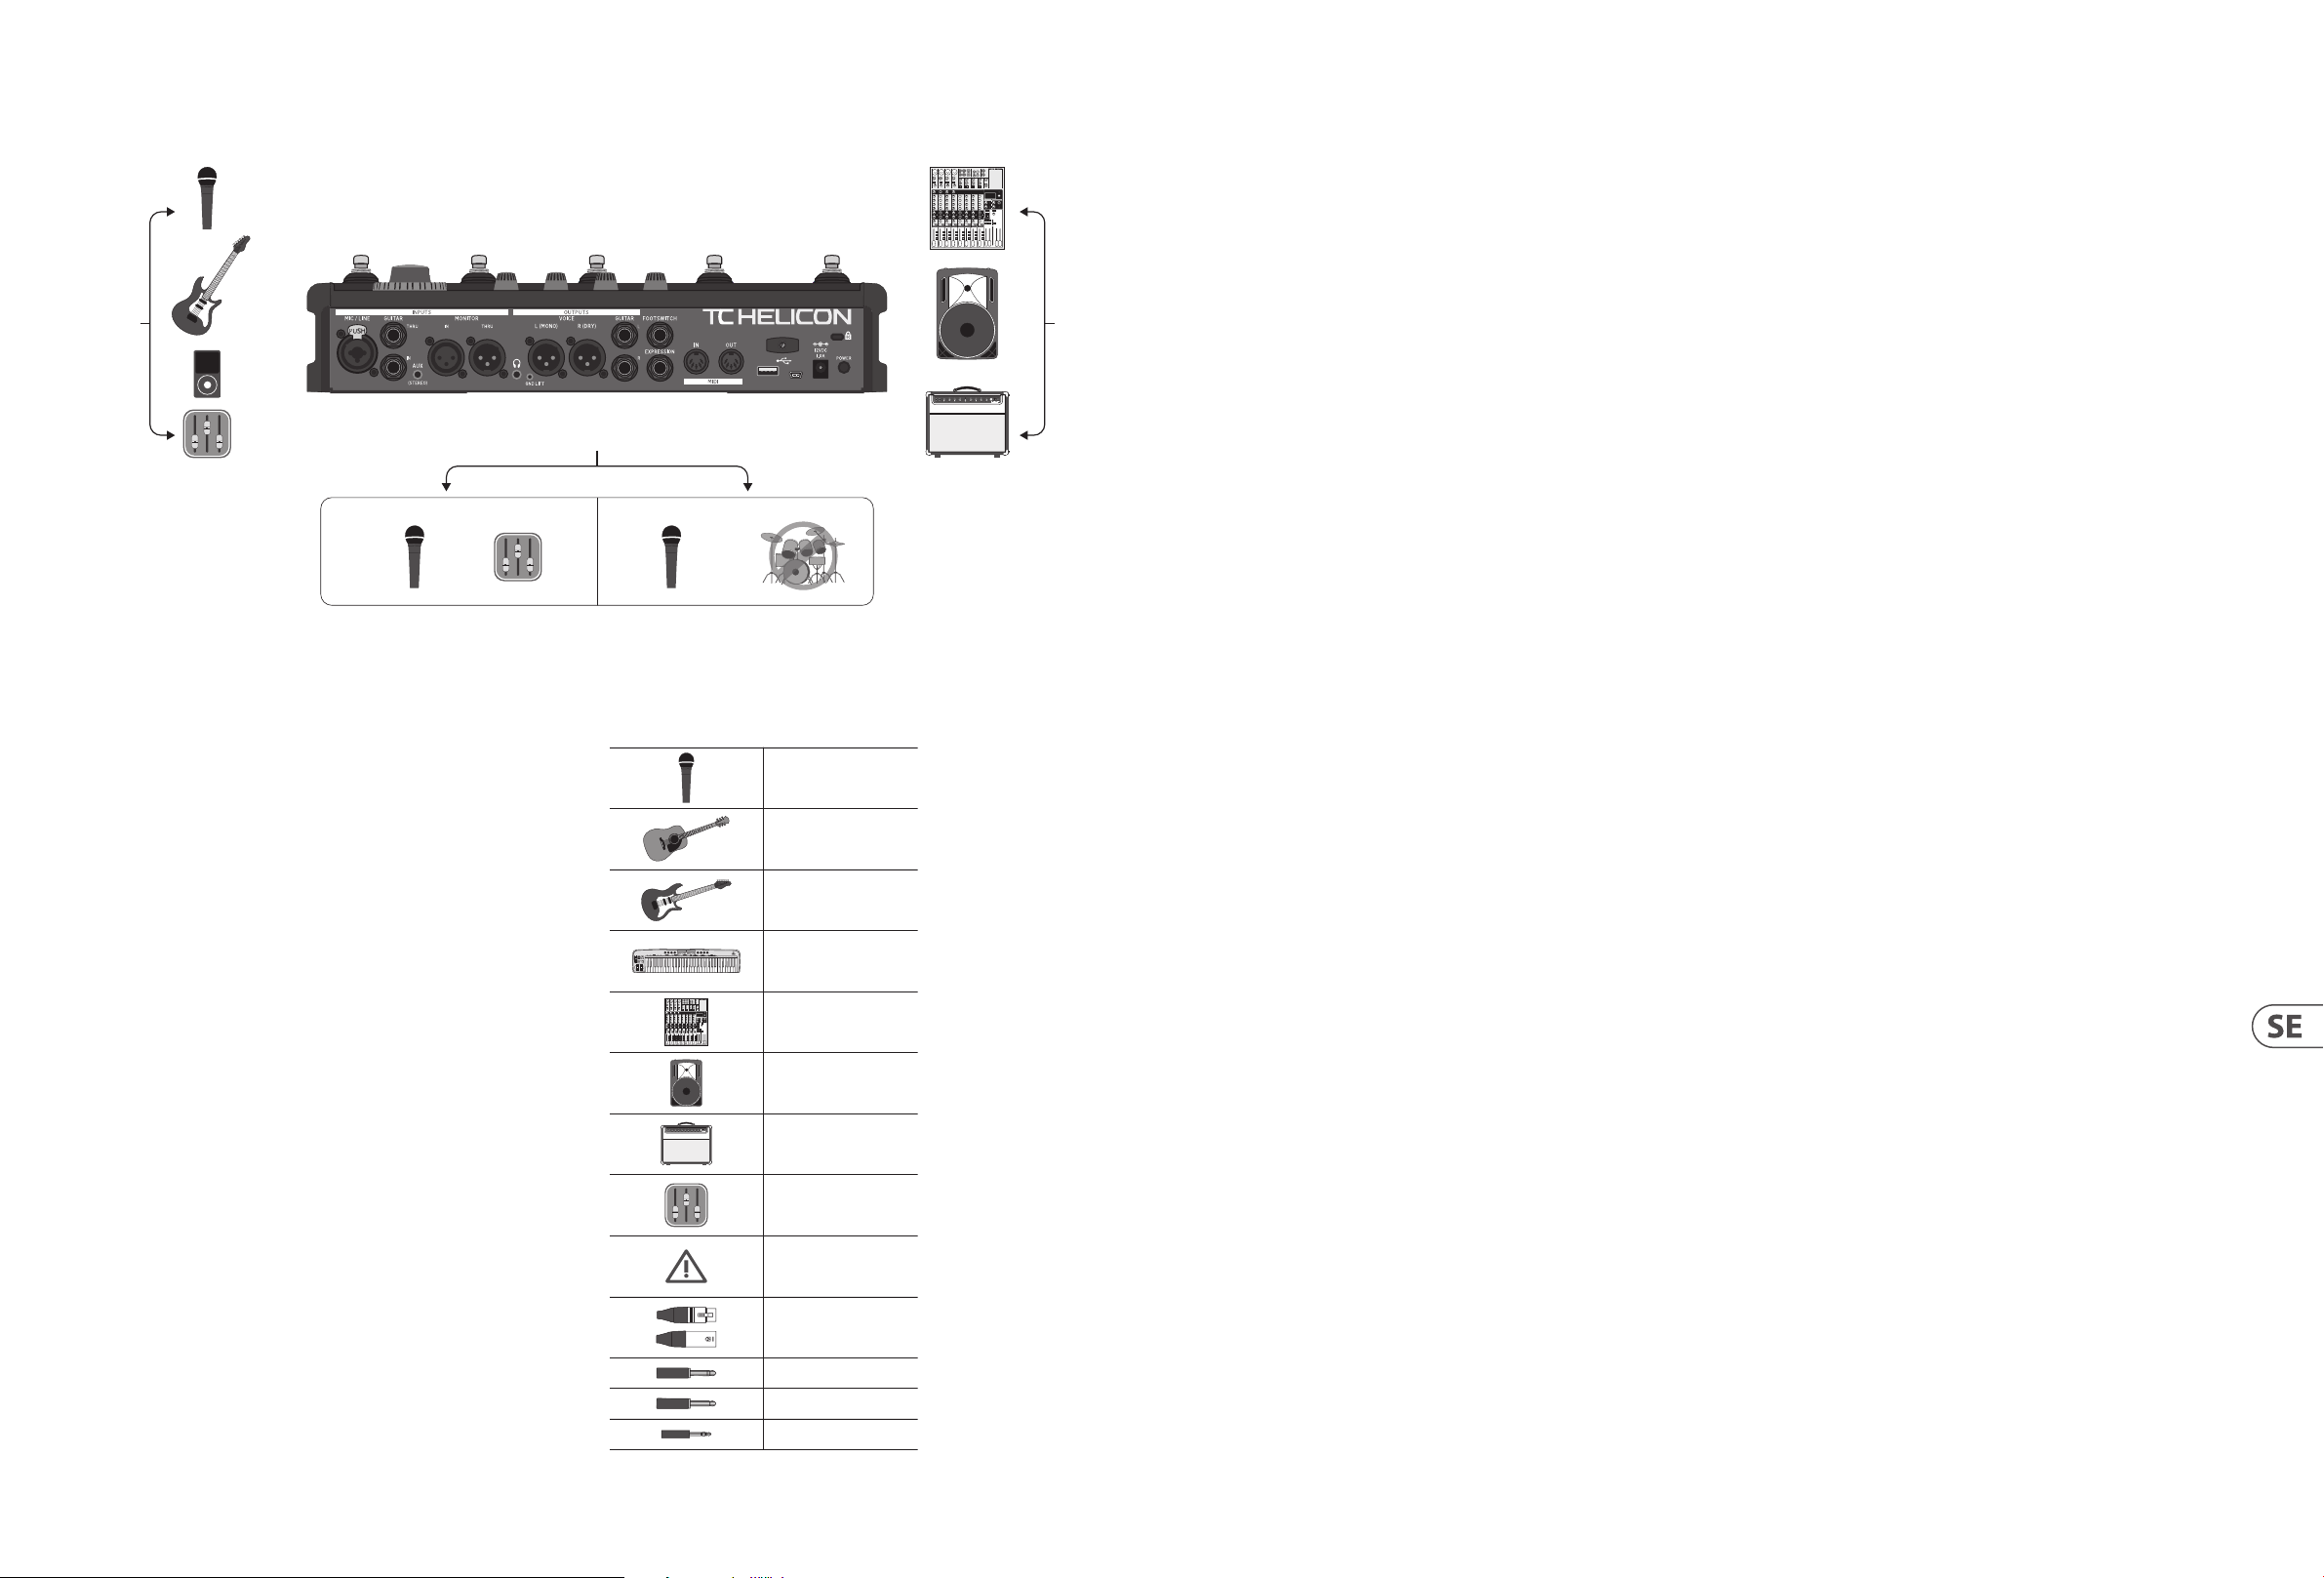
82 Voicelive 3 Extreme Quick Start Guide 83
Diagram Introduktion
Tack för att du köpte
VoiceLive 3!
Din nya Vocal-, Guitar- och Loop-processor är en helt fantastisk teknik. Med
bokstavligen tusentals eektkombinationer och många mångsidiga kontroller kan
du helt anpassa ditt ljud.
VoiceLive 3 ersätter fristående sångprocessorer, multi-eekter-enheter för gitarrer
(1)
VOICELIVE 3 P. A
(5)
För att ge dig tydliga och kortfattade representationer av vad som går vart, har vi
tillhandahållit era anslutningsdiagram i avsnittet ”Gör anslutningar” (sidan 10).
Det nns några saker vi vill att du ska tänka på när du följer dessa diagram:
• Signalkällor som går in i din VoiceLive 3 (t.ex. mikrofon eller gitarr) visas alltid
till vänster om bilden på bakpanelen (1).
• "Nedströms" -enheter (mixer, högtalare) visas alltid till höger om bilden på
bakpanelen (2).
• Rutan i det nedre vänstra hörnet visar vilka signaler du kommer att höra från
VoiceLive 3-hörlursutgången.
• Rutan i det nedre högra hörnet visar vad du kommer att höra från din mixer
/ PA-högtalare. Detta kan vara allt från ett "sticksystem" eller ett bärbar t
/ allt-i-ett högtalarsystem till drivna studiomonitorer eller till och med ett
DAW-inspelningsgränssnitt.
I många fall kommer det du hör från VoiceLive 3-hörlursutgången och din PA vara
densamma (5) - men det kan också vara annorlunda.
Observera att vi inte tar hänsyn till andra ingångar eller instrument i dessa
diagram - så att du inte ser bilder på trummor (4) etc. När ett inställningsexempel
inkluderar en anslutning till din gitarrförstärkare, visar vi inte att förstärkaren
miked och skickas via PA (vilket ofta är fallet) - vi visar bara hur du ansluter
VoiceLive 3 i en viss installation. Detta betyder att avsnittet "vad du hör" i det
nedre högra hörnet inte visar gitarrljud från PA - även om de kanske spelar.
(2)
(3)
(5) (4)
Legend
Följande symboler används i avsnittet om installationsexempel i den här
snabbguiden:
Microphone
Acoustic Guitar
Electric Guitar
Keyboard or
other instrument
Mixing Desk
P.A.
Guitar or
keyboard amp
Monitor Mix
och frase-loopers - vilket minskar din "gig-vikt" till vad du kan kasta i en ryggsäck.
Vi är verkligen glada att få igång dig snabbt, så låt oss komma igång!
I lådan
VoiceLive 3-rutan bör innehålla följande föremål:
• 1 VoiceLive 3-vokalprocessor
• 1 nätadapter
• 1 USB-kabel
• 1 gitarr / hörlurs kabel
• denna bruksanvisning.
Om du saknar en artikel, kontakta din återförsäljare omedelbart.
Inspektera alla föremål för tecken på transportskador. Informera transportören
och leverantören i den osannolika händelsen av transportskada.
Om skada har inträat ska alla förpackningar förvaras eftersom de kan användas
som bevis på överdriven hanteringskraft.
VoiceLive 3 nyckelfunktioner
Bara för att väcka din aptit, här är en grundläggande översikt över
VoiceLive 3s många spännande funktioner!
• Vocal Eects Suite
• Adaptiv ton
• EQ
• Kompression
• De-ess
• Reverb
• Fördröjning (eko)
• Dubbel
• Harmoni
• Kör
• Vocoder / Talk Box / Vocal Synth
Suite för gitarreekter
• Förstärkarsimulering
• Reverb
• Dröjsmål
• Mod: Flanger / Chorus / Detune
• Kör
• Kompressor
• Rytm / tremolo
• Wah Wah
• Oktav ner
Multi-Phrase Looper
• Loop Assist kvantisering
• Bytläge - för enkel vers / kör / brostil looping
• Inbyggd looplagring
• Anpassningsbar knapplayout - Helt ombyggbara fotpedaler
• Enkel redigering på toppnivå - Djupa kontroller när du är redo
• HIT-funktion - Lägg till era eekter till sång, gitarr eller båda med en
knapptryckning
• Direkt gitarr ut - gå direkt till din förstärkare
• Oberoende hörlursmix - Perfekt för in-ear-övervakning utan dyrt sändar- /
mottagarsystem
Important
XLR cable
TRS cable
TS (guitar) cable
1
/8" cable
• Rytmisk
• Mod (uttalad "micro mod"): Flanger / Chorus / Detune
• Givare
• HardTune
• Whammy

84 Voicelive 3 Extreme Quick Start Guide 85
Gör anslutningar
(2) (3) (6) (7) (5)
OR
(4)
(1)
1. Sång och gitarr med gitarr / hörlurskabel
OR
VOICELIVE 3 P. A
Ingångar
(1) Anslut den medföljande nätadaptern till 12 V DC-uttaget på din
VoiceLive 3 och anslut adaptern till ett vägguttag. Slå inte på din
VoiceLive3 än.
(2) Anslut din mikrofon till MIC / LINE-uttaget med en XLR-kabel.
(3) Anslut din gitarr till GUITAR IN-uttaget med en Sle "Tip Sleeve (TS) -kabel
(dvs. en vanlig gitarrkabel).
(4) Anslut din MP3-spelare eller smartphone till AUX-uttaget med en ⁄"
kabel.
(5) Anslut ditt MIDI-mastertangentbord eller din synthesizer till MIDI
IN-uttaget med en MIDI-kabel.
(6) Anslut din switch-3 till FOOTSWITCH-uttaget med en S "Tip Ring Sleeve
(TRS) -kabel (kabeln som medföljer Switch-3).
(7) Anslut din Expression-pedal till EXPRESSION-uttaget.
Har du en kondensor, MP-75 eller e835FX mikrofon? När enheten är
påslagen (det nns några er steg innan det händer) måste du aktivera
Phantom Power. För att aktivera Phantom Power, tryck på SETUP och
navigera till INPUT-iken med knapparna <och> under den stora
kontrollreglaget. Hitta parametern Mic Type och ändra den till Kondensor. Tryck på
SETUP för att avsluta. Dessa instruktioner är också tryckta på botten av din
VoiceLive 3.
Utgångar
Beroende på vilken typ av förstärkningssystem du använder nns det många
alternativ. Vi täcker några vanliga inställningar på följande sidor.
I referenshandboken visar vi många er anslutningsalternativ, inklusive
inkommande bildskärmblandningar.
Denna inställning använder den medföljande gitarr- / hörlurskabeln, som är perfekt för personlig övervakning i alla inställningar. Du kommer att se att de två mindre
ändarna på kabeln är olika. Ena änden har ett manligt hörlursuttag bredvid gitarruttaget. Anslut dessa till GUITAR IN- och HEADPHONE-uttagen. Den andra änden
ansluts till din gitarr och har ett kvinnligt uttag för dina hörlurar / öronmonitorer.
2. Stereovokal och stereogitarr (2 kanaler)
OR
VOICELIVE 3 P. A
Detta är en mycket vanlig inställning för både liveframträdanden med en stereo-PA (dubbelkontrollera att PA-anläggningen faktiskt är i stereo!) Eller för
grundläggande 2-kanalsinspelning.

86 Voicelive 3 Extreme Quick Start Guide 87
3. Stereosång och stereogitarr (4 kanaler)
OR
VOICELIVE 3 P. A
5. Stereosång och gitarrförstärkare
L
R
OR
VOICELIVE 3 P. A
VoiceLive 3 har ”jack sensing” på era in- och utgångar. Med denna anslutningsinställning tas alla gitarrsignaler bort från XLR-signalvägen när ¼" Guitar OUTanslutningar görs. Detta ger dig separata stereokanaler för din sång och gitarr. Detta är en utmärkt inställning för anslutning till ett 4-kanals ljudgränssnitt.
4. Mono sång och mono gitarr (dual mono mode)
OR
VOICELIVE 3 P. A
Tänk på att din gitarrförstärkare kan bli miked och komma ut genom PA. Den delen av signalödet visas inte i detta inställningsexempel.
Gitarrutgången stängs av automatiskt i XLR-signalvägen när en ¼"gitarr-ut-anslutning görs.
6. Monosång och gitarrförstärkare
OR
VOICELIVE 3 P. A
Om du inte använder en gitarr förstärkare är detta en vanlig anslutningsinställning för de esta live-platser, eftersom PA vanligtvis är i mono. Det tillåter också en
ljudteknik att kontrollera den totala balansen mellan din sång och gitarr. Utmatningslägen kan ändras i menyn Setup / Output.
Tänk på att din gitarrförstärkare kan bli miked och komma ut genom PA. Den delen av signalödet visas inte i detta inställningsexempel.
Gitarrutgången stängs av automatiskt i XLR-signalvägen när en ¼" gitarr-ut-anslutning görs.
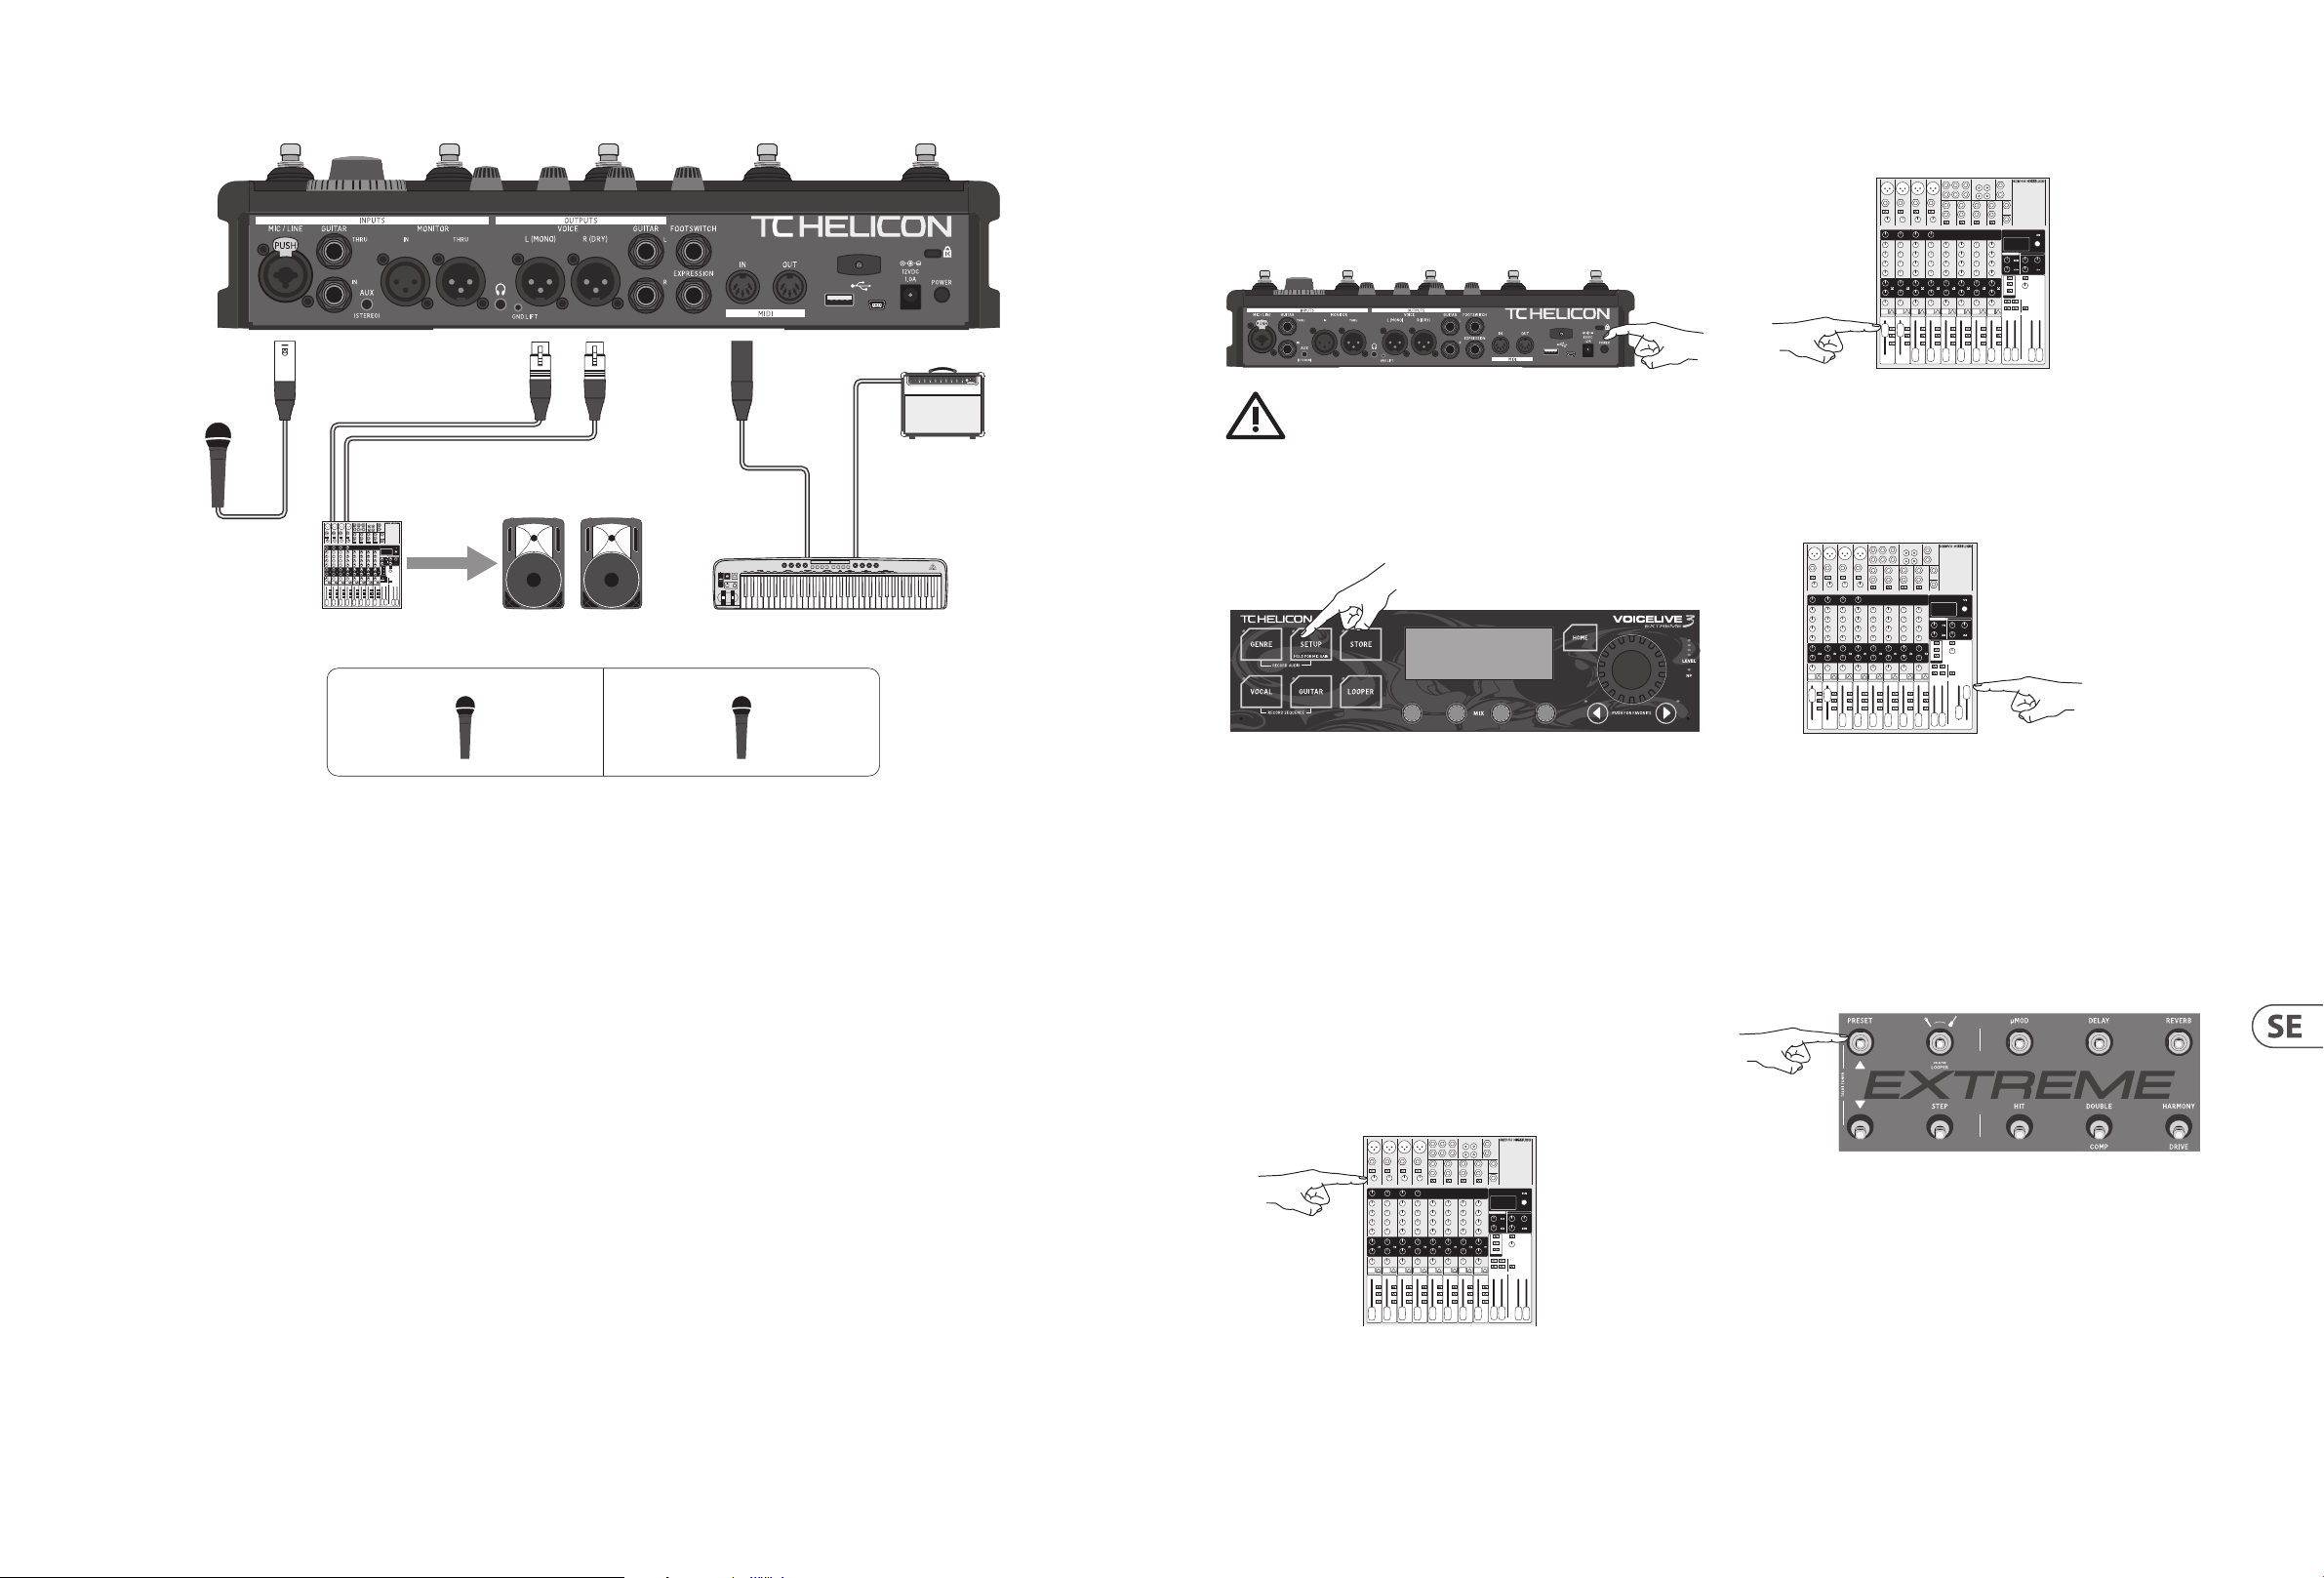
88 Voicelive 3 Extreme Quick Start Guide 89
Sing and play!
7. Stereosång och MIDI-tangentbord
Nu går vi!
Gör alla anslutningar enligt "Gör anslutningar" (sidan 10).
Innan du startar VoiceLive 3, se till att förstärkaren eller PA-enheten som den är
ansluten till är avstängd eller helt ned!
Tryck på POWER-omkopplaren på enhetens baksida.
Uppstart tar några sekunder - så det är normalt om du ser en tom
skärm en kort stund.
Auto Gain
Det enklaste sättet att ställa in ingångsnivåerna för din mikrofon och gitarr är att
trycka på och hålla ner Setup-knappen.
Dags att ha kul!
Det är dags att höra vad din VoiceLive 3 verkligen kan göra! Ställ VoiceLive
3-kanalsfadrarna på din mixer till 0 eller "Unity", beroende på vad som gäller.
Vrid långsamt upp huvud- / huvudvolymen på din PA / mixer (och på din
gitarrförstärkare om du är ansluten till en).
Om du stöter på feedback, sänk ner huvudvolymen tills den försvinner. För mer
information om feedback och hur du kan komma över den, kolla in den här
"Craig's Corner" -videon:
VOICELIVE 3 P. A
VoiceLive 3 är inte en synthesizer och kan inte konvertera MIDI-meddelanden till ljud. MIDI-anslutningen används endast för detek tering av NaturalPlay-ackord och
andra styrdata. Du måste fortfarande ansluta ditt tangentbord till PA eller en förstärkare för att det ska höras!
Du kommer att se en serie instruktioner på skärmen. När du är klar kommer
förstärkningsinställningarna att optimeras för din mikrofon och gitarr.
Du bör bara behöva använda Auto Gain en gång. Det nns inget behov av att gå
igenom denna procedur varje gång du slår på enheten.
Om du har en kondensor, MP-75 eller e835FX-mikrofon är det här en bra tid att
aktivera den. Följ instruktionerna på botten av VoiceLive 3.
Ställa in ingångsförstärkning på
dinmixer
När du sjunger och spelar på din högsta volym, vrid långsamt upp
ingångsförstärknings- / trimknapparna på mixerkanalerna som din
VoiceLive 3 är ansluten till. När klämindikatorn på din mixer tänds, minska
ingångsförstärkningen / trimma något.
youtube.com/watch?v=VlN1RJ4gcAo
Utforska ljudet
Det bästa sät tet att få en uppfattning om din VoiceLive 3s potential är att bläddra
bland förinställningarna. Fabriksförinställningarna har massor av fantastiska
ljud, så vi föreslår att du snider lite tid för att gå igenom och lyssna på dem.
Om du vill bläddra mellan förinställningar trycker du på fotpedalerna med uppoch nedpilarna längst till vänster.
Observera vilka förinställningar du gillar mest - du kan använda dem som
utgångspunkt för att skapa dina egna förinställningar senare.
För ytterligare information om inmatning, se din PA eller mixerns
bruksanvisning. Om du behöver lite mer vägledning, kolla in den här "Craig's
Corner" -videoen som förklarar mixerinställningen:
youtube.com/watch?v=qq0AOtafIjs
VoiceLive 3 för akustiska gitarrspelare
VoiceLive 3 kommer med orörda reverb, moduleringseekter, EQ och
fördröjningar för att göra din akustiska gitarr bättre än någonsin. Men du kanske
inte vill att tung överdrift eller radikal änsning ska appliceras på utgången från
ditt handgjorda mästerverk ...
Om du har en n eektinställning för din akustiska gitarr som du vill använda
för alla dina låtar, tryck på SETUP, gå till iken SYSTEM och ställ ALL GUITAR FX
GLOBAL till ON. Detta kommer att "låsa" gitarreek terna så att de inte ändras när
du byter förinställningar.

90 Voicelive 3 Extreme Quick Start Guide 91
Låt oss göra det till en HIT!
När du checkar ut förinställningar, se till att tr ycka på HIT-knappen.
Med HIT kan du lägga till (eller ta bort) era eekter för både din sång och / eller
gitarr med en enda knapptryckning. Den kan användas som en exibel “A / B”
-funktion för två varianter av en förinställning eller som en ”turbo”. Med HIT kan
du till exempel ta in Harmony vid precis rätt tidpunkt, eller så kan du stänga av
fördröjningen och aktivera Vocoder i bryggan till en låt. Var äventyrlig - HIT tar
verkligen fram nya och intressanta aspekter av förinställningarna.
Redigering av HIT-inställningar beskrivs i referenshandboken.
Är vi där än?
Uppriktigt sagt, vi har inte ens börjat ...
Nu har du antagligen insett att vi bara har repat ytan på vad du kan göra med din
VoiceLive 3 - det nns mycket att lära sig och göra!
Om du verkligen vill veta hur djupt kaninhålet går, ladda ner hela
referenshandboken för din VoiceLive 3. Den visar dig hur du ...
• använda sång, gitarr och loop "lager"
• redigera förinställningar
• slå på och av enskilda eekter
• Knappar om mappeekt
• använda Harmony-lägen eektivt
• justera alla eektparametrar
• skapa och redigera loopar
• Globala eekter uppdrag
• bläddra mellan förinställningar efter genre
• anpassa ljudsignalvägar till dina behov
• mixa ljudsignaler
• ställa in MIDI-kontroller
• … och mycket mera!
Zanim zaczniesz
Informacje o skróconym przewodniku VoiceLive 3
Ten krótki przewodnik pomoże Ci nauczyć się rozumieć i obsługiwać VoiceLive 3.
Najnowszą wersję tego skróconego przewodnika można pobrać z:
tc-helicon.com/products/voicelive-3/support/
Aby jak najlepiej wykorzystać ten krótki przewodnik, przeczytaj go od początku do końca, w przeciwnym razie możesz przegapić ważne informacje.
Pobierz instrukcję obsługi VoiceLive 3!
Należy pamiętać, że ten dokument jest tylko krótkim przewodnikiem, a nie pełną instrukcją! Jego celem jest umożliwienie Ci rozpoczęcia pracy z VoiceLive 3, ale tak
naprawdę tylko przeglądamy tutaj powierzchnię.
Aby uzyskać informacje na temat wszystkich funkcji i funkcji nowego VoiceLive 3, pobierz pełną instrukcję obsługi ze strony:
tc-helicon.com/products/voicelive-3/support/.
Uzyskanie wsparcia
Jeśli po przeczytaniu tej skróconej instrukcji i instrukcji obsługi nadal masz pytania dotyczące produktu, skontaktuj się z pomocą techniczną TC-Helicon:
tc-helicon.com/support/
VoiceSupport
VoiceSupport to aplikacja, która pozwala w pełni uwolnić potencjał produktu TC-Helicon i być na bieżąco z najnowszymi wiadomościami, poradami i wskazówkami.
Kluczowe funkcje VoiceSupport obejmują:
• Profesjonalnie przygotowane biblioteki ustawień wstępnych
• Bezpośredni dostęp do instrukcji produktów
• Aktualizuj wiadomości - pomagając być na bieżąco z najnowszym oprogramowaniem
• Zarządzanie ustawieniami wstępnymi metodą „przeciągnij i upuść”
• Kongurowalne treści dotyczące Twoich produktów
• Aktualizacja oprogramowania
• Dostęp do wsparcia.
Możesz pobrać VoiceSupport dla Microsoft Windows i Mac OS X z:
tc-helicon.com/products/voicesupport/
Zarejestruj swój VoiceLive 3
Aby zarejestrować swój produkt, odwiedź: https://www.tc-helicon.com/brand/tchelicon/product-registration
Du kan ladda ner VoiceLive 3-referenshandboken från:
tc-helicon.com/products/voicelive-3/support/
Należy pamiętać, że rejestracja produktu NIE jest wymagana do korzystania
VoiceSupport, pobierz ustawienia wstępne, zaktualizuj oprogramowanie układowe lub skontaktuj się z pomocą techniczną.

92 Voicelive 3 Extreme Quick Start Guide 93
Diagramy Wprowadzenie
Dziękuje za zakup
VoiceLive 3!
Twój nowy procesor wokalu, gitary i pętli to niesamowita technologia. Dzięki
dosłownie tysiącom kombinacji efektów i wielu wszechstronnym elementom
sterującym możesz całkowicie dostosować dźwięk.
VoiceLive 3 zastępuje samodzielne procesory wokalne, gitarowe jednostki multi-
(1)
VOICELIVE 3 P. A
(5)
Aby zapewnić jasne i zwięzłe przedstawienie tego, co się dzieje, w sekcji
„Wykonywanie połączeń” (strona 10) przedstawiliśmy kilka schematów połączeń.
Jest kilka rzeczy, o których powinniśmy pamiętać podczas wykonywania
tychdiagramów:
• Źródła sygnałów, które traają do VoiceLive 3 (np. Mikrofon lub gitara), będą
zawsze pokazywane po lewej stronie obrazu na tylnym panelu (1).
(2)
(3)
(5) (4)
Legenda
W części poświęconej przykładom konguracji w tym krótkim przewodniku
zastosowano następujące symbole:
Microphone
efekty i zapętlacze fraz - redukując „wagę koncertową” do tego, co można wrzucić
do plecaka.
Cieszymy się, że możemy szybko rozpocząć pracę, więc zaczynajmy!
W pudełku
Pudełko VoiceLive 3 powinno zawierać następujące elementy:
• 1 procesor wokalu VoiceLive 3
• 1 zasilacz
• 1 kabel USB
• 1 kabel gitarowy / słuchawkowy
• niniejszej instrukcji.
Jeśli brakuje jakiegoś elementu, natychmiast skontaktuj się ze sprzedawcą.
Sprawdź wszystkie elementy pod kątem oznak uszkodzeń transportowych.
W mało prawdopodobnym przypadku uszkodzenia w transporcie należy
poinformować przewoźnika i dostawcę.
Jeśli nastąpiło uszkodzenie, należy zachować całe opakowanie, ponieważ może
być użyte jako dowód nadmiernej siły podczas obsługi.
Pakiet efektów gitarowych
• Symulacja wzmacniacza
• Reverb
• Opóźnienie
• Mod: Flanger / Chorus / Detune
• Napęd
• Kompresor
• Rhythm / Tremolo
• Wah Wah
• Oktawa w dół
Looper Multi-Phrase
• Kwantyzacja Loop Assist
• Swap Mode - dla łatwego zapętlania zwrotek / chorus / bridge
• Wbudowany schowek na pętle
• Kongurowalny układ przycisków - Całkowicie zmienialne przełączniki nożne
• Łatwa edycja na najwyższym poziomie - głębokie sterowanie,
gdyjesteśgotowy
• Funkcja HIT - Dodaj wiele efektów do wokalu, gitary lub obu za pomocą
jednego naciśnięcia przycisku
• Bezpośrednie wyjście gitarowe - idź prosto do swojego wzmacniacza
• Niezależny miks słuchawek - idealny do odsłuchu dousznego bez drogiego
systemu nadajnika / odbiornika
• Urządzenia „podrzędne” (miksery, głośniki) będą zawsze pokazywane po
prawej stronie obrazu na tylnym panelu (2).
• Okienko w lewym dolnym rogu pokazuje, jakie sygnały usłyszysz z wyjścia
słuchawkowego VoiceLive 3.
• Pole w prawym dolnym rogu pokazuje, co usłyszysz z głośników miksera /
PA. Może to być wszystko, począwszy od systemu „stick” lub przenośnego
systemu głośników typu all-in-one, po zasilane monitory studyjne, a nawet
interfejs do nagrywania w DAW.
W wielu przypadkach to, co słychać z wyjścia słuchawkowego VoiceLive 3
itwojego PA będzie takie samo (5) - ale może też być inne.
Zwróć uwagę, że nie uwzględniamy innych wejść ani instrumentów na tych
diagramach - więc nie zobaczysz zdjęć bębnów (4) itp. Gdy przykładowa
konguracja obejmuje połączenie z twoim wzmacniaczem gitarowym, nie
pokazujemy, że wzmacniacz jest mikrofonowany i wysyłane przez PA (co często się
zdarza) - pokazujemy tylko, jak podłączyć VoiceLive 3 w określonej konguracji.
Oznacza to, że sekcja „to, co słyszysz” w prawym dolnym rogu nie pokazuje
dźwięków gitary dochodzących z systemu nagłaśniającego - nawet jeśli mogą one
wystąpić na koncercie.
Acoustic Guitar
Electric Guitar
Keyboard or
other instrument
Mixing Desk
P.A.
Guitar or
keyboard amp
Monitor Mix
Important
XLR cable
TRS cable
TS (guitar) cable
1
/8" cable
Kluczowe funkcje VoiceLive 3
Aby zaostrzyć apetyt, oto podstawowe omówienie
Wiele ekscytujących funkcji VoiceLive 3!
• Vocal Eects Suite
• Ton adaptacyjny
• EQ
• Kompresja
• De-ess
• Reverb
• Opóźnienie (echo)
• Podwójnie
• Harmonia
• Chór
• Vocoder / Talk Box / Vocal Synth
• Rytmiczny
• Mod (wymawiane „mikro mod”): Flanger / Chorus / Detune
• Transduktor
• HardTune
• Whammy

94 Voicelive 3 Extreme Quick Start Guide 95
Tworzyć połączenia
OR
(2) (3) (6) (7) (5)
(4)
(1)
1. Wokal i gitara za pomocą kabla gitarowego / słuchawkowego
OR
VOICELIVE 3 P. A
Wejścia
(1) Podłącz dostarczony zasilacz do gniazda 12 V DC swojego
VoiceLive 3 i podłącz adapter do gniazdka ściennego. Nie włączaj jeszcze
VoiceLive 3.
(2) Podłącz mikrofon do gniazda MIC / LINE za pomocą kabla XLR.
(3) Podłącz gitarę do gniazda GUITAR IN za pomocą kabla ¼" Tip Sleeve (TS)
(tj. Zwykłego przewodu gitarowego).
(4) Podłącz odtwarzacz MP3 lub smartfon do gniazda AUX za pomocą
kabla⁄".
(5) Podłącz swoją główną klawiaturę lub syntezator MIDI do gniazda MIDI IN
za pomocą kabla MIDI.
(6) Podłącz Switch-3 do gniazda FOOTSWITCH za pomocą kabla ¼" Tip Ring
Sleeve (TRS) (kabel dostarczony z Switch-3).
(7) Podłącz pedał ekspresji do gniazda EXPRESSION.
Masz mikrofon pojemnościowy MP-75 lub e835FX? Gdy urządzenie
zostanie włączone (zanim to się stanie, jest jeszcze kilka kroków),
musisz włączyć zasilanie Phantom. Aby włączyć zasilanie Phantom,
naciśnij przycisk SETUP i przejdź do zakładki INPUT za pomocą przycisków <i>
poniżej dużego pokrętła sterującego. Znajdź parametr Mic Type i zmień go na
Condenser. Naciśnij przycisk SETUP, aby wyjść. Te instrukcje są również
wydrukowane na spodzie VoiceLive 3.
Wyjścia
W zależności od rodzaju używanego systemu wzmacniającego, istnieje wiele
opcji. Na kolejnych stronach omówimy kilka typowychkonguracji.
W podręczniku pokażemy o wiele więcej opcji połączeń, w tym przychodzące
miksy monitorów.
Ta konguracja wykorzystuje dołączony kabel gitarowy / słuchawkowy, który jest idealny do osobistego odsłuchu w dowolnej konguracji. Zobaczysz, że dwa
mniejsze końce kabla są różne. Na jednym końcu obok gniazda gitarowego znajduje się męskie gniazdo słuchawkowe. Podłącz je do gniazd GUITAR IN i HEADPHONE.
Drugi koniec podłącza się do gitary i ma żeńskie gniazdo do słuchawek / monitorów dousznych.
2. Stereo wokal i gitara stereo (2 kanały)
OR
VOICELIVE 3 P. A
Jest to bardzo powszechna konguracja zarówno w przypadku występów na żywo ze stereofonicznym systemem nagłaśniającym (dwukrotnie sprawdź, czy system
nagłośnienia w sali jest rzeczywiście stereofoniczny!), Jak i do podstawowego nagry wania dwukanałowego.

96 Voicelive 3 Extreme Quick Start Guide 97
3. Wokal stereo i gitara stereo (4 kanały)
OR
VOICELIVE 3 P. A
5. Wokal stereo i wzmacniacz gitarowy
L
R
OR
VOICELIVE 3 P. A
VoiceLive 3 posiada funkcję „wykrywania gniazda” na kilku wejściach i wyjściach. Przy takiej konguracji połączenia wszystkie sygnały gitarowe są usuwane ze ścieżki
sygnału XLR po wykonaniu połączeń Guitar OUT ¼". Daje to oddzielne kanały stereo dla wokalu i gitary. Jest to świetna konguracja do podłączenia do 4-kanałowego
interfejsu audio.
4. Mono wokal i mono gitara (tryb dual mono)
OR
VOICELIVE 3 P. A
Pamiętaj, że twój wzmacniacz gitarowy może być mikrofonowany i wychodzić przez PA. Ta część przepływu sygnału nie jest pokazana w tym przykładzie konguracji.
Wyjście gitarowe jest automatycznie wyciszane w torze sygnału XLR po wykonaniu połączenia wyjścia gitarowego ¼".
6. Mono wokal i wzmacniacz gitarowy
OR
VOICELIVE 3 P. A
Jeśli nie używasz wzmacniacza gitarowego, jest to typowa konguracja połączenia w większości miejsc na żywo, ponieważ system nagłaśniający jest zwykle
monofoniczny. Pozwala również technice dźwięku na kontrolowanie ogólnej równowagi między wokalem a gitarą. Tryby wyjścia można zmienić w menu Konguracja
/ Wyjście.
Pamiętaj, że twój wzmacniacz gitarowy może być mikrofonowany i wychodzić przez PA. Ta część przepływu sygnału nie jest pokazana w tym przykładzie konguracji.
Wyjście gitarowe jest automatycznie wyciszane w torze sygnału XLR po wykonaniu połączenia wyjścia gitarowego ¼".

98 Voicelive 3 Extreme Quick Start Guide 99
Sing and play!
7. Wokale stereo i klawiatura MIDI
Kontynuujmy!
Wykonaj wszys tkie połączenia, jak pokazano w „Wykonywanie połąc zeń” (strona 10).
Zanim włączysz VoiceLive 3, upewnij się, że wzmacniacz lub system nagłośnienia,
do którego jest podłączony, jest wyciszony lub całkowicie wyciszony!
Naciśnij przełącznik POWER z tyłu urządzenia.
Uruchamianie zajmie kilka sekund - więc jest to normalne, jeśli przez
krótką chwilę zobaczysz pusty ekran.
Auto Gain
Najłatwiejszym sposobem ustawienia poziomów wejściowych dla mikrofonu i
gitary jest naciśnięcie i przytrzymanie przycisku Setup.
Czas się zabawić!
Czas usł yszeć, co naprawdę potra Twój VoiceLive 3! Ustaw suwaki kanału VoiceLive
3 na mikserze na 0 lub „Unit y”, w zależności od tego, co ma zastosowanie.
Powoli zwiększ głośność główną / główną na PA / mikserze (i na wzmacniaczu
gitarowym, jeśli jesteś podłączony do jednego).
Jeśli napotkasz sprzężenie zwrotne, ścisz główny poziom głośności, aż zgaśnie.
Aby uzyskać więcej informacji o opiniach i sposobach ich przezwyciężenia,
obejrzyj ten lm „Craig's Corner”:
VOICELIVE 3 P. A
VoiceLive 3 nie jest syntezatorem i nie może konwertować komunikatów nutowych MIDI na dźwięk. Połączenie MIDI jest używane tylko do wykrywania akordów
NaturalPlay i innych danych sterujących. Nadal będziesz musiał podłączyć klawiaturę do systemu nagłośnienia lub wzmacniacza, aby był słyszalny!
Zobaczysz serię instrukcji na ekranie. Po zakończeniu ustawienia wzmocnienia
zostaną zoptymalizowane pod kątem mikrofonu i gitary.
Powinieneś użyć funkcji Auto Gain tylko raz. Nie ma potrzeby wykonywania tej
procedury za każdym razem, gdy włączasz urządzenie.
Jeśli masz mikrofon pojemnościowy, MP-75 lub e835FX, to jest dobry moment,
aby go włączyć. Postępuj zgodnie z instrukcjami wydrukowanymi na spodzie
VoiceLive 3.
Ustawianie wzmocnienia wejściowego w
mikserze
Śpiewając i grając na swoim najgłośniejszym poziomie, powoli podkręcaj gałki
wzmocnienia / przycinania sygnału wejściowego kanałów miksera, do których
podłączony jest VoiceLive 3. Gdy zaświeci się wskaźnik przesterowania na
mikserze, zmniejsz nieznacznie wzmocnienie / przycięcie sygnału wejściowego.
youtube.com/watch?v=VlN1RJ4gcAo
Poznaj dźwięki
Najlepszym sposobem na poznanie potencjału VoiceLive 3 jest przeglądanie
ustawień wstępnych. Ustawienia fabryczne mają mnóstwo świetnych dźwięków,
więc sugerujemy, abyś poświęcił trochę czasu na ich przejrzenie i posłuchanie.
Aby przeglądać presety, naciskaj przełączniki nożne ze strzałkami w górę iw dół
po lewej stronie.
Zwróć uwagę, które ustawienia wstępne lubisz najbardziej - możesz ich użyć jako
punktu wyjścia do późniejszego tworzenia własnych ustawień wstępnych.
Aby uzyskać dodatkowe informacje na temat strojenia wejściowego, zapoznaj się
z instrukcją obsługi PA lub miksera. Jeśli potrzebujesz dodatkowych wskazówek,
obejrzyj ten lm „Craig's Corner” wyjaśniający kongurację miksera:
youtube.com/watch?v=qq0AOtafIjs
VoiceLive 3 dla gitarzystów
akustycznych
VoiceLive 3 jest wyposażony w nieskazitelne pogłosy, efekty modulacyjne,
korektory i opóźnienia, aby Twoja gitara akustyczna brzmiała lepiej niż
kiedykolwiek. Jednak możesz nie chcieć, aby na wyjściu ręcznie wykonanego
arcydzieła zastosowano mocne przesterowanie lub radykalne kołnierze…
Jeśli masz fajny zestaw efektów do gitary akustycznej, którego chcesz używać do
wszystkich swoich piosenek, naciśnij przycisk SETUP, przejdź do zakładki SYSTEM
i ustaw opcję ALL GUITAR FX GLOBAL na ON. Spowoduje to „zablokowanie”
efektów gitarowych, aby nie zmienił y się po zmianie ustawień wstępnych.

100 Voicelive 3 Extreme Quick Start Guide 101
Zróbmy z tego HIT!
Podczas sprawdzania presetów pamiętaj, aby nacisnąć przycisk HIT.
HIT umożliwia dodawanie (lub usuwanie) wielu efektów dla wokalu i / lub gitary
za jednym naciśnięciem przycisku. Może być używany jako elastyczna funkcja
„A / B” dla dwóch odmian presetu lub jako „turbo”. Np. HIT pozwala wprowadzić
Harmony w odpowiednim momencie lub można go użyć do wyłączenia Delay i
aktywacji Vocodera w mostku utworu. Bądź odważny - HIT naprawdę wydobywa
nowe i interesujące aspekty presetów.
Edycję ustawień HIT opisano w podręczniku referencyjnym.
Czy już dotarliśmy?
Szczerze mówiąc, nawet nie zaczęliśmy…
Prawdopodobnie zdałeś sobie już sprawę, że tylko zarysowaliśmy powierzchnię
tego, co możesz zrobić z VoiceLive 3 - jest wiele do nauczenia się i zrobienia!
Jeśli naprawdę chcesz wiedzieć, jak głęboka jest królicza nora, pobierz pełną
instrukcję obsługi VoiceLive 3. Pokaże Ci, jak…
• użyj „warstw” wokalu, gitar y i pętli
• edytować ustawienia wstępne
• włączać i wyłączać poszczególne efekty
• przemapuj przyciski efektów
• efektywnie używać trybów Harmony
• dostrój wszystkie parametry efektów
• tworzyć i edytować pętle
• Globalne przypisania efektów
• przeglądaj ustawienia według gatunku
• dostosuj trasy sygnału audio do swoich potrzeb
• miksować sygnały audio
• skongurować elementy sterujące MIDI
• … i wiele więcej!
Możesz pobrać instrukcję obsługi VoiceLive 3 z:
tc-helicon.com/products/voicelive-3/support/
Specications
Inputs
Mic / line 1 x XLR / ¼" TRS comb jack
Impedance 3.1 k
Mic input level @ 0 dBFS -52 to +7 dBu
Line input leve l @ 0 dBFS -40 to +19 dBu
EIN, max gain @
150 source resist ance
Signal-to-noise ratio >100 dB @ typi cal mic input gain
A/D convers ion "24-bit, 128x oversampling
Guitar in 1 x ¼” TS, unbalanced
Impedance 1 M
Input level @ 0 dBFS -2 to +14 dBu
Signal-to-noise ratio >10 8 dB
A/D convers ion 24-bit, 128x oversampling
Monitor in 1 x XLR, balanced
Impedance 25 k
Monitor inpu t level @
0 dBFS
Aux 1 x ⁄" TRS connec tor, stereo
Impedance 100 k
Aux input level @ 0 dBFS +2 d Bu
Analog Outputs
Voice out 2 x XLR, balanced
Impedance 300 balanced, 150 unbalanced
Output level @ 0 dBFS Line: +14 dBu
Dynamic range >109 dB, 20 Hz to 20 kHz
Frequency response +0/-0.3 dB, 20 Hz to 20 kHz
D/A conversion 24-bit, 128x oversampling
Guitar out 2 x ¼" TRS
Impedance 442 balanced, 221 unbalanced
Output range @ 0 dBFS +14 dB u
Dynamic range >101 dB, 20 Hz to 20 kHz
D/A conversion 24-bit, 128x oversampling
Headphone out 1 x ⁄" TRS, stereo
Guitar thru 1 x ¼" TRS, buered
Impedance 270 balanced, 540 unbalanced
Monitor thru 1 x XLR, balanced
-127 dB u
110 dB SNR A-weighted"
110 dB SNR A-weighted"
+16 dB u
Mic: -2 dBu"
115 dB SNR A-weighted"
106 dB SNR A-weighted
50 , +14 dBu max
Control
USB USB type A
USB mini
MIDI in / out 2 x 5-pin DIN
External Footswitch 1 x ¼" TR S, Switch-3/ Switch- 6 compatible
Expression pedal 1 x ¼" TRS
Power Supply / Voltage
External power supply 100-240 V~, 50/60 Hz (auto-selec t)
Power consumption < 14 W
Operating Requirements
Operating temperature 32° F to 122° F
(0° C to 50° C)
Storage temperature -22° F to 167° F
(-30° C to 70° C)
Humidity max. 90% non-condensing
Dimension / Weight
Dimensions(W x D x H) 351 x 217 x 83 mm (13.8 x 8.5 x 3.3")
Weight 5.66 lb. (2.57 kg)

102 Voicelive 3 Extreme Quick Start Guide 103
Other important information
Important information
1. Register online. Please register your new
Music Tribe equipment right after you purchase it by
visiting musictribe.com. Registering your purchase using
our simple online form helps us to process your repair
claims more quickly and eciently. Also, read the terms
and conditions of our warranty, if applicable.
2. Malfunction. Should your Music Tribe
Authorized Reseller not be located in your vicinity,
you may contact the Music Tribe Authorized Fulller for
your country listed under “Support” at musictribe.com.
Should your country not be listed, please check if your
problem can be dealt with by our “Online Support” which
may also be found under “Support” at musictribe.com.
Alternatively, please submit an online warranty claim at
musictribe.com BEFORE returning the product.
3. Power Connections. Before plugging the
unit into a power socket, please make sure you are using
the correct mains voltage for your particular model.
Faulty fuses must be replaced with fuses of the same type
and rating without exception.
Informations importantes
1. Enregistrez-vous en ligne. Prenez le
temps d’enregistrer votre produit Music Tribe aussi vite
que possible sur le site Internet musictribe.com. Le fait
d’enregistrer le produit en ligne nous permet de gérer
les réparations plus rapidement et plus ecacement.
Prenez également le temps de lire les termes et conditions
de notre garantie.
2. Dysfonctionnement. Si vous n’avez pas
de revendeur Music Tribe près de chez vous, contactez le
distributeur Music Tribe de votre pays : consultez la liste
des distributeurs de votre pays dans la page “Support”
de notre site Internet musictribe.com. Si votre pays n’est
pas dans la liste, essayez de résoudre votre problème avec
notre “aide en ligne” que vous trouverez également dans
la section “Support” du site musictribe.com. Vous pouvez
également nous faire parvenir directement votre demande
de réparation sous garantie par Internet sur le site
musictribe.com AVANT de nous renvoyer le produit.
3. Raccordement au secteur. Avant de relier
cet équipement au secteur, assurez-vous que la tension
secteur de votre région soit compatible avec l’appareil.
Veillez à remplacer les fusibles uniquement par des
modèles exactement de même taille et de même valeur
électrique — sans aucune exception.
Outras Informações
Importantes
1. Registre-se online. Por favor, registre seu
novo equipamento Music Tribe logo após a compra
visitando o site musictribe.com Registrar sua compra
usando nosso simples formulário online nos ajuda a
processar seus pedidos de reparos com maior rapidez e
eciência. Além disso, leia nossos termos e condições de
garantia, caso seja necessário.
2. Funcionamento Defeituoso.
Caso seu fornecedor Music Tribe não esteja localizado
nas proximidades, você pode contatar um distribuidor
Music Tribe para o seu país listado abaixo de “Suporte”
em musictribe.com. Se seu país não estiver na lista,
favor checar se seu problema pode ser resolvido com o
nosso “Suporte Online” que também pode ser achado
abaixo de “Suporte”em musictribe.com. Alternativamente,
favor enviar uma solicitação de garantia online em
musictribe.com ANTES da devolução do produto.
3. Ligações. Antes de ligar a unidade à tomada,
assegure-se de que está a utilizar a voltagem correcta para
o modelo em questão. Os fusíveis com defeito terão de
ser substituídos, sem qualquer excepção, por fusíveis do
mesmo tipo e corrente nominal.
Belangrijke informatie
1. Registreer online. Registreer uw nieuwe
Music Tribe-apparatuur direct nadat u deze hebt gekocht
door naar musictribe.com te gaan. Door uw aankoop
te registreren via ons eenvoudige online formulier,
kunnen wij uw reparatieclaims sneller en eciënter
verwerken. Lees ook de voorwaarden van onze garantie,
indien van toepassing.
2. Storing. Mocht uw door Music Tribe
geautoriseerde wederverkoper niet bij u in de buurt zijn
gevestigd, dan kunt u contact opnemen met de door Music
Tribe Authorized Fulller voor uw land vermeld onder
“Support” op musictribe.com. Als uw land niet in de lijst
staat, controleer dan of uw probleem kan worden opgelost
door onze "Online Support", die u ook kunt vinden onder
"Support" op musictribe.com. U kunt ook een online
garantieclaim indienen op musictribe.com VOORDAT u het
product retourneert.
3. Stroomaansluitingen. Voordat u het
apparaat op een stopcontact aansluit, moet u ervoor
zorgen dat u de juiste netspanning voor uw specieke
model gebruikt. Defecte zekeringen moeten zonder
uitzondering worden vervangen door zekeringen van
hetzelfde type en dezelfde waarde.
Ważna informacja
1. Zarejestrować online. Zarejestruj swój
nowy sprzęt Music Tribe zaraz po zakupie na stronie
musictribe.com. Zarejestrowanie zakupu za pomocą
naszego prostego formularza online pomaga nam szybciej
i efektywniej rozpatrywać roszczenia dotyczące naprawy.
Przeczytaj również warunki naszej gwarancji, jeśli dotyczy.
2. Awaria. Jeśli Twój autoryzowany sprzedawca
Music Tribe nie znajduje się w pobliżu, możesz
skontaktować się z autoryzowanym dostawcą Music Tribe
dla swojego kraju, wymienionym w sekcji „Wsparcie” na
stronie musictribe.com. Jeśli Twojego kraju nie ma na
liście, sprawdź, czy Twój problem może zostać rozwiązany
przez nasze „Wsparcie online”, które można również
znaleźć w sekcji „Wsparcie” na stronie musictribe.com.
Alternatywnie, prześlij zgłoszenie gwarancyjne online na
musictribe.com PRZED zwrotem produktu.
3. Połączenia zasilania. Przed podłączeniem
urządzenia do gniazdka sieciowego upewnij się, że
używasz odpowiedniego napięcia sieciowego dla danego
modelu. Wadliwe bezpieczniki należy bez wyjątku
wymienić na bezpieczniki tego samego typu i wartości.
Aspectos importantes
1. Registro online. Le recomendamos que
registre su nuevo aparato Music Tribe justo después de
su compra accediendo a la página web musictribe.com.
El registro de su compra a través de nuestro sencillo
sistema online nos ayudará a resolver cualquier
incidencia que se presente a la mayor brevedad posible.
Además, aproveche para leer los términos y condiciones de
nuestra garantía, si es aplicable en su caso.
2. Averías. En el caso de que no exista un distribuidor
Music
Tribe en las inmediaciones, puede ponerse en
contacto con el distribuidor
que encontrará dentro del apartado “Support” de nuestra
página web musictribe.com. En caso de que su país no
aparezca en ese listado, acceda a la sección “Online Support”
(que también encontrará dentro del apartado “Support”
de nuestra página web) y compruebe si su problema aparece
descrito y solucionado allí. De forma alternativa, envíenos a
través de la página web una solicitud online de soporte en
periodo de garantía ANTES de devolvernos el aparato.
3. Conexiones de corriente. Antes de enchufar
este aparato a una salida de corriente, asegúrese de que dicha
salida sea del voltaje adecuado para su modelo concreto.
En caso de que deba sustituir un fusible quemado, deberá
hacerlo por otro de idénticas especicaciones, sin excepción.
Music
Tribe de su país,
Weitere wichtige
Informationen
1. Online registrieren. Bitte registrieren Sie
Ihr neues Music Tribe-Gerät direkt nach dem Kauf auf der
Website musictribe.com. Wenn Sie Ihren Kauf mit unserem
einfachen online Formular registrieren, können wir Ihre
Reparaturansprüche schneller und ezienter bearbeiten.
Lesen Sie bitte auch unsere Garantiebedingungen,
falls zutreend.
2. Funktionsfehler. Sollte sich kein Music Tribe
Händler in Ihrer Nähe benden, können Sie den
Music Tribe Vertrieb Ihres Landes kontaktieren, der auf
musictribe.com unter „Support“ aufgeführt ist. Sollte Ihr
Land nicht aufgelistet sein, prüfen Sie bitte, ob Ihr Problem
von unserem „Online Support“ gelöst werden kann, den
Sie ebenfalls auf musictribe.com unter „Support“ nden.
Alternativ reichen Sie bitte Ihren Garantieanspruch
online auf musictribe.com ein, BEVOR Sie das
Produkt zurücksenden.
3. Stromanschluss. Bevor Sie das Gerät an
eine Netzsteckdose anschließen, prüfen Sie bitte, ob Sie
die korrekte Netzspannung für Ihr spezielles Modell
verwenden. Fehlerhafte Sicherungen müssen ausnahmslos
durch Sicherungen des gleichen Typs und Nennwerts
ersetzt werden.
Informazioni importanti
1. Registratevi online. Vi invitiamo a registrare
il nuovo apparecchio Music Tribe subito dopo averlo
acquistato visitando musictribe.com. La registrazione
dell'acquisto tramite il nostro semplice modulo online ci
consente di elaborare le richieste di riparazione in modo
più rapido ed eciente. Leggete anche i termini e le
condizioni della nostra garanzia, qualora applicabile.
2. Malfunzionamento. Nel caso in cui il
rivenditore autorizzato Music Tribe non si trovi nelle vostre
vicinanze, potete contattare il Music Tribe Authorized
Fulller per il vostro paese, elencato in “Support”
@ musictribe.com. Se la vostra nazione non è elencata,
controllate se il problema può essere risolto tramite il
nostro “Online Support”che può anche essere trovato sotto
“Support” @ musictribe.com. In alternativa, inviate una
richiesta di garanzia online su musictribe.com PRIMA di
restituire il prodotto.
3. Collegamento all’alimentazione.
Prima di collegare l'unità a una presa di corrente,
assicuratevi di utilizzare la tensione di rete corretta
per il modello specico. I fusibili guasti devono essere
sostituiti, senza eccezioni, con fusibili dello stesso tipo e
valore nominale.
Viktig information
1. Registrera online. Registrera din nya Music
Tribe-utrustning direkt efter att du köpt den genom
att besöka musictribe.com. Att registrera ditt köp med
vårt enkla onlineformulär hjälper oss att behandla dina
reparationsanspråk snabbare och mer eektivt. Läs också
villkoren i vår garanti, om tillämpligt.
2. Fel. Om din Music Tribe-auktoriserade återförsäljare
inte nns i din närhet kan du kontakta Music Tribe
Authorized Fulller för ditt land listat under “Support” på
musictribe.com. Om ditt land inte är listat, kontrollera om
ditt problem kan hanteras av vår “Onlinesupport” som
också nns under “Support” på musictribe.com. Alternativt
kan du skicka in ett online-garantianspråk på musictribe.
com INNAN du returnerar produkten.
3. Strömanslutningar. Innan du ansluter
enheten till ett eluttag, se till att du använder rätt
nätspänning för just din modell. Felaktiga säkringar
måste bytas ut mot säkringar av samma typ och
märkning utan undantag.

104 Voicelive 3 Extreme Quick Start Guide 105
FEDERAL COMMUNICATIONS
COMMISSION COMPLIANCE
INFORMATION
TC Helicon
Voicelive 3 Extreme
Responsible Party Name: Music Tribe Commercial NV Inc.
Address: 5270 Procyon Street,
Las Vegas NV 89118,
United States
Phone Number: +1 702 800 8290
Voicelive 3 Extreme
This equipment has been tested and found to comply with the limits for a Class B
digital device, pur suant to part 15 of the FCC Rules. These limits are designed
to provide reasonable protection against harmful interference in a residential
installation. This equipment generates, uses and can radiate radio frequency
energy and, if not installed and used in accordance with the instruc tions, may cause
harmful interference to radio communications. However, there is no guarantee that
interference will not occur in a particular installation. If this equipment does cause
harmful interference to radio or television reception, which can be determined
by turning the equipment o and on, the user is encouraged to try to correct the
interference by one or more of the following measures:
• • Reorient or relocate the receiving antenna.
• • Increase the separation between the equipment and receiver.
• • Connect the equipment into an outlet on a circuit dierent from that to which the
receiver is connected.
• • Consult the dealer or an experienced radio/TV technician for help.
This device complies with Part 15 of the FCC rules. Operation is subject to the
following two conditions:
(1) this device may not cause harmful interference, and
(2) this device must accept any inter ference received, including inter ference that may
cause undesired operation.
Important information:
Changes or modications to the equipment not expressly approved by Music Tribe
can void the user’s authority to use the equipment.
Hereby, Music Tribe declares that this product is in compliance with Directive
2014/35/EU,Directive 2014/30/EU, Directive 2011/65/EU and Amendment 2015/863/
EU, Directive 2012/19/EU, Regulation 519/2012 REACH SVHC and Directive
19 07/2 00 6/E C.
Full text of EU DoC is available at https://community.musictribe.com/
EU Representative: Music Tribe Brands DK A/S
Address: Ib Spang Olsens Gade 17, DK - 8200 Aarhus N, Denmark

 Loading...