

Page 1
User Manual
Version 1.0.00
Introduction
Voice Jam Studio combines real-time vocal effect processing taken directly from TC-Helicon’s
best-selling professional vocal processors, the most innovative four track stereo looper app on
the market today, and a music video recorder with direct-to-social media sharing capabilities.
Quick Start
The best way to get familiar with Voice Jam Studio is to attach a pair of headphones to your
iPad, fire up the app, and run through the built-in tutorial. The second best way is to watch the
tutorial videos found on http://www.voicejamstudio.com
Page 2

2
Table&of&Contents&
INTRODUCTION ) 1)
QUICK)START) 1)
MAKING)CONNECTIONS) 4)
CONNECTION)OPTIONS) 4)
!"#$%!&'"()*+,!)+%#$-()./+0,1+')2+3) 4)
!"#$(",)5!"#$%!&'"()*+,!)+',"67#,"$)2+38) 4)
2+39+'(,7/2"',)#$#%,"7)$":+3")*+,!);<)3&''"3,&7) 4)
0+6!,'+'6)"'#.0"$)#/$+&)$":+3") =)
,31!"0+3&')%7&$/3,)*+,!)/(.)#/$+&)(/%%&7,):+#)3#2"7#)3&''"3,+&')>+,) =)
/(.)(&/'$)3#7$():+#)#%%0")3#2"7#)3&''"3,+&')>+,) =)
SETTING)LEVELS) 5)
THE)CONTROLS) 6)
VOCAL)EFFECTS) 6)
VOCAL)EFFECT)LIST) 7)
(%#,+#0)(+2/0#,+&') ?)
(/.,0")3!7&2#,+3)%+,3!)3&77"3,+&') ?)
"@,7"2")%+,3!)3&77"3,+&') ?)
$&/.0+'6) ?)
$+(,&7,+&') ?)
"3!&() ?)
"@,7"2")(!+A,+'6) B)
(%"3+#0)"AA"3,() B)
LOOPING) 9)
WHAT)IS)LOOPING?) 9)
METRONOME) 9)
0&&%)#3,+&')(C'3!7&'+D#,+&') E)
CREATING)LOOPS) 10)
DESTROYING)LOOPS) 10)
STARTING)AND)STOPPING)LOOPS) 10)
OVERDUBBING)LOOPS) 11)
WAVEFORM)TOUCH)MODES) 11)
/'$&97"$&) FF)
(37/.) FG)
&'"1(!&,) FG)
SYNC)LOCK) 13)
Page 3
3
TIME)AND)PITCH)MANIPULATION) 13)
MIXER) 14)
SESSIONS) 14)
THE)DEFAULT)SESSION) 14)
PERFORMANCE)RECORDER) 15)
TAKES) 15)
PERFORMANCE)LIBRARY) 15)
SAVING)TAKES)TO)THE)LIBRARY) 15)
MANAGING)PAST)PERFORMANCES) 15)
PERFORMANCE)DETAIL)EDITING) 16)
YOUTUBE)EXPORT) 16)
CAMERA)ROLL)EXPORT) 16)
SOUNDCLOUD)EXPORT) 16)
APP)SETTINGS) 16)
SLAVE)TO)EXTERNAL)TEMPO) 16)
OVERDUB)DECAY) 16)
KNOB)AUTOMATION)TIME) 16)
AUDIO)LATENCY) 17)
PERFORMANCE)RECORDING) 17)
STOP)AUDIO)WHEN)IN)THE)BACKGROUND) 17)
MIDI)SYNC) 17)
SYNCING)TO)AN)APP) 17)
SYNCING)TO)EXTERNAL)MIDI) 17)
AUDIOBUS) 18)
BASIC)CONNECTION) 18)
ADVANCED)CONNECTION) 18)
LOOP)TRANSFER:) 19)
AUDIO)COPY) 19)
SEND)TO)DOCUMENTS) 20)
Page 4

4
Making Connections
Voice Jam Studio is a real-time vocal effects processor, meaning you hear the results of the
effect algorithms applied to your voice as you are singing with almost no perceptible delay (refer
to the latency section for more information). This presents an incredibly liberating experience
for singers. Singing through live effects in real-time is like playing a new musical instrument.
Caution:
When singing through low latency professional music processors, whether it be on stage or in
the studio, one has to be careful to avoid creating audio feedback loops.
A feedback loop occurs when the sound coming into a microphone is amplified out through
speakers and is picked up again in the same microphone, which goes back through the
speakers again and again. This often creates a high-pitched squealing sound.
Feedback can be avoided by reducing the gain or by making sure the microphone is pointed
away from the speakers.
Note: All iPads have a built-in microphone and speakers. At minimum, Voice Jam Studio should
be used with a pair of headphones in combination with the built-in microphone. Voice Jam
Studio automatically prevents your live voice from passing directly through to the internal
speakers as the metal shell of the device would start vibrating and would feed back into the
internal microphone causing a feedback loop.
Connection Options
Headphones with iPad’s built-in Mic
The simplest option. Make sure you don’t cover up the microphone port on the iPad with your
finger. Attach any set of compatible headphones (earbud, over-the-ear, etc.) to the ⅛”
headphone port.
Headset (Headphones with integrated mic)
Connect a headset with a built-in microphone to the ⅛” port audio port on the top of the iPad.
The iPad internal microphone will automatically be disabled.
Mic/Instrument Adapter Device with ⅛” Connector
There are devices on the market which make it possible to connect an XLR microphone with a
headphone adapter through the ⅛” port. This setup is similar to using a headset. Some
devices provide an output to a PA system instead of headphones. In this case there is always
the possibility of audio feedback if the speakers are pointing at the microphone.
Page 5

5
Lightning Enabled Audio Device
Modern audio-interfaces (external hardware devices) connect directly through the lightning port
(at the bottom of the iPad) and can provide multiple input and output channels from the device
to your iPad. Sound quality with these types of devices is generally much higher than using the
⅛” jack. The common configuration of these devices is to have a microphone going to the first
input (mono vocal channel) and an instrument like a guitar going to the second input channel
(mono input channel). Voice Jam Studio will feed the vocal channel through the vocal effects
path and into the looper. Note: It’s also possible to record more instrument channels into your
performances. See the AudioBus section for more information.
TC-Helicon Product with USB Audio Support via Camera Connection Kit
Many of TC-Helicon’s world-class vocal effect processors support USB audio streaming. Any of
these products can be connected to the iPad using Apple’s camera connection kit and a USB
cable. Plug your XLR microphone into the TC-Helicon device, as well as headphones or a
connection to your PA system where applicable. Using TC-Helicon products will offer enhanced
vocal effect processing.
USB Sound Cards via Apple Camera Connection Kit
Any USB sound card supported by Apple can be connected via the camera connection kit.
Voice Jam Studio will take the first channel and send it through the vocal effects and into the
looper. Note: It’s also possible to record more instrument channels into your performances.
See the AudioBus section for more information.
Setting Levels
No matter what connection method you use to get audio into Voice Jam Studio, it’s important
that it receives the ideal signal level. Depending on the device you are using, there may be a
microphone sensitivity control, or an input level control. Adjusting this level in combination with
controlling your distance from the microphone and how loudly you sing will enable you to find
the perfect input level for optimum sound quality.
While you are singing, the level meters in the top right corner of Voice Jam Studio’s interface
should be constantly rising to show green, often yellow, sometimes orange, but never red. If the
level meters only show blue, you don't have enough input level for the vocal effects to sound
their best. Bars rising on the left indicate lower frequencies while bars to the right show higher
frequencies.
Page 6
6
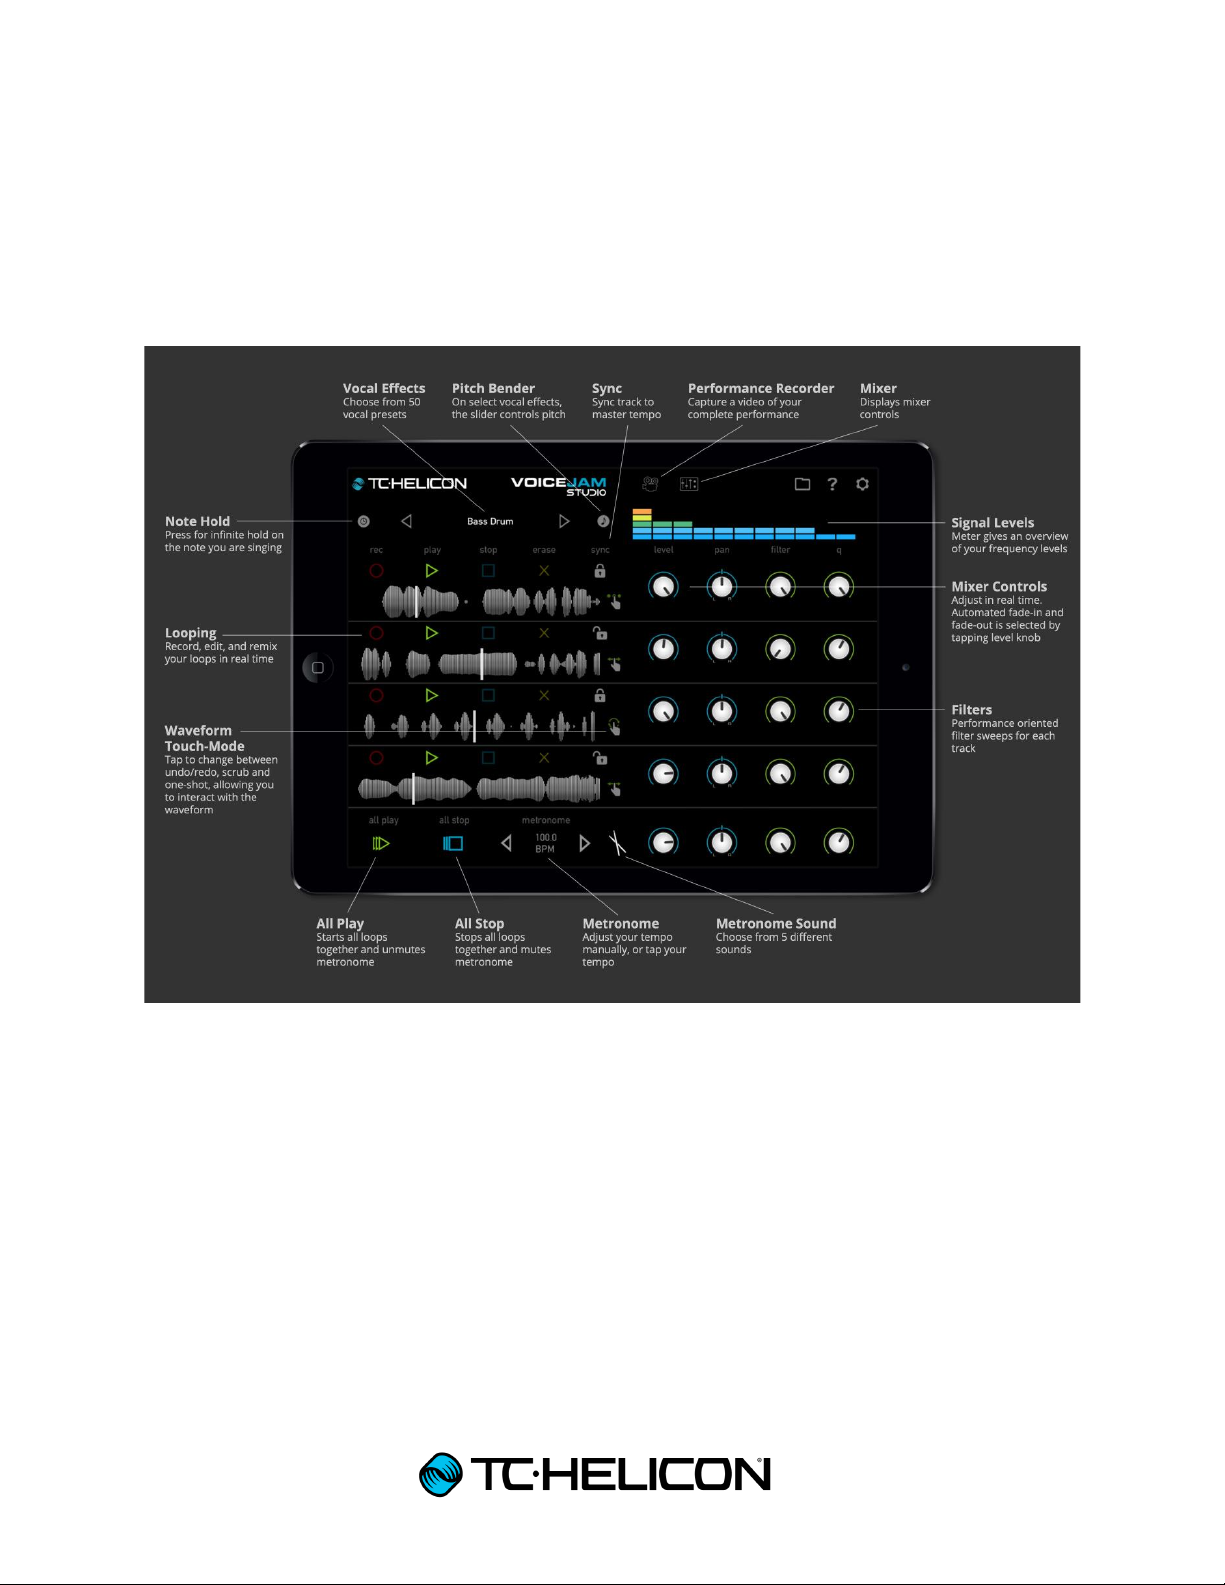
The Controls
Before we get into detail, take a quick glance at the layout of the user interface. It’s worth
skimming through the brief descriptions of each of the controls. Refer back to them when
reading through subsequent sections.
Vocal Effects
The name at the top left (between the left and right arrows) describes the current vocal effect.
“Dry” means no effect and is useful in situations where you are speaking to the audience or
where you want to rely 100% on the natural sound of your voice. In Dry mode the “Note Hold”
and “Pitch Bender” controls have no effect as Dry operates as a “true bypass” in the sense that
no effect processing occurs.
Voice Jam Studio offers many different vocal effects. You can step through them one by one
using the left and right arrows. You can tap on the vocal effect name to see the complete list
which you can scroll through. You can try out each effect by touching the name of the effect and
singing through the microphone. To scroll through the list touch and drag the list with your finger
Page 7

7
up or down. Double tapping on an effect name selects and collapses the effect list, or you can
tap the preset name at the top to collapse the list.
Vocal Effect List
Spatial Simulation
Dry
Bright Room Reverb
Ballad Reverb
Super Bright
Subtle Chromatic Pitch Correction
Pitch Assist
Pitch Assist Room
Pitch Assist Hall
Extreme Pitch Correction
Hardtune
Hardtune Filtered
Hardtune Echoes
Doubling
Stereo Wide
Double Room
Double You
Double Hall
Thick Chorus
Deep Double
High Double
Deep Double Wide
High Double Wide
Distortion
Attention Shoppers!
Megaphone
Distorted
Distorted Megaphone
Echos
Echo Echo
Rockabilly Slap
Dotted Eighth Echo
Runaway Echo
Psychedelic Echoes
Echoverb
Page 8

8
Extreme Shifting
Popeye
Olive Oil
Deep Voice
Deeper Voice
Deep Detune
Female to Male
Male to Female
Thicker
Thinner
Deep C
Fixed Major Harmony
Church Monks
Special Effects
Cylon
Rotary Speaker
Falling 4ever
Synth Bass Drum
60's Sci Fi
Flanger
Talkin' Tube
Bass Distort
Sing Guitar Solo
Page 9

9
Looping
What is Looping?
All music is layered. For example, a band has various members, each adding something to the
fabric of their music, while a solo artist often relies on a guitar or keyboard to accompany their
singing. Loopers offer an innovative alternative for layering and augmenting the music making
process. A looper takes advantage of the cyclical nature of all popular music by first allowing
you to record a small chunk of audio (usually 4 to 16 beats) and then plays it back in a repeating
loop. As the loop repeats, you can overdub and continuously layer new sound on top of it each
pass. The real-time and non-stop nature of loopers make them instruments in their own right
and have become essential in today’s music industry.
Every fiber of the design of Voice Jam Studio is based on the notion that to loop is to perform.
VoiceJam Studio is an instrument. Through an innovative set of industry-first looping features,
Voice Jam Studio allows you to break through the boundaries of monotonous single bar looping
to create compelling fully expressed performances.
Metronome
The easiest way to create great loops is to construct them around an existing groove. Before
you record your first loop, you’ll want to establish your session tempo. The metronome lets you
specify a tempo by either tapping a rhythm directly on the BPM indicator text, or by tapping the
left and right metronome arrows to increment or decrement the tempo by 0.5 BPM in either
direction. Optionally you can sync to an external MIDI tempo by using Apple’s Virtual MIDI
system. Refer to the Virtual MIDI section for more details.
Note: Once you’ve recorded at least one loop at a given tempo, the tempo of the session
becomes locked so that loops can be synchronized to each other for the remainder of the
session. To select a new tempo simply erase all of the loops.
Voice Jam Studio has several built in Metronome Sounds, as well as a muted mode where the
metronome beats can be seen visually by a flashing light bulb icon. Touch the pulsating
metronome icon to select from the various metronome sounds. Note: it’s possible to use an
external drum machine via AudioBus to replace the built-in metronome sound. Refer to the
AudioBus section for more details.
Besides selecting the Mute mode for the metronome sound, the metronome is also temporarily
muted when you touch All Stop, and similarly unmutes when you touch All Start. The level and
stereo panning of the metronome can be edited from the Mixer controls. It can also be filtered
through a low-pass filter. Refer to the Mixer section for more details.
Loop Action Synchronization
Once a metronome beat is established, it’s important to understand how all looping actions
including creating, starting, and stopping loops are synchronized/quantized to the beats. Any
Page 10

10
time you initiate an action, Voice Jam Studio determines whether you are closer to the beat that
just happened (if you press slightly late), or if a beat is about to occur (you press slightly early).
If you press early, the event won’t take place until the imminent beat occurs. If you press just
slightly late, Voice Jam Studio will make an intelligent decision based on the situation. In
general it’s better to be slightly early as if you are slightly late the looper may have to fade in the
beginning of your loop to keep it on time missing any transient you might have had to start the
loop. Also if you are too late, Voice Jam Studio may decide that you are intending to start on
the next beat which might throw your entire loop off by one beat (of course this could lead to an
interesting musical effect!)
Creating Loops
Voice Jam Studio doesn’t place limits on when you can start recording a loop. The process of
creating a new loop requires two touches. The first touch to the record icon begins the loop
recording (synchronized to the closest beat), and the second touch to the record icon “closes
the loop”. The time between the two touches dictates the length of the loop. If you capture four
complete beats the loop will be exactly four beats long. After pressing the record button the
second time the loop will begin to repeat until you stop it.
Note: the most common loop is a multiple of 4 beats. If you want to record a 4 beat loop you
would touch record at the beginning of beat 1 and at the end of beat 4 (actually the start of beat
5). You want to capture four complete beats. If you pressed the record for the second time at
the beginning of beat four you would have only captured three complete beats.
There are two alternate methods of closing, or “setting” a loop. Instead of pressing the record
icon for the second time, you can set the loop by pressing the play button or the stop button.
The stop button will set the loop and stop it from playing back until you again press the play
button. The play button will set the loop but keep it in “record mode” or overdubbing, such that
you can immediately begin to layer on top of it as it repeats.
Note: once you create at least one loop you will see a lock icon appear beside the metronome
BPM. This indicates that the tempo is locked. See the metronome section for more details.
Destroying Loops
To prevent accidentally erasing a loop, you simply have to hold your finger on any of the ‘X’
icons for a short time. You’ll see an orange halo shrink to nothing before the erase occurs. This
gives you a split-second to change your mind. Destroying loops is final, unless you’ve saved
your session in which case as long as you don’t save again, you can always reload the current
session. See the Sessions section for more information.
Starting and Stopping Loops
Each loop has an individual stop and play button. At the bottom there is also “All Start” and “All
Stop”. They start and stop all existing loops simultaneously, as well as mute and unmute the
metronome.
Note: If you want to unmute the metronome without starting all loops you can tap the
metronome icon.
Page 11

11
Overdubbing Loops
To overdub means to layer on top of a loop track. While Voice Jam Studio allows you to record
and play loops on 4 separate tracks simultaneously, it also allows you to add unlimited layers
onto each loop. For example you could record a loop of a simple melody, then on each
progressive cycle through the loop you could overdub a new vocal harmony part. You can add
as many layers as you want without taking up the other loop tracks. To toggle overdubbing,
simply press the record icon on an existing loop.
Overdub Sessions
Each time you start overdubbing you start a new overdub session. You might notice a grey box
containing the old audio data shows up on the left side of the loop waveform. This represents
the sound of the loop just prior to starting your new overdub session. You can continue to
overdub as long as you want for as many cycles around the loop as you choose during an
overdub session. Once you end the overdub session by pressing the record icon again, you
can then create a new overdub session, or you can go back into the past by undoing the last
overdub session (and everything you layered over however many cycles long your last overdub
session was). Voice Jam Studio remembers the last 4 overdub sessions you recorded and you
can swipe back and forth between them at will. See Undo/Redo from Waveform Touch Modes
below.
Waveform Touch Modes
There is a control to the right of each loop waveform showing a finger pointing at an icon. This
determines the current waveform touch mode for the track. Waveform touch modes can be
changed at anytime during your performance. To switch waveform touch modes you hold your
finger on the control until a three segment overlay pops up, and you slide your finger towards
one of three icons depicting the available modes:
Undo/Redo
Every time you create a new overdub session, the state of the loop just prior to your new
session is frozen in time. Much like an image editor or word processor lets you undo/redo
through historical changes, Voice Jam Studio lets you swipe between the last four overdub
sessions. You can only swipe through the previous overdub sessions when the Waveform
Touch Mode “Undo/Redo” has been selected. Swiping to the right will bring back past overdub
sessions and swiping left will move back into the present. For example, you might create an
initial loop with a simple melody, start a first overdub session and add a third above harmony,
start a second overdub session and add a fifth above harmony, and finally start a third overdub
session and add an octave up harmony. At that point you would see 3 grey boxes to the left of
the waveform. If you swiped to the right once, the most recent overdub would go away (the
octave harmony would be gone) and you would now see one grey box to the right of the
Page 12

12
waveform and two to the left of it. Swipe to the right again and you would only have the original
melody and the 3rd above harmony. Swipe to the left and the 5th harmony returns.
Note: You cannot swipe to undo/redo while overdubbing. You must end the current overdub
session first.
Note: Voice Jam Studio only remembers four sessions, so if you start new overdub session with
four existing, the oldest one will fall out of existence.
Note: If you swipe to the right to move to older overdub sessions such that grey boxes are
showing to the right of the waveform, starting a new overdub session will start a new branch of
history and any of the more recent sessions to the right will be lost. From the example above, if
you swiped left so that you were only hearing the original melody and the 3rd above, you could
start a new overdub session with an octave down and the 5th and octave up sessions would be
lost forever.
Scrub
In scrub mode you can tap or drag your finger directly across the waveform to alter the playback
position.
Note: Once you scrub you will likely fall out of sync with your groove. To get back on track you
can press the play button which will retrigger the loop at the start of the next beat.
Note: for faster response, you can unlock sync for the track. See the Sync Lock section for
more details.
One-shot
Similar to scrub mode except that one-shot mode is designed to allow the loop track to act like a
sample player. The loop will only play as you are holding your finger on the track, and will
immediately stop when you let go. Playback will start from wherever you first touch the loop.
Dragging has no effect. Tapping repeatedly will rapidly retrigger the loop.
Note: pressing play will start the loop playing on the next beat.
Note: for faster response, you can unlock sync for the track. See the Sync Lock section for
more details.
Page 13

13
Sync Lock
Most of the time you’ll want all loops to be synchronized with the metronome. The Lock icon to
the top right of each loop track designates whether the loop is paying any attention to your
tempo. Tap the icon to toggle sync lock on and off.
The reason you might want to unlock tempo synchronization for a loop is if you'd like to play it
rapidly like a sampler, or scrub it, or record a loop that loops to the beat of its own drum.
The purpose of locking them to tempo is that every action you take will be quantized to the next
beat. Recording a new loop, setting a recording loop, stopping or playing, all these actions will
be quantized.
Time and Pitch Manipulation
If while singing a sustained note you press and hold the clock icon at the top left, your voice will
be frozen in time until you release your finger. It’s a great special effect.
The musical note control opens up a vertical slider control that can be used for either gender
bending or pitch bending depending on the selected vocal effect. Drag the control higher or
lower to adjust the pitch. Some vocal effects snap the pitch back to center like a traditional pitch
bend control while others allow you to shift the pitch and keep it there when you let go.
Page 14

14
Mixer
The mixer lets you set level, pan, and filter for each track and for the metronome independently.
It's very useful to independently control these parameters during your performance. Turn the
filter down to get that electronic low-pass cut-off effect. Increase the “q” to increase resonance
in the low-pass filter which accentuates the classic electronic filter effect.
You can control the various knobs by holding your finger on them and either moving up and
down, or left to right.
Tip: Avoid moving diagonally. Up, or Right means turn the knob clockwise, while left or down
means turn it counter-clockwise. Diagonal movements will not turn the knobs as you would
expect.
Tip: If you tap on a knob, it will slowly change from where you had it set to Off or Pan-Centre.
Once at Off or Pan-Centre, tapping it again will slowly change them back. Tapping again while
it's moving will cause the automation to complete immediately. You can initiate this type of
automation for multiple knobs simultaneously, for example to fade out all tracks at once. You
can set the fade out time by going to the settings menu.
Note: With AudioBus connected you can route the microphone through the loop tracks and an
external app through the metronome track. That way you could use a 3rd party drum machine
instead of the built-in metronome sounds. Refer to the section on AudioBus for more details.
Sessions
Although a looping purist might argue that every performance you give should be “from scratch”
with no pre-existing material, Voice Jam Studio lets you save your work anyway. When you
save a session you are storing the content of all 4 loop tracks plus the state of their four
independent undo/redo sessions. Sessions also store the master tempo, the position of all dials
in the mixer, whether sync is on or off for each loop, the waveform touch mode for each loop,
and of course the active vocal effect.
The folder icon at the top allows you to load and save sessions.
The Default Session
Sometimes you want to start from scratch, or create a new blank session. In that case you
should load the default session. Use the file menu, select load, and choose “Load Default
Session”.
Page 15

15
Performance Recorder
One of the most exciting things about Voice Jam Studio is that you can record the audio result
of everything you do, whether it be singing through live vocal effects, creating, destroying,
triggering and retriggering loops, mixing, remixing, filtering and panning playback; the video
result of everything the front facing camera captures; and the video screen-capture of all the
activity you create on the Voice Jam Studio interface. All of that media is seamlessly combined
and compressed and prepared for instant upload to YouTube or to be exported to your iPad
camera roll for processing in your favourite 3rd party app. You can also upload the audio
portion of your performances directly to SoundCloud with one click.
To operate the performance recorder, first tap the film-projector icon at the top center of the
user interface.
Takes
If you need multiple takes to get your non-stop performance perfect, Voice Jam Studio offers a
“take system” allowing you to record and favourite several takes before needing to deal with
them offline. Every time you initiate a performance recording by pressing the performance
record icon you create a new take. Pressing the recording icon again finishes the take.
A row of icons will appear below the video preview window showing the last take number, the
length of the last take, a trash can icon and a star icon. If you know you didn’t like the last take
you can immediately erase it by pressing the trash can. If you know you liked it but want to
record more before dealing with it, press the star icon to mark it as a “favourite”.
When you are finished recording takes and want to think about sharing them, you’ll need to
transfer them (or not) to your performance library. Press the film strip icon to enter the
performance library.
Performance Library
Enter the performance library by pressing the film strip icon.
Saving Takes To The Library
If you have recorded any takes since the last time you entered the performance library you will
be asked which ones you’d like to keep and which ones you’d like to throw away. By default
they will all be selected to keep as indicated by checkmarks beside each take number. Press
“Save Takes To Library” to continue.
Managing Past Performances
As long as the library is not empty, you will see a grid of your past performances, their take
number and short description. If you want to share or export a past performance, touch it to
select it.
If you want to delete old performances to save space on your iPad you can select “Edit” from
the top right, touch the performances you’d like to remove, and then press “Delete Selected” at
the bottom.
Page 16

16
Performance Detail Editing
Once you select a performance from your library for editing, you can edit its details. Touch in
any of the text boxes to edit the Title, Author, or Description. You can preview the final result by
pressing the play button at the bottom. To share the selected performance, select the desired
option (YouTube, Camera Roll, or Soundcloud).
YouTube Export
By swiping left and right you can chose to upload Screen + Face Camera or Screen Only. If
you disabled face recording from the settings menu you will not be able to upload it to YouTube
as it will not exist. Next choose the upload quality. High quality is recommended but for slow
internet connections you could choose Medium quality to reduce upload time. Finally, make any
adjustments to metadata, sign into your youtube account, and select “Upload To YouTube”.
Camera Roll Export
By swiping left and right you can chose to upload Screen + Face Camera or Screen Only. If
you disabled face recording from the settings menu you will not be able to upload it to YouTube
as it will not exist. Next choose the export quality. High quality is recommended but will create
a larger output file. Exported videos will be accessible from your iPad Photos App.
SoundCloud Export
Simply log into your account and upload the audio portion of your performance.
App Settings
The gear icon at the top right is where you set global app settings (applying to all sessions).
Slave To External Tempo
You can chose to slave to external MIDI devices (hardware connected via the camera
connection kit, lightning port, or to other apps supporting virtual midi master clock).
Overdub Decay
When you overdub a new layer onto a loop, you can specify what happens to the underlying
layers. If the Overdub Decay was set to 100%, the new layer would be mixed with the old layer
and the overall volume of the loop would get louder and louder until it started clipping. Set at
around 98% the older layers will gradually fade away such that the overall level remains fairly
constant. At 0% the old layers would be completely replaced by the new overdub layer. This is
actually a very useful effect if you want to completely replace the contents of a loop without
erasing it. You can change the overdub decay in real-time during a performance.
Knob Automation Time
When you carefully tap a mixer knob without dragging it will initiate loop automation.
Automation will gradually change the knob from its current value to zero (or centre pan for pan
knobs), or if already at zero, the knob will change to the last value it had been set at before
being faded to zero. This allows you to fade in and out by single tapping on the knobs. You can
start and stop several knobs simultaneously in this way, for example you could gradually fade
Page 17

17
out all four knobs at once. The Knob Automation Time specifies how long it takes a knob to
automate between the two values.
Audio Latency
Low latency is perfect for any performance and is fully compatible when using AudioBus. If you
have an older iPad and you are using lots of CPU intensive 3rd party apps in the background,
you may need to set audio latency to High (Slow Devices) to avoid audio clicks due to limited
shared CPU resources. The latest and greatest iPads generally have no problem managing
several audio processing apps simultaneously.
Performance Recording
If you are shy and you would rather not record the front facing camera video into your
performances, you can disable face recording and select “screen only”. You will still end up with
a compelling video as your audience will be able to see all screen activity that went into creating
your masterpiece.
Stop Audio When In the Background
When using AudioBus you generally want Voice Jam Studio to stop audio when you move to
the background since AudioBus will maintain the streaming connection on its own. The case
where you might want it to play in the background is when you are not using AudioBus but you
are MIDI syncing to a 3rd party app and you want to switch to that app without Voice Jam Studio
stopping.
MIDI Sync
Syncing to an App
One or more iPad apps can communicate together using Apple’s virtual MIDI protocol. Voice
Jam Studio can slave-sync with any app capable of generating MIDI clock output and capable of
following the industry standard MIDI standards when it comes to MIDI syncing behaviours.
Open the 3rd party app and select Voice Jam Studio as an output. In Voice Jam Studio
settings, enable MIDI sync and select “Virtual Input” as the source.
Syncing to external MIDI
Voice Jam Studio has been extensively tested with Ableton Live and can slave sync very
effectively during performance. Connect your computer via a MIDI connector to an iPad MIDI
input exposed by a 3rd party lightning device or USB soundcard or MIDI device connected to
the Apple camera connection kit. Direct Ableton Live to output MIDI sync clock to the iPad MIDI
device. In Voice Jam Studio settings, enable “Slave to External Tempo” and choose the 3rd
party MIDI device. When you start Ableton playing the downbeat will synchronize and you’ll be
able to create new loops in sync with ableton. The loops will stay in sync thanks to Voice Jam
Studio’s anti-drift MIDI sync feature.
Page 18
18
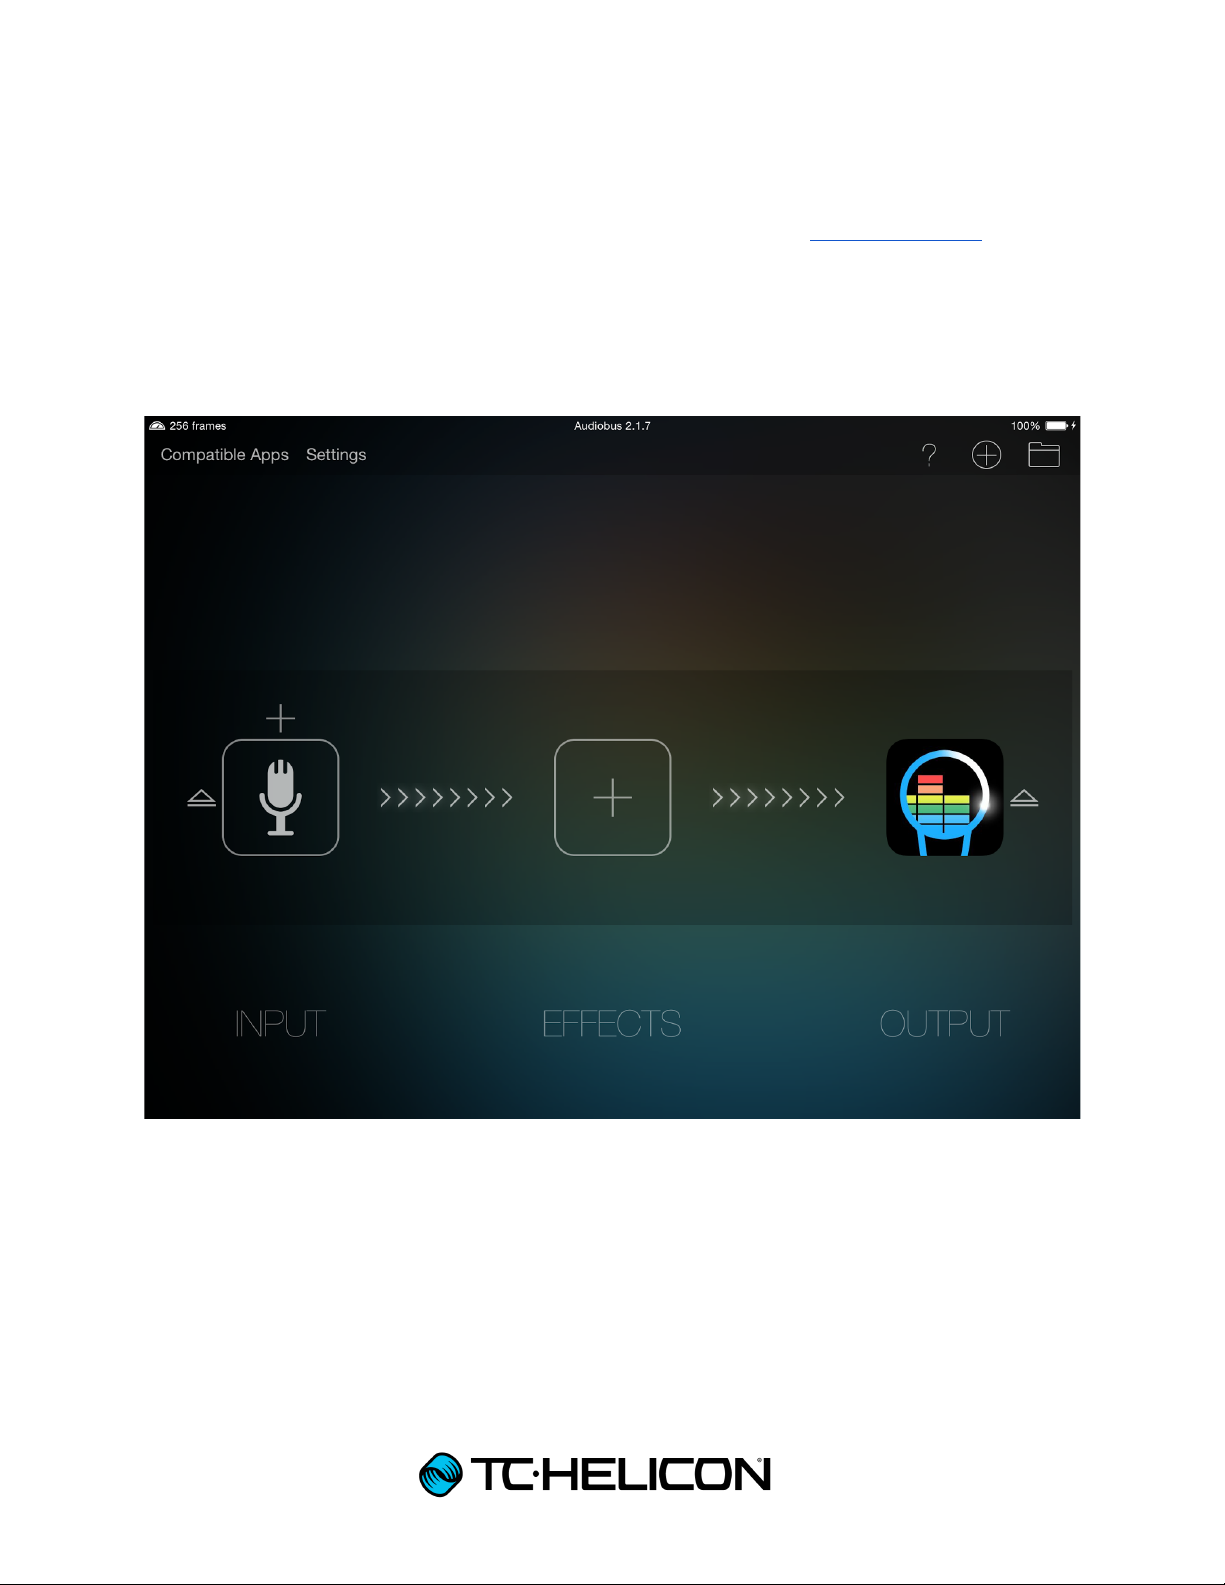
AudioBus
Voice Jam Studio can receive and send audio from and to other apps using AudioBus. For
information on how to use AudioBus, visit the AudioBus webpage at www.audiobus.us
A third party app may be necessary to get the most out of AudioBus.
Basic Connection
Voice Jam Studio should generally be on the output with an internal Mic set as the input. This
allows you to add third party effects in between.
Advanced Connection
The most powerful way to use Voice Jam Studio with AudioBus is to add Voice Jam Studio as
an Input, then add the internal microphone, and finally add a 3rd party drum machine. The
order in which you add components to Voice Jam Studio is important. The first thing you add
will be routed through the Vocal effects and into the looper. The second and subsequent items
you add will be routed through the metronome track such that they will be recorded in your
performance but will not interfere with the vocal effects (for example the vocal effects do not
work well applied to stereo non-vocal signals).
Page 19

19
In the diagram below, you can control the level, pan, and even filter the drum machine with
using the metronome track mixer controls, and the sounds of the external app will be recorder
into your performance for social media sharing.
Note: iPad currently terminates video recording when an app moves into the background. This
means that while you are recording a performance take, you must not leave the app to visit
other AudioBus apps. You can however control them using the AudioBus slide out control panel
if the external apps you are using provide controls. It’s best to configure your external apps
before you start recording your take.
Loop Transfer:
Audio Copy
There are times when you are not using AudioBus but you’d still like to transfer your loops to
and from external apps. Audio Copy and Audio Paste is a third party standard which many
apps work with. From the file menu select “Loop Transfer”. Selecting Audio Copy from a loop
will copy its current audio data into an external “clip board”. When you first click Audio Copy
you must wait for Voice Jam Studio to export the loop audio. Then you must select “Copy
Audio” from the AudioCopy dialog to begin the transfer process.
Page 20

20
Audio Paste
You can only paste to an empty loop. Select the Audio Paste icon and then “AudioPaste From
Pasteboard”. Note: if the external loop tempo is not compatible with the current session tempo
Voice Jam Studio will do its best to accommodate the conflicting tempo assuming it’s in 4/4
time. Voice Jam Studio will not attempt to time stretch your external loops.
Send to Documents
Using iTunes you can access an app’s document folder. If you select “Send to Documents”
Voice Jam Studio will export a loop’s audio and create an audio file in the documents folder
which you can copy onto your computer using iTunes.
 Loading...